


UK User Manual
DK Brugervejledning
DE Bedienungsanleitung
FR Guide d’instructions
IT
Manuale di istruzioni
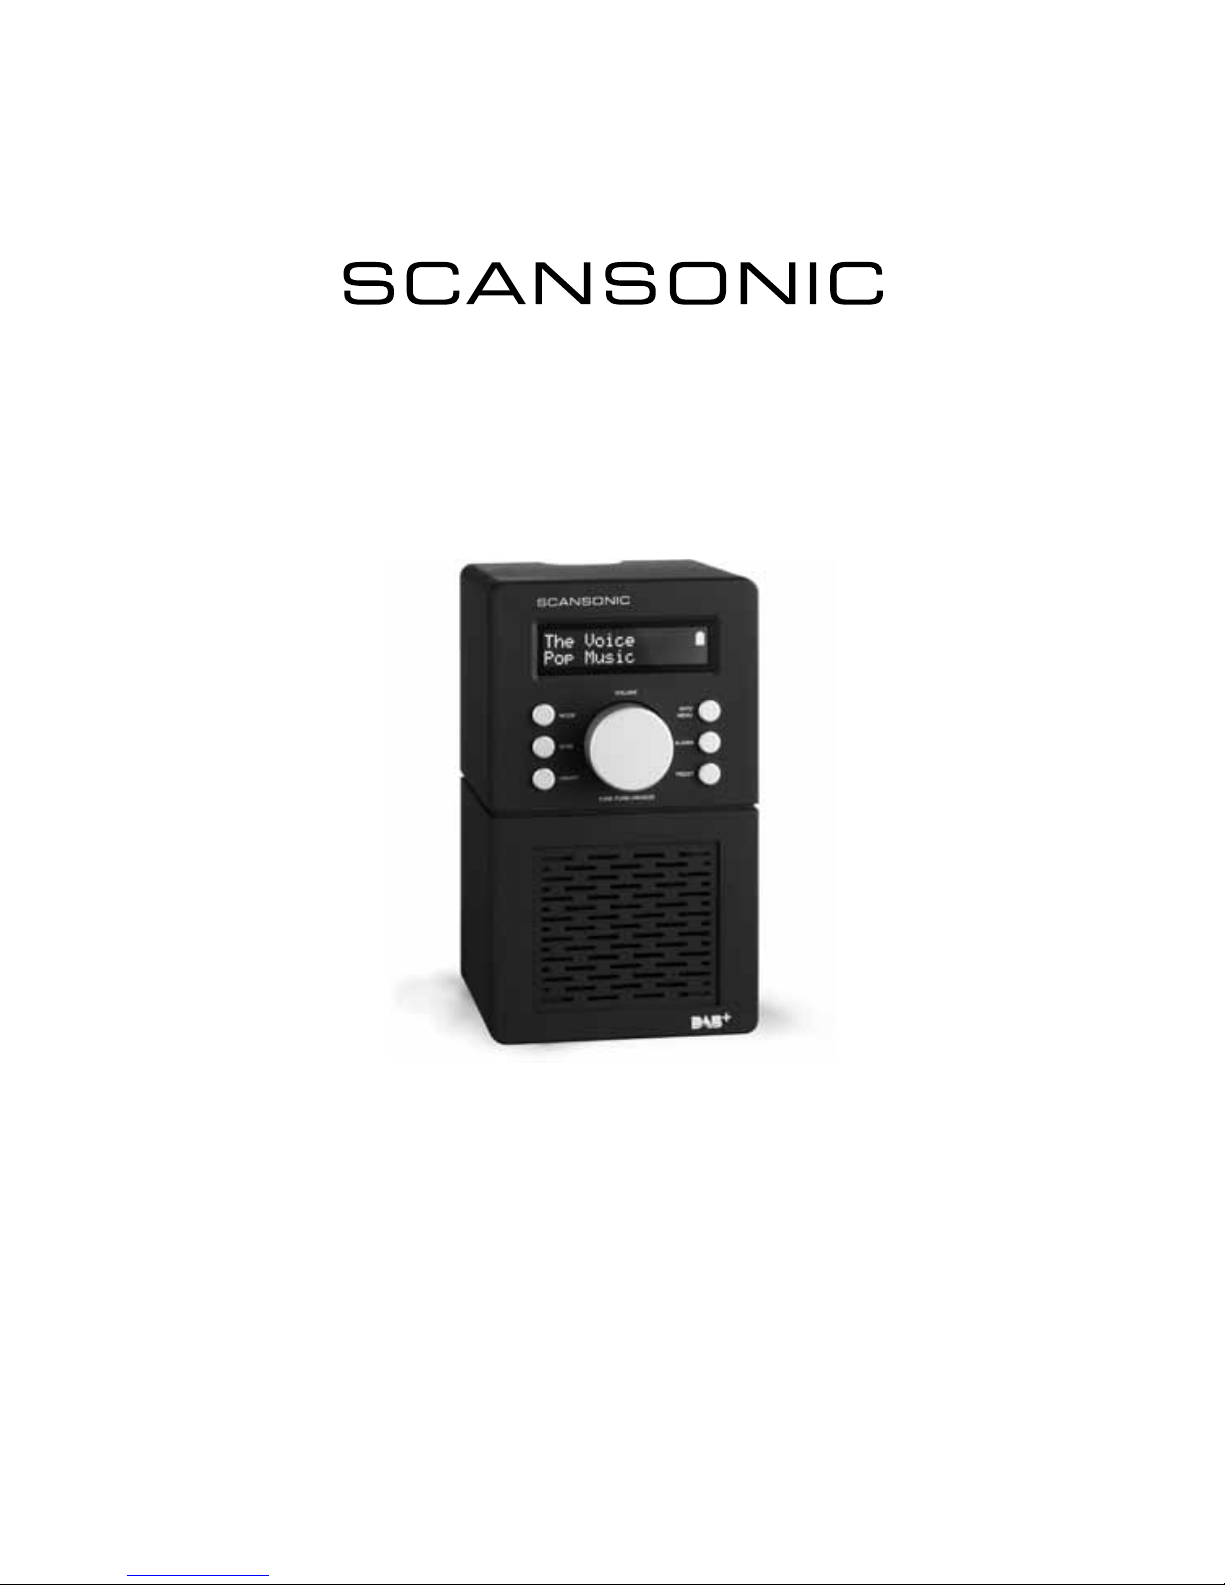
P3000

2
Contents
02 CONTENTS
03 INFORMATION
04 FRONT AND REAR PANEL OVERVIEW
06 CONNECTING YOUR RADIO
06 OPERATING YOUR RADIO – DAB
07 SELECTING A STATION – DAB
07 INFORMATION SERVICES – DAB
08 OPERATING YOUR RADIO – FM
08 DISPLAY MODES – FM
09 AUX MODE
09 MANUAL CLOCK SETTING
10 SETTING THE ALARM
10 EQ SETTING
11 RESETTING THE RADIO
12 SPECIFICATION

3
Information
Congratulations on your new radio.
Please take a moment to read this manual.
Safety Instructions.
Please store this instruction manual for future
reference.
• Place the unit on a solid surface.
• Do not expose Scansonic P3000 to high
humidity, direct sunlight, dirt, heavy vibration
or extreme temperatures.
• Do not open the cabinet. Only qualified
technicians are allowed to handle this
Scansonic radios internal parts.
• If service or repair is required, this must also
be done by qualified technicians.
• User a duster or a slightly damp, soft and
Non-fluffy rag to clean the cabinet. Do not
use corrosive or strong cleaning agents.
• Make sure no liquids or moisture penetrates
the radio during cleaning. Unplug the radio
before cleaning it.
Unplug the radio in following cases:
• Foreign objects or liquids have penetrated
the radio.
• The radio cannot be operated properly.
• The cabinet has been damaged.
• The mains plug or the mains cable is
defective.
• If the radio is not to be used for a longtime.
Disclaimer
Despite our best efforts we cannot guarantee that the technical data indicated are correct, complete and updated,
We, Scansonic, reserve the right to make technical changes without prior notice.

4
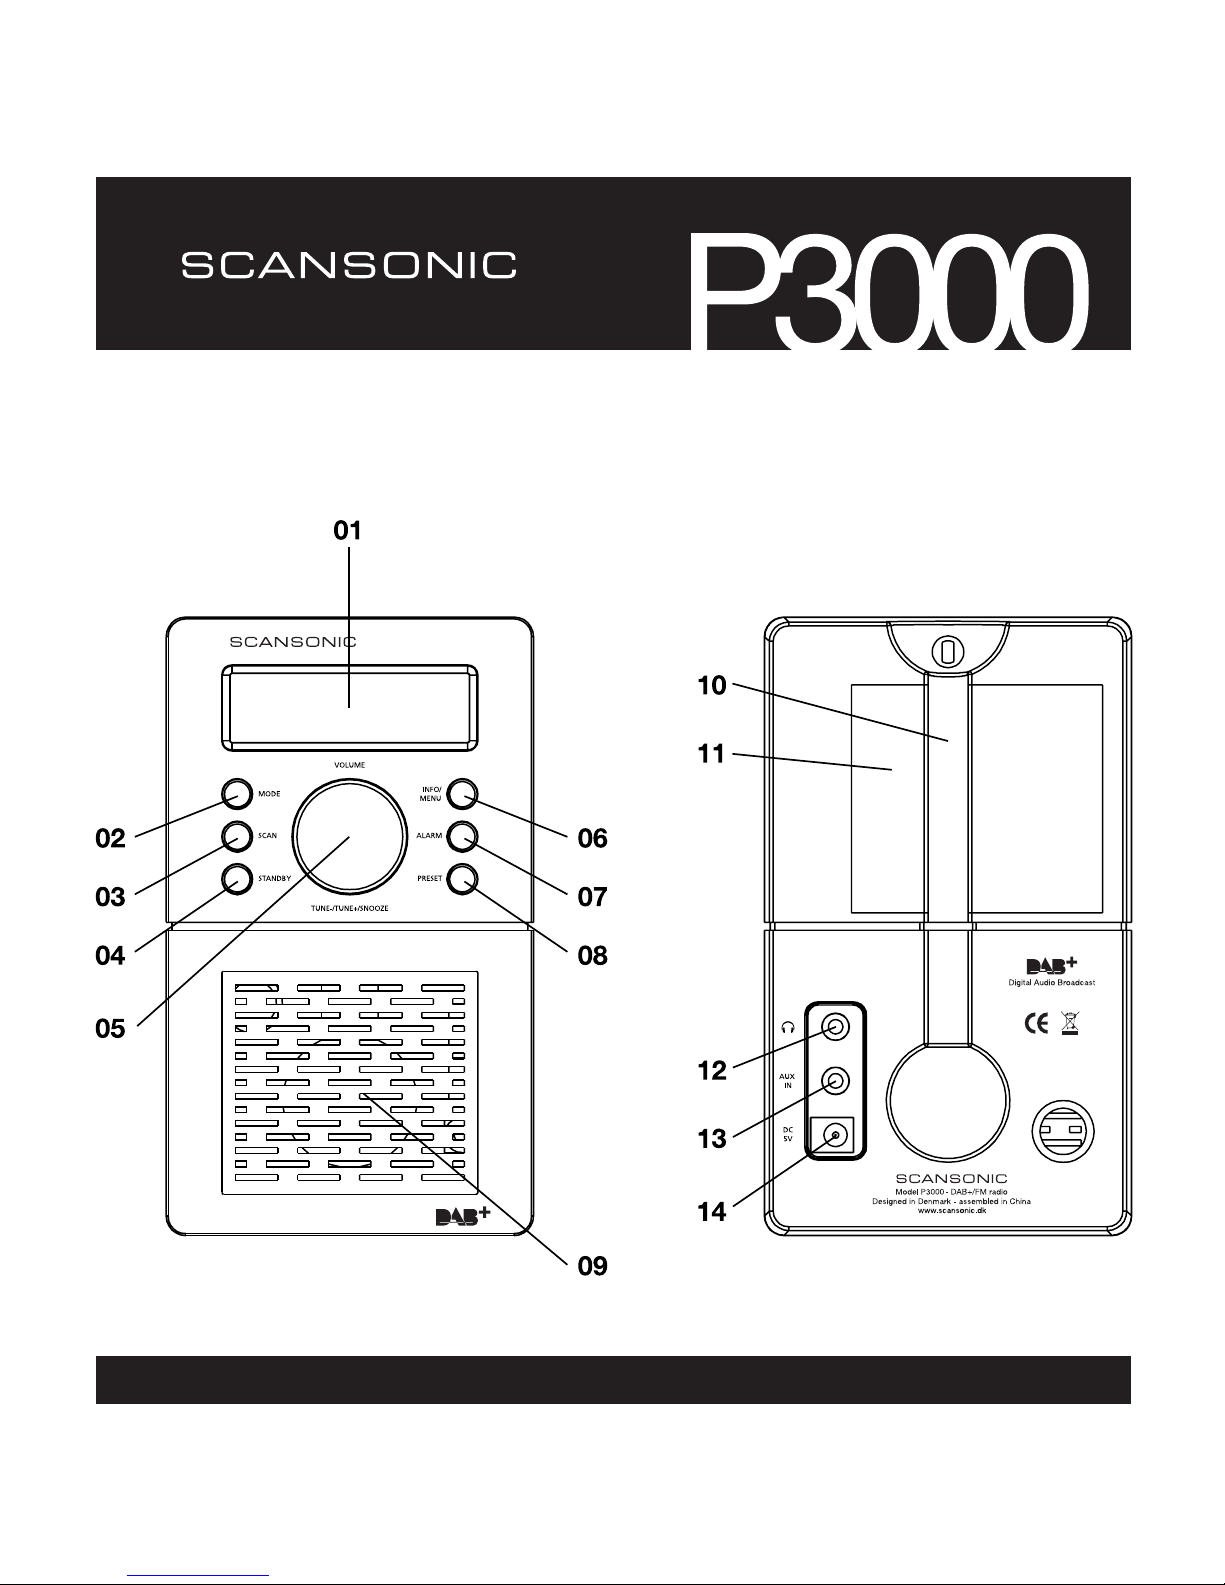
Front panel Rear panel

5
01 Display 16 x 2 Digit LCD display showing all information on the radio
02 MODE Press to select DAB radio, FM radio or AUX input
03 SCAN Press to SCAN radio channels
04 STANDBY Press to go to STANDBY mode. Press Longer to Shut down
radio
05 ROTARY Volume Control / SELECT / Tune+ Tune- / SNOOZE button
06 INFO / MENU INFO: Press to retrieve information from Radio Stations
MENU: Press 2 seconds Manual Tune / EQ / Alarm / Sleep /
Clock System Reset
07 ALARM Press to display Alarm 1 / Alarm 2
08 PRESET Press to preset radio stations 1-10
09 SPEAKER 3” Full range loudspeaker
10 ANTENNA The radio comes with a telescopic antenna. To Improve FM
reception, adjust the antenna for best reception
11 BATTERY This radio can also be played with batteries (AA size x 4)
12 HEADPHONE Connect a separate stereo headset to this input to listen to the
radio. Connecting headset will disable the main speaker
13 AUX IN Connect a stereo or mono audio source (iPod, iPhone, iPad, MP3
Player, TV etc). Use 3.5mm jack enclosed to connect to devices
14 DC5V IN Use this input to the enclosed DC Power Supply

6
Connecting your radio
01 Your radio is supplied with a Mains Adaptor
02 Place your radio on a flat surface
03 Insert the adaptor plug into the DC socket on the back of your radio
04 Plug the adaptor into the 230 volts mains socket outlet
Connecting your radio - DAB
01 Carefully extend the telescopic antenna
02 Press the STANDBY button to switch on radio, the display will show “SCANSONIC”
and the radio will come into DAB mode automatically
03 First time the radio is used a QUICK SCAN will be carried out, if the radio has
been and turned back ON from STANDBY mode, the last used station will be
selected
04 For a full SCAN please press “SCAN” button for 2 seconds
05 When scanning is completed the display shall indicate the number of found
stations
06 You may PRESET your favorite stations by pressing PRESENT button and scroll to
the position you would like to save and then press SELECT button for 2 seconds
07 If no Stations are found after scanning the display will show “NO STATIONS
AVAILABLE” and it is necessary to relocate the radio to a position with better
reception

7
Selecting a station - DAB
01 The display show the name of the station selected
02 Press down ROTARY KNOB to select TUNE – or TUNE + button to scroll the
station list and find the station
03 Press down ROTARY KNOB to select the desired station
Information services - DAB
Your radio shall display different info which can be selected by pressing the INFO
button
01 Date shows the current date and time
02 Ensemble displays the name of broadcaster of the DAB Station
03 Genre displays the type of the selected station: Pop, Rock, News,
Jazz Etc.
04 Data Speed display the digital bit rate and mono / stereo of selected station
05 Station
Frequency
displays the frequency of the selected station
06 Radio text
(DLS)
displays text messages from the station

8
Operating your radio - FM
01 Carefully extend the telescopic antenna
02 Press STANDBY to power on the radio (Use MODE to select to FM)
03 Press SCAN button to automatically scan upwards
04 Press SCAN button 2 seconds to automatically scan downwards
05 You may PRESET your favorite stations by pressing PRESENT button and
scroll to the position you would like to save and then press SELECT button for
2 seconds
Display modes - FM
Your radio shall display below information by pressing the INFO button
01 Date shows the current date and time
02 Station Name shows the name of the station or the frequency of the station
03 Audio displays Mono or Stereo
04 Program displays the name of Program
If not available “Prog Type N/A” shall be displayed
05 Radio text displays text messages from the station

9
AUX mode
CONNECT TO YOUR IPOD, IPHONE, IPAD & OTHER AUDIO SOURCES
The radio has an auxiliary input. This input can be used to connect an external source
such as iPod, iPhone, iPad, MP3 Players and other audio sources by using the
included 3.5mm mini jack cable.
To connect please connect the 3.5mm mini jack cable to your radio and to your other
device.
Press MODE button to select the AUX mode.
Manual clock settings
The radio clock can be set manually as below. (Navigate by using Rotary)
01 Press MENU 2 Sec > Clock Setting > Auto Update or Manual Update
02 With Rotary please select Date Setting: DD : MM : YYYY
03 With Rotary please select Time Setting: HH : MM

10
Setting the alarm
The radio alarm allows you to wake up to your desired radio station or a buzz.
01 Press ALARM button 2 Sec
02 With Rotary Select Alarm number: 1 or 2
03 With Rotary Select Alarm mode: Off / Beep / DAB / FM
04 With Rotary Select Alarm option: Once / Daily / Weekday / Weekend
05 With Rotary Select Alarm Time: 00 : 00
06 With Rotary Adjust the Alarm Level 1-20
07 When Alarm is active and to turn off press MODE or STANDBY
08 When Alarm is active press down on Rotary to enter SNOOZE
Press Alarm button once to delete SNOOZE
EQ setting
The radio has an EQ function that allows your radio to play with different Equalizer
settings. (Navigate by using Rotary)
01 Press MENU 2 Sec > EQ Setting
02 With Rotary please select: Flat, News, Classic, Pop or Rock
03 Press SELECT to end

11
EQ setting
The radio has an EQ function that allows your radio to play with different Equalizer
settings. (Navigate by using Rotary)
01 Press MENU 2 Sec > EQ Setting
02 With Rotary please select: Flat, News, Classic, Pop or Rock
03 Press SELECT to end
Resetting the radio
If you encounter problems with your radio you may reset the radio to Factory Setting
as follows. (Navigate by using Rotary)
01 Press MENU > System Reset
02 Press Select and the System shall reset to factory setting

12
Band (Mode) DAB, DAB+ & FM & (AUX)
Output Power 2 Watts RMS
Loudspeaker 2.75” Full Range
Antenna FM & DAB telescopic
Power / Battery DC 5V / 4 x AA sized Alkaline Batteries
Inputs DC 5V
Aux Input
Outputs Headphones
Dimensions 95mm(W) x 92mm(D) x 160mm(H)
Weight (Net) 650 g
www.scansonic.dk
enjoy
DK Brugervejledning
P3000

2
Indhold
02 INDHOLD
03 INFORMATION
04 OVERSIGT OG FRONT- OG BAGPANEL
06 TILSLUTNING AF DIN RADIO
06 BETJENING AF DIN RADIO – DAB
07 VALG AF EN STATION – DAB
07 INFORMATIONSTJENESTER – DAB
08 BETJENING AF DIN RADIO – FM
08 VISNINGSTILSTANDE – FM
09 AUX TILSTAND
09 MANUEL INDSTILLING AF URET
10 INDSTILLE VÆKKEURET
10 EQ-INDSTILLING
11 GENINDSTILLING AF RADIO
12 SPECIFIKATION

3
Information
Tillykke med din nye radio.
Giv dig venligst god tid til at læse denne
vejledning.
Sikkerhedsvejledninger.
Gem venligst denne vejledning for fremtidig
reference.
• Placer enheden på en robust overflade.
• Udsæt ikke Scansonic P3000 for høj
fugtighed, direkte sollys, snavs, store
vibrationer og ekstreme temperaturer.
• Åbn ikke kabinettet. Kun kvalificerede
teknikere har tilladelse til at håndtere disse
Scansonic radioers indvendige dele.
• Hvis service eller reparation er nødvendig,
skal denne også udføres af kvalificerede
teknikere.
• Brug en støveklud eller en let fugtig klud
og fnugfri klud til at rengøre kabinettet.
Brug ikke ætsemiddel eller stærke
rengøringsmidler.
• Sørg for at ingen væsker eller fugt trænger
gennem radioen under rengøring. Træk
stikket ud til radioen før den rengøres.
Træk stikket ud til radioen i de følgende
tilfælde:
• Fremmedlegemer eller væsket er trængt ind
i radioen.
• Radioen kan ikke betjenes korrekt.
• Kabinettet er beskadiget.
• Stikket eller kablet er defekt.
• Hvis radioen ikke skal bruges over en
længere periode.
Ansvarsfraskrivelse
På trods af vores bestræbelser, kan vi ikke garantere at de angivne tekniske data er korrekte, komplette og
opdaterede, vi, Scansonic, forbeholder os retten til at foretage tekniske ændringer uden varsel.
4
Frontpanel Bagpanel

5
01 Display 16 x 2 Digit LCD-display, der viser alle oplysninger om radioen
02 MODE Tryk for at vælge DAB radio, FM radio eller AUX indgang
03 SCAN Tryk SCAN for at scanne efter radiokanaler
04 STANDBY Tryk for at gå til STANDBY-funktion. Tryk i længere tid for at slukke
radioen helt
05 ROTARY Lydstyrke kontrol / SELECT / Tune+ Tune- / SNOOZE knap
06 INFO / MENU INFO: Tryk for at hente oplysninger om radiostationer
MENU: Tryk i 2 sekunder på Manual Tune / EQ / Alarm / Sleep / Clock
System Reset
07 ALARM Tryk for at vise Alarm 1 / Alarm 2
08 PRESET Tryk for at forindstille radiostationer 1-10
09 HØJTTALER 3” Fuld rækkevidde højttaler
10 ANTENNE Radioen leveres med en teleskopisk antenne. For at forbedre
FM modtagelse, skal antennen indstilles for at opnå den bedste
modtagelse
11 BATTERI Denne radio kan også fungere med batterier (AA størrelse x 4)
12 HØRETELEFONER Tilslut et separat stereo headset til denne indgang for at lytte til
radioen. Tilslutning af headset vil frakoble højttaleren
13 AUX IN Tilslut en stereo eller mono lydkilde (iPod, iPhone, iPad, MP3 afspiller,
TV osv). Brug det medfølgende 3,5 mm stik til at tilslutte enheder
14 DC5V IN Brug denne indgang til den medfølgende DC strømforsyning

6
Tilslutning af din radio
01 Din radio leveres med en adapter
02 Placer din radio på en flad overflade
03 Isæt adapterstikket i DC indgangen på bagsiden af din radio
04 Sæt adapteren i den 230 volt stikkontakt
Tilslutning af radioen - DAB
01 Træk forsigtigt den teleskopiske antenne ud
02 Tryk på knappen STANDBY for at tænde for radioen, displayet viser “SCANSONIC” og radioen
vil automatiske gå i tilstanden DAB
03 Første gang radioen tages i brug udføres en QUICK SCAN, hvis radioen er blevet tændt igen
efter at have været i tilstanden STANDBY tilstand, den sidste brugte station vil blive valgt
04 For en fuld SCAN tryk venligst på knappen “SCAN” i 2 sekunder
05 Når scanningen er udført skal displayet angive antallet af fundne stationer
06 Du kan FORINDSTILLE dine yndlingsstationer ved at trykke på knappen PRESET og gå til den
position du ønsker at gemme og tryk derefter på knappen SELECT i 2 sekunder
07 Hvis der ikke findes nogle stationer efter scanning viser displayet “NO STATIONS AVAILABLE”
og det er nødvendigt at flytte radioen til en position med bedre modtagelse

7
Valg af station - DAB
01 Displayet viser navnet på den valgte station
02 Tryk på knappen ROTARY KNOB for at vælge TUNE – eller TUNE + knappen for at rulle ned
gennem radio stations listen og finde den ønskede station
03 Tryk på knappen ROTARY KNOB ned for at vælge den ønskede station
Information om servicer - DAB
Din radio skal vise forskellige oplysninger, som kan vælges ved at trykke på knappen INFO
01 Dato viser den aktuelle dato og tid
02 Ensemble viser navnet på udsenderen af DAB stationen
03 Genre viser typen for den valgte station: Pop, Rock, News, Jazz Etc.
04 Datahastighed viser den digitale bithastighed og mono/stereo for den valgte station
05 Stationsfrekvens viser frekvensen for den valgte station
06 Radiotekst (DLS) viser tekstmeddelelser fra stationen

8
Betjening af din radio - FM
01 Træk forsigtigt den teleskopiske antenne ud
02 Tryk på STANDBY for at tænde for radioen (Brug MODE for at vælge FM)
03 Tryk på SCAN-knappen for automatisk at scanne opad
04 Tryk på SCAN-knappen i 2 sekunder for automatisk at scanne nedad
05 Du kan FORINDSTILLE dine yndlingsstationer ved at trykke på knappen PRESET og gå til
den position du ønsker at gemme og tryk derefter på knappen SELECT i 2 sekunder
Display-måder - FM
Din radio skal vise oplysningerne herunder ved at trykke på knappen INFO
01 Dato viser den aktuelle dato og tid
02 Stationsnavn viser navnet på stationen eller stationens frekvens
03 Lyd viser mono eller stereo
04 Program viser programnavnet
Hvis ikke tilgængelig vises “Prog Type N/A”
05 Radiotekst viser tekstmeddelelser fra stationen

9
AUX-funktion
TILSLUTTE TIL DIN IPOD, IPHONE, IPAD OG ANDRE LYDKILDER
Radioen har aux. indgang. Denne indgang kan bruges til at tilslutte en ekstern kilde, som iPod,
iPhone, iPad, MP3 afspillere og andre lydkilder, ved at bruge det medfølgende 3,5 mm ministik
kabel.
For at tilslutte skal du tilslutte 3,5 mm ministik kablet til din radio og til din anden enhed.
Tryk på knappen MODE for at vælge tilstanden AUX.
Manuel indstilling af uret
Radioens ur kan indstilles manuelt som beskrevet herunder. (Naviger ved hjælp af
Rotary-knappen)
01 Tryk på MENU i 2 sekunder > Clock Setting > Auto Update eller Manual Update
02 Med drejeknappen vælg venligst datoindstilling: DD : MM : ÅÅÅÅ
03 Med drejeknappen vælg venligst tidsindstilling: HH : MM

10
Indstille vækkeuret
Radioens vækkeur tillader dig at vågne op til din ønskede radiostation eller en brummer.
01 Tryk på ALARM-knappen i 2 sekunder
02 Med drejeknappen vælges vækkeur nummer: 1 eller 2
03 Med drejeknappen vælges vækkeur tilstand: Off / Beep / DAB / FM
04 Brug Rotary-knappen for at vælge alarmtidspunkt: En gang / Dagligt / Hverdage / Weekend
05 Med drejeknappen vælges vækkeur tid: 00 : 00
06 Brug Rotary-knappen til at justere alarmniveauet på 1-20
07 Når du vil slukke for den aktiverede alarm, tryk på MODE eller STANDBY
08 Når alarmen er aktiveret, kan du trykke på Rotary-knappen for SNOOZE-funktion
Tryk på Alarm-knappen en gang for at annullere SNOOZE
EQ-indstilling
Radioen har en EQ funktion som tillader din radio at afspille med forskellige Equalizer indstillinger.
(Naviger ved hjælp af Rotary-knappen)
01 Tryk på MENU i 2 sekunder > EQ Setting
02 Med drejeknappen vælg venligst: Flad, Nyheder, Klassisk, Pop eller Rock
03 Tryk på SELECT for at afslutte

11
EQ-indstilling
Radioen har en EQ funktion som tillader din radio at afspille med forskellige Equalizer indstillinger.
(Naviger ved hjælp af Rotary-knappen)
01 Tryk på MENU i 2 sekunder > EQ Setting
02 Med drejeknappen vælg venligst: Flad, Nyheder, Klassisk, Pop eller Rock
03 Tryk på SELECT for at afslutte
Genindstilling af radio
Hvis du får problemer med din radio, kan du nulstille radioen til fabriksindstillingerne som følger.
(Naviger ved hjælp af Rotary-knappen)
01 Tryk på MENU > System Reset
02 Tryk på Select, så indstilles systemet til fabriksindstillingerne

12
Bånd (Tilstand) DAB, DAB+ & FM & (AUX)
Udgangseffekt 2 Watts RMS
Højttaler 2,75” Fuldt område
Antenne FM & DAB teleskopisk
Effekt / Batteri DC 5V / 4 x AA størrelse alkaline batterier
Indgange DC 5V
Aux indgang
Udgange Hovedtelefoner
Mål 95mm(B) x 92mm(D) x 160mm(H)
Vægt (Net) 650 g
www.scansonic.dk
nyd den

DE Bedienungsanleitung
P3000

2
Inhalt
02 INHALT
03 INFORMATIONEN
04 GERÄTEFRONT UND -RÜCKSEITE ÜBERSICHT
06 ANSCHLUSS IHRES RADIOS
06 BEDIENUNG IHRES RADIOS – DAB
07 AUSWAHL EINES SENDERS – DAB
07 INFORMATIONSDIENSTE – DAB
08 BEDIENUNG IHRES RADIOS – UKW
08 ANZEIGEMODI – UKW
09 AUX-MODUS
09 MANUELLE UHREINSTELLUNGEN
10 WECKEINSTELLUNG
10 EQ-EINSTELLUNG
11 RÜCKSTELLUNG DES RADIOS
12 SPEZIFIKATION

3
Informationen
Herzlichen Glückwunsch zu Ihrem neuen
Radio.
Bitte nehmen Sie sich einen Moment Zeit und
lesen Sie dieses Handbuch.
Sicherheitshinweise.
Bitte bewahren Sie diese Hinweise für den
späteren Gebrauch auf.
• Stellen Sie das Gerät auf festen Untergrund
auf.
• Setzen Sie Scansonic P3000 nicht hoher
Luftfeuchtigkeit, direktem Sonnenlicht,
Schmutz, starken Erschütterungen oder
extremen Temperaturen aus.
• Öffnen Sie nicht das Gehäuse. Eine Wartung
des Inneren der Radios Scansonic darf nur
durch qualifiziertes Personal erfolgen.
• Ebenso gilt dies für Wartung und Reparatur,
sofern erforderlich. Auch hierzu ist nur
Fachpersonal befugt.
• Um das Gehäuse zu reinigen, benutzen
Sie bitte ein feuchtes, weiches und
nicht fusselndes Tuch. Benutzen Sie
keine ätzenden oder aggressiven
Reinigungsmittel.
• Geben Sie darauf Acht, dass bei der
Reinigung keine Flüssigkeit ins Innere
des Radios gelangt. Ziehen Sie vor der
Reinigung den Netzstecker.
Trennen Sie in folgenden Fällen das Radio vom
Netz:
• Fremdkörper oder Flüssigkeiten sind in das
Gehäuse eingedrungen.
• Wenn das Radio nicht ordnungsgemäß
funktioniert.
• Wenn das Gehäuse beschädigt wurde.
• Wenn Schäden am Stecker oder am
Netzkabel vorliegen.
• Wenn das Radio für längere Zeit nicht
benutzt wird.
Haftungsausschluss
Trotz aller Sorgfalt können wir nicht dafür garantieren, dass alle technischen Daten korrekt, vollständig und aktuell
sind. Wir, Scansonic, behalten uns das Recht auf nachträgliche technische Änderungen ohne gesonderten Hinweis
vor.

4
Gerätefront Geräterückseite

5
01 Bildschirm 16 x 2-stelliges LCD-Display zeigt alle Informationen auf dem Radio an
02 MODE Drücken Sie, um DAB-Radio, UKW-Radio oder AUX-Eingang zu wählen
03 SCAN Drücken Sie, um Radiokanäle zu SCANNEN
04 STANDBY Drücken Sie, um in den STANDBY-Modus zu gehen. Bei längerem
Drücken wird das Radio abgeschaltet
05 DREHKNOPF Volume Control / SELECT / Tune+ Tune- / SNOOZE-Taste
06 INFO / MENU INFO: Drücken Sie, um Informationen vom Radiostationen
MENU: Drücken Sie 2 Sekunden lang Manual Tune / EQ / Alarm / Sleep /
Clock System Reset
07 ALARM Drücken Sie, um den Alarm 1 / Alarm 2 anzuzeigen
08 PRESET Drücken Sie, um die Radiosender 1-10 voreinzustellen
09 LAUTSPRECHER 3” Breitbandlautsprecher
10 ANTENNE Das Radio wird mit einer Teleskopantenne verwendet. Um UKW-Empfang
zu verbessern, richten Sie die Antenne für besten Empfang aus
11 BATTERIE Dieses Radio kann auch mit Batterien (AA x 4) wiedergegeben werden
12 KOPFHÖRER Schließen Sie ein separates Stereo-Headset an diesen Eingang an, um
Radio zu hören. Mit dem Headset-Anschluss wird der Hauptsprecher
deaktiviert
13 AUX-IN Schließen Sie eine Stereo- oder Mono-Audioquelle (iPod, iPhone, iPad,
MP3-Player, TV usw.) an. Verwenden Sie den beigefügten 3,5mmKlinkenstecker, um Geräte anzuschließen
14 DC5V-IN Verwenden Sie diesen Eingang mit der beiliegenden
DC-Stromversorgung

6
Anschluss Ihres Radios
01 Ihr Radio wird mit einem Netzteil geliefert
02 Stellen Sie das Gerät auf flachen Untergrund auf
03 Stecken Sie den Adapterstecker in die DC-Buchse auf der Rückseite des Radios
04 Stecken Sie den Adapter in die 230 Volt Steckdose
Anschluss Ihres Radios - DAB
01 Ziehen Sie die Teleskopantenne vorsichtig heraus
02 Drücken Sie die STANDBY-Taste, um Radio einzuschalten, das Display zeigt „SCANSONIC“,
und das Radio wird in den DAB-Modus automatisch kommen
03 Bei der ersten Inbetriebnahme des Radios wird eine SCHNELLSUCHE durchgeführt. Wenn
das Radio schon einmal benutzt und aus dem STANDBY-Modus wieder eingeschaltet worden
ist, wird der zuletzt gehörte Sender wiedergegeben
04 Für eine vollständige SUCHE klicken Sie bitte auf die „SCAN“-Taste für die Dauer von
2 Sekunden
05 Nach abgeschlossener Suche erscheint auf dem Display die Anzahl der gefundenen
Sendestationen
06 Sie können Ihre Lieblingssender VOREINSTELLEN durch Druck auf die PRESET-Taste, dann
blättern Sie zu der Position, in der Sie ihn speichern möchten, und drücken Sie die SELECTTaste für die Dauer von 2 Sekunden
07 Wenn bei der Suche keine Sender gefunden wurden, so erscheint auf dem Display nach
der Suche „NO STATIONS AVAILABLE“, und es ist notwendig, Ihr Radio an einen anderen
Standort zu versetzen, um so einen besseren Empfang zu gewährleisten, oder es mit der
Hausantenne zu verbinden

7
Auswahl eines Senders - DAB
01 Das Display zeigt den Namen des gewählten Senders an
02 Drücken Sie den DREHKNOPF nach unten, um die Taste TUNE – oder TUNE + zu drücken,
damit Sie in der Senderliste blättern und den gewünschten Sender finden
03 Drücken Sie den DREHKNOPF, um den gewünschten Sender auszuwählen
Informationsdienste - DAB
Ihr Radio soll Ihnen unterschiedliche Informationen zeigen, die durch Drücken der INFO-Taste
ausgewählt werden können
01 Datum zeigt das gegenwärtige Datum und die Uhrzeit an
02 Ensemble zeigt den Namen des Senderbetreibers an, zu dem der DAB-Sender
gehört
03 Genre zeigt die Art des gewählten Senders an: Pop, Rock, Nachrichten,
Jazz usw
04 Datengeschwindigkeit zeigt die digitale Bitrate des gewählten Senders und Informationen
zu Stereo/Mono an
05 Senderfrequenz zeigt die Frequenz des gewählten Senders an
06 Radiotext (DLS) zeigt die Textnachrichten vom Sender an

8
Bedienung Ihres Radios - UKW
01 Ziehen Sie die Teleskopantenne vorsichtig heraus
02 Drücken Sie STANDBY, um das Radio einzuschalten (Verwenden Sie MODE, um in den UKW-
Modus zu schalten)
03 Drücken Sie SCAN-Taste, um automatisch nach oben zu suchen
04 Drücken Sie SCAN-Taste 2 Sekunden lang, um automatisch nach unten zu suchen
05 Sie können Ihre Lieblingssender VOREINSTELLEN durch Druck auf die PRESET-Taste, dann
blättern Sie zu der Position, in der Sie ihn speichern möchten, und drücken Sie die SELECTTaste für die Dauer von 2 Sekunden
Anzeigemodi - UKW
Ihr Radio soll Ihnen die nachfolgenden Informationen zeigen, die durch Drücken der INFO-Taste
ausgewählt werden können
01 Datum zeigt das gegenwärtige Datum und die Uhrzeit an
02 Sendername zeigt den Namen oder die Frequenz des Senders an
03 Audio zeigt Mono oder Stereo an
04 Programm zeigt den Programmnamen an
Falls nicht verfügbar, wird „Prog Type N/A“ angezeigt
05 Radiotext zeigt die Textnachrichten vom Sender an

9
AUX-Modus
SCHLIEßEN SIE AN IHREN IPOD, IPHONE, IPAD UND ANDERE AUDIOQUELLEN AN
Das Radio verfügt über einen AUX-Eingang. Über diesen Eingang können externe Quellen, wie
z. B. ein iPod, iPhone, MP3-Player oder viele andere Geräte unter Verwendung eines 3,5mmMiniklinkenstecker-Kabels angeschlossen werden.
Zum Anschließen eines iPods, iPhones oder MP3-Players schließen Sie bitte mittels des
beiliegenden 3,5mm-Miniklinkenstecker-Kabels den Kopfhörerausgang des Geräts an den AUXEingang des Radios an.
Drücken Sie die MODE-Taste, um in den AUX-Modus zu schalten.
Manuelle Uhreinstellungen
Die Funkuhr kann manuell wie folgt eingestellt werden. (Navigieren mit dem Drehknopf)
01 Drücken Sie MENU 2 Sekunden lang > Clock Setting > Auto Update oder Manual Update
02 Mit dem Drehknopf wählen Sie bitte die Datumeinstellungen: DD : MM : YYYY
03 Mit dem Drehknopf wählen Sie bitte die Zeiteinstellungen: HH : MM

10
Weckeinstellung
Der Wecker des Radios kann einen bestimmten Sender oder einen Summton als Weckton
verwenden.
01 Drücken Sie die ALARM-Taste 2 Sekunden lang
02 Mit dem Drehknopf wählen Sie die Alarmnummer: 1 oder 2
03 Mit dem Drehknopf wählen Sie den Alarmmodus: Aus / Piep / DAB / UKW
04 Mit dem Drehknopf wählen Sie die Weckoption: Einmal / Täglich / Werktags / Am
Wochenende
05 Mit dem Drehknopf wählen Sie die Alarmzeit: 00 : 00
06 Mit dem Drehknopf wählen Sie das Alarmniveau 1-20
07 Wenn der Alarm aktiv ist, und um ihn auszuschalten, drücken Sie MODE oder STANDBY
08 Wenn der Alarm aktiv ist, drücken Sie den Drehknopf nach unten, um SNOOZE einzugeben
Drücken Sie die Alarm-Taste einmal, um SNOOZE zu löschen
EQ-Einstellung
Das Radio verfügt über eine EQ-Funktion, die Ihrem Radio die Wiedergabe mit verschiedenen
Equalizer-Einstellungen ermöglicht. (Navigieren mit dem Drehknopf)
01 Drücken Sie MENU 2 Sekunden lang > EQ Setting
02 Mit dem Drehknopf wählen Sie bitte: Flat, Nachrichten, Klassik, Pop oder Rock
03 Drücken Sie SELECT zu beenden

11
EQ-Einstellung
Das Radio verfügt über eine EQ-Funktion, die Ihrem Radio die Wiedergabe mit verschiedenen
Equalizer-Einstellungen ermöglicht. (Navigieren mit dem Drehknopf)
01 Drücken Sie MENU 2 Sekunden lang > EQ Setting
02 Mit dem Drehknopf wählen Sie bitte: Flat, Nachrichten, Klassik, Pop oder Rock
03 Drücken Sie SELECT zu beenden
Rückstellung des Radios
Wenn Sie Problemen mit Ihrem Radio haben, können Sie das Radio auf Werkseinstellung wie folgt
zurücksetzen. (Navigieren mit dem Drehknopf)
01 Drücken Sie MENU > System Reset
02 Drücken Sie Select, und das System wird auf die Werkseinstellung zurückgesetzt

12
Band (Modus) DAB, DAB+ und UKW und (AUX)
Ausgangsleistung 2 Watt RMS
Lautsprecher 2,75” Breitband
Antenne UKW und DAB ausziehbar
Leistung / Batterie DC 5V / 4 x AA-Alkalibatterien
Eingänge DC 5V
Aux-Eingang
Ausgänge Kopfhörer
Abmessungen 95mm(B) x 92mm(T) x 160mm(H)
(Netto) Gewicht 650 g
www.scansonic.dk
Viel Vergnügen!

FR Guide d'instructions
P3000

2
Contenu de la boîte
02 CONTENU DE LA BOÎTE
03 INFORMATIONS
04 PRÉSENTATIONS DES PANNEAUX AVANT ET ARRIÈRE
06 BRANCHEMENT SUR LE SECTEUR
06 UTILISATION DE LA RADIO – MODE NUMÉRIQUE DAB
07 SÉLECTION D'UNE STATION – MODE RADIO NUMÉRIQUE
(DAB)
07 AFFICHAGE D'INFORMATIONS – MODE RADIO NUMÉRIQUE
(DAB)
08 UTILISATION DE LA RADIO – MODE FM
08 INFORMATIONS AFFICHÉES – MODE FM
09 MODE AUX
09 RÉGLAGE MANUEL DE L'HORLOGE
10 RÉGLAGES DU RÉVEIL
10 SÉLECTION D'UN ÉGALISEUR
11 RÉINITIALISATION DE LA RADIO
12 SPÉCIFICATIONS

3
Informations
Félicitations pour l'achat de votre nouvelle
radio.
Prenez le temps de lire attentivement ce guide
afin d'apprécier au mieux toutes ses fonctions.
Instructions de sécurité.
Conservez ces instructions pour référence
ultérieure.
• Placez la radio sur une surface plate.
• Évitez les environnements exposant votre
P3000 à une forte humidité, aux rayons
directs du soleil, à la poussière, à de fortes
vibrations et à des températures extrêmes.
• N'ouvrez pas cet appareil. Seul un
technicien qualifié est autorisé à accéder
aux composants internes de votre appareil.
• En cas de réparation, apportez votre
appareil à un technicien qualifié.
• Pour nettoyer la surface extérieure de votre
appareil, utilisez un chiffon à poussière ou
un chiffon légèrement humide, doux et qui
ne peluche pas. N'utilisez aucun produit
corrosif ni nettoyant chimique puissant.
• Veillez à ce qu'aucun liquide ne pénètre
dans la radio pendant le nettoyage.
Débranchez la radio de la prise secteur
avant de la nettoyer.
Débranchez la radio de la prise secteur
lorsque :
• un objet ou un liquide est tombé à l'intérieur ;
• la radio ne fonctionne pas correctement ;
• le coffret extérieur est endommagé ;
• le cordon d'alimentation ou sa prise est
défectueux ;
• vous n'envisagez pas d'utiliser la radio avant
longtemps.
Avis de non-responsabilité
En dépit de tous nos efforts, nous ne pouvons pas vous garantir que les données techniques rapportées dans
ce guide sont correctes, complètes et à jour. Scansonic se réserve le droit de procéder à des modifications
techniques sans notification préalable.

4
Panneau avant Panneau arrière

5
01 Écran Écran numérique LCD 16 x 2 affichant toutes les informations concernant
la radio
02 MODE Appuyez sur cette touche pour sélectionner le mode d'entrée : radio
numérique DAB, radio FM ou AUX
03 SCAN Appuyez sur cette touche pour rechercher les chaînes de radio
04 STANDBY Appuyez sur cette touche pour activer le mode veille. Appuyez sur cette
touche et maintenez-la enfoncée pour éteindre la radio
05 BOUTON
MULTIFONCTION
Bouton multifonction Volume / SELECT / Tune+ Tune- / SNOOZE pour
ajuster le volume sonore, confirmer une opération, parcourir la liste des
stations et activer le rappel de réveil
06 INFO/MENU INFO : Appuyez sur cette touche pour afficher diverses informations sur
la station sélectionnée. MENU : Maintenez la touche appuyée pendant
2 secondes pour accéder aux fonctions recherche manuelle, égaliseur,
réveil, arrêt automatique, horloge et réinitialisation de l'horloge
07 ALARM Appuyez sur cette touche pour afficher le réveil 1 ou le réveil 2
08 PRESET Appuyez sur cette touche pour présélectionner une station de radio (1-10)
09 HAUT-PARLEUR Haut-parleur 7,5 cm, large bande
10 ANTENNE Votre radio est équipée d'une antenne télescopique. Pour améliorer la
réception FM, ajustez l'antenne
11 PILE Votre radio peut fonctionner à partir d'un jeu de 4 x pile AA
12 ÉCOUTEURS Vous pouvez brancher des écouteurs sur cette sortie pour pouvoir écouter
la radio sans déranger personne. Le branchement d'écouteurs sur cette
sortie désactive automatiquement la sortie sonore sur le haut-parleur
13 Entrée AUX Vous pouvez brancher une source audio externe mono ou stéréo sur cette
entrée (iPod, iPhone, iPad, lecteur MP3, téléviseur, etc.). La connexion
s'effectue à l'aide du câble audio 3,5 mm qui vous est fourni
14 DC5V IN Cette entrée vous permet d'utiliser votre radio à partir de l'adaptateur
secteur qui vous est fourni

6
Branchement sur le secteur
01 Votre radio vous est fournie avec un adaptateur secteur
02 Placez votre radio-réveil sur une surface plate
03 Branchez l'extrémité appropriée de l'adaptateur secteur sur l'entrée DC à l'arrière de la radio
04 Branchez l'autre extrémité sur une prise secteur 230 volts
Utilisation de la radio – mode numérique DAB
01 Déployez soigneusement l'antenne télescopique
02 Appuyez sur la touche STANDBY pour allumer la radio. Le titre "SCANSONIC" s'affiche sur
l'écran et la radio se place automatiquement en mode radio numérique (DAB)
03 Si vous utilisez la radio pour la première fois, celle-ci procède automatiquement à une
RECHERCHE RAPIDE de stations. Si vous avez déjà allumé la radio depuis le mode veille,
celle-ci se cale sur la dernière station que vous avez écoutée
04 Pour démarrer une RECHERCHE complète des stations, appuyez sur la touche "SCAN" et
maintenez-la enfoncée pendant 2 secondes
05 Le nombre total de stations qui ont été détectées est affiché sur l'écran
06 Pour PRÉSÉLECTIONNER une station, appuyez sur la touche PRESET, sélectionnez la
position de présélection en mémoire à laquelle vous voulez affecter la station et confirmez
l'opération en appuyant sur la touche SELECT et la maintenant enfoncée pendant 2 secondes
07 Lorsque la recherche ne détecte aucune station, "NO STATIONS AVAILABLE" s'affiche sur
l'écran. Déplacez alors la radio jusqu'à obtenir une meilleure réception

7
Sélection d'une station– mode numérique (DAB)
01 Le nom de la station sélectionnée est affiché sur l'écran
02 Appuyez sur le BOUTON MULTIFONCTION pour utiliser la fonction TUNE – et TUNE + afin
de parcourir la liste des stations et localiser celle que vous désirez écouter
03 Appuyez sur le BOUTON MULTIFONCTION pour sélectionner cette station
Affichage d'informations– mode radio numérique
Pour afficher diverses informations sur votre radio, appuyez sur la touche INFO
01 Date Indications de la date et de l'heure actuelles
02 Diffuseur Nom du diffuseur de la station numérique
03 Genre Type de contenu diffusé par la station : Pop, Rock, News, Jazz, etc.
04 Vitesse des
données
Vitesse de transmission des signaux numériques et indication de mode
mono ou stéréo
05 Fréquence
de la station
Fréquence de la station que vous écoutez actuellement
06 Radio-texte
(DLS)
Messages texte diffusés par la station

8
Utilisation de la radio – mode FM
01 Déployez soigneusement l'antenne télescopique
02 Appuyez sur la touche STANDBY pour allumer la radio (appuyez sur la touche MODE pour
passer en mode FM)
03 Appuyez sur la touche SCAN pour démarrer une recherche automatique de station par
augmentation de la fréquence
04 Appuyez sur la touche SCAN et maintenez-la enfoncée pendant 2 secondes pour démarrer
une recherche de station par diminution de la fréquence
05 Pour PRÉSÉLECTIONNER une station, appuyez sur la touche PRESET, sélectionnez la
position de présélection en mémoire à laquelle vous voulez affecter la station et confirmez
l’opération en appuyant sur le bouton MULTIFONCTION et le maintenant enfoncé pendant
Informations affichées - FM
Appuyez sur la touche INFO pour afficher les informations suivantes sur l'écran de la radio
01 Date Indications de la date et de l'heure actuelles
02 Nom de la station Titre ou fréquence de la station
03 Audio Type de diffusion : mono ou stéréo
04 Émission diffusée Nom de l'émission
Si aucune émission n'est disponible, le message "Prog Type N/A"
apparaît sur l'écran
05 Radio-texte Messages texte diffusés par la station

9
Mode AUX
CONNEXION À UN IPOD, IPHONE, IPAD ET AUTRE SOURCE AUDIO
Votre radio est équipée d'une entrée auxiliaire. pour y connecter une source audio externe
(iPod, iPhone, iPad, lecteur MP3, etc.) à l'aide du câble 3,5 mm qui vous est fourni.
Pour cela, il vous suffit de relier l'entrée AUX de la radio à la sortie audio 3,5 mm de la source
externe à l'aide de ce câble.
Appuyez sur la touche MODE jusqu'à sélectionner le mode AUX.
Ajustement manuel de l'horloge
Pour régler manuellement l'horloge de votre radio. (la navigation s'effectue à l'aide du bouton
multifonction).
01 Appuyez sur MENU 2 s > Clock Setting > Auto Update ou Manual Update
02 Ajustez les éléments de la date à l'aide du bouton multifonction : JJ : MM : AAAA
03 Ajustez les éléments de l'heure à l'aide du bouton multifonction : HH : MM

10
Réglages du réveil
La radio intègre une fonction pour vous réveiller à l'heure que vous désirez, en vous faisant
entendre une sonnerie ou l'émission alors diffusée sur une station spécifique.
01 Appuyez sur la touche ALARM et maintenez-la enfoncée pendant 2 secondes
02 À l'aide du bouton multifonction, sélectionnez laquelle des deux heures de réveil vous voulez
configurer : 1 ou 2
03 À l'aide du bouton multifonction, sélectionnez la source sonore que vous voulez entendre
pour votre réveil : Off / Beep / DAB / FM (Désactivé/Sonnerie/Radio numérique/radio FM)
04 À l'aide du bouton multifonction, sélectionnez la fréquence de déclenchement du réveil :
Once / Daily / Weekday / Weekend (Une fois / Chaque jour / Jour ouvré / Fin de semaine)
05 À l'aide du bouton multifonction, ajustez les éléments de l'heure de réveil : 00 : 00
06 Ajustez le niveau du réveil entre 1 et 20 à l'aide du bouton multifonction
07 Pour désactiver la fonction réveil après l'avoir activée, appuyez sur MODE ou STANDBY
08 Pour activer le mode rappel (SNOOZE) lorsque le réveil retentit, appuyez sur le bouton
multifonction. Pour désactiver le mode rappel (SNOOZE), appuyez sur la touche ALARM
Sélection d'un égaliseur
La radio intègre une fonction pour modifier le rendu des graves et des aigus selon le type de
musique que vous écoutez. (Navigation à l'aide du bouton multifonction)
01 Appuyez sur MENU 2 s > EQ Setting
02 À l'aide du bouton rotatif, sélectionnez le type d'égaliseur à appliquer : Flat, News, Classic,
Pop ou Rock
03 Appuyez sur le bouton multifonction pour confirmer

11
Sélection d'un égaliseur
La radio intègre une fonction pour modifier le rendu des graves et des aigus selon le type de
musique que vous écoutez. (Navigation à l'aide du bouton multifonction)
01 Appuyez sur MENU 2 s > EQ Setting
02 À l'aide du bouton multifonction, sélectionnez le type d'égaliseur à appliquer : Flat, News,
Classic, Pop ou Rock
03 Appuyez sur le bouton multifonction pour confirmer
Réinitialisation de la radio
Si vous constatez que votre radio ne fonctionne pas normalement, essayez de la réinitialiser. Cela
peut suffire à résoudre le problème. (Navigation à l'aide du bouton multifonction)
01 Appuyez sur MENU > System Reset
02 Appuyez sur le bouton multifonction. Les réglages qui ont été effectués en usine sont rétablis

12
Mode DAB, DAB+, FM et AUX
Puissance en sortie 2 Watts RMS
Haut-parleur 6,9 cm, large bande de fréquences
Antenne télescopique FM et numérique
Alimentation secteur / pile 5V courant continu / 4 x piles alcalines AA
Entrées DC 5V
Aux
Sortie Écouteurs
Dimensions 95 mm(L) x 92 mm(P) x 160 mm(H)
Poids net 650 g
www.scansonic.dk
Appréciez

IT
Manuale di istruzioni
P3000

2
CONTENUTI
02 CONTENUTI
03 INFORMAZIONI
04 PANORAMICA DEL PANNELLO FRONTALE E POSTERIORE
06 CONNESSIONE DELLA VOSTRA RADIO
06 COLLEGAMENTO DELLA VOSTRA RADIO - DAB
07 SELEZIONE DI UNA STAZIONE - DAB
07 SERVIZI DI INFORMAZIONE - DAB
08 FUNZIONAMENTO DELLA VOSTRA RADIO - FM
08 MODALITA' DISPLAY - FM
09 MODALITÀ AUX
09 IMPOSTAZIONI MANUALI OROLOGIO
10 IMPOSTARE L'ALLARME
10 IMPOSTAZIONI EQ
11 RESET DELLA RADIO
12 SPECIFICHE

3
Informazioni
Congratulazioni per la vostra nuova radio.
Vi preghiamo di prendervi un momento per
leggere questo manuale.
Istruzioni di sicurezza.
Conservate questo manuale per consultazioni
future.
• Posizionare l'unità su di una superficie
solida.
• Non esporre la Scansonic P3000 ad elevata
umidità, luce diretta del sole, sporco, forti
vibrazioni o alte temperature.
• Non aprire la struttura. Solo tecnici
specializzati sono autorizzati a gestire le
parti interne della Scansonic.
• Se si necessita di manutenzioni o riparazioni
dovranno essere eseguite da personale
qualificato.
• Per pulire la struttura utilizzare un piumino
o un panno soffice non ruvido, leggermente
inumidito. Non utilizzare detergenti forti o
corrosivi.
• Assicurarsi che nessun liquido o umidità
penetri nella radio durante la pulizia.
Scollegate la radio prima di ogni pulizia.
Scollegare la radio nei casi seguenti:
• Oggetti esterni o liquidi sono penetrati nella
radio.
• La radio non funziona correttamente.
• La struttura è stata danneggiata.
• La spina principale o il cavo sono difettosi.
• Se la radio non viene utilizzata per un lungo
periodo.
Scarico di Responsabilità
Nonostante i nostri migliori sforzi non possiamo garantire che i dati tecnici indicati siano corretti, completi ed
aggiornati. Noi di Scansonic ci riserviamo il diritto di apportare modifiche tecniche senza preavviso.

4
Pannello anteriore Pannello posteriore

5
01 Display Display LCD con 16 x 2 cifre che mostra tutte le informazioni sulla radio
02 MODE Premere per selezionare radio DAB, FM o ingresso AUX
03 SCAN Premere per fare lo SCAN dei canali radio
04 STANDBY Premere per entrare in modalità STANDBY. Premere più a lungo per
spegnere la radio
05 MANOPOLA Controllo Volume / Pulsante SELECT / Tune+ Tune- / SNOOZE
06 INFO / MENU INFO: Premere per ottenere informazioni dal delle stazioni radio
MENU: Premere 2 secondi Sintonizzazione manuale / EQ / Sveglia /
Sleep / Reset Orologio
07 ALARM Premere per mostrare Alarm 1 / Alarm 2
08 PRESET Premere per impostare stazioni radio 1-10
09 ALTOPARLANTE Altoparlante completo da 3"
10 ANTENNA La radio viene fornita con un'antenna telescopica. Per aumentare la
ricezione FM regolare l'antenna per una ricezione ottimale
11 BATTERIA Questa radio può essere utilizzata anche a batterie (4 x dimensione AA)
12 CUFFIA Collegare cuffie stereo a questo ingresso per ascoltare la radio.
Collegando le cuffie si disattiveranno le casse principali
13 AUX IN Collegare una sorgente audio mono o stereo (iPod, iPhone, iPad,
MP3 Player, TV ecc). Utilizzare il jack da 3,5mm fornito per collegare i
dispositivi
14 DC5V IN Utilizzare questo ingresso per l'alimentatore fornito

6
Collegamento della vostra radio
01 La vostra radio viene fornita con un Alimentatore
02 Posizionare la radio su di una superficie piatta
03 Inserire l'alimentatore nella presa DC sul retro della vostra radio
04 Inserire l'adattatore nella presa da muro a 230 volt
Collegare la radio - DAB
01 Estendere con attenzione l'antenna telescopica
02 Premere il pulsante STANBY per accendere la radio, il display mostrerà "SCANSONIC" e la
radio andrà automaticamente in modalità DAB
03 Per la prima volta che la radio viene utilizzata, verrà eseguita una SCANSIONE VELOCE, se
la radio è stata spenta e riaccesa dalla modalità STANDBY, verrà selezionata l'ultima stazione
utilizzata
04 Per una SCANSIONE completa premere il pulsante "SCAN" per 2 secondi
05 Quando la scansione è completa il display indicherà il numero di stazioni trovate
06 Potete PREIMPOSTARE le vostre stazioni preferite premendo il pulsante PRESET e scorrendo
alla posizione in cui volete salvare e premere il pulsante SELECT per 2 secondi
07 Se non vengono trovate stazioni dopo la scansione, il display mostrerà "NO STATIONS
AVAILABLE" ed è necessario riposizionare la radio in un luogo con miglior ricezione

7
Selezionare una stazione - DAB
01 Il display mostra il nome della stazione selezionata
02 Premere la MANOPOLA per selezionare il pulsante TUNE – o TUNE + per scorrere l’elenco
delle stazioni e trovare la stazione
03 Premere la MANOPOLA giù per selezionare la stazione desiderata
Servizi informazioni - DAB
La vostra radio mostrerà le informazioni che possono essere selezionate premendo il pulsante
INFO
01 Data mostra la date ed ora attuali
02 Insieme mostra il nome dell'emittente della stazione DAB
03 Genere mostra il tipo di stazione selezionata: Pop, Rock, News, Jazz Ecc.
04 Velocità dei dati mostra la velocità digitale e mono / stereo della stazione selezionata
05 Frequenza
Stazione
mostra la frequenza della stazione selezionata
06 Testo Radio (DLS) mostra i messaggi di testo dalla stazione

8
Uso della radio - FM
01 Estendere con attenzione l'antenna telescopica
02 Premere STANDBY per accendere la radio (Usare MODE per selezionare FM)
03 Premere il pulsante SCAN per fare la scansione automatica verso l’altro
04 Premere il pulsante SCAN per 2 secondi per fare la scansione automatica verso il basso
05 Potete PREIMPOSTARE le vostre stazioni preferite premendo il pulsante PRESET e
scorrendo alla posizione in cui volete salvare e premere il pulsante SELECT per 2 secondi
Modalità display - FM
La vostra radio mostrerà le informazioni qui sotto premendo il pulsante INFO
01 Data mostra la date ed ora attuali
02 Nome stazione mostra il nome della stazione o la frequenza della stazione
03 Audio mostra Mono o Stereo
04 Programma mostra il nome del Programma
Se non disponibile verrà mostrato "Prog Type N/A"
05 Testo Radio mostra i messaggi di testo dalla stazione

9
Modalità AUX
COLLEGARE IL VOSTRO IPOD, IPHONE, IPAD ED ALTRE SORGENTI AUDIO
La radio possiede un ingresso addizionale. Questo ingresso può essere usato per collegare una
sorgente esterna come iPod, iPhone, iPad, riproduttori MP3 ed altre sorgenti audio utilizzando il
cavo jack da 3,5mm fornito.
Per collegare vi preghiamo di collegare il cavo jack da 3,5mm alla vostra radio ed all'altro
dispositivo.
Premere il pulsante MODE per selezionare la modalità AUX.
Impostazioni manuali orologio
L'orologio della radio può essere impostato manualmente come sotto indicato. (navigare usando
la manopola)
01 Premere MENU per 2 Sec > Clock Setting > Auto Update oppure Manual Update
02 Con la rotella selezionare le impostazioni di Data: DD : MM : YYYY
03 Con la rotella selezionare le impostazioni di Ora: HH : MM

10
Impostare l'allarme
La sveglia vi permette di svegliarvi sulla stazione radio preferita o con un buzz.
01 Premere il pulsante ALARM per 2 Sec
02 Con la rotella selezionare il numero di Allarme: 1 o 2
03 Con la rotella selezionare la modalità di Allarme: Off / Beep / DAB / FM
04 Con la manopola selezionare l’opzione di allarme: Once / Daily / Weekday / Weekend
05 Con la rotella selezionare l'ora di Allarme: 00 : 00
06 Con la manopola regolare il livello di allarme 1-20
07 Quando l’allarme è attivo, per disattivarlo premere MODE o STANDBY
08 Quando l’allarme è attivo premere la manopola per entrare in modalità SNOOZE
Premere una volta il pulsante Alarm per disattivare SNOOZE
Impostazione EQ
La radio ha una funzione EQ che permette alla radio di suonare con differenti impostazioni di
equalizzazione. (Navigare usando la manopola)
01 Premere MENU per 2 Sec > EQ Setting.
02 Con la rotella selezionare: Flat, News, Classic, Pop o Rock.
03 Premere SELECT per terminare.

11
Impostazione EQ
La radio ha una funzione EQ che permette alla radio di suonare con differenti impostazioni di
equalizzazione. (Navigare usando la manopola)
01 Premere MENU per 2 Sec > EQ Setting
02 Con la rotella selezionare: Flat, News, Classic, Pop o Rock
03 Premere SELECT per terminare
Reset della radio
Se avete problemi con la radio potete resettarla sulle impostazioni predefinite di fabbrica come
segue. (Navigare usando la manopola)
01 Premere MENU > System Reset
02 Premere Select e il sistema si reimposterà ai valori predefiniti di fabbrica

12
Banda (Modo) DAB, DAB+ & FM e (AUX)
Uscita alimentazione+ 2 Watt RMS
Altoparlante 2,75" Completo
Antenna FM e DAB telescopica
Alimentazione / Batteria DC 5V / 4 x Batterie di misura AA Alkaline
Ingresso DC 5V
Ingresso Aux
Output Cuffie
Dimensioni 95mm(L) x 92mm(P) x 160mm(A)
Peso (Netto) 650 g
www.scansonic.dk
divertitevi
 Loading...