

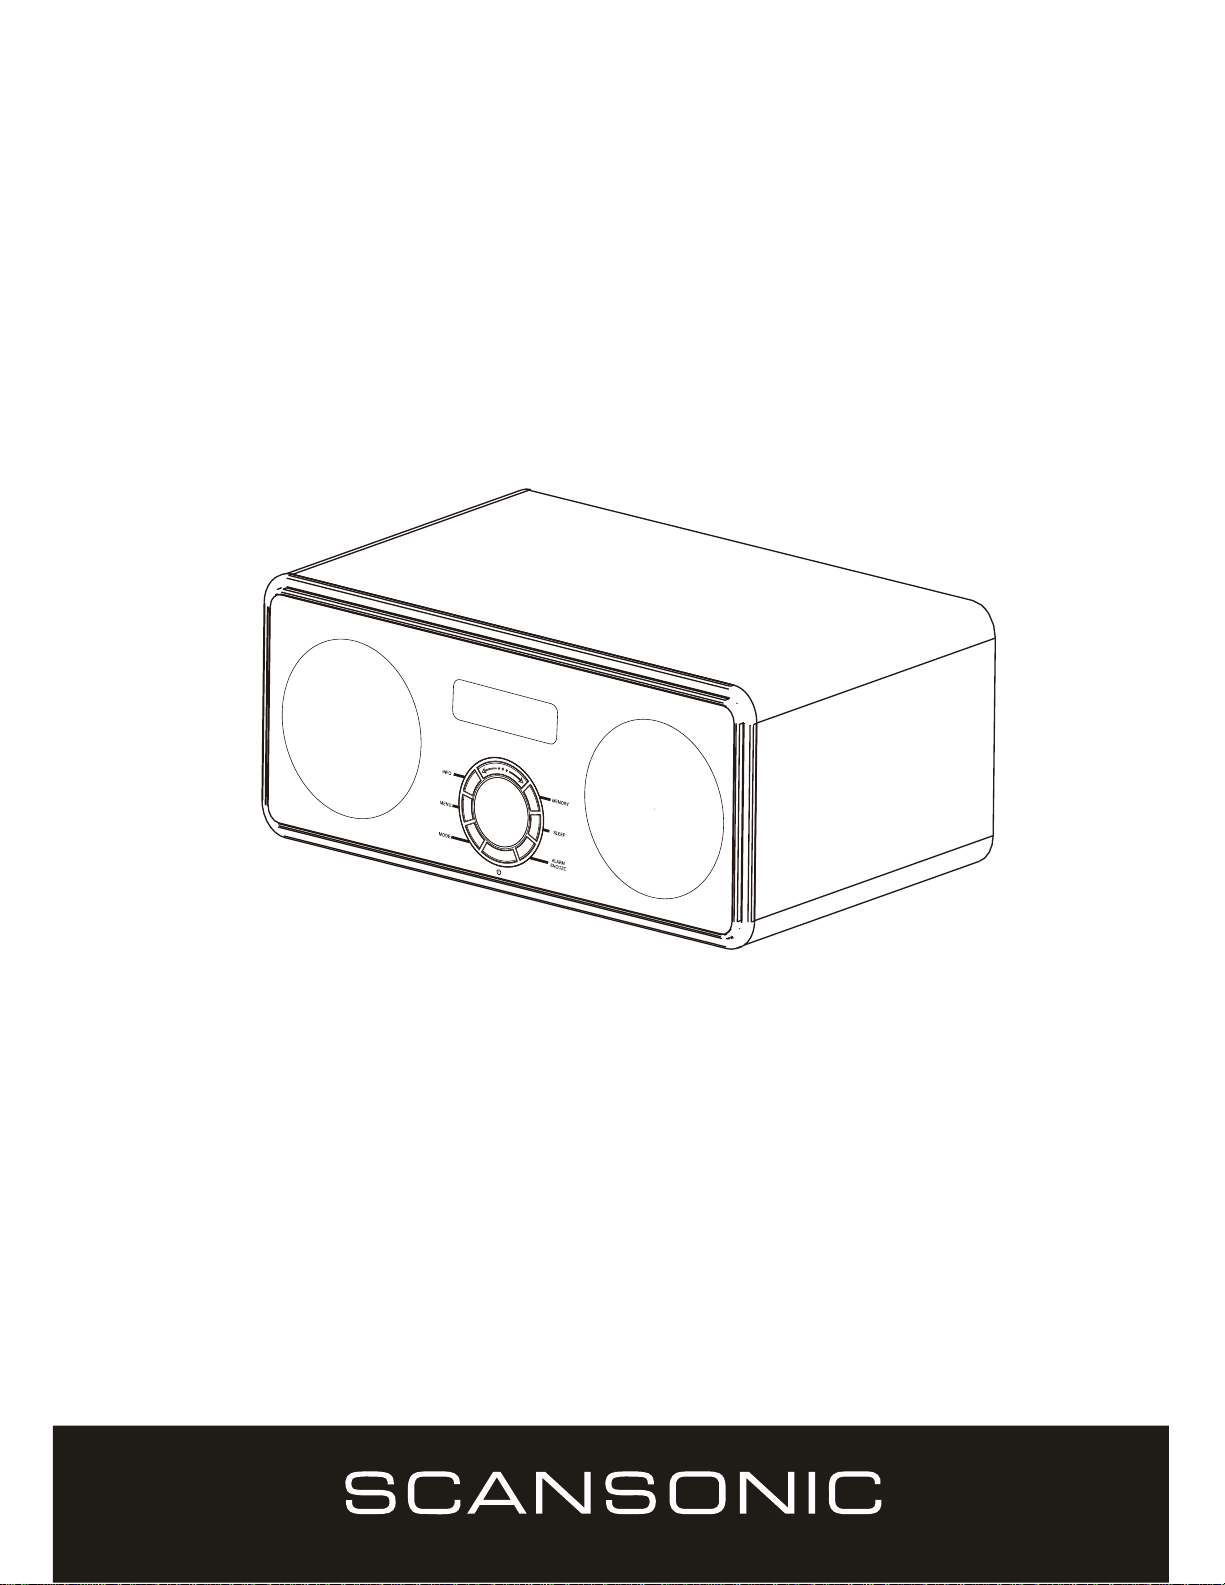
DA300
DAB+DAB/FM Digital Radio & Dual Alarm Clock w/ Bluetooth
UK User Manual
DK Brugervejledning
DE Bedienungsanleitung
FR Guide destructions
IT Manuale di istruzioni
UK-1
SAFETY PRECAUTIONS
- Read all the Instructions carefully before using the unit and keep them for future reference.
- Check that the voltage marked on the rating label matches your mains voltage.
Location of Unit
- The unit must be placed on a flat stable surface and should not be subjected to vibrations.
- Do not place the unit on sloped or unstable surfaces as the unit may fall off or tip over.
- The mains socket must be located near the unit and should be easily accessible.
- Avoid extreme degrees of temperature, either hot or cold. Place the unit well away from heat sources such as
radiators or gas/electric fires. Avoid exposure to direct sunlight and other sources of heat.
- Never place any type of candle or naked flame on the top of or near the unit.
- To reduce the risk of fire, electric shock or product damage, do not expose this unit to rain, moisture, dripping
or splashing. No objects filled with liquids, such as vases, should be placed on the unit.
- If you spill any liquid into the unit, it can cause serious damage. Switch it off at the mains immediately.
Withdraw the mains plug and consult your dealer.
- To prevent the risk of electric shock or fire hazard due to overheating, ensure that curtains and other materials
do not obstruct the ventilation vents.
- Do not install or place this unit in a bookcase, built-in cabinet or in another confined space, ensure that a
minimum of 10cm should be kept around the apparatus for ventilation.
Safety
- Always disconnect the unit from the mains supply before connecting/disconnecting other devices or moving
the unit.
- Unplug the unit from the mains socket during a lightning storm.
- This unit will become warm when used for a long period of time. This is normal and does not indicate i problem
with the unit.
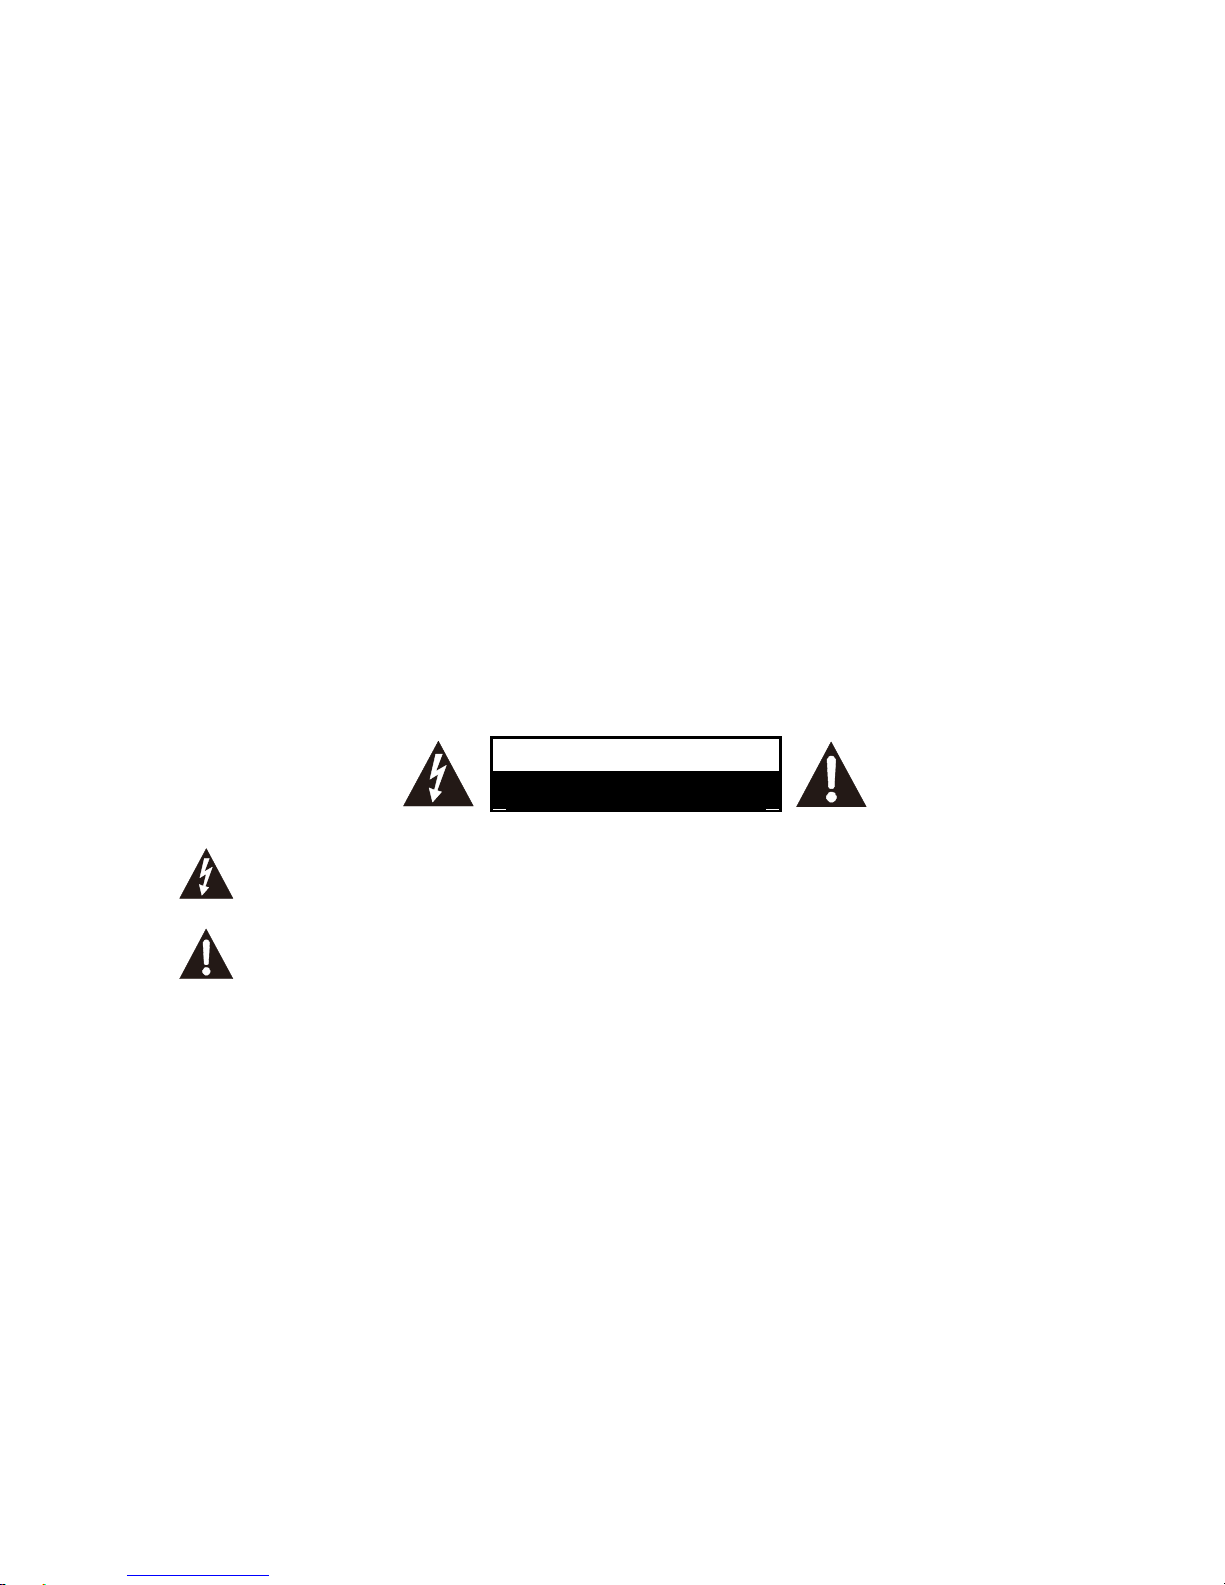
CAUTION
RISK OF ELECTRIC SHOCK
DO NOT OPEN
DANGEROUS VOLTAGE
Conductor dangerous voltage, that may be of sufficient magnitude to constitute a risk of electric
shock to persons is present within this product's enclosure.
ATTENTION
The owner's manual contains important operating and maintenance instructions, for your safety, it is
necessary to refer to the manual.
Mains Cable
- Make sure the unit is not resting on top of the mains cable, as the weight of the unit may damage the mains
cable and create a safety hazard.
- If the mains cable is damaged it must be replaced by the manufacturer, its service agent, or similarly qualified
persons in order to avoid a hazard.
Interference
- The normal function of the product may be disturbed by Strong Electro Magnetic Interference. If so, simply
reset the product to resume normal operation by following the instruction manual. In case the function could
not resume, please use the product in other location.
- This unit includes micro-processors which may malfunction as a result of external electrical interference/noise or
electrostatic discharge. If the unit is not working properly, disconnect the power source and then reconnect it.
Supervision
- Children should be supervised to ensure that they do not play with the unit.
- Never let anyone especially children push anything into the holes, slots or any other openings in the case - this
could result in a fatal electric shock.
UK-2
Service/Maintenance
- To reduce the risk of electric shock, do not remove screws. The unit does not contain any user-serviceable
parts. Please leave all maintenance work to qualified personnel.
- Do not open any fixed covers as this may expose dangerous voltages.
- Ensure to unplug the unit from the mains socket before cleaning.
- Do not use any type of abrasive pad or abrasive cleaning solutions as these may damage the unit's surface.
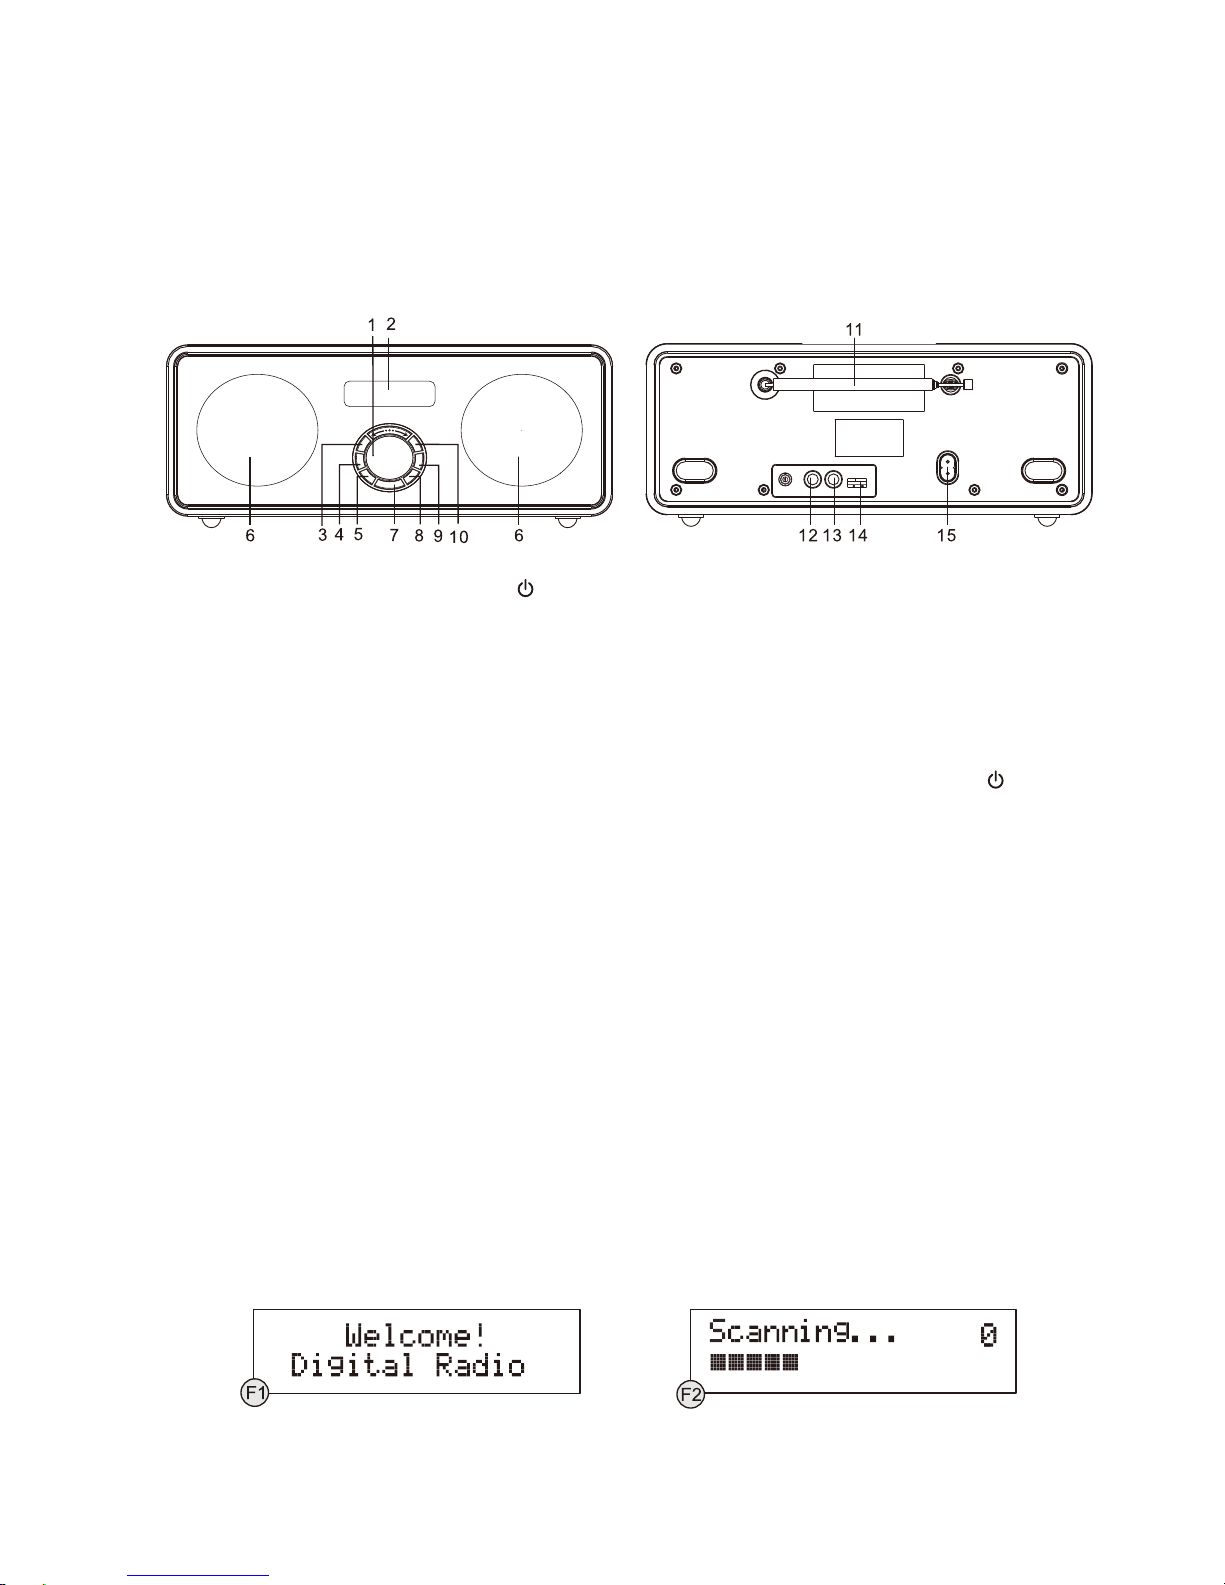
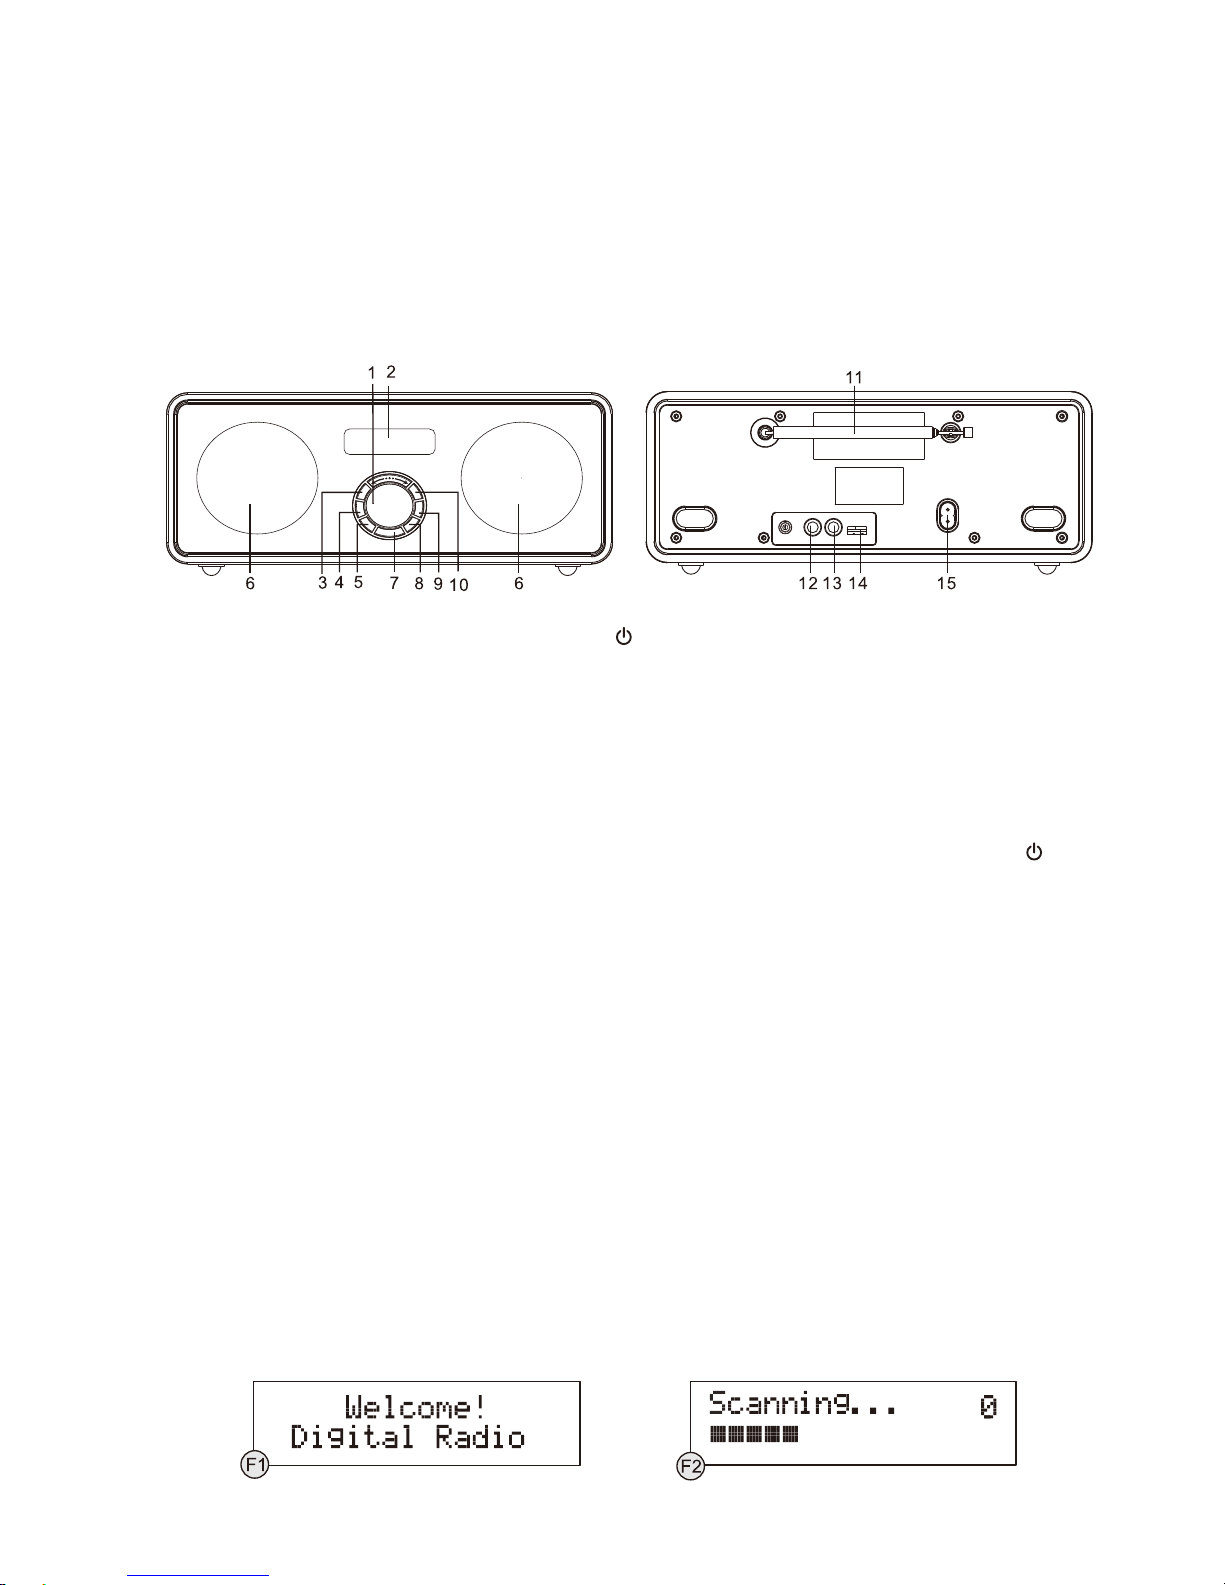
FEA TURES A ND CONTROLS
1. VOLUME/SCROLL & OK/►/II
CONTROL
2. LCD DISPLAY
3. INFO/ BUTTON
4. MENU/ BUTTON
5. MODE BUTTON
6. SPEAKER
7.
BUTTON
8. ALARM/SNOOZE BUTTON
9. SLEEP BUTTON
10. MEMORY BUTTON
11. RODANTENNA
12. HEADPHONE JACK
13. AUXIN SOCKET
14. USB PORT
15. AC CORD SOCKET
SWITCHING YOUR RADIO ON FOR THE FIRST TIME
When the radio is connected to the AC power for the first time, it will be in standby mode. The display backlight
will be on for a few seconds, the display will first show the greetings and finally the clock. Press the
button
once to turn the radio on, it will then automatically enter into the DAB mode and perform auto scan function.
Clock setting
The clock will only set and be updated if you can receive DAB signals in your location. In order for the clock to
synchronise to the current local time you must leave it one DAB station for a short period. Manual clock setting is
not required.
LISTENING TO YOUR RADIO
Hints for better reception
This radio carries a single DAB/FM telescopic antenna, to obtain the best performance, you should fully extend
the antenna and adjust its position as well as the direction until you find the best reception. For ideal DAB
reception, always maintain the antenna in an upright vertical position is highly recommended.
DAB mode
If the radio is powered up and switched on for the first time, it will automatically enter into the DAB mode and
perform auto scan function. During the scan the display will show "Scanning ..." together with a slide bar that
indicates the progress of the scan and the amount of stations that have been found so far. (F1) (F2).
Once the scan has finished, the radio will select the first alphanumerically found station. To explore the found
stations, first press the SCROLL control once, then rotate the same control, and when you find a station that you
would like to listen to, press on the SCROLL control.
Note: If there is no stations found after auto scan, the radio will then enter into the Tune Select Menu, you can
now rotate the SCROLL control followed by pressing on the same control to select "Manual tune" or "Autoscan"
for stations.
UK-3
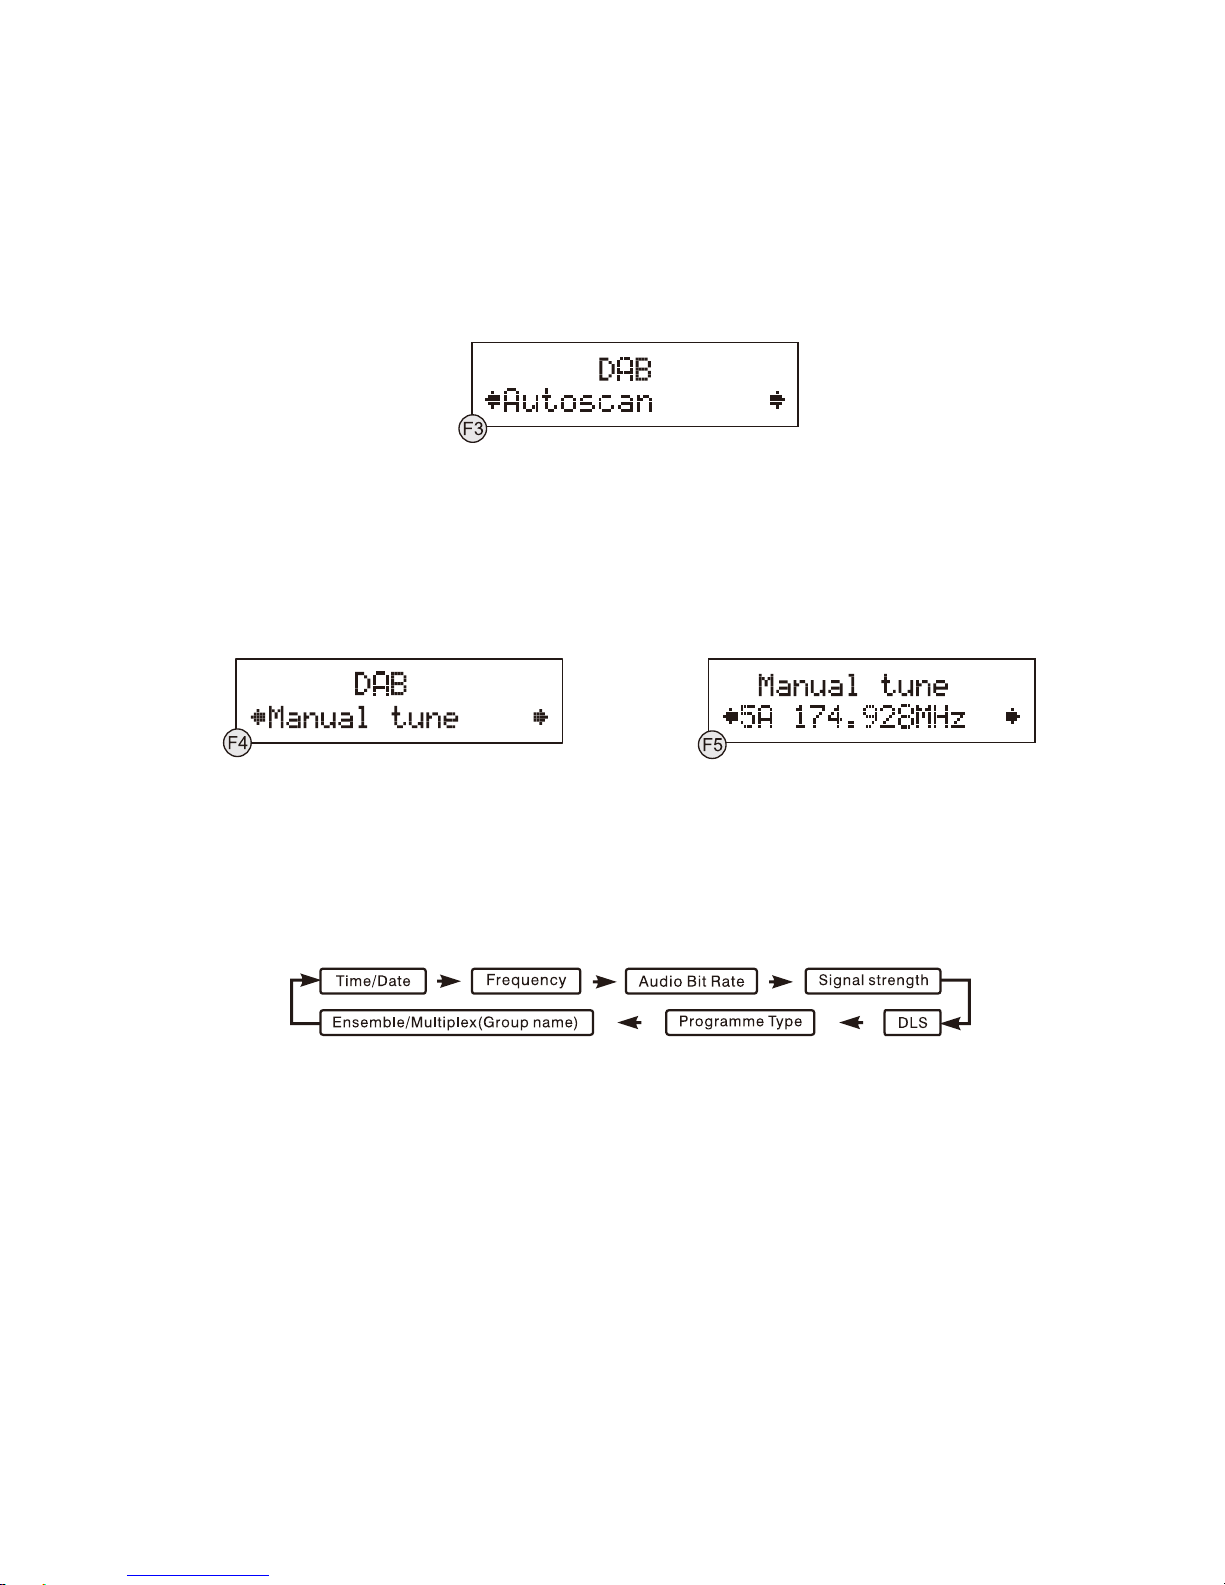
DAB auto scan
The auto scan will search for the entire DAB Band III channels. After the scan has finished, the first
alphanumerically found station will be automatically selected.
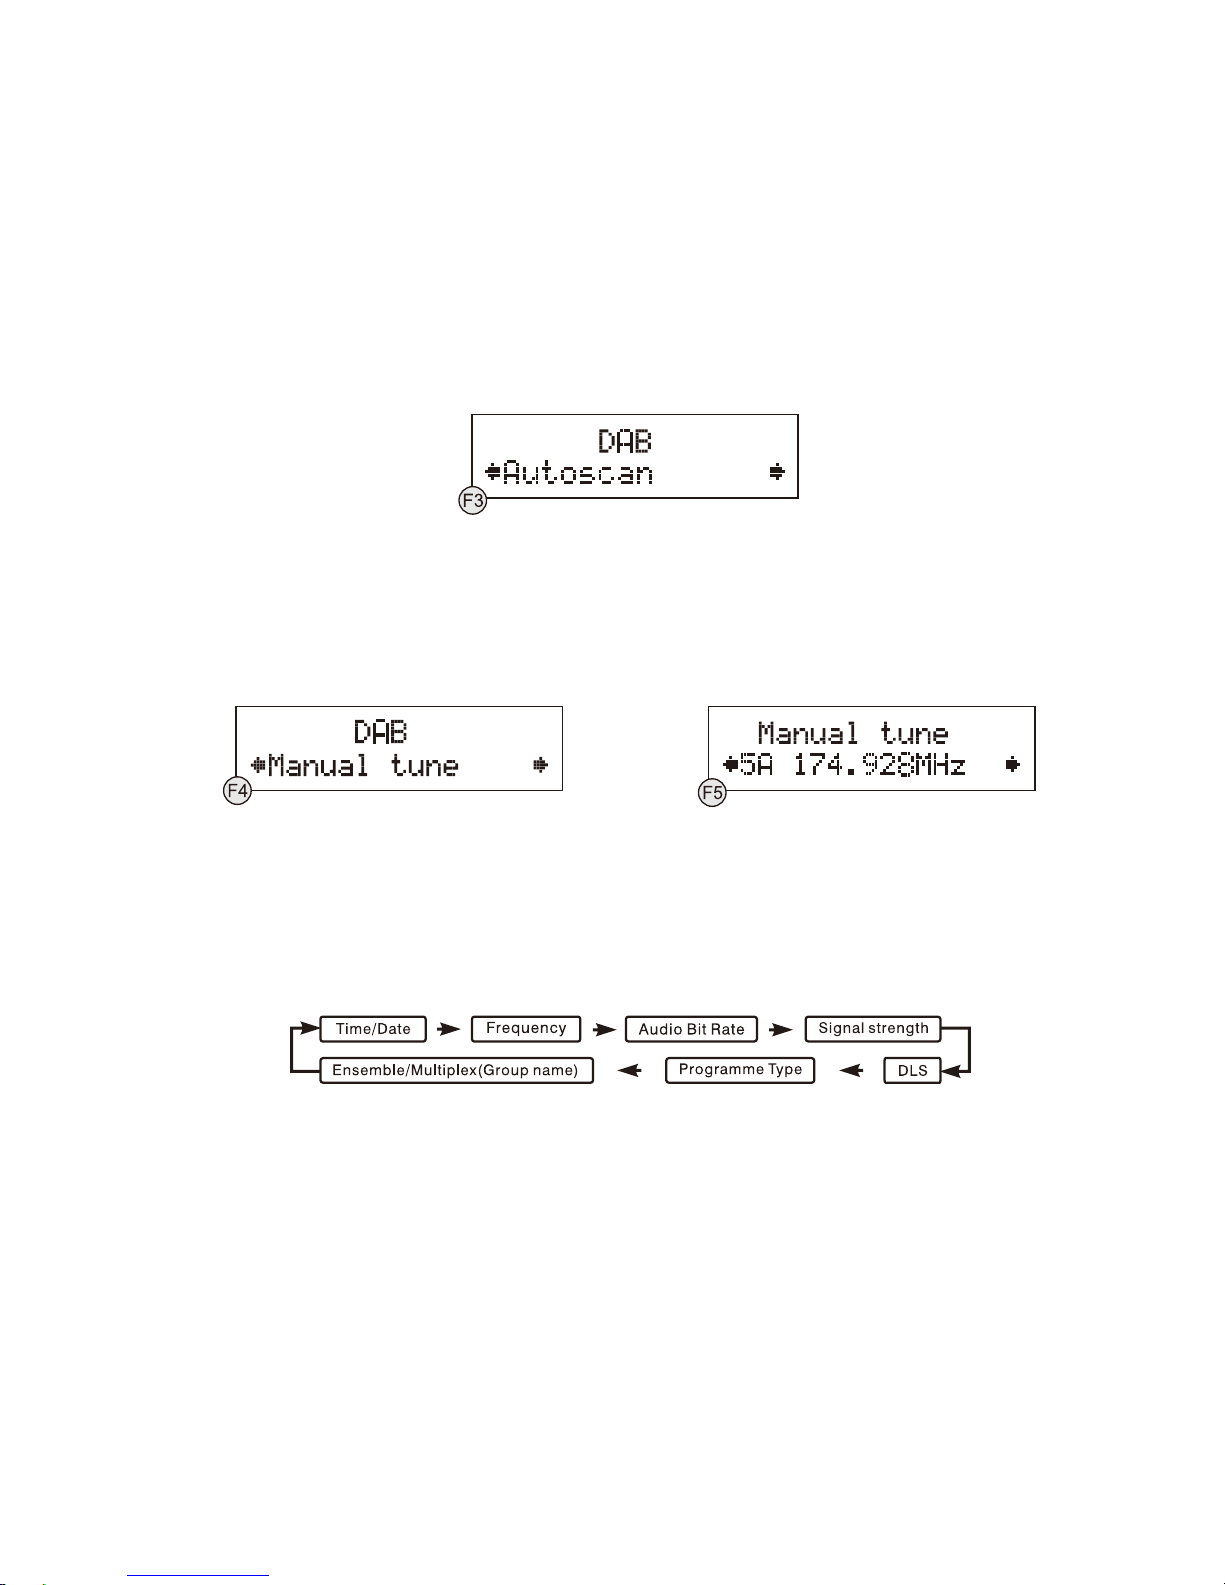
1. To activate auto scan, first press the MENU button to enter into the Tune Select Menu, then rotate the
SCROLL control to select "Autoscan", finally press on the same control to confirm, the display will show
"Scanning ..." and a progressing slide bar. (F3)
2. All the stations that have been found will be stored automatically, to explore and select listening to the found
stations, rotate the SCROLL control followed by pressing on the same control.
DAB manual tune
1. To select manual tune, first press the MENU button to enter into the Tune Select Menu, then press on the
SCROLL control to select "Manual tune". (F4) (F5)
2. Rotate the SCROLL control to move through the DAB channels, the display will show "5A to 13F" and their
associated frequencies.
3. When your desired frequency appears in the display, press on the SCROLL control to confirm. The name of
the station group (ensemble/multiplex) will be displayed.
4. To listen to the station selected, press on the SCROLL control again.
DAB secondary services
On some occasions you will see a ">" symbol directly after the name of the station, this indicates that there are
secondary services available to that station. These secondary services contain extra services that relate to the
primary station. E.g. a sports station may want to add extra commentaries. The secondary services are inserted
directly after the primary station. To select the secondary station, press on the SCROLL control.
DAB display modes
Every time you press the INFO button, the display will cycle through the following display modes:
Time and date
The time and date will be automatically updated by the broadcasted information; it is no need to set the clock
manually. In the unlikely event that no clock information is received, the display will show "<TIME/DATE>".
Frequency
The frequency of the present station will be displayed.
Audio bit rate
The display will show the digital audio bit rate being received.
Signal strength
The display will show a slide bar to indicate the signal strength, the stronger the signal, the longer the bar will be
from left to right.
DLS
DLS stands for Dynamic Label Segment which is a scrolling message that the broadcaster may include in their
transmissions. The message usually includes information such as programme details ...etc.
UK-4
Programme type
This describes the style of the programme that is being broadcast. If the information is not available, the display
will show “<Programme Type>”.
Ensemble/Multiplex (Group name)
The Ensemble/Multiplex is a collection of radio stations that are bundled and transmitted together in a single
frequency. There are national and local multiplexes, local ones contain stations that are specific to that area.
Note: Press and hold the INFO button for longer than 2 seconds, the software version number will be displayed.
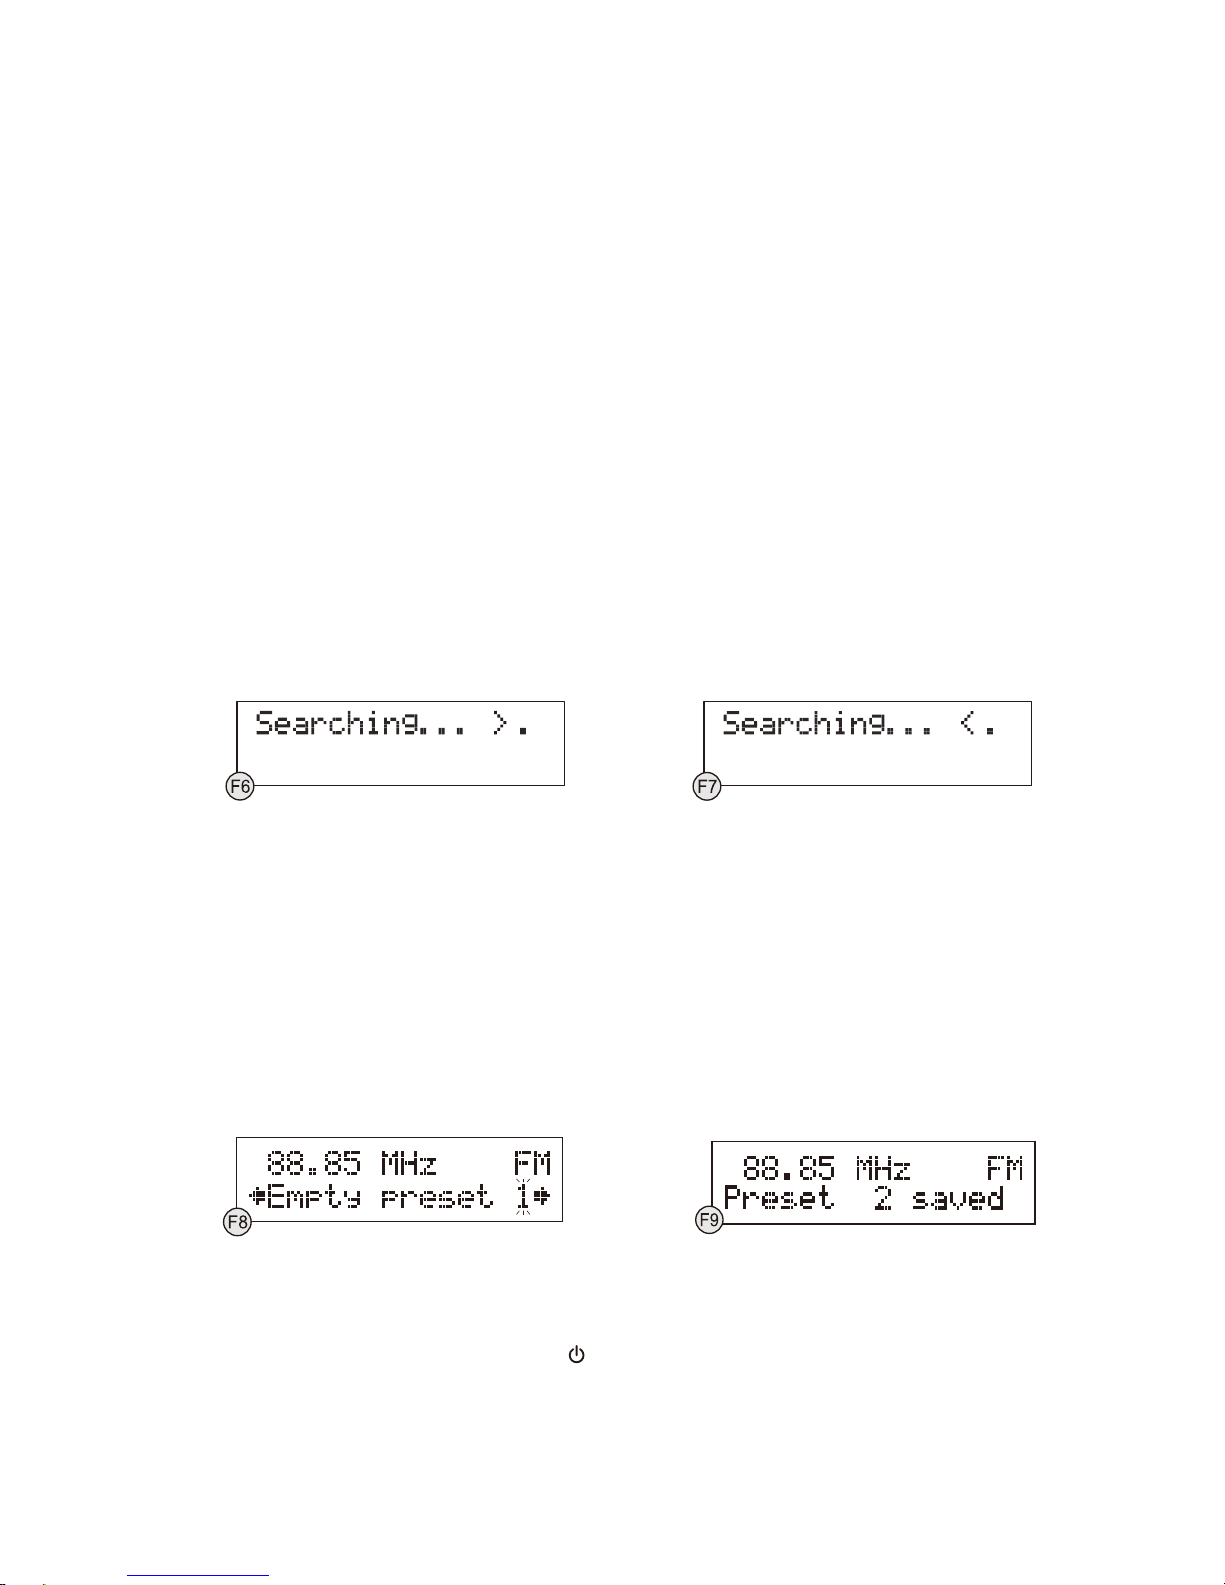
FM radio
1. To select FM, repeatedly press the MODE button until the display shows "Switch to FM"; the FM frequency will
be finally displayed.
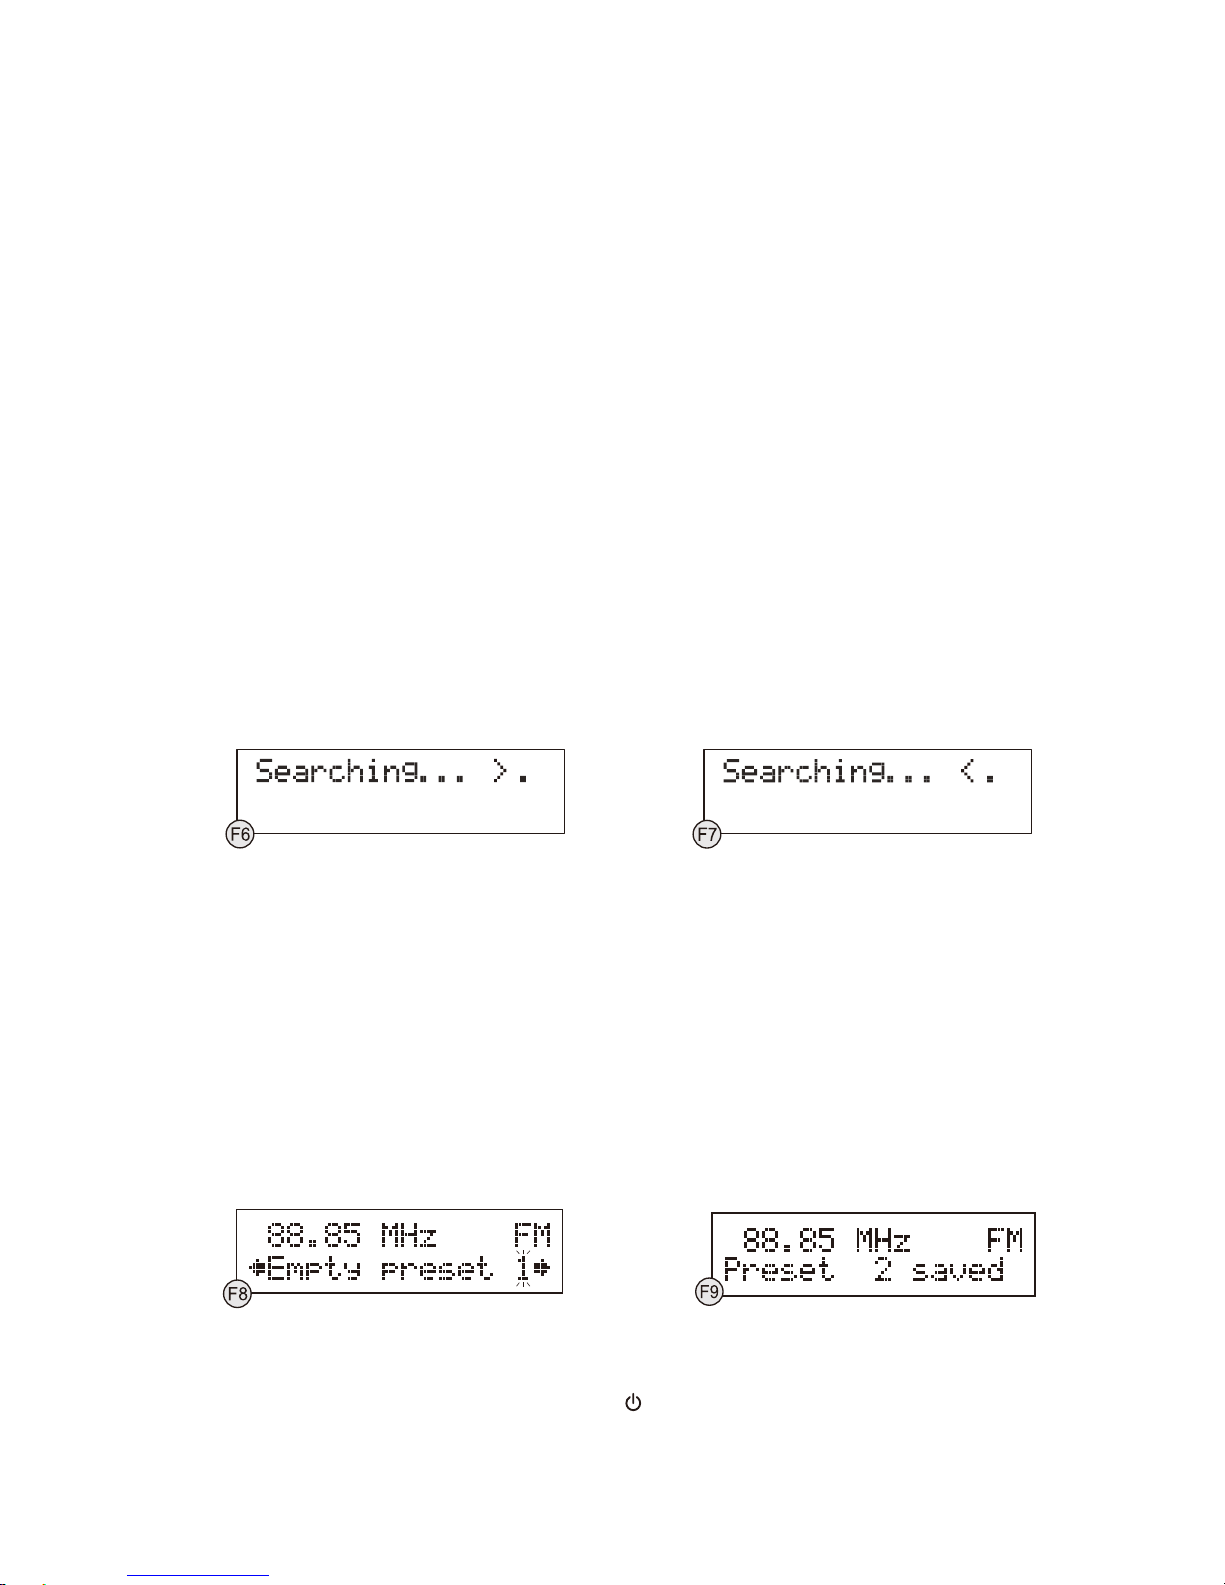
2. To activate auto search, press and hold the SCROLL control until it starts to scan up or down the frequency
band, the display will show "Searching ... > ." or "Searching ... < .", and it will stop automatically once a station
has been found. (F6) (F7)
3. To activate manual tuning, first press on the SCROLL control once and when the display shows < Tuning >,
rotate the SCROLL control to your desired frequency.
4. To select the FM stereo/mono reception, first press on the MENU button once, and when the display shows
"FM Audio setting", press the SCROLL control to enter into the menu, then rotate the SCROLL control
followed by pressing on it to confirm between the "Auto" or "Mono" selection.
Note: The radio will automatically switch between stereo and mono mode, but you can override this and switch
this function manually which is helpful for poor signal reception.
STORING AND RECALLING STORED STATIONS
In either DAB or FM mode, you can store up to 10 stations to the favourite presets; this will enable you to get
direct access to your favourite stations.
1. To store a preset, first tune to your desired station, then press and hold the MEMORY button, the display will
show "Empty preset 1", and the preset number will flash. (F8)
2. Rotate the SCROLL control to select your desired station preset number followed by pressing on the same
control to confirm your selection, the display will show "Preset # saved". (F9)
3. To recall a preset station, first press the MEMORY button once, then rotate the SCROLL control to scroll up or
down the presets that you have stored. When the display shows your desired preset number, stop the rotation
and press on the SCROLL control to confirm. If the preset hasn't been allocated a station, the display will show
"Empty preset #".
FACTORY RESET
When you move the radio to another part of the country, your pre-tuned and stored DAB stations may no longer
be available. If this is the case then you will need to reset your radio back to its original factory settings; to perform
a factory reset, please do the following:
1. Plug the radio to the AC mains and press the
button to turn the radio on.
2. Press and hold the MENU button until the display shows "Press SELECT to confirm reset".
3. Release the MENU button and press on the SCROLL control once, the display will first show "Restarting ..."
and after the reset is completed, the radio will go to standby.
UK-5
4. Press the
button to turn the radio on again, it will then automatically enter into the DAB mode and perform
auto scan function. After the scan has finished, the radio will select and display the first alphanumerically found
station.
ALARM FUNCTION
This unit incorporates an identical Dual Alarm function. You can have two individual alarm wake-up time and
wake-up mode settings to wake you to an electronic buzzer tone or your favourite radio station (DAB/FM).
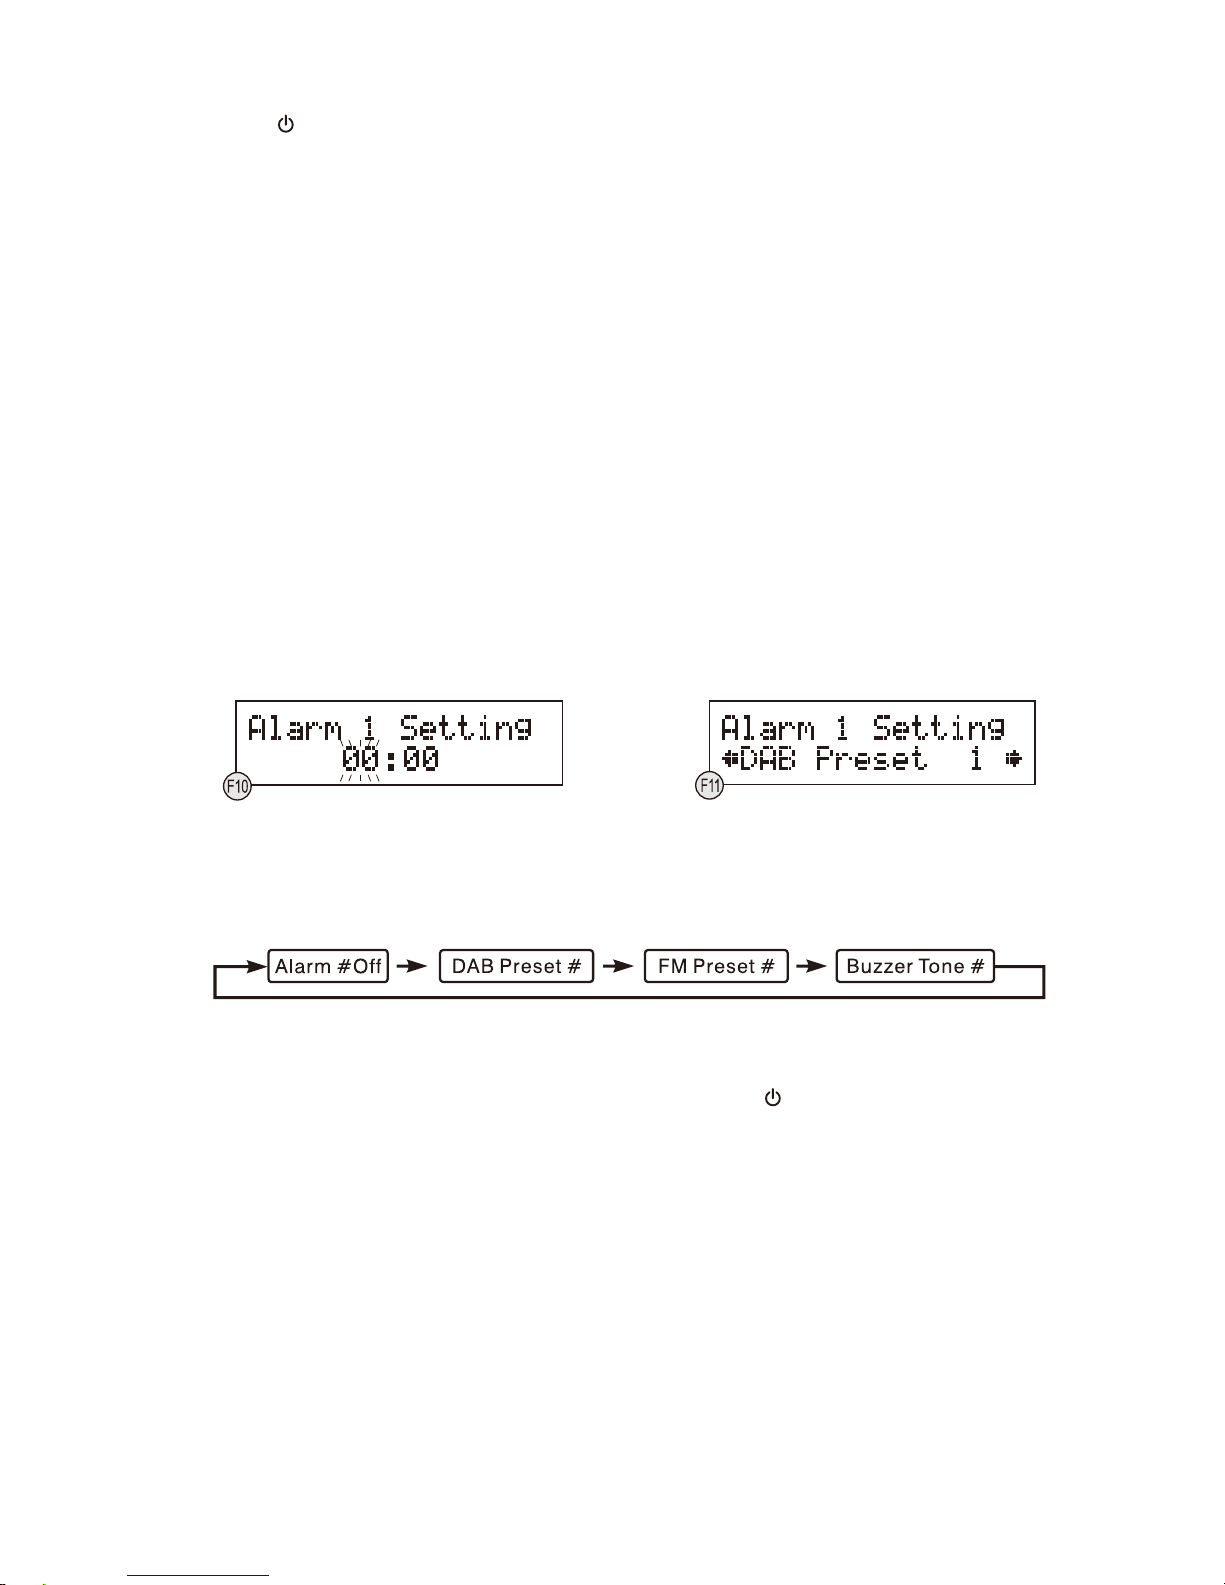
Setting the alarm time and wake-up mode
1. Press the ALARM button once to enter into the Alarm Menu, then rotate the SCROLL control followed by
pressing on the same control to select Alarm (1 or 2).
2. Again rotate the SCROLL control followed by pressing on the same control to select "Alarm Setting'. The
display will show "Alarm # Setting" and the hour digit of the alarm time will flash. (F10)
3. Rotate the SCROLL control followed by pressing on the same control to adjust and confirm your desired alarm
time - first set the hour and then the minute.
4. After the confirmation of the minute setting, the alarm time is set and you will enter into the wake-up mode
settings.
5. Rotate the SCROLL control followed by pressing on the same control to adjust and confirm the wake-up mode
settings - first set the DAB and FM Preset (1-10), then the Buzzer Tone (1 or 2), finally the alarm Volume level.
(F11)
6. After the selection of the alarm volume level, the wake-up mode settings are completed and the alarm function
is now ready for you to activate.
7. Repeat the above procedures to set the other Alarm (1 or 2).
Activating the alarm function
1. To activate the alarm function, press the ALARM button to enter into the Alarm Menu and select Alarm (1 or 2).
2. Rotate the SCROLL control followed by pressing on the same control to select "Alarm Source".
3. Again rotate the SCROLL control and the associated alarm wake-up mode will be displayed and changed in
the below sequence:
4. When the display shows your desired alarm wake-up mode, press the SCROLL control, the alarm function is
now activated and the associated alarm icon will be displayed.
5. When the alarm time arrives, the selected wake-up mode will be on and the alarm icon in the display will flash
to indicate the alarm is triggered. To stop the alarm sooner, press the
button.
Note 1: If you have activated the alarm function and the wake-up mode is DAB or FM, make sure that the alarm
volume level is set at a sufficient level for you to hear.
Note 2: The alarm comes first will have the priority and it would continue for a duration of one hour, the snooze
will just switch off this alarm temporary during this duration, so if the second alarm comes In this period, it will not
function. But if the first alarm is switched off before the second alarm arrives, then the second alarm will be
activated.
Automatic Alarm Repeat
The alarm will automatically repeat each day at the selected time as long as the alarm icon is displayed. To cancel
this function, go to the Alarm Menu and select "Alarm # off" in the associated "Alarm Source" menu.
Snooze function
When the alarm has triggered, press the SNOOZE button will temporary switch off the alarm for 5 minutes, the
display will show "Zz" to indicate snooze on. This is repeatable in the one hour alarm duration.

UK-6
BLUETOOTH MODE
Bluetooth connectivity performance may vary with brand and model of the connected device. For best
performance, please connect newer Bluetooth devices incorporating Bluetooth 2.1 and using the latest firmware
update available from the device vendor. Compatibility with all devices and media types is not guaranteed.
Bluetooth performance considerations
Ensure all Bluetooth devices within 30 feet have Bluetooth transmission disabled. The presence of other
functioning Bluetooth devices during connection may lead to operational difficulties.
Bluetooth is a short-range radio communication standard. The Bluetooth transmitter and receiver hardware in this
unit has an approximate operational range of 30 feet in open space. Generally Bluetooth devices can
communicate with each other clearly within a regular sized room or office. Operation between different rooms will
depend on the construction of the room. It is important to recognize the fact that Bluetooth communication range
may be substantially reduced if the signal passes through a solid object. Human bodies, brick and concrete walls,
and heavy furniture or bookcases will reduce the operational range of your Bluetooth devices. Glass, dry-wall or
wood paneled walls and office partitions may have a less severe but noticeable effect. You should position your
Bluetooth devices closer to each other if you observe communication difficulties.
Supported Bluetooth profiles
The Bluetooth capabilities of this radio enable it to receive audio from many Bluetooth- capable devices Including
mobile phones, personal computers and PDAs. It supports the following Bluetooth profiles and functionality. Only
one device per profile can be connected concurrently.
Advanced Audio Distribution Profile (A2DP)
- High-quality stereo audio connection
- Streaming of stereo music from PC, mobile phones...etc
Audio Video Remote Control Profile (AVRCP)
- Device remote control
- Control connected device
Stereo music connection to your mobile phones
This connection requires a mobile phone supporting the Bluetooth A2DP profile for stereo music connection. In
order to create new Bluetooth connection you will need some familiarity with the Bluetooth functions of your
mobile phone. As each phone operates slightly differently, please familiarize yourself with the Bluetooth
capabilities of your device before connecting.
1. Ensure that the Bluetooth on your mobile phone is powered on. You might need to refer to the phone user
manual for details.
2. Place the radio and the phone where they are no more than 3 feet apart.
3. Repeatedly press the MODE button to select Bluetooth mode, the display will show "Bluetooth" together with
the "flashing icon".
4. Set the A2DP-capable phone to search for Bluetooth devices and follow the instructions on the phone's screen.
You will recognize the radio by its Bluetooth name "BT Speaker". In case that you are prompted for a passkey,
enter "0000".
5. Select and confirm the pairing on your phone, the connection will be completed in a few seconds and the radio
will produce a double beep confirmation tone, the "flashing icon" on the display will change to
and you can
now start your Bluetooth music streaming operation.
6. Press the SCROLL control on the radio or select starting playback on your phone to start the music playback.
7. To interrupt playback, press the SCROLL control again or select "pause" on your phone.
8. To skip forward or back to other songs during playback, press the or buttons on the radio or select the
"skip controls" on your phone.
Note: Some mobile phones may connect and disconne ct as you make and end call s. This is not a n indication of a
problem with your unit.
Stereo music connection to other Bluetooth devices
This connection requires a device supporting the Bluetooth A2DP profile for stereo music connection. Please
ensure your device has the latest versions of software drivers and/or firmware supporting Bluetooth functionality.
Compatibility with all devices is not guaranteed. In addition to the procedures described above for mobile phones,
UK-7
this radio can receive stereo music from many other Bluetooth source devices including personal computers,
PDAs, Bluetooth enabled music players. The exact connection procedures may vary from device to device,
please refer to the device user manual for specific operations.
Note: An increasing number of computing devices include support for Bluetooth, and many include support for
stereo music over Bluetooth (A2DP). For best performance from your particular device, please ensure that you
are using the latest update of software drivers and/or firmware available. In certain circumstances, updating the
software drivers or firmware of your device to the latest release may add support for A2DP that was not available
in a previous release. Please contact the vendor of your device for such updates and refer to the device user
manual for update procedures. Please remember that system updates should only be performed by qualified
individuals after performing a full system backup.
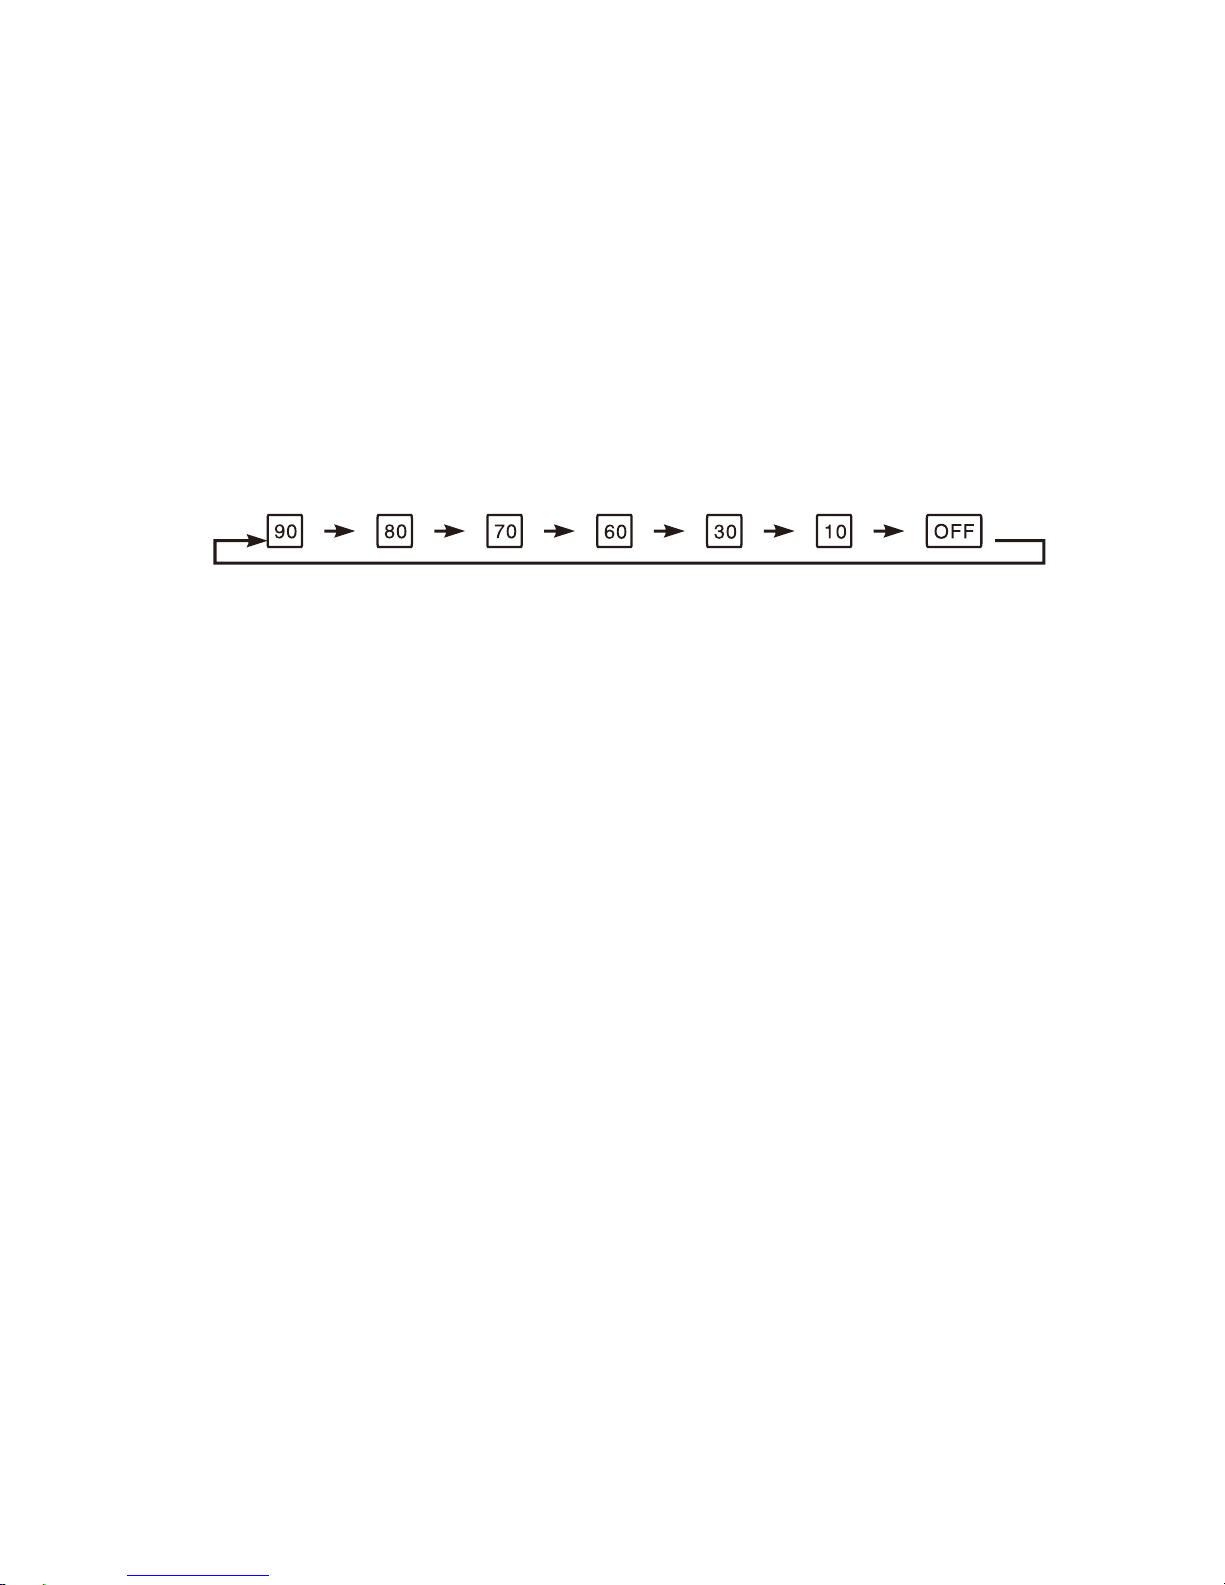
SLEEP FUNCTION
This function allows you to program the radio to switch off itself after a set period of time.
1. To activate the sleep function, repeatedly press the SLEEP button, the display will show "Sleep Timer" and the
time will change in the below sequence on every press:
2. When your desired sleep time appears in the display, release the button and the sleep function will be
activated in two seconds. The display will show "s#" where "s1" is to represent "10 minutes" sleep time and so
on.
3. When the sleep time counts to zero, the unit will go off. To put the sleep function off during sleep timer on,
repeatedly press the SLEEP button until the display shows "Sleep Timer Off".
4. To check the sleep timer status, press the SLEEP button once.
AUXINPUT
There is a 3.5mm stereo aux input socket located at the back of the unit; analogue audio sound signals from other
sources can be input to the radio through this socket.
To select AUX function, repeatedly press the MODE button until you see "Switch to AUX" is displayed, the audio
will be switched to the aux input signal and you can adjust the volume control for your desired sound output level.
Note: To further enhance energy saving, if the unit is left in AUX mode and without any user operation for three
hours, the unit will switch itself to standby automatically; To toggle select this function between on & off During
unit on, press and hold the MODE button for longer than two seconds, the display will show "ECO ON" or "ECO
OFF".
USB PORT
There is an USB port located at the back of the unit, a standard 5V/500mA output is provided for normal USB
charging capability. USB data communication is not available through this port.
DISPLAY BACKLIGHT
The backlight level is defaulted to "Low" in standby and "High" during operation. This is resumed only when the
factory reset has taken place. There are four backlight levels for you to set in unit operation.
1. To set the backlight during operation, first press the MENU button once, then rotate the SCROLL control
followed by pressing on it to enter into the "Backlight" menu.
2. In the "Backlight" menu, rotate the SCROLL control to select the backlight level - High/Medium/Low/Off.
3. In either standby or operation, the backlight will be turned on to "High" for 5 seconds on every key press.
HEADPHONE JACK
A 3.5mm type stereo headphone jack is located at the back of the unit. Connect a set of stereo headphones (not
included) to this jack for private listening without disturbing others. The speakers are automatically disconnected
when the headphones are in use.
IMPORTANT: When using headphones always set the volume to a low level before you put the headphones on.
Then insert the headphones and gradually increase the volume to a comfortable listening level.

UK-8
SPECIFICATION
POWERSUPPLY: AC 100-240V~60/50Hz
OUTPUT POWER: 2 x 5 W
FREQUENCY RANGE: DAB 174-240 MHz
FM 87.5-108 MHz
UNIT DIMENSION: 300 (L) x 158 (W) x 120 (H) mm
SPECIFICATION SUBJECT TO CHANGEWITHOUT FURTHER NOTICE.

DA300
DAB+DAB/FM Digital Clock Radio med dobbelt Alarm og Bluetooth
DK Brugervejledning
DK-1
SIKKERHEDSANVISNINGER
- Læs omhyggeligt alle anvisninger, inden du tager radioen i brug, og gem vejledningen som reference.
- Kontrollér, at spændingen på apparatets rating label modsvarer spændingen på brugsstedet.
Placering af apparatet
- Placér apparatet på en plan, stabil overflade, hvor det ikke udsættes for vibrationer.
- Placér ikke apparatet på en skrå eller ustabil overflade, da apparatet kan tippe eller falde ned.
- Apparatet skal placeres nær stikkontakten, og der skal altid være nem adgang til kontakten.
- Undlad placering på ektremt varme eller kolde steder. Placér apparatet på god afstand af varmekilder som
f.eks. radiatorer og gas-/elvarmere. Undlad at udsætte apparatet for direkte sollys eller andre varmekilder.
- Placér aldrig nogen former for stearinlys eller åben ild oven på eller nær apparatet.
- Nedsæt risikoen for brand, elektrisk stød eller beskadigelse af produktet ved aldrig at udsætte det for regn,
fugt, dryp eller stænk. Placér aldrig væskefyldte beholdere, som f.eks. vaser, oven på apparatet.
- Hvis du spilder væske på apparatet, kan det medføre alvorlig skade. Sluk omgående på stikkontakten. Tag
stikket ud af kontakten og kontakt forhandleren.
- Undgå risiko for elektrisk stød eller brand pga. overophedning ved aldrig at dække apparatets
ventilationsåbninger med gardiner eller andre lignende materialer.
- Undlad at placere apparatet indbygget i en bogkasse, et skab eller på andet indelukket sted. Sørg for, at der
altid er mindst 10 cm frirum omkring apparatet, så den nødvendige ventilation kan finde sted.
Sikkerhed
- Tag altid stikket ud af stikkontakten, inden du tilslutter eller frakobler andre enheder eller flytter apparatet.
- Tag stikket ud af stikkontakten i tordenvejr.
- Denne enhed bliver varm når den bruges i en længere periode. Dette er normalt og betyder ikke, at der er
noget i vejen med apparatet.
FORSIGTIG
RISIKO FOR ELEKTRISK STØD
MÅ IKKE ÅBNES
FARLIG SPÆNDING
Apparatets indre indeholder strømførende dele, der ikke er isolerede, og hvis strømstyrke er
tilstrækkelig til at udgøre en fare for skade på personer ved elektriske stød.
OBS
Betjeningsvejledningen indeholder vigtige oplysninger vedrørende betjening og vedligeholdelse af
apparatet. Læs vejledningen og sæt dig ind i sikker betjening af apparatet.
Netledningen
- Placér apparatet således, at netledningen ikke sidder i klemme under det. Vægten fra radioen kan beskadige
ledningen og udgøre en sikkerhedsrisiko.
- Hvis netledningen beskadiges, skal den udskiftes af producenten, dennes serviceagent eller lignende
kvalificeret servicetekniker, således at der ikke opstår farlige situationer.
Interferens
- Apparatets normale drift kan forstyrres af stærk elektromagnetisk interferens. Sker det, skal du blot følge
vejledningen i manualen for at genoprette normal drift. Hvis normal drift ikke kan genoprettes, kan du prøve at
placere apparatet et andet sted.
- Denne enhed indeholder mikro-processorer, der kan svigte som følge af udefra kommende elektrisk
interferens/støj eller elektrostatisk udladning. Hvis apparatet ikke fungerer korrekt, skal du tage stikket ud af
stikkontakten og sætte det i igen.
Overvågning
- Børn bør overvåges, så de ikke leger med apparatet.
- Lad aldrig nogen, især ikke børn, stikke genstande ind i apparatets huller, sprækker eller andre åbninger dette kunne resultere i livsfarligt elektrisk stød.
DK-2
Service/Vedligeholdelse
- Nedsæt risikoen for stød ved aldrig at fjerne skruerne. Apparatet indeholder ingen dele, som bruger selv kan
servicere. Overlad alt vedligeholdelsesarbejde til kvalificeret servicepersonale.
- Åben ingen af de faste dæksler, da du derved kan komme i forbindelse med de strømførende dele i apparatets
indre.
- Tag altid stikket ud af stikkontakten, inden du rengør apparatet.
- Brug aldrig skuresvampe eller rengøringsmidler med skureeffekt til rengøringen, da sådanne vil beskadige
apparatets kabinet.
KNAPPER OG KONTROLLER
1. DREJE-/TRYKKNAP TIL
VOLUMEN/KANALVÆLGER &
OK/►/II
2. LCD DISPLAY
3. KNAPPEN INFO/
4. KNAPPEN MENU/
5. KNAPPEN MODE
6. HØJTTALER
7. KNAPPEN
8. KNAPPEN ALARM/SNOOZE
9. KNAPPEN SLEEP
10. KNAPPEN MEMORY
11. STAVANTENNE
12. STIK TIL HOVEDTELEFONER
13. AUX IN TERMINAL
14. USB-TERMINAL
15. TILSLUTNING FOR AC
NETLEDNING
NÅR DU TÆNDER RADIOEN FØRSTE GANG
Når du første gang forbinder radioen til lysnettet, starter den op i standby. Displayets baggrundslys tænder i nogle
få sekunder, hvorefter displayet først viser en velkomsthilsen og dernæst uret. Tryk én gang på knappen
for at
tænde radioen. Radioen aktiverer DAB-modus og foretager en automatisk kanalsøgning.
Indstilling af uret
Uret indstilles og opdateres kun, hvis du kan modtage DAB-signaler hvor du befinder dig. For at uret kan
synkronisere sig med det lokale klokkeslet, skal du lade radioen være stillet ind på en DAB-station i en kort
periode. Manuel indstilling af uret er ikke påkrævet.
LYTTE TIL RADIO
Tips til bedre modtagelse
Denne radio er udstyret med en enkelt DAB/FM teleskop-antenne. Du opnår den bedste modtagelse ved at
strække antennen helt ud og justere placering og retning, indtil du finder den position, der giver den bedste
modtagelse. For den bedst mulige modtagelse af DAB anbefales det, at du altid lader antennen stå ret op i luften.
DAB-radio
Når du tænder radioen første gang, aktiverer den DAB-modus og foretager en automatisk kanalsøgning. Under
søgningen viser displayet "Scanning ..." og en skydebjælke, der angiver hvor langt søgningen er nået samt
antallet af stationer, der er fundet indtil videre. (F1) (F2).
Når søgningen er gennemført, stiller radioen automatisk ind på den først fundne station. Hvis du vil søge blandt
de fundne stationer, skal du først trykke én gang på SCROLL, dreje samme knap, indtil du finder en station, du vil
lytte til og dernæst trykke på SCROLL igen.
DK-3
Bemærk: Hvis der ingen stationer findes under den automatiske kanalsøgning, vil radioen åbne menuen Tune
Select (søgemåde), og du kan nu først dreje og dernæst trykke på SCROLL for at vælge mellem "Manual tune"
og "Autoscan" for at søge efter sta tion er.
DAB automatisk kanalsøgning
Den automatiske kanalsøgning søger efter stationer på hele DAB-bånd III. Når søgningen er gennemført, stiller
radioen automatisk ind på den først fundne station.
1. Hvis du vil aktivere automatisk kanalsøgning, skal du først trykke på knappen MENU for at åbne menuen Tune
Select (søgemåde), dernæst dreje SCROLL og vælge "Autoscan" og til sidst trykke på samme knap for at
bekræfte, hvorefter displayet viser "Scanning..." tillige med en skydebjælke over søgningen. (F3)
2. Alle fundne stationer lagres automatisk i radioens hukommelse, og du kan gennemsøge stationerne og vælge
den, du vil lytte til, ved at dreje på SCROLL og trykke på samme knap, når du har fundet den ønskede station.
DAB manuel kanalsøgning
1. Hvis du vil aktivere manuel kanalsøgning, skal du først trykke på knappen MENU for at åbne menuen Tune
Select (søgemåde), dernæst dreje SCROLL og vælge "Manual tune". (F4) (F5)
2. Drej SCROLL for at bladre gennem DAB-kanalerne, displayet viser "5A to 13F" og de tilhørende frekvenser.
3. Når den ønskede frekvens vises på displayet, skal du trykke på SCROLL for at bekræfte. Navnet på den
gruppe, stationen tilhører, (ensemble/multiplex) vises på displayet.
4. Tryk på SCROLL igen, hvis du vil lytte til den valgte station.
DAB sekundære tjenester
Af og til vil du kunne se symbolet ">" lige efter navnet på en station. Dette angiver, at stationen tilbyder
sekundære tjenester. Disse sekundære tjenester indeholder ekstra service i relation til primærstationen. Det kan
f.eks. være en sportsstation, der tilbyder ekstra kommentatorlyd. De sekundære tjenester er indskudt direkte efter
den primære station. Hvis du vil åbne en sekundær tjeneste, skal du trykke på SCROLL.
DAB displayet
For hver gang, du trykker på knappen INFO, skifter displayet i den nedenfor viste rækkefølge:
Tid og dato
Tidspunkt og dato opdateres automatisk via sendenettet; det er ikke nødvendigt at indstille uret manuelt. Skulle
det helt ekstraordinært ske, at der ikke er adgang til tidsoplysninger, vil displayet i stedet vise "<TIME/DATE>".
Frekvens
Frekvensen på den faste station vises.
Audio bitrate
Displayet viser den digitale audio bitrate, der modtages.
Signalstyrke
Displayet viser en skydebjælke med angivelse af signalstyrken. Jo stærkere signalet er, jo længere rækker
skydebjælken fra venstre mod højre.
DLS
DLS står for Dynamic Label Segment, der er en rulletekst, som udbyderen kan udsende sammen med
transmissionen på kanalen. Rulleteksten omfatter sædvanligvis informationer som programoplysninger ... osv.
DK-4
Programtype
Her oplyses typen på det program, der udsendes. Hvis der ingen oplysninger er tilgængelige, viser displayet i
stedet "<Programme Type>".
Ensemble/Multiplex (Gruppenavn)
Hver Ensemble/Multiplex udgør en gruppe radiostationer, der sendes sammen på samme frekvens. Der findes
nationale og lokale multiplexer, de lokale indeholder stationer fra dit nærområde.
Bemærk: Tryk på knappen INFO og hold den inde i mindst 2 sekunder, hvis du vil se oplysninger om software
versionsnummer på displayet.
FM-radio
1. Hvis du vil vælge FM, skal du trykke gentagne gange på knappen MODE, indtil displayet viser "Switch to FM";
FM-frekvensen vises på displayet.
2. Hvis du vil starte en automatisk kanalsøgning, skal du trykke på SCROLL og holde den inde, indtil radioen starter
kanalsøgningen op eller ned ad frekvensbåndet, og displayet viser "Searching ... > ." eller "Searching ... < ."
(søger op/ned). Radioen afbryder automatisk søgningen, når den finder en station. (F6) (F7)
3. Hvis du vil aktivere manuel kanalsøgninge, skal du først trykke én gang på SCROLL, og når displayet viser
< Tuning >, skal du dreje SCROLL, indtil du finder den ønskede frekvens.
4. Hvis du vil skifte mellem modtagelse af FM i stereo eller mono, skal du først trykke én gang på knappen MENU,
og når displayet viser "FM Audio setting", skal du trykke på SCROLL for at åbne menuen, dreje SCROLL for at
vælge og bekræfte dit valg mellem "Auto" og "Mono" ved at trykke på samme knap.
Bemærk: Radioen skifter automatisk mellem stereo og mono, men du kan tilsidesætte radioens valg og foretage
indstillingen manuelt, hvilket kan være en fordel, hvis signalet går svag t igennem.
LAGRING OG GENKALD AF STATIONER
Du kan lagre op til 10 faste stationer fra enten DAB- eller FM-båndet, hvilket vil give dig direkte adgang til dine
favoritstationer.
1. Hvis du vil lagre en station i radioens hukommelse, skal du først stille ind på stationen og dernæst trykke på
knappen MEMORY og holde den inde. Displayet viser "Empty preset 1", og nummeret på den faste
programplads blinker. (F8)
2. Drej SCROLL og vælg den faste programplads, hvor du vil gemme stationen. Tryk dernæst på samme knap
for at bekræfte dit valg, hvorefter displayet viser "Preset # saved". (F9)
3. Når du vil genkalde en fast station, skal du først trykke én gang på knappen MEMORY og dernæst dreje
SCROLL for at søge op eller ned blandt de faste stationer i radioen. Når displayet viser nummeret på den
ønskede faste station, skal du trykke på SCROLL for at bekræfte. Hvis der ikke ligger en station på den valgte
faste programplads, vil displayet vise "Empty preset #".
GENDANNELSE AF STANDARDINDSTILLINGER
Hvis du flytter radioen til en anden del af landet, vil dine faste DAB-stationer muligvis ikke længere være
tilgængelige. Sker det, skal du nulstille radioen til de oprindelige indstillinger; det gøres på følgende måde:
1. Forbind radioen til stikkontakten og tryk på knappen
for at tænde radioen.
2. Tryk på knappen MENU og hold den inde, til displayet viser "Press SELECT to confirm reset".
3. Slip knappen MENU og tryk én gang på SCROLL, hvorefter displayet først viser "Restarting ...". Når
nulstillingen er gennemført, går radioen på standby.

DK-5
4. Tryk på knappen
for at tænde radioen igen, hvorefter den af sig selv aktiverer DAB-radio og gennemfører
en automatisk kanalsøgning. Når søgningen er gennemført, stiller radioen automatisk ind på den først fundne
station.
ALARMFUNKTION
Denne radio tilbyder en dobbelt alarmfunktion. Du kan gemme to forskellige vækketidspunkter og vækkemåder,
hvor valget står mellem at vågne til en elektronisk buzzertone eller til din favorit radiostation (DAB/FM).
Sådan vælger du vækketid og -måde
1. Tryk én gang på knappen ALARM for at åbne menuen Alarm og drej og tryk dernæst på SCROLL for at vælge
den alarm, du vil indstille (1 eller 2).
2. Drej og tryk igen på SCROLL for at vælge "Alarm Setting". Displayet viser "Alarm # Setting", og timetallet
blinker på displayet. (F10)
3. Drej og tryk på SCROLL for at indsætte det ønskede vækketidspunkt. Indsæt først timetallet og dernæst
minuttallet.
4. Når du har bekræftet minuttallet, er alarmtidspunktet valgt, og du går videre til indstilling af vækkemåde.
5. Drej og tryk på SCROLL for at justere og bekræfte indstillingerne for vækkemåde - først vælger du enten DAB
eller FM fast station (1-10), dernæst buzzertone (1 eller 2) og endelig lydstyrke for alarmen. (F11)
6. Når du har valgt lydstyrke for alarmen, er du færdig med at foretage indstillingerne for vækkemåde, og du er
nu klar til at aktivere alarmfunktionen.
7. Gentag ovenstående for at indstille den anden alarm (1 eller 2).
Sådan aktiveres alarmfunktionen
1. Når du vil aktivere alarmfunktionen, skal du trykke på knappen ALARM for at åbne menuen Alarm og vælge
Alarm (1 eller 2).
2. Drej og tryk på SCROLL og vælg "Alarm Source".
3. Drej igen på SCROLL, hvorefter den tilhørende vækkemåde vises, og du kan nu ændre vækkemåden i
nedenfor viste rækkefølge:
4. Når displayet viser den ønskede vækkemåde, skal du trykke på SCROLL. Alarmen er nu aktiveret, og det
tilhørende ikon vises på displayet.
5. Når det valgte alarmtidspunkt nås, starter vækningen med den valgte vækkemåde, og alarmikonet på
displayet blinker som angivelse af, at alarmen er i gang. Hvis du vil afbryde alarmen før tiden, skal du trykke på
knappen
.
Bemærk 1: Hvis du har aktiveret alarmen og valgt en af vækkemåderne DAB eller FM, skal du sikre dig, at
lydstyrken for alarmen er sat tilstrækkeligt højt til, at du kan høre den.
Bemærk 2: Den første alarm har prioritet og fortsætter vækningen i en time. I denne periode kan alarmen
afbrydes midlertidigt med funktionen snooze, så hvis den anden alarm er indstillet til at vække indenfor dette
tidsrum, vil denne alarm ikke lyde. Hvis den første alarm er slået fra, inden den anden alarm skal lyde, vil den
anden alarm derimod starte, som den skal.
Automatisk gentagelse af alarm
Alarmen lyder automatisk på samme tid hver dag, så længe alarmikonet vises på displayet. Hvis du vil afbryde
denne funktion, skal du gå ind i menuen Alarm og vælge "Alarm # off" i undermenuen "Alarm Source".
Funktionen Snooze
Når alarmen lyder, kan du trykke på knappen SNO OZE, hvis du vil udskyde vækningen i 5 minutter. Displayet
viser "Zz" som angivelse af, at snooze er aktiveret. Dette kan gentages i den time, alarmperioden løber.

DK-6
BLUETOOTH-FUNKTION
Bluetooth ydeevnen kan variere afhængigt af mærke og model på den tilsluttede enhed. Den bedste ydeevne
opnås, når du tilslutter en nyere Bluetooth-enhed med Bluetooth 2.1 og opdateret med den nyeste firmware fra
enhedens forhandler. Der kan ikke garanteres kompatibilitet med alle medietyper.
Værd at vide om Bluetooth ydeevne
Sørg for, at alle Bluetooth-enheder indenfor en radius af 9 meter har Bluetooth slået fra. Hvis der er andre tændte
Bluetooth-enheder i nærheden, kan det medføre driftsproblemer.
Bluetooth er en radiokommunikationsstandard med kort rækkevidde. Denne radios Bluetooth sende- og
modtageenheder har en omtrentlig rækkevidde på 9 meter i direkte linje. Generelt kan Bluetooth-enheder
kommunikere klart med hinanden i et værelse eller kontor af normal størrelse. Hvorvidt to enheder kan holde
forbindelse med hinanden fra værelse til værelse vil afhænge af, hvordan værelset er konstrueret. Det er vigtigt at
forstå, at Bluetooths kommunikationsrækkevidde kan nedsættes drastisk, hvis signalet skal passere igennem
solide objekter. Det menneskelige legeme, mursten og betonvægge samt tunge møbler og reoler vil alt sammen
nedsætte rækkevidden for dine Bluetooth-enheder. Glas, tørvægge eller vægge med træpaneler samt
kontoradskillelser vil have en mindre men stadig mærkbar effekt. Hvis du oplever problemer med forbindelsen,
skal du anbringe dine Bluetooth-enheder tættere på hinanden.
Understøttede Bluetooth-profiler
Denne radios Bluetooth-kapacitet gør det muligt at modtage audio fra mange forskellige Bluetooth-enheder, inkl.
mobiltelefoner, PC'er og PDA'er. Følgende Bluetooth-profiler og -funktionalitet er understøttet. Hver profil kan kun
understøtte én tilsluttet enhed ad gangen.
Advanced Audio Distribution Profile (A2DP)
- Stereo audio-tilslutning i høj kvalitet
- Streaming af stereomusik fra PC, mobiltelefon osv.
Audio Video Remote Control Profile (AVRCP)
- Fjernbetjening af enheden
- Styring af tilsluttede enheder
Transmission af stereomusik til din mobiltelefon
Denne tilslutning kræver, at din mobiltelefon understøtter profilen Bluetooth A2DP til streaming af stereomusik.
Hvis du vil oprette en ny Bluetooth-forbindelse, skal du have tilstrækkeligt kendskab til din mobiltelefons
Bluetooth-funktioner. Da de forskellige telefonmodeller varierer, bliver du nødt til at sætte dig ind i betjeningen af
netop din telefon, inden du foretager tilslutningen.
1. Sørg for, at Bluetooth er slået til i din telefon. Det kan være nødvendigt at kigge i manualen til telefonen efter
vejledning.
2. Placér radioen og telefonen således, at der højst er 0,9 meter imellem de to.
3. Tryk gentagne gange på knappen MODE og vælg funktionen Bluetooth. Displayet viser "Bluetooth" sammen
med det "blinkende ikon".
4. Bed din A2DP telefon søge efter Bluetooth-enheder og følg vejledningen på telefonens skærm. Du kan
genkende radioen på dens Bluetooth navn "BT Speaker". Hvis du bliver bedt om en kode, skal du indtaste
"0000".
5. Vælg enheden og bekræft parringen på telefonen, hvorefter det tager nogle få sekunder at oprette
forbindelsen. Radioen afgiver et dobbelt bip som bekræftelse, det " blinkende ikon" på displayet skifter til
og du kan nu starte streaming af musik via din Bluetooth-forbindelse.
6. Tryk på SCROLL på radioen, eller vælg "start afspilning" på din mobiltelefon for at starte afspilningen af musik.
7. Hvis du vil afbryde afspilningen, skal du trykke på SCROLL igen eller vælge "pause" på telefonen.
8. Hvis du vil springe frem eller tilbage i en musikfil under afspilningen, skal du trykke på knapperne eller på
radioen eller bruge de knapper på din telefon, der styrer funktionen "spring".
Bemærk: Visse mobiltelefoner afbryder og tilslutter selv forbindelsen, når du foretager og afslutter opkald. Dette
er ikke tegn på, at der er noget i vejen med din enhed.
Tilslutning for stereomusik til andre Bluetooth-enheder
Denne tilslutning kræver, at enheden understøtter profilen Bluetooth A2DP til streaming af stereomusik. Sørg for,
at din enhed har den nyeste version af software drivere og/eller firmware til understøttelse af Bluetooth

DK-7
funktionalitet. Der kan ikke garanteres kompatibilitet med alle enheder. Ud over den fremgangsmåde, der er
beskrevet herover for mobiltelefoner, kan denne radio også modtage stereomusik fra mange andre Bluetooth
signalkilder inkl. PC'er, PDA'er og musikafspillere, der understøtter Bluetooth. Den nøjagtige tilslutningsmåde
varierer fra enhed til enhed, så kig i manualen til netop din enhed efter vejledning i fremgangsmåden.
Bemærk: Et stigende antal computerenheder understøtter nu Bluetooth, og mange inkluderer understøttelse for
stereomusik via Bluetooth (A2DP). Du får den bedst mulige ydeevne fra netop din enhed ved at sørge for, at du
altid anvender den nyeste version af driversoftware og/eller firmware. I nogle tilfælde vil en opdatering til den
nyeste driversoftware og/eller firmware til din enhed tilføje understøttel se for A2DP, selv hvis dette ikke blev
understøttet af den foregående version. Kontakt forhandleren af din enhed vedrørende sådanne opdateringer og
find beskrivelsen af, hvordan du gennemfører opdateringen, i manualen til din enhed. Husk, at systemopdatering
kun bør udføres af en dertil kvalificeret person efter at der er taget en fuld back-up af systemet.
SLEEP AUTOSLUK
Med denne funktion kan du programmere radioen til automatisk at slukke efter en given periode.
1. Hvis du vil aktivere sleep autosluk, skal du trykke gentagne gange på knappen SLEEP. Displayet viser "Sleep
Timer", og tælleren skifter i nedadgående retning for hvert tryk på knappen:
2. Når den ønskede periode til autosluk vises på displayet, skal du slippe knappen, hvorefter sleep autosluk
aktiveres efter 2 sekunder. Displayet viser "s#", hvor "s1" betyder "10 minutter" til autosluk osv.
3. Når autosluk timeren har talt ned til nul, slukker radioen automatisk. Hvis du vil annullere sleep autosluk, inden
perioden er udløbet, skal du trykke gentagne gange på knappen SLEEP, indtil displayet viser "Sleep Timer
Off".
4. Hvis du vil se status for autosluk timeren, skal du trykke én gang på knappen SLEEP.
AUX INDGANG
Der findes en 3,5 mm aux-indgang på apparatets bagpanel; analoge audiosignaler fra andre signalkilder kan
sendes til radioen gennem denne indgang.
Hvis du vil aktivere AUX-funktionen, skal du trykke gentagne gange på knappen MODE, indtil "Switch to AUX"
vises på displayet. Audio modtages nu via aux-indgangen, og du kan justere lydstyrken til det ønskede niveau
med volumenknappen.
Bemærk: For at spare på strømmen vil apparatet automatisk skifte til standby efter 3 timer indstillet til AUX, hvor
der ikke har fundet betjening af apparatet sted; Hvis du vil slå denne energisparefunktion til eller fra, skal du
trykke på knappen MODE og holde den inde i mindst 2 sekunder, hvorefter displayet viser enten "ECO ON" eller
"ECO OFF".
USB-TERMINAL
Der findes en USB-terminal på apparatets bagpanel, en standard 5V/500mA udgang til normal USB-opladning.
USB datakommunikation kan ikke finde sted gennem denne terminal.
DISPLAYETS BAGGRUNDSLYS
Som standard er baggrundslyset indstillet til "Low" i standby og "High", når systemet er i brug. Disse indstillinger
gendannes, hvis du gennemfører en nulstilling af systemet. Du kan vælge mellem fire niveauer for baggrundslys,
når systemet er i brug.
1. Hvis du vil indstille baggrundslyset under drift, skal du først trykke én gang på knappen MENU, dreje SCROLL
og dernæst trykke på den for at åbne menuen "Backlight".
2. I menuen "Backlight" skal du dreje SCROLL for at vælge niveauet for baggrundslys - High/Medium/Low/Off.
3. Under både standby og drift vil baggrundslyset lyse på "Højt" niveau i 5 sekunder hver gang, du trykker på en
knap.
STIK TIL HOVEDTELEFONER
Et 3,5 mm stereostik til hovedtelefoner findes på bagsiden af apparatet. Tilslut et sæt stereo hovedtelefoner
(medfølger ikke) til dette stik, hvis du vil lytte uden at forstyrre andre. Højttalerne slås automatisk fra, når du
tilslutter hovedtelefoner.

DK-8
VIGTIGT: Hvis du anvender hovedtelefoner, skal du altid skrue ned for lyden, inden du tager hovedtelefonerne på.
Tilslut dernæst hovedtelefonerne og skru gradvist op for lyden til et komfortabelt niveau.
SPECIFIKATIONER
STRØMKRAV: AC 100-240V~60/50Hz
UDGANGSEFFEKT: 2 x 5 W
FREKVENSOMRÅDE: DAB 174-240 MHz
FM 87,5-108 MHz
YDRE MÅL: 300 (L) x 158 (B) x 120 (H) mm
RET TIL UVARSLET ÆNDRING I SPECIFIKATIONER FORBEHOLDES.

DA300
Dual-Alarm DAB+DAB/FM Digitaler Radiowecker mit Bluetooth
DE Bedienungsanleitung

DE-1
SICHERHEITSVORKEHRUNGEN
- Lesen Sie alle Anleitungen vor dem Gebrauch des Geräts sorgfältig durch. Für zukünftige
Verwendungszwecke gut aufbewahren.
- Die Spannungsangaben auf dem Typenschild müssen mit der Netzspannung in Ihrem Haushalt
übereinstimmen.
Standort des Geräts
- Stellen Sie das Gerät auf einen flachen Untergrund, der keinen Vibrationen ausgesetzt ist.
- Stellen Sie das Gerät nicht auf einen schiefen oder instabilen Untergrund, da das Gerät anderenfalls umkippen
oder herunterfallen könnte.
- Die Steckdose muss sich in der Nähe des Geräts befinden und leicht zugänglich sein.
- Vermeiden Sie extrem heiße oder extrem kalte Temperaturen. Stellen Sie das Gerät nicht in die Nähe von
Wärmequellen wie Heizkörper oder Gas/elektrisches Feuer. Schützen Sie das Gerät vor direkter
Sonneneinstrahlung und anderen Wärmequellen.
- Stellen Sie keine Kerzen oder offenes Feuer auf oder neben das Gerät.
- Um die Gefahr von Feuer, Stromschlägen oder Schäden zu verringern, schützen Sie das Gerät vor Regen,
Feuchtigkeit, Tropf- und Spritzwasser. Stellen Sie keine mit Flüssigkeit gefüllten Gegenstände wie Vasen auf
das Gerät.
- Flüssigkeit, die in das Gerät eindringt, kann ernsthafte Schäden verursachen. Schalten Sie das Gerät
umgehend aus. Ziehen Sie den Stecker und kontaktieren Sie Ihren Händler.
- Um die Gefahr von Stromschlägen oder Feuer aufgrund von Überhitzung zu vermeiden, dürfen die
Belüftungsöffnungen nicht durch Gardinen oder andere Materialien blockiert werden.
- Das Gerät darf nicht in Bücherregalen, Einbauschränken oder anderen geschlossenen Orten installiert oder
aufgestellt werden. Lassen Sie um das Gerät herum mindestens 10 cm Platz für die Belüftung.
Sicherheit
- Trennen Sie das Gerät vom Netz, bevor Sie andere Geräte anschließen/trennen oder das Gerät umstellen.
- Trennen Sie das Gerät während Gewittern vom Netz.
- Dieses Gerät wird warm, wenn über einen längeren Zeitraum benutzt wird. Das ist normal und keine
Fehlfunktion des Geräts.
ACHTUNG
STROMSCHLAGGEFAHR
NICHT ÖFFNEN
GEFÄHRLICHE SPANNUNG
Im Inneren des Gerätegehäuses ist gefährliche Spannung vorhanden, die ausreichend ist, um einen
Stromschlag zu verursachen.
ACHTUNG
Die Bedienungsanleitung enthält wichtige Gebrauchs- und Wartungsanleitungen. Lesen Sie das
Handbuch zu Ihrer eigenen Sicherheit durch.
Netzkabel
- Stellen Sie sicher, dass das Gerät nicht auf dem Netzkabel steht, da durch das Gewicht des Geräts das Kabel
beschädigt und damit eine Gefährdung verursacht werden kann.
- Ein beschädigtes Netzkabel muss vom Hersteller, von dessen Kundendienst oder einer ähnlich qualifizierten
Person ausgetauscht werden, um Gefahrensituationen zu vermeiden.
Störungen
- Der normale Betrieb des Geräts kann durch starke elektromagnetische Störungen beeinträchtigt werden.
Setzen Sie in solch einem Fall das Gerät anhand der Bedienungsanleitung zurück, um den normalen Zustand
wiederherzustellen. Falls Sie den normalen Betrieb nicht wiederherstellen können, verwenden Sie das Gerät
bitte an einem anderen Ort.
- Dieses Gerät verfügt über Mikroprozessoren, die aufgrund von elektrischen Störungen/Elektrorauschen oder
elektrostatischer Entladung versagen können. Wenn das Gerät nicht ordnungsgemäß funktioniert, ziehen Sie
den Stecker und schließen Sie dann das Gerät erneut an.

DE-2
Aufsicht
- Kinder müssen beaufsichtigt werden, damit sie nicht mit dem Gerät spielen.
- Lassen Sie niemanden, und damit sind vor allem Kinder gemeint, Gegenstände in die Löcher, Schlitze oder
anderen Öffnungen des Gehäuses einführen – anderenfalls besteht erhöhte Stromschlaggefahr.
Reparatur/Wartung
- Um die Gefahr eines Stromschlags zu vermeiden, dürfen keine Schrauben entfernt werden. Es befinden sich
keine vom Nutzer zu wartenden Teile im Gerät. Lassen Sie Wartungsarbeiten nur von qualifizierten
Fachkräften durchführen.
- Öffnen Sie keine geschlossenen Abdeckungen, da anderenfalls gefährliche Spannung freigelegt werden
könnte.
- Ziehen Sie vor der Reinigung den Stecker aus der Steckdose.
- Verwenden Sie keine Scheuerpads oder Scheuermittel, da diese die Oberfläche des Geräts beschädigen
könnten.
TASTEN UND FUNKTIONEN
1. LAUTSTÄRKE/SCROLL &
OK/►/II
2. LCD-DISPLAY
3. INFO/
4. MENÜ/
5. MODUS
6. LAUTSPRECHER
7.
TASTE
8. WECKRUF/SNOOZE
9. SLEEP-TIMER
10. SPEICHER
11. ANTENNENSTAB
12. KOPFHÖRERBUCHSE
13. AUX-IN BUCHSE
14. USB-PORT
15. AC NETZANSCHLUSSBUCHSE
RADIO ERSTMALIG EINSCHALTEN
Das Radio schaltet den Standby-Modus ein, wenn es das erste Mal an ein Netz angeschlossen wird. Die
Hintergrundbeleuchtung des Displays geht einige Sekunden an, und im Display wird nach der anfänglichen
Begrüßung die Uhr angezeigt. Drücken Sie einmal die Taste
, um das Radio einzuschalten. Das Radio schaltet
den DAB-Modus ein und führt automatisch eine Sendersuche durch.
Einstellung der Uhrzeit
Die Uhr kann nur eingestellt und aktualisiert werden, wenn an Ihrem Standort DAB-Signale empfangen werden
können. Sie müssen einen DAB-Radiosender eine kurze Zeit lang eingeschaltet lassen, damit die Uhrzeit mit der
lokalen Ortszeit synchronisiert werden kann. Eine manuelle Einstellung der Uhrzeit ist nicht erforderlich.
RADIO HÖREN
Hinweise für einen besseren Empfang
Dieses Radio verfügt über eine teleskopische DAB/FM-Antenne. Für einen optimalen Empfang sollten Sie die
Antenne vollständig ausziehen und sowohl deren Position als auch Richtung einstellen, bis Sie das beste Signal
empfangen. Für einen optimalen DAB-Empfang sollten Sie die Antenne immer in einer aufrechten Position
belassen.
DAB-Modus
Wenn das Radio das erste Mal angeschlossen und eingeschaltet wird, schaltet es den DAB-Modus ein und führt
eine automatische Sendersuche durch. Während der Suche erscheinen im Display die Anzeige
„Scanning ...“ und ein Balken, der den Fortschritt der Suche und die Anzahl der bereits gefundenen Sender
anzeigt. (F1) (F2).

DE-3
Nach der Suche schaltet das Radio den nach dem Alphabet zuerst gefundenen Sender ein. Um einen
gefundenen Sender aufzurufen, drücken Sie einmal SCROLL und drehen Sie dann denselben Regler für die
Suche. Wenn Sie den gewünschten Sender gefunden haben, drücken Sie auf SCROLL.
Hinweis: Falls während der automatischen Sendersuche keine Sender gefunden werden, öffnet das Radio das
Tuning-Menü. Drehen und drücken Sie SCROLL, um für die Sendersuche „Manual tune“ oder
„Autoscan“ auszuwählen.
Automatische DAB-Sendersuche
Bei der automatischen Suche wird nach allen Sendern des DAB Bands III gesucht. Nach der Suche wird der nach
dem Alphabet zuerst gefundene Sender automatisch eingeschaltet.
1. Um die automatische Suche zu starten, drücken Sie zunächst MENU, um das Tuning-Menü zu öffnen. Drehen
Sie SCROLL, um „Autoscan“ auszuwählen. Drücken Sie dann denselben Regler zum Bestätigen, und im
Display erscheinen die Anzeige „Scanning...“ und der Fortschrittsbalken. (F3)
2. Alle gefundenen Sender werden automatisch gespeichert. Um einen der gefunden Sender zu suchen und
anzuhören, drehen und drücken Sie SCROLL.
DAB-Sender manuell einstellen
1. Um Sender manuell einzustellen, drücken Sie zunächst MENU, um das Tuning-Menü zu öffnen. Drücken Sie
auf den Regler SCROLL, um die Option „Manual tune“ auszuwählen. (F4) (F5)
2. Navigieren Sie durch Drehen von SCROLL durch die DAB-Radiosender. Im Display werden „5A to 13F“ und
deren entsprechenden Frequenzen angezeigt.
3. Wenn die gewünschte Frequenz im Display angezeigt wird, drücken Sie SCROLL zum Bestätigen. Im Display
erscheint der Name der Sendergruppe (Ensemble/Multiplex).
4. Drücken Sie SCROLL erneut, um den gewählten Radiosender anzuhören.
DAB Sekundärdienste
In einigen Fällen erscheint direkt nach dem Namen des Senders das Symbol „>“. Es weist darauf hin, dass für
diesen Sender sekundäre Dienste verfügbar sind. Bei diesen Sekundärdiensten handelt es sich um zusätzliche
Leistungen des primären Senders. Sportsender bieten z.B. zusätzliche Kommentare an. Die Sekundärdienste
werden direkt nach dem primären Sender eingefügt. Drücken Sie SCROLL, um den sekundären Sender
auszuwählen.
DAB-Anzeigemodi
Mit jedem Drücken der Taste INFO wird nacheinander einer der folgenden Modi angezeigt:
Datum und Uhrzeit
Datum und Uhrzeit werden automatisch durch die Senderübertragung aktualisiert. Die Uhr muss nicht manuell
eingestellt werden. Falls unvorhergesehen keine Uhrzeitinformationen empfangen werden, erscheint im Display
die Anzeige „<TIME/DATE>“.
Frequenz
Im Display wird die Frequenz des aktuellen Senders angezeigt.

DE-4
Audioübertragungsgeschwindigkeit
Im Display wird die empfangene Audioübertragungsgeschwindigkeit angezeigt.
Signalstärke
Im Display wird ein Balken mit der Signalstärke angezeigt. Je stärker das Signal, desto länger der Balken von
links nach rechts.
DLS
DLS steht für Dynamic Label Segment. Dies ist ein Lauftext, der in den Übertragungen der Senderanstalten
enthalten sein kann. Der Lauftext enthält normalerweise Informationen wie Details der Sendung…usw.
Art der Sendung
Dies beschreibt die Art der übertragenen Sendung. Falls die Informationen nicht verfügbar sind, erscheint im
Display die Anzeige „<Programme Type>“.
Ensemble/Multiplex (Gruppenname)
Ein Ensemble/Multiplex ist eine Gruppe von Radiosendern, die auf einer einzigen Frequenz zusammen
übertragen werden. Ein Multiplex kann national oder lokal sein. Letztere beinhalten für den jeweiligen Standort
spezifische Sender.
Hinweis: Halten Sie die Taste INFO länger als 2 Sekunden gedrückt. Die Nummer der Software-Version wird
angezeigt.
FM-Radio
1. Um FM einzustellen, drücken Sie wiederholt die Taste MODE, bis im Display die Anzeige „Switch to
FM“ erscheint. Zum Schluss wird die FM-Frequenz angezeigt.
2. Um die automatische Suche zu aktivieren, halten Sie SCROLL gedrückt, bis das Radio das Frequenzband
vorwärts oder rückwärts durchsucht; im Display erscheint „Searching ... > .“ oder „Searching ... < .“. Die Suche
wird beendet, sobald ein Sender gefunden wurde. (F6) (F7)
3. Um die manuelle Suche zu aktivieren, drücken Sie zunächst einmal SCROLL. Wenn im Display die Anzeige
< Tuning > erscheint, drehen Sie SCROLL, bis Sie die gewünschte Frequenz gefunden haben.
4. Um FM Stereo/Mono einzustellen, drücken Sie zunächst einmal die Taste MENU. Wenn im Display die
Anzeige „FM Audio setting“ erscheint, drücken Sie SCROLL, um das Menü zu öffnen. Drehen und drücken Sie
SCROLL, um eine der Optionen „Auto“ oder „Mono“ auszuwählen und zu bestätigen.
Hinweis: Das Radio schaltet automatisch zwischen Stereo und Mono um. Sie können dies jedoch übergehen
und die Funktion manuell regeln, was bei schlechtem Empfang nützlich ist.
SENDER SPEICHERN UND AUFRUFEN
Sowohl im DAB- als auch FM-Modus können Sie bis zu 10 Sender als Preset speichern. So erhalten Sie direkten
Zugriff auf Ihre Lieblingssender.
1. Um einen Sender als Preset zu speichern, stellen Sie zunächst den gewünschten Sender ein. Halten Sie dann
die Taste MEMORY gedrückt; im Display erscheint die Anzeige „Empty preset 1“ und die Nummer des
Speicherplatzes blinkt. (F8)
2. Wählen Sie durch Drehen von SCROLL den gewünschten Speicherplatz; drücken Sie denselben Regler zum
Bestätigen Ihrer Auswahl. Im Display erscheint die Anzeige „Preset # saved“. (F9)
3. Um einen als Preset gespeicherten Sender aufzurufen, drücken Sie zunächst einmal die Taste MEMORY.
Drehen Sie SCROLL, um vorwärts oder rückwärts durch die als Preset gespeicherten Sender zu navigieren.
Wenn im Display die gewünschte Speicherplatznummer angezeigt wird, drücken Sie SCROLL zum Bestätigen.
Falls ein Speicherplatz noch über keinen Sender verfügt, erscheint die Anzeige „Empty preset #“.

DE-5
RÜCKSTELLUNG
Wenn Sie das Radio an einem anderen Ort des Landes verwenden, sind voreingestellte und gespeicherte
DAB-Sender möglicherweise nicht mehr verfügbar. In solch einem Fall müssen Sie das Radio auf die
Fabrikeinstellungen zurücksetzen; gehen Sie wie folgt vor:
1. Schließen Sie das Gerät an eine Steckdose an und drücken Sie zum Einschalten des Radios die Taste
.
2. Halten Sie die Taste MENU gedrückt, bis im Display die Anzeige „Press SELECT to confirm reset“ erscheint.
3. Lassen Sie MENU los und drücken Sie einmal SCROLL; im Display erscheint zunächst die Anzeige
„Restarting ...“. Nach der Rückstellung geht das Radio automatisch in den Standby-Modus über.
4. Drücken Sie
, um das Radio wieder einzuschalten. Das Radio schaltet den DAB-Modus ein und führt eine
automatische Sendersuche durch. Nach der Suche wird der nach dem Alphabet zuerst gefundene Sender
eingeschaltet und angezeigt.
WECKRUFFUNKTION
Dieses Gerät erlaubt das Einstellen von zwei identischen Weckrufen. Sie können zwei Weckrufzeiten und
Weckmodi einstellen, und mit einem elektronischen Buzzer oder Ihrem Lieblingssender (DAB/FM) geweckt
werden.
Weckrufzeit und Weckmodus einstellen
1. Drücken Sie einmal die Taste ALARM, um das Weckruf-Menü zu öffnen. Wählen Sie durch Drehen von
SCROLL einen Weckruf (1 oder 2) und bestätigen Sie durch Drücken desselben Reglers.
2. Drehen und drücken Sie SCROLL erneut, um die Option „Alarm Setting“ auszuwählen. Im Display erscheint
die Anzeige „Alarm # Setting“ und die Stundenziffer der Weckrufzeit blinkt. (F10)
3. Drehen und drücken Sie SCROLL, um die Weckrufzeit – zuerst die Stunden, dann die Minuten – einzustellen
und zu bestätigen.
4. Nach der Bestätigung der Minuteneinstellung ist die Weckrufzeit fertig eingestellt; die Einstellungen zum
Weckmodus werden angezeigt.
5. Drehen und drücken Sie SCROLL, um die Einstellungen zum Weckmodus vorzunehmen und zu bestätigen –
wählen Sie zunächst Ihren DAB- oder FM-Lieblingssender (1-10), dann den Buzzer-Ton (1 oder 2) und
letztendlich die Lautstärke des Weckrufs. (F11)
6. Nach der Bestätigung der Weckruflautstärke ist die Einstellung des Weckrufmodus abgeschlossen und die
Weckruffunktion kann aktiviert werden.
7. Wiederholen Sie oben genannte Schritte zum Einstellen des anderen Weckrufs (1 oder 2).
Weckruffunktion aktivieren
1. Um die Weckruffunktion zu aktivieren, drücken Sie die Taste ALARM, um das Weckruf-Menü zu öffnen und
den Weckruf (1 oder 2) auszuwählen.
2. Drehen und drücken Sie SCROLL, um die Option „Alarm Source“ auszuwählen.
3. Drehen Sie SCROLL erneut, um den entsprechenden Weckrufmodus anzuzeigen und in folgender
Reihenfolge zu ändern:
4. Wenn im Display der gewünschte Weckrufmodus angezeigt wird, drücken Sie SCROLL . Die Weckruffunktion
ist nun aktiviert und im Display erscheint das entsprechende Weckrufsymbol.
5. Zur eingestellten Weckrufzeit wird der entsprechende Weckrufmodus eingeschaltet und das Weckrufsymbol
blinkt im Display, um darauf hinzuweisen, dass der Weckruf ausgelöst wurde. Um den Weckruf vorzeitig zu
deaktivieren, drücken Sie die Taste
.

DE-6
Hinweis 1: Falls Sie die Weckruffunktion aktiviert und als Weckrufmodus DAB oder FM ausgewählt haben,
müssen Sie darauf achten, dass die Lautstärke des Weckrufs für Sie ausreichend ist.
Hinweis 2: Der Weckruf, der zuerst ausgelöst wird, hat Priorität und läuft ungefähr eine Stunde lang. Die
Snooze-Funktion unterbricht in diesem Zeitraum den Weckruf nur vorübergehend; falls der zweite Weckruf in
diesen Zeitraum fällt, kann er nicht ausgelöst werden. Wird der erste Weckruf jedoch vor der Zeit des zweiten
Weckrufs beendet, dann wird der zweite Weckruf ausgelöst.
Automatische Wiederholung des Weckrufs
Der Weckruf wird automatisch an jedem Tag zur eingestellten Uhrzeit wiederholt, solange das Weckrufsymbol im
Display angezeigt wird. Um die Funktion zu deaktivieren, öffnen Sie das Weckruf-Menü und wählen Sie im
jeweiligen „Alarm Source“ Untermenü die Option „Alarm # off“.
Snooze-Funktion
Wenn der Weckruf ausgelöst wurde, können Sie die Taste SNOOZE drücken, um den Weckruf vorübergehend
für 5 Minuten zu unterbrechen. Im Display erscheint die Anzeige „Zz“ als Hinweis auf die aktivierte
Snooze-Funktion. Dies kann innerhalb der einstündigen Weckrufdauer wiederholt werden.
BLUETOOTH-MODUS
Die Leistung der Bluetooth-Verbindung kann je nach Marke und Modell des angeschlossenen Geräts variieren.
Für eine optimale Leistung sollten Sie neuere Bluetooth-Geräte, die über Bluetooth 2.1 und die aktuellste
Firmware-Version des Geräteherstellers verfügen, anschließen. Eine Kompatibilität mit allen Geräten und
Medientypen wird nicht garantiert.
Hinweise zur Bluetooth-Leistung
Stellen Sie sicher, dass an allen Bluetooth-Geräten in einem Radius von 9,14 m die Bluetooth-Übertragung
deaktiviert ist. Andere funktionierende Bluetooth-Geräte können während der Verbindung Betriebsstörungen
verursachen.
Bluetooth ist ein Kommunikationsstandard des Nahbereichsfunks. Die Bluetooth Übertragungs- und
Empfängersoftware des Geräts hat eine Reichweite von ungefähr 9,14 m auf freier Fläche. Im Allgemeinen
können Bluetooth-Geräte in einem Raum oder Büro normaler Größe miteinander kommunizieren. Der Betrieb
zwischen unterschiedlichen Räumen hängt von der Raumkonstruktion ab. Bitte beachten Sie, dass die
Bluetooth-Kommunikationsreichweite deutlich verringert wird, wenn das Signal durch einen festen Gegenstand
hindurch übertragen wird. Menschen, Stein- und Betonwände, und schwere Möbel oder Bücherregale schränken
die Reichweite Ihres Bluetooth-Geräts ein. Glas, Trockenbauwände oder Wände mit Holzpaneelen, und
Büroraumteiler können geringere, aber dennoch spürbare Auswirkungen haben. Falls Kommunikationsprobleme
auftreten, sollten Sie den Abstand zwischen Ihren Bluetooth-Geräten verringern.
Unterstützte Bluetooth-Profile
Die Bluetooth-Fähigkeiten dieses Radios ermöglichen den Audioempfang von vielen Bluetooth-fähigen Geräten,
einschließlich Handys, PCs und PDAs. Folgende Bluetooth-Profile und Funktionalitäten werden unterstützt. Es
kann jeweils ein Gerät pro Profil angeschlossen werden.
Advanced Audio Distribution Profile (A2DP)
- Hochwertige Audio-Stereoverbindung
- Stereomusikübertragung von PCs, Handys…usw.
Audio Video Remote Control Profile (AVRCP)
- Fernsteuerung von Geräten
- Steuerung angeschlossener Geräte
Stereomusikverbindung mit Ihren Handys
Für diese Verbindung ist ein Handy erforderlich, welches das Bluetooth-Profil A2DP für die
Stereomusikverbindung unterstützt. Für die Einrichtung einer neuen Bluetooth-Verbindung müssen Sie mit den
Bluetooth-Funktionen Ihres Handys vertraut sein. Jedes Handy funktioniert unterschiedlich. Machen Sie sich vor
dem Anschluss mit den Bluetooth-Fähigkeiten Ihres Geräts vertraut.
1. Stellen Sie sicher, dass die Bluetooth-Funktion an Ihrem Handy aktiviert ist. Weitere Details finden Sie ggf. im
Benutzerhandbuch des Handys.

DE-7
2. Stellen Sie das Radio und das Handy mit einem Abstand von höchstens 0,91 m zueinander auf.
3. Drücken Sie wiederholt die Taste MODE, um den Bluetooth-Modus auszuwählen. Im Display erscheint die
Anzeige „Bluetooth“ zusammen mit dem „blinkenden Symbol“.
4. Starten Sie an dem A2DP-fähigen Handy die Suche nach Bluetooth-Geräten und folgen Sie den Anleitungen
auf dem Handybildschirm. Sie erkennen das Radio an dem Bluetooth-Namen „BT Speaker“. Falls Sie nach
einem Passwort gefragt werden, geben Sie „0000“ ein.
5. Wählen und bestätigen Sie die Kopplung an Ihrem Handy; die Verbindung wird in wenigen Sekunden
hergestellt. Zur Bestätigung erzeugt das Radio zwei Signaltöne und aus dem „blinkenden Symbol“ wird die
Anzeige
. Die Musikübertragung via Bluetooth kann nun gestartet werden.
6. Starten Sie die Musikwiedergabe durch Drehen des Reglers SCROLL oder indem Sie die Wiedergabe an
Ihrem Handy starten.
7. Um die Wiedergabe zu unterbrechen, drücken Sie SCROLL erneut oder wählen Sie „Pause“ an Ihrem Handy.
8. Um während der Wiedergabe zum nächsten oder vorhergehenden Titel zu springen, drücken Sie am Radio
die Tasten oder oder verwenden Sie die „skip controls“ an Ihrem Handy.
Hinweis: Einige Handys können nach dem Beenden eines Anrufs die Verbindung trennen oder herstellen. Dies
ist kein Problem Ihres Geräts.
Stereomusikverbindung mit anderen Bluetooth-Geräten
Für diese Verbindung ist ein Gerät erforderlich, welches das Bluetooth-Profil A2DP für die
Stereomusikverbindung unterstützt. Bitte stellen Sie sicher, dass Ihr Gerät über die aktuellste Software-Version
und/oder Firmware für die Kompatibilität der Bluetooth-Funktion verfügt. Eine Kompatibilität mit allen Geräten
wird nicht garantiert. Zusätzlich zu den oben genannten Anleitungen für Handys ist dieses Radio in der Lage,
Stereomusik von anderen Bluetooth-Geräten einschließlich PCs, PDAs oder Bluetooth-fähigen Musikspielern zu
empfangen. Die genaue Herstellung der Verbindung hängt von den jeweiligen Geräten ab. Informieren Sie sich in
den Gebrauchsanleitungen der Geräte über die exakte Vorgehensweise.
Hinweis: Die Zahl der digitalen Geräte, die Bluetooth-fähig sind, wächst ständig, und viele unterstützen auch die
Stereomusikübertragung via Bluetooth (A2DP). Um eine optimale Leistung Ihres jeweiligen Geräts zu
gewährleisten, muss das Gerät über die aktuellste Software-Version und/oder Firmware verfügen. In einigen
Fällen ist es möglich, dass durch die Aktualisierung Ihres Geräts mit der neuesten Software und Firmware eine
vorher noch nicht vorhandene Kompatibilität mit A2DP geschaffen wird. Wenden Sie sich für solche
Aktualisierungen an den Hersteller Ihres Geräts und informieren Sie sich in dem Benutzerhandbuch des Geräts
über die Vorgehensweise der Aktualisierung. Bitte beachten Sie, dass Systemaktualisierungen nur von
qualifizierten Personen und nach einem vollständigen Backup des Systems durchgeführt werden sollten.
SLEEP-TIMER
Mit dieser Funktion können Sie eine Zeit einstellen, nach Ablauf derer sich das Radio selbst ausschaltet.
1. Um diese Funktion zu aktivieren, drücken Sie wiederholt die Taste SLEEP. Im Display erscheint die Anzeige
„Sleep Timer“ und die Zeit ändert sich mit jedem Drücken wie folgt:
2. Lassen Sie die Taste los, wenn die gewünschte Zeit im Display angezeigt wird. Der Sleep-Timer wird nach
2 Sekunden aktiviert. Im Display erscheint die Anzeige „s#“, wobei „s1“ für „10 Minuten“ steht, und so weiter.
3. Wenn der Sleep-Timer null erreicht hat, geht das Gerät aus. Um den Sleep-Timer auszuschalten, wenn dieser
bereits aktiviert ist, drücken Sie wiederholt die Taste SLEEP, bis im Display die Anzeige „Sleep Timer
Off“ erscheint.
4. Drücken Sie einmal die Taste SLEEP, um den Status des Sleep-Timers anzuzeigen.
AUX-EINGANG
An der Rückseite des Geräts befindet sich eine 3,5 mm Aux-Eingangsbuchse. Über diese Buchse können
analoge Audiosignale anderer Geräte empfangen werden.
Zum Einstellen der AUX-Funktion drücken Sie wiederholt die Taste MODE, bis die Anzeige „Switch to
AUX“ erscheint. Der Aux-Signaleingang wird aktiviert und Sie können die Lautstärke wunschgemäß einstellen.

DE-8
Hinweis: Falls der AUX-Modus aktiviert ist und innerhalb von drei Stunden keine Funktion ausgeführt wird,
schaltet das Gerät automatisch den Standby-Modus ein, um Energie zu sparen. Um diese Funktion zu
(de)aktivieren, halten Sie die Taste MODE, während das Gerät eingeschaltet ist, länger als zwei Sekunden lang
gedrückt; im Display erscheint „ECO ON“ oder „ECO OFF“.
USB-PORT
An der Rückseite des Geräts befindet sich ein herkömmlicher 5V/500mA Ausgang für normale USB-Ladefähigkeit.
Eine USB-Datenübertragung ist über diesen Port nicht möglich.
DISPLAY-HINTERGRUNDBELEUCHTUNG
Die Standardeinstellungen für die Hintergrundbeleuchtung sind „Low“ während Standby und „High“ während des
Betriebs. Nach einer Rückstellung des Geräts werden diese Einstellungen wieder aufgenommen. Während des
Betriebs können Sie die Hintergrundbeleuchtung vierstufig verstellen.
1. Um die Hintergrundbeleuchtung während des Betriebs zu verstellen, drücken Sie zunächst einmal die Taste
MENU; drehen und drücken Sie dann SCROLL, um das Menü „Backlight“ zu öffnen.
2. Wählen Sie im Menü „Backlight“ durch Drehen von SCROLL eine Einstellung für die Hintergrundbeleuchtung
– High/Medium/Low/Off.
3. Sowohl im Standby-Modus als auch während des Betriebs wird bei Tastendruck die Einstellung „High“
5 Sekunden lang aktiviert.
KOPFHÖRERBUCHSE
An der Rückseite des Geräts befindet sich eine 3,5 mm Stereokopfhörerbuchse. Schließen Sie Stereokopfhörer
(nicht mitgeliefert) an diese Buchse an, um Musik zu hören ohne dabei Ihre Mitmenschen zu stören. Wenn
Kopfhörer angeschlossen sind, wird die Übertragung über die Lautsprecher automatisch getrennt.
WICHTIG: Stellen Sie die Lautstärke immer niedrig, bevor Sie Kopfhörer anschließen. Schließen Sie dann die
Kopfhörer an und erhöhen Sie die Lautstärke schrittweise bis zum gewünschten Level.
SPEZIFIKATION
STROMVERSORGUNG: AC 100-240V~60/50Hz
AUSGANGSLEISTUNG: 2 x 5 W
FREQUENZBEREICH: DAB 174-240 MHz
FM 87,5-108 MHz
ABMESSUNGEN DES GERÄTS: 300 (L) x 158 (W) x 120 (H) mm
TECHNISCHE DATEN UNTERLIEGEN UNANGEKÜNDIGTEN ÄNDERUNG EN.

DA300
Radio numérique DAB+DAB/FM avec une fonction horloge, deux heures de réveil
et la fonctionnalité Bluetooth
FR Guide destructions

FR-1
PRÉCAUTIONS DE SÉCURITÉ
- Lisez attentivement toutes les instructions avant d'utiliser votre appareil et conservez-les pour référence
ultérieure.
- Vérifiez que la tension fournie par le secteur correspond à celle marquée sur l'étiquette de spécifications de
l'appareil.
Choix d'un emplacement pour votre appareil
- Posez votre radio sur une surface plate et stable, non sujette à vibration.
- Ne placez pas votre appareil sur une surface inclinée ou instable pour éviter qu'il ne tombe ou ne se renverse.
- Prévoyez une prise secteur proche de votre appareil et facilement accessible.
- Évitez d'exposer votre appareil à des températures excessivement chaudes ou froides. N'installez pas votre
appareil près d'une source de chaleur telle qu'un radiateur, une cuisinière au gaz ou électrique, etc. Évitez
d'exposer votre appareil aux rayons directs du soleil ou à toute autre source de chaleur.
- Ne posez ni bougie ni flamme nue à proximité ou sur l'appareil.
- Pour éviter des risques d'incendie, de choc électrique et de dommage pour l'appareil, n'exposez pas celui-ci à
la pluie, à l'humidité, aux éclaboussures et aux infiltrations d'eau. Ne posez aucun récipient contenant un
liquide, par exemple un vase, sur votre appareil.
- Toute infiltration d'un liquide à l'intérieur de votre appareil risque de causer de sérieux dommages. Si cela se
produit, éteignez immédiatement l'appareil. Débranchez-le de la prise secteur et apportez-le à votre
revendeur.
- Pour prévenir un risque de choc électrique ou d'incendie dû à une surchauffe, vérifiez que rien (rideau, etc.)
n'obstrue les ouvertures de ventilation.
- Ne placez jamais cet appareil dans un espace restreint, par exemple à l’intérieur d’un meuble encastré ou
d'une bibliothèque. Laissez un espace d'au moins 10 cm tout autour de votre appareil pour lui assurer une
aération suffisante.
Sécurité
- Débranchez toujours l'appareil de la prise secteur avant de lui connecter/déconnecter un autre appareil ou de
le déplacer.
- Débranchez l'appareil de la prise secteur lorsque le temps est à l'orage.
- Cet appareil s'échauffe lorsque vous l'utilisez d'affilée pour un long temps. Cela est tout à fait normal et n'est
pas à imputer à un quelconque problème avec votre appareil.
ATTENTION
RISQUE DE CHOC ÉLECTRIQUE
NE PAS OUVRIR
TENSION DANGEREUSE
Les tensions électriques présentes à l'intérieur de votre appareil sont suffisantes pour constituer un
risque de choc électrique pour des êtres humains.
ATTENTION
Ce guide contient d'importantes instructions d'utilisation et d'entretien. Pour votre sécurité, n'hésitez
pas à le consulter.
Câble d'alimentation
- Vérifiez que l'appareil ne repose pas sur le câble d'alimentation secteur car son poids risque de l'endommager
et de vous exposer alors à un danger.
- Si le cordon d'alimentation électrique est endommagé, demandez au fabricant, à son agent de service ou à un
technicien qualifié de le remplacer pour vous éviter tout danger.
Interférence
- Les interférences électromagnétiques de forte puissance peuvent perturber le bon fonctionnement de votre
appareil. Lorsque cela se produit, réinitialisez simplement votre appareil, selon les instructions de ce guide,
pour rétablir son fonctionnement normal. Si le dysfonctionnement subsiste, éloignez l'appareil de la source des
interférences.

FR-2
- Cet appareil contient des microprocesseurs sensibles aux interférences/bruits électriques et aux décharges
électriques. S'il ne fonctionne pas correctement, débranchez son cordon d'alimentation de la prise secteur
puis rebranchez-le.
Surveillance
- Surveillez les enfants pour les empêcher de s'amuser avec l'appareil.
- Ne laissez personne, notamment les enfants, insérer des objets au travers des diverses ouvertures de votre
appareil (aération, connexion, etc.) pour éviter un risque de choc électrique.
Réparation/entretien
- Pour réduire les risques de choc électrique, ne retirez pas les vis. Cet appareil ne contient aucune pièce
remplaçable par l'utilisateur. Confiez toutes les opérations de réparation à un technicien qualifié uniquement.
- N'ouvrez aucun couvercle vous exposant à une tension électrique dangereuse.
- Débranchez votre appareil du secteur avant de le nettoyer.
- N'utilisez ni tampon abrasif ni solution de nettoyage abrasive pour ne pas endommager la surface de
l'appareil.
ÉLÉMENTS DE COMMANDE ET FONCTIONS
1. COMMANDE DE
VOLUME/DÉFILEMENT
ET OK/►/II
2. ÉCRAN LCD
3. TOUCHE INFO/
4. TOUCHE MENU/
5. TOUCHE MODE
6. HAUT-PARLEUR
7. TOUCHE
8. TOUCHE ALARM/SNOOZE
9. TOUCHE SLEEP
10. TOUCHE MEMORY
11. ANTENNE
12. CONNECTEURS DES
ÉCOUTEURS
13. ENTRÉE AUX
14. PORT USB
15. CONNECTEUR DE
L'ALIMENTATION SECTEUR
MISE EN ROUTE DE LA RADIO POUR LA PREMIÈRE FOIS
Lorsque vous branchez la radio sur le secteur pour la première fois, elle se place automatiquement en mode
veille. L'écran s'allume pendant quelques secondes puis affiche un message de bienvenue et finalement l'heure.
Appuyez une fois sur la touche
pour allumer la radio. Celle-ci se place automatiquement en mode numérique
et démarre une recherche de stations.
Réglage de l'heure
L'heure n'est synchronisée et mise à jour que si vous recevez les signaux numériques là où vous vous trouvez.
Pour la synchroniser sur l'heure locale, réglez-la sur une station numérique et laissez-la diffuser le contenu de
cette station pendant un bref instant. Aucun réglage manuel de l'heure n'est nécessaire.
ÉCOUTE DE LA RADIO
Amélioration de la réception
Cette radio est équipée d'une antenne télescopique DAB/FM afin d'améliorer la réception des signaux. En cas de
mauvaise réception, déployez complètement l'antenne et recherchez la meilleure position et la meilleure
orientation. La position idéale pour la réception numérique correspond à la position verticale, celle que nous
recommandons.

FR-3
Mode radio numérique
Lorsque vous branchez la radio sur le secteur puis l'allumez pour la première fois, elle se place automatiquement
en mode numérique et démarre une recherche de stations. L'indication "Scanning ..." s'affiche sur l'écran ainsi
qu'une barre de progression de la recherche et le nombre de stations qui ont été localisées jusqu'à présent.
(F1) (F2).
Une fois que la recherche est terminée, la radio sélectionne la première station repérée, dans l'ordre
alphanumérique. Pour caler la radio sur une autre station qui a été localisée pendant la recherche, appuyez une
fois sur le bouton SCROLL et tournez-le jusqu'à atteindre cette autre station. Appuyez alors sur le bouton
SCROLL pour écouter son contenu.
Remarque : Si la radio ne localise aucune station pendant la recherche automatique, elle affiche le menu Tune
Select. Tournez alors le bouton SCROLL jusqu'à atteindre l'option "Manual tune" ou "Autoscan" et appuyez sur
ce même bouton pour valider votre choix.
Recherche automatique de statio n s nu mériq u es
Votre radio recherche automatiquement toutes les stations numériques de la Bande III. Une fois que la recherche
est terminée, la radio sélectionne la première station repérée, dans l'ordre alphanumérique.
1. Pour démarrer la recherche automatique de station, appuyez sur la touche MENU pour afficher le menu Tune
Select. Tournez le bouton SCROLL jusqu'à sélectionner l'option "Auto scan" et appuyez sur ce même bouton
pour confirmer votre choix. L'indication "Scanning ..." et une barre de progression s'affichent sur l'écran. (F3)
2. Toutes les stations localisées sont automatiquement consignées dans la mémoire de la radio. Pour les
parcourir et écouter l'une d'elles, tournez le bouton SCROLL jusqu'à atteindre une station qui vous convienne
et appuyez sur ce même bouton pour écouter son contenu.
Recherche manuelle des stations numériques
1. Pour rechercher manuellement une station numérique, appuyez sur la touche MENU. Le menu Tune Select
apparaît. Appuyez sur le bouton SCROLL pour sélectionner l'option "Manual tune". (F4) (F5)
2. Tournez le bouton SCROLL pour parcourir les stations numériques. L'écran affiche "5A to 13F" et les
fréquences associées.
3. Lorsque vous apercevez la fréquence que vous désirez sur l'écran, appuyez sur le bouton SCROLL pour
confirmer votre choix. Le nom du groupe de stations (ensemble/multiplex) s'affiche sur l'écran.
4. Pour écouter la station sélectionnée, réappuyez sur le bouton SCROLL.
Services numériques supplémentaires
Le symbole ">" apparaissant parfois juste après le nom de la station indique que vous pouvez accéder à des
services supplémentaires pour cette station. Ces autres services concernent la station principale, par exemple
l'ajout de commentaires pour une station de sport. Les services supplémentaires sont insérés directement après
la station principale. Pour sélectionner la station secondaire, appuyez sur le bouton SCROLL.
Affichage d'informations en mode numérique
Chaque pression sur la touche INFO affiche une information différente, selon la séquence suivante :

FR-4
Heure et date
L'heure et la date sont automatiquement mises à jour par les signaux diffusés ; aucun réglage manuel n'est
nécessaire. Dans le cas improbable où la radio ne reçoit pas les signaux de synchronisation de l'heure et la date,
elle affiche l'indication "<TIME/DATE>".
Fréquence
Fréquence de la station actuellement diffusée.
Débit binaire audio
L'écran affiche le débit binaire des signaux audio numériques reçus.
Force du signal
Une barre de niveau, s'étendant de gauche à droite, apparaît pour rendre compte de la force du signal. Plus la
barre est longue et plus le signal est fort.
DLS
DLS est l'acronyme de Dynamic Label Segment, un message défilant transmis par la station émettrice. Le
message fournit généralement des informations sur l'émission diffusée, etc.
Type d'émission
Information précisant le style de l'émission actuellement diffusée. Lorsque cette information n'est pas disponible,
"<Programme Type>" est affiché sur l'écran.
Ensemble/Multiplex (Nom de groupe)
Un ensemble/multiplex est un groupe de stations radio transmises dans un même flot et sur la même fréquence.
Un multiplex peut être national ou local, avec la différence que le multiplex local est limité aux stations spécifiques
à la région considérée.
Remarque : pour afficher la ver sion du logiciel sur l'écran, appuyez sur l a touche INFO et maintenez-la enfoncée
pendant plus de 2 secondes.
Radio FM
1. Pour sélectionner la bande FM, appuyez sur la touche MODE jusqu'à afficher "Switch to FM" sur l'écran. La
fréquence FM apparaît ensuite.
2. Pour démarrer la recherche automatique de stations, appuyez sur le bouton SCROLL et maintenez-le enfoncé
jusqu'à démarrer l'incrément ou le décrément de la fréquence et afficher le message "Searching ... > ." ou
"Searching ... <." La recherche s'arrête automatiquement à la première station localisée. (F6) (F7)
3. Pour démarrer la recherche manuelle de station, appuyez une fois sur le bouton SCROLL. Lorsque l'indication
< Tuning > apparaît sur l'écran, tournez le bouton SCROLL jusqu'à atteindre la fréquence de la station que
vous voulez écouter.
4. Pour activer la réception FM stéréo/mono, appuyez une fois sur la touche MENU. Lorsque l'indication "FM
Audio setting" apparaît sur l'écran, appuyez sur le bouton SCROLL pour entrer dans le menu puis tournez le
bouton SCROLL jusqu'à sélectionner "Auto" ou "Mono". Réappuyez sur ce même bouton pour confirmer votre
choix.
Remarque : La radio sélectionne automatiquement le mode stéréo ou mono, mais vous pouvez modifier
manuellement ce réglage, ce qui peut être utile lorsque le signal reçu est faible.
PRÉSÉLECTION DE STATION ET ÉCOUTE DE STATION PRÉSÉLECTIONNÉE
Vous pouvez présélectionner jusqu'à 10 stations numériques ou FM afin de pouvoir, ensuite, y accéder
directement.

FR-5
1. Pour présélectionner une station, recherchez sa fréquence puis appuyez sur la touche MEMORY et
maintenez-la enfoncée. L'indication "Empty preset 1" apparaît sur l'écran et la position en mémoire clignote.
(F8)
2. Tournez le bouton SCROLL jusqu'à sélectionner le numéro de présélection de la station que vous voulez
conserver et appuyez sur ce même bouton pour confirmer votre choix. L'indication "Preset # saved" apparaît
sur l'écran. (F9)
3. Pour écouter une station présélectionnée, appuyez une fois sur la touche MEMORY et tournez le bouton
SCROLL dans un sens ou dans l'autre pour parcourir la liste des présélections. Lorsque le numéro de la
présélection qui vous intéresse apparaît sur l'écran, arrêtez de tourner et appuyez sur le bouton SCROLL pour
diffuser le contenu de la station correspondante. Lorsque vous appuyez sur une touche de présélection qui
n'est associée à aucune station de radio, le message "Empty preset #" apparaît.
RÉTABLISSEMENT DES RÉGLAGES EFFECTUÉS EN USINE
Lorsque vous déplacez la radio dans une autre région, certaines stations présélectionnées ou certaines stations
qui avaient été auparavant localisées risquent de ne plus être accessibles. Lorsque cela se produit, vous devez
rétablir les réglages effectués en usine, selon la procédure suivante :
1. Branchez la radio sur une prise secteur et appuyez sur la touche
pour la mettre en route.
2. Appuyez sur la touche MENU et maintenez-la enfoncée jusqu'à apercevoir le message "Press SELECT to
confirm reset".
3. Relâchez la touche MENU et appuyez une fois sur le bouton SCROLL. Le message "Restarting ..." s'affiche
sur l'écran. Lorsque la réinitialisation est terminée, la radio se place en mode veille.
4. Réappuyez sur la touche
pour rallumer la radio. Celle-ci se place automatiquement en mode numérique
(DAB) et démarre la recherche de stations. Une fois que la recherche est terminée, la radio sélectionne et
affiche la première station repérée, dans l'ordre alphanumérique.
FONCTION RÉVEIL
Cet appareil vous permet de programmer deux heures de réveil et de sélectionner, pour chacune d'elles, la
source sonore que vous désirez pour vous réveiller (sonnerie ou contenu de votre station numérique ou FM
préférée).
Réglage de l'heure de réveil et sélection de la source sonore
1. Appuyez une fois sur la touche ALARM pour accéder au menu de cette fonction. Tournez ensuite le bouton
SCROLL pour sélectionner l'heure de réveil 1 ou 2 et appuyez sur ce même bouton pour confirmer votre
choix.
2. Tournez le bouton SCROLL jusqu'à sélectionner "Alarm Setting" et appuyez sur ce même bouton pour
confirmer votre choix. L'indication "Alarm # Setting" apparaît sur l'écran, avec les chiffres de l'heure de réveil
qui clignotent. (F10)
3. Tournez le bouton SCROLL jusqu'à régler les chiffres des heures et appuyez sur ce même bouton pour
confirmer votre choix ; recommencez pour le réglage des minutes.
4. La confirmation des minutes termine le réglage de l'heure de réveil et vous devez maintenant choisir la source
sonore du réveil.
5. Tournez le bouton SCROLL et sélectionnez, successivement, une station numérique ou FM présélectionnée
(1-10), la tonalité de la sonnerie (1 ou 2) et le volume sonore du réveil. À chaque réglage, appuyez sur ce
même bouton pour confirmer votre choix. (F11)
6. Les réglages sont terminés et la fonction réveil est prête à fonctionner. Au préalable, vous devez l'activer.
7. Pour configurer également l'autre heure de réveil (1 ou 2), recommencez les instructions ci-dessus.

FR-6
Activation de la fonction réveil
1. Pour activer la fonction réveil, appuyez sur la touche ALARM et sélectionnez l'heure de réveil que vous
désirez (1 ou 2) dans le menu correspondant alors affiché.
2. Tournez le bouton SCROLL jusqu'à sélectionner "Alarm Source" et appuyez sur ce même bouton pour
confirmer votre choix.
3. Tournez de nouveau le bouton SCROLL jusqu'à afficher la source sonore que vous désirez pour vous réveiller,
selon la séquence suivante :
4. Dès que le mode de réveil que vous désirez apparaît à l'écran, appuyez sur le bouton SCROLL. La fonction
réveil est maintenant activée, comme l'indique l'icône affichée sur l'écran.
5. Lorsque l'heure de réveil est arrivée, la source sonore que vous avez choisie retentit et l'icône de la fonction
réveil clignote sur l'écran. Pour arrêter la source de réveil plus tôt, appuyez sur la touche
.
Remarque 1 : Si vous activez la fonction réveil et choisissez la radio numérique (DAB) ou FM comme source
sonore, réglez le volume sonore à un niveau suffisant pour l'entendre.
Remarque 2 : L'heure de réveil que vous avez programmée pour se déclencher en premier a priorité. Aussi, si
vous n'arrêtez pas la source sonore correspondante, celle-ci continue de retentir pendant une heure, empêchant
la seconde programmation de réveil de se déclencher si elle a été programmée avant la fin de cette heure. La
touche snooze arrête juste, momentanément, le re tentis sement de la source sonore pe ndan t cette durée . Si vou s
arrêtez la source sonore avant le déclenchement de la deuxième heure de réveil, celle-ci sera normalement
activée.
Fonctionnement continu du réveil
La source de réveil continue de retentir jour après jour à l'heure que vous avez indiquée, tant que la fonction
réveil est active (l'icône correspondante est affichée sur l'écran). Pour arrêter cette fonction, accédez au menu
Alarm, sélectionnez l'option "Alarm Source" et activez la valeur "Alarm # off".
Fonction rappel de réveil
Lorsque vous entendez la source audio d'une heure de réveil, appuyez sur la touche SNOOZE pour interrompre
le retentissement de cette source pendant 5 minutes. L'indication "Zz" apparaît alors sur l'écran. Vous pouvez
recommencer pendant toute l'heure durant laquelle le réveil retentit.
MODE BLUETOOTH
Les performances de la transmission Bluetooth varient selon la marque et le modèle de l'appareil qui est
connecté. Elles sont d'autant meilleures que l'appareil est compatible avec la dernière version 2.1 de Bluetooth et
qu'il intègre la toute dernière mise à jour de son microprogramme. Nous ne garantissons pas que notre radio est
compatible avec tous les appareils et tous les types de média.
Performances du mode Bluetooth
Désactivez le mode Bluetooth sur tous les appareils se trouvant dans un rayon de 9 m. Tout autre couplage
Bluetooth alors actif risque, en effet, de perturber le bon fonctionnement du couplage Bluetooth de la radio.
La norme Bluetooth utilise une technique de transmission à courte portée. Le dispositif d'émission et de réception
Bluetooth de votre appareil reste opérationnel sur une distance d'environ 9 m en espace ouvert. Généralement,
les appareils Bluetooth communiquent clairement entre eux lorsqu'ils se trouvent dans une même pièce ou dans
un même bureau de taille normale. Lorsqu'ils se trouvent dans des pièces différentes, la qualité de la
communication dépend des matériaux de construction utilisés. La présence d'objet solide sur le trajet des
signaux Bluetooth réduit significativement la portée de la communication. Ce phénomène est visible avec, par
exemple, le corps humain, un mur de briques ou de béton, des meubles massifs et une bibliothèque. La
dégradation de la portée est moindre avec du verre, une cloison sèche, un mur en bois lambrissés et des
cloisons de bureau, mais elle demeure, néanmoins, perceptible. En cas de problèmes de communication,
essayez de rapprocher les deux appareils Bluetooth.
Profils Bluetooth pris en charge
La capacité Bluetooth de votre radio vous permet de recevoir les signaux audio de nombreux appareils Bluetooth
(téléphones mobiles, ordinateurs, PDA, etc.). Ce modèle de radio est compatible avec les profils et

FR-7
fonctionnalités Bluetooth indiqués ci-dessous. Vous ne pouvez communiquer qu'avec un seul appareil par profil à
la fois.
Advanced Audio Distribution Profile (A2DP)
- Connexion audio stéréo de haute qualité
- Diffusion en flux de musique stéréo depuis un ordinateur portable, un téléphone mobile, etc.
Audio Video Remote Control Profile (AVRCP)
- Télécommande d'appareil
- Dispositif de commande connecté
Transmission de musique stéréo avec votre téléphone mobile
Cette connexion n'est possible qu'avec un téléphone mobile gérant le profil Bluetooth A2DP pour la transmission
de musique stéréo. La création d'une nouvelle connexion Bluetooth requiert une certaine familiarité avec les
fonctions Bluetooth de votre téléphone mobile. Aussi, puisque chaque téléphone fonctionne légèrement
différemment des autres téléphones, familiarisez-vous avec les fonctions Bluetooth de votre appareil avant
d'essayer une première connexion.
1. Activez le mode Bluetooth sur votre téléphone mobile si ce n'est pas déjà fait. Si nécessaire, consultez son
guide d'utilisateur pour revoir les instructions correspondantes.
2. Approchez le téléphone mobile de votre radio de façon à que les deux appareils ne soient pas éloignés l'un de
l'autre de plus de 90 cm.
3. Appuyez sur la touche MODE jusqu'à sélectionner le mode Bluetooth. L'indication "Bluetooth" s'affiche sur
l'écran en même temps que "l'icône clignotante".
4. Démarrez la recherche des appareils Bluetooth se trouvant à portée sur le téléphone A2DP et conformez-vous
aux instructions affichées sur l'écran du téléphone. Recherchez l'entrée "BT Speaker" - le nom Bluetooth de
la radio - dans la liste des résultats. Si un mot de passe vous est réclamé, tapez "0000".
5. Sélectionnez et confirmez le couplage sur votre téléphone. Après quelques secondes, la connexion est
établie ; la radio émet deux bips de confirmation et "l'icône clignotante" est remplacée par
sur l'écran. Vous
pouvez maintenant commencer la diffusion en flux Bluetooth d'une musique.
6. Appuyez sur le bouton SCROLL de la radio ou sélectionnez la fonction lecture sur le téléphone. Vous
entendez maintenant votre musique sur la radio.
7. Pour arrêter la lecture, réappuyez sur le bouton SCROLL ou sélectionnez la fonction "pause" sur le téléphone.
8. Pour écouter une chanson suivante ou revenir à une chanson précédente, appuyez sur les touches ou
de la radio, ou sélectionnez les "skip controls" (commandes de saut) sur le téléphone.
Remarque : Certains téléphones mobiles peuvent se connecter et se déconnecter pendant que vous composez
et terminez un appel. Cela ne signifie pas forcément que votre appareil est défectueux.
Transmission de musique stéréo avec d'autres appareils Bluetooth
Cette connexion n'est possible qu'avec un appareil Bluetooth prenant en charge le profil A2DP pour la
transmission de musique stéréo. Vérifiez que cet appareil intègre la dernière version du pilote et/ou du
microprogramme qui lui est nécessaire et que ces versions gèrent totalement la fonctionnalité Bluetooth. Nous ne
garantissons pas que notre radio est compatible avec tous les appareils Bluetooth. En plus des procédures
décrites ci-dessus pour les téléphones mobiles, votre radio peut recevoir les flux de musique stéréo émis par
nombre d'autres sources Bluetooth, notamment un ordinateur, un PDA ou un lecteur de musique Bluetooth. Les
instructions exactes variant d'un appareil à un autre, nous vous recommandons de consulter le guide d'utilisation
de celui auquel vous voulez coupler votre radio.
Remarque : Un nombre toujours plus grand d'appareils intègrent maintenant la fonctionnalité Bluetooth, et un
nombre moindre, mais cependant important, gèrent égale ment le p roto cole A 2DP pour transmettre de la musique
stéréo via Bluetooth. Pour obtenir le meilleur de votre appareil Bluetooth, vérifiez que vous utilisez la dernière
mise à jour disponible de son pilote et/ou de son microprogramme. Le chargement régulier des mises à jour est
important car vous ajoutez des fonctionnalités à votre appareil qui n'étaient pas présentes dans les versions
précédentes, par exemple l'intégration du protocole A2DP. Ces mises à jour sont publiées par le fabricant de
l'appareil. Leur installation est décrite en détail dans le guide d'utilisateur de l'appareil. Attention ! L'installation
d'une mise à jour ne doit être entreprise que par personne qui est familière avec cette opération. La sauvegarde
du contenu de l'appareil est fortement recommandée auparavant.

FR-8
FONCTIO N ARRÊ T AUTO M ATIQ UE
Cette fonction vous permet de programmer l'arrêt de votre radio après un certain délai.
1. Pour l'activer, appuyez sur la touche SLEEP et maintenez-la enfoncée. L'indication "Sleep Timer" s'affiche sur
l'écran, puis les délais défilent sur l'écran, selon la séquence suivante :
2. Dès que le délai que vous désirez apparaît sur l'écran, relâchez la touche. La fonction démarre dans deux
secondes. L'écran affiche l'indication "s#" avec "s1" qui est remplacé par le délai que vous avez choisi, par
exemple "10 minutes".
3. Dès que le délai est écoulé, la radio s'éteint. Pour arrêter la fonction avant la fin du délai, appuyez sur la
touche SLEEP jusqu'à afficher l'indication "Sleep Timer Off" sur l'écran.
4. Pour afficher l'état de la fonction, appuyez une fois sur la touche SLEEP.
ENTRÉE AUX
Une entrée stéréo 3,5 mm se trouve à l’arrière de votre appareil ; elle vous permet de récupérer les signaux audio
analogiques d'une source extérieure.
Pour activer la fonction AUX, appuyez sur la touche MODE jusqu'à afficher l'indication "Switch to AUX" sur l'écran.
L'entrée des signaux audio s'effectue alors depuis le connecteur aux et vous pouvez ajuster le volume sonore en
sortie.
Remarque : Par souci d'économie d'énergie, si votre radio est laissée en mode AUX sans être utilisée pendant
trois heures, elle se place automatiquement en mode veille.Pour activer ou désactiver cette fonction, alors que la
radio est allumée, appuyez sur la touche MODE et maintenez-la enfoncée pendant deux secondes, jusqu'à
afficher l'indication "ECO ON" ou "ECO OFF" sur l'écran.
PORT USB
Le port USB, prévu à l'arrière de la radio, est une sortie d'alimentation 5 V/500 mA compatible avec la norme USB.
Ce port est réservé au chargement de pile et n'est pas adapté à la transmission de données.
ÉCLAIRAGE DE L'ÉCRAN
Par défaut, le niveau d'éclairage de l'écran est fixé à "Low" en mode veille et à "High" en fonctionnement. Il est
réactivé automatiquement à la réinitialisation de la radio. Vous avez le choix entre quatre niveaux d'éclairage.
1. Pour régler l'éclairage de l'écran pendant le fonctionnement de la radio, appuyez une fois sur la touche MENU,
tournez le bouton SCROLL jusqu'à atteindre le menu "Backlight" et appuyez sur ce même bouton pour
accéder au menu.
2. Depuis le menu "Backlight", tournez le bouton SCROLL jusqu'à sélectionner l'intensité de l'éclairage que vous
désirez parmi les valeurs High/Medium/Low/Off.
3. Aussi bien en mode veille qu'en mode marche, la pression sur l'une quelconque des touches de votre radio
allume l'éclairage de l'écran avec l'intensité "High" pendant 5 secondes.
CONNECTEURS DES ÉCOUTEURS
Un connecteur pour des écouteurs stéréo de 3,5 mm se trouve à l'arrière de la radio. Branchez des écouteurs
stéréos (non fournis) sur ce connecteur pour écouter vos émissions préférées sans déranger personne. Le
branchement des écouteurs désactive automatiquement la sortie sur les haut-parleurs.
IMPORTANT : Réduisez le volume sonore avant de placer les écouteurs sur vos oreilles. Posez alors les
écouteurs sur vos oreilles et réglez le volume à un niveau confortable.
SPÉCIFICATIONS
ALIMENTATION ÉLECTRIQUE : Courant alternatif 100-240 V~60/50 Hz
PUISSANCE EN SORTIE : 2 x 5 W
PLAGE DE FRÉQUENCES : Numérique 174-240 MHz
FM 87,5-108 MHz
DIMENSIONS DE L'APPAREIL : 300 (L) x 158 (l) x 120 (H) mm.
LES SPÉCIFICATION SONT SUJETTES À MODI FI CATION SANS NOTIFICATION PRÉALABLE.

DA300
Radio digitale & doppia sveglia DAB + DAB/FM con Bluetooth
IT Manuale di istruzioni

IT-1
PRECAUZIONI DI SICUREZZA
- Leggere attentamente tutte le istruzioni prima di utilizzare l'unità e conservare per riferimenti futuri.
- Controllare che la tensione indicata sulla targhetta corrisponda alla tensione di rete.
Ubicazione dell'unità
- L'unità deve essere posizionata su una superficie piana e stabile e non deve essere sottoposta a vibrazioni.
- Non collocare l'apparecchio su superfici inclinate o instabili poiché l'unità potrebbe cadere o rovesciarsi.
- La presa di corrente deve trovarsi vicino all'unità e deve essere facilmente accessibile.
- Evitare i gradi estremi di temperatura, calda o fredda. Posizionare l'unità lontano da fonti di calore come
termosifoni o fuochi a gas/elettrici. Evitare l'esposizione alla luce diretta del sole e ad altre fonti di calore.
- Non collocare mai qualsiasi tipo di candela o fiamma viva in primo piano o vicino all'unità.
- Per ridurre il rischio di incendi, scosse elettriche o danni al prodotto, non esporre questa unità a pioggia,
umidità, gocciolamento o schizzi. Nessun oggetto contenente liquidi, come vasi, deve essere collocato
sull'unità.
- Se si rovesciano dei liquidi nell'unità, questi possono causare gravi danni. Spegnere immediatamente la
tensione di rete. Estrarre la spina di alimentazione e rivolgersi al rivenditore.
- Per evitare il rischio di scosse elettriche o pericolo di incendio dovuto al surriscaldamento, accertarsi che tende
e altri materiali non ostruiscano le prese di ventilazione.
- Non installare o sistemare questo apparecchio in uno scaffale, armadio incorporato o in un altro spazio chiuso,
assicurarsi che un minimo di 10 cm siano mantenuti intorno al dispositivo per la ventilazione.
Sicurezza
- Scollegare sempre l'apparecchio dalla rete di alimentazione prima di collegare/scollegare altri apparecchi o
spostare l'unità.
- Scollegare l'unità dalla presa di corrente durante un temporale.
- Questa unità si scalda quando viene utilizzata per un lungo periodo di tempo. Questo è normale e non mi
indica un problema dell'unità.
CAUTELA
RISCHIO DI SCOSSE ELETTRICHE
NON APRIRE
TENSIONI PERICOLOSE
Una tensione del conduttore pericolosa, che può essere di intensità sufficiente per costituire un
rischio di scossa elettrica per le persone, è presente all'interno del contenitore di questo prodotto.
ATTENZIONE
Il manuale d'uso contiene importanti istruzioni per l'uso e la manutenzione, per la vostra sicurezza è
necessario consultare il manuale.
Cavo di alimentazione
- Verificare che l'unità non sia appoggiata sulla parte superiore del cavo di alimentazione, in quanto il peso
dell'apparecchio può danneggiare il cavo di alimentazione e creare un pericolo per la sicurezza.
- Se il cavo di alimentazione è danneggiato, esso deve essere sostituito dal produttore, dal suo servizio
assistenza o personale comunque qualificato al fine di evitare situazioni pericolose.
Interferenza
- Il normale funzionamento del prodotto può essere disturbato da forti interferenze elettromagnetiche. Se è così,
è sufficiente ripristinare il prodotto per ripristinare il normale funzionamento, seguendo il manuale di istruzioni.
Nel caso in cui la funzionalità non è stata ripresa, si prega di utilizzare il prodotto in un altro luogo.
- Questa unità comprende microprocessori che possono funzionare male a causa di interferenze
esterne/rumore o scarica elettrostatica. Se l'unità non funziona correttamente, scollegare la fonte di
alimentazione, quindi ricollegarla.
Supervisione
- I bambini devono essere controllati per assicurarsi che non giochino con l'apparecchio.
- Non lasciare mai che chiunque, soprattutto i bambini, spingano oggetti estranei nei fori, nelle fenditure o in
qualsiasi altra apertura della custodia - questo potrebbe causare una scossa elettrica letale.

IT-2
Servizio/Manutenzione
- Per ridurre il rischio di scosse elettriche, non rimuovere le viti. L'unità non contiene parti riparabili dall'utente. Si
prega di lasciare il lavoro di manutenzione a personale qualificato.
- Non aprire i coperchi fissi in quanto ciò potrebbe esporre a tensioni pericolose.
- Assicurarsi di staccare l'unità dalla presa di corrente prima di pulirla.
- Non utilizzare alcun tipo di spugnetta abrasiva o soluzioni detergenti abrasive in quanto potrebbero
danneggiare la superficie dell'unità.
CARATTERISTICHE E CONTROLLI
1. CONTROLLO
VOLUME/SCORRIMENTO &
OK/►/II
2. DISPLAY LCD
3. PULSANTE INFO/
4. PULSANTE MENU/
5. PULSANTE MODALITÀ
6. ALTOPARLANTE
7.
PULSANTE
8. PULSANTE
ALLARME/SNOOZE
9. PULSANTE SLEEP
10. PULSANTE MEMORIA
11. ANTENNA TELESCOPICA
12. PRESA PER CUFFIE
13. PRESA AUXIN
14. PORTA USB
15. PRESA CAVO CA
ACCENSIONE DELLA RADIO PER LA PRIMA VOLTA
Quando la radio è collegata all'alimentazione CA per la prima volta, sarà in modalità standby. La
retroilluminazione del display si accende per alcuni secondi, il display mostra per prima cosa i saluti e, infine,
l'orologio. Premere il pulsante
una volta per accendere la radio, questa poi entrerà automaticamente in
modalità DAB ed eseguirà la funzione di scansione automatica.
Impostazione dell'orologio
L'orologio viene solo impostato e aggiornato, se è possibile ricevere i segnali DAB nella vostra posizione.
Affinché l'orologio si sincronizzi con l'ora locale corrente è necessario lasciare una stazione DAB per un breve
periodo. L'impostazione manuale dell'orologio non è necessaria.
ASCOLTO DELLA RADIO
Suggerimenti per una migliore ricezione
Questa radio ha una singola antenna telescopica DAB/FM, per ottenere le migliori prestazioni, è necessario
estendere completamente l'antenna e regolarne la posizione e la direzione fino a trovare la migliore ricezione.
Per la ricezione DAB ideale, è altamente raccomandato mantenere sempre l'antenna in posizione verticale.
Modalità DAB
Se la radio è alimentata e accesa per la prima volta, entra automaticamente in modalità DAB ed esegue la
funzione di scansione automatica. Durante la scansione, il display visualizza "Scanning ..." insieme a una barra di
scorrimento che indica l'avanzamento della scansione e la quantità di stazioni che sono state trovate finora.
(F1) (F2).
Quando la scansione è terminata, la radio selezionerà la prima stazione alfanumerica trovata. Per esplorare le
stazioni trovate, premere prima il controllo SCROLL una volta, quindi ruotare lo stesso comando, e quando si
trova una stazione che si desidera ascoltare, premere sul controllo SCROLL.

IT-3
Nota: Se non ci sono stazioni trova te dopo la scan sione automatica, la radio entrerà nel menu S elezione Sintonia ,
è possibile ruotare il controllo SCROLL seguito dalla pressione dello stesso controllo per selezionare "Manual
tune" o "Autoscan" per le stazioni.
Scansione automatica DAB
La scansione automatica cercherà l'intera banda canali DAB III. Quando la scansione è terminata, la radio
selezionerà automaticamente la prima stazione alfanumerica trovata.
1. Per attivare la scansione automatica, premere prima il pulsante MENU per entrare nel menu Selezione
Sintonia, quindi ruotare il controllo SCROLL per selezionare "Autoscan", infine premere lo stesso comando
per confermare, il display visualizza "Scanning ..." e una barra di scorrimento in progressione. (F3)
2. Tutte le stazioni che sono state trovate verranno memorizzate automaticamente, per esplorare e scegliere di
ascoltare le stazioni trovate, ruotare il controllo SCROLL seguito dalla pressione sul controllo stesso.
Sintonizzazione manuale DAB
1. Per selezionare Sintonia manuale, premere prima il pulsante MENU per entrare nel menu Selezione sintonia,
quindi premere sul controllo SCROLL per selezionare "Manual tune". (F4) (F5)
2. Ruotare il controllo SCROLL per spostarsi attraverso i canali DAB, il display visualizzerà "5A to 13F" e le loro
frequenze associate.
3. Quando la frequenza desiderata appare sul display, premere sul controllo SCROLL per confermare. Il nome
del gruppo di stazioni (insieme/multiplex) verrà visualizzato.
4. Per ascoltare la stazione selezionata, premere di nuovo sul controllo SCROLL.
Servizi secondari DAB
In alcune occasioni si vedrà il simbolo ">" direttamente dopo il nome della stazione, significa che ci sono servizi
secondari disponibili per quella stazione. Questi servizi secondari contengono servizi extra che si riferiscono alla
stazione principale. Ad esempio, una stazione di sport potrebbe voler aggiungere commenti extra. I servizi
secondari sono inseriti direttamente dopo la stazione primaria. Per selezionare la stazione secondaria premere
sul controllo SCROLL.
Modalità di visualizzazione DAB
Ogni volta che si preme il tasto INFO, il display farà scorrere le seguenti modalità di visualizzazione:
Ora e data
L'ora e la data verranno aggiornate automaticamente dalle informazioni trasmesse, non è necessario impostare
l'orologio manualmente. Nel caso improbabile che nessuna informazione dell'orologio venga ricevuta, il display
visualizzerà "<TIME/DATE>".
Frequenza
La frequenza della stazione attuale sarà visualizzato.
Velocità in bit audio
Il display visualizza la velocità di bit digitali audio in ricezione.

IT-4
Forza segnale
Il display visualizza una barra di scorrimento per indicare la potenza del segnale, più forte è il segnale, maggiore
sarà la lunghezza della barra da sinistra verso destra.
DLS
DLS è l'acronimo di Dynamic Label Segment, che è un messaggio a scorrimento che l'emittente può includere
nelle sue trasmissioni. Il messaggio di solito comprende informazioni quali dettagli del programma, ecc ...
Tipo di programma
Questo descrive lo stile del programma che viene trasmesso. Se le informazioni non sono disponibili, il display
visualizzerà "<Programme Type>".
Insieme/Multiplex (nome gruppo)
L'Insieme/Multiplex è una collezione di stazioni radio che sono in bundle e sono trasmesse insieme in una singola
frequenza. Ci sono multiplex nazionali e locali, i locali contengono stazioni che sono specifiche per quella zona.
Nota: Premere e tenere premuto il tasto INFO per più di 2 secondi, il numero di versione del software viene
visualizzato.
Radio FM
1. Per selezionare FM, premere ripetutamente il pulsante MODE fino a quando il display visualizza "Switch to
FM", la frequenza FM sarà finalmente visualizzata.
2. Per attivare la ricerca automatica, premere e tenere premuto il controllo SCROLL fino a quando non inizia a
eseguire la scansione verso l'alto o verso il basso della banda di frequenza, il display visualizza "Searching ... > ."
o "Searching ... < .", e si fermerà automaticamente una volta che una stazione è stata trovata. (F6) (F7)
3. Per attivare la sintonizzazione manuale, premere prima il controllo SCROLL solo una volta quando il display
visualizza <Tuning>, ruotare il controllo SCROLL alla frequenza desiderata.
4. Per selezionare la ricezione FM stereo/mono, premere prima il tasto MENU una volta, e quando il display
visualizza "FM Audio setting", premere il controllo SCROLL per accedere al menù, quindi ruotare il controllo
SCROLL seguito dalla pressione su di esso per confermare la selezione "Auto" o "Mono".
Nota: La radio passa automaticamente tra le modalità stereo e mono, ma è possibile ignorare questo e attivare
questa funzione manualmente, il che risulta utile per la ricezione di un segnale scadente.
MEMORIZZAZIONE E RICHIAMO STAZIONI MEMORIZZATE
In entrambe le modalità DAB o FM, è possibile memorizzare fino a 10 stazioni per i preset preferiti, questo vi
permetterà di accedere direttamente alle vostre stazioni preferite.
1. Per memorizzare una stazione, prima sintonizzarsi sulla stazione desiderata, quindi premere e tenere premuto
il tasto MEMORY, il display visualizza "Empty preset 1", e il numero del preset lampeggia. (F8)
2. Ruotare il comando di SCROLL per selezionare il numero di preset della stazione desiderata poi premere sul
controllo stesso per confermare la selezione, il display mostrerà "Preset # saved". (F9)
3. Per richiamare una stazione preimpostata, premere prima il pulsante MEMORY una volta, quindi ruotare il
comando SCROLL per scorrere verso l'alto o verso il basso i preset memorizzati. Quando il display mostra il
numero di preset desiderato, fermare la rotazione e premere il comando di SCROLL per confermare. Se il
preset non è stato assegnato a una stazione, il display visualizza "Empty preset #".

IT-5
REIMPOSTAZIONE DEI VALORI DI FABBRICA
Quando si sposta la radio in un'altra parte del paese, le stazioni DAB pre-sintonizzate e memorizzati potrebbero
non essere più disponibili. Se questo è il caso, allora è necessario reimpostare la radio alle sue impostazioni
originali di fabbrica; per eseguire un reset di fabbrica, si prega di effettuare le seguenti operazioni:
1. Collegare la radio alla rete di alimentazione CA e premere il pulsante
per accendere la radio.
2. Premere e tenere premuto il tasto MENU fino a quando sul display appare "Press SELECT to confirm reset".
3. Rilasciare il tasto MENU e premere il comando di SCROLL una volta, il display mostra per prima cosa
"Restarting ..." e dopo che il reset è completato, la radio andrà in standby.
4. Premere il pulsante
per accendere di nuovo la radio, questa poi entrerà automaticamente in modalità DAB
ed eseguirà la funzione di scansione automatica. Quando la scansione è terminata, la radio selezionerà e
mostrerà la prima stazione alfanumerica trovata.
FUNZIONE SVEGLIA
Questa unità dispone di una funzione identica di doppia sveglia. Si possono avere due singole impostazioni di
orario della sveglia e modalità della sveglia per essere svegliati da un cicalino elettronico o dalla vostra stazione
radio preferita (DAB/FM).
Impostare l'orar io d e lla sveglia e la modalità della sveglia
1. Premere una volta il pulsante ALARM per entrare nel menù Allarme, quindi ruotare il controllo SCROLL
seguito dalla pressione sul medesimo controllo per selezionare Allarme (1 o 2).
2. Ruotare di nuovo il controllo SCROLL quindi premere lo stesso controllo per selezionare "Alarm Setting". Il
display visualizzerà "Alarm # Setting" e la cifra delle ore per la sveglia lampeggerà. (F10)
3. Ruotare il controllo SCROLL poi premere lo stesso controllo per regolare e confermare l'orario desiderato
della sveglia - prima impostare l'ora e poi i minuti.
4. Dopo la conferma dei minuti, l'ora della sveglia è impostata e si entrerà nelle impostazioni della modalità di
sveglia.
5. Ruotare il controllo SCROLL poi premere lo stesso controllo per regolare e confermare le impostazioni della
modalità di sveglia - prima impostare il preset DAB e FM (1-10), poi il cicalino (1 o 2), infine, il livello del volume
di allarme. (F11)
6. Dopo aver selezionato il livello del volume di allarme, le impostazioni della modalità di sveglia sono state
completate e la funzione di allarme è ora pronta per essere attivata.
7. Ripetere la procedura per impostare l'altra Sveglia (1 o 2).
Attivazione della funzione sveglia
1. Per attivare la funzione sveglia, premere il pulsante ALARM per entrare nel menu Sveglia e selezionare
Sveglia (1 o 2).
2. Ruotare il controllo SCROLL quindi premere lo stesso controllo per selezionare "Alarm Source".
3. Ruotare di nuovo il controllo SCROLL e la relativa modalità di sveglia verrà visualizzata e modificata nella
successione seguente:
4. Quando il display mostra la modalità di sveglia desiderata, premere il comando di SCROLL, la funzione di
sveglia è attivata e l'icona della sveglia associata verrà visualizzata.
5. Quando arriva l'ora della sveglia, la modalità di sveglia selezionata si accende e l'icona della sveglia nel
display lampeggia per indicare che la sveglia è attivata. Per interrompere prima la sveglia, premere il tasto
.
Nota 1: Se è stata attivat a la funz ione di sveglia e la modalità d i sve glia è DAB o FM , fare in mod o che il livello de l
volume della sveglia sia impostato a un livello sufficiente affinché riusciate a sentirlo.
Nota 2: La sveglia che viene prima avrà la priorità e continuerà per una durata di un'ora, lo snooze disattiverà
solo l'allarme temporaneo nel corso di questo periodo, quindi se la seconda sveglia è prevista in questo periodo,

IT-6
non funzionerà. Ma se la prima sveglia è spenta prima che la seconda sveglia arrivi, allora la seconda sveglia
viene attivata.
Ripetizione automatica della sveglia
La sveglia viene automaticamente ripetuta ogni giorno all'orario selezionato fino a quando l'icona di sveglia è
visualizzata. Per annullare questa funzione, andare nel menu Sveglia e selezionare "Alarm # off" nel relativo
menù "Alarm Source".
Funzione snooze
Quando la sveglia è attivata, premere il pulsante SNOOZE per spegnere temporaneamente la sveglia per
5 minuti, il display visualizza "Zz" per indicare che lo snooze è attivato. Questo è ripetibile durante la durata di
un'ora della sveglia.
MODALITÀ B L U ETOOTH
Le prestazioni di connettività Bluetooth possono variare con la marca e modello del dispositivo collegato. Per
prestazioni ottimali, collegare i dispositivi Bluetooth più recenti che incorporano Bluetooth 2.1 e utilizzando
l'aggiornamento del firmware più recente disponibile presso il fornitore del dispositivo. Non è garantita la
compatibilità con tutti i dispositivi e i tipi di supporti.
Considerazioni sulle prestazioni di Bluetooth
Assicurarsi che tutti i dispositivi Bluetooth nel raggio di 9 metri abbiano la trasmissione Bluetooth disattivata. La
presenza di altri dispositivi Bluetooth funzionanti durante la connessione può portare a difficoltà d'uso.
Bluetooth è uno standard di comunicazione radio a corto raggio. L'hardware trasmettitore e ricevitore Bluetooth in
questa unità ha una portata di funzionamento di circa 9 metri in spazio aperto. In generale i dispositivi Bluetooth
possono comunicare tra loro in modo chiaro all'interno di una stanza o un ufficio di dimensioni regolari. Il
funzionamento tra le varie stanze dipenderà dalla costruzione della stanza. È importante riconoscere il fatto che
l'intervallo di comunicazione Bluetooth può essere sostanzialmente ridotto se il segnale passa attraverso un
oggetto solido. I corpi umani, muri in mattoni e cemento, e mobili pesanti o librerie ridurranno il raggio operativo
dei dispositivi Bluetooth. Vetro, muro a secco o pareti con pannelli in legno e pareti divisorie per ufficio possono
avere un effetto meno grave, ma evidente. Si consiglia di posizionare i dispositivi Bluetooth vicini gli uni agli altri,
se si osservano delle difficoltà di comunicazione.
Profili Bluetooth supportati
Le funzionalità Bluetooth di questa radio consentono di ricevere l'audio da molti dispositivi che supportano
Bluetooth quali telefoni cellulari, personal computer e PDA. Essa supporta i seguenti profili Bluetooth e
funzionalità. Solo un dispositivo per ogni profilo può essere collegato contemporaneamente.
Advanced Audio Distribution Profile (A2DP)
- Connessione audio stereo di alta qualità
- Streaming di musica stereo da PC, telefoni cellulari, ecc ...
Audio Video Remote Control Profile (AVRCP)
- Controllo remoto del dispositivo
- Dispositivo collegato al controllo
Collegamento musica stereo con i cellulari
Questo collegamento richiede un telefono cellulare che supporti il profilo A2DP Bluetooth per il collegamento di
musica stereo. Al fine di creare nuova connessione Bluetooth è necessaria un po' di familiarità con le funzioni
Bluetooth del cellulare. Siccome ogni telefono funziona in modo leggermente diverso, si prega di acquisire
familiarità con le funzionalità Bluetooth del dispositivo prima del collegamento.
1. Assicurarsi che il Bluetooth sul telefono cellulare sia acceso. Potrebbe essere necessario consultare il
manuale utente del telefono per i dettagli.
2. Posizionare la radio e il telefono a non più di 0,9 metri di distanza.
3. Premere ripetutamente il pulsante MODE per selezionare la modalità Bluetooth, il display visualizza
"Bluetooth" con l'"icona lampeggiante".
4. Impostare il telefono abilitato A2DP per la ricerca di dispositivi Bluetooth e seguire le istruzioni sullo schermo
del telefono. Si riconoscerà la radio dal suo nome Bluetooth "BT Speaker". Nel caso in cui viene chiesto di
immettere una chiave di accesso, immettere "0000".

IT-7
5. Selezionare e confermare l'abbinamento sul telefono, la connessione sarà completata in pochi secondi e la
radio produrrà un doppio tono acustico di conferma, l'"icona lampeggiante" sul display cambierà in
e ora è
possibile avviare l'ascolto in streaming della musica tramite Bluetooth.
6. Premere il controllo SCROLL sulla radio o selezionare la riproduzione a partire dal telefono per avviare la
riproduzione della musica.
7. Per interrompere la riproduzione, premere di nuovo il controllo SCROLL o selezionare "pause" sul telefono.
8. Per saltare in avanti o indietro ad altre canzoni durante la riproduzione, premere i pulsanti o sulla radio o
selezionare gli "skip controls" sul telefono.
Nota: Alcuni cellulari possono collegarsi e scollegarsi come si fanno e terminano le chiamate. Questo non è
indice di un problema dell'unità.
Connessione di musica stereo ad altri dispositivi Bluetooth
Questo collegamento richiede un dispositivo che supporti il profilo A2DP Bluetooth per il collegamento di musica
stereo. Assicurarsi che il dispositivo abbia le ultime versioni dei driver software o firmware che supporti la
funzionalità Bluetooth. Non è garantita la compatibilità con tutti i dispositivi. In aggiunta alle procedure sopra
descritte per i telefoni cellulari, questa radio può ricevere musica stereo da molti altri dispositivi sorgente
Bluetooth tra cui personal computer, PDA, lettori musicali Bluetooth. Le procedure di connessione esatte possono
variare da dispositivo a dispositivo, si prega di consultare il manuale utente del dispositivo per le operazioni
specifiche.
Nota: Un numero crescente di dispositivi informatici includono il supporto per Bluetooth, e molti includono il
supporto per la musica stereo tramite Bluetoo th (A2DP). Per ottenere le migliori prest az ioni dal proprio dispo sitivo,
si prega di assicurarsi che si st a u tilizz ando l'ultimo aggi ornamento del dr iver software e/o firmware disponibile. In
alcuni casi, l'aggiornamento dei driver software o firmware del dispositivo alla versione più recente può
aggiungere il supporto per A2DP che non era disponibile in una versione precedente. Si prega di contattare il
fornitore del dispositivo per tali aggiornamenti e consultare il manuale utente del dispositivo per le procedure di
aggiornamento. Si ricorda che gli aggiornamenti del sistema devono essere eseguiti solo da personale
competente e dopo aver eseguito un backup completo del sistema.
FUNZIONE SLEEP
Questa funzione consente di programmare la radio per spegnersi automaticamente dopo un determinato periodo
di tempo.
1. Per attivare la funzione di spegnimento automatico, premere ripetutamente il tasto SLEEP, il display
visualizzerà "Sleep Timer" e il tempo cambierà nella sequenza in basso a ogni pressione:
2. Quando il tempo di spegnimento desiderato appare sul display, rilasciare il pulsante e la funzione sleep si
attiverà in due secondi. Il display visualizza "s#" dove "s1" rappresenta "10 minuti" tempo sleep e così via.
3. Quando il tempo di spegnimento arriva a zero, l'unità si spegne. Per mettere spegnere la funzione sleep
quando il timer sleep è attivo, premere ripetutamente il pulsante SLEEP fino a quando il display visualizza
"Sleep Timer Off".
4. Per controllare lo stato del timer sleep, premere una volta il pulsante SLEEP.
INGRESSO AUX
C'è una presa di ingresso aux stereo da 3,5 mm posta sul retro dell'unità; i segnali audio analogici audio da altre
sorgenti possono essere inseriti nella radio attraverso questa presa.
Per selezionare la funzione AUX, premere ripetutamente il pulsante MODE fino a visualizzare "Switch to AUX" sul
display, l'audio passerà al segnale di ingresso aux e si può regolare il controllo del volume per il livello di uscita
audio desiderato.
Nota: Per migliorare ulteriormente il risparmio energetico, se l'unità viene lasciata in modalità AUX e senza alcun
intervento dell'utente per tre ore, l'apparecchio si spegne automaticamente. Per attivare o disattivare questa
funzione, selezionare tra on e off quando l'unità è accesa, premere e tenere premuto il pulsante MODE per più di
due secondi, il display visualizzerà "ECO ON" od "OFF ECO".

IT-8
PORTA USB
C'è una porta USB situata sul retro dell'unità, un'uscita standard 5V/500mA è prevista per la normale capacità di
ricarica USB. La trasmissione di dati USB non è disponibile tramite questa porta.
RETROILLUMINAZIONE DEL DISPLAY
Il livello di retroilluminazione predefinito è "Low" e in standby e "High" durante il funzionamento. Questo viene
ripristinato solo quando il reset di fabbrica ha avuto luogo. Ci sono quattro livelli di retroilluminazione da
impostare per il funzionamento dell'unità.
1. Per impostare la retroilluminazione durante il funzionamento, premere prima una volta il pulsante MENU,
quindi ruotare il controllo SCROLL seguito dalla pressione su di esso per entrare nel menù "Backlight".
2. Nel menu "Backlight", ruotare il controllo SCROLL per selezionare il livello di retroilluminazione High/Medium/Low/Off.
3. Sia in standby che funzionamento, la retroilluminazione si accende su "High" per 5 secondi per ogni pressione
di un tasto.
PRESA PER CUFFIE
Una presa per cuffie stereo da 3,5 mm si trova sul retro dell'unità. Collegare un paio di cuffie stereo (non incluse)
a questa presa per l'ascolto privato senza disturbare gli altri. Gli altoparlanti vengono automaticamente disattivati
quando le cuffie sono in uso.
IMPORTANTE: Quando si utilizzano le cuffie impostare sempre il volume a un livello basso prima di mettere le
cuffie. Quindi inserire le cuffie e aumentare gradualmente il volume ad un livello di ascolto confortevole.
SPECIFICHE
ALIMENTAZIONE: CA 100-240V~60/50Hz
POTENZA IN USCITA: 2 x 5 W
GAMMA DI FREQUENZA: DAB 174-240 MHz
FM 87,5-108 MHz
DIMENSIONI DELL'UNITÀ: 300 (L) x 158 (P) x 120 (A) mm
LE SPECIFICHE SONO SOGGETTE A MODIFICHE SENZA ULTERIORE AVVISO.
 Loading...