

Page 1
1
OMNI-Test Laboratories, Inc.
INSTRUCTIONS FOR
INSTALLATION AND USE
SCAN DSA 5
FREESTANDING STOVE
Tested &
Listed by
Save these instructions
May 2004
KROG IVERSEN & CO. A/S, DK-5492 VISSENBJERG, DENMARK
Beaverton
Oregon USA
Page 2

2
Table of contents:
1. INTRODUCTION................................................................................................................................3
Safety and environment testing..............................................................................................................3
Important information: ...........................................................................................................................3
SAFETY PRECAUTIONS....................................................................................................................4
Locking of the door:...............................................................................................................................5
Features and items included:..................................................................................................................5
2. INSTALLATION.................................................................................................................................6
Pre Installation Check List:....................................................................................................................6
Specification...........................................................................................................................................7
Technical information............................................................................................................................7
Floor Protection requirements: ..............................................................................................................8
Parallel installation:................................................................................................................................8
Corner installation:.................................................................................................................................9
Ceiling Height........................................................................................................................................9
Combustible Wall Clearance:..............................................................................................................10
Non-Combustible Wall Clearances:.....................................................................................................10
Draft Requirements:.............................................................................................................................11
Chimney Installation:...........................................................................................................................11
Chimney height requirements: .............................................................................................................12
Chimney Connection............................................................................................................................13
OPERATION .........................................................................................................................................14
Fueling the stove: .................................................................................................................................14
Starting a Fire.......................................................................................................................................14
Refueling..............................................................................................................................................14
Smoke Detectors ..................................................................................................................................15
Room Ventilation.................................................................................................................................15
Combustion Air Supply .......................................................................................................................15
4. MAINTENANCE...............................................................................................................................16
Cleaning of the stove: ..........................................................................................................................16
Firebricks and baffle plate....................................................................................................................16
Removing baffle plate for cleaning......................................................................................................17
Glass panel...........................................................................................................................................17
Cleaning the glass panel.......................................................................................................................18
Replacement of door glass: ..................................................................................................................19
Gaskets.................................................................................................................................................19
Dismounting/mounting of the door......................................................................................................20
Replacement of the steering axes/counterweights ...............................................................................21
Replacement part list............................................................................................................................21
6. TROUBLESHOOTING....................................................................................................................22
7. WARRANTY PROVISIONS ............................................................................................................23
8. SAFETY LABEL ...............................................................................................................................23
Page 3
3
We welcome you as a new owner of a Scan DSA 5. In purchasing a DSA 5 you have joined the
growing ranks of concerned individuals whose selection of energy systems reflects both a co ncern for
the environment and aesthetics. The DSA 5 is one of the finest home stoves the world over. This
manual wi ll explain the installation, operation and maintenance of the DSA 5.
Please familiarize yourself with the owner’s manual before operating your stove and save the manual
for future reference. Included are helpful hints and suggestions that will make the operation and
maintenance of your new stove an easier and more enjoyable experience. We offer our continued
support and guidance to help you achieve the maximum benefit and enjoyment from your DSA 5.
1. INTRODUCTION
PLEASE READ THIS MANUAL CAREFULLY BEFORE YOU BEGIN THE INSTALLATION
PROCEDURES. FAILURE TO FOLLOW INSTRUCTIONS MAY RESULT IN PROPERTY
DAMAGE, BODILY INJURY OR L OSS OF LIFE. THIS MANUAL CONTAINS IMPORTANT
USER INFORMATION. KEEP THIS MANUAL WITH THE STOVE AFTER INSTALATION IS
COMPLETE.
Safety and environment testing.
The DSA 5 freestanding stove have been tested by OMNI-Test Laboratories, Inc. of Beaverton,
Oregon, and are safety listed by OMNI to UL 1482, ULC-S627 and environment to WAC 51-30-31200.
See: WWW.omni-test.com for listening.
Important information:
No other SCAN stove has the same registration number as yours. The registration number is fixed to
the stove. In case of complaints we request that you have the registration number.
Page 4

4
SAFETY PRECAUTIONS
USE A METAL CONTAINER WITH A TIGHT FITTING LID TO DISPOSE OF ASHES.
NEVER USE GASOLINE, GASOLINE-TYPE LANTERN FUEL, KEROSENE, CHARCOAL
LIGHTER FLUID, OR SIMILAR LIQUIDS TO START OR “FRESHEN UP” A FIRE IN THIS
STOVE. KEEP ALL SUCH LIQUIDS WELL AWAY FROM THE STOVE WHILE IT IS IN USE.
DO NOT BURN GARBAGE OR FLAMMA BLE FLUIDS SUCH AS GASOLINE, NAPHTHA OR
ENGINE OIL.
THIS STOVE IS HOT WHILE IN OPERATION. DO NOT TOUCH, AND KEEP CHILDREN,
CLOTHING AND FURNITURE AWAY. CONTACT MAY CAUSE SKIN BURNS. USE
GLOVES WHEN STOKING THE FIRE.
DO NOT CONNECT THIS STOVE TO A CHIMNEY FLUE CONNECTED TO ANOTHER
STOVE OR APPLIANCE.
DO NOT CONNECT TO ANY AIR-DISTRIBUTION DUCT OR SYSTEM.
BE SURE TO ALLOW AN ADEQUATE SOURCE OF FRESH AIR INTO THE ROOM WHERE
THE STOVE IS OPERATI NG
DO NOT OPERATE THE STOVE WITHOUT THE FIREBOX BAFFLE PLATES PROPERLY
INSTALLED.
BUILD FIRES DIRECTLY UPON THE HEARTH INSIDE THE STOVE. DO NOT USE
GRATES, IRONS, OR ANY OTHER METHOD TO ELEVATE THE FIRE.
DO NOT INSTALL IN A MOBILE HOME
DO NOT INSTALL IN AN ALCOVE
Page 5
5
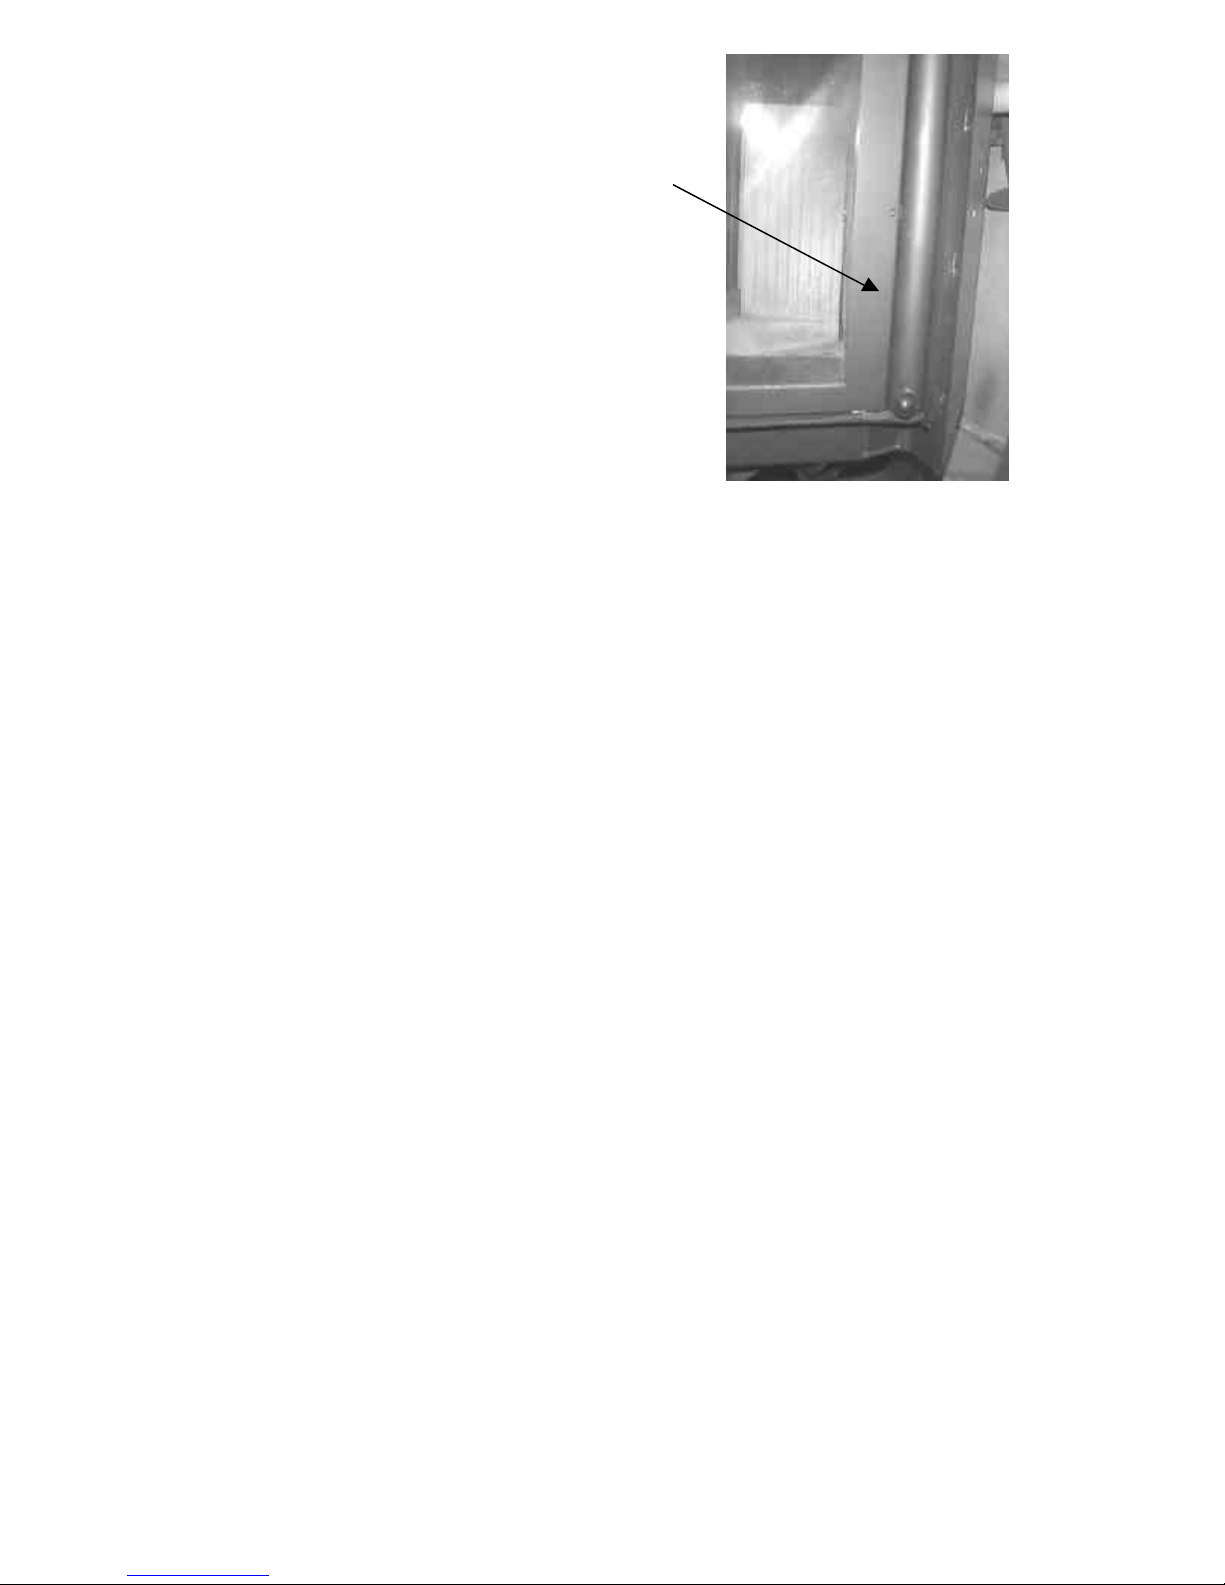
Locking of the door:
When unpacking the stove the door is locked. To unlock
the door pull out in the knob and turning it counterclockwise.
The lock should not be activated during normal use, as
it will then be needlessly worn and scratch the steering
axis.
Note:
Let the door be locked during installation of the stove.
Fig. 2
Features and items included:
Your stove has a built in convection system, so the sides and back of the stove do not get
very hot. It also creates air circulation in the room, to spread the heat faster and more evenly.
Included with the stove are the following items:
1 Special tool is to be used when the door is to be opened for cleaning, maintenance or
dismounting of the door.
1 Hexagon key is to be used when the door is to be opened for cleaning, maintenance or
dismounting of the door.
1 Oven mitten
1 Bag containing fire starters for the first lighting
1 Manual
Page 6

6
2. INSTALLATION
IF THE STOVE IS NOT INSTALLED PROPERLY, A HOME FIRE MAY RESULT, TO REDUCE THE
RISK, PLEASE CAREFULLY FOLLOW THE DIRECTIONS FOR INSTALLATION
DO NOT INSTALL IN A MOBILE HOME
Pre Installation Check List:
Before you begin an installation, review your plans, check to see:
1. Your stove and chimney connector will be far enough from combustible material to meet all
clearance requirements.
2. The floor protection is large enough and is constructed properly to meet all requirements.
3. You have all necessary permits from local authorities. Your local building official is the final
authority for approving your installation as safe and determining that it meets local and state
codes.
The metal label permanently attached to the back of the stove shows that it has been tested to current
UL and ULC safety standards, and gives the name of the testing laboratory. Clearance and installation
information is also printed on the label. Local authorities will generally accept the label as evidence
that, when the stove is installed according to the information on the label and in this manual, the
installation meets codes and can be approved.
WARNING: contact local building officials or the authority having jurisdiction about
restrictions, permit and installation inspection requirements in your area. The installation
instructions and appropriate code requirements must be followed exactly and without
compromise. Alterations to the stove are not allowed. Do not connect the stove to a chimney
system serving another stove or stove, appliance or any air distribution duct. Failure to follow
these instructions will void the manufacturer's warranty.
For any unresolved questions about installation in the USA, we refer to latest version of the national
Fire Protection Association’s publication ANSI/NFPA 211 Standard for Chimneys, Stoves, Vents and
Solid Fuel Burning Appliances. For installation in Canada, refer to CSA CAN-B365, Installation Code
for Solid Fuel Burning Applications and Equipment. These standards are the basis for many national
codes. They are nationally recognized and are accepted by most local authorities. Your local dealer or
your local building official may have a copy of these regulations.
Page 7

7
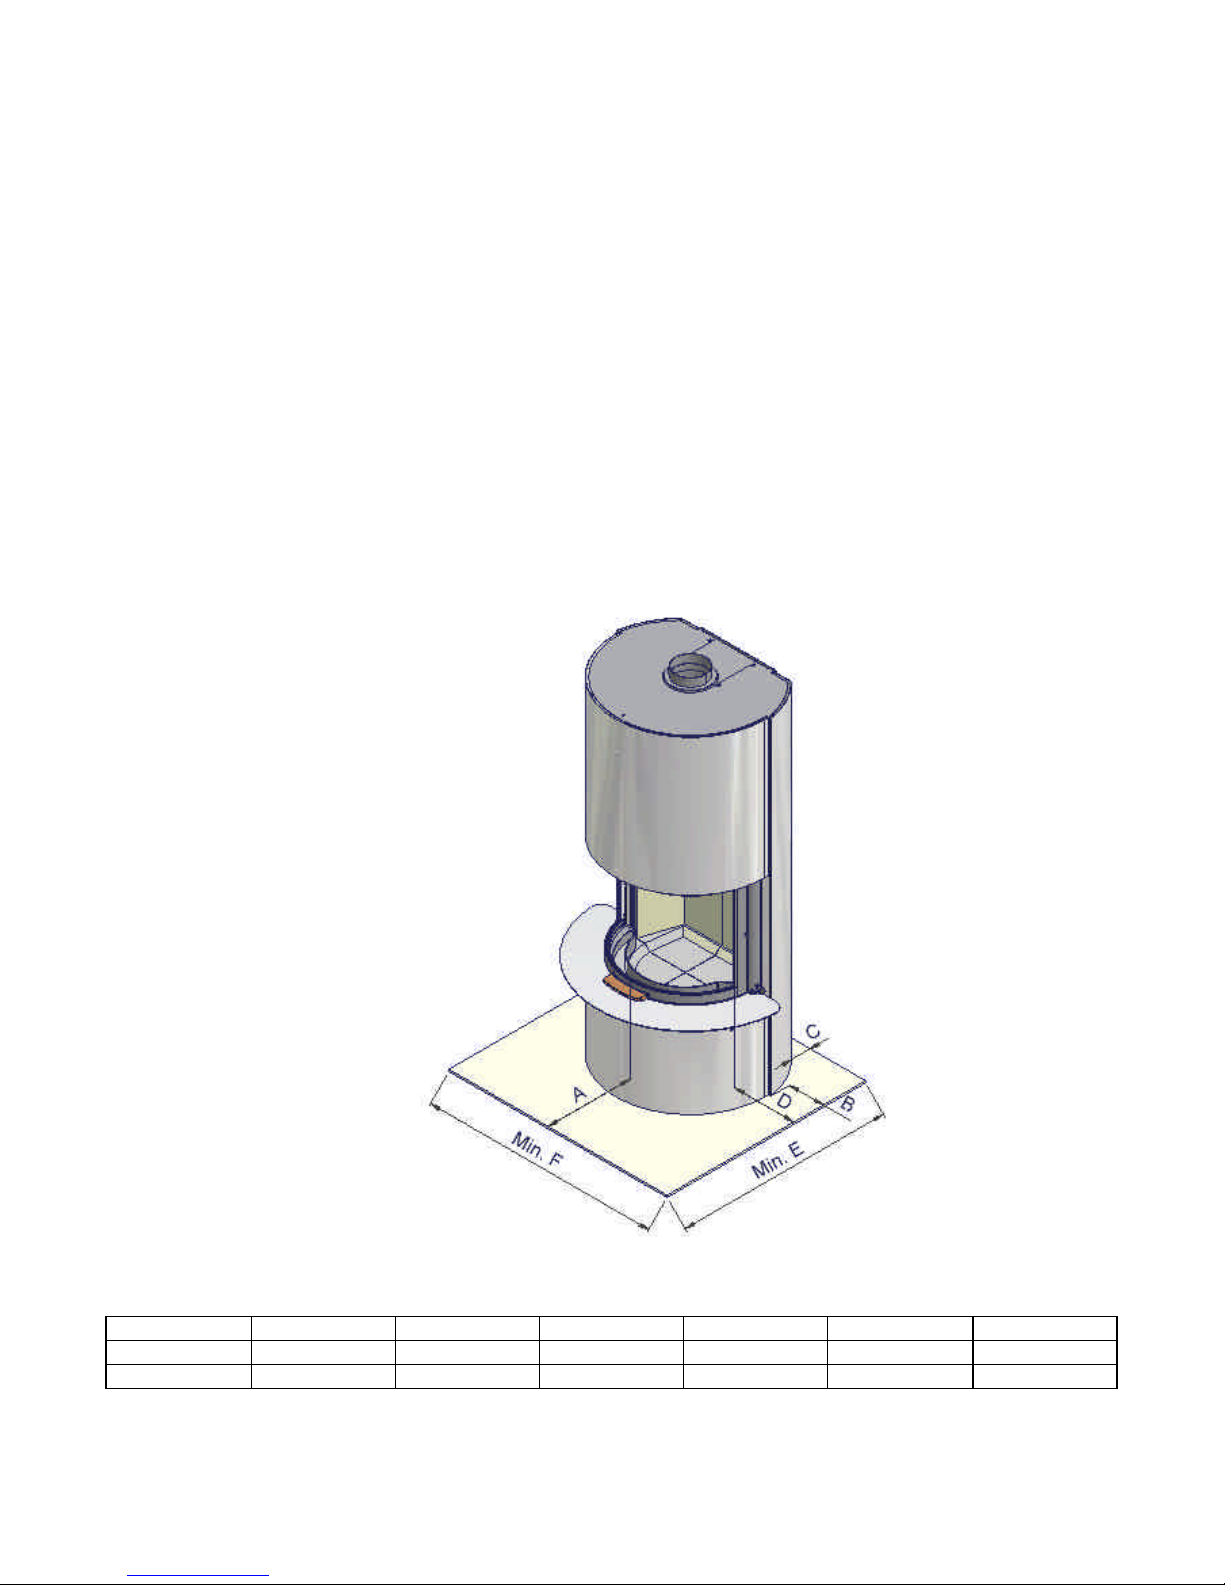
Specification
inch mm
A 65 1650
B 34 1/2 876
C 24 1/4 617
D 9 1/2 243
Technical information
In order to protect the surface of the stove we recommend that you do not remove the plastic bag until
the installation has been completed.
Technical information
Output 63.000 BTU 19 kw
Min-Max output 27.500-63.000 BTU 8 - 19 kw
Size of room 1400 - 2900 Sq f
Fire box opening 16 7/8 x 22 5/8 inch 430 - 575 Mm
Flue outlet with built on adapter 6 inch 152 Mm
Weight 458 pound 208 kg
140 - 290 M
2
Page 8
8
Floor Protection requirements:
The floor protector must extend completely beneath the stove and to the front, sides and rear as
indicated below. The floor protection needs only to be a standard ember protection.
USA:
For USA the protected area must cover the floor completely under the stove and extend 16" to the
front of the fuel door opening and 8" beyond either sides of the fuel door opening
Canada:
For Canada the protected area must cover the floor completely under the stove and extend 18" to the
front of the fuel door opening and 8" beyond both sides and the back of the stove.
Parallel installation:
A B C D E F
USA 16" 3" 8" 40 ¼” 39 ½”
Canada 450 203 203 1276 1283
Page 9

9
Corner installation:
Floor protection measurements and clerence
A B C D
USA 16" 9" 86 ½” 121 ¾”
Canada 450 229 2250 3182
Ceiling Height
The stove must not be installed in a location where the ceiling height is less than 8' (240 cm) tall.
Do not install in an alcove or confined space.
Page 10

10
Combustible Wall Clearance:
432
127
229
508
WARNING: Minimum clearance to combustibles must be observed when installing this stove.
The listed clearances for your DSA 5 are determined in laboratory tests.
If the stove is to be placed at side and back walls of combustible materials the following clearances
must be kept:
Clearances to combustible surfaces*
USA Canada
Rear wall installation Inch
A – stove to side wall 17
B – stove to back wall 3
C – flue collar to side wall 29
D – flue collar to back wall 9
Corner installation
E – stove to adjacent wall 9
F – flue collar to adjacent wall 20
Non-Combustible Wall Clearances:
The DSA stove is a double-skinned convection stove, which means that the temperatures at the rear
of the stove are reduced. This makes it possible to place your DSA 5 next to non-combustible
materials without any distance needed. However, we recommend that you leave enough space in
order to facilitate the cleaning at the rear of the stove.
mm.
736
279
*The clearances may only by reduced be means
approved by the regulatory authority
+
Page 11

11
Draft Requirements:
Required installation components:
The DSA 5 is only one component of the total system. The venting system is equally important for
achieving the required flow of combustion air to the firebox and for safely removing unwanted
combustion by products from the stove. If the venting system’s design does not promote these ends,
the system may not function properly. Poorly functioning venting systems may create performance
problems as well as be a safety hazard (i.e. an oversized chimney may result in less than optimum
performance. A draft test should read greater than .05" W.C. (Inches Water Column) and less than
.08" W.C.
The chimney draught depends on the weather conditions. In stormy weather, you may reduce the
chimney draught by closing the damper in the smoke pipe (if a damper has been installed).
Chimney Installation:
For USA the stove is listed for installation as a vertically to p vented stove using a listed 6" class A
(UL103HT) factory built chimney exiting through the ceiling/attic/roof.
For Canada the stove is listed for installation as a vertically top vented stove using a listed 6"
(CAN/ULC-S629) factory built chimney exiting through the ceiling/attic/roof. The installation shall
conform to CAN/CSA B365.
For connection of the stove to the chimney / Connector pipe use the enclosed adapter, follow the
chimney manufacturer’s instruction for installation of chimney, connector pipe and chimney adapter.
For other vent configuration than descript here follow local codes or NFPA 211 or CAN/CSA-B365
guidelines and methods.
Do not connect this unit to a chimney flue
serving another appliance.
• Chimney cap
• Insulated chimney
• Storm collar
• Roof flashing
• Ceiling support box or joist
shield/fire stop spacer
• Chimney connector
Page 12

12
Chimney height requirements:
The chimney must extend 3 feet above the level of roof penetration and a minimum of 2 feet higher
than any roof surface within 10 feet. Check with your local building officials for additional requirements
for your area.
The condition of the chimney and height is very important; we suggest a total minimum height of 15’
(4,5m).
Page 13

13
Chimney Connection
The chimney connector is ether a single or double walled pipe, depending on the type of installation,
used to connect the stove to the chimney. For use with the stove the chimney connector MUST be 6”
in diameter, with a minimum thickness of 24 gauge black steel or 26 gauge blued steel.
Aluminium and galvanized steel pipe is not acceptable for use with the stove. These materials cannot
withstand the extreme temperatures of a wood fire and can give off toxic fumes when heated.
NOTE:
Listed vent connectors shall be installed in accordance with the terms of their listing and the connector
manufacturer’s installation instructions.
Do not use the connector pipe as a chimney.
Each chimney connector or stovepipe section must be installed to
the stove flue collar and to each other with the male (crimped) end
toward the stove. See fig 5.
Fig. 5
This prevents any amount of condens ed or liquid creosote from running down the outside of the pipe
or the stovetop. All joints, including the flue collar connection must be secured with three sheet metal
screws to ensure that the sections do not separate.
For the best performance the chimn ey connector should be as short and direct as possible
No part of the chimney connector may pass through an attic or roof space, closet or other concealed
space, or through a floor ceiling. All sections of the chimney connectors must be accessible for
cleaning. Where passage through a wall or partition of combustible construction is desired, the
installation must conform to NFPA 211 or CAN/CSA-B365, and is also addressed in this manual.
Page 14

14
3. OPERATION
WARNING
DO NOT USE GASOLINE, LIGHTER FLUID, KEROSENE OR OTHER FLAMMABLE LIQUIDS TO
START OR FRESHEN A FIRE IN THIS STOVE. KEEP SUCH LIQUIDS WELL AWAY FROM THE
STOVE WHILE IT IS IN USE. HOT WHILE IN OPERATION. KEEP CHILDREN, CLOTHING AND
FURNITURE AWAY. CONTACT MAY CAUSE SKIN BURNS
Fueling the stove:
Your stove is designed for burning dry natural well-seasoned wood only (If your wood supply is not
seasoned, ask your authorized SCAN dealer where to obtain seasoned fuel in your area). Wood
should be stored in a dry place for at least one year before being used for fuel. Some trees have very
high moisture contents and it is necessary to thoroughly dry the wood. Cutting and splitting the wood
can speed up the drying process, then stacking it with both ends of the stick exposed. More drying
occurs through the end than through the sides even when the wood is split. We recommend that the
moisture content of the wood be between 15-18% on a wet basis.
Green or uncured wood does not work well as fuel, and can cause increased creosote buildups. The
value of green wood as a source of heat is limited. Do not overload as this may cause over-firing, use
kindling wood, or mill ends for primary fuel.
Although feeding excessive amounts of fuel to the stove should be avoided, it is important to supply it
with sufficient fuel to maintain a moderately hot fire (this is particularly important since burning wood
produces volatile substances).
Burning materials other than natural dry, well-seasoned wood may shorten the life of your stove and
possibly lead to a dangerous over-firing condition. Do not burn garbage, particle, board, scraps or
pressed logs using bonding agents because they can produce conditions, which will deteriorate metal.
Do not store fuel within the installation clearances or within the space required for charging and ash
removal.
Starting a Fire
To start a fire lay a few pieces of kindling or dry twigs and 2 – 3 fire starters in the bed of the hearth in
the stove. Build the wood directly on the stove hearth, and do not use a grate, andiron and do not
elevate the fire.
Light the fire, during start up you can leave the door slightly ajar
Ad 1 or 2 split logs on the kindling fire and allow enough time for them to catch on fire (2 to 6 minutes)
and close the door.
Refueling
To refuel the stove, first open the damper fully, if installed, and let the fire “liven-up” for about one
minute. Open the fuel door to ajar until the draft has stabilized. Open the fuel door and add wood. If
the fire or coal bed is almost depleted and a full load of wood is added, it may be necessary to leave
the door ajar for a short time. Close the door when there is a stable fire again and reset the damper.
Page 15

15
Smoke Detectors
Since there are always several potential sources of fire in any home, we recommend installing smoke
detectors. Do not install them too close to the stove as heat can activate them.
Room Ventilation
During the combustion, oxygen taken from the room air is used. In rare cases it may be necessary to
mount a fresh -air duct on the stove. Please refer to your local building codes.
Combustion Air Supply
Provide for an adequate supply of air for combustion. Proper ventilation is essential when using a solid
fuel-burning appliance. The combustion process uses oxygen from inside the dwelling. If there is not
adequate make-up air (as there is in newer homes which are well-insulated and weather- tight), it may
be difficult to obtain an adequate draft in your chimney (caused by a shortage of air in the house). To
correct this, it may be necessary to crack a window on the windward side of the dwelling, or provide
combustion air to a nearby floor/wall vent (fresh -air duct), or directly to the stove.
Page 16

16
4. MAINTENANCE
WARNING
DISPOSAL OF ASHES:
ASHES SHOULD BE PLACED IN A METAL CONTAINER WITH A TIGHT FITTING LID. THE
CLOSED CONTAINER OF ASHES SHOULD BE PLACED ON A NONCOMBUSTIBLE FLOOR OR
ON THE GROUND, WELL AWAY FROM ALL COMBUSTIBLE MATERIALS, PENDING FINAL
DISPOSAL. IF THE ASHES ARE DISPOSED OF BY BURIAL IN SOIL OR OTHERWISE LOCALLY
DISPERSED, THEY SHOULD BE RETAINED IN THE CLOSED CONTAINER UNTIL ALL CINDERS
HAVE THOROUGHLY COOLED.
Creosote formation and need for removal – When wood is burned slowly, it produces tar and other
organic vapors, which combine with expelled moisture to form creosote, The creosote vapors
condense in the relatively cool chimney flue of a slow-burning fire. As a result, creosote residue
accumulates on the flue lining; this creosote makes an extremely hot fire. The chimney and chimney
connector should be inspected at least once every two months during the heating season to determine
if creosote buildup has occurred. If creosote has accumulated, it should be removed to reduce the risk
of a chimney fire.
Cleaning of the stove:
The stove is cleaned with a moist cloth. Senotherm spray is available for repair of possible
damages/scratches. Your dealer has the right spray in the right color. As there may be minor color
differences, it is recommended to repair large areas with natural borders. You will get the best result if
the stove is repaired while it is lukewarm (if the stove is too hot the paint will be granular). Remember
a good airing during the repair. A possible change of color to gray is caused by over-firing, i.e. you
have used more wood than recommended.
Firebricks and baffle plate
Little cracks may arise in the firebricks and baffle plate because of a minor content of water, especially
if the stove is overheated during the first firing. These cracks do not influence the workability of the
stove and are not covered by the limited warranty .
DO NOT OPERATE THE STOVE WITHOUT FIREBRI CKS AND BAFFLE PLATE PROPERLY
INSTALLED OR WARRANTY WILL BE VOIDED
Page 17

17
Removing baffle plate for cleaning
Fig. 4
The baffle plate must be placed according to the pictures below, fig 3 & 4.
When the stove and the chimney are cleaned/swept, a layer of soot may be left on the baffle plate.
This can be removed by tipping the baffle plate. The soot will then fall into the stove, where it is easily
removed.
The baffle plate is made of vermiculite and it is a porous material, which can easily be broken, so
please handle it with care. If the plate is broken or worn, it has to be replaced (not covered by the
limited warranty).
Fig. 3
Glass panel
The glass is a heat resistant ceramic glass that can withstand continuous temperatures up to 1390°F
(754°C). This temperature is well beyond the temperatures in which you operate your stove.
This stove is designed to provide a flow of hot air over the inside of the glass, which helps keep it
optimally clean during combustion. When operating t he insert on low for extended periods of time, the
glass may become dirty. A short, hot fire will help clean off much of the normal buildup (see section 6:
Troubleshooting). In order to keep the glass soot free, the moisture content of the wood must be
between 15 and 18% on a wet basis.
Page 18

18
Cleaning the glass panel
Fig. 6
Fig. 7
Fig. 5
1 2
The door must be dismounted from the stove before installing a new glass.
When firing with moist wood, during the first lighting, or by a small fire/heat requirement, a bad
combustion may arise, which can cause that the glass gets more or less sooty. The glass is easily and
effectively cleaned when using a commercial glass cleaner designed for stoves (available at your
dealer) do not use abrasive cleaners. The doors is opened as follows:
1. In order to protect the ceramic gasket in the bottom of the door, you should place the delivered
distance tool (1, fig. 5) under the column on the left side of the door.
2. IMPORTANT! Close the door and LOCK it. The door is locked by means of the locking button
(2, fig. 6) on the right side. The locking button is to be turned until it clicks. IT IS NOT TO BE
UNLOCKED WHILE WORKING WITH THE DOOR.
3. Turn the screw (3, fig.6) in the middle of the doorframe on the right side clockwise with a 6 mm
hexagon spanner.
4. Swing out the door (fig.7)
5. Clean the glass; this should only be done on a cold stove.
6. Close the door and tighten the screw counter-clockwise. Unlock the door and remove the
distance tool.
NOTE: The lock/lock-pin should not be activated during normal use, as it will then be needlessly worn
and scratch the steering axis.
Be careful not to abuse the glass by striking or slamming the door shut.
Do not operate the stove with broken glass. If the glass breaks, then replace it promptly with original
factory replaceme nt ceramic glass.
3
Page 19

19
Replacement of door glass:
12 1 3
1. Swing out the door (see under "cleaning the glass panel", point 1-4). THE DOOR IS NOT TO
BE UNLOCKED WHILE WORKING WITH IT.
2. Unscrew all visible screws (1, fig. 8) in the inner frame and remove the inner frame.
3. Remove the cracked glass.
4. Put in the new glass panel (2, fig. 8)
5. Remount the inner frame.
6. Tighten all screws and then loosen them 2-3 rounds.
7. Push the steel gasket between the glass and the outer frame
8. Push the steel gasket between the glass and the inner frame.
9. Tighten the screws.
10. Swing back the door and tighten the screw (3, fig. 8) (see under "Cleaning the glass panel"),
unlock the door and remove the distance piece.
Fig. 8
Gaskets
The DSA 5 is equipped with ceramic gasket to ensure the tightness of the door and the glass. This
ceramic gasket is a wearing part and must be changed from time to time. Please consult your
authorized dealer in this case.
Page 20

20
Dismounting/mounting of the door
1 3
Fig. 9
Fig. 10
Generally, we do not recommend dismounting the door. If you do, you must be at least two persons,
so that one can hold the door, when the last screw is removed.
1. Swing out the door (see under "Cleaning the glass panel", point 1-4). THE DOOR MUST NOT
BE UNLOCKED WHILE WO RKING WITH IT.
2. The door is swung out so that the 6.5 mm hole (1, fig. 9) on the left column is placed opposite
the hole in the inner tube (the door will then be ca. 1/3 open).
3. IMPORTANT! Put a screwdriver (2, fig. 10) with appropriate dimensions in the hole.
4. The 4 screws (3, fig. 9) in the doorframe can now be loosened. Support the door. When the
last screw has been removed, the door is free to be dismounted.
5. Mounting is to be done in reverse order.
2
Page 21

21
Replacement of the steering axes/counterweights
We recommend that this be done by the authorized SCAN -dealer. It is done in the following way:
1. Swing out the door or dismount it (it is only necessary to dismount the door when replacing the
left counterweight).
See under "Cleaning the glass panel", point 1-4 and under "Dismounting/mounting of the
door). THE LOCK OF THE CURRENT STEERING AXIS MUST NOT BE UNLOCKED
DURING THE WORK!
2. Turn the lower screw in the steering axis clockwise with a 2 mm key.
3. Raise the steering axis with the counterweight, lift off the counterweight and take it out
(diagonally, downwards).
4. Mounting is done in the reverse order. Tighten the lower screw of the steering axis.
Replacement part list
Caution: Use only original DSA 5 replacement parts. Do not use substitute materials.
Replacement part Part #
Glass panel for the door 57705011
Packet of ceramic gasket for door/glass 55999000 705
Upper baffle plate 54705000 091
Lower baffle plate 54705000 0911
Hearth stone back left 53999751 1
Hearth stone back right 53999751 2
Hearth stone front left 53999752 1
Hearth stone front right 53999752 2
Fire brick for firebox left side 53999753 1
Fire brick for firebox right side 53999753 2
Fire brick for firebox back wall 53999753 3
Page 22

22
Firebox lining layout
6. TROUBLESHOOTING
Smoke:
- Insufficient chimney draught!
- Check chimney height. Recommended height is minimum 15 feet.
- Check if the chimney has the right dimension.
- Check if the smoke pipe or chimney is blocked.
- Check if the chimney has the right height compared to the surroundings.
- Wood with too high moisture content.
The wood burns too fast:
- Is the door closed fully?
- Is the baffle plate placed correctly?
Sootend glass:
- Is the baffle plate placed correctly?
- Is the wood dry?
Sootend chimney:
- Incorrect combustion!
- Is the wood dry?
The stove surface turns gray:
- Over heating - please refer to the maintenance section: Cleaning of the stove.
The stove does not heat:
- Use of moist wood. The energy is used to dry the wood.
Page 23

23
7. WARRANTY PROVISIONS
All SCAN wood stoves, inserts and stoves are subject to a strict quality control, before they are
shipped to the customer and end user. However, an error may occur, wherefore we back all SCAN
wood burning stoves, inserts and stoves with an extensive five years limited warranty.
The warranty covers all parts that may require replacement, from a failure that was caused in the
judgment of SCAN, to be a defect in material or workmanship.
This warranty is given to the first retail purchaser (other than for the purposes of resale) only and is
not transferable. This warranty does not cover damage resulting from other than defects in material or
workmanship or damage caused by unreasonable use including the failure to provide reasonable and
necessary maintenance. In addition, this warranty does not cover repairs performed due to neglect,
abuse, or use of the stove/insert/stove other than in the application for which it is designed.
Specifically this warranty does not cover:
• Wearing parts, such as firebricks, baffle plate, shaking grate and gaskets (other than
damages that are visible at the time of delivery)
• Glass (other than damages that are visible at the time of delivery or damages that occur
during the first fire)
• Transport costs
• Dismounting/mounting
The warranty is invalid if the serial number for your SCAN stove/insert/stove is removed or defaced or
if service for defects covered under this warranty is performed by other than an authorized SCAN
dealer or SCAN factory recommended service person.
This warranty is void if installation is not in conformity with installation instructions and/or local fire and
building regulations.
This warranty applies only to SCAN stoves/inserts/stoves sold within the United States of America and
Canada.
THIS LIMITED WARRANTY IS IN LIEU OF ALL OTHER EXPRESS WARRANTIES, ANY IMPLIED
WARRANTY OF FAIRNESS FOR A PARTICULAR PURPOSE, MERCHANTABILITY, OR
OTHERWISE, APPLICABLE TO THIS PRODUCT, SHALL BE LIMITED IN DURATION TO THE
DURATION OF THIS LIMITED WARRANTY. SCAN SHALL NOT BE LIABLE FOR ANY SPECIAL,
INCIDENTAL, OR SONSEQUENTIAL DAMAGES, WHETHER BASED ON LOST GOODS OR
OTHERWISE.
SOME STATES DO NOT ALLOW LIMITATIONS ON HOW LONG ANY IMPLIED WARRANTY
LASTS, SO THE ABOVE LIMITATION MAY NOT APPLY TO YOU. SOME STATES DO NOT ALLOW
THE EXCLUSION OR LIMITATION OF INCIDENTAL OR CONSEQUENTAL DAMAGES, SO THE
ABOVE LIMITATION OR EXCLUSION MAY NOT APPLY TO YOU.
This warranty gives you specific legal rights, and you may have other rights, which vary from state to
state.
8. SAFETY LABEL
The Safety label is permanently attached to the backside of stove and a copy of the label is showed
below. Local authorities will generally accept the label as evid ence that, when the stove is installed
according to the information on the label and in this manual, the installation meets codes and can be
approved.
Page 24

24
 Loading...