

SCAN 60,61 Instructions For Installation And Use Manual
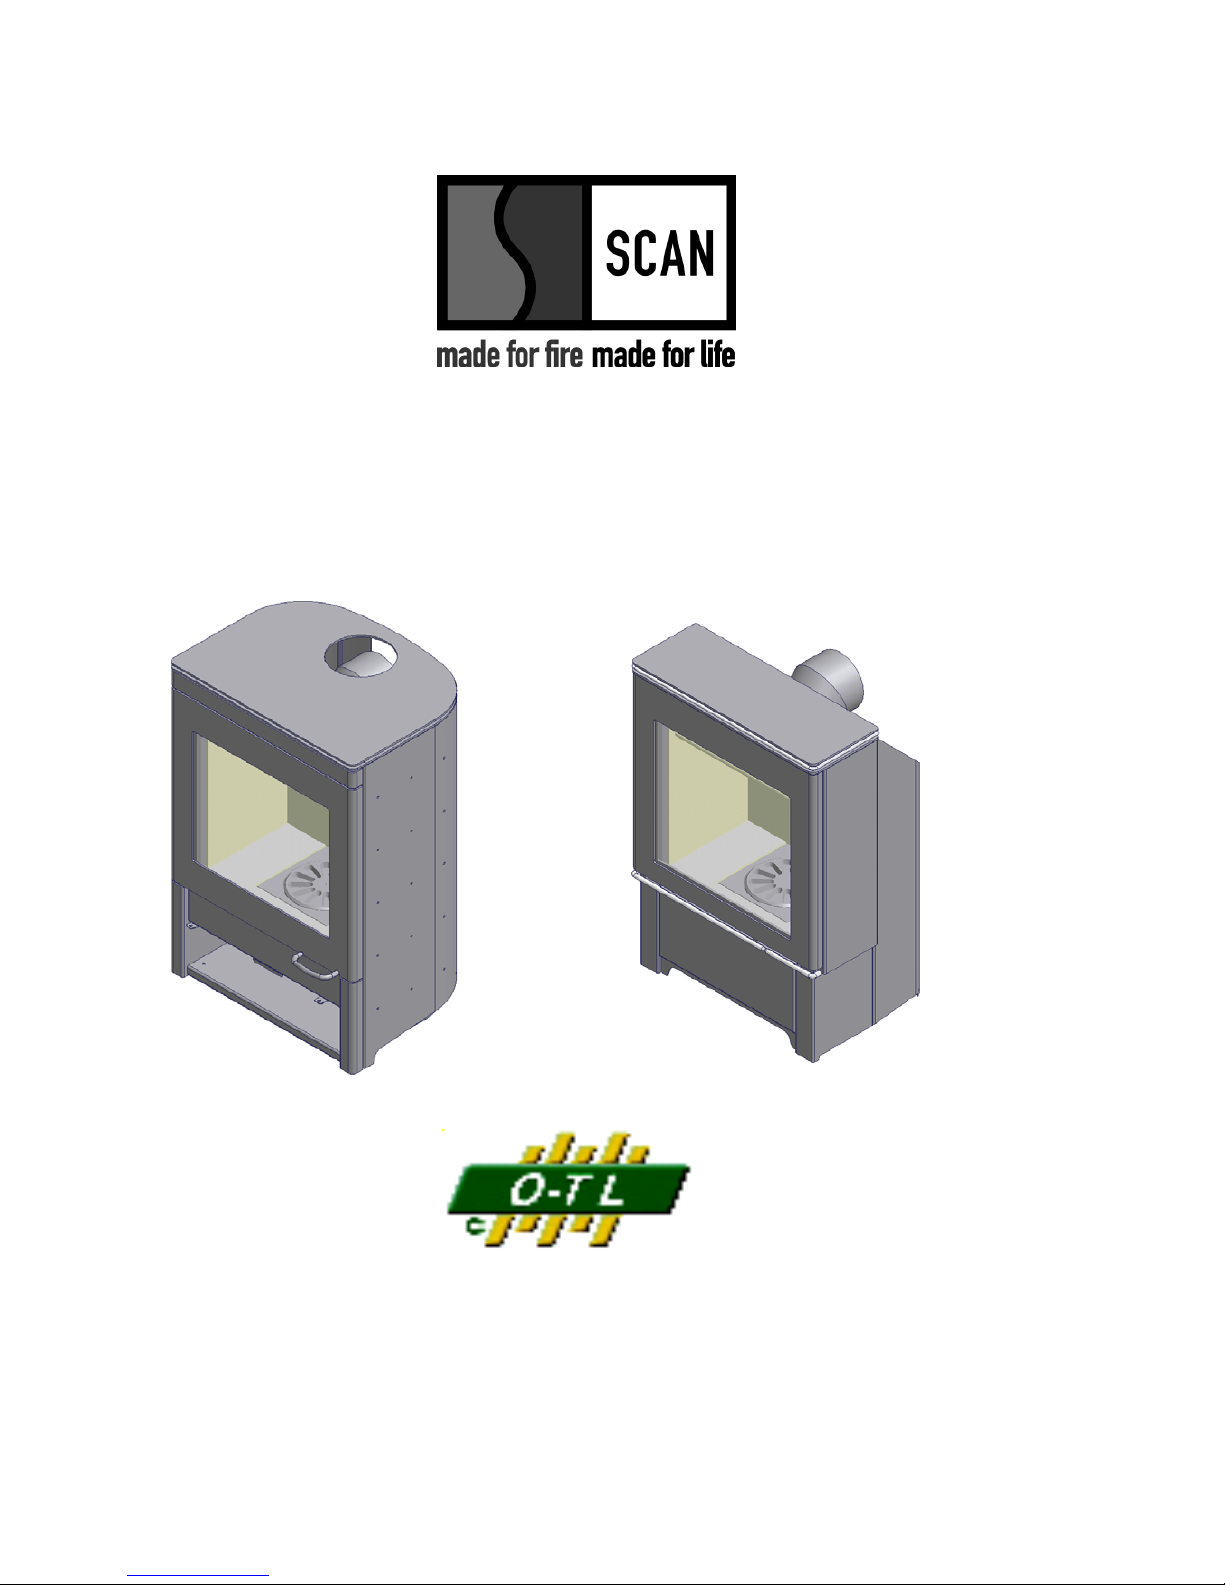
SCAN 60 and 61
INSTRUCTIONS FOR
INSTALLATION AND USE
Tested &
Listed by
Beaverton
O regon U SA
OMNI-Test Laboratories, In c.
Save these instructions
February 2004
KROG IVERSEN & CO. A/S - 5492 VISSENBJERG - DENMARK

2
Table of Contents:
1. INTRODUCTION............................................................................................................................................................. 3
Safety and environmental testing. ......................................................................................................................................... 3
Important information:.......................................................................................................................................................... 3
SAFETY PRECAUTIONS ................................................................................................................................................... 4
2. INSTALLATION.............................................................................................................................................................. 5
Precaution.............................................................................................................................................................................. 5
Pre Installation Check List:................................................................................................................................................... 5
The Floor............................................................................................................................................................................... 6
Floor pad at Corner Installation ..........................................................................................................................................7
Ceiling Height ....................................................................................................................................................................... 7
Combustible Wall Clearance for Top Vent Installation........................................................................................................ 8
Combustible Wall Clearance for Rear Vent Installation....................................................................................................... 9
Alcove Installation Requirements: ...................................................................................................................................... 10
Mobile Home Installation: US only .................................................................................................................................... 11
Outside air requirements ..................................................................................................................................................... 12
Draft Requirements ............................................................................................................................................................. 12
Chimney Installation:.......................................................................................................................................................... 13
Factory Built Chimney........................................................................................................................................................ 13
Masonry Chimney............................................................................................................................................................... 13
Top vent installation............................................................................................................................................................ 13
Chimney Connection........................................................................................................................................................... 14
Rear Vent Installation.......................................................................................................................................................... 15
Combustible Wall Chimney Connector Pass-Throughs...................................................................................................... 16
Chimney height requirements: ............................................................................................................................................ 17
3. INSTRUCTIONS FOR USE........................................................................................................................................... 18
Ash Drawer ......................................................................................................................................................................... 18
Ash Grate ............................................................................................................................................................................ 18
Baffle Plates ........................................................................................................................................................................ 18
Glass.................................................................................................................................................................................... 18
Smoke Detectors ................................................................................................................................................................. 18
Room Ventilation ................................................................................................................................................................ 18
Fire Box Lining................................................................................................................................................................... 18
Ceramic Packing Cord ........................................................................................................................................................ 19
Protected Wall Reduced Clearances.................................................................................................................................... 19
Combustion Air Supply....................................................................................................................................................... 19
4. OPERATION .................................................................................................................................................................. 20
Fueling the Stove: ............................................................................................................................................................... 20
To start a fire: ...................................................................................................................................................................... 20
Refueling............................................................................................................................................................................. 20
5. MAINTENANCE ........................................................................................................................................................... 21
Ash Disposal and Removal ................................................................................................................................................. 21
Cleaning of Stove................................................................................................................................................................ 21
Soapstone ............................................................................................................................................................................ 21
Removing Baffle for Cleaning. ........................................................................................................................................... 22
Air Tube removal:............................................................................................................................................................... 22
Remove the screw (pos.3) on the right air tube collar (pos.2).
.................................................................................. 22
Slide the air tube collar (pos.2) to the left, swing the air tube (pos.1) down and remove it.
................................. 23
Replacement Part List SCAN 60 and 61............................................................................................................................. 23
Creosote Formation and the Need for Removal.................................................................................................................. 23
Door Glass........................................................................................................................................................................... 24
Dimensions SCAN 60 and 61 ............................................................................................................................................. 24
6. TROUBLESHOOTING.................................................................................................................................................. 25
7. WARRANTY CONDITIONS FOR SCAN WOOD BURNING PRODUCTS.............................................................. 26
8. EPA Sticker..................................................................................................................................................................... 27

3
We welcome you as a new owner of a SCAN wood-burning stove. In purchasing a SCAN stove you
have joined the growing ranks of concerned individuals whose selection of energy systems reflects
both a concern for the environment and aesthetics. The SCAN stove is one of the finest home wood
stoves in the world over. This manual will explain the installation, operation and maintenance of the
SCAN stove. Please familiarize yourself with the owner’s manual before operating your stove and
save the manual for future reference. Included are helpful hints and suggestions that will make the
operation and maintenance of your new stove an easier and more enjoyable experience. We offer
our continued support and guidance to help you achieve the maximum benefit and enjoyment from
your SCAN stove.
1. INTRODUCTION
Please read this entire manual carefully before you install and use your new SCAN stove,
failure to follow instructions may result in property damage, bodily injury or loss of life. This
manual contains important user information. Keep this manual with the stove after
installation is complete.
Safety and environmental testing.
SCAN has been tested by OMNI-Test Laboratories, Inc. of Beaverton, Oregon, and is safety listed
by OMNI to UL 1482, ULC-S627 and EPA certified.
Important information:
No other SCAN stove has the same registration number as yours. The registration number is fixed
to the stove. In case of complaints we request that you have the registration number.
Items included
In the SCAN stove you will find a service box containing the following items:
1 oven mitten
1 set of screws and hexagon spanners
1 bag containing fire starters for the first lightning

4
SAFETY PRECAUTIONS
USE A METAL CONTAINER WITH A TIGHT FITTING LID TO DISPOSE OF ASHES.
NEVER USE GASOLINE, GASOLINE-TYPE LANTERN FUEL, KEROSENE, CHARCOAL
LIGHTER FLUID, OR SIMILAR LIQUIDS TO START OR “FRESHEN UP” A FIRE IN THIS
STOVE. KEEP ALL SUCH LIQUIDS WELL AWAY FROM THE STOVE WHILE IT IS IN
USE.
DO NOT BURN GARBAGE OR FLAMMABLE FLUIDS SUCH AS GASOLINE, NAPHTHA
OR ENGINE OIL.
THIS STOVE IS HOT WHILE IN OPERATION. DO NOT TOUCH, AND KEEP CHILDREN,
CLOTHING AND FURNITURE AWAY. CONTACT MAY CAUSE SKIN BURNS. USE
GLOVES WHEN STOKING THE FIRE.
DO NOT CONNECT THIS STOVE TO A CHIMNEY FLUE CONNECTED TO ANOTHER
STOVE OR APPLIANCE.
DO NOT CONNECT TO ANY AIR-DISTRIBUTION DUCT OR SYSTEM.
BE SURE TO ALLOW AN ADEQUATE SOURCE OF FRESH AIR INTO THE ROOM
WHERE THE STOVE IS OPERATING (SEE ROOM VENTILATION PAGE 16 AND
COMBUSTION AIR SUPPLY PAGE 17).
DO NOT OPERATE THE STOVE WITHOUT THE FIREBOX BAFFLE PLATES PROPERLY
INSTALLED.
BUILD FIRES DIRECTLY UPON THE HEARTH INSIDE THE STOVE. DO NOT USE
GRATES, IRONS, OR ANY OTHER METHOD TO ELEVATE THE FIRE.
THE SCAN STOVES ARE NOT USABLE FOR FIREPLACE INSTALLATION.
FOR USA ONLY:
WHEN INSTALLING IN A MOBILE, THIS APPLIANCE MUST BE BOLTED TO THE
FLOOR, HAVE OUTSIDE AIR SOURCE FOR COMBUSTION, AND NOT BE INSTALLED
IN THE BEDROOM (PER H.U.D. REQUIREMENTS). CHECK WITH LOCAL BUILDING
OFFICIALS.
FOR CANADA ONLY:
DO NOT INSTALL IN A MOBILE HOME

5
2. INSTALLATION
Precaution
If your SCAN stove is not properly installed, operated and maintained, a house fire may result. For
your safety, follow all installation, operation and maintenance directions. Contact your local building
officials about restrictions and installation requirements in your area.
Pre Installation Check List:
Before you begin an installation, review your plans and check to see that:
1. Your stove and chimney connector will be far enough from combustible material to meet all
clearance requirements.
2. The floor protection is large enough and is constructed properly to meet all requirements.
3. You have all necessary permits from local authorities. Your local building official is the final
authority for approving your installation as safe and determining that it meets all local and state
building and safety codes.
The metal label permanently attached to the back of every SCAN stove shows that it has been
tested to current UL and ULC safety standards, and gives the name of the testing laboratory.
Clearance and installation information is also printed on the label. Local authorities will generally
accept the label as evidence that, when the stove is installed according to the information on the
label and in this manual, the installation meets codes and can be approved.
Codes vary in different areas. Before starting the installation, review your plans with the local
building authority. Your local dealer can provide any additional information needed.
For any unresolved questions about installation in the USA, refer to the national Fire Protection
Association’s publication ANSI/NFPA 211 Standard for Chimneys, Fireplaces, Vents and Solid Fuel
Burning Appliances.
For installation in Canada, refer to CSA CAN-B365,
Installation Code for Solid
Fuel Burning Applications and Equipment
. These standards are the basis for many national codes.
They are nationally recognized and are accepted by most local authorities. Your local dealer or your
local building official may have a copy of these regulations.
NOTE: NFPA 211 6-5.1.1 Chimney Connector and Vent connector Clearances from
Combustible material: Exception:
That your Scan stove is listed for installation with a
clearance of less than 12" shall be installed in accordance with the terms of their listing and
the manufacturer's instructions.
WARNING:
Check all local building and safety codes before installation. The installation
instructions and appropriate code requirements must be followed exactly and without compromise.
Alterations to the stove are not allowed. Do not connect the stove to a chimney system serving
another stove, appliance or any air distribution duct. Failure to follow these instructions will void the
manufacturers warranty.
NOTE:
If you plan to vent your stove into an existing masonry chimney, have the chimney inspected
by a local fire marshal or qualified installer. Remember that the chimney and its location on the roof
heavily influent on the stove performance. An oversized flue may not provide effective draught and a
flue liner may be required. (Observe draft requirements). Consult your dealer or qualified installer
before final selection is made.
We advise you to leave enough room to enable cleaning between the stove and the wall.
6
NOTE:
The clearances expressed in inches are those approved for installation in the United States.
The clearances in expressed in millimeters are those approved for installations in Canada. Different
test standards for the respective countries may result in differences in the clearance requirements.
The Floor
One of the main necessary precautions when installing a wood stove is to leave sufficient space
between the stove (top, sides, back, front, and under stove pipes) and any other material that can
catch fire.
NOTE: the floor protection need's only to be a standard ember protection.
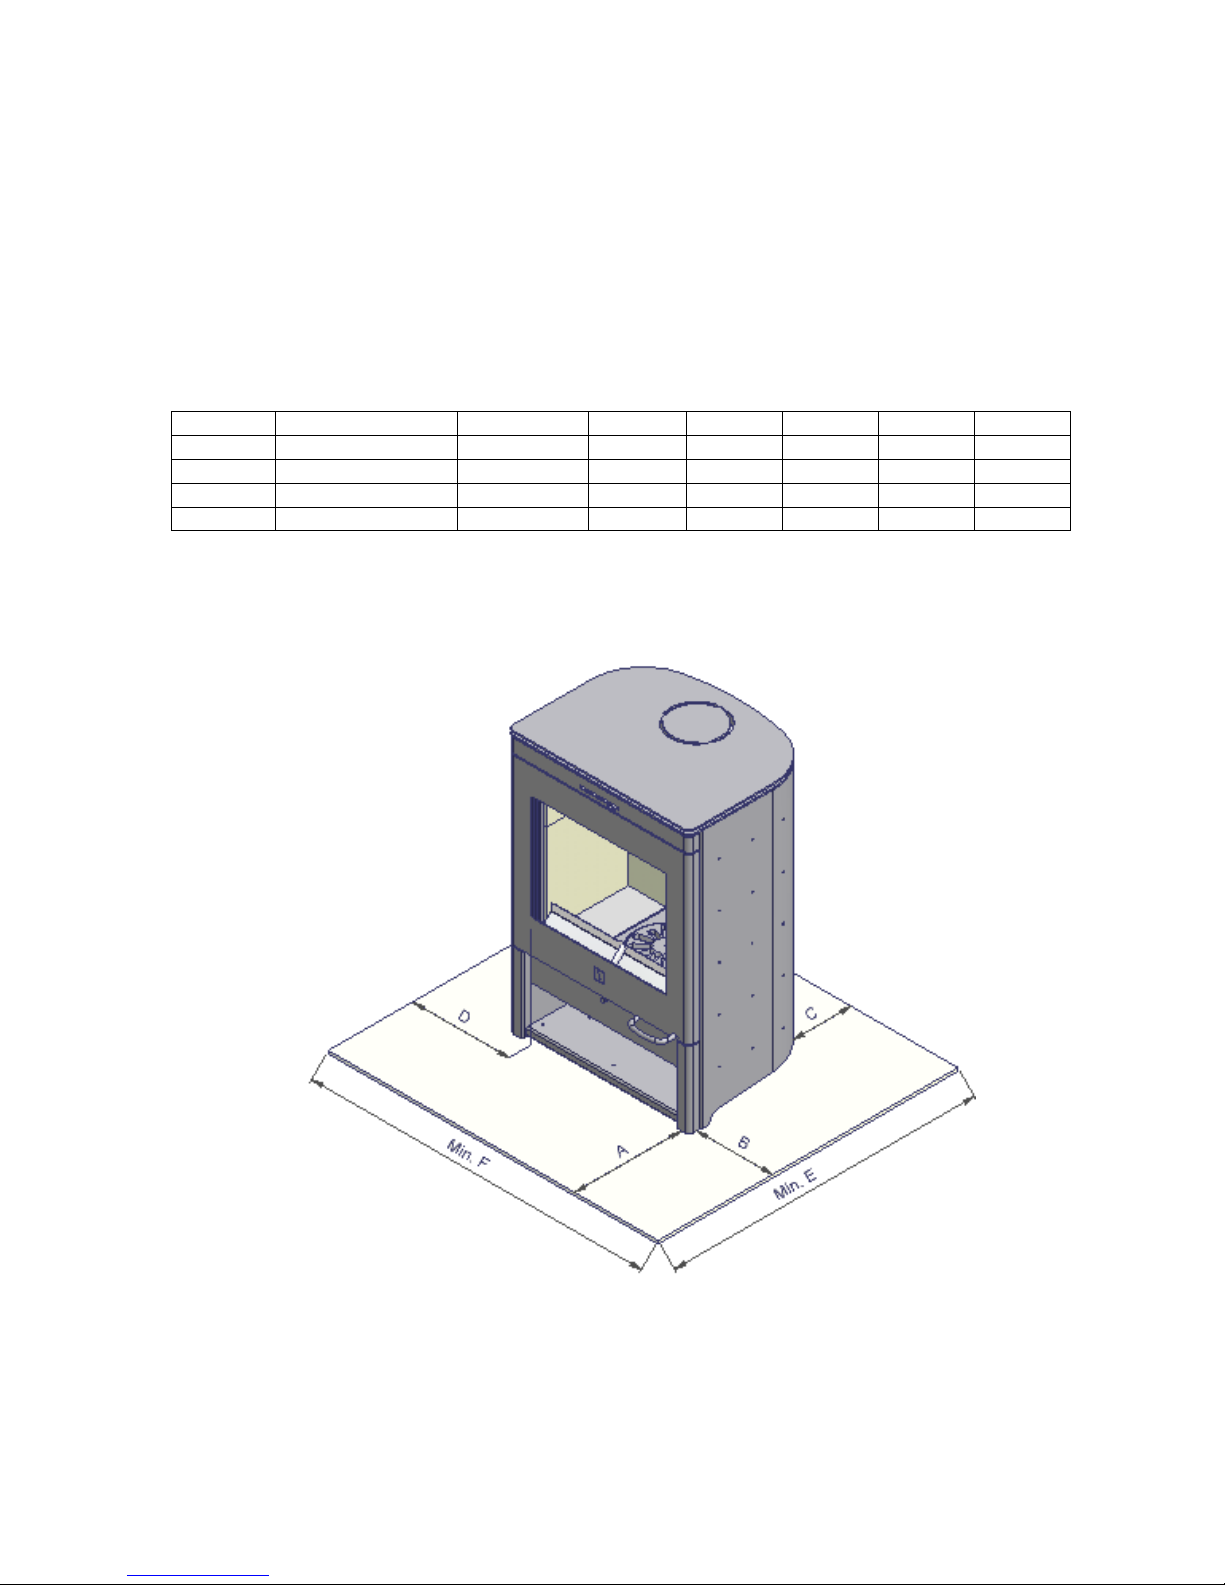
Floor pad at Parallel Installation
Model Floor protection A B C D E F
Scan 60 USA 16” 9,5” 8” 43,8” 33,7”
Scan 60 Canada 457 203 317 1240 1010
Scan 61 USA 16” 9,5” 8” 42” 33,7”
Scan 61 Canada 457 203 317 1192 1010
Parallel installation
7
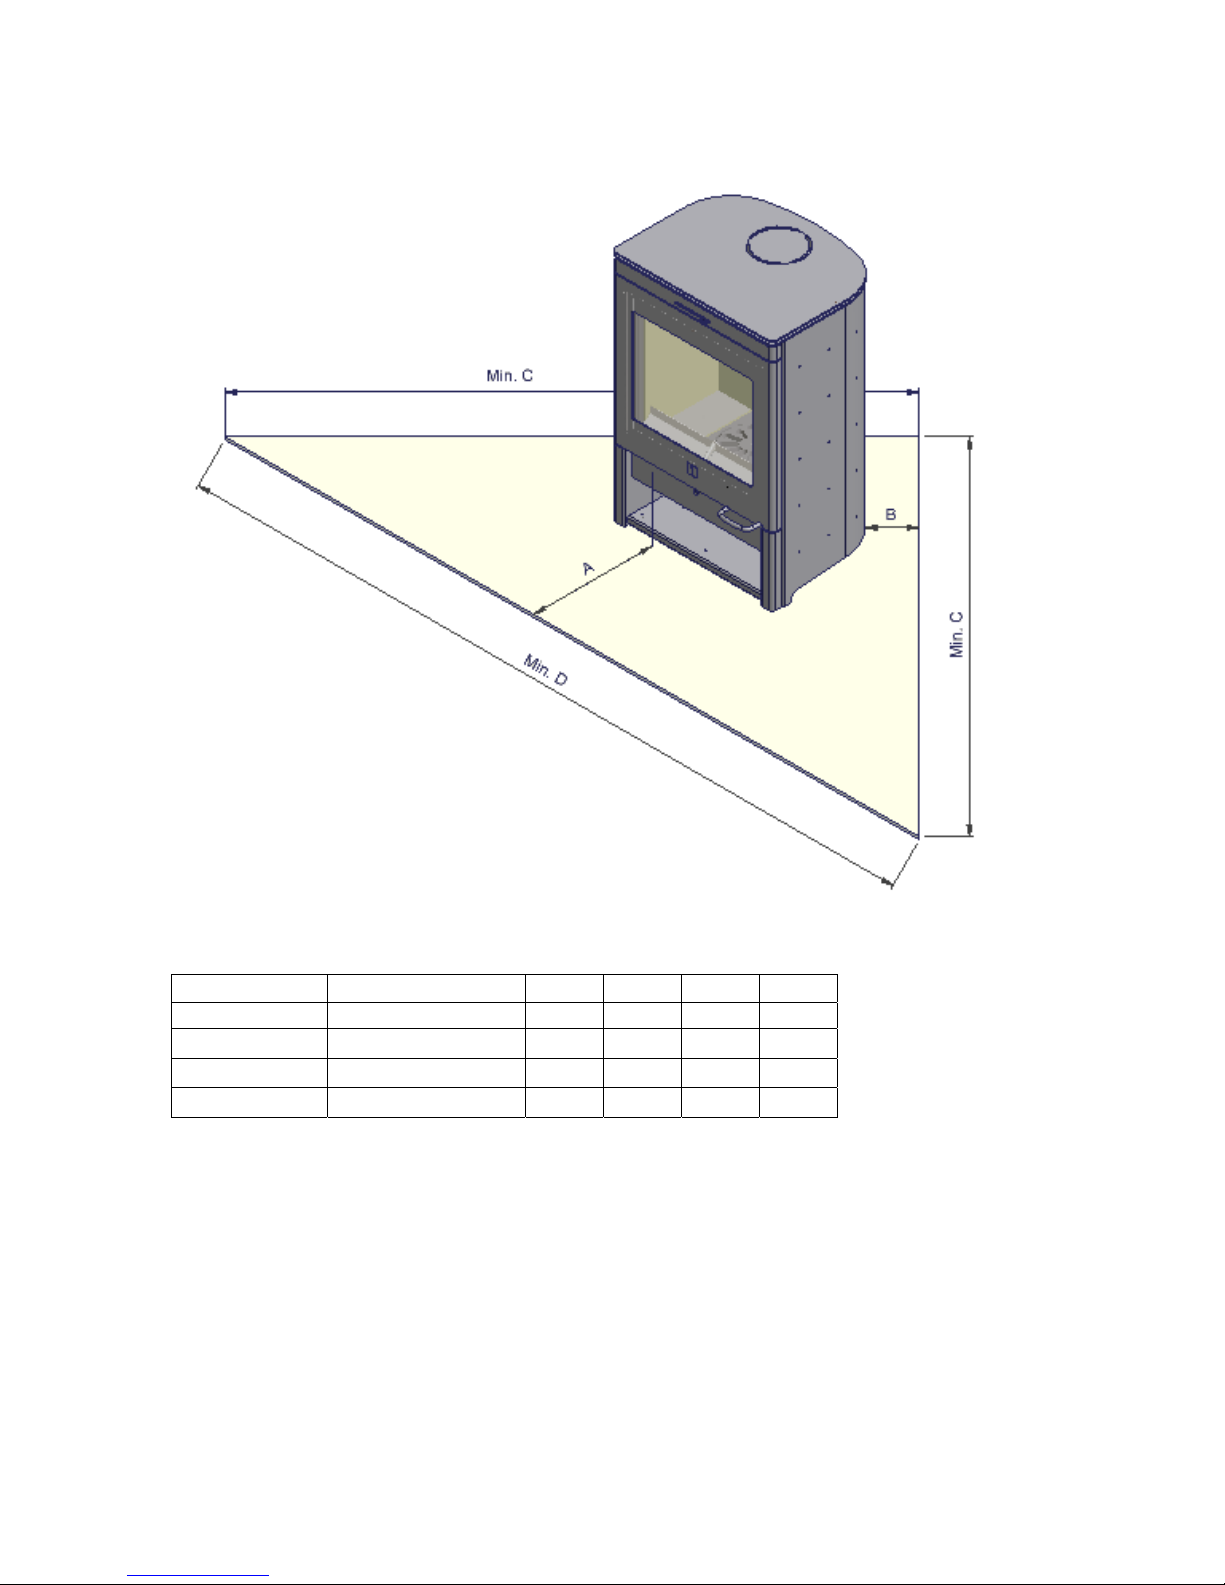
Corner installation
Floor pad at Corner Installation
Model Floor protection A B C D
Scan 60 USA 16” 7,5” 73,8” 104,5”
Scan 60 Canada 457 203 1975 2794
Scan 61 USA 16” 7,5” 68” 96”
Scan 61 Canada 457 203 1983 2804
In a rear vent installation the floor protection must also extend under the stovepipe a minimum of 2”
(50mm) beyond either side of the pipe.
Ceiling Height
Do not install in an alcove or confined space and do not install in a room with a ceiling high below 7’
(210 cm)
8
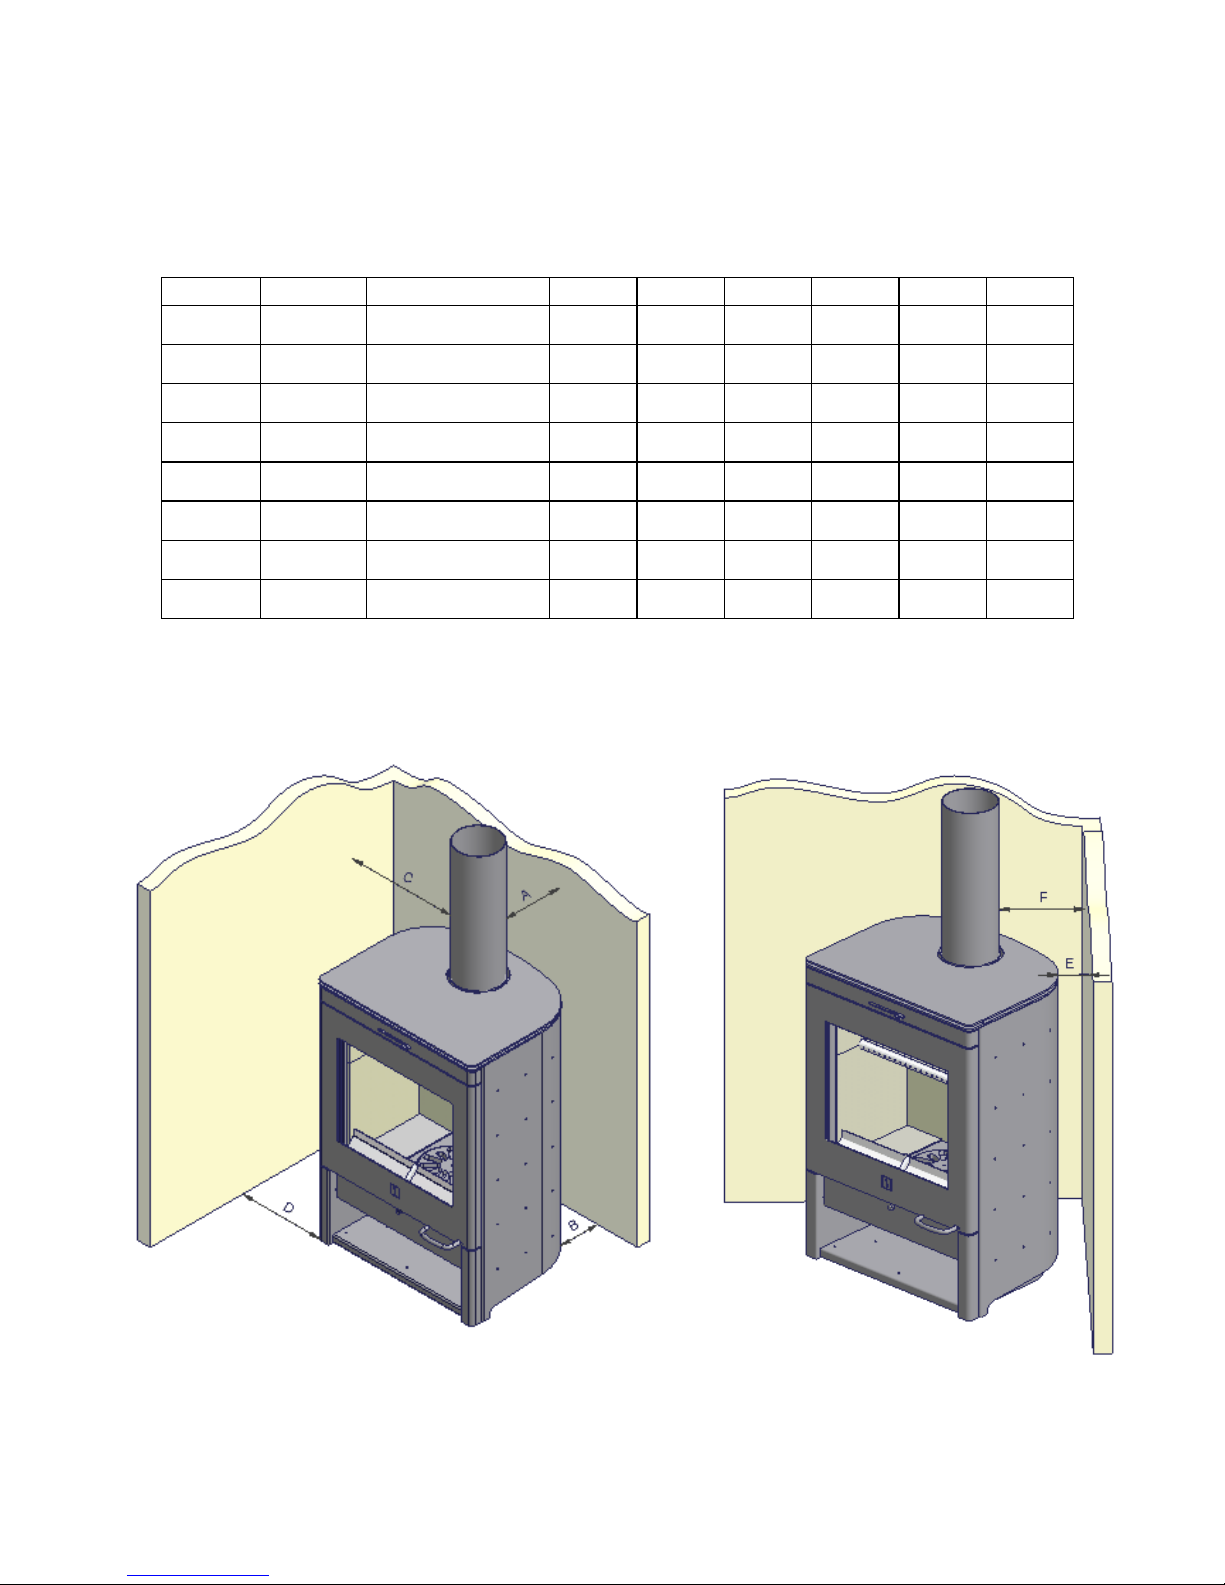
Combustible Wall Clearance for Top Vent Installation
If the stove is to be placed at side and back walls of combustible materials the following clearances
must be kept
Parallel and corner installation
Parallel installation
Corner installation
Model
Connector pipe A B C D E F
Scan 60 USA Single wall
13 10.5 21 12 7.5 13.5
Scan 60 Canada Single wall
330 265 535 305 190 343
Scan 60 USA Double wall
8 6 21 12 5.5 13.5
Scan 60 Canada Double wall
205 152 535 305 140 340
Scan 61 USA Single wall
11 10.5 21 12 7.5 13.5
Scan 61 Canada Single wall
279 265 535 305 190 340
Scan 61 USA Double wall
6 6 21 12 5.5 11.5
Scan 61 Canada Double wall
152 152 535 305 138 290
9
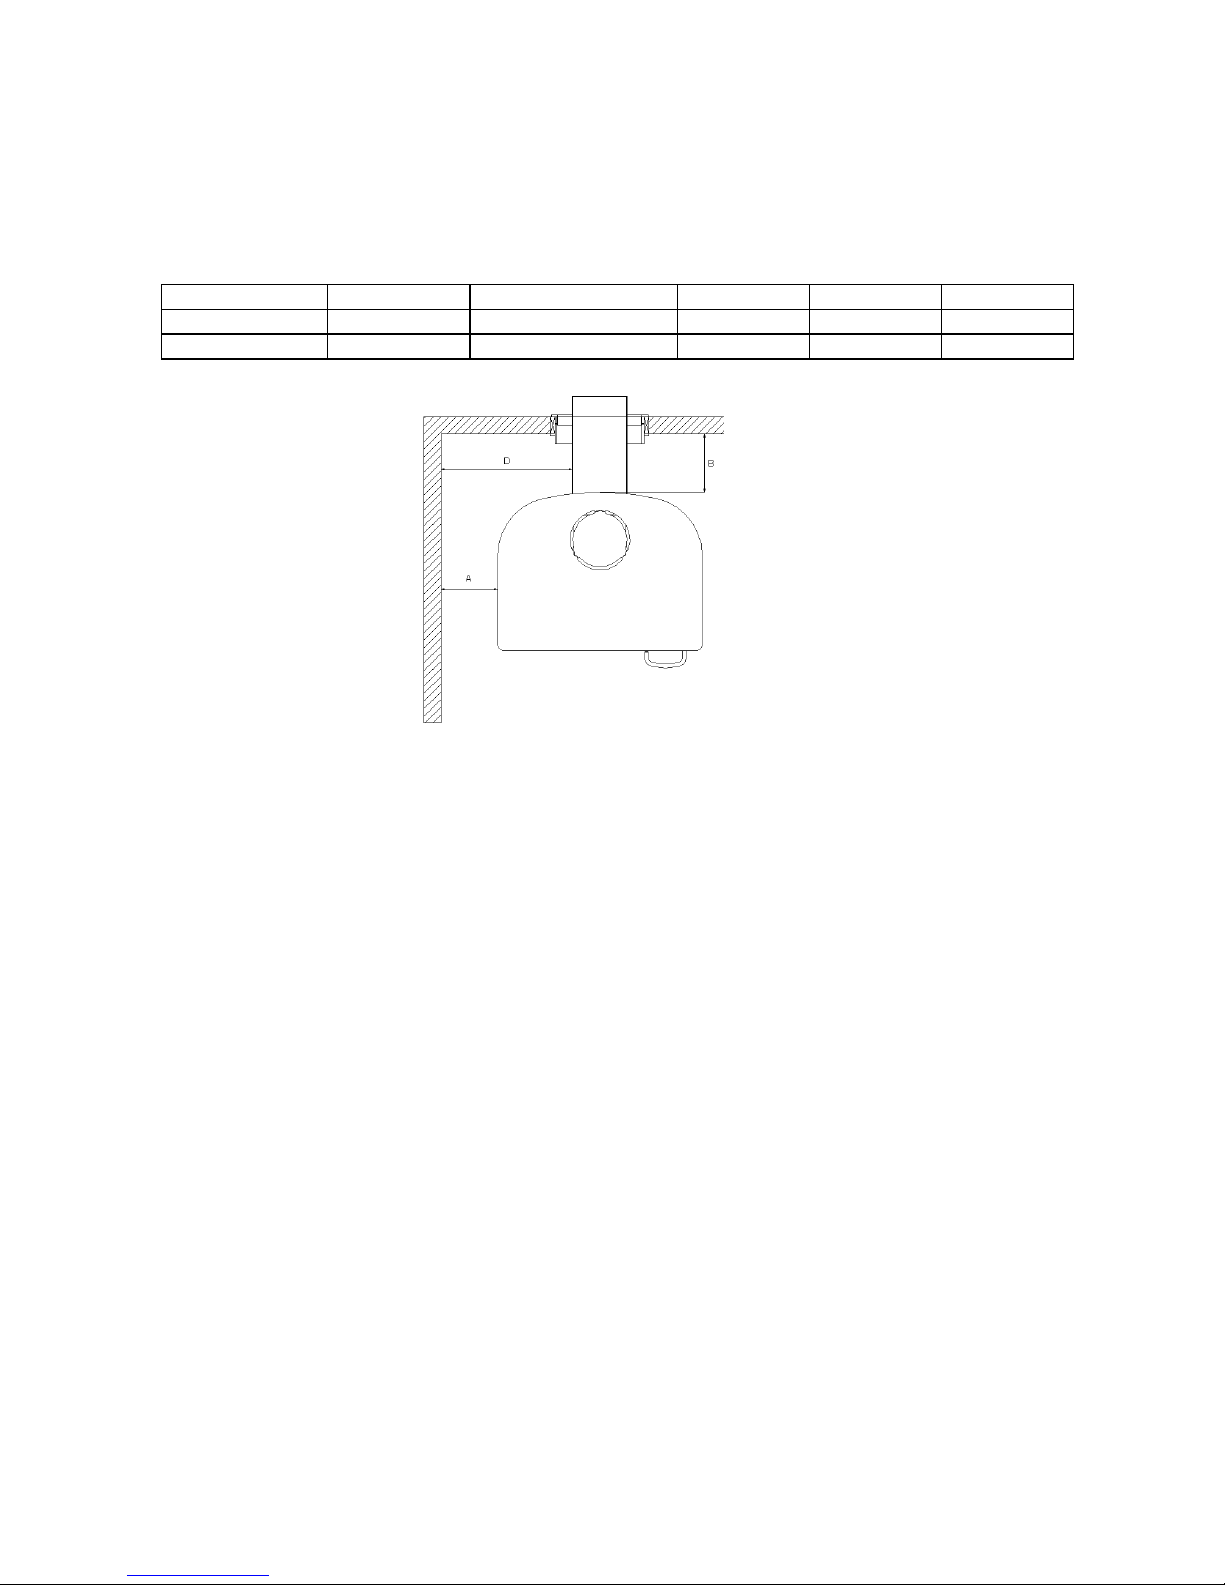
Combustible Wall Clearance for Rear Vent Installation
If the stove is to be placed at side and back walls of combustible materials the following clearances
must be kept:
Rear outlet through wall
Refer to the manufacturer’s instructions concerning installation of listed single wall connector pipe,
wall thimble and chimney
Model Connector pipe B C D
Scan 60 & 61 USA Single wall 5.25 21 12
Scan 60 & 61 Canada Single wall 133 535 304
 Loading...