

SCAN 58-2,58-5,58-1,58-4,58-6,58-3 Assembly And Instruction Manual

Version GB 28.08.08 - 1
Congratulations on your new Scan wood-burning stove
You have purchased a product by one of Europe’s leading manufacturer’s of wood-burning stoves, and we are sure that you will have years of
pleasure with your purchase. To make the best possible use of your stove, it is important that you follow our advice and instructions.
Please read this Assembly- and instructions manual before you start to assemble your stove.
Make a note of your stove’s product
registration number here so that you
have it available if you need to contact
us.
Test in compliance with
EN 13240
The EC declaration of conformity is available from www.scan.dk
ASSEMBLY- AND INSTRUCTIONS MANUAL
Scan 58

2 INSTALLATION
Table of contents
Installation ........................................................................ 2
Installation
Approval
Technical data and dimensions
Assembly ........................................................................... 3
Dimension sketch Scan 58
Unpacking
Transp or t br ackets
Service package
Accessories
Product registration number
Type plate
Positioning your wood-burning stove
Position near to non-flammable walls
Distance to furniture
Distance to flammable walls
Load bearing underlay
Floor plate
Connection between stove and steel chimney
Requirements for chimney
Connection with 90° elbow pipe
Adjusting screws
Fitting the stove onto the plinth
Flue collar top outlet
Preparing the stove for a rear outlet
Fresh air intake
Closed combustion system
Fitting the soapstone top
Fitting a storage door
Instruction for use ........................................................ 12
CB Technology
Primary air
Secondary air
Smoke deflector plates
Ash pan
Handle for riddling grate
Instructions for heating .............................................. 13
Lighting
Handling fuels
Maintenance .................................................................. 14
Troubleshooting ............................................................ 16
Installation
The house owner is responsible for ensuring that all necessary national and local safety measures are observed during installation and
fitting and also responsible for observing the fitting and operating
instructions detailed in this manual.
When you install any kind of fireplace or stove, you must inform the
local authorities. You are also responsible for calling in a chimney
sweep to inspect and authorize the installation.
To ensure best-possible functionality and safety for your installation, we advise you to call a professional fitter. Our Scan Dealer will
be able to recommend a qualified fitter in your area. For information
on Scan Dealers, please go to www.scan.dk.
Approval
If you intend to connect your stove to an existing chimney, it makes
sense to contact an authorised Scan dealer, or a local chimney sweep
for advice. These experts will also let you know if your flue needs
renovating.
On connecting to a multiple element chimney: follow the vendor‘s
instructions as applicable to the chimney type (e.g. Leca, Plewa, Icopal, Isokern, Zanda etc.)
No matter whether an authorised Scan dealer installs your stove, or
you do the job yourself, remember that the chimney sweep has to
approve the installation before you start to use it.
Technical data and dimensions
CO Emission at 13% O2: 0,11% 1338 mg/Nm
3
Dust @ 13% O2: 44 mg/Nm
3
Nox @ 13% O2: 119 mg/Nm3
Efficiency: 76%
Rated heat load: 5,5 kW
Chimney temperature: 350 °C
Flue outlet flow: 6,7 g/sec
Recommended vacuum in flue collar: 16 Pa
Combustion air requirement: 19 Nm3/h
Recommended fuel: Wood
Fuel consumption: 1,8 Kg/h
Amount of fuel: 1,4 kg
Weight: 100 kg
Flue collar internal diameter: 135 mm
Flue collar external diameter: 148 mm
Approval type: Intermittent fuelling
Intermittent fuelling means normal use of a woodstove. In other
words, you should let the fire die down until only the embers are
left, before refuelling.
The Scan 58 was build in compliance with the homologized product
type specified in the Assembly- and Instructions Manual provided
with the product.
Unpacking
To protect your stove, we recommend not removing the plastic packaging from the stove until you have completed the assembly.
ASSEMBLY
3
Additional accessories
• Large shaped floor plate in glass or steel.
• Small shaped floor plate in steel
• Soapstone top for rear outlet
• Soapstone top for top outlet
• Glass top plate for rear outlet
• Glass top plate for top outlet
• Storage door
1
1
3
8
1
7
5
9
9
8
*
175***
1
1
1
2
*
*
350500
108Ø
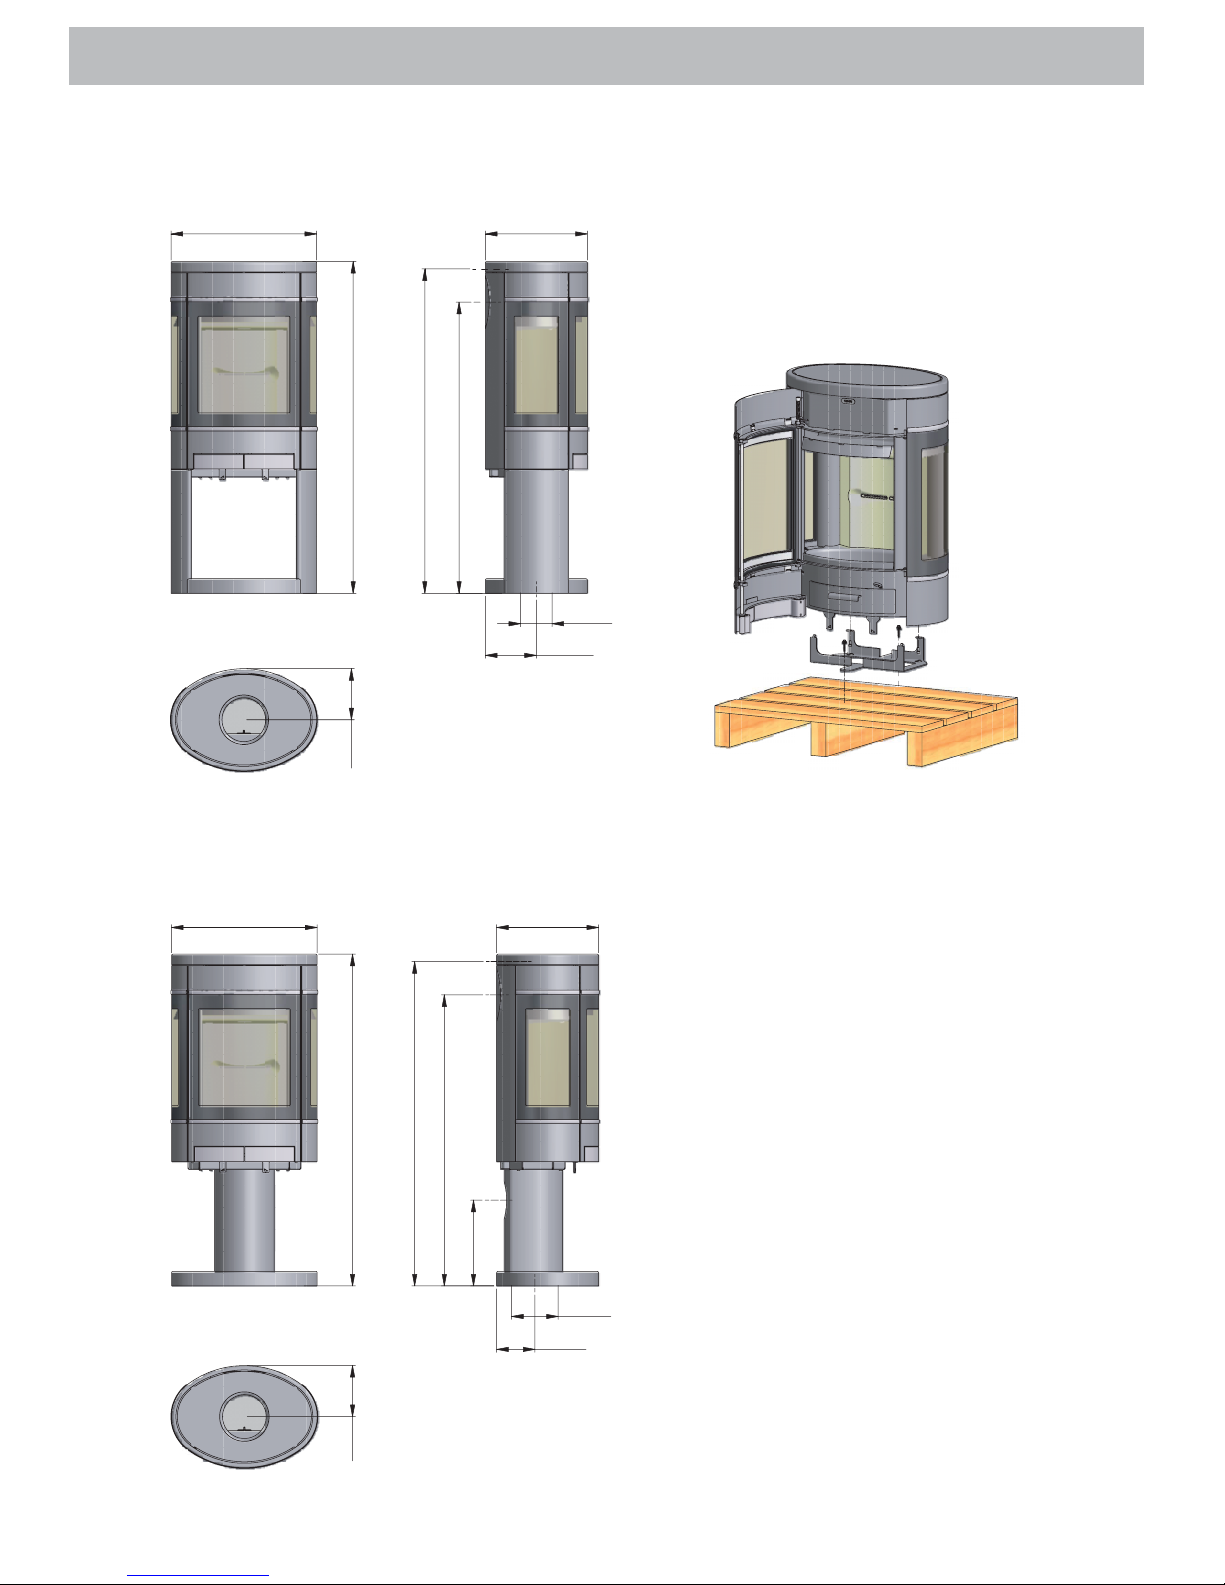
Dimension sketch
Scan 58 with "see throug" plinth
1
1
3
8
500
1
7
5
350
1
1
1
2
*
*
2
9
4
*
*
*
*
131***
160Ø
9
9
8
*
* Centre rear outlet
** Height to the beginning
of the flue pipe at top
outlet
*** Centre of fresh air in take bottom
**** Centre of fresh air intake
rear
* Centre rear outlet
** Height to the beginning
of the flue pipe at top
outlet
*** Centre of fresh air in take bottom
Service package
The service package contains the following:
• Fitting for flue collar
• Seal
• Safety fitting
• Plastic plugs for transport safety hole at the bottom of
the stove (not used for this Scan model)
• Various tools
• Glove
• Fire starters for first lighting
Transport brackets
Remove shipping transport brackets as shown below.
Dimension sketch
Scan 58 with pedestal plinth
4
ASSEMBLY
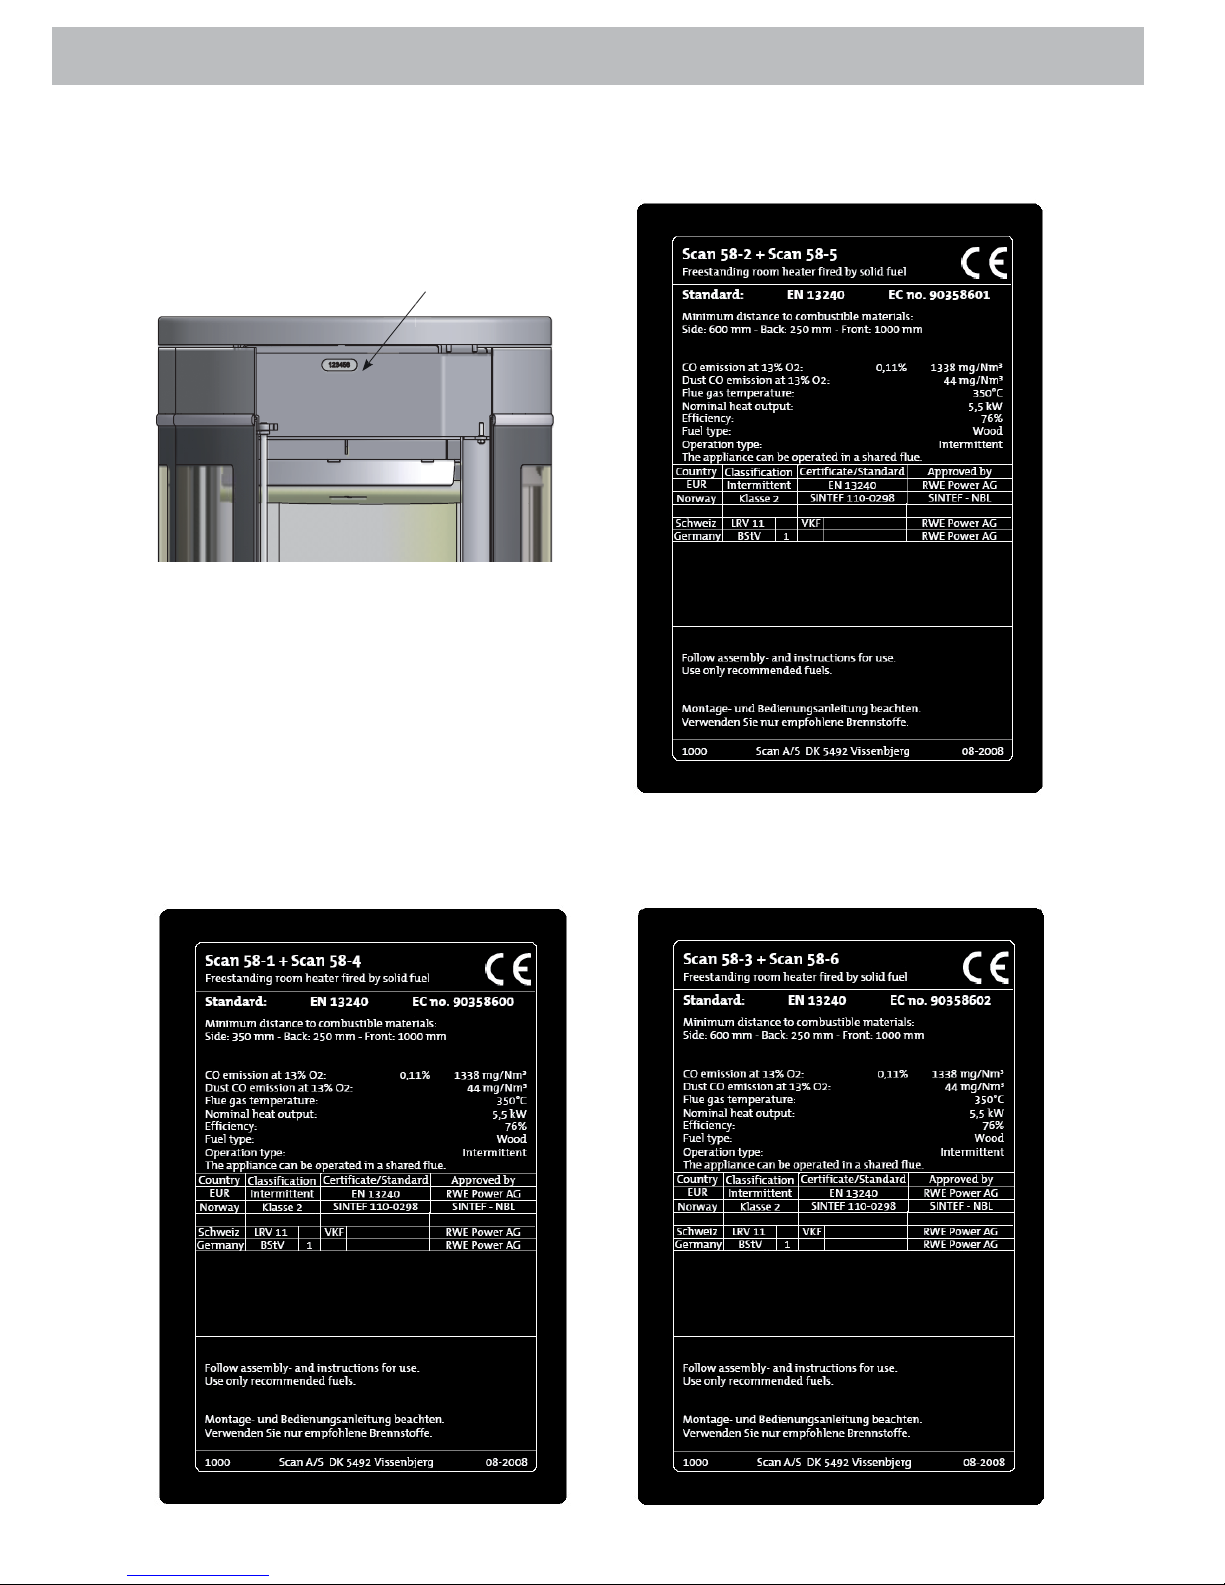
Product registration number
Open the wood-burning stove door; you can read and make a note
of the product registration number (see front of these Assembly- and
instructions for use).
Product registration number
Type plate
All Scan wood-burning stoves are fitted with a type plate, that
specifies the approval standards and the distance to flammable
materials.
Scan 58-1 & Scan 58-4 (without lateral glass panes)
Scan 58-2 & Scan 58-5 (with half lateral glass panes)
Scan 58-3 & Scan 58-6 (with full lateral glass panes)
ASSEMBLY
5
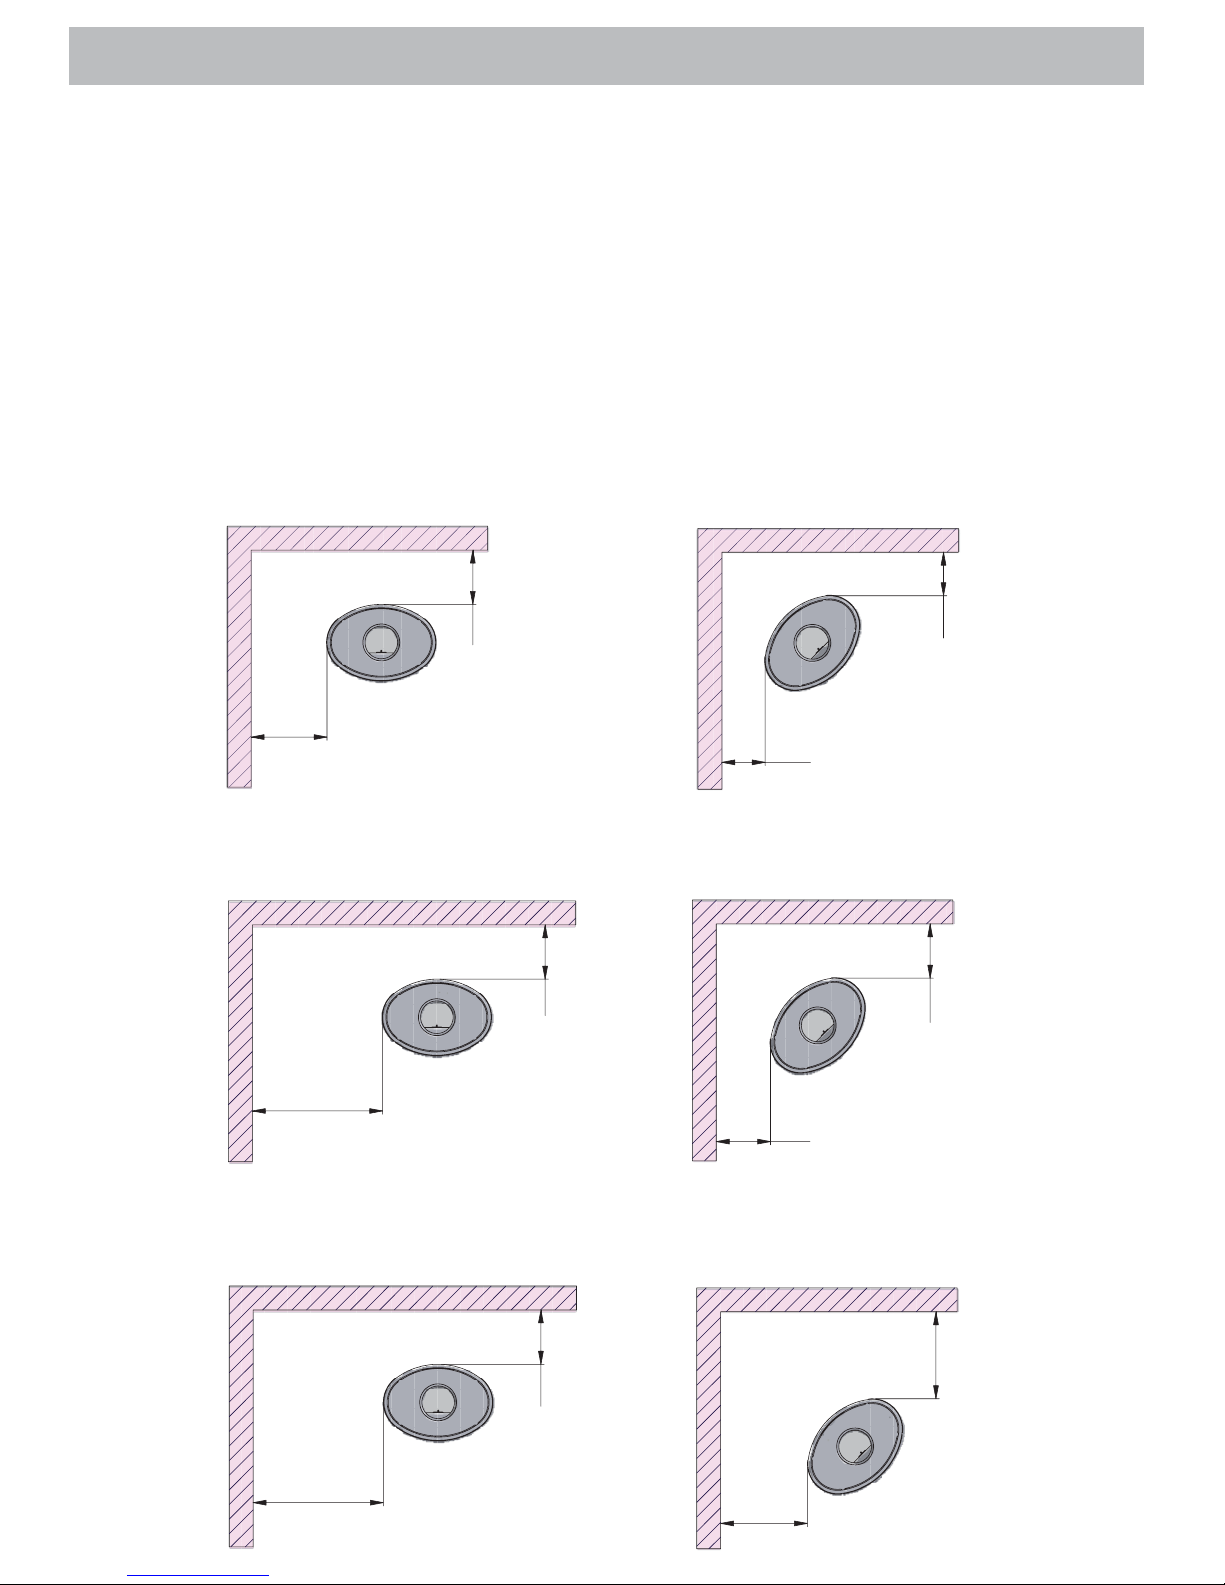
Distance to flammable walls
Positioning your wood-burning stove
The wood-burning stove must be set up so that the stove itself, the flue pipe, and the chimney can all be cleaned.
Position near to non-flammable walls
When positioning near a non-flammable wall, we recommend you keep a minimum distance of 50 mm between the rear of the product and
the wall for cleaning purposes.
Distance to furniture: 1000 mm
But please check to avoid furniture or other furnishings being dried out due to being too close to the stove.
2
5
0
600
45° Corner installation
Parallel rear wall installation
2
5
0
600
2
5
0
350
Scan 58-3 & Scan 58-6 (with full lateral glass panes)
Parallel rear wall installation
Scan 58-2 & Scan 58-5 (with half lateral glass panes)
45° Corner installation
Scan 58-1 & Scan 58-4 (without lateral glass panes))
Parallel rear wall installation
45° Corner installation
4
0
0
400
2
5
0
250
2
0
0
200
 Loading...