


KAD68-06319B (REV 0.1)
DIGITAL AUDIO PLAYER
SF3000
User Manual
The product should be fully charged before use.
■
The above picture may not be
a true likeness of the product.

COPYRIGHT NOTICE
The copyright of this manual is owned by S.CAM Co., Ltd and unauthorized duplication or
distribution of all or any part of the manual is prohibited.
SORELL is the trademark of S.CAM Co., Ltd.
WMA is a registered trademark of Microsoft Corporation.
※Details may change without prior notice.
What is SF3000?
1. SF3000 is a portable digital audio player that can save and play Microsoft WMA and OGG files as
well as MP3 files.
2. SF3000 allows you to play video in MP4 format and display JPG images on its color LCD.
3. SF3000 has a built-in MP3 encoder that allows you to take an audio input (via the line-in jack)
from a voice recorder, CDP or other audio device, and save it as an MP3 file.
4. SF3000 also has a built-in FM radio allowing you to listen to FM broadcasts and save them as
MP3 files.
WOW, SRS and symbol are trademarks of SRS Labs, Inc.
WOW technology is incorporated under license from SRS Labs, Inc.

3
Table of Contents
2
Product Features
■
PRODUCT FEATURES AND GETTING STARTED
Cautions............................................................4
Package Contents and Name of Parts..............6
LCD Display/Battery Charge.............................7
Connecting to PC..............................................8
■ BASIC OPERATION
Power on/Playing music..................................14
Volume Control/Segment Repeat ...................15
Bookmark........................................................16
EQ Selection/Navigation .................................17
Deleting a File .................................................17
Listening to FM Radio .....................................18
Recording FM Radio .......................................19
Recording voice ..............................................20
Recording external input .................................21
Using a program list ........................................22
Playing video/Displaying images.....................23
Using Text Viewer...........................................24
Using the M3U Playlist....................................25
To use User’s Logo ........................................26
■ MENU CONFIGURATION AND ITS USE
MENU Configuration .......................................28
MODE Functions.............................................29
SYSTEM .........................................................30
CONTROL.......................................................31
DISPLAY.........................................................35
SOUND ...........................................................37
Accessing the latest features through firmware
upgrades .........................................................38
■ Using LDB (Lyrics Database).................39
■ Using Transcoder......................................49
■ Specifications.............................................58
■ Warranty.......................................................59
Product Features
● MP3, WMA, OGG music files playback
Save and play Microsoft WMA and OGG files as
well as MP3 files.
● FM Reception and Recording
Make an MP3 digital recording of an FM
broadcast, while listening to it.
● Voice Recording in the quality MP3 format
Save and play voice signals as an MP3 file with
the world’s best sound quality.
●
Recording external audio input signals as an MP3 file
Convert and save audio signals from any analog
audio device directly to an MP3 file without the
need for a PC.
● Lyrics display supported
Provides an automatic lyrics input program,
obviating the need for separate lyrics editing, and
displays 3-row lyrics on the LCD.
● Enhanced firmware upgrade
After downloading an upgrade file, turn the power
off and back on to automatically upgrade your
product, keeping it up to date.
● Setting Variable Bit Rate (VBR)
Adjust the recording quality for more efficient use
of memory by configuring the voice or line-in
recording bit rate according to your particular time
requirements and location conditions.
● Speed Control
Adjust the playback speed.
● Playing video/Displaying an image
Enjoy video and image files on the 96X96 65K
CSTN high-quality color LCD.
● A built-in rechargeable lithium polymer battery
No need to purchase a separate battery as your
battery can be easily recharged with your PC’s
USB socket.

5
Cautions
4
The following cautions are provided to ensure user safety and to prevent damage to
property. Please be sure to read it through thoroughly before using the product.
When a problem occurs while using the product, please use the following checklist:
Things to check before contacting customer services
Safety Cautions
1. Exposure to loud volumes for an extended period of time may result in hearing impairment.
2. Do NOT repair, disassemble or modify the product by yourself.
3. Do NOT use the product in an airplane, or in other places where the use of electronic devices is restricted.
4. It is very dangerous to use headsets or earphones while operating bicycles, motorcycles or automobiles.
(Using headsets/earphones at loud volumes while walking may also cause accidents.)
5. When wearing the player with the neck strap, take care to avoid the strap becoming caught in a door.
※Optimal Operating Conditions •Ambient Temperature: 5°C~35°C
•Humidity: 10~75%
Do NOT place the product in
places of extreme temperatures
(too high (above 35°C) or too
low (below -5°C)), closed cars,
dusty places, bathrooms or
other humid places.
When cleaning the product, use a
smooth dry cloth and avoid solvent,
benzene or thinner usage.
(These chemicals may cause damage or
discoloration to the product.)
Do NOT allow foreign material to get
inside the product. If water or other fluid
enters the product, stop usage
immediately, press the RESET switch
and contact our customer service
center.
Do NOT exert excessive force on the
LCD display. Do NOT disassemble,
repair or modify the product by yourself.
Please note that we cannot take any
responsibility for data loss caused by
product failure, attempted repair, or
other causes.
Please note that plastic cards with
magnetic strips, e.g. ATM cards, may
be damaged and rendered unusable by
the product’s magnetic field.
1.
The product fails to
operate with nothing
displayed on the LCD.
- Recharge the built-in battery. 3. Button keys do
not work.
- Check whether they have
been locked (Hold mode).
4. Cannot download
a file.
-
Make sure that the product is
properly connected to your PC.
-
When using the USB extension
cable, make sure that it has
been properly connected.
5. Stops operating. - Press the RESET button next
to the HOLD button on the
main body. (This forces the
product to shut down.)
2. No sound during
playback.
- Ensure that a track has been
saved to the removable disk.
- Check whether the volume
level is set to “0”.
- Ensure that the earphones
are properly plugged in.

76
Package Contents and Name of Parts LCD Display/Battery Charge
Necklace type earphone
Carrying Case
(Option) Arm Band (Option) USB Adapter(Option)USB Cable
Main Body
Installation CD Line-in Cable
User Manual
LCD
LED (Charge /
Operation Indication)
Microphone
Direction / MENU Button
Power, Play /
Stop Button
EQ / Navigation /
Bookmark Button
Segment Repeat /
Record Button
USB Jack
Earphone Jack/
Line-in Jack
HOLD Switch
RESET Button
Operation Mode
Current track number
Total number of saved
tracks
Play control
Folder format indicator
File format indicator
EQ mode
Play mode / Segment
Repeat indicator
Playing time
Hold (Lock indicator)
Battery life
Bit rate
Playback progress
Folder name
File name and ID3Tag Info
Level Meter
Charging battery
Charging via PC Charging via adapter
• After turning your PC on, connect the
product to the USB port of your PC
using the USB cable.
•
The charge LED (blue) of the main body
lights up during charging and goes off
once charging is complete (this takes
approximately 2-3 hours).
•
The charging time may vary depending on
the USB usage of your PC.
※Be sure to power off the product
before connecting it.
• Connect the adapter to the main
body.
• It takes 2-3 hours to completely
charge a discharged battery.
• The (blue) charge LED of the main
body lights up during charging and
goes off once charging is complete.
※The adapter is sold separately.
9
Connecting to PC
8
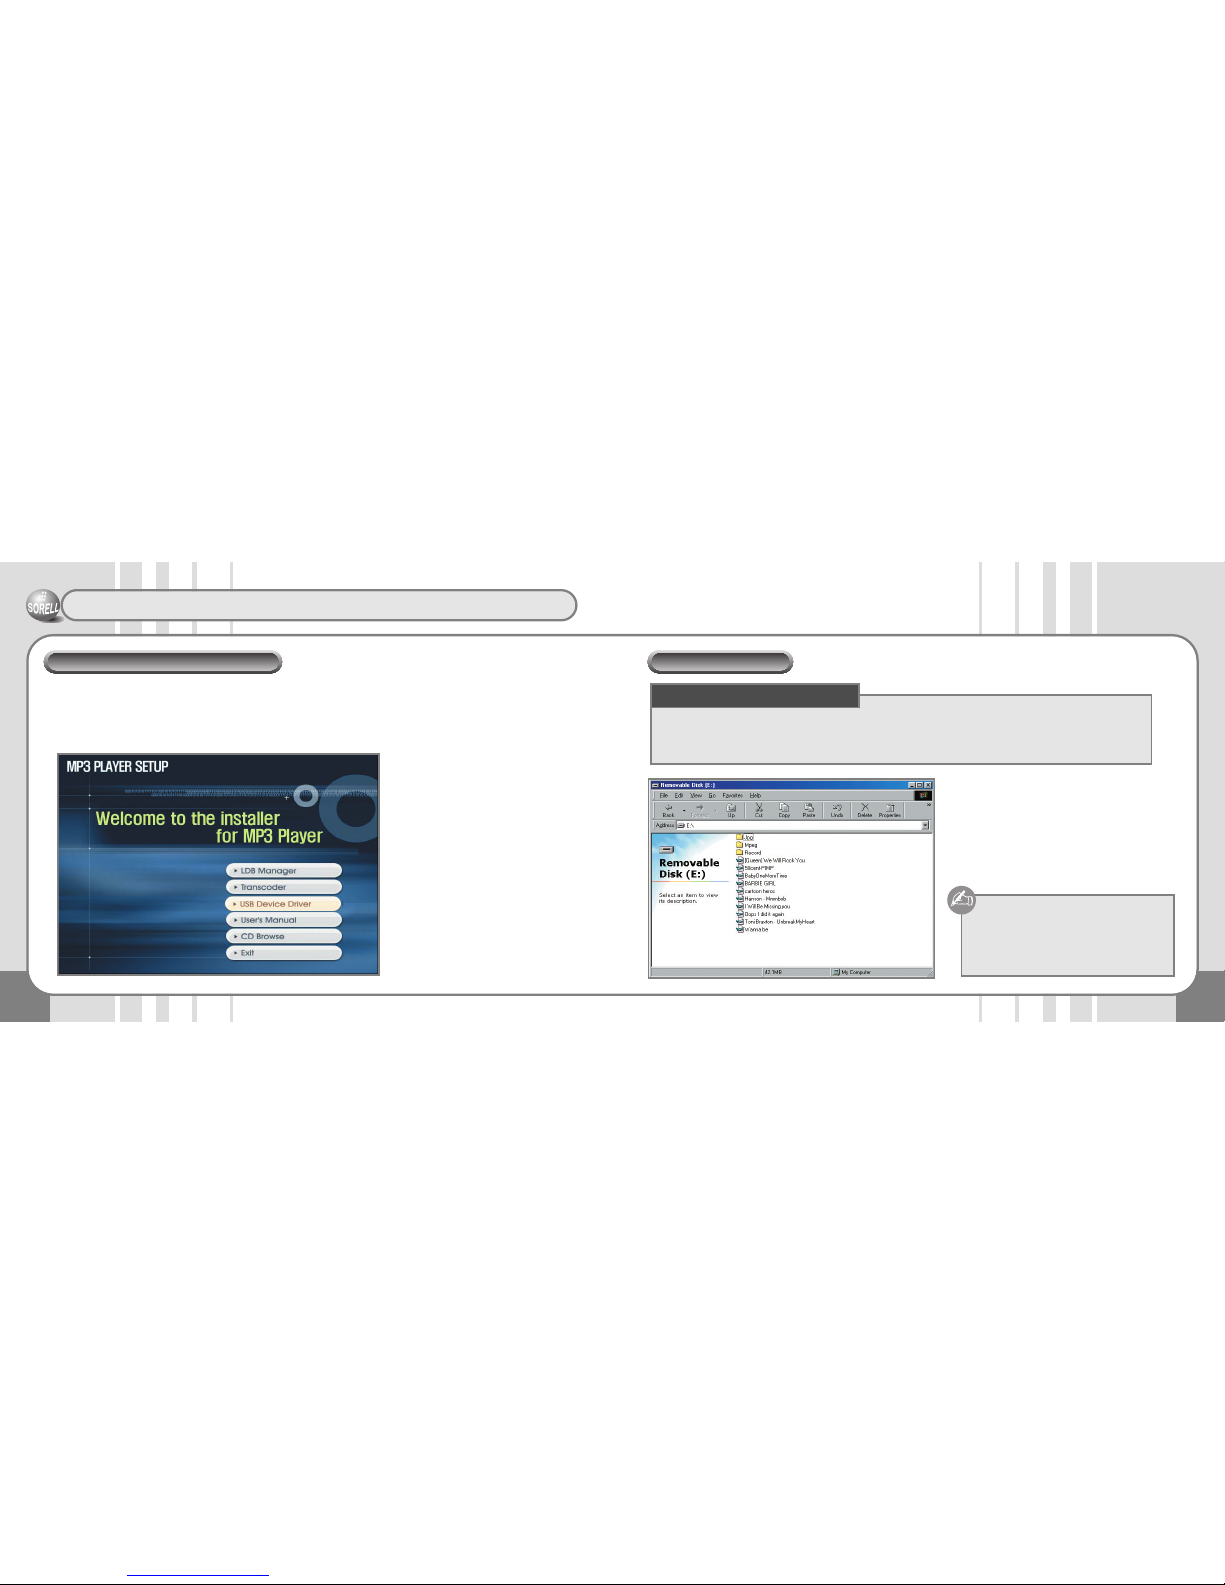
USB device driver installation is only required for Window 98 SE/ME environments.
Insert the installation CD into the CD-ROM drive of your PC and select “USB Device Driver”.
The installation program runs automatically. Follow the instructions in the installation window.
Restart your PC.
Installing the USB device driver
Power on the main body.
Connect it to the USB port of your PC.
A new Removable Disk is created in My
Computer.
After selecting a file to save, drag & drop or
copy & paste it to the Removable Disk.
Connecting to PC
• PC: A PC with Pentium MMX or above
• OS: Win98SE / ME / XP / 2000 / Mac or Linux
• Peripheral Devices: A CD-ROM drive, a hard disk with more than 50 MB available space, a USB port
Do NOT remove the USB jack while
transferring a file.
The order in which music files appear in
Windows Explorer does not reflect the play
order.
Recommended system requirements

11
Connecting to PC
10
Power on the product and connect the USB jack to your PC.
Select [Control Panel ➝ System ➝ Device Manager] and
the following window appears. After selecting [USB Device],
press the Property button.
Press the Update Driver button.
The Device Driver Update Wizard is displayed.
Press the Next button.
After creating a driver list, select a driver to update and
press the Next button.
Select a hard disk controller and press the Next button.
Press the “I have a disk” button.
After inserting the provided CD into the CD ROM drive,
choose “Search” and select the Driver ➝ Win98 folder
and press the OK button.
Installing the Windows 98 driver manually

13
Connecting to PC
12
Press the Next button.
Installation of the USB driver is now complete.
Press the Finish button.
Check whether it has been properly installed.
1) Go to Control Panel ➝ System for checking.
If after the above procedure has been completed the
product is still not recognized, uninstall the USB driver
completely and install it again.
Managing files
• The product is recognized as a removable disk when it is
connected to your PC and it contains two folders named
CONFIG and RECORD.
• MP3, WMA, OGG music files can be saved to either of the
folders.
• Voice recording files should be saved to the RECORD
folder.
• FM recording and encoding files should be saved to the
RECORD folder.
• The main body can hold up to 999 files in 999 folders.
Disconnecting from PC
• Data loss may occur if you disconnect the device from
your PC during data transfer.
• In Windows ME/XP/2000 environments, only remove the
device after first disabling it by clicking the “Safely remove
hardware” icon ( ) displayed in the lower right corner of
the task bar.
File transfer in progress.
Do NOT remove the device.
File transfer complete.
You can now remove the device.
ROOT

15
Power on/Playing music
14
Volume Control/Segment Repeat
● Power on
Press the PLAY/STOP [] button briefly.
The product turns on and the SORELL screen or another user specified screen appears on
the LCD.
● Power off
Press and hold the PLAY/STOP [] button for more than 2 seconds.
“Bye Bye” is displayed on the LCD and the product turns off.
● HOLD Switch
Push the HOLD switch in the indicated direction to disable all buttons.
● To play a track:
Press the PLAY/STOP [] button to play an MP3, WMA or OGG file.
● To select a track:
Push the jog key in the or direction to skip to the previous/next track.
Push the jog key in the direction within 3 seconds of starting playback to skip to the
previous track, and after 3 seconds of playback to move to the beginning of the current track.
Push and hold the jog key to the or to seek within the current track.
● To stop playing:
To stop playing, press the PLAY/STOP [] button.
To resume playing, press the PLAY/STOP [] button again.
● Volume Control
The volume level can be set between 0-38.
To increase the volume: Push the jog key in the + direction.
Push and hold it to increase the volume further.
To decrease the volume: Push the jog key in the - direction.
Push and hold it to decrease the volume further.
The volume level setting is automatically saved when the product is turned off, and used
when the product is turned on again.
※Please exercise caution. Exposure to loud volumes for an extended time may result in
hearing impairment and earphone damage.
● Segment Repeat
Press the REC/A-B button where you want to start Segment Repeat during playback.
The icon is displayed.
Press the REC/A-B button again, this time at the point where you want to end Segment
Repeat.
The icon is displayed and the selected segment is played repeatedly.
To disable Segment Repeat, press the REC/A-B button once more.
The icon disappears and Segment Repeat is disabled.

17
Bookmark
16
EQ Selection/Navigation/Deleting a File
● Bookmark
Inserting a bookmark
While playing a music file, press and hold the jog key to insert a bookmark.
(Up to 99 bookmarks can be inserted.)
Searching for a bookmark
When stopped, press the EQ button briefly to display the bookmark list.
After moving to the desired bookmark by using the +/- key of the jog button, press the
FF [] button and playing begins from the bookmark. The symbol is displayed as
the play mode indicator.
(The same button operations apply as when navigating.)
Deleting a bookmark
When stopped, press the EQ button briefly to display the bookmark list.
After moving to the desired bookmark by using the +/- key of the jog button in the front
panel, press the EQ button to delete it. Press and hold the EQ button to delete all saved
bookmarks at once.
Any changes to a file on the removable disk to which a bookmark has
been added (deletion/moving) will cause a “NO SONG” message to appear
upon bookmark playback i.e. the bookmark feature can only be used if the
file location has not been changed since its download.
● EQ (Sound Effect) Mode
You can enjoy music in various tones.
The sound tone changes each time you press the EQ button briefly:
NORMAL, ROCK, JAZZ, CLASSIC, POP, USER EQ (user-defined), SRS 3D
● Navigation
Press and hold the EQ button to enter Navigation mode.
After locating the desired file with the jog key, push the key in the direction to play
the selected file right away.
Moving to the sub folder
Select the desired folder and push the jog key in the direction.
Moving to the upper folder
Whilst in a folder, push the jog key in the direction.
● Deleting a File
Press the REC button in Navigation mode.

19
Listening to FM Radio
18
Recording FM Radio
● Listening to FM radio (87.5-108.0MHz, 76.0-108.0MHz)
After displaying the main menu screen by pressing the jog key briefly, select MODE and
use the jog key to select FM mode.
※Please be sure to plug in the earphones before using FM mode. The earphones work as
an antenna.
The Station Search mode has two modes: Manual and Preset.
Press and hold the jog key to enable or disable the Preset mode.
AUTOSCAN
Press and hold the EQ button. The device then automatically scans frequencies and stores
up to 20 present channels.
PRESET SCAN Mode
Push the jog key further in the or direction to increase/decrease the preset
number and locate a desired station. (Ex. 93.1➝95.9➝97.3)
Push the jog key briefly in the or direction to increase/decrease the channel and
locate a desired station.
AUTOSEARCH SCAN Mode
Push the jog key in the or direction to increase/decrease the frequency and locate
a desired station. (Ex. 89.1➝91.9MHz)
Storing a station channel
Briefly press the EQ button in the center of the side of the main body to create a new
channel number and save the current frequency.
Erasing a station channel
Select a channel and press the EQ button briefly to erase the channel number along with
the stored frequency.
● FM Recording
While listening to FM, press the REC button to start recording.
To pause recording:
Press the PLAY/STOP [] button to pause recording and press it again to resume
recording.
※When paused, ( ) is displayed.
To finish recording:
Press the REC button briefly to stop recording. The recording file is automatically saved in
the RECORD folder.
The recording time is displayed. When the max. recording time - determined by memory
capacity - is reached, recording is automatically stopped and the recording saved.
※The Max Recording Time (based on 256 MB)
128 kbps (4 hr), 64 kbps (9 hr), 32 kbps (18 hr), 16 kbps (36 hr)

21
Recording voice
20
Recording external input
● Voice Recording
After selecting MODE by pressing the jog key briefly, select Voice mode.
(Alternatively, you can press and hold the [REC] button.)
In the Recording mode, press the REC button briefly to start recording.
To pause voice recording:
Press the PLAY/STOP [] button to pause recording and press it again to resume
recording.
※When paused, ( ) is displayed.
To finish voice recording:
Press the REC button briefly to stop recording. The recording file is automatically
saved in the RECORD folder.
It displays the recording time. When the recording time exceeds the max recording
time - determined by the memory capacity - the device stops recording automatically
and saves the recording.
※You can also press the PLAY/STOP [] button to stop voice recording.
Recording
● Entering the Line-in Recording mode
Connect an external device to the line-in jack of the main body with the line-in
cable.
To enter the line-in Recording mode:
Press the jog key to display the main menu.
Select ENCODING mode in the MODE menu and press the jog key.
To make a line-in recording:
Press the PLAY/STOP [] button briefly to pause recording and press it again
to resume recording.
※When paused, ( ) is displayed.
To finish line-in recording:
Press the REC button briefly to stop recording.
The recorded file is automatically saved in the RECORD folder.
The recording time is displayed. When the max. recording time - determined by
memory capacity - is reached, recording is automatically stopped and the
recording saved.
※Set the output volume of the external device to a high level before commencing
line-in recording.
If the output volume of an external device is low, the volume level of the
recording may end up being too low to be audible.
Use the Auto Sync feature to split recording over separate tracks.
External Audio Input
You cannot make a recording when the displayed remaining time is
[00:00:00].
(Out of memory space. Delete a file and try voice recording again.)

23
Using a program list
22
Playing video/Displaying images
● Using a program list
To create a program list:
Select a track in navigation mode to add it to a program list by pressing the EQ button
briefly. (Up to 99 files can be added.)
To view a program list:
Go to CONTROL ➝ PROGRAM to display the selected files.
To play a program list:
After moving to the desired track in the PROGRAM list by pushing the jog key in the + or direction, press the direction key. While in program play mode, is displayed.
To delete a program list:
After moving to the desired file in the PROGRAM list by pushing the jog key in the + or direction, press the EQ button briefly to delete the selected track from the list.
Press and hold the EQ button to delete all the saved lists at once.
To exit from the program play mode:
To activate general play mode while in program play mode, enter navigation mode and
play another track.
● Playing video
Press and hold the EQ button and select an MP4 file by pushing the jog key in the + or direction. After selecting an MP4 file, push the jog key in the direction.
• To select a track:
Push the jog key in the or direction to skip to the previous/next track.
• To stop:
Press the PLAY/STOP [] button to stop.
Press the PLAY/STOP [] button again to resume playing.
● Displaying an image
Press and hold the EQ button and push the jog key in the + or - direction to select a JPG file.
After selecting a JPG file, push the jog key in the direction to view the image file as a slide.
• To finish viewing an image file:
Press the jog key briefly and select an MP3 file.
Only MP4 files that have been converted using the Transcoder program
(on the provided CD) can be played.
if the file capacity is over the one hour, our set can not support to this
kind of files.
our set can not support to progressive and compressed JPG mode file.
The Playing Status will be disappeared when user clicks the Jog button shortly
during MP4 playing, and it will be displayed again when click one more time.

25
Using the M3U PlaylistUsing Text Viewer
24
● Using Text Viewer:
Press and hold the EQ button, and select a TXT file by moving the jog key in the + or direction. After selecting a TXT file, push the jog key in the or direction to move to
the previous/next page within the current file.
• Turn the pages automatically [Set Up / Cancel]
If you set a value for JPG SLIDE, the page advances automatically when the specified
time duration elapses (see Page 34).
When the page has advanced, pressing the PLAY/STOP [] button pauses and/or
cancels Automatic Page Advancement.
• To Use the bookmark in Text Viewer
Push the Jog Button to the direction of “+” to memorize the present page, push the Jog
Button to the direction of “-” to go to memorized page (Only one page is available for
book mark).
It will move to same page, which is memorized when user tries to read other text file. It
will go to last page if the page number of other files is below the page of bookmarked.
• To Close the Text Viewer:
Press the jog key briefly, and select an MP3 file.
●
Using the M3U Playlist:
Press and hold the EQ button, and select an M3U file by moving the jog key in the + or direction.
After selecting an M3U file, push the jog key in the + or - direction. The playlist is played
beginning with track #1, and the PLAY MODE icon is changed to M3U ( ).
• To Select a Track:
Enter NAVIGATION MODE in the M3U MODE to display the list of music files contained
in a chosen M3U file. Select the desired track and press to start playing from the
selected point.
• To Disable M3U MODE:
Enter NAVIGATION MODE in the M3U MODE to display the list of music files contained
in a chosen M3U file. Press to move to the directory where the M3U files are located,
and cancel M3U MODE.
Push the jog key to change from PLAY MODE in the menu, or push the REC key when
paused to change to PLAY MODE.
• To Create an M3U File:
After running the Winamp program, select a track to save, and press “Save as a Playlist”
in Manage Playlist.
To Play an M3U File: The tracks contained in the M3U file should
exist in MP3 player.
It goes FM Radio mode directly when user click the EQ button
during text viewer, it goes Music mode when user click EQ again.

27
To use User’s Logo
26
“INTERVAL” time Setting
Copy and Paste the picture file in ROOT Directory after
connecting PC.
Create the TXT file under name of “LOGINFO.TXT” on the
WINDOWS WORD PAD, and write [INTERVAL:200] in the TXT
file and save it into the root directory.
User can adjust the time of “INTERVAL” value.
Example) The INTERVAL(The Gap of Files) time range : Can
be adjusted between 100ms ~ 5000ms.
[INTERVAL:100]:
After 0.1 sec. Move to the next image
[INTERVAL:300]:
After 0.3 sec. Move to the next image
※If have no “LONGINFO.TXT” file, adjust 200ms (0.2 sec)
automatically.
Remove the USB cable out, and power off & power
on again. The SF3000.LOG file is coming in the root
directory by automatically, and saved “BMP” file &
“TXT” file will be eliminated automatically too. User
can re-use SF3000.LOG file through moving it to PC
and re-download.
To make User’s Logo
• Connect the player with PC and Push to PLAY/STOP [] button for Power On. The [Removable Disk] will be shown in
[My Computer].
Save the Logo File
Rename the picture as “LOGO00.BMP ~ LOGO19.BMP” (The
other name and format can not be available, and it should be use
LOGO00.BMP format)
TIP: BMP File : • Maximum 20files
• Below 1Mbyte per each file capacity
• Zip BMP file does not supported
• BMP file size should be below 96 x 96 Pixel.
• Otherwise, it will show only left top side instead
of full size.

29
MENU Configuration
28
Using MENU
MENU
☞
Press the jog key briefly.
SOUND
SELECT EQ
SETTING
DISPALY
CONTRAST
SCR SPEED
BACK LIGHT
BLINK LED
ID3 DISP
LYRIC DISP
JPG SLIDE
SCR SAVER
MODE
MUSIC
FM
VOICE
ENCODING
SYSTEM
FORMAT
DEFAULT
SYS INFO
MEM INFO
POWER OFF
CONTROL
LANGUAGE
PLAY MODE
PROGRAM
RECORDING
SLEEP TIME
STUDY KEY
PLAY SPEED
VOL LIMIT
Radio CTRL
MODE
●MUSIC: Play various file formats - including MP3, WMA,
OGG, JPG and MP4.
●FM: Listen to or record FM radio.
●VOICE: Record voice.
●ENCODING: Record audio signals from an external
device to an MP3 file.
➤
➤
➤
➤
Select
M
o
v
e

31
Using MENU
30
SYSTEM
●FORMAT: Used to format the memory.
Use with caution as formatting results in the loss
of all files.
●DEFAULT: Restore all the settings of the product to the
initial factory settings.
●SYS INFO: Check the firmware version.
●MEM INFO: Display memory-related information: total
memory space, used memory space and
available memory space.
·USED: Used memory space
·REMAIN: Available memory space
➤
➤
➤
➤
●POWER OFF: The product turns off automatically when
play is stopped for a certain period of time.
The idle time can be specified as anywhere
between 1 and 30 minutes.
➤
CONTROL
●LANGUAGE: Select a language to be used for will be
used to displaying ID3 TAG information
and lyrics.
●PLAY MODE: Select a desired play mode.
After selecting CONTROL in the main menu, select
PLAY MODE and then a desired play mode.
■ Play Mode
NORMAL: Play the entire tracks once in a sequential order.
NORMAL DIR: Play the tracks within a directory once.
REPEAT ALL: Play the entire tracks repeatedly.
REPEAT DIR: Play the tracks within a directory repeatedly.
REPEAT One: Play a single track repeatedly.
SHUFFLE RPT:
Play the entire tracks repeatedly in a random order.
SHUFFLE DIR: Play the tracks within a directory repeatedly in a
random order.
INTRO Play the entire tracks for the first 10 seconds per each.
PROGRAM: Play the programmed tracks only.
BOOKMARK: Play the bookmarked portions only.
※Press the REC/A-B button briefly when stopped and then the
play mode changes sequentially.
➤
➤
Select
M
o
v
e
Select
M
o
v
e

33
Using MENU
32
CONTROL
●PROGRAM: Allows you to listen to the selected tracks only.
• To perform track programming:
Press and hold the EQ button to enter
Navigation mode.
After selecting a desired track with the jog
key, press the EQ button briefly to save it.
• To play programmed tracks:
Go to MENU ➝ CONTROL ➝ PROGRAM by
pressing and holding the jog key and then the
PROGRAM list is displayed.
Select a track to begin play with and push the
jog key in the direction to play tracks in
the programmed order.
(See page 22.)
●RECORDING: Adjust the recording quality of external
input, FM radio and voice recording.
■ BITRATE
: Specify the recording quality that you want.
A low bit rate decreases file size but yields poorer
sound quality. A high bit rate yields better sound
quality but increases the file size, shortening the
max. recording time.
■ AUTO SYNC
: This function automatically detects when there
is no incoming signal during encoding
(recording) and saves the input in separate
files. (Signals following about 3 seconds of
silence are saved as separate files.).
➤
➤➤
➤➤
CONTROL
■ MIC VAD
: During voice-recording, stops recording when there
is no signal.
●SLEEP TIME: Specify the time after which the player
automatically powers off while playing.
■ SET TIMER
: Specify the desired time (0-60 minutes).
■ TIMER
: Display the remaining timer time.
●STUDY KEY: Set the time interval that is skipped when
the jog key is pushed in the or
direction.
This function allows you to skip the specified
time interval by pushing the jog key in the
or direction, which can be useful
when used with a language study file that
has a long recording time.
※Set it to 00 to disable the function.
●PLAY SPEED: Specify the desired play speed.
Press “-” to decrease and “+” to increase
the play speed. 100% (00) represents
normal play speed.
➤➤
➤➤
➤➤
➤
➤
Select
M
o
v
e
Select
M
o
v
e

35
Using MENU
34
CONTROL
●VOL LIMIT: Limit the post power-on volume level.
(e.g. if you set the value to 10, then the volume
level will be set to 10 whenever you power on
the player - even if the volume level was higher
than 10 when you turned the power off.)
●RADIO CTRL: Select the frequency range for your country.
(76.0 - 108.0 MHz)
(US/Europe, Japan)
➤
➤➤
■ SCAN LEVEL
: Adjust the FM reception sensitivity for Autoscan.
• +: Decrease sensitivity during Autoscan.
• -: Increase sensitivity during Autoscan.
➤➤
DISPLAY
●CONTRAST: Adjust the contrast of LCD (0-35). ●BLINK LED: Let the LED blink while playing a file.
This allows you to see that the player is
operating, even when the backlight is off.
●ID3 DISP: Display the ID3 TAG information instead of the
filename.
➤
➤
➤
●SCR SPEED: Adjust the filename scroll speed (0-6).
➤
●BACK LIGHT: Adjust the LCD backlight time (0-18).
➤
Select
M
o
v
e
Select
M
o
v
e

37
Using MENU
36
DISPLAY
●LYRIC DISP: Display the lyrics contained in a music file on
the LCD.
A filename is displayed when lyrics are not
available.
●JPG SLIDE: Specify the time duration for which each JPG
file is displayed.
(Automatically proceeds to the next file after
the specified time period.)
●SCR SAVER: The SF3000.LOG images in the root directory
as user selected will be displayed after user
set the SCR SAVER time.
This function is to show the image or
animation which is selected for user’s
preference with listening music.
(Can be adjusted 0~30 sec)
(See page 26)
➤
➤
➤
SOUND
●SELECT EQ: Specify the music tone appropriate for each
genre: NORMAL, ROCK, JAZZ, CLASSIC,
POP, USER EQ (user-defined), SRS 3D
Select
M
o
v
e
Select
M
o
v
e
■SRS 3D:
SRS technology expresses and enhances sound
through 2-channel headsets or speakers better than
stereo is able to. SRS delivers a ‘live’ surround
experience - a 3D sound image with sound directions
that simply aren’t possible with stereo.
• WOW: Adjust 3D sound effects.
• TRUBASS: Emphasize the bass.
• FOCUS: Emphasize the treble or the delicacy of
sound.
●SETTING: Configure 3D sound effects.
■USER EQ
:
Adjust the tone from low to high frequency
according to user preference.
Select a band, by pushing the jog key in the or
direction, and use +/- to set its value.
➤➤
➤
➤➤

39
Accessing the latest features through firmware upgrades
38
Using LDB (Lyrics Database)
Download the latest firmware version from www.sorell.co.kr and save it in your player.
The firmware upgrade file must be saved in the root directory.
Power off and then power on the player; the firmware is automatically upgraded.
※
What is the root directory? This is the directory that contains all other directories and folders in the system.
Accessing the latest features through firmware upgrades
The firmware upgrade should be done only when there is sufficient battery.
If the upgrade process is interrupted by a power-off due to insufficient battery
power, serious product damage can result.
Please ensure that the power does not go off during upgrades.
■ For more information on firmware upgrades, please refer to our web page.
LDB Manager and its screen layout
This the LDB Manager shortcut icon that was created during program installation.
Double-click the icon to run the LDB Manager program.
LDB Manager screen layout
• LDB Manager is the program that adds lyrics to MP3 files on your PC. It can be used when the player is not connected to
your PC. You must have internet access in order to download lyric information from the server.
Preview Pane
Device
Selection Pane
Notice
File List Pane
Toolbar
Explorer Pane

41
Using LDB (Lyrics Database)
40
Enter lyrics: After selecting an MP3 file to enter lyrics for, press this button to have it automatically marked (or entered) with lyrics.
For a file that has no lyrics, “NO” is displayed and, for a file that has lyrics, the supported lyrics data are displayed
under the marking information in the file list plane. “No” is displayed for a track that has no lyrics available.
Tracks with available lyrics have their lyrics data displayed under marking information in the file list pane.
※You cannot mark a VBR file with lyrics since its time data does not correspond to the actual play time.
Search lyrics: If you prefer to search for lyrics data, select an MP3 file and press this button to search for lyrics on the lyrics server.
Delete lyrics: After selecting an MP3 file to delete lyrics from, press this button to delete its lyrics.
Edit lyrics: Use this button to add new lyrics to a file that has no lyrics or to modify the existing lyrics.
Preview: The preview pane is not visible the first time you run the program. Press this button to enable the preview pane.
After selecting a file that has lyrics, play it in the preview pane to preview lyrics.
Refresh: Press this button to refresh the file list.
Configuration: When entering lyrics in LDB Manager, use this button to change the modification status of the ID3v1 tag information.
About LDB: Press the button to display the version and company information of LDB Manager.
Preview Pane:
You can preview entered lyrics in the preview pane. After selecting a file that has been marked with
lyrics, you can adjust the play or schedule time by dragging them in the preview pane.
Depending on the device model that you have, there may be restrictions on the number of characters and
lines that can be displayed. Select the device and model name that correspond to your unit.
Menus in the file list pane
• These are the menus available in the file list pane:
Play: Play the selected file in the preview pane.
Search: Search lyrics data.
Edit: Add new lyrics to a file that has no lyrics or modify the
existing lyrics.
New Folder: Create a new folder in the current directory.
Select All: Select all files in the current list.
Refresh: Refresh the display in the file list pane.
Delete: Delete the selected file.
Rename: Rename the selected file.
Delete Lyrics: Delete lyrics data from the selected file.

43
Using LDB (Lyrics Database)
42
Automatic Lyrics Search (Automatic Search)
Run LDB Manager and locate the folder that contains the
MP3 file you want to enter lyrics for.
You can enter lyrics automatically, as shown below:
(Select an MP3 file ➝ Enter lyrics ➝ Check the preview pane ➝ Play it in the player)
After selecting a file to enter lyrics for, click the “Enter Lyrics”
button in the toolbar.
After searching for lyrics for the selected file on the lyrics
server, enter them.
Once lyrics are entered, the lyrics marking information is
displayed in the file list pane.
Play the file to display lyrics data in the preview pane as
shown in the picture.
※When you cannot find the applicable lyrics with
Automatic Search, perform a Manual Search.

45
Using LDB (Lyrics Database)
44
When you cannot find lyrics with Automatic Search, you can search for them manually based on the author
and title information of the selected file.
Manual Lyrics Search (Manual Search)
After selecting a file to enter lyrics for, click the “Search
Lyrics” button in the toolbar.
The search window appears as shown below:
Enter a musician and a title in the lyrics search condition
input box and click the Search button. For a file with an ID3
tag, click the musician box or title box in the ID3 tag
information to have lyrics automatically entered from the
lyrics search box.
Find and click the song with the best time data, musician
and title match. The corresponding lyrics are displayed in
the right pane.
After checking the lyrics, press the Mark Lyrics button to
enter them. The following confirmation window is displayed.
Press the OK button and then click the Close button in the
lower right corner of the LDB Search window.
After checking the lyrics, download them to the player for
playing.

47
Using LDB (Lyrics Database)
46
Manual Lyrics Synchronization (Manual Input)
After selecting a file to enter lyrics for, click the “Edit Lyrics”
button in the Toolbar.
When the Edit Lyrics screen shown below appears, press the
Text Editor button.
Type the desired lyrics into the Lyrics Input window and
press the OK button.
You can see the lyrics just entered in the Edit Lyrics screen.
Press the Play button in the preview pane and press the SYNC button when you have a line of lyrics in the Edit Lyrics screen.
When you are done, press the Mark Lyrics button to save the lyrics that have been worked on so far.

49
Using LDB (Lyrics Database)
48
Using Transcoder
Modifying existing lyrics
After selecting a file to modify lyrics for, click the “Edit Lyrics”
button in the toolbar.
You can see the lyrics just entered in the Edit Lyrics screen.
Modify the lyrics or the time by double-clicking over the
portion of lyrics to modify.
When you are done, press the Mark Lyrics button to save
the lyrics that have been worked on so far.
Introduction
Transcoder is a program that converts video file formats such as WMV, ASF, MPG or AVI that are commonly used in desktop
PC environments to the MP4 format (which SF3000 uses).
The system should run Microsoft Windows XP or above and Microsoft DirectX 9.0 or above.
It should also have the filters required for video play properly installed.
● H/W requirement
- CPU: Intel Pentium 4 1 GHz or above
- HDD: 20MB or more space
● S/W requirement
- Windows 2000, Windows XP
- Microsoft DirectX 9.0
- MS Media Player 9.0
- DivX and other codecs
Recommended system requirements
Transcoder
Input: File (WMV, ASF, MPG, AVI)
Output: .MP4 File

51
Using Transcoder
50
Install
Run . The following window is displayed.
Press the Next button to proceed.
Press the Yes button to proceed, otherwise press the No
button.
After specifying a directory to install to using the Browse
button, press the Next button.
When the installation is complete, press the Finish button.
Transcoding
Double-click the icon.
Press the button to select an input file.
The input file name is given a *.MP4 extension. Information
on both input and output files are displayed in the window.
The initial information of the output file is the same as that of
the input file.
Press the button to transcode the entire range
to the input file. A dialog window appears showing the
transcoding progress along with information on the
input/output files.
Press the button to stop transcoding.
When transcoding is complete, the button is
pressed automatically.
※After right-clicking in the file
list pane, select View File
Information to view
information on the selected
file.
To specify another output file, press the button
and enter the filename of the file to be created.

53
Using Transcoder
52
Selection Transcoding
You can also select specific segments for transcoding.
Select to choose a file to transcode.
Select to start playing the selected file.
Press the button to set the start point. is displayed
over the selected point - showing that it is the start point.
Press the button to set the end point. is displayed
over the selected point - showing that it is the end point.
Press the button to confirm the selected
segment. The selected segment is highlighted in
sky blue, indicating that the segment has been
confirmed.
(Press the button to cancel the selected
segment.)
Press the button to start transcoding.
Multiple Transcoding
You can select multiple files and transcode them at the same time.
Press the button repeatedly to select multiple files.
Alternatively, drag & drop all the desired files onto the
Transcoder window at the same time to register all of them
automatically.
To perform Selection Transcoding from a registered list, click
a desired file and repeat the above Selection Transcoding
procedures.
After selecting a list that you do not want to transcode among
the registered lists, right-click on it and choose “Delete
selected list”. Choose “Delete all list” to cancel all files.
Press the button and the selected files are
transcoded sequentially. The file that is currently being
transcoded is highlighted.
Press the button to stop transcoding of the
current file and start transcoding of the next file.
You cannot apply different settings to each of the files when performing
Multiple Transcoding. (The same settings are applied to each file).

55
Using Transcoder
54
Setup
You can set the video and audio options and specify a directory to save output files to.
Press the button to display the tab dialog, where you can specify file attributes.
Select the Video tab to set various video related options.
① Video Rotate: Rotate a video image by 90, 180 and 270
degrees and set the symmetry.
Video Rotation
0 90 180 270
Video Symmetry
0 90 180 270
② Video Quality: Adjust video quality.
You can specify a desired setting (number) in
the Video Quality combo box. The video
quality degrades as the number increases.
③ Wide Screen: Many Divx titles have a wide screen
format - such as 720x480. If you convert
this wide screen to 176x144, the face in
the screen becomes longer as shown in
the picture below. Enabling this option
preserves the original screen ratio.

57
Using Transcoder
56
Audio Setup: Press the Audio tab to set the sampling rate to
32.0, 44.1, or 48.0 KHz and the audio bit rate to 64, 96, or
128 Kbps.
Specify the output file directory.
You can specify a directory to save output files to that
have been created during transcoding.
Player
The transcoded file can be played with Player.
Double-click the icon.
Press the button to select a file to play.
Press the button to start playing.
Press the or button to change the playing location.
Press the button to pause and the button to stop
playing.
Press the button to minimize the window and the
button to exit.

59
Specifications
58
Warranty
Specifications
Type Option Specification
NO of channels Stereo (L/R)
Audio
Frequency range 20Hz - 20KHz
Headset output L 12mW + R 12mW (Max. Volume, 16 Ω)
Signal to noise Ratio > 87dB (30 KHz LPF)
FM Radio
Frequency range 76 MHz - 108.0MHz
Signal to noise ratio > 80dB (With filter applied)
Decoding file MPEG 1/2/2.5 Layer3, WMA, OGG (Ogg Vorbis)
JPG, MP4 (PIXTREE format), TXT
Encoding file MP3: 16 - 192 kbps
Bit rate MP3 : 8 Kbps - 320 Kbps supported, VBR (Variable Bit Rate) supported
WMA : 32 Kbps - 192 Kbps supported
OGG: Q0 - Q9
Tag ID3 V1 Tag, ID V2 Tag
Dimension (W X H X D) Appr. 30 X 65 X 15 mm
Weight Appr. 34 g (including the battery)
Playing time (music file) About 10 hours (based on 128 kbps, MP3, EQ Normal, Back Light Off, Vol 20)
Playing time (FM radio) About 10 hours (based on Back Light Off, Vol 20)
Voice Recording Time About 36 hours (16 kbps, 256 MB)
Language Multiple languages supported
USB Spec. USB 2.0 (High speed)
Charging time About 3 hours for complete charge using PC USB power
Battery Li-Polymer Battery (3.7 V, 450 mAh)
LCD 96 X 96 65K CSTN LCD
General
Specifications
The supported
files
The warranty is effective for one year.
Service Information
•
S•CAM provides a product warranty as described below by item, in
accordance with the Consumer Damage Compensation Regulations.
• If the product malfunctions, please contact your vendor for a
speedy response.
Product Digital Audio Player
Mode SF3000
Purchase Date
Vendor
SORELL MP3 Player
SF3000
Consumer’s Name
Consumer’s Address
This warranty has to be submitted in order to obtain repair.
This warranty will not be reissued, so please keep it in a safe place.
This warranty is valid only in Korea.
Free Service
• Free service only applies for malfunctions that occur within one
year (the Warranty Period) from the date when you purchased it.
• If you use normal products for any commercial purposes, the
warranty period is reduced to six months.
1. This product is manufactured using strict quality management
and inspection procedures.
2. If the product malfunctions during normal use, your vendor or the
head office service center will provide free service during the
Warranty Period.
Charged Service Conditions:
• If the product is not damaged.
If you request a service and the product turns out not to be
damaged, you will be charged for our costs. Therefore please read
the user manual carefully.
• If the product is damaged as a result of consumer error.
• If the product is damaged as a result of consumer negligence or
unauthorized repair or alteration.
• If the product is damaged as a result of the use of an incorrect
power rating.
EG) if excessive or insufficient voltage (outside our specification
range) is used.
• If the product is damaged by being dropped.
• If the product is damaged as a result of the use of unauthorized
accessories or optional extras.
Other Causes
• If a product is damaged as a result of natural calamity (fire, salt
water, water flood).
• When the normal lifespan of consumable items has expired
(battery, power supplies, adapter, etc).
Therefore please keep the warranty together with the user manual
in a safe place.

MEMO
60
 Loading...