

Page 1

Page 2

For easy reference while on the road, download the Pocket Guide from cardosystems.com/quick-guides/.
This is version 1.0 of the FREECOM4 Manual. The latest version of the manuals in your preferred language and various
tutorials can be found at cardosystems.com/product-manuals/.
2
Page 3

CONTENTS
1. Introduction 4
2. Charging the FREECOM4 5
3. Getting Started 6
3.1 Getting to Know Your FREECOM4 6
3.2 Switching Your Unit On/Off 6
3.3 Different Ways to Operate Your FREECOM4 6
3.4 Basic Functions 6
3.5 Pairing Your Unit to Bluetooth Devices 7
3.5.1 Pairing through the Unit Buttons 7
3.5.2 Pairing through the Voice-Assisted Menu 8
3.6 Pairing the Bluetooth Intercom 8
3.6.1 3-Way and 4-Way Bluetooth Intercom Calls 8
3.6.2 Pairing the Bluetooth Intercom to other Cardo Units 9
3.6.3 Pairing the Bluetooth Intercom to non-Cardo Units 10
4. Before You Ride 12
4.1 Configuring Your FREECOM4 through the SmartSet App 15
4.1.1 Configuring Your FREECOM4 Basic Settings through the SmartSet App 15
4.1.2 Configuring Your FM Radio 16
4.2 Configuring Your FREECOM4 through Cardo Community 19
4.2.1 Installing the Cardo Updater on Your Computer 19
4.2.2 Configuring Your FREECOM4 Basic Settings through Cardo Community 19
4.2.3 Configuring Your FM Radio through Cardo Cardo Community 20
4.3 Configuring Your FREECOM4 through the Configuration Voice Menu 21
4.4 Using Parallel Audio Streaming 21
4.5 Audio Source Priorities 22
4.6 Setting the Default Mobile Phone 23
4.7 Checking Battery Status through the SmartSet App 24
5. On the Road 25
5.1 Making and Receiving Phone Calls 25
5.1.1 Making Phone Calls 25
5.1.2 Answering Phone Calls 25
5.1.3 Rejecting Phone Calls 25
5.1.4 Ending Phone Calls 25
5.1.5 Toggling Between Two Calls on Two Mobile Phones Paired to Your Unit 26
5.1.6 Disconnecting the Current Call and Switching To The Second Call 26
5.2 Making and Receiving Bluetooth Intercom Calls 26
5.2.1 Making a Bluetooth Intercom 2-Way Call 26
5.2.2 Making Bluetooth Intercom 3-Way or 4-Way Calls 27
5.2.3 Receiving Bluetooth Intercom Calls 28
5.2.4 Holding a Mobile/Bluetooth Intercom Conference Call 28
5.2.5 Bluetooth Intercom Busy Signal 29
5.2.6 Click-To-Link Calls 29
5.3 Listening to Music and Radio 30
5.3.1 Listening to Music 30
5.3.2 Listening to FM Radio 31
5.3.3 Sharing Music and Radio 33
6. Troubleshooting 35
6.1 Soft Reset 35
6.2 Reset Pairing 35
6.3 Reset to Factory Settings 35
6.4 FAQ 35
7. Support 36
8. Glossary 37
Appendix A. FREECOM4 Modes and Events - LEDIndications 38
3
Page 4

1. INTRODUCTION
Thank you for choosing the Cardo FREECOM4 Bluetooth® communication and entertainment system for motorcycle
helmets.
This Manual describes the features of your FREECOM4 and how to use them.
We wish you a great FREECOM4 experience and encourage you to write to us at support@cardosystems.com
regarding any questions, suggestions or comments you may have.
If you have not yet installed the FREECOM4 unit in your helmet, please install it as described in the Installation Guide
provided in the package.
4
Page 5

2. CHARGING THE FREECOM4
Make sure that your FREECOM4 battery is charged for at least 4 hours before initial use.
To charge the FREECOM4:
1. Using the supplied USB cable, connect your computer or wall charger to the FREECOM4 USBport.
● Charging with the wall charger is faster than via a computer USB port.
● Charging your unit switches it off automatically. To use your unit while it is being charged, switch it on. (see
Switching Your Unit On/Off on page 6).
During charging, the LED indicates charging status as follows:
● red LED on - charging
● red LED off - charging complete
5
Page 6

3. GETTING STARTED
3.1 GETTING TO KNOW YOUR FREECOM4
3.2 SWITCHING YOUR UNIT ON/OFF
To switch your FREECOM4 on:
● Press and for 1 second. The speaker plays an ascending tone and a voice message "Hello FREECOM4".
In all battery states, the LED flashes blue three times repeatedly, confirming that your FREECOM4 is on.
To switch your FREECOM4 off:
● Tap and .
In all battery states, the LED flashes red three times repeatedly, confirming that your FREECOM4 is switching off.
The speaker plays a descending tone and a voice message "Goodbye".
Connecting your unit to a charger switches off the unit.
3.3 DIFFERENT WAYS TO OPERATE YOUR FREECOM4
You can operate the various features by any of the following methods:
● Pressing a button or combination of buttons on the unit.
● Using the SmartSet app on your mobile device (once it is paired with the unit).
● Using the Voice-Assisted Menu in combination with either unit buttons or with the VOX (voice activation). VOX is
for hands free operation of your FREECOM4. You can say a word or phrase loudly when the voice-assisted menu
reaches the function you want to use and your FREECOM4 performs that function. You can also adjust VOX
sensitivity for the microphone, see Configuring Your FREECOM4 Basic Settings through the SmartSet App on
page 15
LEDs, tones and voice announcements guide you while using the functions of your FREECOM4, as described in
FREECOM4 Modes and Events - LEDIndications on page 38.
This manual describes the most suitable method or methods to operate each feature.
3.4 BASIC FUNCTIONS
To turn the volume up for current audio source:
● Tap .
With each tap, a louder tone is played on the speaker until you reach the maximum volume, as indicated by the
maximum volume tone.
6
Page 7

To turn the volume down for current audio source:
● Tap .
With each tap, a quieter tone is played on the speaker until you reach the minimum volume, as indicated by the
minimum volume tone.
To mute the microphone completely and lower the speaker volume to the minimal level when an audio source is active:
● Tap and .
A descending tone is played on the speaker.
Automatic Gain Control (AGC) adjusts your speaker volume according to ambient noise and riding speed. To
adjust AGC sensitivity, see Configuring Your FREECOM4 Basic Settings through the SmartSet App on page 15.
3.5 PAIRING YOUR UNIT TO BLUETOOTH DEVICES
Your FREECOM4 has two Bluetooth channels for connection to Bluetooth devices such as mobile phones, GPS
devices and Bluetooth music players with A2DP.
To connect your FREECOM4 to a Bluetooth device, you must first pair them while in Standby (see FREECOM4 Modes
and Events - LEDIndications on page 38). Once paired, they automatically recognize each other whenever they are
within range.
3.5.1 PAIRING THROUGH THE UNIT BUTTONS
If you are pairing more than one device, Cardo recommends that you pair the mobile phone to channel 1, and the
additional device (such as GPS, music player or additional mobile phone) to channel 2.
To pair Bluetooth channel 1 to a mobile phone:
1. Enable Bluetooth on the mobile phone.
2. Press for 5 seconds. The LED flashes red and blue.
3. Search for Bluetooth devices on your mobile phone as described in your phone's instructions.
4. After a few seconds the phone lists your FREECOM4. Select it.
5. If prompted for a PIN or Passkey, enter 0000 (four zeros).
6. The phone confirms that pairing has succeeded and the LED flashes purple for 2 seconds.
To pair Bluetooth channel 2 to another Bluetooth device:
1. Enable Bluetooth on the device (such as mobile phone, GPS device, music player).
2. Press for 5 seconds. The LED flashes red and blue.
3. Tap twice. The LED starts flashing red and green.
If you are pairing a GPS device, make sure you perform the next step.
4. If you are pairing a GPS device, tap . The LED flashes slower.
5. On the device you are pairing, search for Bluetooth devices (as described in its instructions).
6. After a few seconds the device lists your FREECOM4. Select it.
7. If prompted for a PIN or Passkey, enter 0000 (four zeros).
8. The device confirms that pairing has succeeded and the LED flashes purple for 2 seconds.
7
Page 8

● If pairing is not completed within 2 minutes, the unit automatically returns to Standby.
● If you have paired two different mobile phones directly to your FREECOM4, set one as default for making
calls (see Setting the Default Mobile Phone on page 23).
● Not all Bluetooth mobile phones broadcast Bluetooth Stereo music (A2DP), even if the phone has an MP3
player function. Consult your mobile phone’s user manual for more information.
● Not all Bluetooth GPS devices allow connection to Bluetooth audio devices. Consult your GPS User Manual for
more information.
To cancel the pairing process:
● Press for 2 seconds. The LED stops flashing red and blue or red and green.
To reset all Bluetooth device pairing:
● Press and for 5 seconds.
In all battery states, the LED flashes purple slowly five times, confirming that pairing has been reset.
Resetting all Bluetooth device pairing also resets all Bluetooth intercom pairing.
3.5.2 PAIRING THROUGH THE VOICE-ASSISTED MENU
To pair your FREECOM4 with devices through the voice-assisted menu:
1. Tap and .
2. When the voice-assisted menu reaches "Advanced Features", tap or use VOX.
3. When the voice-assisted menu reaches the required option, tap or use VOX.
● To reset all Bluetooth pairing, select the menu option "Reset Mobiles and GPS Pairing".
3.6 PAIRING THE BLUETOOTH INTERCOM
To connect your unit to another unit with a Bluetooth intercom, you must first pair their channels. Once paired, the
units automatically recognize each other whenever they are in range (line of sight up to 1.2 km / 3,900 ft subject to
terrain).
● Pairing a channel replaces any existing paired device on that channel with the new device.
● If you have purchased the FREECOM4 MultiSet, the retail package contains two pre-paired units configured
to communicate on Channel A.
● Your FREECOM4 is compatible with most Cardo models for Bluetooth intercom calls. In addition, it is also
compatible with the Schuberth SRC-System™. Intercom range with other models is limited to the distance of
the device with the shorter range.
For details on how to pair and use your FREECOM4 with other Cardo units, go to
www.cardosystems.com/freecomcompatibility.
3.6.1 3-WAY AND 4-WAY BLUETOOTH INTERCOM CALLS
In addition to standard 2-way Bluetooth intercom calls, you can use the FREECOM4 for 3-way and 4-way Bluetooth
intercom calls on Cardo and non-Cardo devices. FREECOM4 allows full-duplex Bluetooth intercom communication for
up to 3 riders or 4 riders/passengers to communicate up to 1.2 km / 3,900 ft in line of sight (subject to terrain).
8
Page 9

In a 3-way Bluetooth intercom, you are connected to two riders/passengers and each of those riders are connected
only to you. You can call each of the two riders/passengers. If you are already in a Bluetooth intercom call with one
rider/passenger, just add another. All three riders/passengers are now connected in a 3-way Bluetooth intercom call.
In a 4-way intercom conference call, you are connected to your passenger, the second rider is also connected to
his/her passenger, and the passengers are also connected. Each rider calls his/her passenger, and one of the
passengers calls the other passenger. All four riders are now all connected in a 4-way Bluetooth intercom call.
Cardo recommends that during a 3-way or 4-way intercom conference call, riders should be connected to only
one Bluetooth intercom call so they can continue to hear mobile phone and GPS announcements.
Using parallel audio streaming, you can also speak on a 3-way or 4-way Bluetooth intercom call while listening to FM
radio. The Bluetooth intercom volume remains the same while the FM radio plays at a reduced volume in the
background.
For information on making Bluetooth intercom calls, see Making and Receiving Bluetooth Intercom Calls on page 26
3.6.2 PAIRING THE BLUETOOTH INTERCOM TO OTHER CARDO UNITS
To pair your Unit with Cardo units through the unit buttons:
1. Confirm your unit is in Standby mode (LED flashes slowly).
2. On your unit, press for 5 seconds. The LED flashes red.
3. Select the Bluetooth intercom channel you would like to pair:
● Channel A - do not tap anything (default channel).
● Channel B - tap twice. The LED flashes blue.
● Channel C - tap three times. The LED flashes purple.
4. On the other Cardo unit, activate Bluetooth intercom pairing mode (see the other Cardo unit user manual at
cardosystems.com/product-manuals/).
9
Page 10

5. The unit confirms that pairing has succeeded and the LED flashes purple for 2 seconds.
● To cancel the pairing process, press for 2 seconds. The LED stops flashing.
● If pairing is not completed within 2 minutes, the unit automatically returns to Standby.
● To reset all Bluetooth intercom pairing while in Bluetooth intercom pairing mode:
● Press and for 2 seconds. The LED flashes purple 5 times slowly, confirming that pairing has been
reset .
To pair your FREECOM4 with Cardo units through the SmartSet app:
1. Confirm your unit is in Standby mode (LED flashes slowly).
1. Open the SmartSet app and tap .
2. Tap Bluetooth.
3. Under Riders, tap Add (or Change if you are changing to whom the channel is paired) for the required channel
and follow the on screen menus.
4. On the other Cardo unit, activate Bluetooth intercom mode (see the other Cardo unit user manual at
cardosystems.com/product-manuals/).
5. The unit confirms that pairing has succeeded and the LED flashes purple for 2 seconds.
● To reset all Bluetooth intercom pairing, tap Delete all.
To pair your FREECOM4 with Cardo units through the voice-assisted menu:
1. Confirm your unit is in Standby mode (LED flashes slowly).
2. Tap and .
3. When the voice-assisted menu reaches "Advanced Features", tap or use VOX.
4. When the voice-assisted menu reaches your required option ("Pair Intercom A", "Pair Intercom B", or "Pair
Intercom C"), tap or use VOX.
5. On the other Cardo unit, activate Bluetooth intercom pairing mode (see the other Cardo unit user manual at
cardosystems.com/product-manuals/).
6. The unit confirms that pairing has succeeded and the LED flashes purple for 2 seconds.
● To reset all Bluetooth intercom pairing, select the menu option "Reset Intercom Channels Pairing".
3.6.3 PAIRING THE BLUETOOTH INTERCOM TO NON-CARDO UNITS
The Cardo gateway enables Cardo units to connect to non-Cardo units over Bluetooth.
To pair your FREECOM4 with non-Cardo units through the unit buttons:
1. Confirm your unit is in Standby mode (LED flashes slowly).
2. On your unit, press for 5 seconds. The LED flashes red.
3. Select the Bluetooth intercom channel you would like to pair:
● Channel A - do not tap anything (default channel).
10
Page 11

● Channel B - tap twice. The LED flashes blue.
● Channel C - tap three times. The LED flashes purple.
4. Tap to activate the Cardo gateway. The LED flashes red and blue.
5. On the non-Cardo unit, activate Bluetooth mobile pairing mode (see the non-Cardo unit user manual).
6. The unit confirms that pairing has succeeded and the LED flashes purple for 2 seconds.
● To cancel the pairing process, press for 2 seconds. The LED stops flashing.
● If pairing is not completed within 2 minutes, the unit automatically returns to Standby.
● To reset all Bluetooth intercom pairing while in Bluetooth intercom pairing mode:
● Press and for 2 seconds. The LED flashes purple 5 times slowly, confirming that pairing has been
reset .
To pair your FREECOM4 with non-Cardo units through the SmartSet app:
1. Confirm your unit is in Standby mode (LED flashes slowly).
2. Open the SmartSet app and tap .
3. Tap Bluetooth.
4. Under Riders, tap Add (or Change if you are changing to whom the channel is paired) for the required channel
and follow the on screen menus.
5. On the non-Cardo unit, activate Bluetooth mobile pairing mode (see the non-Cardo unit user manual).
6. The unit confirms that pairing has succeeded and the LED flashes purple for 2 seconds.
● To reset all Bluetooth intercom pairing, tap Delete all.
To pair your FREECOM4 with non-Cardo units through the voice-assisted menu:
● When using voice-assisted menus, the unit automatically pairs through Channel B.
1. Confirm your unit is in Standby mode (LED flashes slowly).
2. Tap and .
3. When the voice-assisted menu reaches "Advanced Features", tap or use VOX.
4. When the voice-assisted menu reaches "Pair Cardo Gateway", tap or use VOX.
5. On the non-Cardo unit, activate Bluetooth mobile pairing mode (see the non-Cardo unit user manual).
6. The unit confirms that pairing has succeeded and the LED flashes purple for 2 seconds.
● To reset all Bluetooth intercom pairing, select the menu option "Reset Intercom Channels Pairing".
11
Page 12

4. BEFORE YOU RIDE
Get the most out of your FREECOM4 by changing the settings and customizing your unit according to your own
personal preferences, using either of the following methods:
● SmartSet App on iOS / Android (see Configuring Your FREECOM4 through the SmartSet App on page 15).
● Cardo Community on Windows / Mac - minimum requirements - Windows® 7 / Mac OS X 10.8 (see Configuring
Your FREECOM4 through Cardo Community on page 19).
● Unit buttons.
● Configuration voice menu on your device.
Cardo recommends customizations and settings before getting out on the road.
Object
AGC sensitivity
(Off/Low/Medium/High)
Audio priority
(A2DP/Bluetooth
intercom)
Background Audio
Level
Bluetooth friendly name
Default Value Description
Medium AGC
automatically
adjusts speaker
volume according
to ambient noise
and riding speed.
For example,
when set to Low,
higher ambient
noise will cause
the volume
increase to kick in
at a higher level.
Bluetooth
intercom
Priority of audio
source playing
through speakers.
Either music is
not interrupted
by an intercom
call, or vice-versa.
N/A Sets the
background
audio volume
when parallel
audio streaming
is on (see Parallel
audio streaming
(Enable/Disable)
below).
FREECOM 4 Sets the name
that appears on
your phone while
pairing and in the
SmartSet app.
SmartSet App
(iOS/Android)
Cardo
Community
ü ü ü
ü ü ü
ü û û
ü ü û
Configuration Voice
Menu
12
Page 13

Object
Click-to-Link settings
(Enable/Disable)
Download the latest
firmware upgrade
FMBand
Language
Default Value Description
Enable Spontaneous way
to instantly
initiate one-onone intercom
calls with another
Cardo
passenger/rider,
without being
paired.
N/A Stay up-to-date
by downloading
software updates
whenever a new
version is
available (, see
Configuring Your
FREECOM4 Basic
Settings through
Cardo
Community on
page 19.
According to
Your Region
According to
Your Region
If you are in
Japan, select
Japan. Otherwise,
select Worldwide.
Voice
announcements
and voiceassisted menus
language (see
"Spoken Status
Announcements"
below).
SmartSet App
(iOS/Android)
ü ü ü
û ü û
ü ü û
ü ü ü
Cardo
Community
Configuration Voice
Menu
Mobile priority
To select a
language that
is not in your
region, you
must first
change your
region
through
Cardo
Community.
Mobile 1 If you paired your
unit to two
mobile phones,
you must set one
of them as the
default phone for
outgoing calls.
ü û û
13
Page 14
Object
Parallel audio streaming
(Enable/Disable)
Default Value Description
Enable You can hear two
audio sources
simultaneously.
For example, hear
GPS while
listening to
music.
Limitations
may apply
when using
certain iOS
devices.
SmartSet App
(iOS/Android)
ü ü ü
Cardo
Community
Configuration Voice
Menu
RDS (Enable/Disable)
Set speed dial numbers
Set the 6 FM radio
presets
Spoken Status
Announcements
(Enable/Disable)
Disable Radio Data
System allows the
radio to
automatically
retune to the
strongest
frequency
available for the
FM station you
are listening to
when the signal
becomes too
weak.
Empty Pre-set phone
numbers for
automatic dialing.
107.5 Pre-set FM radio
stations.
Enable Voice
announcements
inform you to
whom or to what
device you are
connected.
ü ü ü
ü û
ü ü û
ü ü ü
14
Page 15

Object
VOX activation
(Enable/Disable)
VOX sensitivity
(Low/Medium/High)
Default Value Description
Enable Enables voice
activation of
certain features
for hands-free
operation.
Medium Adjusts your
microphone
sensitivity for
voice activation
while riding. For
example, in high
ambient noise
situations, setting
VOX sensitivity to
low requires
speaking loudly.
SmartSet App
(iOS/Android)
ü ü ü
ü ü ü
Cardo
Community
Configuration Voice
Menu
AGC and VOX performance vary based on environmental conditions, including riding speed, helmet type and
ambient noise. For improved performance, minimize the wind impact on the microphone by closing the visor and
using the large microphone sponge.
4.1 CONFIGURING YOUR FREECOM4 THROUGH THE SMARTSET APP
You can configure your FREECOM4 through your mobile phone by installing the SmartSet app available at Google
Play Store and Apple App Store.
The minimum operating system requirements for the SmartSet app are:
● Android: 4.0 and higher
● IOS: 8 and higher
4.1.1 CONFIGURING YOUR FREECOM4 BASIC SETTINGS THROUGH THE SMARTSET APP
To configure your FREECOM4 through the SmartSet app:
1. Make sure that your unit is paired to the mobile device on which the SmartSet app is installed.
2. Open the SmartSet app and tap :
15
Page 16

3. The following screen appears.
4. Use the appropriate menu to configure your FREECOM4 settings:
● - FREECOM4 features:
Group Description/Options
MY DEVICE
LANGUAGE
Spoken Status Announcements
VOX
AGC
FEATURES
Reset to Factory
● Change Device Name.
● Set Language.
● Enable/disable.
● Enable/disable VOXActivation.
● Set VOX Sensitivity (low, medium, or high).
● Enable/disable AGCActivation.
● Set AGCSensitivity (low, medium, or high).
● Enable/disable Click-to-link.
● Enable/disable IC to Phone.
● Enable/disable Parallel Audio Streaming.
● Set A2DP/IC Priority (A2DP or Intercom).
● Set FMBand Region (Worldwide or Japan).
● Resets the unit to factory defaults.
● - manage devices and passengers/riders.
● - sets the level for each audio source (mobile phone, intercom, music, FM, announcements,
parallel audio streaming).
● - SmartSet app preferences and general information.
● - FAQ, email Cardo SUPPORT, FEEDBACK.
4.1.2 CONFIGURING YOUR FM RADIO
Your FREECOM4 includes a built-in FM radio with six presets and Radio Data System (RDS), as described in the
following sections.
4.1.2.1 SETTING THE FM BAND
The FM Band Frequency is set to Worldwide FM frequencies by default. In Japan, you must change the FM Band.
16
Page 17
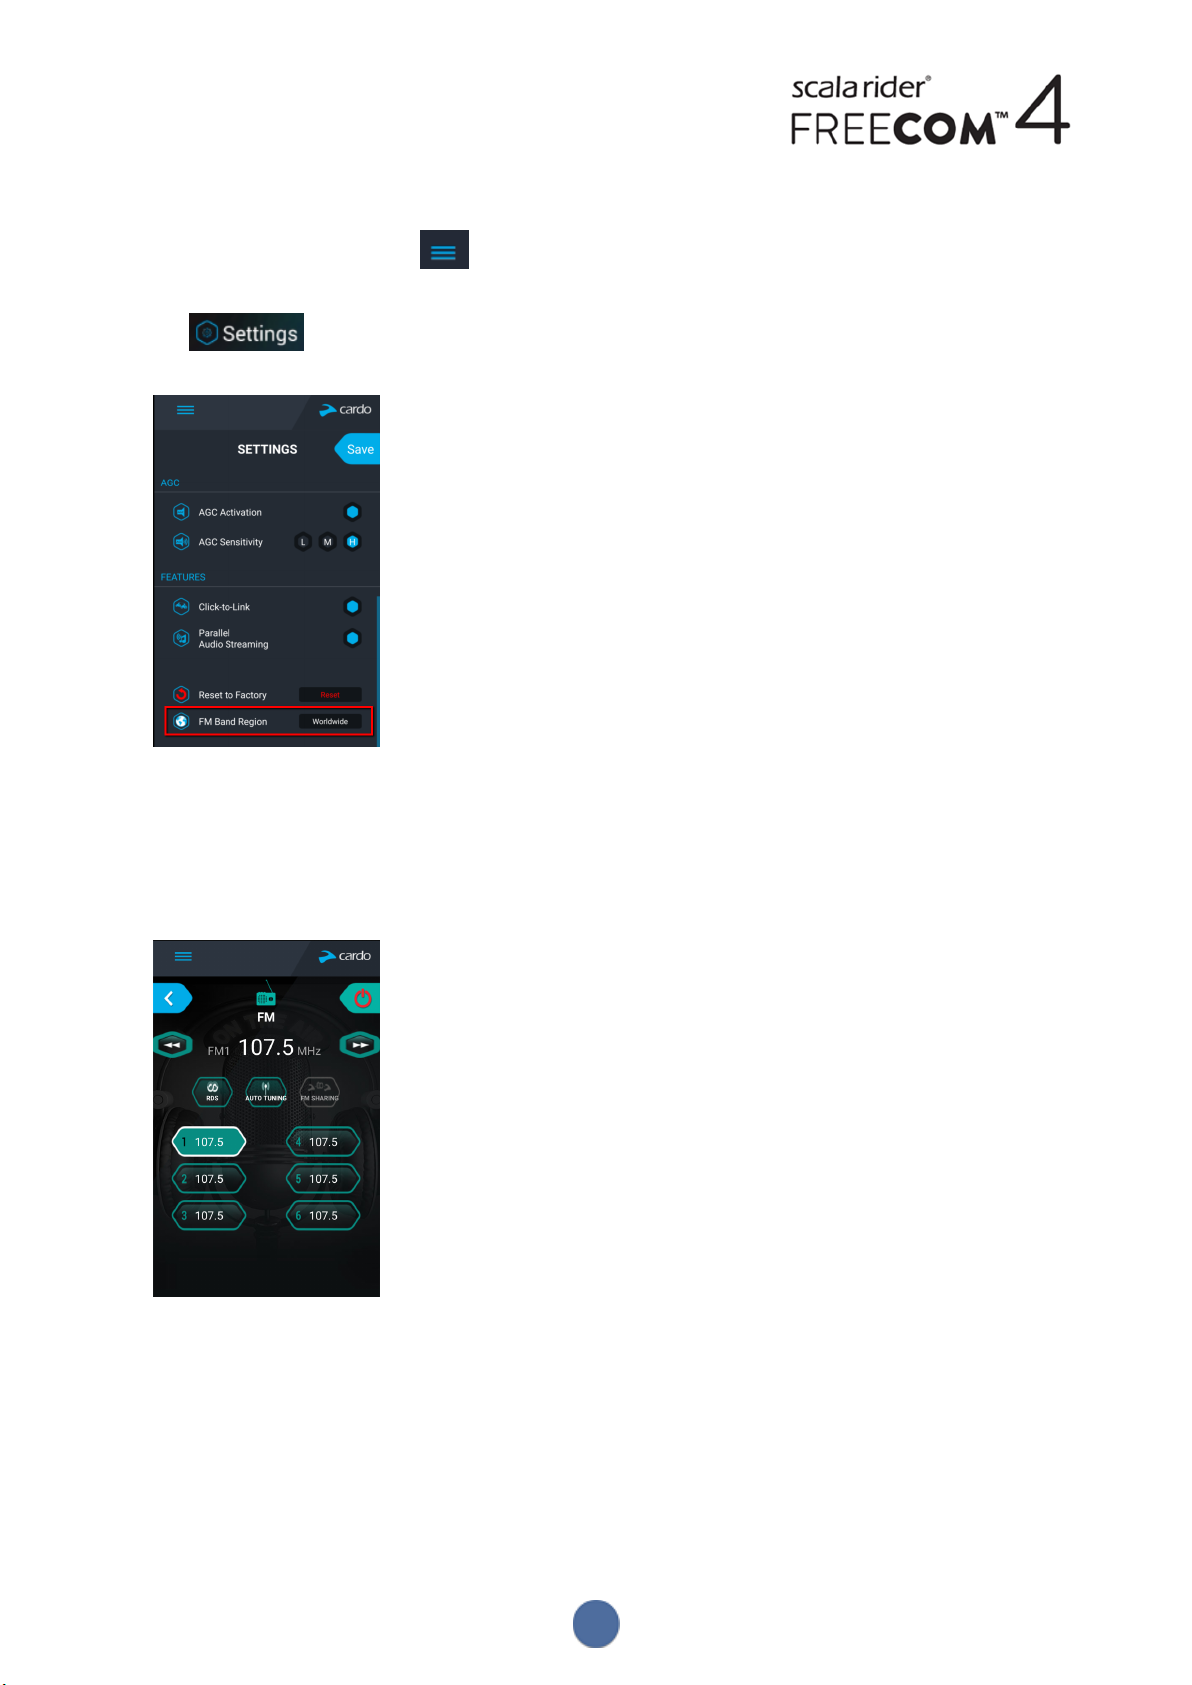
To set the FM Band:
1. Open the SmartSet app and tap :
2. Tap .
3. Under FEATURES, scroll to FM Band Region and tap Worldwide or Japan as required.
4.1.2.2 CONFIGURING YOUR FM RADIO MANUALLY
You can configure your FM radio preset stations manually or by using auto scan (see Configuring Your FM Radio Using
Auto Tuning on page 18).
To configure the six FMradio preset radio stations manually:
1. In the Home screen, tap FM.
17
Page 18
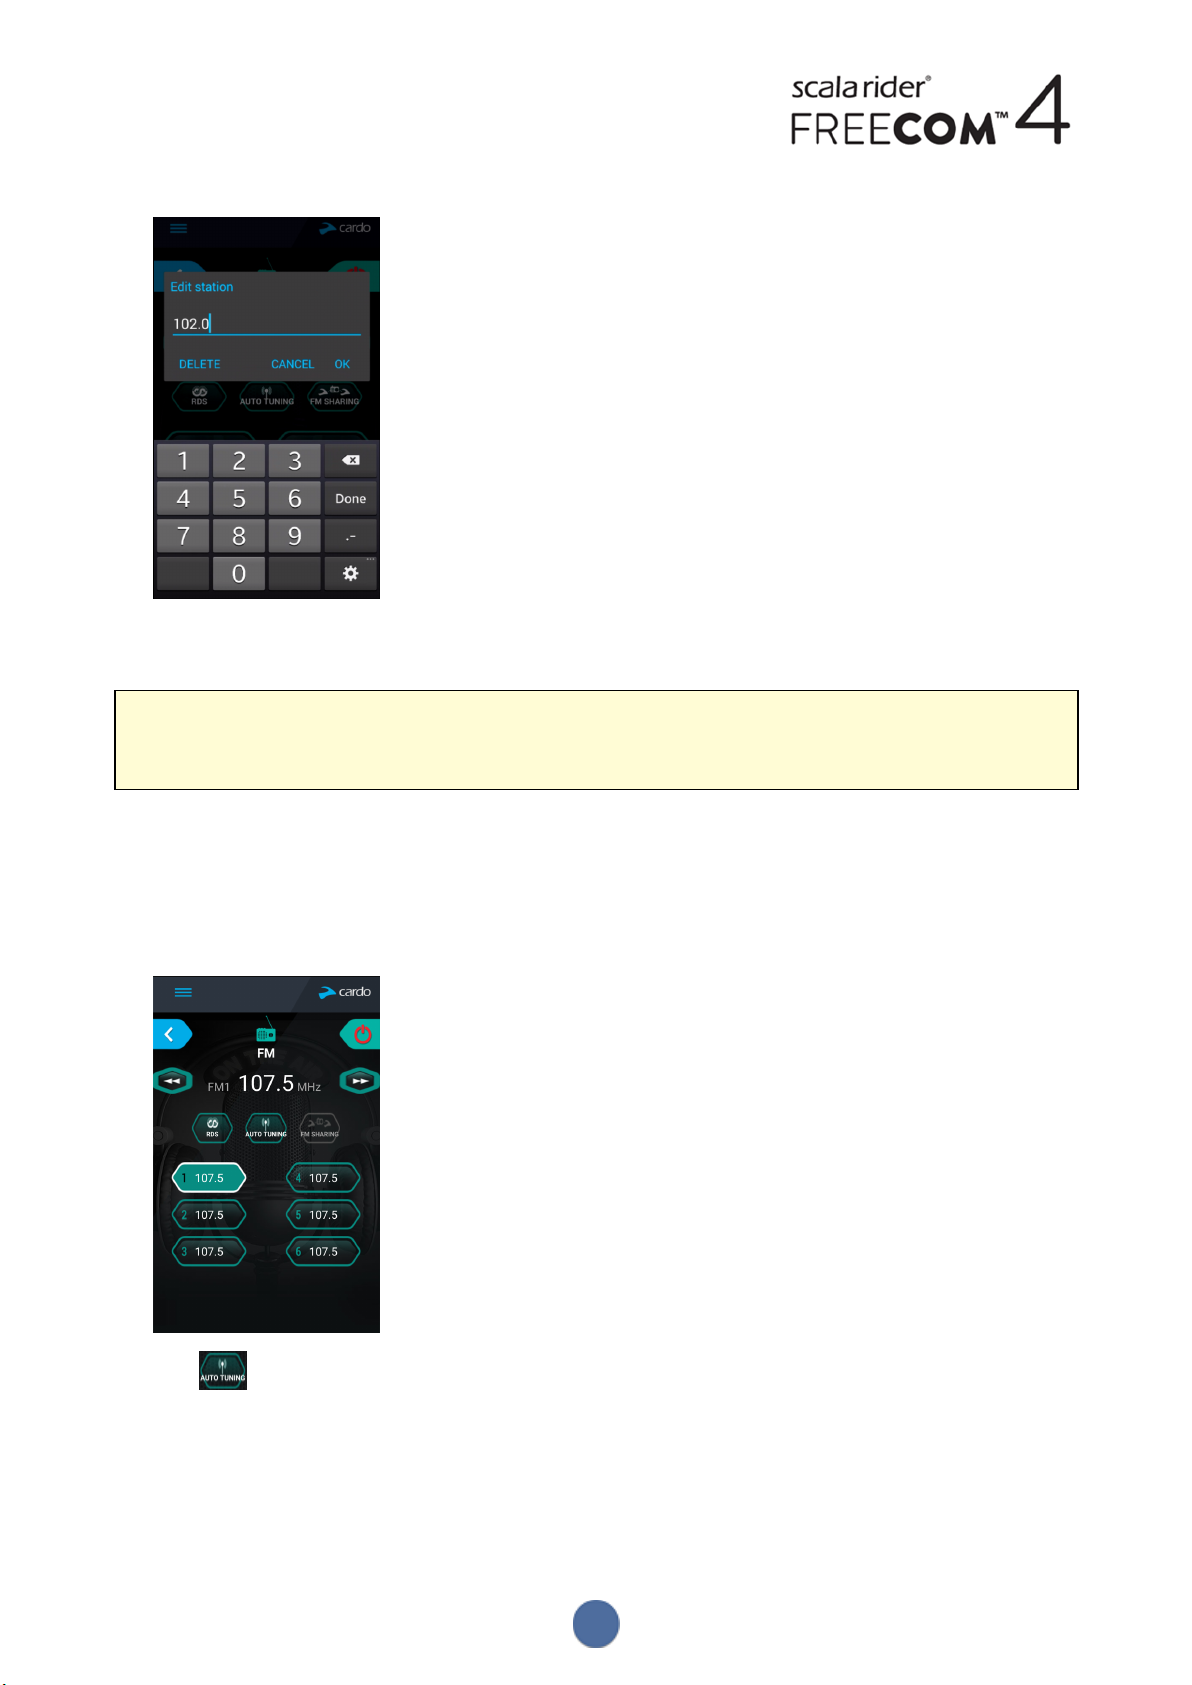
2. Press the required preset until the following screen appears:
3. Enter the desired FM station's frequency and tap OK.
4. To delete a preset station, tap DELETE.
● Preset radio station 1 cannot be deleted.
● During a station scan, deleted preset radio stations are skipped. The station scan automatically advanced to
the next defined preset station. For more information, see Listening to FM Radio on page 31.
4.1.2.3 CONFIGURING YOUR FM RADIO USING AUTO TUNING
You can configure your FREECOM4 FMradio preset stations using auto scan, which automatically locates FM stations
and temporarily stores them.
To temporarily configure the six FMradio preset stations using Auto Tuning:
1. In the Home screen, tap FM.
2. Press . The presets are temporarily set to FMstations with the strongest signal available.
4.1.2.4 CONFIGURING FMRADIO RDS THROUGH THE SMARTSET APP
RDS allows the FMradio to automatically retune to the strongest frequency available for the FM station you are
listening to when the signal becomes too weak.
18
Page 19

To enable/disable RDS:
1. In the Home screen, tap FM.
2. Tap . RDS is enabled/disabled.
4.2 CONFIGURING YOUR FREECOM4 THROUGH CARDO COMMUNITY
You can configure your FREECOM4 unit by connecting the unit to a computer with the supplied USBcable and
running the Cardo Updater while your computer is connected to the Cardo Community website.
The minimum operating system requirements for the Cardo Updater are:
● Windows® 7
● Mac OS X 10.8
4.2.1 INSTALLING THE CARDO UPDATER ON YOUR COMPUTER
To install the Cardo Updater on your computer:
1. Go to http://cardosystems.com/cardo-community/, register and login.
2. Download the Cardo Updater from the provided link and install it on your computer.
4.2.2 CONFIGURING YOUR FREECOM4 BASIC SETTINGS THROUGH CARDO COMMUNITY
To configure your FREECOM4 through the Cardo Community:
1. Run the Cardo Updater.
2. Using the supplied USBcable, connect your unit to the computer USB port.
3. If this is the first time you are connecting your unit, the Edit my Profile screen appears. Click SETTINGS.
19
Page 20

4. The GENERAL SETTINGS window appears:
5. Set your preferred options for each feature and refer to the provided explanations as a guide.
If a new firmware version is available, follow the instructions on the screen to update your FREECOM4 with the
latest features.
4.2.3 CONFIGURING YOUR FM RADIO THROUGH CARDO CARDO COMMUNITY
To configure the six FMradio preset radio stations using Cardo Community:
1. Scroll down to FMRADIOPRESETS section.
2. On FM Band:
● If you are in Japan, select Japan.
20
Page 21

● Otherwise, select Worldwide.
3. On the preset station you want to edit, click .
4. Enter the desired FM station's frequency and press Enter.
You can also use the left and right blue arrows on the frequency scale to update the preset frequency.
5. To delete a preset station, click .
Preset radio station 1 cannot be deleted.
4.3 CONFIGURING YOUR FREECOM4 THROUGH THE CONFIGURATION VOICE MENU
You can configure your FREECOM4 using the configuration voice menu in combination with either unit buttons or
using VOX.
To configure your FREECOM4 through the Configuration Voice Menu:
1. Confirm your unit is in Standby (LED flashes slowly).
2. Press and for 2 seconds.
3. When the voice-assisted menu reaches your required option ("Language", "A2DP Audio Priority", "Spoken Status
Announcements", "Click-to-Link", "AGC", "RDS", "VOX Sensitivity", "VOX", "Parallel Audio Streaming"), tap or
use VOX to select.
4.4 USING PARALLEL AUDIO STREAMING
With parallel audio streaming, you can hear GPS instructions during a mobile or Bluetooth intercom call, or while
listening to other audio sources, such as music or FM radio.
21
Page 22

Limitations may apply when using certain iOS devices.
Your FREECOM4 sets the various audio sources to either foreground (volume remains the same) or background
(volume reduced) as described in the following table:
Mobile Phone 1/2 GPS Intercom 1 Intercom 2 Music FM Radio
Foreground Foreground
Foreground
1
Foreground
1
Foreground Foreground
Foreground Background
Foreground Background
Foreground Background
Foreground Background
Foreground
2,3
Foreground
2,3
Foreground
Background
4
Foreground
1
If you add an intercom call to a mobile phone call creating a conference call, the volume for both audio sources is the
same.
2
If you make two intercom calls simultaneously creating an intercom conference call, the volume for both audio
sources is the same.
3
If you make two intercom calls simultaneously creating an intercom conference call, you cannot hear the mobile
phone or GPS.
4
If you play music only, the music volume is not reduced.
5
If you play the FMradio only, the FM radio volume is not reduced.
5
In some cases, parallel audio streaming may not work properly due connected device limitations (music player or
GPS navigator). For more information, see FAQ on page 35.
Cardo recommends that during a 3-way or 4-way Bluetooth intercom conference call, the rider who is connected
to only one intercom call listens for mobile phone and GPS announcements.
You cannot use music sharing for voice audio with riders during parallel audio streaming.
To configure parallel audio streaming:
● SmartSet app - see Configuring Your FREECOM4 Basic Settings through the SmartSet App on page 15.
● Cardo Community - see Configuring Your FREECOM4 Basic Settings through Cardo Community on page 19.
4.5 AUDIO SOURCE PRIORITIES
If Parallel Audio Streaming is disabled, FREECOM4 manages the audio sources you hear through the speakers
according to the following audio source priorities.
22
Page 23

Priority AudioSource
Higher Priority
↑
Mobile phone, GPS device instructions
Intercom (Click-to-Link) or Music
Music or Intercom (Click-to-Link)
1
2
FM Radio
Lower Priority
1
When audio priority is set to Intercom, you cannot hear navigation app or SMS messages from your phone during an
ongoing intercom call.
2
When audio priority is set to A2DP (music), the intercom is disabled while listening to music (via A2DP). A rider
calling you by intercom hears a sound indicating you are not available.
● Intercom modes all have the same priority, so ongoing intercom calls will not be interrupted by any other
intercom call.
● Bluetooth intercom and Click-to-Link calls have the same priority, so Click-to-Link calls will not interrupt any
Bluetooth intercom call in progress, and vice versa.
If you paired your unit to two mobile phones (see Setting the Default Mobile Phone on page 23), music will be
shared from the mobile phone through which you last played music.
When sharing FM radio (see Sharing Music and Radio on page 33), either rider can change station and Intercom
(Click-to-Link).
4.6 SETTING THE DEFAULT MOBILE PHONE
If you paired your unit to two mobile phones, you must set one of them as the default phone for outgoing calls.
To set the default phone through the SmartSet app:
1. Confirm your unit is in Standby mode (LED flashes slowly).
2. Open the SmartSet app and tap :
3. Tap .
4. Tap PRIORITY for the default mobile phone.
To set the default phone through the unit:
● During a mobile call, press for 5 seconds.
23
Page 24

4.7 CHECKING BATTERY STATUS THROUGH THE SMARTSET APP
Battery Status on Your Mobile Phone
If you installed the SmartSet app on your mobile phone, the unit battery indicator appears in the SmartSet app
bottom right-corner, as well as in the notification bar.
If your FREECOM4 battery level reaches 20%, you hear a battery status voice announcement warning you that your
battery is low.
24
Page 25
5. ON THE ROAD
5.1 MAKING AND RECEIVING PHONE CALLS
You can use your mobile phone normally to make and receive phones while paired to your FREECOM4.
5.1.1 MAKING PHONE CALLS
You cannot make phone calls during mobile or Bluetooth intercom 3 or 4-way calls.
To make a phone call through the unit buttons:
● With your mobile phone's voice dialing - tap and .
● Dialing the default speed dial number - tap three times.
● Redialing the last number called - press for 2 seconds .
To make a phone call through the SmartSet app:
● In the SmartSet app, tap Phone then do either of the following:
● tap REDIAL.
● tap VOICEDIAL.
To make a phone call through the voice-assisted menu:
1. Confirm your unit is in Standby mode (LED flashes slowly).
2. Tap and .
3. When the voice-assisted menu reaches your required choice ("Voice Dial", "Redial" or "Speed Dial"), tap or
use VOX.
5.1.2 ANSWERING PHONE CALLS
To answer a phone call through the unit buttons:
● Tap or .
To answer a phone call through VOX:
● Say a word loudly.
5.1.3 REJECTING PHONE CALLS
To reject a phone call through the unit buttons:
● Press for 2 seconds.
To reject a phone call through VOX:
● Remain silent for 30 seconds.
5.1.4 ENDING PHONE CALLS
To end a phone call through the unit buttons:
● Tap .
25
Page 26
To end a phone call through the SmartSet app:
1. In the Home screen, tap PHONE.
2. Press ENDCALL.
5.1.5 TOGGLING BETWEEN TWO CALLS ON TWO MOBILE PHONES PAIRED TO YOUR UNIT
Your FREECOM4 can toggle between two calls on two mobile phones when both mobile phones are paired to your
unit.
To toggle between two calls on two mobile phones through the unit buttons:
● Tap twice.
5.1.6 DISCONNECTING THE CURRENT CALL AND SWITCHING TO THE SECOND CALL
To disconnect the current call and switch to the call on the second phone when two mobile phones are paired to your unit, through
the unit buttons:
● Tap .
5.2 MAKING AND RECEIVING BLUETOOTH INTERCOM CALLS
● To make and receive Bluetooth intercom calls, you must first pair the Bluetooth, see Pairing the Bluetooth
Intercom on page 8.
● During a 3 or 4-way Bluetooth intercom conference call while riders are range (1.2 km / 3,900 ft), riders using
both Bluetooth intercom channels cannot receive phone calls or GPS instructions while the call is in progress.
5.2.1 MAKING A BLUETOOTH INTERCOM 2-WAY CALL
To start a Bluetooth intercom call with a passenger/rider, do one of the following:
● To use the unit buttons:
● To start a call on Channel A, tap .
● To start a call on Channel B, tap twice.
● To start a call on Channel C, tap three times.
● Use VOX. A Bluetooth intercom call with the passenger/rider on Channel A or B starts.
If Channels A and B are connected, VOX opens a Bluetooth intercom3-way call.
● To use the SmartSet app: On the INTERCOM screen, select the required channel (A, B or C).
● To use the voice-assisted menu:
a. Tap and .
b. When the voice-assisted menu reaches "Call Intercom", tap or use VOX.
26
Page 27
To end a Bluetooth intercom call, do one of the following:
● To use the unit buttons:
● To disconnect Channel A, tap .
● To disconnect Channel B, tap twice.
● To disconnect Channel C, tap three times.
● To use the SmartSet app: On the INTERCOM screen, select the required channel to disconnect.
If you initiated the Bluetooth intercom call using VOX and remain silent for at least 30 seconds, the call ends.
5.2.2 MAKING BLUETOOTH INTERCOM 3-WAY OR 4-WAY CALLS
For recommendations on making Bluetooth intercom 3-way and 4-way calls and pairing units for Bluetooth
intercom calls, see Pairing the Bluetooth Intercom on page 8.
To start a Bluetooth intercom 3-Way call, do one of the following:
● To use the unit buttons :
● To start a conference call on Channels A and B, press for 2 seconds.
● To start a call on Channel A or add Channel A to a call, tap .
● To start a call on Channel B or add Channel B to a call, tap twice.
● To start a call on Channel C or add Channel C to a call, tap three times.
● Use VOX. A Bluetooth intercom call on Channels A+B starts (if the the riders/passengers are paired and in range).
● To use the SmartSet app: On the INTERCOM screen, select Channels A+B.
● To use the voice-assisted menu:
a. Tap and .
b. When the voice-assisted menu reaches "Call Intercom", tap or use VOX.
27
Page 28

To start a Bluetooth intercom 4-Way call, do one of the following:
Cardo recommends the following pairing configuration for Bluetooth intercom 4-way calls:
● Passenger 2 is paired to rider 1 on Channel A, and to passenger 4 on Channel B.
● Passenger 4 is paired to rider 3 on Channel A, and to passenger 2 on Channel B.
● To use the unit buttons :
a. Passenger 2 presses for 2 seconds. A Bluetooth intercom 3-way call with rider 1 and passenger 4 starts.
b. Passenger 4 taps . Rider 3 is added to the Bluetooth intercom call.
● To use the SmartSet app:
a. On the INTERCOM screen, passenger 2 selects Channels A+B. A Bluetooth intercom 3-way call with rider 1
and passenger 4 starts.
b. On the INTERCOM screen, passenger 4 selects Channel A. Rider 3 is added to the Bluetooth intercom call.
To end a Bluetooth intercom call, do one of the following:
● To use the unit buttons:
● To disconnect rider A, tap .
● To disconnect rider B, tap twice.
● To disconnect rider C, tap three times.
● To end all active Bluetooth intercom connections, press for 2 seconds.
● If you initiated the Bluetooth intercom call using VOX: remain silent for at least 30 seconds. Any open call is
disconnected.
5.2.3 RECEIVING BLUETOOTH INTERCOM CALLS
● If another paired unit calls you via Bluetooth intercom, the call begins instantly.
● To receive Bluetooth intercom calls from unpaired units, see Click-To-Link Calls on page 29.
5.2.4 HOLDING A MOBILE/BLUETOOTH INTERCOM CONFERENCE CALL
You can hold a conference call between a mobile call and Bluetooth intercom (single channel) call.
To add a Bluetooth intercom call to the current mobile call:
● To use the unit buttons:
28
Page 29

● To add rider A to a call, tap .
● To add rider B to a call, tap twice.
● To add rider C to a call, tap three times.
● To use the SmartSet app: On the INTERCOM screen, select the required channel (A, B or C).
To disconnect the Bluetooth intercom conference call from the mobile call, do one of the following:
● To use the unit buttons:
● To disconnect rider A, tap .
● To disconnect rider B, tap twice.
● To disconnect rider C, tap three times.
● To use the SmartSet app: On the INTERCOM screen, disconnected the active channel.
After disconnecting the Bluetooth intercom call, you can continue talking on the mobile call. Similarly, if you first
disconnect the mobile call, you can continue talking on the Bluetooth intercom call.
5.2.5 BLUETOOTH INTERCOM BUSY SIGNAL
A busy signal is heard when you attempt a Bluetooth intercom call when the other passenger/rider is in a:
● phone call
● Bluetooth intercom call with Channels A and B
● Click-to-Link call
5.2.6 CLICK-TO-LINK CALLS
Click-to-Link is a spontaneous way to instantly initiate one-on-one intercom calls with a nearby passenger/rider,
without being paired.
● If other Cardo users are nearby, your next Click-to-Link call may randomly connect to any of them.
● To block incoming Click-to-Linkcalls, disable Click-to-Link (see Before You Ride on page 12).
To make a Click-to-Link call through the SmartSet app:
1. Open the SmartSet app and tap Intercom.
2. Tap CLICKTO LINK.
To end a Click-to-Link call through the unit buttons:
● Tap .
To accept a Click-to-Link call through the unit buttons:
● Tap .
To reject a Click-to-Link call through the unit buttons:
● Press for 2 seconds.
29
Page 30

To accept a Click-to-Link call through VOX:
● Say a word loudly.
5.3 LISTENING TO MUSIC AND RADIO
5.3.1 LISTENING TO MUSIC
To start music streaming from your paired device, do one of the following:
● To use the unit buttons: tap .
● To use the SmartSet app: tap MUSIC.
● To use the voice-assisted menu:
a. Tap and .
b. When the voice-assisted menu reaches "Music On", tap or use VOX.
To stop music streaming, do one of the following:
● To use the unit buttons: press for 2 seconds.
● To use the SmartSet app: on the MUSIC screen, tap .
● To use the voice-assisted menu:
a. Tap and .
b. When the voice-assisted menu reaches "Music Off", tap or use VOX.
To skip to the next track (while streaming music), do one of the following:
● To use the unit buttons: tap .
● To use the SmartSet app: on the MUSIC screen, tap .
To skip to the previous track (while streaming music), do one of the following:
● To use the unit buttons: tap twice.
● To use the SmartSet app: on the MUSIC screen, tap .
To forward auto scan tracks (while streaming music) and then play your desired track, do one of the following:
● To use the unit buttons:
a. Tap and . Forward scan plays a few seconds of each track.
b. When you hear a track that you want to play, tap or use VOX.
● To use the SmartSet app:
a. On the MUSIC screen, under MUSIC SCAN, tap . Forward scan plays a few seconds of each track.
b. When you hear a track that you want to play, on the MUSIC screen, under MUSIC SCAN, tap .
● To use the voice-assisted menu:
a. Tap and .
30
Page 31

b. When the voice-assisted menu reaches "Scan Tracks Up", tap or use VOX.
c. When you hear a track that you want to play, tap or use VOX.
To backward auto scan tracks (while streaming music) and then play your desired track:
● To use the SmartSet app:
a. On the MUSIC screen, under MUSIC SCAN, tap . Backward scan plays a few seconds of each track.
b. When you hear a track that you want to play, on the MUSIC screen, under MUSIC SCAN, tap .
● To use the voice-assisted menu:
a. Tap and .
b. When the voice-assisted menu reaches "Scan Tracks Down", tap
c. When you hear a track that you want to play, tap or use VOX.
5.3.1.1 SWITCHING MUSIC SOURCES
If two music (A2DP) audio sources are paired, FREECOM4 uses the audio source from which you last played music.
To switch to the other audio source:
1. Stop music (A2DP) playback from the current device (see Listening to Music on page 30).
2. Play music (A2DP) from the other device (see Listening to Music on page 30).
FREECOM4 automatically remembers your last played device.
5.3.2 LISTENING TO FM RADIO
To turn on the FMradio, do one of the following:
When you switch on your FMradio, the station that was playing when you last switched off resumes playing.
● To use the unit buttons: tap twice.
● To use the SmartSet app: on the FM screen, tap ON/OFF.
● To use the voice-assisted menu:
a. Tap and .
b. When the voice-assisted menu reaches "Radio On", tap or use VOX.
To turn the FMradio off, do one of the following:
● To use the unit buttons: press for 2 seconds.
● To use the SmartSet app: on the FM screen, tap the On/Offbutton.
● To use the voice-assisted menu:
a. Tap and .
b. When the voice-assisted menu reaches "Radio Off", tap or use VOX.
31
Page 32

To play a different preset station:
● To use the unit buttons, do one of the following:
● tap for the next preset
● tap twice for the previous preset
● To use the SmartSet app: On the FM screen, tap the desired preset.
To seek the next available station:
● To use the SmartSet app: On the FM screen, do one of the following:
● tap .
● tap .
To scan available stations and select your desired station:
● To use the unit buttons:
a. Tap and . The FMradio plays each station that it finds for several seconds.
b. When you hear a station you want to select, tap or use VOX.
● To use the voice-assisted menu:
a. Tap and .
b. When the voice-assisted menu reaches "Scan Stations Up", tap or use VOX.
To store a scanned station in the active preset:
● To use the unit buttons: tap within 20 seconds of stopping the scan.
To set all presets efficiently using Cardo Community, see Configuring Your FM Radio through Cardo Cardo
Community on page 20.
To set all presets efficiently using the SmartSet app, see Configuring Your FM Radio Manually on page 17.
Temporarily Storing New FM Radio Preset Stations Using Auto Tuning
You can temporarily store new FM radio stations in the presets using auto tuning and restore the original presets when
you want.
To temporarily store new stations in the presets (auto tuning):
● To use the unit buttons: press for 5 seconds.
● To use the SmartSet app: on the FM screen, tap .
● To use the voice-assisted menu:
a. Tap and .
b. When the voice-assisted menu reaches "Auto Scan 6 Stations", tap or use VOX.
32
Page 33

To restore the original presets (following auto tuning):
● To use the unit buttons: switch your unit off then turn it back on.
5.3.3 SHARING MUSIC AND RADIO
You can share music and FMradio with a passenger or other rider. Music sharing is more suitable for rider/passenger
combinations, while FM radio is also intended for rider/rider combinations.
● Music and radio can be shared with only one passenger/rider.
● Bluetooth intercom calls are disabled when sharing music.
● FM radio sharing opens a Bluetooth intercom call automatically.
● While sharing music, you cannot use Bluetooth intercom.
● If you paired your unit to two mobile phones, music will be shared from the mobile phone through which you
last played music.
● When sharing FM radio, either passenger/rider can change station while the Bluetooth intercom call remains
open.
● When you stop sharing FM radio, the Bluetooth intercom call remains open and the FM radio continues to play
independently on each passenger/rider's unit.
● When stop music sharing, music continues on your unit only.
To start/stop sharing, do one of the following:
● To use the unit buttons:
a. Confirm your FREECOM4 is in Standby mode (LED flashes slowly).
b. Start playing music or the FM radio.
c. Press for 2 seconds to start sharing on Channel A (by default).
To share music or radio on other channels:
1. Start playing music or the FM radio.
2. Start a Bluetooth intercom call on the desired channels (A, B or C).
3. Press for 2 seconds.
d. To stop sharing, press for 2 seconds.
● To use the SmartSet app:
a. Confirm your FREECOM4 is in Standby mode (LED flashes slowly).
b. Start playing music or the FM radio.
c. Either:
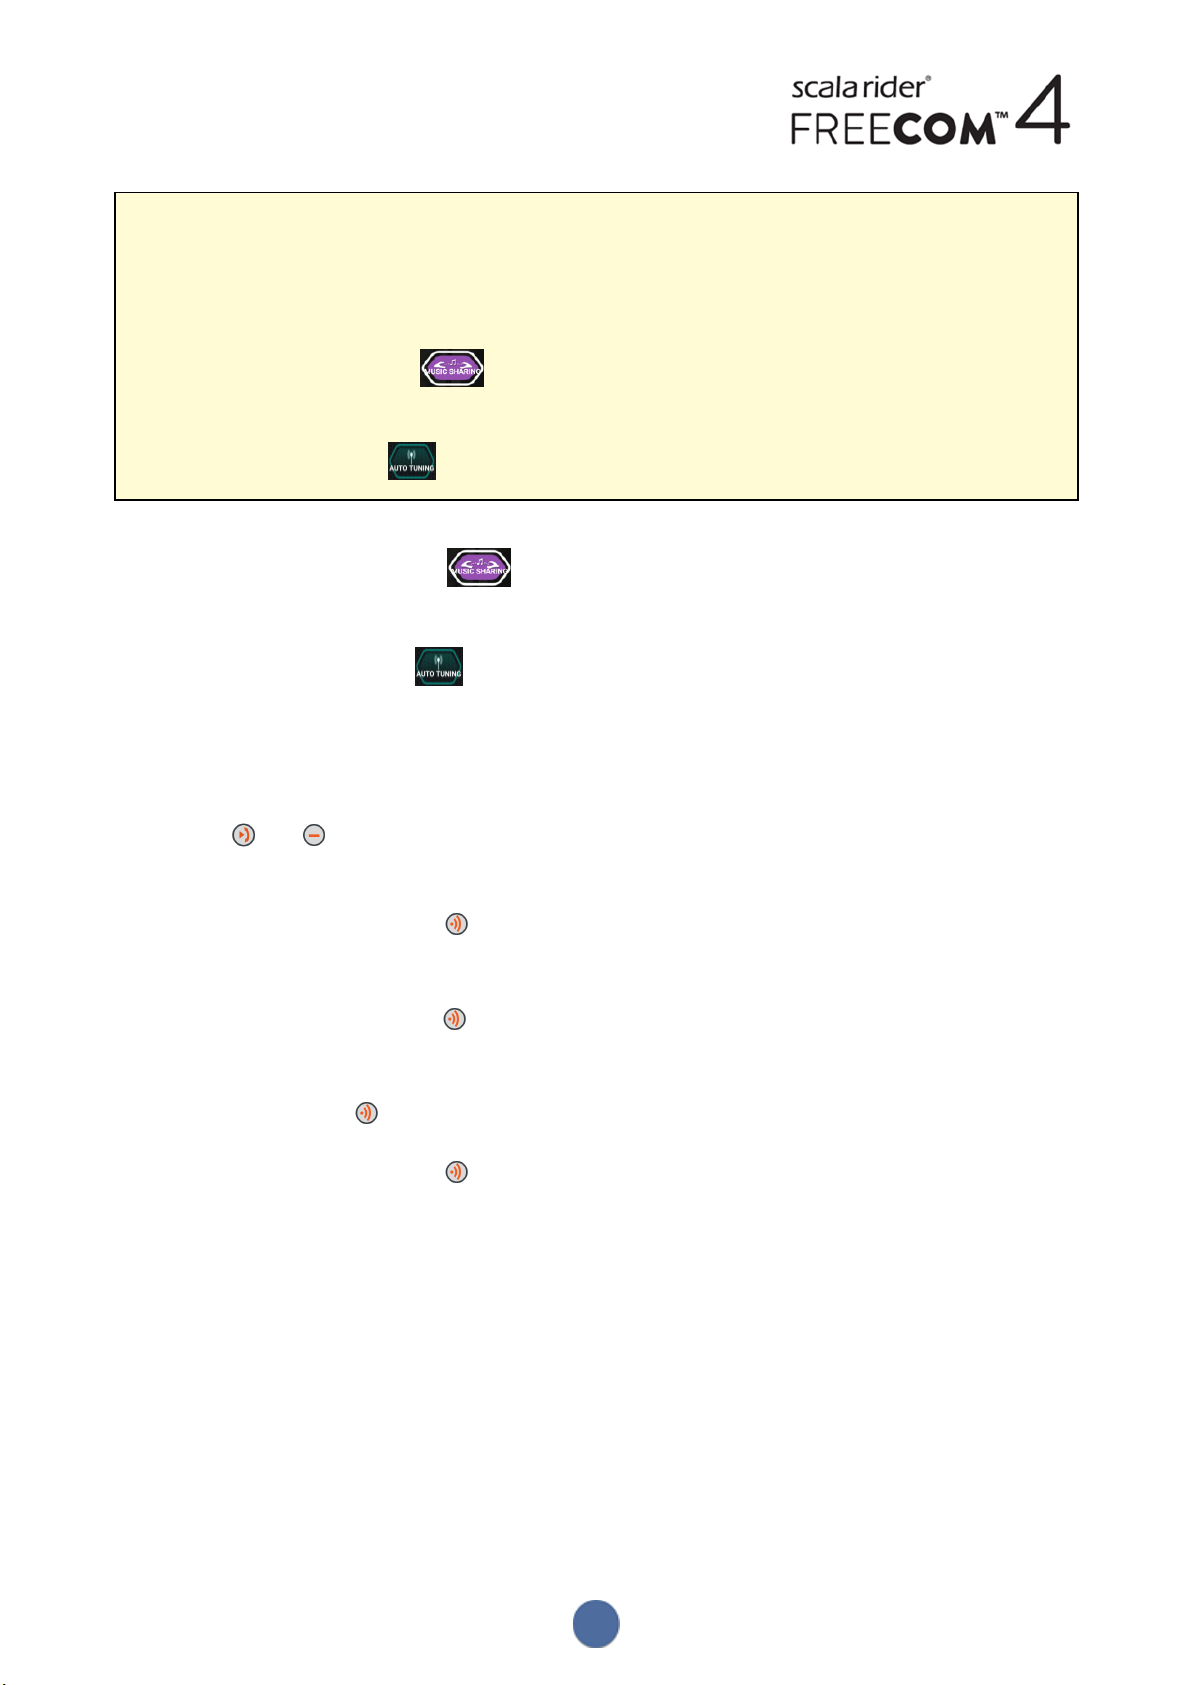
● on the MUSIC screen, tap .
or
● on the FM screen, tap .
d. Music is shared on Channel A (by default ).
33
Page 34
To share music or radio on other channels:
1. Start playing music or the FM radio.
2. Start a Bluetooth intercom call on the desired channels (A, B or C).
3. Either:
● on the MUSIC screen, tap
or
● on the FM screen, tap .
d. To stop sharing, either:
● on the MUSIC screen, tap .
or
● on the FM screen, tap .
● To use the voice-assisted menu (applicable only for Channel A):
a. Confirm your FREECOM4 is in Standby mode (LED flashes slowly).
b. Start playing music or the FM radio.
c. Tap and .
d. When the voice-assisted menu reaches:
● "Start Music Sharing", tap or use VOX.
or
● "Start Radio Sharing", tap or use VOX.
e. To stop sharing, do one of the following:
● FM radio - tap . The Bluetooth intercom call ends.
● FM radio or music - press for 2 seconds. If FM radio was shared, the Bluetooth intercom call remains
on.
34
Page 35
6. TROUBLESHOOTING
6.1 SOFT RESET
If your FREECOM4 stops responding, reset it by either:
● Turning it off and then on again (see Switching Your Unit On/Off on page 6).
● Using the supplied USB cable, connect your computer or wall charger to the FREECOM4 USBport for 30
seconds.
6.2 RESET PAIRING
This option deletes all paired units and devices.
To reset pairing:
● Press and for 5 seconds.
6.3 RESET TO FACTORY SETTINGS
This option deletes all paired units, devices and all configuration settings.
To perform a factory reset through the unit, do one of the following:
● To use the unit buttons:
a. Check that your FREECOM4 is in Standby (see FREECOM4 Modes and Events - LEDIndications on page 38).
b. Simultaneously press + + for 5 seconds
● To use the SmartSet app:
a. Check that your FREECOM4 is in Standby (see FREECOM4 Modes and Events - LEDIndications on page 38).
b. Open the SmartSet app and tap .
c. Tap Settings.
d. Tap Reset to Factory.
● To use the voice-assisted menu:
a. Tap and .
b. When the voice-assisted menu reaches "Advanced Features Menu", tap or use VOX.
c. When the voice-assisted menu reaches "Reset to Factory Settings", tap or use VOX.
6.4 FAQ
Additional answers to common problems can be found at www.cardosystems.com/faqs.
35
Page 36

7. SUPPORT
For additional information:
: www.cardosystems.com
* support@cardosystems.com
( USA and Canada: 1-800-488-0363 / International: +49 89 450 36819
Multinational E-commerce companies and online auction websites are not authorized to sell Cardo products and
purchases from such sites are at your own risk. To receive warranty or customer service, you must submit original
receipts from authorized Cardo dealers.
Products that were imported from North America must be serviced in the USA.
36
Page 37

8. GLOSSARY
Term/Abbreviation Description
A2DP
AGC sensitivity
Click-to-Link
IC
Language
RDS
VOX
VOX sensitivity
Unit
Device
Advanced Audio Distribution Profile (for music). A protocol for playing music
over Bluetooth.
AGC (Automatic Gain Control) automatically adjusts speaker volume
according to ambient noise and riding speed.
Spontaneous way to instantly initiate one-on-one intercom calls with aother
Cardo passenger/nearby rider, without being paired.
Intercom.
Voice announcements and voice-assisted menus language.
Radio Data System allows the radio to automatically retune to the strongest
frequency available for the FM station you are listening to when the signal
becomes too weak.
Voice activation (by saying a word or phrase loudly) of certain features for
hands-free operation.
Adjusts your microphone sensitivity for voice activation while you are
riding.
FREECOM4 device.
Mobile phone, GPS or music player.
37
Page 38

APPENDIX A. FREECOM 4 MODES AND EVENTS - LEDINDICATIONS
Your FREECOM4 operates in various modes. Each mode consists of a group of features currently available for your
use. For example, when FREECOM4 plays music, it will be in music playing mode, enabling features related to
playing music such as skipping to the next and previous tracks.
"Events" are considered to occur whenever you operate a feature and when FREECOM4's responds. For example,
turning on music is an "event".
FREECOM4's current mode is indicated by the unit LEDs. You also hear voice announcements on your unit for mode
changes and events.
The following table shows LEDindications for modes and events according to the current battery state.
LED Flashing Battery State Mode or Event
Blue
Blue
Blue
Blue
Blue
Off
Purple
Purple
Purple
Purple/Red
Purple/Red
Red
Red
Red
For 2 seconds Normal ● Rider B connected
● Set VOX to enabled
Fast (3 times) Normal
● Power on
Low Battery
Charging
Fast (repeating fast) Normal,
● Pairing intercom rider B
Low Battery
Charging
Slow (repeating every 3 seconds) Normal ● Standby
Slow twice (repeating slowly every 3
seconds)
Normal ● Incoming/outgoing call (intercom or
mobile)
● Audio active (intercom, FM, A2DP, GPS,
Feature/Settings menu)
Off Normal
● Off
Low Battery
Fast (repeating fast) Normal
● Pairing intercom rider C
Low Battery
Charging
For 2 seconds Normal
Low Battery
Charging
Slow (5 times) Normal
● Mobile pairing successful
● Mobile connected
● Rider C connected
● GPS pairing successful/connected
● Reset pairing
Low Battery
Purple twice slowly and red on Charging ● Incoming/outgoing call (intercom or
mobile)
● Audio active (intercom, FM, A2DP, GPS,
Feature/Settings menu)
Slow purple and red (repeating) Charging ● Standby
Slow twice (repeating slowly every 3
seconds)
Low Battery ● Incoming/outgoing call (intercom
ormobile)
● Audio active (intercom, FM, A2DP, GPS,
Feature/Settings menu)
Fast (repeating slowly every 3 seconds) Low Battery ● Standby
Fast (repeating fast) Normal
● Pairing intercom rider A
Low Battery
Charging
38
Page 39

LED Flashing Battery State Mode or Event
Red
Fast (3 times) Normal
● Power off
Low Battery
Charging
Red
For 2 seconds Normal
Low Battery
● Rider A connected
● Set VOX to disabled
Charging
Red
Red/Blue
Remains on Charging ● Off
Alternating fast Normal
● Pairing Mobile 1
Low Battery
Charging
Red/Blue
Alternating slow Normal
● Pairing GPS 1
Low Battery
Red/Green
Alternating fast Normal
● Pairing Mobile 2
Low Battery
Charging
Red/Green
Alternating slow Normal,
● Pairing GPS 2
Low Battery
Yellow
Fast (repeating) Normal
● Incoming/outgoing Click-to-Link
Low Battery
Charging
Yellow
For 2 seconds Normal
Low Battery
● Intercom call attempted without
microphone or audio kit connected.
Charging
© 2017 Cardo Systems
All rights reserved. Cardo, the Cardo logo and other Cardo marks are owned by Cardo and may be registered. All
other trademarks are the property of their respective owners. Cardo Systems assumes no responsibility for any errors
that may appear in this document. Information contained herein is subject to change without notice.
The unit weighs 35 g (1.2 oz).
39
 Loading...