

Page 1
OPERA TOR'S MANUAL
MODEL GC-4D
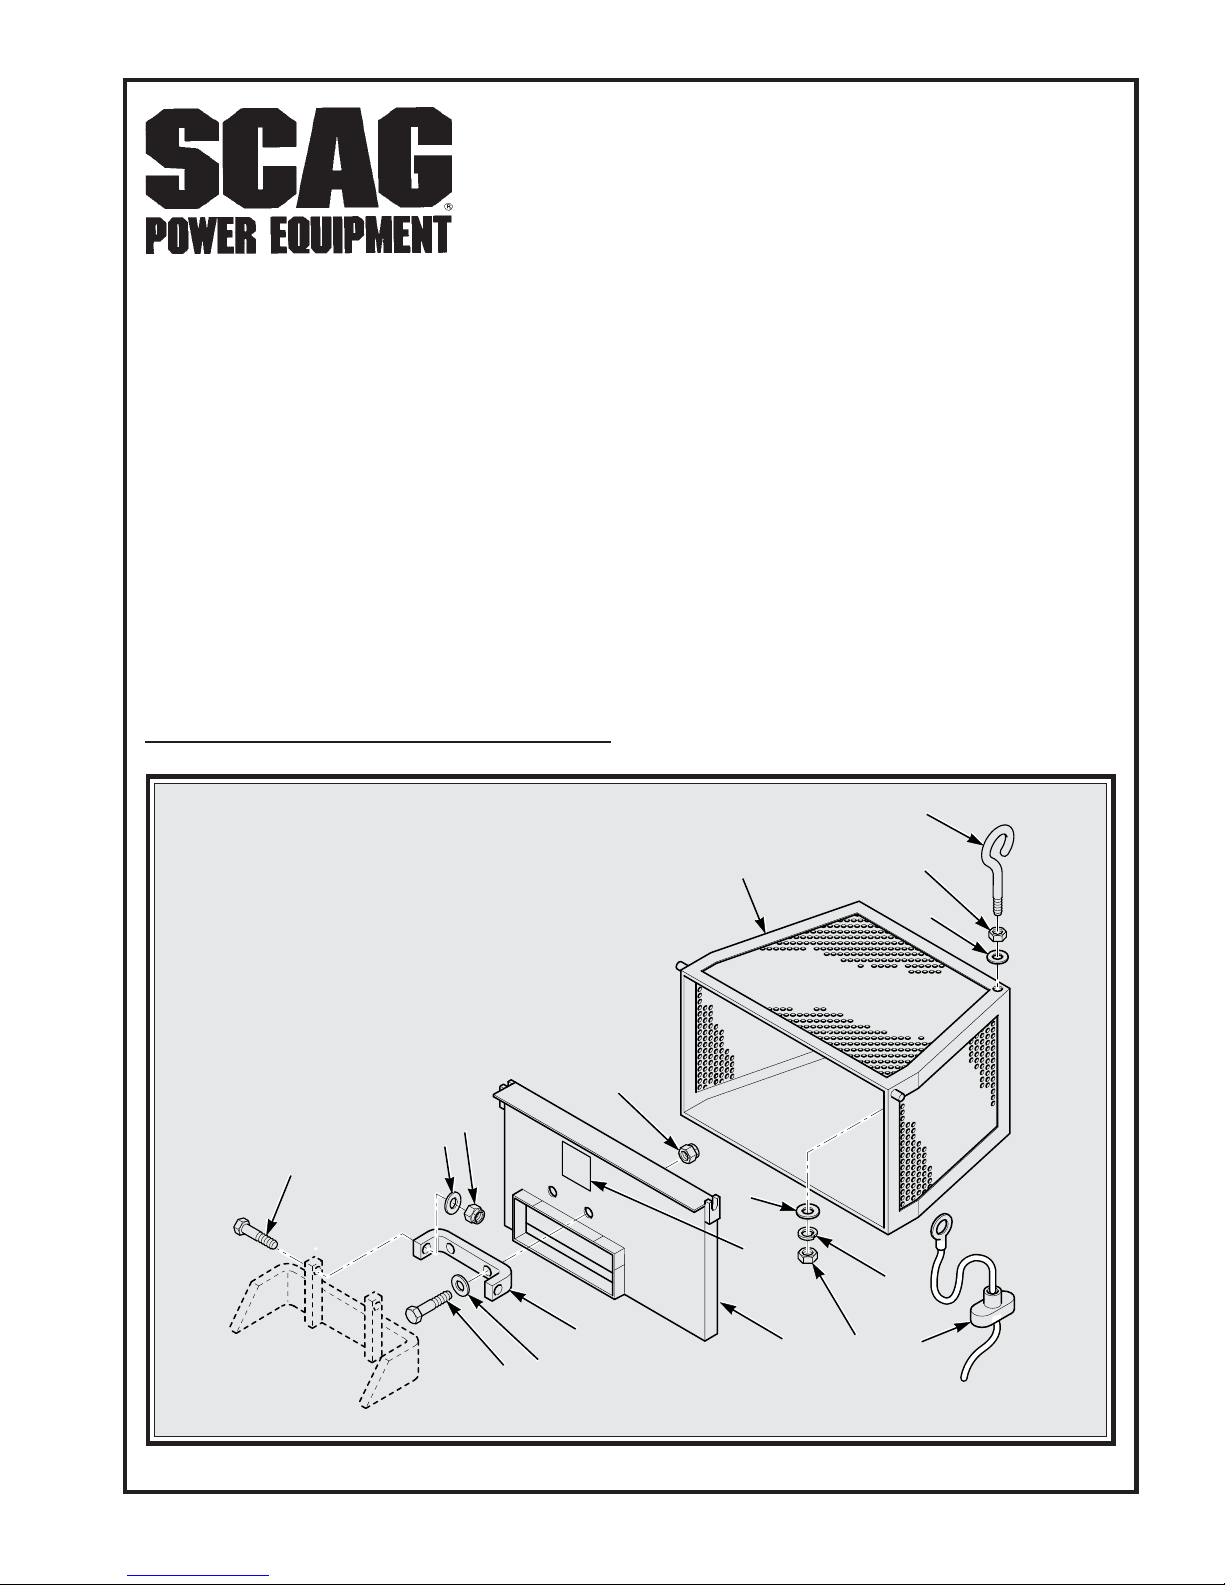
GRASS CATCHER GC-4D
5
11
12
13
1
10
12
14
3
9
8
2
7
12
6
4
7
SC300G
PART 03174
Page 2

SAFETY INSTRUCTIONS
Y our mower is only as safe as the operator! As with any type of power
equipment or accessory , carelessness or error on the part of the operator
may result in serious bodily injury . To reduce the potential for injury,
please read and follow these instructions on safe operation and be certain
that anyone using this accessory fully understands and complies with the
following instructions.
1. Read and understand the contents of this manual before operating your
machine with this accessory attached.
2. If a mechanism becomes clogged, stop the engine before cleaning.
3. Before performing any maintenance or service, stop the machine and
remove the spark plug wire.
4. Do not allow children to operate equipment with this accessory installed. Do
not allow adults to operate equipment with this accessory installed without
proper instruction.
5. Shut the engine off and wait until the blades come to a complete stop before
removing the grass catcher container.
6. If the discharge area should plug, shut the engine off and wait for all
movement to stop before removing obstructions.
7. This accessory , when installed, may change the performance and operation of
your machine. Be sure you have practiced operating your machine with this
accessory attached in a clear and open area before beginning to mow grass.
REMEMBER - YOUR MOWER IS ONLY AS SAFE AS THE OPERATOR!
FAILURE TO FOLLOW SAFE OPERATING PRACTICES
MAY RESULT IN SERIOUS INJURY.
This manual covers the operating instructions
and illustrated parts list for:
GC-4D Grass Catcher Accessories
1
Page 3
ADVANTAGE CUTTER DECK INSTALLATION INSTRUCTIONS
WARNING
1. Remove all packaging materials. Lay out the mounting hardware and the catcher
assembly parts for easy access. Prepare the work area making sure that it is a
clean, safe environment.
2 Remove the discharge chute from the cutter deck. Retain all mounting hardware as
the discharge chute must be reinstalled whenever the grass catcher is removed.
WARNING
DO NOT OPERATE WITHOUT DISCHARGE CHUTE, MULCH
SYSTEM, MULCH PLATE, OR ENTIRE GRASS CATCHER
INSTALLED
3. If you are installing the catcher to a machine with an Advant age cutter deck,
with a serial number of 8619999 or lower , you must also install the filler plate
(item 15, Figure 3, page 5) to the cutter deck. If the machine serial number is
8910001 or higher, proceed to step 6.
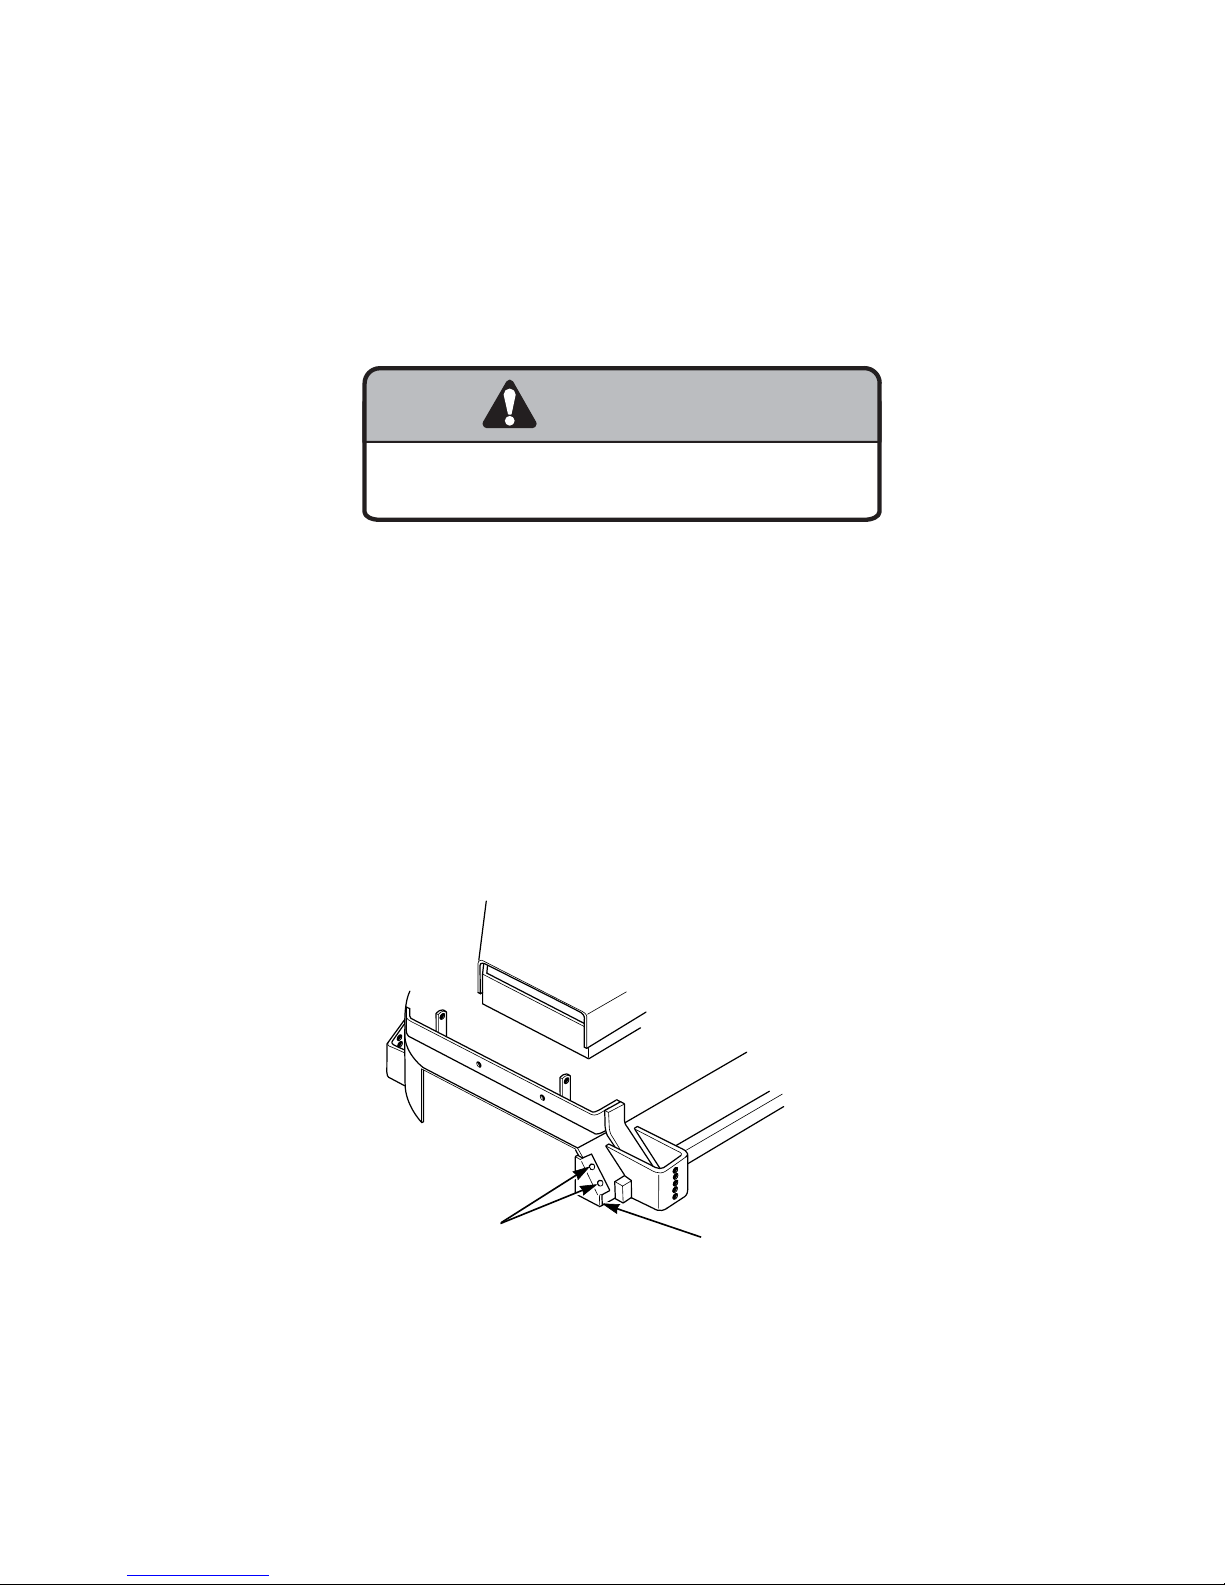
4. Hold the filler plate (item 15, Figure 3) to the front of the cutter deck as shown in
Figure 1. Center punch the two hole locations in the cutter deck. Drill the holes at
the marked locations using a 1/8" drill bit, then finish drilling using a 9/32" drill bit.
5. Install the deck filler plate to the inside front of the Advantage deck using (2)
1/4-20 x 3/4" bolts and (2) 1/4-20 elastic stop nuts.
03054126982
Center punch
and drill these
two holes.
Align the front edge
of the filler plate with
the front edge of the
cutter deck.
Figure 1. Filler Plate Installation for Advantage Cutter Decks
2
Page 4
ADVANTAGE CUTTER DECK INSTALLATION INSTRUCTIONS
WARNING
6. Install the mounting bracket (item # 3, Figure 3) to the cover weldment (item # 2,
Figure 3) and secure with the hardware provided. Do not tighten the hardware.
-NOTE-
There are two (2) mounting brackets included with this grass cacther.
The mounting bracket for Advant age cutter decks is longer
than the mounting bracket for Velocity Plus
7. Install the grass catcher filler plate (item # 18, Figure 3) as shown. Secure using the
hardware provided. Tighten the hardware.
8. Install the grass catcher cover assembly to the discharge mounting area. The
grass catcher cover assembly must be installed as shown in Figure 3. Secure the
grass catcher cover assembly to the discharge chute mounting area using the
hardware provided.
9. Align the grass catcher cover assembly with the discharge opening on the cutter
deck and tighten the hardware securing the mounting bracket to the cover
weldment.
cutter decks.
10. Install the catcher box onto the grass catcher cover assembly .
1 1. Operate and test.
VELOCITY PLUS CUTTER DECK INSTALLATION INSTRUCTIONS
1. Remove all packaging materials. Lay out the mounting hardware and the catcher
assembly parts for easy access. Prepare the work area making sure that it is a
clean, safe environment.
2 Remove the discharge chute from the cutter deck. Retain all mounting hardware as
the discharge chute must be reinstalled whenever the grass catcher is removed.
WARNING
DO NOT OPERATE WITHOUT DISCHARGE CHUTE, MULCH
SYSTEM, MULCH PLATE, OR ENTIRE GRASS CATCHER
INSTALLED
3. Install the mounting bracket (item # 4, Figure 4) to the cover weldment (item # 3,
Figure 4) and secure with the hardware provided. Do not tighten the hardware.
There are two (2) mounting brackets included with this grass catcher.
The mounting bracket for Advant age cutter decks is longer
than the mounting bracket for Velocity Plus
-NOTE-
cutter decks.
3
Page 5
VELOCITY PLUS CUTTER DECK INSTALLATION INSTRUCTIONS
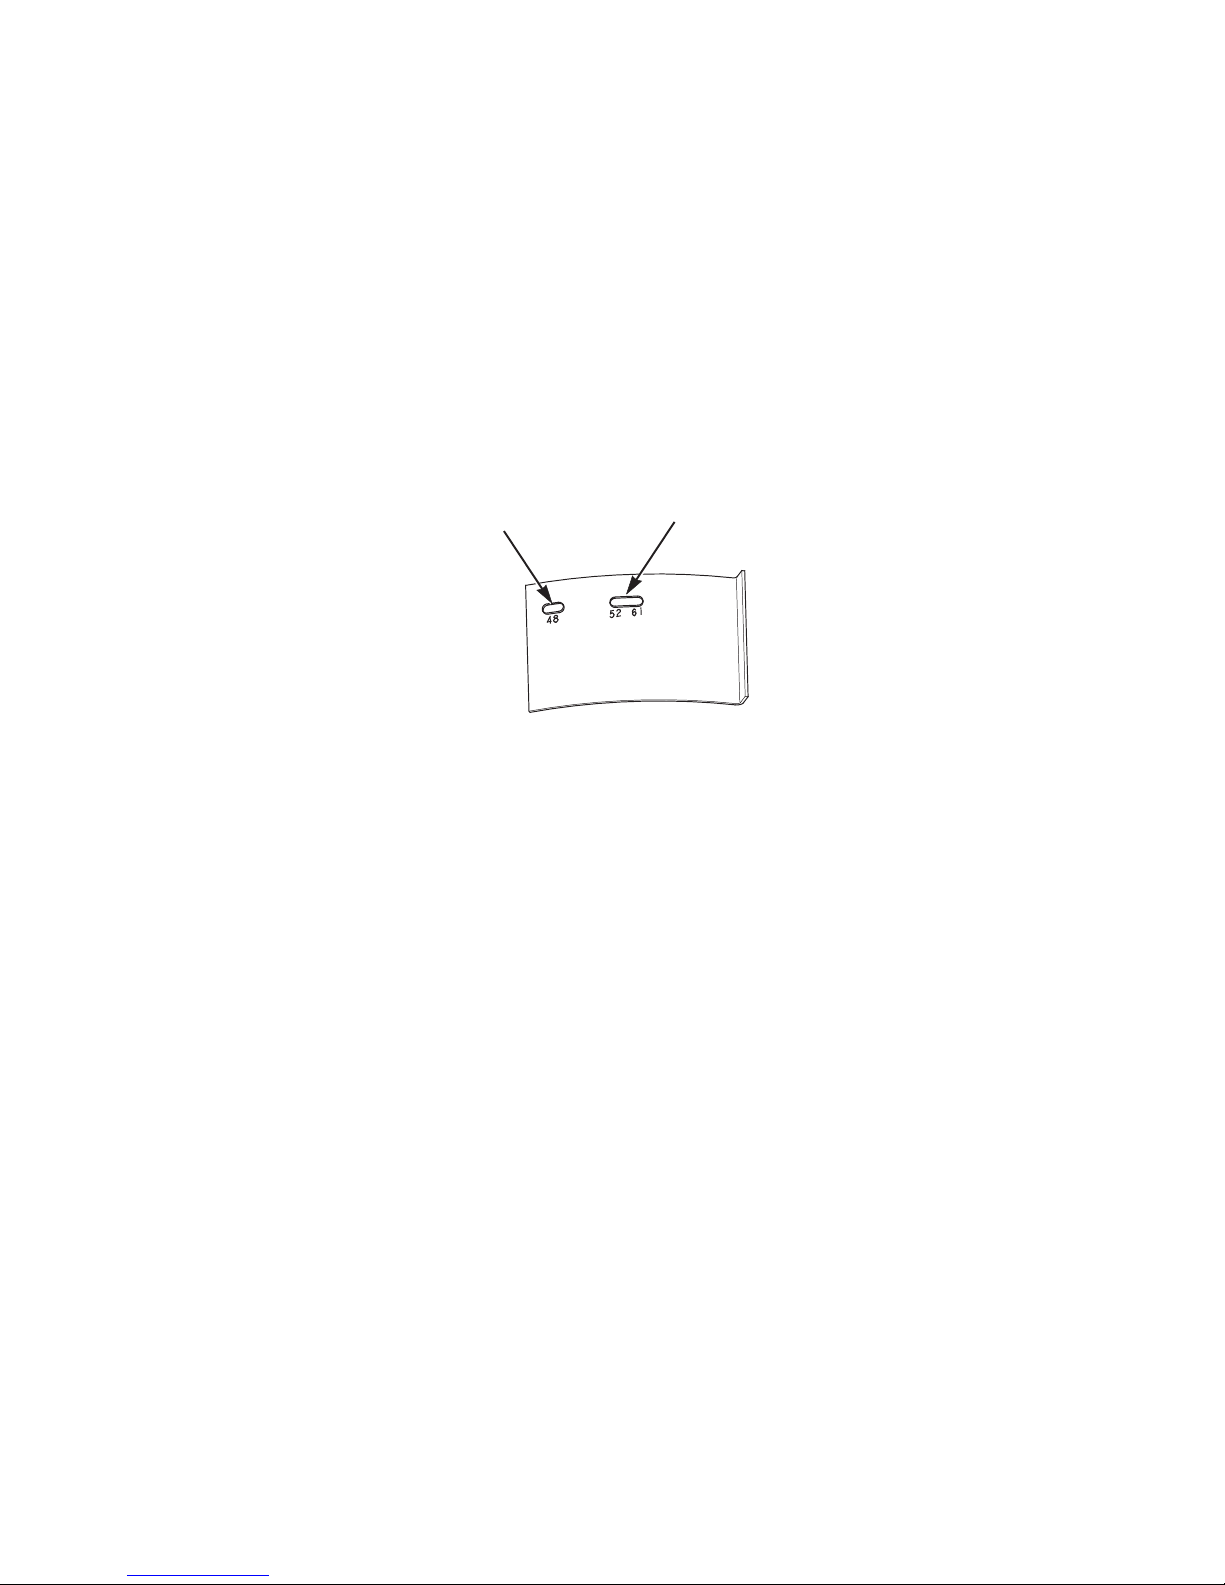
4. Install the grass catcher filler plate (item # 2, Figure 4, page 6) as shown In Figure 4.
There are two (2) mounting slots in the grass catcher filler plate. Reference Figure 2
below for the correct mounting slot for the deck size this catcher will be mounted on.
Secure using the hardware provided and tighten.
-NOTEIf the Velocity Plus cutter deck is equipped with a Turbo Baffle, it will need to be
removed when installing the grass catcher filler plate. Retain the Turbo Baffle
and mounting hardware as this will need to be reinstalled when the grass catcher
is removed.
Mounting slot
for 48" cutter deck
Mounting slot
for 52" & 61" cutter decks
Figure 2. Filler Plate Installation for V elocity Plus Cutter Decks
5. Install the grass catcher cover assembly to the discharge mounting area. The
grass catcher cover assembly must be installed as shown in Figure 4. Secure the
grass catcher cover assembly to the discharge chute mounting area using the
hardware provided.
6. Align the grass catcher cover assembly with the discharge opening on the cutter
deck and tighten the hardware securing the mounting bracket to the cover
weldment.
7. Install the catcher box onto the grass catcher cover assembly .
8. Operate and test.
4
Page 6
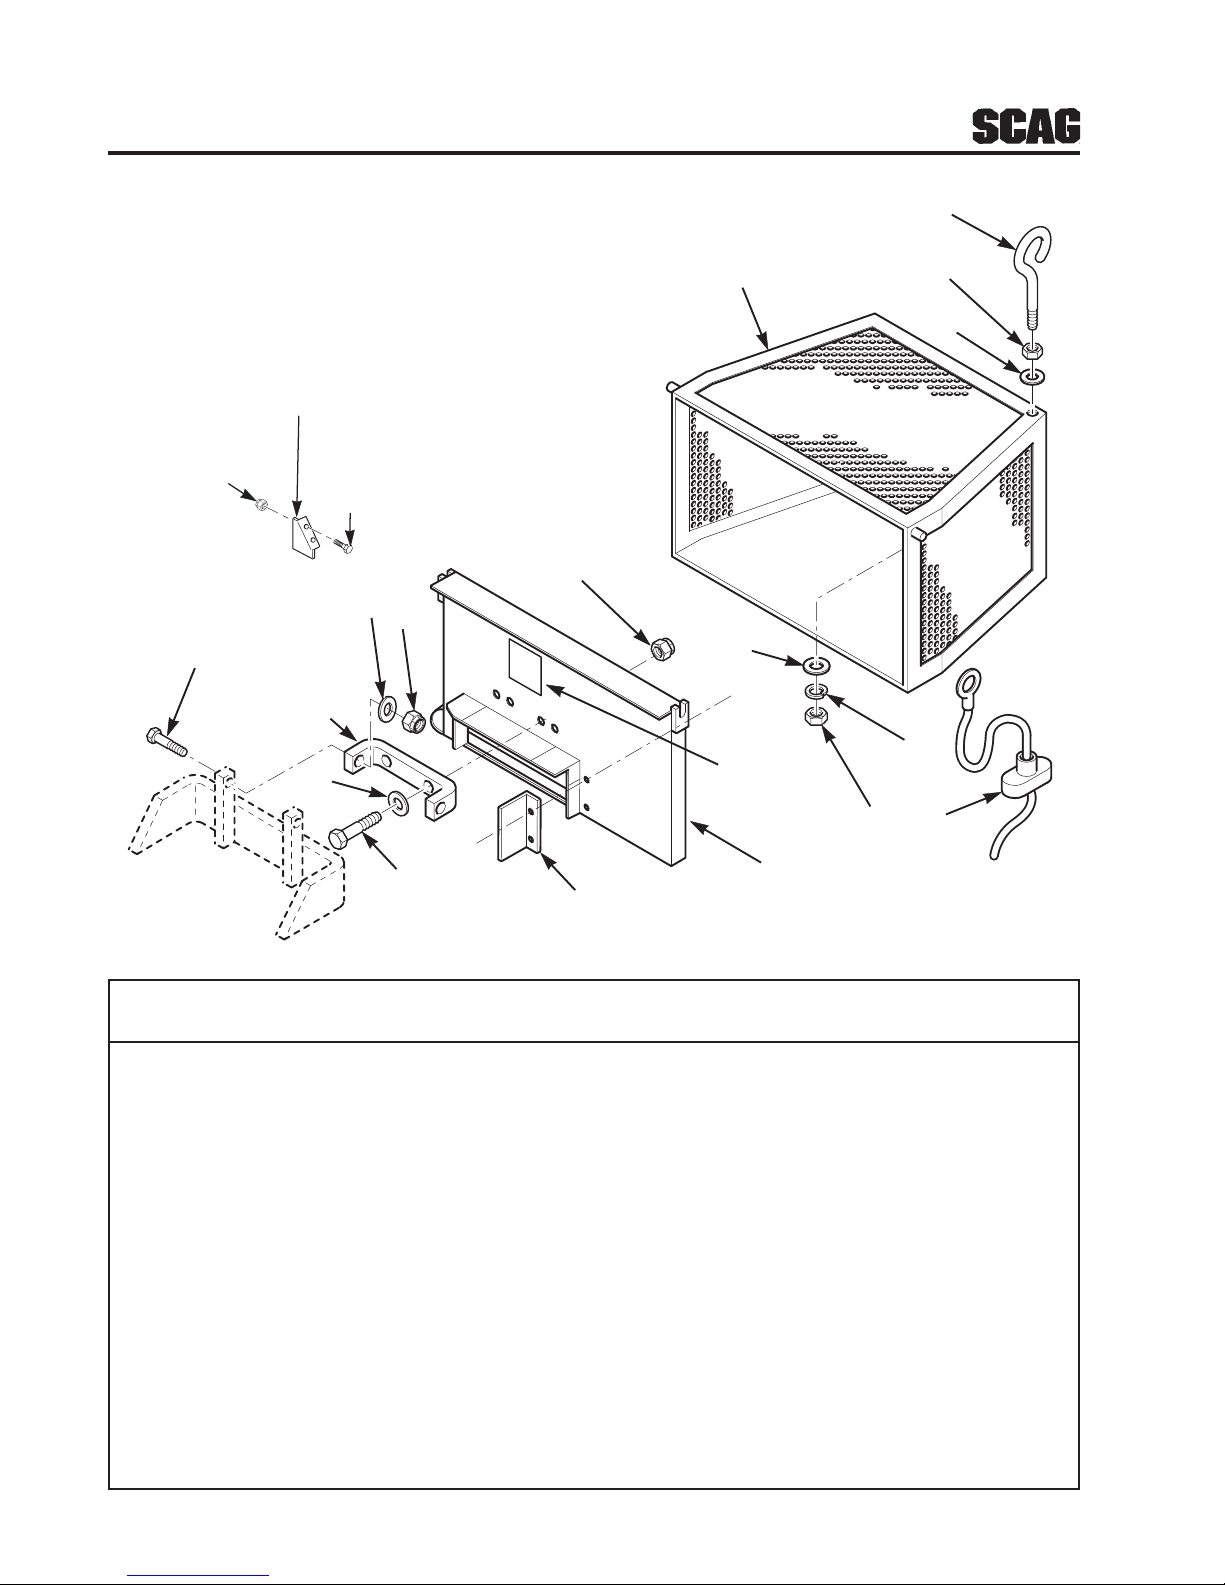
Grass Catcher GC-4D for Advantage Cutter Decks
5
11
17
15
1
16
10
12
13
12
3
9
14
7
7
12
6
4
8
18
Figure 3
Ref. Part
No. Number Description
1 - Catcher Box (Not av ailable as spare part)
2 46452 Cover Weldment W/Decal
3 42211 Mounting Bracket
4 46043 Pull Rope Assembly
5 04070-01 Eyebolt, 5/16-18 x 2.25"
6 04030-03 Lock Washer, 5/16
7 04020-03 Nut, 5/16-18 Hex Head
8 04001-20 Bolt, 3/8-16 x 1.50" Hex Head
9 04041-07 Flat W asher , 3/8 (.391 x .938 x .105)
10 04021-09 Nut, 3/8-16 Elastic Stop
11 04001-10 Bolt, 5/16-18 x 1.25" Hex Head
12 04040-15 Flat W asher, 5/16 (.375 x .875 x .083)
13 04021-10 Nut, 5/16-18 Elastic Stop
14 482293 Decal, Danger
15 422592 Filler Plate, Chute Advantage Deck Only
16 04001-01 Bolt, Hex Head 1/4-20 x 3/4"
17 04021-08 Nut, Elastic Stop 1/4-20
18 424355 Filler Plate, Grass Catcher Advantage Decks
2
SC300GA
5
Page 7
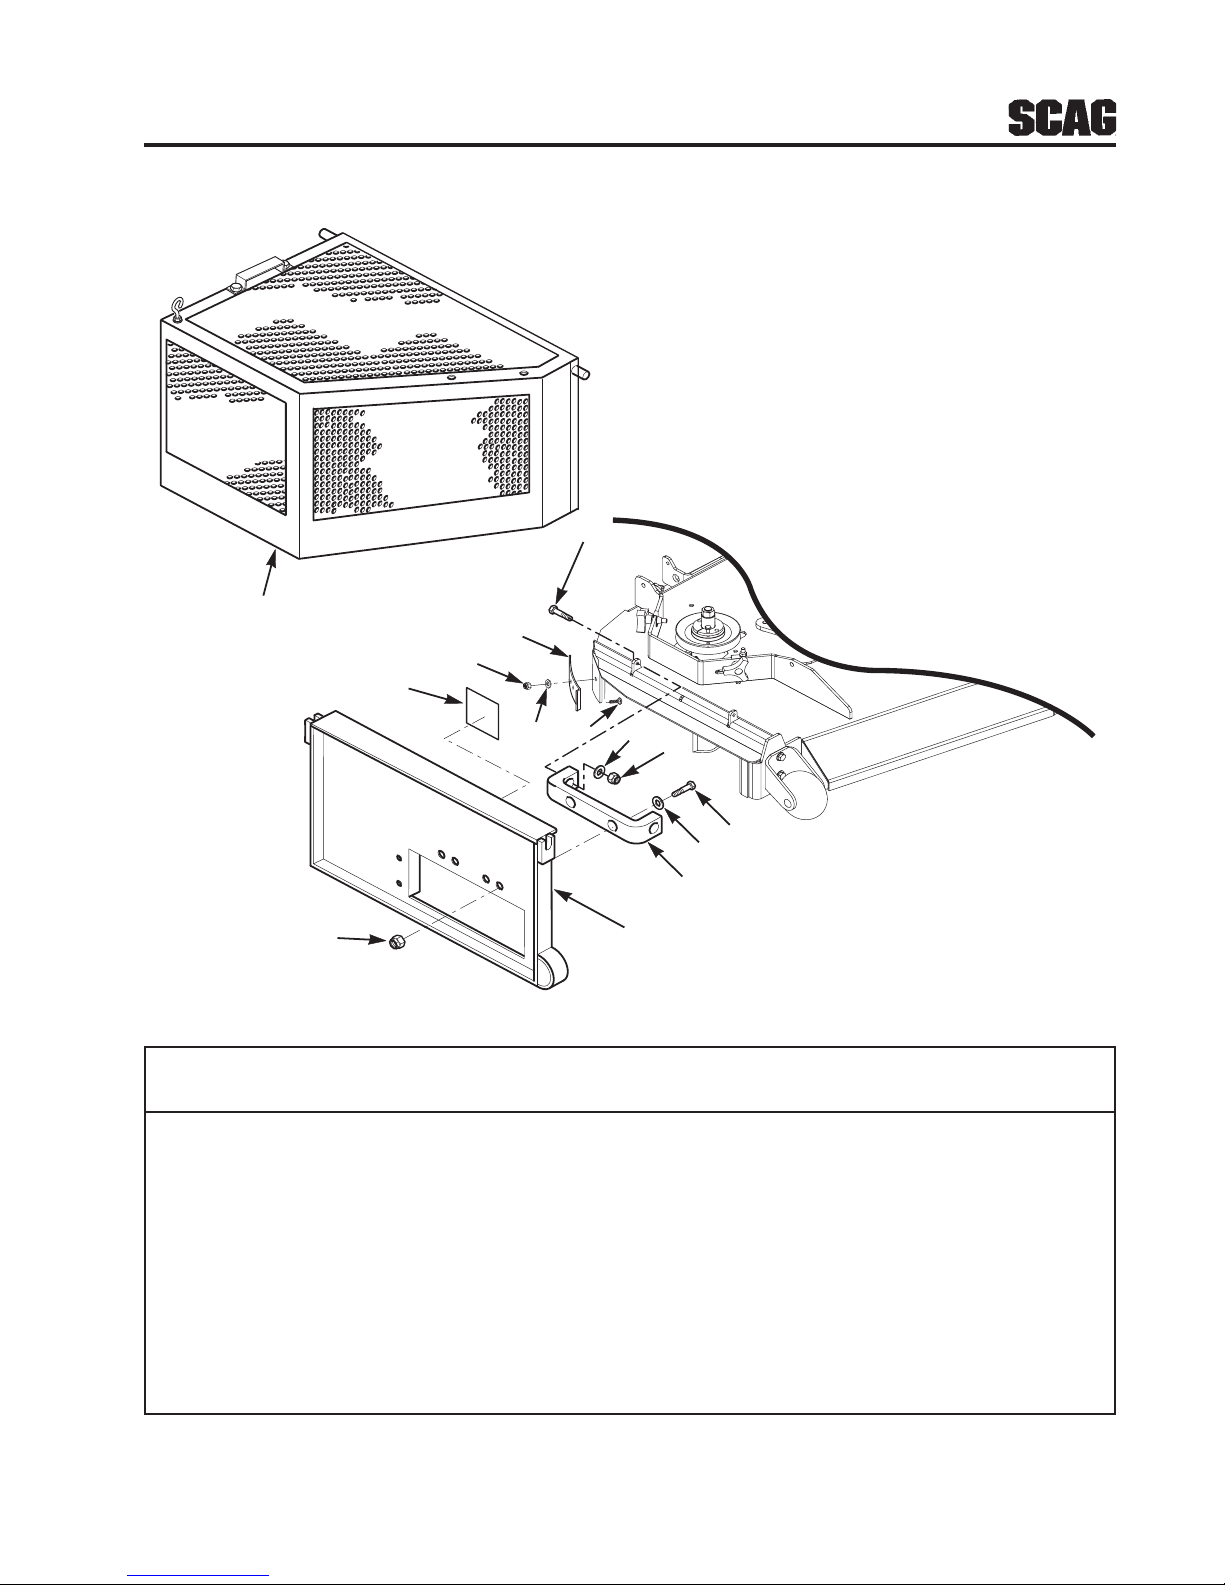
Grass Catcher GC-4D for Velocity Plus Cutter Decks
9
1
2
10
5
12
11
11
10
6
7
4
8
3
Figure 4
Ref. Part
No. Number Description
1 Catcher Box (Not available as a spare part)
2 424355 Filler Plate, Grass Catcher Velocity Plus Decks
3 46452 Cover Weldment With Decal
4 424357 Bracket, Mounting
5 482293 Decal, Danger
6 04001-20 Bolt, 3/8-16 x 1.50" Hex Head
7 04041-07 Flat Washer, 3/8 (.391 x .938 x .105)
8 04021-09 Nut, 3/8-16 Elastic S top
9 04001-10 Bolt, 5/16-18 x 1.25" Hex Head
10 04021-10 Nut, 5/16-18 Elastic S top
1 1 04040-15 Flat Washer, 5/16 (.375 x .875 x .083)
12 04003-12 Bolt, Carriage 5/16-18 x 1-1/2"
6
Page 8

NOTES
7
Page 9

LIMITED WARRANTY- COMMERCIAL ACCESSORY
Any part of the Scag commercial accessory manufactured by Scag and found, in the reasonable judgment of Scag, to be defective
in materials or workmanship, will be repaired or replaced by an Authorized Scag Service Dealer without charge for parts and
labor.
The Scag accessory, including any defective part, must be returned to an Authorized Scag Service Dealer within the warranty
period. The expense of delivering the accessory to the dealer for warranty work and the expense of returning it back to the
owner after repair or replacement will be paid for by the owner. Scag’s responsibility in respect to claims is limited to making
the required repairs or replacements, and no claim of breach of warranty shall be cause for cancellation or rescission of the
contract of sale of any Scag machine. Proof of purchase will be required by the dealer to substantiate any warranty claim. All
warranty work must be performed by an Authorized Scag Service Dealer.
This warranty is limited to 90 days (excluding grass catcher blower assemblies) from the date of original retail purchase for any
Scag accessory that is used for commercial purposes, or any other income-producing purpose including rental use.
Grass catcher blower assembly (excluding the drive belt) warranty is limited to 1 year from the date of original retail purchase.
Parts and labor.
This warranty does not cover any accessory that has been subject to misuse, neglect, negligence, accident, or that has been
operated in any way contrary to the operating instructions as specified in the Operator's Manual. The warranty does not apply
to any damage to the accessory that is the result of improper maintenance, or to any accessory or parts that have not been
assembled or installed as specified in the Operator's Manual.
The warranty does not cover any accessory that has been altered or modified. In addition, the warranty does not extend to
repairs made necessary by normal wear, or by the use of parts or accessories which, in the reasonable judgment of Scag, are
either incompatible with the Scag mower or adversely affect its operation, performance or durability. This warranty does not
cover engines and electric starters, which are warranted separately by their manufacturer.
Scag Power Equipment reserves the right to change or improve the design of any accessory without assuming any obligation
to modify any accessory previously manufactured.
All other implied warranties are limited in duration to the periods specified above. Accordingly, any such implied warranties
including merchantability, fitness for a particular purpose, or otherwise, are disclaimed in their entirety after the expiration of
the appropriate warranty period. Scag’s obligation under this warranty is strictly and exclusively limited to the repair or
replacement of defective parts and Scag does not assume or authorize anyone to assume for them any other obligation. Some
states do not allow limitations on how long an implied warranty lasts, so the above limitation may not apply to you.
Scag assumes no responsibility for incidental, consequential or other damages including, but not limited to, expense for
gasoline, oil, expense of delivering the machine to an Authorized Scag Service Dealer and expense of returning it back to the
owner, mechanic’s travel time, telephone or telegram charges, rental of a like product during the time warranty repairs are being
performed, travel, loss or damage to personal property, loss of revenue, loss of use of the mower, loss of time, or inconvenience.
Some states do not allow the exclusion or limitation of incidental or consequential damages, so the above limitation or exclusion
may not apply to you.
This warranty gives you specific legal rights, and you may also have other rights which vary from state to state.
Page 10

© 2005
SCAG POWER EQUIPMENT
DIVISION OF MET ALCRAFT OF MAYVILLE
PART NO. 03174
REVISED PRINTING 11/2005
PRINTED IN USA
 Loading...