


2-PORT POP-UP SOCKET BOX
3-PORT POP-UP SOCKET BOX
KNIFE / SPICE / KEY / BAKERS’ BOX
INSTRUCTIONS AND INSTALLATION GUIDE
WE RECOMMEND THAT ALL ‘CUT-OUT’ PROCESSES
AND/OR ANY ‘CUSTOM TOP’ FABRICATION SHOULD BE
DONE BY YOUR SPECIALIST WORKTOP PROVIDER

In either of these surface-mount methods, it is also possible to ‘personalise’ the unit, by replacing the
steel top with a piece of matching material to the work top if required.
OPTION 1
OPTION 2
OPTION 2
in shallow rebate
for a ‘flush’ finish
Maximum thickness of any material is 12mm. The Collar can be adjusted upwards to relevel it with that
new material. Then please follow counterbalance “re-weight” instructions shown later in this guide.
2.5mm
OPTION 3
OPTION 4
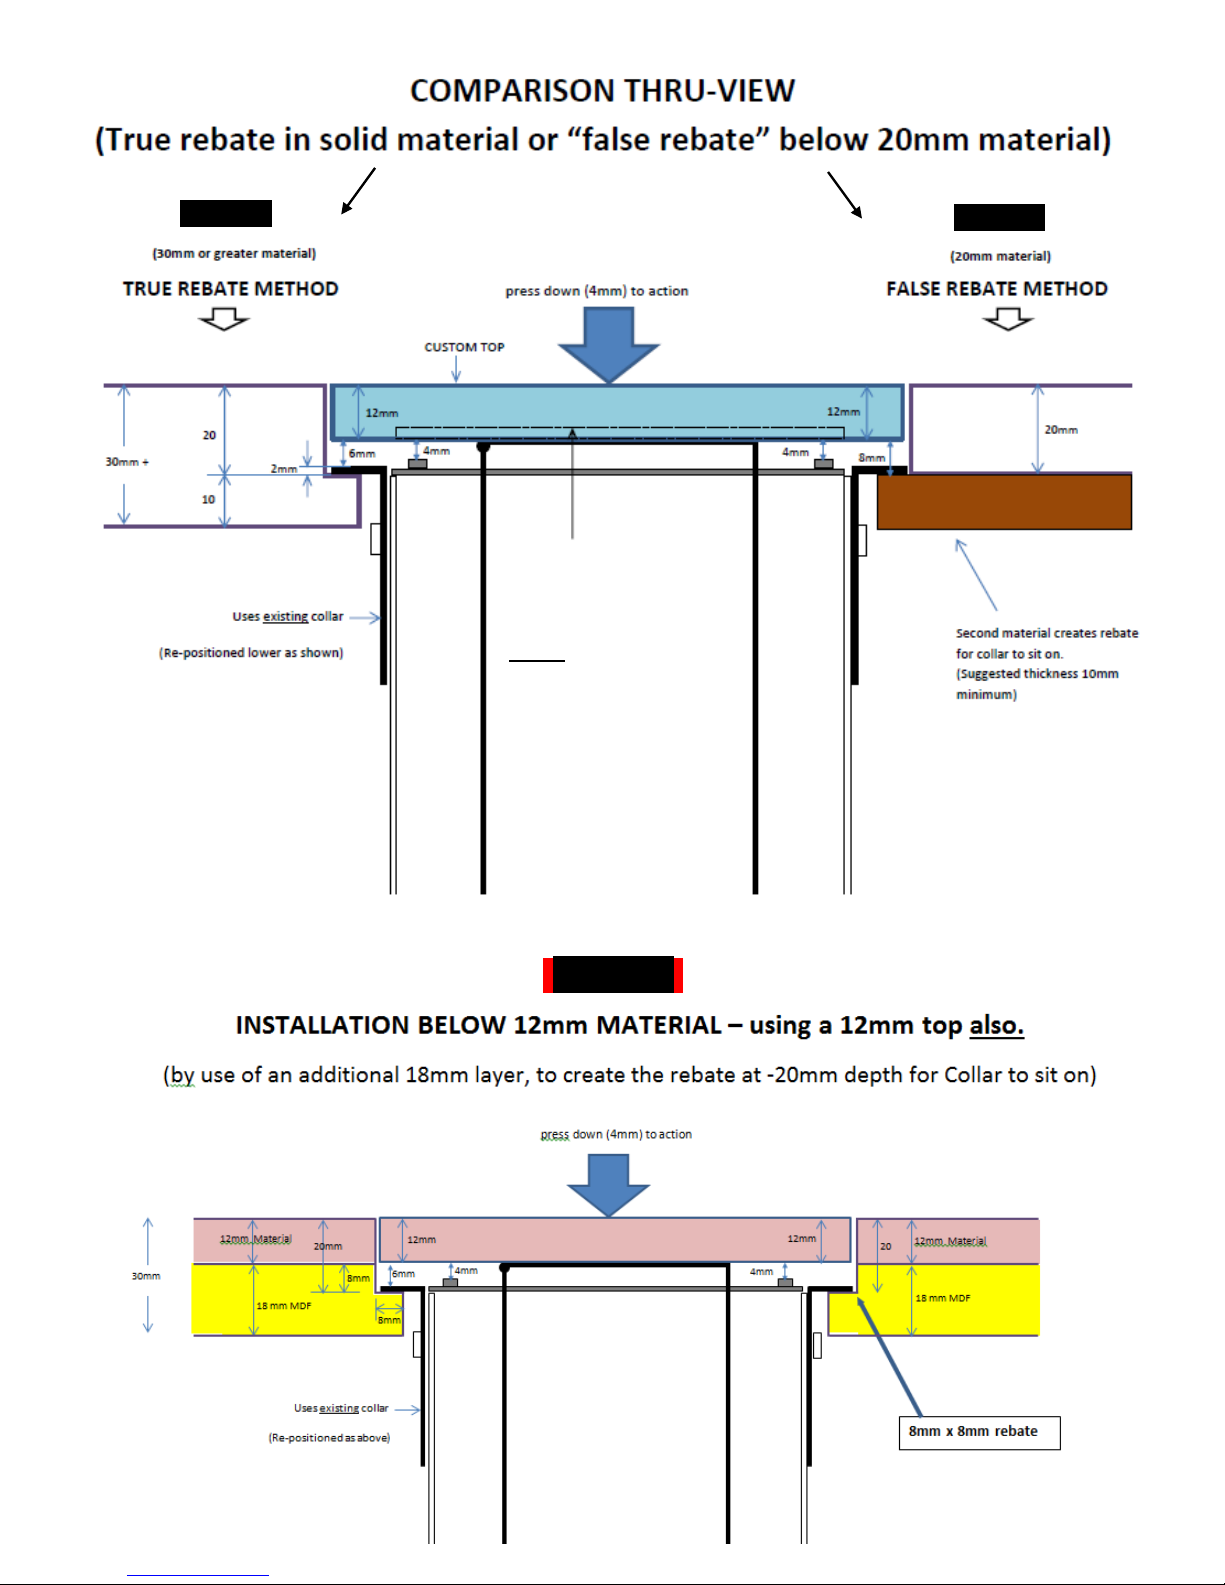
This method involves the installation of the unit at exactly 20mm below the Counter-top surface so that the
product can be fully disguised into its location with a custom top that matches its surroundings. This is
known as an “Inset” or rebated method. The maximum thickness of this custom top is also 12mm.
In worktop materials of 30mm thickness and above, the installation is achieved by sitting the collar on a
rebate shelf within the material.
For materials of 20mm thickness, installation is achieved by sitting the collar on a “false” rebate, created
by using a second material below it.
30 mm +
20 mm
B - ‘INSET’ or REBATED – The Unique Custom (“chameleon”) Installation)
20 mm
Material 2
on or in surface
NB. If your Worktop material is only 12mm thick (e.g. Corian or Silestone) please see thru-view Option 5
There are 2 (and only 2) positions to fit an S-Box™ unit:
Either: A - Surface-mounted
Or: B - ‘Inset’ at -20mm below surface.
This simplest installation method is to insert it straight into a cut-out hole →
The fitted collar sits neatly on the worktop surface. Its own weight will keep it there. Please do not use any
adhesive or sealant. (A shallow rebate can also be used if preferred to create a flush finish)
A - SURFACE MOUNT

or
DIMENSIONS FOR THE PRINCIPAL ‘CUT-OUT’ HOLE FOR ALL INSTALLATIONS ARE:
A B
2-PORT POWER BOX = 98mm x 211mm
3-PORT POWER BOX = 115mm x 295mm
KNIFE/SPICE/KEY/CHEF = 115mm x 425mm
FOR A SURFACE MOUNT INSTALLATION
THIS IS ALL YOU NEED. THE UNIT DROPS
STRAIGHT INTO THIS HOLE AND THE COLLAR
SITS NEATLY ON THE WORKSURFACE
8mm radius
corners
A
B
PLAN VIEW
[FOR ‘FLUSH MOUNT’ INSTALLATION AN
ADDITIONAL 8mm WIDE SHALLOW REBATE
SHOULD BE ROUTED AT 2.5mm DEPTH, WITH
10mm RADIUS CORNERS TO NEATLY ACCEPT THE
8mm RADIUS CORNERS OF THE COLLAR ITSELF]
8mm
2.5mm
10mm radius
corners
Remove Steel Top
by unscrewing the
3 dome nuts.
Then fix custom
top instead using
double sided tape
SURFACE MOUNT THRU-VIEWS
Custom Top option - Collar still sits on countertop but steel top has been EXCHANGED for an
alternative one ↓ Please note that any custom top CANNOT be thicker than 12mm.
Using Top and Collar as supplied ↑

- STAGE 1 (Preparing the S-Box™)
Remove and discard the existing Steel top - by unscrewing its 3 dome nuts.
>
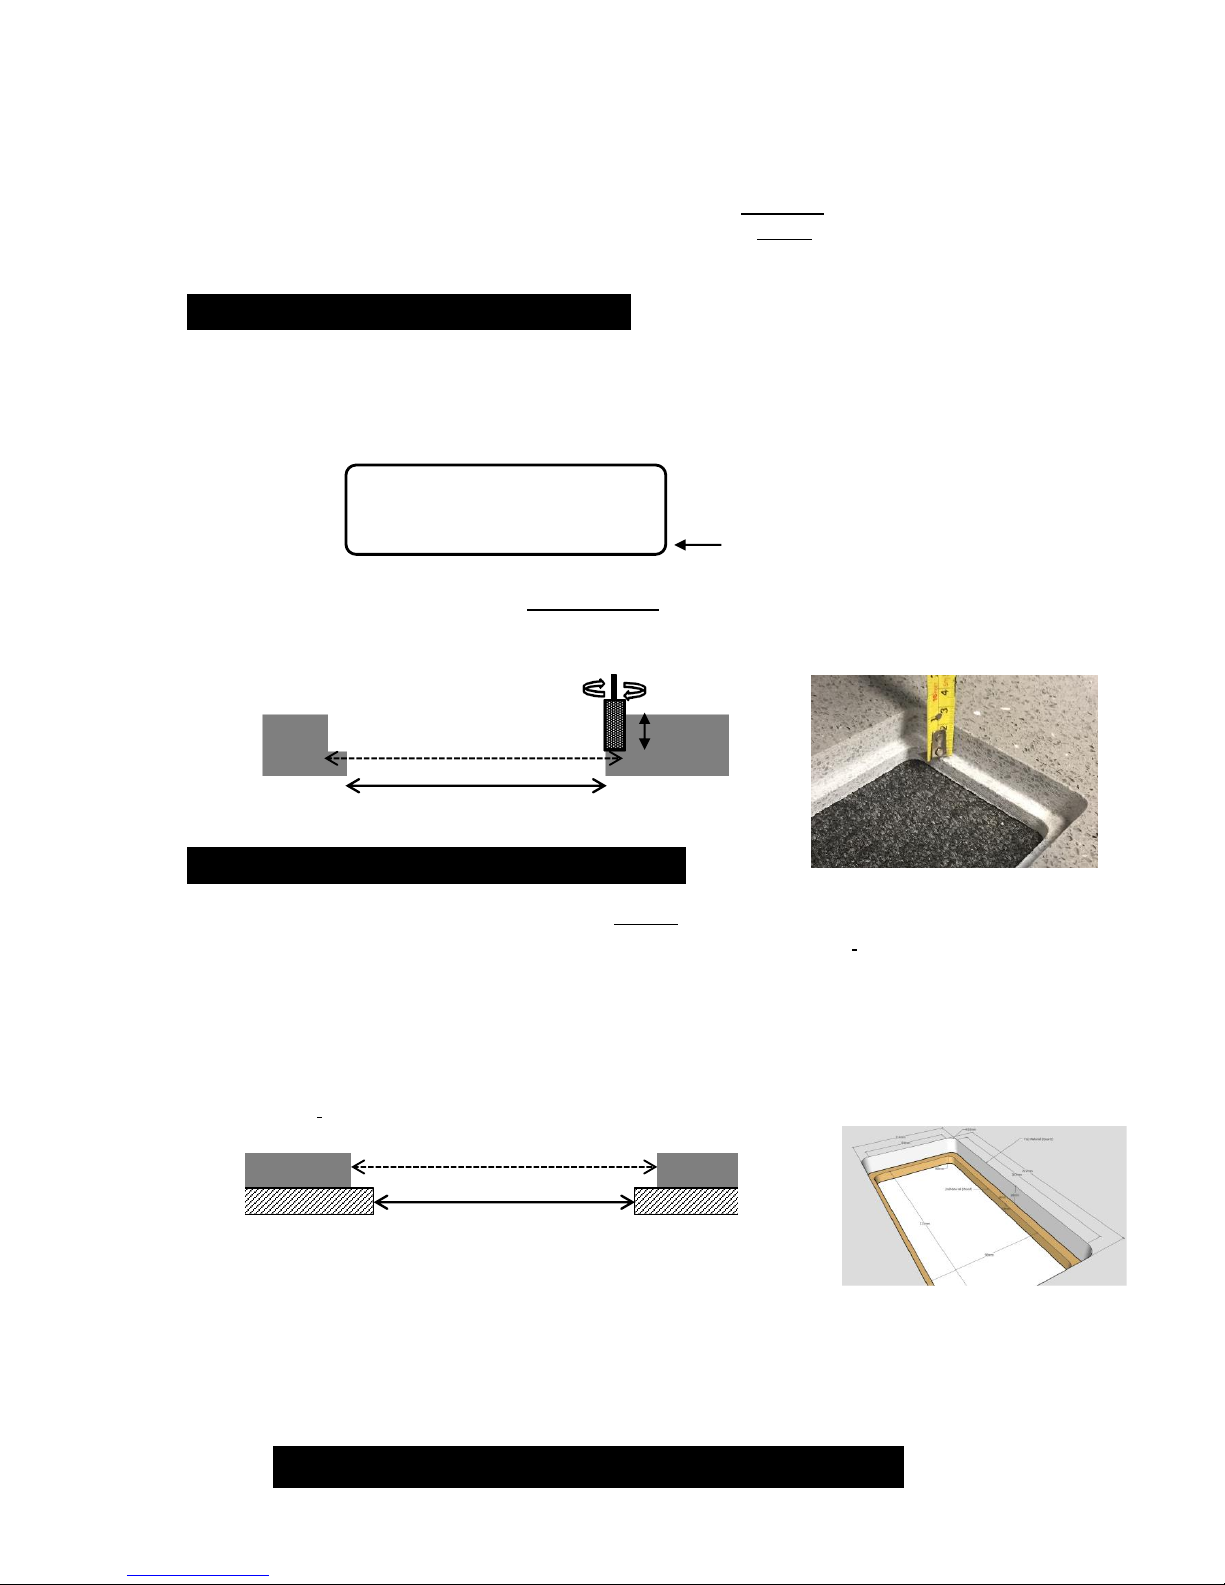
Loosen the 6 Collar screws and press it down - so that it is level with the pattress metal. (See below).
P.S. The pattress is the flat skirt plate shown below.
This re-creates the clearance required below the later new top - so that when it is pressed down it will
engage and disengage the catch mechanism inside the unit. Re-tighten the collar screws (with the
new top temporarily ↓ in position) so that the required 20mm total is achieved (as below)
<< 4-5 mm clearance
for ‘press down’ action
Note:
MAX THICKNESS OF ANY
CUSTOM TOP IS 12mm
20mm
‘INSET’ (REBATED)
*PLEASE NOTE*
THESE STAGE 1 INSTRUCTIONS ARE TO ENABLE THE
CONVERSION OF A UNIT THAT HAS A STEEL TOP AND
COLLAR ALREADY FITTED WHEN IT WAS DELIVERED.
IF YOU HAVE A UNIT THAT IS ALREADY PREPARED FOR A
CUSTOM TOP (i.e. S-BOX CHAMELEON) YOU MAY SKIP
TO STAGE 2.
YOUR “ADAPTED” UNIT WILL LOOK
LIKE THIS ↓
A PRE-PREPARED “CHAMELEON”
MODEL LOOKS LIKE THIS →
Both can be inserted into the 20mm rebate
and both are ready to receive the custom top
STAGE 2 (Preparing the rebate)
There are two ways of installing the S-Box below the work-surface. Both involve the creation of a rebate
at -20mm datum. The method you chose depends entirely on the thickness of the worktop material:
>For 30mm material and above (e.g. Granite) - the rebate is made within the material itself.
>For 20mm material (e.g. Quartz) - the rebate is “created” using a second material below it (e.g. MDF)
‘TRUE’ REBATE in 30+ mm material:
Firstly cut the standard primary hole for insertion of the box itself (= DIMENSIONS A x B)
A 98mm X B 211mm (2-port) A-115mm x B-295mm (3-port) A-115mm x B- 425mm (storage units)
(We suggest an 8mm radius setting for this primary cut)
Then create a further 8mm wide rebate at 20mm depth from the top of the work-surface, on which to
mount the S-Box, and its collar, in its new position. The radius of the collar’s corners is 8mm, so we
suggest that you use a maximum 10mm radius for the rebate-routing process.
‘FALSE’ REBATE BELOW 20mm material:
This is where the rebate is being “created” using a second material below. The upper hole now
becomes the Master cut in the worktop material. So 16mm needs to be added to both the
A and B dims above to allow the collar to pass through to sit on the second material below.
Cut-outs for the UPPER MATERIAL for this method are:
POWER BOXES > 114mm x 227mm (2-port) or 131mm x 311mm (3-port)
STORAGE BOXES > 131mm x 441mm
It is the LOWER material that requires the Standard Dimensions A x B for the collar to sit on ↓
After either of the above methods has been completed,
the new top can now be created.
This should be carefully made to “marry” neatly with the larger rebated hole dimension.
Top requires correct radius (slightly less than the hole) and a gap of 1-1.5mm all way round to ensure
clearance. As a guide: TOP DIMENSIONS = 111mm x 224mm (2-port)
= 128mm x 308mm (3-port)
= 128mm x 438mm (STORAGE BOXES)
A B A x B
REMINDER! – MAX THICKNESS OF ANY CUSTOM TOP IS 12mm
(A+16mm) x (B+16mm)
A/B
= (A+16mm) x (B+16mm)
8mm radius
corners
20

STAGE 3 (Re-weighting the counterbalance)
The new top will be heavier than the standard stainless steel one it is replacing, so the internal
counterweight box will firstly require some of the weights (provided) adding to it, to re-instate the
correct “lift”.
To do this, place the new top temporarily where the SS one used to be: ↓
Then open the front plate as shown below: ↓
Info:
These fixings are
T20 star screws >
You can now add the required amount of extra weight into the recess, until you are happy
with its pace of lift (when the new top is added more permanently later)
> >
Take the New Top off and introduce the S-Box unit into its rebated hole.
NB. In “CHAMELEON” Models this
tape is already be fitted for you →
Apply good quality double-sided
tape (e.g. 3M) to the plate ↗

Peel back the tape and place the custom top into position.
Using Tape allows you to have a few goes at getting the perfect position for the top before pressing it
firmly home and letting the tape adhesive to bond and cure.
Any final “fine-tuning” of levels, if still required, can be achieved by adjusting the male ball’s position
so that in the closed (catch-engaged) position, your new top and adjacent surface are perfect. By
twisting the threaded ball part, and holding the top nut, the position of the ball can be raised or
lowered by the tiniest of amounts.
You can now fix the front back on - and ENJOY YOUR CUSTOMISED POP-UP SOLUTION!
Please Note:
All electrical connections for the Power Box unit must be carried out by a fully Qualified Electrician.
STAGE 4 (Adding the new top)
OPTION 3
OPTION 4
OPTION 5
Original position of
steel top.
If still present, it
MUST be removed
before any custom
top is fitted.

3-PORT DIMENSIONS
2-PORT DIMENSIONS
STORAGE BOX DIMENSIONS (Knife, Spice etc)

WARRANTY AND OTHER INFORMATION
AFTER 6 -12 MONTHS USE (PARTICULARLY IN VERY WARM or CENTRALLY HEATED
ENVIRONMENT) THE INTERNAL RUNNERS MAY REQUIRE A TINY AMOUNT OF RE-LUBRICATION
TO MAINTAIN THE UNIT’S SMOOTH OPERATION.


S-Box™ is a registered trademark of Cardinal IP Limited
The S-Box™ product innovation is protected by Patents - registered to Cardinal IP Limited
Cardinal Innovations Limited
Battye Street, Bradford
West Yorkshire, ENGLAND BD4 8AG
Tel: +44 (0)1274 386820 Email: sales@the-sbox.com
Web: www.the-sbox.com
WE RECOMMEND THAT ALL ‘CUT-OUT’ PROCESSES
AND/OR ANY ‘CUSTOM TOP’ FABRICATION SHOULD
BE DONE BY YOUR SPECIALIST WORKTOP PROVIDER
 Loading...