

Page 1
Leading Image Processing Technology
We've been there when you needed
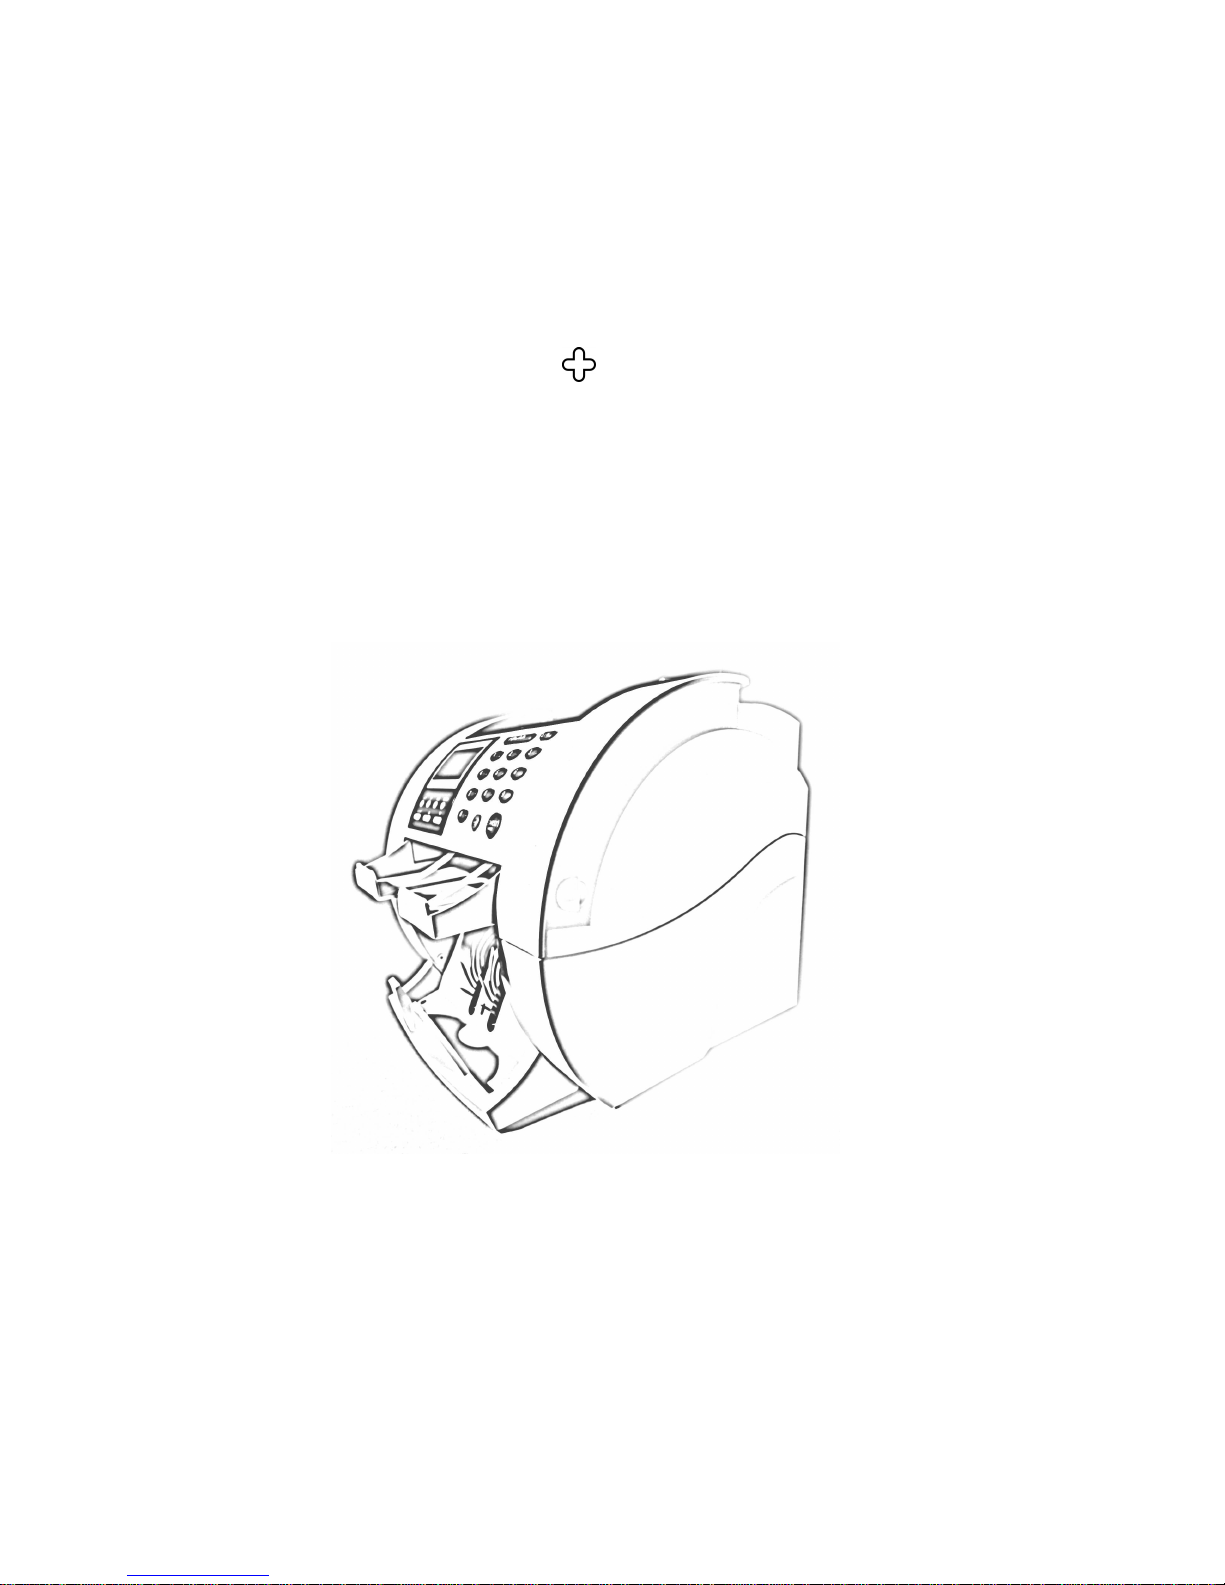
SB1000 / SB-1100
Currency Discrimination Counter
SBM Co., Ltd.
6F, Hyunwoo Bldg., 206, Anyang7-Dong, Manan-Gu, Anyang-City, Gyeonggi-Do, Korea 430-817
Page 2

1
Important Safety Information
Always be careful when using the machine. To reduce the risk of fire, electrical shock, and other
injuries, keep these safety considerations in mind when installing, using, and maintaining your
machine:
Stability. Place the machine on a secure, stable surface. The machine can be seriously
damaged if it falls.
Power Supply. Provide correct power to the machine, as listed on the back of the machine. If
you are not sure of the type of power that is supplied to your office, call your electric company.
Grounding. If the plug has three prongs, it must be plugged into a grounded (three hole) outlet.
Grounded plugs and outlets are designed for your safety - do not try to make a three-prong plug
fit into a two-prong outlet by modifying the plug or outlet in any way. If you cannot insert the plug
into your wall outlet easily, then a qualified electrician should inspect the outlet.
Overload. Do not plug too many electrical devices into a wall outlet or an extension cord. An
overloaded outlet could be a reason of a fire and electrical shock hazard.
Cleaning. Before cleaning the machine, unplug it from the power outlet. Clean exposed parts
with a soft cloth slightly dampened with water. Do not use aerosol cleaners.
Gas Leaks. Never use any machine close to a gas leak. If you think gas is leaking, call the gas
company immediately. A small electrical spark in the machine could cause a fire or explosion.
Precaution
When using the machine, these precautions should always be followed.
1. Never push objects of any kind into your machine through the case or cabinet openings.
2. Do not use your machine near water, in wet locations, or outdoors.
3. Do not allow anything to rest on the power cord, line cord, or PC interface cable.
Do not locate your machine where the cords can be damaged by persons walking on
them.
4. Do not allow pets to chew on the power cord or PC interface cable.
5. Use supplies or cleaning materials only as directed. Keep all supplies and materials out
of the way of children.
6. The power supply turns this machine on and off. Make sure that your machine is
installed near an outlet and is easily accessible.
7. Never remove covers or guards that require a tool for removal. There are no operator
serviceable areas inside your machine. Refer servicing to authorized service personnel.
8. Never defeats interlock switches. This machine is designed to restrict operator access
to unsafe areas. Covers, guards and interlock switches are provided to ensure that the
machine will not operate with covers opened.
Page 3

2
9. Avoid direct viewing of the image sensor lights. The lamps are bright and, while not
harmful, they may cause an annoying afterimage. Always keep the rear cover closed
during operation and storage.
10. Risk of explosion if battery is replaced by an incorrect type. Dispose of used batteries
according to the instruction.
FCC Compliance Statement
Safety Notes
Your machine and the supplies are designed and tested to meet strict safety requirements.
Included are safety agency examination and approval and compliance to established
environmental standards.
Please read the following instructions carefully before operating your machine, and refer to
them as needed to ensure the continued safe operation of your machine.
Battery is used for PBA IMAGE in this machine.
If wrong date and time are displayed on LCD after correct setting, it is necessary to change the
battery of PBA IMAGE.
Please read the following instructions carefully before changing the battery.
Warning
Hazardous moving parts!
Keep fingers and other body parts away
CAUTION
Risk of explosion if battery is replaced by an incorrect type.
Dispose of used batteries according to the instructions.
THIS DEVICE COMPLIES WITH PART 15 OF FCC RULES. OPERATION IS SUBJECT
TO THE FOLLOWING CONDITIONS:
1. THIS DEVICE MAY NOT CAUSE HARMFUL INTERFERENCE, AND
2. THIS DEVICE MUST ACCEPT ANY INTERFERENCE RECEIVED, INCLUDING
INTERFERENCE THAT MAY CAUSE UNDESIRED OPERATION.
Page 4

3
Table of Contents
Chapter 1 Installation 4
Chapter 2 Description of the Parts 6
Chapter 3 Overview of Control Panel 7
Chapter 4 Overview of Display (LCD) 8
Chapter 5 Getting Started 9
Placing Bills into the Hopper 9
Counting 9
Chapter 6 Basic Operation 11
Selecting Count Mode 11
Selecting Counterfeit (CF) Function 14
Selecting Add Function 15
Selecting Batch Function 15
Changing Display Contents 16
Grand Total 18
Selecting Currency 19
Chapter 7 Set Function and its Parameters 20
Function Main Menu 19
Set Speed of the Machine 21
Set Contrast of Banknotes 22
Set Auto Start Mode & Mode Lock Function 22
Set Beep Function 23
Set Pocket Capacity 23
Setup Interface and Print results 24
Set Banknote Criteria 25
Set Parameters 25
Settings 26
Currency Mode Change 27
Chapter 8 Troubleshooting 28
LCD Error Messages 28
Fixing Problems 28
Chapter 9 Daily Maintenance 29
Cleaning the Banknote Scanner 30
Chapter 10 Specification 31
Page 5
4
Installation
Unpacking List
1. SB1000 / SB-1100 1 Unit
2. AC Power Code 1 pc.
3. SB1000 / SB-1100 User's Guide 1 pc.
4. Cleaning Brush 1 pc.
5. Glass Cleaning Cloth 1 pc.
6. Serial Cable (used in connecting a PC) (option) 1 pc.
7. Printer Cable (used in connecting a printer) (option) 1 pc.
Choosing a Location
To help guarantee trouble-free operation of your machine, place it on a flat, stable surface near
your workstation.
Do not place your machine:
In direct sunlight.
Near heat sources or air conditioners.
In dusty or dirty environments.
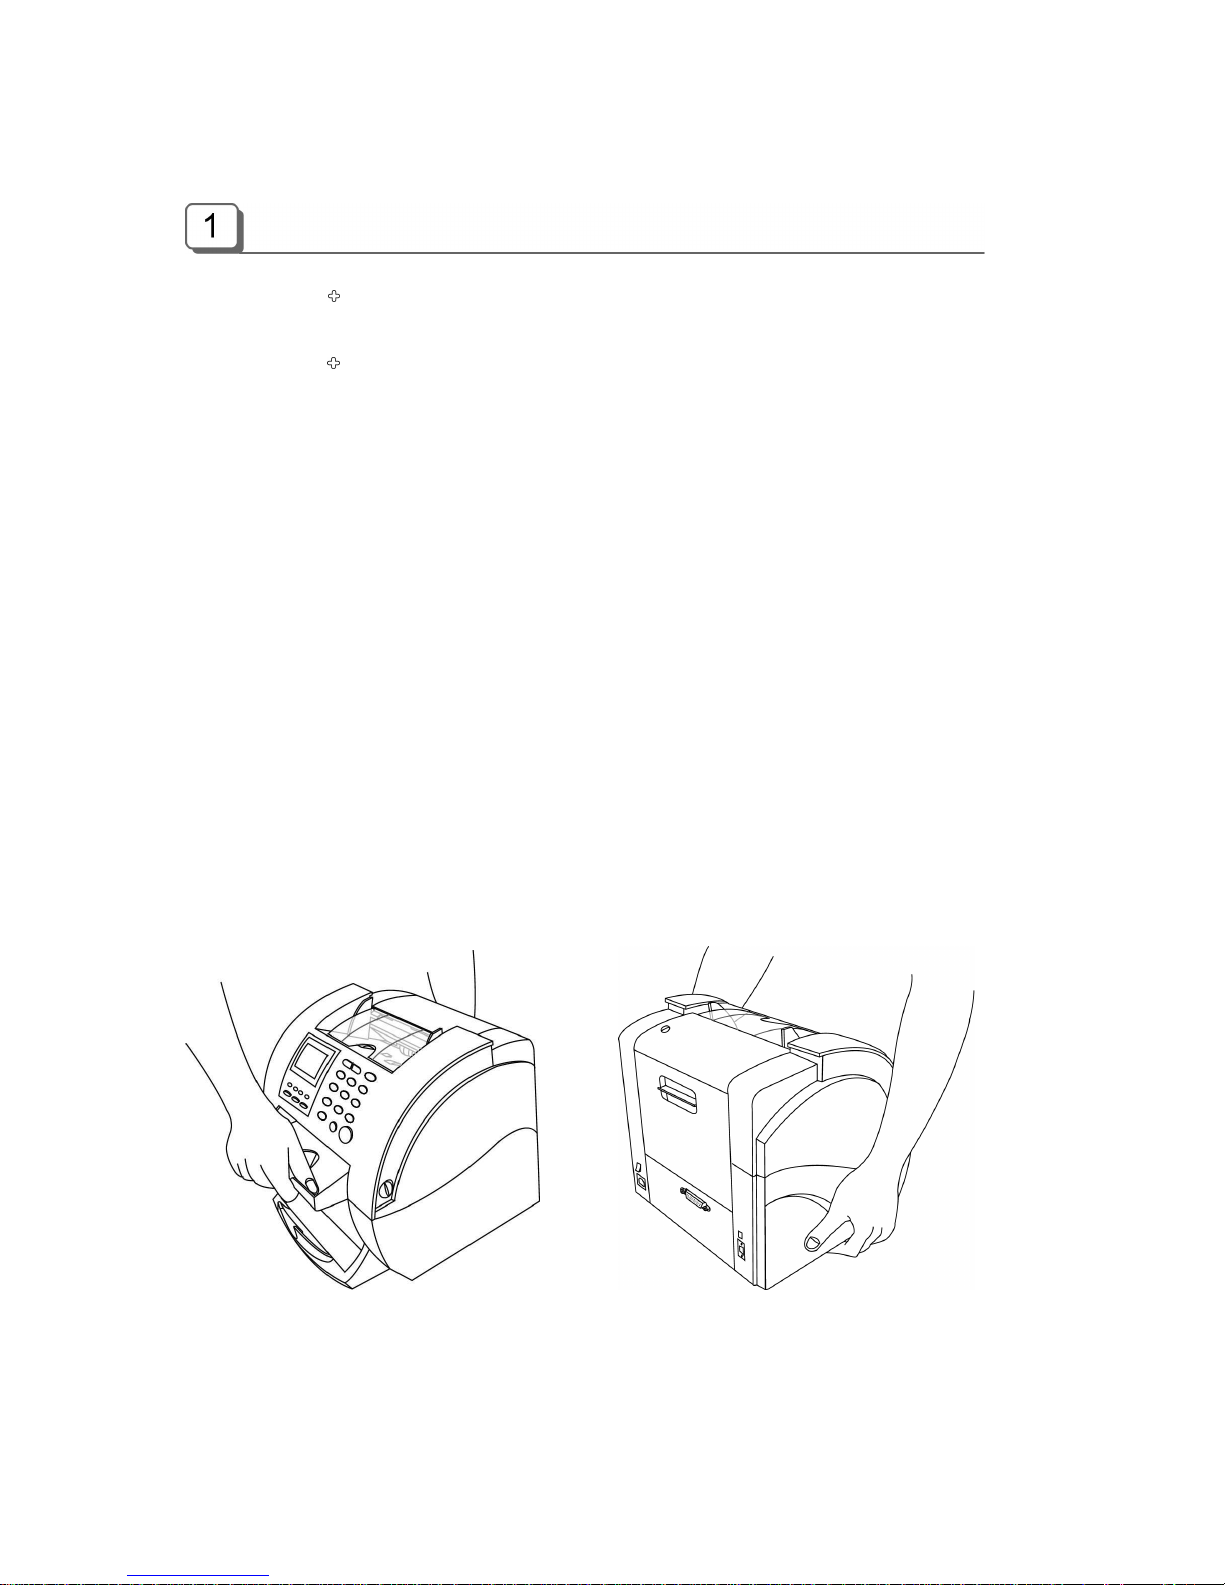
Handling the Machine
When handling or moving the machine, do not lift with grasping the Reject Pocket. The picture
shows how to lift the machine correctly.
(X) (X)
Page 6
5
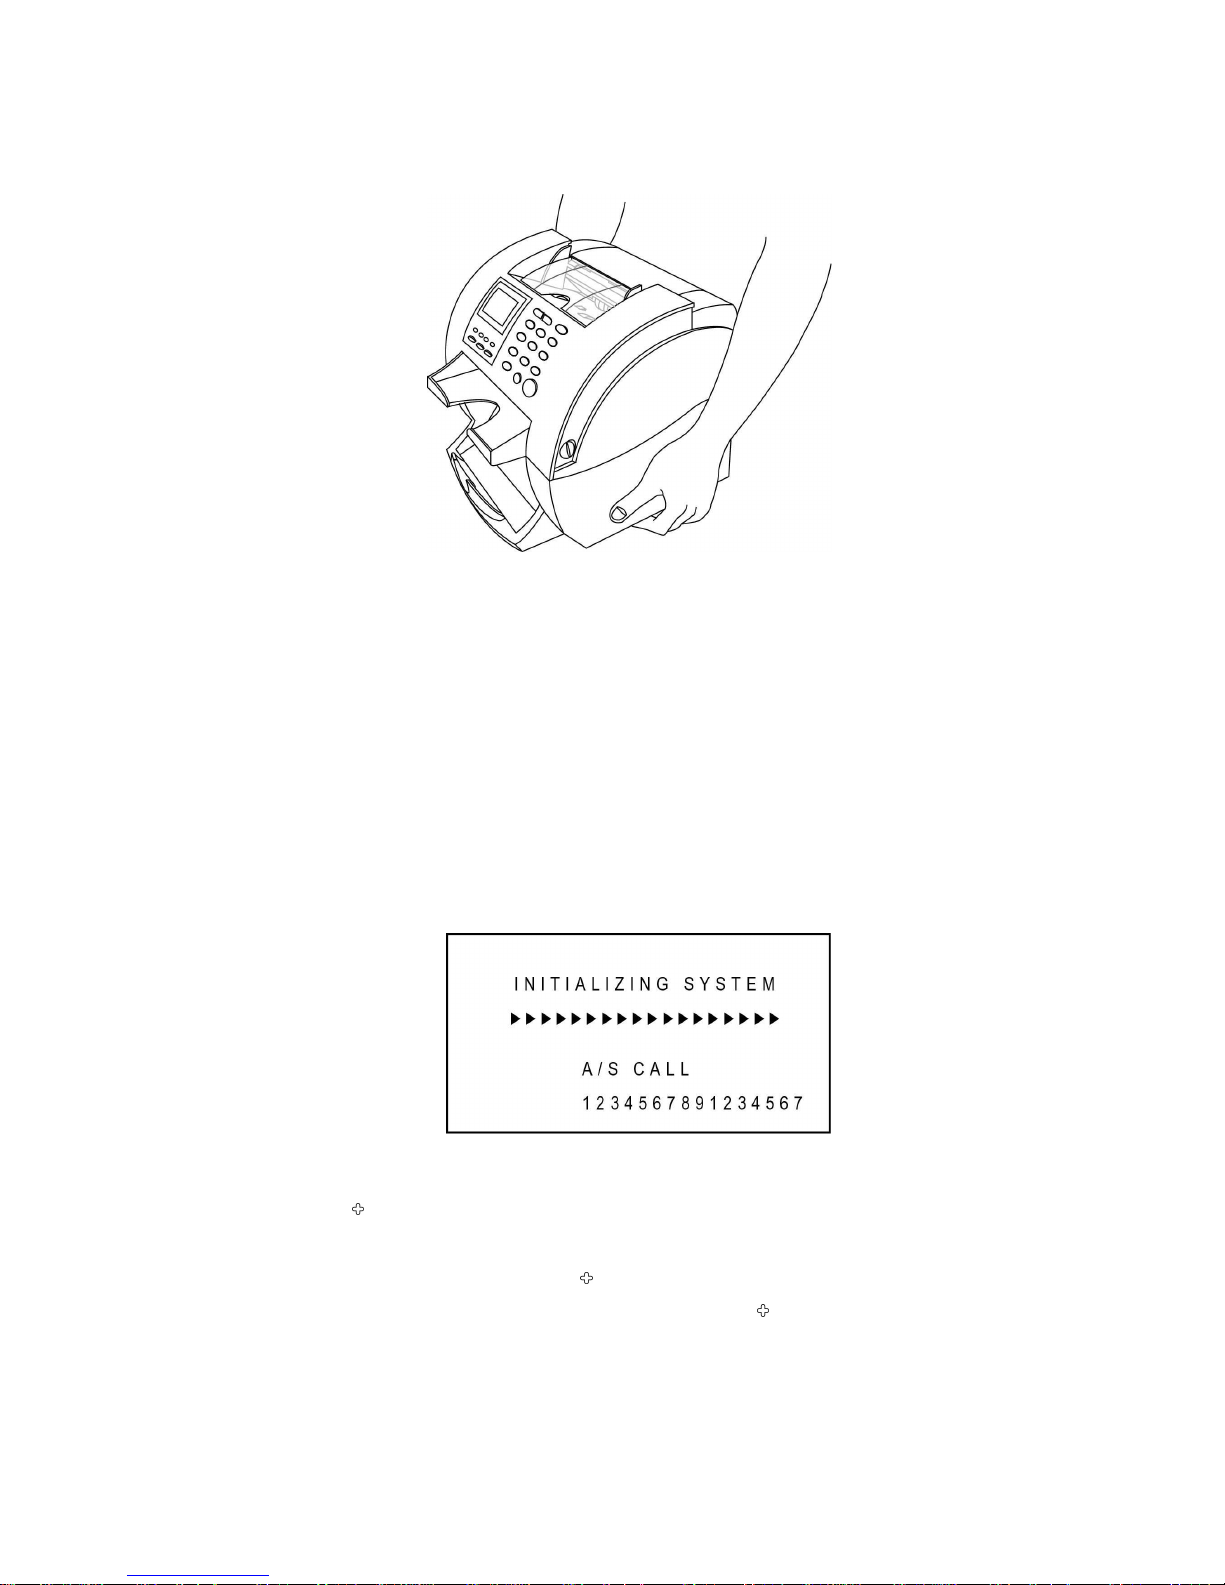
(O)
Correct way to lift the machine
Setting Up Your Machine
Power Cord
Plug one end of the cord into the back of the machine and the other end into a standard AC
power outlet.
If you turn on the power switch, the machine will display initializing process. If there is Service
Call number saved by a service provider, the Call number will be displayed as below:
Printer
Your SB1000 /SB-1100 has a serial interface port, which allows you to connect the printer to
print out counting result. To connect the printer to the machine, follow the steps below:
1. Make sure that both the SB1000 /SB-1100 and the printer are turned off.
2. Plug the cable of printer into the serial port of SB1000 /SB-1100.
3. Set parameters referring to the “Ch 7. Set Function and its Parameters -> Interface”.
Page 7
6
Description of the Parts
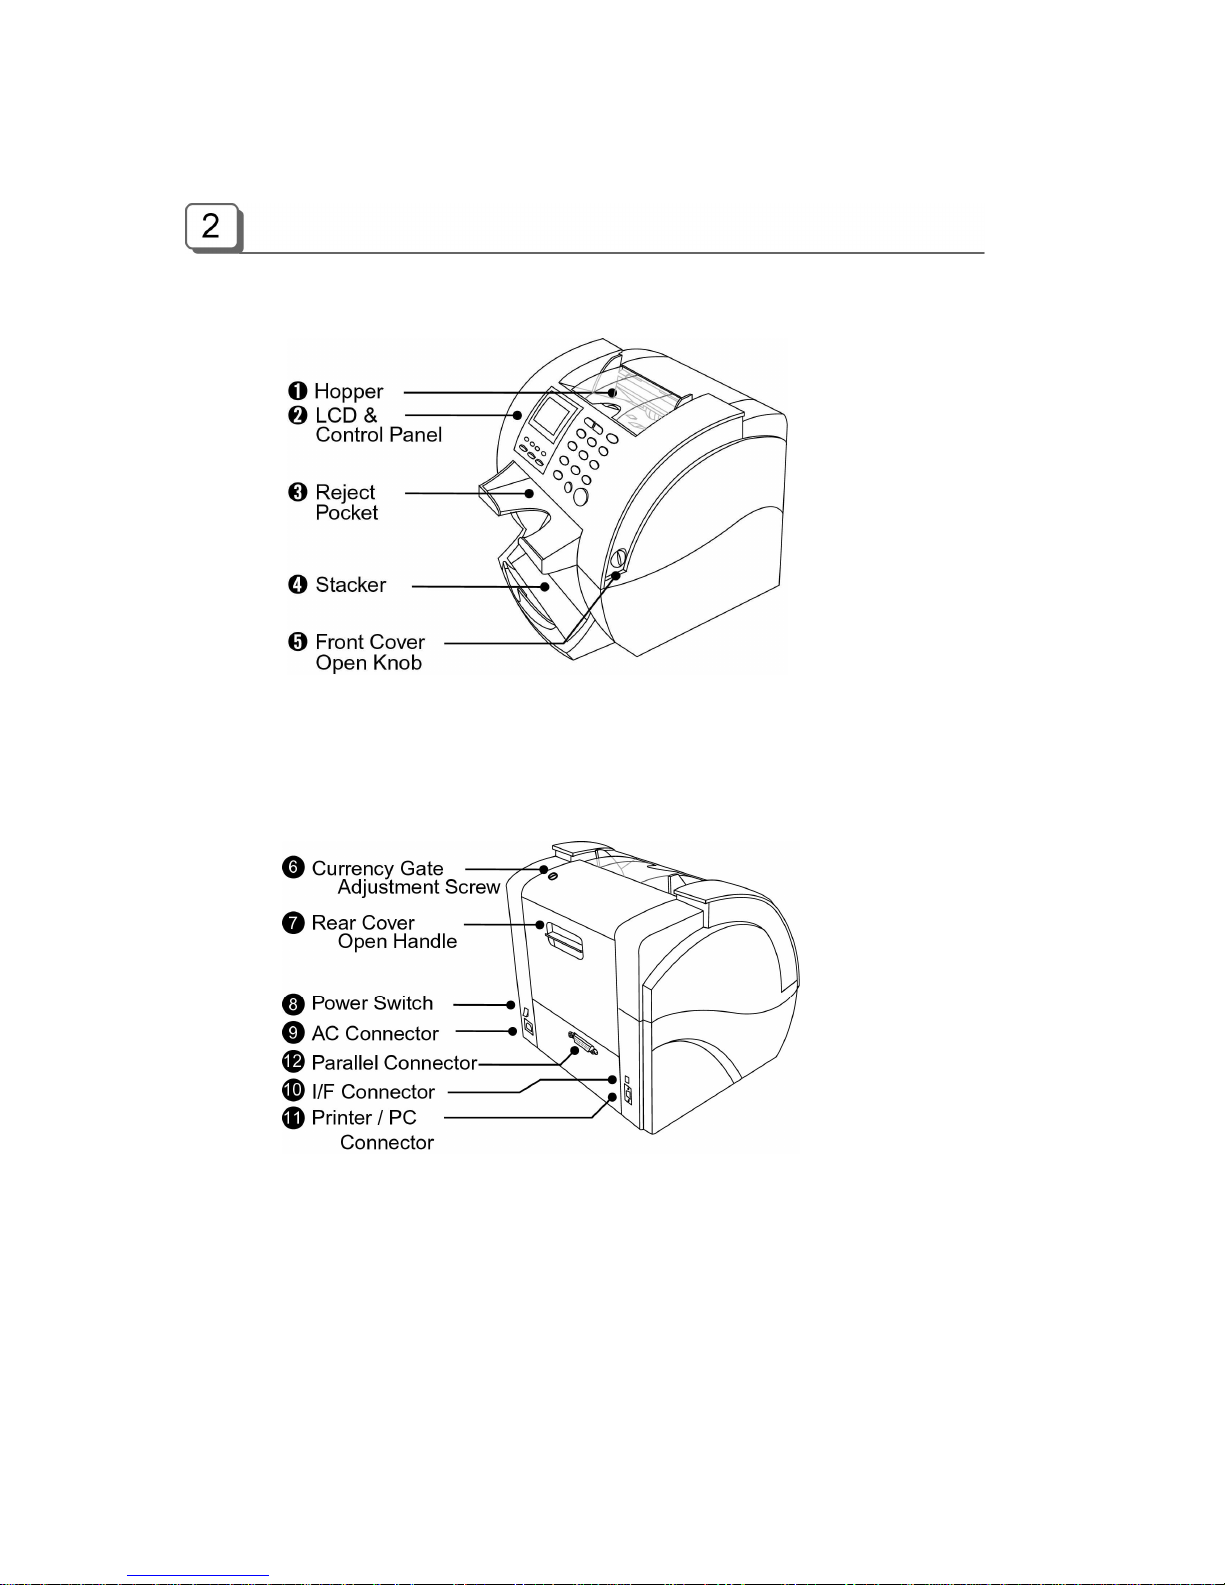
Front View
Rear View
Remark: The Parallel Connector is an optional item.
Page 8
7
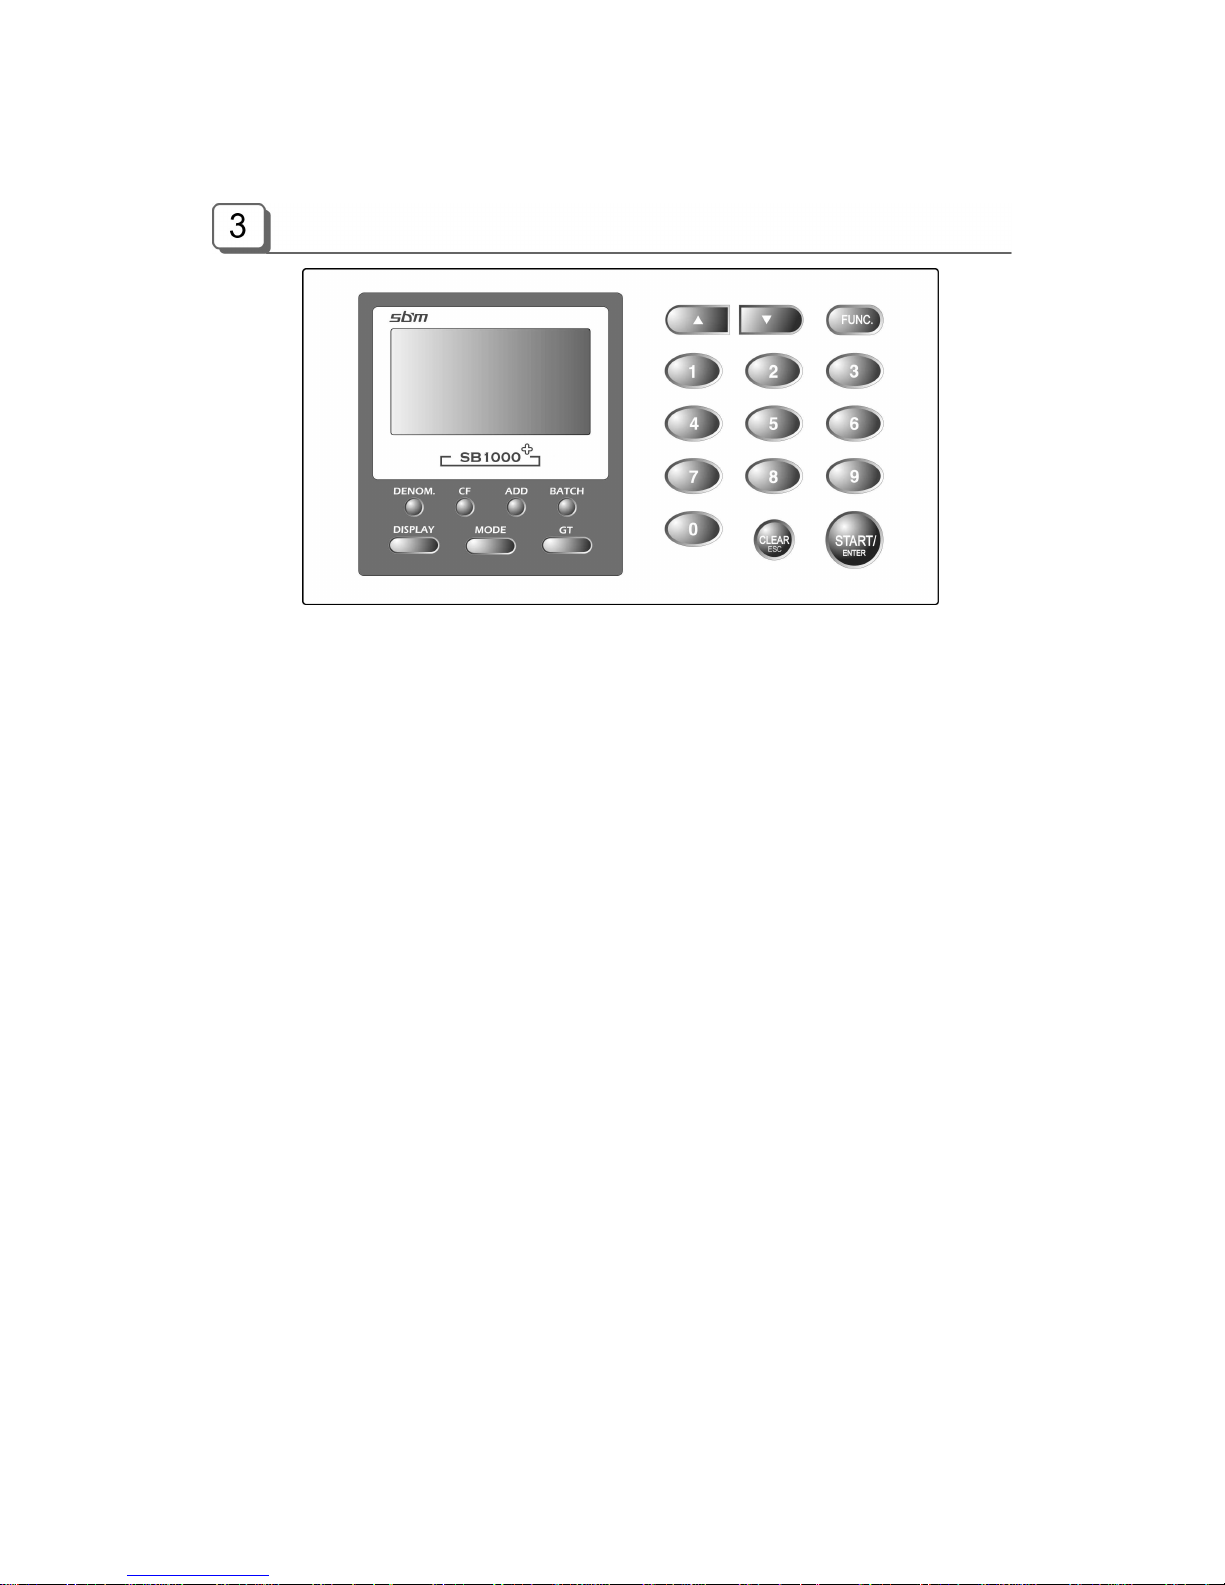
Overview of Control Panel
DENOM. Select a denomination in Single Mode
CF Set Counterfeit Detection Mode (CF ON CF OFF)
ADD Add function On/Off
BATCH Batch function On/Off in Count, Mixed and Orientation modes
Denom. Batch Set On/Off in Single, Sort and Face-All modes
DISPLAY 1) Change Display Mode
Amount & Piece (Large View) Amount (Detail View) Piece (Large
View) Piece (Detail View) Reject Reason
2) HYPHEN key (in some input mode)
MODE 1) Change Mode
Mixed Single Sort Facing Orientation Count
*Option
Serial no. Printing (SRL) / P-OCR/B-CODE and B-MIXED
2) LEFT key (in some input mode)
GT 1) Grand Total Display
2) RIGHT key (in some input mode)
▲ Up
▼ Down
FUNCTION Change Values of various Parameters
START/ENTER Counting Start / ENTER key, PRINT key (if pressed long), Stop key
CLEAR/ESC Clear Errors / Escape from Function Menu / Cancel Input
Page 9
8
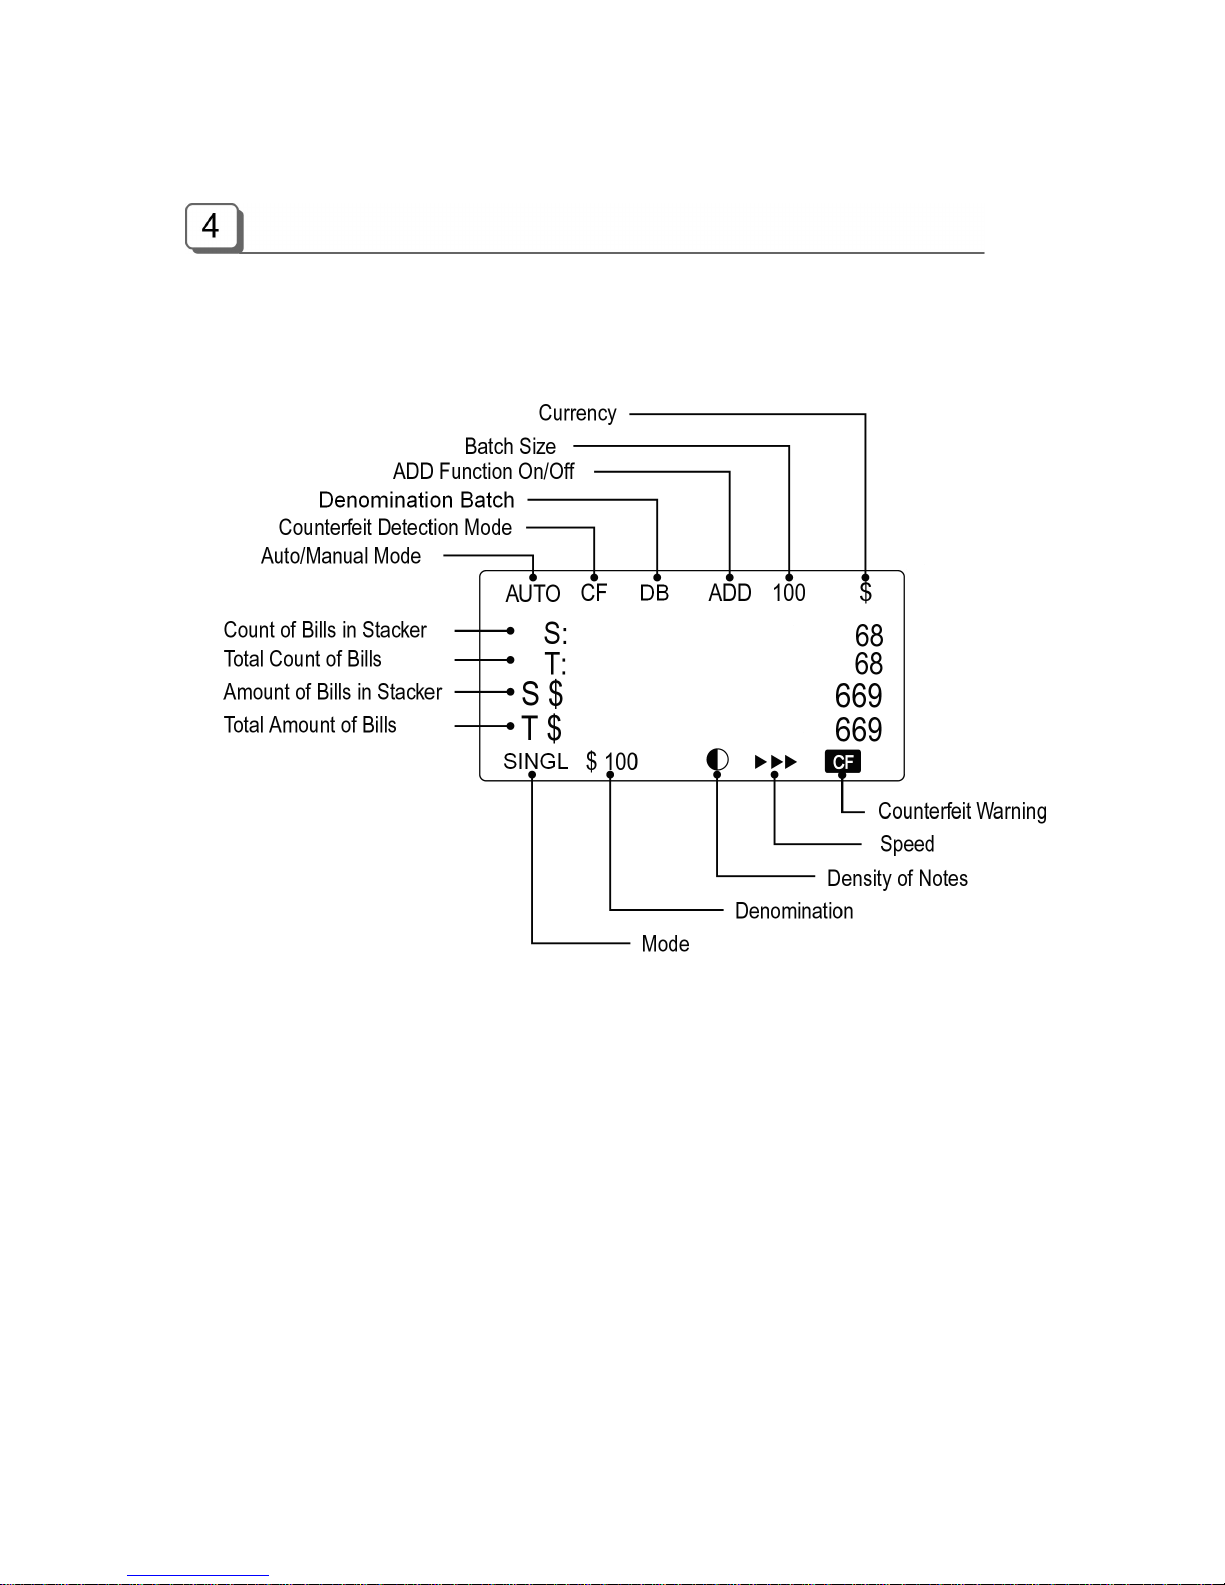
Overview of Display (LCD)
Page 10
9
Getting Started … (Simple Counting)
Placing Bills into the Hopper
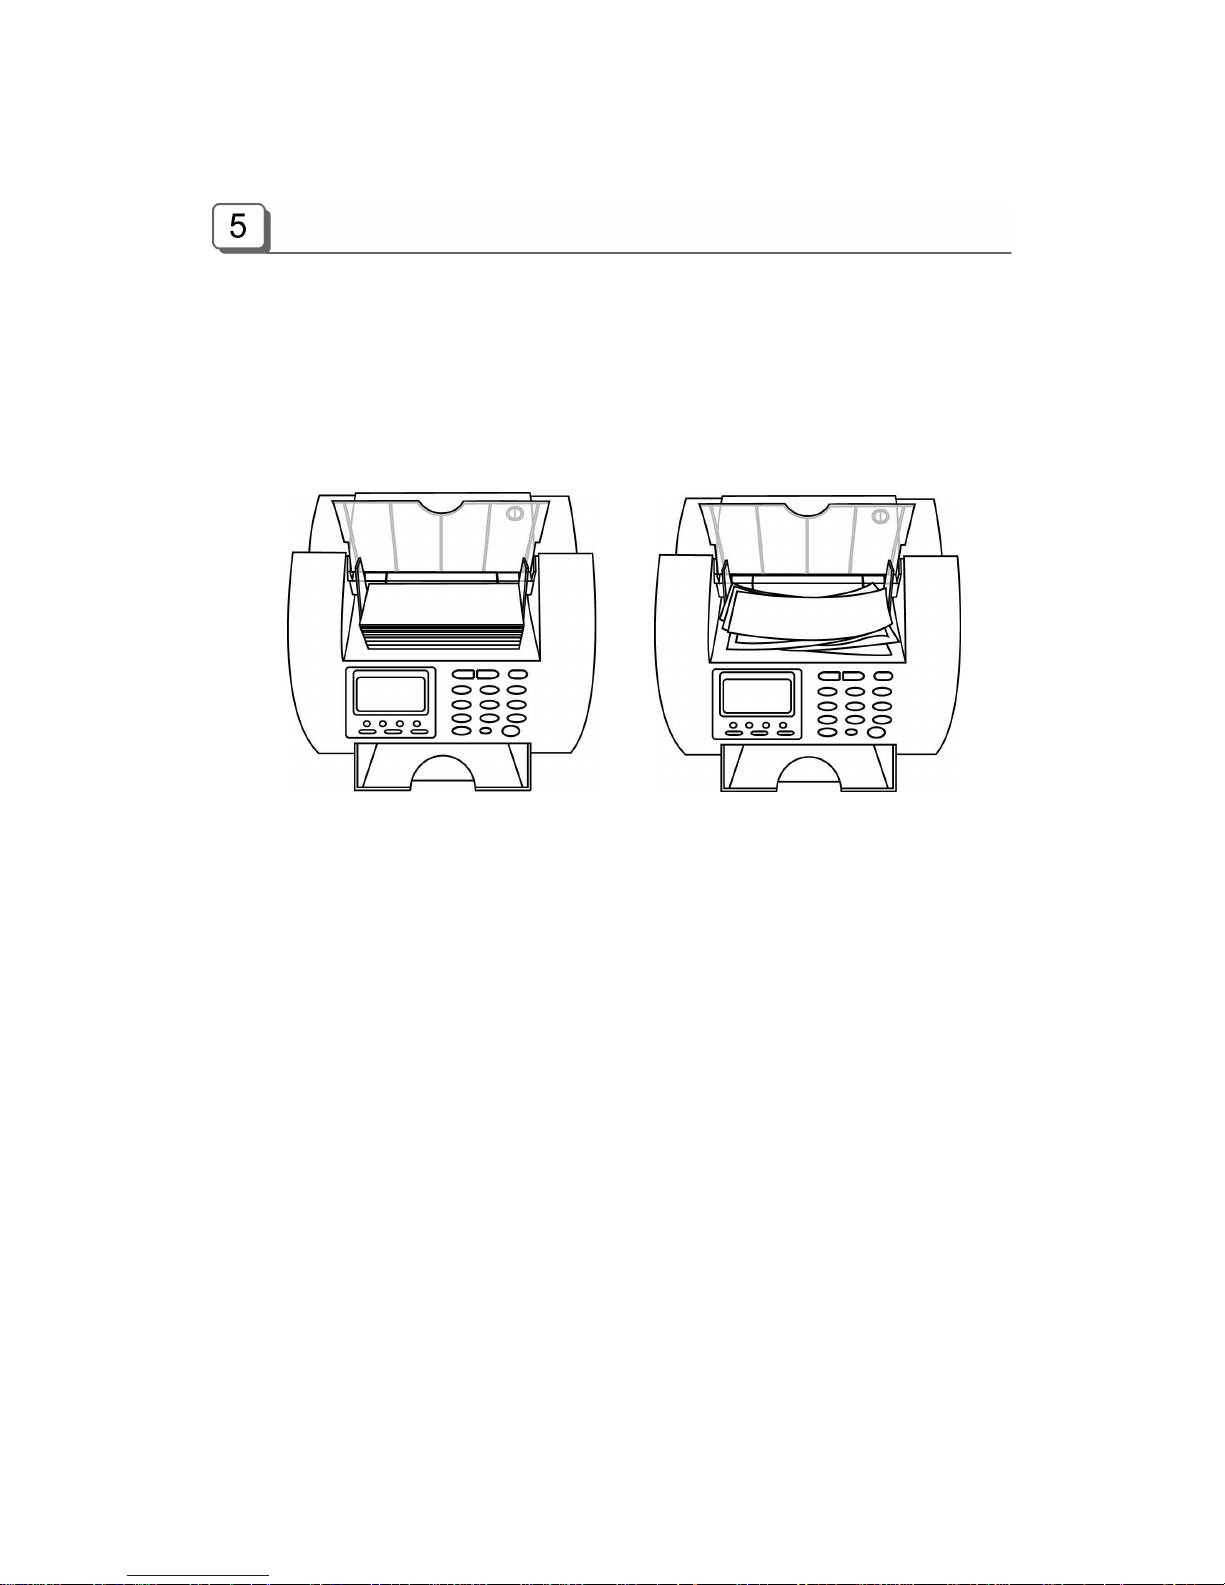
It is very important to place the bills into the hopper correctly because recognition performance of
the bills is highly affected by the arrangement of the bills. And the number of the rejected bills can
be increased when they are not arranged and placed. Refer to the pictures for the correct
placement of the bills.
Good Bad
Please avoid counting bills like wet, excessively dirty, spoiled, folded, curled notes and with foreign
material like clips, bands, etc. Sometimes it causes malfunction of the machine.
Counting
In AUTO mode, the machine starts to count the bill automatically as it detects the existence of the
bill in the hopper. In MANUAL mode, the machine will start to count the bill only if the bills are
placed into the hopper and START key is pressed. While counting, the machine will display the
number of the bills on LCD display and it stops working when it meets the conditions described as
below;
- No bills in the hopper
- Stacker is full.
- Rejecter is full.
- The number of the bills counted is the same as the batch number to be set in BATCH
mode.
- Errors have occurred.
When the machine finishes counting without errors, the number of counted bills will be displayed in
COUNT mode, and the value of the counted bills will be displayed in all modes except COUNT
mode.
Page 11

10
If ADD mode is set, the cumulative number will be displayed in COUNT mode.
If an error is occurred during operation and the machine stops, then an error message will be
displayed. To clear the error, press CLEAR key. The machine will try to solve the problem
automatically, but if it fails to clear a jam or there are some other mechanical errors, open the front
or rear cover and get rid of jammed bills and close the cover correctly. Then press the CLEAR key
again to clear error message. Especially in case of JAM3, it is recommended to open the front
cover and to check the machine before pressing CLEAR key.
Stop in operation
Press START button to stop operation while the machine is counting.
To restart, press CLEAR button.
Page 12
11
Basic Operation
Selecting Counter Mode
There are four counting modes; COUNT, MIXED, SORT and SINGLE modes. Furthermore, the
machine provides the facilities to align notes with same face or same directions, for detail refer to
the “Facing Mode” and “Orientation Mode” described below.
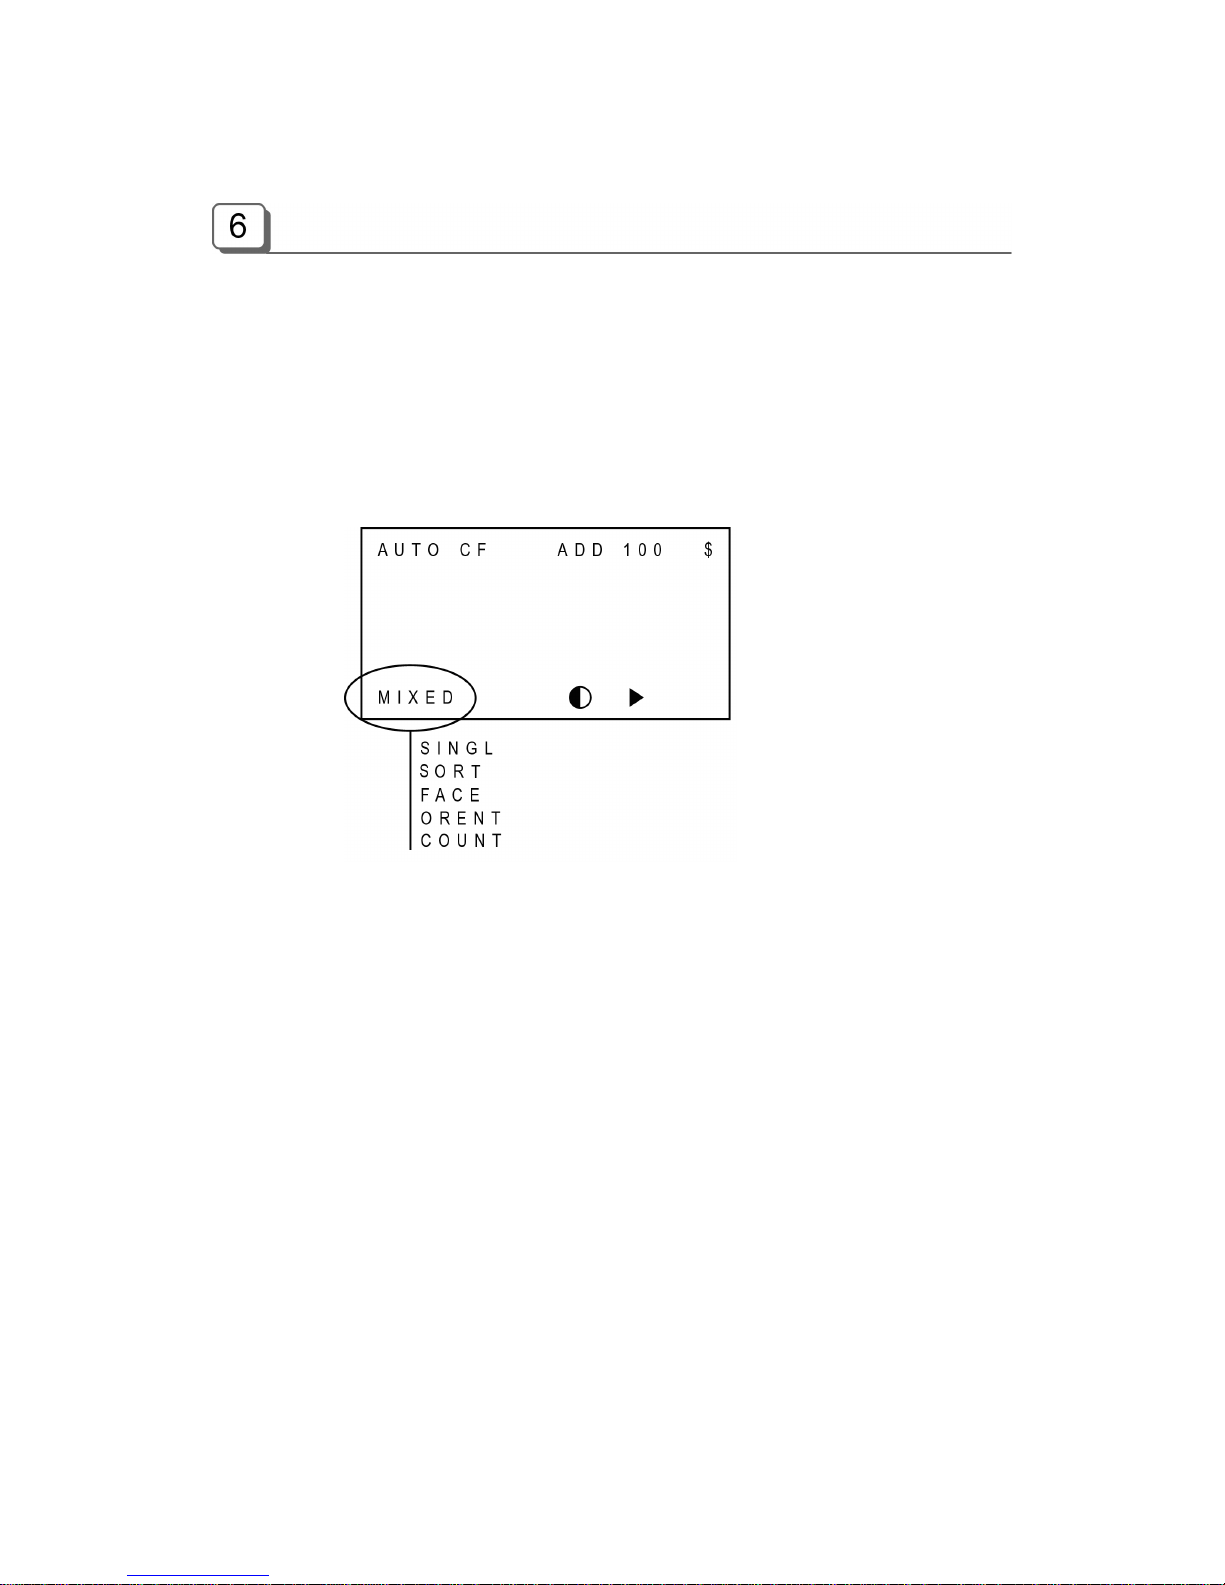
The modes are changed in sequence as shown below every time when the MODE key is pressed;
MIXED SINGL SORT FACE ORENT COUNT
■ Mixed mode (MIXED mode)
In Mixed mode, the machine counts and discriminates the denominations of the bank notes. If the
denomination of a bank note is successfully discriminated, then the note will be sent to the output
stacker. If a note fails to be detected or it is a counterfeit suspect (if CF mode is ON), the note will
be sent to the reject pocket.
To change into the MIXED mode, press MODE key until “MIXED” is displayed on LCD.
■ Single mode (SINGL mode)
In Single mode, when the machine reads a note whose denomination is same as the first
denomination of note counted or the pre-set denomination while counting and discriminating the
notes, then it sends the note to the output stacker. If the note is not the same denomination, the
machine will send the note to the Reject Pocket.
To change the mode into Single mode, press MODE key until “SINGL” is displayed on LCD.
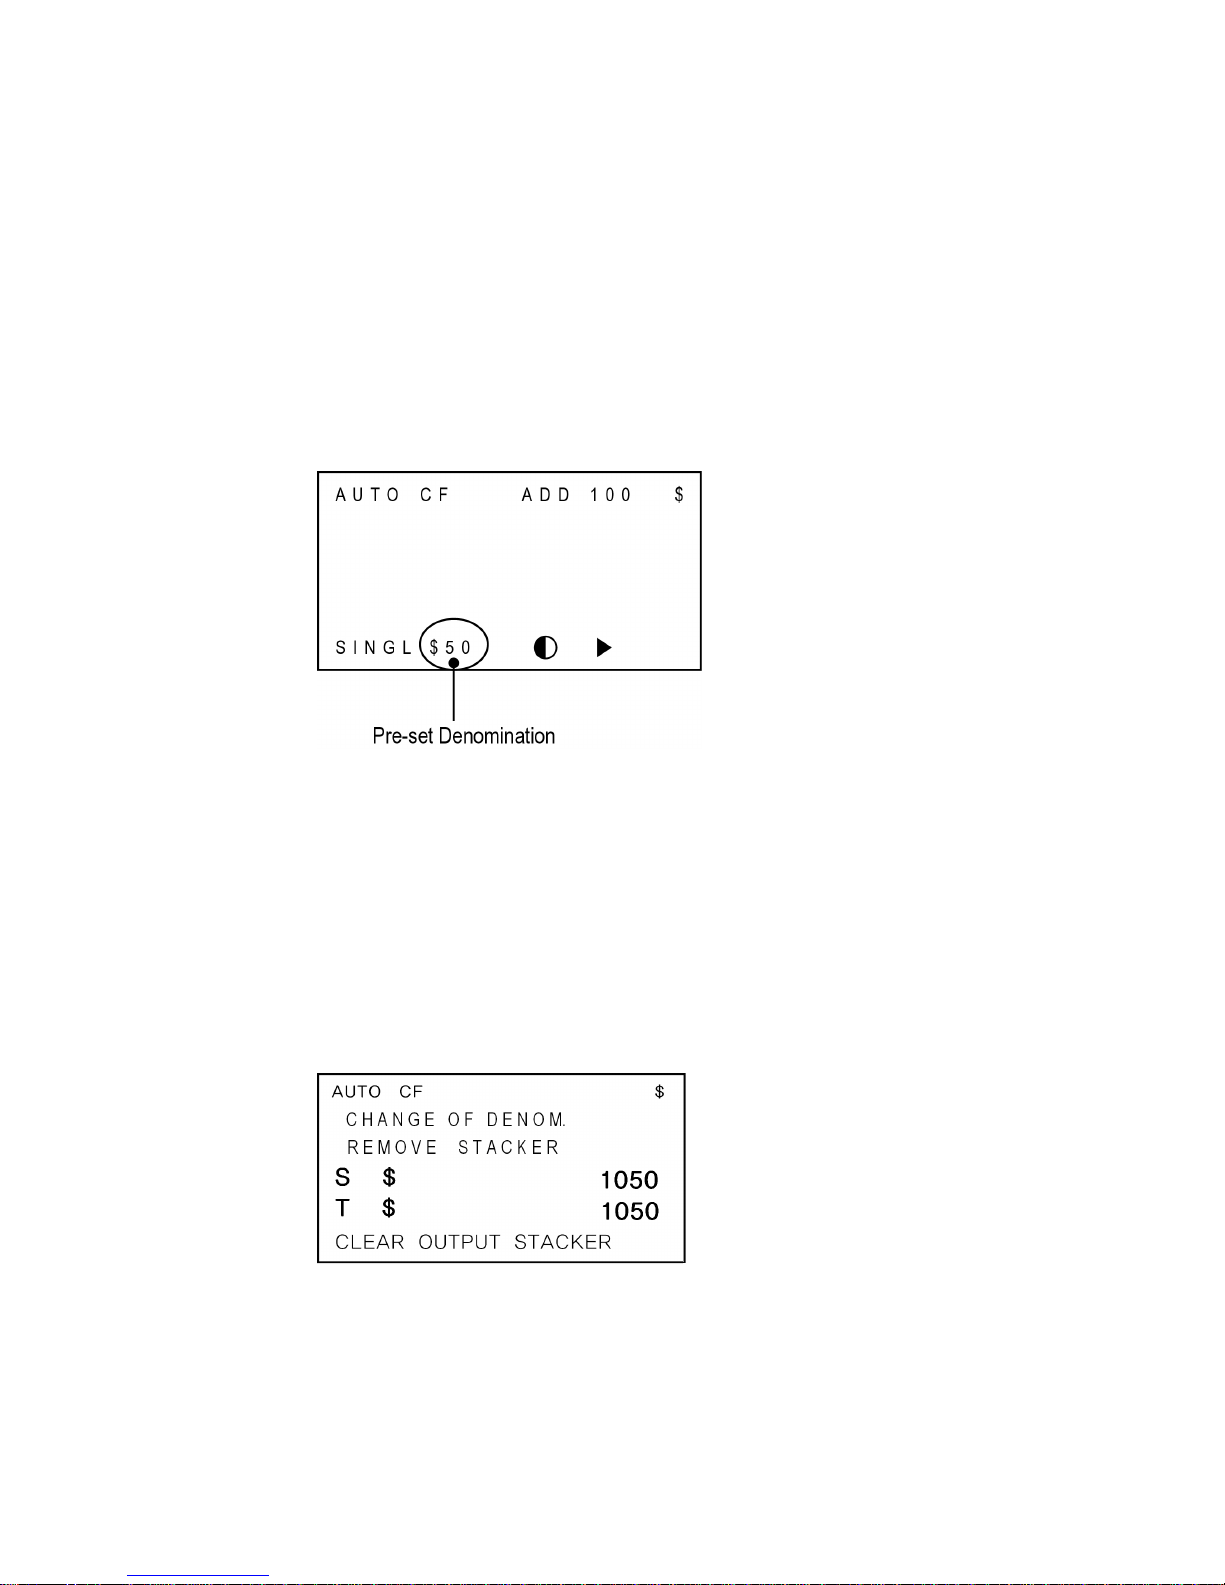
After changing the mode into SINGL, a denomination must be set by pressing DENOM key. The
denomination will be displayed in LCD like below. For example (in case of US dollar), every time
Page 13
12
DENOM key is pressed, the denomination will be changed sequentially:
$1 -> $2 -> $5 -> $10 -> $20 -> $50 -> $100 -> D.D
D.D is an abbreviation of “Detected Denomination”. If D.D is selected, the machine detects a
denomination of the first bank note and the machine counts the notes of that denomination and all
other denominations to the reject pocket. Once a denomination is selected under the condition of
D.D, it cannot be changed while the Input Hopper or the output stacker contains notes. If the output
stacker and the input Hopper are emptied, the machine will try to find a new denomination of the
first note in next trial and sorts the notes with the new denomination.
■ Sorting mode (SORT mode)
In SORT mode, the machine allows you to count and sort stacks of mixed denomination notes into
straps and verify deposits. Each time machine begins processing of a new stack of notes, it
automatically starts counting denomination of the first note fed from the hopper. When a note of a
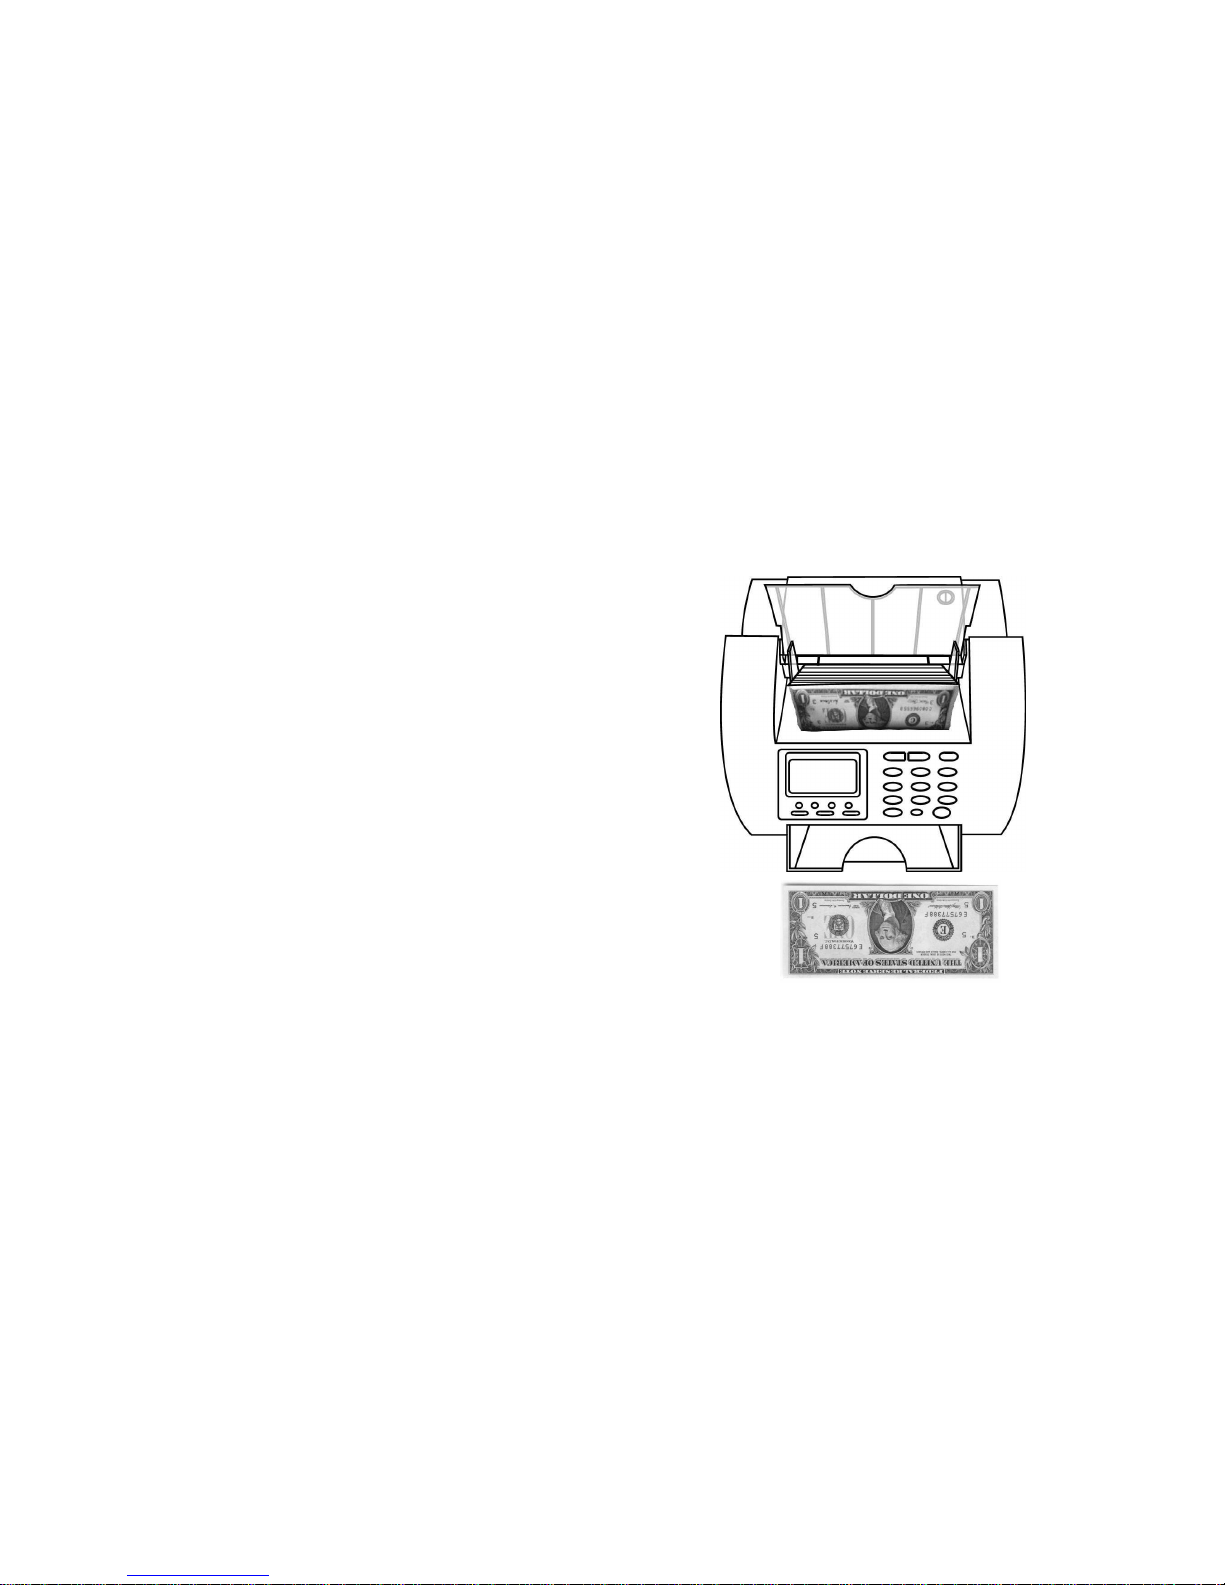
different denomination from the first denomination is detected, machine stops with the error
message “CHANGE OF DENOM.” and user would be asked to remove all notes from the stacker.
The stopped note would be included in the counted result along with rest of the notes on the
stacker.
Once all banknotes are removed from the stacker and START key is pressed, machine then
continues counting of that second denomination of banknotes. Machine stops when it sees a
different denomination and upon placing START key, machine continues to count and sort rest of
the notes in the stack
Page 14
13
■ Facing mode (FACE mode)
Facing means to arrange the notes by its face. In this mode, the machine reads the first note to find
out the face and denomination information. Then it passes the note whose face and denomination
is the same as the first note to the output stacker. If a face of a note or a denomination is not as
same as the first note, those notes will be sent to the Reject Pocket. Other operation is the same
as SINGL mode operation with D.D condition except that the machine sorts the notes by their faces.
If you want to change the face or the denomination, empty the output Stacker and the input Hopper
and retry with the first note whose face and denomination are the same, as you want to sort out.
This Face mode also equipped with a “Face-All” sub-mode where machine allows you to sort mixed
banknotes by face. The machine reads the first note to find out the face information despite of
denomination. AllD.D $1 $2 $5 $10 $20$50$100
■ Orientation mode (ORENT mode)
In this mode, the machine arranges the note with its
direction, face and denomination. The machine reads the
first note and find out information regarding denomination,
direction and face. Then it sorts the notes with the
information. If a note has same denomination, face, and
direction, it will be sent to the output Stacker Pocket.
Otherwise it will be sent to the Reject Pocket. Other
operation is as same as SINGL mode operation with D.D
condition except that the machine sorts by direction and face.
The machine will try to find out information for sorting every stack
of currency after the output Stacker and the input Hopper are
emptied. You can change the sorting condition by changing the first note of the stack of notes to
the same one whose denomination, face and direction is as same as you want to sort out.
If you try to orient as like the picture shown on the up right, then the notes will be arranged at the
Stacker as the picture showed.
This Orientation mode also equipped with an “Orent-All” sub-mode where machine allows you to
sort mixed banknotes by its orientation. The machine reads the first note to find out the direction of
face information despite of denomination. AllD.D $1 $2 $5 $10 $20$50$100
■ Count mode (COUNT mode)
In Counting mode, the machine only counts the bank notes without discriminating a denomination.
To change into the simple counting mode, press MODE key until “COUNT” is displayed on LCD
Page 15
14
<OPTIONAL FUNCTION>
■ Serial number printing mode (SRL mode)
In SRL mode, the machine reads serial no. of banknote and prints it as an image on a thermal
printer.
To change into the SRL mode, press MODE key until “SRL” is displayed on LCD.
■ P-OCR mode
In P-OCR mode, the machine reads serial no. of banknote and prints it as an image and at the
same time, the image is sent to the PC. By running the application program on the computer, user
can read the image and convert it into OCR data so that user can store and manage it.
To change into the P-OCR mode, press MODE key until “P-OCR” is displayed on LCD.
■ B-CODE and B-MIXED mode
In B-CODE Mode, machine reads bar code printed on casino tickets and sends image data to an
attached printer (SBM configured Thermal Printer) or to your PC application software. In B-MIXED
mode, the machine reads bar coded tickets and banknotes at one pass and sends bar code
information as image to the printer or to your PC software. To change into the B-CODE or BMIXED mode, press MODE key until the mode displayed on LCD.
Selecting Counterfeit Function
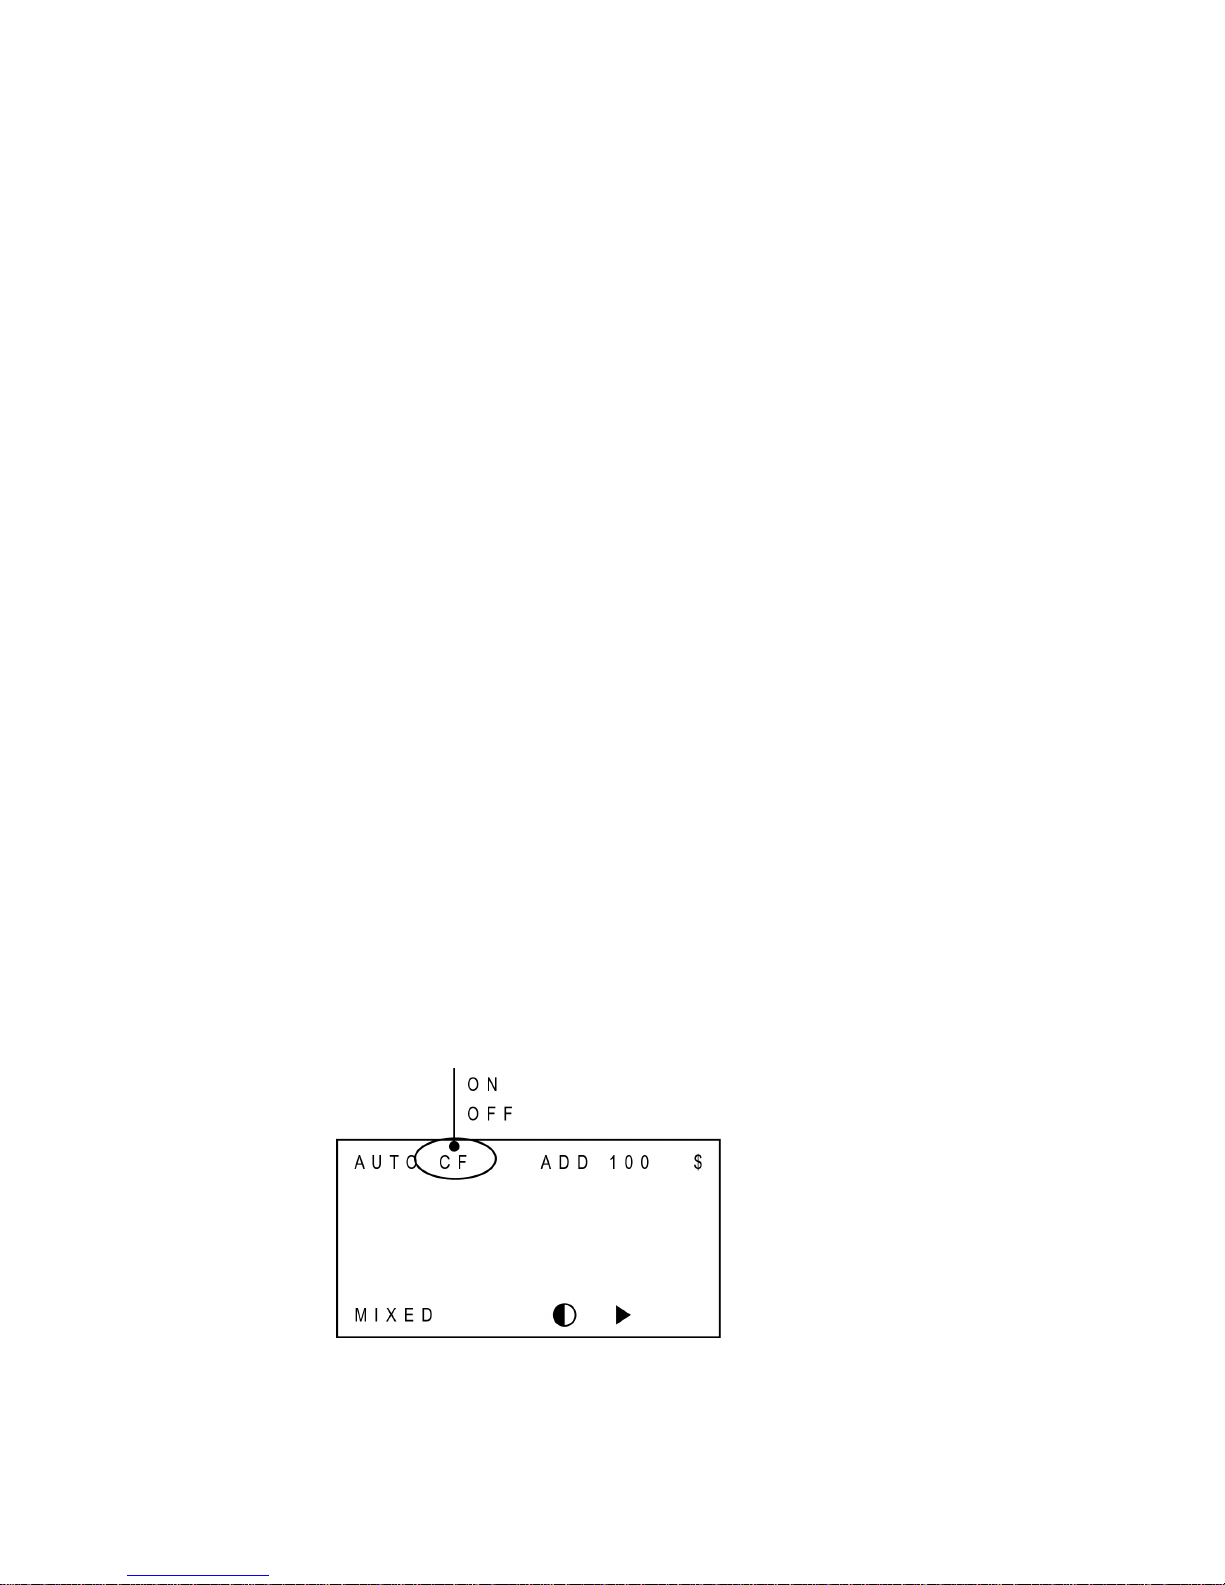
CF determines the method of detecting a counterfeit. With pressing CF key, the mode is changed
like below;
CF ON / OFF
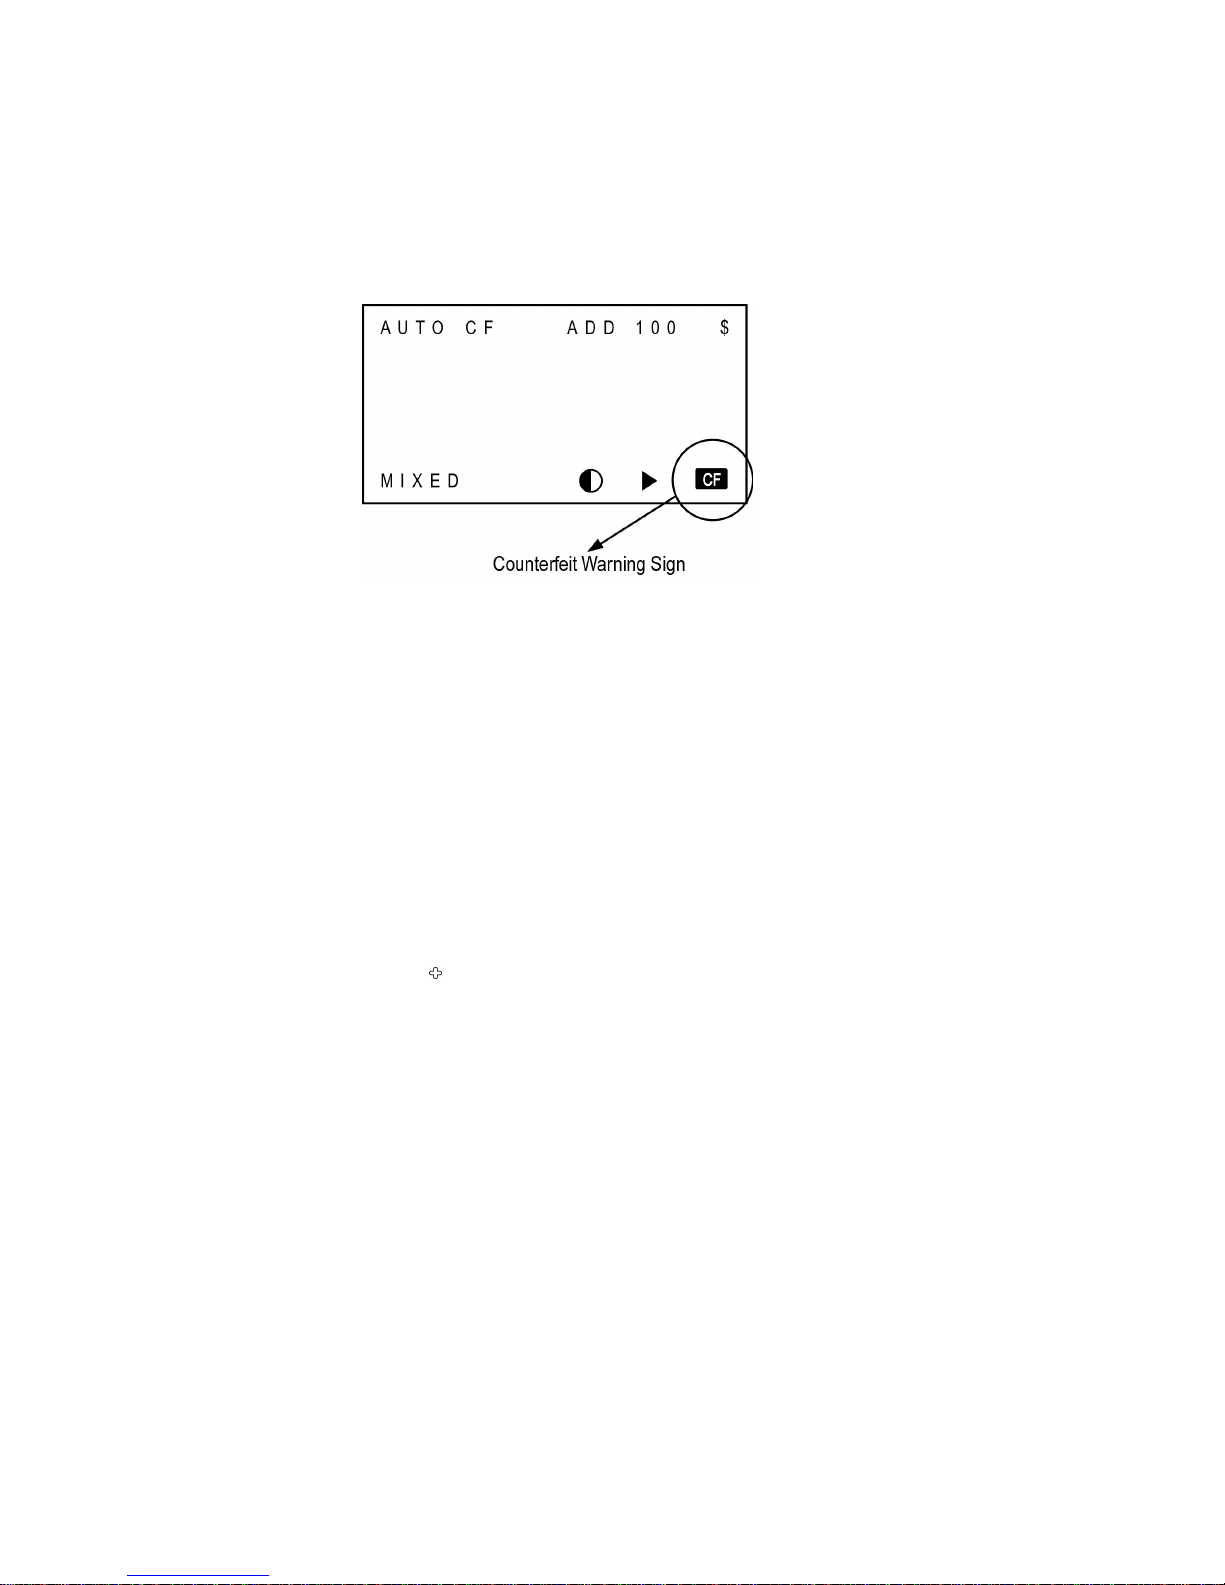
If a note is determined as a counterfeit, CF sign will be lit on LCD as the figure like below and the
Page 16
15
note will be sent to the Reject Pocket. The machine will beep warning sound if the counting job is
finished. The sign will be cleared automatically when the Reject Pocket is emptied and a new stack
of currency is started.
Selecting Add Function
■ ADD Function in COUNT MODE
ADD function provides a cumulative count on COUNT mode. For example, if operator places a
stack of 400 banknotes on the hopper, the machine will stop at 200, which is maximum capacity of
the Stacker. But if cumulative count is activated by pressing ADD key, the machine will count and
stops when the Stacker reached the maximum capacity of 200 notes and resumes counting once
notes are removed from the stacker and START key is pressed.
The Add function is On/Off by pressing ADD key.
■ ADD Function in all other modes (Mixed, Sort, Face, Orent).
When ADD is on, SB1000 /SB-1100 will accumulate each running total in all of these modes and
save them to memory. Each of these running totals will be added automatically and carry over to
the next count when modes are changed. For example, a running total in Mixed mode can be
carried over to the running total in Sort mode. Total amount will be displayed all the time even
when multiple counts are performed.
Selecting Batch Function
BATCH key is used to turn on/off the batch function. Once pressed, you have to input batch size
(1-200) using keypad and then press START button to enter. In the batch count mode, the machine
stops counting when the piece count reaches the batch setting even though the bank notes remain
in the Input Hopper.
To deactivate the batch count mode, simply press BATCH key, confirming that the batch size
displayed on LCD has disappeared.
Page 17
16
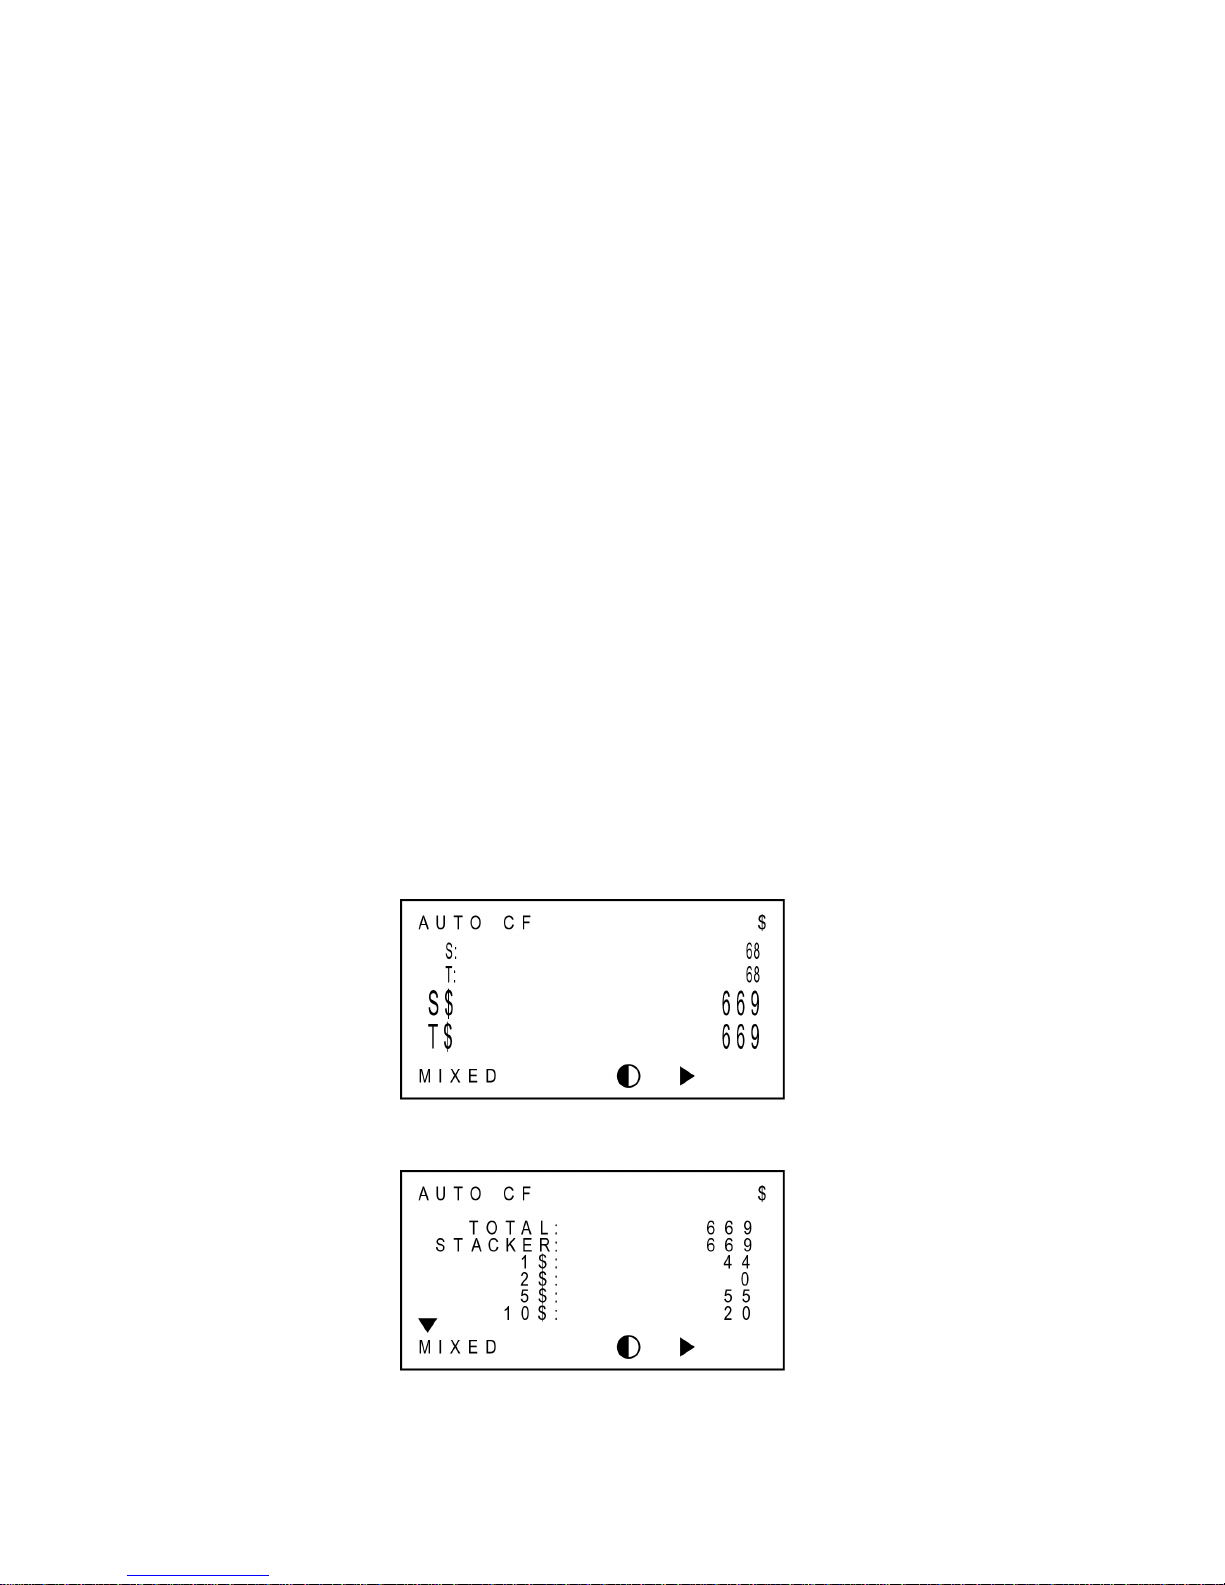
Each Denomination associated Batch function (DB) is available with ‘SINGLE’, ‘SORT’, and
‘FACE’ (ALL)’ modes and can be activated or deactivated by pressing [BATCH] key. This is how
they are organized: By pressing Batch key in SINGL, SORT, or FACE(ALL), batch function will be
changed recursively like below:
In SINGL or FACE (ALL) mode:
Denom. Batch ON Normal Batch (1-200) ON All Batch Off
In SORT mode:
Denom. Batch On Denom. Batch Off
Once Batch Key is pressed, “DB” message will be displayed on LCD ensuring activation of
denomination batch function. If DB is selected, machine will count and batch the desired
denomination by pre-set batch number. For further information on how to set up DB (Denomination
Batch) setting, please refer to Chapter 7. Set Function and its Parameters Settings.
Changing Display Contents
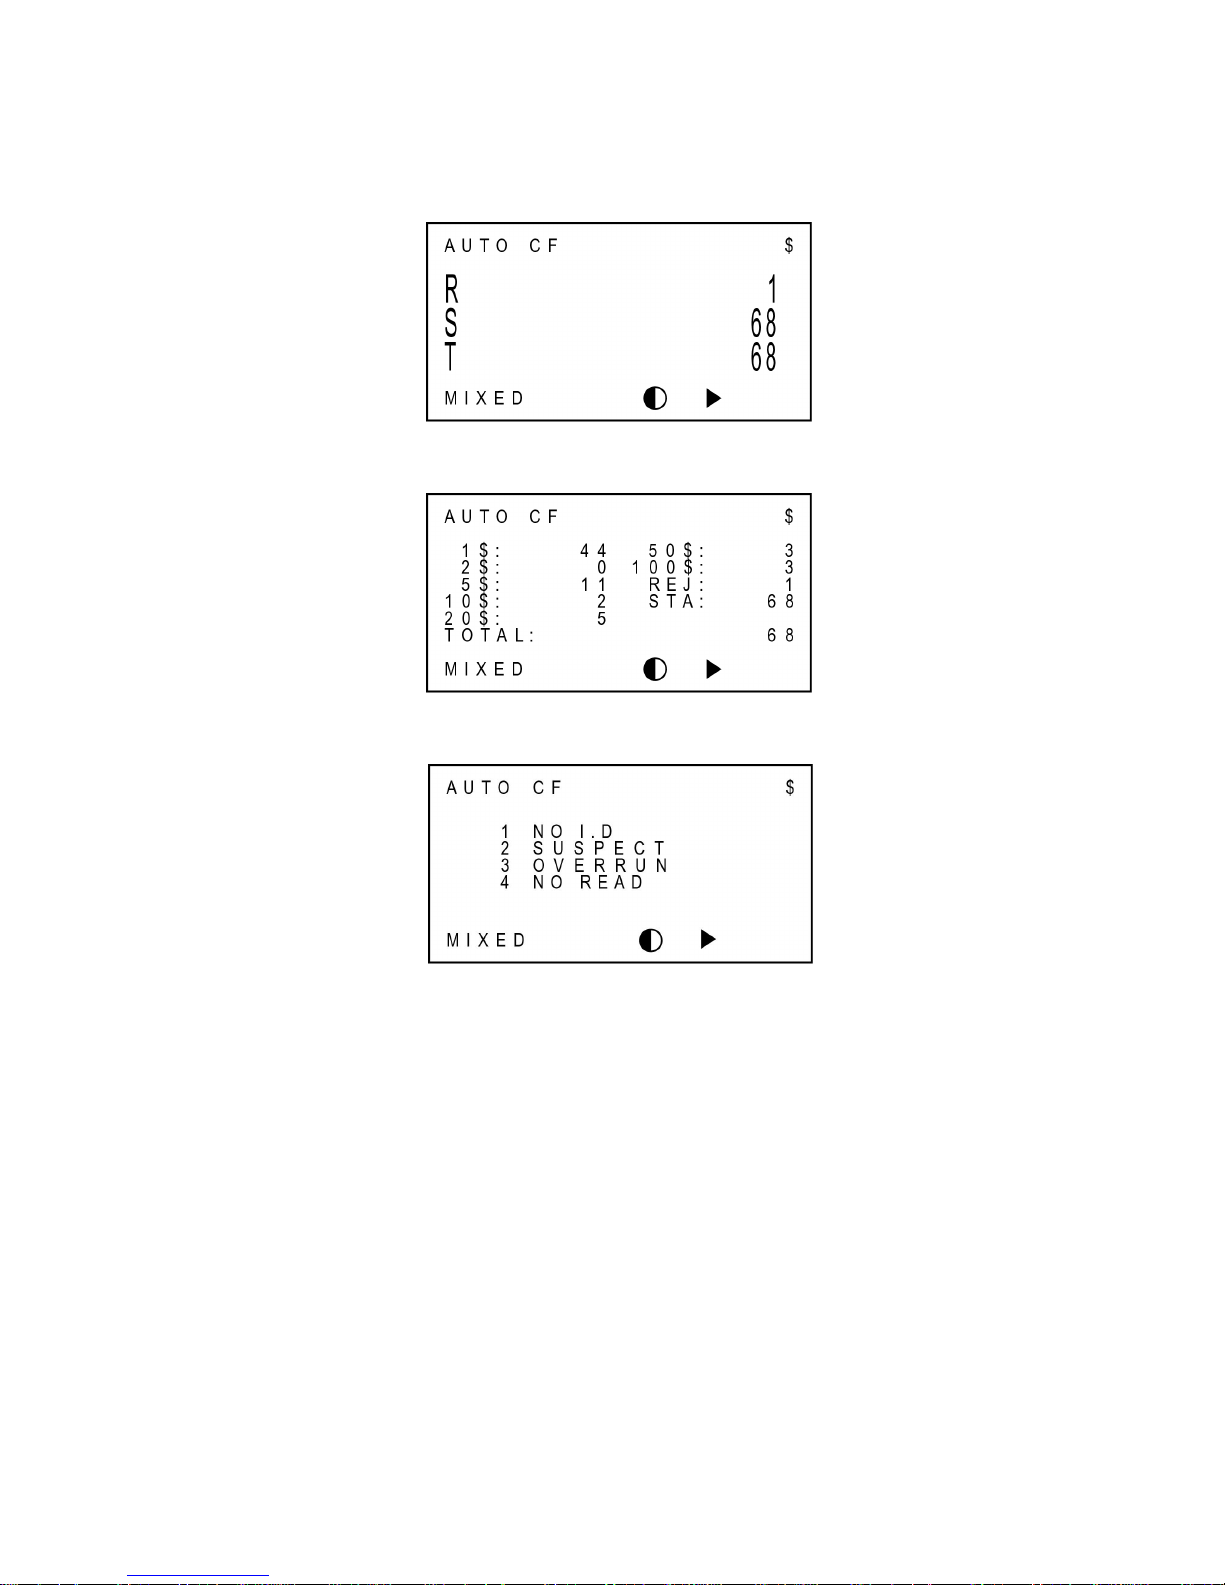
The machine provides various information regarding counting results. Every time pressing
DISPLAY key, the display mode is changed sequentially. There are 5 modes: Count Display (Large
View), Count Display (Detail View), Amount Display (Large View), Amount Display (Detail View),
and Reject Reason. There are some examples of each Display mode.
Amount & Piece Display (Large View)
↓
Amount Display (Detail View)
Page 18
17
↓
Count Display (Large View)
↓
Count Display (Detail View)
↓
Reject Reason View
In the last example, the picture shows that several notes were rejected. The first note from the
bottom of the Reject Pocket was rejected by the reason of NO I.D and the second note was
rejected by the reason of SUSPECT, etc. The “Down” arrow in the picture means that there are
more lists, and you can see the rest lists by pressing DOWN key.
Page 19
18
Grand Total
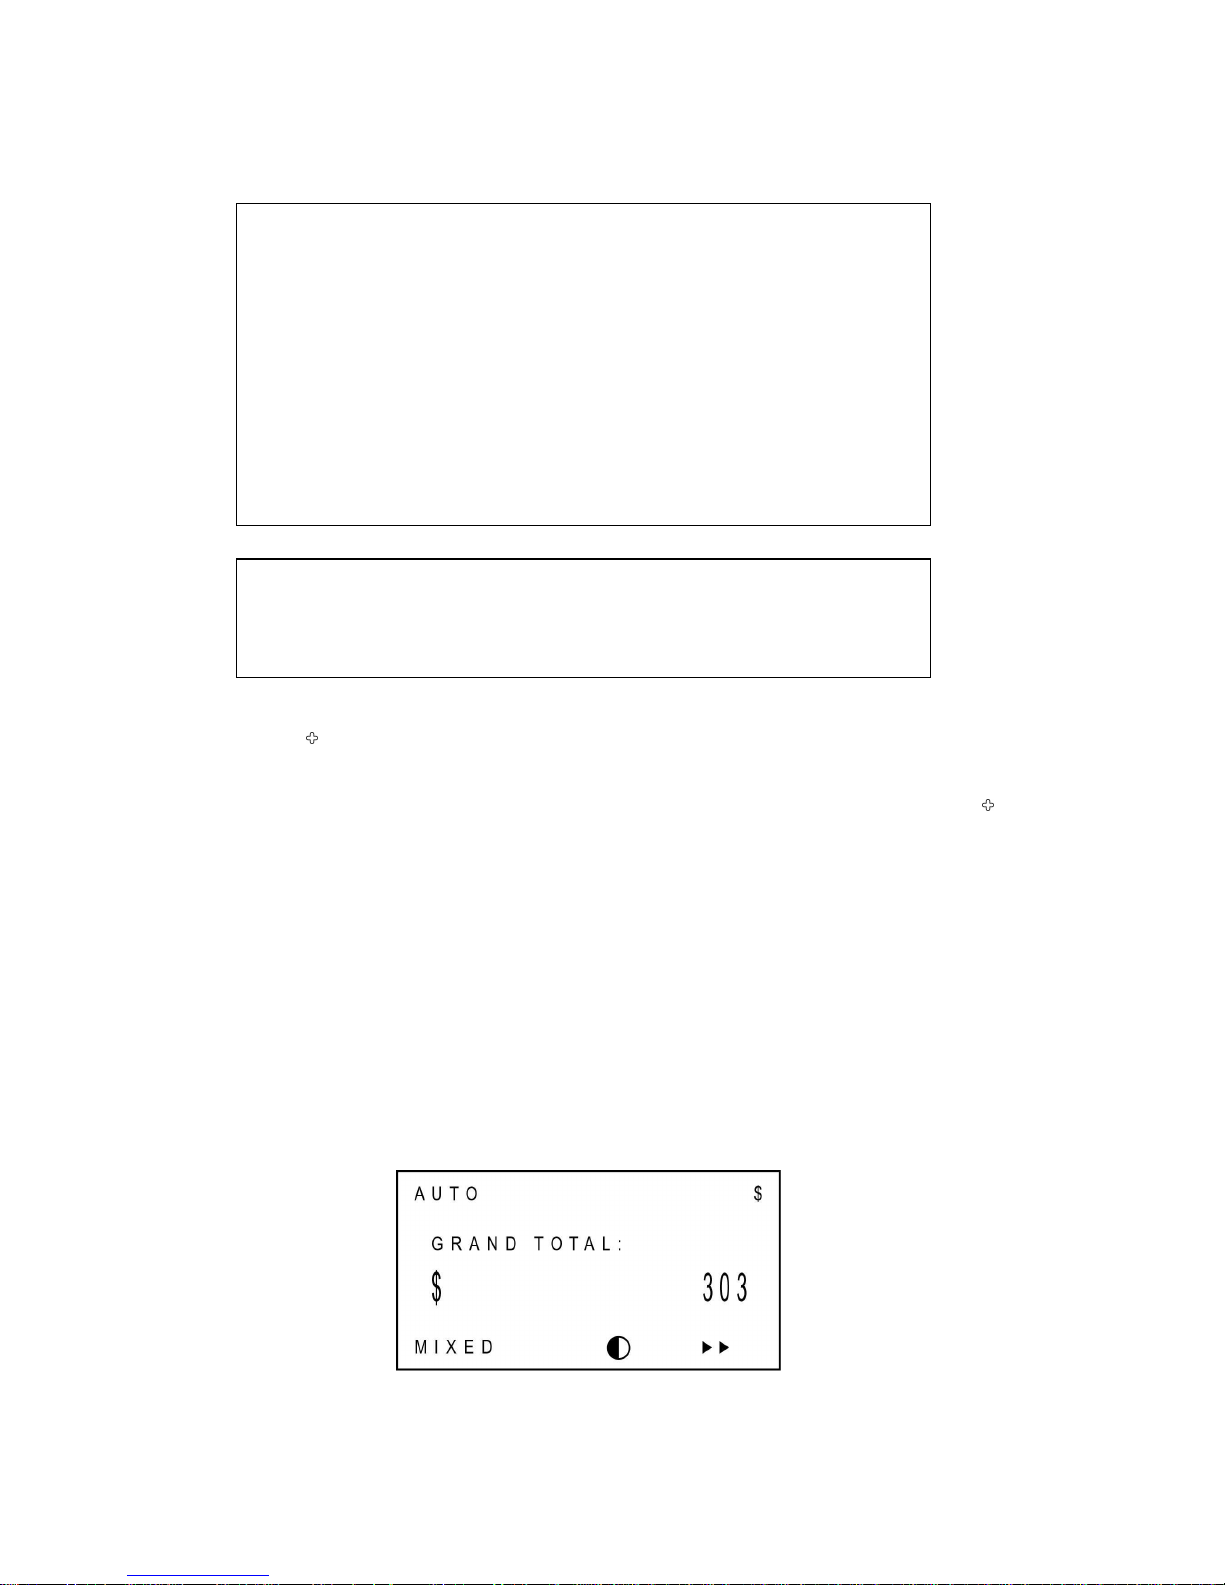
When SB1000 /SB-1100 starts printing counting result, the value, which is displayed as T$ on
LCD, is added to the grand total automatically. Then the display will show the total amount of the
grand total. Even though a printer is not connected, this operation will be done because SB1000
/SB-1100 does not check whether a printer is connected or not.
The grand total is managed separately in MIXED and SINGL mode, namely there are two grand
totals. You can see only one grand total at a time: for example in SINGL mode the display will show
only grand total for SINGL.
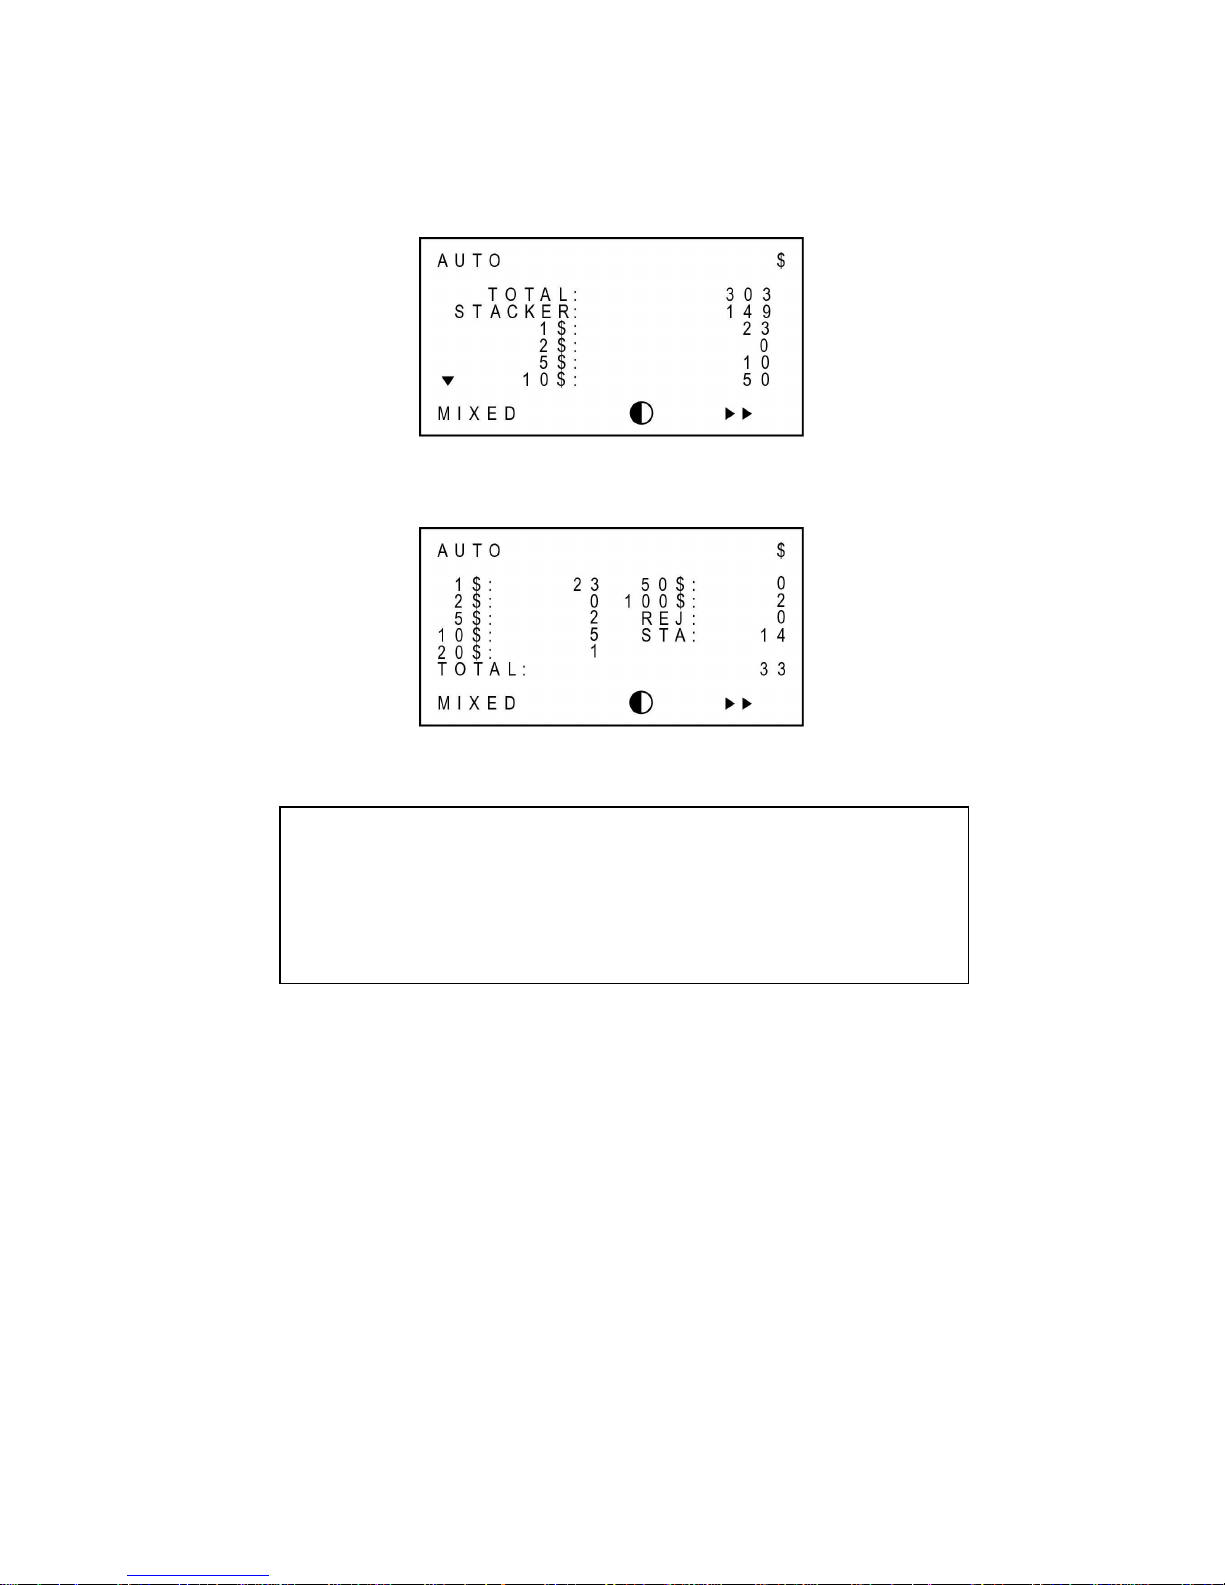
If you want to just see the grand total without adding a value then press GT key and the display will
be changed like below pictures every time when GT key is pressed. Only in this display mode the
operator can clear grand total by pressing CLEAR key. If the grand total is cleared, the printing
sequence number is automatically reset to “1”.
To exit from the grand total display mode, just press DISPLAY or just start another counting job.
Grand Total View
Summary of the Reject Reasons
NO I.D. : The machine failed to identify the denomination.
NO READ : The note was not successfully read.
OVERRUN : The next note was fed too close to the first note.
SUSPECT : The note was suspected to be a counterfeit.
STAY NOTE : The note was not fit to the condition of sorting.
DOUBLE : More than two pieces of notes were fed into machine
CHAIN : Chain Error
HALF : Half Error
CAUTION
If the reject reason is Chain or Half, the number of the reject note displayed on
LCD can be different with the actual number of notes in the reject pocket.
Page 20
19
↓
Grand Total for each denomination
↓
Grand Total: Number of notes for each denomination
Selecting Currency
The machine can work for several currencies if an optional software is purchased. For example, if
multiple currencies software model is purchased, then by pressing FUNC key 0 numeric key the
currency mode can be changed sequentially. If you need more software to handle different
currencies, please consult with your dealer for purchasing the software. See also Ch. 7 Set
Function and its Parameters Currency Mode Change.
Caution
GT function will not be activated if ADD key is on. Please turn off the ADD
function to use GT function
If the currency mode is changed to another, all grand totals are cleared.
Page 21
20
Set Function and its Parameters
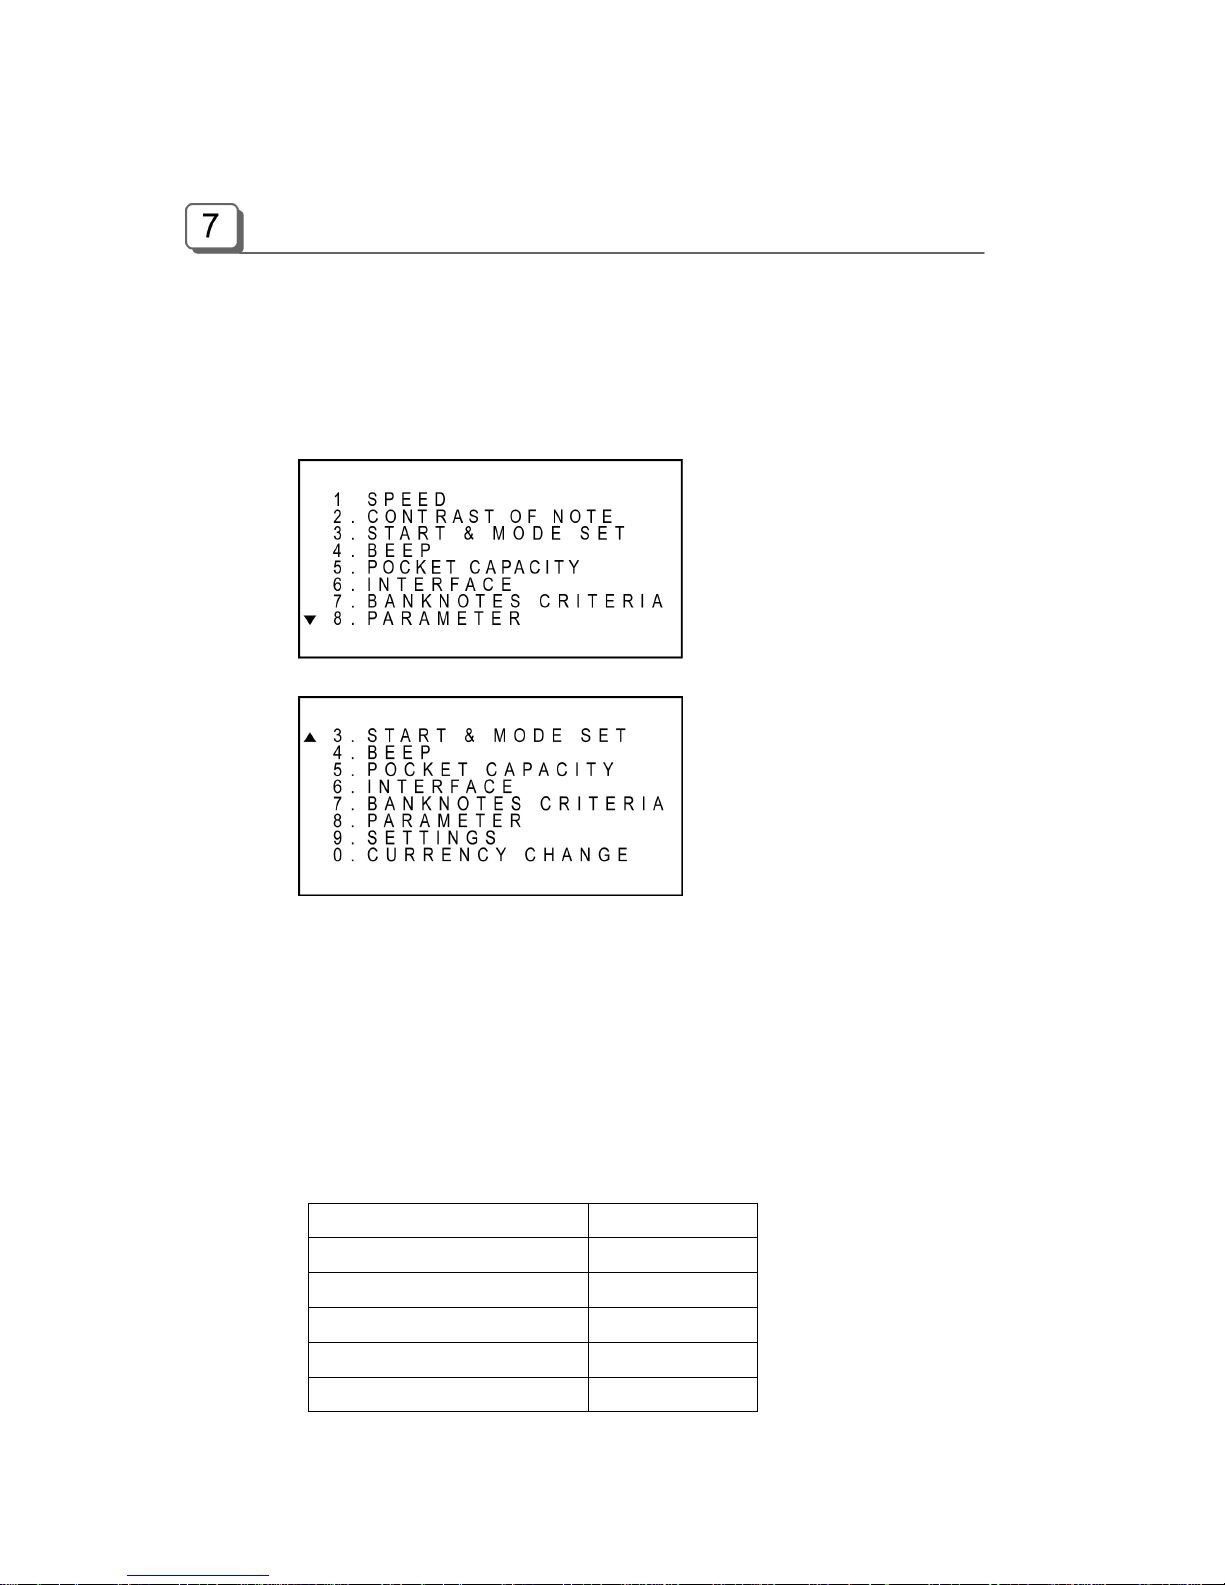
Function Main Menu
To set a function and its parameters, at first move to Function Main Menu by pressing FUNCTION
key. After pressing FUNCTION key, you can see the Display as shown below. To see the next
page of the Menu, press DOWN key several times.
To move to a menu, press UP/DOWN key. Then press START key to enter. Or you can directly
move to a menu by just pressing a numeric key. For example, to move to the “BEEP” menu, press
DOWN key two times and press START or just press numeric “3” key. Then a sub menu will be
displayed and you can set a value or “ON” /”OFF” condition.
To escape from the menu completely, press CLEAR/ESC key or to continue to set up, press
FUNCTION key again in sub menu mode.
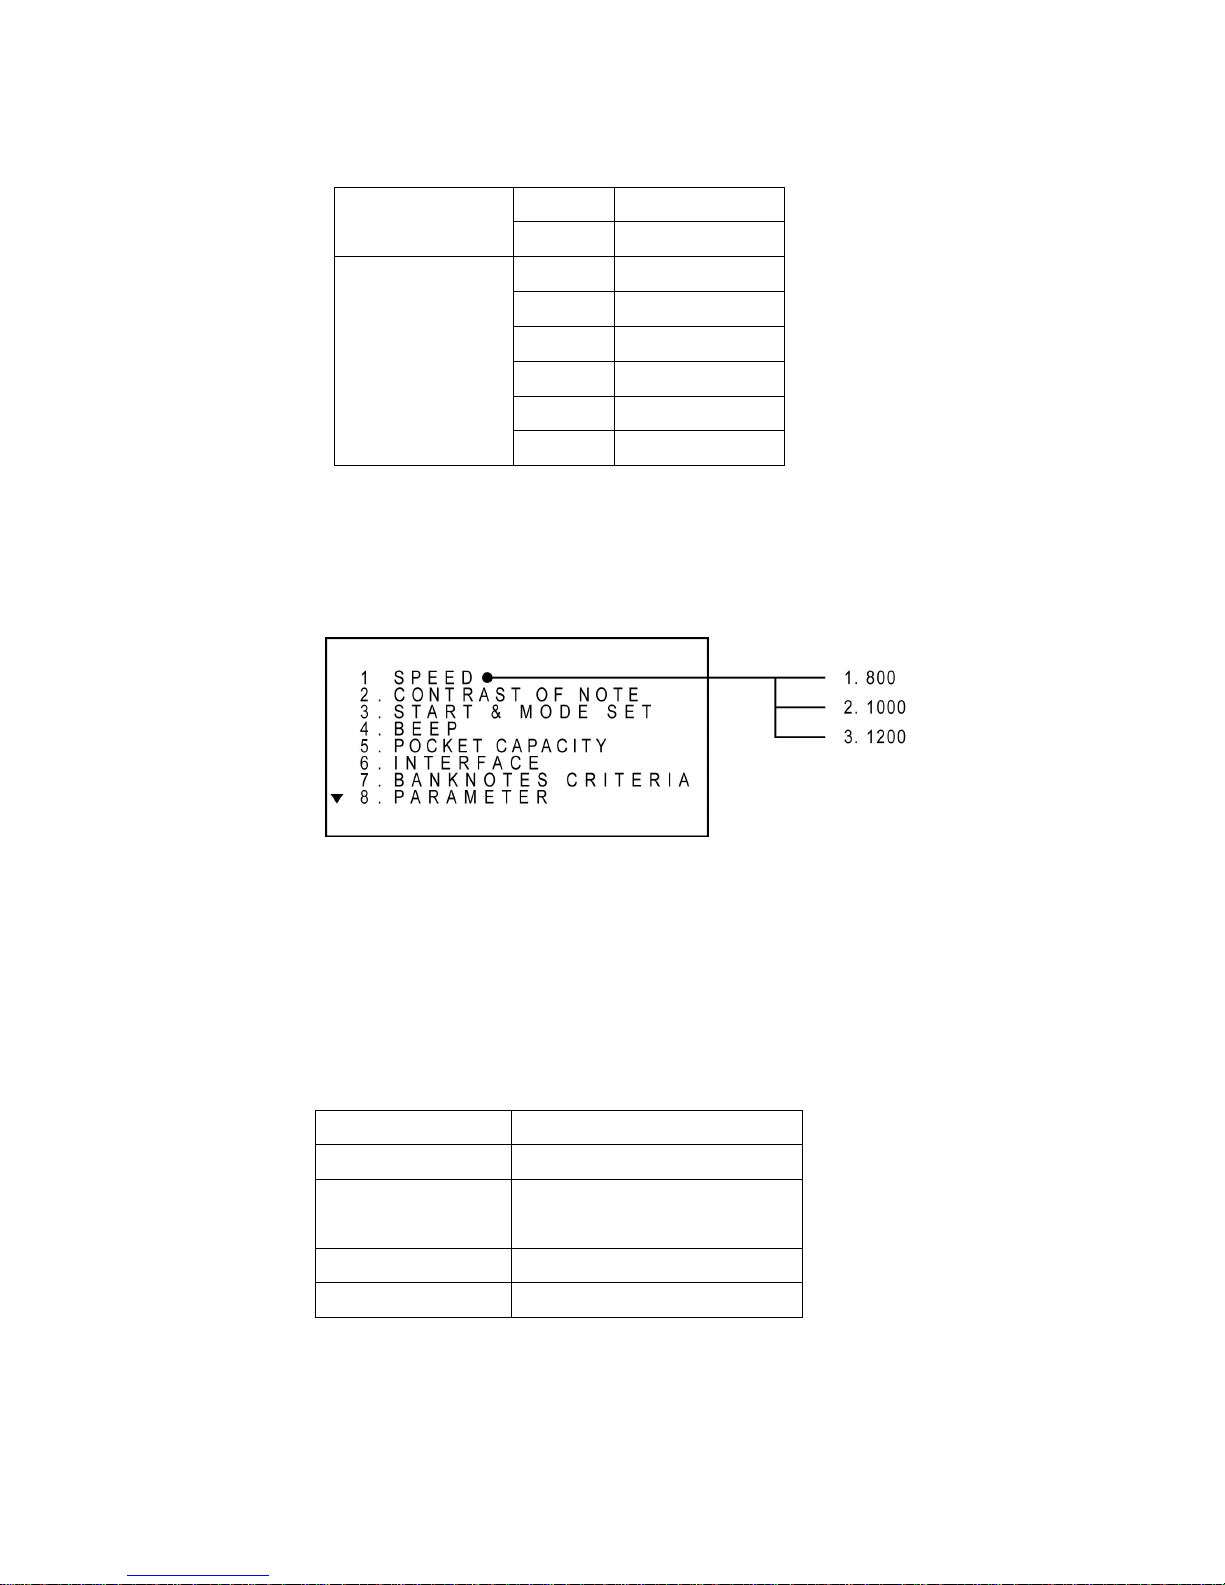
The factory default settings are like below;
Function/Parameter Default Value
Speed 1000 NPM
Contrast of Note Normal
Beep On
Auto Start On
Mode Lock Off
Page 22
21
Rejecter 50 notes
Pocket Capacity
Stacker 100
Printer Serial *)
Baud 9600
Data 8
Stop 1
Parity None
Interface
Column 40
*) If the machine has optional SRL or P-OCR mode, default printer type is set to Parallel Port.
Set Speed of the machine
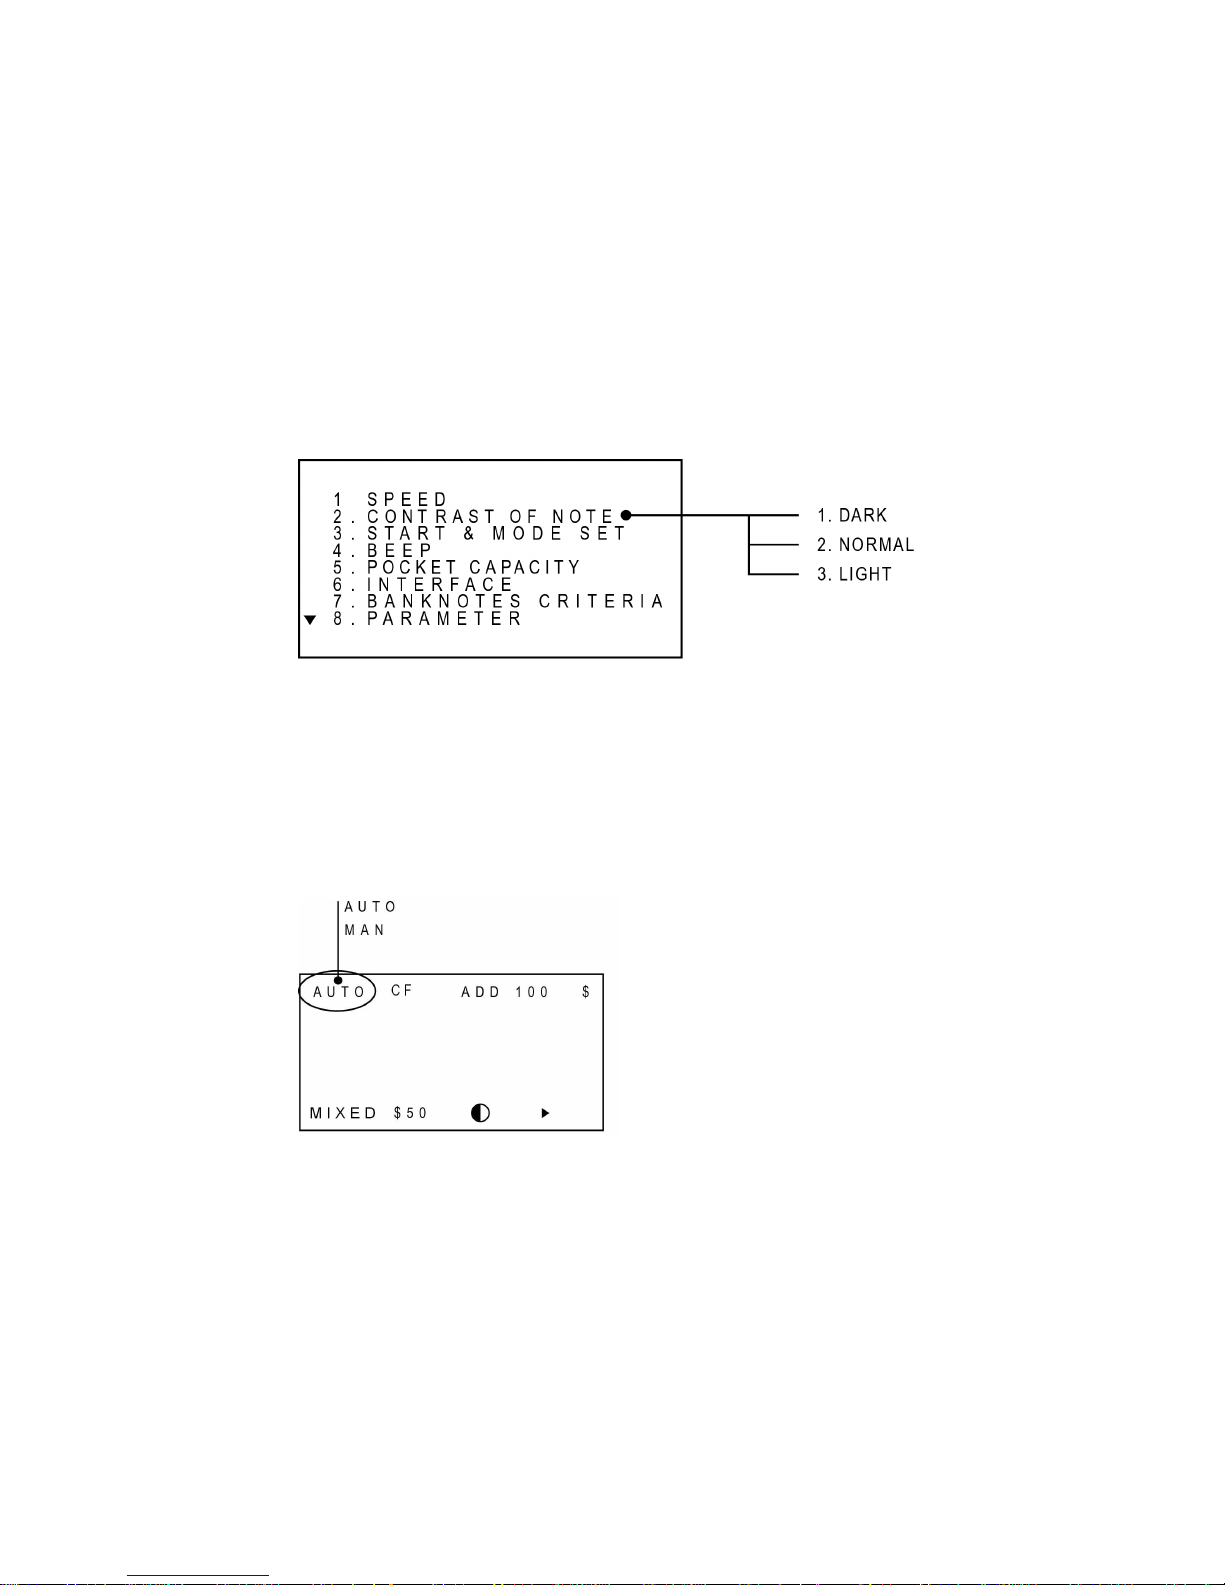
From the Function Main Menu, select the “SPEED”.
The machine offers with three speeds; 800 / 1000 / 1200 NPM (Notes per Minute). In sub menu,
press a numeric key to select a speed or you can select using UP/DOWN key and START key. In
COUNT mode, you can set the speed up to 1200NPM but in SINGL , FACE, ORENT or MIXED
modes, the machine works with maximum 750 NPM. Please refer to the below table to see the
compulsory maximum speed for each condition.
Mode Compulsory Maximum Speed
COUNT 1200 NPM
MXED / SINGL /
FACE / ORENT
About 750 NPM
SORT About 700 NPM
SRL About 400 NPM
Page 23
22
Set Contrast of Banknotes
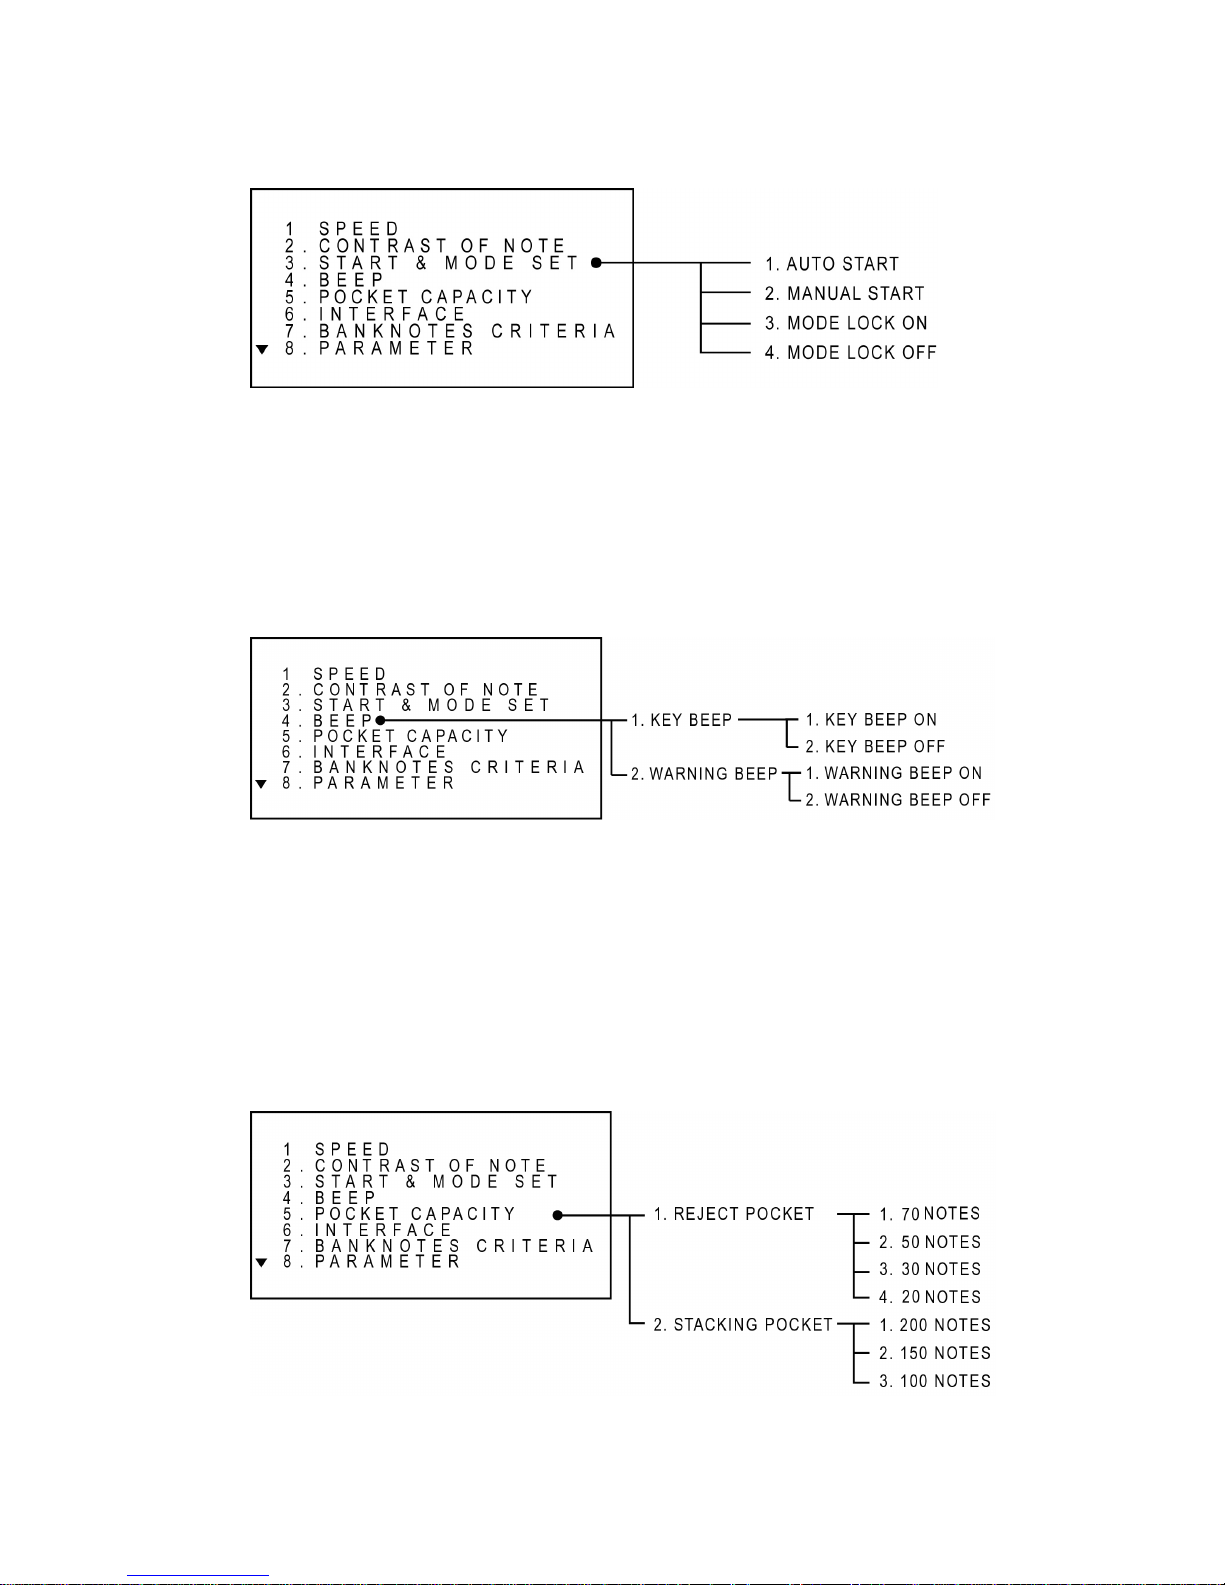
This menu decides the contrast of bank notes to be counted. The machine refers to this parameter
when it checks for a double feeding error. If the machine cannot detect double feeding error well,
then set “Contrast” to lighter level, on the contrary if the machine detects double even though
actually notes are not double fed, then set “Contrast” to darker level.
To set a level, move to that level using UP/DOWN key. Then press START key to enter or directly
press a numeric key.
Set Auto Start Mode & Mode Lock Function
In Automatic mode, the machine starts to count automatically when detecting a note on the hopper.
Whereas in Manual mode, the machine starts to count after a note is placed in the Hopper and
START/ENTER is pressed.
This mode is displayed on LCD like below:
To change the mode, move to “START & MODE SET” and press ENTER key or directly press the
numeric “3” key. And then select an option in the sub menu. If “AUTO START” is selected, the
Display will show “AUTO”, else “MAN”.
To prevent a mode from changing unintentionally, you can disable the MODE key by setting MODE
LOCK to ON. While this function is ON, the MODE key cannot work. To change a mode, at first
make the Mode Lock function OFF. To set to an ON/OFF, moves to a level using UP/DOWN key
then press START key to enter or directly press a numeric key.
Page 24
23
Set Beep Function
If beep function is set to "ON", an audible beep tone will be generated when a key is pressed,
otherwise it will not be generated. To set to an ON/OFF, moves to a level using UP/DOWN key
then press START key to enter or directly press a numeric key.
Set Pocket Capacity
The capacity of the Reject Pocket and the Stacker Pocket is changeable using this function. If a
user normally processes good quality notes, then the capacity of the Reject Pocket and the
Stacking Pocket can be set to maximum 70 notes and 200 notes respectively, otherwise the value
should be set to minimum 30 notes for the Reject Pocket and 100 notes for the Stacking Pocket.
To set to a value, moves to a level using UP/DOWN key then press START key to enter or directly
press a numeric key.
Page 25
24
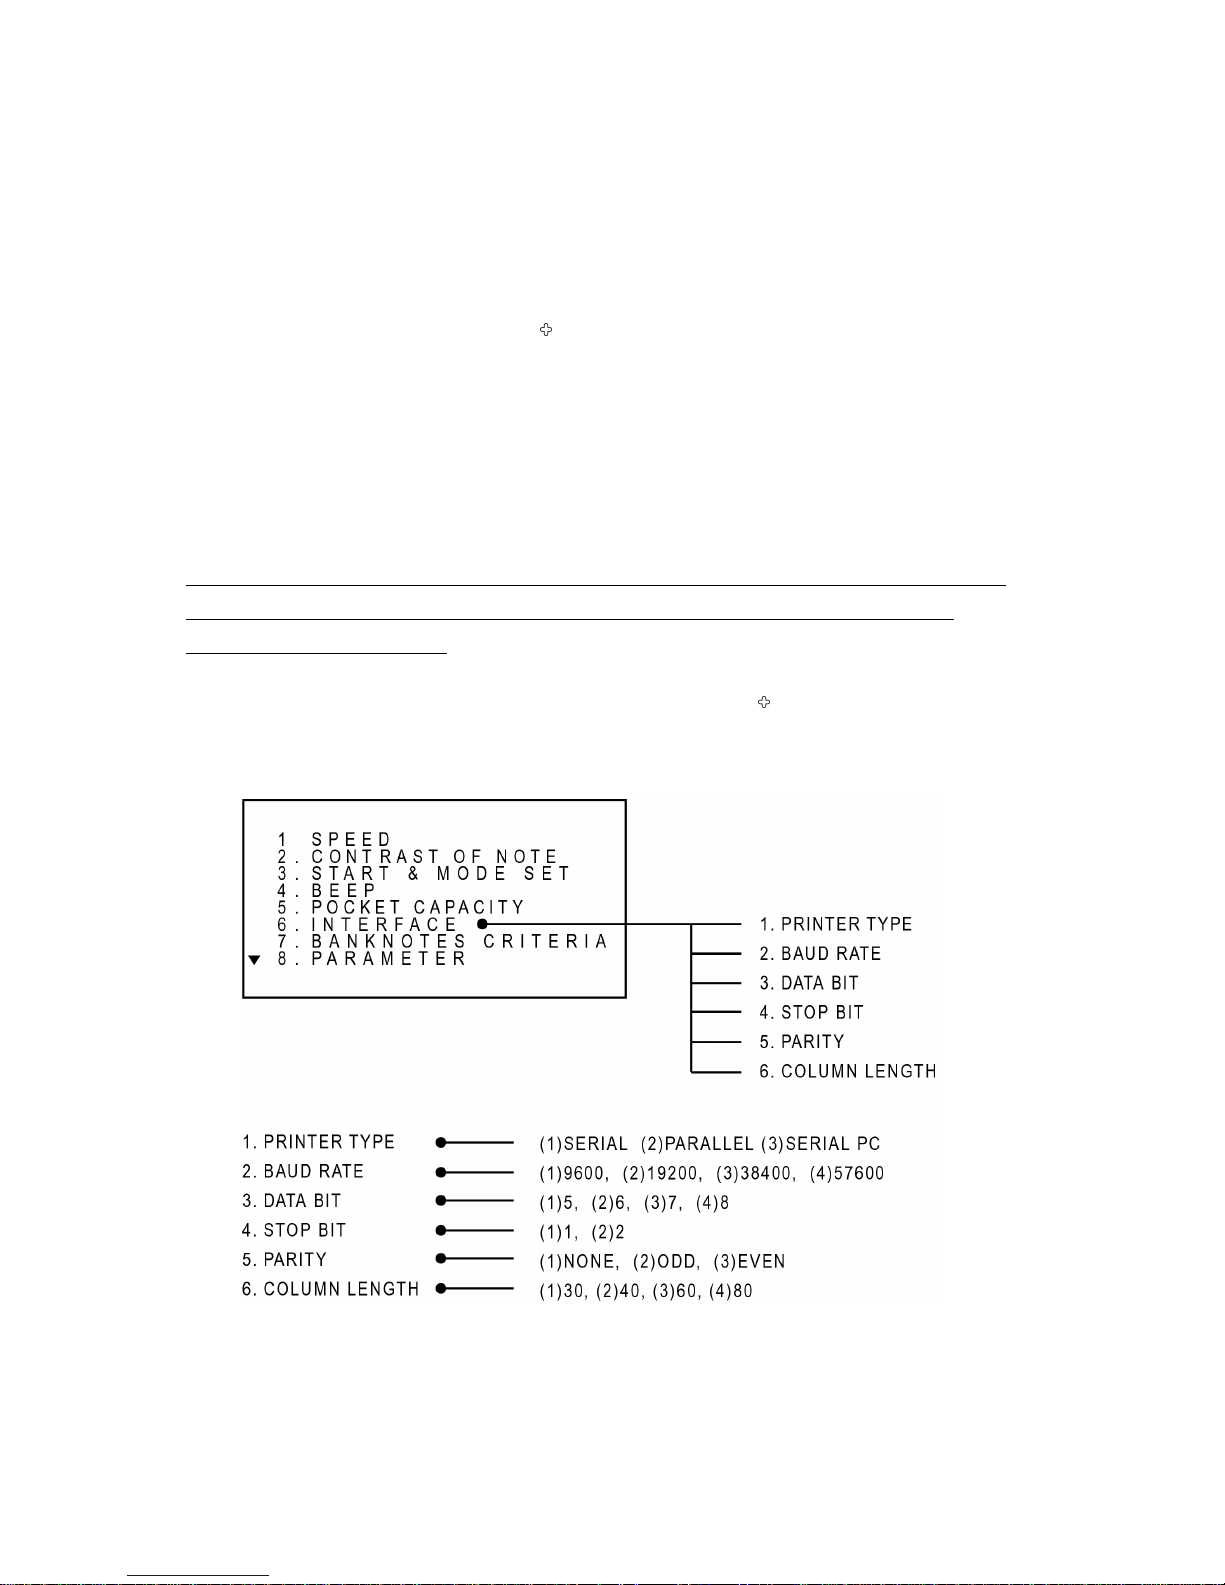
Setup Interface and Print results
To use a printer, the operator must select one of printer types before connecting a printer. The
parallel printer port is optional item and it is used for special purpose. Regarding the available
printers, please consult with your dealer.
If the printer type is set to “Serial”, SB1000 /SB-1100 operates with the parameters like below:
Speed (Baud Rate) : 9600 bps
Parity : None
Data Bit : 8
Stop Bit : 1
The parameters of a printer should be set to as same value as the above description.
The Column Length parameter is to be set to the column length of the printer.
To print the result, press and hold START key for more than 1 second after the machine finished
counting. To print the Grand Total, press and hold START key for more than 1 second while
Display shows the Grand Total.
The other parameters are related with the interface between SB1000 /SB-1100 and other
peripherals like PC.
Page 26
25
Set Banknote Criteria
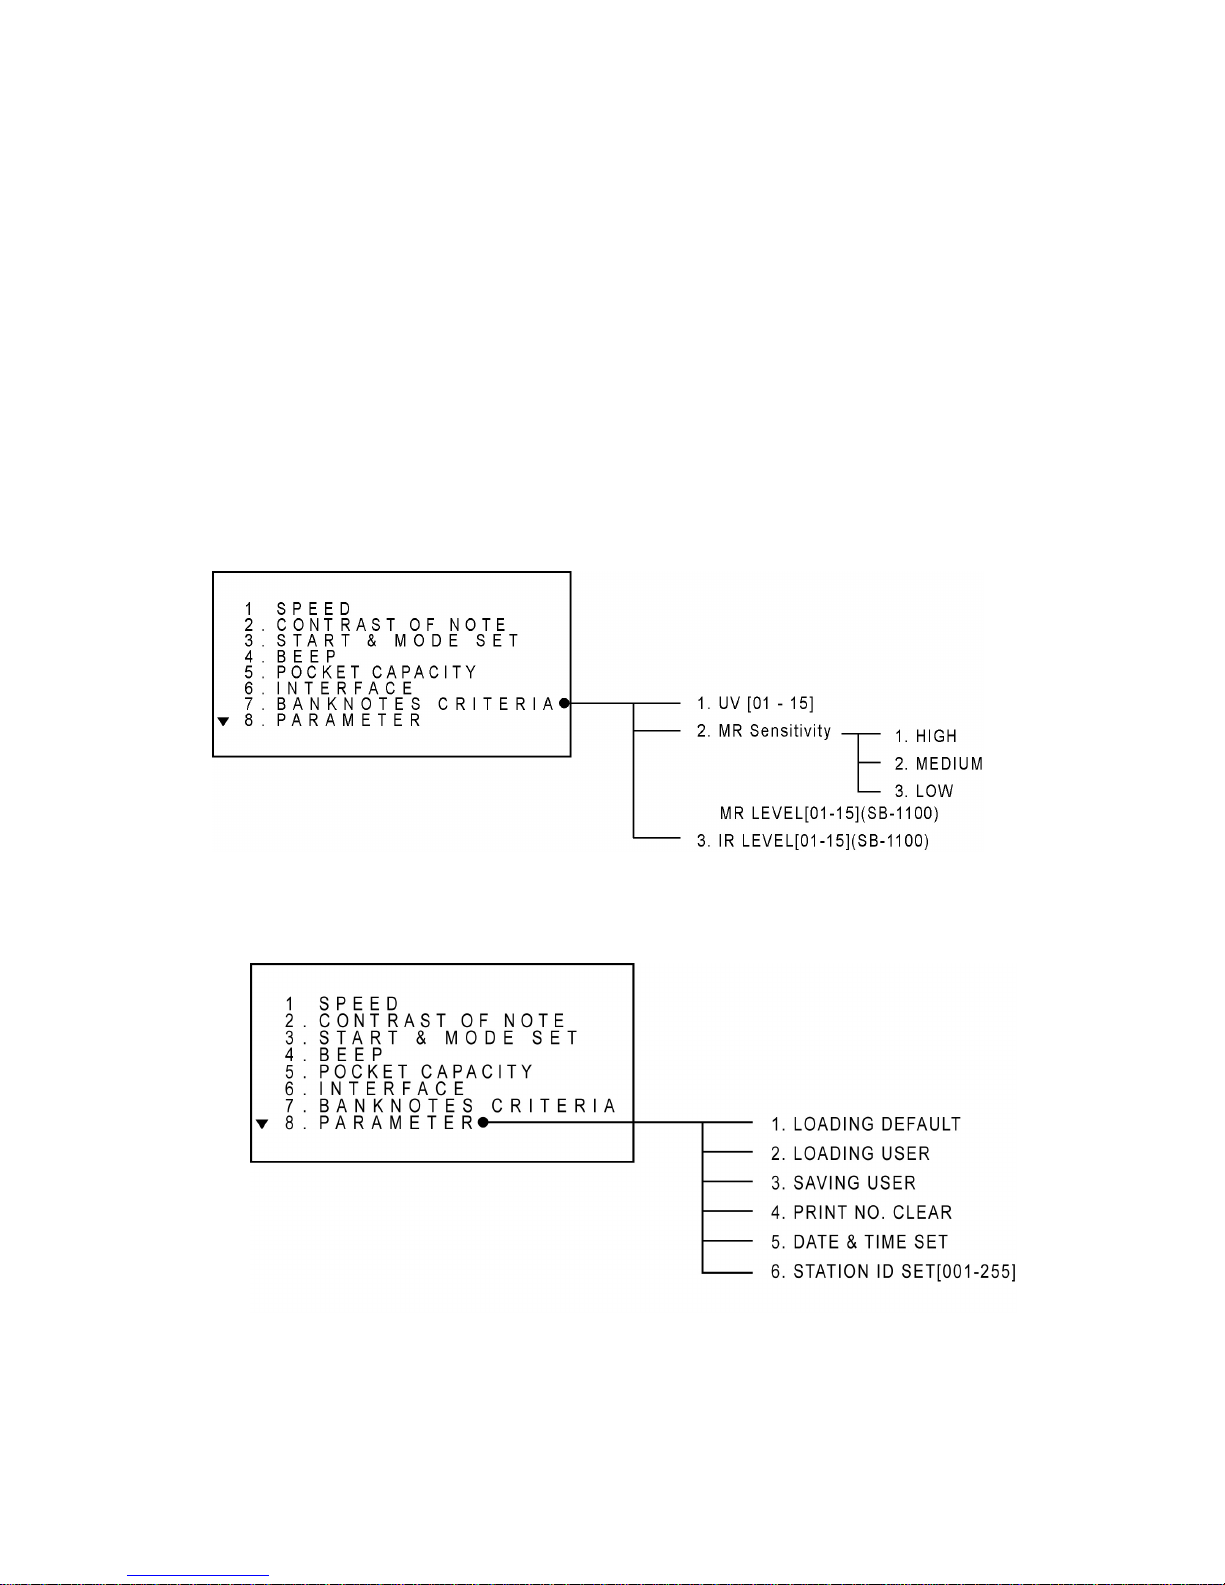
User can adjust the designed detection level of UV sensor and Magnetic Sensor with this function.
To set the level to the lower value means that the sensitivity of the sensor is lower. To get the
proper value, begin testing from the lowest level. If the machine detects real money as a counterfeit,
then change the value to higher level and try again until proper value is reached. In case of MR
sensor on SB1000+ model, there are only three levels to choose from. As for SB-1100 model, user
can choose MR counterfeit level from 1 – 15.
To set a certain level, select “BANKNOTES CRITERIA” and press ENTER key. Then choose one
of the sensors by pressing UP/DOWN key or a numeric key and select a certain level you want to
set.
Set Parameters
Loading Default
This operation refreshes all the parameters as same as the factory settings.
Page 27
26
Saving User
User can save his own setting by using this function. If you want to save your parameters (all
settings now set by yourself), move to “Saving User” and press ENTER key or directly press the
numeric “3” key.
Loading User
If you want to reload your own parameters saved by “Saving User”, then select “Loading User”
using UP/DOWN key and press START key.
Print No. Clear
This function makes the print sequential number reset to 001. Select “Print No Clear” using
UP/DOWN key and press START key.
Date & Time Set
Select “Date & Time Set” using UP/DOWN key and press START key then a new window will be
open. Input date and time using the numeric keys and MODE () or GT () key. To save the
change, press START key.
Station ID Set
Select “Station ID Set” using UP/DOWN key and press START key to enter. Using UP/DOWN key,
input station ID of the machine and then press START key to save the change.
Settings
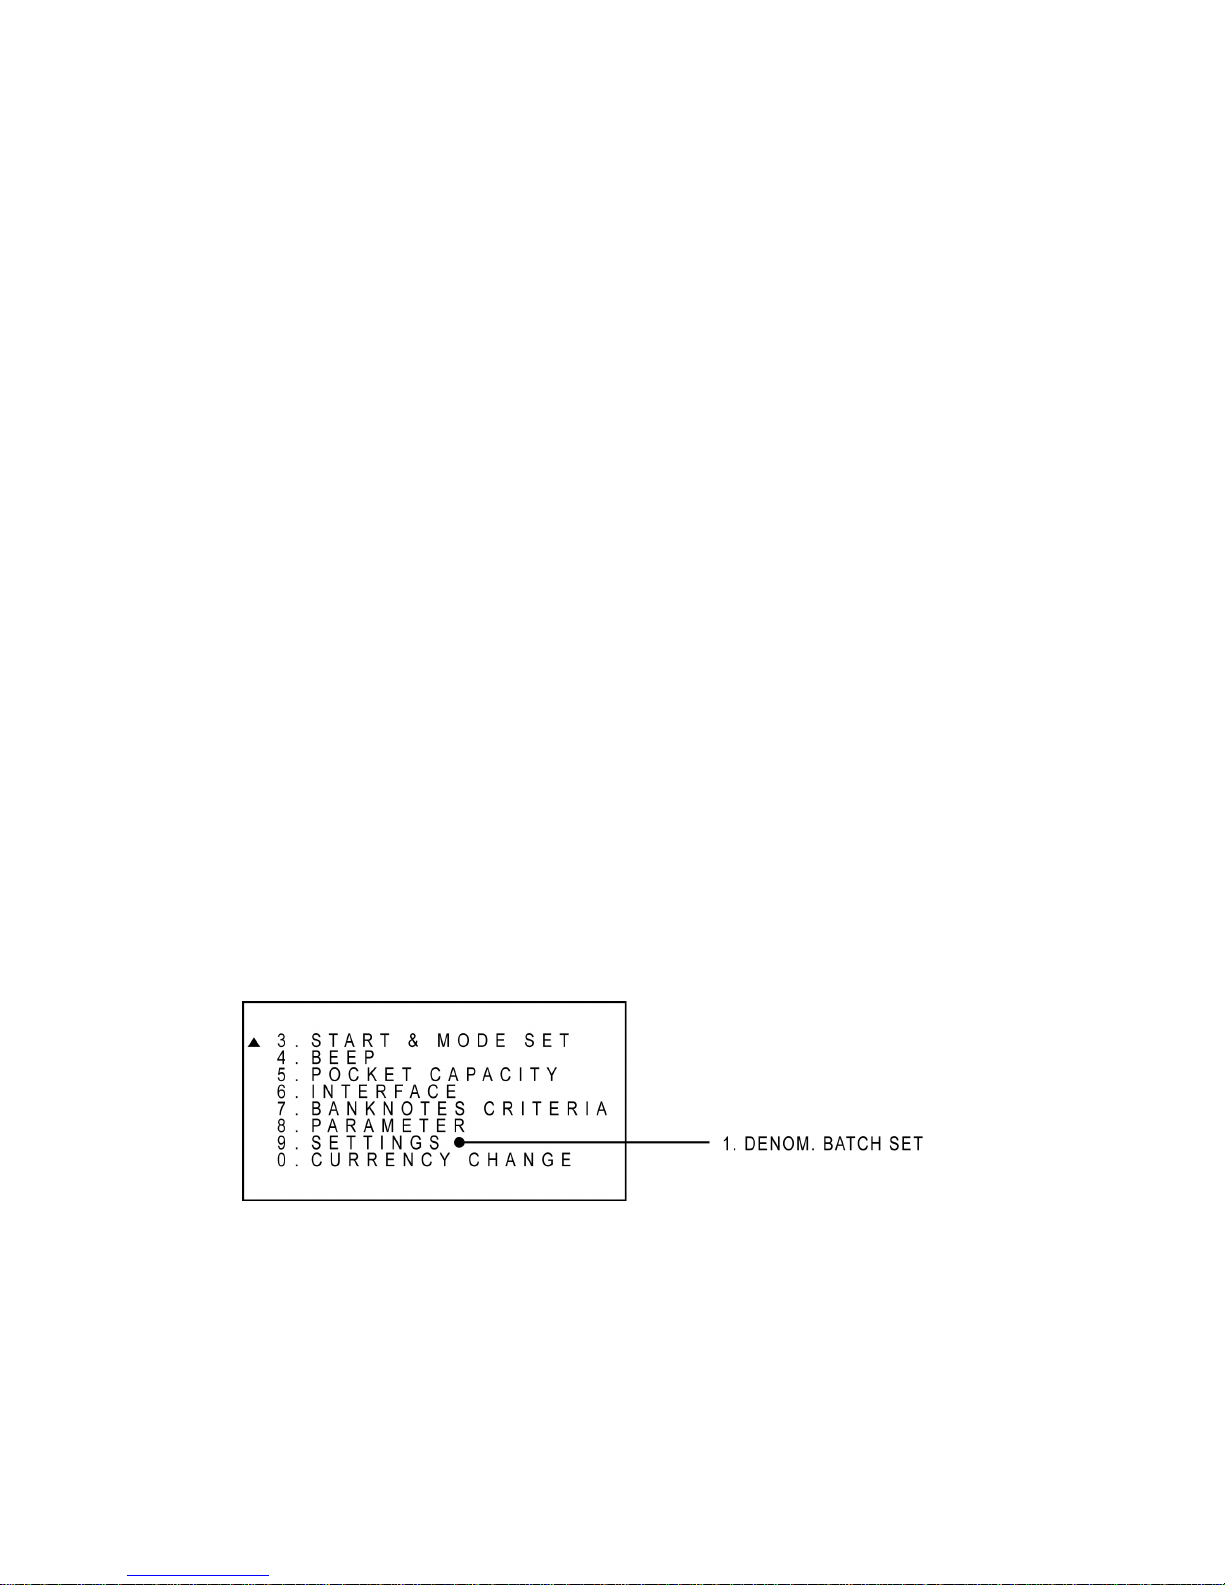
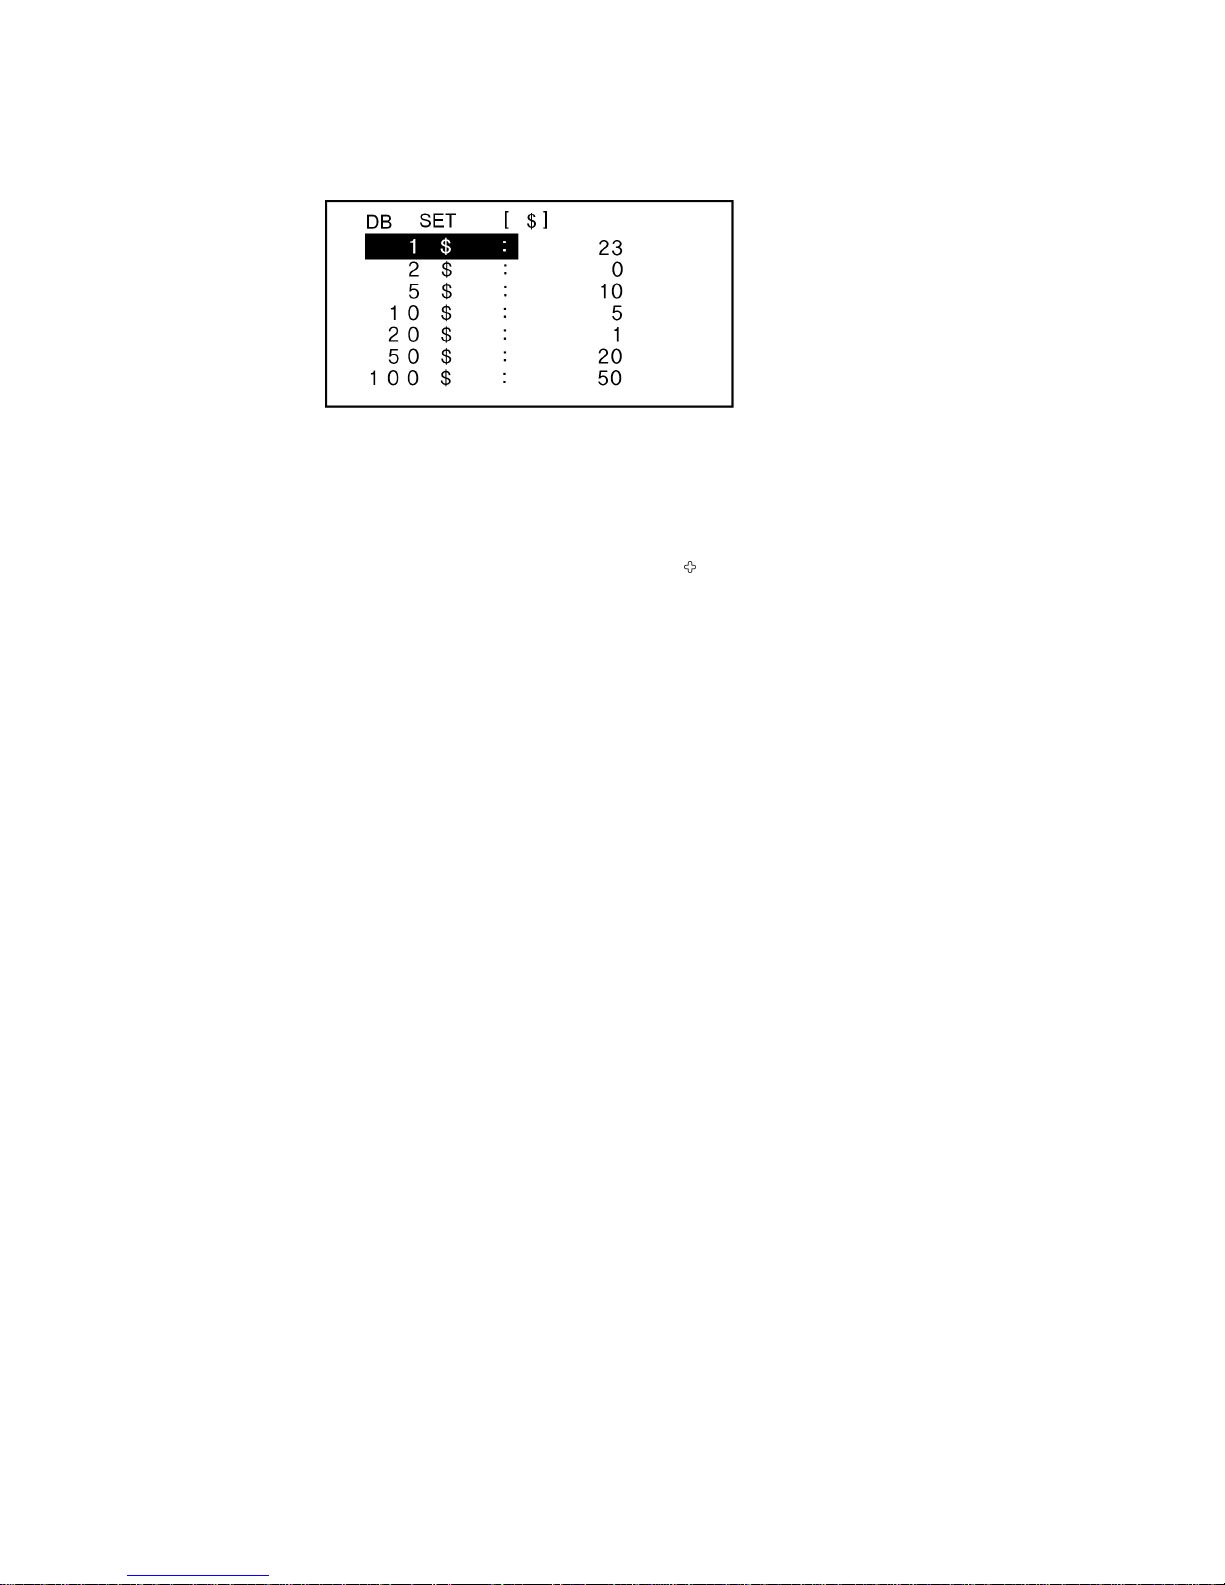
Denomination Batch Setting (DB) can also be set under this menu. User can set desire batch
number for each denomination and save them into memory. To set the denomination batch, select
‘1. ‘DENOM. BATCH SET’ and use [▼], [▲] key to select denomination. Once denomination is
selected, set batch number using [0-9] keys and [Enter] to save the batch number into memory.
See an example of DB set menu at the below:
Page 28
27
Currency Mode Change
If multiple currencies software is purchased with SB1000 /SB-1100, then, every time when
‘FUNC.’ key ‘0’ key is pressed, the currency mode can be changed recursively.
Page 29
28
Troubleshooting
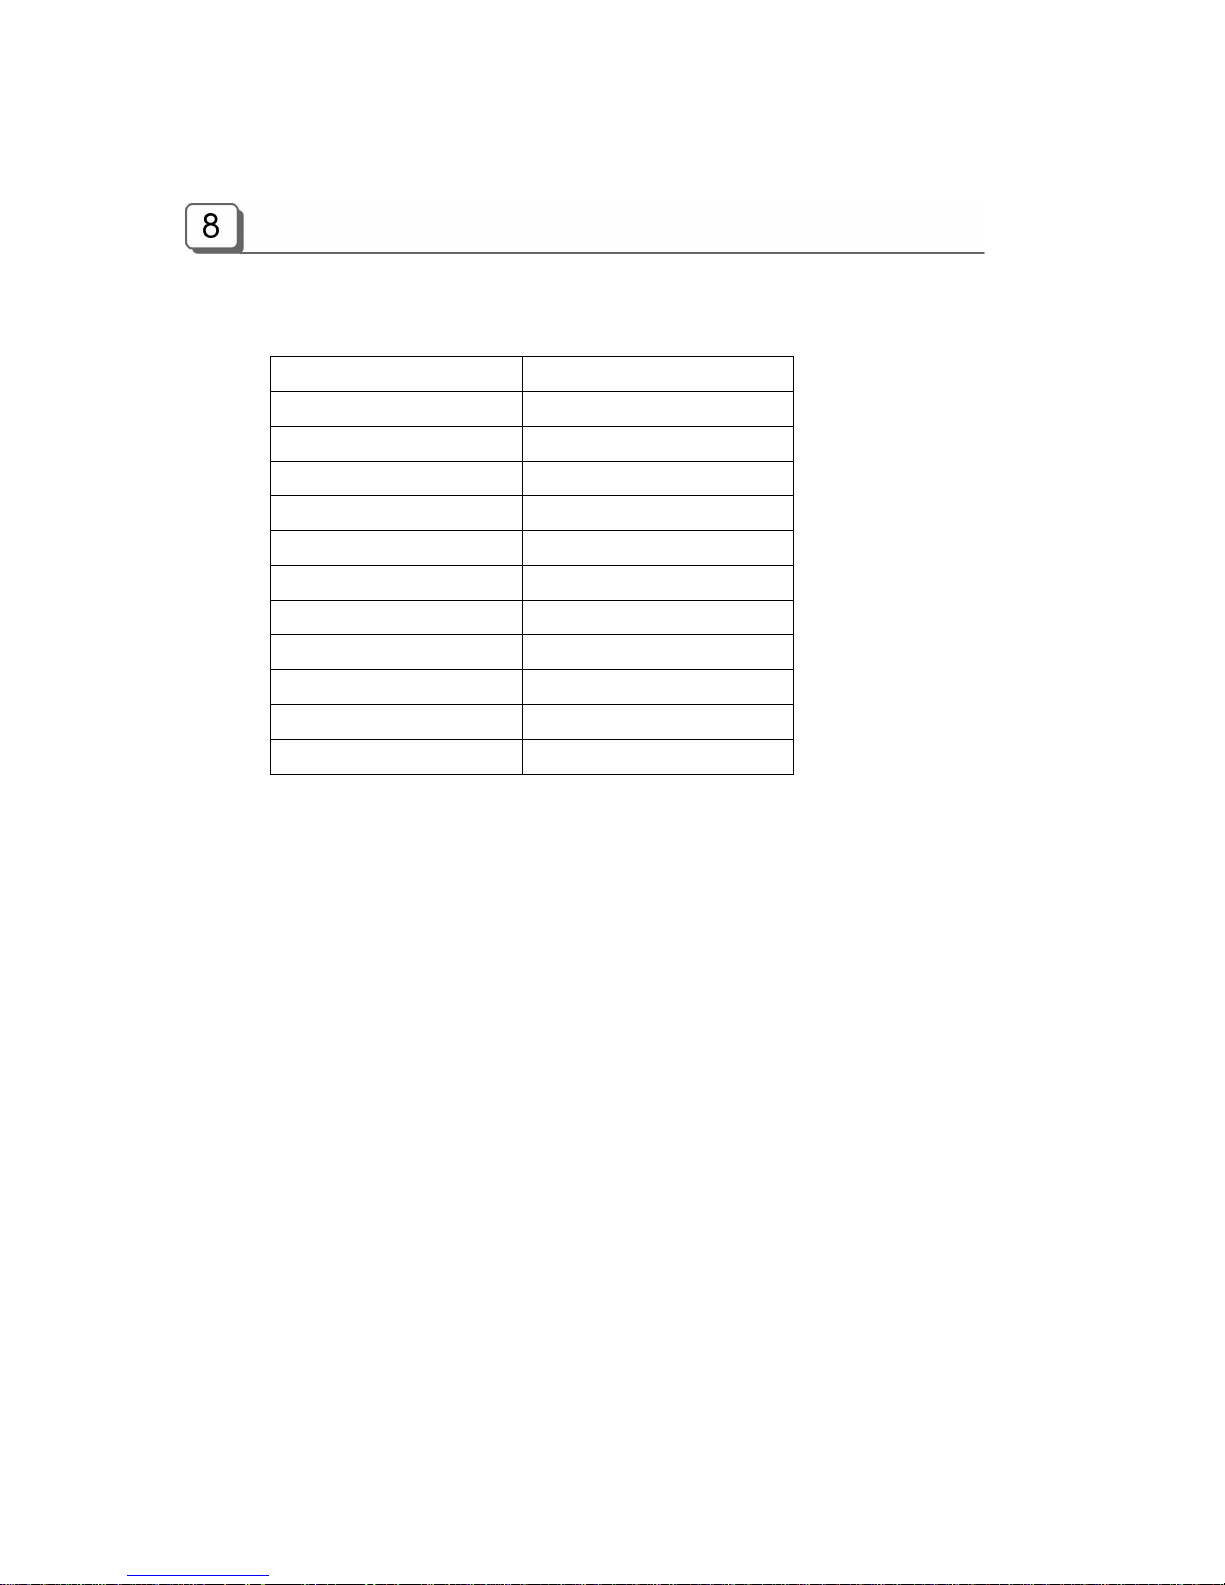
LCD Error Messages
Display Meaning
FRONT COPEN Front Cover is opened.
REAR COPEN Rear Cover is opened
MAIN MOTOR Main Motor stopped.
CHECK HOPPER Notes exist in the Hopper.
CHECK REJECTOR Notes exist in the Rejecter
CHECK STACKER Notes exist in the Stacker
FEEDING Miss-feeding Error
JAM0 Jam Error near RP1 sensor
JAM1 Jam Error near RP2 sensor
JAM2 Jam Error near JP sensor
JAM3 Jam Error near SP sensor
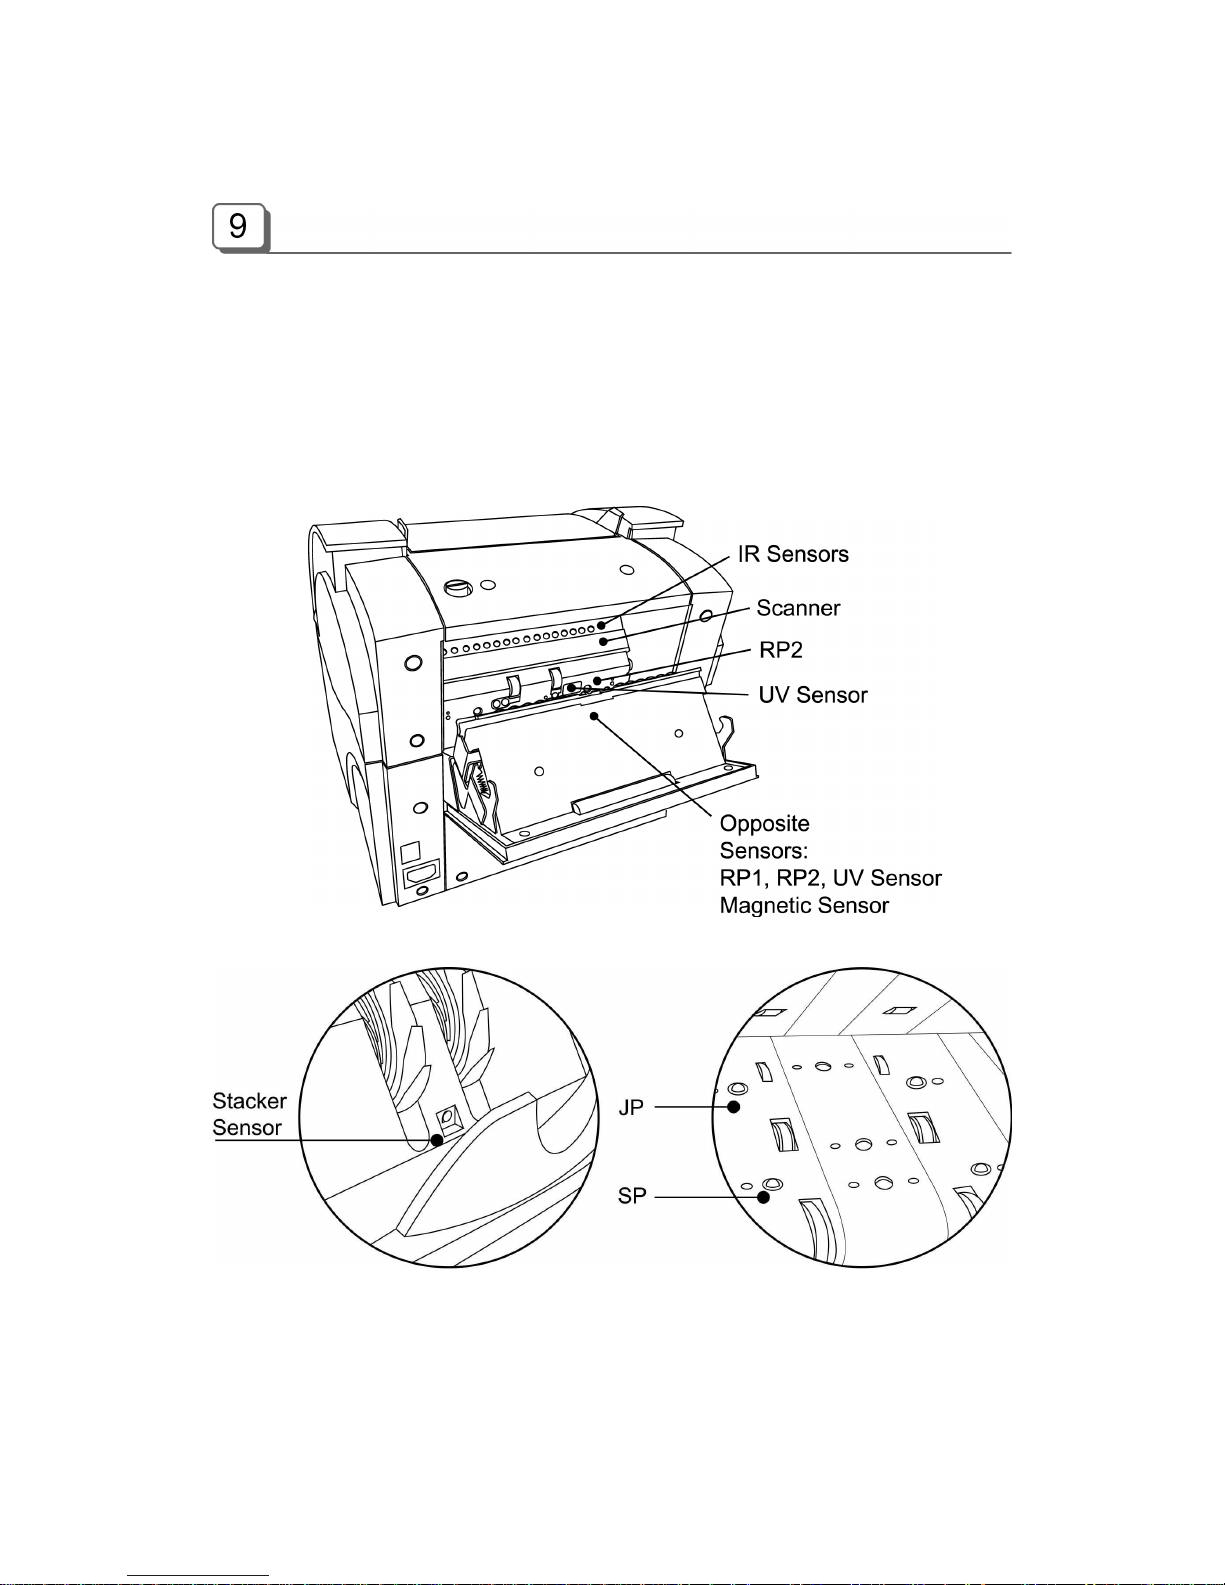
Notes: Please refer to the figures on “Chapter 9” to see the position of the sensors.
Fixing Problems
FRONT COPEN
1. Press Front Cover until it clicks in place.
2. Press CLEAR.
HOPPER EXIST
1. Remove the banknotes on the Hopper.
2. Press CLEAR.
MAIN MOTOR, SKEW, DOUBLE, MFEED, JAM0, JAM1, JAM2, and JAM3*
1. Remove banknotes on the Hopper.
2. Press CLEAR.
*) Caution:
In occurrence of JAM3, it is recommended that a user open the front cover and check the
inside of the machine then remove notes before pressing CLEAR key.
Page 30
29
Daily Maintenance
This machine uses various sensors to detect the malfunction of the machine and the status of the
notes in the machine and to recognize the denominations of the notes. The sensors are very
sensitive and if they are not cleaned correctly everyday, this may negatively affect performance of
the machine. Note that only SB-1100 model is equipped with IR Sensors as shown below.
Clean the sensors described below everyday after operating. The power must be turned off before
cleaning and please do not use a volatile solvent for cleaning.
Inside of the Machine
(Front Cover Open)
Page 31
30
Note:
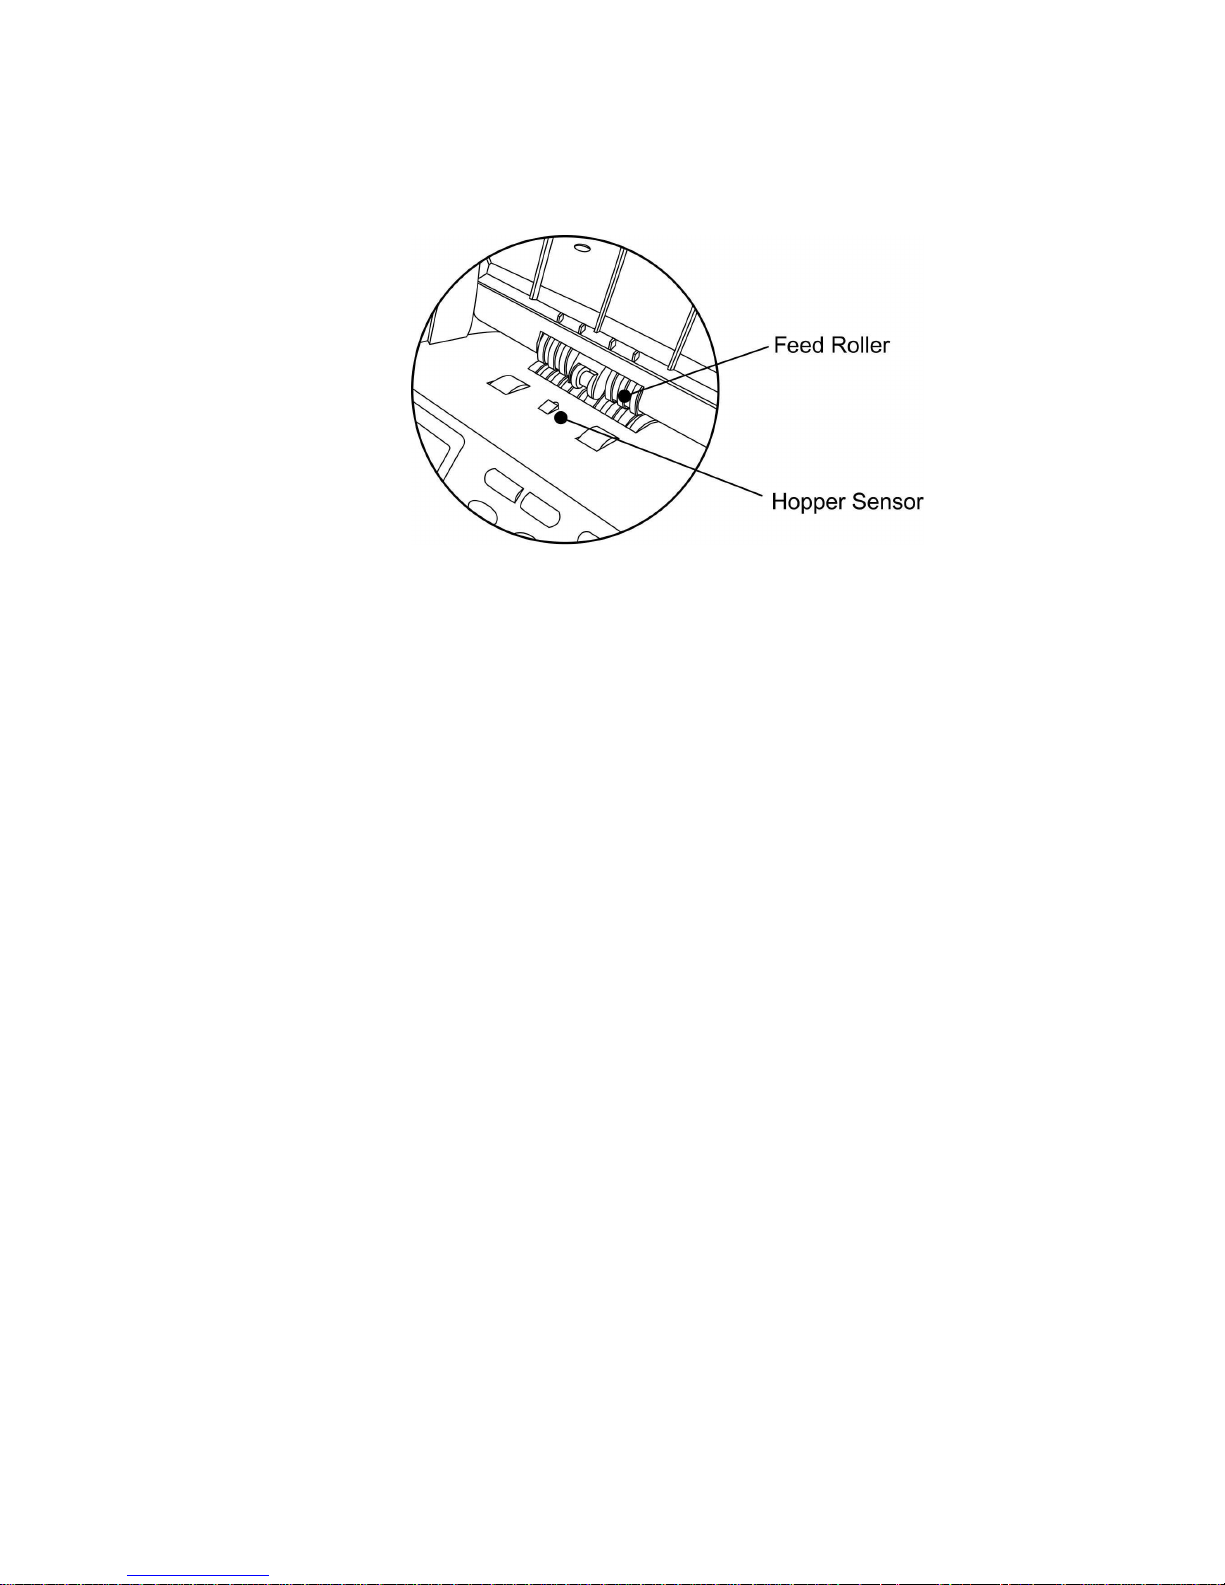
In case of feed roller, clean with slightly dampened cloth with alcohol. While rotating one side of the
roller manually, stick the cloth to the other side of the roller.
Caution: Cleaning the Banknote Scanner
To keep your machine working properly, please clean the photo sensors, the rollers and the
scanning glass once a day. If excess dust is allowed to accumulate, the recognition rate can be
lower than expected.
1. Open the rear cover.
2. Clean inside of the rear cover.
3. Carefully wipe the scanning glass with a soft, dry cloth.
If the glass is very dirty, first wipe it with a slightly dampened cloth with alcohol, then with
a dry cloth. Be very careful not to scratch the glass surface.
4. Close the rear cover firmly until it clicks into place.
Page 32
31
Specifications
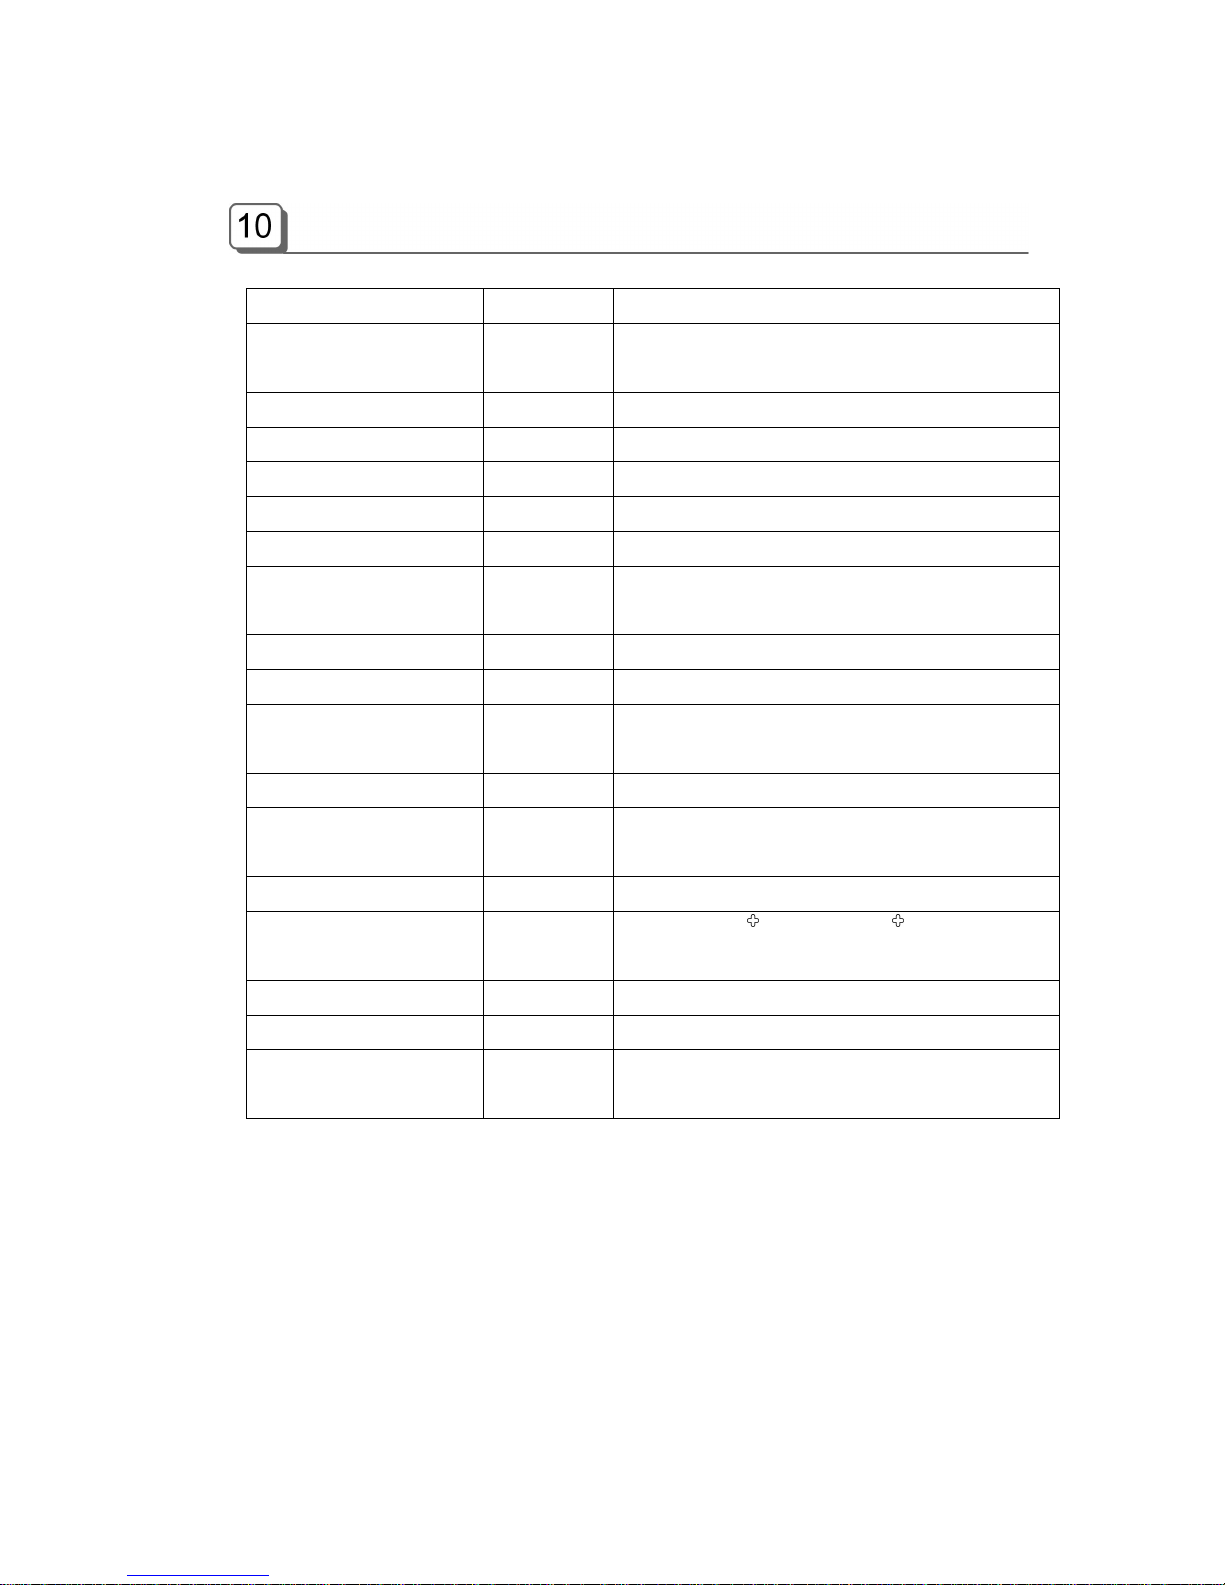
Item Unit Specification
Size (W x D x H) mm
inch
312[W] x 321[D] x 289[H]
12.36”[W] x 12.72”[D] x 11.45”[H]
Weight Kg / lbs Approx. 15 / 33
Hopper capacity Notes Max. 500
Stacker capacity Notes Max. 200
Reject pocket capacity Notes Max. 70
Display Type Dot 128 x 64 Graphic LCD
Connectivity interfaces
2 RS232C Port, Parallel Port
(9 Pin D-SUB and Modular Jack)
Currencies available 1 (Available up to 5 currencies)
Banknote size range mm W: 100 ~ 185, H: 60 ~ 90
Banknote thickness
range
mm
0.08 ~ 0.12
Counting Speed Notes/min 800/1000/1200
Discrimination Mode MIXED/SINGL/SORT/FACE/ORENT/COUNT
Optional: P-OCR/B-CODE/B-MIX/SRL
Preset Batch Number 1 – 200
Counterfeit Detection MG (SB1000 ), UV (SB1000 -1ch. /SB-1100-
3ch), MR-Array (SB-1100), IR (SB-1100)
Power Requirements 90-240VAC, 50~60Hz
Power Consumption W Standby: 9, Operation: 70
Operational
requirements
0~50deg/30~85%RH (Non Condensing)
Notes:
- This machine specification can be changed without further notice to improve its reliability,
function or design.
- The contents of this user's guide can also be changed.
Printed November, 2008
Rev. 2010
 Loading...