

Page 1

Operating Manual
for the ST-237
Advanced CCD Camera
PRICE $10.00
Santa Barbara Instrument Group
Page 2

Santa Barbara Instrument Group
1482 East Valley Road - Suite 33
PO Box 50437
Santa Barbara, CA 93150
PHN (805) 969-1851
FAX (310) 969-4069
Note: This equipment has been tested and found to comply with the limits for a Class B digital
device pursuant to Part 15 of the FCC Rules. These limits are designed to provide reasonable
protection against harmful interference in a residential installation. This equipment generates,
uses, and can radiate radio frequency energy and if not installed and used in accordance with
the instructions, may cause harmful interference to radio communications. However, there is
no guarantee that interference will not occur in a particular installation. If this equipment does
cause harmful interference to radio or television reception, which can be determined by turning
the equipment off and on, the user is encouraged to try to correct the interference by one or
more of the following measures:
• Reorient or relocate the receiving antenna.
• Increase the separation between the receiver and the equipment.
• Connect the equipment into an outlet on a circuit different from that to which the
receiver is connected.
• Consult the dealer or an experienced radio/TV technician for help.
Changes or modifications not expressly approved by the party responsible for compliance
could void the user's authority to operate the equipment.
Also note that user must use shielded interface cables in order to maintain product within FCC
compliance.
ST-237 Manual
Second Printing
November 1999
Page 3

Table of Contents
1. INTRODUCTION TO CCD CAMERAS....................................................................................................3
1.1. HOW CCDS WORK...............................................................................................................................3
1.2. CCDS APPLIED TO ASTRONOMICAL IMAGING ................................................................................... 4
1.2.1. Cooling............................................................................................................................................. 4
1.2.2. Dark Frames..................................................................................................................................... 5
1.3. THE VARIOUS CCD PARAMETERS AND HOW THEY AFFECT IMAGING.............................................5
1.3.1. Pixel Size .......................................................................................................................................... 5
1.3.2. Full Well Capacity............................................................................................................................ 6
1.3.3. Dark Current.....................................................................................................................................6
1.3.4. Read Noise ........................................................................................................................................ 6
1.3.5. Frame Transfer .................................................................................................................................7
1.3.6. Antiblooming Protection ................................................................................................................... 7
1.3.7. A/D Bits and Digitization Rate.......................................................................................................... 8
1.3.8. Binning .............................................................................................................................................9
1.3.9. Spectral Response............................................................................................................................. 9
1.4. CAMERA HARDWARE ARCHITECTURE ............................................................................................. 10
2. THE FIRST DAY WITH THE CAMERA ............................................................................................... 13
2.1. SETTING UP THE SYSTEM..................................................................................................................13
2.1.1 Installing the CCDOPS Software ..................................................................................................... 13
2.1.2. Getting Acquainted with CCDOPS Software.................................................................................... 13
2.1.3. Connecting the Camera to the Computer......................................................................................... 16
2.1.4. Establishing a Communications Link with the Camera.................................................................... 17
2.1.5. Operating your Camera with CCDOPS - a Daytime Orientation.................................................... 17
2.2. THE FIRST NIGHT WITH THE CAMERA.............................................................................................. 19
2.2.1. Focusing the Camera ...................................................................................................................... 20
2.2.2. Finding and Centering the Object ................................................................................................... 21
2.2.3. Taking an Image ............................................................................................................................. 21
3. SOFTWARE FLOW..................................................................................................................................23
3.1. IMAGE ACQUISITION ROUTINES........................................................................................................23
3.1.1 Grab ............................................................................................................................................... 23
3.1.2 Focus.............................................................................................................................................. 23
3.1.3 Track and Accumulate..................................................................................................................... 24
3.1.4 Eyepiece Mode................................................................................................................................ 24
3.1.5 Auto Grab....................................................................................................................................... 24
3.1.6 Color Grab...................................................................................................................................... 25
3.2. FILE OPERATIONS .............................................................................................................................. 25
3.2.1 Naming Conventions....................................................................................................................... 25
3.2.2 File Path and Filter......................................................................................................................... 26
3.2.3 Saving Images................................................................................................................................. 26
3.2.4 Loading Images............................................................................................................................... 27
3.3. IMAGE DISPLAY ROUTINES ............................................................................................................... 27
3.3.1 Photo vs. Analysis Mode ................................................................................................................. 27
3.3.2 Image Parameters........................................................................................................................... 27
3.3.3 Slide Shows..................................................................................................................................... 28
3.3.4 Printing Images............................................................................................................................... 28
3.3.5 Background and Range................................................................................................................... 28
3.4. IMAGE PROCESSING ROUTINES......................................................................................................... 28
3.4.1 Depixelize and Reduce.................................................................................................................... 29
3.4.2 Filtering..........................................................................................................................................29
3.4.3 Image Corrections........................................................................................................................... 30
i
Page 4

3.4.4 General Purpose ............................................................................................................................. 30
3.5. IMAGE ANALYSIS ROUTINES.............................................................................................................30
3.5.1 Histogram....................................................................................................................................... 31
3.5.2 Cross Hairs..................................................................................................................................... 31
3.6. SETUP FUNCTIONS.............................................................................................................................31
3.6.1 Camera Setup.................................................................................................................................. 31
3.6.2 Graphics Setup................................................................................................................................ 32
3.6.3 Communications Setup.................................................................................................................... 32
3.7. GENERAL PURPOSE CAMERA FUNCTIONS........................................................................................32
3.7.1 Establish Link ................................................................................................................................. 32
3.7.2 Information..................................................................................................................................... 32
3.7.3 Shutdown......................................................................................................................................... 32
3.7.4 Autoguiding .................................................................................................................................... 33
3.7.5 Filter Wheel.................................................................................................................................... 33
4. ADVANCED IMAGING TECHNIQUES.................................................................................................35
4.1. TAKING A GOOD FLAT FIELD ............................................................................................................ 35
4.2. TRACK AND ACCUMULATE............................................................................................................... 35
4.3. COLOR IMAGING................................................................................................................................35
4.4. AUTOGUIDING.................................................................................................................................... 36
4.5. FIELD OPERATION.............................................................................................................................. 37
5. GLOSSARY...............................................................................................................................................39
6. HINTS AND TIPS......................................................................................................................................43
6.1 QUESTION AND ANSWER....................................................................................................................... 43
6.2. CCDOPS USE TIPS ............................................................................................................................. 45
6.3. HINTS AND TIPS FOR LAPTOP USERS................................................................................................ 45
6.4. TELESCOPE TIPS ................................................................................................................................ 46
A. APPENDIX A - SPECIFICATIONS ......................................................................................................... 49
A.1 DC POWER JACK................................................................................................................................ 49
A.1 COMMUNICATIONS PORT .................................................................................................................. 49
A.1 TELESCOPE PORT...............................................................................................................................50
B. APPENDIX B - FILE FORMATS ............................................................................................................. 51
B.1 SBIG COMPRESSED AND UNCOMPRESSED FORMATS...................................................................... 51
B.2. TIFF FORMAT .................................................................................................................................... 56
B.3. FITS FORMAT .................................................................................................................................... 56
C. APPENDIX C - MAINTENANCE ............................................................................................................ 57
C.1. REPLACING THE FUSE........................................................................................................................ 57
C.2. DISASSEMBLING/REASSEMBLING THE OPTICAL HEAD....................................................................57
C.3. CLEANING THE OPTICAL WINDOWS..................................................................................................58
C.4. REPLACING THE DESICCANT.............................................................................................................58
D. APPENDIX D - ADVANCED IMAGE PROCESSING TECHNIQUES ................................................. 59
D.1. ASTROMETRY AND PHOTOMETRY.................................................................................................... 59
D.1.1 Astrometric Measurements..........................................................................................................59
D.1.2 Photometric Measurements......................................................................................................... 60
D.1.3 Calculation of Centroids............................................................................................................. 62
D.1.4 Calculation of Separation ........................................................................................................... 63
D.1.5 Calculation of Magnitude ........................................................................................................... 63
D.1.6 Calculation of Diffuse Magnitude.................................................................................................... 64
D.2. FLAT FIELDING TRACK AND ACCUMULATE IMAGES....................................................................... 64
ii
Page 5

D.3. FURTHER READING............................................................................................................................ 65
iii
Page 6

Introduction
Congratulations and thank you for buying the SBIG ST-237 Advanced CCD Camera. This
camera offers incredible performance in a small package for a moderate cost. Using the camera
will expand your astronomical experience by allowing you to easily take images like the ones
you've seen in books and magazines, but never seen when peeking through the eyepiece. CCD
cameras offer convenience, high sensitivity (a typical deep-sky image is several minutes), and
advanced image processing techniques that film just can't match. While CCDs will probably
never replace film in its large format, CCDs offer ease of use and allow a wide range of
scientific measurements. Their use has established a whole new field of Astronomy. Some of
the features you'll discover about your camera include:
• Based on the Texas Instrument TC37 CCD with 640 x 480 pixels that are 7.4
microns square.
• Double Correlated Sampling readout with 12 Bit A/D for the lowest possible
noise.
• Convenient and fast parallel interface offers full frame download times under 4
seconds.
• Thermoelectric cooling and vibrationless fan give sky background limited
performance.
• Integral Shutter Wheel that can be replaced with a Color Filter Wheel for Tricolor
imaging.
• Telescope port for use as an Autoguider.
• Advanced CCDOPS software for data acquisition, display and processing.
• Track and Accumulate1for hassle-free long duration exposures.
• 12 VDC wall transformer or use with battery in the field.
• Standard T-Thread allows use with a variety of telescope adapters including the
standard 1.25 inch nosepiece and eyepiece projection units.
This manual is organized for two types of use. Some sections have been designed to be read
through from the start while you're learning about the camera and the software whereas other
sections are to be used for reference. Briefly the manual consists of the following sections:
• Section 1 describes CCD cameras and how they work. While it is the first section
of the manual, it is a bit technical, and some users may wish to skip ahead to the
second section then come back to this section once they have had a little hand's
on experience.
• Section 2 tells you how to install the camera and camera software and takes you
step by step through the process of taking your first images. Even if you have
experience with other cameras you should browse through this section and read
any sections that are new to you.
• Section 3 describes the CCDOPS imaging software that comes with your camera.
It presents the software from the standpoint: "What commands do I use to take
1
Track and Accumulate covered by SBIG US Patent 5,365,269.
Page 1
Page 7

Introduction
images?", etc. While it doesn't discuss every nuance of each command (that's
reserved for Section 4) it will give you a good feel for the flow of the software.
• Section 4 presents some more detailed information about how you use the
camera for some slightly more advanced tasks. The discussion of even more
advanced topics is continued in Appendix D. Once you have become familiar
with the basic operations of the camera you will want to read these sections.
• A separate manual describes each and every command in the CCDOPS software
and is meant more as a reference section than a narrative one. If you're
wondering what the "Dark interval" setting in the Track and Accumulate
command does this section is for you.
• Sections 5 and 6 provide a Glossary of common CCD imaging terms, a Question
and Answer section on the most common questions you'll have and a section of
useful hints and tips for using the camera. Again, this is a good section to read
once you have had a little time with the camera.
• Finally, the Appendices provide a wealth of technical information about the
camera.
Page 2
Page 8

Section 1 - Introduction to CCD Cameras
1. Introduction to CCD Cameras
The CCD (charge coupled device) is very good at the most difficult astronomical imaging
problem: imaging small, faint objects. For such scenes, long film exposures are typically
required. The CCD based system has several advantages over film: greater speed, quantitative
accuracy, ability to increase contrast and subtract sky background with a few keystrokes, the
ability to co-add multiple images without tedious dark room operations, wider spectral range,
and instant examination of the images at the telescope for quality. Film has the advantages of a
much larger format, one-step color, and independence of the wall plug (the ST-237 camera can
be battery operated in conjunction with a laptop computer, though). After some use, you will
find that film is best for producing sensational large area color pictures, and the CCD is best for
planets, small faint objects, and general scientific work such as variable star monitoring and
position determination. It is for this reason that we designed the camera to support both
efforts, as an imaging camera and as an auto-guider to aid astrophotography.
1.1. How CCDs Work
The CCD is a solid-state imaging detector that is quite commonly used in video tape cameras
and is starting to find acceptance in still frame cameras. It has been used for Astronomical
Imaging for over twenty years. The CCD is arranged as a rectangular array of imaging
elements called pixels. An image is formed by reading the intensity of these pixels.
The basic function of the CCD detector is to convert an incoming photon of light to an
electron which is stored in the detector array until it is read out, thus producing data which
your computer can display as an image. How this is accomplished is eloquently described in a
paper by James Janesick and Tom Elliott of the Jet Propulsion Laboratory:
"Imagine an array of buckets covering a field. After a rainstorm, the buckets are
sent by conveyor belts to a metering station where the amount of water in each
bucket is measured. Then a computer would take these data and display a
picture of how much rain fell on each part of the field. In a CCD the "raindrops"
are photons, the "buckets" the pixels, the "conveyor belts" the CCD shift registers
and the "metering system" an on-chip amplifier.
Technically speaking the CCD must perform four tasks in generating an image.
These functions are:
1) charge generation
2) charge collection
3) charge transfer
4) charge detection
The first operation relies on a physical process known as the photoelectric effect when photons or particles strike certain materials free electrons are liberated. In
the second step the photoelectrons are collected in the nearest discrete collecting
sites or pixels. The collection sites are defined by an array of electrodes, called
gates, formed on the CCD. The third operation, charge transfer, is accomplished
by manipulating the voltage on the gates in a systematic way so the signal
electrons move down the vertical registers from one pixel to the next in a
conveyor-belt like fashion. At the end of each column is a horizontal register of
Page 3
Page 9
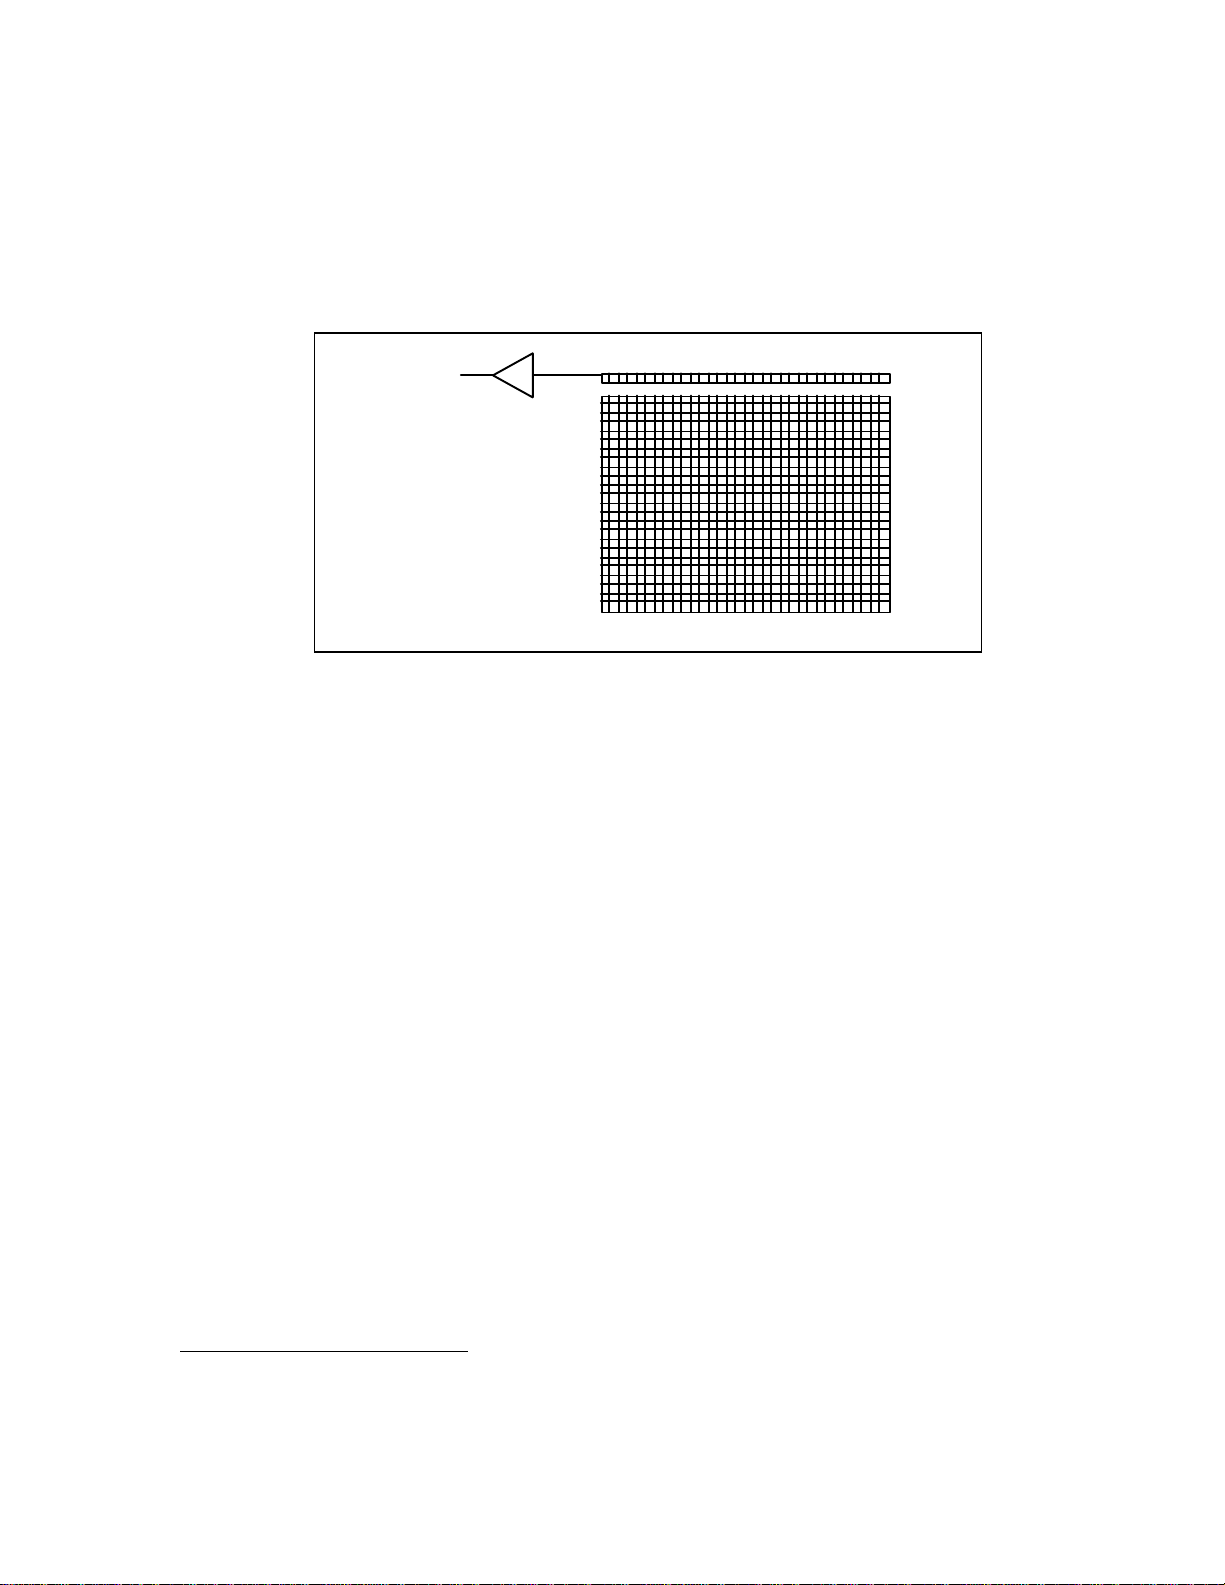
Section 1 - Introduction to CCD Cameras
Readout Register
pixels. This register collects a line at a time and then transports the charge
packets in a serial manner to an on-chip amplifier. The final operating step,
charge detection, is when individual charge packets are converted to an output
voltage. The voltage for each pixel can be amplified off-chip and digitally
encoded and stored in a computer to be reconstructed and displayed on a
television monitor."
2
Output
Y=1
Amplifier
Y=N
X=1 X=M
Figure 1.1 - CCD Structure
1.2. CCDs Applied to Astronomical Imaging
When CCDs are applied to astronomy, with the relatively long exposure times (compared to
the 30 frames per second used in video camera), special considerations need to be applied to
the system design to achieve the best performance. This section discusses the cooling and dark
frame requirements of astronomical imaging.
1.2.1. Cooling
Random noise and dark current combine to place a lower limit on the ability of the CCD to
detect faint light sources. If the CCD is producing more electrons from its own internal
processes than is produced by photons from a distant object, the signal from the object is said to
be "lost in the noise", and will be impossible to display without sophisticated image processing
software. Noise here refers to the "gritty" look of short exposure images.
Internally, the CCD generates thermal noise and readout noise caused by the operation
of the electronics on the chip. The goal is to eliminate unwanted sources of electron production
in the chip and thus make the detector more sensitive to the remaining source of electron
production by incoming photons. As you can imagine, the reduction of unwanted noise is
important for the best performance of the CCD.
Dark current is thermally generated electrons in the device itself. All CCDs have dark
current which can cause each pixel to fill with electrons in only a few seconds at room
temperature even in the absence of light. By cooling the CCD, this source of noise is reduced,
2
"History and Advancements of Large Area Array Scientific CCD Imagers", James Janesick, Tom
Elliott. Jet Propulsion Laboratory, California Institute of Technology, CCD Advanced Development
Group.
Page 4
Page 10

Section 1 - Introduction to CCD Cameras
the sensitivity increased, and longer exposures are possible. In fact, for every 8°C of additional
cooling, the dark current in the CCD is reduced to half. In your camera for example, cooling
the CCD from room temperature (25°C) down to 0°C results in an eight-fold reduction in dark
current.
The ST-237 uses a thermoelectric (TE) cooler to cool the CCD. The TE cooler is a solid-
state device that acts like a heat pump. By running electrical current through the TE cooler,
heat is pumped out of the CCD through the TE cooler. The camera also has a temperature
sensing thermistor attached to the CCD to monitor the temperature, and the camera electronics
control the temperature at a user determined value for long periods. As a result, exposures up
to an hour long are possible, and saturation of the CCD by the sky background typically limits
the exposure time.
The sky background conditions also increase the noise in images, and in fact, as far as
the CCD is concerned, there is no difference between the noise caused by dark current and that
from sky background. If your sky conditions are causing photoelectrons to be generated at the
rate of 100 e-/pixel/sec for example, increasing the cooling beyond the point where the dark
current is roughly half that amount will not improve the quality of the image. This very reason
is why deep sky filters are so popular with astrophotography. They reduce the sky
background level, increasing the contrast of dim objects, and can be used to advantage with the
CCD camera.
1.2.2. Dark Frames
No matter how much care is taken to reduce all sources of unwanted noise, some will remain.
Fortunately, however, due to the nature of electronic imaging and the use of computers for
storing and manipulating data, this remaining noise can be drastically reduced by the
subtraction of a dark frame from the raw light image. A dark frame is simply an image taken
at the same temperature and for the same duration as the light frame with the source of light to
the CCD blocked so that you get an "image" of the dark. This dark frame will contain an image
of the noise caused by dark current (thermal noise) and other fixed pattern noise When the
dark frame is subtracted from the light frame, this pattern noise is removed from the resulting
image. The CCDOPS software can automatically perform this.
1.3. The Various CCD Parameters and How they Affect Imaging
If you scan the CCD related literature you will see a slew of new terms describing CCDs and
their performance. In this section we will discuss the more common CCD parameters and their
effects in an imaging application.
1.3.1. Pixel Size
Every CCD, independent of the manufacturer, is divided into a relatively large number of
small pixels. In your CCD camera the imaging area of the CCD is 4.7 mm x 3.6 mm and the
pixels are 7.4 microns square (1 micron is one thousandth of a millimeter or roughly 0.0004"). If
you looked at the CCDs available from the various manufacturers you would see that their
pixels typically vary from 7 microns on the small end to 25 microns on the large end. There are
advantages and disadvantages associated with the size of pixels in a CCD.
Page 5
Page 11

Section 1 - Introduction to CCD Cameras
While having small pixels may seem advantageous in terms of offering "higher
resolution", large pixels gather more light and are thus "more sensitive". You can also adjust
your telescope configuration to accommodate various size pixels, using faster telescopes to
increase the speed of small pixel CCDs or longer focal lengths to increase the resolution of
larger pixel CCDs.
Often times the basic goal is to match the CCD resolution to the telescope resolution and
to the overall seeing. It would be a waste to use a pixel size of 7 microns on a telescope with a
spot size of 25 microns or to configure the CCD/telescope to produce an image scale of 10 arcseconds per pixel when you're looking for fine planetary detail.
1.3.2. Full Well Capacity
The full well capacity of a CCD is the number of electrons each pixel can hold before the pixels
are full. While this may seem like an important consideration in choosing a camera, you need
to think about how the camera is used.
The typical CCD astronomer is taking images of faint galaxies and nebulae. While
exposures are long, you very rarely will expose the CCD to more than a small fraction of its full
well capacity on these dim objects. Some stars in the image will expose to the full well capacity,
but not much of the nebulosity. So even though small pixel size CCDs have lower full well
capacities than large pixel CCDs, most applications do not stress this CCD parameter.
1.3.3. Dark Current
Every CCD, independent of manufacturer, will suffer from dark current. One manufacturer's
CCD may have lower dark current than another manufacturer's, but they all have dark current.
The only way to reduce dark current in a CCD is by cooling it, and in general the more cooling,
the better. But there is a limit.
In astronomical imaging, you're looking at objects against the sky background, and that
sky background isn't perfectly dark. City light and sky glow itself cause the sky to actually
have some brightness. As far as the CCD is concerned from a noise standpoint, it can't tell the
difference between electrons generated by dark current and those generated by sky
background. Because of this, cooling the CCD beyond the point where the dark current is less
than the sky background will not result in any further improvement in image quality.
As a matter of interest, your CCD camera produces roughly 1 e-/p/s
(electron/pixel/second) of dark current when cooled to -5°C and a typical dark sky through an
F/10 telescope produces 2 e-/p/s. Sky background scales inversely with the square of the
telescope's F-Ratio and for example is 25 times higher at F/2 than it is at F/10.
1.3.4. Read Noise
The read noise of a CCD is the noise inherent in the CCD's amplifier and charge detection
circuitry. This read noise forms a noise floor below which the CCD will not detect weak
signals. Something you're imaging must rise above the read noise level before you'll be able to
see it.
Since the read noise is the noise floor, it is really only important for very short exposures
of dim objects. As the signal from your target or the signal from the sky background builds up,
it will cross the noise floor and the noise in the image will be determined only by the brightness
Page 6
Page 12

Section 1 - Introduction to CCD Cameras
of the target and the exposure time, not the CCD's read noise. For example, the read noise in
your CCD camera is 15 electrons RMS, and when your signal has built up to 225 electrons (15
electrons RMS squared) the read noise is no longer the dominant noise in the final image. At
F/10 the sky background alone achieves this level in 2 minutes and at F/2 it occurs in 4
seconds!
There are techniques CCD manufacturers can use to reduce the read noise. One of the
techniques is Double Correlated Sampling where some of the noise in the amplifier is
subtracted out by making two measurements per pixel rather than one. Your Advanced CCD
camera uses such a technique.
1.3.5. Frame Transfer
There are two basic types of CCDs available: Frame Transfer CCDs like the one used in your
camera and Full Frame CCDs. A Frame Transfer CCD is divided into 2 separate areas on the
CCD. One area, called the image area, is sensitive to light and that is where the image builds
up when exposed to light. But CCDs can't be "turned off" and they continue to build up signal,
even throughout the readout phase. Remember that during readout, the rows of charge are
shifted up to the readout register. It's sort of like advancing the film in a camera with the
shutter open. Unless the CCD is covered with a shutter during the readout, the continued
buildup of signal throughout the readout phase will cause streaking.
The second area in the Frame Transfer CCD, called the storage area, is shielded from
light by an aluminum layer on the CCD. This storage area is used as an "electronic shutter"
whereby data from the image area, after completing the exposure, is rapidly shifted into the
storage area where it is then digitized. A fast shift from the imaging area to the storage area
insures minimal streaking. Once the image is in the storage area, it can read out by the camera
electronics without causing streaking.
The simple answer to streaking you might say is to use a mechanical shutter, and in fact
your camera does have a shutter but the accurate timing of exposures is not limited by the
speed of that shutter but by how rapidly the imaging area can be moved into the storage area.
In this way the mechanical shutter is used to cover the CCD chip for taking dark frames while
short exposure images can be achieved electronically, without the limitations of mechanical
shutters.
1.3.6. Antiblooming Protection
As described above, the individual pixels in the CCD have a limited full well capacity. When a
pixel fills up with charge, the excess charge generated has to go somewhere. Again, there are
two basic types of CCDs available.
Standard CCDs, when reaching the saturation point, will spill the charge into
neighboring pixels, typically up and down the column in a line that is called blooming. If for
example you had a pixel that was exposed to 10 times its full well capacity, it would bloom
until a column of ten pixels was saturated, causing streaks in the image. The second type of
CCD offers Antiblooming protection.
In an Antiblooming protected CCD, when the charge in the pixel gets above some
threshold, typically one-half the full well capacity, the majority of the excess charge gets bled
off into a drain on the CCD. For example, a CCD with a 100X Antiblooming protection will
Page 7
Page 13

Section 1 - Introduction to CCD Cameras
drain off 99% of the excess charge, allowing a pixel to overexpose to 100-fold before blooming
occurs.
There is a price to pay however with Antiblooming protection and that's why
manufacturers produce both protected and unprotected CCDs. First off, the process of
Antiblooming protection causes a nonlinearity in the response of a CCD. If you were trying to
make accurate Photometric measurements, you would want the integrated star brightness kept
below the knee where the Antiblooming kicks in. The second detriment to some Antiblooming
protected CCDs is that at the integrated circuit level, the Antiblooming structures can reduce
the sensitive area of the individual pixels, causing a slight reduction in overall sensitivity.
The Texas Instruments (TI) TC237 CCD used in your camera has Antiblooming
protection and, according to TI, the structures required to implement the Antiblooming
protection do not cause any reduction in sensitivity
1.3.7. A/D Bits and Digitization Rate
If you browse through the literature on specifications of the various CCD cameras, you see
some of them are 8 bits, some are 12 bits and some are 16 bits. While in general an A/D
(Analog to Digital) converter with greater precision is desired, there is a point where the extra
precision doesn't get you any increased performance. In most CCD cameras it's actually the
CCD that limits the performance, not the A/D converter.
As a starting point, you can take the CCD's full well capacity and divide by the CCD's
read noise to come up with a figure for the CCD's dynamic range. In this way the dynamic
range is the ratio of the brightest object you could image without saturating to the dimmest
object you could detect. You could see that a 16 bit A/D with a dynamic range of 65,000 is
overkill for a CCD with a dynamic range of 4000 for example. Let's look at your camera. The
CCD has a full well capacity of 30,000 electrons and a read noise of 15 electrons RMS giving a
dynamic range of roughly 2000. A 12 bit A/D offers a dynamic range of 4096 and covers the
CCD fairly well.
One thing you do want to do with the A/D is make sure that the A/D's noise (typically
a fraction of a count) is lower than the CCD's noise so that you are truly CCD limited. Setting
the A/D to have a fraction of the noise of the CCD allows averaging several images to improve
noise.
Finally, the CCDs can be used in a mode where the pixels are combined in a process
called binning which is described in detail below. Binning reduces the CCD's spatial resolution
like increasing grain size in film, but increases the CCD's sensitivity and dynamic range. With
your camera you can bin the CCD 2 by 2 or 3 by 3 resulting in increased dynamic range.
The final consideration regarding the A/D is how fast the data is digitized and
downloaded from the CCD to the computer. The A/D is not the only contributor to that time.
The actual transmission of the data to the computer is a significant portion of it. In your
camera an entire image can be digitized by the A/D converter and sent to the PC in under 15
seconds. This is done using the PC's standard Parallel port without requiring the addition of
expensive (and difficult to configure) SCSI adapter cards.
Page 8
Page 14

Section 1 - Introduction to CCD Cameras
1.3.8. Binning
Binning is a process where multiple pixels in the CCD are combined to form a single larger
pixel. This reduces the CCD's resolution but increases the sensitivity. Different CCDs from
various manufacturers support different types of binning.
Some CCDs support on-chip binning, where all the pixels in the group are combined in
the CCD itself. This has the advantages of lower noise (a single read noise is generated for the
group of pixels) and higher speed digitization since fewer pixels are involved. In imaging
applications you tend to bin the images in both directions to preserve a "square" aspect ratio.
The one final advantage of binning is that it increases the overall image throughput, reducing
the digitize and download times due to the reduced number of pixels involved.
The camera software allows you to select a High resolution 7.4 micron square mode
where the pixels are unbinned, a Medium resolution mode resulting in 14.8 micron square
pixels and a Low resolution mode with 22.2 micron pixels. The latter is useful for fast
acquisition of faint objects.
1.3.9. Spectral Response
Like film, CCDs have a varying response to differing wavelengths. The basic fabrication
techniques used in manufacturing the CCDs greatly affect their spectral response. At the
extreme Red end of the spectrum, the CCDs loose their sensitivity because the photons simply
do not have enough energy to generate electrons in the CCD wells. At the Blue end of the
spectrum, the photons do not penetrate deep enough into the CCDs to get into the wells and
are stopped by the top layers of the CCD. Between the Red and the Blue, interference effects in
the top layers of the CCD can also cause peaks and valleys in the response.
This affects you in several ways. The most obvious is the overall effect that causes you
to take longer exposures with CCDs for various colors. For example, when taking color
images, your Blue exposure is typically several times longer than the Red exposure to give an
image with similar quality or Signal/Noise. One last interesting note about CCD's spectral
response is that they have much more response in the near infrared than film.
The TC237 CCD used in your camera is made using Texas Instrument's Virtual Phase
technology that gives excellent Blue response compared to other CCDs. This is achieved by
reducing the number of photon-absorbing clocking gates in the CCD.
Page 9
Page 15
Section 1 - Introduction to CCD Cameras
Figure 1.2 - CCD Quantum Efficiency
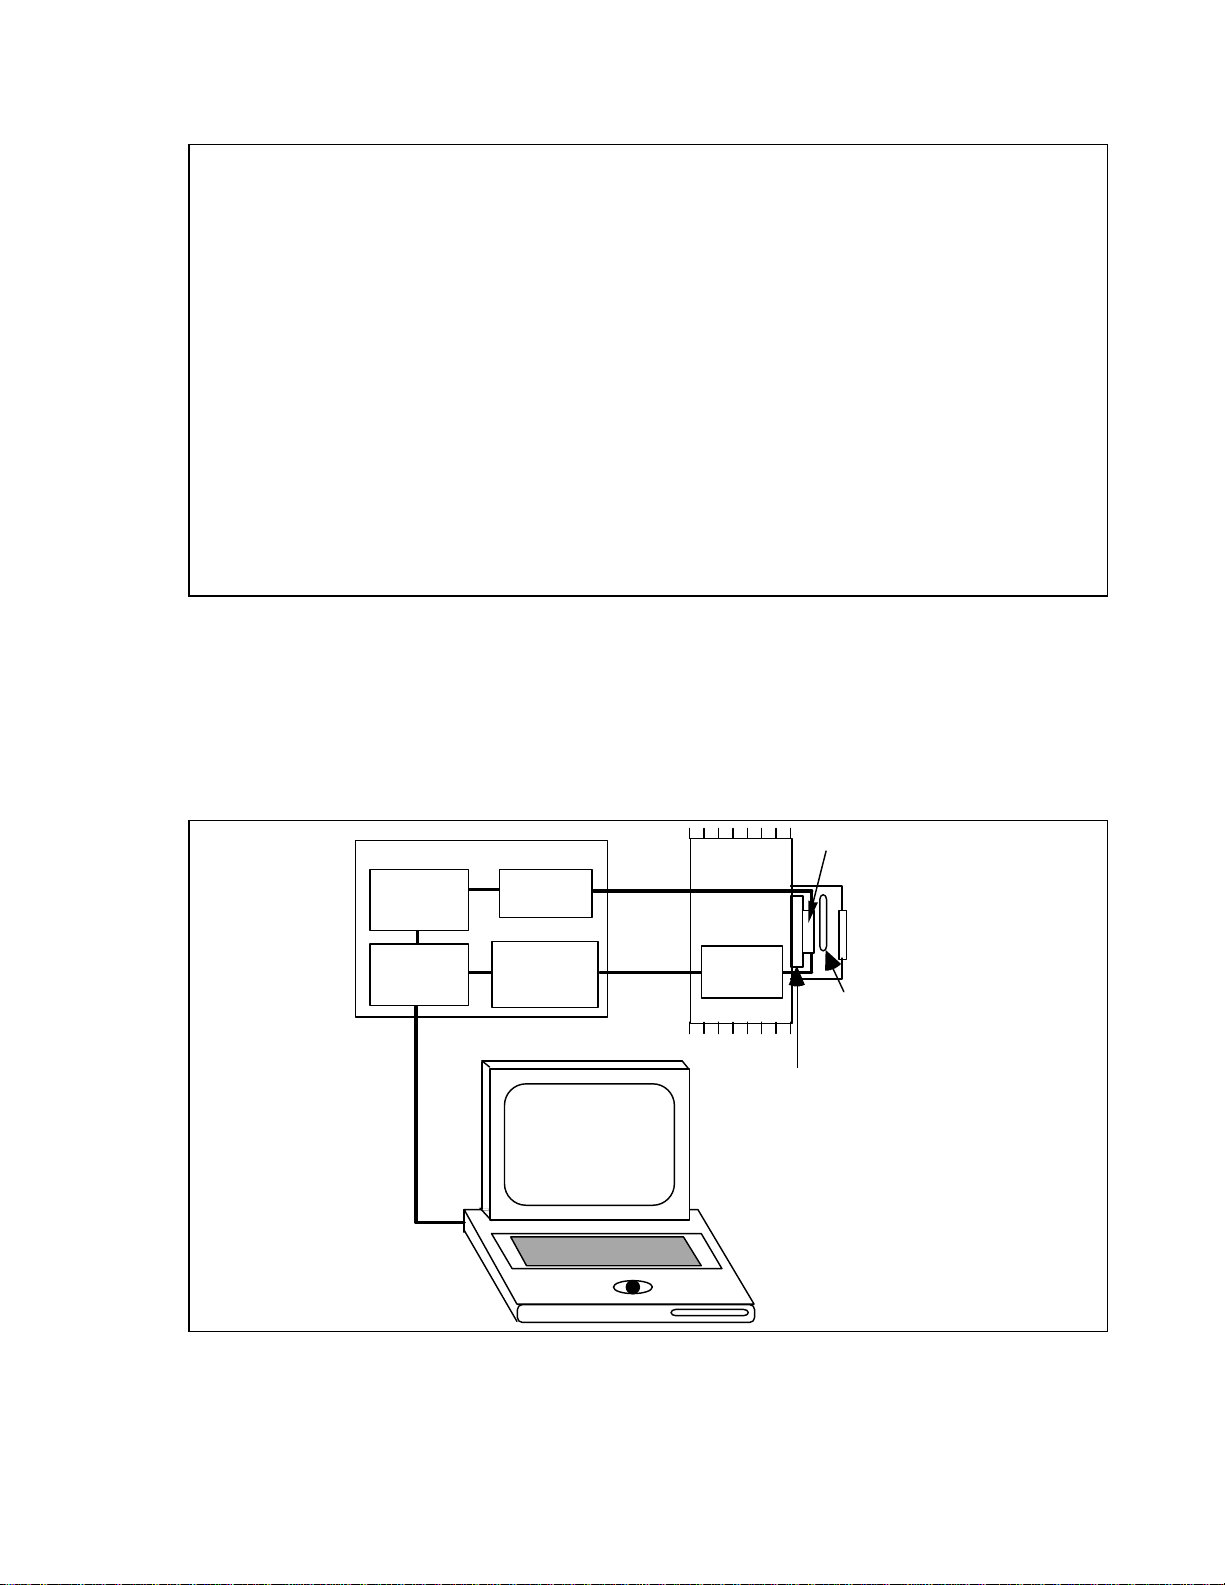
1.4. Camera Hardware Architecture
This section describes the ST-237 Advanced CCD Camera from a systems standpoint. It
describes the elements that comprise a CCD camera and the functions they provide. Please
refer to the figure below as you read through this section.
CCD
Shutter/
Filter Wheel
Micro-
controller
Gate
Array
CPU
Clock
Drivers
Postamp/
A/D
Converter
Host Computer
Optical
Head
Preamp
TE Cooler
Figure 1.3 - CCD System Block Diagram
The ST-237 camera is a two piece system consisting of an Optical Head and a CPU. The Optical
Head houses the CCD and Preamplifier and the CPU contains the Readout and Control
Page 10
Page 16

Section 1 - Introduction to CCD Cameras
Electronics. The CPU is powered by an external 12 VDC wall transformer and can be easily run
off a 12 volt battery in the field. Finally, the CPU interfaces to the PC through the Parallel Port
and is controlled by the software.
Examining the Optical Head in more detail shows the "front end" of any CCD camera
which is the CCD sensor itself. In this case the CCD is the Texas Instruments TC237. The CCD
is cooled by mounting it on a thermoelectric (TE) cooler. The TE cooler pumps heat out of the
CCD and dissipates it into the camera body where it is removed by a small fan in the rear of the
Optical Head.
Since the CCD is cooled below 0°C (32 °F), some provision must be made to prevent
frost from forming on the CCD. The camera has the CCD/TE Cooler mounted in a windowed
hermetic chamber sealed with an O-Ring. The hermetic chamber does not need to be a
vacuum, and contains a desiccant packet to absorb the small amount of moisture that might
condense.
Other elements contained in the optical head include the preamplifier and a rotating
shutter wheel. The shutter wheel makes taking dark frames a simple matter of pushing a
button on the computer. Remember that the shutter wheel does not perform the task of timing
the exposure, it merely blocks the light from the CCD to facilitate taking dark images. Timing
of exposures is based upon the electronic clocking scheme applied to the CCD. Also, the
shutter wheel can be replaced by a Color Filter Wheel which allows taking Tricolor images and
dark shuttering.
The Microcontroller acts as the "brains" of the camera electronics. It is responsible for
starting and stopping exposures in the CCD, clearing the CCD at the start of the exposure and
transferring the image into the CCD's storage area at the end of the exposure. The
microcontroller also regulates the CCD's temperature by monitoring the temperature sensor
and adjusting the power to the TE cooler. Finally, the microcontroller provides control of the
Shutter/Filter Wheel and the Telescope Port that is used when Autoguiding.
The final element of the camera system is the host computer and operating software.
The CCDOPS software runs under MS-DOS and is used to acquire, display and process images
from the camera. As you will learn, CCDOPS is a powerful package with a user-friendly
interface. It is unequaled in the industry. Also, third party software packages such as Software
Bisque's SkyPro for Windows will support the ST-237 Advanced CCD Camera and open up a
whole realm of capabilities including integrated Telescope and Camera control.
Page 11
Page 17

Page 18

Section 2 - The First Day with the Camera
2. The First Day with the Camera
This section takes you step-by-step through your first use of the software and camera.
2.1. Setting up the System
This section tells you how to install the CCDOPS software and establish a communications link
with the camera.
2.1.1 Installing the CCDOPS Software
The CCDOPS software is provided on floppy diskette, and should be copied to your system's
hard disk prior to use. SBIG's CCDOPS software which supports all cameras except the
original ST-4 is available for Windows, DOS and the Macintosh (Mac users need the optional
Mac/SCSI Adapter). Follow the instructions below to install your software:
Windows - The software comes as a 2 diskette set. Insert the first floppy disk and run
the Setup.exe program to install the software.
DOS, Macintosh - Create a CCDOPS directory on your hard disk and copy the contents
of the floppy disk to your hard drive.
After you have finished installing the software, place the floppy disk in a safe place in case you
need to reinstall it later.
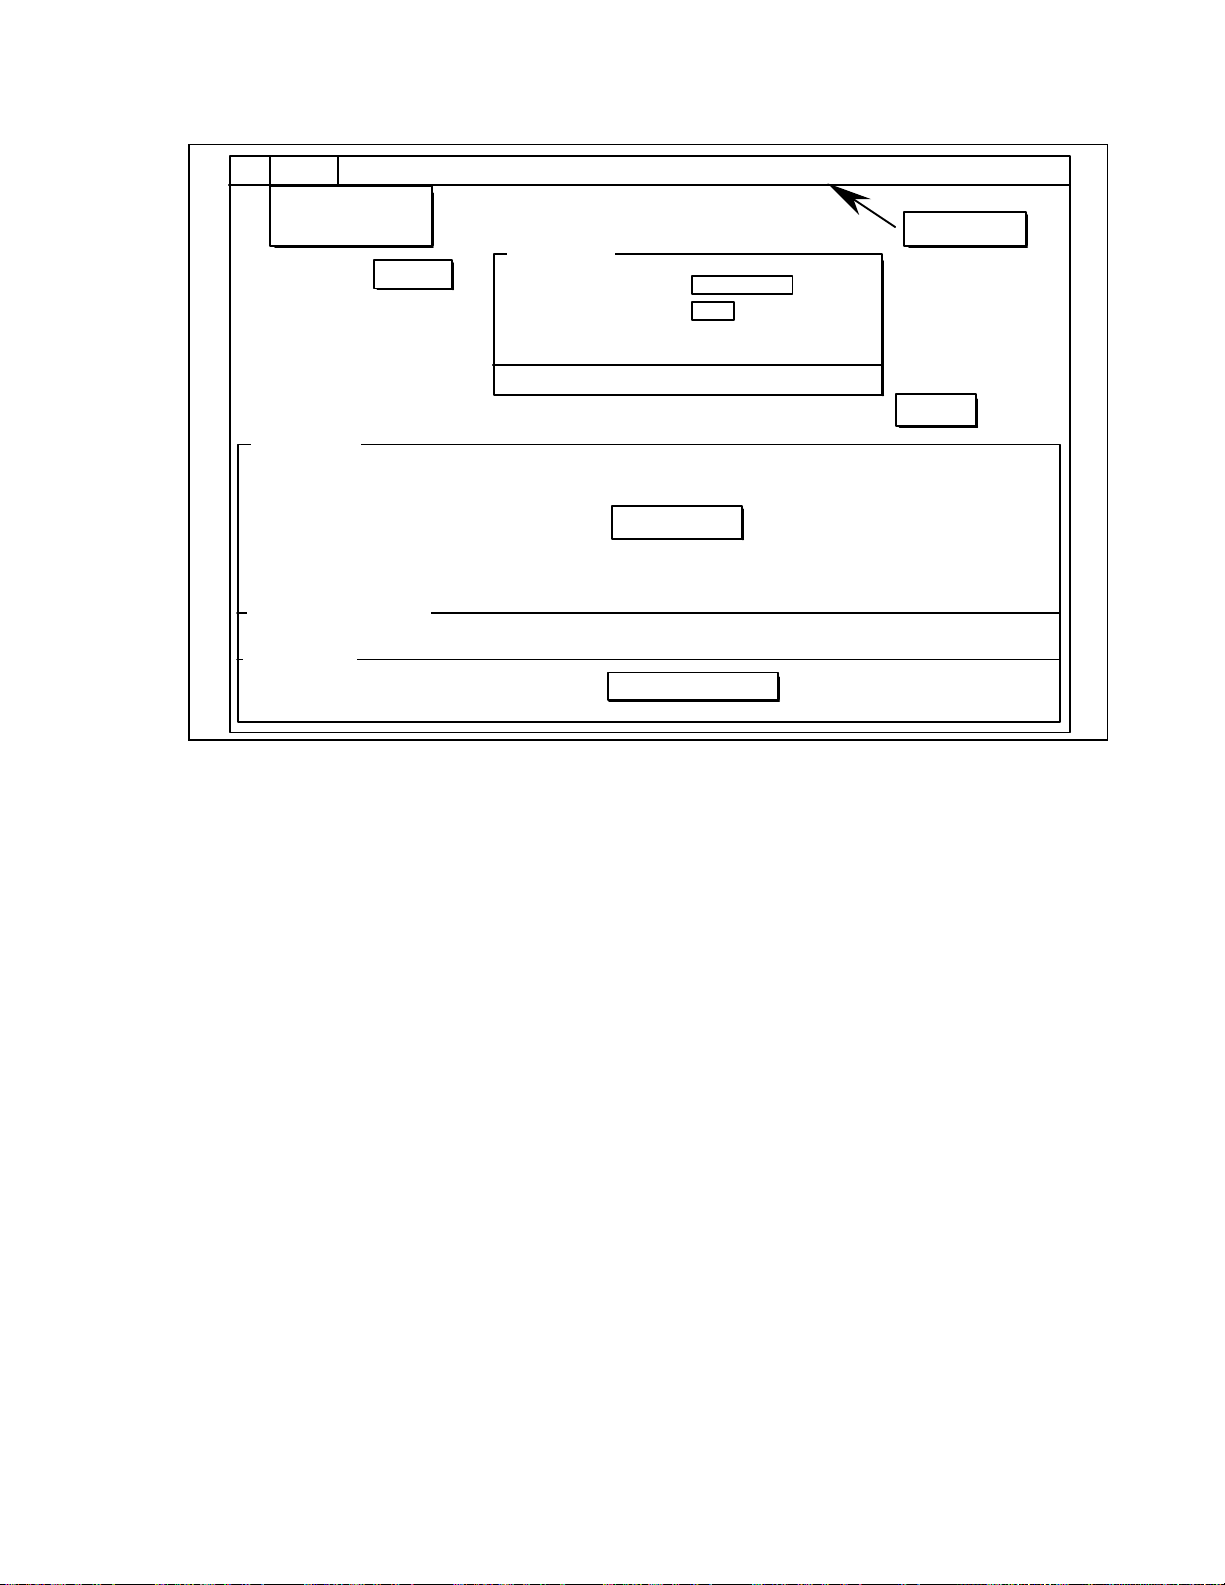
2.1.2. Getting Acquainted with CCDOPS Software
Upon entering CCDOPS a warning (referred to as an Alert) states no camera is hooked up yet.
To proceed, hit any key and you are presented with our user friendly menu based interface
shown in the figure below:
Page 13
Page 19
Section 2 - The First Day with the Camera
* File Camera Display Utility Misc Track Filter
O
pen Alt-O
S
ave Alt-s
Menu
Display
Display mode: Analysis Photo
Auto contrast: Yes No
Background: 100
Menu Bar
[ Enter ]
[ Esc ]
Dialog
Status
Welcome to the CCDOPS Software
Status Box
Data Buffer
Name:M27.237
Camera
Link:
Res:
The menu bar starts with an * at the top left and extends horizontally to the Filter menu item on
the right. Navigating between these menus can be accomplished with a mouse or left/right
cursor arrows on your keyboard. Go ahead now and move between these items.
The File menu is the most frequently used since it navigates you toward image retrieval
(Open command) and the image Save command. It also is the way to the off switch, via the
Exit command. To pull down the File menu, highlight it and simply hit Enter or click on it
when highlighted. To leave it, hit Esc key or click on another menu.
Camera Status
Figure 2.1 - The CCDOPS User Interface
Camera Menu
Move to the right and Camera menu is highlighted. Pull it down to see the 3 sections making
7 commands. None of these function yet since a camera is not hooked up or powered. Notice
that you are alerted to this fact by the software when you hit Enter on a highlighted command.
Display Menu
Moving right again to the Display menu, you see 2 sections of 5 items. You can use your
up/down cursors or mouse to navigate between these. Similarly, when selected, error messages
come up in all but the Slide Show command. Select it. Now you are prompted by a new
window (referred to as a Dialog) to select a slide show script. Move the highlighted box to the
DEMO.SLD script which we created for you and hit Enter. Now you are presented with more
choices. Temporarily ignore these and hit Enter again. When in doubt, just hit Enter to use the
Page 14
Page 20

Section 2 - The First Day with the Camera
standard defaults. You are now viewing a library of images created with the TC-237 chip in
your camera. These will run until you hit Esc.
You can adjust your monitor's brightness or contrast for best view. If you find an image
you wish to freeze, hit the Space bar. Hit the R key to resume slide show or hit any other key
to fast forward through the images.
File Menu
To call up specific images stored in image files, Esc the Slide Show command. In order to
display an image, it is necessary to first select its image file. Move the cursor to the File menu,
hit Enter, select the Open command and again hit Enter. Now you see the File Open dialog
presenting you with many choices. First are file directories shown in <>. These are created by
the software and later by you to organize and store images. The current directory you are in is
noted at the top center of list of files. Move the highlighted cursor to the MOON.237 file and
click on it twice in short succession (double-click) or hit Enter.
You are first shown with the image header data pertaining to that image. After viewing
the data, hit Enter. Highlight the Display menu and hit Enter to bring it down. Execute the
Image command and the software brings up the Display Settings dialog. Use the mouse or the
cursor keys to select the Photo display mode and then hit Enter one last time and your selected
image is now displayed.
If you have a VESA based SVGA display adapter, depress the up/down arrows to
adjust the image brightness and right/left arrows to adjust its contrast. This feature allows real
time display optimizing. If you are not getting a satisfactory image display, refer to the
Graphics Setup command in Section 5, the Software Reference section for help. Note that
images will almost always look better on a video monitor than from a laptop LCD. If you wish
to increase image size, again refer to Graphics Setup command in Section 5 and change the
graphics card to VGA or MCGA. Your selected image will still be held in the image buffer,
ready for redisplay when selected. When you're done with looking at the image hit Esc to
return to main menu.
Utility Menu
The next menu to the right, Utility, allows you to modify an image. Pull down the Utility
menu. These commands can be used without permanently modifying the selected image until
you save it. Move back to File menu.
Open and display the Jupiter image using the File Open and Display Image commands
and study the image briefly. Esc back to the main menu. Under the Misc menu use the
Graphics Setup command and make sure the graphics card is set to Auto. Press Enter and then
redisplay the image. Adjust the image with arrow keys for the best detail. Hit Esc and move to
Utility menu and execute the Sharpen command. In the Sharpen dialog select
Lunar/Planetary and Medium settings. Hit Enter. A sharpened image of Jupiter comes up
and notice how the red spot (light oval) now shows on Jupiter's right side by one of its moons.
Also, cloud band detail has been enhanced. At this point, you could save this image, but be
cautious and make sure you have read the manual and understand what the save function can
do to the original unsharpened Jupiter image. You are only a few Enter keystrokes away from
modifying your original data permanently unless you heed the warning box displayed while
Page 15
Page 21

Section 2 - The First Day with the Camera
executing the Save command. No problem, just hit Esc or be sure to rename the modified
Jupiter file before saving it so as not to modify the original file.
Display the sharpened Jupiter image again using the Display Image command and hit
Esc. We will go to the Utility menu and do something else to this image. Select the Depixelize
Image command and hit Enter. You have magnified the number of pixels in this image fourfold. Be aware that this would increase the size of the image on disk four-fold as well if you
saved it. Notice that even more detail becomes visible. Vary the contrast and brightness with
cursor arrow keys for the best view.
You have just successfully retrieved an image and optimized it for viewing. Since this is
any easily repeated example, let's get rid of the modified image by hitting Esc and moving to
Misc menu on the main menu bar.
Misc Menu
The Misc menu contains one section with 3 commands. You previously used this to verify the
graphics setup. These commands are covered in detail in Section 5 if you want to refer to it,
otherwise let's move right over to the Track Menu.
Track Menu
In the Track menu you see 3 sections containing 6 commands. Except for the Track and
Accumulate command, these all pertain to using your CCD camera as a separate auto guider
for astrophotography with accessories such as a Radial Guider, guide scope or to guide a
separate piggyback camera from your main scope. It is for advanced users with appropriate
equatorial tracking mounting systems.
Filter Menu
The last menu on the top right is the Filter menu. The commands in this menu are used for
controlling the Color Filter Wheel accessory and are discussed in Section 5 and in the manual
that comes with the Color Filter Wheel.
This basic preview should make you comfortable with the ease of moving around in
CCDOPS and what it entails. You can exit through the File menu now. Notice how a warning
box still alerts you that you are leaving an unsaved image that will be lost when you exit.
Specify "Quit:Yes" and hit Enter to leave CCDOPS and exit back to a DOS command. You can
now shut down your computer or type in WIN and hit Enter to go back into your Windows
software.
2.1.3. Connecting the Camera to the Computer
Place the camera's CPU midway between the computer and the telescope or some other
convenient place. With the power to the CPU disconnected, plug the Optical Head into the
CPU at the marked location and plug the beige parallel cable provided with the system into the
CPU. Connect the other end of the parallel cable into your computer's Parallel port (printer
port). Finally plug the power supply into the CPU and turn on the power switch. The CPU's
power switch should light up and the small fan on the back of the optical head will begin to
spin.
Page 16
Page 22

Section 2 - The First Day with the Camera
Important Note: Never connect or disconnect the CCD head from the CPU box unless the power
switch on the rear side of the CPU box is turned OFF. Damage to the CCD head,
or the CPU could occur.
2.1.4. Establishing a Communications Link with the Camera
Run the CCDOPS software and when it starts up, it will automatically attempt to establish a
link to the camera. If the camera installation is successful, the "Link" field in the Status Window
is updated to show the Link status. If the camera is not connected or the LPT port setting has
not yet been properly set, a message will be displayed indicating that the software failed to
establish a link. If this happens, use the Communications Setup command in the Misc menu to
configure the CCDOPS software for the parallel port you are using. Then use the Establish
COM Link command in the Camera menu to re-link.
2.1.5. Operating your Camera with CCDOPS - a Daytime Orientation
With the Camera menu highlighted, select the Setup command. Notice the choices for
temperature regulation, etc. Ignore these for the time being and hit Esc to get rid of the dialog.
Again select the Camera menu and then execute the Grab command. Note the exposure time,
etc. Verify that the exposure time is set to :1.00 second and other settings are Dark frame:Only,
Auto display:Analysis, Exposure delay:0 and Special processing:None. With the CCD camera
nosepiece uncovered, hit Enter. A sequence of events occurs and you will notice a spotted
image. This represents a 1 second exposure dark frame at your room temperature with the
CCD chip still covered by the internal mechanical shutter wheel to keep out light. At the upper
left on your current screen is a menu named Display. Under the image is a box with
information pertaining to this image. Of interest is Back (background) and Range. These are
pixel values that can theoretically go from a low of 0 to a high of 4,095. These will register
numbers in the low thousand range. Using your mouse or Enter key, pull down the Display
menu. Notice 8 choices. Select the X-Hairs command.
You are presented with a lot of data pertaining to the small crosshair cursor (+) now
located in your dark frame image. The cross placement is now in your control and is used to
obtain pixel information. Move it around with the arrow cursors or rapidly by mouse point
and click. Notice 9 lines of data in the X-Hair box that are updated with each pixel position
movement. A convenient zoomed box located below and left of the entire main image
magnifies the immediate area surrounding the crosshair cursor. The very center of this zoomed
box represents the cursor position. Move the crosshair toward the top of the frame. Now
slowly move it, an arrow stroke at a time, to find a dark pixel (low value). A reading of 400 to
1400 is typical. Now move it to the bottom of the image and note the brightest pixel value. It
might be in the range 1200-1300. A single very hot pixel could give a value of 3000. Hitting
Enter again brings up more advanced crosshair commands. Hit Esc twice to view just the
image. This is what you will typically view after you capture an image.
Next, Esc back to the main menu and hit the Grab command again. Select Dark
frame:None. With the camera nosepiece uncovered, hit Enter to begin another exposure. This
time you are taking a light frame. Notice how smooth the image looks. Repeat the above steps
used in evaluating pixels in the dark frame. Notice that they all saturated with 4,095 counts.
This is the maximum amount of light entering as photons and converted to electrons that the
CCD can read.
Page 17
Page 23

Section 2 - The First Day with the Camera
Next, cover the nosepiece of the camera and use the Grab command again, only this
time select Dark frame:Also and hit Enter. This image has a much lower background and
range, and represents a dark subtracted image. Still, pixel intensity variations fall between 50
and 250. Some individual hot and cold pixels may show at 30 to 900 counts, but their Average
Value is 100 or so. This "Avg" value (displayed in the crosshairs data) represents the low end
intensity of your pixel image data, while 4,095 represents the maximum intensity value. All
your CCD image data is represented as shades of grey between 100 and 4,095 counts. This is a
very large range, far beyond the photographic process capability.
Let's Esc to the main menu and use the Setup command in the Camera menu. We will
cool the camera to 0 degrees C. with a new Setpoint setting of 0. Also, set Temperature
regulation to Active. Nothing happens yet until you hit enter. Notice the lower corner of the
Camera Status that shows Temperature and that it is rapidly dropping. When it stabilizes at
around 0, you can see the percentage cooler capacity you are using shown in parentheses.
Grab another dark subtracted image(Dark frame:Also) and study the display. First notice the
much more uniform look the pixels show. The benefits of CCD cooling are very evident.
Notice that the average count remains consistently around 100 but that the pixels are much
more closely clustered around 100 counts.
3
If your room temperature is about 70 degrees F., try further cooling to -8 degrees C.
Nearly 100% cooler capacity may be indicated. For good astroimages, don't run above 90%.
Grab an image once the temperature stabilizes in the -8 degree range. Notice that the image is
even more uniform appearing now. The average pixel count is still around 100, but "hot" pixels
have greatly diminished except for an errant few that may always read high. No amount of
cooling can help these. They are inherent in the manufacture of most CCDs and typical.
Summary
Even at a 1 second exposure, the value of cooling is demonstrated to be important as well as the
dark taking and subtraction procedure. These steps are absolutely necessary to get the most
from your CCD camera. If you were at the telescope, all that would be left to do is to save this
image. Let's do that now but first we will need to use the Create Directory command in the File
menu to make a new directory for our images. Execute the command and when it asks you for
a directory name type CCD.4 Hit Enter to create the directory.
Finally, get back to the main menu and use the Save command in the File menu. Type a
name for the image (that follows standard DOS naming convention) with 8 legal characters,
e.g., the first eight letters of your name and hit Enter (don't put spaces in the file name). Then
use the Open command in the File menu and look for your name there. Highlight it and hit
Enter to open it. Notice the displayed header data has the file name you gave it, the date and
time setting of your computer as well as exposure time and temperature, etc. Some other
parameters were not yet set by you and may be incorrect. See Section 5 and the Telescope Setup
and Edit Parameters commands for more on this. This data will always be connected with the
3
You might think the pixel values would be clustered around 0 counts but instead they are clustered
around 100. That's because the CCDOPS software adds 100 counts to the dark subtracted image to
stop pixels from going below zero when the two images are subtracted. Just remember that 100
counts represents zero signal.
4
As a convenience the software makes up directory names for you by adding the current month and
day to DATA. You can use this name or type in your own name.
Page 18
Page 24

Section 2 - The First Day with the Camera
saved image as long as it is viewed by any CCDOPS software such as a friend's or a
magazine's.
5
Repeat the above procedures to capture, display and save images until you are
confident enough to take the next step of coupling your CCD camera to a telescope at night.
This time, before you exit the software, use the Shutdown command in the camera menu. You
want to do this before you turn off power to the CPU so that it has a chance to let the cooler
warm up a bit before the power is turned off. After using the Shutdown command give the
CPU 30 seconds or so before turning off the power. If you try to exit the software with the
cooling on, the software will prompt you to shut it down first.
2.2. The First Night with the Camera
Focusing a CCD camera can be a tedious operation, so a few hints should be followed. Before
using the software to focus the camera the first time, you should place a diffuser (such as scotch
tape, wax paper or ground glass) at the approximate location of the CCD's sensitive surface
behind the eyepiece tube and focus the telescope on the moon, a bright planet , star, or a distant
street lamp. This preliminary step will save you much time in initially finding focus. The
approximate distance behind the eyepiece tube for your CCD camera is 0.660 inches as shown
in the figure below.
Diffuser
Telescope
CCD
Camera
0.660
Back Focus - 0.660
Figure 2.2 - Camera Back Focus
Your CCD camera has a T-Thread on the front and is supplied with a screw-in 1.25 inch
nosepiece. Most users will find simply inserting the nosepiece into the telescope focuser in
place of the eyepiece the most convenient. Using the camera with other T-Thread accessories
like eyepiece projection adapters is also possible. At first, just use the nosepiece.
Orient the camera as shown in the figure below and drape the optical head's cable over
the telescope fork so that it is not hanging free and being dragged by the telescope which could
cause the telescope to have erratic RA (Right Ascension) motion. The orientation shown below
has the CCD's wide axis (X) aligned with RA and the narrow axis (Y) aligned with Declination.
Re-balance the telescope as required.
5
Note that it's always a good idea to display the image and adjust the background and range
parameters to your liking before you save the image. That way the CCDOPS software will
remember the settings and use them the next time you load and display the image.
Page 19
Page 25

Section 2 - The First Day with the Camera
telescope
chip
DEC (Y)
cord
RA (X)
Figure 2.3 - Camera Orientation
If you haven't done so already, power up the CCD camera and computer. Under the Misc
menu use the Telescope Setup command to enter your telescope information. For the Aperture
item enter the clear aperture in square inches (for example an 8" SCT is 43 square inches). The
focal length will be close to the product of the telescope diameter and the f-ratio (for example
an 8" f/10 has an 80" focal length). Finally enter your name in the User item. These parameters
are saved with each image in the image header.
6
2.2.1. Focusing the Camera
The telescope should be polar aligned and tracking. Since at this point you can be fairly far out
of focus, we recommend you start with a relatively bright star (2nd Magnitude or brighter).
Visually center the telescope on the star using your finder/guide scope or by sliding an
eyepiece in and out of the telescope without readjusting the telescope focus knob.
Use the Focus command in the Camera menu and set up for a 1 second exposure, Full
frame, Automatic update, Zero delay and Auto grab disabled. When you hit the Enter button,
the software will switch into graphics mode and start taking images, displaying them on the
screen one after another.
What you will typically see is a huge, out of focus star image. On an SCT if the focus is
off enough, you'll see an image of a donut with the telescope's central obstruction showing in
the middle of the star. On refractors there won't be any central obstruction. At this point you
adjust the telescope's focus, causing the star's image to shrink until it is a fairly small, bright
spot. When you get close to focus, you will see the star starts to bloom, with streaks protruding
above and below the core of the star. In fact, the signs of a really good focus is when the
blooming tails are their longest. For now don't worry about getting a perfect focus, just get
close. When you think you are focused hit the ESC key to exit from focus mode.
6
Refer to Section 5, the Software Reference section for a more detailed description of the Telescope
Setup command.
Page 20
Page 26

Section 2 - The First Day with the Camera
Now, reposition the telescope on a dimmer star, 5th or 6th Magnitude should work
well. We want to do the critical focus on a star that won't saturate the camera. Reenter the
Focus command using a 3 second exposure and the Planet frame mode. The 3 second exposure
allows the camera to average out some of the atmospheric effects. The Planet frame mode takes
a full frame image and then allows you to position a box around the star using the mouse or
keyboard in order to reduce download time. You can also resize the default box as desired.
To position the planet frame with the mouse, click and drag the upper-left and lower-
right corners of the box or click and drag the center. To position it with the keyboard, you use
the arrow keys in combination with the T key. The T key toggles whether you are moving the
Center, the Upper-Left or the Lower-Right corner of the box. You can see which is currently
selected in the upper-left corner of the display adjacent to the Hot label. Once you have placed
or redrawn the box, proceed with the Focus command by hitting the L key (for located).
7
You achieve critical focus by watching the Peak value displayed in the upper-left corner
of the display and adjusting the telescope focus until the highest peak value reading is
achieved. We recommend you start on one side of focus and adjust the telescope a little at a
time. On the first pass just get a feel for what sort of peak reading you'll be able to achieve and
don't worry if you go past the peak. In fact, make sure you have gone through the peak and
the peak values are dropping off or the star image is deteriorating. Then back up the focus and
go through it again, this time stopping when you get close to the peak readings from the first
pass. For SCT's always enter exact focus with a counter-clockwise focus knob movement.
2.2.2. Finding and Centering the Object
Once best focus is achieved, we suggest changing the Focus command to the "Dim" mode to
help center objects. This mode gives a full field of view, increased sensitivity, but reduces
resolution in order to increase the digitization and download time. If you have difficulty
finding an object after obtaining good focus, you can remove the head and insert a medium or
low power eyepiece. Being careful not to adjust the focus knob on the telescope, slide the
eyepiece in until the image appears in good focus. Then visually find and center the object, if it
is visible to the eye. If not, use your setting circles carefully. Then, re-insert the CCD head and
set an exposure time of about ten seconds. Center the object using the telescope hand controls.
Remember, your CCD chip is only 4.7 x 3.6 mm or the size of a match head. This field of view
is like using a 4-6 mm focal length ocular!
Note: With a 10 second exposure, objects like M51 or the ring nebula are easily detected with
modest amateur telescopes.
2.2.3. Taking an Image
Take a CCD image of the object by selecting the Grab command and setting the exposure time
to 60 seconds. Set the Dark Frame option to Also so the software does an Auto-Dark
subtraction, set with Image size to full and enable Auto Display. The camera will expose the
CCD for the correct time, download and then display the image. You can then save it or keep
7
You don't have to remember all the key names. The CCDOPS software has a pull down menu in the
upper-left corner of the display (named Focus in this case) that you an click on with the mouse or
pull down with the Enter key. You can then make choices from that pull-down menu.
Page 21
Page 27

Section 2 - The First Day with the Camera
trying your acquisition and focusing technique. Refer to section 3.2.2 for the "dated directory"
saving short cut. If you now have questions, read on through section 3.
When you are through for the night don't forget to use the Shutdown command in the
Camera Menu before you power down the CPU.
Page 22
Page 28

Section 3 - Software Flow
3. Software Flow
This section describes the CCDOPS software from a work flow standpoint. Rather than discuss
each command in every detail which is done in the separate Software Manual, this section lets
you see the forest through the trees, describing at a high level what each command does and
why you would use it. Read this section after your first night with the camera system and it
will help chart your course for future use.
3.1. Image Acquisition Routines
Probably the most important part of any CCD camera system is the acquisition of image data.
This section describes the various commands that can be used to take images.
3.1.1 Grab
The Grab command is the most straight forward way to take images with the camera. It's just
like pressing the button on your SLR to take a snapshot. You use the Grab command once the
camera system is all set up and focussed. In its simplest form it takes a single image of a
programmed duration and downloads it to the PC.
There are several options associated with the Grab command that expand its use. First
off, you can choose to take an auto Dark-Subtracted image or a single Dark Frame or Light
Frame. At the start you'll want to take auto Dark-Subtracted images and later, as your
experience grows, you may want to take Dark frames separately and store them on disk for
later manual subtraction from Light frames.
Another aspect of the Grab command is that you don't have to take full frame images.
You can choose to take Half Frame or Quarter Frame images where only the central half or
quarter of the field of view is captured. This has the benefit of reducing storage requirements
for images of objects such as Planets that don't fill the field of view. Along this vein, note that
you can also use the Camera Setup command described below to reduce the camera's
resolution through binning which also reduces storage requirements while preserving the field
of view.
Finally, the Grab command can be programmed to automatically display the image
after it has been acquired, or delay a number of seconds prior to starting an exposure to allow
you time to get back to the telescope and start hand guiding when desired.
3.1.2 Focus
The Focus command works like a continuous version of the Grab command. It takes images
and displays them on the computer, one after another. In its most simple form it is used to
focus the telescope and to find and center objects in the field of view.
As each image is downloaded and displayed on the screen, the Focus command
searches through the image and reports the brightness and location of the brightest pixel in the
image. Critical focus of the telescope/camera system is easily achieved by adjusting the
telescope focus until this peak value is maximized.
The Focus command can be programmed to take a partial frame image to help speed up
the image display in the Planet mode. In Planet mode you select a small region of the full
frame with the mouse and on subsequent images only that region of interest is digitized and
downloaded. For focusing on stars, this can dramatically increase the frame rate when used
with short exposures.
Page 23
Page 29

Section 3 - Software Flow
You can also program the Focus command for the Dim mode where the camera is
switched into low resolution mode. With the use of binning, the image resolution is reduced
and pixel size increased to 22.2 x 22.2 microns. This is handy for finding faint objects, as larger
pixels gather more light, or for generally improving the image throughput (if binning is
selected from setup mode, don't forget to change resolution prior to imaging at Hi-Res).
3.1.3 Track and Accumulate
Track and Accumulate is a patented process invented by SBIG that allows you to take long
duration images through the telescope without having to hand guide. It greatly simplifies
digital astrophotography.
First, a little background is required. It's obvious that the clock drive in your telescope
counteracts the earth's rotation, but what may not be so obvious is that even the most precise
drives, with periodic error correction and an excellent polar alignment eventually drift, causing
streaking of your images. What Track and Accumulate does is divide the long exposure into
several shorter duration snapshots which are automatically co-registered and co-added. The
final result is an image that is nearly identical to a single longer image except that there is no
tracking induced streaking!
There are a few limitations of this process though. First of all, this couldn't be applied to
a bunch of 0.01 second images to remove the effects of atmospheric turbulence, as desirable as it
may seem. To get the benefits of co-adding several images to equal a single longer image, the
noise in each of the snapshots must be above the camera's read noise floor. What this implies is
that you still need to get a relatively good mount and have a fairly good polar alignment. The
good news is that today's modern mounts can track fairly well over a minute to several
minutes. Also faster f/# telescopes and larger pixels help. A second limitation is that over a
long exposure time, the effects of accumulated telescope drift reduces the size of your final
image due to misregistration of shifted frame edges. For example, if over the duration of the
acquisition the telescope had drifted 15 pixels in RA and 10 pixels in DEC, the final image
would be smaller by that amount.
When using the Track and Accumulate command you choose the snapshot time and
the number of snapshots. You can also program it to take a partial frame, selecting the Half-
Frame or Quarter-Frame mode. The Track and Accumulate command always takes auto DarkSubtracted images but you can program how often it takes a dark frame by setting the dark
interval.
3.1.4 Eyepiece Mode
The Eyepiece feature turns your camera into an electronic eyepiece. You select the
exposure time (and the resolution) and the camera tkes image after image, displaying the
image on the screen. Point you telescope at the heavens and watch the galaxies fly by.
3.1.5 Auto Grab
The Auto Grab feature allows taking a sequence of images at some periodic interval and
saving them to disk. It isn't a command in itself but rather an extension of the Grab and Focus
commands. It's most useful for monitoring type programs or for selecting the best images out
of a series of images (planets).
Page 24
Page 30

Section 3 - Software Flow
With the Auto Grab feature you must pick a file name for the series of images and the
software automatically adds an index to the name for you as the images are being logged. In
addition to the file name, you also specify whether to save the images in the SBIG, TIFF or
FITS formats discussed below. Finally you select the number of images to acquire and the
interval from the start of one image to the start of the next.
When used in conjunction with Grab command, the Auto Grab can further be
programmed to refresh the dark frames for auto Dark-Subtracted images at a specified dark
interval. The software then proceeds through the program, taking images at the periodic rate
and logging them to disk. Again, this feature is quite handy for variable star monitoring or
other related tasks.
When used in conjunction with the Focus command, the Auto Grab feature can be used
to see the images while they are being acquired or to manually select the best image from a
series of images for example. If the Focus command is programmed for the manual update
mode then after inspecting each image you can choose to skip the image or save it to disk. In
the auto update mode the Focus command automatically logs each image to disk.
3.1.6 Color Grab
The Color Grab feature works in conjunction with the Color Filter Wheel accessory and takes a
series of three images with dark frames through the red, green and blue filters and logs them to
disk. Color Grab isn't a command in itself but rather an extension of the Grab and Track and
Accumulate commands.
With the Color Grab feature you must pick a file name for the series of images and the
software automatically adds an extension (.R, .G or .B) to the name for you as the images are
being logged (example M51.R). In addition to the file name you also specify whether to save
the images in the SBIG, TIFF or FITS formats discussed below.
For programming the exposure time, you set the Red exposure in seconds as part of the
Grab or Track and Accumulate commands and then with the Color Grab extension you set the
Green and Blue exposures as a ratio of the Red. We do it as a ratio so you can easily
compensate in exposure time for the decreased CCD sensitivity in those color bands. This need
only be set once.
3.2. File Operations
Just as important as acquisition of image data, is saving and retrieving images on the disk. This
section describes the various commands that are used for image storage and retrieval.
3.2.1 Naming Conventions
Although you can choose most any name when saving your images you are restricted by MSDOS's naming convention of an eight character name followed by a three character extension
(example 8INCHM51._ _ _). Beyond that, we have a few recommendations that may simplify
your image naming.
We recommend that you use the eight character name as you wish but try to leave the
three character extension up to the CCDOPS software. For everyday images the CCDOPS
software will attach the .237 extension to the file name when you save it. For Auto Grab
Page 25
Page 31

Section 3 - Software Flow
images the CCDOPS software will attach a .001, .002, etc. to mark the image sequence. Finally,
for Color Grab images the CCDOPS software will attach the .R, .G and .B extensions etc.
3.2.2 File Path and Filter
For convenience MS-DOS allows you to divide your hard disk into different sub-directories.
To get the maximum flexibility out of the CCDOPS software, you should be quite familiar with
how sub-directories work, remembering that your hard disk is C: and your floppy disk is A:.
For example, you might have your CCDOPS software installed in the C:\CCDOPS directory
and save your images in the C:\IMAGES\CCD directory.
CCDOPS software always works in one directory at a time and you tell it which
directory to use by setting the path parameter. You can set the path in two ways. If you know
the name of the directory, you can use the Set Path/Filter command to type in the path. If
however you would like to browse through the directories, searching for files in some forgotten
spot, the software allows you to navigate through the file structure within the Open and Save
commands.
When searching through directories looking for images to load, the software also allows
you to restrict the files displayed to match a certain pattern by setting the filter parameter. For
example, if you set the path to C:\IMAGES\CCD and the filter to *.237, only files with the .237
extension show up in the directory. To display all files you would set the filter to *.*. The filter
is changed using the Set Path/Filter command.
The simplest way to create a directory in which to store an evening's images is to use
the Create Directory command in the File menu. This adds that evening's date after DATA.
Now any image saved to it will be in a directory with that date. After midnight, images are still
saved in the previous day's directory since you didn't change it. Each night of image taking,
you can perform this "/dated data directory" shortcut and the next day save images in more
appropriate directories that you may wish to create.
3.2.3 Saving Images
Saving images on the disk is accomplished using the Save command. You can choose to save
the images in one of two SBIG formats or in the TIFF or FITS formats. Which format you
choose will depend on what you plan to do with the image in the future.
Images saved in the SBIG compressed and uncompressed formats can later be read
back into CCDOPS which is a very important consideration. Compressed images take up
about one-half the space of the uncompressed format with no loss of information and we
recommend you always save your images in this format.
The TIFF format is popular with desktop image processing software packages such as
Adobe's Photoshop. The FITS format is a scientific image format that is popular with
professional astronomical image processing packages. Be forewarned that if you only save your
images in TIFF or FITS format, you will not be able to read the data back into CCDOPS and could
limit 3rd party software image processing capability.
Also, the TIFF and FITS formats support 8 or 16 bit data. While 16 bit mode is
preferable from a standpoint that there is no reduction in image dynamic range (remember the
camera is 12 bits), many TIFF programs for example do not know how to handle 16 bit data so
you have to use the 8 bit format. When saving the image in the 8 bit format, you should first
Page 26
Page 32

Section 3 - Software Flow
display the image to get a suitable display and then save the 8 bit data. In that way you have
told CCDOPS how to reduce the 16 bit data to 8 bits.
3.2.4 Loading Images
You use the Open command to load SBIG compressed and uncompressed images from the
disk into CCDOPS. When the software presents the Open dialog, you can select files or move
through the directory structure by opening other directory or disk entries. Also note that you
can point to an image file and click on the Info button to view the image parameters without
having to load the image.
3.3. Image Display Routines
Image data wouldn't be very valuable if you didn't have some way to look at it. This section
describes the various commands and parameters that affect the image display.
3.3.1 Photo vs. Analysis Mode
There are basically two ways to view and image: Analysis and Photo mode. In either mode
you can choose to display the image as a Negative or with a soft Smoothing. Also if your
computer has a VESA extended VGA display adapter, you can use the arrow keys to adjust the
image brightness and contrast in real time.
In Analysis mode the image is displayed and several tools are available to analyze or
modify the image. You can use a Crosshair to inspect individual pixels and to make
Photometric and Astrometric measurements or verify focus of individual stars. You can
perform a Horizontal or Vertical Flip of the image to match other published results or to
compensate for varying optical configurations such as refractor, Cassegrain, Newtonian, or
diagonal use. You can Crop the image to remove something from the field of view or you can
Zoom the image 4:1, taking a small portion of the image and expanding it to full scale.
In Photo mode the image is displayed in the center of the screen free of any other
information. This is handy for taking photographs of the screen and visual presentation.
3.3.2 Image Parameters
The CCDOPS software saves an image header with every SBIG format image. The header
contains various parameters affecting the image such as the exposure time, the date and time
the image was acquired, etc. Several commands utilize this header information.
The Display Parameters command shows the image header in a tabular form. The
Modification History command shows which CCDOPS operations have been performed on
the image, such as dark subtraction, etc. The Edit Parameters command allows you to change
some of the parameters after an image has been acquired (if they had been set incorrectly for
example) and the Telescope Setup command allows you to tell CCDOPS about the type of
telescope you are using. This information also gets saved in the header.
Page 27
Page 33

Section 3 - Software Flow
3.3.3 Slide Shows
The CCDOPS software allows you to create Slide Shows of images you have acquired. A slide
show is just what it sound like: a series of images is displayed in photo mode at a periodic
interval. You'll have to provide the narration though!
You use the Create Slide Show command to build the slide show, selecting the images
and the sequence. The script gets saved on disk and is later played back with the Display Slide
Show command. When playing back the slide show you can program the interval between
slides, whether the slide show loops at the end and whether the images are shown as negatives
or with a soft smoothing.
3.3.4 Printing Images
The Print command allows you to make a hard copy print of the image. It supports Postscript
and HP compatible laser printers and the FotoFun dye sublimation printer. The image is
printed along with the header. You can print the image as a negative or save it on disk8.
3.3.5 Background and Range
The Background and Range parameters are used throughout the display software and affect
the displayed image's brightness and contrast. While the image data has a relatively large
dynamic range, computer displays and the human eye only work over a limited range. For
example while the CCD may be able to distinguish 4,0969 shades of grey, your eye would have
a hard time distinguishing more than 100 and the computer displaying more than 64 shades.
Using the background and range parameters you select which portion of the image's
intensity values you wish to display. On dim objects you can increase the contrast for example.
You can get the CCDOPS software to analyze the image with the Auto Contrast setting and
have it set the background and range for you or you can set them yourself. Usually Auto
Contrast results in the best display.
The background parameter sets the black level in the image or the overall image
brightness. Any pixels with intensity below the background are completely black on the
display. Lowering the background increases the image brightness by displaying dimmer
pixels.
The range parameter is relative to the background level and sets the white level in the
image or the overall image contrast. Any pixels with intensity above the level equal to the
background plus the range are displayed as completely white. Again, decreasing the range
parameter increases the image contrast as dimmer pixels begin to saturate on the display.
Finally, pixels with values between the background and the background plus the range
are displayed using shades of grey.
3.4. Image Processing Routines
The third part of any imaging system, after image acquisition and storage, is image processing.
This section describes the commands found in the Utility menu that are used to process
8
Saving printed images on disk allows you to take the print file to other laser printers if you don't
have one of your own.
9
In the binned Medium and Low Res modes the CCD has 8,192 and 12,228 shades of grey.
Page 28
Page 34

Section 3 - Software Flow
images. Note that the image processing commands that are part of the Analysis display mode
(Horizontal and Vertical Flip and Crop/Zoom) have already been discussed as part of the
Display Commands.
3.4.1 Depixelize and Reduce
The Depixelize Image command enlarges the image 2 times and fills in the missing pixels
using pixel interpolation. This rounds out square looking star images when taken through
short focal lengths and increases the size of the image four fold. It is also handy when sending
TIFF images to photo labs for prints to reduce the "blocky" pixel appearance of enlargements
and increases the file size to one they are accustomed to handling.
The Reduce command does just the opposite. It reduces the size of the image four-fold
by combining groups of 2 by 2 pixels into a single pixel. This is analogous to running the
camera in the binned Medium resolution mode.
3.4.2 Filtering
The commands in this section are used to filter the images, typically comparing pixels to their
neighbors and enhancing or reducing the differences.
Smoothing
The Smooth command softens the image by replacing each pixel by a weighted average of
itself and its eight neighbors. Three settings of smoothing are available: soft, medium and
hard. This can be used to advantage in images that are underexposed and have an
objectionable amount of graininess, but it will reduce the sharpness of the image.
Sharpening
The Sharpen command enhances image detail and is available in three strengths (soft, medium
and hard) and in two forms: Nebulae and Lunar/Planetary. The Lunar/Planetary option
provides the most sharpening but can leave rings around stars that are buried in nebulosity.
Warm/Cool Pixel Removal
The Remove Cool Pixels and Kill Warm Pixels commands ferret out single pixel blemishes in
the image and replace them with a weighted sum of their neighboring pixels. The commands
are available in three strengths: soft, medium and hard. Warm pixels are generally caused by
hot dark current pixels in the CCD that saturate in the exposure and thus don't subtract out
correctly. Cool pixels are often caused by using poor quality dark frame or one taken at a
slightly different temperature.
Co-Adding and Averaging
You can reduce the noise in images by co-adding or averaging several images. The Average
Dark Frames command is most useful for dark frames. Both commands allow registering one
image relative to the other after you had used the crosshairs to note the required displacements.
Page 29
Page 35

Section 3 - Software Flow
3.4.3 Image Corrections
The commands in this section are generally used to correct the images for one type of artifact or
another, whether they be from the camera or the telescope.
Dark Subtract
The Dark Subtract command is used when you are manually taking and storing light frames
and dark frames as opposed to auto Dark-Subtracted images. This can be handy in situations
where you know you are going to be taking a group of exposures of equal length. You could
take a dark frame first, save it on disk, and then take several light frames. using this command
to subtract the dark frame before saving the result.
Flat Field
The Flat Field command is used to correct an image for the effects of vignetting and/or small
pixel-to-pixel variations in response. To correct an image for these effects you first need to
make a flat field image. That is done by imaging the inside of the dome or a nearby wall or
card held in front of the telescope that is uniformly illuminated. The purpose of the flat field
image is to record what happens to a uniformly illuminated target, and then apply those
intensity variations in reverse to your images. See page 31.
3.4.4 General Purpose
The commands discussed in this section are general purpose image processing commands.
Log Scaling
The Log Scaling command compresses the image's dynamic range through a non-linear
logarithmic scaling function. It essentially highlights the dim portions of the image and
attenuates the bright portions, much like a photographic dodging & burning effect. This is
useful for compressing the incredible dynamic range of objects like the Orion Nebula where
bright stars and nebulosity are surrounded by faint nebular detail and useful for well exposed
galaxies.
Build Track/Accum Flat
The Build Track/Accum Flat command is used to prepare a special flat field image for
correcting Track and Accumulate images. In the process of capturing a Track and Accumulate
image, the CCDOPS software co-adds several images together, shifting them relative to one
another to compensate for the telescope drift. To properly correct for the pixel-to-pixel
variations and any vignetting, the flat field file must have the same shift and add operations
applied to it. This is accomplished with the this command in conjunction with a Track List file
that is created as part of the Track and Accumulate command.
3.5. Image Analysis Routines
The commands discussed in this section are general purpose image analysis commands.
Page 30
Page 36

Section 3 - Software Flow
3.5.1 Histogram
The Histogram command displays the image histogram in a graphical format. The histogram
is an analysis of the image on a pixel-by-pixel basis where an accounting of the number of
pixels at a given intensity is made. It's sort of like a census count of the pixels. How many
pixels have intensities between 1 and 10? How many between 10 and 20? Simply stated it is a
graph of the number of pixels having a given intensity (this is also referred to as the frequency)
vs. pixel intensity. But what good is it, you ask?
One of the ways the CCDOPS software uses the histogram is in setting the background
and range parameters as part of the Auto Contrast feature. The software looks for the portion
in the histogram where pixels start to have a non-zero frequency and sets the background to
that value. It then looks at the top end of the histogram and again looks where the pixel
frequencies drop to zero, setting the range accordingly. In that way, the background and range
have been adjusted to show the bulk of the image's dynamic range.
3.5.2 Cross Hairs
Using the Cross Hairs as part of the Analysis display mode allows you to examine the image
on a pixel-by-pixel basis. As you move the crosshairs around with the mouse or arrow keys,
the coordinates and brightness value of the pixel under the crosshair are shown. The software
also shows the average pixel value and the deviation (noise) of the pixels in a selectable box of
pixels surrounding the crosshair.
As explained in detail later, you can also make Photometric (stellar and nebular
brightness) measurements and Astrometric (separation) measurements. Finally when
positioned over a star, the software will make an estimate of the seeing in arcseconds (this
counts on you having good focus and tracking).
3.6. Setup Functions
This section describes the various commands that are used to customize the CCDOPS software
to your PC and Telescope.
3.6.1 Camera Setup
The Camera Setup command is used to set/enable various options in the camera. You can
enable temperature regulation and choose a setpoint. The camera then regulates the CCD
temperature to that setpoint. Choosing a setpoint is usually a fairly simple matter. You want
to choose as cold a setpoint as possible without having the power supplied to the TE cooler
hold at 100% (as shown in the lower-right hand corner of the main menu display). If you pick
a setpoint roughly 30°C below the ambient temperature, you should be safe. You can monitor
the CPU temperature with the Camera Info command or the ambient temperature by means of
an external thermometer. You don't have to pick the exact right setpoint, as long as the power
to the TE cooler is running between 80 and 95 percent.
You can also program the camera's resolution , choosing Hi, Medium, Low or Auto res
modes. In Hi res mode the camera is configured for 640 x 480 pixels of 7.4 micron square. In
the Medium res mode the camera is binned 2 by 2 and in the Low res mode the camera is
binned 3 by 3. Finally the Auto mode configures the camera for Hi res mode in all cases except
Page 31
Page 37

Section 3 - Software Flow
the Full Frame Focus mode, where it uses Low res mode. This is handy for speeding up
finding objects and focusing the camera.
You can also configure the CCDOPS software to reuse dark frames. With that option
enabled, the software will remember when you take a dark frame of equal duration to light
frame and try to reuse that dark frame for future exposures rather than taking a new one.
3.6.2 Graphics Setup
The Graphics Setup command allows you to configure the CCDOPS software for your
computer graphics hardware. You can select the type of graphics card you have, but in general
the Auto setting should work well. You can configure CCDOPS display for a Color monitor,
Monochrome LCD or for color display of a NiteVision mode where every thing turns red.
Finally you can configure the mouse and enable an annunciator that beeps at the start and end
of an exposure to tell you when you need to be guiding and when the image is fully
downloaded.
3.6.3 Communications Setup
You use the Communications Setup command to tell CCDOPS which port you are using to
communicate with the camera. You will want to select the Parallel interface and the
appropriate parallel port. LPT1 is the default.
3.7. General Purpose Camera Functions
The commands discussed in this section are general purpose camera control commands.
3.7.1 Establish Link
You use the Establish Link command to tell the CCDOPS software to look for a camera and to
establish a communications link with it. The software does this automatically when you run
the software so you will typically only need to use this command after you have changed
parallel ports or turned off the camera and then turned it back on again.
3.7.2 Information
The Camera Information command interrogates the camera and shows you information about
your camera's capabilities including the version of firmware. This information may be useful
should you have problems with the camera and are in need of technical support.
3.7.3 Shutdown
The Shutdown command should be used when you are ready to put the camera away for the
night. It turns off the camera's cooling and otherwise prepares it for being powered down. It's
a good idea to wait 30 seconds or so after shutting down the camera before turning off the CPU
power because that gives the TE cooler time to warm up.
Page 32
Page 38

Section 3 - Software Flow
3.7.4 Autoguiding
The commands in the Track menu allow you to use your camera as an autoguider. The
Calibrate command is used first and it lets the CCDOPS software measure your drive's
correction speeds so that it can make calibrated corrections. The Autoguide command is then
used to do the autoguiding. For a more in depth control of the autoguiding operation, the
Autoguide Parameters command allows you to fine tune tracking and the Convert Track Log
File command allows you to diagnose tracking problems. More on this later in section 4.4.
3.7.5 Filter Wheel
The commands in the Filter Menu are used to position the filter wheel in cameras that have
been upgraded for tricolor operation. There is one command to select each possible filter
position.
Page 33
Page 39

Page 40

Section 5 - Camera Software Reference
4. Advanced Imaging Techniques
The following sections describe some of the advanced uses of CCD cameras. While you may
not use these features the first night, they are available and a brief description of them is in
order for your future reference.
4.1. Taking a Good Flat Field
If you find that flat field corrections are desired due to vignetting effects or for more accurate
measurements of star magnitudes, try either taking an image of the sky devoid of stars or take
an image of a blank wall or neutral grey card that is evenly illuminated.
Finding areas of the sky devoid of stars is very difficult after twilight. Therefore, you
should take flat field images of the night sky after sunset, but long before you can see any stars.
If this is not possible, take an image of a featureless wall or card held in front of the telescope.
However, if using this second method, be sure that the wall or card is evenly illuminated. Do
not use a flashlight to directly illuminate a card, but rather allow the light to bounce off of
another card or the wall of your observatory opposite the one you are imaging. Use a diffuse
light source.
If you plan on flat fielding Track and Accumulate images, you should also refer to
section 4.6. Since the same flat field is added to itself a number of times, be sure that you do
not saturate the flat field image by starting with pixel values too high. Typically try to keep the
pixel values between 10% to 20% of saturation for this purpose. For single flat field images, try
to keep the values to approximately 50% of saturation. That is a value of roughly 2,000 counts
for the TC-237 in Hi-Res.
4.2. Track and Accumulate
An automatic Track and Accumulate mode is available in CCDOPS which simplifies image
acquisition for the typical amateur with a good telescope drive. Drives employing PEC or
PPEC technology and accurate gears, only need adjustment every 30 to 120 seconds. With
Track and Accumulate the software takes multiple exposures and automatically co-registers
and co-adds them. The individual exposures are short enough such that drive errors don't
show up and the accumulated image has enough integrated exposure to yield a good signal to
noise ratio.
Procedurally, the camera will take an exposure, determine the position of a preselected
star, co-register and co-add the image to the previous image in the CPU, and then start the
cycle over again. Up to 64 images can be co-added. The resulting exposure is almost as good
as a single long exposure, depending on the exposure used and sky conditions. The great
sensitivity of the CCD virtually guarantees that there will be a usable reference star within the
field of view. This new patented feature provides dramatic performance for the amateur,
enabling unattended hour long exposures!
4.3. Color Imaging
The field of CCD color imaging is relatively new but expanding rapidly. Since your CCD
camera is equipped with a monochromatic CCD, discriminating only light intensity, not color,
some provision must be made in order to acquire color images. Your camera has been
Page 35
Page 41

Section 5 - Camera Software Reference
designed with color imaging in mind with the ability to easily upgrade the camera with an
internal color filter wheel in place of the standard shutter wheel.
The color filter wheel allows conveniently placing colored interference filters in front of
the CCD in order to take multiple images in different color bands. These narrow band images
are then combined by software to form a color image. The Red, Green and Blue pass filters are
used to acquire three separate color images of the object. The resulting images are combined to
form a tri-color image using the CCDCOLOR software.
Color imaging places some interesting requirements on the user that bear mentioning.
First, many color filters have strong light transmission in the infrared (IR) region of the
spectrum, a region where CCDs have very good response. If the IR light is not filtered out,
then combining the three images into a color image can give erroneous results. If your Blue
filter has a strong IR leak (quite common), then your color images will look Blue. For this
reason, you place an IR blocking filter in front of the three color filters.
Second, since you have narrowed the CCD's wavelength response with the interference
filters, longer exposures are required to achieve a similar signal to noise compared to what one
would get in a monochrome image with wide spectral response. This is added to the fact that
tri-color images require a higher signal to noise overall to produce pleasing images. In black
and white images your eye is capable of pulling large area detail out of random noise quite
well, whereas with color images your eye seems to get distracted by the color variations in the
noisy areas of the image. The moral of the story is that while you can achieve stunning results
with CCD color images, it is quite a bit more work. Fast optical systems, f/2 through f/6.3,
work best. Focal reducers also help.
4.4. Autoguiding
The CCDOPS software allows the CCD camera to be used as an autoguider through the
commands in the Track menu.
When used as an autoguider, the CCD camera repeatedly takes images of a guide star,
measures the star's position to a fraction of a pixel accuracy, and corrects the telescope's
position through the hand controller input. While autoguiding alleviates the user of the
tedious task of staring through an eyepiece for hours at a time, it is by no means an end-all cure
to telescope drive corrector performance. All the things that were important for good manually
guided exposures still exist including a good polar alignment. Use of an auto guider is to
correct for the small drive errors and long term drift, not to slew the telescope or compensate
for a poor drive.
One of the reasons that autoguiders are often better than human guiding is that rather
than just stabbing the hand controller to bump the guide star back to the reticule, it gives a
correction that is the precise duration necessary to move the guide star back to its intended
position. It knows how much correction is necessary for a given guiding error from the
Calibrate Track command. The Calibrate command, which is used prior to autoguiding,
exercises the telescope's drive corrections in each of the four directions, measuring the
displacement of a calibration star after each move. Knowing the displacement and the duration
of each move calibrates the drive's correction speed.
To autoguide you need to connect the camera's Telescope port to your telescope's CCD
input. On Celestron Ultima, Losmandy and LX-200 mounts this is accomplished with the small
6 conductor "telephone" cable provided with the camera. Simply plug one end into the
Telescope port on the camera's CPU and the other end into the telescope. On Ultima and
Page 36
Page 42

Section 5 - Camera Software Reference
Losmandy mounts you will need to unplug the hand controller and plug the auto guiding
cable in its place. On the LX-200 you plug the cable into the CCD jack. Finally if you have an
older telescope that does not support the 6 pin CCD port contact SBIG Technical support and
inquire about custom hand controller modifications and whether you need an external Relay
Adapter box.
4.5. Field Operation
The ST-237 Advanced CCD Camera is supplied with a wall transformer for operation off
110 VAC that provides 12 VDC output to the camera. You can run the camera off of a car
battery when operated in the field. If you are interested in this please contact SBIG or refer to
Appendix A for the power jack pinouts.
Page 37
Page 43

Page 44

Section 5 - Glossary
5. Glossary
Antiblooming Gate - When a CCD pixel has reached its full well capacity, electrons can
effectively spill over into an adjoining pixel. This is referred to as blooming. The
Antiblooming gate can be used to help stop or at least reduce blooming when the
brighter parts of the image saturate.
Astrometry - Astrometry is the study of stellar positions with respect to a given coordinate
system.
Autoguider - All SBIG CCD cameras have auto guiding or "Star Tracker" functions. This is
accomplished by using the telescope drive motors to force a guide star to stay precisely
centered on a single pixel of the CCD array. The camera has four relays to control the
drive corrector system of the telescope. The CCD camera head is installed at the guide
scope or off axis guider in place of a guiding eyepiece.
CCD - The CCD (Charged Coupled Device) is a flat, two dimensional array of very small light
detectors referred to as pixels. Each pixel acts like a bucket for electrons. The electrons
are created by photons (light) absorbed in the pixel. During an exposure, each pixel fills
up with electrons in proportion to the amount of light entering the pixel. After the
exposure is complete, the electron charge buildup in each pixel is measured. When a
pixel is displayed at the computer screen, its displayed brightness is proportional to the
number of electrons that had accumulated in the pixel during the exposure.
Dark Frame - The user will need to routinely create image files called Dark Frames. A Dark
Frame is an image taken completely in the dark. Dark Frames are subtracted from
normal exposures (light frames) to eliminate fixed pattern and dark current noise from
the image. Dark Frames must be of the same integration time and temperature as the
light frame being processed or numerous hot and cold occur.
Dark Noise - Dark Noise or Dark Current is the result of thermally generated electrons
building up in the CCD pixels during an exposure. The number of electrons due to
Dark Noise is related to just two parameters; integration time and temperature of the
CCD. The longer the integration time, the greater the dark current buildup. Conversely,
the lower the operating temperature, the lower the dark current. This is why the CCD is
cooled for long integration times. Dark noise is a mostly repeatable noise source,
therefore it can be subtracted from the image by taking a "Dark Frame" exposure and
subtracting it from the light image. This can usually be done with very little loss of
dynamic range.
Double Correlated Sampling - Double Correlated Sampling (DCS) is employed to lower the
digitization errors due to residual charge in the readout capacitors. This feature results
in lower readout noise.
FITS Image File Format - The FITS image file format (which stands for Flexible Image
Transport System) is a common format supported by professional astronomical image
processing programs such as IRAF and PC Vista. CCDOPS can save image files in this
format but can not read them.
Flat Field - A Flat Field is a image with a uniform distribution of light entering the telescope.
An image taken this way is called a flat field image and is used with CCDOPS to correct
images for vignetting.
Page 39
Page 45

Section 5 - Glossary
Focal Reducer - A Focal Reducer reduces the effective focal length of an optical system. It
consists of a lens mounted in a cell and is usually placed in front of an eyepiece or
camera. With the relatively small size of CCDs compared to film, focal reducers are
often used in CCD imaging.
Frame Transfer CCDs - Frame Transfer CCDs are CCDs that have a metal mask over some
portion (usually half) of the pixel array. The unmasked portion is used to collect the
image. After the exposure is complete, the CCD can very quickly shift the image from
the unmasked portion of the CCD to the masked portion, thus protecting the image
from light which may still be impinging on the CCD. This acts as an electronic shutter.
Full Well Capacity - Full Well Capacity refers to the maximum number of electrons a CCD
pixel can hold. This number is usually directly proportional to the area of the pixel.
Histogram - The Histogram is a table of the number of pixels having a given intensity for each
of the possible pixel intensities. Remember that, in the end, the image file is nothing
more than a list of pixel values, one for each CCD pixel.
Light Frame - The Light Frame is the image of an object before a Dark Frame has been
subtracted.
Path/Filter - The Path setting tells CCDOPS which directory and disk drive to find and store
the image files. In essence, it defines the current directory. The filter controls which
image files are shown in the Open directory. Only files that match the filter are shown.
For example, a filter setting of "*.237" will only show files that have an "237" extension.
Photometry - Photometry is the study of stellar magnitudes at a given wavelength or bandpass.
Photons/ADU - This is an indication of the camera's gain in converting incoming light into
image counts. This value is used with programs such as Hidden Image. For any image
you take the Photons/ADU is shown in the Parameters command from the Image
menu.
Pixel Size - The smallest resolution element of a CCD camera is the CCD pixel. The pixel size
for your camera is 10 microns square (10 by 10 microns)
Planet Mode - Planet Mode is the most useful way to achieve focus. When you select Planet
mode, a full frame is exposed, downloaded, and displayed on the computer monitor. A
small window can be placed anywhere in the image area and the size of the window
can be changed. Subsequent downloads will be of the area inside the box resulting in a
much faster update rate.
Quantum Efficiency - Quantum Efficiency refers to the fractional number of electrons formed
in the CCD pixel for a given number of photons. Quantum Efficiency is usually plotted
as a function of wavelength.
Readout Noise - Readout noise is associated with errors generated by the actual interrogation
and readout of each of the CCD pixels at the end of an exposure. This is the result of
fixed pattern noise in the CCD, residual charge in the readout capacitors and to a small
extent the noise from the A/D converter and preamplifier.
Readout Streaking - When a bright object is imaged using a short exposure time, readout
streaking can occur. Readout streaking can look similar to blooming except it extends
across the entire image passing through the bright object. This is a result of image shift
Page 40
Page 46

Section 5 - Glossary
at the beginning and again at the end of an exposure due to frame transfer. The readout
streaking is usually very faint with respect to the overall image and can sometimes be
eliminated from the display image by slightly raising the background level.
Resolution Mode - The resolution of a CCD camera is determined by pixel size. Pixel size can
be increased by combining or binning more than one pixel and displaying it as one
pixel. Doing so decreases the effective resolution but speeds up the download time of
the image. Maximum resolution is determined by the smallest size of the individual
CCD pixel.
Response Factor - Response Factor is a multiplier used by CCDOPS to calibrate a telescope for
photometric calculations. The Response Factor multiplied by 1000 is the number of
photoelectrons generated in the CCD for a 0th magnitude star per second per square
inch of aperture.
Saturation - Saturation refers to the full well capacity of a CCD pixel as well as the maximum
counts available in the A/D converter. The pixel is saturated when the number of
electrons accumulated in the pixel reaches its full well capacity. The A/D is saturated
when the input voltage exceeds the maximum.
Sky Background - The sky background illumination or brightness is the number of counts in
the image in areas free of stars or nebulosity and is due to city lights and sky glow.
High levels of sky background can increase the noise in images just like dark current.
For some deep sky objects, filters can be used to reduce the sky background level.
Seeing - Seeing refers to the steadiness and the transparency of the atmosphere during an
observing session.
TE Cooler - The TE Cooler is a Thermal Electric cooling device used to cool the CCD down to
operating temperature. The CCD is mounted to the TE Cooler which is mounted to a
heat sink, usually the camera head housing.
TIFF Image File Format - The TIFF image file format (which stands for Tagged Interchange File
Format) was developed jointly by Microsoft and Aldus Corporations to allow easy
interchange of graphics images between programs in areas such as presentation and
desktop publishing. CCDOPS can save image files in this format but it can not read
them.
Track and Accumulate - The Track and Accumulate function is an patented feature of
CCDOPS that allows the user to automatically co-register and co-add (including dark
frame subtraction) a series of images of an object. These exposures can be taken
unguided as long as the "Snapshot time" does not exceed the length of time before
tracking errors of your clock drive become apparent. This allows you to image and track
without guiding or the need to connect the CCD Relay port to your drive motors.
Track List - The Track List is a file generated by CCDOPS during a Track and Accumulate
session. The Track List logs all the corrections made by CCDOPS for each of the images.
Track lists are required when flat fielding Track and Accumulate images.
Tri-Color - Tri-Color refers to color images created using three different colors mixed into a
balanced color image using red, green and blue filters. An object is imaged three times,
Page 41
Page 47

Section 5 - Glossary
once with each color filter. The three images are then co-added and color balanced with
the appropriate software.
Vignetting - Vignetting is obstruction of the light paths by parts of the instrument. It results in
an uneven illumination of the image plane. The effects of vignetting can be corrected
using flat field images.
Page 42
Page 48

Section 6 - Hints and Tips
6. Hints and Tips
This section contains hints and tips to get the most use out of your camera and software. There
is a section of Question and Answers to the most common questions followed by several
sections of tips.
6.1 Question and Answer
This section contains answers to some of the more common questions we hear in the Technical
Support department.
Q. Is there a short cut to focusing the camera? A. We find the best method to be using the peak
brightness as described in the manual but there are almost as many opinions here as there are
people.
Q. How often do I need to refocus? A. When there has been a big temperature change (3 °F) or
when you have moved to a vastly different position of the sky with an SCT, you should
consider refocusing.
Q. What is the back focus of the camera? A. Please refer to Figure 2.2.
Q. What is the extra rectangular bar that came with the camera ? A. It is a tripod mount that you
screw into the side of the camera that allows you to mount the camera on a tripod if you plan
to fit it with camera lenses.
Q. Can I use a camera lens with the camera? A. Yes, SBIG sells an adapter for the camera that
allows you to use C-mount or other lenses with the camera.
Q. Can I operate the camera off of a car battery? A. Yes you can. You'll probably want to use a
deep cycle marine battery and you'll have to purchase a cable. Please refer to section 4.5.
Q. How cold should the CCD get? A. You should be able to work around 30 degrees Celsius
below ambient.
Q. Who should I call when I have questions or problems with the camera? Call SBIG and ask for
PixCel Technical Support.
Q. How long of a cable can I use between the PC and the CPU? A. You should be able to use cables
up to 100 feet in length but it will vary from PC to PC.
Q. Where can I get a longer cable? A. Go to your nearest computer store and ask for a 25 pin male
to female extension cable.
Q. Where can I get a shorter cable? A. Go to your nearest computer store and ask them to make
you a short 25 pin male to female crimp type cable.
Q. Why does the software say there isn't enough memory? A. You need to make sure you have at
least 1 Megabyte Extended memory and that the HIMEM.SYS driver is loaded into your
CONFIG.SYS file. Also check that other entries in the CONFIG.SYS or AUTOEXEC.BAT files
are not consuming too much memory.
Q. I see dark spots in my images, what causes them? A. If the dark spots are a single pixel they are
typically caused by hot pixels in the CCD saturating and can be removed with the Remove
Cool Pixels command. If they're several pixels wide you should suspect dust on the window
Page 43
Page 49

Section 6 - Hints and Tips
and that effect can be removed with flat fielding your images or clean the window with an "air
duster".
Q. My images have dark tendrils in the corners. What can I do? A. These are caused by the CCD
frosting and you need to replace the desiccant as described in Appendix C.4.
Q. Can I write my own software for the camera? A. Appendix B describes the file format used to
save images. You can also request an Application Note from the manufacturer telling how to
interface and program to the camera.
Q. Is there other software available for the camera? A. You can upgrade your camera with the Color
Filter Wheel and CCDCOLOR software. Also there are several third party software packages
for image processing, camera control and various printer output.
Q. Can I run the software under Windows,? A. While we don't recommend running the CCDOPS
software under Windows you should be able to do it. Also Software Bisque's SkyPro software
supports the camera under Windows and is fully integrated with their excellent The Sky
software. Contact Software Bisque at (303) 278-4478.
Q. What do I do if my images have elongated stars? A. If using Track and Accumulate you are
probably using a snapshot time that is too long. If the snapshot time is longer than the amount
of time your drive can track unguided with acceptable guiding errors, you will see elongated
stars in your final images. If your snapshot times are getting down to 30 seconds or less you
should improve your drive.
If you are using your camera as an autoguider for film photography and are noticing
unacceptable guiding errors, please check the following:
1. Can you move the telescope using the Move command? This is an indicator
as to whether or not you are properly connected to your drive system via the
relay cable from the CPU.
2. Be sure that your calibration time gives at least 10 to 50 pixels of movement
for each step of the Calibrate command.
3. Check for flexure between the CCD camera head and your system. Check for
flexure between the guide scope or off-axis guider and your telescope
system. This is a very common source of guiding errors. A very small
movement of the CCD head with respect to the guide scope during an
exposure can cause unacceptable streaking.
4. If your mount is stable, try longer exposure times while tracking to average
out the atmospheric effects.
Q. What do I do if my CCD frosts? A. If your camera starts to frost after a year of use it's time to
replace the desiccant as described in Appendix C.
Q. The moon is too bright, what do I do? A. Try a full aperture solar filter. Try a variable rotating
neutral density filter. Don't use off-axis apertures smaller than 4" or you give up resolution.
Q. What exposure is best for planets? A. Use the crosshairs mode to measure the disk's intensity.
Make sure that the pixels are about 75% saturated. This should give a good range of
brightness. Sometimes moons can also be imaged at the long end of the exposure range.
Page 44
Page 50

Section 6 - Hints and Tips
Q. Which laptop is best for CCD use? A. Nearly any laptop will work, however you should take a
copy of CCDOPS with images and run it from any units you are considering. Color LCD isn't
necessary unless it is your only computer.
Q. Why are my images grainy looking and not smooth? A. The grainy look is from low signal to
noise. A longer integration time will increase signal and reduce graininess. Try doubling
exposure times. This works up to a point where you begin picking up sky background (light
pollution) which limits maximum practical integration times. Also make sure your cooler is
running at 75% capacity or more.
Q. What are the advantages of shorter focal lengths and faster F# telescopes? A. Shorter focal lengths
increase the field of view, allowing you to image larger objects. Faster F# telescopes increase
the field of view and shorten the exposure times. Do not underestimate the benefits of focal
reducing your f/10 SCT systems!
6.2. CCDOPS Use Tips
• If you display an image and nothing shows, check that the Auto Contrast was enabled.
• When selecting a Track and Accumulate guide star, it is not necessary to exactly set the
cursor on the center of the selected star. It automatically snaps to the brightest pixel, not
necessarily the geometric visual center.
• Co-adding images together, whether guided or accumulated, averages out noise and results
in a smoother image than one single long exposure. Keep in mind, the longer the
individual exposure, the higher the signal to noise until you reach background sky limits.
You will find that at f/10, a single 60 second exposure will be grainy for low contrast objects
and 5 minutes may be the minimum tolerable, requiring off-axis guiding or a guide scope.
At f/6.3, this snapshot time may be 1 minute and at f/2 it may be 10 seconds. Don't be
afraid to experiment with poorly guided images of varying exposure times to learn what
works best. Co-adding many underexposed images still results in inferior results. This is
especially true for tricolor.
• If you are fortunate enough to have access to a full aperture solar filter, daytime use with
the CCD camera is possible at f/6.3 to f/10. Distant power poles and power lines
silhouetted against the sky work well as a target. Use binning since turbulence will limit
resolution. This will allow you to learn the software flow in daylight.
• Dark frames aren't necessary for short exposures of bright objects (Jupiter at f/20 with 2x
Barlow projection or the moon).
6.3. Hints and Tips for Laptop Users
• If you mainly use your laptop for field use with CCDOPS, it is possible to modify your
AUTOEXEC.BAT file to boot directly into CCDOPS, saving time.
• If your laptop is monochrome, obtain a small piece of red litho stripping film (rubylith) to
slip in front of the LCD display. Most print shops have the red plastic. Use it matte side
out.
Page 45
Page 51

Section 6 - Hints and Tips
• You can stack your laptop directly on top of the CPU for a compact package. You could
make a custom 8" ribbon type cable to couple the CPU to the laptop. The cable is wired pin
1 to pin 1, etc. See Question #11 on page 73.
• Cursor movement through CCDOPS is much faster using the mouse, especially if your
laptop has one of the small keyboard based pen-point mice.
• Some LCD displays dim when it is very cold outside. A small heat pad behind the display
can help.
• Don't be afraid to adjust display brightness on your computer in the course of viewing an
image. Negative views require opposite settings.
• Try to use a laptop with 64 shade gray display capability. Some laptops have a display
setup mode in their resident software to optimize. VESA compliant is also useful for real
time cursor contrast changes.
• LAPLINK software and cables allow easy next day image file transfer to your main
computer. This is very handy.
• Images will always look better when displayed on a video monitor, however, an active
matrix LCD display is pretty close except in brightness.
• You may wish to change your display and hard drive sleep cycles (battery conservation) to
longer "keep awake" times so as not to interfere with image acquisition (long Track and
Accumulate).
• LED flashlights help to see the keyboard when the display is dimmed red.
6.4. Telescope Tips
• Always verify best collimation prior to installing the CCD camera. Because sub-arc second
imaging (better than that you can see visually) is possible.
• Always secure the camera head cable to the optical tube assembly. Never let the cable
dangle free from the focuser/ocular holder.
• Off-axis guiding is worth it, even on a bunch of 3 minute co-adds of a deep sky object.
• Don't guess on focus. If you're not sure, it is time to refocus.
• Take time to frame your object. Rotate the camera 90 degrees to take advantage of the CCD
chip's 3:4 aspect ratio and don't forget to refocus again.
• Focal reduce as much as possible for deep sky objects. Exposure times are then shorter and
signal to noise gets better. 2-3 arc-seconds per pixel (30" focal length) is plenty of resolution
for deep sky objects, especially nebulae. Good tracking is still critical down to 12" focal
lengths in hi-res mode. Always polar align to minimize Dec drift.
• Focusing micrometers really help, especially on SCTs where you want to always enter the
best focus position on a counterclockwise knob rotation. This advances the primary mirror
forward against gravity and preloads bearings, screw threads and any mirror/baffle
rocking. A light knuckle rap prior to exposure or guiding is advisable to settle moving
components. It is always possible to ascertain exact focus only after you have passed a peak
Page 46
Page 52

Section 6 - Hints and Tips
intensity and then come back to the peak's setting. You may not see the exact high value,
but will see the trend at best focus position. Again, don't guess at focus.
• Focusing on planets is difficult since seeing can uniquely blur each frame. If a planet's
moon is present, use the slow motion hand control to move over to it. Readjust exposure
time accordingly and refocus on it, then bring the planet back into view and capture it.
• If track problems exist, first check balance in declination and then RA since they interact.
Verify the 1 1/4" camera head coupler doesn't rock in the telescope bushing and that it is
flush at it's coupler flange with bushing. Check drive clutches or clamps. Check drive rate
setting. With guiding ocular visually check PEC setting or reprogram. Trails on only the
brightest stars along short axis of the CCD is blooming, not tracking.
• Real dark skies are not necessary for beautiful CCD images of deep sky objects. CCDs are
far superior to film with or without filters in this respect. Tricolor CCD will benefit from
dark skies, but still works great compared to color film.
• Simple 2 element refractors can show bloated stars due to chromatic aberration since CCDs
have a wide spectral response and a very wide dynamic range of signal. Red filters can
help or quality multi-element color corrected refractors.
• Always keep an eye on ambient temperature changes. A 3 degree Fahrenheit change can
affect SCT focus enough to merit refocusing. Temperature drop = clockwise movement of
SCT focus knob (yes, the way you didn't want to move it).
• Closely re-align your finder as needed to the CCD image on the screen to speed up object
finding. Don't use a 90 degree diagonal to visually acquire objects and expect them to be in
the CCD camera view. The chip is only .1 x .13 inch in size and 90 degree diagonals are
never rotationally collimated to optical axis close enough to use for CCD work. Special
laser collimated diagonals are available for this purpose as well as CCD framing oculars
with exact reticle patterns to match the CCD chip.
• Digital setting circles with hi-res encoders (1/12 degree or better) can get you close to faint
objects if you are polar aligned and they are "dialed in" as well.
• Integrating Software Bisque's "The Sky" software into your imaging system is another help
in object acquisition, but adds new complexity to the operations until after you are
comfortable with CCDOPS and CCD imaging. It is then a very interactive tool.
• Don't bother with deep sky imaging on an Alt/Az configured mount even if it tracks.
Image rotation results and precludes co-adding, etc. in most instances. Use a wedge and
polar align such systems for best and simplest results.
• Wait for both telescope and CCD camera to thermally settle in before trying for optimal
results. Typically wait 1/2 to 1 hour after setting up and running. This is a good time to set
up software, balance scope, and polar align, etc.
• Use a dew shield on SCTs to prevent dewing and minimize stray light. Re-balance as
necessary. CCDs have a tremendous dynamic range. Bright stars at edge of field can spray
light across nebula, especially Veil, Horsehead, California nebulae. Anti-blooming can't
help scattered light. Reposition field slightly and try again.
• Due to small 7.4 micron pixels (.0003") the TC-237 works best at shorter focal lengths of 12" 80". An 8" aperture is an ideal match for this imager. A bigger scope and larger chip will
Page 47
Page 53

Section 6 - Hints and Tips
just scale results like a larger format 6x7 camera compared to a 35mm camera. A TC-237
and 8" SCT can offer years of imaging capability before plunging into bigger/better with
more money. Tricolor should be the next progression before scaling up.
• Fast telescopes with high resolution optics offer remarkable imaging characteristics with
CCD cameras, especially tricolor. Exposure times are short, excellent tracking is easier,
signal is awesome, therefore contrast of colors in deep sky objects is spectacular enough to
warrant color dye sublimation prints that rival photographic color prints done with film
through much larger telescopes at a much higher difficulty level. Takahashi Epsilon, Flat
Field cameras and specialized SCTs are hard to match in performance.
• Off-axis guiding is necessary to fully exploit the great imaging potential of your CCD
camera. Even with an 8" SCT @ f/6.3, the 50" focal length offers 1.6 arc seconds/pixel
resolution, much finer than optimum photographic results. Many of the software's sample
SCT images were off-axis guided to produce small round high resolution stars. No matter
how good your mount is, count on guiding to get the most from your CCD camera.
Page 48
Page 54

Appendix A - Specifications
A. Appendix A - Specifications
This appendix lists the specifications for the ST-237 CCD camera.
CCD Texas Instruments TC237
Active Area 4.7 x 3.6 mm (.186" x .140")
Field of View 8.0 x 6.1 arc minutes at 80 inch focal length (8" F/10)
2/3° x 1/2° at 16 inch focal length
Pixels/Pixel Size 640 x 480 @ 7.4 microns square
Read Noise 15e- RMS
Dark Current Typically 1e-/p/s at -5°C
Full Well Capacity CCD : 30,000 e-
A/D : 17,000 e- with Photons/ADU set at 4.1
Cooling Single Stage Thermoelectric, Selectable Setpoint
A/D Converter 12 Bit, 22 KHz Pixel Rate
Power Requirements 12 VDC at 1.2 Amps
Telescope Port 4 Open Drain Outputs
Communications Port Interfaces to PC Parallel Port
Electronic Shutter .01 to 3600 seconds
Mechanical Shutter Rotary Shutter Wheel
Color Filter Wheel Available as Option
Weight of Optical Head Approximately 1 pound
(less cable)
Size of Optical Head 3.25" diameter by 3" deep
F# throughput of Filter Wheel f/2 - f/30
A.1 DC Power Jack
A.1 Communications Port
Pins 15,13,12,10,11 Data 0 through Data 4 from Camera
+12VDC on outside
Ground in Center
Mating plug is 5.5mm
outside and 2.1mm inside
Figure A.2 - DC Power Jack
Pins 2 - 5 Data 0 through Data 3 to Camera
Pins 6,7 Address 0, 1 to Camera
Pin 9 Strobe to Camera
Pins 18 - 25 Data Ground
Shell Chassis Ground
Page 49
Page 55

A.1 Telescope Port
Appendix A - Specifications
1 2 3 4 5 6
1 = +RA (Right)
2 = +DEC (Up)
3 = -DEC (Down)
4 = -RA (Left)
5 = Ground
6 = No Connect
Figure A.3 - Telescope Port
Note that the four outputs are active-low, open-drain outputs without internal pull-ups and are
capable of sinking 250 mA DC to ground when activated. They have a breakdown voltage of
45V, a typical on resistance of 1.3 and an avalanche energy of 75 mJ for driving inductive
loads.
Page 50
Page 56

Appendix B - File Formats
B. Appendix B - File Formats
This appendix describes the file format used by the CCDOPS software including the SBIG
Compressed and Uncompressed, TIFF and FITS formats.
B.1 SBIG Compressed and Uncompressed Formats
This section describes the file formats used to save SBIG images on both the IBM PC and
compatible computers and the Macintosh computers. The files contain the image data as well
as header information describing the image in terms of exposure time, telescope, etc. The files
come in two varieties: Compressed and Uncompressed. In addition the file format has evolved
throughout the development of these CCD cameras and has finally settled down to the "Type
3" format described herein.
Type 3 Format
The Type 3 format starts with a 2048 byte header of ASCII information followed by the image
data in one of two varieties: Compressed or Uncompressed. The ASCII information for Type 3
files consists of a line showing the type of camera used to acquire the image and the variety of
image data (Compressed or Uncompressed) as shown in the example below:
PixCel237 Compressed Image<lf><cr>
or
PixCel237 Image<lf><cr>
where <lf> and <cr> represent the linefeed (hex 0A) and carriage return (hex 0D) characters.
Other camera images replace the "PixCel237" with the camera name (“PixCel255”, "ST-4X", ST5", "ST-6", "ST-7" "ST-8") in the lines above respectively. After the 1st line are several lines of
parameters in the format:
Parameter = Value<lf><cr>
where "Parameter = " is a string describing the parameter and "Value" is a string containing the
value of the parameter. At the end of all the parameters is the line:
End<lf><cr><ctrl-z>
used to signify the end of the of the image information. The <ctrl-z> is used to tell DOS
commands like type to stop and not display any further data. The remainder of the 2048 bytes
in the header are unused. The parameters for a Type 3 file are shown below:
Page 51
Page 57

Appendix B - File Formats
Table 1
Type 3 Parameters
PixCel237 Compressed Image
File_version = 1
Data_version = 1
Exposure = xxx
Focal_length = xx.xxx
Aperture = xx.xxx
Response_factor = xx.xxx
Note = xxxxxxxx
Background = xxx
Range = xxx
Height = xxx
Width = xxx
Date = xx/xx/xx
Time = xx:xx:xx
Exposure_state = xx
Temperature = xx.xx
Number_exposures = xx
Each_exposure = xx
History = xxxxxx
Observer = xxxxxxxx
X_pixel_size = xx.xx
Y_pixel_size = xx.xx
Pedestal = xx
E_gain = x.xx
The following parameters are optional and may be present
User_1 = xxxxxxxx
User_2 = xxxxxxxx
User_3 = xxxxxxxx
User_4 = xxxxxxxx
Filter = xxxxxxxx
Readout_mode = xx
Track_time = xxx
Sat_level = xxx
End
Table 2
Parameter Descriptions
??? Compressed Image - This indicates the type of camera used to take the image and
the fact that the data is compressed as described below. The ??? will be PixCel237,
PixCel255, ST-4X, ST-5, ST-6, ST-7 or ST-8.
Page 52
Page 58

Appendix B - File Formats
??? Image - This indicates the type of camera used to take the image and that the image
data is not compressed and is saved as N rows of M pixels where N and M are
specified by the Height and Width entries in the header. The pixels are two byte
unsigned integers each with the least significant byte before the most significant
byte. The pixels are written with pixel (1,1) first, proceeding in left-to-right order to
pixel (1,M), followed by the subsequent N-1 rows of pixel data.
File_version - This field should be 3 to indicate the file is Type 3.
Data_version - This field describes the version of the image data and will be 1.
Exposure - This field indicates the exposure time in 1/100ths of a second.
Focal_length - This field indicates the focal length in inches of the telescope used to
capture the image.
Aperture - This field indicates the aperture area in square-inches of the telescope used to
capture the image.
Response_factor - This field specifies the CCD's response calibration factor.
Note - This field is the annotation attached to the image.
Background - This is the value of the Background parameter used to display the image
when it was last saved.
Range - This is the value of the Range parameter used to display the image when it was
last saved.
Height - This is the height of the image in pixels.
Width - This is the width of the image in pixels.
Date - This field shows the date the image was captured.
Time - This field shows the time the image was captured.
Exposure_state - This field contains sets of bits indicating whether ABG was active
during the exposure, whether Double Correlated Sampling was used and whether
DC Restore was used.
Temperature - This field indicates the temperature of the CCD in °C at the end of the
exposure.
Number_exposures - This field indicates how many images were co-added to produce a
composite image.
Each_exposure - For composite images this field indicates the exposure time of the
individual exposures in 1/100ths of a second.
History - This is a string of characters indicating which image processing functions have
peen performed on the image. The following is the mapping between individual
characters in the string and the operation performed:
@ - Modifications made before
history established.
B - Image linearly scaled.
A - Co-addition of image.
D - Image dark subtracted.
Page 53
Page 59

Appendix B - File Formats
E - Cool pixels removed.
G - Image smoothed.
I - Image pseudo flat field
corrected.
K - Warm pixels removed.
M - Image flipped vertically.
F - Flat field corrected.
H - Image sharpened.
J - Image quantized or posterized
to less than 16 bits precision.
L - Image flipped horizontally.
N - Image zoomed with pixel
interpolation.
O - More than 40 operations
performed.
Q - Pixels combined.
S - Image zoomed with pixel
replication.
U - Image converted to 8 bit log
format (ST6COLOR).
W - Image merged to color using 3
color merge (ST6COLOR).
P - Image log scaled.
R - Image auto dark subtracted.
T - Image clipped and filled
(ST6COLOR)
V - Image merged to color using 2
color merge (ST6COLOR).
X - Image translated and back
filled (ST6COLOR)
Y - Image pixels inverted. Z - Image sharpened with
unipolar algorithm.
[ - Image sharpened with one-
sided sharpening.
] - Image resampled to make
\ - Image modernized by
replacing ST6COLOR history
characters
10
^ - Image averaged.
square pixels.
_ - Constant added to or
subtracted from image.
0 - (Zero) The history string is set
to '0' for new images. This is
` - Constant multiplied by or
divided into image.
a - Image enlarged 2X by pixel
interpolation.
not a C null string, it is
actually the '0' character.
b - Image reduced 2X by pixel
c - Column or Row repair.
combining.
d - Adaptive dark subtraction. e - Pseudo 3D
f - Auto HPR dark subtract g -HPR dark subtract
h - Lucy-Richardson
deconvolution
Please note the SBIG reserves the use of the characters '@' through '~' (decimal 64 through
126) for their use, and that any other characters added to the history string by other users
should not use those characters.
Observer - This string contains the name of the observer who captured the image.
10
The ST6COLOR software used history codes 'S', 'T' and 'V' differently than described in this table.
Modernizing replaces 'S' with 'T' (clip operation), 'T' with 'U' (compress operation) and 'U' with 'X'
(translate operation).
Page 54
Page 60

Appendix B - File Formats
X_pixel_size - This field indicates the width in millimeters of the pixels in the image.
Y_pixel_size - This field indicates the height in millimeters of the pixels in the image.
Pedestal - This field indicates any pedestal (constant value) that has been subtracted
from each pixel in the image.
11
E_gain - This field gives the conversion factor between pixel values and electrons of
charge in the CCD. The units are e-/count.
The following fields are optional. They may or may not be present. in the header As the
CCDOPS software has evolved these fields have been added to the header. a few at a time If
present they will be in the order shown.
User_1 through User_4 - These fields are for the use of non-SBIG software packages and
can be up to 64 characters in length each, terminated with the <lf><cr> characters.
SBIG software will ignore and preserve the settings of these 4 user parameters when
reading and writing files. Either all 4 should be present or none of them should be
present. If present and any one of them is blank then a single dash character ("-")
should be written before the <lf><cr> characters. Finally, SBIG uses the User_1
filed to indicate the version of CCDOPS software used to capture the image.
Filter - This field is a 10 character text string indicating the name of the optical filter
used when taking the image.
Readout_mode - This field indicates the readout mode the CCD camera's internal
firmware utilized in capturing the image.
Track_time - This field, when non-zero, indicates the exposure used for the Tracking
CCD in Self-Guided images.
Sat_level - This field indicates the maximum level you should expect in the pixel data.
The ST-4X and ST-5 are 14 bit cameras for example and this setting will be 16383.
Note that this level can increase as images are co-added or with Track and
Accumulate images.
Image Compression
Type 3 images can be saved using a simple form of image compression. The image
compression consists of saving the differences between adjacent pixels and using single bytes
for small differences rather than double bytes.
Each line of compressed image data starts with a two-byte integer (least significant byte
first) indicating the compressed length of the line in bytes followed by the compressed image
11
All image pixels have a bias of 100 counts added to them to stop underflow due to noise. If you
need to flat field correct an image the pixel value that is due to light is:
Actual Counts = Image Counts - 100 + Pedestal
where Image Counts is what is read from the file and Actual Counts is the light response. For flat
field correcting images you would multiply the Actual Counts by the flat field correction, not the
Image Counts.
Page 55
Page 61

Appendix B - File Formats
data. The 1st pixel of the actual image data is written using two-bytes and is the actual pixel
value. Subsequent pixels are written as follows depending on the difference between that pixel
and the previous pixel ( = pixel (m,n) - pixel (m, n-1)):
If -127 127 then write as a single byte in 2's complement format, otherwise
write hex 80 (-128) followed by the actual pixel value using two-bytes (least
significant byte first).
The last caveat to the compressed image data is that if any line after being compressed has as
many or more bytes than if it were stored uncompressed then that line is stored uncompressed
with the 2 bytes of length followed by the actual pixel values written using 2-bytes per pixel
(least significant byte first).
Note also that the compression algorithm described above used in saving images is
similar though different than the compression algorithm used in downloading images from the
CPU. You can not simply read a compressed image from the CPU and write it to file, adding a
header. You must the CPU data and then compress the file data. This unfortunate
consequence stems from the desire to have the CPU compression occur on the fly to keep the
image throughput up.
B.2. TIFF Format
The TIFF format (which stands for Tagged Interchange File Format) was developed jointly by
Microsoft and Aldus Corporations to allow easy interchange of graphics images between
programs in areas such as presentation and desktop publishing. The TIFF format is described
in "Tag Image File Format, Revision 5.0, FINAL" by Aldus Corporation, Seattle, Washington.
B.3. FITS Format
The FITS format (which stands for Flexible Image Transport System) is a common format
supported by professional astronomical image processing programs such as IRAF and PC
Vista. The format of FITS images is described in "Implementation of the Flexible Image
Transport System (FITS)" published by NOST, NASA/OSSA Office of Standards and
Technology, NASA Goddard Space Flight Center, Greenbelt, MD.
Page 56
Page 62

Appendix C - Maintenance
C. Appendix C - Maintenance
This appendix describes the maintenance items you should know about with your CCD camera
system.
C.1. Replacing the Fuse
The CPU is internally fused with a 2 amp fast blow fuse. The fuse is located inside the CPU box
on the printed circuit board. Remove the four screws on the bottom of the CPU box to access
the fuse holder.
C.2. Disassembling/Reassembling the Optical Head
In order to gain access to the CCD for cleaning or desiccant removal, please follow these
instructions or return to the manufacturer for service.
1. Remove the four screws holding the front cover onto the camera and set the
cover aside.
2. Remove the shutter/filter wheel from the camera by pulling it straight up
out of the camera, lifting it off the axle.
3. Remove the three hex-head screws that hold the inner housing into the
camera. The inner housing covers the CCD, making a hermetic chamber for
the CCD and desiccant. Lift the inner housing and set it and the O-Ring
aside.
At this point you have access to the CCD and all the windows in the system as well as the
desiccant pack. To reassemble the camera please do the following:
1. Make sure the desiccant packet is in place below the CCD so that it may be
captured by the inner housing. You may find it necessary to take the two
outer corners of the desiccant and turn them inwards, making the
rectangular packet somewhat conform to the round outline of the inner
housing.
2. Seat the O-Ring in the groove in the bottom of the inner housing and gently
place the inner housing down into the camera. Place careful attention to not
pinching the desiccant packet under the seat of the inner housing. The
proper orientation of the inner housing is with the window over the CCD.
3. Tighten each of the three hex-head screws one-half turn at a time until the
inner housing is seated completely and flatly into the camera.
4. Place the shutter/filter wheel back into the camera with the side containing
the small reference marks and the larger brass bearing towards the CCD.
You will have to slightly deform the O-Ring that surrounds the wheel
against the shaft of the motor and be careful not to pinch or tear it.
5. Replace the front cover, noting that there is only one orientation that will fit
as the four mounting screws are at irregular angles.
Page 57
Page 63

Appendix C - Maintenance
C.3. Cleaning the Optical Windows
The design of the ST-237 allows for cleaning of the CCD. The optical heads are not evacuated
and are quite easy to open and clean. Follow the instruction in the section above to gain access
to the CCD and clean it using one of the following 3 methods:
1. To remove dust from the windows, a can of dust remover can be used but be
careful to hold the can in the proper orientation. If you tilt the cans too far
from upright a stream of cold liquid (the propellant) will issue forth rather
than the burst of air.
2. In lieu of canned air, a small, soft, camel hair brush can be used to wipe dust
from the windows.
3. Finally, for hard to remove particles or water spots, use a Q-Tip lightly
dampened in Isopropyl Alcohol to clean the windows.
Note: The key to cleaning optical surfaces is successive cleanings with a fresh Q-tip
each time.
C.4. Replacing the Desiccant
This section describes the replacement procedure for the desiccant used in your camera. The
desiccant absorbs moisture in the CCD chamber, lowering the dew point below the operating
temperature of the cooled CCD, thus preventing the formation of frost. The desiccant is
contained in a small rectangular package inside the CCD chamber. In normal operation the
useful life of the desiccant is over a year. If the CCD chamber is opened often, the desiccant
should be replaced when frosting is noticed.
Follow the instructions in the section above to gain access to the CCD chamber and
desiccant packet. Discard the old packet and replace it with a fresh one. Note that the
desiccant material in the packet can be regenerated by baking it in an oven at 400 degrees
Fahrenheit for four hours but you'll have to remove the desiccant from the packet first . Otherwise
the packet will melt. In a pinch you could snip the end of the packet off, pour out the desiccant
beads, bake them out, pour them back into the packet and reseal the packet with scotch tape.
Page 58
Page 64

Appendix D - Advanced Image Processing Techniques
D. Appendix D - Advanced Image Processing Techniques
This Appendix describes advanced image processing techniques including making Astrometric
and Photometric measurements and how to flat field Track and Accumulate images.
D.1. Astrometry and Photometry
Using the crosshair mode12 enables examination of images on a pixel by pixel basis for such
measurements as Stellar and Diffuse Magnitude, and measurement of stellar positions. The 16
bit accuracy of your camera produces beautiful low-noise images and allows very accurate
brightness measurements to be made. With appropriate filters stellar temperature can be
measured.
D.1.1 Astrometric Measurements.
The CCDOPS software allows measuring separations between objects in the field of view of an
image. Essentially, these measurements involve the user specifying telescope focal length and
two points in the image and the software calculating the separation in arcseconds (1 arcsecond
1
=
of a degree). The details of this process follow.
3600
You can specify each of the two points using two methods or algorithms: 1) A point can
be selected to be a pixel coordinate in the image; or 2) A point can be calculated by the software
to be the centroid or "center of light" of the area near a pixel in the image. The latter works well
when measuring separations involving stellar objects, the former should be used in all other
cases.
The crosshairs mode of the operating software is used to make the astrometric
measurements. Setting the positions of the two points is a five step process: 1) A determination
of the background level is made, 2) The cursor is moved to the first point, 3) The position of the
first point is recorded and the separation measurement zeroed, 4) The cursor is moved to the
second point, 5) The separation is calculated and displayed. These steps are discussed in detail
below:
1) If neither of the two points is stellar and measurements from pixel to pixel in the
image are desired then you can skip ahead to step 2. If however you want the
software to more accurately measure distances based upon stellar objects, then
you must let the software know what the background level is. Move the cursor
to an area of sky free of stars and nebulosity and hit the 'B' key (for background).
2) Move the cursor to the desired location of the first point using the arrow keys or
mouse. If the first location is a star, then position the cursor near the center of
the star.
3) If the first point is not a star and you desire to zero the separation on a pixel,
then hit the 'S' key (for set position) to set the position of the first point to the
pixel coordinate of the crosshair. If however the first object is a star and you
wish to zero the separation on the optical center of the star, then hit the 'C' key
(for centroid) and the computer will calculate the centroid of the star under the
crosshair and zero the separation measurement at that centroid position. The
12
The Crosshairs mode is accessed through the Display Image command in the Analysis mode.
Page 59
Page 65

Appendix D - Advanced Image Processing Techniques
advantage of using the centroid is that the zero position can be set between
pixels resulting in a more accurate measurement.
4) Move the cursor to the desired location of the second point. Each time the cursor
is moved, the separation between the 1st point and the current pixel coordinate
of the cursor is calculated and displayed.
5) If the second point is not a star then you're done. The separation shown is the
separation between the 1st point and the current pixel coordinate of the cursor in
seconds of arc. If however the second point is a star and you wish to set the 2nd
point to the centroid of the star, then position the cursor near the center of the
star and hit the 'P' key (for position). The computer will calculate the centroid of
the area under the cursor and use that centroid location for calculating and
displaying the separation. You will have to hit the 'P' key each time you move
the cursor to a new location because as soon as you move the cursor, the 2nd
point is set to the pixel coordinate of the cursor and no new centroid is
calculated. Finally note that in both cases, you can make several separation
measurements between the 1st point and the different 2nd points without
having to re-set the position of the 1st point.
How does the computer calculate the separation, you ask? The separation calculations are
discussed in detail at the end of this section but in general, the software does this by measuring
the physical separation of the two points in the image and dividing by the focal length of the
telescope. For this reason, accurate astrometric measurements depend on the correct setting of
the focal length parameter in the Edit Parameters command. This parameter, which is copied
from the Telescope Setup command, should be set to the focal length of the telescope in inches.
An object with a known separation, such as a wide double star, can be used to
accurately determine the focal length as follows:
1) Set your focal length parameter in the Telescope Setup command approximately
correct. For example if you have an 8-inch f/10 telescope, the approximate focal
length is 80 inches.
2) Take an image of the known object and measure the separation.
3) Finally adjust the focal length parameter in both the Edit Parameters command
and the Telescope Setup command accordingly. For example if the measured
separation is 10% lower than the actual value, then you should lower the focal
length parameter by 10%.
D.1.2 Photometric Measurements.
The CCDOPS software also lets you make photometric measurements of objects in the field of
view. These measurements include stellar magnitude and surface brightness (Diffuse
Magnitude). Stellar magnitude measures the total energy in an object . Surface brightness
calculates the total energy per unit of area.
These measurements are made in the crosshairs mode and involve three steps: 1) A
determination of the sky background is made to zero the calculations, 2) The crosshair is
positioned on the star or portion of nebulosity, and 3) An appropriate box-size is determined
for accurately measuring the magnitude. These three steps are detailed below:
Page 60
Page 66

Appendix D - Advanced Image Processing Techniques
1) Move the cursor to an area that is representative of the background surrounding
the object you wish to measure. For example, if you're trying to determine the
magnitude of a star buried in nebulosity, you would select a background area
with roughly the same brightness as the nebulosity surrounding the star. If you
are trying to measure the surface brightness of a galaxy, then pick a location out
in the sky background free of stars and nebulosity. Once the cursor is
positioned, hit the 'B' key (for background) to calibrate the magnitude
measurements based upon the background level.
2) Position the crosshair over the object of interest. For stellar objects get the
crosshair close to the center of the star. For nebular objects place the crosshair
over the region of interest.
3) The size of the box used to measure the magnitude is toggled through using the
'T' key (for toggle box size). For stellar objects the box size should be big enough
to include all the light from the star but small enough to exclude other objects
from the calculations. As you increase the size of the box from 3x3, you will see
the calculated magnitude decrease (stellar brightness increase) and plateau out
as the box size includes all the star's light. For nebular objects, set the size of the
box large enough to get the desired smoothing effects of larger numbers of pixels
but small enough to be able to measure any desired spatial variations in the
surface brightness.
Accurate measurements of photometric quantities requires attention to several items. First, the
CCD's spectral response means it measures light from 4000Å through 9000Å with varying
efficiencies. In general the CCD's response peaks near 6750Å and is roughly 50% (relative to the
peak) at 4500Å and 7500Å. Using the CCD without any optical bandwidth filters is roughly
equivalent to measuring photographic magnitudes. Second, the software needs to know the
aperture area of the telescope. Larger apertures capture more light. This is set in the Telescope
Setup command for images to be taken in the future and in the Edit Parameters command for
existing images. This aperture area should be the clear aperture area with any obstruction
subtracted. The software also depends on a response or calibration factor to convert pixel
counts to magnitudes. This parameter is in both the Camera Setup and Edit Parameters
commands. The correct value for your camera is roughly 2000. The reason we say roughly is
that the calibration parameter is adjusted to calibrate the magnitude to that of a known star or
object. Reasons for the variation include transparencies of optical elements in the telescope,
transmission of the atmosphere and manufacturing variations from camera to camera. All this
aside, the method you use to determine the correct setting of the CCD response factor is as
follows:
1) Select an object in the field of view for which you know the magnitude or take
an image of a known object. The former is preferable because it takes into
account any variations in atmospheric transmission as a function of altitude in
the sky which can be quite substantial. Objects at the zenith go through less air
than objects near the horizon.
2) Make a background setting as described in the steps above.
3) Position the cursor over the known object and select the box size as described
above. If the magnitude shown is incorrect, use the '+' and '-' keys to adjust the
Page 61
Page 67

Appendix D - Advanced Image Processing Techniques
h−1
w−1
h×w
−
−
calculated magnitude. Each press of the '+' and '-' keys adjusts the magnitude
by 0.1 or 0.01 depending on whether the Shift key is held down.
4) When the calculated magnitude is correct, note the settings of the response factor
parameter in the Edit Parameters command and copy it to the settings in the
Camera Setup command so it will be used in future images13.
If you're interested in the nuts and bolts of the photometric calculations, read on. They're
described in full detail below.
D.1.3 Calculation of Centroids
The centroid calculation is directly analogous to a center-of-mass calculation for an object if you
represent the local mass density with the pixel intensity values and allow a discrimination level
at the average background level. This is shown in the following figures and formulas:
X
0
Y
0
h
Threshold
Stellar Profile
w
P( i, j)
∑
∑
=0
=0
j
Threshold
i
=
where in the formula above P(i,j) represents the intensity value of the pixel at x=X0+i, y=Y0+j.
Also the Threshold value which will be used as a discrimination level in the centroid calculation
is taken over the background area and represents the average pixel level in the background
area.
1
1
h
w
i×(P(i, j)−Threshold)
∑
∑
=0
=0
j
i
Xcentroid=X
+
0
−1
−1
h
w
P(i, j)−Threshold
∑
∑
=
=
0
0
j
i
13
The star's spectral class can produce ±0.5 magnitude errors in this determination. For the greatest
accuracy calibrate the response factor on a star with a similar spectral class.
Page 62
Page 68

Appendix D - Advanced Image Processing Techniques
−
−
∑
∑
L−B
1
1
h
w
j×(P(i, j)−Threshold)
∑
∑
=0
=0
j
Ycentroid=Y
i
+
0
−1
−1
h
w
P(i, j)−Threshold
∑
∑
=
=
0
0
j
i
where in the formulas above should the quantity P(i,j) - Threshold be less than zero, zero is
substituted on a pixel-by-pixel basis.
D.1.4 Calculation of Separation
The angular separation between two points on the image is determined by calculating the
corresponding physical separation between the points on the CCD and dividing by the focal
length, keeping track of the units14:
2
Separation
3600×180
=
π
(∆x ×0.01)2+ (∆y ×0.01)
×
25.4 × fl
where Separation is in seconds of arc, x and y are the x and y separations between the two
points in pixels and fl is the focal length of the telescope in inches.
D.1.5 Calculation of Magnitude
The magnitude calculation involves calculating the total energy in a star, subtracting the
background, correcting for the exposure time, aperture area and CCD response factor and
taking a scaled logarithm. The calculation is broken down into several steps below:
=
L
=
B
where L and B are the sum of all pixel values in the box centered on the star and background
areas respectively.
P(i, j)
j∑i
P(i, j)
j∑i
Magnitude
2.5×log
= −
10
A×C×T
where A is the aperture area in square inches, C is the magnitude calibration factor and T is the
exposure duration in seconds. Note that the units of C are counts per second per square inch of
aperture for a 0th magnitude star. C is proportional to the CCD's response factor from the
Camera Setup command. You can calculate C from the CCD's Response factor (R) using the
formula below:
14
The pixel sizes shown are for the camera in the High Resolution readout mode (0.01 x 0.01
millimeters). For the other readout modes substitute the appropriate X and Y pixel sizes. This
information is shown in the Image Parameters command.
Page 63
Page 69

Appendix D - Advanced Image Processing Techniques
1000
×
R
Magnitude
BoxArea
C
=
e−/ AD Count
D.1.6 Calculation of Diffuse Magnitude
Diffuse Magnitude is the magnitude per square arcsecond of subtended area. The calculation
uses the Magnitude calculated above and the area of the box as shown below15:
3600×180
BoxArea
where BoxArea is the area of the box over which the Diffuse Magnitude is calculated in square
arcseconds, BoxSize is the size of the box in pixels and fl is the focal length of the telescope in
inches. Finally:
=
π
DiffuseMagnitude
2
BoxSize
×
=
2
0.01×0.01
×
fl×25. 4
( )
2
D.2. Flat Fielding Track and Accumulate Images
This section gives the step by step procedure for flat field correcting images taken using the
Track and Accumulate command.
Flat field correcting images allow the user to remove the effects of CCD response non-
uniformity (typically less than a few percent) and optical vignetting which for some optical
systems can be as much as a 50% effect from center to edge. The CCDOPS software allows flat
field correcting images using the Flat Field command, but some preparation must be made to
use that command with Track and Accumulate images. Essentially you must prepare a special
flat field correction image for Track and Accumulate images. This special preparation is
necessary to have the same set of alignment and co-addition operations apply to the flat field
file that have occurred in acquiring the Track and Accumulate image. In general, the following
procedure should be followed when flat field correction of Track and Accumulate images is
desired:
1. Take a normal flat field image using the Grab command. Try to adjust the
illumination and/or exposure so that the build up of light in the image yields
pixel values around 2000 counts or so. You don't want to exceed the
antiblooming knee which starts to kick in around 4000 counts.
Note: You will have to take a new flat field image anytime you change the optical
configuration of your telescope such as removing and replacing the optical head in the
eyepiece holder.
2. Save the flat field image on your disk using the Save command. In the following
discussions this flat field file will be referred to as FLAT.
15
Refer to the previous footnote.
Page 64
Page 70

Appendix D - Advanced Image Processing Techniques
3. Take your Track and Accumulate image using the Track and Accumulate
command and save it on the disk using the Save command. In the following
discussions this Track and Accumulate image file will be referred to as IMAGE.
4. Immediately after saving the IMAGE, use the Save Track List command to save
the Track and Accumulate track list. The track list is a file that describes what
alignment operations were done to the individual components of IMAGE to
achieve the end result. In the following discussions this track list file will be
referred to as TRACK.
5. Repeat steps 3 and 4 as many times as desired for all the objects you wish to
image, each time choosing a set of corresponding new names for the IMAGE and
TRACK files.
6. You will now create a combined flat field image for each Track and Accumulate
image you captured. Invoke the Build Track/Accum Flat command. The
software will present a file directory box asking you to select the track list saved
in step 4 above. Select the TRACK file corresponding to the image you wish to
correct. The software will load the TRACK file and present you with another file
directory dialog showing all the images. Select the appropriate FLAT image.
The software will align and co-add the FLAT image using the same operations it
performed on the Track and Accumulate image. Finally save the combined flat
field image using the Save command. In the following discussions this
combined flat field image will be referred to as COMBINED-FLAT. Repeat this
step for each of the TRACK files using a corresponding name for the
COMBINED-FLAT image.
7. You will now flat field correct the Track and Accumulate image with the
combined flat field image. Use the Open command to load the IMAGE file, then
use the Flat Field command. The software will present you with a file directory
dialog where you should select the corresponding COMBINED-FLAT image.
After the software has finished correcting the image, you can view the results
and save the flat field corrected image with the Save command. This image will
be referred to as the CORRECTED-IMAGE file. Repeat this step for each of the
IMAGE files using the corresponding COMBINED-FLAT image.
D.3. Further Reading
CCD Astronomy by Christian Buil, available through Willmann-Bell Publishing (804) 320-7016.
Page 65
Page 71

Page 72

A
A/D converter................................................................. 8
analysis mode................................................................27
antiblooming .............................................................7, 37
Antiblooming Gate (def)................................................37
astrometric measurements........................................ 37, 57
Astrometry (def)............................................................37
Auto Grab Command.....................................................24
Autoguide Command.....................................................32
Autoguider (def)............................................................37
autoguiding..............................................................32, 34
Average Dark Frames Command....................................29
B
backfocus ......................................................................19
background and range....................................................28
battery operation............................................................35
binning........................................................................... 8
Build Track/Accum Flat Command................................30
C
Calibrate Command .......................................................34
camera features............................................................... 1
Camera Information Command ......................................32
camera orientation.........................................................19
Camera Setup Command ...............................................31
CCD
(def)..........................................................................37
cameras.................................................................3, 10
cleaning....................................................................56
detector................................................................. 3, 10
CCD port on telescope...................................................35
CCDCOLOR software ...................................................34
CCDOPS
installing...................................................................13
Celestron Ultima mount.................................................34
centering objects............................................................21
centroid.........................................................................60
cleaning the CCD ..........................................................56
Co-Add Command.........................................................29
co-add images............................................................ 3, 33
cold pixels.....................................................................29
Color Filter Wheel.......................................................... 1
Color Grab Command ....................................................25
color images ..................................................................33
commands
Calibrate...................................................................34
Grab .........................................................................21
Track and Accumulate...............................................33
Commands
Auto Grab.................................................................24
Autoguide.................................................................32
Average Dark Frames................................................29
Build Track/Accum Flat............................................30
Camera Information ..................................................32
Camera Setup ...........................................................31
Co-Add.....................................................................29
Index
Color Grab ................................................................25
Communications Setup........................................17, 32
Convert Track Log File .............................................32
Dark Subtract............................................................29
Depixelize Image ......................................................28
Display Slide Show ...................................................27
Establish COM Link.................................................17
Establish Link...........................................................32
Eyepiece ...................................................................24
Flat Field..................................................................30
Focus........................................................................23
Grab .........................................................................23
Graphics Setup..........................................................31
Histogram.................................................................30
Log Scaling ...............................................................30
Make Slide Show ......................................................27
Print .........................................................................28
Reduce Image ...........................................................29
Sharpen ....................................................................29
Shutdown..................................................................32
Smooth .....................................................................29
Track and Accumulate...............................................24
communications link......................................................13
Communications Setup Command............................17, 32
Convert Track Log File Command .................................32
cooling ......................................................................4, 39
co-register images..........................................................33
crosshairs ......................................................................31
D
dark current.................................................................4, 6
dark frame.................................................................5, 10
Dark Frame (def) ...........................................................37
dark frames ...................................................................29
Dark Noise (def)............................................................37
Dark Subtract Command................................................29
dark subtracted............................................................... 5
depixelize......................................................................28
Depixelize Image Command ..........................................28
desiccant .......................................................................56
Diffuse Magnitude.............................................57, 58, 62
diffuser..........................................................................19
Display Slide Show Command .......................................27
Double Correlated Sampling ........................................1, 7
Double Correlated Sampling (def) .................................37
dynamic range ................................................................ 8
E
Establish COM Link Command.....................................17
Establish Link Command...............................................32
eyepiece ........................................................................21
Eyepiece Command .......................................................24
eyepiece projection......................................................... 1
F
fan.................................................................................. 1
field operation ...............................................................35
file filter........................................................................26
67
Page 73

file formats....................................................................49
file path .........................................................................26
film ................................................................................ 3
Filter Commands...........................................................32
filter wheels ..................................................................32
filters.............................................................................57
finding objects...............................................................21
FITS format...................................................................54
FITS format (def)...........................................................37
flat field .................................................................. 33, 62
Flat Field (def) ..............................................................37
Flat Field Command......................................................30
Focal Reducer (def) .......................................................38
focus
Dim mode.................................................................21
Planet mode..............................................................38
Focus Command............................................................23
focusing.........................................................................20
Focusing........................................................................19
frame transfer CCDs ....................................................... 7
Frame Transfer CCDs..................................................... 5
Frame Transfer CCDs (def) ...........................................38
frost...............................................................................10
full well capacity ............................................................ 6
Full Well Capacity (def) ................................................38
fuse ...............................................................................55
G
Grab Command .......................................................21, 23
Graphics Setup Command..............................................31
guiding error..................................................................34
H
hand controller ........................................................ 21, 34
hermetic chamber ..........................................................10
Hints and Tips...............................................................41
Histogram (def) .............................................................38
Histogram Command.....................................................30
hot pixels.......................................................................29
I
image header.................................................................27
image parameters...........................................................27
installing CCDOPS........................................................13
interference ....................................................................ii
IR blocking filter ...........................................................34
L
light frame...................................................................... 5
light frame (def) ............................................................38
Link ..............................................................................17
Log Scaling Command ...................................................30
Losmandy mounts ..........................................................34
LPT port ........................................................................17
LX-200 mount...............................................................34
Index
M
magnitude
diffuse ..........................................................57, 58, 62
stellar ...........................................................57, 58, 61
maintenance ..................................................................55
Make Slide Show Command ..........................................27
moon.............................................................................19
Mounts
Celestron Ultima.......................................................34
Losmandy .................................................................34
LX-200.....................................................................34
N
nosepiece........................................................................ 1
O
O-ring............................................................................10
P
parallel interface............................................................. 1
path (def).......................................................................38
path/filter (def)..............................................................38
PEC drive correctors ......................................................33
photo mode....................................................................27
photometric measurements.......................................38, 58
Photometry (def)............................................................38
Photons/ADU ................................................................38
pixel size........................................................................ 5
Pixel Size (def)..............................................................38
Planet mode (def) ..........................................................38
planets.......................................................................3, 19
PPEC drive correctors....................................................33
preamp..........................................................................10
Print Command .............................................................28
Q
QE curve ........................................................................ 9
Quantum Efficiency (def)...............................................38
Question and Answer.....................................................41
R
read noise....................................................................... 6
readout
noise.......................................................................... 4
Noise (def)................................................................38
Streaking (def)..........................................................38
reduce ...........................................................................29
Reduce Image Command ...............................................29
relay adapter box...........................................................35
replacing desiccant ........................................................56
Resolution (def).............................................................39
Response factor (def).....................................................39
68
Page 74

S
Saturation (def) .............................................................39
seeing............................................................................33
Seeing (def) ...................................................................39
separations ..............................................................57, 61
Sharpen Command ........................................................29
Shutdown Command......................................................32
shutter wheel.................................................................. 1
signal to noise ratio........................................................34
sky background.......................................................... 3, 33
Slide Shows...................................................................27
Smooth Command .........................................................29
specifications.................................................................47
spectral range ................................................................. 3
spectral response ............................................................ 9
Status Window ..............................................................17
Link field ..................................................................17
stellar magnitude...............................................57, 58, 61
stellar temperature.........................................................57
streaking........................................................................38
T
Index
TC255.........................................................................1, 9
TE cooler........................................................................ 5
TE Cooler......................................................................10
TE Cooler (def) .............................................................39
telescope .......................................................................21
telescope hand controller .........................................21, 34
telescope port ................................................................. 1
Telescope port...............................................................34
thermistor....................................................................... 5
TIFF format...................................................................54
TIFF format (def)...........................................................39
Tips...............................................................................41
Track and Accumulate (def)..........................................39
Track and Accumulate Command.............................24, 33
Track and Accumulate mode ..........................................62
track list........................................................................63
Track List (def) .............................................................39
Tri-Color (def)..............................................................39
T-Thread ........................................................................ 1
V
Vignetting (def).............................................................40
taking images ................................................................21
69
 Loading...