

Page 1
SBIG’s New AO-L High Speed Guider for the STL Camera Series
Alan Holmes
12/19/2005
!!! Important Note: Remove the front cover and take the neoprene foam out of the
unit before operation!!!
AO-L Operation:
SBIG’s previous high speed guider, the AO-7, is unable to be used with the large CCDs
of the STL cameras due to vignetting by the 50 mm diameter mirror it uses. At the 45
degree angle the mirror is used at it foreshortens to only 35 mm. It also had an issue with
image rotation at large deflections which becomes serious for large CCDs, but is not a
problem for the smaller CCDs of the ST series. For these reasons SBIG has designed a
new Adaptive Optic device for high speed beam steering called the AO-L (Active Optic –
Large Format). It does not have the range and speed of the old AO-7, but can cover the
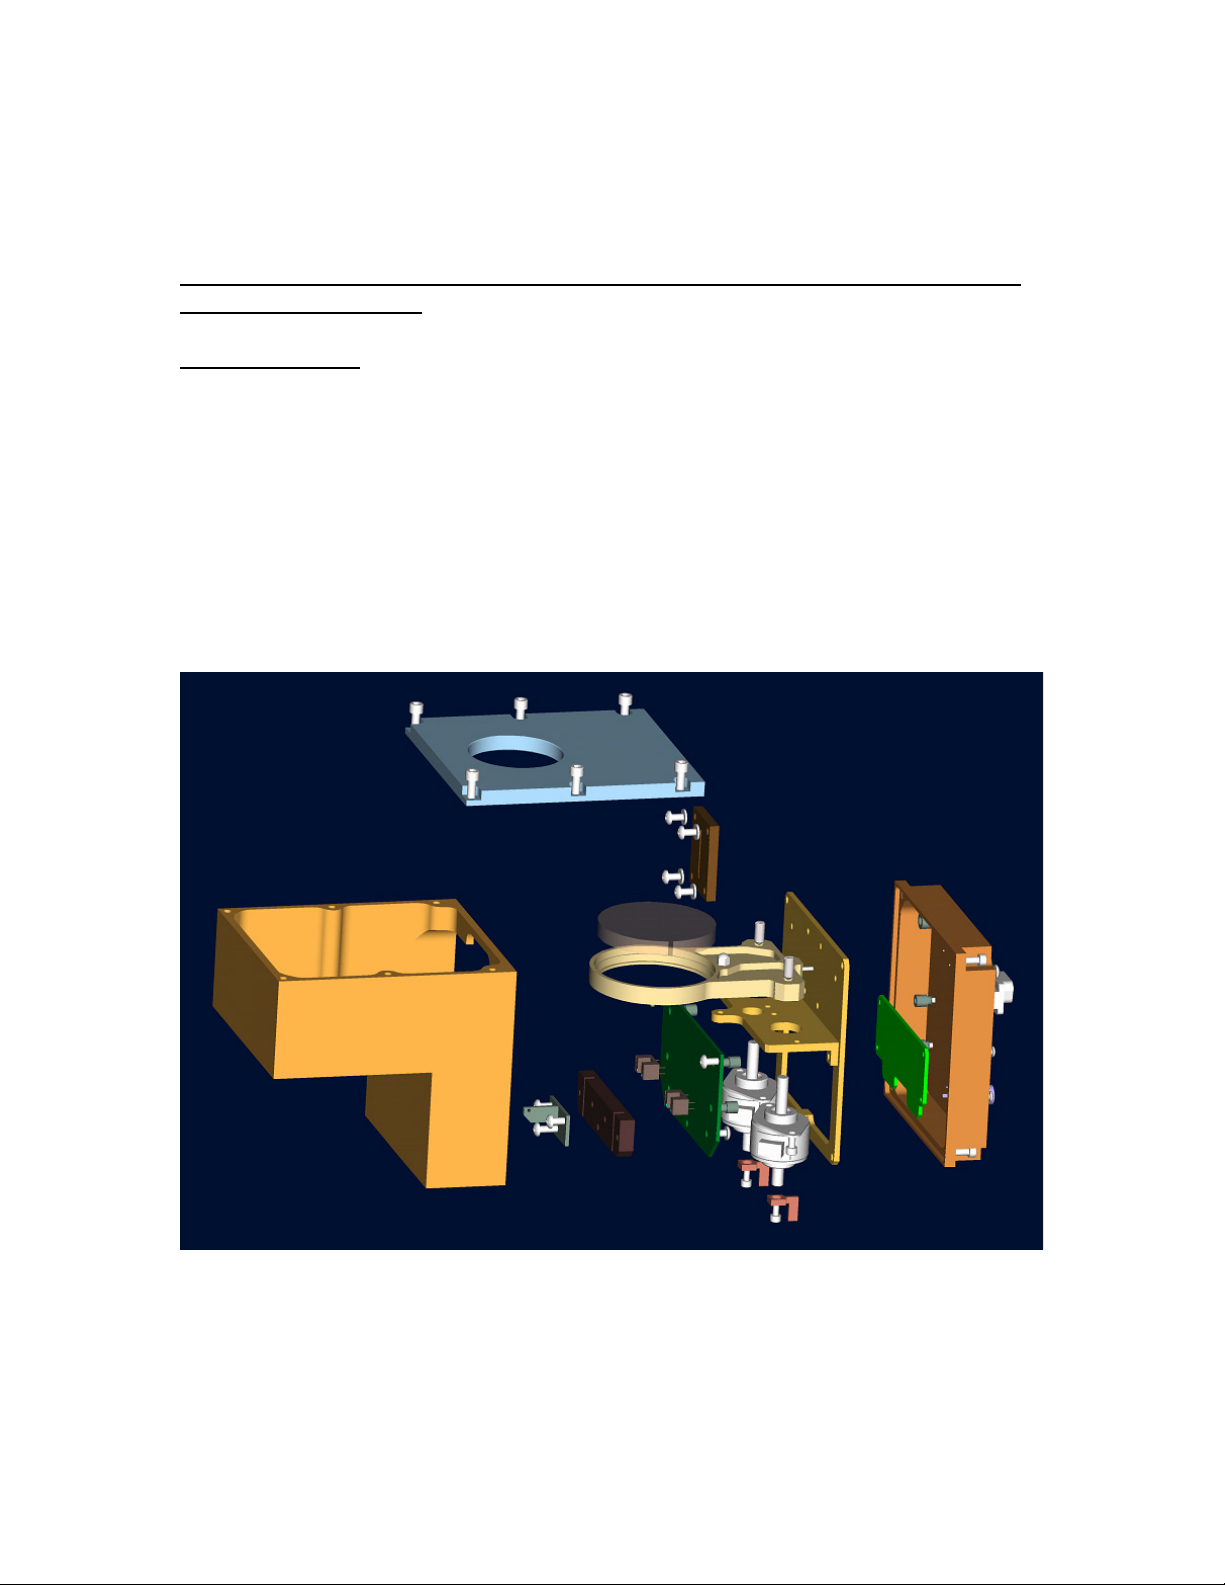
larger CCDs. It is shown in an exploded view below.
Figure One: Exploded view of New AO-L
The light passes through a 6 mm thick plane parallel plate that can be tilted by the action
of two linear stepper motors in conjunction with a Delrin pivot point. The total amount
of tilt in each direction is about +/- 4.6 degrees. The light beam is deviated by 36
microns per degree of tilt, so the maximum deviation is +/- 165 microns, or +/-18 pixels
with an STL-6303. We have done careful raytracing to convince ourselves that no focal
Page 2
shift or significant aberration occurs as the plate is tilted over these small angles, nor is
there any distortion, rotation, or change in magnification. Our testing has verified these
results. The window is AR coated with the same coating on our STL chamber window,
and has less than 1% reflection per surface from 400 to 900 nm wavelength. Our
assumption is that this device is being used with long focus telescopes where bright stars
in the field of view are unlikely, and is not used with short focus refractors. Short
refracters should not need a fast steering device like the AO-L.
The main advantage of the new technique is that it is thin, only using up 1.483
inches (38 mm) of back focus distance, whereas a mirror-based technique would
probably require 6 inches (150 mm) of back focus. It is somewhat slower, since the
motor can only tip the motor at 11.7 degrees per second, or 47 pixels per second. In this
design moves are slew-rate limited. What this means to the user is that the user should
use a focal length that does not produce too large of a star image. For example, if the
seeing is bad and the star is 9 pixels across, it is probably jumping around by 4 pixels or
so with each look, which would take 85 milliseconds to move. If under such conditions
you reduced your focal length to where the star was only three pixels across, only 28
milliseconds are spent making the move, and you can achieve a higher update rate with
the AO-L. The total overhead in the software for an AO-L move is 45 milliseconds. If,
for example, you are taking 50 millisecond exposures with an optimized focal length (3
pixel Full Width Half Maximum stars), the total cycle time is 45 + 50 + 28 ms, or 123 ms
(8 updates per second). The AO-7 advantage is that a move of any length is 20
milliseconds, but the exposure and overhead times were similar. Based on our
experience and knowledge, AO-L and AO-7 rates help only slightly with reducing
ground layer atmospheric turbulence, but are quite effective in reducing guide errors and
wind buffeting.
AO-L Installation:
The AO-L is designed to be bolted directly to the nosepiece mounting plate on the front
of your STL camera. The motor portion of the AO-L hangs over the top edge of the
camera. The steps to attaching the AO-L are as follows:
1) Very important: Make sure the AO-L is unpowered so if a screw falls into it you
do not get an electrical short.
2) Remove the top plate of the AO-L by removing the 6 screws that hold it down.
3) Remove the pieces of neoprene or foam that were inserted between the window
paddle and the top plate during shipment. Save these in case the unit ever needs
to be returned to SBIG. They cage the window paddle, keeping it from flying
around when the shippers throw the boxes from truck to truck, and being
damaged.
4) Using the 4 screws provided, attach the housing of the AO-L to the camera
nosepiece mounting plate, which is 2.75 inches (7 cm) on a side. You can do this
without removing the window paddle. Do this while the camera is unpowered.
Be VERY careful not to let the screws fall into the camera. If they do fall in,
shake them out carefully or remove the camera chamber front plate to reach them
so as to not scratch the optical surfaces within the camera. You do not need to
Page 3

remove the camera nosepiece front plate. If you do, be very careful to keep any
shim washers found under it in the same position so as to maintain the squareness
of the CCD to the optical axis.
5) Re-install the AO-L top plate. Attach your nosepiece to it.
6) Plug the cable from the AO-L into the I2C-AUX port on the STL. Download the
latest drivers from SBIG and install them. At the time of this writing CCDOPS is
the only image acquisition program that supports the AO-L but we expect
CCDSOFT and Maxim will follow shortly.
Hints/Troubleshooting:
Stray light: There may be some concern about the gap above the AO-L window
and the AO-L front plate aperture. At F/5 light passing through the gap will NOT hit the
CCD, and there should be no stray light associated with it.
Cleaning: If the window ever needs cleaning it is much easier to clean it when the
paddle assembly is out of the camera. If one removes the electronics cover on the AO-L
the entire optical, mechanical and electrical assembly pulls out the side, and access is
much easier. Use cotton swabs and isopropyl (rubbing) alcohol to clean the window if
necessary. Cleaning is laborious – never re-use a cotton swab. Keep using fresh ones,
and eventually all oil on the window will be removed. The AR coating on the window
makes any residual oil very apparent.
Exercise mode: the AO-L should recenter every time it is powered up. You can
also exercise the AO-L over its full range of operation using the AO exercise command
in CCDOPS with 0.5 to 1 second per axis. The full range is about +/- 0.1 inch (2.5 mm)
at the corners of the window. We have never had an assembly get lost and jam at the
extremes of its range – contact SBIG should this happen.
Vibration: the AO-L does vibrate substantially in exercise mode, with an easily
felt buzz. This is not a problem for the much shorter moves typical of actual operation,
and when mounted to a substantial telescope.
Use with ST-Series cameras: SBIG will soon offer an adapter so the AO-L can be
used with the ST- series cameras that have USB capability
Removal of Paddle: the paddle containing the window can easily be removed if
necessary by unhooking one end of the spring and pulling it off the pivot point. The
pivot point is a spherical ball with a snap fit.
Ghosts/Haloes: AO-L imaging here with a 12 inch F/8 Ritchey-Cretien telescope
on the Beehive cluster, which contains many bright stars, revealed no trace of ghost
reflections or haloes around the stars. They may be there at some low level, but we
haven’t seen them.
 Loading...