

Page 1
SBE SB-36 OPERATION MANUAL
SB-36 OPERATION MANUAL
Remastered by NoobowSystems Lab. Tomioka, Japan 2003 Rev.00
http://www.noobowsystems.com
PRELIMINARY VERSION
NoobowSystems Lab. Tomioka, Japan 2003 http://www.noobowsystems.com/ Page 1 / 56
Page 2

SBE SB-36 OPERATION MANUAL
WARRANTY
Linear Systems, Inc. warrants equipment manufactured by it to be free from defects in
material or workmanship and agrees to repair such equipment which under normal use
and service, develops defects arising from the fault of the manufacturer. Equipment must
be returned transportation prepaid within 90 days from the date of original purchase, and
unless the warranty card has been filled in and returned within ten days of original
purchase, the warranty shall be void.
This warranty does not apply to equipment which (1) has been repaired or altered by
anyone in any way so as, in our judgment, to injure its stability or reliability, (2) has been
subject to misuse, negligence, or accident, (3) has had the serial number altered defaced,
or removed, or (4) has been connected, installed, adjusted otherwise than in accordance
with our written instructions.
The foregoing is in lieu of any other warranty or liability expressed, implied, or statutory
and in no event shall Linear Systems, Inc. be liable for special or consequential damages.
Linear Systems, Inc. neither assumes nor authorizes any person to assume for it any other
obligation or liability in connection with this equipment.
LINEAR SYSTEMS, INC.
220 Airport Boulevard
Watsonville, California 95076
(408) 722-4177
NoobowSystems Lab. Remastering Information
Revision 0.0 Aug.11, 2003 Preliminary release, some pages are missing.
NoobowSystems Lab. Tomioka, Japan 2003 http://www.noobowsystems.com/ Page 2 / 56
Page 3

SBE SB-36 OPERATION MANUAL
TABLE OF CONTENTS
Paragraph Page
Section I
General Description
1.1
General
1
1.2
Specifications 1
1.2.1 General 1
1.2.2 Transmitter 1
1.2.3 Receiver 2
Section II
In starvation
2.1 General 3
2.2 Fixed Station 3
2.3 Antennas 3
2.4 Linear Amplifier 3
Section III
Operation
3.1 Operation Instructions 4
Section IV
Operating Procedure
4.1 Receiver Operation 11
4.2 Transmitter Tuning Procedure 11
4.3 CW operation 12
Section V
Theory of Operation
5.1 General 13
5.2 Transmitter circuitry 13
5.3 Receiver Circuitry 16
NoobowSystems Lab. Tomioka, Japan 2003 http://www.noobowsystems.com/ Page 3 / 56
Page 4

SBE SB-36 OPERATION MANUAL
Table of Contents
1.0 INTRODUCTION...........................................................................................................................5
1.1 GENERAL............ ............. . ..................... ......................................................................................5
1.2 SPECIFICATIONS.............. ............... . ............... . ............... . ............... . ............... . .........................5
1.2.1..................................................................................................................................General
.....................................................................................................................................................5
1.2.2............................................................................................................................Transmitter
.....................................................................................................................................................6
2.0 INSTALLATION............................................................................................................................7
2.1 GENERAL............ ............. . ..................... ......................................................................................7
2.2 FIXED STATION....................................................................... ....................................................7
2.3 ANTENNAS........... . ................................................. . ................................................. ...................7
2.4 LINEAR AMPLIFIER.....................................................................................................................7
3.0 OPERATION....................................................................... ..........................................................8
3.1 OPERATING INSTRUCTIONS.......................... .............. ............. . .............. .................................8
3.1.1.............................................................................................................................................8
4.0 OPERATING PROCEDURE............ ............. . .......................... ............. . .....................................14
WARNING:............................................... .........................................................................................14
4.1 RECEIVER OPERATION...........................................................................................................14
4. 2 TRANSMIT TUNING PROCEDURE........................................ ..................................................14
4. 3 CW OPERATION.......................................................................................................................15
5. 0 THEORY OF OPERATION........................................................................................................17
5. 1 GENERAL.......................... ........................................................................................................17
5.1.1...........................................................................................................................................17
5. 2 TRANSMITTER CIRCUITRY..................... ........................ ........................ ................................18
5.2.1.........................................................................................................Transmitter Signal Path
...................................................................................................................................................18
5.2.2......................................................................................................Automatic Level Control
...................................................................................................................................................19
5. 3 RECEIVER CIRCUITRY....................... ......................................................................................19
5.3.1.............................................................................................................Receiver Signal Path
...................................................................................................................................................19
5.3.2........................................................................................................................Noise Blanker
...................................................................................................................................................20
5.3.3........................................................................................................Automatic Gain Control
...................................................................................................................................................20
5.3.4.........................................................................................................................VOX Keying
...................................................................................................................................................21
5.3.5..................................................................................................Frequency Mixing Network
...................................................................................................................................................21
5.3.5.1................................................................................................................Carrier Oscillator
...................................................................................................................................................22
5.3.5.2...................................................................................................................VFO Oscillator
...................................................................................................................................................22
5.3.5.3.................................................................................................High Frequency Oscillator
...................................................................................................................................................23
5.3.5.4 Side Tone Oscillator.....................................................................................................23
5.3.6..................................................................................................................................Counter
...................................................................................................................................................24
5.3.7........................................................................................................................Power Supply
...................................................................................................................................................25
NoobowSystems Lab. Tomioka, Japan 2003 http://www.noobowsystems.com/ Page 4 / 56
Page 5

SBE SB-36 OPERATION MANUAL
6. 0 MAINTENANCE......................... . ...............................................................................................27
6. 1 INTRODUCTION........................................................................................................................27
6.2 PREVENTATIVE MAINTENANCE..............................................................................................27
6.2.1..................................................................................................................................General
...................................................................................................................................................27
6.2.2......................................................................................................................Cover Removal
...................................................................................................................................................27
6.2.3................................................................................................................................Cleaning
...................................................................................................................................................27
6.2.4............................................................................................................................Lubrication
...................................................................................................................................................28
6.3 TROUBLESHOOTING................................................................................................................28
6.3.1.................................................................................................Troubleshooting Techniques
...................................................................................................................................................28
6.3.2.......................................................................................Voltage Table and Injection Points
...................................................................................................................................................30
6.1.1........................................................Receiver DC Voltages - No Signal Input - USB Mode
...................................................................................................................................................30
NoobowSystems Lab. Tomioka, Japan 2003 http://www.noobowsystems.com/ Page 5 / 56
Page 6

SBE SB-36 OPERATION MANUAL
1.0 INTRODUCTION
1.1 GENERAL
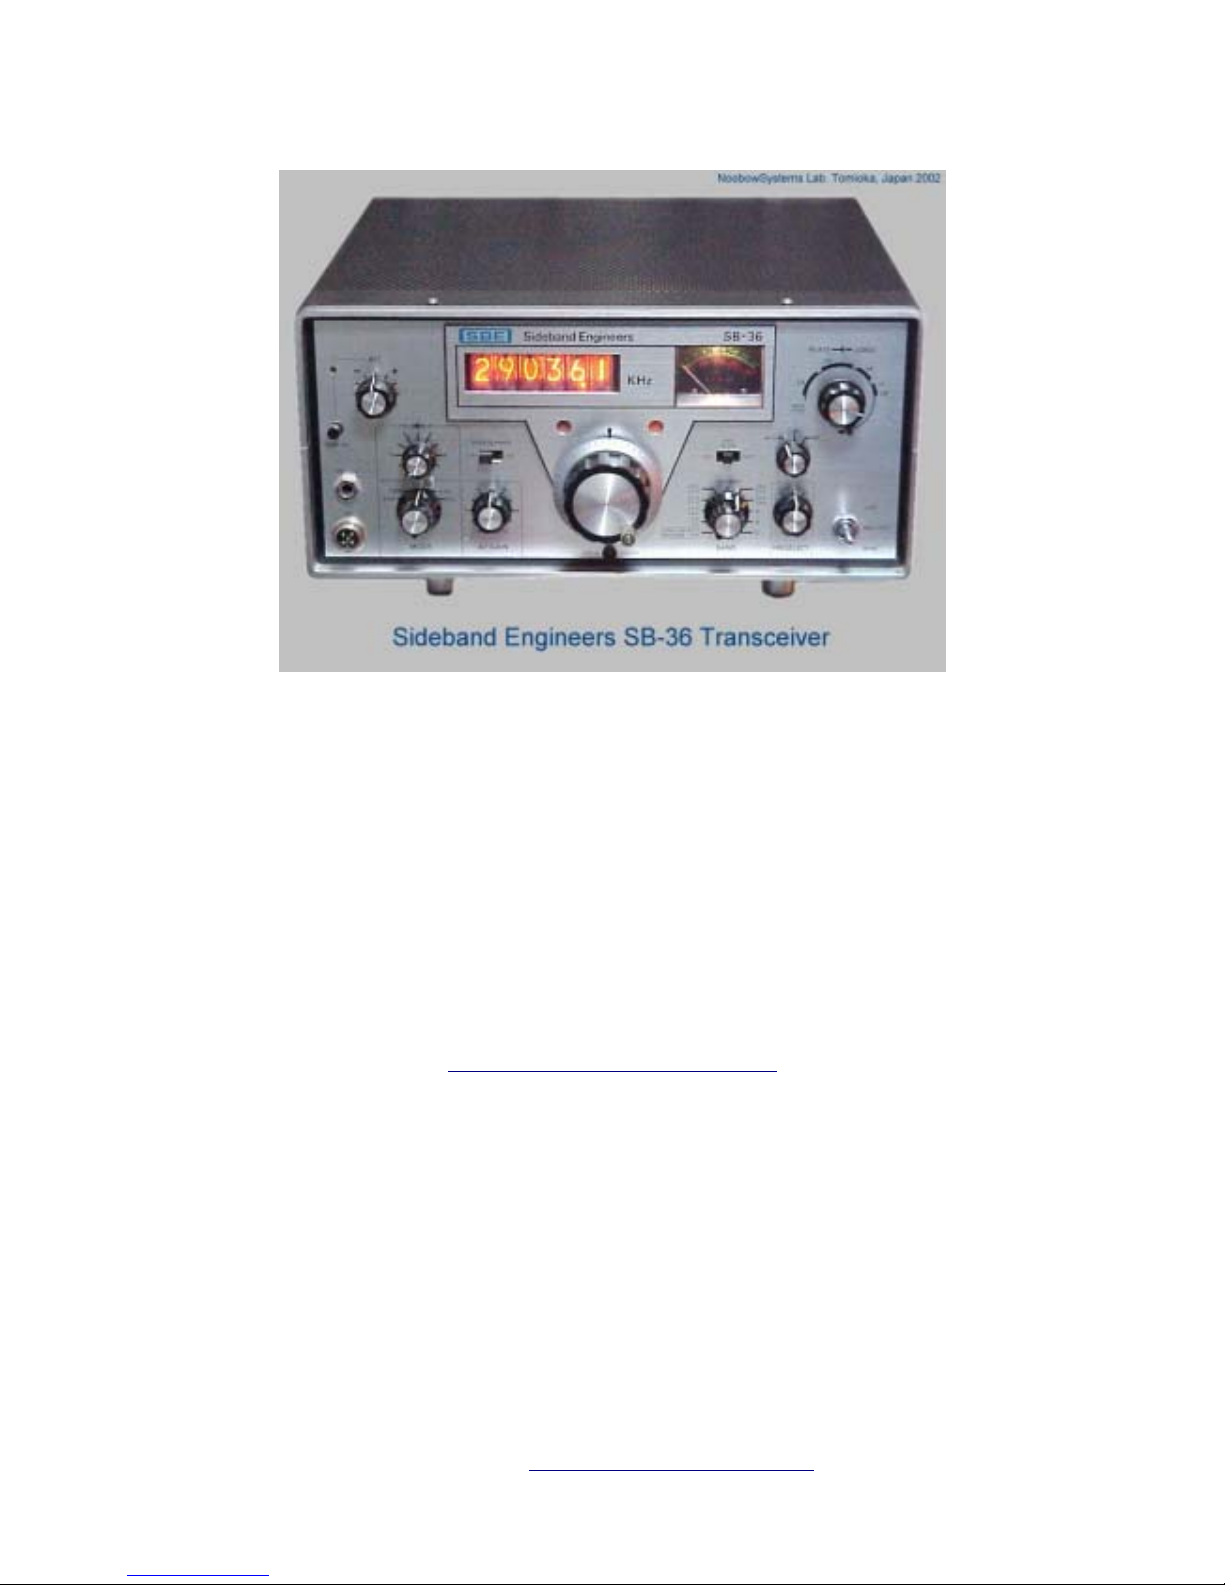
The SB-36 Transceiver is a single sideband, suppressed carrier, digital
read-out transceiver designed for the professional / amateur radio
operator.
The SB-36 is capable of operation in the SSB and CW modes of
operation. Frequency coverage includes all amateur bands between 3.0
and 29.7 MHz.
Provisions are made for spare crystals permitting operation in the nonamateur frequencies from 4-7 or 8-14 MHz. Tuning to the precise
frequency of operation is accomplished by observing the Arabic
numerals being indicated by the nixie tubes while adjusting the VFO
control for the desired display.
Included as standard equipment in the SB-36 are VOX, ANTI-VOX,
Noise Blanker, and Break-In CW.
The SB-36 consists of a basic transceiver unit and accessory AC Power
Supply. The companion AC Power Supply will operate from 117 VAC or
220 VAC, 50/60 Hertz.
The unique digital read-out incorporated in the SB-36 allows direct,
accurate, instantaneous frequency read-out to within ±100 Hz. This
accuracy will provide more reliable communications for the serious
amateur.
NoobowSystems Lab. Tomioka, Japan 2003 http://www.noobowsystems.com/ Page 6 / 56
Page 7

SBE SB-36 OPERATION MANUAL
1.2 SPECIFICATIONS
1.2.1 General
Frequency Range
3.50 - 4.00 MHz
7.00 - 7.50 MHz
14.00 - 14.50 MHz
21.00 - 21.50 MHz
28.00 - 30.00 MHz
Frequency Accuracy Nixie tube Read-out, accurate to within +100 Hertz
on all bands
Dimensions Transceiver: 13 - 1/4 inches wide
7-1/4 inches high
l2-1/2 inches deep
Power Supply: 6 inches wide
7-1/4 inches high
l2-1/2 inches deep
Weight Transceiver:29 pounds
Power Supply: 15-1/2 pounds
1.2.2 Transmitter
Power Input SSB 500 watts, P.E.P.
CW 400 watts
Primary Input Voltage 115/220 VAC, 50/60 Hertz
PA cooling Fan Built. in to PA compartment
Carrier Suppression -50 db
Distortion Products -30 db
Modes of Operation USB,LSB or CW. Selectable frown front panel on
all frequencies.
Unwanted Sideband -50 db, @ 1kHz
Antenna impedance 50-100 ohms unbalanced
VSWR Not to exceed 2:1
Audio Band Width 300-2700 Hertz @ 6 db
Sideband Rejection Filters Crystal lattice, 9 MHz
Power Conscription Single Tone Output - 550 watts
Front Panel Meter Indicates Plate current (Ip), Relative RF Output
and ALC
NoobowSystems Lab. Tomioka, Japan 2003 http://www.noobowsystems.com/ Page 7 / 56
Page 8

SBE SB-36 OPERATION MANUAL
1.2.3 Receiver
Sensitivity 0. 5 microvolts for 10 db S+N/N
Selectivity 2.4 kHz @6 db
4.2 kHz @60 db
Spurious Response Image and IF responses down at least 50 db
Stability 100 Hertz (or less) per 1/z hour under any normal
ambient condition
Audio Output 2. 5 watts @ 10% distortion
Speaker 8 ohms, built into accessory AC Power Supply
unit. Rear panel jack provided for external
speaker.
Noise Blanker IF type, switchable from front panel.
Receiver Incremental Tuning
(RIT)
±7 kHz, nominal
Power Consumption 100 watts
Front Panel Meter Calibrated in "S" units
Ear Phones Jack on front panel. 600 ohm output.
NoobowSystems Lab. Tomioka, Japan 2003 http://www.noobowsystems.com/ Page 8 / 56
Page 9

SBE SB-36 OPERATION MANUAL
2.0 INSTALLATION
2.1 GENERAL
The SB-36 Transceiver is designed for Fixed, portable or mobile
operation. No special precautions need be observed in choice of a
location, provided adequate ventilation is available. A minimum of two
inches air space above the top cabinet and on all sides is
recommended to allow proper air flow around the top and bottom of the
cabinet. Do not place the unit on a car seat or similar surface which
knight block air flow through the bottom. Never stack other units above
or below the cabinet since the accumulated heat could cause
permanent damage.
2.2 FIXED STATION
Connect the transceiver's power supply inter-connect cable, speaker
cord and plug the 117 VAC power cord into an AC outlet to provide
power to all circuits for AC operation. The transceiver should be
connected to a good water pipe ground. The ground should be
connected to the terminal provided on the rear panel of the transceiver.
2.3 ANTENNAS
Results in both receiving and transmitting are dependent largely on the
antenna. The receiver is particularly sensitive to the antenna used. Any
of the common antenna systems designed for use on the higher
frequency amateur bands may be used with the SB-36 provided the
input impedance of the antenna system matches the capability of the pi
output matching network (50-100 ohms resistive). If a tuned open-wired
transmission line is used, or if a long wire antenna is desired, a suitable
antenna tuner must be used between the transceiver and the
transmission line to provide an impedance match between the
unbalanced pi output network and the balanced open wire line or long
wire.
2.4 LINEAR AMPLIFIER
Any conventional linear amplifier requiring 300 watts of drive or less
may be used in conjunction with the SB-36. An external jack on the rear
panel provides relay control information to accessory linear amplifiers.
Another external jack on the rear of the transceiver will accept ALC
NoobowSystems Lab. Tomioka, Japan 2003 http://www.noobowsystems.com/ Page 9 / 56
Page 10

SBE SB-36 OPERATION MANUAL
feed-back information from the linear amplifier to control the power
output of the transceiver.
NoobowSystems Lab. Tomioka, Japan 2003 http://www.noobowsystems.com/ Page 10 / 56
Page 11

SBE SB-36 OPERATION MANUAL
3.0 OPERATION
3.1 OPERATING INSTRUCTIONS
3.1.1
The front and rear panel controls, connectors and indicators used in
operating the SB-36 are shown in Figures 3.1 and 3.2 and are
described in Table 3.1. The descriptions given in the table are not
intended to be operating instructions, but only a reference to determine
the function of each stern. The actual transceiver operating procedures
will be covered in Sections 4.1 through 4.3.
FIGURE 3.1 SB-36 FRONT VIEW
NoobowSystems Lab. Tomioka, Japan 2003 http://www.noobowsystems.com/ Page 11 / 56
Page 12

SBE SB-36 OPERATION MANUAL
3.1 OPERATING INSTRUCTIONS
NoobowSystems Lab. Tomioka, Japan 2003 http://www.noobowsystems.com/ Page 12 / 56
Page 13

SBE SB-36 OPERATION MANUAL
Number Nomenclature Description
1 RIT Push- On Switch The receiver incremental (RIT) is activated by depressing
the PUSH-ON switch.
2 RIT Lamp Wren the RIT PUSH-ON control is activated, the RIT Lamp
will be lit.
3 RIT Control Potentiometer varies the frequency of the VFO Oscillator, +7
kHz in the receive mode.
4 MIC Gain Control A dual function potentiometer. In USB or LSB modes of
operation, the microphone gain regulates the level
of audio input from the transceiver microphone. When the
mode switch is in the TUNE position, the MIC Gain Control
adjusts the RF drive to the final amplifier to a suitable level
for tuning the transmitter.
5 Noise Blanker
OFF/ON Switch
A two-position switch which controls the receiver noise
blanker. Noise blanker does not function when the
control is set to "OFF”. In the "ON" position the noise
blanker will cancel RF noise pulses in the receiver.
6 "kHz" Display A six nixie tube numeric read-out display is present
whenever the transceiver is activated.
7 Upper Band Limit Light This light will be activated on the following bands whenever
the VFO tuning knob is rotated beyond the
upper edge of the band: Bands effected:
3.5 - 4.0 MHz
28.5 - 29.0 MHz
29.5 - 30.0 MHz
The upper band limit light will not be activated on the
remaining bands.
8 Lower Band Light This light will activate whenever the VFO frequency knob is
turned below the lower limit of the band selected by the
band selector knob.
9
Meter The meter indication is dependent upon which "METER"
switch position is selected. When receiving, the 0-60
scale indicates receive signal strange regardless of the
"METER” switch position. In the IP position the 0-800
milliamp indication on the meter scale should be used. In the
ALC position, the bottom portion of the scale marked ALC
should be used.
10 AGC Switch A 3-position slide switch that determines the operation of the
autocratic gain control (AGC) circuit used in the receive
more. The OFF position opens the AGC output signal path
and the remaining two positions complete
the signal path. The "FAST" position selects a fast time
constant AGC voltage decay and the "SLOW" position
selects a slow "HANG" time constant AGC voltage decay.
NoobowSystems Lab. Tomioka, Japan 2003 http://www.noobowsystems.com/ Page 13 / 56
Page 14

SBE SB-36 OPERATION MANUAL
11 Meter Switching The "METER" switch is used to select the desired parameter
to be measured. The three functions of the switch are as
follows;
ALC: When transmitting, place the meter switch in the
ALC position. This will help in determining the
proper levels of microphone gain and ALC.
IP: In this position, the meter will indicate plate current
in the final amplifier tubes.
RF: In this position, the meter will indicate the relative
RF output power of the transceiver.
"S” Meter: When receiving, the front panel meter indicates
the signal strength of the incoming receive signal
irregardless of the position of the meter switch.
12 Plate control The Plate Tuning Capacitor resonates the final amplifier Pi-
network capacity by varying the input capacity of the Pinetwork.
13 Load control The Load Control matches the output impedance of the Pi-
network
to the impedance of the load.
14 PHONES Connector The jack connector that permits low impedance head- phone
connection. When the head-phone plug is inserted, the
speaker is disconnected from the circuit.
15 MIC connector The jack connector that permits a low-medium impedance
microphone audio output and push-to-talk lines to be
connected to the transceiver.
16 Mode Switch P. OFF: Main power removed from the transceiver.
TUNE: Tune position is used for transmitter tune-up (USB
selected).
USB: For upper sideband operation.
LSB: For lower sideband operation
CW: For CW operation.
17 "RF" Gain control A potentiometer which varies the operating bias of the first
receiver RF amplifier.
18 "AF" Gain Control The potentiometer which is used to set the speaker or
headphone audio output to a comfortable listening level.
19 VFO Tuning Knob A control that permits tuning of the VFO. Its movement
covers a 500 kHz band spread range with approximately
30 kHz per revolution. The exact position in the band, to
within +100 Hertz is indicated in the Nixie-tube
display.
NoobowSystems Lab. Tomioka, Japan 2003 http://www.noobowsystems.com/ Page 14 / 56
Page 15

SBE SB-36 OPERATION MANUAL
20 100 Hz ON/OFF
Switch
A two-position switch which controls the 100 Hertz Nixie
tube. In the. ON position, the 100 Hertz Nixie tube
will be lit. In the OFF position the 100 Hertz Nixie tube will
be turned off.
21 "MHz" Band Selector An 11-position rotary switch used to select the desired
frequency band. The "A", "B" or "C" positions will result in no
transmitter output unless optional crystals have been
installed for non-amateur band use. The remaining positions
represent the specific low-end frequency of
the selected band.
WARNING: Do not change position of the "MHz" band
selector when the SB-36 is keyed for transmit condition,
as this will result in damage to the equipment, which is not
covered by the warranty.
22 Pre-Selector Control A control used to tune both the receiver RF front end and
the transmitter mixer and driver plate circuits.
23 VOX, REC-PTT, Send
Switch
A 3-position snap switch which provides for the following
functions:
In the VOX position, the built-in VOX circuitry in the unit is
activated.
In the REC-PTT position, the receiver will function until the
PUSH-TO-TALK button on the microphone is depressed to
activate the transmitter. When placed in the SEND position,
the transmitter is automatically keyed. This position should
be used for transmitter tune-up.
24 CARR Control A potentiometer that varies the level of carrier re-insert. This
control will adjust the transmitter power output when the unit
is in the CW mode of operation.
25 ALC Control A potentiometer that varies the gain of low level transmit
stages in the transceiver to prevent fiat-topping or over
driving the final amplifier tubes.
26 BIAS Control A potentiometer that varies the grid voltage to the final
amplifier tubes. This control should be used to set the final
amplifier plate current at 50 milliamps idle current.
27 External VFO Jack A connector for applying the output of an external VFO to
the transceiver.
28 KEY Jack A connector for applying the output of an external paddle
key.
29 VOX- SENSE Control A potentiometer that varies the attenuation of the audio input
being applied to the VOX amplifier circuitry. Its function is to
adjust the threshold level of speech that is required to key
the transmitter.
NoobowSystems Lab. Tomioka, Japan 2003 http://www.noobowsystems.com/ Page 15 / 56
Page 16

SBE SB-36 OPERATION MANUAL
30 DELAY Control Potentiometer that varies the resistance in a time constant
circuit on the audio board. When using VOX keying in the
transmit mode, its function is to adjust the length of time that
the transmitter stays keyed after the operator stops
speaking.
31 ANTI- TRIP Control The potentiometer that varies the attenuation of the speaker
audio signal being applied to the ANTI-VOX amplifier circuit
input. Its function is to adjust the threshold level of the
modulated audio that keeps the SB-36 keyed for a receive
condition.
32 Phone Patch
"IN JACK"
A connector which will accept phone patch information to
excite the transmitter.
33 Phone Patch
"OUT JACK"
A connector which provides a 600 ohm audio output for use
with phone patch devices.
34 Antenna Jack The SO-239 connector for connecting the antenna to both
transmitter output and receiver input.
35 VFO Jack A 7-pin socket to be used in conjunction with the external
VFO accessory. When the external VFO is not used, the
dummy VFO plug should be installed in this
socket.
36 Ext. ALC Jack A connector for accepting external ALC information from a
companion linear amplifier to control the transmitter output.
37 RF Jack This jack provides a low-level output for use with a
transverter.
38 REM Jack This jack provides a remote output to control a companion
linear amplifier. The remote output jack
provides a ground connection when the transceiver is in the
transmit mode.
39 SP Jack A connector providing an audio output for external speaker
use.
40 POWER connector An 11-pin plug providing primary and secondary power input
connections from the accessory power supply.
41 GROUND Connector A threaded bolt with wing nut provided for earth ground
connections.
NoobowSystems Lab. Tomioka, Japan 2003 http://www.noobowsystems.com/ Page 16 / 56
Page 17

SBE SB-36 OPERATION MANUAL
4.0 OPERATING PROCEDURE
WARNING:
Under no circumstances should operation of the SB-36 be attempted without a
proper antenna or dummy load of specific power handling capability. Please
read Sections 4.1 through 4.3 fully before attempting to operate the SB-36
Transceiver.
4.1 RECEIVER OPERATION
4.1.1 Rotate the mode selector switch clockwise from the P. OFF position to the
desired operating mode. Allow approximately two minutes for warm-up.
4.1.2 Rotate the BAND selector switch to the desired band.
4.1.3 Advance the RF gain control to the full clockwise position.
4.1.4 Rotate the AF Gain Control to its mid-range position.
4.1.5 Rotate the VFO Tuning Knob to the desired operating frequency.
4.1.6 Adjust the PRE-SELECT control until maximum back ground noise/interning
signal is obtained.
4.1.7 Place the noise blanker and AGC controls in desired operating position.
4.1.8 Adjust the RF and AF Gain Controls for a suitable listening level.
4.1.9 Fine tuning of the incoming signal may be accomplished by either rotating the
main VFO tuning knob or by use of the RIT control.
NOTE: If the RIT control is used, the Nixie tube read-out will indicate the exact
frequency of the incoming signal. When the SB-36 is placed in the transmit
mode, the Nixie tube read-out will revert back to the frequency selected when
the RIT control was off.
4. 2 TRANSMIT TUNING PROCEDURE
4.2.1 For transmitter tune up, place the controls as outlined in Steps 4.1.1 through
4.1.9.
4.2.2 Position the plate tuning control to correspond to the band on which operation
is desired.
4.2.3 Rotate the LOAD control to its maximum counter clockwise position.
4.2.4 Place the meter switch in the IP position.
4.2.5 Rotate the MIC control to its maximum counter clockwise position.
NoobowSystems Lab. Tomioka, Japan 2003 http://www.noobowsystems.com/ Page 17 / 56
Page 18

SBE SB-36 OPERATION MANUAL
4.2.6 Place the MODE switch to the TUNE position.
4.2.7 Place the VOX/REC-PTT/SEND switch to the SEND position.
4.2.8 Advance the MIG Gain Control slightly while tuning the PRESELECT control for
maximum indication on the meter.
CAUTION: Do not exceed 300-400 mA of plate current until final amplifier
tuning and load control have been properly adjusted.
4.2.9 Rotate the PLATE tuning control for minimum or dip indication on
the IP reading. When dip is obtained, advance the MIC Gain Control
to produce a 300-400 mA indication on the meter.
4.2.10 Place the METER switch in the RF position.
4.2.11 Rotate the LOAD control for maximum meter indication. Use the MIC Gain
Control as necessary to keep the maximum meter indication below 600-700
mA indication on the meter. Tune both the PLATE Tuning Control and LOAD
control to obtain Maximum indication on the meter.
4.2.12 Place the VOX/REC-PTT /SEND switch to the REC-PTT position. Rotate the
MODE switch to either Upper or Lower Sideband position.
4.2.13 Place the METER switch in the IP position. Press the push-to-talk button on the
microphone and, while speaking into the microphone in a normal tone of voice,
adjust the microphone gain control for an average IP indication of 350-400
milliamps.
4.2.14 Place the METER switch in the ALC position. The meter will indicate nearly full
scale deflection. Adjust the ALC potentiometer (located on the rear panel of the
radio) so that on voice peaks, a slightly downward indication is obtained on the
meter. This will indicate that the ALC is functioning properly.
4.2.15 The METER switch may now be placed in the RF position to indicate relative
transmitter power output.
4. 3 CW OPERATION
4.3.1 Perform the steps outlined in sterns 4.2.1 through 4.2.15.
4.3.2 Place the VOX/REC-PTT/SEND switch to the VOX position.
4.3.3 Rotate the MODE switch to the CW position.
4.3.4 Connect a key to the KEY jack located on the rear panel of the
transceiver.
4.3.5 Depress the key and adjust the VOX SENSE CONTROL on the rear
panel so that the transmitter keys on. It may be also necessary to adjust the
ANTI-VOX potentiometer on the rear panel of the unit.
NoobowSystems Lab. Tomioka, Japan 2003 http://www.noobowsystems.com/ Page 18 / 56
Page 19

SBE SB-36 OPERATION MANUAL
4.3.6 With the key depressed, adjust the CARR potentiometer (located on the rear
panel of the unit) so the transmitter power output does not exceed 200 watts on
15 through 80 meters or 150 watts on 10 meters.
NoobowSystems Lab. Tomioka, Japan 2003 http://www.noobowsystems.com/ Page 19 / 56
Page 20

SBE SB-36 OPERATION MANUAL
5. 0 THEORY OF OPERATION
5. 1 GENERAL
5.1.1
Figure 5.1 shows the basic transmitter receive signal paths and the
printed circuit boards associated with each. The SB-36 Transceiver is
comprised of a power amplifier assembly, accessory power supply, and
one each of the following circuit boards:
Drive RF/Pre-Mixer and Oscillator Board, Counter Unit, VFO Oscillator,
carrier Oscillator Board, Double Sideband Amplifier/Crystal Filter/Noise
Blanker Board, Microphone Amplifier and Side Tone Oscillator Board,
Receiver IF Amplifier and AGC Amplifier Board, 20 volt Regulator
Board, AF Power Amplifier Board, and VOX and ANTI-TRIP Board.
The printed circuit board relationship in respect to transmit or receive
signal paths is shown in Figure 5.1. In the transmit mode, the signal is
routed from the microphone through the MIC AMP Board, Double
Sideband AMP/Crystal Filter Board, Driver RF/Pre-Mix and Oscillator
Board, and PA Assembly. A more detailed explanation of the transmit
signal path is covered in paragraph 5.2. In the receive mode the signal
is routed from the antenna connector through the PA assembly, Driver
RF/Pre-Mix and Oscillator Board, Double Sideband Amplifier / Crystal
Filter Board, Receiver IF Amplifier and AGC Amplifier Board, Audio PC
Board, to the external speaker jack. A more detailed explanation of the
receiver signal path is covered in paragraph 5. 3.
Frequencies generated by the BFO (9 MHz) Board are routed to the
double sideband amplifier and noise blanker board and from there are
routed to the driver RF/Pre-Mixer and Oscillator Board. Frequencies
generated by the VFO are routed to the Driver RF/Pre-Mixer and
Oscillator Board. The Theory of Operation section employs the use of
more detailed block diagram's than Figure 5.1. Complete schematics
are also contained in Section 7 and should be used in conjunction with
the description of the transmitter and receiver circuitry contained in the
following paragraphs.
NoobowSystems Lab. Tomioka, Japan 2003 http://www.noobowsystems.com/ Page 20 / 56
Page 21

SBE SB-36 OPERATION MANUAL
5. 2 TRANSMITTER CIRCUITRY
5.2.1 Transmitter Signal Path
Stage-by-Stage transmit signal path block diagrams is shown in Figure
5.1. Unless otherwise indicated in the following explanation, it is
assumed that the SB-36 is operating in the Single Sideband Mode.
Audio signals from the microphone connector or phone patch input jack
are routed to TR-l located on the Microphone Amplifier and Side Tone
Oscillator Board. The audio signal is amplified by transistor TR-l and
then routed to the base of TR-2. The amplified output of transistor TR-2
is routed through transistor TR-3, which is operating as an emitter
follower. The output of transistor TR-3 is routed through variable
resister VR-l (Microphone Gain Potentiometer) to the base of transistor
TR-4.
The signal from transistor TR-4 is then routed to one input of the
balanced modulator. The balanced modulator is comprised of
transformer T-9 and Diodes D-1 through D-4. The second input of the
balanced modulator is a 9.0 MHz carrier signal. The 9.0 MHz carrier
signal originates in the carrier oscillator board and is applied to the
balanced modulator by variable resistor VR-5. The balanced modulator
mixes the 9.0 MHz carrier with the audio signal to produce a resultant
9.0 MHz double sideband signal with a carrier suppressed
approximately 40 dB. Third and higher order modulation products are
also suppressed approximately 30 dB below each sideband. The
balanced modulator output is routed to the input of the upper or lower
sideband crystal filter.
The output from the crystal filter is routed by transformer T-10 to the
input of transistor TR-7. The output of transistor TR-7 is coupled by
transformer T-11 to the grid of mixer tube V-1.
A second input to the grid of mixer tube V-l is derived by mixing the
output of the HFO transistor TR-10 with the output of VFO oscillator.
The HFO oscillator output and the VFO oscillator output are combined
in mixer transistor TR-11. The resultant frequency is transformer
coupled to the grid of mixer tube V-1.
The desired transmit frequency is obtained by mixing the 9.0 MHz
sideband output of transistor TR-7 with the HFO/VFO product produced
NoobowSystems Lab. Tomioka, Japan 2003 http://www.noobowsystems.com/ Page 21 / 56
Page 22
SBE SB-36 OPERATION MANUAL
by transistor TR-11. The output of mixer tube V-l is coupled to the grid
of V-2, the driver tube. Output of tube V-2 is capacitively coupled to the
input of the PA tubes, V-5 and V-6.
Normal signal level at the PA tube input is 50 volts peak-to-peak. The
signal passes through the plate tuning circuits and metering circuits to
the main antenna connector located on the rear panel.
The RF power output at the connector is a nominal 300 watts on 15-80
meters and 200 watts on 10 meters.
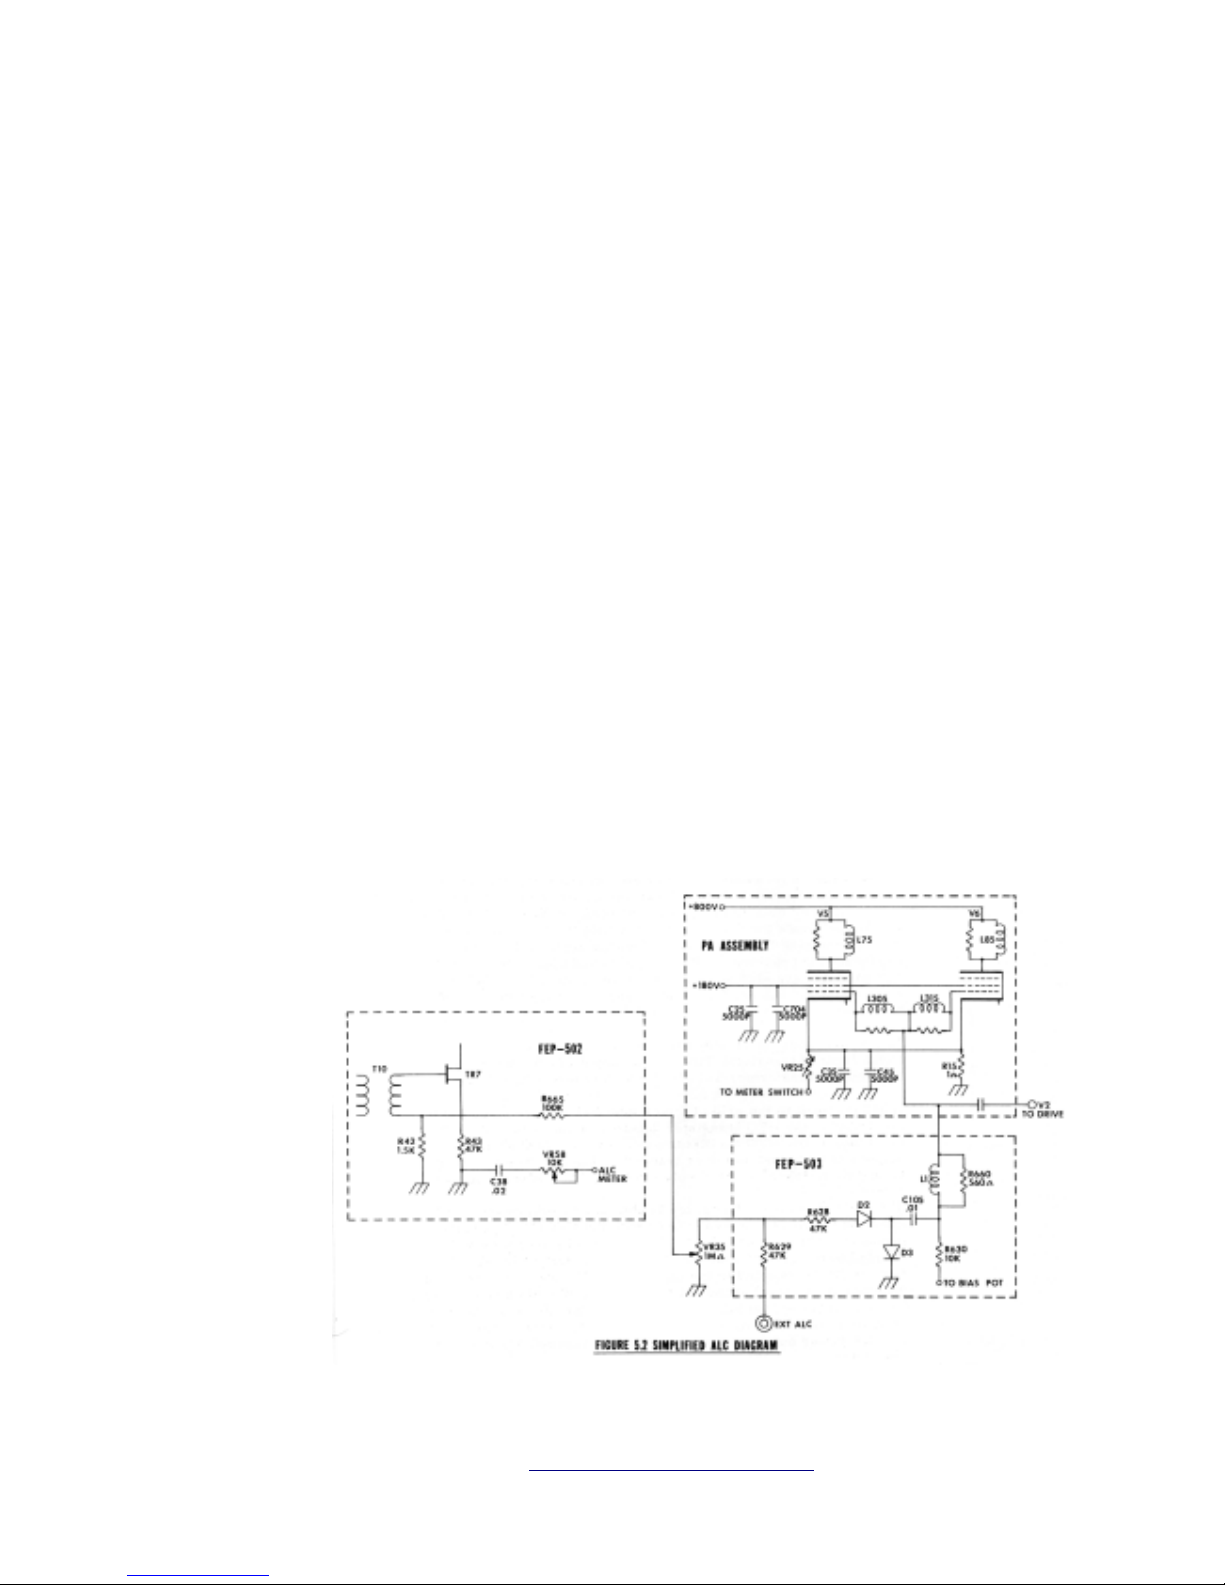
5.2.2 Automatic Level Control
Automatic Level Control (ALC) is employed to control the amount of RF
drive to the power amplifier tubes. The ALC method utilized by the SB36 is shown in simplified diagrams Figure 5.2. When the signal present
on the grid of the final amplifier tubes exceeds the grid bias of the tube,
Diodes D-29 and D-30 conduct.
This conduction will establish a reference voltage across the ALC
potentiometer.
The voltage on the center terminal of the ALC potentiometer is fed back
to the gate of transistor TR-7. This voltage is used to control the gain of
TR-7 to prevent flat-topping of the transmitter signal. This system of
ALC allows a high average level of modulation without a corresponding
increase in distortion products.
NoobowSystems Lab. Tomioka, Japan 2003 http://www.noobowsystems.com/ Page 22 / 56
Page 23

SBE SB-36 OPERATION MANUAL
5. 3 RECEIVER CIRCUITRY
5.3.1 Receiver Signal Path
RF signals from the antenna connector pass through the antenna relay
and trap coil L-24 to the grid of 1st, the first RF amplifier. Trap Coil L-24
minimizes spurious receiver response caused by signals which fall
within the 9 MHz IF frequency range. The amplified signal from V-4 is
coupled to the grid of V-3, the receiver mixer tube. Signals present in V3 consist of the incoming RF signal and the VFO/HFO mixture from TR-
11.
The output of V-3 is a 9 MHz IF signal which is coupled to either the
upper or lower crystal filter through transformer T-9A. Output of the
crystal filter is then coupled to TR-7, TR-28, TR-27 and TR-i6 which are
all 9 MHz IF amplifiers. The output of TR-26 is coupled to both the
receiver balance protector circuit and the receiver AGG circuit.
The 9 MHz output of the TR-26 is also coupled to Diodes D-18 through
D-21, the receiver balanced detector. The audio output of the balanced
detector is then applied to VR-509, the AF gain control. The audio
signal front the wiper of VR-9 is routed to the audio printed circuit board
where it is coupled to the base of TR-25. The output cf TR-25 drives
TR-22 and TR-23 the AF power amplifier transistors.
The resultant audio output from TR-22 and TR-23 is applied to the
earphone jack, speaker jack and telephone patch out jack.
5.3.2 Noise Blanker
The noise blanker circuit utilized in the SB-36 Transceiver receives
noise information directly from the antenna connector. The incoming
noise signal is amplified by integrated circuit TR-8 detected by Diodes
D-205 and D-206 and coupled to the gate of TR-7 to inhibit the received
signal from passing through
TR-7 during the presence of strong RF noise pulses.
5.3.3 Automatic Gain Control
Automatic Gain Control (AGC) is employed in the SB-36 Transceiver to
maintain a constant receive signal level passing through the front end
and IF Amplifier Board. The AGC circuitry can be completely disabled
by switching the front panel "AGC" control to the "OFF" position.
NoobowSystems Lab. Tomioka, Japan 2003 http://www.noobowsystems.com/ Page 23 / 56
Page 24

SBE SB-36 OPERATION MANUAL
AGC circuit is located on the IF amplifier printed circuit board. Its
controlling effects can be overridden by setting of the front panel "RF
Gain" potentiometer VR-601. The AGC circuit provides two outputs with
an increasing RF input signal level. First, the AGC voltage is applied to
the control grid of V-4 the RF amplifier tube. Second, the AGC voltage
is applied to the gate of TR-28 on the IF amplifier board.
With the frost panel "AGC" switch set to the "OFF" position, the front
panel "RF Gain" potentiometer VR-601 still can control the gain in V-4,
the first RF amplifier tube. A negative potential from the wiper of VR601 is applied to the control grid of V-4. The account of negative
potential selected by the wiper of VR-601 determines the gain of V-4.
The AGC circuit is comprised of Diodes D-22, D-23 and transistor TR-
29. Under a no-RF signal input condition, transistor TR-29 does not
conduct. With an RF signal present, transistor TR-29 is driven into
conduction. The output of transistor TR-29 is applied to both the grid of
V-4 and the gate of TR-28.
5.3.4 VOX Keying
When operating in the VOX mode of operation, transmitter switching is
accomplished automatically by the "VOX” circuitry. Microphone audio
signals are routed from TR-3 to VR-501, the VOX SENSE
potentiometer. The audio signal from the wiper of VR-501 is coupled to
the base of transistor TR-13. The audio output of TR-13 is provided
additional amplification by transistor TR-13A. The output of transistor
TR-13A is coupled to TR-14 and TR-15 which are Darlington connected
transistors. When transistors TR-14 and TR-15 are switch "ON" by the
audio signal from TR-13A, a ground return is provided for relay RF-l
which then places the transceiver in the transmit mode of operation.
The rear panel “DELAY" potentiometer VR-502 is used to vary the RC
time constant in tee emitter of transistor TR-13A. The "DELAY" circuit is
used to prevent the transmitter from unkeying between spoken syllables
of a lower speech rate. Therefore, it is desirable to keep the transmitter
keyed a few milliseconds longer than is normal. This is accomplished
by increasing the resistance setting of the "DELAY" potentiometer VR-
502.
Transistor TR-13 provides ANTI-TRIP or ANTI-VOX information to the
VOX circuitry. This information will prevent audio from the transmitter
NoobowSystems Lab. Tomioka, Japan 2003 http://www.noobowsystems.com/ Page 24 / 56
Page 25

SBE SB-36 OPERATION MANUAL
speaker (which is also heard by the microphone) from keying the
transceiver. The output of transistor TR-13A, a DC potential derived
from Diodes D-14 and D-15, is applied to the base of the Darlington pair
transistors TR-14 and TR-15.
When the VOX SENSE and ANTI- TRIP controls are properly set, audio
from the transceiver speaker, which is also picked up by the
transceivers microphone, will produce opposite voltages at the base of
transistor TR-14 which will cancel each other so that the stage remains
cut off. Any speech then applied to the microphone will cause the stage
to conduct.
5.3.5 Frequency Mixing Network
The basic concept of the frequency mixing employed in the SB-36
Transceivers is show in Table 5.1.
Table 5.1 shows the relationship of the 9 MHz carrier oscillator, VFO
and HFO outputs for the various bands used in the SB-36 Transceiver.
TABLE 5.1 SB-36 FREQUENCY CHART
Band Mode Output Frequency BFO
Freq.
VFO Freq. HFO
Freq.
(MHz) (kHz) (kHz) (kHz) (kHz)
3.5 CW 3500 - 4000 9000 5000 - 5500 ---
7.0 CW 7000 - 7500 9000 5000 - 5500 21500
14.0 CW 14000 - 14500 9000 5000 - 5500 28500
21.0 CW 21000 - 21500 9000 5000 - 5500 35500
28.0 CW 28000 - 28500 9000 5000 - 5500 42500
28.5 CW 28500 - 29000 9000 5000 - 5500 43000
29.0 CW 29000 - 29500 9000 5000 - 5500 43500
29.5 CW 29500 - 30000 9000 5000 - 5500 44000
5.3.5.1 Carrier Oscillator
The Carrier Oscillator is a crystal controlled oscillator operating at 9.000
MHz. The output of the 9 MHz oscillator transistor TR-17 is coupled to
transmitter buffer transistor TR-19 and receiver buffer transistor TR-20.
The output of the transmitter buffer transistor TR-19 is applied via the
mode switch to the wiper arm of BR-5 located in the transmit balanced
modulator circuitry.
NoobowSystems Lab. Tomioka, Japan 2003 http://www.noobowsystems.com/ Page 25 / 56
Page 26

SBE SB-36 OPERATION MANUAL
Output of the receiver buffer transistor TR-20 is coupled to the wiper
arm of potentiometer VR-12 located in the receiver balanced detector
circuit.
5.3.5.2 VFO Oscillator
The VFO Oscillator uses a field effect transistor TR-3
(*)
as the oscillator
and TR-31 as the buffer transistor. The output of TR-31 is connected to
transistors TR-32 and TR-48.
(* Typo. Should be TR-30.)
The output of transistor TR-32, VFO information, is applied to the
counter circuitry in the SB-36 Transceiver.
The output of transistor TR-48 is VFO injection which is applied to the
emitter of mixer transistor TR-11.
The VFO operates on a frequency of 5.0 to 5.5 MHz.
Diode D-211 is a variable capacitance Diode connected in parallel with
C-120. Diode D-211 is switched into the circuit by the RIT selector
switch and the main relay contacts to shift the VFO frequency when
capacitor VR-602 is varied from one extreme to the other.
<Figure 5.43 Block Diagram of Counter Unit >
5.3.5.3 High Frequency Oscillator
The SB-36 has seven high frequency crystals used in the HFO
oscillator circuitry. The relationship between the transceiver operating
frequency and the HFO crystal frequency is shown on Table 5. 2.
HFO oscillator transistor TR-10 is crystal controlled by one of the seven
crystals selected by the band switch. Output of HFO transistor TR-10 is
coupled to the base of pre-mixed transistor TR-11. Output of pre-mixed
transistor TR-11 is coupled to either the grid of the transmit mixer tube
V-1, or the cathode of the receiver mixer tube V-3.
NoobowSystems Lab. Tomioka, Japan 2003 http://www.noobowsystems.com/ Page 26 / 56
Page 27

SBE SB-36 OPERATION MANUAL
5.3.5.4 Side Tone Oscillator
Transistor TR-5 is a phase shift side-tone oscillator which operates
when the mode switch is in either the CW or tune position. Frequency
with phase shift oscillator is approximately 1000 kHz.
The output of TR-5 is fed to the transmitter microphone audio circuit
when the mode switch is in the TUNE position to provide a signal which
will allow tune-up of the transmitter.
In the CW mode of operation, output from the side tone oscillator is fed
to the VOX circuitry and to the receiver audio amplifier.
The signal to the VOX circuitry is used to drive the VOX amplifier
transistor, TR-13.
The side tone audio output supplied to the receiver audio amplifier is
used for operator monitoring when in CW operation.
5.3.6 Counter
The basic concept of the frequency counter circuit employed by the SB36 Transceiver is shown in Figure 5.3. To obtain a "RESET" and
"READ" command signal, the master clock input signal is reduced in
frequency by the clock divider chain. The “RESET" Command signal
instructs the RF counter chain when to start and when to stop
processing the RF input count-down.
The "READ" Command signal instructs the input count gate when to
pass and when not to pass the RF input to the RF counter chain.
The “READ" Command also causes the "READ" gate to turn on or off
the Nixie display tubes. The code converter circuit transposes the logic
output of the RF counter chain into driving voltages that cause the
appropriate numerals of each Nixie tube to illuminate.
The operating sequence of events for the frequency counter circuit is
as follows:
A. Momentary reset pulse clears the RF counter outputs causing the
output state to return to the starting count of zero.
B. The "READ" Command turns off the Nixie tubes for the duration of
the read-in period and also enables the input count gate to pass the
RF input to the RF counter.
C. The RF counter chain processes the RF input frequency count
NoobowSystems Lab. Tomioka, Japan 2003 http://www.noobowsystems.com/ Page 27 / 56
Page 28

SBE SB-36 OPERATION MANUAL
down.
D. After a specific period of time, the "READ” Command switches to
the read-out potential. The operation of the input count is inhibited.
With no more inputs being applied to the RF counter chain, the last
count produced by each divider circuit (in the RF counter chain) is
retained. Their output stages are, in effect, a form of data storage.
E. When the "READ" Command is switched to the READ-OUT
potential, it also causes the "READ" gate to turn on the Nixie tubes.
The converted output states of the RF counter chain is displayed for
the duration of the READ-OUT potential.
F. The reset pulse reoccurs causing a recycling of events discussed in
paragraph 5.3.6, items A through E.
The previous sequence of events occurs at a rate faster than the
human eye can follow. Only the frequency display of the Nixie tubes is
perceived.
Operating in conjunction with the counter circuit in the SB-36
Transceiver are upper and lower band limit lights. The band limit lights
provide a visual indication to the operator when the transceiver VFO is
operating outside of a normal band. Table 5.2 shows the relationship
between the various bands in the SB-36 Transceiver and functions of
the band edge limit lights.
TABLE 5.2 UPPER/LOWER RANGE LIMIT LIGHTS
Band Upper Lamp Lower Lamp
80 m ON ON
40 m OFF ON
20 m OFF ON
15 m OFF ON
10 m (28.0 - 28.5 MHz) OFF ON
10 m (28.9 - 29.0 MHz) *1 ON ON
10 m (29.0 - 29.5 MHz) OFF ON
10 m (29.5 - 30.0 MHz) ON ON
(*1: Typo: Should be 28.5 -29.0MHz.)
5.3.7 Power Supply
The DC operating voltage for the SB-36 Transceiver are generated by
the companion AC power supply. The power supply consists of a
printed circuit board and miscellaneous electrical parts mounted in the
NoobowSystems Lab. Tomioka, Japan 2003 http://www.noobowsystems.com/ Page 28 / 56
Page 29

SBE SB-36 OPERATION MANUAL
AC power supply chassis. A block diagrams of the power supply circuit
is shown in Figure 5.4.
Table 5.3 shows pin connections for the power supply interconnect
cable on the SB-36 Transceiver and the various voltages and currents
required at each pin.
TABLE 5.3 POWER SUPPLY REQUIREMENTS
Pin Voltage Current
1 Power Supply to Transceiver Ground ---
2 100 VAC ---
3 +12 VDC 700 mA
4 +30 VDC 150 mA
5 12 VAC Filaments
6 OFF/ON Switch ---
7 OFF/ON Switch ---
8 -180 VDC Bias
9 +180 VDC 80 mA
10 +400 VDC 70 mA
11 +800 VDC 650 mA
<Figure 5.4 Power Supply Block Diagram>
NoobowSystems Lab. Tomioka, Japan 2003 http://www.noobowsystems.com/ Page 29 / 56
Page 30

SBE SB-36 OPERATION MANUAL
6. 0 MAINTENANCE
6. 1 INTRODUCTION
This section contains general information for use in preventative or
corrective maintenance, troubleshooting, component replacement and
troubleshooting aids. This section is not intended to contain information
necessary for major repair of the SB-36, however, information
contained herein may be useful in minor corrective maintenance.
6.2 PREVENTATIVE MAINTENANCE
6.2.1 General
Preventative maintenance consists of cleaning, visual inspection,
lubrication, etc. Preventative maintenance performed on a regular basis
may prevent breakdown and improve reliability.
The SB-36 Transceiver should be cleaned as often as operating
conditions require. Accumulation of dirt in the instrument can cause
overheating and component breakdown. Dirt on component acts as an
insulating blanket and prevents efficient heat dissipation. It also
provides an electrical conduction path.
CAUTION: Avoid the use of chemical cleaning agents which may
damage the plastic used in various components in the transceiver.
6.2.2 Cover Removal
Reprove the 20 Phillips Head Screws securing the top and bottom
cover to the transceiver. The top cover may then be removed and the
transceiver may be lifted free of the bottom cover.
6.2.3 Cleaning
A. Exterior. Loose dust accumulated on the outside cover of the SB-36
Transceiver and Power Supply can be removed with a soft
cloth or squall paint brush. A paint brush is particularly
useful for dislodging dirt on and around front panel
controls.
B. Interior. Dust in the interior of the transceiver should be r emoved
occasionally due to its electrical conductivity under high
humidity conditions. The best way to clean the interior is to
blow out the accumulated dust with dry, low velocity air. A
NoobowSystems Lab. Tomioka, Japan 2003 http://www.noobowsystems.com/ Page 30 / 56
Page 31

SBE SB-36 OPERATION MANUAL
cotton tipped applicator is useful for cleaning in narrow
spaces and circuit boards.
The high voltage circuits, particularly located in the PA assembly,
should receive special attention. Excessive dirt in these areas may
cause high voltage arcing and result in improper operation of the
transceiver.
6.2.4 Lubrication
The reliability of potentiometers, rotary switches and other moving parts
can be maintained if they are kept properly lubricated. Use a cleaning
type lubricant on switch contacts. Lubricate switch detentes with a
heavier grease. Potentiometers which are not permanently sealed
should be lubricated with a lubricant which does not effect electrical
characteristics. A potentiometer lubricant can also be used on shaft
bushings. Do not over lubricate.
6.3 TROUBLESHOOTING
6.3.1 Troubleshooting Techniques
These troubleshooting procedures are arranged in an order which
checks the simplest possibility before proceeding. The first checks
assure proper operation and connection. If the trouble is not located by
these checks, the remaining steps aid in locating the defective
component. When the defective component is located it should be
replaced.
A. Check switch and control settings.
Incorrect settings can indicate a trouble that does not exist. If there is
any question about the correct function or operation of any control, see
the Operating Instructions section of this manual.
B. Check associated equipment.
Before proceeding with troubleshooting, check that the equipment used
with the transceiver is operating correctly. Check that the
interconnecting cables are not defective. Also, check the power supply.
C. Isolate trouble.
Investigate the extent of the symptoms by monitoring the front panel
and "kHz" display while operating in different switch and control settings
NoobowSystems Lab. Tomioka, Japan 2003 http://www.noobowsystems.com/ Page 31 / 56
Page 32

SBE SB-36 OPERATION MANUAL
and various modes. Perform a visual check for damaged wires,
electrical and mechanical parts, and printed circuit boards. Check for
loose interconnection between printed circuit boards.
D. Check individual parts.
The following procedure describes the method of checking individual
parts. Parts which are soldered in place are best checked by
disconnecting one end. This isolates the measurements from the effects
of surrounding circuitry.
(1) Transistors and Integrated circuits.
The best check of operation is actual performance under operating
conditions. If a part is suspected of being defective, it can best be
checked by substituting a new part or one which has been checked
previously. However, be sure that circuit conditions are not such that a
replacement might also be damaged.
(2) Diodes.
A Diode can be checked for open or shorted conditions by measuring
the resistance between terminals. With an ohm meter scale having an
internal source of between 800 millivolts and 3 volts, the resistance
should be very high in one direction and very low when the leads are
reversed.
(3) Resistors.
Check the resistors with an ohm meter. check the electrical parts list for
the tolerance of the resistor used in the instrument. Resistors do not
nominally need to be replaced unless the measured value varies widely
from the specified value.
(4) Inductors.
Check for open inductors by checking continuity with an ohm meter.
Shorted or partially shorted inductors can easily be found by checking
the wave form response when high frequency signals are passed
through the circuit. Partially shorting often reduces high frequency
response (roll-off).
(5) Capacitors.
A leaky or shorted capacitor can best be detected by checking
resistance with an ohm meter on high scale. Do not exceed the voltage
reading of the capacitor. The resistance reading should be high after
initial charge of the capacitor. An open capacitor' can best be detected
NoobowSystems Lab. Tomioka, Japan 2003 http://www.noobowsystems.com/ Page 32 / 56
Page 33

SBE SB-36 OPERATION MANUAL
with a capacitance meter or by checking whether the capacitor passes
AC signals.
6.3.2 Voltage Table and Injection Points
Table 6.1 contains voltage measurements and injection levels to be
used as an aid in isolating a defective stage or component.
TABLE 6. 1 VOLTAGE TABLE AND SIGNAL INJECTION LEVELS
Table 6.1.1 Receiver DC Voltages - No Signal Input - USB Mode
V4 6BZ6 (R.F. Amplifier) Pin 1 0.08 V
Pin 2 1.0 V
Pin 5 320 V
Pin 6 102 V
Pin 7 1.0 V
V3 6AW8 (Receiver Mixer) Pin 6 1.95 V
Pin 7 0.1 V
Pin 8
50 V
Pin 9 320 V
Gate Source Drain
TR-7 (IF Amplifier) 0.01V 0.47V 20V
TR-28 (IF Amplifier) 0.15V 1.1V 20V
Base Emitter
Collector
TR-27 (IF Amplifier) 7.2V 6.6V 18V
TR-26 (IF Amplifier) 6.8V 6.2V 14.5V
TR-29 (AGC Amplifier) Base Emitter
Collector
AFC OFF -8V -8V 0
AGC ON – No Input -8V -8V 0
AGC ON - 10µV Input -7.5V -8V -4V
AGC ON – 1000µV Input -7.4V -8V -5.6V
NoobowSystems Lab. Tomioka, Japan 2003 http://www.noobowsystems.com/ Page 33 / 56
Page 34

SBE SB-36 OPERATION MANUAL
Table 6.1.2 Audio Amplifier DC Voltages
Base Emitter
Collector
TR-25 7.2V 7.8V 0.6V
TR-24 0.6V 0V 8.8V
TR-23 8.8V 9.4V 0V
TR-22 10.2V 9.7V 19.5V
Table 6.1.3 20V Regulator DC Voltages
Base Emitter
Collector
TR-45 22V 21.5V 27.4V
TR-46 21.7V 21.0V 28V
TR-47 13.8V 13.2V 22V
Table 6.1.4 Transmitter Tube DC Voltages - “Send” Mode – No Drive
V1 6EJ7 (Transmitter Mixer) Pin 1-3 5.2V
Pin 2 0V
Pin 7 310V
Pin 8 300V
V2 6BQ5 (Transmitter Driver) Pin 2 0.04V
Pin 3 9.8V
Pin 7 350V
Pin 9 315V
V5 & V6 (PA Tubes) Pin 5-9 -57V
Pin 3-11 190V
Pin 4-10 0V
Pin 2 0.04V
Plate Caps 780V
TABLE MISSING
NoobowSystems Lab. Tomioka, Japan 2003 http://www.noobowsystems.com/ Page 34 / 56
Page 35

SBE SB-36 OPERATION MANUAL
NoobowSystems Lab. Tomioka, Japan 2003 http://www.noobowsystems.com/ Page 35 / 56
Page 36

SBE SB-36 OPERATION MANUAL
SERVICE MAINTENANCE
Should your SB-36 fail to perform as stated in this manual, it is
recommended that SBE be contacted in writing. SBE will either
authorize return of the unit to the factory or refer you to an authorized
SBE repair agency in your area. DO NOT SHIP EQUIPMENT
WITHOUT PRIOR WRITTEN AUTHORIZATION FROM SBE.
Your letter to SBE must include the following:
1. Model number and serial number of equipment.
2. Date of purchase of equipment.
3. Nature of trouble.
4. Cause of trouble if known.
5. Name of distributor from whom equipment was purchased.
6. Your return address.
7. Method of shipment by which the equipment should be returned.
In addition, include any information that you feel will be helpful in
locating or
correcting the problems.
PARTS ORDERING INFORMATION
When ordering replacement parts, you should direct your order to an
SBE distributor or SBE, Replacement Parts Department, 220 Airport
Boulevard, Watsonville, California 95076. Please furnish the following
information.
1. Quantity required.
2. SBE part number and description.
3. Item or symbol number obtained from parts list, schematic,
component location drawings.
4. SBE model number and serial number.
Unless specified, SBE will determine the best method of shipment for
the parts involved.
All parts will be sent C.O.D. unless ordered through an SBE distributor.
NOTE: Minimum parts billing is $2.50.
NoobowSystems Lab. Tomioka, Japan 2003 http://www.noobowsystems.com/ Page 36 / 56
Page 37

SBE SB-36 OPERATION MANUAL
FEP-501: MICROPHONE AMPLIFIER SIDE TONE OSCILLATOR PC BOARD
SYM PART NUMBER DESCRIPTION
C1 8000-00010-009 Capacitor, Fixed, Electrolytic, 47µF, 25V
C2 8000-00010-003 Capacitor, Fixed, Ceramic, 330pF, 50V
C3 8000-00010-007 Capacitor, Fixed, Electrolytic, 10µF, 16v
C4 8000-00010-007 Capacitor, Fixed, Electrolytic, 10µF, 16v
C5 8000-00010-007 Capacitor, Fixed, Electrolytic, 10µF, 16v
C6 8000-00010-004 Capacitor, Fixed, Ceramic, 0.01µF, 50V
C7 8000-00010-007 Capacitor, Fixed, Electrolytic, 10µF, 16v
C8 8000-00010-005 Capacitor, Fixed, Ceramic, 0.1µF, 50V
C9 8000-00010-007 Capacitor, Fixed, Electrolytic, 10µF, 16v
C10 8000-00010-008 Capacitor, Fixed, Electrolytic, 22µF, 25v
C11 8000-00010-008 Capacitor, Fixed, Electrolytic, 22µF, 25V
C12 8000-00010-007 Capacitor, Fixed, Electrolytic, 10µF, 16v
C13 8000-00010-007 Capacitor, Fixed, Electrolytic, 10µF, 16v
C14 8000-00010-010 Capacitor, Fixed, Ceramic, 0.02µF, 50V
C15 8000-00010-005 Capacitor, Fixed, Ceramic, 0.1µF, 50V
C16 8000-00010-007 Capacitor, Fixed, Electrolytic, 10µF, 16v
C17 8000-00010-006 Capacitor, Fixed, Mylar, 0.01µF, 50V
C18 8000-00010-006 Capacitor, Fixed, Mylar, 0.01µF, 50V
C19 8000-00010-005 Capacitor, Fixed, Ceramic, 0.1µF, 50V
RL4 8000-00010-015 Relay, 12 VDC
TR1 8000-00010-002 Transistor, 2SC458
TR2 8000-00010-002 Transistor, 2SC458
TR3 8000-00010-002 Transistor, 2SC458
TR4 8000-00010-001 Transistor, 2SC367
TR5 8000-00010-002 Transistor, 2SC458
VR2 8000-00010-011 Resistor, Variable, 10kΩ
VR3 8000-00010-012 Resistor, Variable, 100kΩ
NoobowSystems Lab. Tomioka, Japan 2003 http://www.noobowsystems.com/ Page 37 / 56
Page 38

SBE SB-36 OPERATION MANUAL
FEP-502: DSB SSB AMPLIFIER AND NOISE BLANKER PC BOARD
SYM PART NUMBER DESCRIPTION
C22 8000-00010-004 Capacitor, Fixed, Ceramic, 0.01µF, 50V
C23 8000-00010-036 Capacitor, Fixed, Ceramic, 1000pF, 50V
C24 8000-00010-032 Capacitor, Fixed, Styrol, 22pF, 50V
C25 8000-00010-010 Capacitor, Fixed, Ceramic, 0.02µF, 50V
C26 8000-00010-010 Capacitor, Fixed, Ceramic, 0.02µF, 50V
C26A 8000-00010-005 Capacitor, Fixed, Ceramic, 0.1µF, 50V
C26B 8000-00010-005 Capacitor, Fixed, Ceramic, 0.1µF, 50V
C26C 8000-00010-004 Capacitor, Fixed, Ceramic, 0.01µF, 50V
C26D 8000-00010-034 Capacitor, Fixed, Electrolytic, 10uf, 25V
C26E 8000-00010-004 Capacitor, Fixed, Ceramic, 0.01µF, 50V
C26F 8000-00010-004 Capacitor, Fixed, Ceramic, 0.01µF, 50V
C26G 8000-00010-004 Capacitor, Fixed, Ceramic, 0.01µF, 50V
C26H 8000-00010-004 Capacitor, Fixed, Ceramic, 0.01µF, 50V
C26I 8000-00010-004 Capacitor, Fixed, Ceramic, 0.01µF, 50V
C26J 8000-00010-004 Capacitor, Fixed, Ceramic, 0.01µF, 50V
C26L 8000-00010-004 Capacitor, Fixed, Ceramic, 0.01µF, 50V
C26M 8000-00010-004 Capacitor, Fixed, Ceramic, 0.01µF, 50V
C26N 8000-00010-004 Capacitor, Fixed, Ceramic, 0.01µF, 50V
C26P 8000-00010-004 Capacitor, Fixed, Ceramic, 0.01µF, 50V
C26Q
8000-00010-004
Capacitor, Fixed, Ceramic, 0.01µF, 50V
C37 8000-00010-010 Capacitor, Fixed, Ceramic, 0.02µF, 50V
C38 8000-00010-010 Capacitor, Fixed, Ceramic, 0.02µF, 50V
C601 8000-00010-005 Capacitor, Fixed, Ceramic, 0.1µF, 50V
C602 8000-00010-028 Capacitor, Fixed, Ceramic, 5pF, 50V
C602A 8000-00010-004 Capacitor, Fixed, Ceramic, 0.01µF, 50V
C604 8000-00010-028 Capacitor, Fixed, Ceramic, 5pF, 50V
C605
8000-00010-004
Capacitor, Fixed, Ceramic, 0.01µF, 50V
C608 8000-00010-034 Capacitor, Fixed, Electrolytic, 10µF, 25V
C609
8000-00010-005
Capacitor, Fixed, Ceramic, 0.1µF, 50V
C610 8000-00010-004 Capacitor, Fixed, Ceramic, 0.01µF, 50V
C611 8000-00010-005 Capacitor, Fixed, Ceramic, 0.1µF, 50V
C612 8000-00010-004 Capacitor, Fixed, Ceramic, 0.01µF, 50V
C614
8000-00010-005
Capacitor, Fixed, Ceramic, 0.1µF, 50V
C624 8000-00010-005 Capacitor, Fixed, Ceramic, 0.1µF, 50V
C632 8000-00010-030 Capacitor, Fixed, Ceramic, 100pF, 50V
C671 8000-00010-036 Capacitor, Fixed, Ceramic, 1000pF, 50V
D1 8000-00010-020 Diode, 1N60
D2 8000-00010-020 Diode, 1N60
D3 8000-00010-020 Diode, 1N60
D4
8000-00010-020
Diode, 1N60
NoobowSystems Lab. Tomioka, Japan 2003 http://www.noobowsystems.com/ Page 38 / 56
Page 39

SBE SB-36 OPERATION MANUAL
SYM PART NUMBER DESCRIPTION
D5 8000-00010-020 Diode, 1N60
D6 8000-00010-020 Diode, 1N60
D7 8000-00010-020 Diode, 1N60
D8 8000-00010-020 Diode, 1N60
D9 8000-00010-020 Diode, 1N60
D10
8000-00010-020
Diode, 1N60
D205 8000-00010-020 Diode, 1N60
D206
8000-00010-020
Diode, 1N60
L601 8000-00010-039 Choke, RFC
L602 8000-00010-039 Choke, RFC
T9 8000-00010-038 Transformer, 9 MHz
T9A 8000-00010-038 Transformer, 9 MHz
T10 8000-00010-038 Transformer, 9 MHz
T11 8000-00010-038 Transformer, 9 MHz
T12
8000-00010-038
Transformer, 9 MHz
TR6 8000-00010-018 Transistor, 2SK30
TR7
8000-00010-017
Transistor, 2SK30
TR8 4804-00003 Integrated Circuit, µA-703
TR9 8000-00010-018 Transistor, 2SK30
TR50 8000-00010-002 Transistor, 2SC458
TR51 8000-00010-018 Transistor, 2SK30
TR52 8000-00010-019 Transistor, 2SA495
TR53 8000-00010-019 Transistor, 2SA495
VC1 8000-00010-037 Capacitor, Variable, 30pF
VR5 8000-00010-023 Resistor, Variable, 500Ω
VR5N 8000-00010-027 Resistor, Variable, 100KΩ
8000-00010-040 Filter, Crystal, 9 MHz, Upper
8000-00010-041 Filter, Crystal, 9 MHz, Lower
8000-00010-046 Filter, Crystal, 9 MHz, CW
8000-00010-042 Socket for RL1
8000-00010-242 Filter, Crystal, CW
NoobowSystems Lab. Tomioka, Japan 2003 http://www.noobowsystems.com/ Page 39 / 56
Page 40

SBE SB-36 OPERATION MANUAL
FEP-503 DRIVER RF PRE MIXER AND OSCILLATOR PC BOARD
SYM PART NUMBER DESCRIPTION
C46 8000-00010-050 Capacitor, Fixed, Ceramic, 30pF, 500V
C47 8000-00010-048 Capacitor, Fixed, Ceramic, 5pF, 500V
C48 8000-00010-054 Capacitor, Fixed, Ceramic, 0.01µF, 500V
C49 8000-00010-048 Capacitor, Fixed, Ceramic, 5pF, 500V
C50 8000-00010-048 Capacitor, Fixed, Ceramic, 5pF, 500V
C50T 8000-00010-074 Capacitor, Fixed, 1200pF, 500V
C51T 8000-00010-075 Capacitor, Fixed, 68pF, 500V
C52 8000-00010-053 Capacitor, Fixed, Ceramic, 0.005µF, 500V
C53 8000-00010-053 Capacitor, Fixed, Ceramic, 0.005µF, 500V
C54 8000-00010-050 Capacitor, Fixed, Ceramic, 30pF, 500V
C5s 8000-00010-053 Capacitor, Fixed, Ceramic, 0.005µF, 500V
C56 8000-00010-053 Capacitor, Fixed, Ceramic, 0.005µF, 500V
C57 8000-00010-050 Capacitor, Fixed, Ceramic, 30pF, 500V
C58 8000-00010-048 Capacitor, Fixed, Ceramic, 5pF, 500V
C59 8000-00010-052 Capacitor, Fixed, Ceramic, 0.001µF, 500V
C60 8000-00010-053 Capacitor, Fixed, Ceramic, 0.005µF, 500V
C61 8000-00010-053 Capacitor, Fixed, Ceramic, 0.005µF, 500V
C62 8000-00010-060 Capacitor, Fixed, Ceramic, 330pF, 500V
C63 8000-00010-054 Capacitor, Fixed, Ceramic, 0.01µF, 500V
C64 8000-00010-052 Capacitor, Fixed, Ceramic, 0.001µF, 500V
C65 8000-00010-054 Capacitor, Fixed, Ceramic, 0.01µF, 500V
C66 8000-00010-053 Capacitor, Fixed, Ceramic, 0.005µF, 500V
C67 8000-00010-059 Capacitor, Fixed, Mica, 250pF, 500V
C68 8000-00010-057 Capacitor, Fixed, Mica, 100pF, 500V
C69 8000-00010-058 Capacitor, Fixed, Mica, 150pF, 500V
C70 8000-00010-059 Capacitor, Fixed, Mica, 250pF, 500V
C73 8000-00010-053 Capacitor, Fixed, Ceramic, 0.005µF, 500V
C74 8000-00010-053 Capacitor, Fixed, Ceramic, 0.005µF, 500V
C75 8000-00010-053 Capacitor, Fixed, Ceramic, 0.005µF, 500V
C76 8000-00010-060 Capacitor, Fixed, Ceramic, 330pF, 500V
C77 8000-00010-005 Capacitor, Fixed, Ceramic, 0.1µF, 50V
C625 8000-00010-005 Capacitor, Fixed, Ceramic, 0.1µF, 50V
C626 8000-00010-054 Capacitor, Fixed, Ceramic, 0.01µF, 500V
C627 8000-00010-052 Capacitor, Fixed, Ceramic, 0.001µF, 500V
C628 8000-00010-054 Capacitor, Fixed, Ceramic, 0.01µF, 500V
C631 8000-00010-069 Capacitor, Fixed, 50pF, 500
C632 8000-00010-053 Capacitor, Fixed, Ceramic, 0.005µF, 500V
C633 8000-00010-053 Capacitor, Fixed, Ceramic, 0.005µF, 500V
C634 8000-00010-053 Capacitor, Fixed, Ceramic, 0.005 mid, 500V
C635 8000-00010-053 Capacitor, Fixed, Ceramic, 0.005µF, 500V
C636 8000-00010-056 Capacitor, Fixed, Mylar, 0.1µF, 250V
NoobowSystems Lab. Tomioka, Japan 2003 http://www.noobowsystems.com/ Page 40 / 56
Page 41

SBE SB-36 OPERATION MANUAL
SYM PART NUMBER DESCRIPTION
C674 8000-00010-053 Capacitor, Fixed, Ceramic, 0.005µF, 500V
C675 8000-00010-053 Capacitor, Fixed, Ceramic, 0.005µF, 500V
C677 8000-00010-049 Capacitor, Fixed, Ceramic, 10pF, 500V
C678 8000-00010-054 Capacitor, Fixed, Ceramic, 0.01µF, 500V
C679 8000-00010-054 Capacitor, Fixed, Ceramic, 0.01µF, 500V
C681 8000-00010-061 Capacitor, Fixed, Electrolytic, 10µF, 160V
C801 8000-00010-053 Capacitor, Fixed, Ceramic, 0.005µF, 500V
L9 8000-00010-254 Coil, 28 MHz
L10 8000-00010-255 Coil, 21 MHz
L10A 8000-00010-259 Coil, 21.2 MHz
L11 8000-00010-256 Coil, 14 MHz
L12 8000-00010-257 Coil, 7 MHz
L13 8000-00010-258 Coil, 3.5 MHz
L14 8000-00010-076 Coil, 28 MHz
L15 8000-00010-077 Coil, 21 MHz
L16 8000-00010-078 Coil, 14 MHz
L17 8000-00010-079 Coil, 7 MHz
L18 8000-00010-080 Coil, 3.5 MHz
L19 8000-00010-081 Coil, 28 MHz
L20 8000-00010-082 Coil, 21 MHz
L21 8000-00010-083 Coil, 14 MHz
L22 8000-00010-084 Coil, 7 MHz
L23 8000-00010-085 Coil, 3.5 MHz
L24 8000-00010-260 Coil, 9MHz
L26 8000-00010-064 Choke
L27 8000-00010-065 Choke, RFC
L28 8000-00010-067 Choke
L29 8000-00010-065 Choke, RFC
L29A 8000-00010-065 Choke, RFC
TR10 8000-00010-046 Transistor, 2SC717
TR11 8000-00010-046 Transistor, 2SC717
V1 8000-00010-088 Tube, 6EJ7
V2 8000-00010-089 Tube, 6BQ5
V3 8000-00010-091 Tube, 6Aw8
V4 8000-00010-090 Tube, 6BZ5
8000-00010-062 Socket, 7-Pin
8000-00010-063 Socket, 9-Pin
NoobowSystems Lab. Tomioka, Japan 2003 http://www.noobowsystems.com/ Page 41 / 56
Page 42

SBE SB-36 OPERATION MANUAL
FEP-504 CRYSTAL OSCILLATOR PC BOARD
SYM PART NUMBER DESCRIPTION
L2 8000-00010-093 Coil, Oscillator, 28 MHz
L3 8000-00010-094 Coil, Oscillator
L4 8000-00010-094 Coil, Oscillator
L5 8000-00010-095 Coil, Oscillator
L6 8000-00010-095 Coil, Oscillator
VC2 8000-00010-097 Capacitor, Variable, 30pF
VC3 8000-00010-097 Capacitor, Variable, 30pF
VC4 8000-00010-097 Capacitor, Variable, 30pF
VC5 8000-00010-097 Capacitor, Variable, 30pF
VC6 8000-00010-097 Capacitor, Variable, 30pF
VC7 8000-00010-097 Capacitor, Variable, 30pF
VC8 8000-00010-097 Capacitor, Variable, 30pF
VC9 8000-00010-097 Capacitor, Variable, 30pF
X1 8000-00010-098 Crystal, 44.0 MHz
X2 8000-00010-099 Crystal, 43.5 MHz
X3 8000-00010-100 Crystal, 43.0 MHz
X4 8000-00010-101 Crystal, 42.5 MHz
X5 8000-00010-102 Crystal, 35.5 MHz
X6 8000-00010-103 Crystal, 28.5 MHz
X7 8000-00010-104 Crystal, 21.5 MHz
8000-00010-096 Socket, Crystal
NoobowSystems Lab. Tomioka, Japan 2003 http://www.noobowsystems.com/ Page 42 / 56
Page 43

SBE SB-36 OPERATION MANUAL
FEP-504A HF CRYSTAL PRINTED CIRCUIT PC BOARD
SYM
PART NUMBER
DESCRIPTION
VC1 8000-00010-084 Capacitor, Fixed, Ceramic, Trimmer, 30pF
VC3 8000-00010-084 Capacitor, Fixed, Ceramic, Trimmer, 30pF
VC4 8000-00010-084 Capacitor, Fixed, Ceramic, Trimmer, 30pF
VC5 8000-00010-084 Capacitor, Fixed, Ceramic, Trimmer, 30pF
VC5A 8000-00010-084 Capacitor, Fixed, Ceramic, Trimmer, 30pF
VC6 8000-00010-084 Capacitor, Fixed, Ceramic, Trimmer, 30pF
VC6A 8000-00010-084 Capacitor, Fixed, Ceramic, Trimmer, 30pF
VC7 8000-00010-084 Capacitor, Fixed, Ceramic, Trimmer, 30pF
VC8 8000-00010-084 Capacitor, Fixed, Ceramic, Trimmer, 30pF
VC9 8000-00010-084 Capacitor, Fixed, Ceramic, Trimmer, 30pF
X1 8000-00010-216 Crystal, 44.0 MHz
X2 8000-00010-215 Crystal, 43.5 MHz
X3 8000-00010-211 Crystal, 43.0 MHz
X4 8000-00010-213 Crystal, 42.5 MHz
X5 8000-00010-212 Crystal, 35.5 MHz
X6 8000-00010-211 Crystal, 28.5 MHz
X7 8000-00010-210 Crystal, 21.5 MHz
8000-00010-228 Socket, Crystal, HC-25U
8000-00010-243 Printed Circuit Board, FEP-504A
NoobowSystems Lab. Tomioka, Japan 2003 http://www.noobowsystems.com/ Page 43 / 56
Page 44

SBE SB-36 OPERATION MANUAL
FEP-505 VOX AND ANTI-TRIP PC BOARD
SYM
PART NUMBER DESCRIPTION
C77 8000-00010-007 Capacitor, Fixed, Electrolytic, 10µF, 16v
C77A 8000-00010-007 Capacitor, Fixed, Electrolytic, 10µF, 16v
C78 8000-00010-007 Capacitor, Fixed, Electrolytic, 10µF, 16v
C78A 8000-00010-007 Capacitor, Fixed, Electrolytic, 10µF, 16v
C79 8000-00010-007 Capacitor, Fixed, Electrolytic, 10µF, 16v
C79A 8000-00010-009 Capacitor, Fixed, Electrolytic, 47µF, 25V
C639 8000-00010-113 Capacitor, Fixed, Ceramic, 5000pF, 50V
C640 8000-00010-113 Capacitor, Fixed, Ceramic, 5000pF, 50V
C641 8000-00010-007 Capacitor, Fixed, Electrolytic, 10µF, 16V
C642 8000-00010-113 Capacitor, Fixed, Ceramic, 5000pF, 50V
D12 8000-00010-020 Diode, 1N60
D13 8000-00010-020 Diode, 1N60
D14 8000-00010-020 Diode, 1N60
D15 8000-00010-020 Diode, 1N60
TR12 8000-00010-002 Transistor, 2SC458
TR13 8000-00010-002 Transistor, 2SC458
TR13A 8000-00010-002 Transistor, 2SC458
TR14 8000-00010-105 Transistor, 2SC374
TR15 8000-00010-002 Transistor, 2SC458
VR501 8000-00010-112 Resistor, Variable, 50kΩ
VR502 8000-00010-112 Resistor, Variable, 50kΩ
NoobowSystems Lab. Tomioka, Japan 2003 http://www.noobowsystems.com/ Page 44 / 56
Page 45

SBE SB-36 OPERATION MANUAL
FEP-506 CARRIER OSCILLATOR PC BOARD
SYM
PART NUMBER DESCRIPTION
C84 8000-00010-121 Capacitor, Fixed, Mica, 100pF, 50V
C87 8000-00010-122 Capacitor, Fixed, Mica, 200pF, 50V
C89 8000-00010-119 Capacitor, Fixed, Mica, 27pF, 50V
C90 8000-00010-120 Capacitor, Fixed, Mica, 47pF, 50V
C91 8000-00010-010 Capacitor, Fixed, Ceramic, 0.02µF, 50V
C643 8000-00010-119 Capacitor, Fixed, Mica 27pF, 50V
C650 8000-00010-004 Capacitor, Fixed, Ceramic, 0.1µF, 50V
C651 8000-00010-004 Capacitor, Fixed, Ceramic, 0.1µF, 50V
C652 8000-00010-004 Capacitor, Fixed, Ceramic, 0.1µF, 50V
RL3 8000-00010-015 Relay, 12 VDC
T13 8000-00010-124 Transformer, 9 MHz
T14 8000-00010-124 Transformer, 9 MHz
TR17 8000-00010-002 Transistor, 2SC458
TR19 8000-00010-002 Transistor, 2SC458
TR20 8000-00010-002 Transistor, 2sC458
VC201 8000-00010-123 Capacitor, Variable, 30pF
8000-00010-126 Plug, 11-Pin
FEP-507 AF POWER AMPLIFIER PC BOARD
SYM
PART NUMBER DESCRIPTION
C85A 8000-00010-116 Capacitor, Fixed, Electrolytic, 220µF, 16V
C95 8000-00010-009 Capacitor, Fixed, Electrolytic, 47µF, 25V
C96 8000-00010-115 Capacitor, Fixed, Electrolytic, 47µF, 16V
C97 8000-00010-114 Capacitor, Fixed, Electrolytic, 4.7µF, 16V
C98A 8000-00010-004 Capacitor, Fixed, Ceramic, 0.01µF, 50V
C98B 8000-00010-005 Capacitor, Fixed, Ceramic, 0.1µF, 50V
C99 8000-00010-004 Capacitor, Fixed, Ceramic, 0.01µF, 50V
C100 8000-00010-009 Capacitor, Fixed, Electrolytic, 47µF, 25V
C101 8000-00010-114 Capacitor, Fixed, Electrolytic, 4.7µF, 16V
D17 8000-00010-109 Diode, 1S155
D18 8000-00010-021 Diode, 10D1
D19 8000-00010-021 Diode, 10D1
TR22 8000-00010-107 Transistor, 2SC495
TR23 8000-00010-108 Transistor, 2SA496
TR24 8000-00010-106 Transistor, 2SC733GR
TR25 8000-00010-019 Transistor, 2SA495
VR10 8000-00010-111 Resistor, Variable, 10kΩ
VR11 8000-00010-161 Resistor, Variable, 1kΩ
NoobowSystems Lab. Tomioka, Japan 2003 http://www.noobowsystems.com/ Page 45 / 56
Page 46

SBE SB-36 OPERATION MANUAL
FEP-508 RECEIVER IF AND AGC AMPLIFIER PC BOARD
SYM PART NUMBER DESCRIPTION
C102 8000-00010-004 Capacitor, Fixed, Ceramic, 0.01µF, 50V
C103 8000-00010-004 Capacitor, Fixed, Ceramic, 0.01µF, 50V
C104 8000-00010-004 Capacitor, Fixed, Ceramic, 0.01µF, 50V
C105 8000-00010-036 Capacitor, Fixed, Ceramic, 1000pF, 50V
C106 8000-00010-010 Capacitor, Fixed, Ceramic, 0.02µF, 50V
C107 8000-00010-010 Capacitor, Fixed, Ceramic, 0.02µF, 50V
C108 8000-00010-010 Capacitor, Fixed, Ceramic, 0.02µF, 50V
C109 8000-00010-010 Capacitor, Fixed, Ceramic, 0.02µF, 50V
C110 8000-00010-010 Capacitor, Fixed, Ceramic, 0.02µF, 50V
C111 8000-00010-010 Capacitor, Fixed, Ceramic, 0.02µF, 50V
Cll2 8000-00010-010 Capacitor, Fixed, Ceramic, 0.02µF, 50V
Cll3 8000-00010-005 Capacitor, Fixed, Ceramic, 0.1µF, 50V
Cll4 8000-00010-010 Capacitor, Fixed, Ceramic, 0.02µF, 50V
Cll6 8000-00010-032 Capacitor, Fixed, Styrol, 22pF, 50V
C644 8000-00010-034 Capacitor, Fixed, Electrolytic, 10µF, 25V
C645 8000-00010-005 Capacitor, Fixed, Ceramic, 0.1µF, 50V
C646 8000-00010-010 Capacitor, Fixed, Ceramic, 0.02µF, 50V
C647 8000-00010-028 Capacitor, Fixed, Ceramic, 5pF, 50V
C648 8000-00010-035 Capacitor, Fixed, Electrolytic, 330µF, 10V
C649 8000-00010-010 Capacitor, Fixed, Ceramic, 0.02µF, 50V
C650 8000-00010-033 Capacitor, Fixed, Electrolytic, 1.0µF, 16V
C661 8000-00010-005 Capacitor, Fixed, Ceramic, 0.1µF, 50V
C670 8000-00010-036 Capacitor, Fixed, Ceramic, 1000pF, 50V
C672 8000-00010-031 Capacitor, Fixed, Ceramic, 0.01µF, 500V
C826 8000-00010-010 Capacitor, Fixed, Ceramic, 0.02µF, 50V
D18 8000-00010-020 Diode, 1N60
D19 8000-00010-020 Diode, 1N60
D20 8000-00010-020 Diode, 1N60
D21 8000-00010-020 Diode, 1N60
D22 8000-00010-020 Diode, 1N60
D23 8000-00010-020 Diode, 1N60
D24 8000-00010-022 Diode, RD-9A
D25 8000-00010-020 Diode, 1N60
D211 8000-00010-021 Diode, 10D-1
L50 8000-00010-039 Choke, RFC
L605 8000-00010-039 Choke, RFC
T15 8000-00010-038 Transformer, 9 MHz
T16 8000-00010-038 Transformer, 9 MHz
T17 8000-00010-038 Transformer, 9 MHz
T18 8000-00010-038 Transformer, 9 MHz
TR26 8000-00010-002 Transistor, 2SC458
NoobowSystems Lab. Tomioka, Japan 2003 http://www.noobowsystems.com/ Page 46 / 56
Page 47

SBE SB-36 OPERATION MANUAL
SYM PART NUMBER DESCRIPTION
TR27 8000-00010-002 Transistor, 2SC458
TR28 8000-00010-016 Transistor, 2SK25
TR29 8000-00010-002 Transistor, 2SC458
VR12 8000-00010-161 Resistor, Variable, 1kΩ
VR14 8000-00010-025 Resistor, Variable, 3kΩ
VR53 8000-00010-026 Resistor, Variable, 10kΩ
NoobowSystems Lab. Tomioka, Japan 2003 http://www.noobowsystems.com/ Page 47 / 56
Page 48

SBE SB-36 OPERATION MANUAL
FEP-509 VFO PC BOARD
SYM
PART NUMBER DESCRIPTION
C120 8000-00010-131 Capacitor, Fixed, Mica, 5pF, 50V
C121 8000-00010-136 Capacitor, Fixed, Mica, 250pF, 50V
C122 8000-00010-113 Capacitor, Fixed, Ceramic, 5000pF, 50V
C123 8000-00010-134 Capacitor, Fixed, Mica, 500pF, 50V
C124 8000-00010-135 Capacitor, Fixed, Mica, 800pF, 50V
C127 8000-00010-132 Capacitor, Fixed, Mica, 50pF, 50V
C128 8000-00010-005 Capacitor, Fixed, Ceramic, 0.1µF, 50V
C128A 8000-00010-005 Capacitor, Fixed, Ceramic, 0.1µF, 50V
C129 8000-00010-137 Capacitor, Fixed, Ceramic, 1000pF, 50V
C130 8000-00010-137 Capacitor, Fixed, Ceramic, 1000pF, 50V
C131 8000-00010-005 Capacitor, Fixed, Ceramic, 0.1µF, 50V
C133 8000-00010-133 Capacitor, Fixed, Mica, 150pF, 50V
C134 8000-00010-137 Capacitor, Fixed, Ceramic, 1000pF, 50V
C135 8000-00010-010 Capacitor, Fixed, Ceramic, 0.02µF, 50V
C651 8000-00010-005 Capacitor, Fixed, Ceramic, 0.1µF, 50V
C696 8000-00010-004 Capacitor, Fixed, Ceramic, 0.01µF, 50V
C698 8000-00010-004 Capacitor, Fixed, Ceramic, 0.01µF, 50V
C698A 8000-00010-134 Capacitor, Fixed, Mica, 500pF, 50V
c750 8000-00010-004 Capacitor, Fixed, Ceramic, 0.01µF, 50V
D26 8000-00010-020 Diode, 1N60
D27 8000-00010-020 Diode, 1N60
D29 8000-00010-128 Diode, 1S338
D60 8000-00010-020 Diode, 1N60
D211 8000-00010-127 Diode, 1S48
L31 8000-00010-140 Choke
L32 8000-00010-139 Choke
L34 8000-00010-141 Choke
L509 8000-00010-142 Choke
TR30 8000-00010-016 Transistor, 2SK25
TR31 8000-00010-018 Transistor, 2SK30
TR32 8000-00010-002 Transistor, 2SC458
TR48 8000-00010-002 Transistor, 2SC458
VC509 8000-00010-138 Capacitor, Variable, 5-54pF
VR51 8000-00010-129 Resistor, Variable, 3kΩ
VR52 8000-00010-130 Resistor, Variable, 5kΩ
NoobowSystems Lab. Tomioka, Japan 2003 http://www.noobowsystems.com/ Page 48 / 56
Page 49

SBE SB-36 OPERATION MANUAL
FEP-510 COUNTER PC BOARD
SYM
PART NUMBER DESCRIPTION
Cl 8000-00010-097 Capacitor, Fixed, Mica, 330pF, 50V
C2 8000-00010-097 Capacitor, Fixed, Mica, 330pF, 50V
C3 8000-00010-097 Capacitor, Fixed, Mica, 330pF, 50V
C4 8000-00010-097 Capacitor, Fixed, Mica, 330pF, 50V
C5 8000-00010-097 Capacitor, Fixed, Mica, 330pF, 50V
C6 8000-00010-097 Capacitor, Fixed, Mica, 330pF, 50V
Cl 8000-00010-091 Capacitor, Fixed, Styrol, 1500pF, 50V
C8 8000-00010-126 Capacitor, Fixed, Ceramic, 0.01µF, 500V
C9 8000-00010-117 Capacitor, Fixed, Mylar, 0.01µF, 50V
C10 8000-00010-117 Capacitor, Fixed, Mylar, 0.01µF, 50V
C11 8000-00010-117 Capacitor, Fixed, Mylar, 0.01µF, 50V
Cl2 8000-00010-117 Capacitor, Fixed, Mylar, 0.01µF, 50V
Cl3 8000-00010-118 Capacitor, Fixed, Mylar, 0.lµF, 50V
Cl4 8000-00010-118 Capacitor, Fixed, Mylar, 0.1µF, 50V
C15 8000-00010-127 Capacitor, Fixed, Ceramic, 0.1µF, 50V
Cl6 8000-00010-127 Capacitor, Fixed, Ceramic, 0.1µF, 50V
Cl7 8000-00010-127 Capacitor, Fixed, Ceramic, 0.1µF, 50V
Cl8 8000-00010-066 Capacitor, Fixed, Electrolytic, 33µF, 16V
Cl9 8000-00010-066 Capacitor, Fixed, Electrolytic, 33µF, 16V
C20 8000-00010-066 Capacitor, Fixed, Electrolytic, 33µF, 16V
D1 8000-00010-027 Diode, RD-5A
D2 8000-00010-027 Diode, RD-5A
IC1 8000-00010-149 Integrated Circuit, FEP-505
IC2 8000-00010-149 Integrated Circuit, FEP-505
IC3 8000-00010-149 Integrated Circuit, FEP-505
IC4 8000-00010-150 Integrated Circuit, FEP-506
IC5 8000-00010-150 Integrated Circuit, FEP-506
IC6 8000-00010-150 Integrated Circuit, FEP-506
IC7 8000-00010-148 Integrated Circuit, FEP-504
IC8 8000-00010-145 Integrated Circuit, FEP-501
IC9 8000-00010-144 Integrated Circuit, FEP-500
IC10 8000-00010-144 Integrated Circuit, FEP-500
IC11 8000-00010-144 Integrated Circuit, FEP-500
ICl2 8000-00010-146 Integrated Circuit, FEP-502
ICl3 8000-00010-146 Integrated Circuit, FEP-502
ICl4 8000-00010-146 Integrated Circuit, FEP-5o2
IC15 8000-00010-146 Integrated Circuit, FEP-502
ICl6 8000-00010-144 Integrated Circuit, FEP-500
ICl7 8000-00010-144 Integrated Circuit, FEP-500
ICl8 8000-00010-144 Integrated Circuit, FEP-500
IC19 8000-00010-151 Integrated Circuit, FEP-507
NoobowSystems Lab. Tomioka, Japan 2003 http://www.noobowsystems.com/ Page 49 / 56
Page 50

SBE SB-36 OPERATION MANUAL
SYM
PART NUMBER DESCRIPTION
IC20 8000-00010-146 Integrated Circuit, FEP-502
IC21 8000-00010-147 Integrated Circuit, FEP-503
IC22 8000-00010-148 Integrated Circuit, FEP-504
IC23 8000-00010-148 Integrated Circuit, FEP-504
IC24 8000-00010-146 Integrated Circuit, FEP-502
IC25 8000-00010-148 Integrated Circuit, FEP-504
IC26 8000-00010-144 Integrated Circuit, FEP-500
IC27 8000-00010-144 Integrated Circuit, FEP-500
IC28 8000-00010-144 Integrated Circuit, FEP-500
IC29 8000-00010-150 Integrated Circuit, FEP-506
IC30 8000-00010-149 Integrated Circuit, FEP-505
V1 8000-00010-153 Tube, Nixie
V2 8000-00010-153 Tube, Nixie
V3 8000-00010-153 Tube, Nixie
V4 8000-00010-153 Tube, Nixie
V5 8000-00010-153 Tube, Nixie
V6 8000-00010-153 Tube, Nixie
8000-00010-240 Printed Circuit Board, FEP-S10
NoobowSystems Lab. Tomioka, Japan 2003 http://www.noobowsystems.com/ Page 50 / 56
Page 51

SBE SB-36 OPERATION MANUAL
FEP-511 5.6 MHz OSCILLATOR/UPPER AND LOWER LIMIT LIGHT PC BOARD
SYM
PART NUMBER
DESCRIPTION
Cl 8000-00010-162 Capacitor, Fixed, Mica, 30pF, 50V
C2 8000-00010-010 Capacitor, Fixed, Ceramic, 0.02µF, 50V
C3 8000-00010-121 Capacitor, Fixed, Mica, 100pF, 50V
C4 8000-00010-059 Capacitor, Fixed, Mica, 250pF, 50V
C5 8000-00010-120 Capacitor, Fixed, Mica, 50pF, 50V
C5B 8000-00010-120 Capacitor, Fixed, Mica, 50pF, 50V
C6 8000-00010-004 Capacitor, Fixed, Ceramic, 0.01µF, 50V
C7 8000-00010-120 Capacitor, Fixed, Mica, 50pF, 50V
C8 8000-00010-055 Capacitor, Fixed, Styrol, 500pF, 50V
C9 8000-00010-005 Capacitor, Fixed, Ceramic, 0.1µF, 50V
C10 8000-00010-005 Capacitor, Fixed, Ceramic, 0.1µF, 50V
C11 8000-00010-055 Capacitor, Fixed, Styrol, 500pF, 50V
C13A 8000-00010-164 Capacitor, Fixed, Mylar, 0.1µF, 50V
C13B 8000-00010-163 Capacitor, Fixed, Styrol, 1000pF, 50V
C14 8000-00010-155 Capacitor, Fixed, Styrol, 1500pF, 50V
C15 8000-00010-059 Capacitor, Fixed, Mica, 250pF, 50V
C16 8000-00010-165 Capacitor, Fixed, Mylar, 0.5µF, 50V
C17 8000-00010-165 Capacitor, Fixed, Mylar, 0.5µF, 50V
C18 8000-00010-004 Capacitor, Fixed, Ceramic, 0.01µF, 50V
C19 8000-00010-004 Capacitor, Fixed, Ceramic, 0.01µF, 50V
C20a 8000-00010-164 Capacitor, Fixed, Mylar, 0.1µF, 50V
C20b 8000-00010-163 Capacitor, Fixed, Styrol, 1000pF, 50V
C20d 8000-00010-122 Capacitor, Fixed, Mica, 100pF, 50V
C20e 8000-00010-164 Capacitor, Fixed, Mylar, 0.1µF, 50V
C003 8000-00010-169 Capacitor, Fixed, Electrolytic, 330µF, 16V
C004 8000-00010-174 Capacitor, Fixed, Ceramic, 0.005µF, 500V
C005 8000-00010-174 Capacitor, Fixed, Ceramic, 0.005µF, 500V
C006 8000-00010-005 Capacitor, Fixed, Ceramic, 0.1µF, 50V
C007 8000-00010-005 Capacitor, Fixed, Ceramic, 0.1µF, 50V
C008 8000-00010-17? Capacitor, Fixed, Ceramic, 0.005µF, 500V
C206 8000-00010-005 Capacitor, Fixed, Ceramic, 0.1µF, 50V
C501 8000-00010-115 Capacitor, Fixed, Electrolytic, 47µF, 16V
C503 8000-00010-007 Capacitor, Fixed, Electrolytic, 10µF, 16V
C503a 8000-00010-005 Capacitor, Fixed, Ceramic, 0.1µF, 50V
C504a 8000-00010-122 Capacitor, Fixed, Mica, 1000pF, 50V
C504b 8000-00010-004 Capacitor, Fixed, Ceramic, 0.01µF, 50V
C506 8000-00010-168 Capacitor, Fixed, Electrolytic, 100µF, 10V
D1 8000-00010-152 Diode, RD-5A
D2 8000-00010-152 Diode, RD-5A
L1 8000-00010-170 Coil
NoobowSystems Lab. Tomioka, Japan 2003 http://www.noobowsystems.com/ Page 51 / 56
Page 52

SBE SB-36 OPERATION MANUAL
SYM
PART NUMBER
DESCRIPTION
L2 8000-00010-171 Coil
L3 8000-00010-172 Coil
TR33 8000-00010-002 Transistor, 2SC458
TR34 8000-00010-002 Transistor, 2SC458
TR35 8000-00010-002 Transistor, 2SC458
TR36 8000-00010-002 Transistor, 2SC458
TR37 8000-00010-002 Transistor, 2SC458
TR38 8000-00010-002 Transistor, 2SC458
TR39 8000-00010-002 Transistor, 2SC458
TR40 8000-00010-002 Transistor, 2SC458
TR41 8000-00010-105 Transistor, 2SC374
TR42 8000-00010-002 Transistor, 2SC458
TR43 8000-00010-002 Transistor, 23C458
TR44 8000-00010-002 Transistor, 2SC458
TR45 8000-00010-160 Transistor, 2SC373
TR46 8000-00010-175 Transistor, 2SC491
TR47 8000-00010-002 Transistor, 2SC458
R503 8000-00010-185 Resistor, Fixed, 0.5Ω, 2W
VC1 8000-00010-123 Capacitor, Variable, 30pF
VR18 8000-00010-161 Resistor, Variable, 1kΩ
X1 8000-00010-159 Crystal, 5.6 MHz
NoobowSystems Lab. Tomioka, Japan 2003 http://www.noobowsystems.com/ Page 52 / 56
Page 53

SBE SB-36 OPERATION MANUAL
FEP-531 POWER SUPPLY PC BOARD
SYM
PART NUMBER DESCRIPTION
C504 8000-00010-177 Capacitor, Fixed, Electrolytic, 100µF, 250V
C505 8000-00010-178 Capacitor, Fixed, Electrolytic, 470µF, 16V
C506 8000-00010-179 Capacitor, Fixed, Electrolytic, 1000µF, 35V
C507 8000-00010-179 Capacitor, Fixed, Electrolytic, 1000µF, 35V
D50l 8000-00010-176 Diode, 10D-10
D502 8000-00010-176 Diode, 10D-10
D503 8000-00010-176 Diode, 10D-10
D504 8000-00010-176 Diode, 10D-10
D506 8000-00010-176 Diode, 10D-10
D507 8000-00010-176 Diode, 10D-10
D508 8000-00010-176 Diode, 10D-10
D509 8000-00010-176 Diode, 10D-10
D510 8000-00010-176 Diode, 10D-10
D511 8000-00010-176 Diode, 10D-10
D512 8000-00010-176 Diode, 10D-10
D513 8000-00010-021 Diode, 10D-1
D514 8000-00010-021 Diode, 10D-1
D515 8000-00010-021 Diode, 10D-l
D516 8000-00010-021 Diode, 10D-1
FEP-532 20V REGULATOR PC BOARD
SYM
PART NUMBER
DESCRIPTION
C511 8000-00010-005 Capacitor, Fixed, Ceramic, 0.1µF, 50V
C512 8000-00010-007 Capacitor, Fixed, Electrolytic, 10µF, 16V
C513 8000-00010-183 Capacitor, Fixed, Electrolytic, 220µF, 16V
D31 8000-00010-128 Diode, RD-16A
R512 8000-00010-180 Resistor, Fixed, 1Ω, 2W
TR45 8000-00010-002 Transistor, 2SC458
TR46 8000-00010-175 Transistor, 2SC491
TR47 8000-00010-002 Transistor, 2SC458
VR19 8000-00010-181 Resistor, Variable, 1kΩ
8000-00010-182 TR-46 Heat Sink
8000-00010-184 L Angle Bracket
NoobowSystems Lab. Tomioka, Japan 2003 http://www.noobowsystems.com/ Page 53 / 56
Page 54

SBE SB-36 OPERATION MANUAL
AC POWER SUPPLY CHASSIS
SYM
PART NUMBER
DESCRIPTION
C5 8000-00010-073 Capacitor, Fixed, Electrolytic, 47µF, 500V
C5a 8000-00010-073 Capacitor, Fixed, Electrolytic, 47µF, 500V
C50l
Not Used
C502
Not Used
C503 8000-00010-073 Capacitor, Fixed, Electrolytic, 47µF, 500V
C508 8000-00010-144 Capacitor, Fixed, Ceramic, 0.01µF, 1kV
R509 8000-00010-052 Resistor, Fixed, 1kΩ, 7 W
R510 8000-00010-053 Resistor, Fixed, 5kΩ, 10 W
T001 8000-00010-171 Transformer, Primary Power
8000-00010-238 Printed Circuit Board
8000-00010-226 Jack, Speaker
8000-00010-259 Bakelite Board, Spkr, Jack Mounting
8000-00010-227 Socket, 11-Pin
8000-00010-219 Relay
8000-00010-261 Speaker, 8Ω
8000-00010-260 Fuse Holder
8000-00010-262 Speaker Grill
8000-00010-263 Cabinet
8000-00010-265 Fuse, 5A Fast-Blo
NoobowSystems Lab. Tomioka, Japan 2003 http://www.noobowsystems.com/ Page 54 / 56
Page 55

SBE SB-36 OPERATION MANUAL
SB-36 MAIN CHASSIS
SYM
PART NUMBER
DESCRIPTION
C25 8000-00010-207 Capacitor, Fixed, Ceramic, 0.005µF, 500V
C35 8000-00010-207 Capacitor, Fixed, Ceramic, 0.005µF, 500V
C45 8000-00010-207 Capacitor, Fixed, Ceramic, 0.005µF, 500V
C55 8000-00010-213 Capacitor, Fixed, Ceramic, 0.002µF, 3kV
C65 8000-00010-189 Capacitor, Fixed, Ceramic, 0.01µF, 1.4kV
C71 8000-00010-210 Capacitor, Fixed, Ceramic, 300pF, 500V
C74 8000-00010-210 Capacitor, Fixed, Ceramic, 300pF, 500V
C75 8000-00010-211 Capacitor, Fixed, Ceramic, 470pF, 1.6kV
C85 8000-00010-005 Capacitor, Fixed, Ceramic, 0.1µF, 50V
C674 8000-00010-209 Capacitor, Fixed, Ceramic, 0.002µF, 500V
C675 8000-00010-209 Capacitor, Fixed, Ceramic, 0.002µF, 500V
C695 8000-00010-212 Capacitor, Fixed, Ceramic, 150pF, 500V
C701 8000-00010-207 Capacitor, Fixed, Ceramic, 0.005µF, 500V
C702 8000-00010-207 Capacitor, Fixed, Ceramic, 0.005µF, 500V
C703 8000-00010-207 Capacitor, Fixed, Ceramic, 0.005µF, 500V
C710 8000-00010-212 Capacitor, Fixed, Ceramic, 150pF, 500V
C205 8000-00010-020 Diode, 1N60
L55 8000-00010-235 Choke
L75 8000-00010-234 Choke
L85 8000-00010-234 Choke
L205 8000-00010-230 Choke, Plate
L215 8000-00010-231 Coil, Tank
L225 8000-00010-232 Coil, Tank, 10 Meter
L305 8000-00010-233 Choke
L315 8000-00010-233 Choke
R15 8000-00010-228 Resistor, Fixed, 0.5Ω
R95 8000-00010-229 Resistor, Fixed, 5kΩ, 10 w
RL1 8000-00010-215 Relay, MH4
RL2 8000-00010-214 Relay, 4-Pole
S1 8000-00010-200 Switch, Mode
S2 8000-00010-202 Switch, Band
S3 8000-00010-201 Switch, 3-Position, Meter
S4 8000-00010-206 Switch, Noise Blanker
S5 8000-00010-203 Switch, AGC
S6 8000-00010-205 Switch, Push Button
S7 8000-00010-204 Switch, 2p-3T
S8 8000-00010-205 Switch, Push-Button
V5 8000-00010-092 Tube, 6KD6
V6 8000-00010-092 Tube, 6KD6
VC10 8000-00010-226 Capacitor, Variable
VC15 8000-00010-225 Capacitor, Variable, 10pF
NoobowSystems Lab. Tomioka, Japan 2003 http://www.noobowsystems.com/ Page 55 / 56
Page 56

SBE SB-36 OPERATION MANUAL
SYM
PART NUMBER
DESCRIPTION
VC25 8000-00010-224 Capacitor, Variable, 280pF
VC35 8000-00010-227 Capacitor, Variable
VC45 8000-00010-223 Capacitor, Variable, 10pF
VR25 8000-00010-221 Resistor, Variable, 10kΩ
VR35 8000-00010-219 Resistor, Variable, 1MΩ
VR45 8000-00010-218 Resistor, Variable, 10kΩ
VR503 8000-00010-216 Resistor, Variable, 100kΩ
VR504 8000-00010-217 Resistor, Variable, 10kΩ
VR509 8000-00010-222 Resistor, Variable, 10kΩ
VR601 8000-00010-220 Resistor, Variable, 50k X 2Ω
8000-00010-236 Jack, 2-Pole
8000-00010-237 Lamp, RIT
8000-00010-238 Socket, 12-Pin
8000-00010-239 Capacitor, Plate, 6KD6
8000-00010-240 Meter, 300µA
8000-00010-241 Motor, AC
8000-00010-243 Knob, VFO
8000-00010-244 Knob, Plate Load
8000-00010-245 Knob, Pre-Selector
8000-00010-246 Knob, Mac Gain
8000-00010-247 Shield, Tube, 7-Pin Type
8000-00010-248 Shield, Tube, 9-Pin Type
8000-00010-249 Knob, Band Selector
8000-00010-250 Knob, RF Gain
8000-00010-261 Front Panel, Complete
8000-00010-262 Feet, Rubber
8000-00010-263 Feet, Metal
8000-00010-264 Capacitor, Fixed, Electrolytic, 1000µF, 16V
8000-00010-265 High Voltage Warning Tag
8000-00010-266 Jack Strip, Accessory Output
8000-00010-267 Terminal Strip, 4-Pose
8000-00010-268 Socket, Lamp, Push-On Type
8000-00010-269 Socket, Lamp, Bolt-On Type
8000-00010-270 Core, Transformer slug
8000-00010-271 Gear Assembly, VFO
8000-00010-272 Bezel, Front Panel
NoobowSystems Lab. Tomioka, Japan 2003 http://www.noobowsystems.com/ Page 56 / 56
Page 57

Page 58

Page 59

Page 60

Page 61

Page 62

Page 63

Page 64

Page 65

Page 66

Page 67

Page 68

Page 69

Page 70

Page 71

Page 72

Page 73

Page 74

Page 75

Page 76

 Loading...