

Page 1
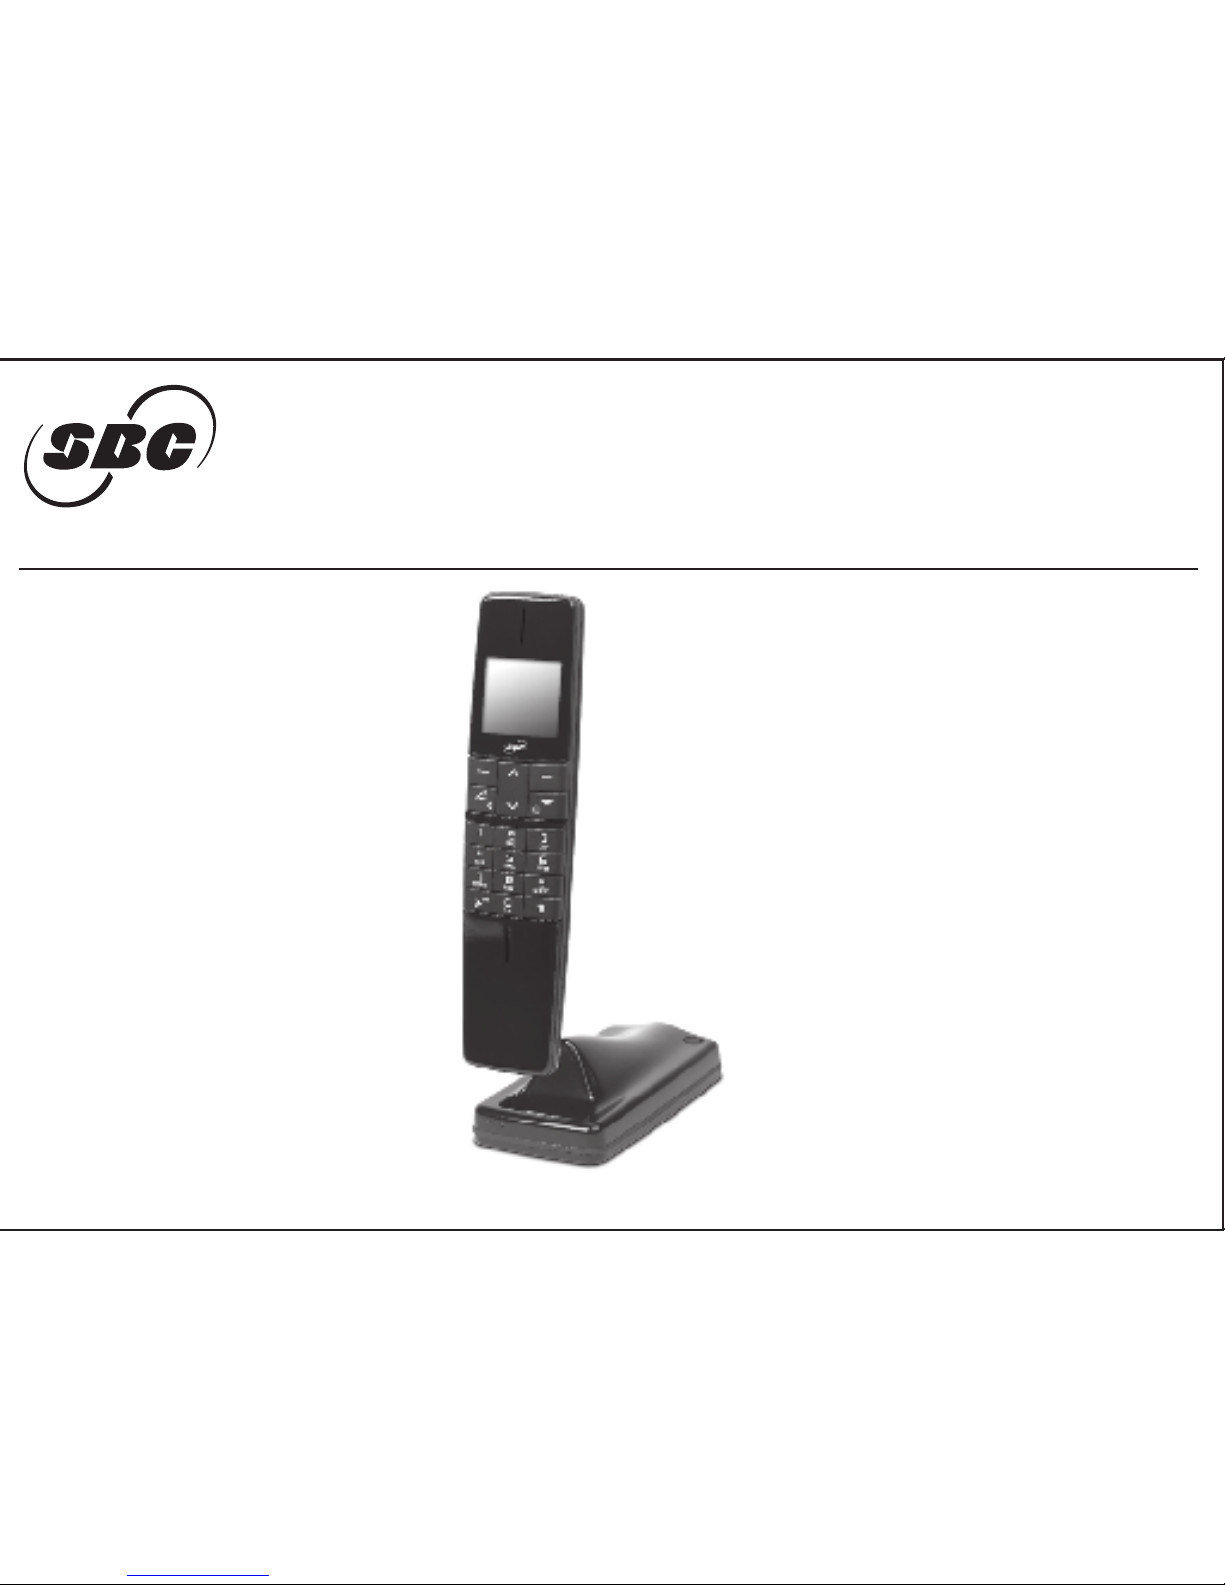
Users Manual
Digital Enhanced Cordless Telephone
SBC-6020
In case of difficulities, visit our service center at www.sbctelephones.com or call 800-400-5156
Page 2

1
Contents
Introduction ................................................................................... 2
Welcome ..............................................................................................2
DECT Technology
..................................................................................2
Features ................................................................................................ 3
Quick Reference
............................................................................ 4
Terminology ..........................................................................................4
Symbols On The LCD
.............................................................................4
Key Descriptions
....................................................................................4
Parts Checklist
...................................................................................... 5
Controls & Functions
..................................................................... 6
Handset and Base Functions & Controls
................................................6
Connection Diagram
.............................................................................7
Getting Started
............................................................................. 8
Powering On and Off the Handset
.........................................................8
Access to Ringer Menu
.......................................................................... 9
Ring mode setting for handset
..............................................................9
Volume setting for handset
.................................................................10
Adjusting the earpiece volume
............................................................10
Melody setting for handset
..................................................................11
Ring mode setting for base
.................................................................11
Volume setting for base
......................................................................12
Melody setting for base
.......................................................................12
Setting the date and the time
.............................................................. 13
Setting the area code
.......................................................................... 13
Setting keypad tones
...........................................................................14
Setting the backlighting of LCD display
................................................14
Setting the language
...........................................................................14
Prefix Dialing
...................................................................................... 15
Flash ..................................................................................................16
Inter-digit pause
.................................................................................. 16
Register to Base
................................................................................. 17
Telephone Operation
................................................................... 20
Making and receiving calls
..................................................................20
Out of range indication
.......................................................................21
Call duration time
...............................................................................21
Answering a call
................................................................................. 22
Repeat one of the last 10 dialed numbers
............................................ 22
Holding with on-hold music
................................................................23
Microphone muting
............................................................................23
Transferring a call
................................................................................24
Call conferencing
................................................................................24
Using the intercom
.............................................................................. 25
Room monitoring
................................................................................ 26
Paging a handset
................................................................................27
Call Waiting
........................................................................................27
Caller ID
.............................................................................................27
Phone book
........................................................................................28
Caller ID (CID)
.....................................................................................32
Voice Mail Waiting Indicator (
VMWI) ................................................... 33
Alarm Clock
........................................................................................ 34
Appointment function
.........................................................................35
Deregister the Handset
........................................................................ 38
Call Blocking
.......................................................................................38
Factory Reset
...................................................................................... 39
Troubleshooting ........................................................................... 40
Precautions .........................................................................................41
Specifications .............................................................................. 41
Warranty ...................................................................................... 42
FCC Information
.......................................................................... 43
Index ............................................................................................ 44
Table Of Contents
Page 3

2
Welcome
Thank you for purchasing this 1.9 GHz Digital Cordless phone. Your
phone is equipped with a fully functional phone book, alarm, caller ID,
and the ability to use additional handsets. It has an elegant design and is
simple to use.
This user’s guide is designed to familiarize you with your cordless telephone.
We strongly recommend you read the guide before using your phone.
DECT Technology
Your phone uses the new Digital Enhanced Cordless Telecommunications
(DECT) Technology. This allows for better cordless communications in
residential, corporate, and public environments.
DECT offers higher quality speech and enhanced security. You will
experience a low risk of radio interference because your phone will
continually search for the best radio channels, while in standby mode and
on a call. Phone calls will be encrypted for maximum call security. And radio
transmission is optimized for maximum battery life. In addition, this new
technology works well with equipment from different manufacturers, such
as handsets.
Introduction
IMPORTANT: Allow
the handsets to
charge for at least
12 hours before
using the phone for
the first time. The
fully charged phone
should offer 8 hours
of continuous talk
time.
NOTE!
Page 4

3
Features
• Phone book with 100 locations (up to 15
digits for names & 25 digits for numbers)
• Area
code
• Back light (both on LCD and keypad)
• Call timer (displays the length of communication)
• Call blocking
• Pre-dialing
• Last number redial (for up to 10 numbers)
• Hands-free in the handset with local echo
suppression
• Access to the functions through
Soft Keys
•
Caller ID*
•
Caller ID* list : stores last 40 calls
• Handset power off
•
Microphone mute
•
Hold music
• Low
battery warning beep
• Battery
monitoring (3 levels : empty, half, full)
• Range of use: 300 meters outside and 50
meters inside
• 65,000 color LCD display
•
PABX access code
•
Adjustable volume on handset receiver or speaker
• Handset ringer melody programmable for
internal and external calls (13 melodies)
• Handset ringer volume programmable for
internal and external calls (9 volume levels)
• Base station ringer melody (9
melodies)
Introduction
• Base station ringer volume (9 levels)
• Internal call between handsets while on an
external call
•
Transfer an external call to another handset
• Conference calling
•
Incoming call waiting signal during intercom
calls
• Room
monitoring
• Multiple handset feature (up to 5 handsets)
• Multiple base feature (up to 4 bases)
•
Alarm
•
Appointment (annual / monthly / daily)
• Multi-
language
•
Paging from base to handset
• Internal
antenna
•
AAA rechargeable battery
• Battery charging time: 16
hours standard
charging method
• Battery life: about 60
hours for standby and
8 hours for talk
*requires subscription to Caller ID service from your telephone company
**requires subscription to Voice Mail service from your telephone company
Page 5
4
Terminology
Standby Mode - The mode your phone is in when you’re not on a
call. The phone is ready to accept a new action.
Talk Mode - The mode your phone is in when you’re on a call. Some
of the Soft Keys will not be available when in this mode.
Soft Keys - Soft Keys appear on the LCD screen of the handsets
directly below the LCD. The functions of these keys change based on
the mode (standby or talk) or menu.
Quick Reference
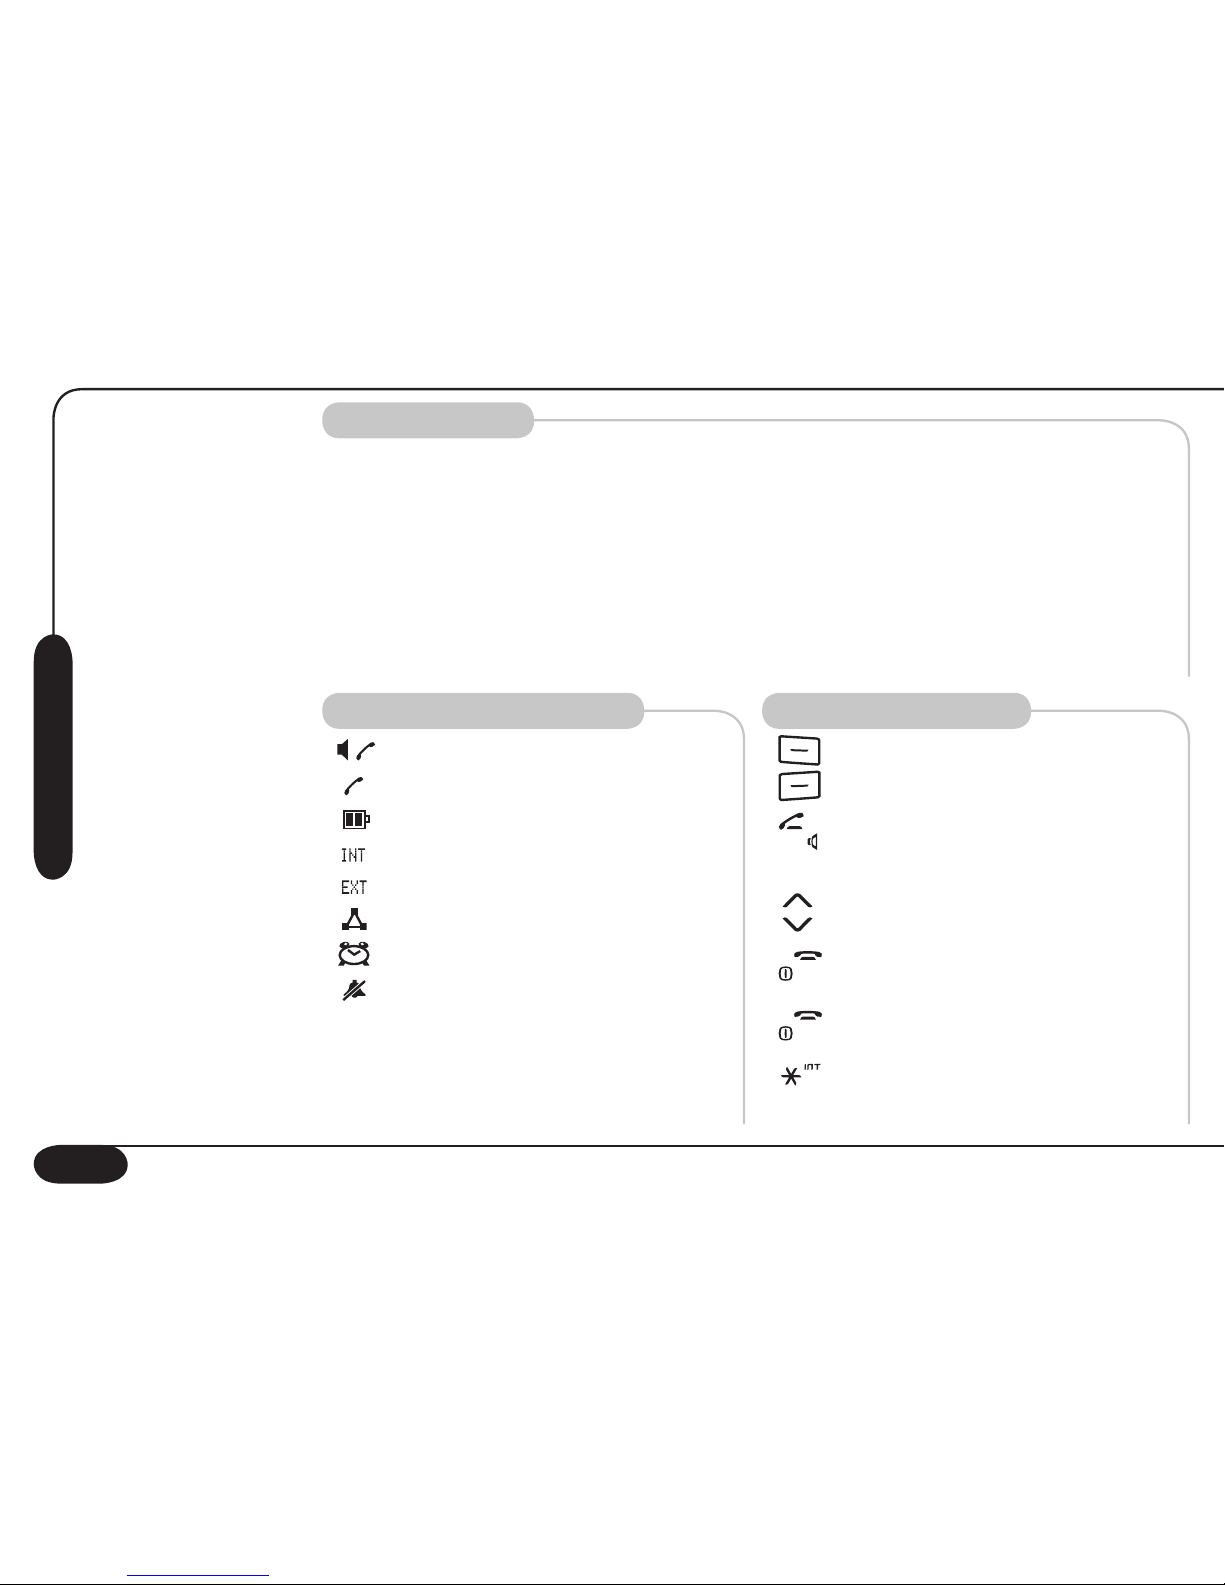
Symbols On The LCD Key Descriptions
Hands Free Mode
Off-hook
Mode
Battery Charge Status
Internal Call
External Call
Conference Call
Alarm or Appointment is Set
External Ring Disabled
Current functions & display keys
Redial key (also Flash function)
Talk key (press briefly)
Hands Free key (hold down)
Control keys:
Up: Caller ID List
Down: Phone Book Menu
Talk off key or one menu level back
(press briefly)
Power on/off or Return to idle state
(hold down)
Internal call key (hold down * key)
Page 6
5
Quick Reference
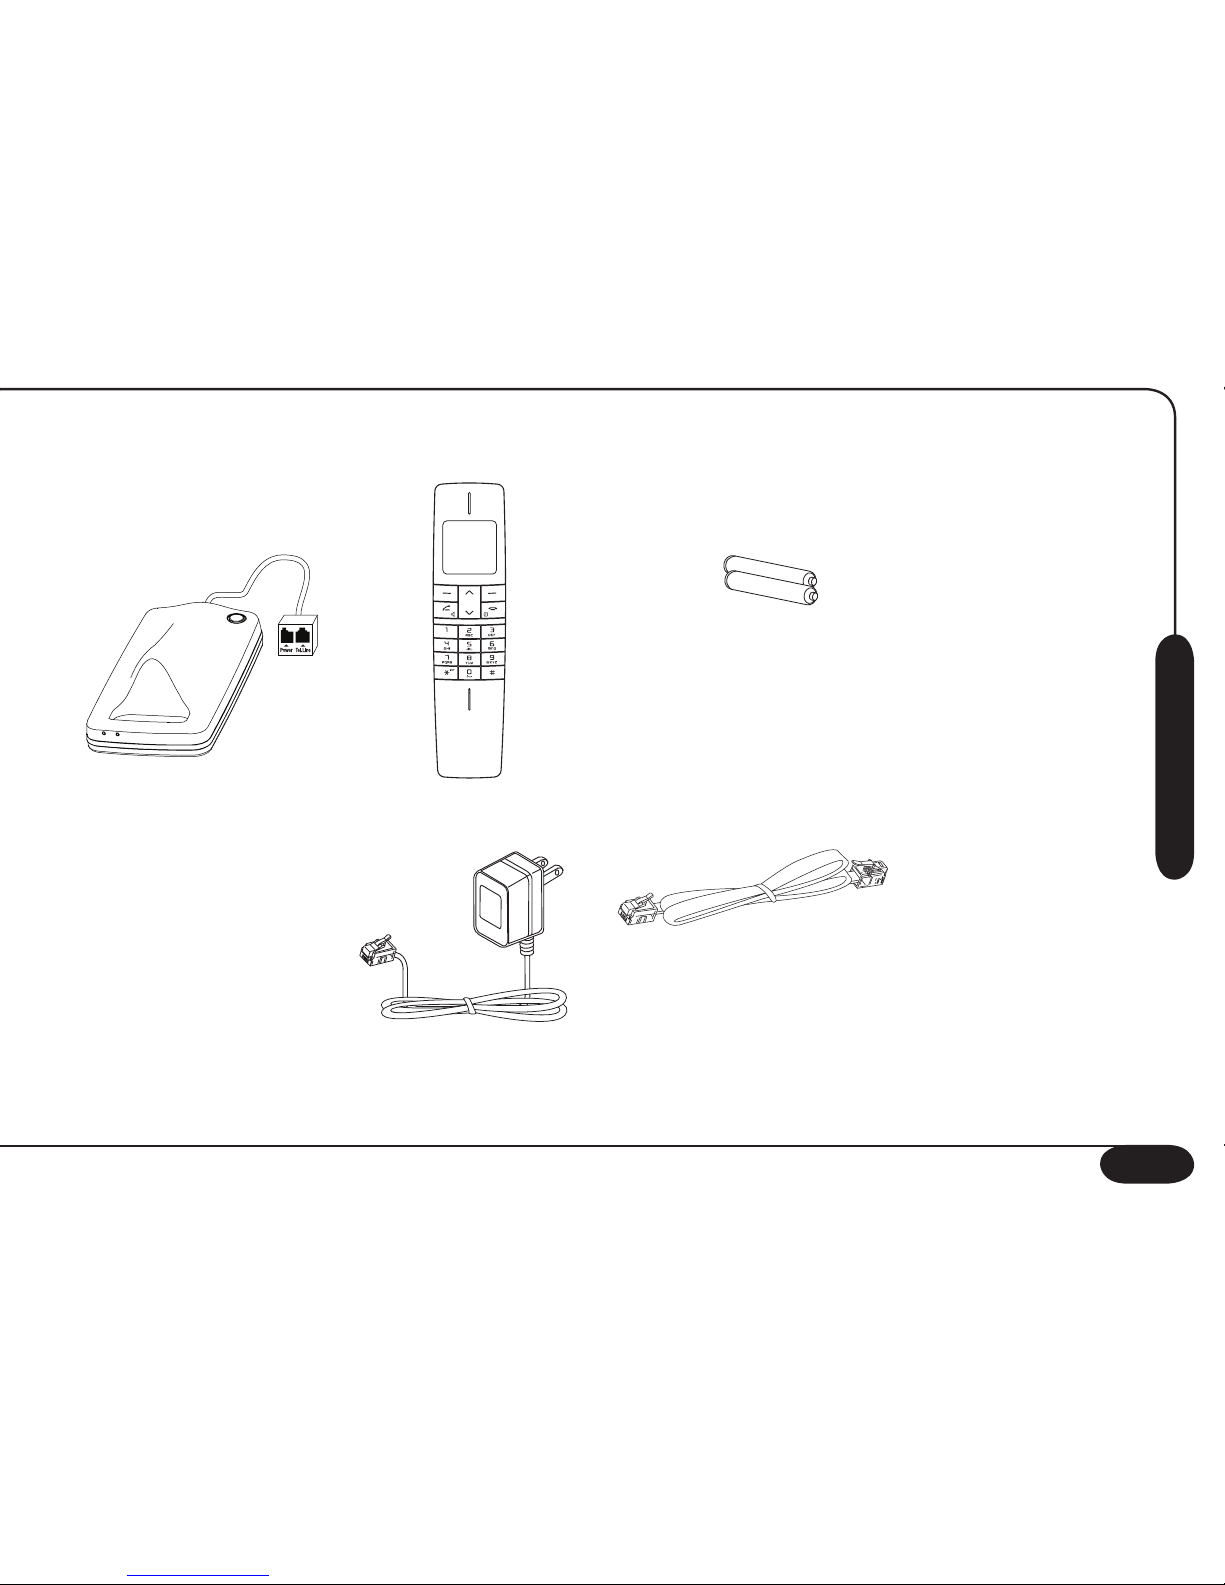
Parts Checklist
1. This user’s guide
2. Base unit
3. Handset
4. 2
rechargeable batteries
5.
Power adapter
6.
Telephone line cord
2 3 4
5 6
Page 7
6
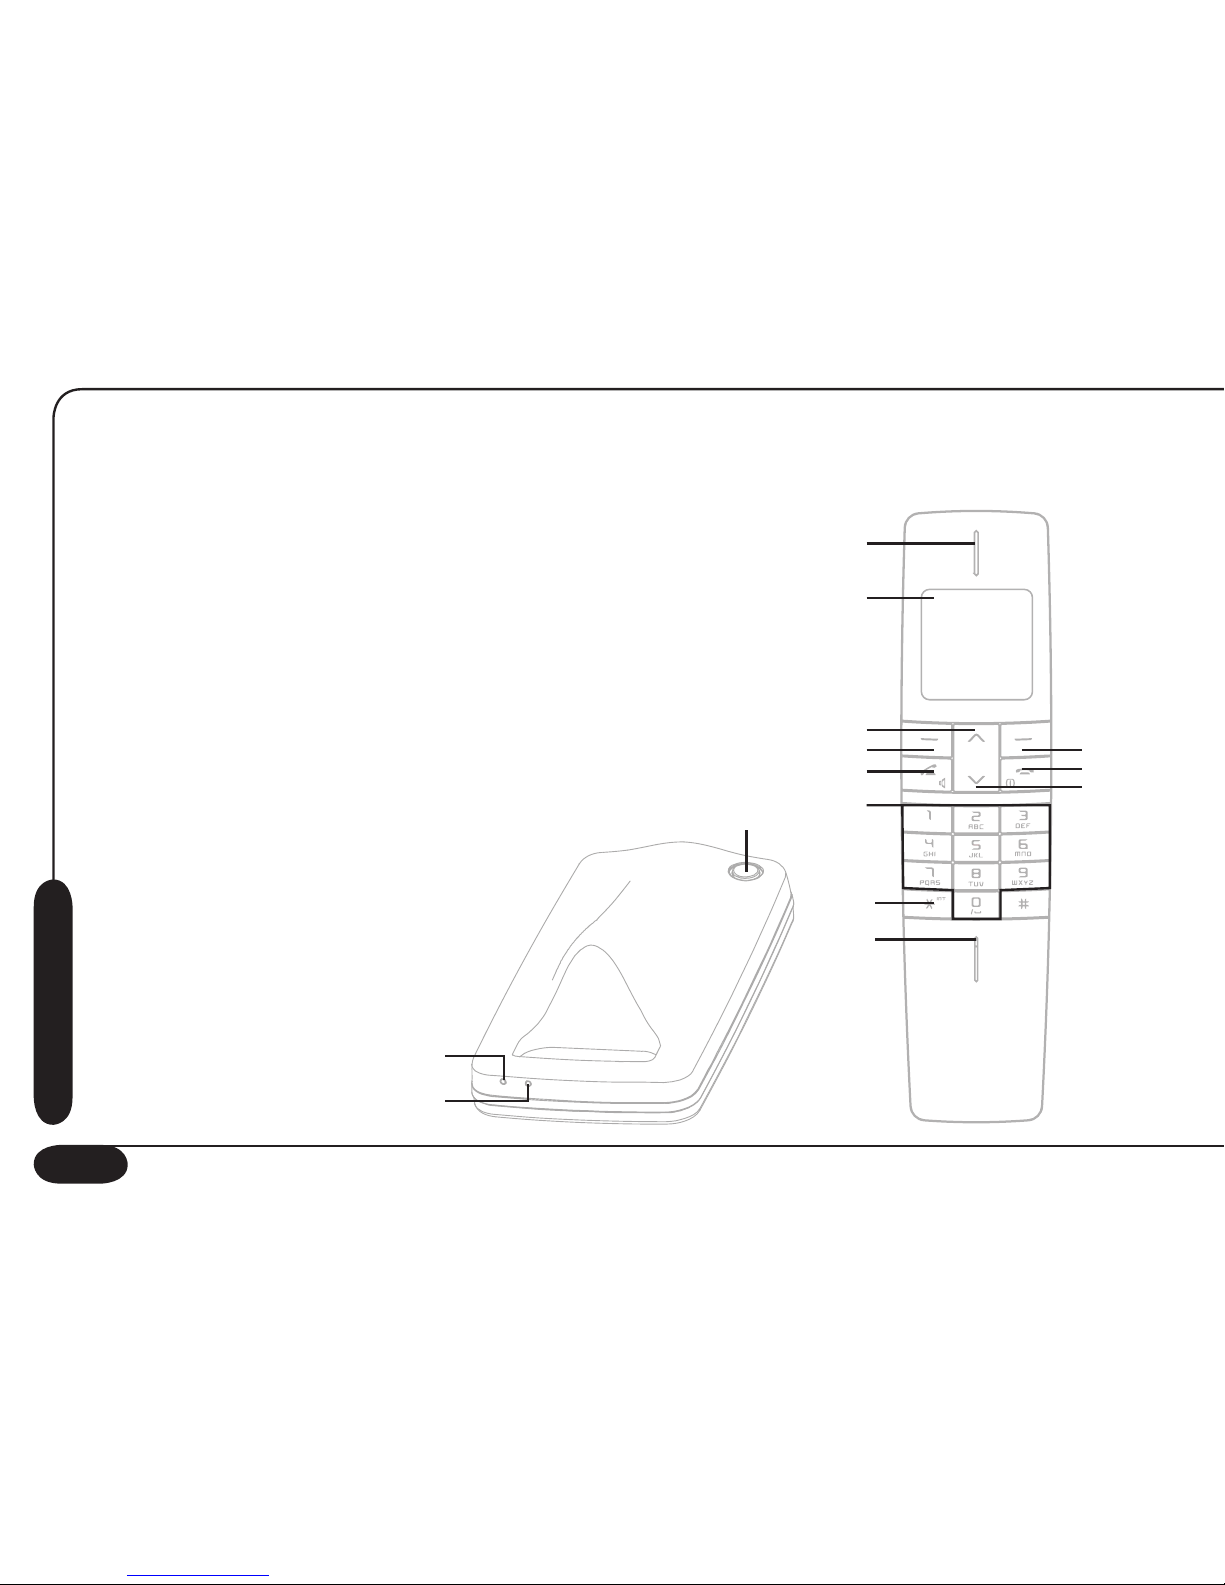
Handset and Base Functions & Controls
Controls & Functions
1
1. Ear piece (speaker)
2. LCD
3.
Navigation Key Up
4. Soft Key 1
5. Soft Key 2
6.
Talk On
7.
Talk Off
8.
Navigation Key Down
9. Number Keys
10. * Key (Press and hold for Internal Call)
11.
Microphone
12. Page handset(s)
13. Charging
LED
14. Visual Ringer LED
2
3
4 5
6
7
8
9
10
11
12
13
14
Page 8
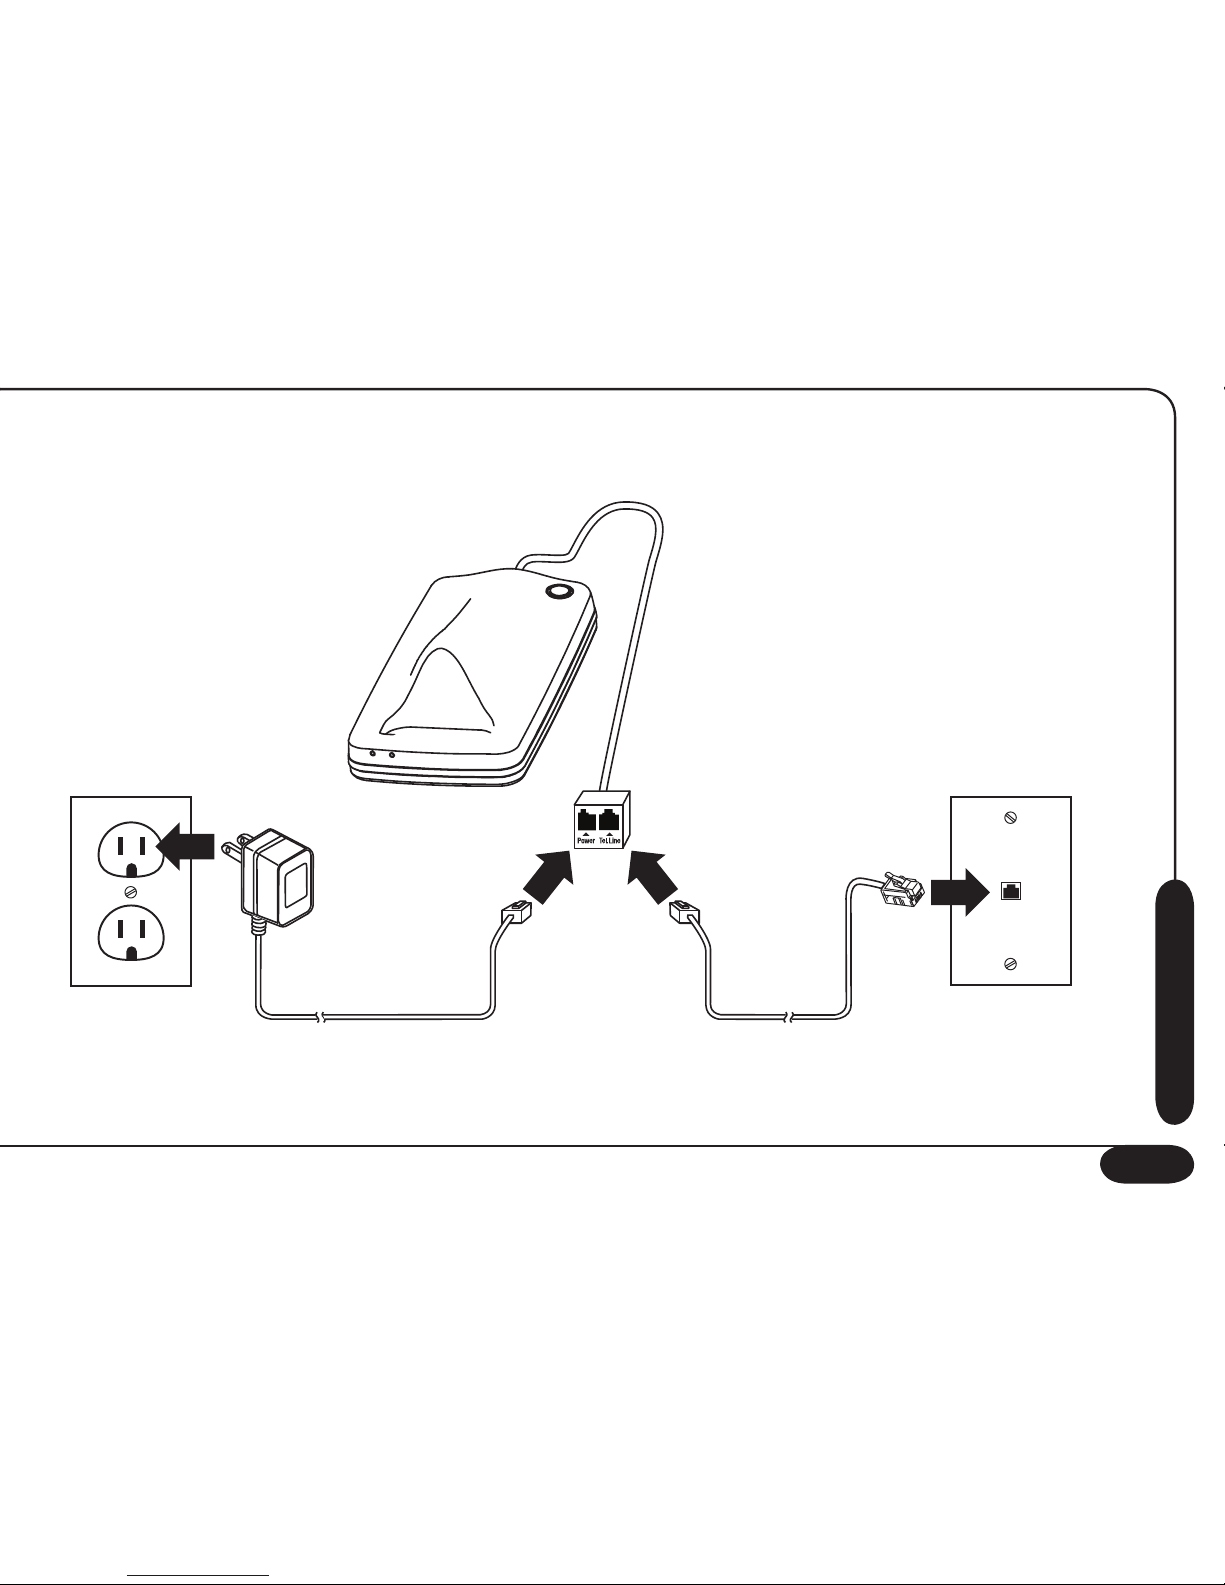
7
Controls & Functions
Connection Diagram
Page 9

8
Getting Started
Powering On and Off the Handset
Power Off
To turn off the handset:
1. Press the
key for 2 seconds.
After the validation melody, the handset will be switched off.
Power On
To turn on the handset:
1. Press the
key while in the power off state.
The handset will turn on. It will search for the base station and the
handset LCD will display “Searching”. After locating the base, the
initial screen is displayed on the handset LCD.
Getting Started
Page 10

9
Access to Ringer Menu
You can customize the ring tone you hear for incoming calls through
the handset and the base.
1. Press the
Menu key (Soft Key 1 ). Choose the “Ringer” Menu
using the or keys.
2. Press the
Back key (Soft Key 2 ) or the key to return to the
previous menu. And press the key to return to standby mode.
Ring mode setting for handset
1. Go to the
“Ringer” menu. Press the OK key (Soft Key 1 ).
2. Choose
“Incoming Call”. Press the OK key (Soft Key 1 ).
3. Choose
“Ring Mode”. Press the OK key (Soft Key 1 ).
4. Browse through the ring modes. Press the
OK key (Soft Key 1 )
to select the desired ring mode:
a. “Standard”: Standard Ring mode.
b. “Disable”: Ring tone is disabled.
c. “Ring After #”: Select from 1 ring to 4 rings
5. Press the
OK key (Soft Key 1 ). The ring tone you selected is
enabled.
Getting Started
Page 11

10
Volume setting for handset
You also can set the volume for the melody.
1. Go to
“Ringer” menu. Press the OK key (Soft Key 1 ).
2. Choose
“Incoming Call”. Press the OK key (Soft Key 1 ).
3. Choose
“Volume”. Press the OK key (Soft Key 1 ). The display
will show the previously stored volume level.
4. Choose from volumes 1 through 9. Press the
OK key (Soft Key 1 )
to confirm.
Adjusting the earpiece volume
You can change the listening volume at any point during a conversation.
While on a phone call:
1. Press the
Options key (Soft Key 1 ). Then, use the or keys to
choose “Ear Volume”.
2. Press the
OK key (Soft Key 1 ).
3. Press the
or keys to choose the appropriate ear volume: 1-5.
4. Press the
OK key (Soft Key 1 ).
Getting Started
Page 12
11
Melody setting for handset
You can choose from 13 different ring melodies for the handset.
1. Go to the
“Ringer” menu. Press the OK key (Soft Key 1 ).
2. Choose
“Incoming Call”. Press the OK key (Soft Key 1 ).
3. Choose
“Melody”. Press the OK key (Soft Key 1 ).
4. Choose from
melodies 1 through 13. Press the OK key (Soft Key 1
) to confirm.
Ring mode setting for base
1. Go to the
“Base Settings” menu. Press the OK key (Soft Key 1 ).
2. Choose
“Base Ring Tone”. Press the OK key (Soft Key 1 ).
3. Choose
“Ring Mode”. Press the OK key (Soft Key 1 ).
4. Browse through the ring modes. Press the
OK key (Soft Key 1 )
to select the desired ring mode:
a.
“Standard”: Standard Ring mode.
b.
“Disable”: Ring tone is disabled.
c.
“Ring After #”: Select from 1 ring to 4 rings
5. Press the
OK key (Soft Key 1 ). The ring tone you selected is
enabled.
Getting Started
Page 13

12
Volume setting for base
You also can set the volume for the melody.
1. Go to
“Base Settings” menu. Press the OK key (Soft Key 1 ).
2. Choose
“Base Ring Tone”. Press the OK key (Soft Key 1 ).
3. Choose
“Volume”. Press the OK key (Soft Key 1 ). The display
will show the previously stored volume level.
4. Choose from volumes 1 through 9. Press the
OK key (Soft Key 1 )
to confirm.
Melody setting for base
You can choose from 9 different ring melodies.
1. Go to the
“Base Settings” menu. Press the OK key (Soft Key 1 ).
2. Choose
“Base Ring Tone”. Press the OK key (Soft Key 1 ).
3. Choose
“Melody”. Press the OK key (Soft Key 1 ).
4. Choose from
melodies 1 through 9. Press the OK key (Soft Key 1
) to confirm.
Getting Started
Page 14
13
Setting the date and the time
You can set the date and time. The clock is in 24-hour mode.
1. Go to the
“HS Settings” Menu. Choose “Set Clock”.
2. Press the
OK key (Soft Key 1 ). Enter the month, day and year.
3. Press the
OK key (Soft Key 1 ). Enter the hours and minutes.
4. Press the AM/PM key (Soft Key 2
). Choose the desired option.
5. Press the
OK key (Soft Key 1 ) to confirm.
Setting the area code
You can enter your home area code to indicate which phone numbers
are local calls.
1. Go to the
“HS Settings” menu. Press the OK key (Soft Key 1 ).
2. Choose
“Set Area Code”. Press the OK key (Soft Key 1 ).
3. Enter the area
code. Press the OK key (Soft Key 1 ) to confirm.
Getting Started
Page 15

14
Setting keypad tones
1. Go to the
“HS Settings” menu. Press the OK key (Soft Key 1 ).
2. Choose
“Keypad Tones”. Press the OK key (Soft Key 1 ).
3. Choose
“On” to enable this function and choose “Off” to disable
the function. Press the OK key (Soft Key 1 ).
Setting the backlighting of LCD display
You can choose to turn the LCD backlight on or off while in standby
mode.
1. Go to the
“HS Settings” menu. Press the OK key (Soft Key 1 ).
2. Choose
“Backlighting”. Press the OK key (Soft Key 1 ).
a. Choose “Standard” to turn on
backlighting for 30 seconds.
b. Choose “Enable” to always turn on
backlighting.
Setting the language
The handset can display menus and information in either English or
Spanish. To set the language:
1. Go to the
“HS Settings” menu. Press the OK key (Soft Key 1 ).
2. Choose
“Language”. Press the OK key (Soft Key 1 ).
3. Choose either English or Spanish. Press the
OK key (Soft Key 1 )
to confirm.
Getting Started
Page 16
15
Prefix Dialing
If the telephone is connected to a PABX, you can set the code to access an external line (usually 0 or 9). This gives the possibility to insert
a pause between dialing the access code and the phone number.
To enable this prefix dialing:
1. Go to the
“Base Settings” menu. Press the OK key (Soft Key 1 ).
2. Choose
“Prefix Dialing”. Press the OK key (Soft Key 1 ).
3. Insert the desired
external access number (1 digit). Press the OK key
(Soft Key 1 ) to confirm.
To disable prefix dialing:
1. Go to the
“Base Settings” menu. Press the OK key (Soft Key 1 ).
2. Choose
“Prefix Dialing”. Press the OK key (Soft Key 1 ).
3.
Delete the external access number. Press the OK key (Soft Key 1 )
to confirm.
When prefix dialing is set, the prefix automatically will be added to
phone numbers in the Phone Book, Received Calls, and Missed Calls.
Getting Started
Page 17

16
Flash
While on a call, you may want to transfer the call to someone else
connected to the same PABX. This can be done by using the flash
function.
• Press the
Flash key (Soft Key 2 ) or press and hold the # key for
2 seconds during an external call.
The base station will then transmit a FLASH signal to the line.
Inter-digit pause
Some phone numbers require you to dial additional digits a few
seconds after entering the phone number. You can insert a 3-second
pause while in pre-dialing mode.
1. Enter the first set of numbers.
2. Press the
key and a “-” will be inserted. Alternatively, you can press
the Options key (Soft Key 1 ) and choose the item “Insert Pause”.
3. Enter the number you want to dial, and press the
key to start a call.
Getting Started
Page 18

17
Register to Base
In multi-handset mode, you may need to switch the base to which a
handset is assigned. Up to four assignments are possible. You can set
based selection manually or automatically.
Register an optional handset
1. Press and hold down the button on the base for 5 seconds or
until the base begin to give out a confirmation tone.
2. Go into the
“HS setting” menu of the handset and press the
or keys until the “Register to BS” is selected. Press the OK key
(Soft Key 1 ) and select the base number (from 1 to 4) where
the handset should be registered by using the or keys.
3. Press the
OK key (Soft Key 1 ). The handset now searches for
the base. When it finds the signal, the Base Identification Code
is displayed.
4. Press the
OK key (Soft Key 1 ) and insert the PIN code (default
1590). Press the OK key (Soft Key 1 ) to confirm.
Register a handset on a secondary base
The procedure is the same as previously shown in “
Register an
optional handset”. At the end of this procedure, the base will
assign the number to the handset automatically.
If the base where you want to register a handset is a different model,
When registering an
optional handset or
registering a handset
on a secondary base,
you must know the
PIN code of the base
where the handset
will be registered.
NOTE!
Getting Started
Page 19

18
use the instructions of this base to place it in registration mode.
When you need to register a different handset on the base of
your telephone, you can place it in registration mode by pressing
and holding the key on the base for 5 seconds or until it gives
out a confirmation tone. Then, follow the specified registration
procedure for the other handset.
Manual selection of a base
This function is used to select one specific base among the ones
to which the handset is already assigned. This selection will not
change automatically when the handset loses synchronization with
the base.
1. Go to the
“HS Settings” Menu and choose “Switch Base”. The
display now shows the currently selected base’s number.
2. Use the
or keys to select the base. Press the OK key (Soft
Key 1). The handset tries to search for the selected base.
3. Press the
OK key (Soft Key 1 ) to confirm once the base is
located.
Automatic base search
This function is used to enable the automatic base selection mode.
Automatic selection means that every time the handset loses
synchronization with the current base, it will look for another one
automatically from its list of bases.
Getting Started
Page 20
19
Once enabled, the automatic selection remains active until the next
manual selection or the next assignment.
1. Go to the
“HS Settings” Menu. Choose “Switch Base”. The
display will show the current base’s number.
2. Choose
“Automatic” by using the navigation key.
3. Press the
OK key (Soft Key 1 ). The handset will start the search
for the base that has the strongest signal. Then, the handset will
show the number of the base with the strongest signal.
4. Press the
OK key (Soft Key 1 ) to confirm.
Getting Started
Page 21

20
Telephone Operation
Telephone Operation
Making and receiving calls
There are two ways to make a phone call – manually or using pre-dialing mode.
Make a call in talk mode
1. When the handset is in standby mode, press the
key and
listen for the dial tone. Then, dial the destination phone number.
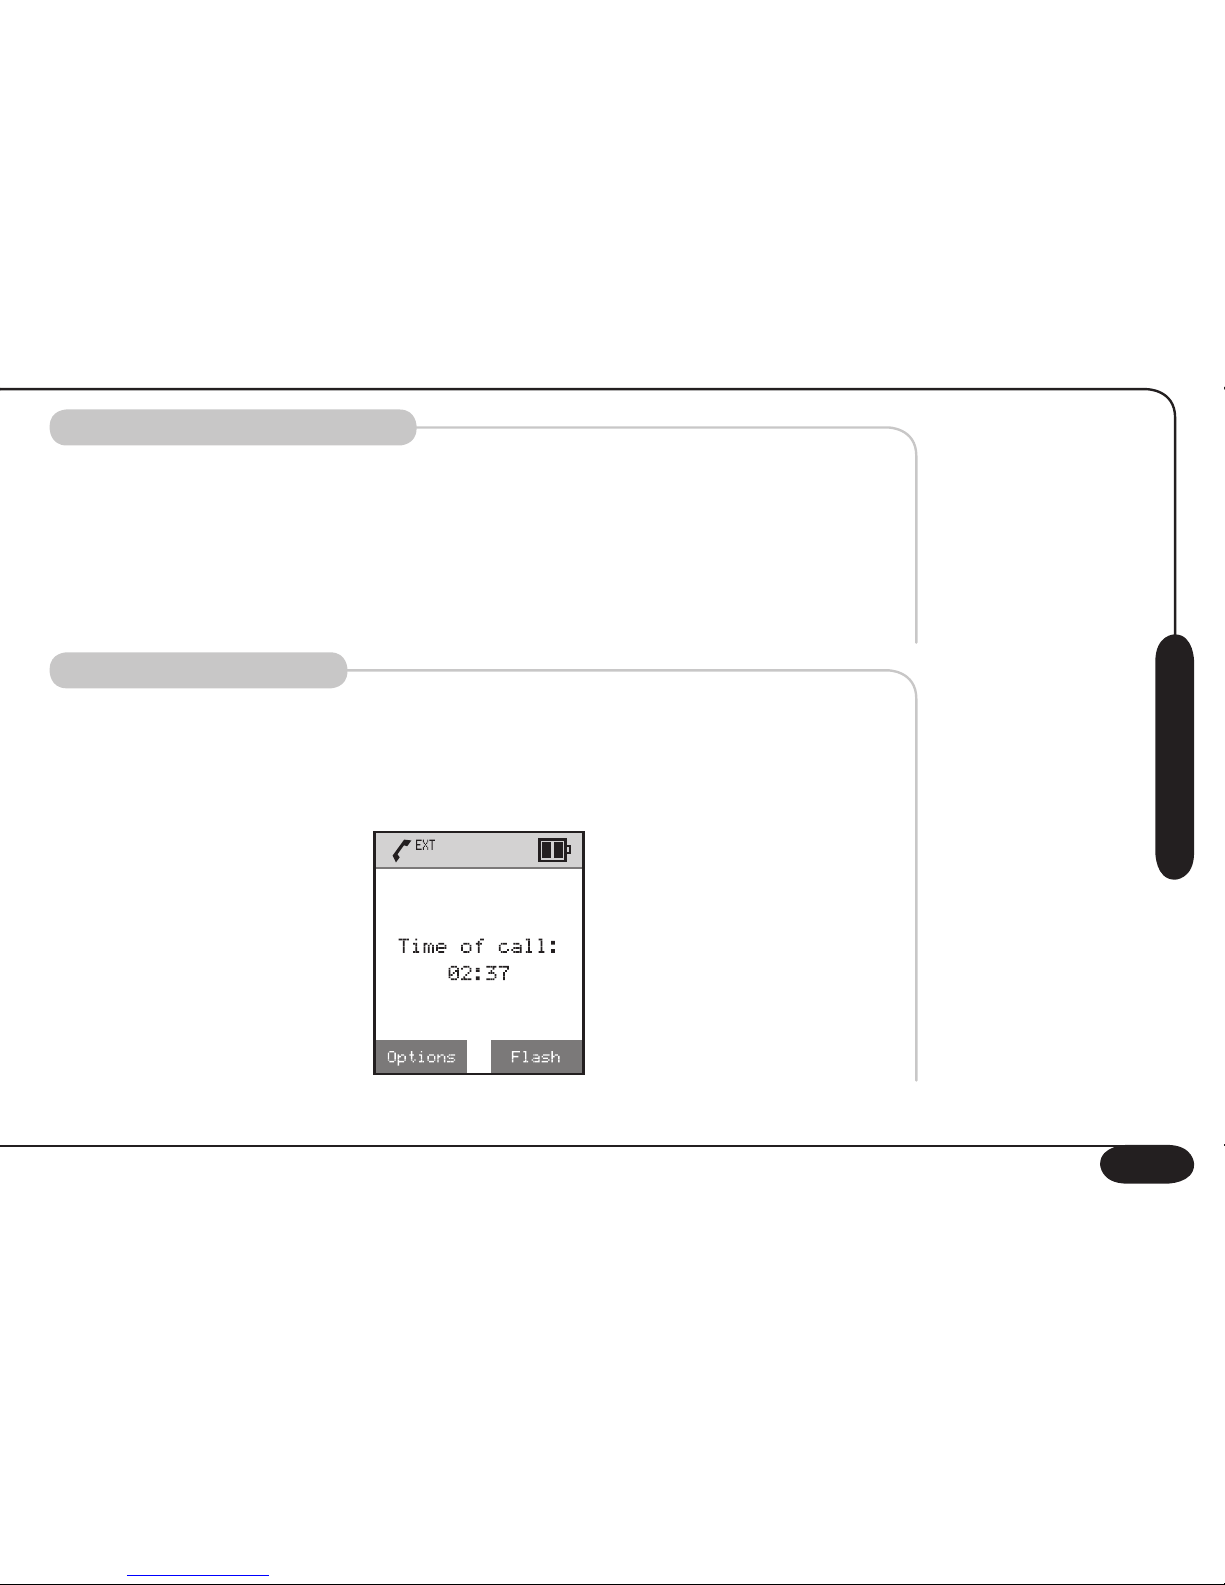
2. During the call, you will see the call
duration time on the display.
3. To terminate the call, press the
key.
Make a call in pre-dialing mode
You can enter the destination number before entering talk mode.
In pre-dialing mode, it’s possible to make corrections if you enter
an incorrect destination number. With the unit in standby mode,
follow this procedure:
1. Enter the destination number.
2. Press the
Delete key (Soft Key 2 ) to erase the last inserted
number or press more than once to erase more numbers.
3. Press the
key to erase all the numbers and return to standby
mode.
4. Press the
key to start the call.
Page 22
21
Telephone Operation
Out of range indication
The cordless system uses special digital signal processing to ensure
maximum range for your call. If you go out of base range during a
conversation, the handset begins to give out an acoustic signal. To avoid
dropping your call, approach the base until the acoustic signal ends.
If you go out of range while in standby mode, the display will show
“Out of Range”.
Call duration time
The call duration time appears on the LCD after making or receiving a
call. This function starts 5 seconds after the beginning of a conversation and ends 3 seconds after the call is complete. The time is shown
in minutes and seconds (mm : ss).
Page 23

22
Telephone Operation
Answering a call
When you receive an incoming call, both the base and the handset
ring. Also, the LCD will display “External”. Press the key or the
Accept key (Soft Key 1 ) to answer the call. To end the call, press
the key or put the handset on the base.
Repeat one of the last 10 dialed numbers
The phone stores the last 10 numbers that have been dialed. To
retrieve one of those numbers, start in standby mode:
1. Press the
Redial key (Soft Key 2 ). The display will show the last
dialed numbers.
2. Choose the destination number using the
or keys.
3. Press the
key to start the call.
4. Press the
Options key (Soft Key 1 ). From here, you’ll have 4
options:
• Choose the
“Details” option to see the full list of recently dialed
numbers.
• Choose the
“Save” option to store the number to the phone book.
• Choose the
“Delete” option to delete the number from the
Redial list.
• Chose the
“Call” option to dial.
Page 24
23
Telephone Operation
Holding with on-hold music
You can place the other party on hold at any point during the call. The
other party will hear hold music on their end.
After placing the other party on hold, the handset LCD will display
“Hold”. While on a phone call:
1. Press the
Options key (Soft Key 1 ) and use the or keys to
choose “Hold”.
2. Press the
OK key (Soft Key 1 ).
3. Press the
Disable key (Soft Key 2 ) to return from holding mode.
Microphone muting
You can mute your end of the conversation at any point during the
call. The other party will hear silence on their end.
After muting the call, the handset LCD will show “Muted”. While on
a phone call:
1. Press the
Options key (Soft Key 1 ) and use the or keys to
choose “Mute”.
2. Press the
OK key (Soft Key 1 ).
3. Press the
Disable key (Soft Key 2 ) to get out of mute mode.
Page 25

24
Telephone Operation
Transferring a call
In a multi-handset configuration, it is possible to transfer a call from
one handset to another. To transfer an external call between handsets:
1. Press the
Option key (Soft Key 1 ) and choose “Internal Call”.
2. Select the desired handset’s number and press the
OK key (Soft Key
1 ).
3. Press the
key or Accept key (Soft Key 1 ) on the called hand-
set to answer the call.
4. To transfer the
external call, press the key on the calling handset.
Call conferencing
An external call can be conferenced with another handset during a
conversation. The procedure is similar to that for transferring a call.
1. Press the
Option key (Soft Key 1 ) and choose “Internal Call”.
2. Select the desired handset’s number and press the
OK key (Soft Key
1 ).
3. Press the
key or Accept key (Soft Key 1 ) on the called hand-
set to answer the call.
4. Press the
Option key (Soft Key 1 ) and choose “Conference”.
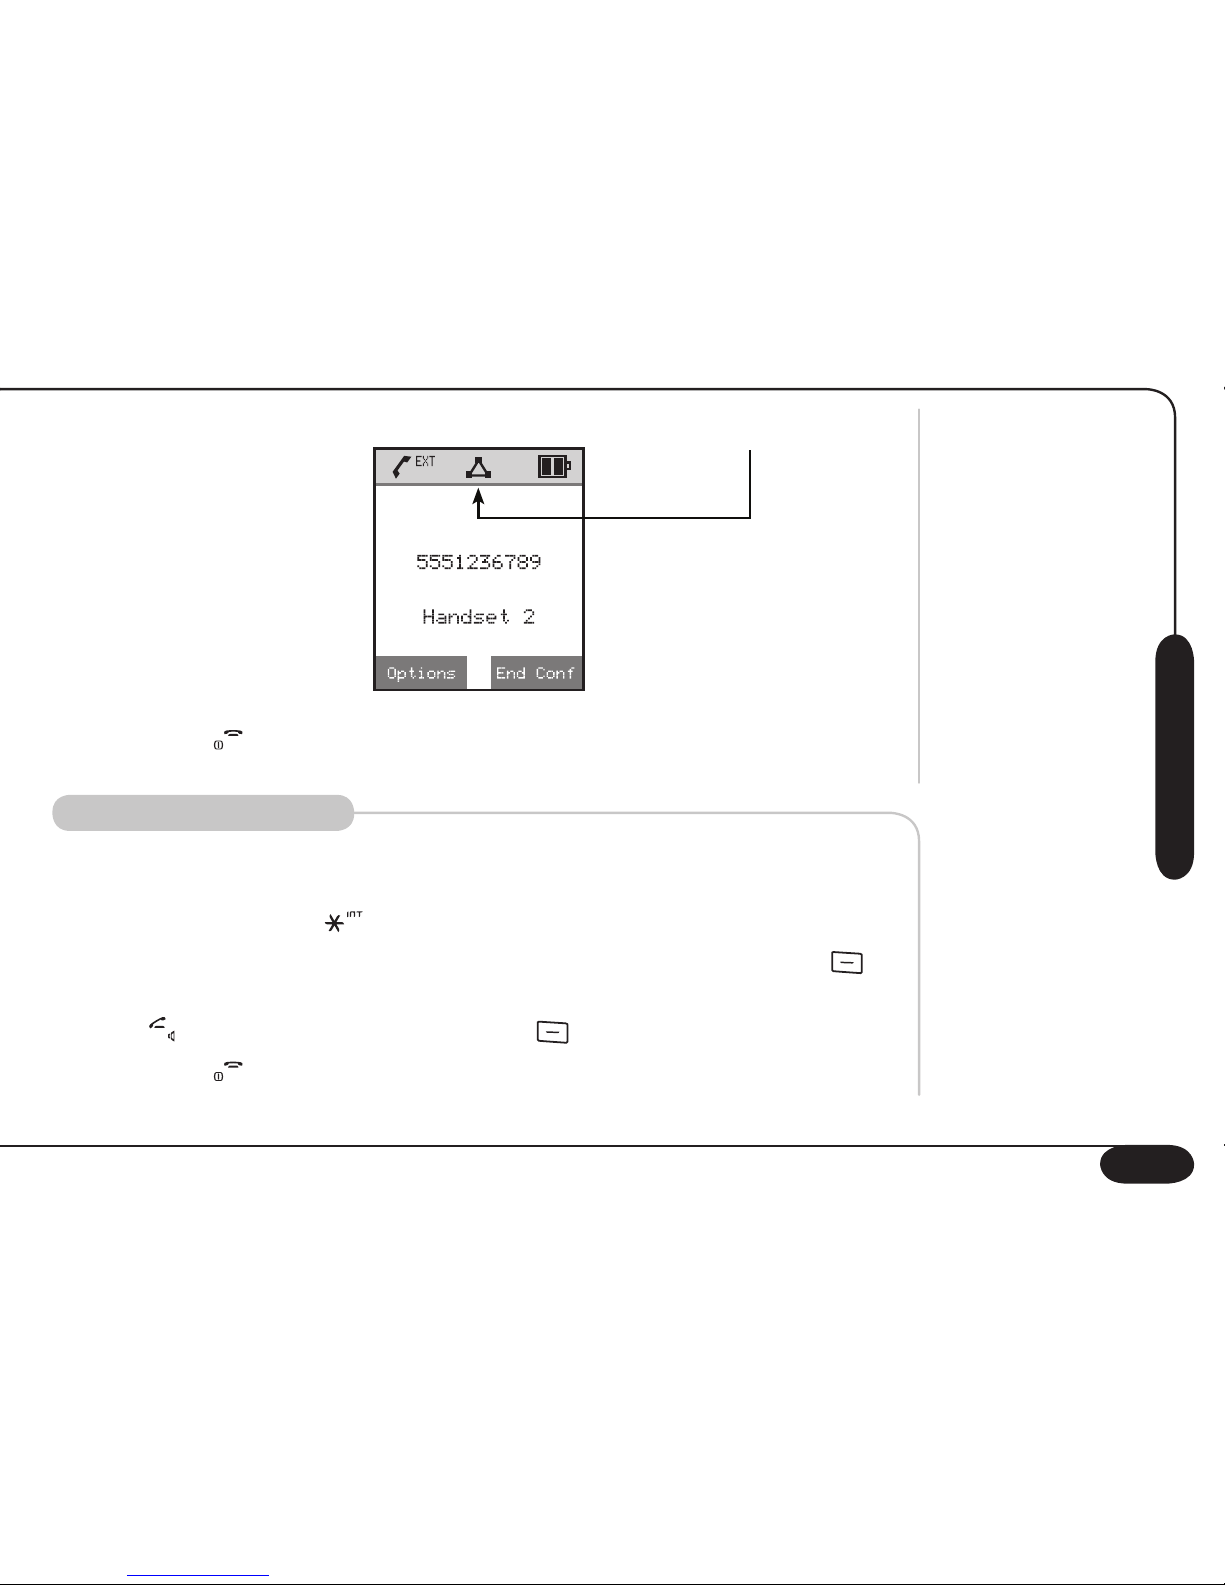
5. The
external call is connected to both of the handsets and the con-
Page 26
25
Telephone Operation
ference conversation is enabled. The display will show:
6. Press the
key on one of the two handsets to transfer the call
completely to the other handset.
Using the intercom
In a multi-handset configuration, it is possible to make an internal call
between two handsets. To make an internal call:
1. Press and hold the
key.
2. Select the handset’s number and press the
OK key (Soft Key 1 ).
3. The called handset begins to ring and will flash the
INT icon. Press
the key or Accept key (Soft Key 1 ) to answer.
4. Press the
key on both of the handsets to end the conversation.
Page 27
26
Telephone Operation
Room monitoring
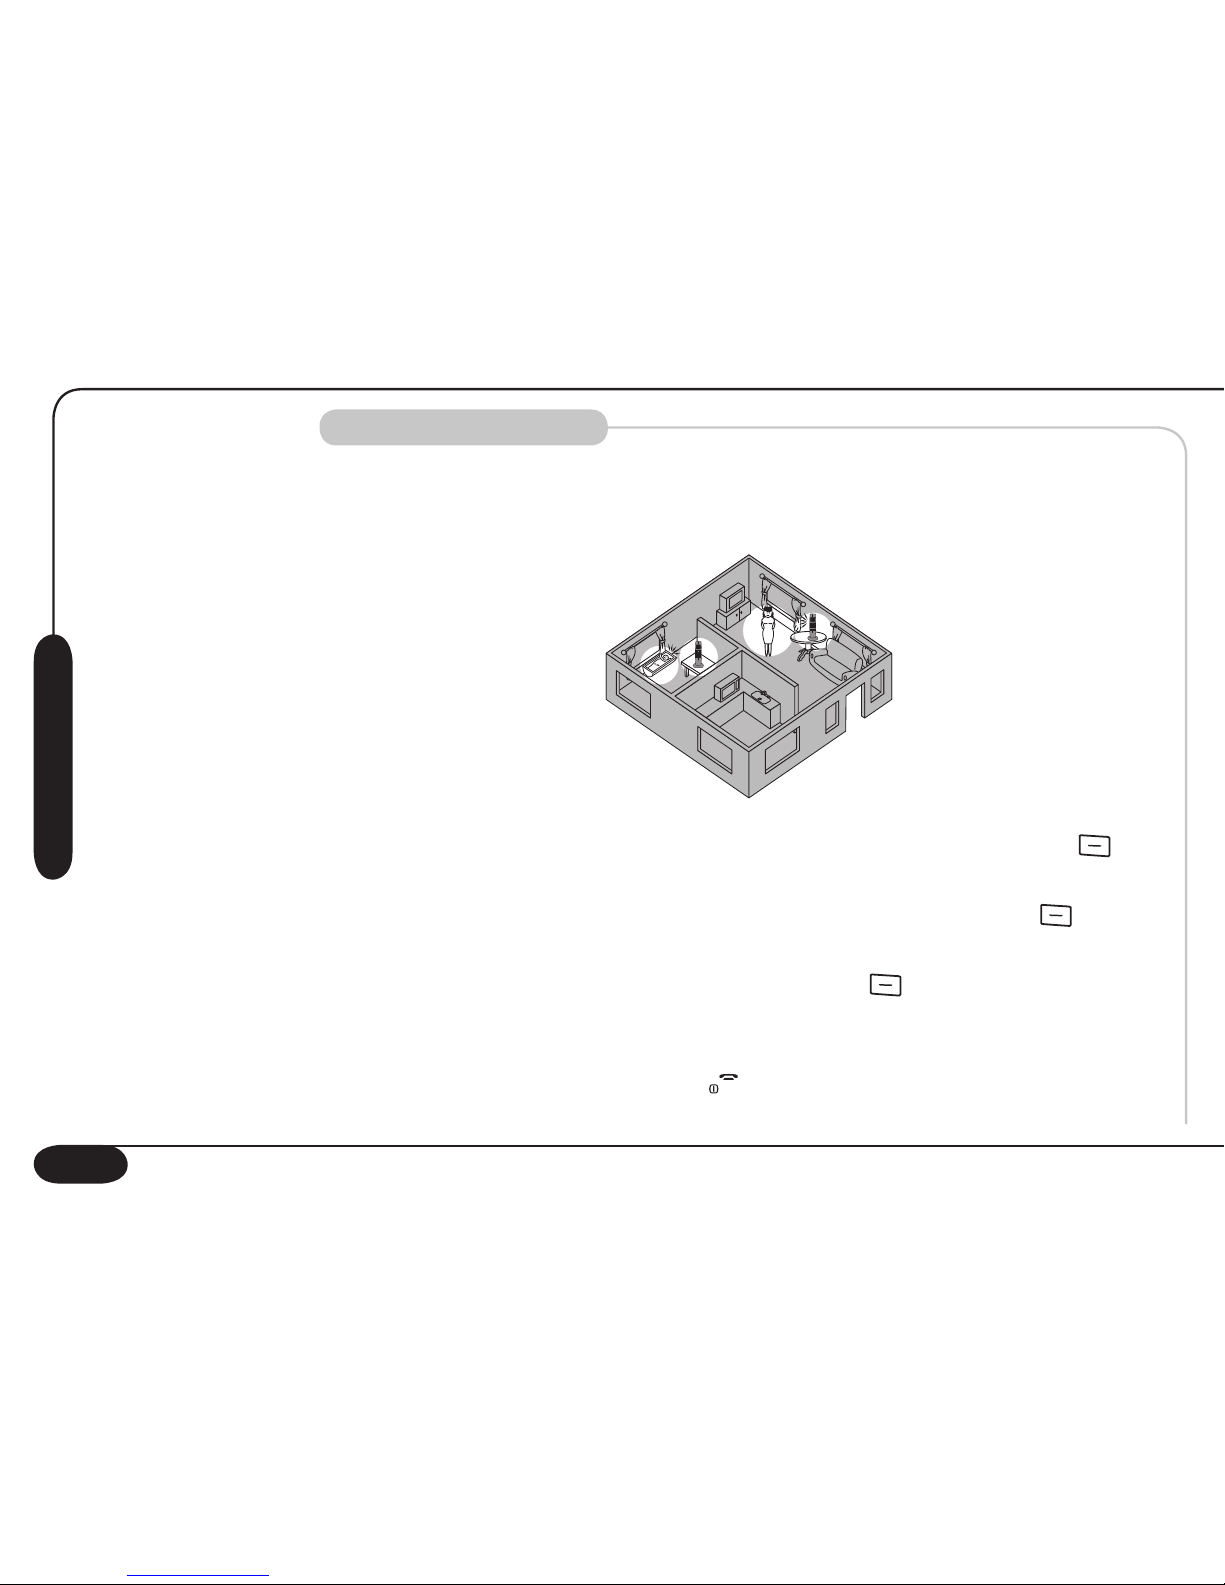
You can monitor another room as long as two handsets are registered
to the same base. For example, you could monitor a child by placing one
handset in your room and another handset in the child’s room.
To enable this function:
1. Go to the
“HS Settings” menu. Press the OK key (Soft Key 1 )
key.
2. Choose
“Room Monitor”. Press the OK key (Soft Key 1 ).
3. Choose
“On” to enable the function and choose “Off” to disable
the function. Press the OK key (Soft Key 1 ).
To use this function, enable the function on one handset and place it
in another room. Try placing an internal call to that handset. To stop
the room monitoring, press the key.
Page 28
27
Telephone Operation
Paging a handset
If you misplace the handset, you can use the paging function to find it
again. To use the paging function, push the button on the base. The
handset will ring for 20 seconds. To stop the ringing, push the same
button on the base. Or, you can press the key on the handset.
Call Waiting
If during an internal conversation, an external call comes in, the telephone will make an acoustic warning in the earpiece and the display will
blink with the EXT symbol. To finish the internal conversation, press the
key and wait for the ring. Then, press the key to answer the call.
Caller ID
1. To go to the
Caller ID List, press the Menu key (Soft Key 1 ).
Choose the “Caller ID List”. Press the OK key (Soft Key 1 ) to
see the “Caller ID List”.
2. Use the
or keys to browse the list.
3. Press the
Options key (Soft Key 1 ). From here, you will have
several options:
a. Choose
“Details” to show the date, time, and telephone number of the call (only if this kind of information is available). The
user can change the dial number format prior to starting a call
by pressing the Format key.
Page 29
28
Telephone Operation
b. Choose “Save” to store this entry to your phone book.
c. Choose
“Delete” to delete the entry from the Caller ID list.
d. Choose
“Call” to dial the phone number.
Phone book
Your phone is featured with a phone book that has the capacity to store
up to 40 different name and number entries. The phone book feature
allows you to copy entries from one handset to another or from the base
to the handsets without manually having to re-enter names and numbers.
Storing an entry
The phone has an alphanumeric phone book that can store 100
names and numbers. Names can be up to 15 characters long and
phone numbers can be up to 25 digits.
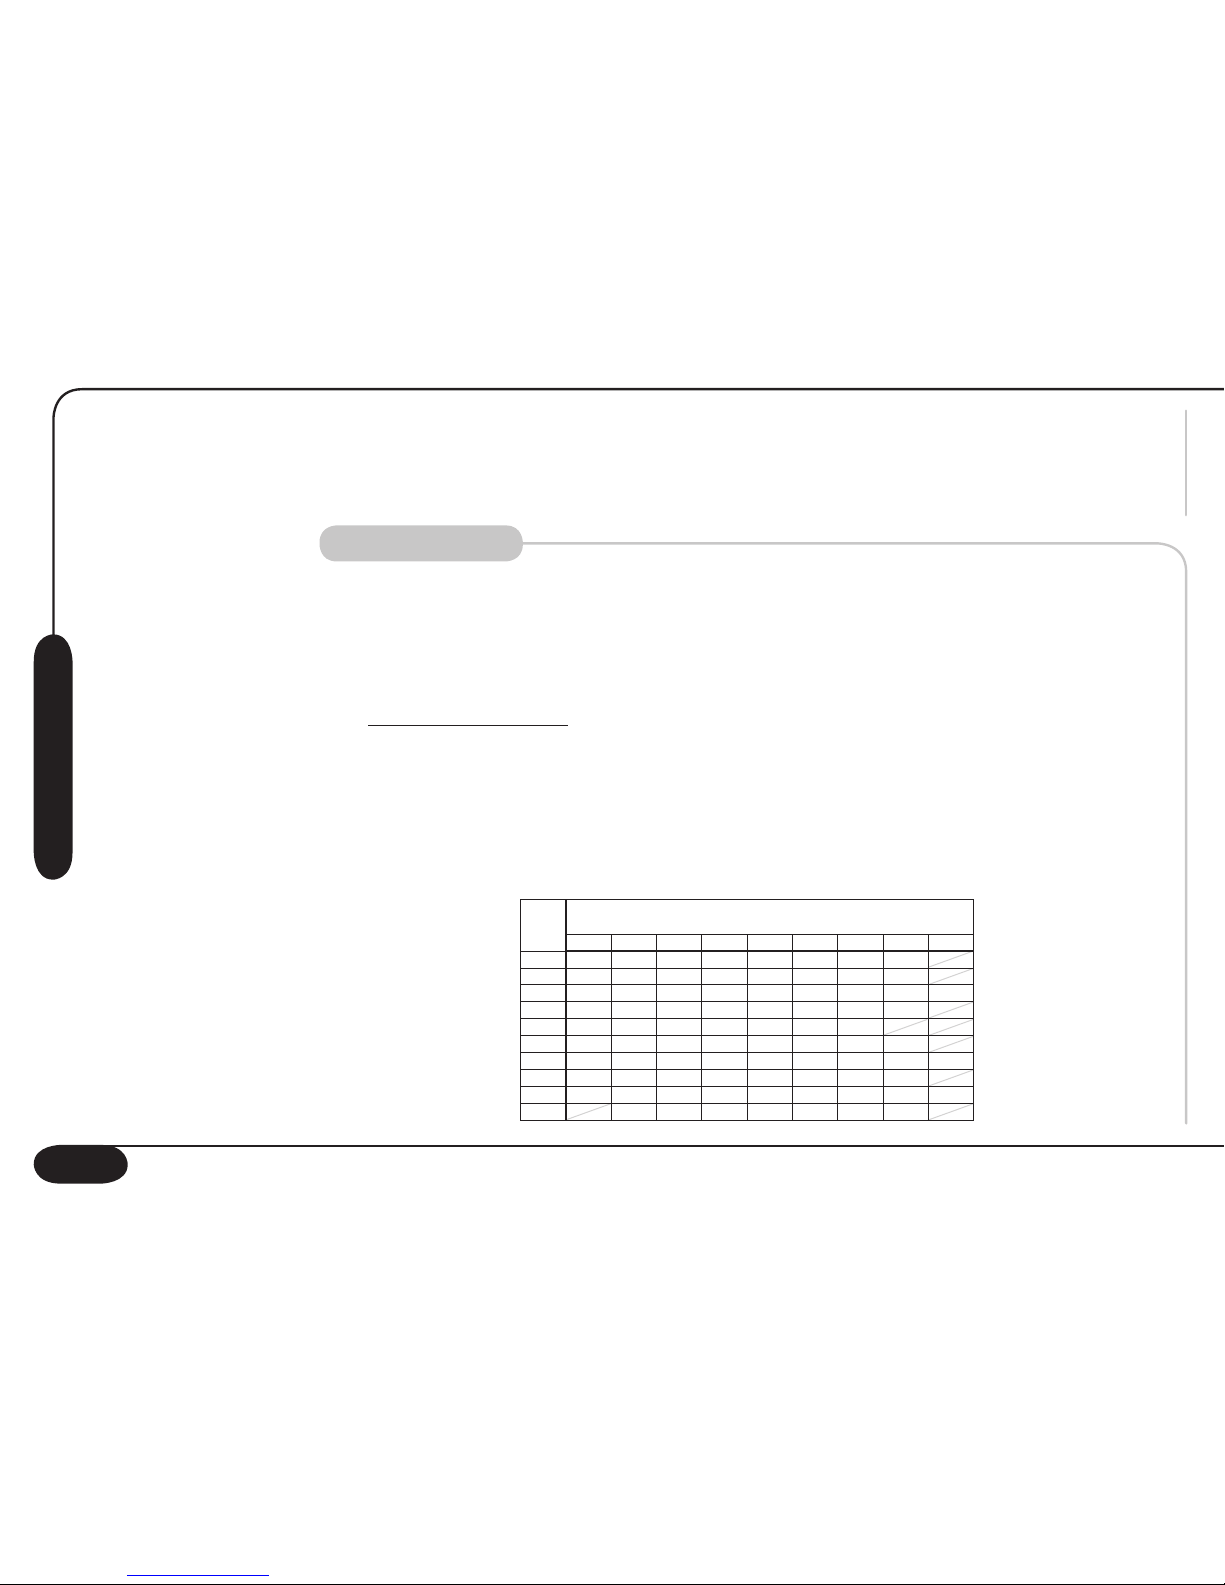
Every numeric key has additional characters available which you
can use when storing names and numbers in the phone book:
KEY
Number of times to press the key
1
1 2 3 4 5 6 7 8 9
@ . , ? 1 ! - &
A B C 2 a b c Á
D E F 3 d e f É é
G H I 4 g h i Ì
J K L 5 j k l
M N O 6 m n o Ò
P Q R S 7 p q r s
T U V 8 t u v Ù
W X Y Z 9 w x y z
_ £ € 0 $ : ;
2
3
4
5
6
7
8
9
0
Page 30

29
Telephone Operation
To store an entry in the phone book, start in standby mode:
1. Press the
Menu key (Soft Key 1 ) and use the or keys to
choose the Phone Book icon. Press the or keys to choose
“Add Entry”.
2. Press the
OK key (Soft Key 1 ).
3. After the character insertion, press the
OK key (Soft Key 1 ).
4. During the character insertion, press the
Delete key (Soft Key 2
) to erase the last character.
5. Press the
OK key (Soft Key 1 ) to enter the telephone number.
6. Enter the new telephone number.
7. Press the
Options key (Soft Key 1 ).
a. Choose the
“Save” item to save the entry.
b. Choose the
“VIP Ringer” item to select a ring melody. The
phone will play this melody when someone calls from this
phone number.
Viewing entries
You can also display a number from the phone book without dialing it.
1. Press the
Menu key (Soft Key 1 ) and use the or keys to
choose the Phone Book icon. Press the OK key (Soft Key 1 ).
2. Choose
“Find”.
Page 31

30
Telephone Operation
3. Enter one or more characters for the entry you are trying to find.
Press the Find key (Soft Key 1 ).
4. Select the required entry.
5. Press the
Options key (Soft Key 1 ) and choose the “Dial
Number”. Press the key and the number will be dialed.
Calling an entry
Once a name and number are saved in the phone book, you can
search for and dial that number directly.
1. Press the
Menu key (Soft Key 1 ) and use the or keys to
choose the Phone Book icon. Choose “Find”.
2. Press the
OK key (Soft Key 1 ).
3. Enter the first letter of the name that you want to find. Press the
Find key (Soft Key 1 ). You will be able to see all the names
that have been stored in the phone book that begin with the
letter you entered. The names will be listed in alphabetical order.
4. Select the name that you want to dial.
5. Press the
key or the Call key (Soft Key 2 ) to dial the number.
Page 32
31
Telephone Operation
Editing an entry
1. Press the
Menu key (Soft Key 1 ) and use the or keys to
choose the Phone Book icon and the OK key (Soft Key 1 ).
Choose “Find”.
2. Find the entry that you want to modify.
3. Press the
Options key (Soft Key 1 ).
4. Choose
“Edit Entry”.
5. Press the
OK key (Soft Key 1 ). Change the name, if necessary.
6. Press the
OK key (Soft Key 1 ). Change the telephone num-
ber, if necessary.
7. Press the
Options key (Soft Key 1 ).
8. Choose
“Save” to save the entry.
9. Choose
“Modify Melody” to assign a different melody to the entry.
10. Press the
OK key (Soft Key 1 ).
11. Choose the melody.
12. Press the
OK key (Soft Key 1 ) to save the selected melody.
13. Choose
“Save” and press the OK key (Soft Key 1 ) to save
your changes.
Page 33
32
Telephone Operation
Deleting an entry
If you enter a duplicate name and number or no longer want to
save an entry, you can delete it from the phone book.
1. Press the
Menu key (Soft Key 1 ) and use the or keys to
choose the Phone Book icon. Choose “Delete”.
2. Press the
OK key (Soft Key 1 ).
3. Press the
OK key (Soft Key 1 ) again to delete all the entries.
Caller ID (CID)
Calling a Caller ID number
1. To show the last 10 numbers that were dialed, press the
Menu
key (Soft Key 1 ) and use the or keys to choose the Call
List icon.
2. Choose the
“Redial List”.
3. Use the
or keys to look through the redial list.
4. Press the
Options key. From here, you will have several options:
a. Choose
“Save” to store the number to the phone book.
b. Choose
“Delete” to delete the number from the redial list.
5. Press the
key to dial the phone number.
IMPORTANT: Once
the phone book
entries are deleted,
they cannot be
recovered.
NOTE!
Page 34
33
Telephone Operation
Deleting a Caller ID number
You can delete the names and numbers from the
Caller ID, Redial,
and Missed Calls lists at any time.
1. Press the
Menu key (Soft Key 1 ) and use the or keys to
choose the Call List icon.
2. Choose
“Delete All”.
3. Press the
OK key (Soft Key 1 ). From here, you will have the
option to delete one or all of the call lists.
a. Choose
“Caller ID List” to delete the received calls list.
b. Choose
“Missed Calls” to delete the missed calls list.
c. Choose
“Redial List” to delete the dialed calls list.
d. Choose
“All Calls” to delete all 3 of the call lists (Caller ID,
Missed, and Dialed).
Voice Mail Waiting Indicator (VMWI)
If you subscribe to a Voice Mail service provided by your local telephone
company and you have a voice mail message, the display will show:
IMPORTANT: Once
a call list deleted,
it cannot be
recovered.
NOTE!
Page 35

34
Alarm Clock
Setting the alarm
You can use your handset as an alarm.
1. To go to the
Alarm menu, press the Menu key (Soft Key 1 ).
Select “Alarm Clock”. Press the OK key (Soft Key 1 ).
2. Choose
“Alarm”. Press the OK Key (Soft Key 1 ).
Activating the alarm clock
Once activated, the alarm clock will ring at the same time every
day. When the alarm is set, you will see a icon on the LCD
display.
1. Go to the
“Alarm Clock” menu. Choose “On”. Press the OK
key (Soft Key 1 ).
2. Enter the alarm time in
hours and minutes. Press the OK key
(Soft Key 1 ) to confirm.
Deactivating the alarm clock
1. Go to the
“Alarm Clock” Menu. Choose “Off”. Press the OK
key (Soft Key 1 )
Turning off the alarm call
When the alarm clock goes off, the handset will ring and the word
“Alarm” will blink for approximately 20 seconds. To turn it off,
press any key on the handset.
Telephone Operation
Page 36
35
Appointment function
The alarm clock also can be used to set appointments.
Setting the appointment
1. Go into the
“Alarm Clock” menu and press the OK Key (Soft Key
1 ). Choose “Appointment”. Press the OK Key (Soft Key 1
). “No appointment set” will appear on the LCD display.
2. Press the
Set Key (Soft Key 1 ). Choose from “Daily”,
“Monthly”, or “Annual”.
3. Set the
date and time as appropriate:
a. Daily: time
b. Monthly: day and time
c. Annual: day/month and time
4. Press the
OK Key (Soft Key 1 ).
5. Enter the text for the appointment. (See the “Storing an Entry”
section in “Phone Book Functions” to locate letters and other
characters.) After inserting a character, wait a second before
inserting the next character. Press the Delete key to erase the
last character.
6. Press the
OK Key (Soft Key 1 ) once you have entered all of
your text for the appointment.
Telephone Operation
Page 37
36
Telephone Operation
7. Press the Enable key (Soft Key 2 ) to make the appointment
active.
8. Press the
key to exit the menu.
Modifying the date of the appointment
Once you have entered an appointment, you can change the
date
and time.
1. Go into the
“Alarm Clock” menu and press the OK key (Soft
Key 1 ). Choose “Appointment”.
2. Press the
OK key (Soft Key 1 ). The current appointment
setting is displayed.
3. Press the
Options key (Soft Key 1 ). Choose “Modify Date”.
The current date and time are displayed.
4. Change the
date and time as needed. Press the OK key (Soft Key
1 ).
Modifying the subject of the appointment
Once you have entered an appointment, you can change the
appointment text.
1. Go into the
“Alarm Clock” menu and press the OK key (Soft
Key 1 ). Choose “Appointment”.
2. Press the
OK key (Soft Key 1 ). The current appointment
setting is displayed.
Page 38
37
Telephone Operation
3. Press the Options key (Soft Key 1 ). Choose “Modify
Subject”. The current subject is displayed.
4. Change the
subject as needed. Press the OK key (Soft Key 1
).
Deleting the appointment
Once you have entered an appointment, you can delete it from the
Alarm Clock memory.
1. Go into the
“Alarm Clock” menu and press the OK key (Soft
Key 1 ). Choose “Appointment”.
2. Press the
OK key (Soft Key 1 ). The current appointment
setting is displayed.
3. Press the
Options key (Soft Key 1 ). Choose “Delete”.
“Delete the appointment?” is shown on the LCD display.
4. Press the
OK key (Soft Key 1 ). The current appointment
setting is deleted.
Viewing the subject of the appointment
You can view the subject of an appointment that has been set.
1. Go into the
“Alarm Clock” menu and press the OK key (Soft
Key 1 ). Choose “Appointment”.
2. Press the
OK key (Soft Key 1 ). The current appointment
setting is displayed.
Page 39
38
3. Press the Options key (Soft Key 1 ). Choose “View Subject”.
4. Press the
OK key (Soft Key 1 ). The subject is displayed.
Deregister the Handset
You can deregister one or more handsets previously assigned to the
same base.
To deregister a handset:
1. Go to the
“Base Settings” menu. Press the OK key (Soft Key 1 ).
2. Choose
“Deregister HS”. Press the OK key (Soft Key 1 ).
3. Choose the handset you would like to deregister. Press the
OK
key (Soft Key 1 ). The display will show “Deregister Handset
n ?”, where n is the handset number.
4. Press the
OK key (Soft Key 1 ) to confirm.
Call Blocking
You can block up to 5 locations with up to 5 digits. It is possible to
specify the number and handset that cannot make a call to that prefix.
1. Go to the
“Base Settings” menu. Press the OK key (Soft Key 1 ).
2. Choose
“Call Blocking”. Press the OK key (Soft Key 1 ). The
display will show “Prefix 1:_” or the stored blocking number.
a. Note: When you delete the stored blocking number and
It is not possible
to deregister the
handset that you
use to perform this
operation.
NOTE!
Telephone Operation
Page 40
39
press the OK key (Soft Key 1 ), the call blocking function is
disabled.
3. Insert the new blocked number or go to the next blocking
location and enter a new blocked number.
4. Press the
OK key (Soft Key 1 ) to confirm. The display will
show “Handset n”, where n is the stored handset number.
5. Choose the handset that will be blocked from calling that prefix.
6. Press the
OK key (Soft Key 1 ) to confirm.
The call blocking function will be enabled and it would not be
possible to make a call to the stored, blocked number.
Factory Reset
The Reset operation allows the user to reset all the customized
settings including the phone book and the received caller ID list. To
execute the reset with the handset in standby mode:
1. Go into the
“HS Settings” menu. Press the OK key (Soft Key 1 ).
2. Choose
“Factory Reset”. Press the OK key (Soft Key 1 ). “Are
you sure ?” is displayed on the LCD.
3. Press the
OK key (Soft Key 1 ) to confirm.
Telephone Operation
Page 41
40
Troubleshooting
Troubleshooting
Problem Solution
If the phone does not work,
check all of the following:
• Make sure the
batteries are installed properly in
the handset and that the battery plug is firmly
clicked into place
• Make sure the AC adapter is plugged into the
wall and that the outlet is not controlled by a wall
switch
• Make sure the telephone line
cord is plugged into
the phone and into the wall jack
• Make sure your
battery is charged
If you hear static on the line: • Move closer to the base
• Move away from metal objects or electrical items
that may cause interference
If you cannot hear the phone
ringing when a call comes in:
• Check that the ringer is turned on
• Move closer to the
base
• Phone may not be properly registered to the base.
To re-register, see “Register to base” on page 17.
Page 42
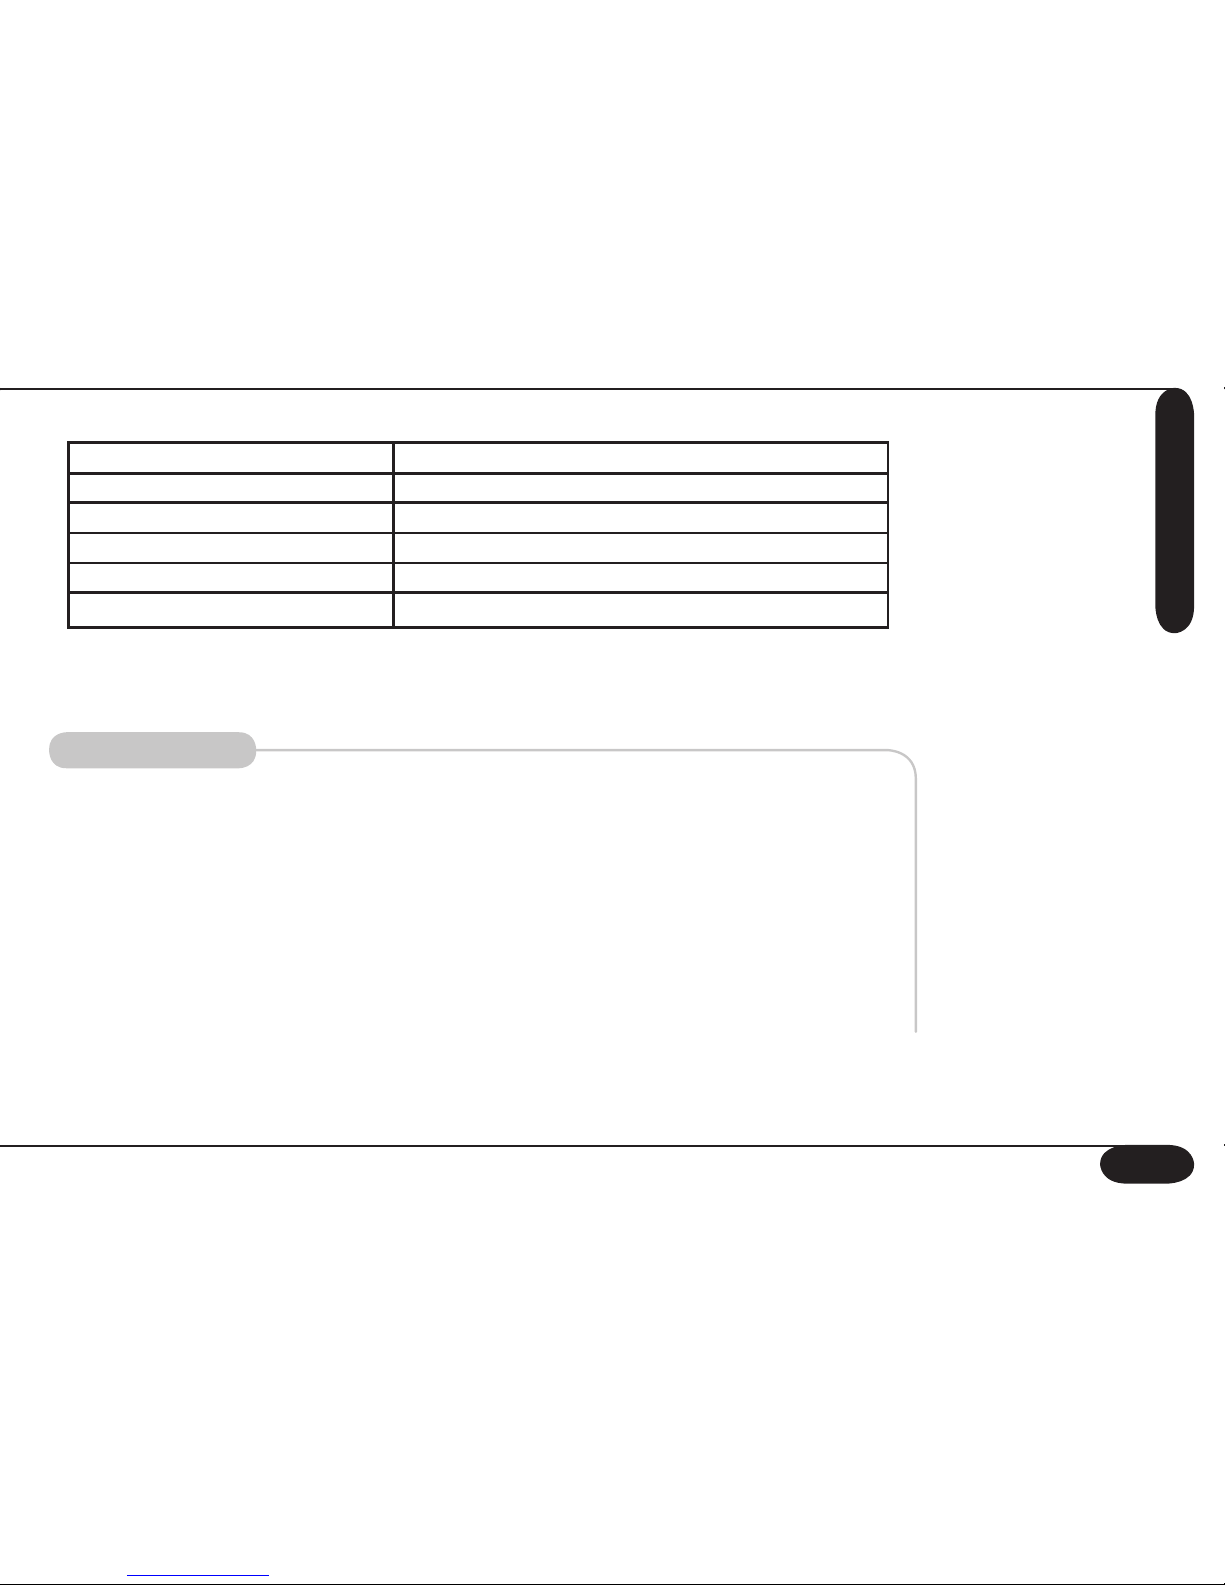
41
Specifications
Frequency Range
RF Channel
Max Output Power
TDMA slot per frame
Modulation
Speech Encoding
1.920 ~ 1.930GHz
5 Channels
20.8 dBm
24 slot
GFSK
ADPCM (32Kbps)
Precautions
1. Read and understand all instructions in the user’s guide. Observe all
markings on the product.
2. Avoid using the telephone during a thunderstorm.
3. Do not use the telephone in the vicinity of a gas leak.
4. Do not use this product near water.
5. If this
phone does not operate normally, read the “Troubleshooting”
section in the user’s guide.
6. Replace
batteries only as describe in the user’s guide.
Specifications
Page 43

42
Warranty
In case of difficulties, visit our service center at
www.sbctelephones.com or call 800-400-5156
© 2006 Intellitouch
All rights Reserved
SBC is a trademark of AT&T Knowledge Ventures, L.P,
Licensed to IntelliTouch
Printed in China
This product has a one-year over the counter warranty. For any inquiries after the
warranty period, please contact IntelliTouch at (800) 400-5156. Hours are from 8:00
a.m. to 5:00 p.m. PST, Monday through Friday or visit www.sbctelephones.com.
Page 44

43
FCC Information
FCC Information
1.This equipment complies with Part 68 of the FCC rules and the requirements adopted by the ACTA. On bottom of this equipment is a label that contains,
among other information, a product identifier in the format US: 7TNW400BITC60202. If requested, this number must be provided to the telephone company.
2. An applicable certification jacks Universal Service Order Code (USOC) for the equipment is provided (i,e., RJ11C) in the packaging with each piece of approved
terminal equipment.
3. A plug and jack used to connect this equipment to the premise wiring and telephone network must comply with the applicable FCC Part 68 rules and requirements adopted by the ACTA. A compliant telephone cord and modular plug is provided with this product. It is designed to be connect to a compatible modular
jack that is also compliant. See installation instructions for details.
4. The REN is used to determine the number of devices that may be connected to telephone line. Excessive RENs on a telephone line may result in the device’s
not ringing in response to an incoming call. In most but not all areas, the sum of RENs should not exceed five (5.0). To be certain of the number of devices that
may be connected to a line, as determined by the total RENs, contact the local telephone company. [ For products approved after July 23,2001, the REN for this
product is part of the product identifier that has the format US: 7TNW400BITC60202. The digits represented by ## are the REN without a decimal point (e.g., 03
is a REN of 0.3). For earlier products, the REN is separately shown on the label.]
5. If this equipment causes harm to the telephone network, the telephone company will notify you in advance that temporary discontinuance of service may be
required. But if advance notice isn’t practical, the telephone company will notify the customer as soon as possible. Also, you will be advised of your right to file a
complaint with the FCC if you believe it is necessary.
6. The telephone company may make changes in its facilities, equipment, operations or procedures that could affect the operation of the equipment. If this happens, the telephone company will provide advance notice in order for you to make necessary modifications to maintain uninterrupted service.
7. Please follow instructions for repairing if any (e.g. battery replacement section); otherwise do not alternate or repair any parts of device except specified.
8. Connection to party line service is subject to state tariffs. Contact the state public utility commission, public service commission or corporation commission for
information.
9. Should you experience trouble with this equipment, please contact:
IntelliTouch
5160 Carroll Canyon Road
San Diego, CA 92121-1775
Customer Service: (800)296-3084 8 a.m. To 5 p.m. PST, Monday through Friday
CAUTION:
To maintain compliance with the FCC’s RF exposure guidelines, place the base unit at least 20cm from nearby persons.
Page 45

44
Index
Symbols
1.9 GHz 2, 41
A
AAA 3
Accept
22, 24, 25
access code
3, 15
acoustic
21, 27
Adjustable
3
Alarm
3, 4, 34, 35, 36, 37
antenna
3
Appointment
3, 4, 35, 36, 37
Automatic
18, 19
B
backlighting 14
base
40
batteries
40, 41
battery
2, 3, 40, 43
Blocking
38
C
Call duration 21
Caller ID
3, 4, 27, 28, 32, 33
Call Waiting
27
channels
41
CID
32
Clock
13, 34, 35, 36, 37
code
3, 13, 15, 17
conferenced
24
conferencing
24
Connection
7, 43
conversation
10, 21, 23, 24, 25, 27
cord
5, 40, 43
cordless
2, 21
D
date 13, 27, 35, 36
DECT
2
Delete
15, 20, 22, 28, 29,
32, 33, 35, 37
Deleting
32, 33, 37
Deregister
38
duration
20, 21
E
earpiece 10, 27
external
3, 15, 16, 24, 27
F
Flash 4, 16
frequency range
41
H
handset 40
Hold
3, 23
hours
2, 3, 13, 34
I
Incoming 3, 9, 10, 11
Inter-digit
16
intercom
3, 25
internal
3, 25, 26, 27
K
keypad tones 14
L
language 3, 14
LED
6
levels
3
M
melodies 3, 11, 12
Microphone
3, 6, 23
Missed
15, 33
Mode
4, 9, 11
mode
4
Modify
31, 36, 37
modulation
41
monitoring
3, 26
N
Navigation Key 6
NiCad
5
O
Options 10, 16, 22, 23, 27, 29,
30, 31, 32, 36, 37, 38
P
PABX 3, 15, 16
Paging
3, 27
pause
15, 16
phone
2, 4, 40, 41
PIN
17
power adapter
5
Prefix
15, 38
R
radio channels 2
range
21
rechargeable
3, 5
Redial
4, 22, 32, 33
Register
17, 40
Repeat
22
Reset
39
Ringer
6, 9, 10, 11, 29
ring tone
9, 11
S
sensitivity 41
signal
3, 16, 17, 19, 21
soft key
4
Soft Keys
3, 4
soft keys
4
standby
4, 8
static
40
subject
36, 37, 38, 43
T
Talk 4, 6
talk
4
talk mode
4
telephone line
5
time
2
Transfer
3
Transferring
24
V
Visual Ringer 6
VMWI
1, 33
W
wall jack 40
warning
3, 27
Index
Page 46

Page 47

 Loading...