

Page 1
47
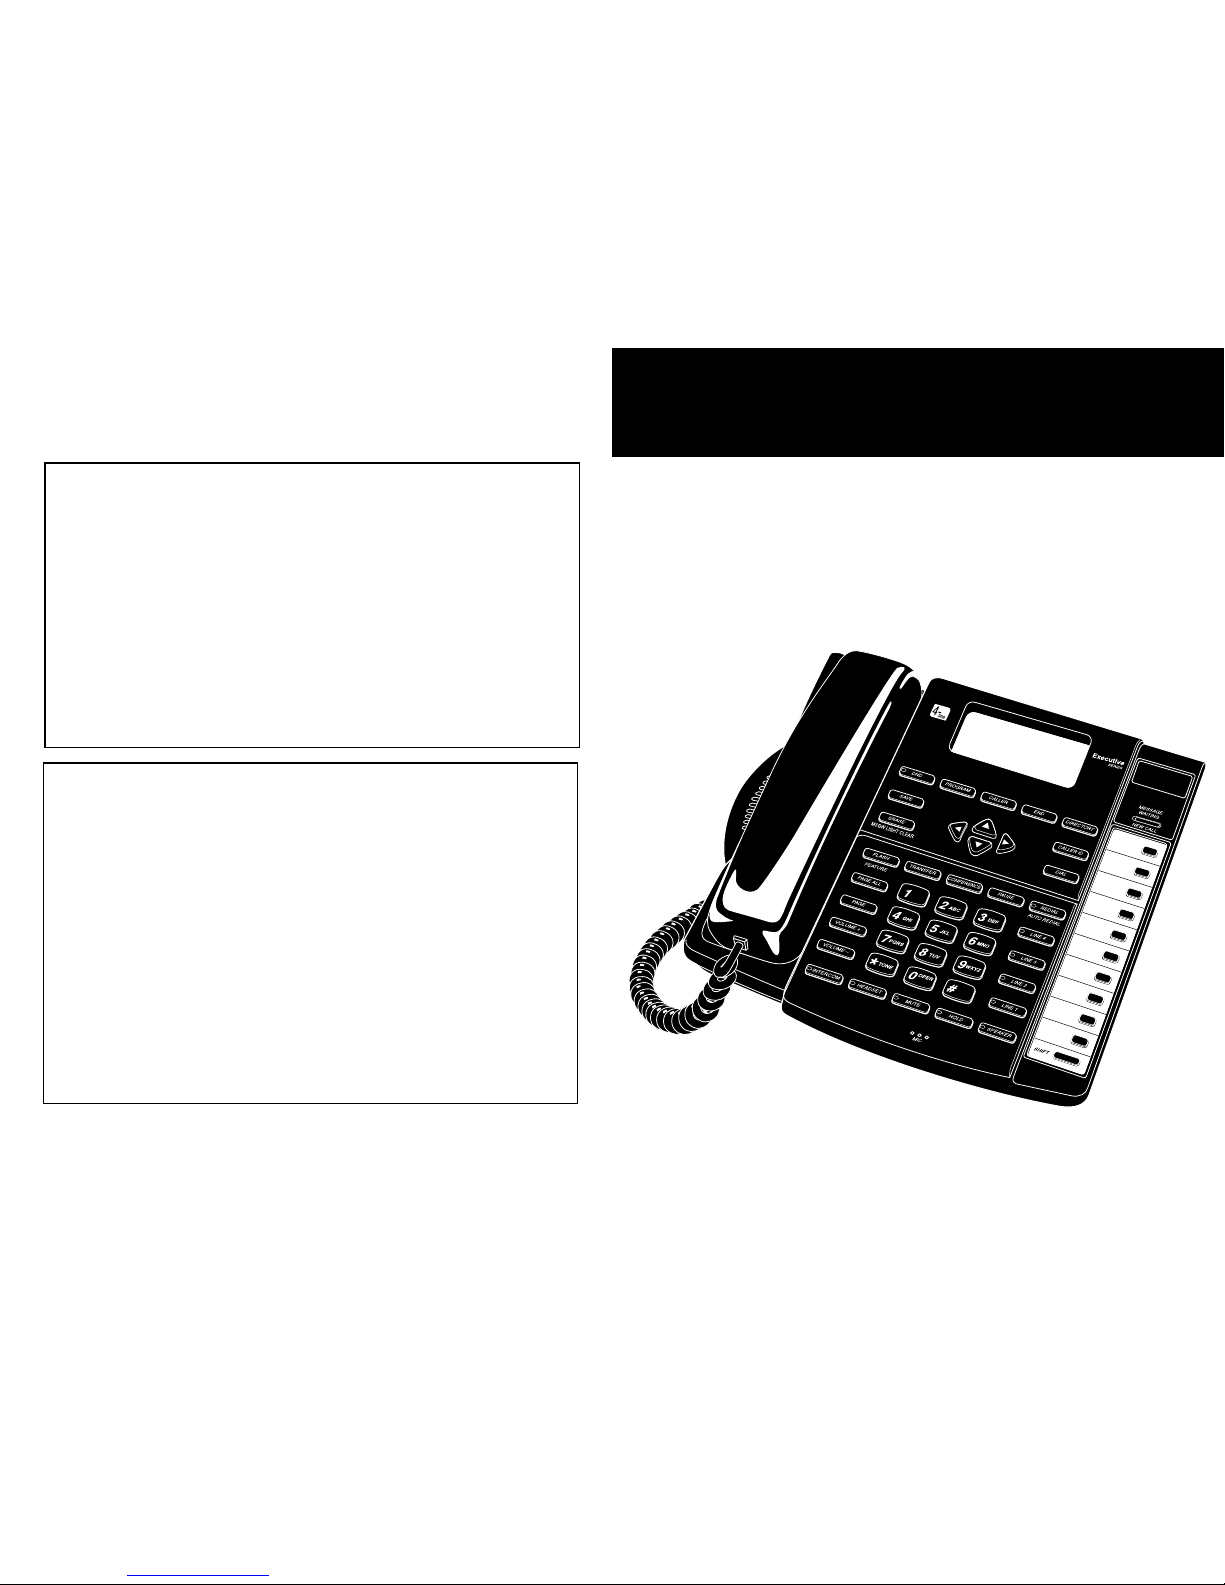
Users Manual
4-line Speakerphone with Caller ID
SBC-420
For problems with installation or operation, visit our web site at
www.sbctelephones.com or call 800-400-5156
© 2006 Intellitouch, All rights Reserved SBC is a trademark of AT&T Knowledge Ventures, L.P, Licensed to IntelliTouch
In case of difficulities, visit our service center at
www.sbctelephones.com or call 800-400-5156
© 2006 Intellitouch
All rights Reserved
SBC is a trademark of AT&T Knowledge Ventures, L.P,
Licensed to IntelliTouch
Printed in China
Page 2

1
TABLE OF CONTENTS
INITIAL SETUP
Introduction................................................ 3
Packing List ................................................. 3
Terms .......................................................... 3
420 Key Features.........................................4
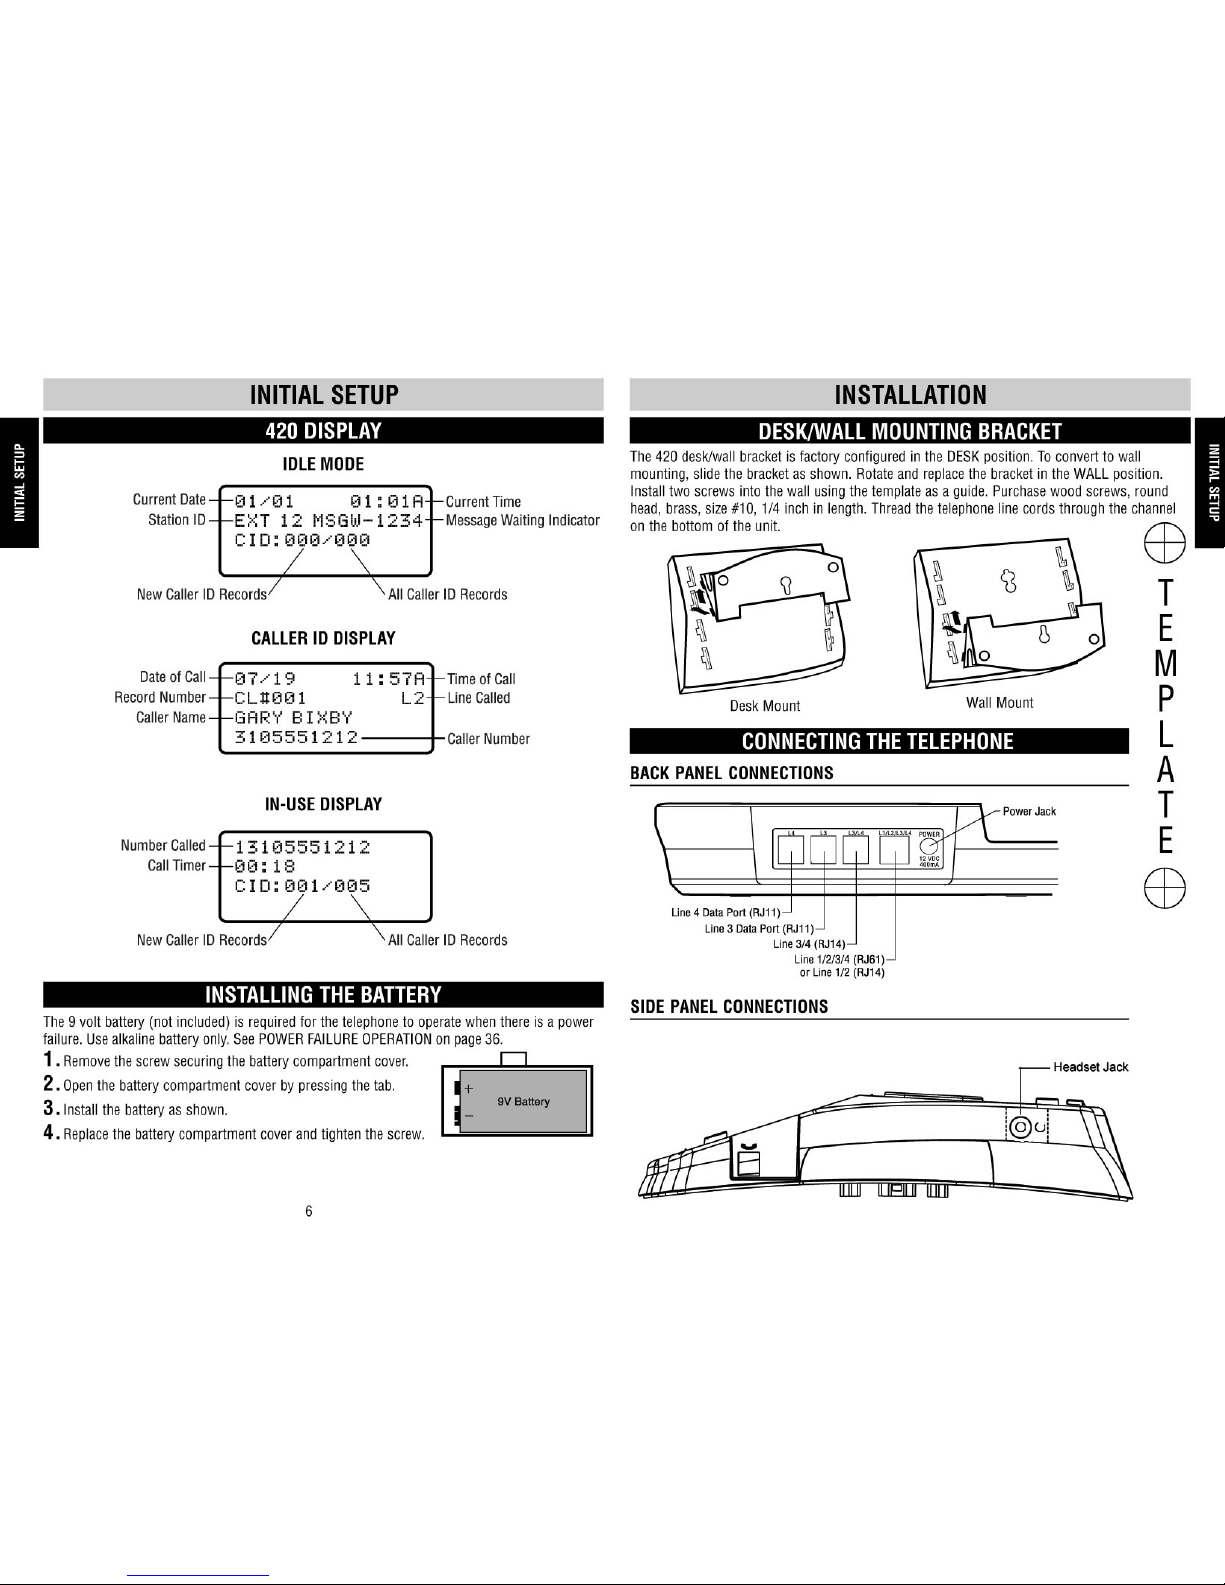
420 Display ................................................. 6
Installing the Battery ................................... 6
INSTALLATION
Desk/Wall Mounting Bracket ....................... 7
Connecting the Telephone .......................... 7
Back Panel Connections .......................... 7
Side Panel Connections ........................... 7
Two RJ14 2- Line Telephone Jacks ......... 8
One RJ61 4-Line Telephone Jack ............ 8
INITIAL PROGRAMMING
To Enter the Program Mode...................10
To Exit the Program Mode ..................... 10
Setting the Language ................................ 1 0
Setting the Time and Date ......................... 10
Setting the Extension ID ........................... 1 1
Setting Message Waiting Indicator On/Off 1 1
PROGRAMMING OPTIONS
Turning the Ringers On or Off ................... 1 2
Change the Ringer Types ..........................12
Setting the Delay Ring...............................13
Programming the Line Usage....................14
Setting the Prime Line ............................... 15
Programming Line Groups/Private Line ....16
Setting Auto-Mute ..................................... 17
Auto Intercom Answer ........................... 17
Setting Tone/Pulse Dialing ........................ 1 8
Changing the Flash Duration.....................18
Changing Hold Reminder .......................... 1 9
Programming Area Codes..........................19
Resetting the 420 ...................................... 20
TELEPHONE OPERATION
New Call/Message Waiting Indicator.........21
Voice Mail..................................................21
Turning the Message Waiting Indicator
Off .......................................................... 21
Line Status Indicators ............................... 22
Volume Control ......................................... 22
Off-Hook Volume ................................... 22
Ringer Volume ....................................... 22
Making Telephone Calls............................. 2 3
Prime Line .................................................23
Receiving Telephone Calls......................... 2 3
Receiving Call Waiting Calls ...................... 23
Transferring Calls ...................................... 24
To Transfer a Call ................................... 24
Answer a Transferred Call....................... 24
Hold...........................................................24
To Place a Call on Hold .......................... 24
To Release a Call on Hold....................... 24
Mute.......................................................... 25
To Mute a Call ........................................ 25
To Release Mute .................................... 25
Flash/Feature............................................. 25
Redial/Last Number Redial........................ 25
Auto Redial................................................ 2 5
3-Way Call Conferencing ........................... 26
Tone/Pulse Mixed Dialing .......................... 2 6
DND - Do Not Disturb ................................ 26
To Activate DND..................................... 26
To Deactivate DND................................. 26
Call Privacy - Extension Conferencing ....... 27
To Deactivate Call Privacy ...................... 27
To Restore Call Privacy .......................... 27
Paging and Intercom................................. 27
Paging All Extensions ................................ 2 7
Answering a System Wide Page ................27
Paging a Single Extension......................... 2 8
Answering a Single Extension Page ..........28
Auto-Mute Off at Receiving Extension... 28
Auto-Mute On at Receiveing Extension . 28
Page 3

2 3
INITIAL SETUP
CID – Caller Identification or Caller ID.
EXTENSION – An individual 420 telephone having a unique extension number.
IDLE MODE – Extension not is use.
OFF-HOOK - Going “off-hook” refers to lifting the handset, activating the speakerphone or
pressing the headset button for the purpose of making or answering a call. When the phone is
successfully taken off-hook, a telephone line will be “seized” in which either an incoming call is
answered or a dial tone heard.
VMI – Visual Message Indication.
POT – “Plain old telephone” refers, in so far as this manual is concerned, to a non 420 type
telephone. A POT can be connected to any line shared by a 420 system, but cannot utilize the
420 system features such as intercom, paging or call transfer.
SYSTEM – Up to twelve 420 telephones connected with a common line 1, each having a unique
extension number between 11 and 22.
INTRODUCTION
Congratulations! You have purchased the 420, a versatile fully featured 4 line telephone. The
420 is designed to work as a
system phone
when used with additional 420 telephones. As a
system, the 420 supports advanced telephone features such as intercom, paging and call
transfer. Up to twelve 420s can be connected as a system.
Plan your system before you install the telephones, remembering the following requirements:
TERMS
INITIAL SETUP
TELEPHONE OPERATION
Room Monitor ........................................... 28
Making an Intercom Call............................ 29
Answering an Intercom Call....................... 29
Making an Intercom Conference Call......... 29
CALLER ID
Caller ID.....................................................30
The Caller ID Display ................................. 30
Viewing Caller ID Information.................... 30
Viewing Caller ID Information of an
Incoming Call ..................................... 30
Viewing Caller ID Information of
Simultaneous Incoming Calls ............30
Call Waiting Caller ID ................................. 30
Stored Caller ID Records ........................... 31
Viewing Stored Caller ID Records ..........31
Information Other than the Caller’s Name
and Number may be Displayed........... 31
Dialing Using Caller ID Records................. 31
Deleting Caller ID Records......................... 32
Deleting an Individual Caller ID Record .32
Deleting All Caller ID Records ................32
DIRECTORY
Directory.................................................... 32
Creating a New Directory Entry.................. 32
Transferring a Caller ID Record to the
Directory ................................................ 33
Locating a Directory Record...................... 33
To Scroll through the Alphabetical List of
Directory Records .............................. 33
Locating a Directory Record
(by Jumping)...................................... 33
Dialing a Directory Number ....................... 33
Deleting Directory Records ....................... 3 4
Deleting an Individual Directory Record 3 4
Deleting All Directory Records ............... 34
Transferring a Number from LNR (Last
Number Redial) to the Directory ............ 34
TABLE OF CONTENTS
Please take a moment to locate and identify the components shipped with your Telephone.
Enclosed within the packaging:
■ Executive Telephone Set
■ Handset
■ Handset Cord
■ AC Adapter
■ 2 Telephone Line Cords (long)
■ 1 Line Cord (short)
■ Owner’s Guide
■ The 420 telephones communicate over
the wire on line 1. Line 1 must be
common to all 420 telephones for the
system features to operate.
■ The total length of telephone wiring
connected to line 1 should not exceed
600 feet.
■ Each 420 in the system must be assigned
a unique EXTENSION NUMBER. Valid
numbers are from 11 – 22.
■ If multiple extensions will be installed,
install and program the extension
numbers one at a time.
The 420 is designed to support telephone company features, including CENTREX. Caller ID and
Call Waiting Caller ID and other telephone company features require subscription to these
services.
NOTES:
■ You must subscribe to the combined service of Call Waiting and Call Waiting Caller ID to use the Call Waiting
Caller ID feature. Check with your local telephone company for service availability.
■ DSL service on line 1 or 2 may interfere with system communications. Use line 3 or 4 for DSL.
PACKING LIST
■ 3 Feature Key Index Cards;
1 installed, 2 spares
■ Desk/Wall Mount Bracket
Programming the Feature Keys ................. 35
Dialing Using the Feature Keys .............. 35
Transferring a Number from LNR (Last
Number Redial) to a Feature Key............ 36
Using a Headset ........................................36
Power Failure Operation ............................36
Battery Low Indication .............................. 3 6
Troubleshooting........................................ 37
Programming Tree..................................... 39
FCC Requirements ..................................... 45
ADDITIONAL FEATURES
Page 4
4 5
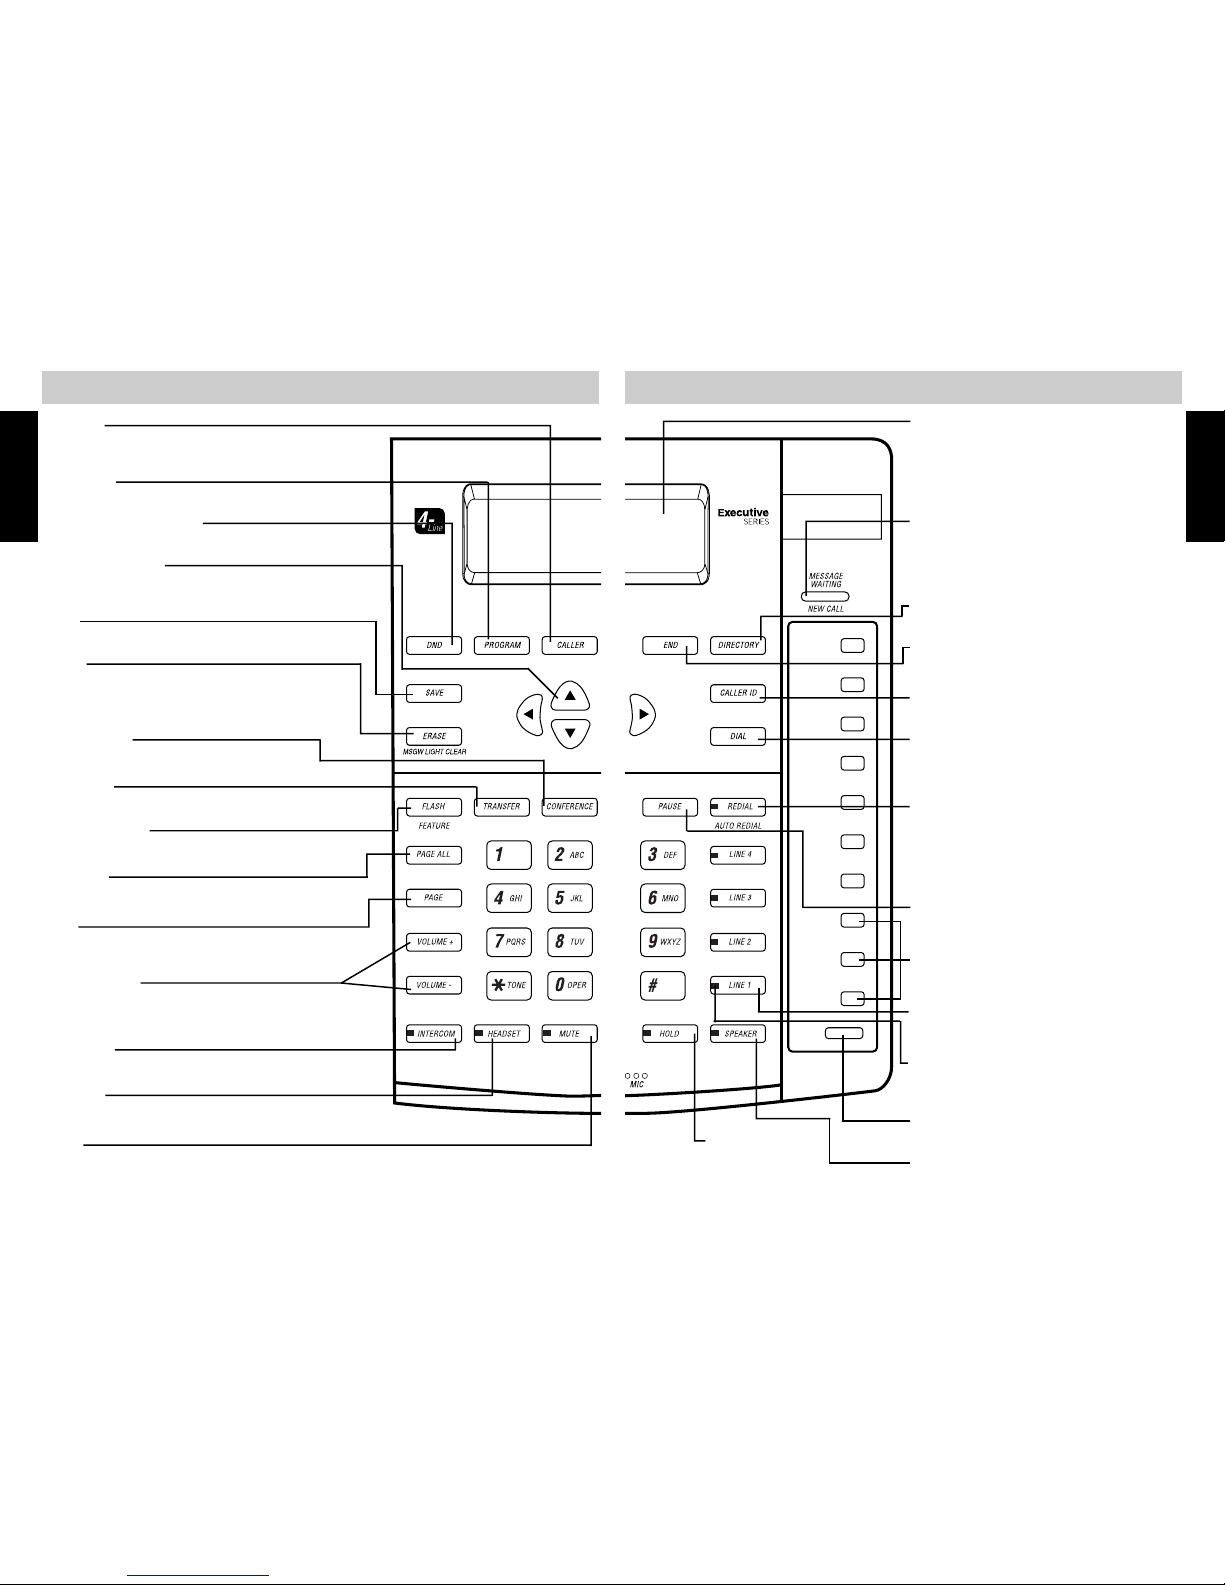
420 KEY FEATURES420 KEY FEATURES
INITIAL SETUP
INITIAL SETUP
VOLUME KEYS
Adjust the handset, headset, speakerphone or ringer
volume levels, page 22.
REDIAL/LAST NUMBER REDIAL
Automatically dials the last number called,
page 25.
AUTO REDIAL
Automatically dials the last number called up
to 10 times at 30 second intervals, page 25.
CALLER
Used to view Caller ID information when more than
one line is ringing.
CALLER ID
Accesses the CALLER ID database, page 31.
CONFERENCE
Initiates 3-Way conference calls, page 26.
NAVIGATION KEYS
Used to navigate CALLER ID records, DIRECTORY
records and Programming options.
DIRECTORY
Accesses the DIRECTORY database, page 32.
DIAL
Used to dial CALLER ID and DIRECTORY
numbers, pages 31-33.
DND - DO NOT DISTURB
Silences the call and intercom ringers, page 26.
END
Used to exit a mode.
ERASE
Used to erase Caller ID or Directory records.
MSGW LIGHT CLEAR
Used to clear MESSAGE WAITING indicator.
FLASH/FEATURE
Used to access telephone company features, page 25.
HEADSET
Answer or make calls without lifting the handset, page 36.
HOLD
Places or releases
a call on hold,
page 24.
INTERCOM
Call other 420 stations without using an outside line.
LCD (BACKLIT)
Large multi-function Liquid Crystal
Display indicates telephone status and
displays CALLER ID and DIRECTORY
records, page 6.
LINE SELECT KEYS
Allows manual selection of lines 1, 2, 3 or 4,
page 23.
2-COLOR LINE STATUS INDICATORS
Shows status of telephone lines at a glance,
page 22.
MUTE
Turns off the 420 microphone. The receiver stays on
and calling party can still be heard, page 25.
NEW CALL/MESSAGE WAITING
INDICATOR
Indicates new Caller ID data or new
telephone company voice mail, page 21.
PAUSE
Allows a pause to be inserted in a dialing
sequence, page 32.
PAGE
Page individual 420 stations, page 28.
PAGE ALL
Page all 420 stations simultaneously, page 27.
PROGRAM
Used to enter the program mode, page 10.
TRANSFER
Calls can be transferred from one 420 extension to another.
SPEAKER(PHONE)
Answer or make calls hands free, page 23.
SAVE
Used to program or change settings.
FEATURE KEYS
Store multi-function autodial numbers, page 35.
SHIFT
Programs and dials Feature Keys, page 35.
Page 5
7
Page 6
8 9
INSTALLATION
INITIAL SETUP
INITIAL SETUP
INSTALLATION
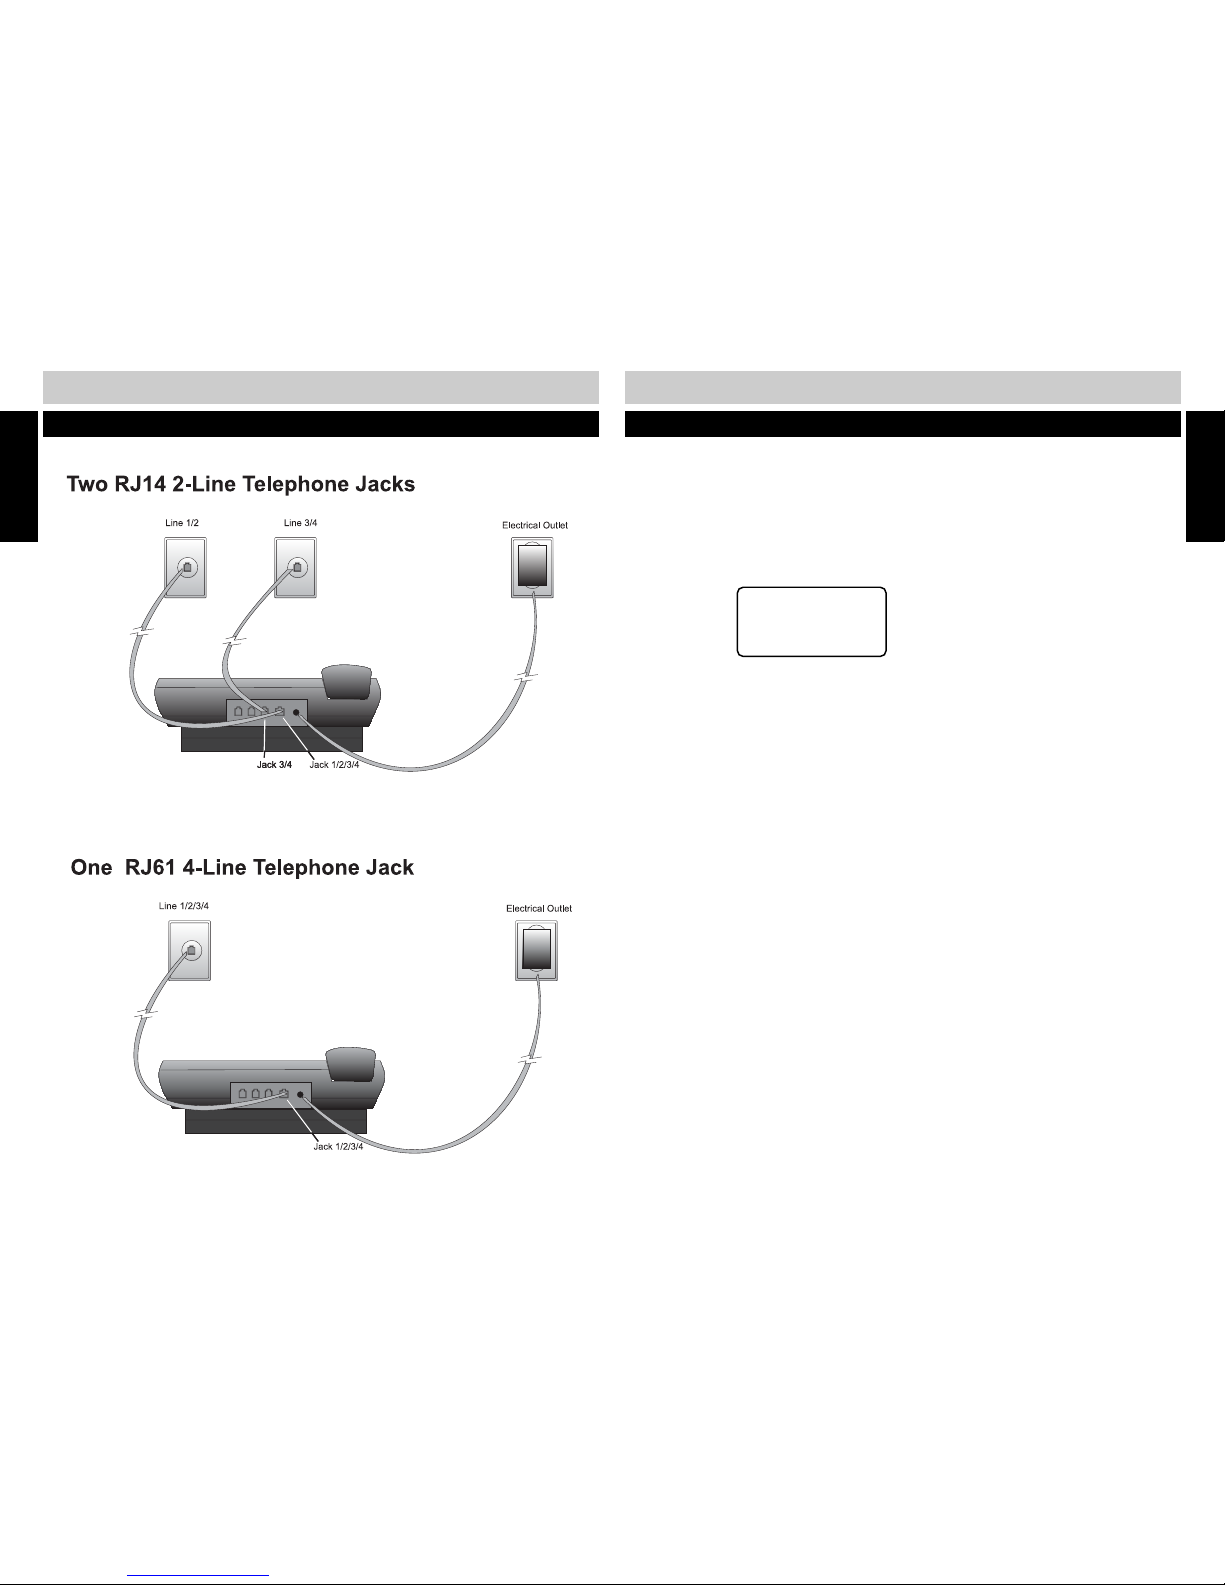
1.Connect the 420 to the telephone wall jacks as shown in the illustrations below.
CONNECTING THE TELEPHONE (cont.)
2. Connect the handset cord.
3. Connect the power adapter. Make sure that the outlet into which you plug the AC adapter is
not controlled by a wall switch.
4. When power is connected, the display will indicate initialization. This process will take about
8 seconds.
5. The initial display will appear. The default extension ID is 22.
CONNECTING THE TELEPHONE (cont.)
01/01 01:01A
EXT 22
CID: 000/000
NOTE:
■ If you are using a single cable to connect all 4 lines, you must use a USOC RJ-61 cable. DO NOT USE a
RJ-45 (568Bg data) cable.
NOTE:
■ First connect the Line 1/2 RJ14 cable (included) to the Line 1/2/3/4 RJ61 jack on the back panel of the 420.
Then connect the Line 3/4 RJ14 cable (included) to the Line 3/4 RJ14 jack.
NOTE:
■ Connect the Line 1/2/3/4 RJ61 cable (not included) to the Line 1/2/3/4 RJ61 jack on the back panel of the
420.
Page 7
10 11
INITIAL PROGRAMMINGINITIAL PROGRAMMING
SETTING THE TIME AND DATE (cont.)
TO ENTER THE PROGRAM MODE
You are now ready to begin configuring the extension using the PROGRAM mode. Press
PROGRAM to enter .
TO EXIT THE PROGRAM MODE
Press END to exit the PROGRAM mode. Going off-hook will also exit the PROGRAM mode. The
PROGRAM mode will also automatically exit after 20 seconds of inactivity.
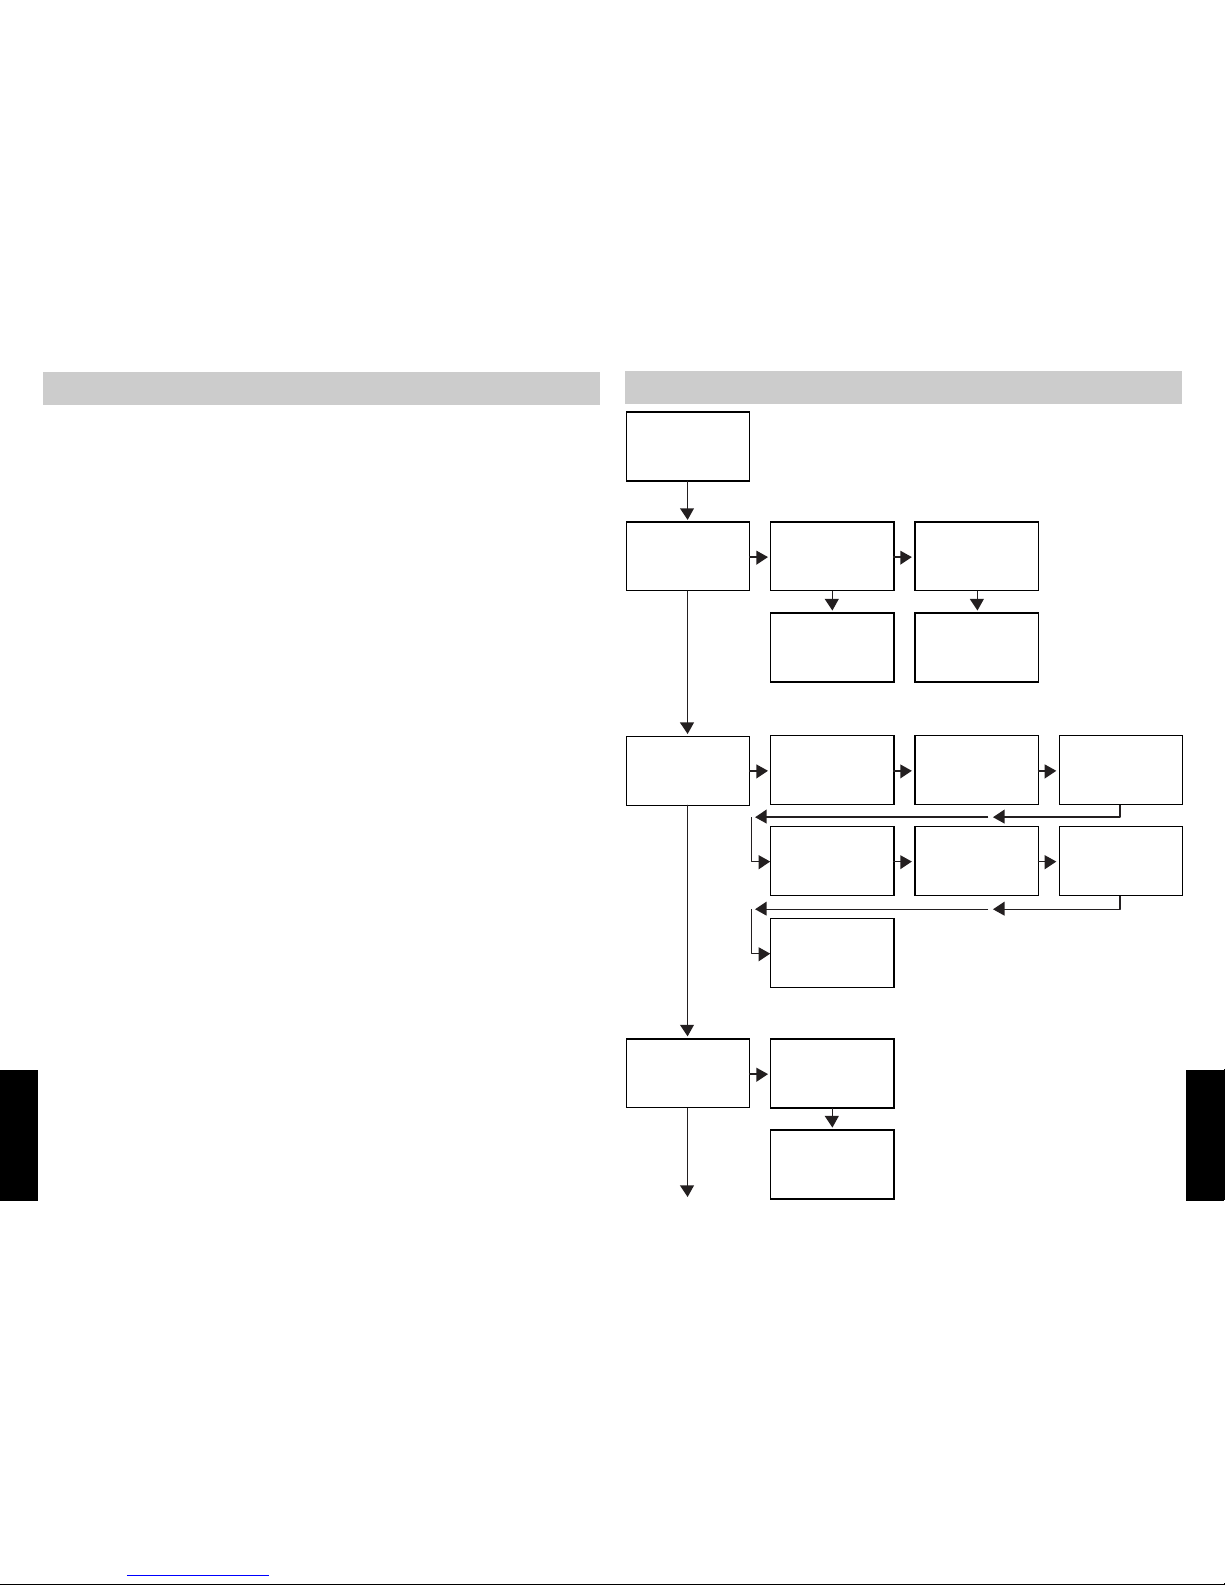
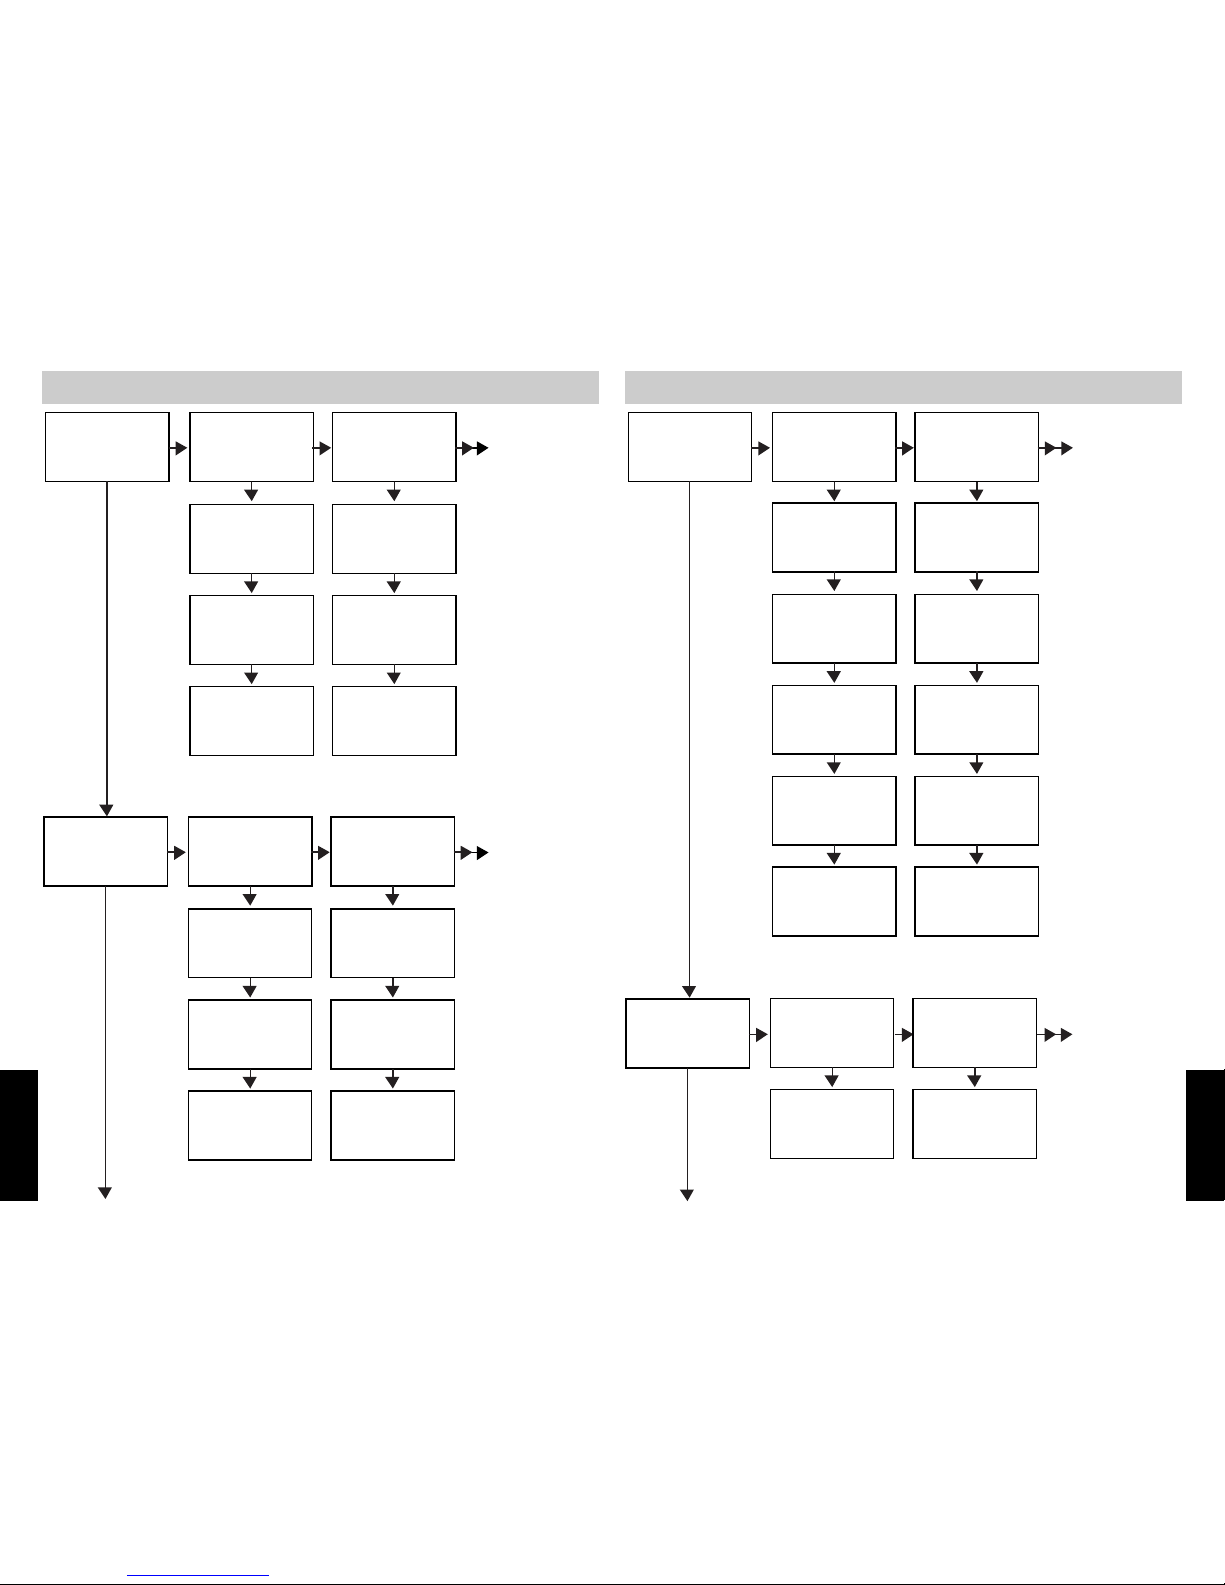
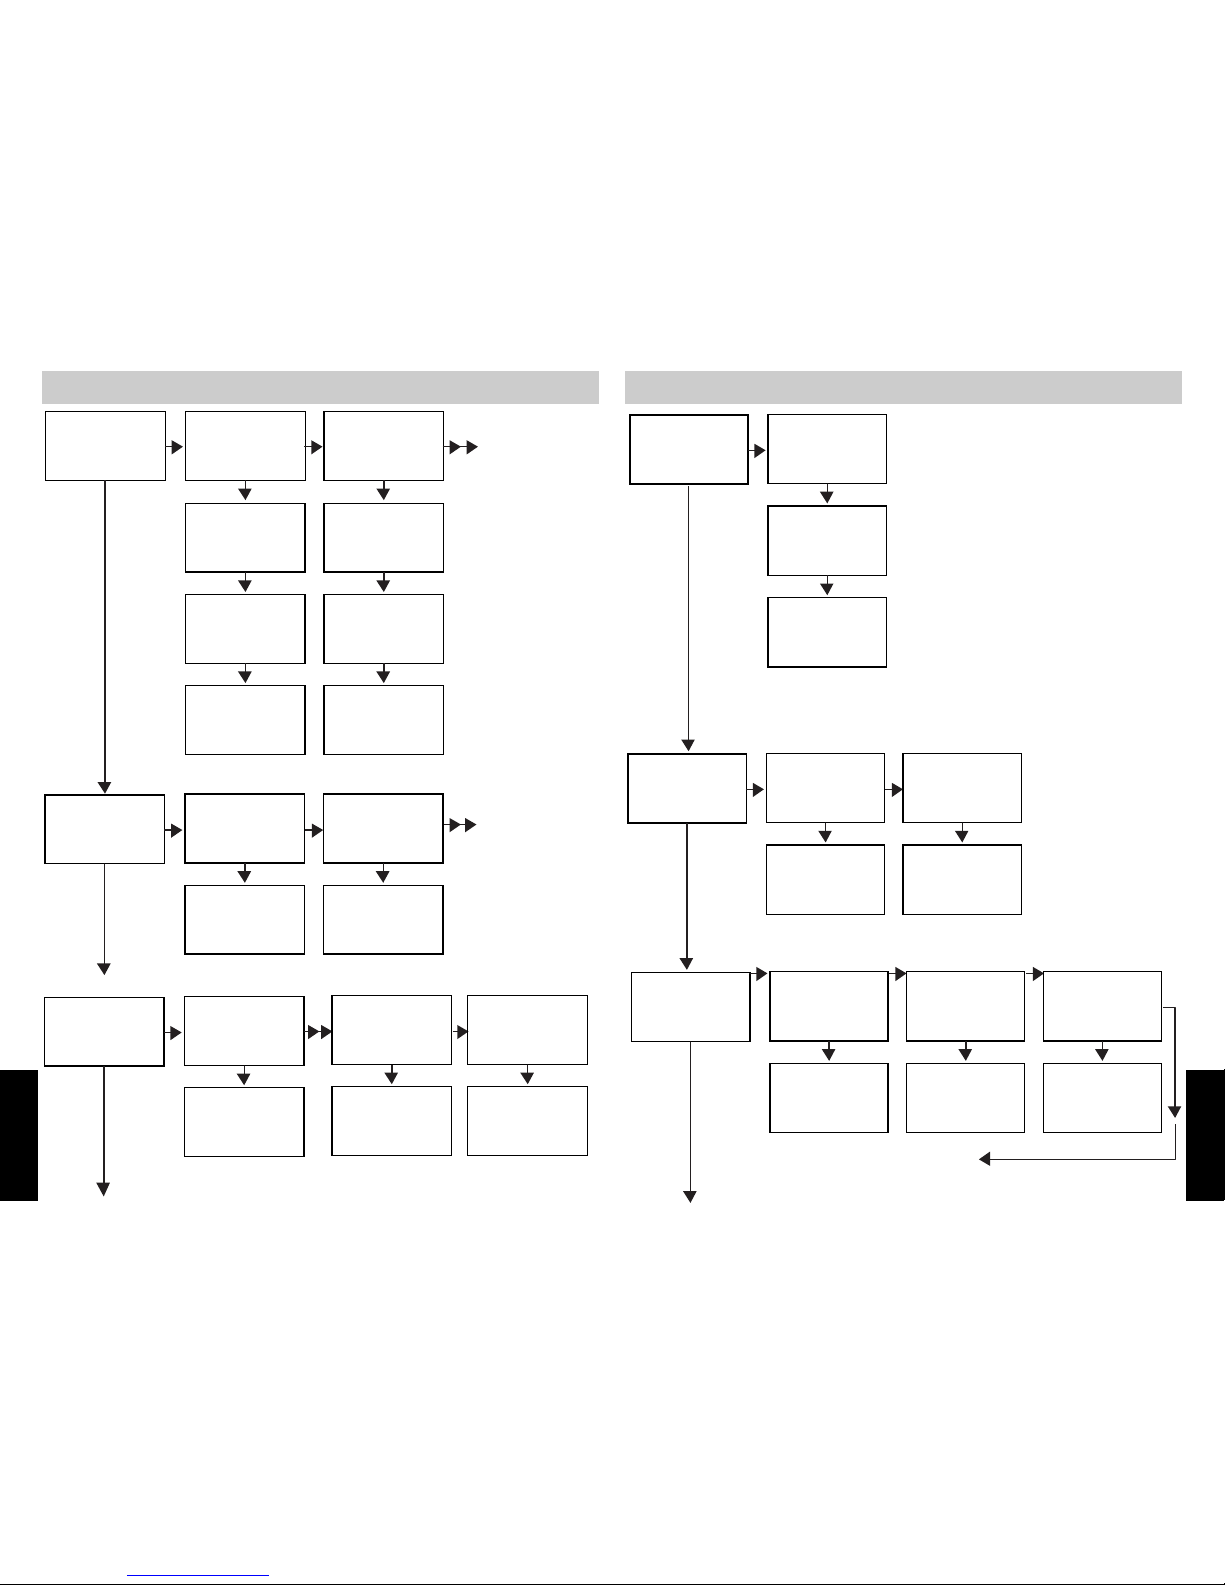
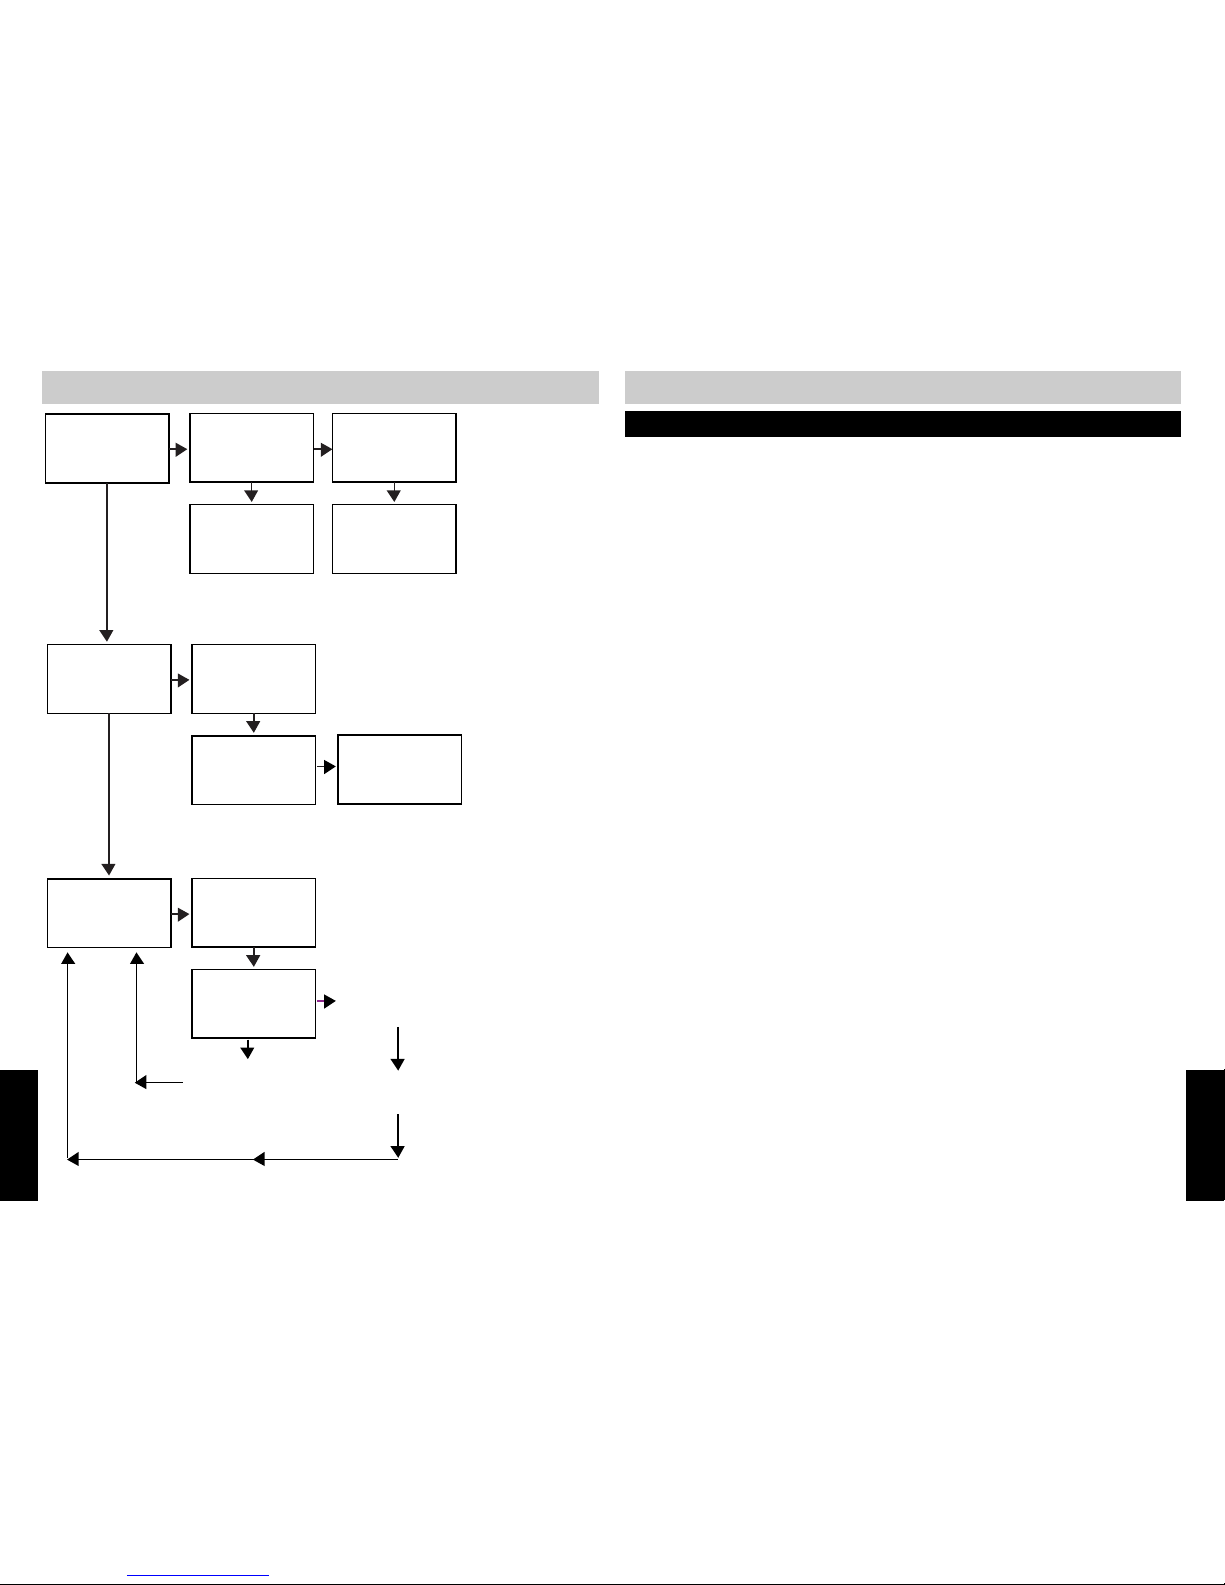
The PROGRAM options are structured like a tree (see Programming Tree page 39). The ▲▼keys
are used to navigate options. The programming tree is a loop that returns to the first option as
you navigate up or down.
The default language is English.
1.Press PROGRAM .
SETTING THE LANGUAGE
2.Press the ▼ button once.
PROGRAM
▲▼:select
LANGUAGE
▲▼: select
: enter
▲
4.Use the ▲▼ buttons to select the desired
language.
5.Press SAVE when done.
3.Press the button to enter.
3.Use the ▲▼ buttons to select the correct MONTH.
4.Press SAVE to accept your setting and to advance to the DATE.
5.Use the ▲▼ buttons to select the correct date.
6.Press SAVE to accept your settings and advance to the HOUR.
7.Use the ▲▼ buttons to select the correct hour.
8.Press SAVE to accept your settings and advance to the MINUTES.
9.Use the ▲▼ buttons to select the correct minutes.
10.Press SAVE to accept your settings and advance to AM/PM.
11.Use the ▲▼ buttons to select AM or PM.
12.Press SAVE to accept your settings and advance to DAY OF WEEK.
13.Use the ▲▼ buttons to select the correct day.
14.Press SAVE to accept your settings.
LANGUAGE
= English
▲▼: select
SAVE?
LANGUAGE
= English
Programmed!
SETTING THE TIME AND DATE
1.While in the PROGRAM mode, press the ▼ button until the following screen appears:
TIME/DATE
▲▼: select
: enter
▲
MONTH
01/01 1:00A
▲▼: select
SAVE?
2.Press the button to enter.
DAY OF WEEK
= Sunday
Programmed!
SETTING THE EXTENSION ID
1.While in the PROGRAM mode, press the
▼ button until the following screen
appears:
EXTENSION NO
▲▼: select
: enter
▲
3.Use the ▲▼ buttons to select an
extension between 11 and 22.
2.Press the button to enter.
EXTENSION NO
=22
▲▼: select
SAVE?
4.Press SAVE to accept your choice.
5.Initial programming is now complete. You
can press the PROGRAM button to exit the
PROGRAM mode and begin using the 420
with the factory default settings (see
TELEPHONE OPERATION on pages 21-29)
or you can program additional options.
NOTE:
■ If more than one extension in a system is
assigned the same ID number, the phone will beep
continuously. Press PROGRAM to reassign a
unique ID number.
EXTENSION
= 11
Programmed!
PROGRAMMING
PROGRAMMING
TURNING MESSAGE INDICATOR LIGHT OFF
The light and display indication can be turned OFF in the PROGRAM MODE. See page 21. Please note trhe MSGW
feature cannot be turned-off-this feature £simply turns the light off until you receive a new message.
Page 8
12 13
1.While in the PROGRAM mode, press the
▼ button until the following screen
appears:
PROGRAMMING OPTIONSPROGRAMMING OPTIONS
RINGER ON/OFF
▲▼: select
: enter
▲
L1 RINGER ON/OFF
= On
▲▼: select
SAVE?
L1 RINGER ON/OFF
= Off
Programmed!
The ringer for each of the 4 lines can be turned ON or OFF. The default setting is ON.
2.Press the button to enter.
L1 RINGER ON/OFF
▲▼: select
: enter
▲
3.Use the ▲▼ buttons to select the desired
ringer, 1-4.
4.Press the button to enter.
5.Use the ▲▼ buttons to change the
setting to OFF.
L1 RINGER ON/OFF
= Off
▲▼: select
SAVE?
6.Press SAVE to accept the setting.
7.Repeat for the other lines, or select ALL
RINGER ON/OFF to determine setting for
all 4 lines.
There are 4 ringer tones, or types, that can be selected. The default is 1. Changing the ringer
types by line is useful if you want to distinguish which line is ringing audibly without having to
see the LINE indicators on the telephone itself.
CHANGE THE RINGER TYPES
1.While in the PROGRAM mode, press the
▼ button until the following screen
appears:
RINGER TYPE
▲▼: select
: enter
▲
L1 RINGER TYPE
▲▼: select
: enter
▲
2.Press the button to enter.
3.Use the ▲▼ buttons to select the desired
line, 1-4.
CHANGE THE RINGER TYPES (cont.)
L1 RINGER TYPE
= Type 1
▲▼: select
SAVE?
4.Press the button to enter.
▲
5.Use the ▲▼ buttons to select the ringer
type. As you scroll through the types, a
sample of the actual ringer will be heard.
L1 RINGER TYPE
= Type 2
Programmed!
L1 RINGER TYPE
= Type 2
▲▼: select
SAVE?
6.Press SAVE to accept the setting.
7.Repeat for the other lines.
SETTING THE DELAY RING
The DELAY RING is useful in installations where all 4 lines are common (square) and a
receptionist is answering all calls. Each extension would activate the DELAY RING for the
desired period of time except for the receptionist.
Incoming calls would ring at the receptionist extension ONLY for the DELAY RING time. If the
receptionist doesn’t answer, after that time other extensions would begin to ring. By varying the
delay ring time, a hierarchy of back-up for the receptionist can be defined.
Most ring cycles are 6 seconds per ring. So to delay for two rings, program 12 seconds. For
three rings, program 18 seconds, and so on. Programming is in two second increments. The
default is DELAY RING OFF.
NOTE TO VOICE MAIL SUBSCRIBERS:
■ If you set the DELAY RING for LONGER than the number of rings that the voice mail waits before answering,
the phone will never ring.
DELAY RING
▲▼: select
: enter
▲
1.While in the PROGRAM mode, press the
▼ button until the following screen
appears:
2.Use the ▲▼ buttons to change the
desired ring delay.
DELAY RING
= 12 sec
▲▼: select
SAVE?
3.Press SAVE to accept the setting.
PROGRAMMING
PROGRAMMING
TURNING THE RINGERS ON OR OFF
Page 9
14 15
1.While in the PROGRAM mode, press the
▼ button until the following screen
appears:
PROGRAMMING OPTIONSPROGRAMMING OPTIONS
LINE USAGE
▲▼: select
: enter
▲
L4 USAGE
= On
▲▼: select
SAVE?
L4 USAGE
= Off
Programmed!
L1 USAGE
▲▼: select
: enter
▲
Lines that are not used (connected) to the 420 must be turned OFF. If lines are added later they
can be turned ON.
For system feature operations like call transfer, paging and intercom, line one must be
connected and common to all 420 extensions in the system.
NOTE:
■ If a line is NOT connected to the 420 and the LINE USAGE is NOT turned OFF, the LINE IN USE INDICATOR
will flash.
PROGRAMMING THE LINE USAGE
2.Press the button to enter.
3.Use the ▲▼ buttons to select the desired
line, 1-4.
4.Press the button to enter.
5.Use the ▲▼ buttons to turn the line on or
off.
L4 USAGE
= Off
▲▼: select
SAVE?
6.Press SAVE to accept the setting.
7.The LINE IN USE INDICATOR for the line
will stop flashing and will not relight until
the LINE USAGE is turned back on. Repeat
for the other lines.
The PRIME LINE is the line that the 420 attempts to use when going off-hook when the phone
is not ringing. Line 1 is the default.
If the phone is ringing and you go off-hook, the 420 will answer the ringing line. If more than
one line is ringing, the 420 will answer the line that was ringing first.
SETTING THE PRIME LINE
1.While in the PROGRAM mode, press the
▼ button until the following screen
appears:
PRIME LINE
▲▼: select
: enter
▲
PRIME LINE
= L1
▲▼: select
SAVE?
3.Use the ▲▼ buttons to select the desired
PRIME LINE.
2.Press the button to enter.
PRIME LINE
= L2
▲▼: select
SAVE?
4.Press SAVE to accept the setting.
PRIME LINE
= L2
Programmed!
PROGRAMMING
PROGRAMMING
Page 10
16 17
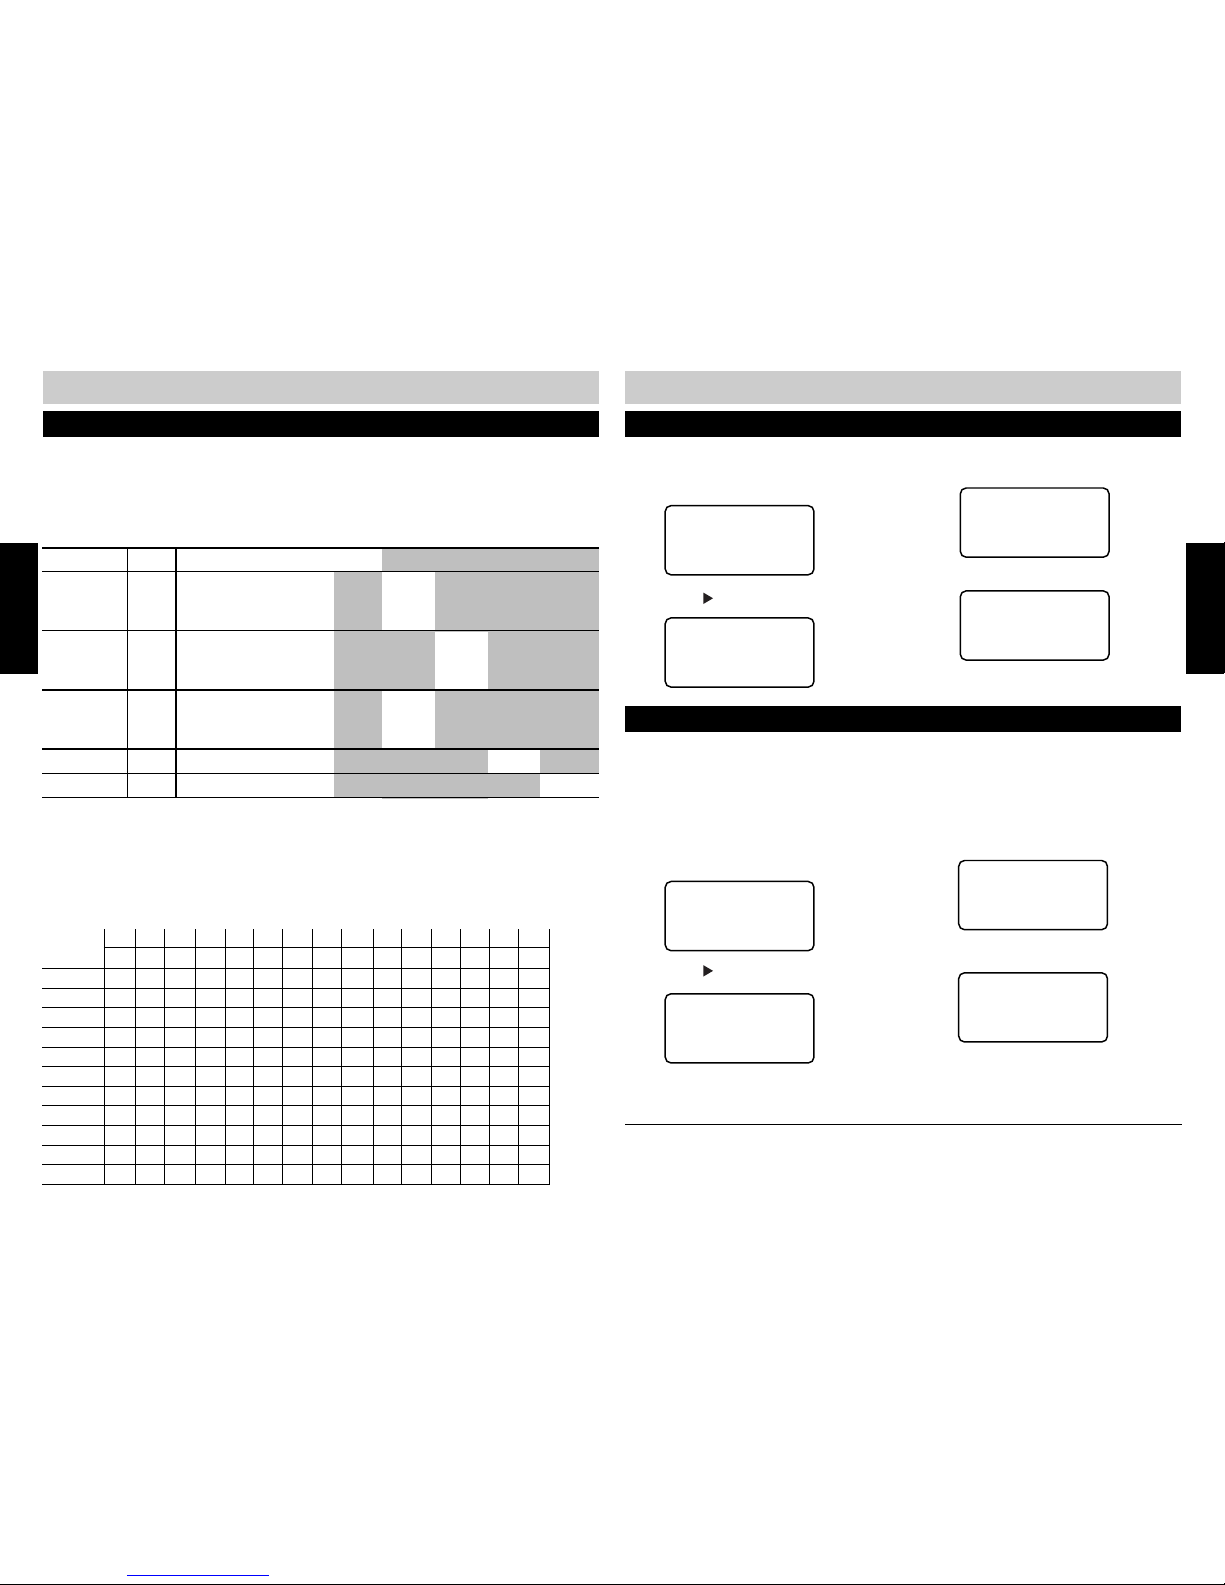
The 420 system can support up to 12 extensions and 15 lines. This is possible by using line 4
for line groups. This allows additional lines to be shared by extensions. The 420 must be
programmed for line groups for the system functions to operate properly. The chart below
describes a typical line group application using eight lines.
PROGRAMMING OPTIONSPROGRAMMING OPTIONS
PROGRAMMING LINE GROUPS / PRIVATE LINE
L1 L2 L3 L4 L5 L6 L7 L8 L9 L10 L11 L12 L13 L14 L15
EXT 11 ●●●PRV
EXT 12 ●●● PRV
EXT 13 ●●● PRV
EXT 14 ●●● PRV
EXT 15 ●●● PRV
EXT 16 ●●● PRV
EXT 17 ●●● PRV
EXT 18 ●●● PRV
EXT 19 ●●● PRV
EXT 20 ●●● PRV
EXT 21 ●●● PRV
EXT 22 ●●● PRV
Calls can only be transferred between extensions sharing the same line group. Line 7 and 8 are
private and calls cannot be transferred to any other extension.
Departmen t Line 1 Line 2 Line 3 Line 4 Line 5 Line 6 Line 7 Line 8
Reception EXT 11 ●●●●
Sales EXT 12 ●●● ●
EXT 13 ●●● ●
EXT 14 ●●● ●
Credit EXT 15 ●●● ●
EXT 16 ●●● ●
EXT 17 ●●● ●
Warehouse EXT 18 ●●● ●
EXT 19 ●●● ●
EXT 20 ●●● ●
Vice President EXT 21 ●●● PRV
President EXT 22 ●●● PRV
PROGRAMMING LINE GROUPS / PRIVATE LINE (cont.)
1.While in the PROGRAM mode, press the
▼ button until the following screen
appears:
LINE GROUP
▲▼: select
: enter
▲
LINE GROUP
= L04
▲▼: select
SAVE?
2.Press the button to enter.
3.Use the ▲▼ buttons to change the LINE
GROUP.
LINE GROUP
= L05
▲▼: select
SAVE?
LINE GROUP
= L05
Programmed!
4.Press SAVE to accept the setting.
SETTING AUTO-MUTE
When set to ON, the auto-mute feature automatically mutes the microphone of an extension
receiving a paging call. Setting this feature to OFF allows the paging party to immediately hear
the paged extension. This setting is useful as a ROOM MONITOR and for automatic hands free
communication. See PAGING A SINGLE EXTENSION on page 28.
1.While in the PROGRAM mode, press the
▼ button until the following screen
appears:
AUTO-MUTE
▲▼: select
: enter
▲
AUTO-MUTE
= On
▲▼: select
SAVE?
2.Press the button to enter.
3.Use the ▲▼ buttons to change the
setting.
AUTO-MUTE
= Off
▲▼: select
SAVE?
AUTO-MATE
= Off
Programmed!
4.Press SAVE to accept the setting.
PROGRAMMING
PROGRAMMING
● = Line Connected PRV = Private Line
The chart below describes a system where all extensions have a private 4
th
line.
AUTO INTERCOM ANSWER
If auto-mute of one extension is set to OFF and it receives a page from another extension, the
page call becomes an automatically answered intercom call.
Page 11
18 19
The default FLASH is set to .6 seconds. This is suitable for most US telephone companies. Older
PBX’s and international telephone companies might require different timing. If PBX or flash
features are not working properly, contact the telephone company or PBX manufacturer to
obtain the correct FLASH TIME.
FLASH TIME can be set from .1 seconds to 1.2 seconds in .1 second increments.
PROGRAMMING OPTIONSPROGRAMMING OPTIONS
HOLD REMINDER
▲▼: select
: enter
▲
HOLD REMINDER
= On
▲▼: select
SAVE?
HOLD REMINDER
= Off
▲▼: select
SAVE?
HOLD REMINDER
= Off
Programmed!
SETTING TONE/PULSE DIALING
The factory default dialing mode is TONE. If your telephone company requires PULSE dialing,
change this setting. If you use pulse dialing it is still possible to access tone services like bank
by phone, etc. See TONE/PULSE MIXED DIALING on page 26.
1.While in the PROGRAM mode, press the
▼ button until the following screen
appears:
TONE/PULSE
▲▼: select
: enter
▲
TONE/PULSE
= Tone
▲▼: select
SAVE?
2.Press the button to enter.
3.Use the ▲▼ buttons to change the
setting.
TONE/PULSE
= Pulse
▲▼: select
SAVE?
TONE/PULSE
= Pulse
Programmed!
4.Press SAVE to accept the setting.
CHANGING THE FLASH DURATION
1.While in the PROGRAM mode, press the
▼ button until the following screen
appears:
FLASH TIME
▲▼: select
: enter
▲
FLASH TIME
= 0.6 sec
▲▼: select
SAVE?
2.Press the button to enter.
FLASH TIME
= 0.8 sec
▲▼: select
SAVE?
FLASH TIME
= 0.8 sec
Programmed!
3.Use the ▲▼ buttons to change the
setting.
4.Press SAVE to accept the setting.
CHANGING HOLD REMINDER
The 420 can be set to sound an alert tone when a call has been left on hold for more than 3
minutes. The default setting is HOLD REMINDER = ON.
1.While in the PROGRAM mode, press the
▼ button until the following screen
appears:
3.Use the ▲▼ buttons to change the
setting.
4.Press SAVE to accept the setting.
PROGRAMMING AREA CODES
The 420 can be programmed with six area codes: 1 “HOME” and 5 “LOCAL”. The 420 will use
these area codes to determine how to dial Caller ID numbers. LOCAL and HOME area codes will
not be dialed when calling a number stored in a Caller ID record.
When numbers are transferred from the Caller ID database to the DIRECTORY (see
TRANSFERING A CALLER ID RECORD TO THE DIRECTORY on page 33) local and home area
codes will NOT be transferred to allow correct dialing.
If you must dial your home area code when dialing locally, program “000” as your home area
code.
AREA CODES
▲▼: select
: enter
▲
HAC
= (empty)
▲▼: select
: enter
▲
HAC
= 310
(Enter Digits)
SAVE?
HAC
= 310
Programmed!
2.Press the button to enter.
2.Press the button to enter.
1.While in the PROGRAM mode, press the
▼ button until the following screen
appears:
3.Use the numeric keypad to enter your
HOME AREA CODE.
4.Press SAVE to accept the setting.
5.Repeat for up to 5 LOCAL AREA CODES.
PROGRAMMING
PROGRAMMING
Page 12
20 21
TELEPHONE OPERATIONPROGRAMMING OPTIONS
RESETTING THE 420
The 420 can be reset to all factory default settings. The EXTENSION ID NUMBER is reset to 22.
The factory defaults are as follows:
LANGUAGE: ENGLISH
TIME: 01:01 AM
DATE: 01/01
DAY: SUNDAY
EXTENSION ID: 22
ALL RINGERS: ON
L1-L4 RINGERS: ON
MSGW LIGHT: Off, L1-L4
DELAY RING: OFF
LINE USAGE: 1-4 ON
PRIME LINE: L1
LINE GROUP: L04
AUTO MUTE: O N
TONE/PULSE: TONE
FLASH TIME: .6 seconds
HOLD REMINDER: ON
In addition, all AREA CODES, all CALLER ID RECORDS and all DIRECTORY entries will be deleted.
NOTE:
■ See page 44, Programming Tree, for additional Reset information.
RESET ALL
▲▼: select
: enter
▲
RESET ALL
ERASE: reset all
2.Press the button to enter.
1.While in the PROGRAM mode, press the ▼ button until the following screen appears:
3.Press ERASE to RESET.
Reset!
NEW CALL/MESSAGE WAITING INDICATOR
OFF – There are no Voice Mail messages or new Caller ID records.
ON SOLID – You have new CALLER ID records.
FLASHING - You have new Voice Mail.
PROGRAMMING
TELEPHONE
TURNING THE MESSAGE WAITING INDICATOR OFF
The light and display indication can be turned OFF manually in the PROGRAM MODE.
MSGW LIGHT
▲▼: select
: enter
▲
L1 MSGW LIGHT
▲▼: select
: enter
▲
2.Press the button to enter.
LI MSGW LIGHT
=Off
▲▼
SAVE?
LI MSGW ON/OFF
=Off
▲▼: select
SAVE?
LI MSGW LIGHT
=Off
Programmed!
ALL MSGW LIGHT
ERASE: clear?
ALL MSGW LIGHT
Cleared!
1.While in the PROGRAM mode, press the
▼ button until the following screen
appears:
3.Use the ▲▼ buttons to select the desired
line.
4.Press the button to enter.
5.Use the ▲▼ buttons to change the
setting.
5.Press SAVE to accept the setting.
6.Repeat for the other lines.
OR
1.
While in the IDLE mode, press ERASE.
The LCD will display:
2. Press ERASE again to turn the indicator
off.
If you subscribe to telephone company voice mail, the 420 supports the feature with Visual
Message Indication (VMI). When new voice mail is received, the MESSAGE WAITING/NEW CALL
indicator will flash and the display will indicate which line has received the new voice mail.
When voice mail is reviewed and deleted, the light should automatically turn off.
See the IDLE MODE display in the DISPLAY diagram on page 6.
VOICE MAIL
Page 13

22 23
A call can be manually answered by pressing the LINE SELECT button for the ringing line. The
speakerphone will turn ON and the call will be answered.
If the phone is ringing and is taken off-hook, the ringing line will be answered. If more than one
line is ringing, the line that was ringing first will be answered.
If the phone is ringing and you do NOT wish to answer the call but wish to make an outgoing
call, press the LINE SELECT button of a non-ringing line.
TELEPHONE OPERATIONTELEPHONE OPERATION
MAKING TELEPHONE CALLS
Incoming and outgoing calls can be made using the handset, headset or speakerphone modes.
Switch between off-hook modes as follows:
Handset to headset – press HEADSET.
Handset to speakerphone – press SPEAKER.
Headset to handset – lift the handset.
Headset to speakerphone – press SPEAKER.
Speakerphone to handset – lift the handset.
Speakerphone to headset – press HEADSET.
PRIME LINE
When a line is set as the PRIME LINE, the 420 will attempt to seize this line when the phone is
taken off-hook. If the PRIME LINE is not available when the phone goes off hook, the next
available line will be selected. If all lines are in use, an error tone will be heard and no line will be
seized.
The PRIME LINE selection can be overridden simply by pressing the LINE SELECT button. If the
line selected is free, the speakerphone will be automatically activated. If the line is in use, the
line will not be seized.
RECEIVING TELEPHONE CALLS
If you subscribe to Call Waiting and a call is received on a line in use for another call, you will
hear a beep to indicate the presence of a Call Waiting call. If you subscribe to Call Waiting Caller
ID, the Caller ID information will appear on the display.
To answer the call waiting call, either press FLASH or enter the CENTREX call waiting command
(for example ❋99) on the desk station. To simplify CENTREX operation, you can program the
command into one of the feature keys. Refer to your CENTREX manual for the correct command
sequence.
RECEIVING CALL WAITING CALLS
TELEPHONE
TELEPHONE
Volume levels for each of the three off-hook modes and the telephone ringer can be
independently set. Once set, the volume for each mode will be saved until a new setting is
entered.
Corded Handset: 4 levels
Speaker: 8 levels
Headset: 4 levels
Ringer: 4 levels
LINE STATUS INDICATORS
The status of each line is indicated with a LED in the LINE SELECT keys.
Mode This Extension Other Extension
Idle Off Off
In Use Solid Green Solid Red
On Hold Slow Green Slow Red
Ringing Fast Green Fast Green
POT in Use Slow Red Slow Red
Transfer Slow Green Fast Green
VOLUME CONTROL
OFF-HOOK VOLUME
1.To change the volume level for each mode, press VOLUME + or VOLUME – when in that
mode.
2. A tone will sound when the highest or lowest setting is reached.
NOTE:
■ There is no tone when the highest speaker volume level is reached.
RINGER VOLUME
1. From the idle mode, press VOLUME + or VOLUME – until the desired ringer level is heard.
Page 14

24 25
TELEPHONE OPERATION
REDIAL/LAST NUMBER REDIAL
Automatically dials the last number called, up to 32 digits in length.
AUTO REDIAL
The 420 can automatically redial a busy number. It will make 10 attempts at 30 second intervals.
1.Press REDIAL/AUTO REDIAL twice within 3 seconds. The AUTO REDIAL LED will flash and
the speakerphone will go off-hook on the prime line (if available). The MUTE light comes on.
2.To end the Auto Redial and talk to the party you are calling, press SPEAKER, HEADSET or lift
the handset.
NOTE:
■ The LED will flash slowly between dialing attempts and rapidly during the actual dialing to alert you that the
Auto Redial mode is active.
1.Press REDIAL.
2.The 420 will automatically go off-hook
using the speakerphone.
1.Go off-hook manually.
2.Press REDIAL.
OR
TELEPHONE OPERATION
Used to answer a call waiting call or to activate a telephone company feature. The FLASH
command can be programmed into the one-touch FEATURE KEYS and the DIRECTORY dialing
sequences.
FLASH/FEATURE
Disables the microphone on the 420 handset, headset and speakerphone. This is useful for
private conversations in the middle of a call.
TO MUTE A CALL
1.Press MUTE.
2.The MUTE INDICATOR will light to indicate that the 420 has been muted.
TO RELEASE MUTE
1.Press MUTE.
2.Mute is released and the call can be resumed.
MUTE
TELEPHONE
TELEPHONE
The number stored in the Last Number Redial memory can be transferred to the Directory (see
page 34) or a Feature Key (see page 36).
HOLD
Places the current call on HOLD. Both parties cannot hear each other when HOLD is engaged.
TO PLACE A CALL ON HOLD
1.Press HOLD.
2.The LINE INDICATOR will flash (regular) to indicate that the call is on Hold.
TO RELEASE A CALL ON HOLD
1.Press the flashing LINE button or pick up another phone on the same line.
2.The call will be released from hold.
Any 420 extension in a system can take a call off-hold.
NOTES:
■ If the Hold Reminder is programmed ON, an audible reminder will alert you that the call has been left on hold
for more than 3 minutes.
■ If a call has been on hold for more than 20 minutes, the unit will automatically disconnect the call.
TRANSFERRING CALLS
Calls answered at one extension can be transferred to any available extension in the system.
TO TRANSFER A CALL
1.While off-hook, press TRANSFER followed by the extension to which the call is to be
transferred.
2.The call will automatically be placed on hold at the transferring extension.
3.Hang up.
NOTES:
■ If a call is transferred and not answered by the intended recipient, an alert tone will sound every 3 minutes
(Hold Reminder is programmed ON). After 20 minutes without being answered, the call will automatically be
dropped.
■ If an extension number is not entered within 10 seconds, the call will remain on hold and the display will
return to idle mode.
■ If DO NOT DISTURB is activated at the receiving extension, the calling party will hear a fast busy tone.
ANSWER A TRANSFERRED CALL
The extension receiving the transferred call will sound a fast ring. The line indicator for the
transferred call will flash rapidly to inform the call recipient which line to pick up.
1.If your phone rings the distinctive transfer ring, simply go off-hook to take the call.
NOTE:
■ Any extension can answer a transferred call by simply pressing the line select button for the call being
transferred.
Transfer 11
CID:000/001
Page 15
26 27
Calls on any 420 extensions are private. Other 420 extensions cannot intrude on the call unless
the extension user releases privacy.
TO DEACTIVATE CALL PRIVACY (ALLOWING OTHERS TO JOIN CALL)
1.While on a call, press the LINE SELECT key. A beep will sound indicating that privacy is
released.
2.The LINE STATUS LED for the released privacy call will remain lit on the other extensions,
allowing others to join the call by simply pressing the LINE SELECT key.
TO RESTORE CALL PRIVACY
1.Press the LINE SELECT key. A double beep will sound, indicating that privacy is restored.
2.Any joined extensions will be dropped and the call will again be private.
Calls in progress on non-420 telephones common lines are not private and can be joined at any
time by a 420 extension.
TELEPHONE OPERATION
CALL PRIVACY – EXTENSION CONFERENCING
TELEPHONE OPERATION
TELEPHONE
TELEPHONE
The PAGING and INTERCOM features require that LINE 1 be common to all 420’s in the system.
NOTE:
■ Only one paging or intercom call can be supported at one time. When the paging/intercom system is in use
the INTERCOM indicator will light on all extensions in the system.
All extensions can be paged simultaneously by any 420 in the system.
1.Press PAGE ALL. The INTERCOM and SPEAKERPHONE indicators will light.
2.Lift the handset, activate the headset or simply speak into the built in speakerphone
microphone.
3.To end the page, hang-up the phone by pressing SPEAKER, HEADSET or return the handset
to the cradle.
ANSWERING A SYSTEM WIDE PAGE
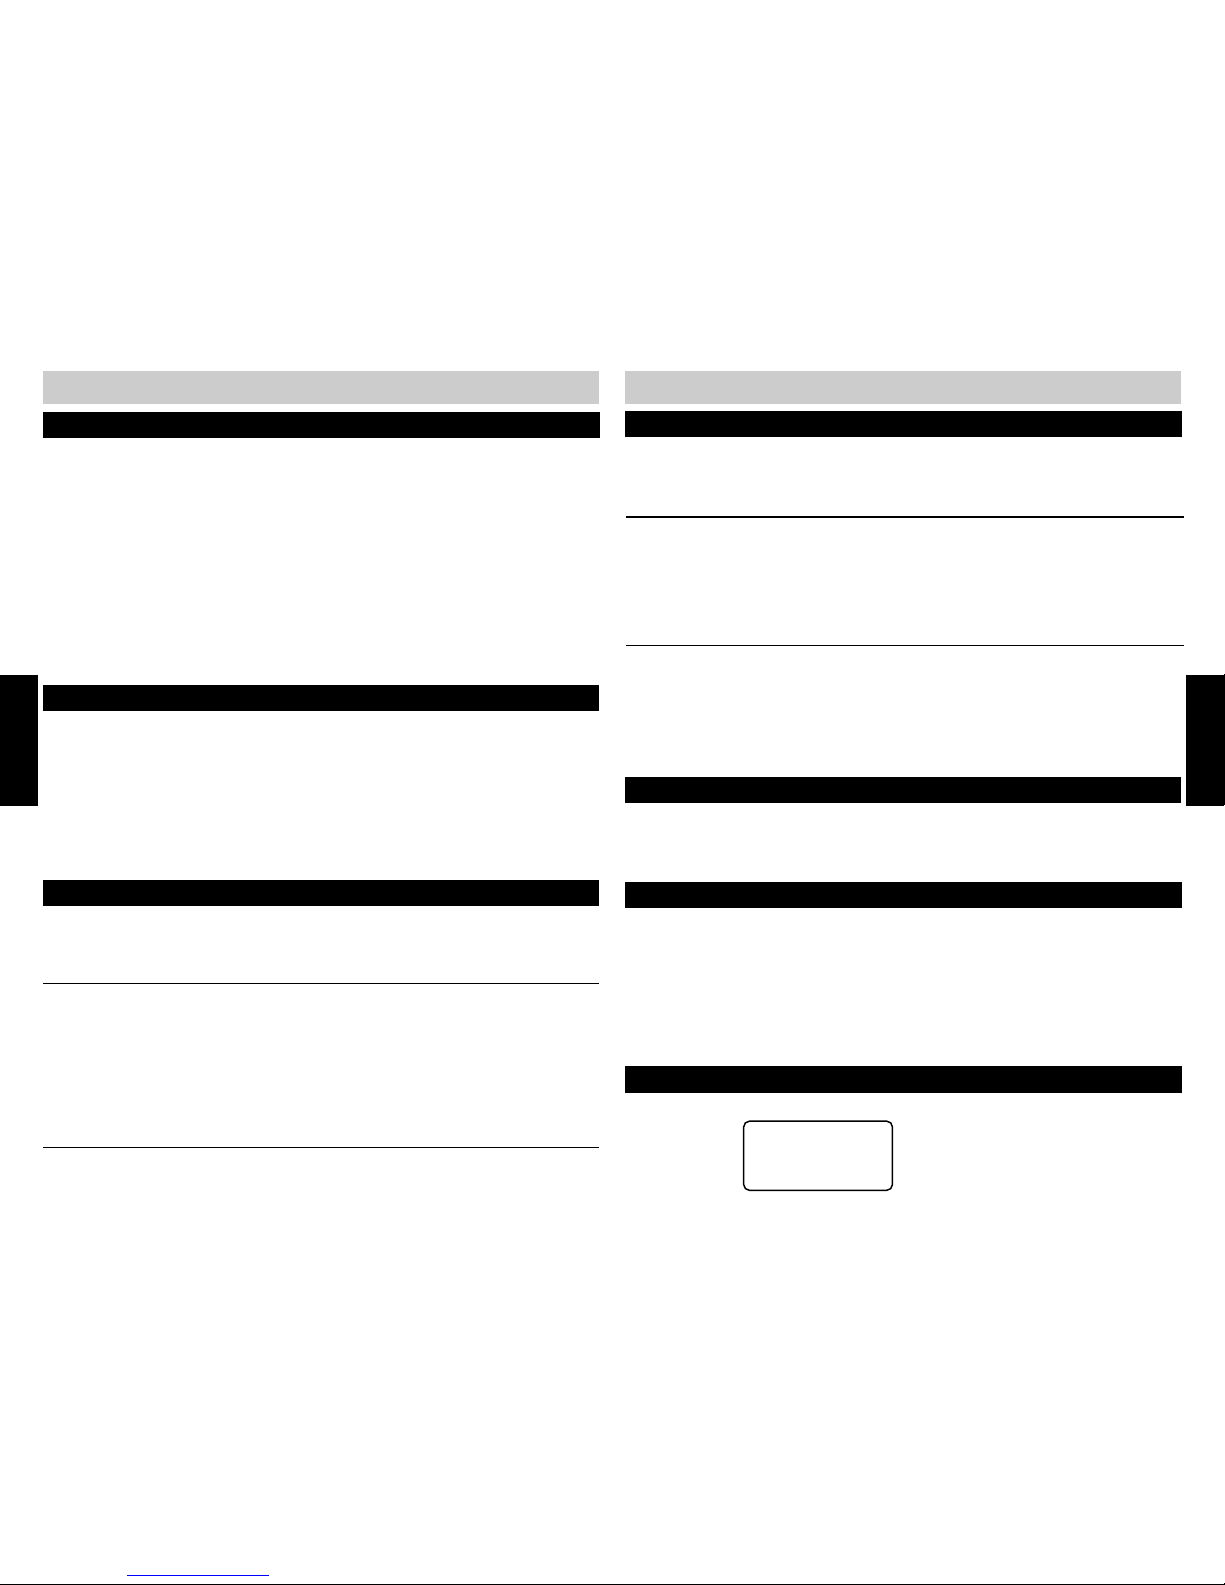
When extension 12 intiates a system wide page, every idle 420 in the system will have the
following display:
PAGE ALL BY 12
CID:000/001
PAGING AND INTERCOM
PAGING ALL EXTENSIONS
The 420 allows you to bridge a call between any two lines to establish a 3-way conference call.
1.Initiate the first call.
2.Place the first call on HOLD.
3.Initiate the second call.
4.Press CONFERENCE. You will now be talking to parties on both lines.
5.To end the conference call simply hang-up.
NOTE:
In some instances where the two parties joined by the 420 are a long distance away from their telephone
company’s central office, these two far end parties might not hear each other very well. If this occurs
frequently, it is recommended that the telephone company’s 3-way calling service be used.*
■ Call Waiting Caller ID records will not be displayed or logged during a 3-Way Conference Call.
*Subscription to 3-way calling service is required.
3-WAY CALL CONFERENCING
TONE/PULSE MIXED DIALING
This feature is useful if your telephone service is PULSE and you need to use TONE dialing to
access a special service. This feature is only needed if you have programmed the TONE/PULSE
setting to PULSE mode.
1.Dial the telephone number and wait for the line to connect.
2.Press
❋ ❋
❋ ❋
❋ TONE on the key pad to temporarily change from PULSE dialing to TONE dialing.
3.Dial the tone numbers (such as automated menu choices).
4.Hang up and the 420 automatically returns to the PULSE mode.
DND – DO NOT DISTURB
When DND is activated, the 420 will not ring for an intercom, transferred or regular telephone
call. Likewise, the paging feature will also be muted allowing you to work undisturbed.
TO ACTIVATE DND
1.Press DND to activate the feature.
2.The DND LED will light on the button and DND will appear in place of EXT on the LCD,
indicating that the feature is ON.
When another extension attempts to intercom or page an extension on which DND is active, the
calling party will hear a fast busy tone.
TO DEACTIVATE DND
1.Simply press DND. The LED will turn off and the telephone will ring and be available to
intercom or page an extension.
Page 16
28 29
TELEPHONE
TELEPHONE
TELEPHONE OPERATIONTELEPHONE OPERATION
1.Press INTERCOM followed by the number of the extension you wish to call.
MAKING AN INTERCOM CALL
ICM 22
CID:000/001
2.The extension you called will hear the intercom ring and the display will indicate which
extension is calling.
ICM 11
CID:000/001
NOTE:
■ If the extension being called is in use or DND is ON, a busy ring will be heard.
ANSWERING AN INTERCOM CALL
1.Press INTERCOM. The speakerphone will activate and you can begin speaking. The handset
or headset can also be used.
2.To end the call, simply hang-up.
MAKING AN INTERCOM CONFERENCE CALL
1.Make or answer a telephone call.
2.Press INTERCOM and enter the number of the extension with which you want to conference.
3.When the extension answers, press CONFERENCE to join all parties.
NOTE:
■ An intercom conference call cannot be placed on hold.
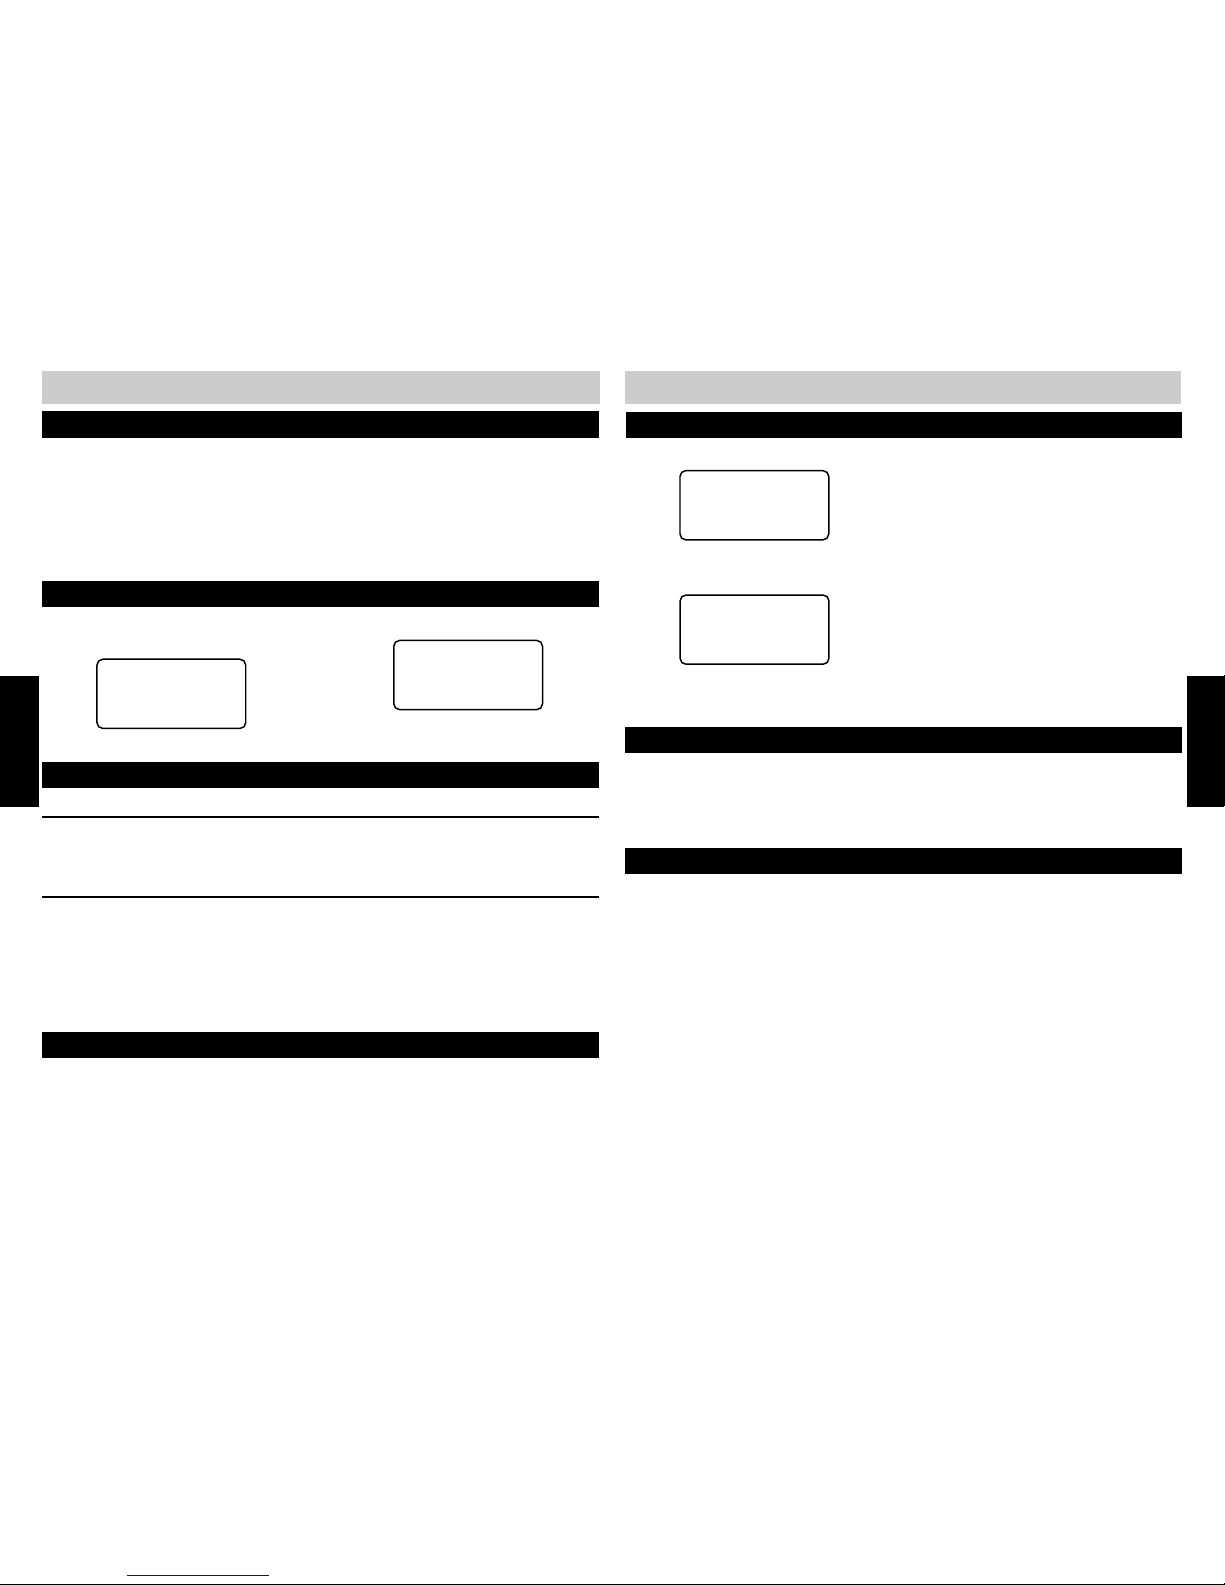
1.Extension 22 presses PAGE, then enters
“11” to page extension 11.
PAGE 11
CID:000/001
Any 420 in the system can answer the page and talk to the paging station.
1.Press PAGE to answer. You can use the speakerphone, headset or handset to converse.
2.To end, simply hang-up.
NOTE:
■ Only one extension can answer a system wide page at a time.
PAGING A SINGLE EXTENSION
2.Extension 11 receives the page:
PAGE 22
CID:000/001
AUTO-MUTE OFF AT RECEIVING EXTENSION
When an extension receives a page, the phone will beep and the speakerphone will
automatically be activated. You can begin speaking or switch to the handset or headset.
AUTO-MUTE ON AT RECEIVING EXTENSION
When an extension receives a page, the phone will beep and the speakerphone will be activated
and the MUTE indicator will light. To answer the page, press MUTE and begin speaking. The
handset or headset can also be used.
NOTE:
■ If a paged extension is in use or DND is on, the paging station will hear a busy tone.
ANSWERING A SINGLE EXTENSION PAGE
ANSWERING A SYSTEM WIDE PAGE (cont.)
The paging feature can be used as a room monitor.
1.Press PAGE followed by the extension number to be monitored.
2.Activate MUTE by pressing MUTE so sounds on the monitoring side are not broadcasted.
3.To end the monitoring, press SPEAKER.
NOTE:
■ An extension cannot be monitored if the AUTO-MUTE feature is set to ON at that extension.
ROOM MONITOR
Page 17
30 31
CALLER ID
2.Use the ▲▼ buttons to scroll through the stored caller ID records.
3.Press END to exit, or wait 20 seconds and the LCD will revert back to the IDLE MODE.
CALLER ID
STORED CALLER ID RECORDS
The 420 will store the 200 most recent Caller ID records. Caller ID records are numbered
sequentially in the order in which they are received. When the memory is full, the oldest record
will be deleted automatically each time a new record is received.
VIEWING STORED CALLER ID RECORDS
1.Press CALLER ID
to enter the Caller ID database. The LCD will display the number of CID
records.
CID LIST
002 Calls
001 New
INFORMATION OTHER THAN THE CALLER’S NAME AND NUMBER MAY BE
DISPLAYED
Display Meaning
Private Name The other party is blocking name information
Private Number The other party is blocking telephone number information
Out Of Area Your phone company is unable to receive this caller’s name or number
Incomplete DATA Line disturbance occurred during transmission
DIALING USING CALLER ID RECORDS
In addition to storing and displaying up to 200 Caller ID records, phone numbers contained in
those Caller ID records can be automatically dialed.
If you have programmed local and home area codes, any numbers from within those area codes
will be dialed WITHOUT the initial “1” and area code.
1.Select the desired Caller ID record.
2.Press DIAL.
3.The 420 will automatically go off-hook and speakerphone dialing will commence
automatically. The handset or the headset may be used to continue the call.
OR
1.Manually go off-hook.
2.Press DIAL.
CALLER ID
CALLER ID
VIEWING CALLER ID INFORMATION OF AN INCOMING CALL
During an incoming call, the name and telephone number of the caller (if available) will display
on the LCD. The information is received by the 420 between the first and second ring.
NOTE:
■ If you answer a call before the second ring, the Caller ID information might not be displayed.
■ Call Waiting Caller ID records will not be displayed or logged during a 3-Way Conference Call.
VIEWING CALLER ID INFORMATION OF SIMULTANEOUS INCOMING CALLS
When multiple lines are ringing, you can view the Caller ID information for each line by pressing
CALLER to toggle the display between the Caller ID information for each ringing line.
Caller ID is a subscription service available from your telephone service provider and is required
for the Caller ID features to operate.
To receive Caller ID information for a Call Waiting call, you must subscribe to the
combined Call
Waiting Caller ID service from your telephone service provider. Even if you subscribe to both
Caller ID and Call Waiting services separately, it is possible that you are not subscribed to the
combined service.
The 420 will store and display on demand the 200 most recent caller ID records.
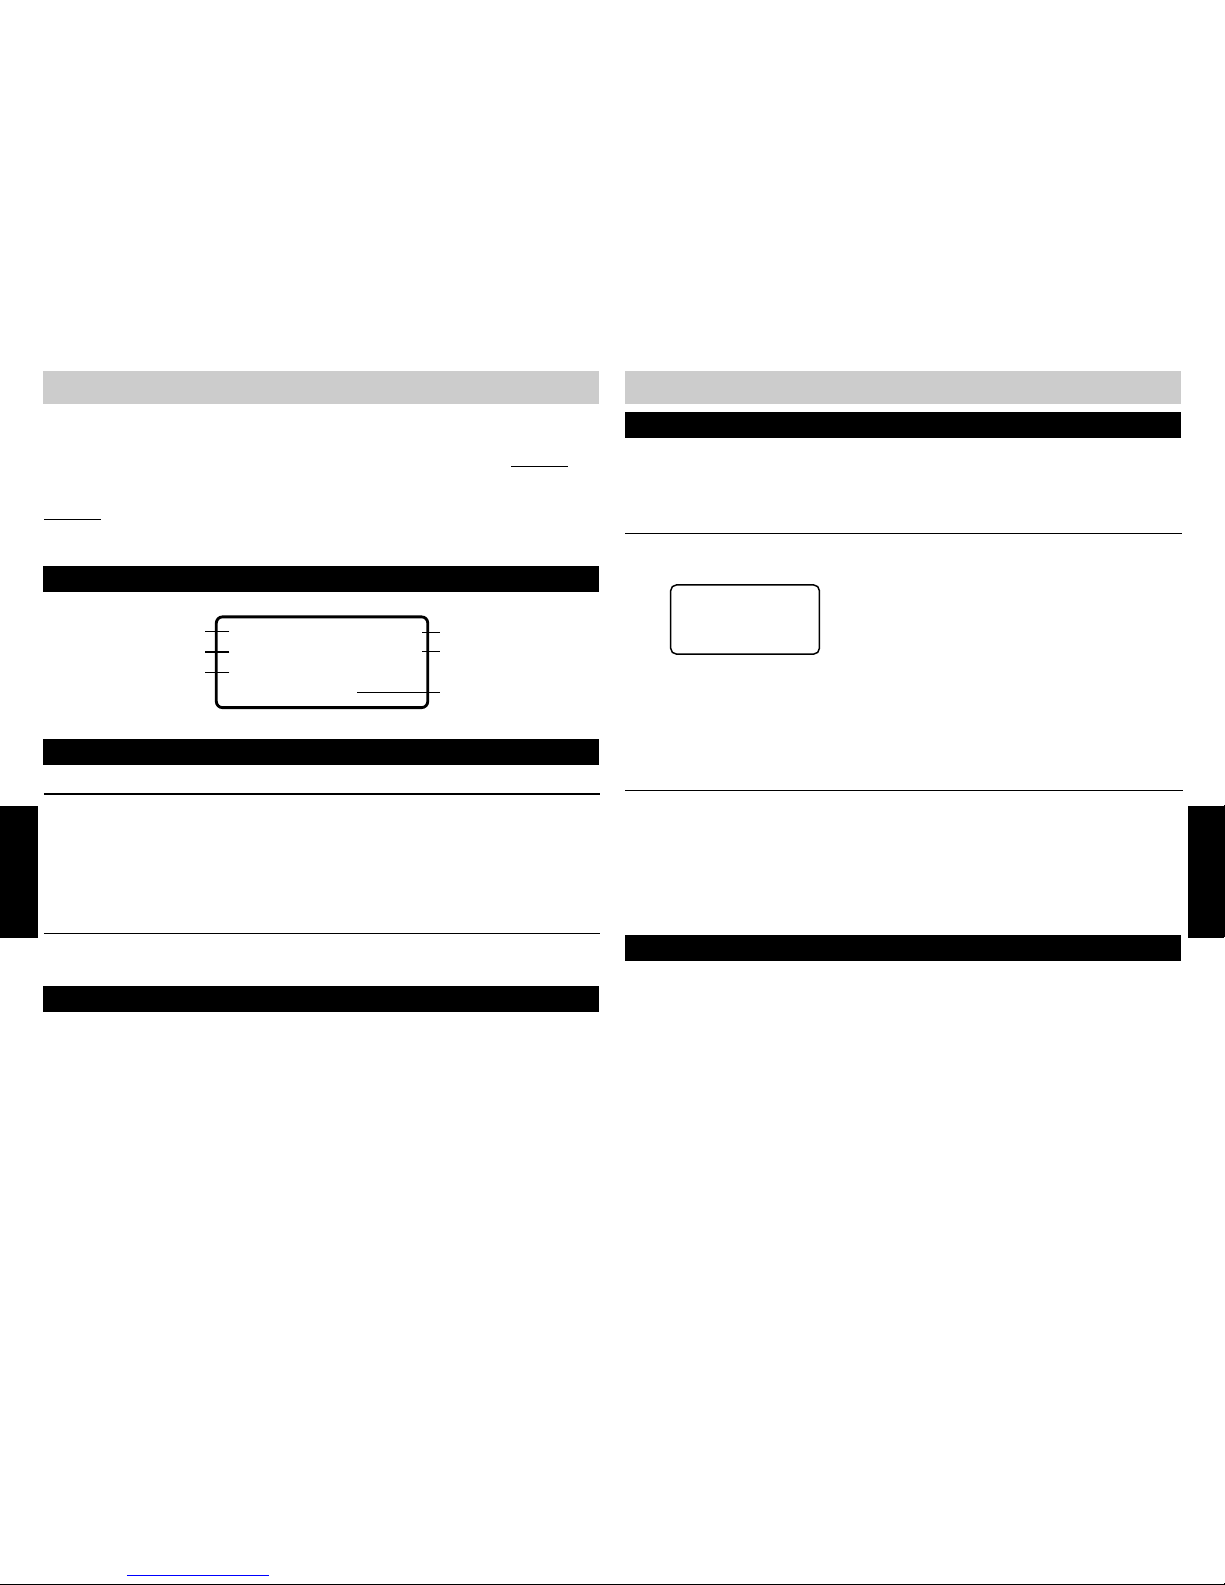
THE CALLER ID DISPLAY
Caller Number
Line Called
Time of Call
Caller Name
Record Number
Date of Call
GARY BIXBY
3105551212
07/19
11:57A
CL#001
L2
VIEWING CALLER ID INFORMATION
If you subscribe to Call Waiting Caller ID (combined service), the 420 will display the Caller ID
information (if available) from the Call Waiting calls. During a phone call, you will hear a beep to
indicate the presence of a Call Waiting call. Shortly afterward, the Caller ID information will
appear on the LCD.
To answer the call waiting call, either press FLASH or enter the CENTREX call waiting command
(for example ❋99) on the desk station. To simplify CENTREX operation, you can program the
command into one of the feature keys. Refer to your CENTREX manual for the correct command
sequence.
If you do not answer the call, the calling party will hear the phone continue to ring. If you
subscribe to voice mail, the incoming call will be answered by voice mail.
CALL WAITING CALLER ID
Page 18
32 33
DIRECTORY
TO SCROLL THROUGH THE ALPHABETICAL LIST OF DIRECTORY RECORDS
1.From idle mode press DIRECTORY.
2.Use the ▲▼ buttons to scroll through the DIRECTORY entries.
LOCATING A DIRECTORY RECORD (BY JUMPING)
To jump immediately to the Directory listings beginning with a selected letter:
1.Press DIRECTORY.
2.Press the keypad key associated with the desired letter and continue pressing the key until
the desired letter is displayed.
3.The display will jump to the first Directory listing beginning with the chosen letter.
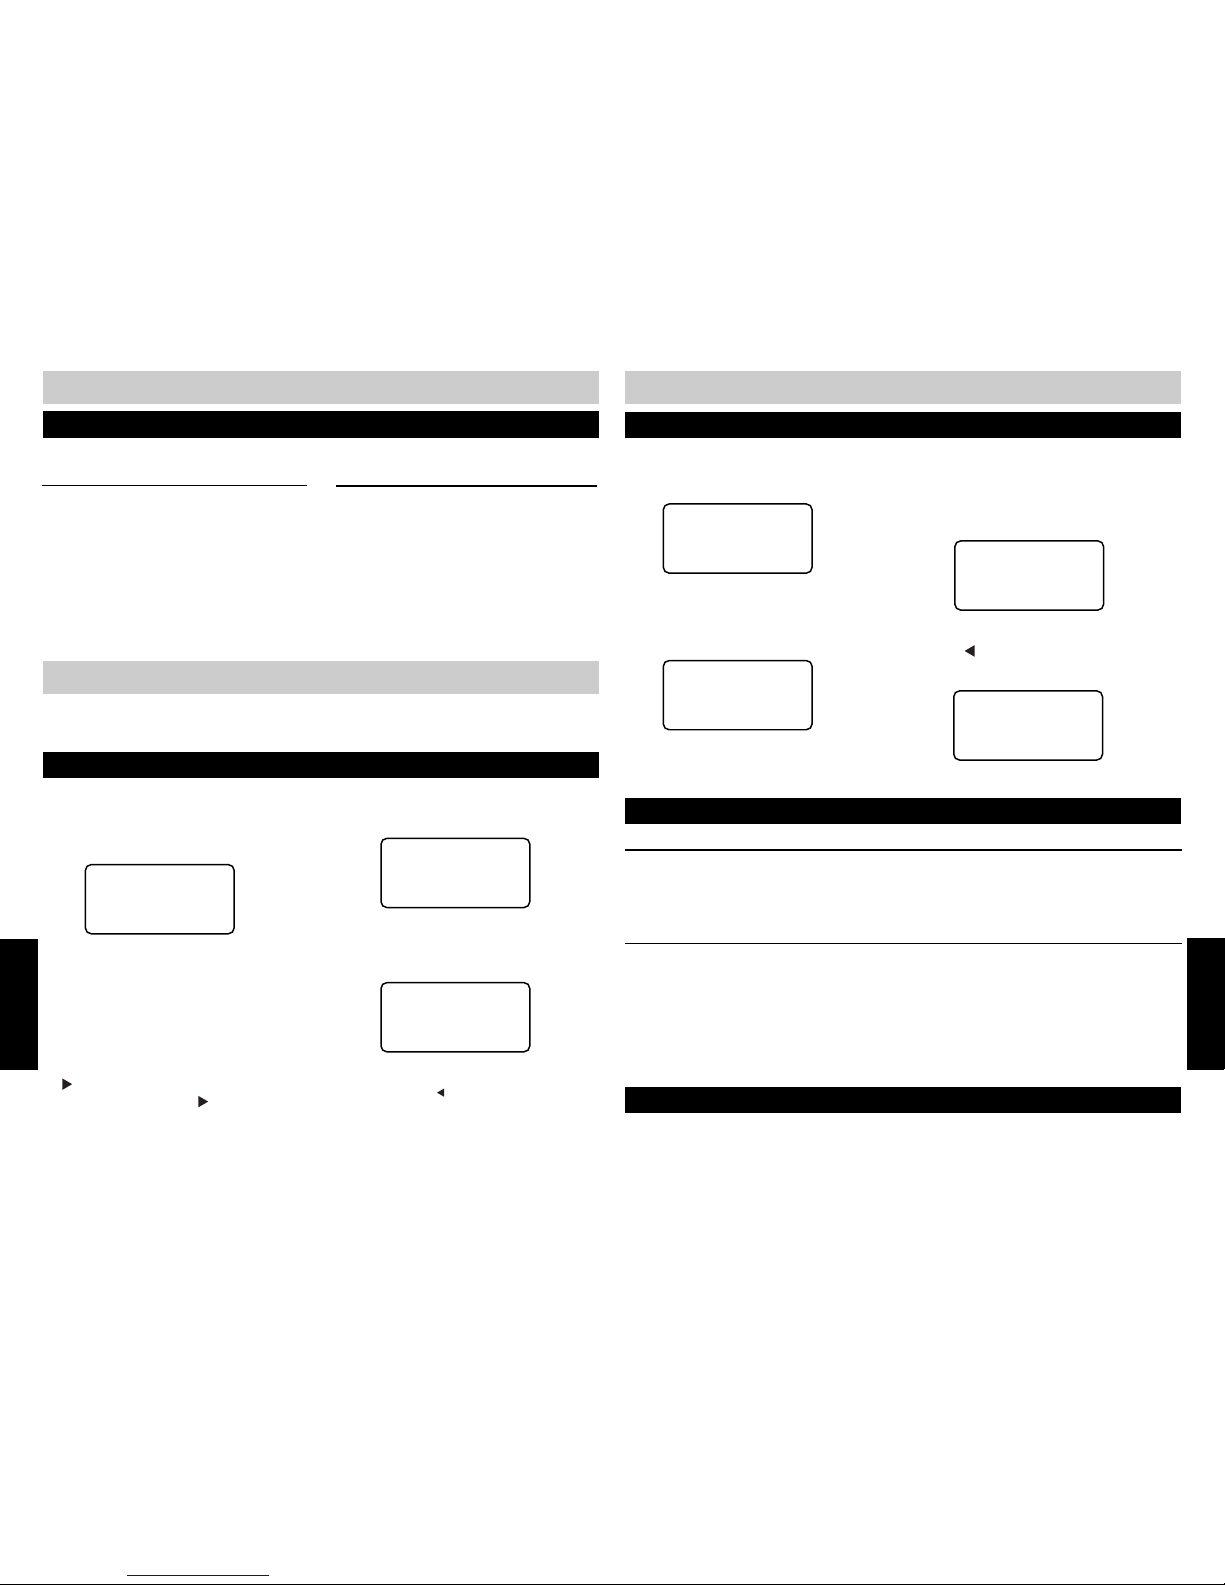
TRANSFERRING A CALLER ID RECORD TO THE DIRECTORY
The 420 allows Caller ID records to be transferred to the directory.
1.Display the desired Caller ID record.
11/12 10:27A
CL#002
GARY BIXBY
5551212
2.Press END to exit the CALLER ID mode.
3.Press DIRECTORY.
4.Press SAVE as if to add a new entry.
(Enter name)
SAVE: save?
6.A new Directory record will be created
automatically, using the name and number
of the Caller ID record.
GARY BIXBY
5551212
SAVE: save?
If you wish to edit the new Directory record,
use the
button to backspace.
7.Press SAVE when done.
LOCATING A DIRECTOR Y RECORD
1.Select the desired Directory record.
2.Press DIAL. The telephone will automatically go into speakerphone mode and dialing will
commence automatically. The handset or the headset may be used to continue the call.
DIALING A DIRECTORY NUMBER
DIRECTORY
DIRECTORY
CALLER ID
DELETING CALLER ID RECORDS
DELETING AN INDIVIDUAL CALLER
ID RECORD
1.Press CALLER ID.
2.Locate the desired Caller ID record using
the ▲▼ buttons.
3.Press ERASE.
4.The screen will prompt ERASE: erase?
5.Press ERASE to confirm or END to abort.
DIRECTORY
The 420 will store up to 200 names and numbers in an alphabetical phone directory. You may
manually program each Directory record or you may transfer a Caller ID record into the Directory.
CREATING A NEW DIRECTORY ENTRY
The maximum name length is 16 characters. The maximum number length is 32 digits.
1.Press DIRECTORY.
2.Press SAVE.
(Enter name)
SAVE: save?
5.Press SAVE when the name is complete.
GARY BIXBY
(Enter Number)
SAVE: save?
3.Press the appropriate keypad key to
toggle through the letters and numbers
associated with that key (For example:
press the number “5” key to toggle among
the letters “J”, “K” and “L”, and the
number “5”).
4.When the desired letter appears, press the
button to manually move to the next
character. Pressing the
button twice will
insert a space.
6.Enter the telephone number using the
numeric keypad.
7.Press SAVE when done.
GARY BIXBY
5551212
Saved!
To add a PAUSE or a FLASH to a Directory dialing sequence press the appropriate button while
entering a telephone number. The letter “P” will be displayed to indicate a PAUSE and “F” a
FLASH.
DELETING ALL CALLER ID
RECORDS
1.Press CALLER ID.
2.Immediately press ERASE without
scrolling through the individual records.
3.The screen will prompt ERASE :all?
4.Press ERASE to confirm or END to abort.
NOTE:
■ If you make a mistake while entering a name or
number, use the
button to backspace and
erase.
5.Press CALLER ID to copy the last viewed
Caller ID record into the DIRECTORY.
GARY BIXBY
5551212
Saved!
Page 19
34 35
ADDITIONAL
ADDITIONAL
ADDITIONAL FEATURESDIRECTORY
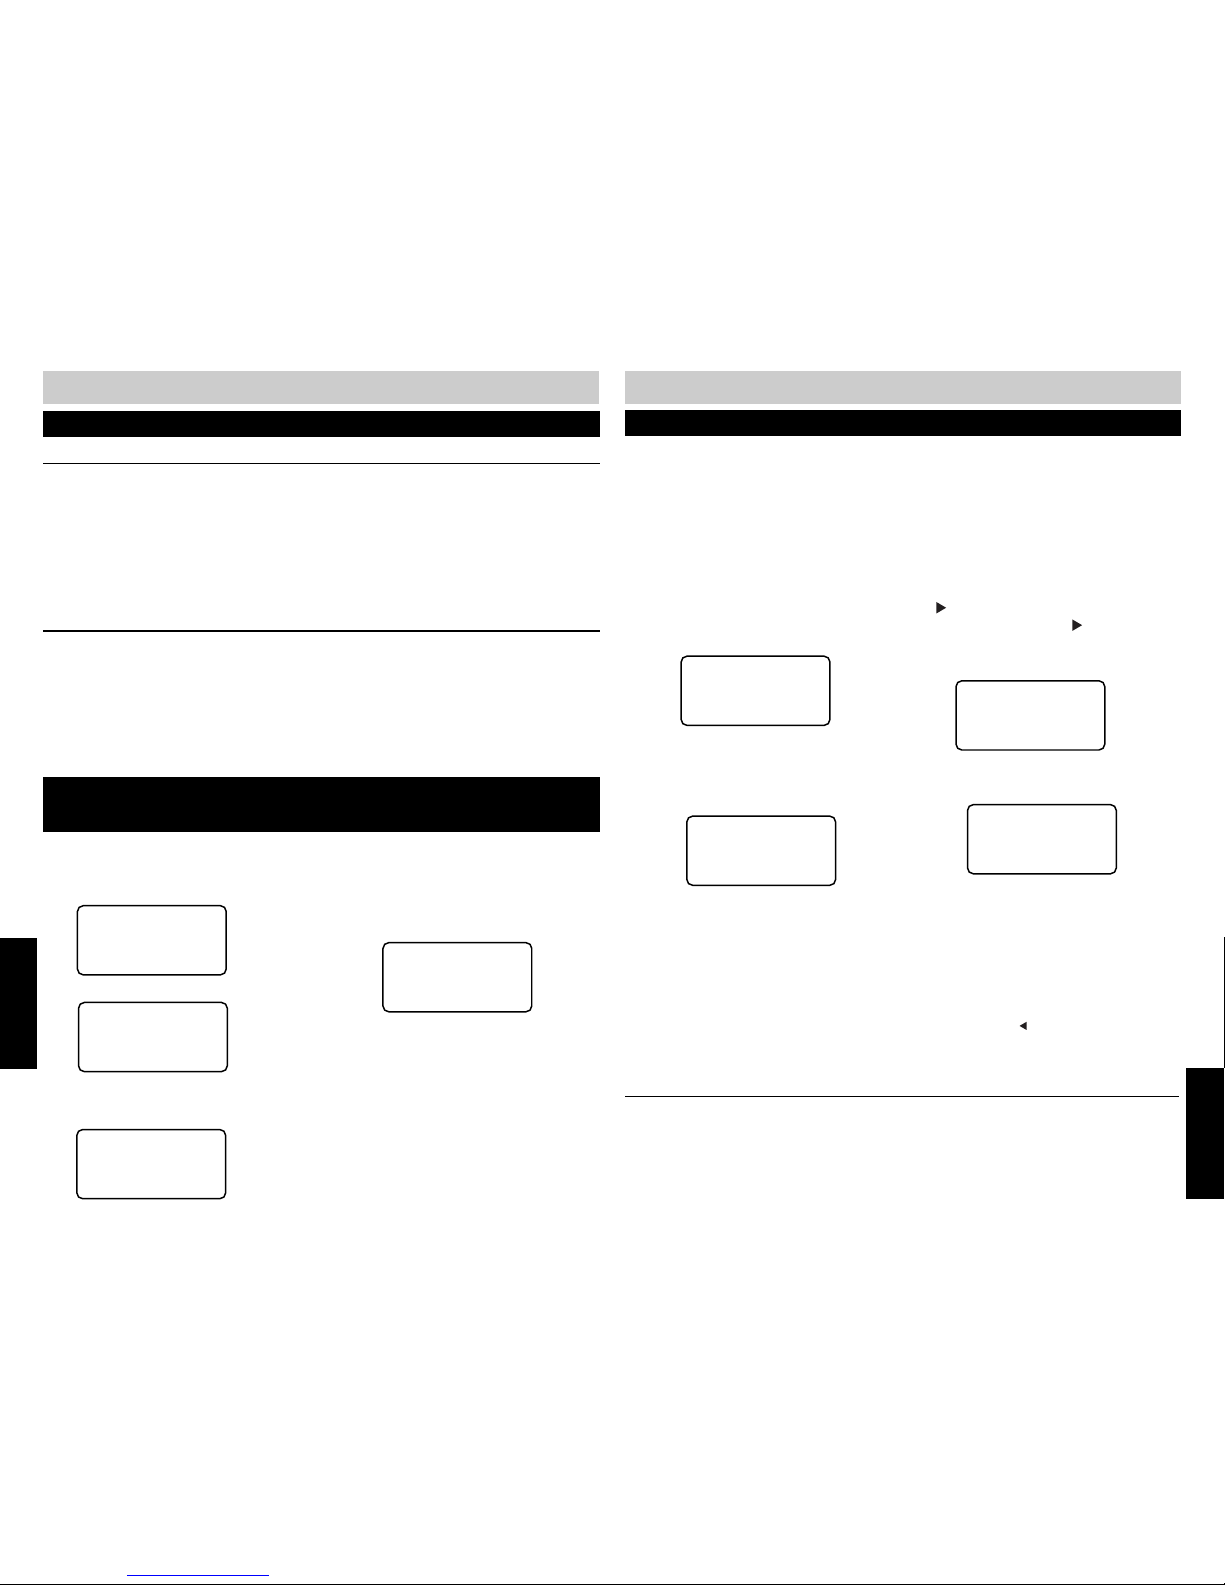
PROGRAMMING THE FEATURE KEYS
Ten FEATURE keys can store twenty names and phone numbers or commonly used CENTREX or
other telephone company features. These one touch dial locations can be programmed and
dialed by pressing the desired FEATURE key and/or SHIFT key.
Maximum capacities: name - 16 characters; number - 32 digits.
Write the information you want to store on the FEATURE key index card before your perform the
programming steps below.
(empty)
*:edit
NOTE:
■ If the FEATURE key is not empty, press ERASE
twice to delete the existing name and number.
2.Press the “❋” key to begin entering the
name.
(Enter name)
SPD#: save?
3.Press the appropriate keypad key to
toggle through the letters and numbers
associated with that key (For examplepress the number “5” key to toggle
among the letters “J”, “K” and “L”, and
the number “5”).
GARY BIXBY
(Enter Number)
SPD#: save?
GARY BIXBY
5551212
Saved!
1.Press the desired FEATURE key . If you are
programming the “second” memory
locations, press SHIFT followed by the
FEATURE key.
4.When the desired letter appears, press the
button to manually move to the next
character. Pressing the
button twice will
insert a space.
5.Press SAVE when the name is complete.
DIALING USING THE FEATURE KEYS
1.Go off hook.
2.Press the desired FEATURE key. To dial the “second” memory, press SHIFT followed by the
FEATURE key.
6.Enter the telephone number using the
numeric keypad.
7.Press the FEATURE key again when done.
If you are programming the “second”
memory, press SHIFT followed by the
FEATURE key to finish.
8.A confirmation ring will sound.
NOTE:
■ If you make a mistake while entering a name or
number, use the
button to backspace and
erase.
DELETING AN INDIVIDUAL DIRECTORY RECORD
1.Press DIRECTORY.
2.Locate the desired record using the ▲▼ buttons or by jumping.
3.Press ERASE.
4.The screen will prompt ERASE: erase?
5.Press ERASE to confirm or END to abort.
DELETING ALL DIRECTORY RECORDS
1.Press DIRECTORY.
2.Immediately press ERASE without scrolling through the individual records.
3.The screen will prompt ERASE: all?
4.Press ERASE to confirm or END to abort.
DELETING DIRECTORY RECORDS
The 420 allows the number stored in the Last Number Redial memory to be transferred to the
Directory.
TRANSFERRING A NUMBER FROM LNR
(LAST NUMBER REDIAL) TO THE DIRECTORY
1.Press DIRECTORY.
DIRECTORY
2.Press SAVE to enter the Program mode.
(Enter Name)
SAVE:save?
3.Enter the name, then press SAVE to
proceed.
GARY BIXBY
(Enter number)
SAVE:save?
4.Press REDIAL to copy the phone number
from the LNR. A confirmation tone will
sound.
GARY BIXBY
5551212
SAVE:save?
5.Edit the phone number if you wish, then
press SAVE to finish.
DIRECTORY
ADDITIONAL
Page 20
36 37
ADDITIONAL
ADDITIONAL
During Initial Set-up, the Phone Beeps Continuously
■ Make sure that each 420 in the system is assigned a unique EXTENSION NUMBER between
11 and 22.
Intercom, Page All, Privacy and/or other system features do not work properly.
■ DSL service can interfere with communication between Executive Series telephones. Usage
should be restricted to Line 3 or 4 and a filter (provided by the DSL provider) should be
installed.
■ Make sure the total length of wiring used in your system is less than 600 feet. If the wiring
is longer, you may need to use a special filter device. Contact the company from which you
purchased the phone to obtain this filter.
■ Installation sites at greater distances from the telephone company central office may also
experience network communication problems. These problems include inability to make or
receive intercom calls or inconsistent call transfers and paging. If you are experiencing
these problems, a filter (part number 3001-01) needs to be installed. Contact the company
from which you purchased the phone to obtain this filter.
Cannot Access Program Mode
■ Is the extension off-hook? You cannot program the phone and talk on it at the same time.
Telephone Does Not Ring
■ Make sure the Do Not Disturb (DND) feature is not activated.
■ Make sure ringers are turned on.
■ If there are several non-system phones on the line that do not ring, disconnect some of
them.
■ If the INTERCOM light flashes but you do not hear a paging signal, make sure the Do Not
Disturb (DND) feature is not activated.
■ If you subscribe to Telephone Company Voice Mail, make sure the Delay Ring setting is not
greater than the time it takes for Voice Mail to answer. See pg. 13.
Telephone Handset is Dead
■ Make sure the coiled handset cord is plugged into the HANDSET jack, not the HEADSET jack.
See pg. 7.
Intercom Paging Signal Not Received
■ Make sure you have programmed your extension number correctly. Line 1 must be
connected at all extensions and must be the same telephone number/line for Page and
Intercom to work properly.
■ Make sure the Do Not Disturb feature is turned off at the extension you are calling.
Cannot Join a Conversation in Progress
■ The PRIVACY feature prevents another extension on the system from interrupting a
conversation. Press the LINE button to release privacy.
TROUBLESHOOTINGADDITIONAL FEATURES
A dedicated HEADSET button on the 420 allows you to keep the headset plugged in, and to only
use it when desired.
USING A HEADSET
Incoming calls can be received (the phone will ring) and outgoing calls can be made on all four
lines using the handset or headset. An optional 9 volt battery must be installed for power failure
operation. The speakerphone will not function during a power failure.
The Caller ID database and the Directory database are stored in non-volatile memory and will not
be affected during a power failure.
POWER FAILURE OPERATION
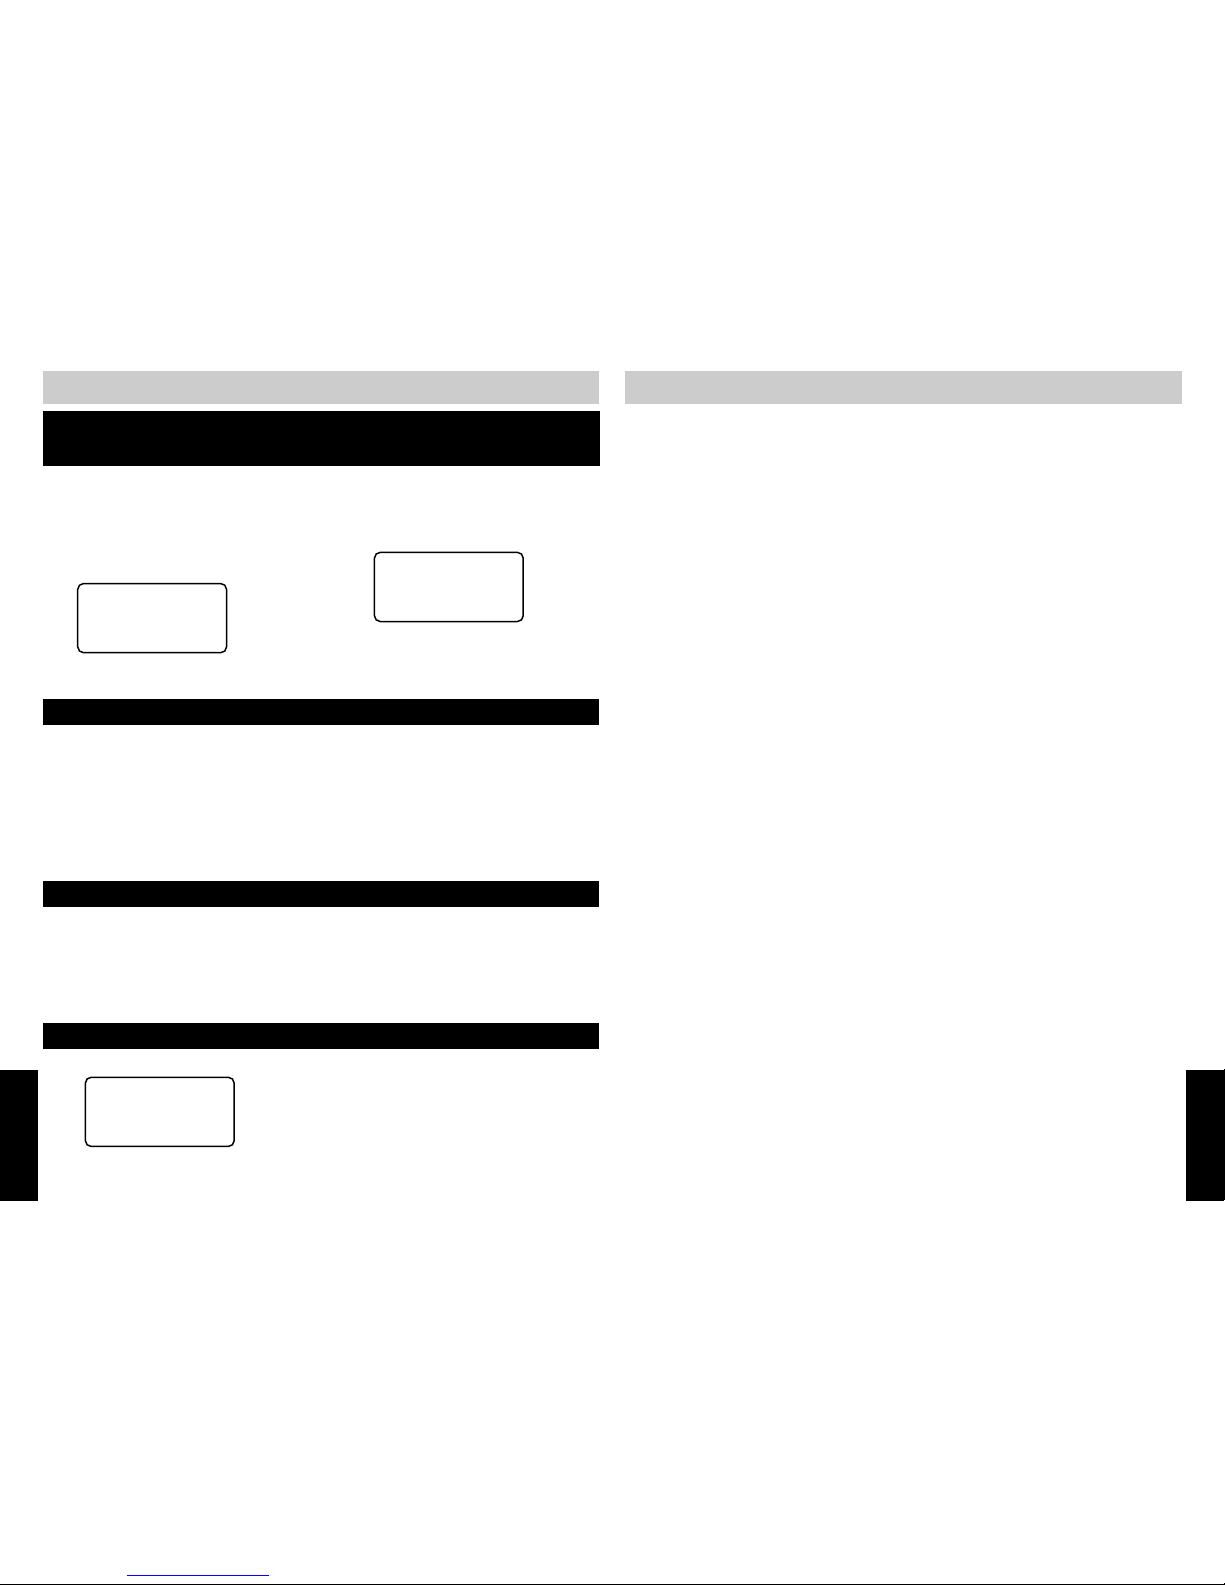
When the back-up battery becomes old or weak, the word BATT will appear on the display.
BATTERY LOW INDICATION
09/06 08:41A
EXT 22
CID:000/001 BATT
Replace the battery as described in INSTALLING THE BATTERY on page 6.
NOTE:
■ Use only ALKALINE batteries.
The 420 allows the number stored in the Last Number Redial memory to be transferred to a
FEATURE key .
TRANSFERRING A NUMBER FROM LNR
(LAST NUMBER REDIAL) TO A FEATURE KEY
1.Follow steps 1-2 under “PROGRAMMING
THE FEATURE KEYS” on page 35.
2.Press SAVE to save the name.
GARY BIXBY
(Enter number)
SPD#:save?
GARY BIXBY
5551212
spd#:save?
3.Press REDIAL to copy the phone number
from the LNR to the LCD.
4.Edit the phone number if you wish, then
press the FEATURE key to save the name
and number into that location.
Page 21
38 39
ADDITIONAL
ADDITIONAL
PROGRAMMING TREE
PROGRAM
▲▼: select
LANGUAGE
▲▼: select
:enter
▼
TIME/DATE
▲▼: select
:enter
▼
LANGUAGE
= English
▲▼: select
SAVE?
LANGUAGE
= Spanish
▲▼: select
SAVE?
LANGUAGE
= English
Programmed!
IDIOMA
= Español
Programado!
EXTENSION NO
▲▼: select
:enter
▼
EXTENSION NO
= 22
▲▼: select
SAVE?
EXTENSION NO
= 22
Programmed!
MONTH
01/01 1:52A
▲▼: select
SAVE?
DATE
01/01 1:52A
▲▼: select
SAVE?
HOUR
01/01 1:52A
▲▼: select
SAVE?
MINUTES
01/01 1:52A
▲▼: select
SAVE?
AM/PM
01/01 1:52A
▲▼: select
SAVE?
DAY OF WEEK
= Sunday
Programmed!
DAY OF WEEK
= Sunday
▲▼: select
SAVE?
Error Tone (Fast Busy Signal) Heard When Making an Intercom Call
■ The Do Not Disturb feature is activated at the extension you are calling.
Line Lights Remain On When No Line is Connected
■ Make sure the system is programmed for that line to be off. (See “Programming the Line
Usage” in PROGRAMMING OPTIONS.) See pg. 14.
■ Make sure that your Line Groups are programmed properly . (See “Programming Line Groups/
Private Line” in PROGRAMMING OPTIONS.) See pg. 16.
■ Disconnect all other devices (fax, modem, credit card reader, etc.) from any lines connected
to your phone. These devices can interfere with the system’s data links.
Operation During a Power Failure
■ A 9-volt battery must be installed for power failure operation. See pg. 36.
No Call Waiting Caller ID Information While on a Call
■ You must subscribe to combined Caller ID with Call Waiting as a single service to see Call
Waiting information.
■ Call Waiting Caller ID records will not be displayed or logged during a 3-Way Conference Call.
Display Screen is Blank
■ Make sure the power cord is connected to both the phone and an electrical outlet that is not
controlled by a wall switch.
■ Verify that the AC outlet is working by plugging a lamp, etc. to test.
No Caller ID Information Received
■ Subscription to Caller ID service is required.
■ Caller ID information is transmitted by the telephone between the first and second rings. If
you answer a call before the second ring, the Caller ID information may not be displayed.
■ Call Waiting Caller ID records will not be displayed or logged during a 3-Way Conference Call.
MESSAGE WAITING/NEW CALL Light Flashes
■ Make sure you have deleted all messages on all lines.
■ It may be a false indicator from the Central Office. To clear, see “Turning the Message Waiting
Indicator On/Off” in ADDITIONAL FEATURES.
TROUBLESHOOTING
Page 22
40 41
ADDITIONAL
ADDITIONAL
PROGRAMMING TREE
RINGER TYPE
▲▼: select
:enter
▼
L1 RINGER TYPE
▲▼: select
:enter
▼
L1 RINGER TYPE
= Type 1
▲▼: select
SAVE?
L2 RINGER TYPE
▲▼: select
:enter
▼
L2 RINGER TYPE
= Type 1
▲▼: select
SAVE?
L1 RINGER TYPE
= Type 2
▲▼: select
SAVE?
L1 RINGER TYPE
= Type 3
▲▼: select
SAVE?
L1 RINGER TYPE
= Type 4
▲▼: select
SAVE?
L2 RINGER TYPE
= Type 2
▲▼: select
SAVE?
L2 RINGER TYPE
= Type 3
▲▼: select
SAVE?
L2 RINGER TYPE
= Type 4
▲▼: select
SAVE?
L1 RINGER TYPE
= Type 4
Programmed!
L2 RINGER TYPE
= Type 4
Programmed!
L3, L4
DELAY RING
▲▼: select
:enter
▼
DELAY RING
= Off
▲▼: select
SAVE?
DELAY RING
= Off
Programmed!
DELAY RING
= 02 sec
▲▼: select
SAVE?
DELAY RING
= 02 sec
Programmed!
Maximum Delay
Ring = 30 sec
PROGRAMMING TREE
L3, L4
L3, L4
MSGW LIGHT
▲▼: select
:enter
▼
L1 MSGW LIGHT
▲▼: select
:enter
▼
L1 MSGW LIGHT
= OFF
▲▼: select
SAVE?
L1 MSGW LIGHT
= OFF
▲▼: select
Programmed!
L1 MSGW ON/OFF
= ON
Programmed!
L2 MSGW LIGHT
▲▼: select
:enter
▼
L2 MSGW LIGHT
= OFF
▲▼: select
SAVE?
L2 MSGW LIGHT
= OFF
▲▼: select
Programmed!
L2 MSGW ON/OFF
= ON
Programmed!
RINGER ON/OFF
▲▼: select
:enter
▼
L1 RINGER ON/OFF
▲▼: select
:enter
▼
L1 RINGER ON/OFF
= On
▲▼: select
SAVE?
L1 RINGER ON/OFF
= Off
▲▼: select
SAVE?
L1 RINGER ON/OFF
= Off
Programmed!
L2 RINGER ON/OFF
▲▼: select
:enter
▼
L2 RINGER ON/OFF
= On
▲▼: select
SAVE?
L2 RINGER ON/OFF
= Off
▲▼: select
SAVE?
L2 RINGER ON/OFF
= Off
Programmed!
Page 23
42 43
ADDITIONAL
ADDITIONAL
PROGRAMMING TREEPROGRAMMING TREE
LINE USAGE
▲▼: select
:enter
▼
L1 USAGE
▲▼: select
:enter
▼
L1 USAGE
= On
▲▼: select
SAVE?
L1 USAGE
= Off
▲▼: select
SAVE?
L1 USAGE
= Off
Programmed!
L2 USAGE
▲▼: select
:enter
▼
L2 USAGE
= On
▲▼: select
SAVE?
L2 USAGE
= Off
▲▼: select
SAVE?
L2 USAGE
= Off
Programmed!
L3, L4
L3, L4
PRIME LINE
▲▼: select
:enter
▼
PRIME LINE
= L1
▲▼: select
SAVE?
PRIME LINE
= L1
Programmed!
PRIME LINE
= L2
▲▼: select
SAVE?
PRIME LINE
= L2
Programmed!
LINE GROUP
▲▼: select
:enter
▼
LINE GROUP
= L04
▲▼: select
SAVE?
LINE GROUP
= L04
Programmed!
LINE GROUP
= L15
▲▼: select
SAVE?
LINE GROUP
= L15
Programmed!
LINE GROUP
= PRV
▲▼: select
SAVE?
LINE GROUP
= PRV
Programmed!
AUTO-MUTE
▲▼: select
:enter
▼
AUTO-MUTE
= On
▲▼: select
SAVE?
AUTO-MUTE
= Off
▲▼: select
SAVE?
AUTO-MUTE
= Off
Programmed!
TONE/PULSE
▲▼: select
:enter
▼
TONE/PULSE
= Tone
▲▼: select
SAVE?
TONE/PULSE
= Tone
Programmed!
TONE/PULSE
= Pulse
▲▼: select
SAVE?
TONE/PULSE
= Pulse
Programmed!
FLASH TIME
▲▼: select
:enter
▼
FLASH TIME
= 0.6 sec
▲▼: select
SAVE?
FLASH TIME
= 0.6 sec
Programmed!
FLASH TIME
= 0.7 sec
▲▼: select
SAVE?
FLASH TIME
= 0.7 sec
Programmed!
FLASH TIME
= 0.8 sec
▲▼: select
SAVE?
FLASH TIME
= 0.8 sec
Programmed!
Maximum Flash Time is 1.2 second
Page 24
44 45
ADDITIONAL
ADDITIONAL
PROGRAMMING TREE
AREA CODEs
▲▼: select
:enter
▼
HAC
= (empty)
▲▼: select
:enter
▼
HAC
= 310
(Enter digits)
SAVE?
HAC
= 310
Programmed!
RESET ALL
▲▼: select
:enter
▼
RESET ALL?
ERASE: reset all
Reset!
Multi-unit installation with
duplicating EXT #.
Press PROGRAM to select
a unique EXT #.
Single unit installation,
multi-unit installation
with unique EXT #.
HOLD REMINDER
▲▼: select
:enter
▼
HOLD REMINDER
= On
▲▼: select
SAVE?
HOLD REMINDER
= On
Programmed!
HOLD REMINDER
= Off
▲▼: select
SAVE?
HOLD REMINDER
= Off
Programmed!
FCC REQUIREMENTS
1. This equipment complies with Part 68 of the FCC rules. On the bottom of this equipment is a label that
contains, among other information, the FCC registration number and Ringer Equivalence Number (REN)
for this equipment. If requested, provide this information to your telephone company.
2. The REN is useful to determine the quantity of devices you may connect to your telephone line and still
have all of those devices ring when your number is called. In most, but not all areas, the sum of the
RENs of all devices should not exceed five (5.0). To be certain of the number of devices you may
connect to your line, as determined by the REN, you should call your local telephone company to
determine the maximum REN for your calling area.
3. If your telephone causes harm to the telephone network, the telephone company may discontinue your
service temporarily. If possible, they will notify you in advance. But if advance notice is not practical,
you will be notified as soon as possible. You will be advised of your right to file a complaint with the
FCC.
4. Your telephone company may make changes in its facilities, equipment, operations, or procedures that
could affect the proper operation of your equipment. If they do, you will be given advance notice so as
to give you an opportunity to maintain uninterrupted service.
5. If there is a problem with this unit, the telephone company may ask you to disconnect this equipment
from the network until the problem has been corrected or you are sure that the equipment is not
malfunctioning.
6. Repairs can only be made by the manufacturer or an authorized ser vice agency. Unauthorized repairs
void registration and warranty. Contact seller or manufacturer for details of permissible user-performed
routine repairs, and where and how to have other than routine repairs made.
7. This equipment may not be used on coin ser vice provided by the telephone company. Connection to
party lines is subject to state tariffs. (Contact your state public utility commission or corporation
commission for information.)
Jacks: USOC RJ61, RJ14, 2X RJ-11 Ringer Equivalence: See bottom/underside of the base unit.
NOTE: This equipment has been tested and found to comply with the limits for a Class B digital device,
pursuant to Part 15 of the FCC Rules. These limits are designed to provide reasonable protection against
harmful interference in a residential installation. This equipment generates, uses, and can radiate radio
frequency energy and, if not installed and used in accordance with the instructions, may cause harmful
interference to radio communications. However, there is no guarantee that interference will not occur in a
particular installation. If this equipment does cause harmful interference to radio or television reception,
which can be determined by turning the equipment off and on, the user is encouraged to try to correct the
interference by one or more of the following measures:
● Reorient or relocate the receiving antenna.
● Increase the separation between the equipment and receiver.
● Connect the equipment into an outlet on a circuit different from that to which the receiver is
connected.
● Consult the dealer or an experienced radio/TV technician for help.
Any changes made by the user not approved by the manufacturer can void the user’s authority to operate
the equipment. This product is hearing aid compatible.
USER INSTRUCTIONS
Page 25
46 47
4-LINE SYSTEM TELEPHONE
WITH SPEAKERPHONE AND
CALL WAITING CALLER ID
OWNER'S GUIDE
420 M1S1 10/01
Printed in Taiwan
Technical Specifications
FCC Registration No.:
See bottom/underside of the unit
Ringer Equivalence:
See bottom/underside of the unit
Lines: 4 Analog/POTS
Jacks:
RJ61 USOC = L1/L2/L3/L4
RJ14=L3/L4
2XRJ11=L3/L4
Headset Jack: 2.5 mm Jack
Power Source:
Base Unit, Adapter M/N-140
Output: 12VDC 400mA
Battery Type: 9 Volt
Handset Amplification: 0dB to +12dB, 4
levels
The unit is hearing aid compatible.
Design and specifications are subject to
change without notice.
Feature Specifications
UZ635AT
Caller ID with Call Waiting: Type 2
Message Waiting Indicator: FSK
Feature Keys (Autodialers/Centrex):
20 @ 32 digits
Directory Records: 200 @ 32 digits
Caller ID Records: 200
LCD: English/Spanish, 4 lines x 16
characters, Backlit
Speakerphone: Half Duplex
3-way Conference
Clock/Call Timer
Tone/Pulse
Mixed Tone/Pulse Dialing
Flash: 600ms/100ms-1200ms
Distinctive Ring Compatible
Non KSU Features:
Intercom
Paging
Call Transfer
Networking Requirements:
Common Line 1
600 feet, maximum
Page 26

48 49
420 M1S1 10/12/01
Printed in China
Technical Specifications
FCC Registration No.:
See bottom/underside of the unit
Ringer Equivalence:
See bottom/underside of the unit
Lines: 4 Analog/POTS
Jacks:
RJ61USOC = L1/L2/L3/L4
RJ14=L3/L4
2XRJ11=L3/L4
Headset Jack: 2.5mm Jack
Power Source:
Base Unit, Adapter M/N-140
Output: 12VDC 400mA
Battery Type: 9 Volt
Handset Amplification: 0dB to +12dB, 4
levels
The unit is hearing aid compatible.
Design and specifications are subject to
change without notice.
UZ635AT
Feature Specifications
Caller ID with Call Waiting: Type 2
Message Waiting Indicator: FSK
Feature Keys (Autodialers/Centrex):
20 @ 32 digits
Directory Records: 200 @ 32 digits
Caller ID Records: 200
LCD: English/Spanish, 4 lines x 16
characters, Backlit
Speakerphone: Half Duplex
3-way Conference
Clock/Call Timer
Tone/Pulse
Mixed Tone/Pulse Dialing
Flash: 600ms/100ms-1200ms
Distinctive Ring Compatible
Non KSU Features:
Intercom
Paging
Call Transfer
Networking
Requirements:
Common Line 1
600 feet, maximum
IMPORTANT SAFETY INSTRUCTIONS
INSTALLA TION INSTRUCTIONS
1. Never install telephone wiring during a lightning storm.
2. Never install telephone jacks in wet locations unless the jack is specifically designed for wet locations.
3. Never touch uninsulated telephone wires or terminals unless the telephone line has been disconnected
at the network interface.
4. Use caution when installing or modifying telephone lines.
SAFETY PRECAUTIONS
When using your telephone equipment, basic safety precautions should always be followed to reduce the
risk of fire, electric shock and injury to persons, including the following:
1. Read and understand all instructions.
2. Follow all warnings and instructions marked on the product.
3. Unplug this product from the wall outlet before cleaning. Do not use liquid cleaners or aerosol
cleaners. Use a damp cloth for cleaning.
4. Do not use this product near water: for example, near a bath tub, wash bowl, kitchen sink or laundr y
tub, in a wet basement, or near a swimming pool.
5. Do not place this product on an unstable cart, stand, or table. The product may fall, causing serious
product damage.
6. Slots and openings in the cabinet and the back or bottom are provided for ventilation. To protect it
from overheating, these openings must not be blocked or covered by placing the product on the bed,
sofa, rug, or other similar surface. This product should never be placed near or over a radiator or heat
register. This product should not be placed in an enclosed environment unless proper ventilation is
provided.
7. Do not allow anything to rest on the power cord. Do not locate this product where the cord will be
abused by animals or persons walking on it.
8. Do not overload wall outlets and extension cords as this can result in the risk of fire or electric shock.
9. Never push objects of any kind into this product through cabinet slots as they may touch dangerous
voltage points or short out parts that could result in a risk of fire or electric shock.
10. Never spill liquid of any kind on the product.
11. To reduce the risk of electric shock, do not disassemble this product. Take it to a qualified
serviceperson when service or repair work is required. Opening or removing covers may expose you to
dangerous voltages or other risks. Incorrect re-assembly can cause electric shock when the appliance
is subsequently used.
12. Unplug this product from the wall outlet and refer servicing to qualified service personnel under the
following conditions:
A. When the power supply cord or plug is damaged or frayed.
B. If liquid has been spilled into the product.
C. If the product has been exposed to rain or water.
D. If the product does not operate normally by following the operating instructions. Adjust only
those controls that are covered by the operating instructions because improper adjustment of
other controls may result in damage and will often require extensive work by a qualified
technician to restore the product to normal operation.
E. If the product has been dropped or the cabinet has been damaged.
F. If the product exhibits a distinct change in performance.
13. Avoid using a telephone (other than a cordless type) during an electrical storm. There may be a remote
risk of electric shock from lightning.
14. Do not use the telephone to report a gas leak while near the leak.
15. You should use ONLY the power adapter supplied with your telephone.
SAVE THESE INSTRUCTIONS
 Loading...