

Page 1
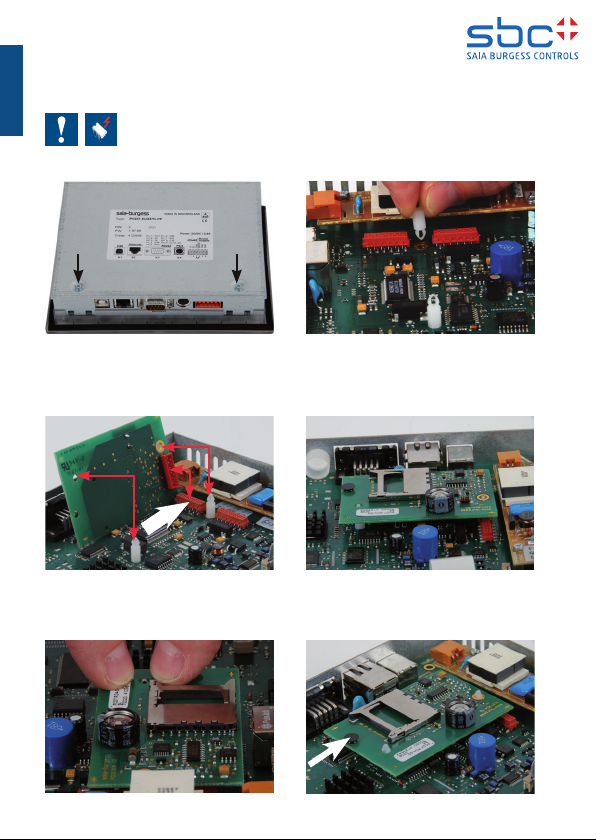
Mounting instructions for PCD7.RD4-SD
on PCD7.D457xxxx HW version B or earlier
English
ATTENTION: ELECTROSTATIC DISCHARGE SENSITIVE DEVICES
1. Remove the backcover
by removing the 2 screws shown below. 2. Mount the 2 plastic supports.
3. Align the red module connector with J11
of the PCB and the module holes with the
2 plastic supports.
4. Slightly rocking the module while
pressing down will help snap the module
onto the 2 plastic supports.
J11
6. Module is installed. Make sure the red
5. Push the module down until it is plugged
correctly into socket J11
Saia-Burgess Controls AG, Bahnhofstrasse 18, CH-3280 Murten, Switzerland www.saia-pcd.com
431950610A 08.2016 Subject to change without notice
connector is pressed all the way on.
Remove black rivet to install SD Card,
then replace it. Replace backcover.
Page 2
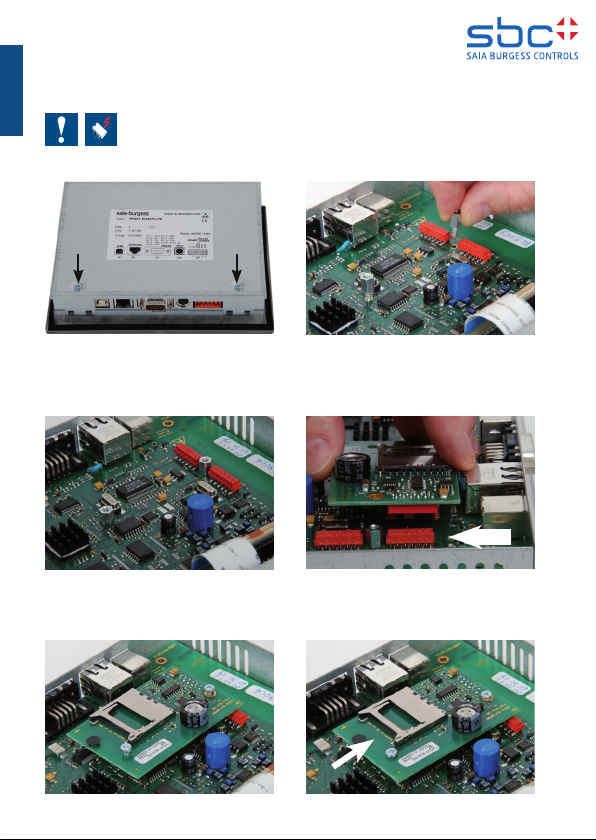
Mounting instructions for PCD7.RD4-SD
on PCD7.D457xxxx HW version C or newer
English
ATTENTION: ELECTROSTATIC DISCHARGE SENSITIVE DEVICES
1. Remove the backcover
by removing the 2 screws shown below.
3.. Use 5.5 mm socket/wrench to screw in the
screws. Keep them perpendicular to the PCB
as much as possible. Do not over tighten.
Stop when the screw touches the PCB.
5. Screw the module to the screw supports.
2. Place the 2 support screws, turning them
by hand until they are started into their holes.
4. Plug the red connector on the bottom of the
module into J11 of the PCB. The module will
then be resting on the 2 support screws.
6. Module is installed. Remove black rivet to
install SD Card, then replace it.
Replace backcover.
J11
Saia-Burgess Controls AG, Bahnhofstrasse 18, CH-3280 Murten, Switzerland www.saia-pcd.com
431950610A 08.2016 Subject to change without notice
 Loading...