

Page 1

INSTRUCTION MANUAL
Men’s Digital Video Watch Recorder
SB-WR069B
Revised: July 9, 2013
ank you for purchasing from SafetyBasement.com! We appreciate your business.
We made this simple manual to help you enjoy your new product as quickly and easily as
possible.
Be sure to check the TECH SUPPORT tab on your product page at SafetyBasement.com
for the latest available manual.
Page 2
PRODUCT MANUAL Digital Video Watch Recorder : SB-WR069B
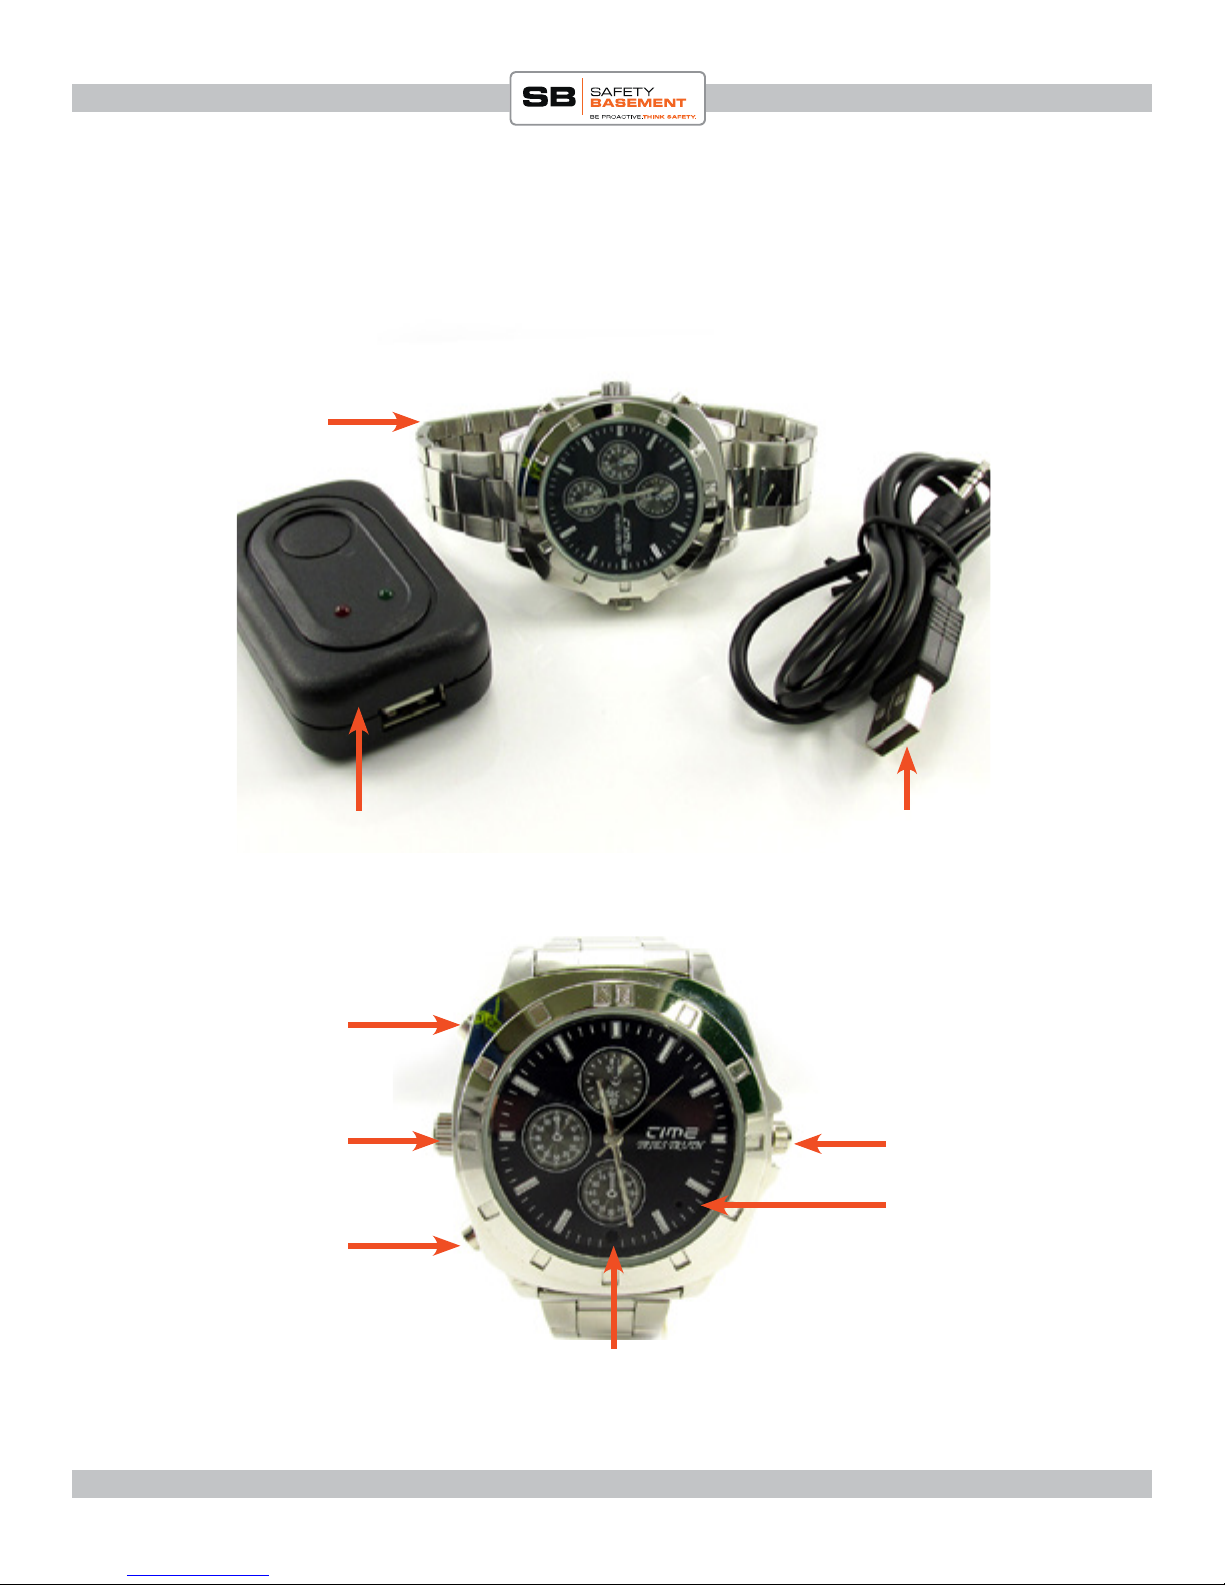
PRODUCT REFERENCE
What’s Included with
Your WR069B
WR069B Watch
Charger
A BUTTON /
PHOTO / AUDIO
USB Port
B BUTTON /
POWER / VIDEO
Wall
USB Cable
Time Adjuster
Status Light
(Red & Blue)
Camera
www.SafetyBasement.com Phone: 877-345-2336 Fax: 888-236-2524
Page 2
Page 3
PRODUCT MANUAL Digital Video Watch Recorder : SB-WR069B
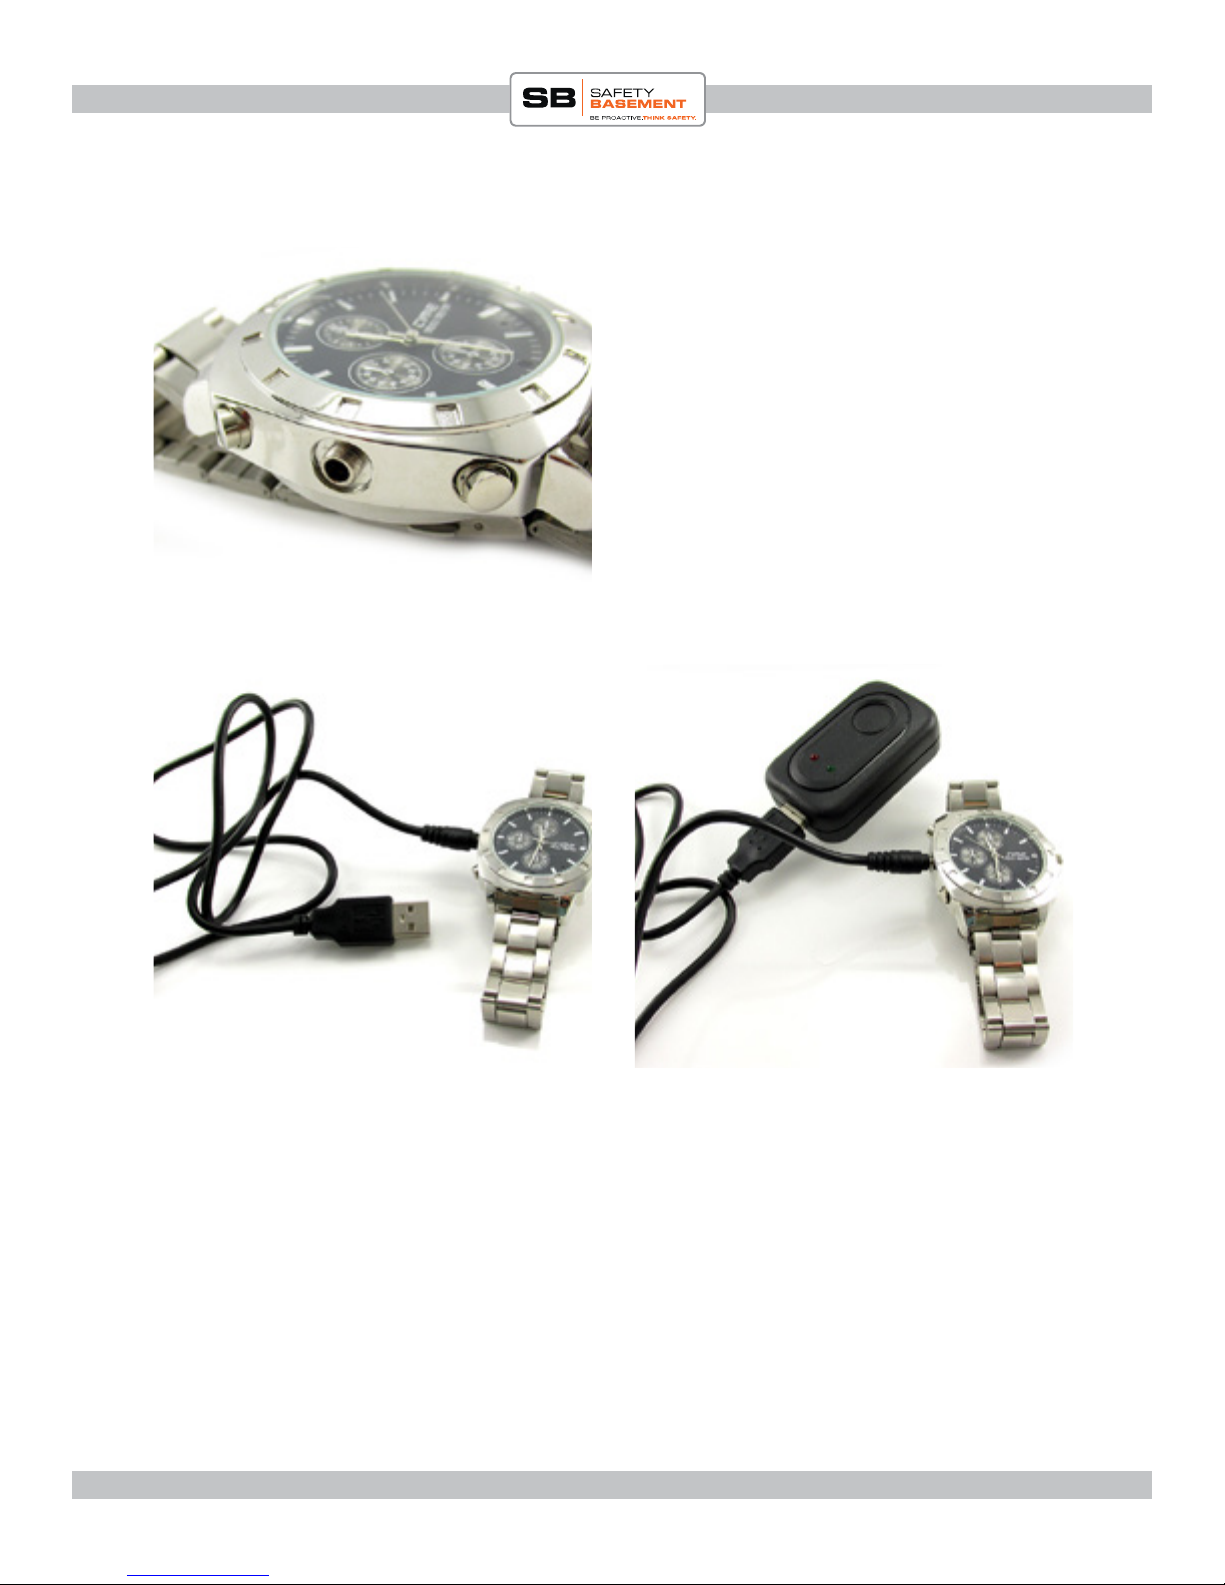
CHARGING
Before you use your video watch recorder,
you should charge it for several hours.
You can do this by connecting your watch
to your computer’s USB port, or use the
included wall adapter.
For now, please connect to your PC. We will
need to be connected to set your time and
date.
You do not need to download any drivers to connect your watch to a PC or Mac.
Simply connect the USB cable to your watch. Connect the other end directly to a USB port
on your PC. Do not use a hub.
In a few moments, your PC will automatically connect to the watch. e rst time, it may
install standard drivers. is is normal. Your watch will charge while connected, and you
can also access the les on it.
You can now use the watch as you would any external drive or USB ash drive.
Remember to EJECT your device before pulling the USB cable out.
www.SafetyBasement.com Phone: 877-345-2336 Fax: 888-236-2524
Page 3
Page 4
PRODUCT MANUAL Digital Video Watch Recorder : SB-WR069B
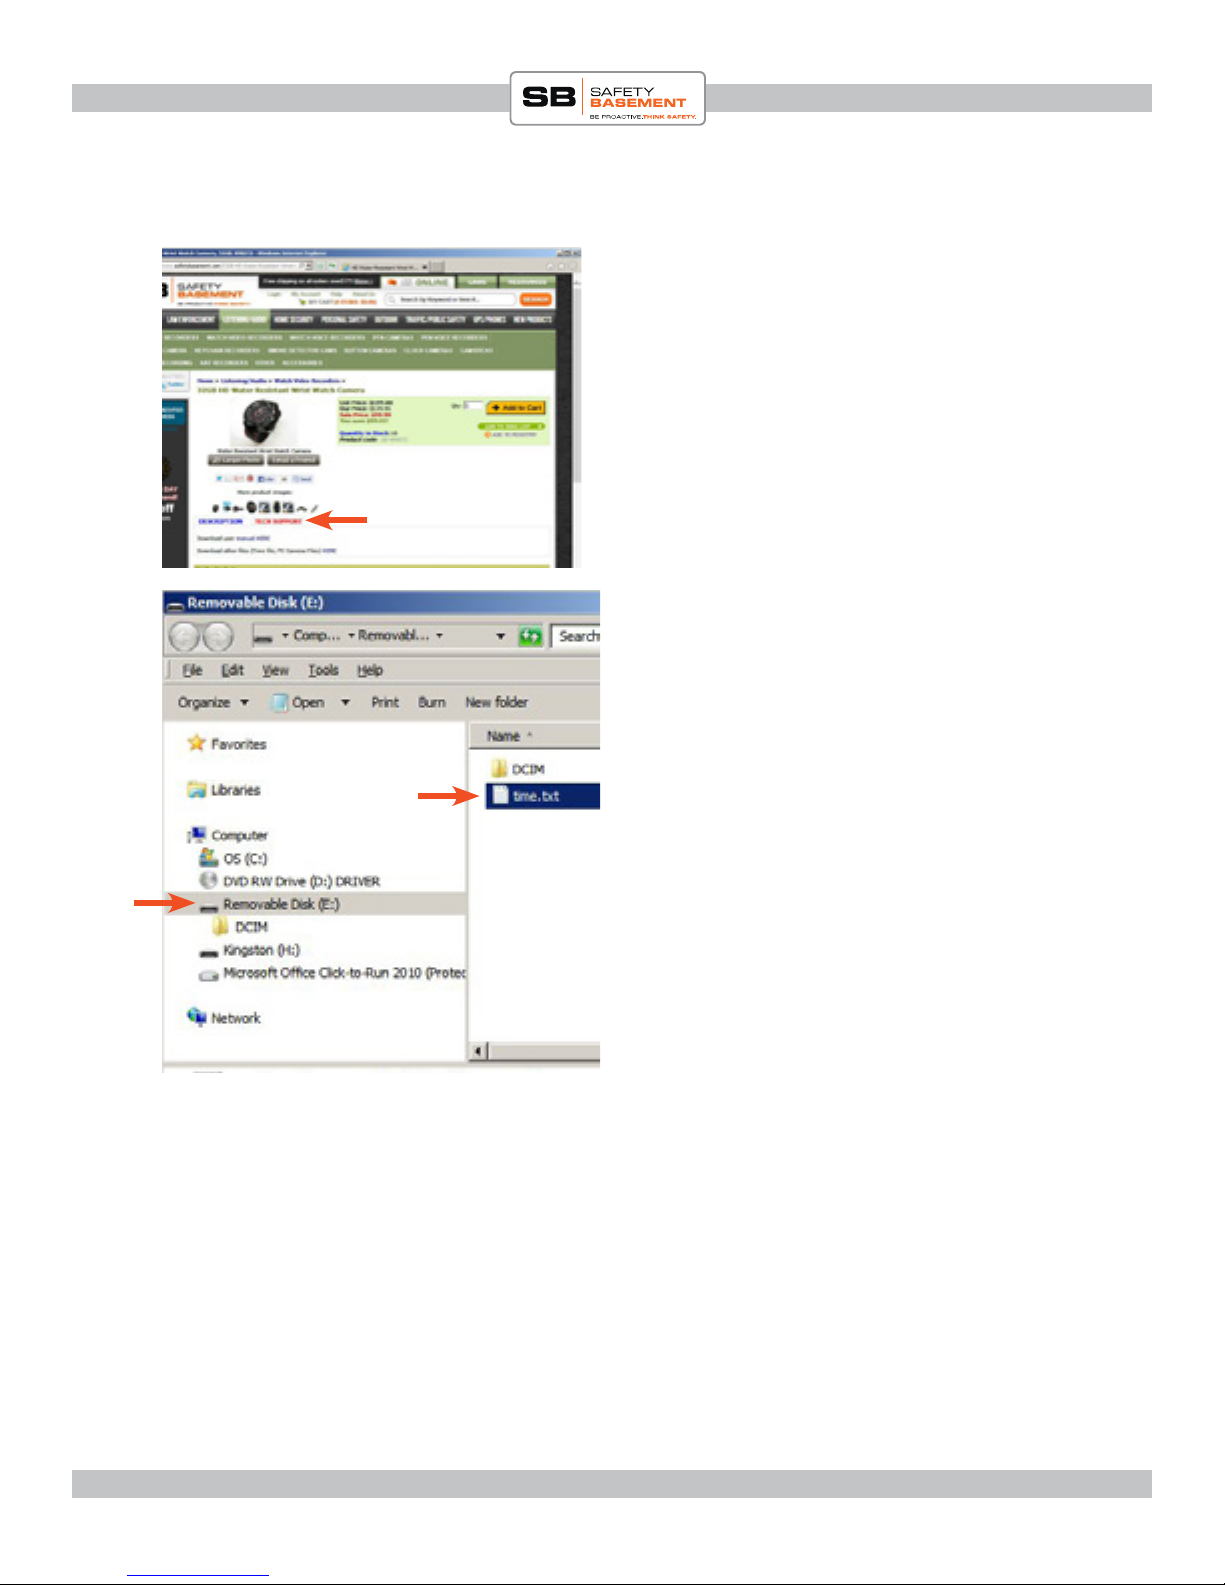
DOWNLOADS
Go to the Product Page for your device on
SafetyBasement.com and locate the red
TECH SUPPORT tab, as shown in this
example.
You will nd the latest manual here, along
with any les you may need.
Right-click on the TIME.TXT le, and
TECH SUPPORT
and available les
choose SAVE LINK AS, or SAVE TARGET
AS...
Save the le to your watch, as shown in this
example.
Note: some computers may NOT show the
“.txt” in the lename. is is normal.
Your Drive Letter may vary.
Do NOT save the Time le inside the
DCIM folder.
www.SafetyBasement.com Phone: 877-345-2336 Fax: 888-236-2524
Page 4
Page 5

PRODUCT MANUAL Digital Video Watch Recorder : SB-WR069B
SETTING THE TIME & DATE
Now that the Time.txt le is saved on your
watch, Double-Click the le.
A standard text editor should open the le.
In Windows, this would be Notepad. On a
Mac, it would be TextEdit.
Adjust the Year-Month-Day (SPACE)
Hour:Minutes:Seconds as needed.
e punctuation and SPACE must remain.
When nished, SAVE this le.
Close the text editor.
To use the Time and Date you set, you must EJECT the watch from your PC and power it
up.
EJECT the watch from your PC. In Windows, right-click on the drive letter and choose
Eject. Wait for Windows to say it’s okay to remove the device.
Now, unplug the USB cable from the computer, then from the watch.
HOLD the B BUTTON until the Red and Blue light appear. en, the Blue light will remain
steady. You are now in Stand By Mode. Your time is now set. Should the timestamp be
wrong in your les, please redo the setup.
NOTE: It is normal for the time.txt le to be deleted during power up. If it’s still there,
something is wrong with the le.
www.SafetyBasement.com Phone: 877-345-2336 Fax: 888-236-2524
Page 5
Page 6

PRODUCT MANUAL Digital Video Watch Recorder : SB-WR069B
VIDEO
A BUTTON /
PHOTO / AUDIO
Status Light
B BUTTON /
POWER / VIDEO
(Red & Blue)
Camera
NOTE: When shooting video or taking a photo, remember to TURN YOUR WRIST
towards the subject. In the proper position, the camera will be on TOP. When the camera is
facing you in the standard watch position, images will be upside down.
HOLD the B button to turn the watch ON. e status light will be red and blue, then a
steady blue. Steady Blue is Stand By Mode.
From Stand By Mode, quick-press the B Button. e status light will blink Blue a few times.
You are now shooting video.
To check the status of your watch, quick-press the B button. It will blink blue a few times to
show that you are still shooting video.
To Stop, quick-press the B button to check status. en quick-press the B button again. e
status light will be a steady Blue. You are now back in Stand By Mode.
www.SafetyBasement.com Phone: 877-345-2336 Fax: 888-236-2524
Page 6
Page 7

PRODUCT MANUAL Digital Video Watch Recorder : SB-WR069B
PHOTO
A BUTTON /
PHOTO / AUDIO
Status Light
B BUTTON /
POWER / VIDEO
(Red & Blue)
Camera
From Stand By Mode, aim your watch with the camera on top (turn your wrist).
Quick-press the A button. e status light will blink Red while your photo is taken and
saved. When the status light is Blue, you are ready to take another photo.
AUDIO ONLY
From Stand By Mode...
Hold the A button. e status light will blink Red. You are now recording audio-only.
e status light will blink red during your audio-only recording.
To stop recording, quick-press the A button. e status light will turn Blue. You are in Stand
By Mode.
To Power OFF, hold the B button until the status light blinks red a few times, then goes dark.
Your watch should always be OFF when connecting to your PC.
www.SafetyBasement.com Phone: 877-345-2336 Fax: 888-236-2524
Page 7
Page 8

PRODUCT MANUAL Digital Video Watch Recorder : SB-WR069B
WHERE ARE MY FILES?
Your les are located inside the DCIM /
100DSCIM folder.
You should COPY these les to your PC for
archiving and best playback.
en, delete the les to make room for
more.
NOTE TO MAC USERS! When deleting
les, you MUST empty your trash BEFORE
you Eject the watch from your Mac.
www.SafetyBasement.com Phone: 877-345-2336 Fax: 888-236-2524
Page 8
Page 9

PRODUCT MANUAL Digital Video Watch Recorder : SB-WR069B
SUGGESTED SOFTWARE
Your Windows PC or Mac has built-in soware that will play most of the les created by devices
like yours. However, if you are having problems playing your les, or need more options, please
download and try these programs.
is soware is free and can be downloaded directly from the links below. You can nd support
and tutorials for these programs on their respective websites. SafetyBasement can not provide
soware support for these programs
As with ANY les you download from the internet, be sure to scan them for viruses using your
particular virus scanner. While most users report no issues using this soware, we can not be
responsible for any damage caused by this soware. Please proceed carefully. Back up your PC
before installing any new soware.
VIDEO PLAYBACK - VLC
(http://www.videolan.org/vlc/index.html)
e VLC Media Player can play almost any video or audio le type. ere is
a version for Windows and for Mac OS X.
VIDEO EDITING for WINDOWS - MOVIE MAKER 2012
(http://windows.microso.com/en-US/windows/get-movie-makerdownload)
Movie Maker is a simple video editing program from Microso. Please go
to this link, and choose the download for your version of Windows. Please
note: Movie Maker is part of the Windows Essentials package.
VIDEO EDITING for MAC OS X - iMOVIE
(Visit the Apple Mac App Store for latest version)
iMovie is a simple video editing program from Apple. It comes installed with
your new Mac. e latest version is also available at the Mac App Store at
additional cost.
AUDIO PLAYBACK and EDITING - AUDACITY
(http://audacity.sourceforge.net/)
Audacity is a popular audio editing program used by amateurs and
professionals to edit simple and complex audio projects. You can use
Audacity to convert your audio les to another format, such as MP3. ere
is a version for Windows and Mac OS X.
PHOTOS
Your Windows and Mac computers have the ability to do basic editing of
photos built in.
www.SafetyBasement.com Phone: 877-345-2336 Fax: 888-236-2524
Page 9
Page 10

PRODUCT MANUAL Digital Video Watch Recorder : SB-WR069B
DEVICE SPECIFICATIONS
Format Wave / PCM
Bit Rate Mode Constant
Bit Rate 64 Kbps
Sampling Rate 8000 Hz
Audio
Codec MJPG
Dimensions 1280x960 pixels (4:3)
Frame Rate 30 fps
Bit Rate 10.6 Mbps
Audio PCM
Video
Bit Rate Mode Constant
Bit Rate 64 Kbps
Sampling Rate 8000 Hz
Format JPEG
Dimensions 3264x2448 pixels
Photo
www.SafetyBasement.com Phone: 877-345-2336 Fax: 888-236-2524
Page 10
Page 11

PRODUCT MANUAL Digital Video Watch Recorder : SB-WR069B
DEVICE SPECIFICATIONS
Memory Built In 8 GB
Memory Expansion n/a
Battery Type Internal Rechargeable for camera, stan-
dard watch battery for clock
Charger Type via USB port, wall adapter or PC
Device Info
Please check our site for the latest available manual for this product.
Notes
File sizes shown are approximate.
Video (10 minutes) 331 MB
Audio (10 minutes) 4.6 MB
Photo 650-750 KB
File Sizes
www.SafetyBasement.com Phone: 877-345-2336 Fax: 888-236-2524
Page 11
 Loading...