

Page 1
INSTRUCTION MANUAL
Password Protected 4-Mic Super Voice Re-
corder
Revised: June 4, 2014
ank you for purchasing from SafetyBasement.com! We appreciate your business.
We made this simple manual to help you enjoy your new product as quickly and easily as
possible.
Be sure to check the TECH SUPPORT tab on your product page at SafetyBasement.com
for the latest available manual.
Page 2
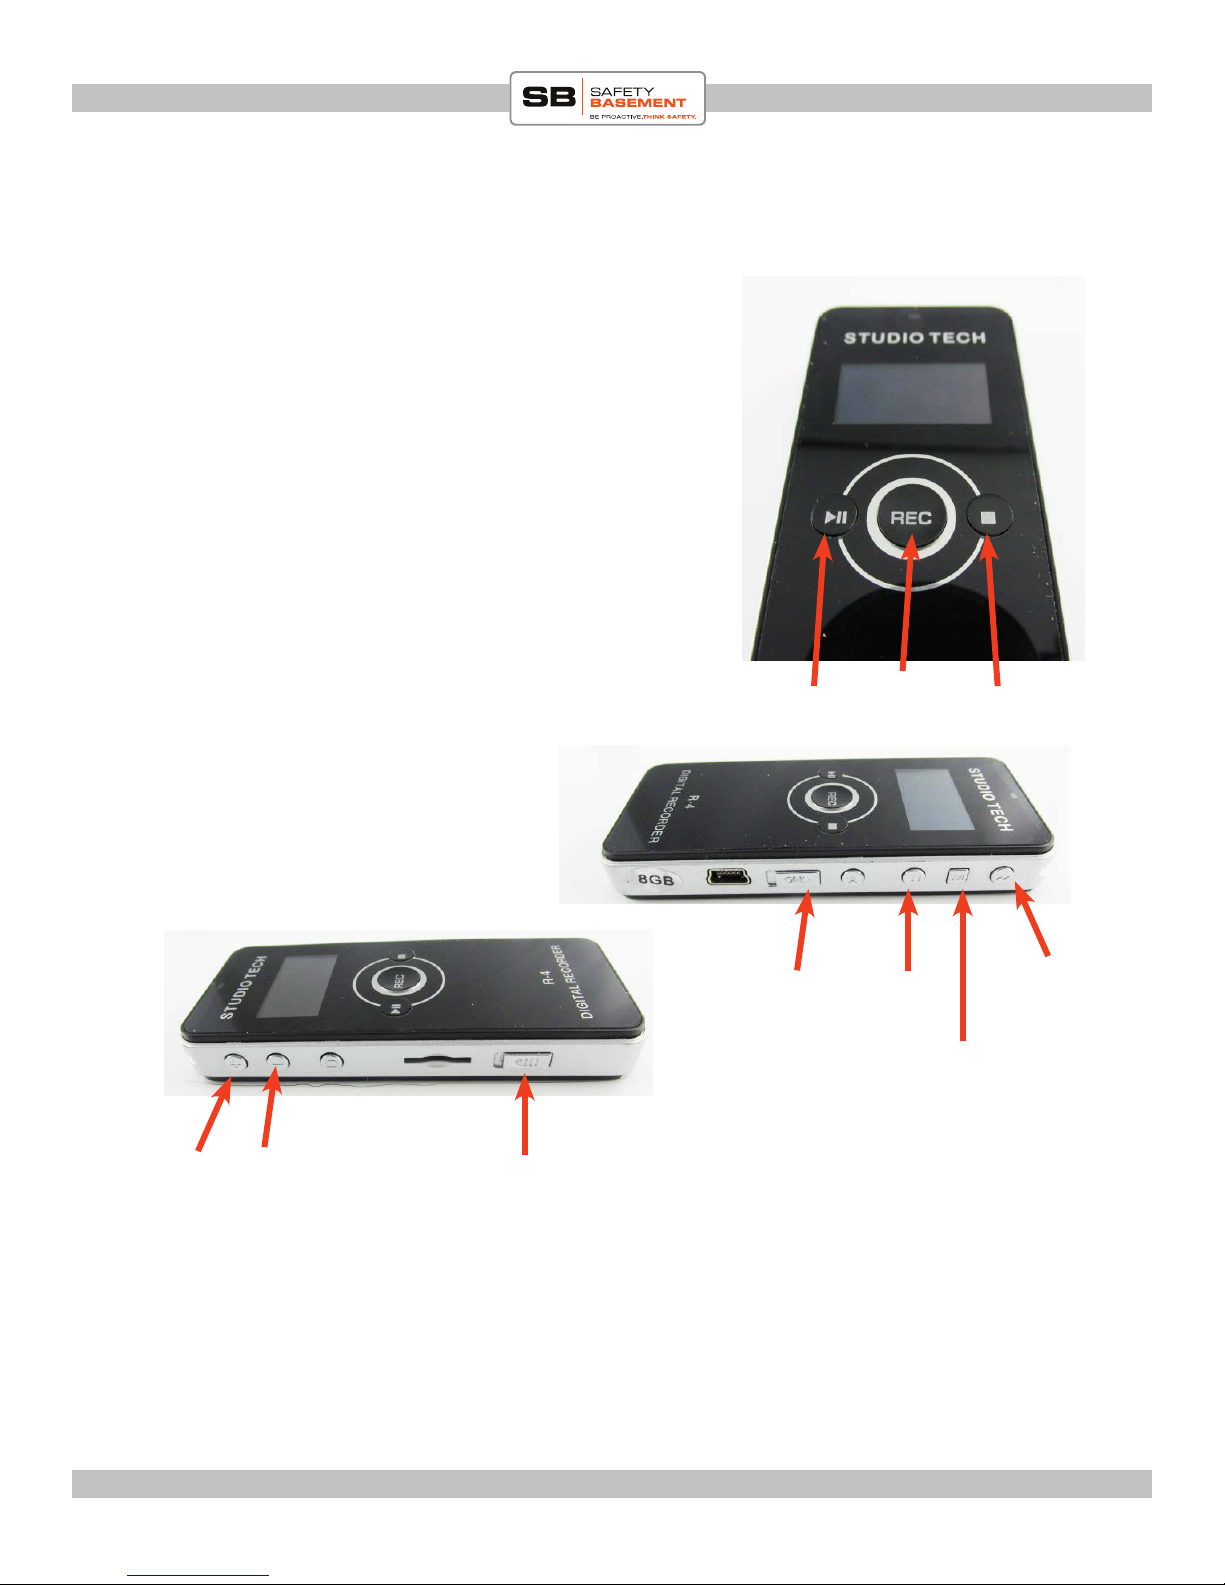
PRODUCT MANUAL Password Voice Recorder : SB-VR8204
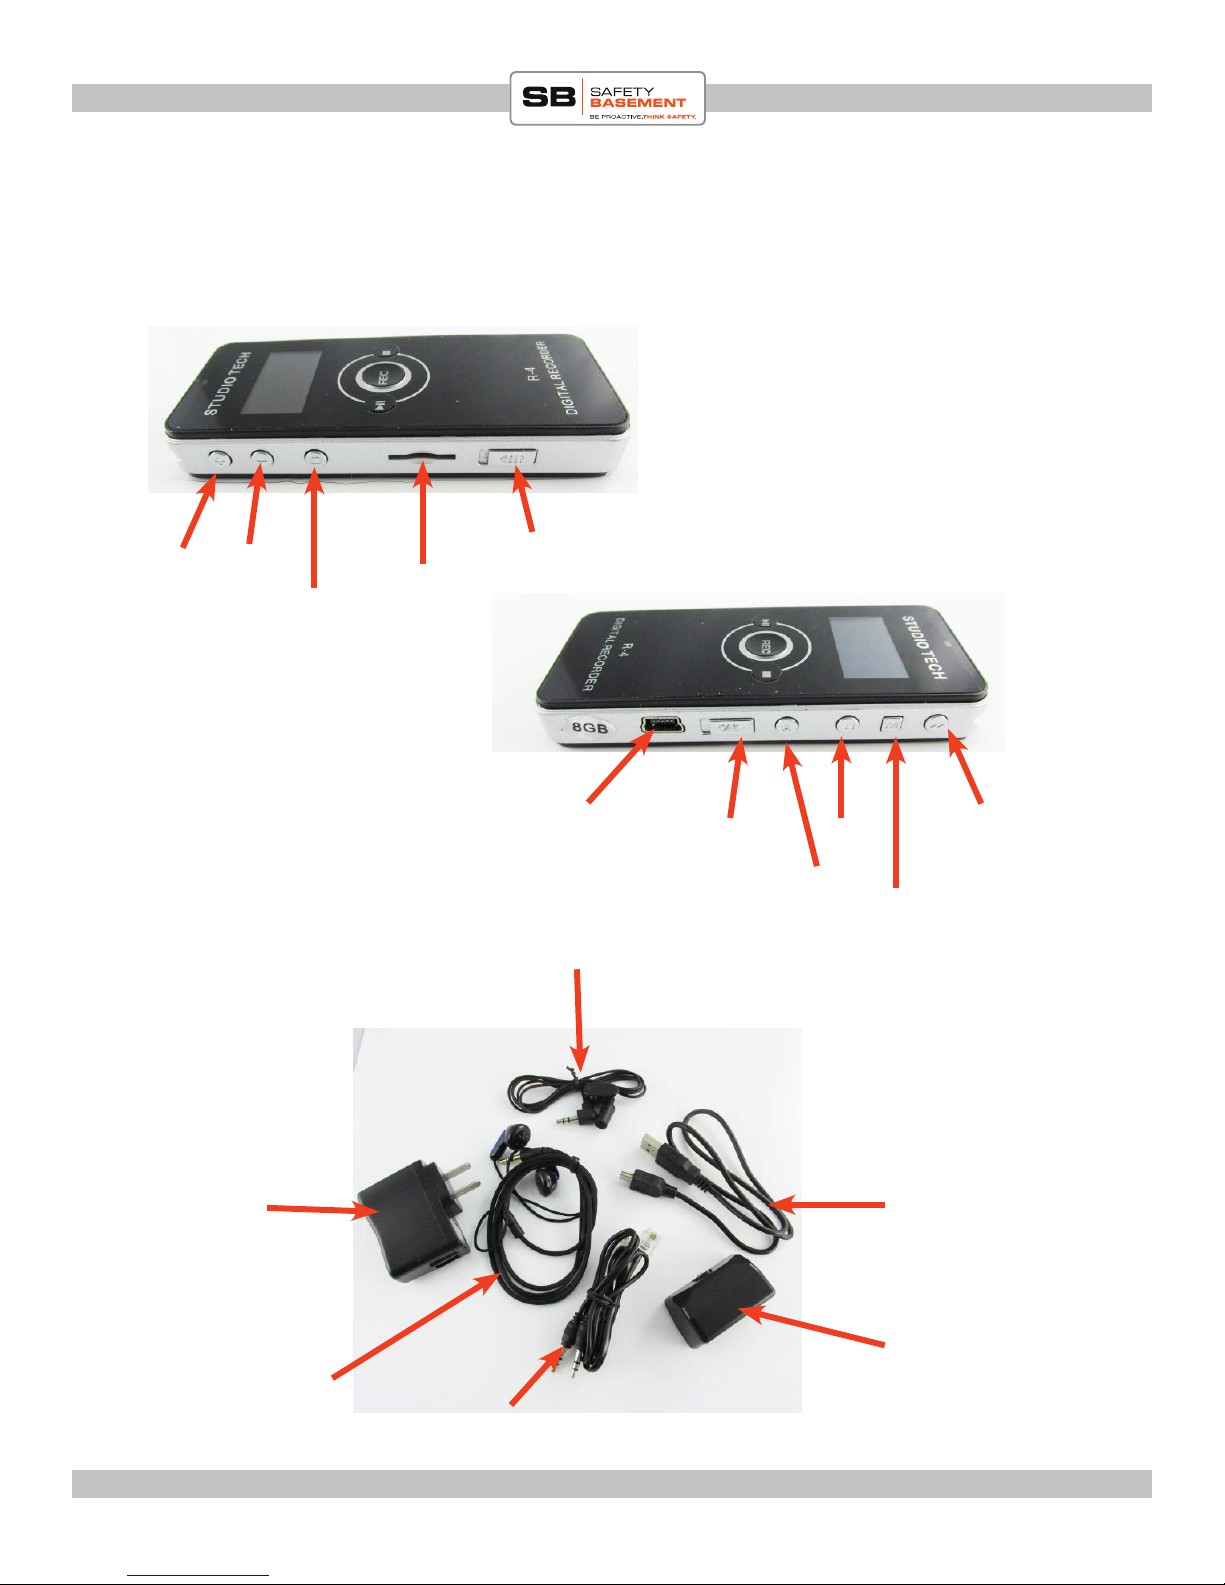
PRODUCT REFERENCE
VOL +
VOL -
Delete
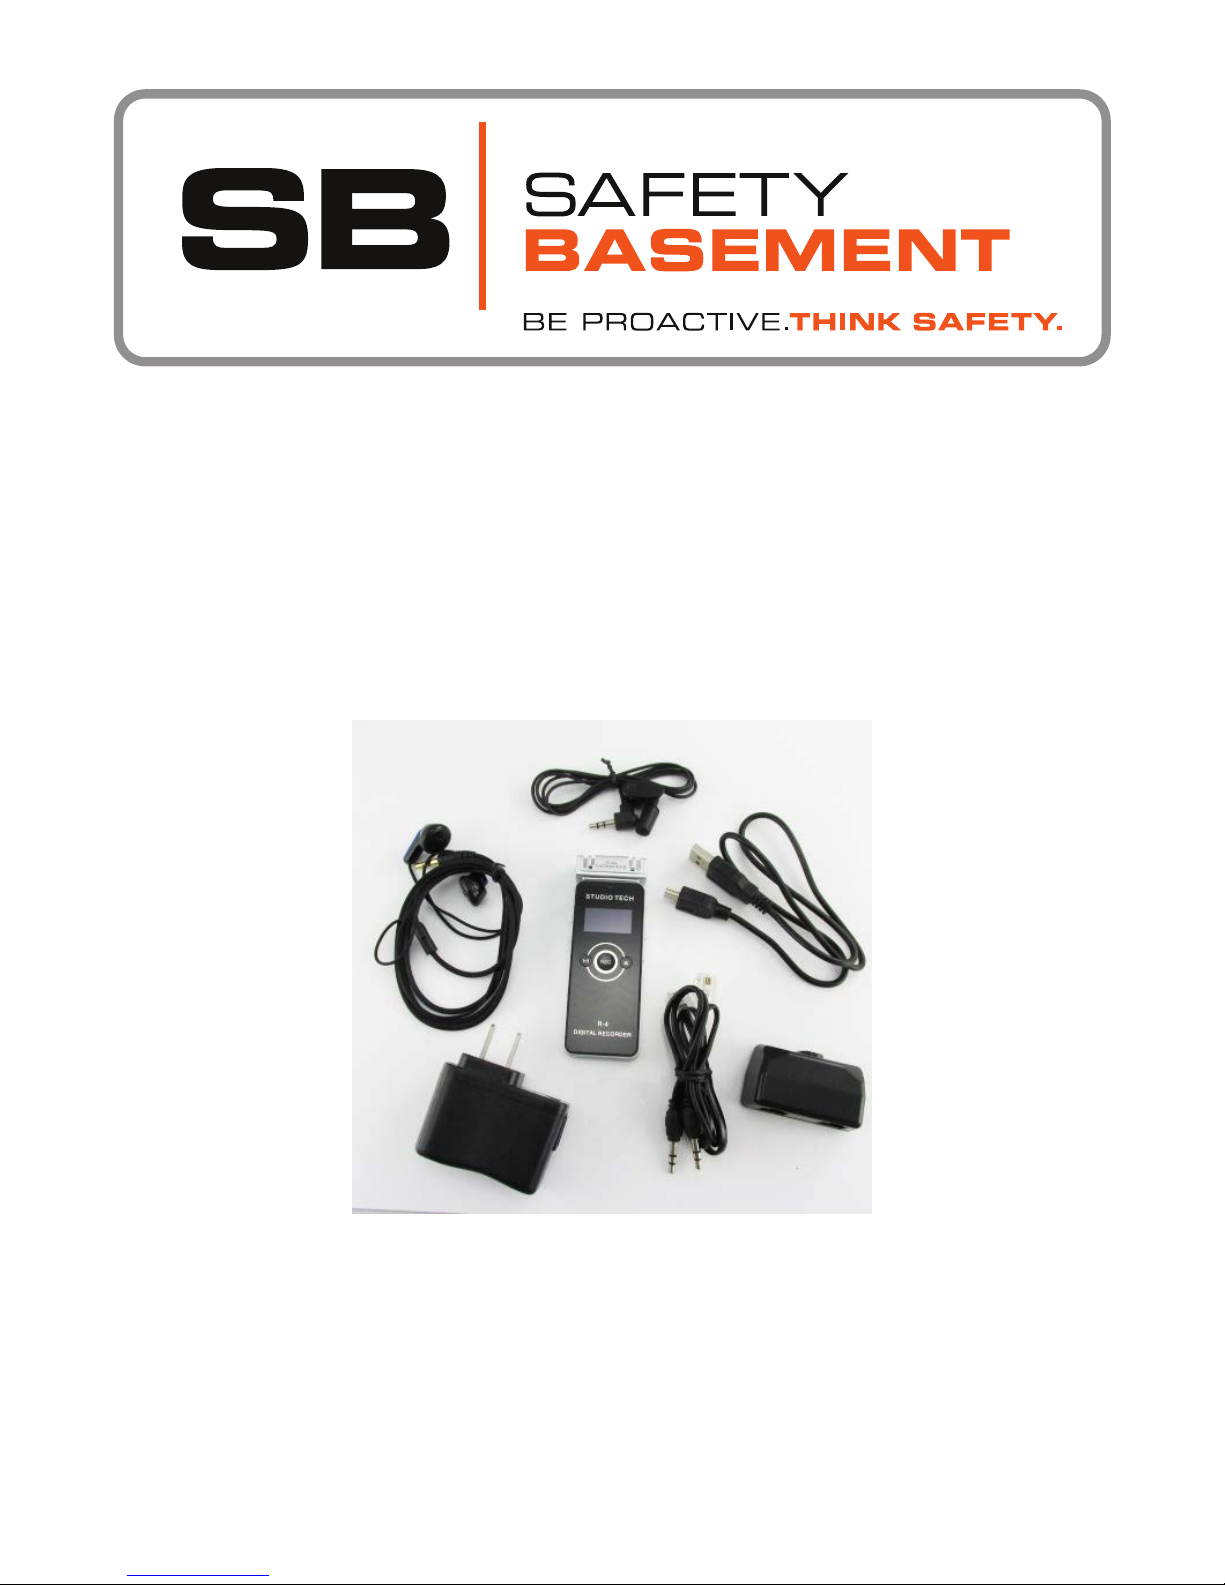
ACCESSORIES:
SD card slot
USB charging/
Download port
Button LOCK
Microphone
SYSTEM
POWER
ON/OFF
AGC
NEXT
PREVI-
MODE
Power
adapter
www.SafetyBasement.com Phone: 877-345-2336 Fax: 888-236-2524
USB cable. connects straight to
PC or to power
adapter
telephone adapter
Line-in cable
Page 2
Page 3
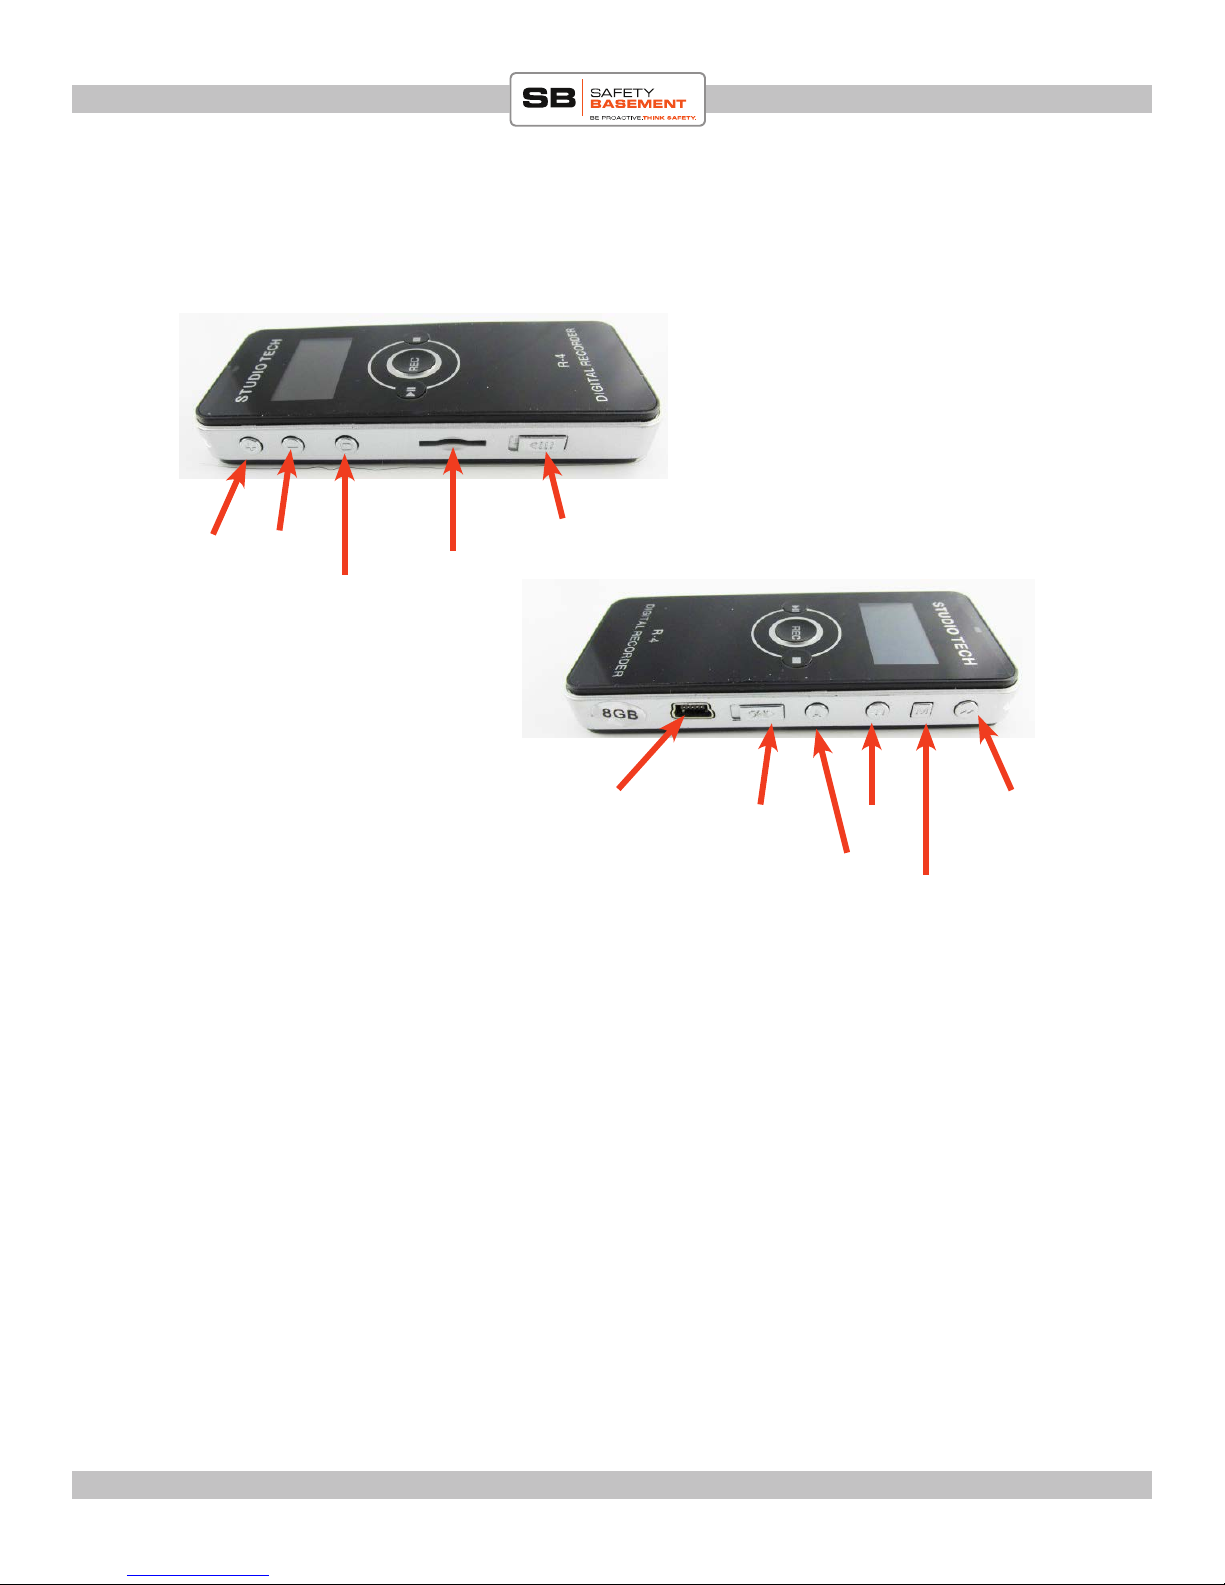
PRODUCT MANUAL Password Voice Recorder : SB-VR8204
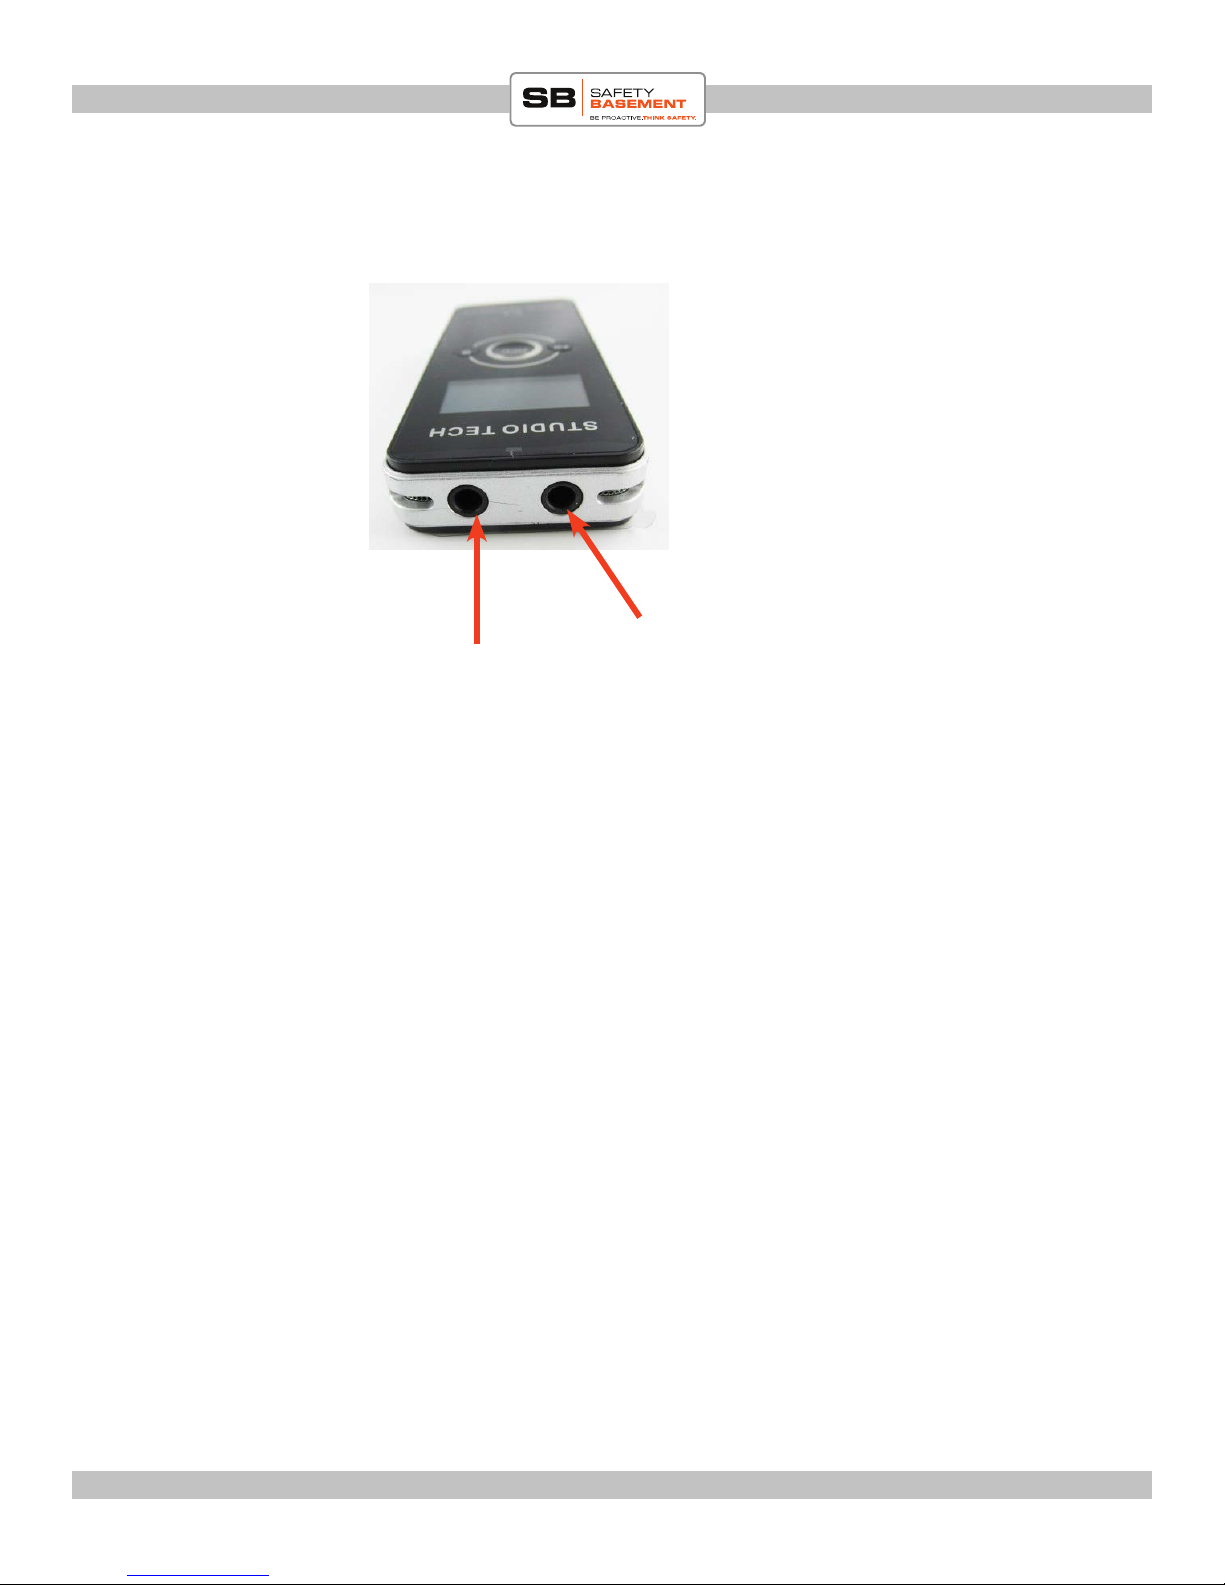
PRODUCT REFERENCE
Headphone
Mic Jack
www.SafetyBasement.com Phone: 877-345-2336 Fax: 888-236-2524
Page 3
Page 4
PRODUCT MANUAL Password Voice Recorder : SB-VR8204
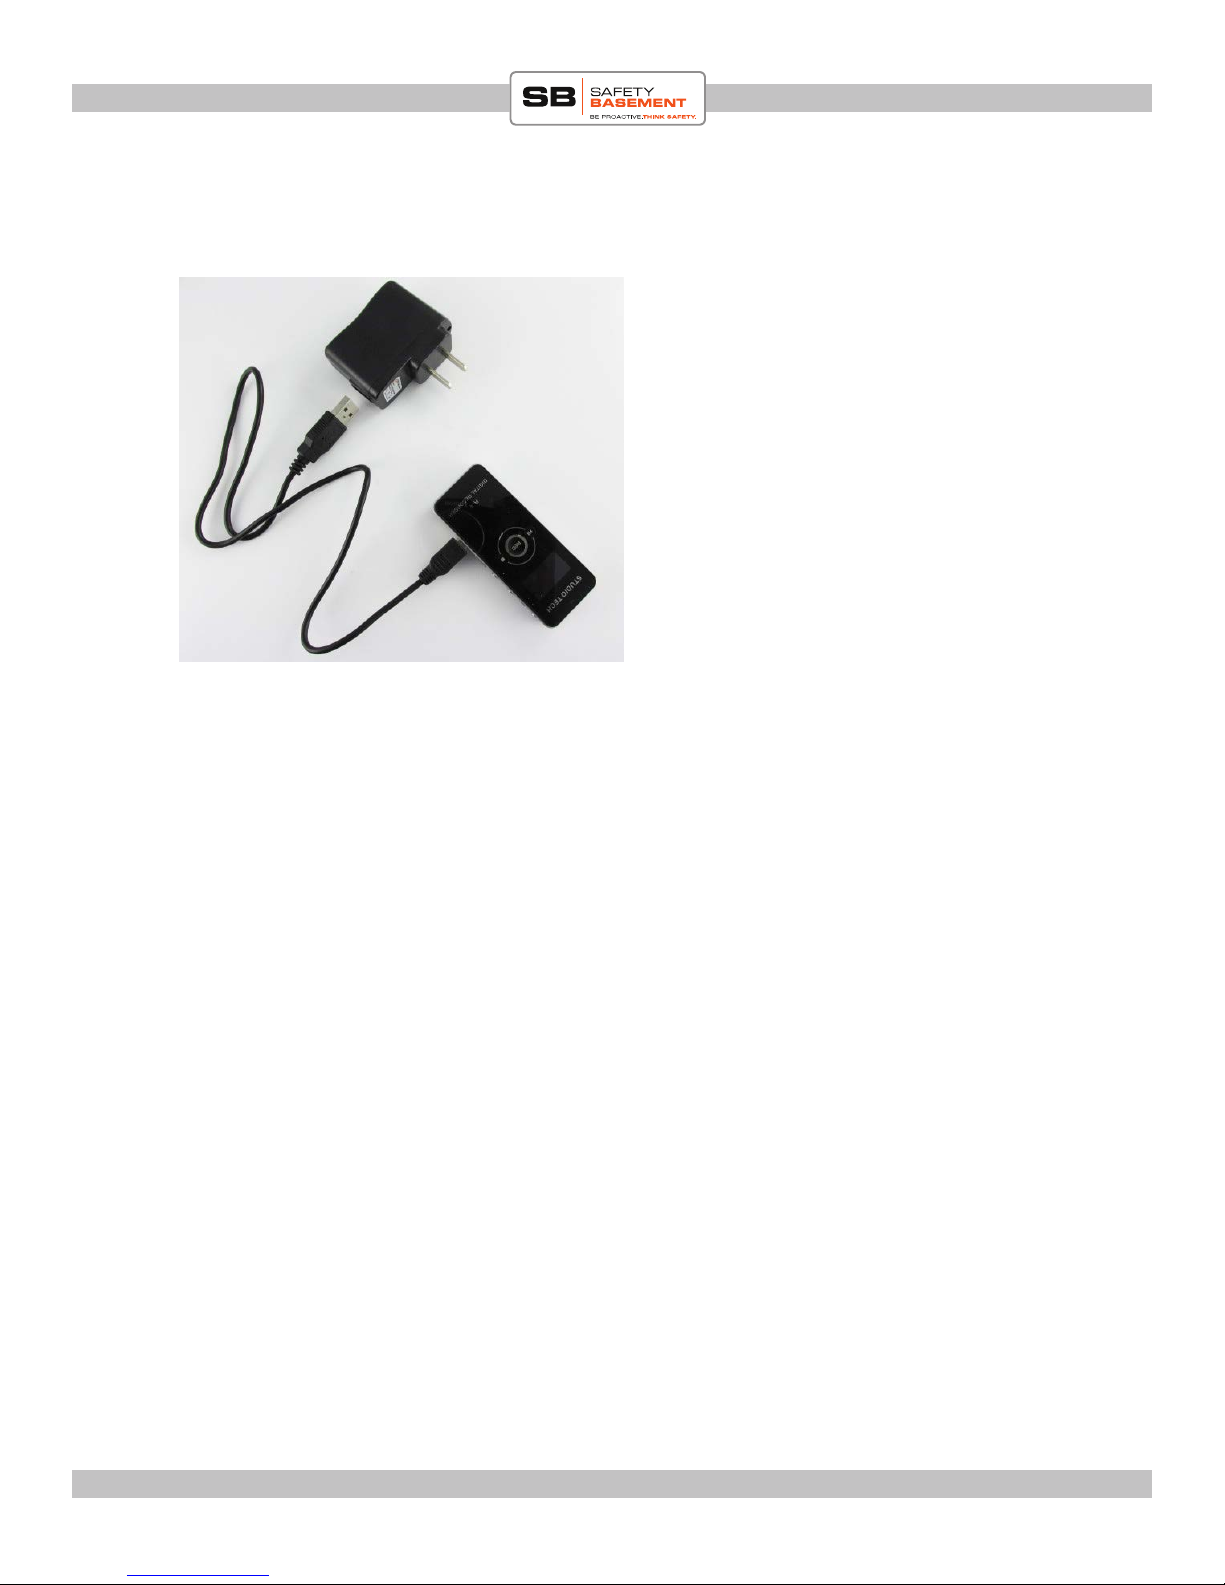
CHARGING
Before you use your voice recorder, you
should charge it for several hours.
You can do this by connecting it to your
computer’s USB port, or use included wall
adapter. Hint: Charge faster via wall adapter.
CONNECTING TO A PC
You do not need to download any drivers to connect your device to a PC or Mac.
Simply connect the USB cable to your recorder. Connect the other end directly to a USB
port on your PC. Do not use a hub.
In a few moments, your PC will automatically connect to the voice recorder. e rst
time, it may install standard drivers. is is normal. Your voice recorder will charge while
connected, and you can also access the les on it.
You can now use the voice recorder as you would any external drive or USB ash drive.
Remember to EJECT your device before pulling the USB cable out.
www.SafetyBasement.com Phone: 877-345-2336 Fax: 888-236-2524
Page 4
Page 5

PRODUCT MANUAL Password Voice Recorder : SB-VR8204
QUICK START - RECORD
Need to start recording immediately, without reading the entire manual rst, then read this page:
Turn the Power Switch to ON. In fact, leave the Power Switch in the ON all the time. You should
only turn it OFF when you are not going to use your voice recorder for an extended period of
time. Turning it o will reset all your customized settings and you will need to reset them again. If
you didnt do any custom settings then you can turn it on or o as needed.
Screen will turn on and ask you to enter password. If you dont want to deal with password right
now, simply press the MODE button to continue. is will take you to the main screen.
Press the (REC) button to begin recording. A little red light at the top of the recorder will stay on
while recording.
To stop recording, press the STOP button
IMPORTANT: Please note, the screen tends to turn o aer a few seconds (to conserve batery). If
that happens while you are in the middle of canging something, simply press any button to turn
screen back on, then press the button you want to submit your instructions. If you press a button
for a specic command, it will simply wake recorder the rst press, so you will need to press the
button again to submit the instructions. Keeo this in mind when using this recorder.
NOTE: Default password is: 0000
STOP button
MODE
SYSTEM POWER
ON & OFF
With the power switch on all the time, you will use the REC button to turn your recorder on and
o. If it is OFF, simply press and HOLD the REC button for about 5 seconds or until screen turns
on. release. Do likewise to turn o.
www.SafetyBasement.com Phone: 877-345-2336 Fax: 888-236-2524
Page 5
Page 6
PRODUCT MANUAL Password Voice Recorder : SB-VR8204
QUICK PLAYBACK
is section only adresses playing back recordings
Start from ANY SCREEN
1. press PL AY. Unit will begin playing back recorded les in
order.
2. Press PAUSE to pause playback. Press play again to resume
VOLUME:
While unit is in playback mode, use the VOL+ or VOL- to
increase or decrease volume. Remember, the volume feature
will only work while you are playing back a le at the time of
adjusting volume!
VOL +
VOL -
LOCK
MODE
PLAY/PAUSE
System power
ON/OFF
REC
NEXT
STOP
PREVI-
MODE
BUTTON LOCK:
To avoid accidentally turning unit o during recording (or pressing any other button by accident and interrupting your important recording session) you can LOCK the recorder so that all
buttons are disabled. UNLOCK to enables buttons again.
www.SafetyBasement.com Phone: 877-345-2336 Fax: 888-236-2524
Page 6
Page 7
PRODUCT MANUAL Password Voice Recorder : SB-VR8204
SETTINGS
Le Side
VOL +
VOL -
SD card slot
Delete
Button LOCK
Right Side
USB charging/
Download port
Please turn the Main System/Power Switch to ON.
You will want to leave it in the ON position at all times. You will set the Time and Date once, but
if you turn o the main power, you will lose your settings, and will need to set it again.
Your voice recorder will automatically power down when not in use. To WAKE UP your recorder,
press and hold the REC button for a few seconds or until screen turns on
SYSTEM
POWER
ON/OFF
NEXT
AGC
MODE
PREVI-
REMEMBER:
1. At any point while you are setting up your recorder, use the DEL button to go back one level.
2. If your recorder turns o HOLD the REC button to turn it back on.
3. Aer you have done your settings, dont turn it o using system power switch. Instead let it turn
o by itself or press and hold the REC button to turn it o. is way you wont lose your settings.
Turning unit o via ON/OFF switch will also make you lose all your custom settings and you will
have to do it over again! Not fun if you did a lot of custom settings!
www.SafetyBasement.com Phone: 877-345-2336 Fax: 888-236-2524
Page 7
Page 8

PRODUCT MANUAL Password Voice Recorder : SB-VR8204
MODES
ere are several MODES available to you with the Password Voice recorder. You can see
the Modes by pressing and holding the MODE button until you see the 4 mode options
below:
RADIO MODE
VOICE
You will see one of the following;
RECORD QUALITY-is allows you to select 4 recording quality levels. ey are:
HQ: MP3 pattern, high quality recording pattern, 191Kbps
SP: MP3 pattern, standard recoring pattern, 128Kbps
LP: MP3 pattern, lower quality recording pattern for a long time, 64Kbps
XQ:WAV pattern, HD PCM recording, 348Kbps
See chart in Appendix A for how much memory time you will get for each recording quality level.
e lower the recording quality level, the more recording memory space you will get.
TIME SET
SETTING MODE
REC LEVEL - is option allows you to optimize microphone recording quality.
LINE-IN DEVICE- is mode allows you to choose the LINE-IN source.
VOR SETTING- is mode allows enable or disable Voice Activated Recording
MONITOR SET- is feature allows for LIVE recording. Meaning you can listen to a conversation
via headphones while it is being recorded at the same time. is feature could be useful in situation
where you have maybe a wireless microphone and want to hear maybe a lecture from a distance
or if you are having a hard time hearing, you can tap the the many microphones on the device to
enhance sound pick up.
AGC- is stands for Automatic Gain Control. is allows for recorder to enhance weaker sounds
and diminish much louder sounds so that sounds recorded are even, whether far or near. Set it to
high if you want a more even recording of faint and loud sounds.
www.SafetyBasement.com Phone: 877-345-2336 Fax: 888-236-2524
Page 8
Page 9

PRODUCT MANUAL Password Voice Recorder : SB-VR8204
SET PASSWORD
is unit allows for password protection. You can turn password protection ON or OFF.
e unit begins by having password protection ON. e default password is 0000.
1. Turn unit ON (via side switch if this is the rst time using it or via pressing and holding the
REC button until screen turns on)
2. When unit turns on it will prompt you to enter password. It will already show 0000 on the
screen. is is the default password. Press the MODE button to conrm password. Unit will now
proceed to DEFAULT SCREEN.
MODE
PREV
NEXT
CHANGING PASSWORD:
Now that you are into the system, lets learn how to
change password or disable password. Lets start with
changing:
1. Turn screen on (if it is o, by pressing any key or
pressing and holding REC key till screen turns on)
2. PRESS & HOLD MODE button until you see the 4
icons (right)
3. Use PREV/NEXT to move to SETTING MODE
4. Press MODE
5. Press NEXT to highlight SET PASSWORD
6. Press MODE
7. Press NEXT to move to WRITE PASSWORD
8. Press MODE
9. You will be asked for your OLD PASSWORD which
is the current default password. Just press MODE to
conrm it.
10. On the next page you will be asked to enter NEW
PASSWORD. Use the NEXT/PREV buttons to move a
digit le or right and use the VOL+ or VOL- to change
the numbers up or down. en press MODE to conrm your new password
RADIO MODE
VOICE
SETTING MODE
TIME SET
www.SafetyBasement.com Phone: 877-345-2336 Fax: 888-236-2524
Page 9
Page 10

PRODUCT MANUAL Password Voice Recorder : SB-VR8204
SET PASSWORD..continued
CHANGING PASSWORD (continued):
11. On the next screen you will be asked for a SECOND PASS-
WORD, which is really asking you to conrm your password by
entering it again. Do it on this screen.
Re-enter password then press MODE to conrm it.
12. You will see WRITE OK! Which means your new password
has been conrmed to match your rst one and you now have a
new password.
PLEASE WRITE THIS PASSWORD SOMEWHERE INCASE
YOU FORGET IT
Screen/Backlight turn o time:
You may have noticed that the screen light turns o pretty quickly aer about 10 seconds. is
could be a bit annoying. Here is a way to extend that turn o time to atleast 30 seconds:
1. Turn device on. If screen is o press any button once or if it is totally o pres and hold the
REC button unitl screen turns on.
2. Aer enterign password (if it is enabled), press and hold the MODE button until the for setting icons appear.
3. highlight and select the SETTING MODE
4. Use NEXT or PREV buttons to scrol o and highlight BACKLIGHT. Press MODE to select.
5. Use the PREV or NEXT button to select he number of seconds you want the backlight to stay
on before turning o. en press MODE to go back one. You are all set. Now your screen light
will stay on a little longer especially during set up!
REMEMBER:
1. At any point while you are setting up your recorder, use the DEL button to go back one level.
2. If your recorder turns o HOLD the REC button to turn it back on.
3. Aer you have done your settings, dont turn it o using system power switch. Instead let it turn
o by itself or press and hold the REC button to turn it o. is way you wont lose your settings.
Turning unit o via ON/OFF switch will also make you lose all your custom settings and you will
have to do it over again! Not fun if you did a lot of custom settings!
www.SafetyBasement.com Phone: 877-345-2336 Fax: 888-236-2524
Page 10
Page 11

PRODUCT MANUAL Password Voice Recorder : SB-VR8204
DEACTIVATE PASSWORD
If you wish to deactivate the password feature, follow
the instructions below.
1. Go to MODES screen and select SETTING MODE
2. use NEXT button to Select SET PASWORD. Press
MODE to select.
3. Press Use NEXT/PREV to select PASSWORD
OPEN. Perss MODE to select
4. Enter password. press MODE
5. You will now see PASSWORD CLOSE aer the
previous instruction. You have now turned o the
password feature.
6. you can revert to enabling password by highlighting PASSWORD CLOSE and press MODE. is
should change the word back to PASSWORD OPEN
which means the feature has been re-enabled.
RADIO MODE
VOICE
SETTING MODE
TIME SET
REMEMBER:
1. At any point while you are setting up your recorder, use the DEL button to go back one level.
2. If your recorder turns o HOLD the REC button to turn it back on.
3. Aer you have done your settings, dont turn it o using system power switch. Instead let it turn
o by itself or press and hold the REC button to turn it o. is way you wont lose your settings.
Turning unit o via ON/OFF switch will also make you lose all your custom settings and you will
have to do it over again! Not fun if you did a lot of custom settings!
www.SafetyBasement.com Phone: 877-345-2336 Fax: 888-236-2524
Page 11
Page 12

PRODUCT MANUAL Mi6 Mini Voice Recorder : SB-VR9000
PRODUCT MANUAL Password Voice Recorder : SB-VR8204
SET THE DATE AND TIME
You’ll rst want to set the Date and Time for your voice recorder. Remember, your Date and Time
will RESET when you turn OFF the Main Power Switch. So aer you turn the main switch to ON,
dont turn it o unless you are done using the device for a while, otherwise just charge it when it
runs out of juice, then press and hold the REC button until screen turns on. Remember it shuts
itself o aer being idle for a while and you can turn it back on by pressing and holding the REC
button for about 5 seconds or until screen turns on. Dont turn the main switch OFF. You will lose
all your custom settings and will need to reset them all over again.
RADIO MODE
VOICE
Button presses are shown in RED.
Default screen is recording screen. erefore make sure screen is
ON (not o)
CALENDAR:
Press and hold the MODE button until you see the 4 icons above right.
1. NEXT or PREV to choose TIME SET.
2. MODE to enter the TIME SET
4. MODE to select SET CALENDAR
5. Press NEXT to adjust month higher or PREV to adjust it lower. to get to 2014 continue higher
on month until it starts in January again. is will change the year.
6. Aer getting month (and year), press the VOL+ or vol- to adjust day
7. Press MODE to conrm changes
SYSTEM TIME:
8. Press NEXT to move to SYSTEM TIME
9. Press MODE to select
10. YEAR will blink. Use VOL+ or VOL- to adjust year.
11. Press NEXT to move to MONTH
12. Repeat step 10 - 11 to complete adjusting date and time.
13. Press MODE to accept and return to previous screen.
TIME SET
SETTING MODE
TIP: Press the DEL button to go one step back. Eg you went to TIME SET, then to SET CALEN-
DAR and you want to go back to TIME SET, press the DEL button to take you that one step back.
www.SafetyBasement.com Phone: 877-345-2336 Fax: 888-236-2524
www.SafetyBasement.com Phone: 877-345-2336 Fax: 888-236-2524
Page 12
Page 12
Page 13

PRODUCT MANUAL Password Voice Recorder : SB-VR8204
PRODUCT MANUAL Mi6 Mini Voice Recorder : SB-VR9000
FORMAT & QUALITY
e settings most users may want to adjust next is related to the Format and Quality
of your recordings. is will directly impact how many hours you will get on the 8GB
memory. e higher the quality level the less memory recording time you will get but the
better and crisper the recording quality. However since you can expand the memory up
to 32GB, you wil have more exibility on quality settings if you max out your memory
capacity.
FORMATS available are: MP3 and PCM. MP3 is a compressed format, good quality using
less space. PCM is uncompressed, excellent quality, using more space. Of course, your
recording quality will vary depending on the Quality Settings you choose as well.
For this recorder, you will get the most recording time using LP (if your main goal is to get
as much recording time as possible). If quality and clarity is critical, then you should go
for HQ or XQ.
OPTION QUALITY / RATE EST. TIME AT (8GB Internal)
HQ MP3 pattern at 192 Kbps 72 hrs
SP MP3 pattern at 128 Kbps 144 hrs
LP MP3 pattern at 64 Kbps 288 hrs
XQ WAV pattern at HD PCM at 384
Kbps
48 hrs
Choosing a QUALITY/FORMAT
ere are two ways to change the quality settings.
First is by going through the main menu screen as
shown below:
METHOD 1:
(from MAIN menu screen)
MODE to RECORDING QUALITY menu
1. MODE to enter RECORDING QUALITY
2. NEXT/PREV to select .HQ, SP, LP, or XQ
3. MODE to select.
4. DEL to return to main screen
METHOD 2:
From the main menu screen, press VOL + button.
You will notice the quality settings will change with
each press.HQ, SP, LP or XQ. Once you get the
setting you want then allow about 5 seconds for the
option to be selected. Option will stop blinking.
www.SafetyBasement.com Phone: 877-345-2336 Fax: 888-236-2524
www.SafetyBasement.com Phone: 877-345-2336 Fax: 888-236-2524
Main Menu
screen.
Current quality
setting HQ
Page 13
Page 13
Page 14

PRODUCT MANUAL Password Voice Recorder : SB-VR8204
RADIO MODE
is mode allows you to listen to, record and manage
your radio settings.
RADIO MODE
VOICE
SETTING MODE
TIME SET
GETTING TO RADIO MODE
(from MAIN menu screen)
MODE to RECORDING QUALITY menu
1. Press & hold MODE to enter see settings
options (right)
2. NEXT/PREV to highlight RADIO MODE
3. MODE to select.
4. You are now in FM radio selection.
MANUAL CHANNEL SELECTION: You can manually move through channels by pressing the
NEXT or PREV buttons.
AUTOMATIC CHANNEL SELECTION: You can allow unit to scan channels and stop when it
nds a strong channel signal. Do that using below steps:
1. While in RADIO MODE press MODE button.
2. Press NEXT or PREV till you see and highlight AUTO SEARCH
3. Press MODE to select that option
4. Unit will begin to ‘auto scan’ until it nds a channel
GETTING OUT OF RADIO MODE:
You can get out of radio mode by pressing and holding the MODE BUTTON. is will
take you to the 4 settings options. Use the NEXT or PREV buttons to select another mode.
VOICE will take you back to recording mode.
REMEMBER:
1. At any point while you are setting up your recorder, use the DEL button to go back one level.
2. If your recorder turns o HOLD the REC button to turn it back on.
3. Aer you have done your settings, dont turn it o using system power switch. Instead let it turn
o by itself or press and hold the REC button to turn it o. is way you wont lose your settings.
Turning unit o via ON/OFF switch will also make you lose all your custom settings and you will
have to do it over again! Not fun if you did a lot of custom settings!
www.SafetyBasement.com Phone: 877-345-2336 Fax: 888-236-2524
Page 14
Page 15

PRODUCT MANUAL Password Voice Recorder : SB-VR8204
PRODUCT MANUAL Mi6 Mini Voice Recorder : SB-VR9000
OTHER DEVICE SETTINGS
We assume at this time you have a sense of the controls and how to toggle through and
select options. So we will just explain below what the remaining options do so that you
know what you are working with.
OTHER FEATURES UNDER: SETTING MODE
MEMORY SELECT:
is options allows you to
SYSTEM INFO:
During playback only, how long do you
want les to play before the Mi9 auto
powers OFF?
DEFAULT SET: is option allows
you to retstore this device to its original
factory settings. You will select this
options if you feel like you have made
a lot of changes and just want to start
everything from scratch. Again use
this option with CAUTIION!!!! Not
recommended!!
BACKLIGHT:
Options under this setting are:
1. BRIGHTNESS: is allows you to set
the screen brightness while you make
changes or playback your recordings. You
can dim it or make it brighter.
2. BACKLIGHT TIMER: is allows you
to set how long the screen stays bright
before it goes o. is helps save battery.
You can choose ALWAYS ON or select
the other options.
LANGUAGE: is options allows you
to select the language you want to operate
in. IMPORTANT if you speak English
only, dont go to a dierent language as
you wil not understand that language on
how to return to English.
EXIT: is option provides you with
information about this player, such as
disk space le, le types supprted ETC.
www.SafetyBasement.com Phone: 877-345-2336 Fax: 888-236-2524
www.SafetyBasement.com Phone: 877-345-2336 Fax: 888-236-2524
Page 15
Page 15
Page 16

PRODUCT MANUAL Password Voice Recorder : SB-VR8204
TIMED/SCHEDULED RECORDINGS
You can schedule the recorder to automatcally start and
stop recordings at pre-dened times. is feature is available under the TIMES SET feature.
Lets begin with START TIME:
1. highlight and select the TIMES SET option
2. use PREV or NEXT to highlight POWER ON.
3. MODE to select option
4. Highlight POWER ON.
5. Press MODE button. You will notice that option in
bracket will change from ON to OFF to ON at each press
6. Use NEXT or PREV to move and highlight POWER ON TIME.
Press MODE to select
7. you will see 00:00. First set of zeros is HOURS and the second is
MINUTES.
8. Use the Vol+ or Vol- to change the blinking set of numbers. e
time is in MILITARY time (24 hours). Use the buttons to select
what hour of day you want your scheduled recording to begin.
9. Aer selecting hour, press NEXT to highlight and start blinking
the next set of numbers (minutes). Here again press the Vol+ or
Vol- to change the minutes.
10. Press MENU to save and go back to previous screen.
RADIO MODE
VOICE
SETTING MODE
TIME SET
Hours
Minutes
Now lets adjust the STOP TIME:
11. Press DEL button to move one level back to the TIME SET
menu options
12. Use NEXT or PREV to nd and highlight POWER OFF. Press
MODE to select
13. Press MODE until the option is at POWER OFF (ON)
14. Use PREV or NEXT to highlight POWER OFF TIME. Press
MODE
15. Use Vol+ or VOL- to adjust HOUR then press PREV or NEXT
to highlight and blink MINUTES.
16. use Vol+ or VOL- to change minutes to desires numbers.
Press MODE
17. Now select POWER OFF CYCLE.
18. Use PREV or NEXT to select option: ONE TIME, DAILY or
WEEKLY We recommend use the same selections as the ones
under POWER ON so that there is no confusion.
www.SafetyBasement.com Phone: 877-345-2336 Fax: 888-236-2524
Page 16
Page 17

PRODUCT MANUAL Password Voice Recorder : SB-VR8204
19. Press MODE to select.
20. Press the DEL button or use NEXT button to highlight EXIT and press MODE to exit.
21. You have now set the scheduled recordings. Your recorder will begin and stop recording
at the set times at the frequencies selected.
REMEMBER:
1. At any point while you are setting up your recorder, use the DEL button to go back one level.
2. If your recorder turns o HOLD the REC button to turn it back on.
3. Aer you have done your settings, dont turn it o using system power switch. Instead let it turn
o by itself or press and hold the REC button to turn it o. is way you wont lose your settings.
Turning unit o via ON/OFF switch will also make you lose all your custom settings and you will
have to do it over again! Not fun if you did a lot of custom settings!
www.SafetyBasement.com Phone: 877-345-2336 Fax: 888-236-2524
Page 17
Page 18

PRODUCT MANUAL Mi6 Mini Voice Recorder : SB-VR9000
PRODUCT MANUAL Password Voice Recorder : SB-VR8204
WHERE ARE YOUR FILES?
You can playback your les using without the need of plugging the device to your computer.
is recorder has a speaker.
However to manage your les, it is recommended that you plug your device to your computer
and opening the VOICE le to manage your voice recordings.
Other folders on the recorder are:
1. VOICE : is is for all your voice recordings
2. MUSIC: is is where you will save all your mp3 songs
3. LINE: is is where all your LINE-IN recordings will go automatically
4. FM : All FM recordings you make will be saved in this folder
Use the included USB cable to connect your recorder to your PC. Be sure you are NOT
recording before plugging in your cable. You do NOT need to turn o your recorder to
connect to your PC. Just make sure it is not recording or playing back when you plug in.
Once connected, you will be able to browse the folders on your device. (Shown in
Windows 7. Other sytems are similar.)
Recorded les will be inside the VOICE folder.
www.SafetyBasement.com Phone: 877-345-2336 Fax: 888-236-2524
www.SafetyBasement.com Phone: 877-345-2336 Fax: 888-236-2524
Page 18
Page 18
Page 19

PRODUCT MANUAL Password Voice Recorder : SB-VR8204
PRODUCT MANUAL Mi6 Mini Voice Recorder : SB-VR9000
WHERE ARE YOUR FILES?
Use standard Windows and Mac techniques to COPY, MOVE and DELETE your les.
We recommend you COPY your les to your PC for archiving and best playback.
NOTE TO MAC USERS: To delete les properly, you MUST empty your trash before
disconnecting your Mi6.
www.SafetyBasement.com Phone: 877-345-2336 Fax: 888-236-2524
www.SafetyBasement.com Phone: 877-345-2336 Fax: 888-236-2524
Page 19
Page 19
Page 20

PRODUCT MANUAL Mi6 Mini Voice Recorder : SB-VR9000
PRODUCT MANUAL Password Voice Recorder : SB-VR8204
SUGGESTED SOFTWARE
Your Windows PC or Mac has built-in soware that will play most of the les created by devices
like yours. However, if you are having problems playing your les, or need more options, please
download and try these programs.
is soware is free and can be downloaded directly from the links below. You can nd support
and tutorials for these programs on their respective websites. SafetyBasement can not provide
soware support for these programs
As with ANY les you download from the internet, be sure to scan them for viruses using your
particular virus scanner. While most users report no issues using this soware, we can not be
responsible for any damage caused by this soware. Please proceed carefully. Back up your PC
before installing any new soware.
VIDEO PLAYBACK - VLC
(http://www.videolan.org/vlc/index.html)
e VLC Media Player can play almost any video or audio le type. ere is
a version for Windows and for Mac OS X.
VIDEO EDITING for WINDOWS - MOVIE MAKER 2012
(http://windows.microso.com/en-US/windows/get-movie-makerdownload)
Movie Maker is a simple video editing program from Microso. Please go
to this link, and choose the download for your version of Windows. Please
note: Movie Maker is part of the Windows Essentials package.
VIDEO EDITING for MAC OS X - iMOVIE
(Visit the Apple Mac App Store for latest version)
iMovie is a simple video editing program from Apple. It comes installed with
your new Mac. e latest version is also available at the Mac App Store at
additional cost.
AUDIO PLAYBACK and EDITING - AUDACITY
(http://audacity.sourceforge.net/)
Audacity is a popular audio editing program used by amateurs and
professionals to edit simple and complex audio projects. You can use
Audacity to convert your audio les to another format, such as MP3. ere
is a version for Windows and Mac OS X.
PHOTOS
Your Windows and Mac computers have the ability to do basic editing of
photos built in.
www.SafetyBasement.com Phone: 877-345-2336 Fax: 888-236-2524
www.SafetyBasement.com Phone: 877-345-2336 Fax: 888-236-2524
Page 20
Page 20
Page 21

PRODUCT MANUAL Password Voice Recorder : SB-VR8204
DEVICE SPECIFICATIONS
Audio Formats PCM, MP3
Audio Encoding WAV: 384Kbps
MP3: 192,128,64Kbps
See chart for recording times.
Audio
Video
Photo
n/a
n/a
www.SafetyBasement.com Phone: 877-345-2336 Fax: 888-236-2524
Page 21
Page 22

PRODUCT MANUAL Password Voice Recorder : SB-VR8204
DEVICE SPECIFICATIONS
Memory Built In 8 GB
Memory Expansion up to 32 GB Micro SD card
Battery Type Internal Rechargeable
Charger Type via USB port
Device Info
Please check our site for the latest available manual for this product.
Notes
See chart for bit rates and available time.
File Sizes
www.SafetyBasement.com Phone: 877-345-2336 Fax: 888-236-2524
Page 22
 Loading...