

Page 1

INSTRUCTION MANUAL
2.4G Wireless DVR
SB-WDVR50
Revised: April 26, 2013
ank you for purchasing from SafetyBasement.com! We appreciate
your business.
We made this simple manual to help you enjoy your new product as
quickly and easily as possible.
Be sure to check the TECH SUPPORT tab on your product page at
SafetyBasement.com for the latest available manual.
Page 2
PRODUCT MANUAL Wireless DVR : SB-WDVR50
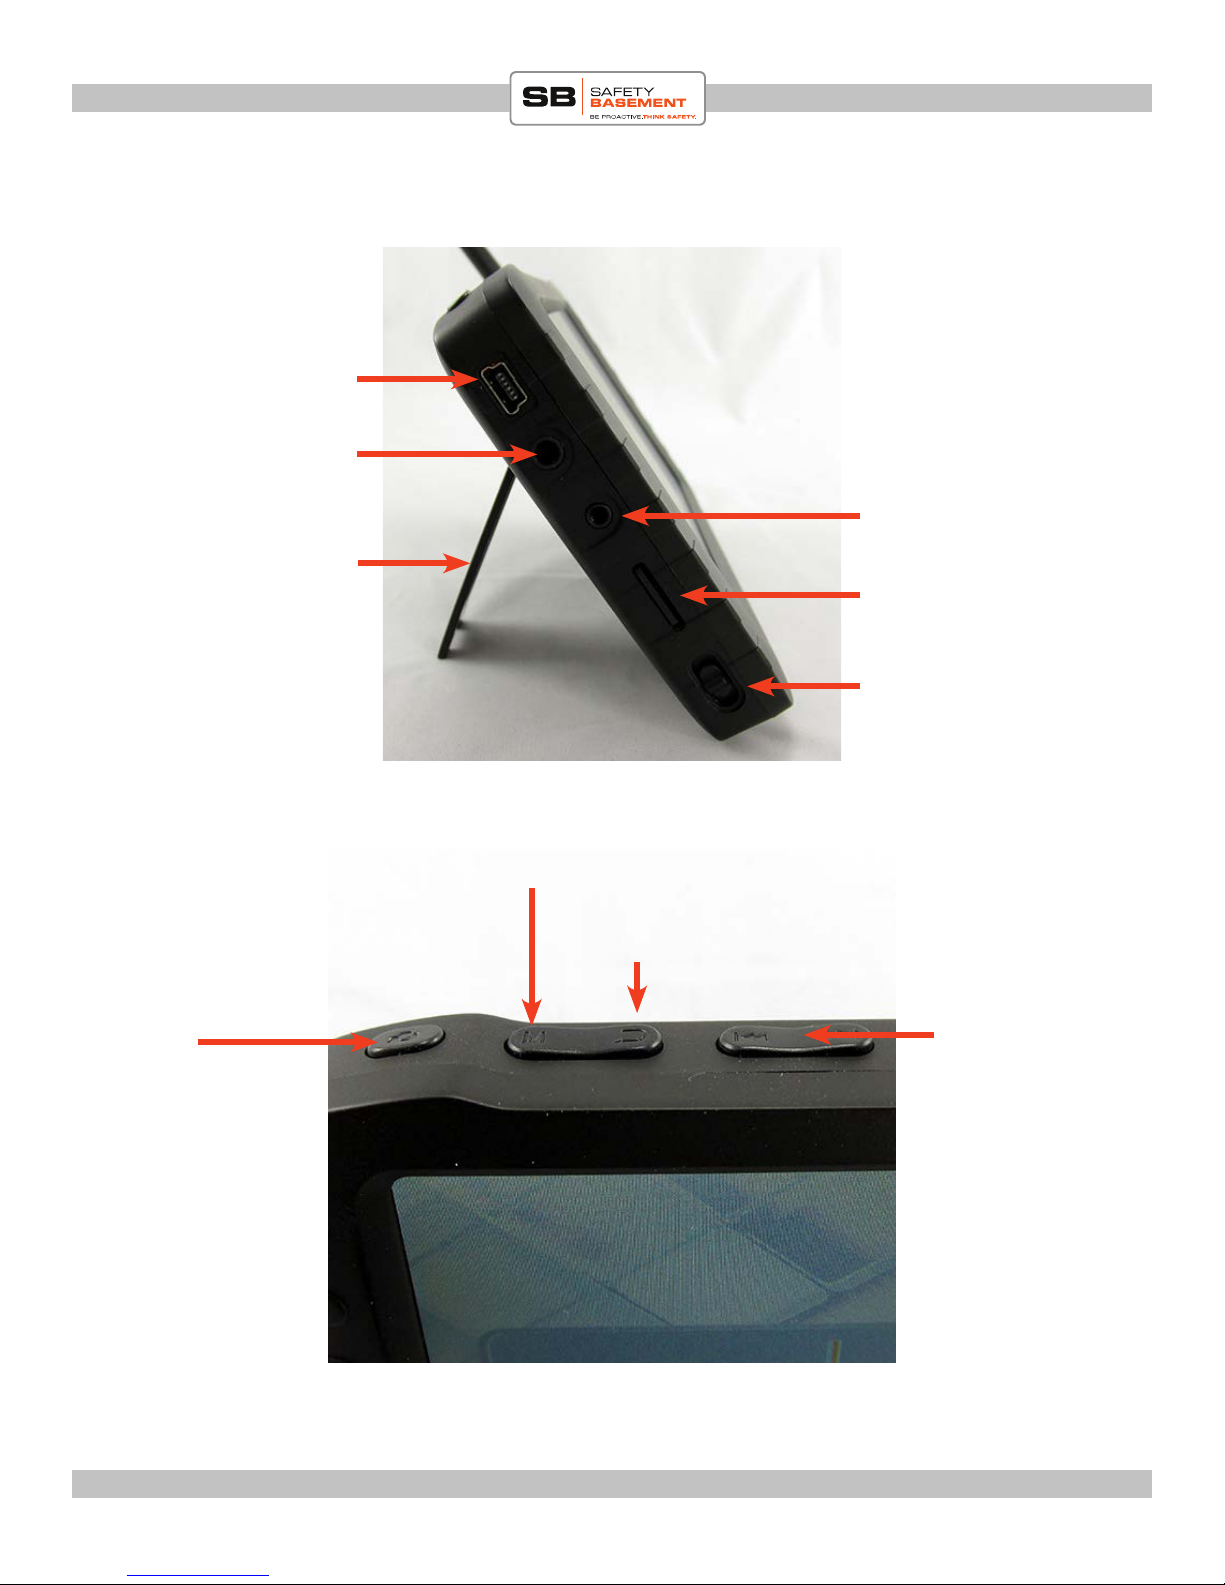
PRODUCT REFERENCE
USB connection
Earphones port
AV / Camera IN
Stand
SD Card Slot with
card inserted
Record / Photo /
Enter
RECORD /
PLAY /
MOTION DETECT
Switch
M / Power / Mute
Back / ESC
Previous / Next
www.SafetyBasement.com Phone: 877-345-2336 Fax: 888-236-2524
Page 2
Page 3

PRODUCT MANUAL Wireless DVR : SB-WDVR50
BEFORE YOU START - SD CARD
is DVR requires an SD card for proper
operation. It will take an SD card up to 32GB
in size.
With the LCD screen facing you, the gold
connectors on the SD card will also face you.
Gently push the SD card into the SD card slot.
If there is any resistance, stop. Do not force the
SD card, as this may damage the device and
void your warranty.
www.SafetyBasement.com Phone: 877-345-2336 Fax: 888-236-2524
Push the SD card into place. It should click in.
To remove the card, gently push the card and
it should click out.
Page 3
Page 4
PRODUCT MANUAL Wireless DVR : SB-WDVR50
BEFORE YOU START - BATTERY
e DVR has a built-in battery.
To charge the battery, use the included wall
adapter. One end of the adapter is a USB
connector. Plug that into the USB port on the
DVR.
Plug the other end into a wall socket. Charge
the DVR for 6 hours for a full charge. It may
take a few uses before your battery reaches
peak eciency.
When not in use, be sure to charge the battery
at least every 2 months.
www.SafetyBasement.com Phone: 877-345-2336 Fax: 888-236-2524
Page 4
Page 5
PRODUCT MANUAL Wireless DVR : SB-WDVR50
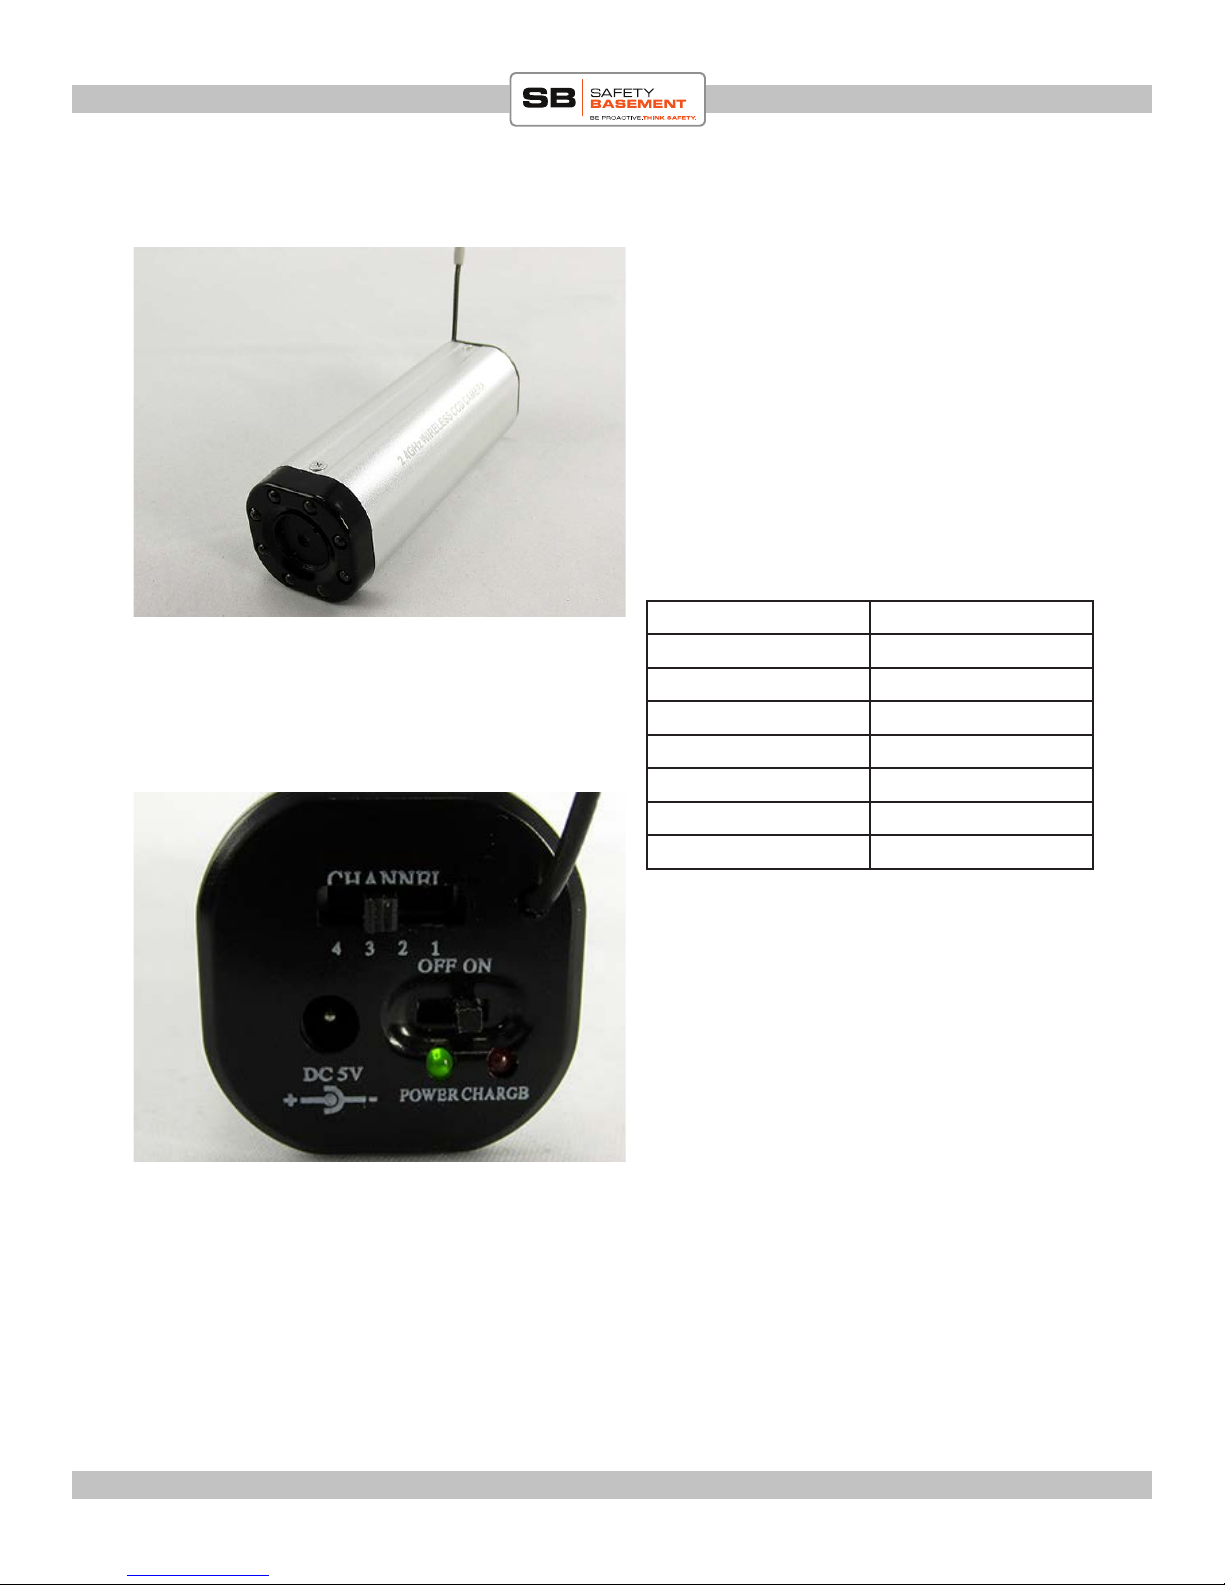
WIRELESS CAMERA USE
Wireless cameras in the 2.4 Ghz range have up
to 8 channels available to them for broadcast.
When using a wireless camera, be sure to
assign a unique channel to each camera. Please
note which channel each camera is using for
reference later.
e DVR can connect to yor wireless cameras
or transmitters on the 8 channels listed below:
Wireless camera shown for illustrative
purposes only and is not included with the
DVR. Cameras are available in all shapes
and sizes. Contact Safety Basement about
cameras compatible with your DVR.
CH 1 2414 MHz
CH 2 2432 MHz
CH 3 2450 MHz
CH 4 2468 MHz
CH 5 2490 MHz
CH 6 2510 MHz
CH 7 2390 MHz
CH 8 2370 MHz
www.SafetyBasement.com Phone: 877-345-2336 Fax: 888-236-2524
Page 5
Page 6
PRODUCT MANUAL Wireless DVR : SB-WDVR50
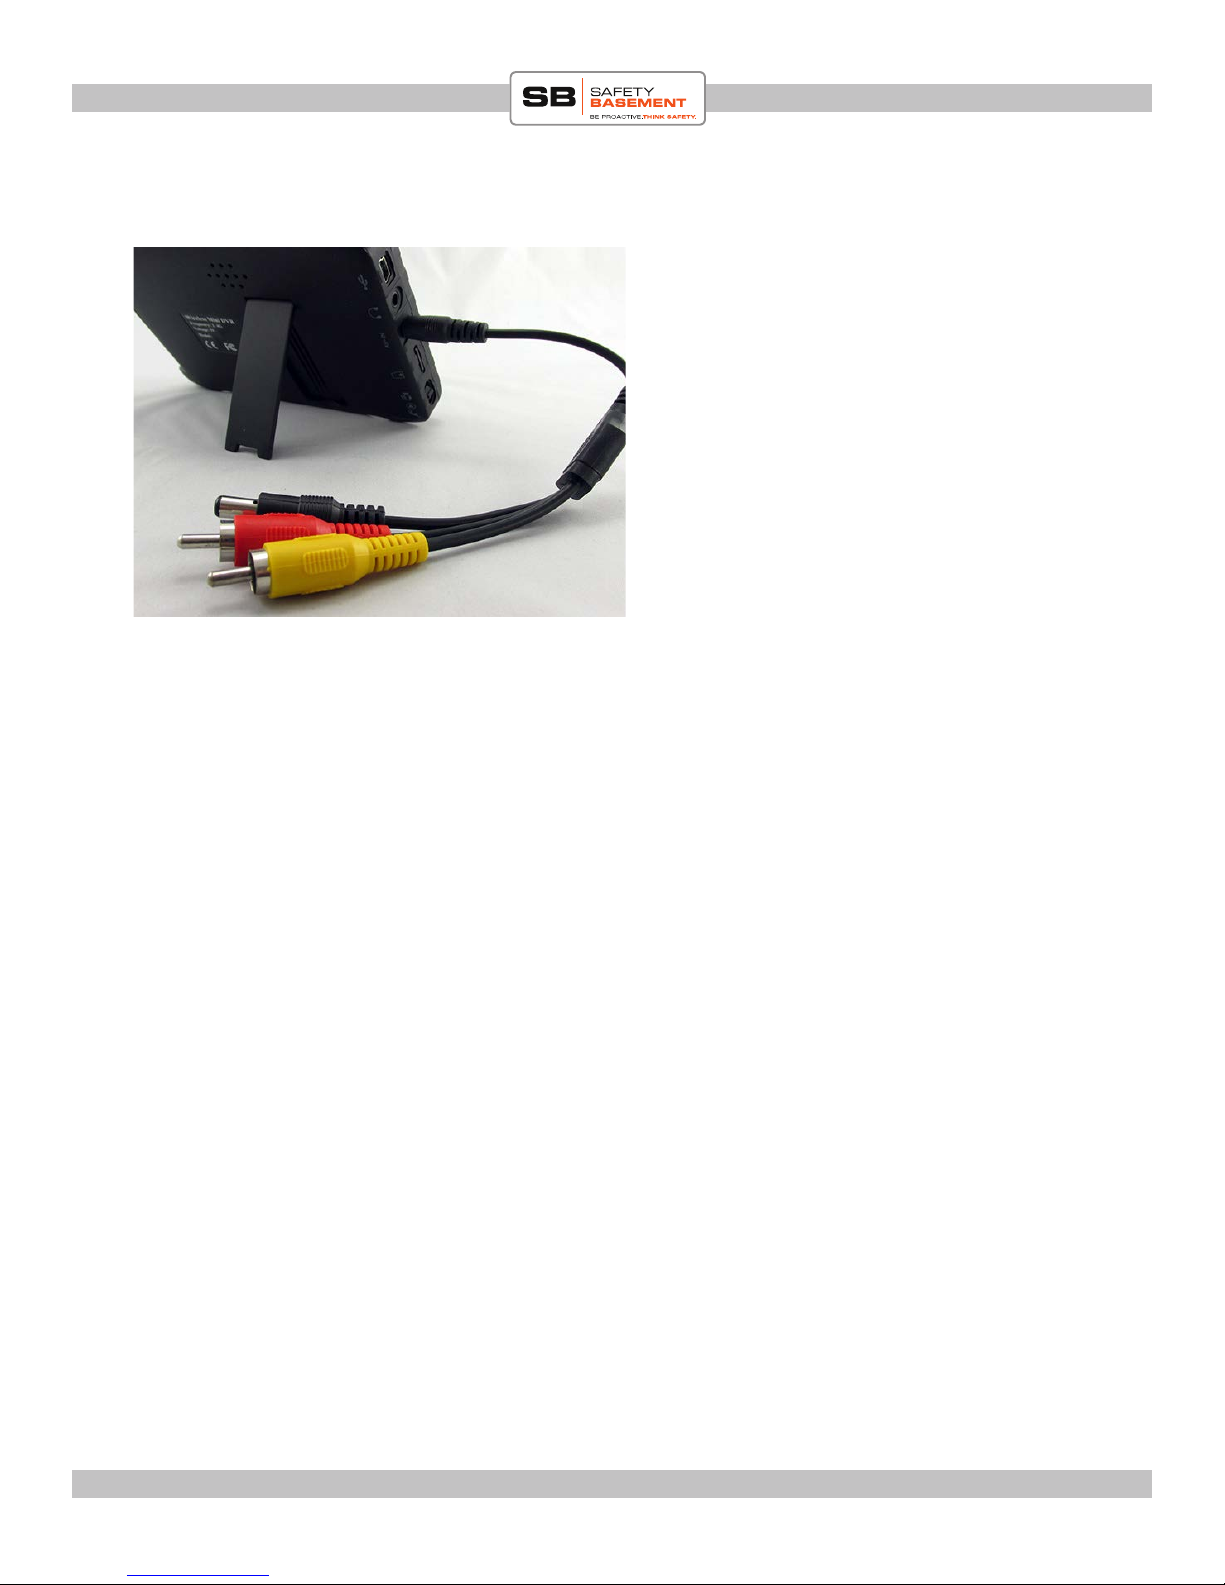
WIRED CAMERA USE
e DVR may also accept a wired camera or
video source.
Connect the AV cable to the AV INPUT port
on the DVR.
Connect your video source using the RCA
connectors.
e DVR can provide power to your video
source. e output voltage is 3.6 - 4.2 V.
Please contact Safety Basement for available
compatible cameras and other accessories for
your DVR.
www.SafetyBasement.com Phone: 877-345-2336 Fax: 888-236-2524
Page 6
Page 7
PRODUCT MANUAL Wireless DVR : SB-WDVR50
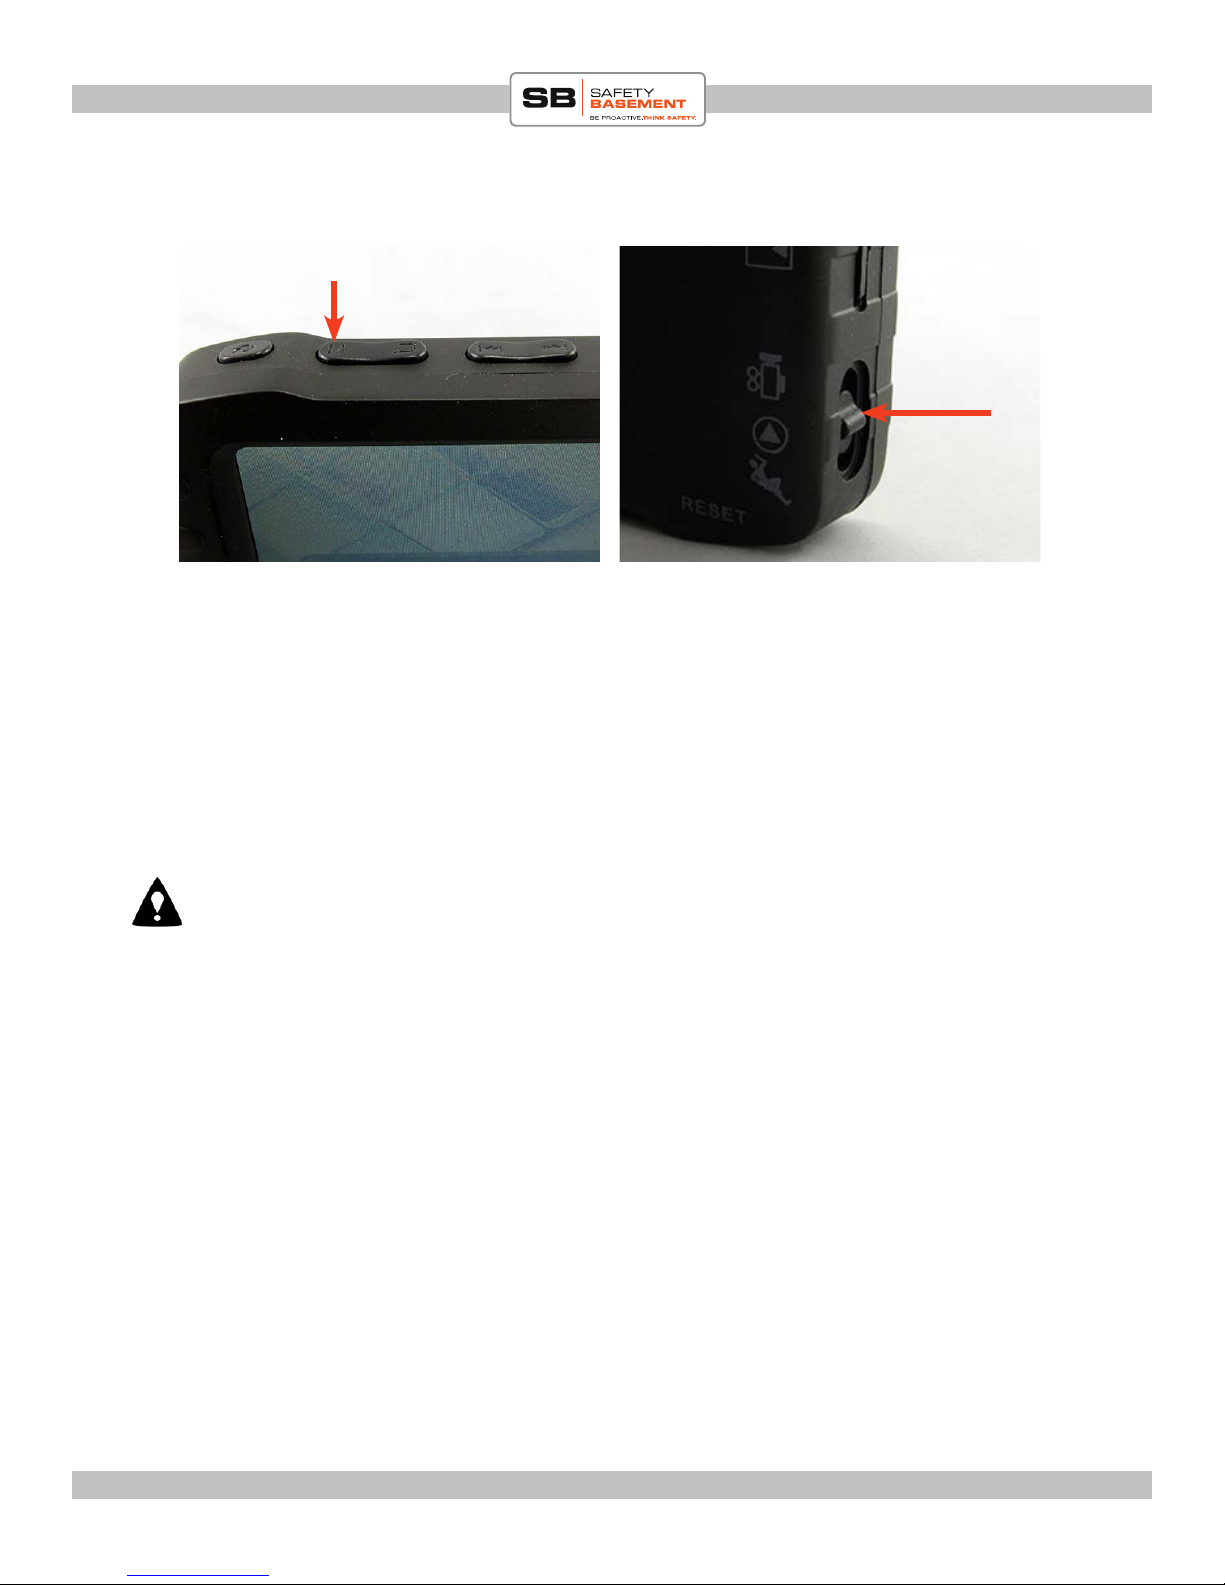
SETTINGS
M
RECORD
PLAY
MOTION
You will use the buttons located at the top of the DVR to access and adjust the settings
shown in the following pages.
Note: Please plug the included ear bugs into the Audio port before turning on your
DVR. e ear buds have a volume control on their cable. e DVR can be muted, but
most volume control will be done with the ear buds.
If you purchase optional headphones for your DVR, please be sure that they have a
volume control.
First, push the MODE button into the RECORD position.
Now, hold the M button until the DVR turns on.
When it rst comes on, there may be a burst of static and noise as we have not
connected to a camera yet. Quick-press M to MUTE the audio.
www.SafetyBasement.com Phone: 877-345-2336 Fax: 888-236-2524
Page 7
Page 8
PRODUCT MANUAL Wireless DVR : SB-WDVR50
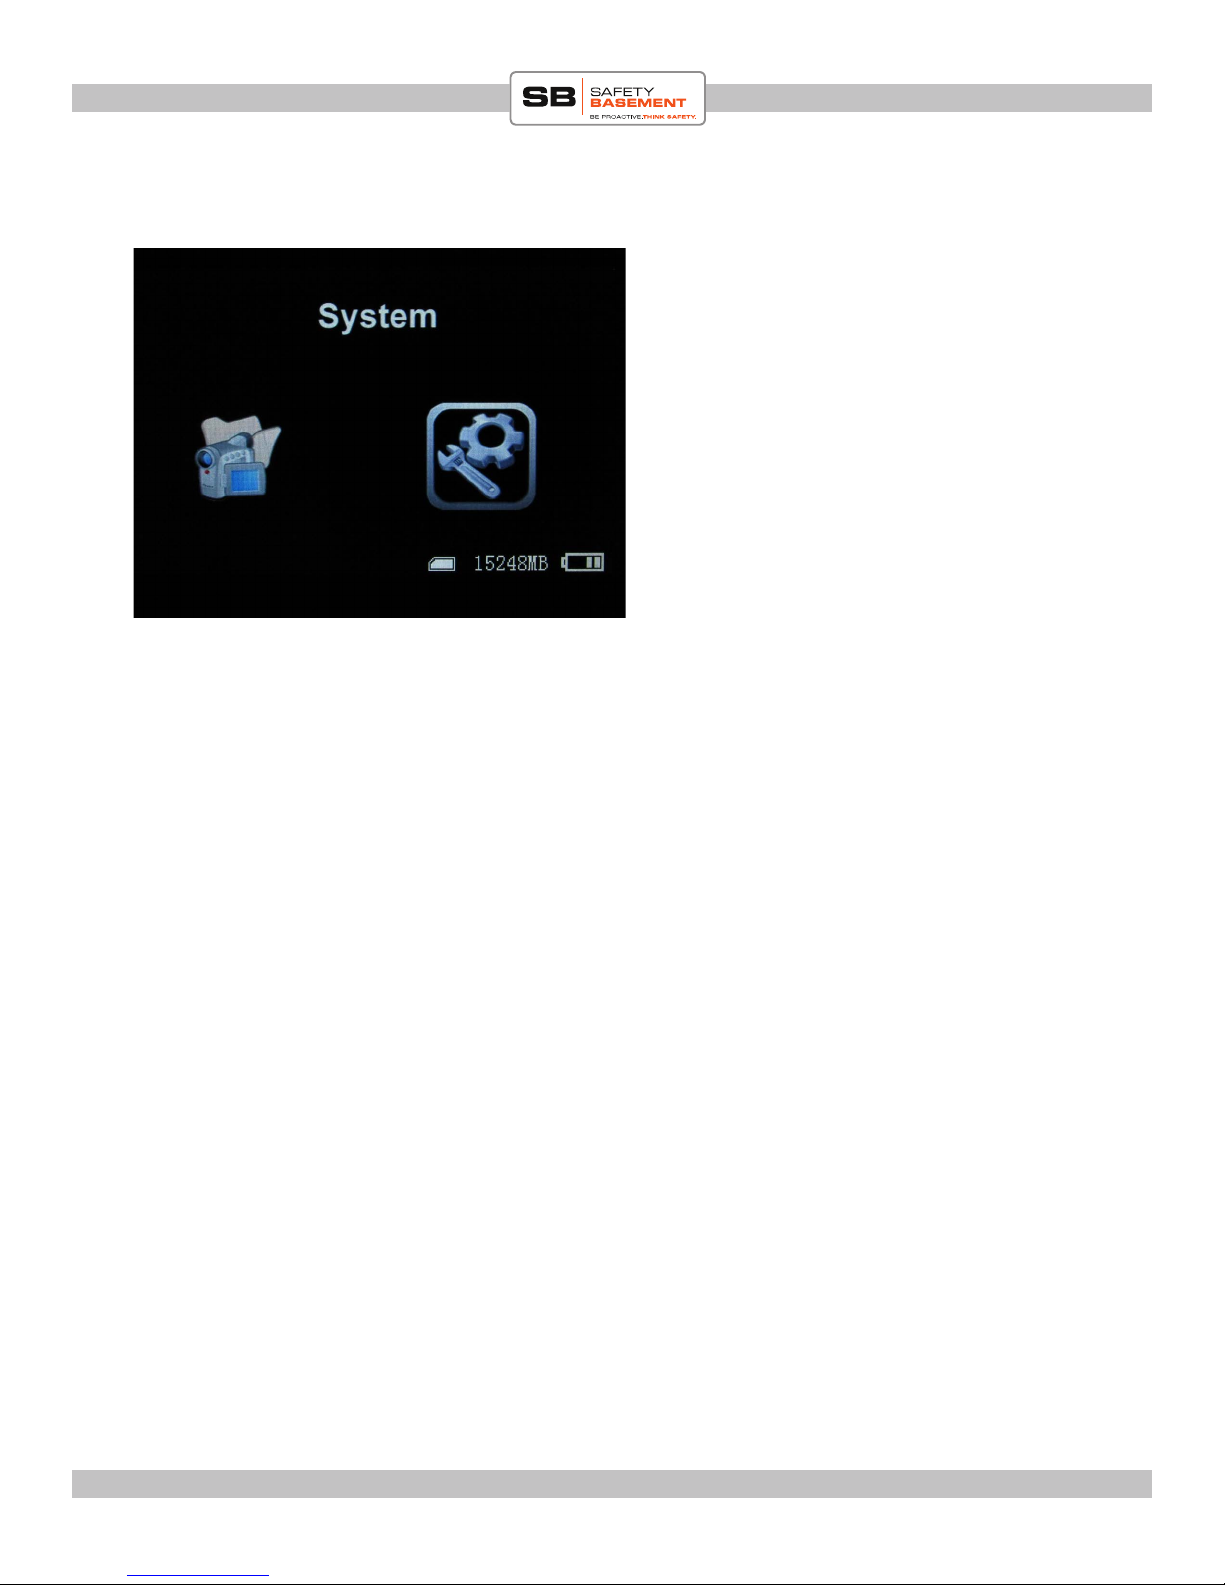
SYSTEM SETTINGS
With the power on, press the ESC button to
enter the Menu system.
ere are 2 options here, Function and System.
We will set up the SYSTEM options rst.
Use the NEXT and PREVIOUS, also known as
the arrow keys, to Highlight SYSTEM.
Press the ENTER key to enter this menu.
You will use the arrow keys, ESC and Enter
keys to make changes to the settings.
www.SafetyBasement.com Phone: 877-345-2336 Fax: 888-236-2524
Page 8
Page 9
PRODUCT MANUAL Wireless DVR : SB-WDVR50
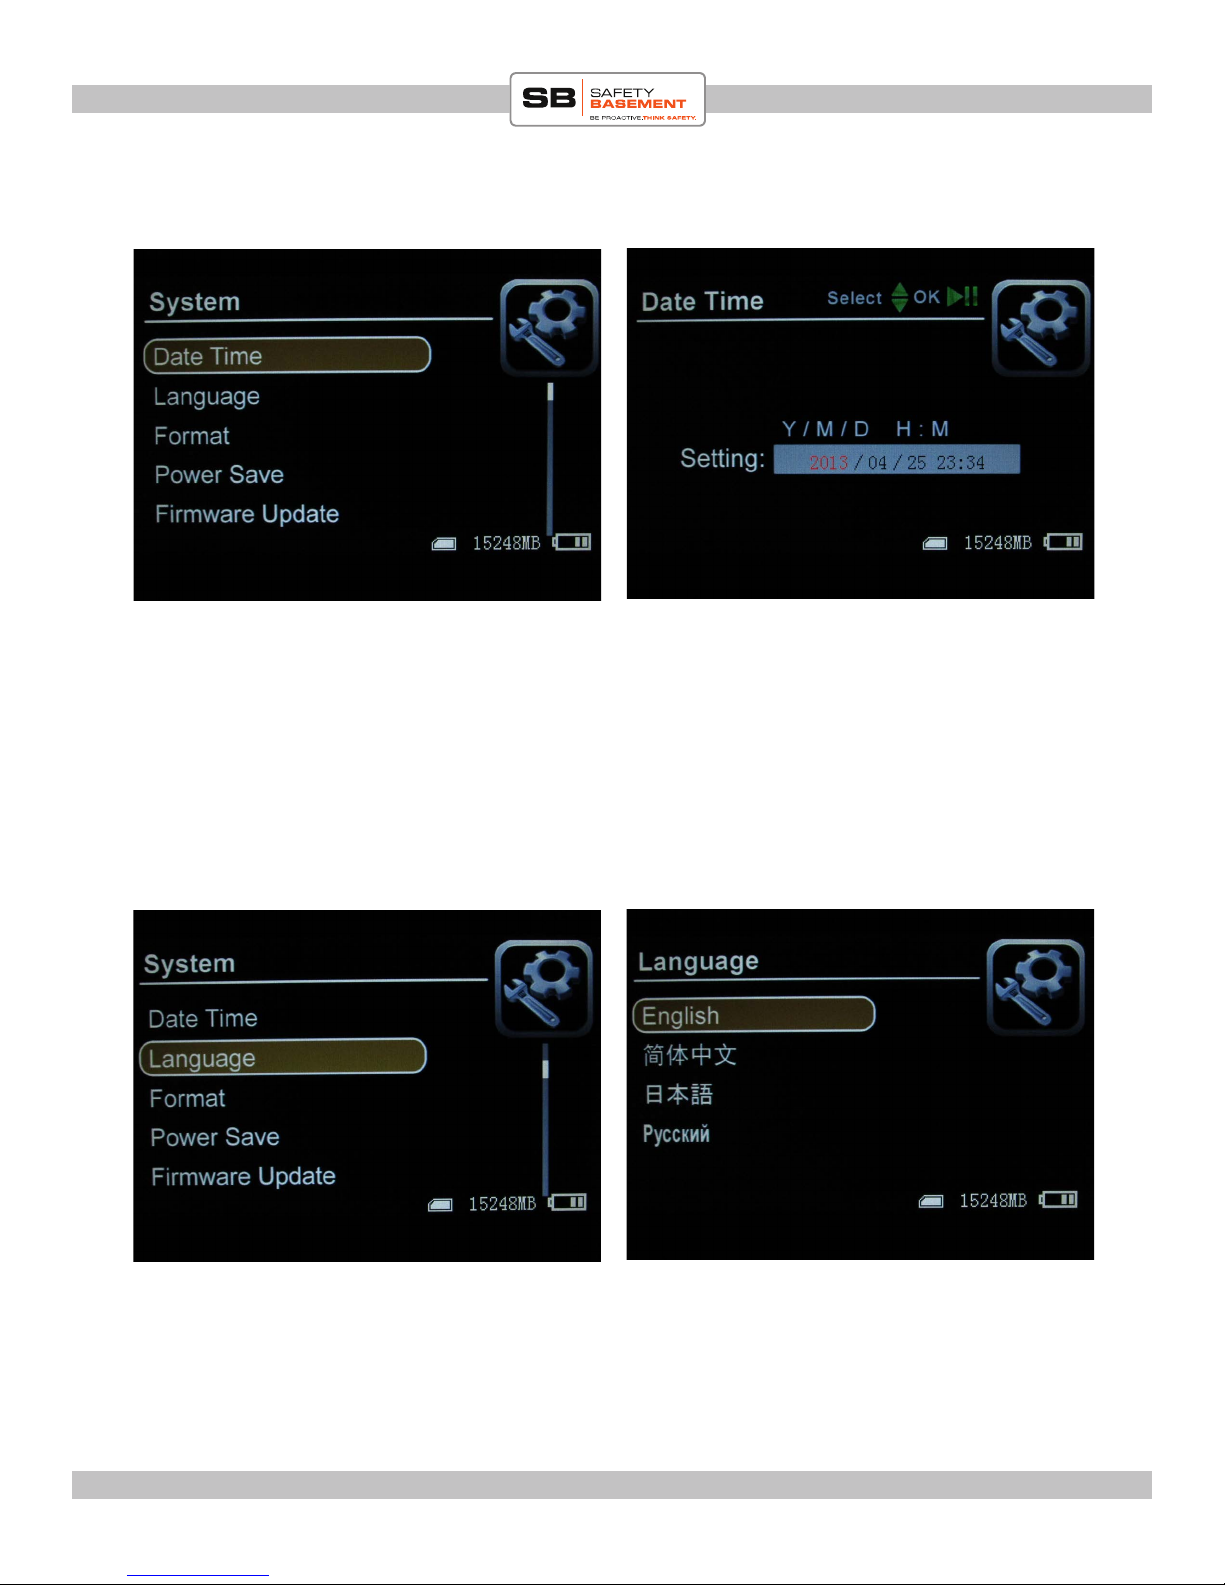
SYSTEM SETTINGS
Highlight the DATE TIME option. Press ENTER.
Use the arrow keys to adjust the year. Press ENTER to move to the Month, and so on until
you have changed the Date and Time.
Press the ESC key to save your settings and return to the SYSTEM SETTINGS.
LANGUAGE
Highlight the LANGUAGE option. Press ENTER.
Use the arrow keys to highlight your Language choice.
Press ENTER to save, and you will be returned to the SYSTEM SETTINGS.
www.SafetyBasement.com Phone: 877-345-2336 Fax: 888-236-2524
Page 9
Page 10
PRODUCT MANUAL Wireless DVR : SB-WDVR50
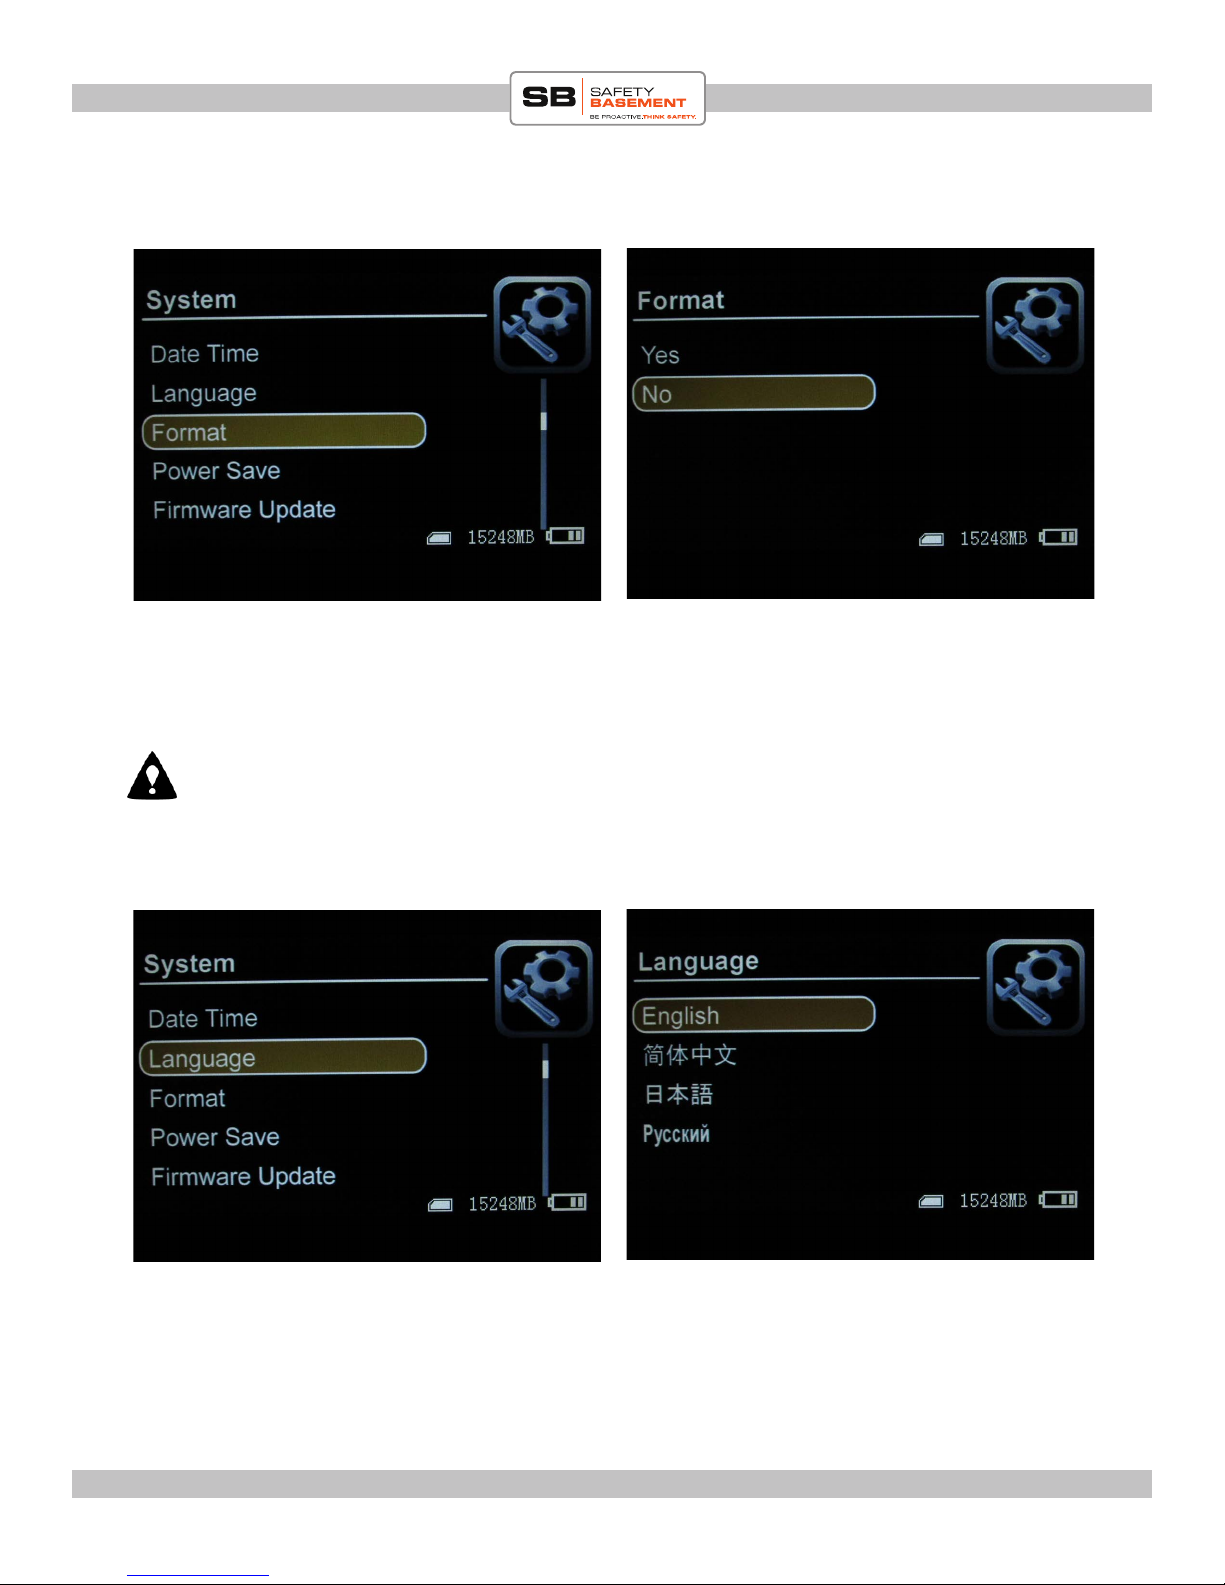
FORMAT
A new SD card will usually work immediately with this DVR. If you are unsure, or wish to
refresh a card, you can format it with this option.
Highlight the FORMAT option. Press ENTER. Verify that you wish to format the card.
Note: all data on the card will be lost. Proceed carefully.
LANGUAGE
Highlight the LANGUAGE option. Press ENTER.
Use the arrow keys to highlight your Language choice.
Press ENTER to save, and you will be returned to the SYSTEM SETTINGS.
www.SafetyBasement.com Phone: 877-345-2336 Fax: 888-236-2524
Page 10
Page 11

PRODUCT MANUAL Wireless DVR : SB-WDVR50
POWER SAVE
Use the POWER SAVE options to maximize
battery life.
Highlight POWER SAVE, and press Enter.
ere are 2 Power Save options available; AUTO
LCD OFF, and AUTO POWER OFF.
AUTO LCD OFF
Highlight the AUTO LCD OFF option. Press ENTER.
Use the arrow keys to choose how long you want the LCD to remain on when no buttons
have been pressed. e “countdown” will reset each time you press a button.
Press ENTER to save your setting.
www.SafetyBasement.com Phone: 877-345-2336 Fax: 888-236-2524
Page 11
Page 12

PRODUCT MANUAL Wireless DVR : SB-WDVR50
AUTO POWER OFF
Highlight the AUTO POWER OFF option. Press ENTER.
Use the arrow keys to choose how long you want the DVR to remain on when no buttons
have been pressed. e “countdown” will reset each time you press a button. e DVR will
remain on when recording, no matter what you choose here.
Press ENTER to save your setting.
FIRMWARE UPDATE
Please ignore this setting. You will be notied if a crucial update is available to you.
www.SafetyBasement.com Phone: 877-345-2336 Fax: 888-236-2524
Page 12
Page 13

PRODUCT MANUAL Wireless DVR : SB-WDVR50
DEFAULT SETUP
If you need to reset the DVR to factory specs, use this option.
Highlight the DEFAULT SETUP option. Press ENTER.
Highlight YES if you wish to reset the device. Press ENTER to conrm.
Note: all settings will be lost and you will need to start over.
MEMORY INFO
You can see how much room is le on your SD card with this option.
Highlight MEMORY INFO and press ENTER. To return to the menu, press ESC.
www.SafetyBasement.com Phone: 877-345-2336 Fax: 888-236-2524
Page 13
Page 14
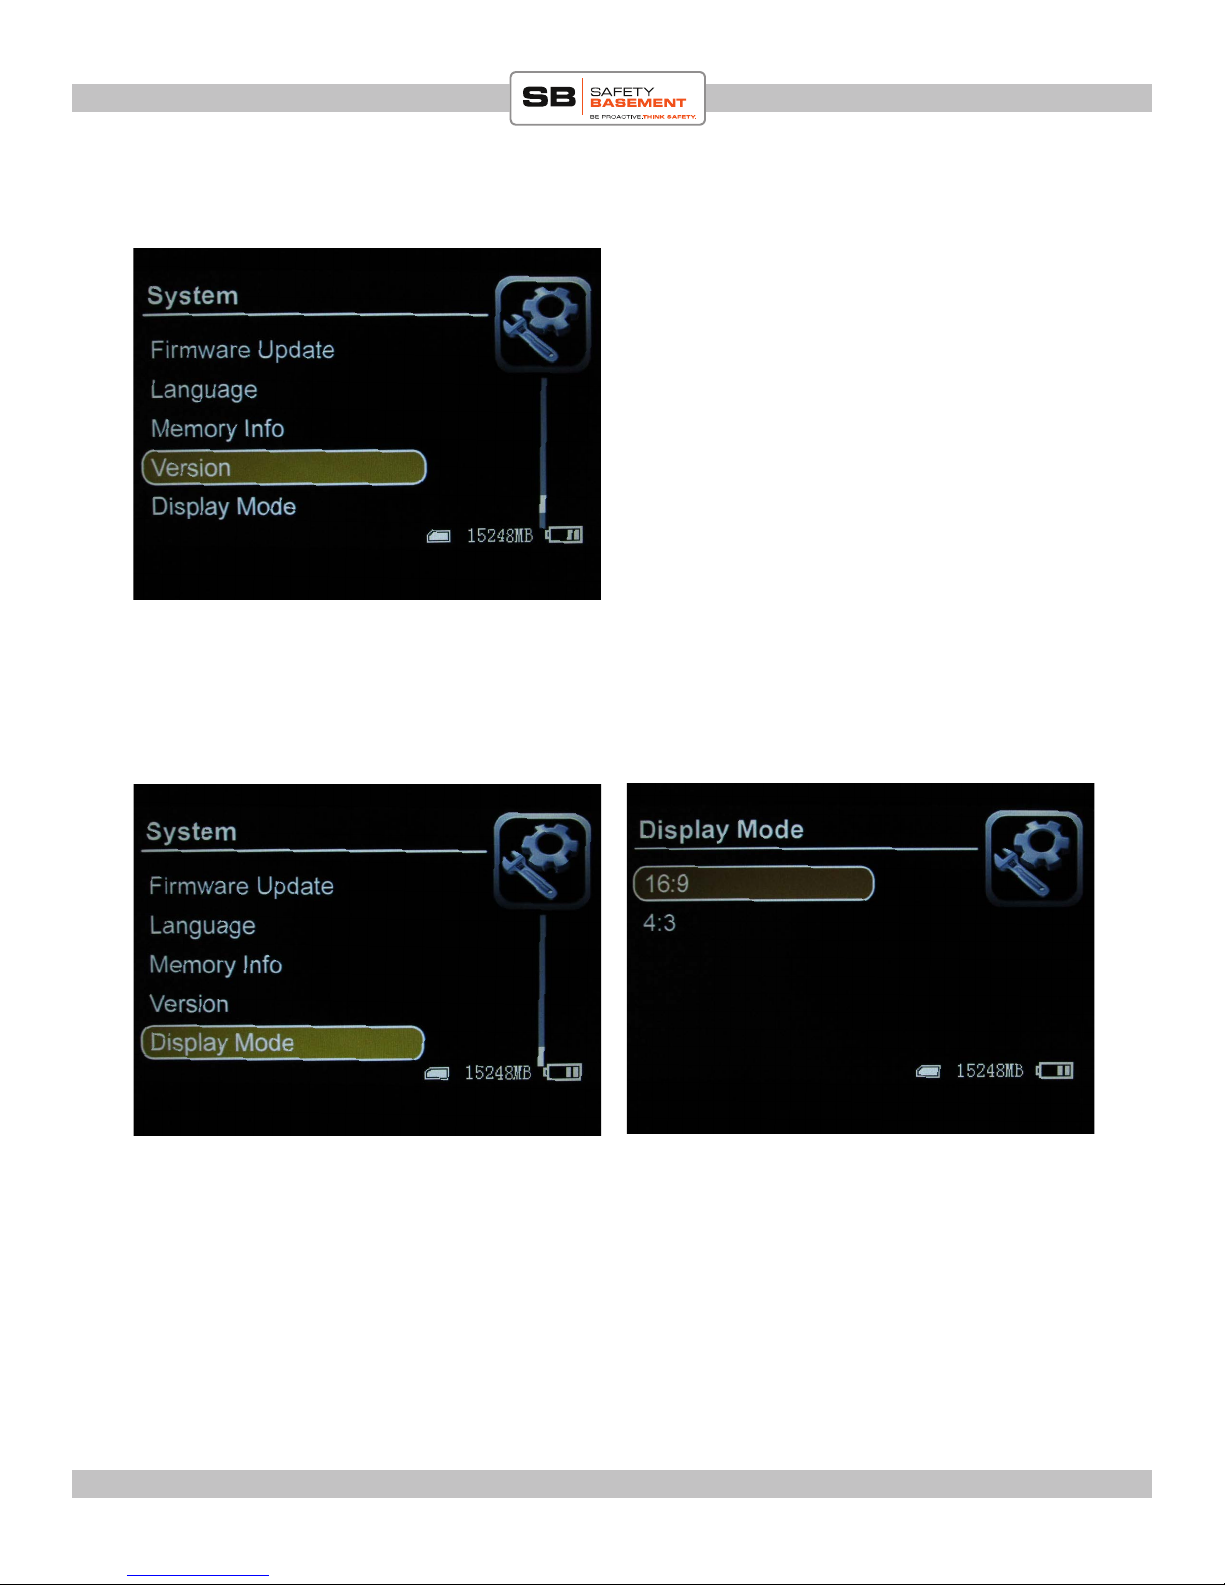
PRODUCT MANUAL Wireless DVR : SB-WDVR50
VERSION
You may ignore this option.
DISPLAY MODE
Your DVR has a widescreen display, and this option should usually be set to 16:9
(widescreen). However, there may be times when you need a standard “square” display.
In those cases, HIGHLIGHT 4:3 and press Enter to save your setting.
www.SafetyBasement.com Phone: 877-345-2336 Fax: 888-236-2524
Page 14
Page 15

PRODUCT MANUAL Wireless DVR : SB-WDVR50
FUNCTON SETTINGS
e System Settings are complete. We are now going to adjust the Function Settings of
your DVR. We will look at the CHANNEL SETTING last.
Use the ESC key to return to the Main Menu, and Highlight FUNCTION. Press ENTER
to see the options available here.
RECORDER RESOLUTION
Highlight RECORDER RESOLUTION and press ENTER.
If you are going to display your recordings on a TV monitor, adjust the resolution to
your country’s standard TV resolution. In the US, the standard TV resolution is 720x480.
Highlight the resolution you want and press ENTER to save.
www.SafetyBasement.com Phone: 877-345-2336 Fax: 888-236-2524
Page 15
Page 16

PRODUCT MANUAL Wireless DVR : SB-WDVR50
FRAME RATE
Highlight FRAME RATE and press ENTER.
If you are going to display your recordings on a TV monitor, adjust the frame rate to your
country’s standard TV resolution. In the US, the standard TV frame rate is 30 frames per
second. Highlight the frame rate you want and press ENTER to save.
is DVR does not connect directly to a television monitor. A PC can usually play any
combination of resolution and frame rate.
However, for best compatibility with possible use on a TV monitor or editing soware, in
the US choose a resolution of 720x480 and a frame rate of 30 FPS.
www.SafetyBasement.com Phone: 877-345-2336 Fax: 888-236-2524
Page 16
Page 17

PRODUCT MANUAL Wireless DVR : SB-WDVR50
VIDEO SEGMENT SIZES
You can limit the size of video les that are recorded to 10, 30 or 60 minutes. We
recommend setting this option to 10 minutes, to minimize loss due to power loss, etc.
Highlight the option you want to use, and press ENTER to save.
OVERWRITE or LOOPING
When you SD card is full, the DVR has 2 options. It can OVERWRITE or erase older les
to make room for new recordings. is is also known as LOOPING.
You can also turn OVERWRITE o. If OFF, the DVR will not be able to record until you
erase some les, or insert a fresh SD card.
Highlight your choice and press ENTER to save.
www.SafetyBasement.com Phone: 877-345-2336 Fax: 888-236-2524
Page 17
Page 18

PRODUCT MANUAL Wireless DVR : SB-WDVR50
TIME STAMP
Choose TIME STAMP if you want the current Date and Time to appear on your photos
and video recordings. Highlight your choice of OFF or ON, and press ENTER to save.
You are done with the settings for now. We will return to the channel settings shortly.
First, let’s test your camera feed.
www.SafetyBasement.com Phone: 877-345-2336 Fax: 888-236-2524
Page 18
Page 19

PRODUCT MANUAL Wireless DVR : SB-WDVR50
TESTING YOUR WIRED CAMERA
Before you make any changes to the
CHANNEL SETTINGS, you should test
your camera feed.
For a wired camera, plug the AV cable into
your DVR’s AV INPUT jack.
Connect your camera to the RCA jacks.
e DVR can provide power to your video
source. e output voltage is 3.6 - 4.2 V.
When connected to a wired camera, using the AV jack, the DVR will automatically show
the camera feed from the AV Input. Wireless cameras will NOT be available to you in this
mode.
Please refer to the section about RECORDING for instruction on how to record video and
take photos.
If you are using WIRELESS cameras, please remove the AV cable from the DVR.
If you do not see an image from your camera, recheck your connections, check the power
requirements of your camera. You can also turn your DVR OFF, then back on.
e AV INPUT is automatically chosen when a proper signal is found. ere are no
adjustments to be made in the SETTINGS menus.
www.SafetyBasement.com Phone: 877-345-2336 Fax: 888-236-2524
Page 19
Page 20

PRODUCT MANUAL Wireless DVR : SB-WDVR50
TESTING YOUR WIRELESS CAMERA
Before you make any changes to the
CHANNEL SETTINGS, you should test
your camera feed.
For a wireless camera, raise the antenna on
the right hand side of the DVR.
Make sure your wireless camera is on and
note what channel it is using.
Turn on your DVR. Note that you will want to MUTE the audio if you are not using your
ear buds. Do this by Quick-Pressing the M button.
Your DVR will show the rst wireless channel. Use the Arrow keys to move to other
channels until you see your video feed, which should be on the channel you noted earlier.
If you see your camera, then you are ready to move on to the next step.
If you do not see your camera, be sure that your camera is on. Check the channels
displayed on the DVR while you press the Arrow keys. It should cycle through all 8
available channels. If not, you will need to activate those channels using the setup menu
shown in the next step.
Current Channel
Showing a feed from a wireless camera using Channel 3
www.SafetyBasement.com Phone: 877-345-2336 Fax: 888-236-2524
Page 20
Page 21

PRODUCT MANUAL Wireless DVR : SB-WDVR50
CHANNEL SETTINGS
e CHANNEL SETTING options allow you to control how the DVR works with
Channels; limiting the channels it can reach, auto-switching, and length of time on each
channel.
You should verify that multiple wireless cameras are set to unique channels, and test
reception prior to locking out channels. Each camera MUST be on it’s own channel.
Press the ESC key to enter the main menu again. Choose FUNCTION, press ENTER.
Highlight CHANNEL SWITCH SELECT. Press ENTER.
www.SafetyBasement.com Phone: 877-345-2336 Fax: 888-236-2524
Page 21
Page 22

PRODUCT MANUAL Wireless DVR : SB-WDVR50
CHANNEL SWITCH SELECT
In this example, all channels are ON and
available.
is menu turns the 8 available channels ON and OFF.
Leave a channel ON if you want to manually get to that channel, or let the DVR switch
automatically to that channel.
Turn a channel OFF if you are not going to use that channel.
Use the Arrow keys to highlight a channel. Press ENTER to toggle between ON and OFF.
ON is a lled white box. OFF is an empty box.
In this example, channels 5 and 6 have
been turned OFF and are not available.
www.SafetyBasement.com Phone: 877-345-2336 Fax: 888-236-2524
Page 22
Page 23

PRODUCT MANUAL Wireless DVR : SB-WDVR50
AUTO SWITCH
is option lets your DVR automatically switch between every available channel (set in
CHANNEL SWITCH SELECT) on a loop. It will remain on each channel for the amount
of time you set in the next menu, DWELL TIME.
Highlight your option, ON or OFF, and press ENTER to Save.
DWELL TIME
is option determines how long the DVR will sit on a channel until it moves on to the
next channel available to it. Use the arrow keys to adjust the number of seconds and press
ENTER to save.
www.SafetyBasement.com Phone: 877-345-2336 Fax: 888-236-2524
Page 23
Page 24

PRODUCT MANUAL Wireless DVR : SB-WDVR50
RECORD VIDEO / TAKE PHOTO
To record video or take a photo, your DVR must
be in RECORD mode.
e RECORD / PLAY / MOTION DETECT
switch should be in the upper position.
Use the arrow keys to choose a channel.
Your DVR is now ready to record a video, or take a photo of that channel.
Quick-press the Enter key to take a photo.
Long-press the Enter key to start recording video. When recording video, a red REC icon
will appear. To stop recording, press the Enter key again.
If you are using AUTO SWITCH, the DVR will automatically switch channels. Note that
it will only record the channel that is currently on screen.
www.SafetyBasement.com Phone: 877-345-2336 Fax: 888-236-2524
Page 24
Page 25

PRODUCT MANUAL Wireless DVR : SB-WDVR50
MOTION DETECTION
Motion detection will start recording video
when motion is detected on the camera currently
on screen.
e RECORD / PLAY / MOTION DETECT
switch should be in the lower position.
To start using Motion
Detection, long-press the
Record button. e on
screen text will change
to notify you that it is
detecting motion and
recording.
www.SafetyBasement.com Phone: 877-345-2336 Fax: 888-236-2524
Page 25
Page 26

PRODUCT MANUAL Wireless DVR : SB-WDVR50
PLAYBACK PHOTOS
Playback your video and photo les directly on
your DVR.
e RECORD / PLAY / MOTION DETECT
switch should be in the middle position.
Highlight the PHOTO option and press ENTER.
You will be shown a list of available photo les. Use the arrow keys to highlight a photo,
then press ENTER to show it on the DVR screen.
When showing a photo, you can cycle through your photos by pressing the arrow keys.
www.SafetyBasement.com Phone: 877-345-2336 Fax: 888-236-2524
Page 26
Page 27

PRODUCT MANUAL Wireless DVR : SB-WDVR50
PLAYBACK VIDEOS
Playback your video and photo les directly on
your DVR.
e RECORD / PLAY / MOTION DETECT
switch should be in the middle position.
www.SafetyBasement.com Phone: 877-345-2336 Fax: 888-236-2524
Highlight the VIDEO option and press ENTER.
You will be shown folders by date. Use the arrow
keys to highlight a folder, then press ENTER to
see the list of videos available for that date.
Long-press the arrow keys to FF and REW
through a video.
PAUSE a video by pressing ENTER.
Quick-press the arrow keys to adjust the volume.
Page 27
Page 28

PRODUCT MANUAL Wireless DVR : SB-WDVR50
DELETE FILES
In playback mode, you can delete single les, or
all les.
We recommend connecting your DVR to a PC,
or inserting the SD card directly into a PC for
most le maintenance and backup of your les.
Deleted les can not be retrieved.
www.SafetyBasement.com Phone: 877-345-2336 Fax: 888-236-2524
Highlight the le you want to delete.
Press M to show your delete options. Choose
carefully.
Press ENTER to choose.
You will be asked to conrm that you want to
delete the le. Highlight YES and press ENTER
to continue.
e le is deleted.
Page 28
Page 29

PRODUCT MANUAL Wireless DVR : SB-WDVR50
DEVICE SPECIFICATIONS
n/a
Audio
Video Formats AVI
Video Codec MPEG-4 Visual, Advanced Simple@L5
Bit Rate 11.4 Mbps (@720x480)
Resolution 720x480, 720x576
Display Aspect Ratio 3:2
Video
Audio Format MPEG Audio, Version 2
Bit Rate Mode Constant
Bit Rate 64 Kbps
Sampling 22.05 KHz
Format JPEG
Resolution 640x480
Photo
www.SafetyBasement.com Phone: 877-345-2336 Fax: 888-236-2524
Page 29
Page 30

PRODUCT MANUAL Wireless DVR : SB-WDVR50
DEVICE SPECIFICATIONS
Memory Built In n/a
Memory Expansion up to 32GB
Battery Type Rechargeable 3200 Mah
Charger Type 5.0V, 2.0A wall adapter
LCD Resolution 800x480
AV IN Format NTSC, PAL
USB 2.0 Port
Size 131mm x 86mm x 18mm
Device Info
Weight 205g
Camera shown in photos is for illustrative purposes only. Please check our site for
available camera options and wireless options.
Notes
File sizes shown are approximate.
Video (10 min @ 720x480) 818 MB
Photo 40 KB
File Sizes
www.SafetyBasement.com Phone: 877-345-2336 Fax: 888-236-2524
Page 30
Page 31

PRODUCT MANUAL Wireless DVR : SB-WDVR50
CONNECTING TO YOUR PC
Your Windows PC or Mac can connect to your DVR without the need for additional drivers or
soware.
You may want to connect to your PC to back up your les, and for le maintenance.
1. Connect the USB cable to the USB port of your DVR.
2. Connect the other end of the USB cable to a USB port on your PC. Do not connect
to a hub.
3. Hold the M button on your DVR until the DVR powers on.
4. e DVR will automatically enter USB CONNECT mode.
5. Your Windows or Mac PC will automatically install any standard drivers necessary
to connect to your DVR. is is normal and should only occur the rst time.
6. A dialog box may appear on your PC to let you know you have connected to your
DVR.
7. You may now explore the les on your DVR using standard Windows and Mac
naviation.
Special Note for Mac Users:
When deleting les, be sure to EMPTY your BIN before you eject yout DVR. You must
empty the trash for proper le deletion.
www.SafetyBasement.com Phone: 877-345-2336 Fax: 888-236-2524
Page 31
Page 32

PRODUCT MANUAL Wireless DVR : SB-WDVR50
SUGGESTED SOFTWARE
Your Windows PC or Mac has built-in soware that will play most of the les created by devices
like yours. However, if you are having problems playing your les, or need more options, please
download and try these programs.
is soware is free and can be downloaded directly from the links below. You can nd support
and tutorials for these programs on their respective websites. SafetyBasement can not provide
soware support for these programs
As with ANY les you download from the internet, be sure to scan them for viruses using your
particular virus scanner. While most users report no issues using this soware, we can not be
responsible for any damage caused by this soware. Please proceed carefully. Back up your PC
before installing any new soware.
VIDEO PLAYBACK - VLC
(http://www.videolan.org/vlc/index.html)
e VLC Media Player can play almost any video or audio le type. ere is
a version for Windows and for Mac OS X.
VIDEO EDITING for WINDOWS - MOVIE MAKER 2012
(http://windows.microso.com/en-US/windows/get-movie-makerdownload)
Movie Maker is a simple video editing program from Microso. Please go
to this link, and choose the download for your version of Windows. Please
note: Movie Maker is part of the Windows Essentials package.
VIDEO EDITING for MAC OS X - iMOVIE
(Visit the Apple Mac App Store for latest version)
iMovie is a simple video editing program from Apple. It comes installed with
your new Mac. e latest version is also available at the Mac App Store at
additional cost.
AUDIO PLAYBACK and EDITING - AUDACITY
(http://audacity.sourceforge.net/)
Audacity is a popular audio editing program used by amateurs and
professionals to edit simple and complex audio projects. You can use
Audacity to convert your audio les to another format, such as MP3. ere
is a version for Windows and Mac OS X.
PHOTOS
Your Windows and Mac computers have the ability to do basic editing of
photos built in.
www.SafetyBasement.com Phone: 877-345-2336 Fax: 888-236-2524
Page 32
 Loading...