

Page 1

INSTRUCTION MANUAL
Mi6 Mini Voice Recorder
SB-VR9000
Revised: July 8, 2013
ank you for purchasing from SafetyBasement.com! We appreciate your business.
We made this simple manual to help you enjoy your new product as quickly and easily as
possible.
Be sure to check the TECH SUPPORT tab on your product page at SafetyBasement.com
for the latest available manual.
Page 2
PRODUCT MANUAL Mi6 Mini Voice Recorder : SB-VR9000
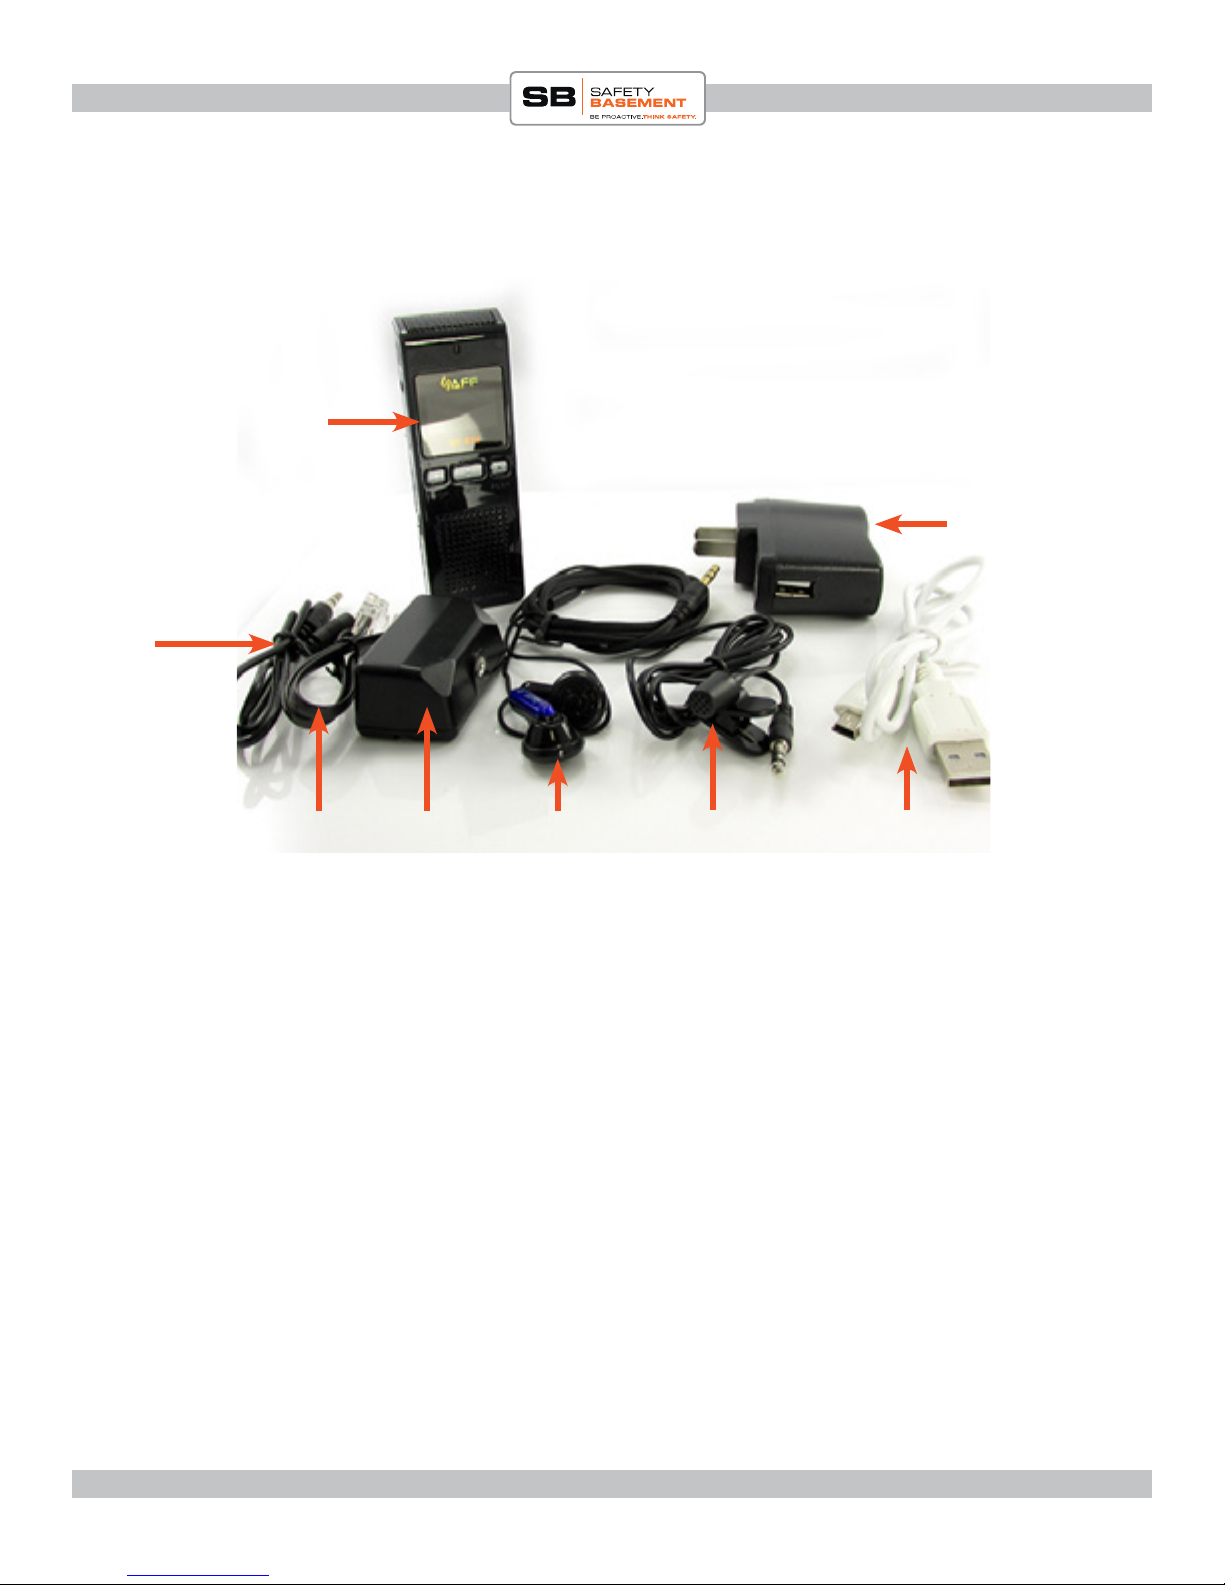
PRODUCT REFERENCE
What’s Included with
Your Mi6
Mi6 Recorder
Wall Charger
Audio
Cable
Phone
Line
Phone
Adapter
Ear Buds
External
Microphone
USB Cable
www.SafetyBasement.com Phone: 877-345-2336 Fax: 888-236-2524
Page 2
Page 3

PRODUCT MANUAL Mi6 Mini Voice Recorder : SB-VR9000
PRODUCT REFERENCE
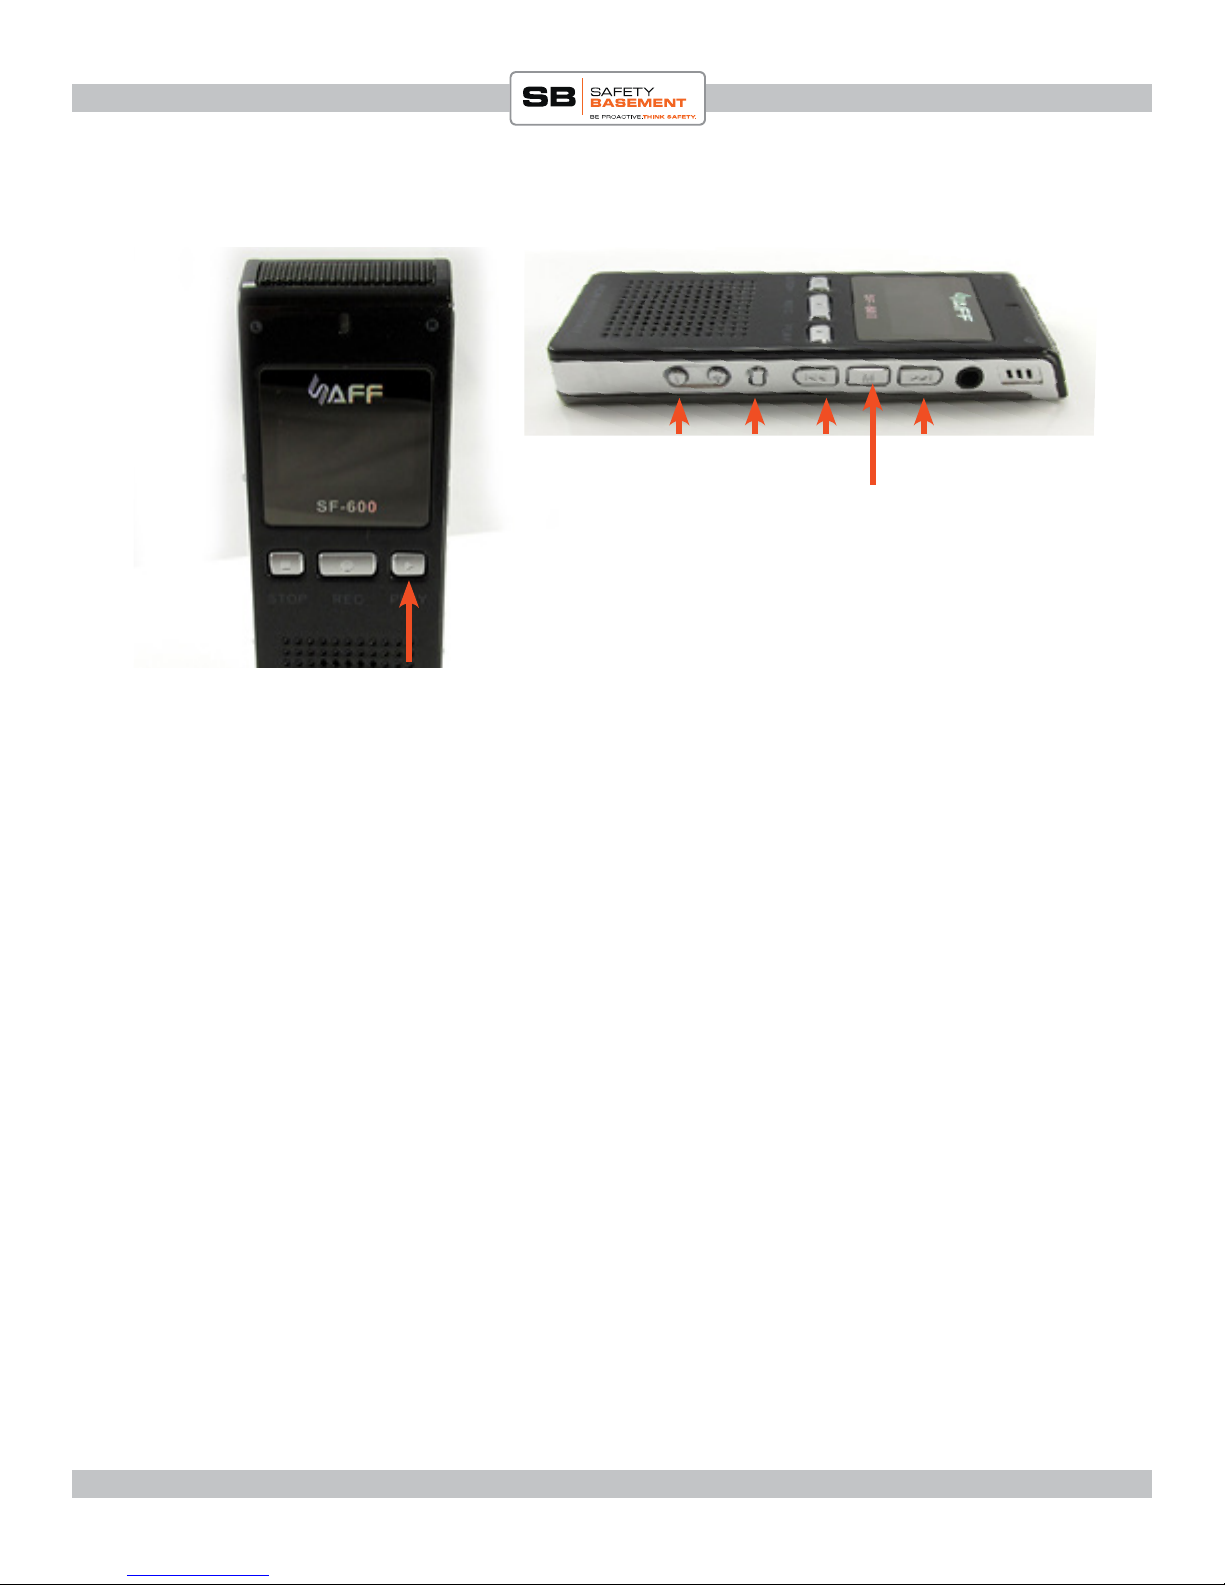
Microphone
Status Light
Display
STOP / REC / PLAY
Buttons
Speaker
Le Side
Right Side
External
Microphone
Port
Hold
Switch
USB Port
(on bottom)
SD Card
Slot
Power
Switch
Volume + / -
www.SafetyBasement.com Phone: 877-345-2336 Fax: 888-236-2524
Buttons
A/B
Erase
Prev Next
“M”
Button
Ear
Buds
Port
Page 3
Page 4
PRODUCT MANUAL Mi6 Mini Voice Recorder : SB-VR9000
CHARGING
Before you use your Mi6 recorder, you should
charge it for several hours.
You can do this by connecting your Mi6 to
your computer’s USB port, or use the included
wall adapter.
CONNECTING TO A PC
You do not need to download any drivers to connect your Mi6 to a PC or Mac.
Simply connect the USB cable to your Mi6. Connect the other end directly to a USB port on
your PC. Do not use a hub.
In a few moments, your PC will automatically connect to the Mi6. e rst time, it may
install standard drivers. is is normal. Your Mi6 will charge while connected, and you can
also access the les on it.
You can now use the Mi6 as you would any external drive or USB ash drive.
Remember to EJECT your device before pulling the USB cable out.
www.SafetyBasement.com Phone: 877-345-2336 Fax: 888-236-2524
Page 4
Page 5
PRODUCT MANUAL Mi6 Mini Voice Recorder : SB-VR9000
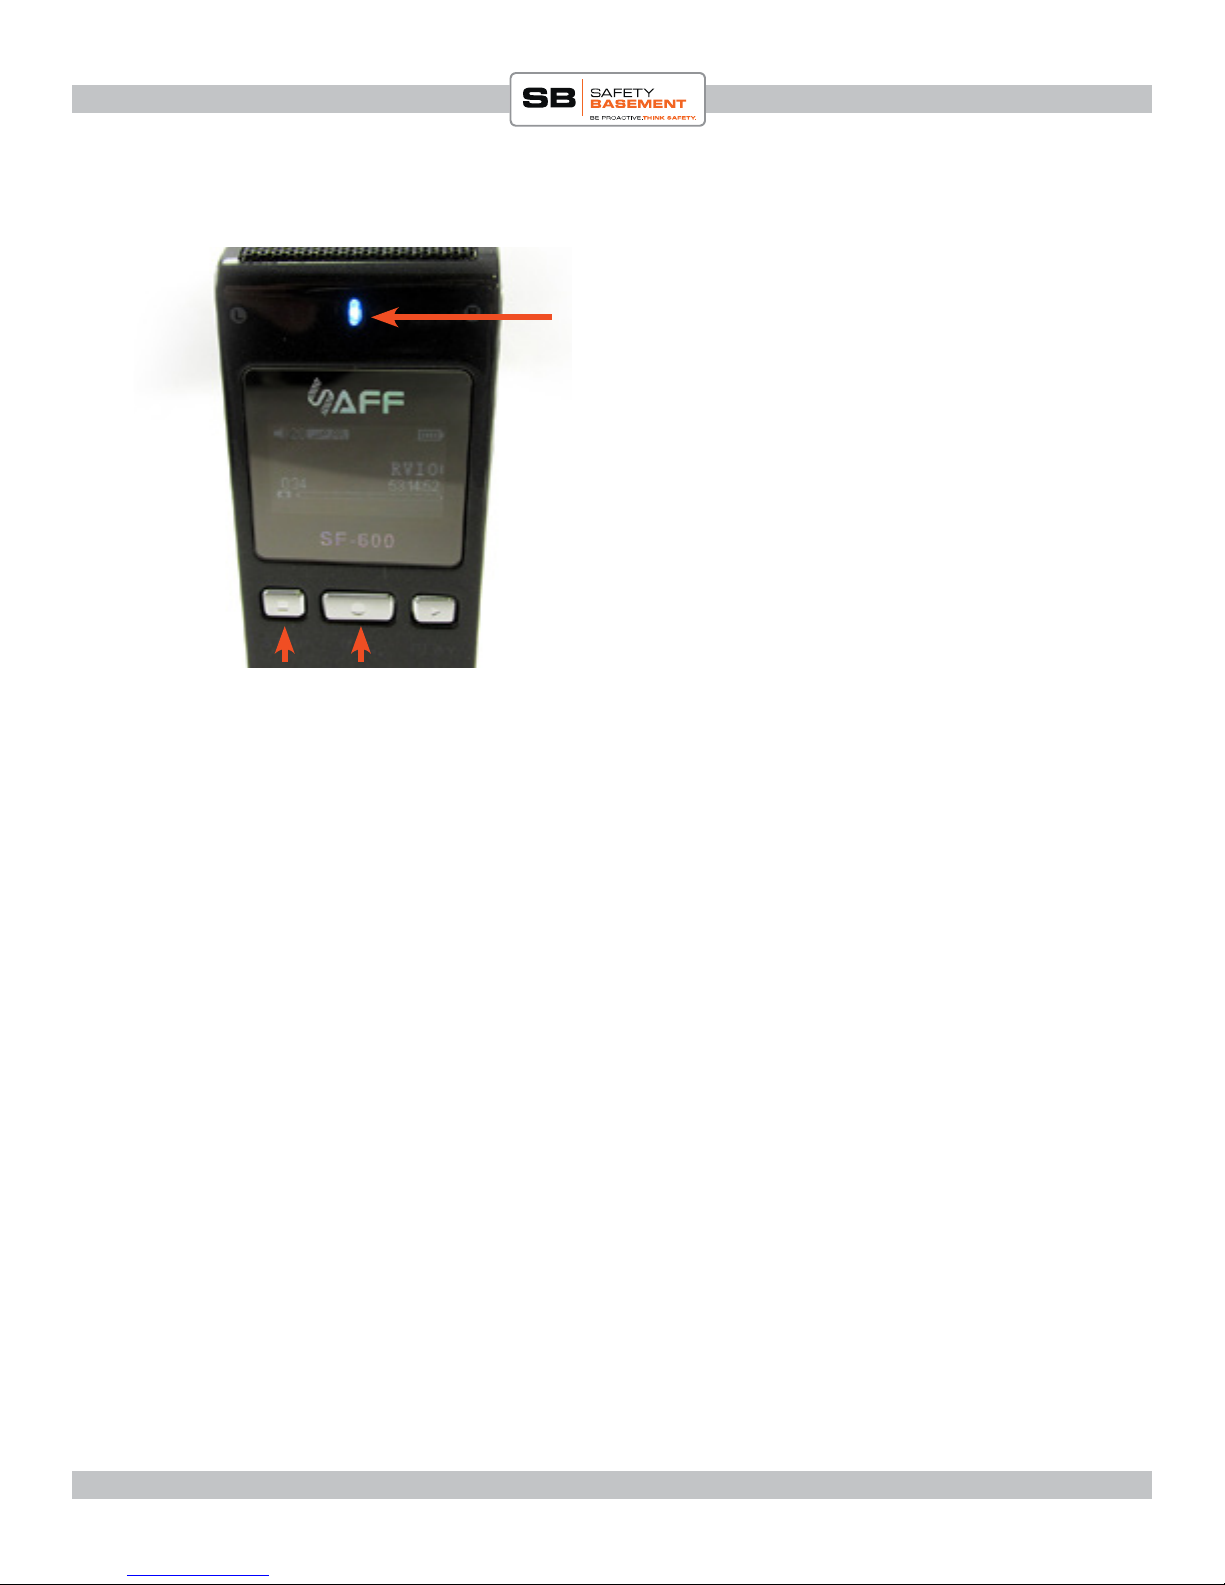
QUICK START - RECORD
Need to start recording immediately?
Turn the Power Switch ON. In fact, leave the
Power Switch ON all the time. You should
only turn it OFF when you are not going to
use your Mi6 for an extended period of time.
Quickly press the REC button. Your Display
Screen should light up.
Quickly press the REC button again. e
Status Light will light up, and you have started
recording.
To stop recording, press the STOP button to
RECSTOP
light up your Display. Press the STOP button
again to stop recording.
e Mi6 saves your le and you are ready to
record again.
POWER ON & OFF
With the power switch on all the time, you will use the PLAY button to turn your Mi6 on
and o.
Press the PLAY button to wake up your Mi6.
HOLD the PLAY button to shut it o.
www.SafetyBasement.com Phone: 877-345-2336 Fax: 888-236-2524
Page 5
Page 6
PRODUCT MANUAL Mi6 Mini Voice Recorder : SB-VR9000
SETTINGS
Volume + / -
Buttons
PLAY
e Mi6 has a number of settings you can customize to your particular needs. You will use
the buttons noted above to enter these settings, make changes and save your settings.
Please follow these instructions carefully.
Please turn the Main Power Switch to ON.
A/B
Erase
Prev Next
“M”
Button
You will want to leave it in the ON position at all times. You will set the Time and Date
once, but if you turn o the main power, you will need to set it again.
Your Mi6 will automatically power down when not in use. To WAKE UP your Mi6, press
PL AY.
www.SafetyBasement.com Phone: 877-345-2336 Fax: 888-236-2524
Page 6
Page 7

PRODUCT MANUAL Mi6 Mini Voice Recorder : SB-VR9000
MODES
ere are several MODES available to you with the Mi6. You can see the Modes by
pressing the M button, between the Next and Prev buttons on the right side of the device.
Press the M button now. Use the PREV and NEXT keys to see the dierent Modes
available.
You will see one of the following;
MUSICPLAY - Play your MP3 les.
MUSIC - Find your MP3 les. ere will be dierent options available, such as All Songs,
or Artist. Your MP3 les must be tagged correctly for this feature to work properly.
VOICE - Play your recorded les, either Mic Record or Line-In Record les.
RECORD SETTINGS - Adjust the dierent Settings for your Recordings.
TIME - See the current system time.
EBOOK - View text les.
SETTINGS - Adjust dierent System Settings, including the Date and Time.
BROWSE - Browse the les on your Mi6 or SD Card. Note: we will not use this. It is more
convenient to use a PC to browse the les you will have on your device.
at is a list of the available MODES. We will skip around into various modes as we
review the Mi6. Use the M key to return to the list of Modes at any time.
www.SafetyBasement.com Phone: 877-345-2336 Fax: 888-236-2524
Page 7
Page 8

PRODUCT MANUAL Mi6 Mini Voice Recorder : SB-VR9000
SET THE DATE AND TIME
You’ll rst want to set the Date and Time for your Mi6. Remember, your Date and Time
will RESET when you turn OFF the Main Power Switch. Button presses are shown in RED.
1. M to Mode Menu.
2. NEXT/PREV to choose SETTINGS.
3. PLAY to enter the Settings Menu.
4. NEXT/PREV to highlight the SET TIME option.
5. PL AY.
6. VOLUME +/- to adjust the Year.
7. NEXT to highlight the Month.
8. REPEAT until you have set the Minute.
9. PLAY to Save.
10. PL AY to Conrm OK.
Your Date and Time is now set.
Conrm your Date and Time.
1. M to Mode Menu
2. NEXT/PREV to TIME
3. PLAY to see current system date and time.
www.SafetyBasement.com Phone: 877-345-2336 Fax: 888-236-2524
Page 8
Page 9

PRODUCT MANUAL Mi6 Mini Voice Recorder : SB-VR9000
FORMAT & QUALITY
e settings most users may want to adjust next is related to the Format and Quality of
your recordings.
FORMATS available are: MP3 and PCM. MP3 is a compressed format, good quality
using less space. PCM is uncompressed, great quality, using more space. Of course, your
recording quality will vary depending on the Quality Settings you choose as well.
QUALITY available; STANDARD (good), INTERVIEW (better) and SESSION (best).
Please refer to this info to choose the best combination for your needs.Recommended
settings are in Red.
FORMAT QUALITY / RATE EST. TIME AVAILABLE (4GB Internal)
PCM SESSION / 1411 Kbps 6 hours 10 minutes
PCM INTERVIEW / 1024 Kbps 8 hours 30 minutes
PCM STANDARD / 256 Kbps 34 hours
MP3 SESSION / 160 Kbps 53 hours 30 minutes (DEFAULT)
MP3 INTERVIEW / 128 Kbps 67 hours
MP3 STANDARD / 96 Kbps 89 hours
More time and space is available to you when using an optional SD card. For example, an
8GB card will double the times shown on the card alone.
Choose a FORMAT.
1. M to Mode Menu
2. NEXT/PREV to RECORD
SETTINGS.
3. PLAY.
4. NEXT/PREV to FORMAT
SELECT.
5. PLAY
6. NEXT/PREV to highlight MP3 or
PCM.
7. PLAY to Save.
Choose a QUALITY.
1. M to Mode Menu
2. NEXT/PREV to RECORD
SETTINGS.
3. PLAY.
4. NEXT/PREV to RECORD
QUALITY.
5. PLAY
6. NEXT/PREV to highlight desired
Quality Setting.
7. PLAY to Save.
www.SafetyBasement.com Phone: 877-345-2336 Fax: 888-236-2524
Page 9
Page 10

PRODUCT MANUAL Mi6 Mini Voice Recorder : SB-VR9000
OTHER DEVICE SETTINGS
You’ve adjusted the settings most people use on the Mi6. Here are the rest of the device
settings under MODE / SETTINGS.
EQ: Equalizer settings during playback
1. M to Mode Menu
2. NEXT/PREV to SETTINGS.
3. PLAY.
4. NEXT/PREV to EQ.
5. PLAY
6. NEXT/PREV to highlight the sound
you want.
7. PLAY to Save.
You can customize the EQ by choosing
USER, then using NEXT/PREV and VOL
+- to adjust levels.
SCREEN OFF: To save battery power,
how quickly do you want the screen to go
dark?
PLAY MODE: Do you want to Repeat
Playback or Randomize?
1. M to Mode Menu
2. NEXT/PREV to SETTINGS.
3. PLAY.
4. NEXT/PREV to PLAYMODE
5. PLAY
6. NEXT/PREV to highlight desired
Play Mode.
7. PLAY to Save.
SLEEP TIME: During playback only, how
long do you want les to play before the
Mi6 auto powers OFF?
1. M to Mode Menu
2. NEXT/PREV to SETTINGS.
3. PLAY.
4. NEXT/PREV to SCREEN OFF.
5. PLAY
6. NEXT/PREV to highlight the time.
Select OFF if you want the screen to
stay on.
7. PLAY to Save.
www.SafetyBasement.com Phone: 877-345-2336 Fax: 888-236-2524
1. M to Mode Menu
2. NEXT/PREV to SETTINGS.
3. PLAY.
4. NEXT/PREV to SLEEP TIME
5. PLAY
6. NEXT/PREV to highlight desired
Sleep Time. Choose OFF to keep Mi6
on all the time during playback.
7. PLAY to Save.
Page 10
Page 11

PRODUCT MANUAL Mi6 Mini Voice Recorder : SB-VR9000
OTHER DEVICE SETTINGS
LANGUAGE: Set the Language for
Menus
1. M to Mode Menu
2. NEXT/PREV to SETTINGS.
3. PLAY.
4. NEXT/PREV to LANGUAGE.
5. PLAY
6. NEXT/PREV to highlight the
Language you want.
7. PLAY to Save.
STORAGE INFO: See how much space
has been used and is remaining on the
INTERNAL memory.
JUMP SETTINGS: Not used
1. M to Mode Menu
2. NEXT/PREV to SETTINGS.
3. PLAY.
4. NEXT/PREV to STORAGE INFO.
5. PLAY
6. M to return to the Menu.
www.SafetyBasement.com Phone: 877-345-2336 Fax: 888-236-2524
Page 11
Page 12

PRODUCT MANUAL Mi6 Mini Voice Recorder : SB-VR9000
OTHER RECORD SETTINGS
You’ve adjusted the settings most people use on the Mi6. Here are the rest of the settings
under MODE / RECORD SETTINGS. We will address a few in depth.
RECORD MODE: is is where you set
Voice Activation.
1. M to Mode Menu
2. NEXT/PREV to RECORD
SETTINGS.
3. PLAY.
4. NEXT/PREV to RECORD MODE.
5. PLAY
6. NEXT/PREV to highlight the mode
you want. NORMAL to record
everything. VOR to use Voice
Activated Recording.
7. PLAY to Save.
RECORD SOURCE: Internal
Microphone, External Mic, or Line-In
(telephone adapter)
MEMORY OPTIONS: Choose to use an
SD card for your recordings. Note: and
SD card must be installed for this option.
1. M to Mode Menu
2. NEXT/PREV to RECORD
SETTINGS.
3. PLAY.
4. NEXT/PREV to MEMORY
OPTIONS
5. PLAY
6. NEXT/PREV to highlight desired
Memory - Internal 4GB or External
SD card (up to 32 GB).
7. PLAY to Save.
RECORD LIGHT: Do you want the
Blue recording light to appear when
recording?
1. M to Mode Menu
2. NEXT/PREV to RECORD
SETTINGS.
3. PLAY.
4. NEXT/PREV to RECORD SOURCE.
5. PLAY
6. NEXT/PREV to highlight
microphone / source you are using.
Use Internal Mic when nothing is
connected.
7. PLAY to Save.
www.SafetyBasement.com Phone: 877-345-2336 Fax: 888-236-2524
1. M to Mode Menu
2. NEXT/PREV to RECORD
SETTINGS.
3. PLAY.
4. NEXT/PREV to RECORD LIGHT
5. PLAY
6. NEXT/PREV to highlight ENABLE
or DISABLE (light o).
7. PLAY to Save.
Page 12
Page 13

PRODUCT MANUAL Mi6 Mini Voice Recorder : SB-VR9000
OTHER RECORD SETTINGS
RECORD SENSITIVITY: Set the
sensitivity level for Voice Activated
recording.
1. M to Mode Menu
2. NEXT/PREV to RECORD
SETTINGS.
3. PLAY.
4. NEXT/PREV to RECORD
SENSITIVITY.
5. PLAY
6. NEXT/PREV to highlight the
sensitivity level you need. You will
want to test the dierent settings to
nd the best for your needs.
7. PLAY to Save.
www.SafetyBasement.com Phone: 877-345-2336 Fax: 888-236-2524
Page 13
Page 14

PRODUCT MANUAL Mi6 Mini Voice Recorder : SB-VR9000
TIMER RECORDING
You can set the Mi6 to record a single event, or recurring event. First, set the length of
the recording for the event. en, set the timer. is is done in the RECORD SETTINGS
mode.
Set the Length of the Recording
1. M to Mode Menu
2. NEXT/PREV to RECORD
SETTINGS.
3. PLAY.
4. NEXT/PREV to RECORD TIME
SETTING.
5. PLAY
6. NEXT/PREV to set the numbers of
Hours to record for the event.
7. PLAY to Save.
8. PLAY to Conrm OK.
Set the Event Time
1. M to Mode Menu
2. NEXT/PREV to RECORD
SETTINGS.
3. PLAY.
4. NEXT/PREV to TIMING TIME
SETTINGS
5. PLAY
6. NEXT/PREV to highlight the HOUR.
7. VOL +- to adjust the event HOUR.
8. NEXT/PREV to highlight the
MINUTE.
9. VOL +- to adjust the event MINUTE.
10. NEXT/PREV to highlight the DAILY
or ONE TIME option in the top right
corner.
11. VOL+- to choose DAILY event or
ONE TIME event.
12. NEXT/PREV to highlight the
ENABLE or DISABLE option in the
top le corner. VOL+- to ENABLE
event. Your event is now enabled.
Note: is should be your LAST step
when setting an event.
13. M to leave the menu. You do not
press PLAY in this case.
www.SafetyBasement.com Phone: 877-345-2336 Fax: 888-236-2524
DO NOT go back to the TIMING TIME
SETTINGS. Each time you return, the
TIMING TIME SETTINGS will reset and
you will need to set them again. is is
normal.
Page 14
Page 15

PRODUCT MANUAL Mi6 Mini Voice Recorder : SB-VR9000
DISPLAY ICONS - PLAYBACK
FILE NAME
CURRENT
TIME IN
FILE
VOLUME
LEVEL
22
FileName123456_ABCD.MP3
0:05 001/001 3:23
PLAYBACK
STATE (STOP,
PAUSE, PLAY)
EQ
SD /
INTERNAL
MEMORY
Class
CURRENT FILE /
TOTAL FILES
PLAY
MODE
BATTERY
LEVEL
FILE
LENGTH
PROGRESS BAR
FILE NAME
WITH DATE
& TIME
CURRENT
TIME IN
FILE
DISPLAY ICONS - RECORD
VOLUME
LEVEL
22
FileName123456_ABCD.MP3
0:05 53:23:00
RECORD STATE
RECORD
QUALITY
SD /
INTERNAL
MEMORY
TIME AVAILABLE
BATTERY
LEVEL
RECORD
QUALITY
SESSION - BEST
INTERVIEW -
BETTER
STANDARD -
GOOD
www.SafetyBasement.com Phone: 877-345-2336 Fax: 888-236-2524
Page 15
Page 16

PRODUCT MANUAL Mi6 Mini Voice Recorder : SB-VR9000
RECORDING - PHONE ADAPTER
We covered how to record quickly earlier in the manual using the internal mic. Now we’re
going to record with the Phone Adapter.
You will need the Phone Adapter, the
included audio cable, the included phone
cable, and a phone.
First, disconnect the phone line attached to
the wall.
Connect that line from the wall to the LINE
IN on the Phone Adapter.
Use the included phone line to connect the
adapter to your Phone.
www.SafetyBasement.com Phone: 877-345-2336 Fax: 888-236-2524
Connect the audio cable to the Audio Output
on the Phone Adapter.
Page 16
Page 17

PRODUCT MANUAL Mi6 Mini Voice Recorder : SB-VR9000
RECORDING - PHONE ADAPTER
Connect the other end of the Audio Cable to
the Mi6, using the External Microphone port
on the le side of the device.
You must now changed the RECORD
SOURCE to use the Phone Adapter. Set
the Source to Line-In.
1. M to Mode Menu
2. NEXT/PREV to RECORD
SETTINGS.
3. PLAY.
4. NEXT/PREV to RECORD SOURCE.
5. PLAY
6. NEXT/PREV to highlight Line-In.
7. PLAY to Save.
When you need to record a call, press the
RECORD button.
RECORDING - EXTERNAL MIC
Connect the external microphone to the
External Microphone port.
You must now changed the RECORD
SOURCE to use the External
Microphone. Set the Source to External
Mic.
1. M to Mode Menu
2. NEXT/PREV to RECORD
SETTINGS.
3. PLAY.
4. NEXT/PREV to RECORD SOURCE.
5. PLAY
6. NEXT/PREV to highlight External
Mic.
7. PLAY to Save.
To record, press the RECORD button.
www.SafetyBasement.com Phone: 877-345-2336 Fax: 888-236-2524
Page 17
Page 18

PRODUCT MANUAL Mi6 Mini Voice Recorder : SB-VR9000
PLAYBACK - “MUSICPLAY” MODE
You playback your MP3 and music les
using the MUSICPLAY and MUSIC
modes.
MUSICPLAY - Plays a single le from
the available les on your Mi6. NOTE: If
you choose to record in MP3 mode, your
recordings will appear in the available le
list alongside your music les.
To play a le:
1. M to Mode Menu
2. NEXT/PREV to MUSIC PLAY
3. PLAY. Your rst available le will
appear.
4. NEXT/PREV to move between
available les.
5. PLAY to play the le.
Remember, you can change the EQ
settings for playback!
To LOOP your playback, press the A/B
BUTTON once to set your starting point.
Press A/B again to set the end point, and
your recording will loop.
DELETE A FILE
1. HOLD A/B. A Delete File menu will
appear.
2. NEXT/PREV to highlight YES.
3. PLAY to delete the le.
PLAYBACK - “MUSIC” MODE
MUSIC - is mode allows you to nd
your MP3 les by Artist, Albums and
Genres. NOTE: Your MP3 les must be
Tagged properly for this feature to work.
To p la y :
1. M to Mode Menu
2. NEXT/PREV to MUSIC
3. PLAY.
4. NEXT/PREV to move between
available types.
5. PLAY to see the available les
under that option, or other available
options.
www.SafetyBasement.com Phone: 877-345-2336 Fax: 888-236-2524
TAGGING - MP3 les can be “Tagged”
with information, such as title, artist,
genre and other information.
You can manually Tag your own les by
using MP3 Tagging soware.
We do not have a recommendation for
tagging soware.
Page 18
Page 19

PRODUCT MANUAL Mi6 Mini Voice Recorder : SB-VR9000
PLAYBACK - “VOICE” MODE
You playback your recorded les using
VOICE mode.
VOICE - Plays the les you recorded
using the internal or external / line-in
microphones.
To play a le:
1. M to Mode Menu
2. NEXT/PREV to VOICE
3. PLAY. Choose the folder you want to
listen to; MIC RECORD or LINE-IN
RECORD.
4. PLAY
5. NEXT/PREV to highlight a le.
6. PLAY to play the le.
EBOOK READER
DELETE A FILE during PLAYBACK or
from the LIST:
1. HOLD A/B. A Delete File menu will
appear.
2. NEXT/PREV to highlight YES.
3. PLAY to delete the le.
e Mi6 can display standard TXT les.
To read a le:
1. M to Mode Menu
2. NEXT/PREV to EBOOK
3. PLAY.
4. NEXT/PREV to highlight a le.
5. PLAY to read the le.
www.SafetyBasement.com Phone: 877-345-2336 Fax: 888-236-2524
Page 19
Page 20

PRODUCT MANUAL Mi6 Mini Voice Recorder : SB-VR9000
WHERE ARE YOUR FILES?
Use the included USB cable to connect your Mi6 to your PC. Be sure you are NOT
recording before plugging in your cable. You do NOT need to turn o your Mi6 to
connect to your PC.
Once connected, you will be able to browse the folders on your Mi6. (Shown in Windows
7. Other sytems are similar.)
e Mi6
appears as
an external /
removeable
drive. Your
drive letter will
var y.
DO
NOT
USE
NOT USED
YOUR FILES
Your Files Are
in is Folder.
www.SafetyBasement.com Phone: 877-345-2336 Fax: 888-236-2524
We added our
favorite songs
here as MP3
les.
We added a
TXT le of
important
notes here.
Page 20
Page 21

PRODUCT MANUAL Mi6 Mini Voice Recorder : SB-VR9000
Our
recordings
from the
internal
microphone
are in this
folder.
WHERE ARE YOUR FILES?
is is our
list of voice
recordings. Note
that we were
recording in
MP3 mode.
Use standard Windows and Mac techniques to COPY, MOVE and DELETE your les.
We recommend you COPY your les to your PC for archiving and best playback.
NOTE TO MAC USERS: To delete les properly, you MUST empty your trash before
disconnecting your Mi6.
www.SafetyBasement.com Phone: 877-345-2336 Fax: 888-236-2524
Page 21
Page 22

PRODUCT MANUAL Mi6 Mini Voice Recorder : SB-VR9000
MORE MEMORY - SD CARDS
Your Mi6 includes 4GB of internal memory. You can also add a Micro SD memory card,
with up to 32GB additional space. at’s 8x the amount of space and time shown in the
chart earlier in the manual.
You will insert the Micro SD card with the
gold connectors facing UP.
Here, the SD card is properly inserted into
the Mi6.
Gently insert the SD card into the slow. Push
in, and the card will click into place. Do not
force it.
MEMORY OPTIONS: You must tell the Mi6
to use your SD card for storage.
1. M to Mode Menu
2. NEXT/PREV to RECORD SETTINGS.
3. PLAY.
4. NEXT/PREV to MEMORY OPTIONS
5. PLAY
6. NEXT/PREV to highlight desired
Memory - Internal 4GB or External SD
card (up to 32 GB).
7. PLAY to Save.
www.SafetyBasement.com Phone: 877-345-2336 Fax: 888-236-2524
Page 22
Page 23

PRODUCT MANUAL Mi6 Mini Voice Recorder : SB-VR9000
SUGGESTED SOFTWARE
Your Windows PC or Mac has built-in soware that will play most of the les created by devices
like yours. However, if you are having problems playing your les, or need more options, please
download and try these programs.
is soware is free and can be downloaded directly from the links below. You can nd support
and tutorials for these programs on their respective websites. SafetyBasement can not provide
soware support for these programs
As with ANY les you download from the internet, be sure to scan them for viruses using your
particular virus scanner. While most users report no issues using this soware, we can not be
responsible for any damage caused by this soware. Please proceed carefully. Back up your PC
before installing any new soware.
VIDEO PLAYBACK - VLC
(http://www.videolan.org/vlc/index.html)
e VLC Media Player can play almost any video or audio le type. ere is
a version for Windows and for Mac OS X.
VIDEO EDITING for WINDOWS - MOVIE MAKER 2012
(http://windows.microso.com/en-US/windows/get-movie-makerdownload)
Movie Maker is a simple video editing program from Microso. Please go
to this link, and choose the download for your version of Windows. Please
note: Movie Maker is part of the Windows Essentials package.
VIDEO EDITING for MAC OS X - iMOVIE
(Visit the Apple Mac App Store for latest version)
iMovie is a simple video editing program from Apple. It comes installed with
your new Mac. e latest version is also available at the Mac App Store at
additional cost.
AUDIO PLAYBACK and EDITING - AUDACITY
(http://audacity.sourceforge.net/)
Audacity is a popular audio editing program used by amateurs and
professionals to edit simple and complex audio projects. You can use
Audacity to convert your audio les to another format, such as MP3. ere
is a version for Windows and Mac OS X.
PHOTOS
Your Windows and Mac computers have the ability to do basic editing of
photos built in.
www.SafetyBasement.com Phone: 877-345-2336 Fax: 888-236-2524
Page 23
Page 24

PRODUCT MANUAL Mi6 Mini Voice Recorder : SB-VR9000
DEVICE SPECIFICATIONS
Audio Formats PCM, MP3
Audio Encoding PCM: 1411, 1024, 256 Kbps
MP3: 160, 128, 96 Kbps
See chart for recording times.
Audio
Video
Photo
n/a
n/a
www.SafetyBasement.com Phone: 877-345-2336 Fax: 888-236-2524
Page 24
Page 25

PRODUCT MANUAL Mi6 Mini Voice Recorder : SB-VR9000
DEVICE SPECIFICATIONS
Memory Built In 4 GB
Memory Expansion up to 32 GB Micro SD card
Battery Type Internal Rechargeable
Charger Type via USB port
Device Info
Please check our site for the latest available manual for this product.
Notes
See chart for bit rates and available time.
File Sizes
www.SafetyBasement.com Phone: 877-345-2336 Fax: 888-236-2524
Page 25
 Loading...