

Page 1
INSTRUCTION MANUAL
“e Charger” 40 Hour Voice Recorder
SB-VR5700
Revised: Feb 14, 2013
ank you for purchasing from SafetyBasement.com! We appreciate
your business.
We made this simple manual to help you enjoy your new product as
quickly and easily as possible.
Be sure to check the TECH SUPPORT tab on your product page at
SafetyBasement.com for the latest available manual.
Page 2
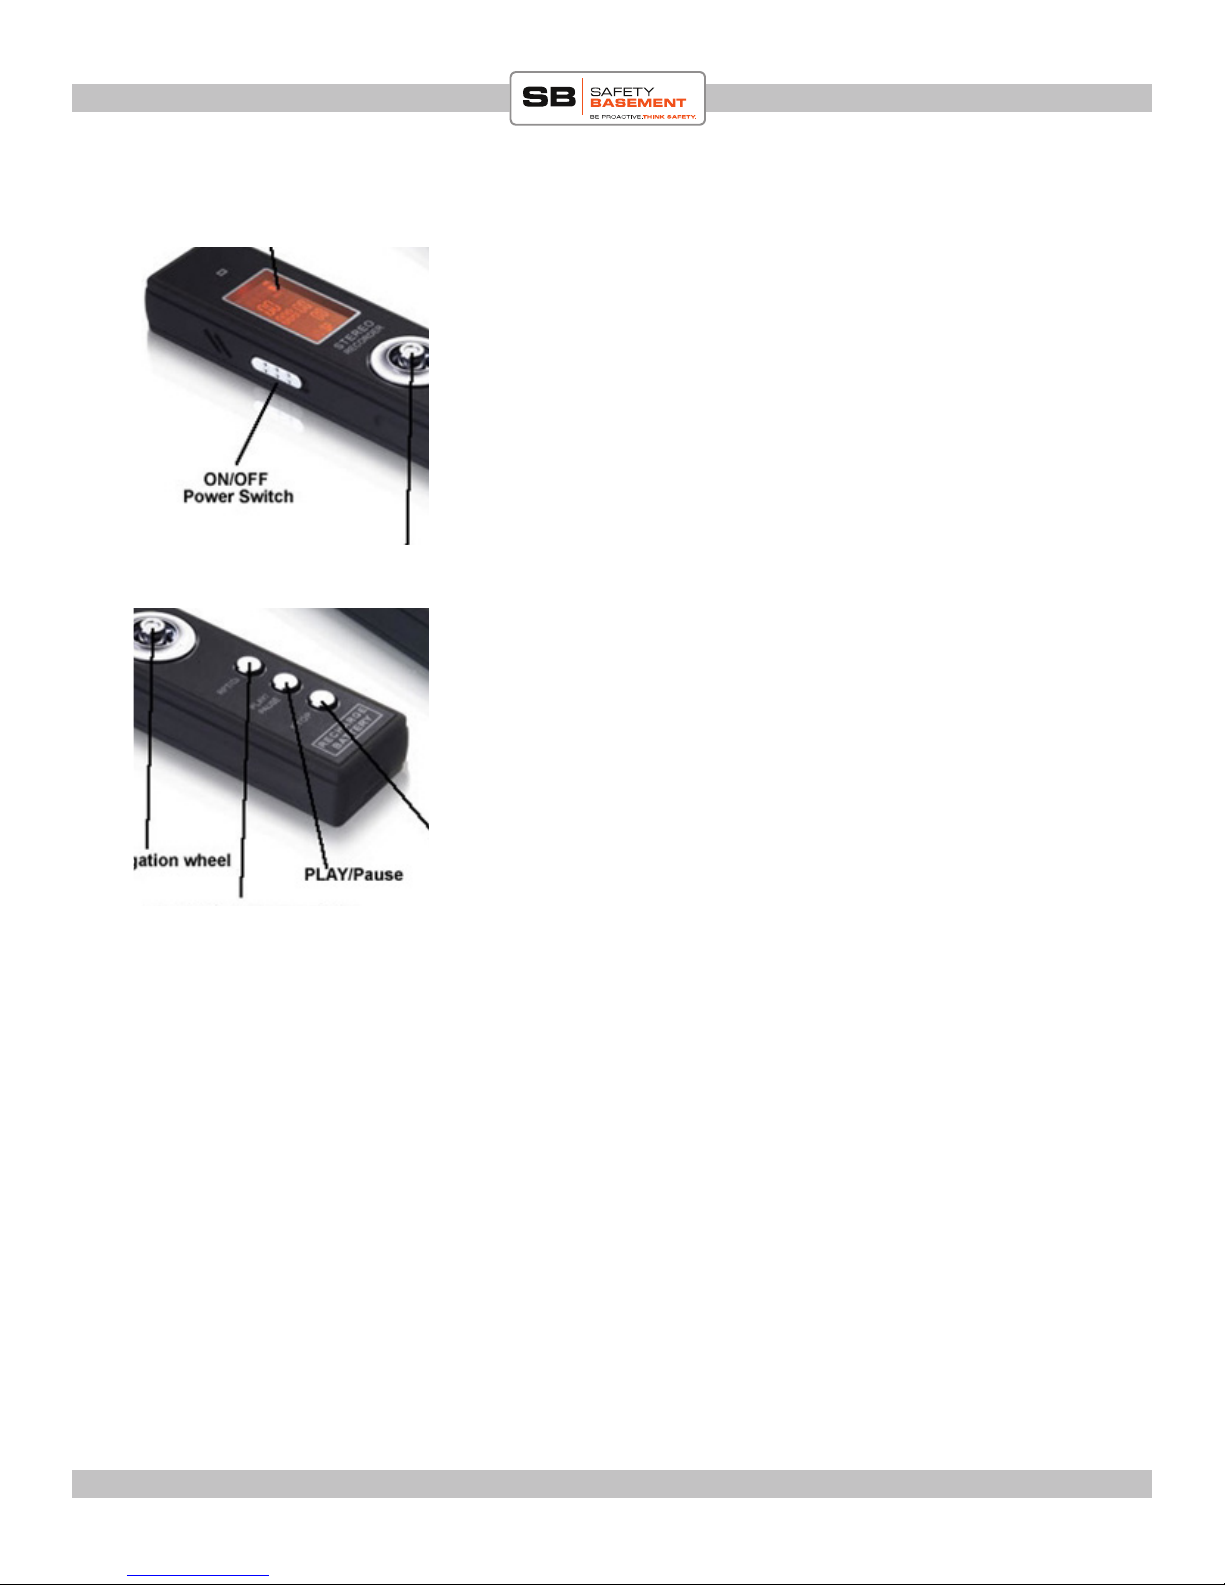
PRODUCT MANUAL “Charger” Voice Recorder : SB-VR5700
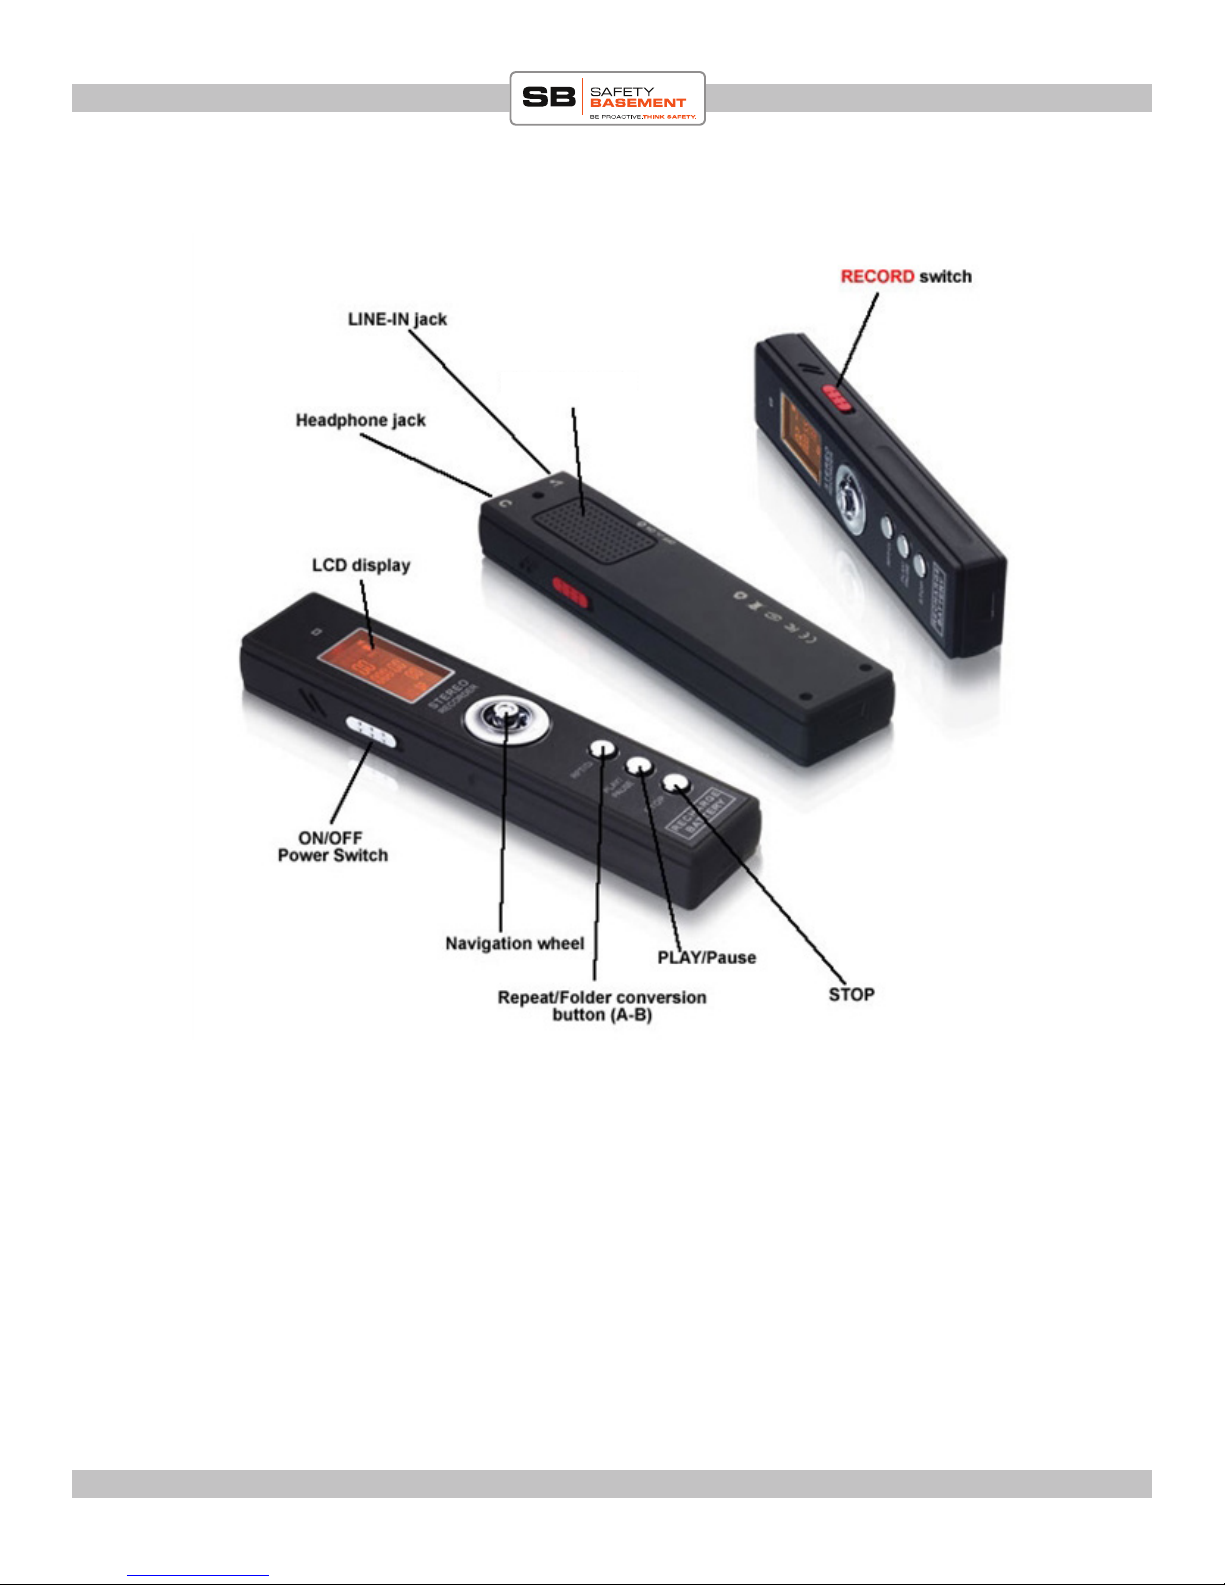
PRODUCT REFERENCE
Speaker
www.SafetyBasement.com Phone: 877-345-2336 Fax: 888-236-2524
Page 2
Page 3
PRODUCT MANUAL “Charger” Voice Recorder : SB-VR5700
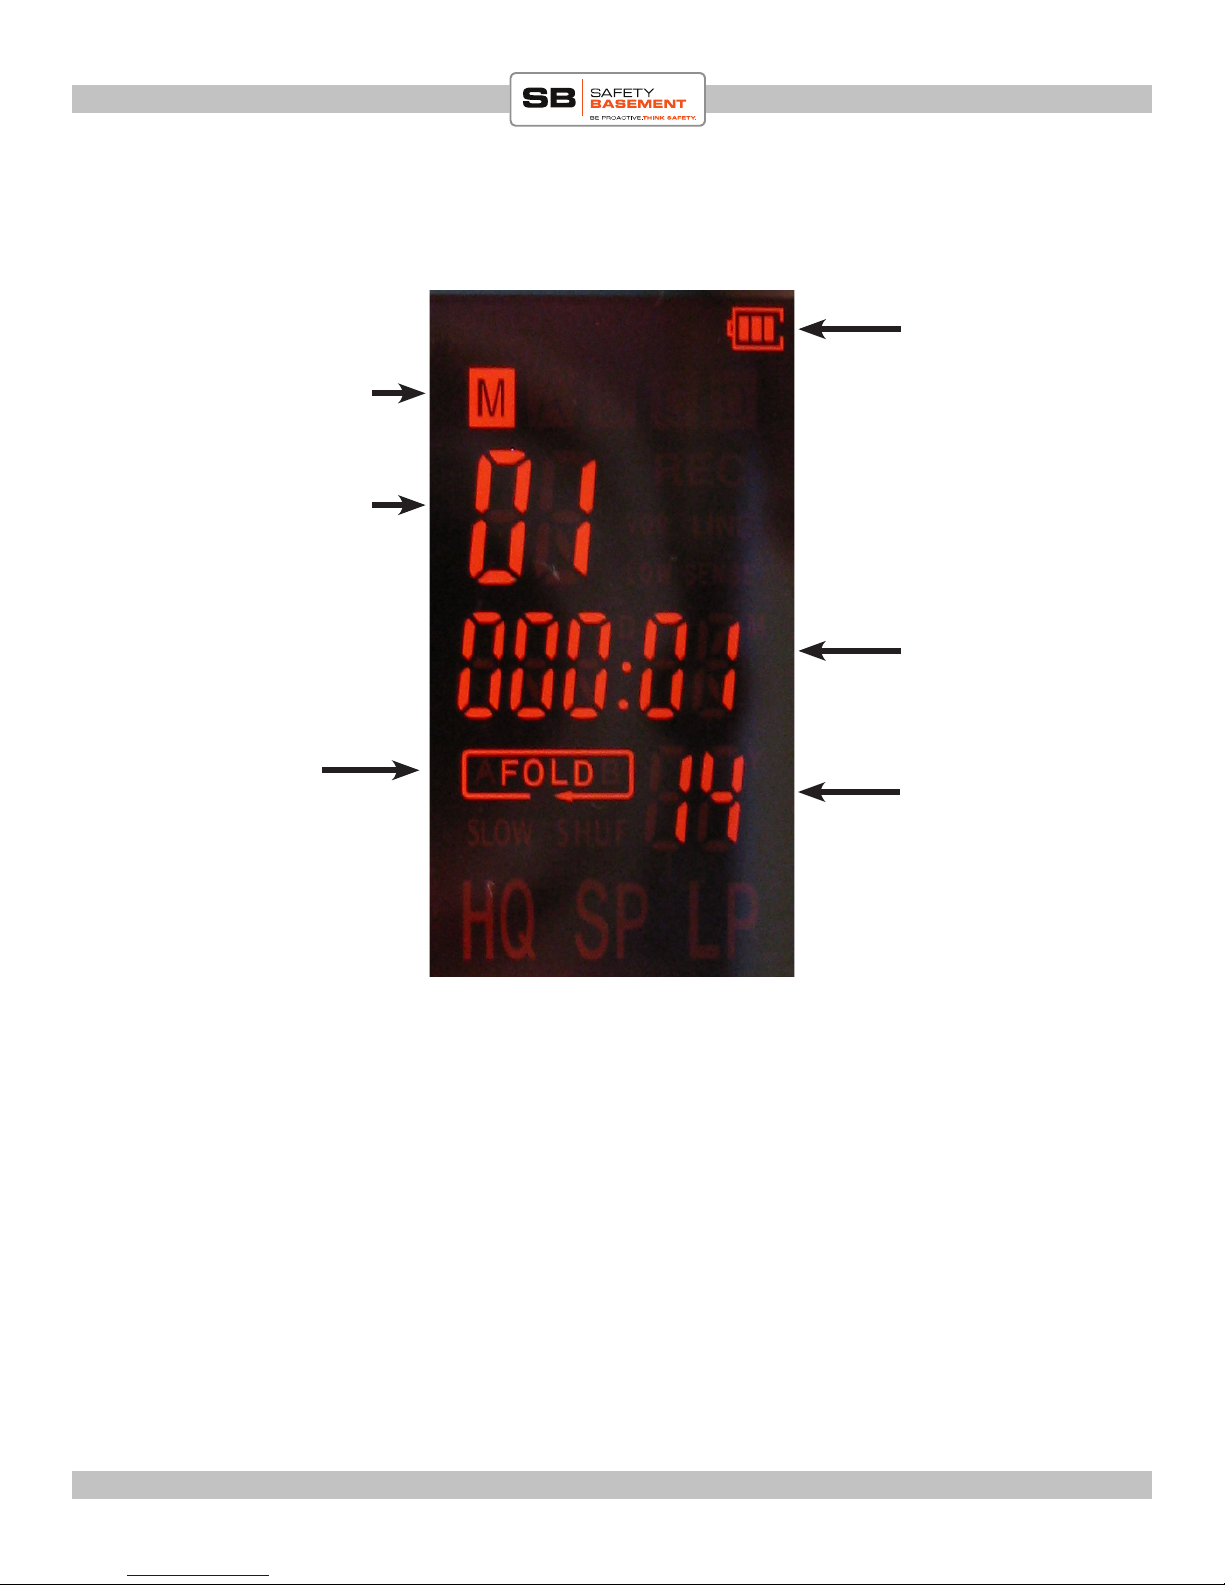
PLAYBACK SCREEN REFERENCE
Battery Level
Current Folder
A, B, C, D
or M (MP3)
Track
File Time
Hours : Minutes
Repeat / Loop
Setting
File Time
Seconds
VOLUME
To adjust the Volume during playback or monitoring, press the Navigation Stick UP and
DOWN.
www.SafetyBasement.com Phone: 877-345-2336 Fax: 888-236-2524
Page 3
Page 4
PRODUCT MANUAL “Charger” Voice Recorder : SB-VR5700
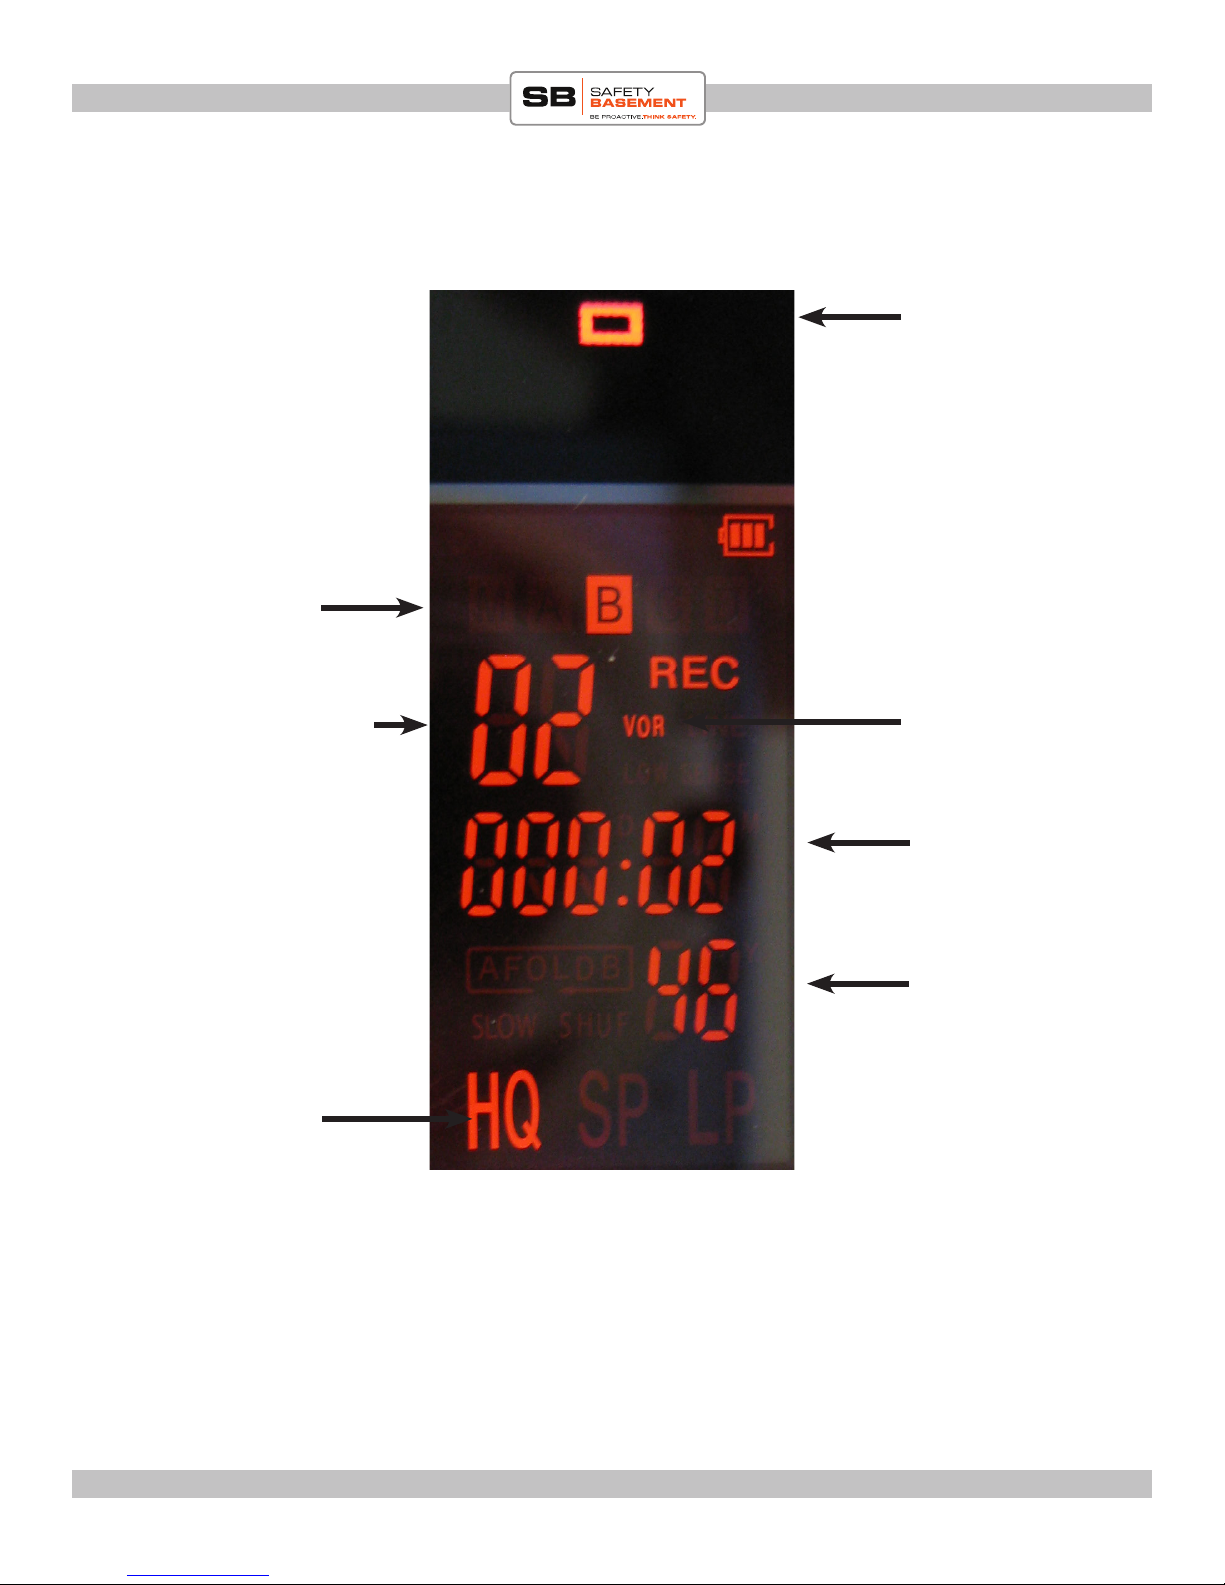
RECORDING SCREEN REFERENCE
Recording Light
Current Folder
A, B, C, D
(MP3 folder is
not available for
recordings)
Track
Recording Quality
HQ, SP, LP
Voice Activated
Recording is ON
File Time
Hours : Minutes
File Time
Seconds
www.SafetyBasement.com Phone: 877-345-2336 Fax: 888-236-2524
Page 4
Page 5

PRODUCT MANUAL “Charger” Voice Recorder : SB-VR5700
BEFORE YOUR FIRST USE
Please charge fully before use. Please use only the adapter that was included with your device.
Do not use other adapters, as they may damage your device.
1. Be sure that the device is OFF.
2. Plug USB cable into device rst.
3. Plug the other end into the wall adapter.
4. Plug the adapter into your power outlet. Please let the device charge for several hours before
your rst use.
NEEDED FILES
No other les are needed to use this device. No device drivers are needed for Windows or Mac
use.
www.SafetyBasement.com Phone: 877-345-2336 Fax: 888-236-2524
Page 5
Page 6
PRODUCT MANUAL “Charger” Voice Recorder : SB-VR5700
POWER ON
Turn on your Charger Recorder by pushing the Power Switch
UP to the ON position.
If your Charger Recorder goes to sleep, you can turn it back on
by holding the PLAY button until it turns back on.
To turn o the Charger Recorder, hold the PLAY button until it
shuts down.
To turn o the Charger Recorder and prevent it from turning on
accidentally, push the Power Switch to the OFF position.
www.SafetyBasement.com Phone: 877-345-2336 Fax: 888-236-2524
Page 6
Page 7
PRODUCT MANUAL “Charger” Voice Recorder : SB-VR5700
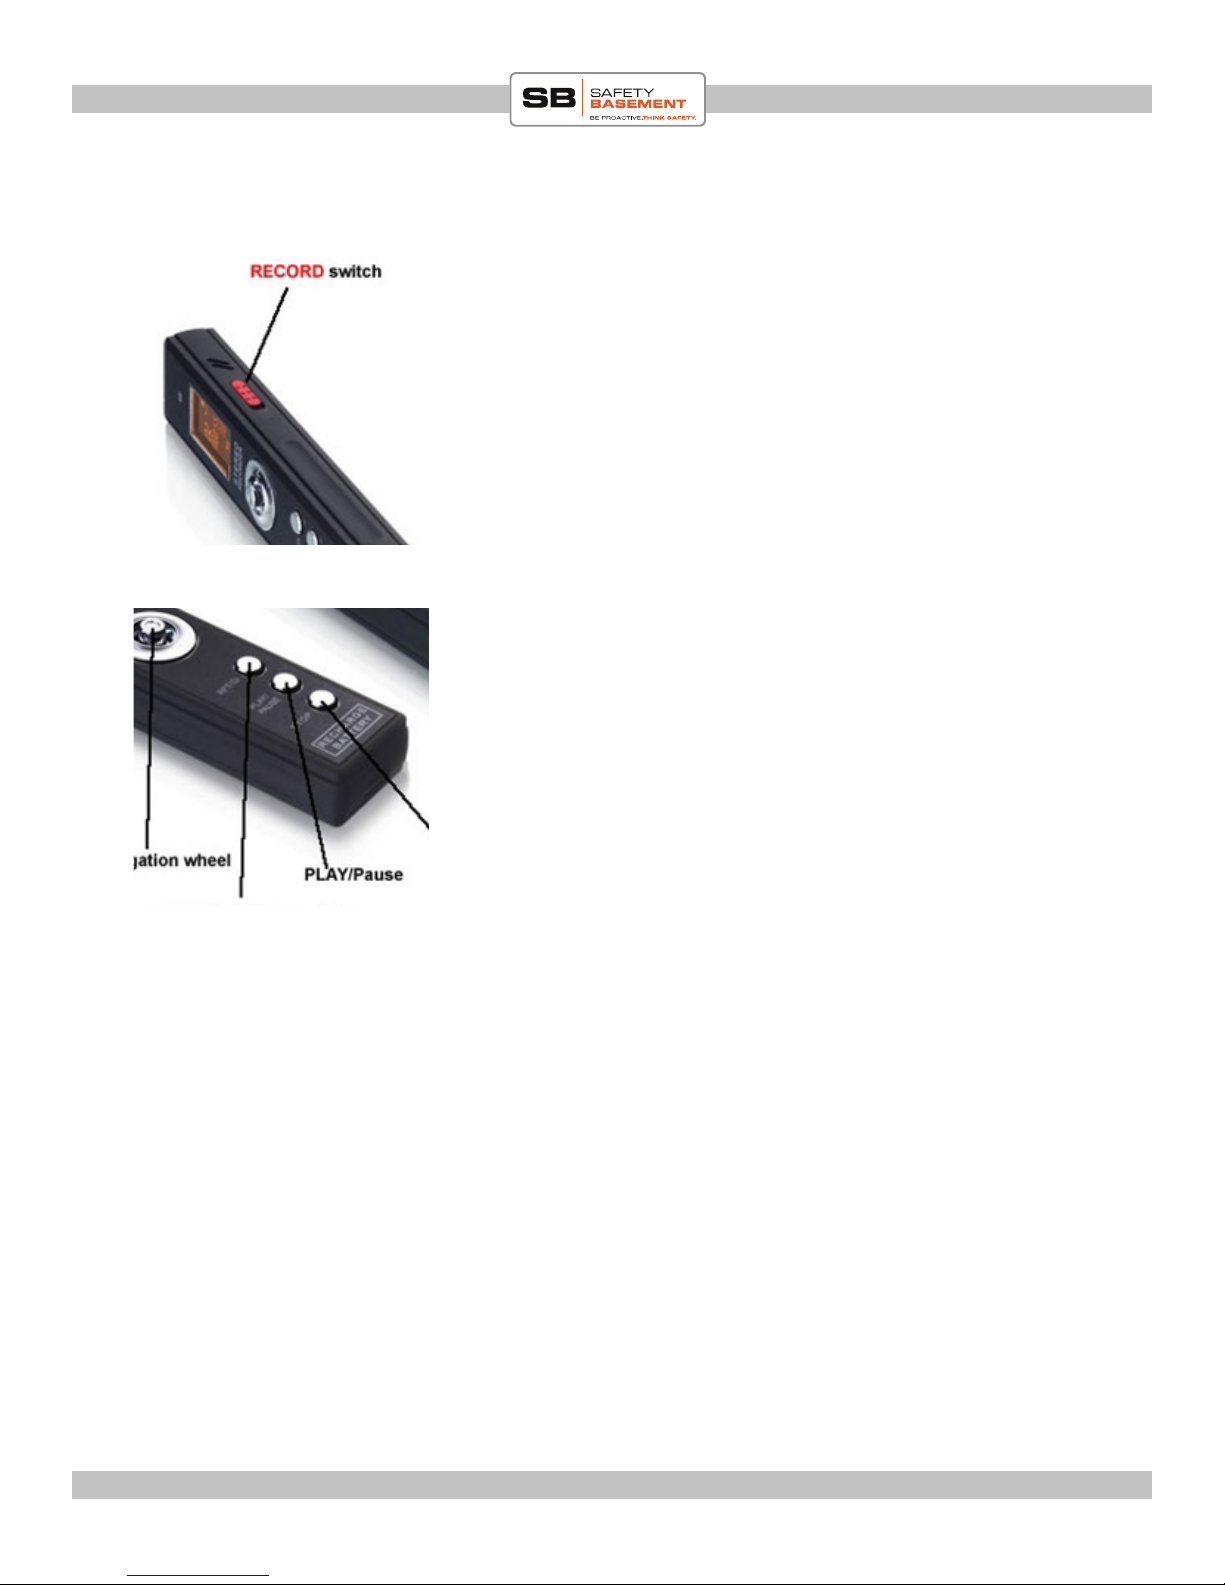
QUICK RECORD
To start recording, using the current recording settings, push the
RECORD switch UP.
Your Charger Recorder will immediately start recording using
the current settings.
To stop recording, and save your le, push the RECORD button
DOWN.
Note: the display will go dark aer several seconds, but the
recorder will continue to record. e Recording Light may be on
while recording, depending on your settings.
To check the status of your recorder, press the PLAY button
quickly.
www.SafetyBasement.com Phone: 877-345-2336 Fax: 888-236-2524
Page 7
Page 8

PRODUCT MANUAL “Charger” Voice Recorder : SB-VR5700
SETTINGS - ERASE
ere are several options available to you when you are in
Playback Mode, while paused or stopped.
1. While paused or stopped, hold the Navigation Stick down
until you see ERASE. Erase is the rst option in the menu.
2. To ERASE the current track, press PLAY. e display will
show DONE when it has deleted that track. NOTE: Proceed
carefully as these les can not be retrieved once deleted.
3. To ERASE ALL les in your current folder, press the
Navigation Stick to the right, until AL appears. To ERASE
ALL, press PLAY. NOTE: Proceed carefully as these les can
not be retrieved once deleted.
TIP!
For easiest le maintenance, connect your Recorder to your
Windows PC or Mac.
Track # or AL(L)
www.SafetyBasement.com Phone: 877-345-2336 Fax: 888-236-2524
Page 8
Page 9

PRODUCT MANUAL “Charger” Voice Recorder : SB-VR5700
SETTINGS - RECORD QUALITY
1. While paused or stopped, hold the Navigation Stick down
until you see ERASE. Erase is the rst option in the menu.
2. Press the Navigation Stick again and you will see REC. is
is your Record Quality Setting.
3. Press the Navigation Stick RIGHT and LEFT until you
have the setting you desire for your voice recordings. Your
options are: HQ, SP, LP. HQ is the best quality, but will use
the most memory. LP is the lower quality, but will use the
least amount of memory.
Quality Setting
4. Note that you also see an option for LINE IN. Use this
setting when using an external microphone or phone
adapter kit.
5. Press PLAY to keep that setting.
LINE
External Microphone or
Phone Adapter Setting
www.SafetyBasement.com Phone: 877-345-2336 Fax: 888-236-2524
Page 9
Page 10

PRODUCT MANUAL “Charger” Voice Recorder : SB-VR5700
SETTINGS - VOICE ACTIVATION
1. While paused or stopped, hold the Navigation Stick down
until you see ERASE. Erase is the rst option in the menu.
2. Press the Navigation Stick until you see VOR. is is your
Voice Activated Recording option.
3. Press the Navigation Stick RIGHT and LEFT until you have
the setting you desire. Voice Activation can be ON or OFF.
4. Press PLAY to keep that setting.
VOR is ON
e VOR icon will appear
in your display when
recording.
www.SafetyBasement.com Phone: 877-345-2336 Fax: 888-236-2524
Page 10
Page 11

PRODUCT MANUAL “Charger” Voice Recorder : SB-VR5700
SETTINGS - REPEAT / LOOPING
1. While paused or stopped, hold the Navigation Stick down
until you see ERASE. Erase is the rst option in the menu.
2. Press the Navigation Stick until you see REP. is is your
Repeat or Looping option.
3. Press the Navigation Stick RIGHT and LEFT until you have
the setting you desire. You can Repeat an entire FOLDER, a
single le, or turn Repeat OFF.
4. Press PLAY to save your setting.
Repeat is ON
is will repeat your current
folder.
Repeat is ON
is will repeat your current
track.
Repeat is OFF
is area is blank when
Repeat function is OFF.
www.SafetyBasement.com Phone: 877-345-2336 Fax: 888-236-2524
Page 11
Page 12

PRODUCT MANUAL “Charger” Voice Recorder : SB-VR5700
SETTINGS - RECORD LIGHT
e LED Recording Light
is located above the display.
is will blink during
recording when set to ON.
1. While paused or stopped, hold the Navigation Stick down
until you see ERASE. Erase is the rst option in the menu.
2. Press the Navigation Stick until you see LED. is is where
you can turn the Recording Light ON and OFF.
3. Push the Navigation Stick RIGHT and LEFT until you have
the option you desire.
4. Press PLAY to save your setting.
LED is ON
e Record Light will Blink
during recording
LED is OFF
www.SafetyBasement.com Phone: 877-345-2336 Fax: 888-236-2524
Page 12
Page 13

PRODUCT MANUAL “Charger” Voice Recorder : SB-VR5700
SETTINGS - SENSITIVITY
1. While paused or stopped, hold the Navigation Stick down
until you see ERASE. Erase is the rst option in the menu.
2. Press the Navigation Stick until you see SENSE. is is
where you can adjust the sensitivity of your Voice Activated
Recordings.
3. Push the Navigation Stick RIGHT and LEFT until you have
the option you desire.
4. Press PLAY to save your setting.
It is recommended that you leave this setting in HI.
www.SafetyBasement.com Phone: 877-345-2336 Fax: 888-236-2524
Page 13
Page 14

PRODUCT MANUAL “Charger” Voice Recorder : SB-VR5700
RECORDING
1. You can record at any time by pushing the Record Switch
UP to Record.
2. Stop recording by pushing the Record Switch DOWN.
3. To record to a particular folder, A, B, C or D, push the
Folder Button until your folder is selected. Your next
recording will be saved in that folder.
4. If you are in MP3 mode, the M folder will be lit. Hold the
Folder Button until the M folder is no longer lit, then choose
the folder you in which you want your recordings saved.
Track in this folder
Recording Time
Recording Quality
Recording to be
saved in C folder
Recording
VOR is ON
www.SafetyBasement.com Phone: 877-345-2336 Fax: 888-236-2524
Page 14
Page 15

PRODUCT MANUAL “Charger” Voice Recorder : SB-VR5700
RECORDING - TELEPHONE ADAPTER
You can record telephone conversations using the
included phone adapter.
You will need the following items, all included with
your recorder:
1. e Charger Recorder
2. e Telephone Adapter Box
3. A Telephone cord to connect to your phone.
4. e audio cable.
Phone line from wall
goes in here
First, you will need to connect the Telephone Adapter
to your phone line. e Telephone Adapter is shown
here.
Remove the line that is currently connected to your
phone, and plug it into the LINE A connection on the
Adapter. is is the line coming from your wall.
www.SafetyBasement.com Phone: 877-345-2336 Fax: 888-236-2524
Page 15
Page 16

PRODUCT MANUAL “Charger” Voice Recorder : SB-VR5700
RECORDING - TELEPHONE ADAPTER
1 foot telephone
cable goes here
Using the 1 foot telephone cable that came with your
recorder, plug one end into the Telephone Adapter
into the connector named TEL.
Plug the other end of this cable into your phone,
where the telephone line was previously.
Please test your phone. You should hear a dial tone.
Connect one end of the audio cable into the other
side of the Telephone Adapter, in the connector
named AUDIO OUTPUT.
Audio Cable goes here
www.SafetyBasement.com Phone: 877-345-2336 Fax: 888-236-2524
Page 16
Page 17

PRODUCT MANUAL “Charger” Voice Recorder : SB-VR5700
RECORDING - TELEPHONE ADAPTER
Your Telephone Adapter should look like this.
Audio cable. Other end is
plugged into the Telephone
Adapter
Connect the other end of the audio cable to the LINE
IN connector on your recorder.
Line In Connector
www.SafetyBasement.com Phone: 877-345-2336 Fax: 888-236-2524
Page 17
Page 18

PRODUCT MANUAL “Charger” Voice Recorder : SB-VR5700
RECORDING - TELEPHONE ADAPTER
e audio cable is now connected to the recorder and
the Telephone Adapter.
You now need to set your recorder to use the Adapter
through the LINE IN connection.
Recording in
LINE IN mode
Refer to the SETTINGS - RECORD QUALITY
part of this manual. You will need to change the
RECORDING QUALITY to LINE.
Normally, your Record Quality is set to HQ, SP or LP
for the built-in microphone.
To use the Telephone Adapter, you must choose
LINE IN for your Quality Setting.
To record a call, with the device ON, push the Record
Switch UP to record. Push DOWN to stop recording
and save your le.
Note: Please observe all local laws regarding
recording telephone conversations.
www.SafetyBasement.com Phone: 877-345-2336 Fax: 888-236-2524
Page 18
Page 19

PRODUCT MANUAL “Charger” Voice Recorder : SB-VR5700
PLAYBACK
1. Press the FOLDER button to choose the folder you want to
playback from.
2. If you want your MP3 collection, hold the folder button
until the M folder lights up.
3. Push the Navigation Stick RIGHT and LEFT to choose a
track.
4. Push the Navigation Stick UP and DOWN to adjust volume
level.
5. Press PLAY to play your le.
6. Press PLAY again to PAUSE.
7. Press STOP to stop.
Track in this folder
Track Time
Current Folder
www.SafetyBasement.com Phone: 877-345-2336 Fax: 888-236-2524
Page 19
Page 20

PRODUCT MANUAL “Charger” Voice Recorder : SB-VR5700
PLAYBACK - REPEAT A SEGMENT
While playing a le, you can repeat a segment. is is helpful if
you need to listen to the same segment a few times, while taking
notes, etc.
1. During playback, press the Folder / Repeat Button. e
folder icon will now show AFOLDB. You have just set the
Starting Point of your segment that will repeat.
2. Let the le play until you have reached the end of the
segment you want to repeat.
3. At the end of the segment, press the Folder / Repeat Button
again. You have just set the End Point. e segment will now
start to play and it will repeat at the end.
4. To stop the repeating segment, press the Folder / Repeat
button again until the icon says FOLDER.
Track in this folder
Repeat Option is
being used
Current Folder
Track Time
www.SafetyBasement.com Phone: 877-345-2336 Fax: 888-236-2524
Page 20
Page 21

PRODUCT MANUAL “Charger” Voice Recorder : SB-VR5700
CONNECTING TO PC / MAC
WINDOWS - RETRIEVE YOUR FILES
1. Device must be OFF before connecting to your PC.
2. Connect USB cable to watch rst.
3. Connect other end of USB cable to your PC using USB port directly on PC. Note: A USB
hub may cause your device to not work properly.
4. Please wait until Windows recognizes your device. is may take several seconds. Note: the
rst time you connect your device, Windows may install standard drivers. is is normal.
5. Access your device as you would any standard Flash Drive.
6. COPY your les from the device to a folder on your PC.
7. You may now highlight and DELETE the les from your device.
8. Be sure to properly EJECT your device from Windows before unplugging it.
MAC OS X - RETRIEVE YOUR FILES
1. Device must be OFF before connecting to your Mac.
2. Connect USB cable to watch rst.
3. Connect other end of USB cable to your Mac using USB port directly on Mac. Note: A USB
hub may cause your device to not work properly.
4. Please wait until Mac recognizes your device. is may take several seconds. It will mount as
a Device in your FINDER.
5. Access device as you would any standard FLASH DRIVE.
6. SPECIAL NOTES TO MAC USERS!
7. To properly save your les to your Mac, MOVE your les, rather than copy.
8. Create a folder on your Mac.
9. Highlight the les on the device.
10. CMD CLICK and drag the les to your folder. Let go and choose MOVE.
11. To properly empty your device on Mac, be sure to Empty your Trash Can before ejecting the
device.
12. Be sure to properly EJECT your device from Mac before unplugging it.
ank you! And enjoy your new device from SafetyBasement.com!
www.SafetyBasement.com Phone: 877-345-2336 Fax: 888-236-2524
Page 21
Page 22

PRODUCT MANUAL “Charger” Voice Recorder : SB-VR5700
DEVICE SPECIFICATIONS
Audio Format (Voice Recordings) WAV
Audio Encoding (Voice Recordings) HQ (192kbps), SP (64kbps), LP (32kbps)
LINE IN (384kbps)
Audio Format (Playback) MP3, WAV*
*Playback of WAV les created on Device
Audio Encoding (Playback) Standard MP3 les
Memory (Internal) 4 GB
www.SafetyBasement.com Phone: 877-345-2336 Fax: 888-236-2524
Page 22
Page 23

PRODUCT MANUAL “Charger” Voice Recorder : SB-VR5700
SUGGESTED SOFTWARE
Your Windows PC or Mac has built-in soware that will play most of the les created by devices
like yours. However, if you are having problems playing your les, or need more options, please
download and try these programs.
is soware is free and can be downloaded directly from the links below. You can nd support
and tutorials for these programs on their respective websites. SafetyBasement can not provide
soware support for these programs
As with ANY les you download from the internet, be sure to scan them for viruses using your
particular virus scanner. While most users report no issues using this soware, we can not be
responsible for any damage caused by this soware. Please proceed carefully. Back up your PC
before installing any new soware.
VIDEO PLAYBACK - VLC
(http://www.videolan.org/vlc/index.html)
e VLC Media Player can play almost any video or audio le type. ere is
a version for Windows and for Mac OS X.
VIDEO EDITING for WINDOWS - MOVIE MAKER 2012
(http://windows.microso.com/en-US/windows/get-movie-makerdownload)
Movie Maker is a simple video editing program from Microso. Please go
to this link, and choose the download for your version of Windows. Please
note: Movie Maker is part of the Windows Essentials package.
VIDEO EDITING for MAC OS X - iMOVIE
(Visit the Apple Mac App Store for latest version)
iMovie is a simple video editing program from Apple. It comes installed with
your new Mac. e latest version is also available at the Mac App Store at
additional cost.
AUDIO PLAYBACK and EDITING - AUDACITY
(http://audacity.sourceforge.net/)
Audacity is a popular audio editing program used by amateurs and
professionals to edit simple and complex audio projects. You can use
Audacity to convert your audio les to another format, such as MP3. ere
is a version for Windows and Mac OS X.
PHOTOS
Your Windows and Mac computers have the ability to do basic editing of
photos built in.
www.SafetyBasement.com Phone: 877-345-2336 Fax: 888-236-2524
Page 23
 Loading...