

Page 1

INSTRUCTION MANUAL
Direct Connect Covert Telephone Recorder
SB-TRX20
Revised: June 5, 2013
ank you for purchasing from SafetyBasement.com! We appreciate your business.
We made this simple manual to help you enjoy your new product as quickly and easily as
possible.
Be sure to check the TECH SUPPORT tab on your product page at SafetyBasement.com
for the latest available manual.
Page 2

PRODUCT MANUAL Direct Connect Phone Recorder : SB-TRX20
GETTING STARTED
Your Direct Connect Telephone Recorder is very easy to use, and it requires just a little
setup to get started.
You will need to use your PC during setup, to charge your recorder and to download a le
from our website. You will also need the included cables, the SD card adapter, and an SD
card is required.
You will:
• Charge the recorder fully.
• Download a le from our website
• Adjust your time and date
• Install the SD card
• Connect your device to your phone line
• Start recording!
is manual will also show you how to retrieve your les and play them on your PC.
www.SafetyBasement.com Phone: 877-345-2336 Fax: 888-236-2524
Page 2
Page 3
PRODUCT MANUAL Direct Connect Phone Recorder : SB-TRX20
CHARGING
Your recorder does get power from the phone line to keep it running. However, before you
start using it, you should charge it fully using the included USB cable and your PC.
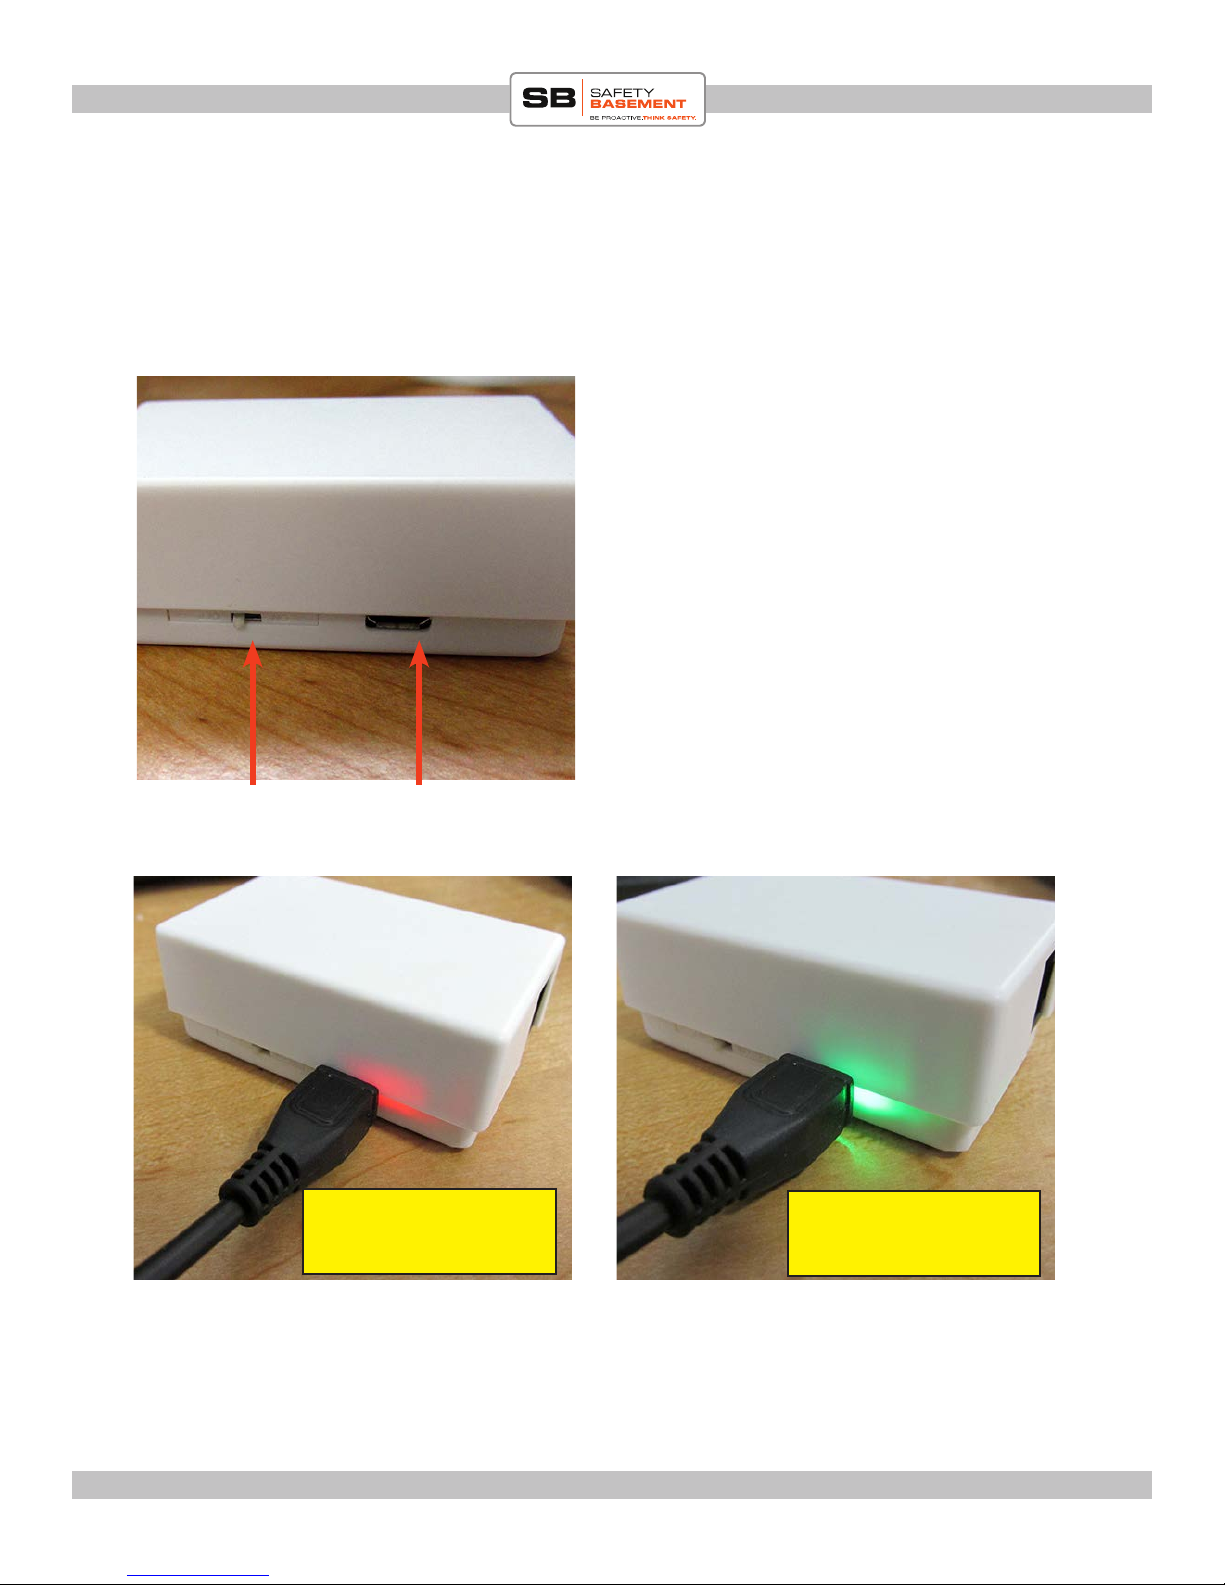
Plug the small end of the USB cable into the
recorder.
Plug the other end into a USB port on your PC
or a Hub.
Your PC or Hub acts as a charger only. Your
computer will not “talk” to your recorder. is
is normal.
On / O Switch
(O at this step)
While charging, the status light near the USB port will be Red.
It may take several hours to fully charge your recorder the rst time. Please wait until it is
completely charged and the status light is green before moving to the next step.
USB Port
e status light is red.
e device is charging.
is recorder is fully
charged.
www.SafetyBasement.com Phone: 877-345-2336 Fax: 888-236-2524
Page 3
Page 4
PRODUCT MANUAL Direct Connect Phone Recorder : SB-TRX20
TIMESTAMP SETUP
Now that your recorder is charged, you should download the TimeStamp le from our
website. You will need your SD card, and the included SD card adapter. Your adapter may
have a dierent appearance, but it will work the same way.
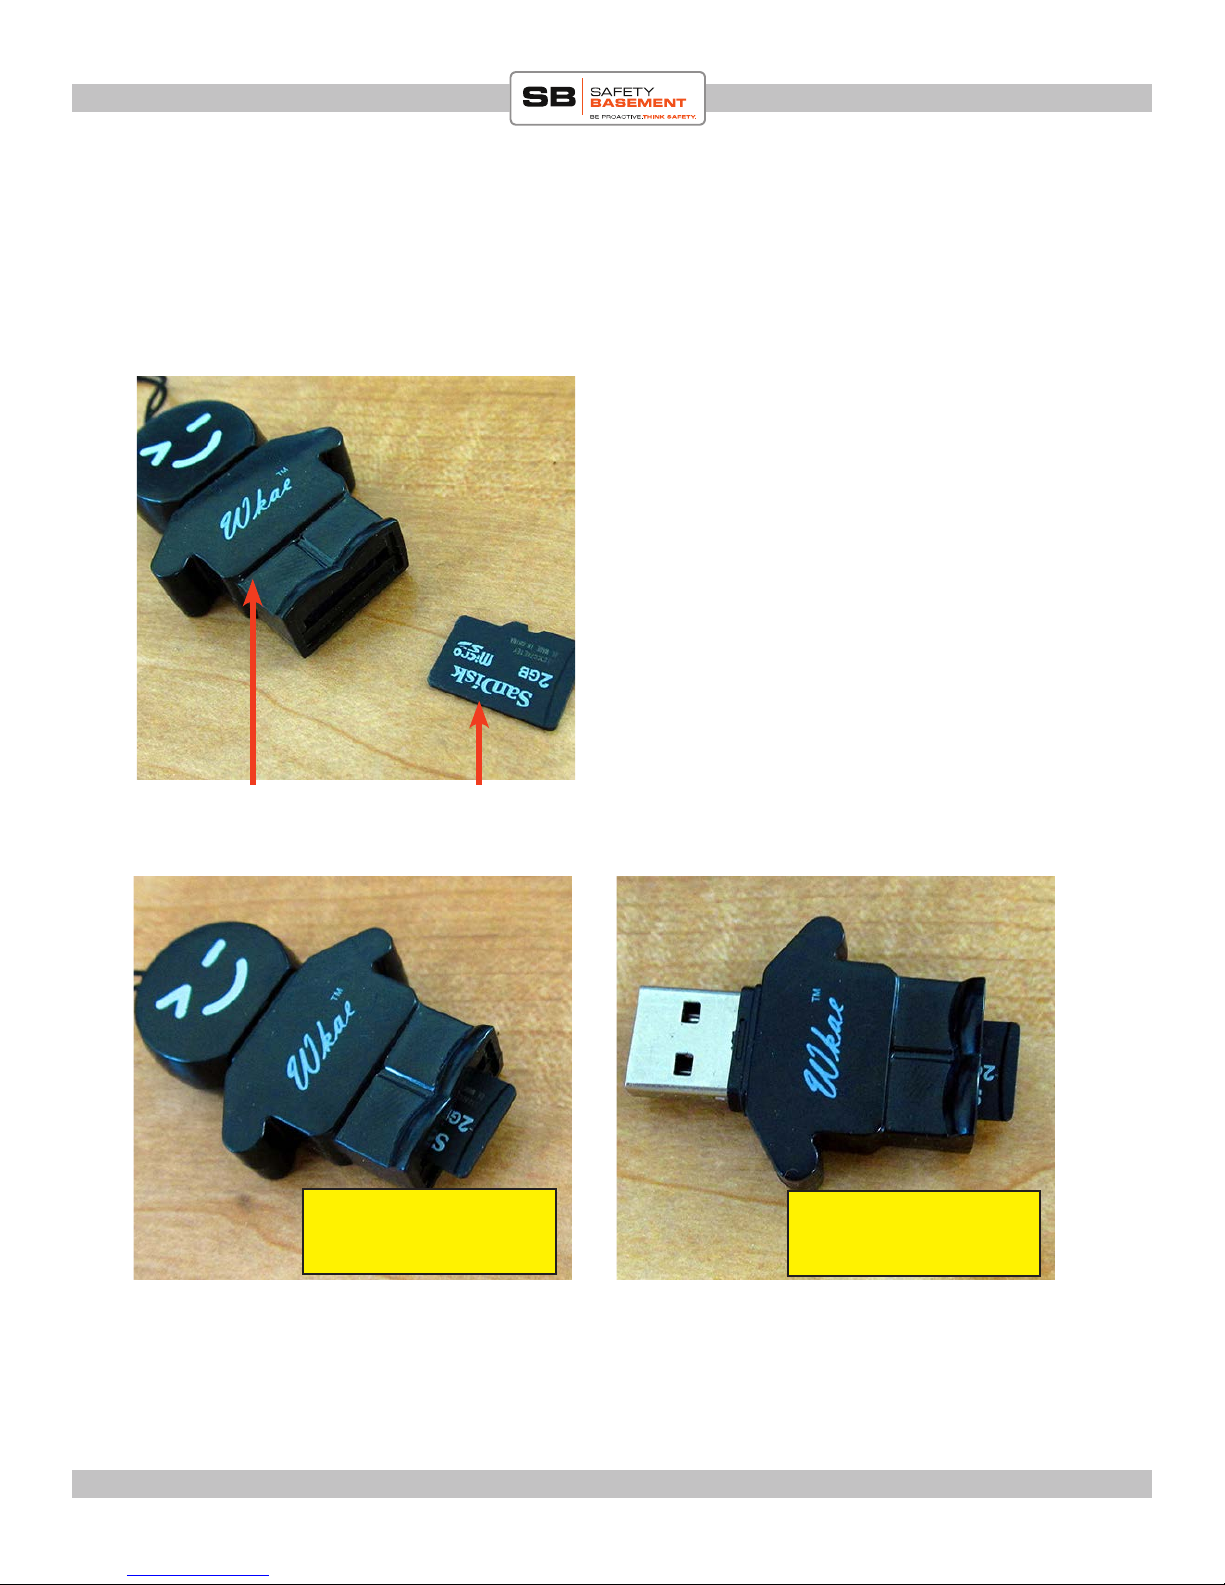
Insert the SD card into your adapter. You
may have received the adapter shown in these
photos.
Your recorder uses a MICRO SD card.
Your PC may have a standard SD card slot as
well. Just insert the MICRO SD card into a
standard SD card size adapter for use. is was
included in your package if you bought an SD
card from SafetyBasement.
SD Card Adapter
e SD card is fully
inserted into this adapter
You may now plug the adapter into your PC. Your computer may install standard drivers
the rst time it connects - this is normal.
SD Card
e USB connector is
shown
www.SafetyBasement.com Phone: 877-345-2336 Fax: 888-236-2524
Page 4
Page 5

PRODUCT MANUAL Direct Connect Phone Recorder : SB-TRX20
TIMESTAMP SETUP
It is normal for Windows to present you with a
pop up when you plug in your card / adapter.
Choose to OPEN FOLDER.
In these images, we are using Windows 7.
Other operating systems will be similar.
Your SD card will appear similar to this
example, as a REMOVABLE DISK with a drive
letter. In this example, we are DRIVE E:. Yours
may be dierent.
Please note that our new SD card is EMPTY.
You will now need to download a le from our
website. Go to www.safetybasement.com.
Find your product.
www.SafetyBasement.com Phone: 877-345-2336 Fax: 888-236-2524
Look under the photos for a Red TECH
SUPPORT tab. Your le is in this location,
along with the latest manual.
Page 5
Page 6

PRODUCT MANUAL Direct Connect Phone Recorder : SB-TRX20
TIMESTAMP SETUP
RIGHT-CLICK on the le “time.txt” and
choose SAVE LINK AS.
You are going to SAVE this le to the empty
SD card, as shown.
Save this le.
e time.txt le is now located on your SD
card. Note: your PC may not show the “.txt”
part of the name. is is normal.
DOUBLE-CLICK this le. A standard text
editor will open this le.
You will need to adjust the date and time
shown in the le. Only change the numbers.
Year-Month-Day,Hour:Minutes:Seconds
Note the comma, no spaces, and the use
of a 24 hour clock. You may want to add a
few minutes to the clock as it will take a few
minutes to nish the setup.
When done, SAVE this le.
You may now EJECT your SD card as you
would any Removable Disk.
www.SafetyBasement.com Phone: 877-345-2336 Fax: 888-236-2524
en, unplug your SD card adapter and
remove the card from the adapter.
Page 6
Page 7

PRODUCT MANUAL Direct Connect Phone Recorder : SB-TRX20
SD CARD INSTALLATION
Unplug the USB cable from your recorder. Do
not turn it on yet.
Insert the SD card into the slot with the Gold
Connectors facing DOWN, as shown.
Carefully push the card into place. It should
click into place.
When done, the card will be ush with the
case.
is SD card is shown
partially inserted
is SD card is shown
fully inserted
You are now ready to plug in the phone lines.
www.SafetyBasement.com Phone: 877-345-2336 Fax: 888-236-2524
Page 7
Page 8

PRODUCT MANUAL Direct Connect Phone Recorder : SB-TRX20
CONNECTING
Unplug the phone line from your phone that is
connecting to your wall.
Plug this into one of the phone line ports on
your recorder. It does not matter which one
you use.
Your recorder is now connected to your phone
line.
Use the included cable to connect the recorder
to your phone.
Plug one end of the cable into the recorder.
Plug the other end into your phone, in the
same spot the original cable was pluggin in.
A red light should now appear on your
recorder. Your recorder is properly connected.
www.SafetyBasement.com Phone: 877-345-2336 Fax: 888-236-2524
Page 8
Page 9

PRODUCT MANUAL Direct Connect Phone Recorder : SB-TRX20
POWER ON
You may now turn on the recorder using the
Power Switch. A white light will appear near
the power switch as it starts up.
Your datestamp is now being set using the
settings you set earlier.
e white light will go o when it has nished
starting. e red light will again appear on the
other side of the device.
You can put the bottom cover back on the
recorder.
e red status light will remain ON. It will go o, and the white light will appear during
recording. Your recorder will start recording immediately when the phone is picked up.
If you have a cordless phone with additional units, the recorder WILL record from all
units.
e recorder does receive power from the phone line. However, it is good practice to
charge it fully via the USB cable occasionally.
e white light will blink if the battery is running low. Please turn OFF and recharge
fully using the USB cable if this happens.
www.SafetyBasement.com Phone: 877-345-2336 Fax: 888-236-2524
Page 9
Page 10

PRODUCT MANUAL Direct Connect Phone Recorder : SB-TRX20
LISTENING TO YOUR FILES
When you want to listen to your recordings,
you will need to POWER OFF the recorder.
en remove the SD card.
Insert the SD card into your adapter as you did
earlier in the manual.
en insert your adapter into your PC.
Browse to your SD card.
www.SafetyBasement.com Phone: 877-345-2336 Fax: 888-236-2524
Page 10
Page 11

PRODUCT MANUAL Direct Connect Phone Recorder : SB-TRX20
LISTENING TO YOUR FILES
Your audio les are in this folder
Ignore these
2 les
Inside the AUDIO folder are your recordings.
ese should be named using the timestamp
you set earlier. If the timestamp does not look
accurate, please redo the timestamp setup.
You should COPY this les to a folder on your
PC for archiving and playback.
You can then DELETE these les from your
SD card aer archiving.
NOTE FOR MAC USERS:
When deleting your les, please EMPTY your trash BEFORE you eject the SD card from
your system.
www.SafetyBasement.com Phone: 877-345-2336 Fax: 888-236-2524
Page 11
Page 12

PRODUCT MANUAL Direct Connect Phone Recorder : SB-TRX20
NOTES ABOUT AUDIO
You are usually going to use your standard media player to play your audio les, such as
Windows Media Player, or Quicktime on the Mac.
If you need to BOOST the volume of your recordings, or need to edit your recordings, we
recommend using AUDACITY.
Audacity is free, and available for the Mac and PC. With it, you can
BOOST the volume of your les, or edit them. Please refer to the
Audacity website for installation and other help.
is is what a le can look like in Audacity. Note the “wave form” is
where there is conversation. e bigger the wave form, the “louder”
the conversation.
You can “boost” the volume of a quiet conversation with Audacity.
Note that it will also boost any background noise as well.
www.SafetyBasement.com Phone: 877-345-2336 Fax: 888-236-2524
Quiet
Conversation
“Loud”
Conversation
Page 12
Page 13

PRODUCT MANUAL Direct Connect Phone Recorder : SB-TRX20
SUGGESTED SOFTWARE
Your Windows PC or Mac has built-in soware that will play most of the les created by devices
like yours. However, if you are having problems playing your les, or need more options, please
download and try these programs.
is soware is free and can be downloaded directly from the links below. You can nd support
and tutorials for these programs on their respective websites. SafetyBasement can not provide
soware support for these programs
As with ANY les you download from the internet, be sure to scan them for viruses using your
particular virus scanner. While most users report no issues using this soware, we can not be
responsible for any damage caused by this soware. Please proceed carefully. Back up your PC
before installing any new soware.
VIDEO PLAYBACK - VLC
(http://www.videolan.org/vlc/index.html)
e VLC Media Player can play almost any video or audio le type. ere is
a version for Windows and for Mac OS X.
VIDEO EDITING for WINDOWS - MOVIE MAKER 2012
(http://windows.microso.com/en-US/windows/get-movie-makerdownload)
Movie Maker is a simple video editing program from Microso. Please go
to this link, and choose the download for your version of Windows. Please
note: Movie Maker is part of the Windows Essentials package.
VIDEO EDITING for MAC OS X - iMOVIE
(Visit the Apple Mac App Store for latest version)
iMovie is a simple video editing program from Apple. It comes installed with
your new Mac. e latest version is also available at the Mac App Store at
additional cost.
AUDIO PLAYBACK and EDITING - AUDACITY
(http://audacity.sourceforge.net/)
Audacity is a popular audio editing program used by amateurs and
professionals to edit simple and complex audio projects. You can use
Audacity to convert your audio les to another format, such as MP3. ere
is a version for Windows and Mac OS X.
PHOTOS
Your Windows and Mac computers have the ability to do basic editing of
photos built in.
www.SafetyBasement.com Phone: 877-345-2336 Fax: 888-236-2524
Page 13
Page 14

PRODUCT MANUAL Direct Connect Phone Recorder : SB-TRX20
DEVICE SPECIFICATIONS
Audio Formats WAV
Audio Encoding 64 Kbps
WAV Bit Rate Mode Constant
WAV Bit Rate 64 Kbps
WAV Sampling Rate 16 KHz
Audio
Video
Photo
www.SafetyBasement.com Phone: 877-345-2336 Fax: 888-236-2524
Page 14
Page 15

PRODUCT MANUAL Direct Connect Phone Recorder : SB-TRX20
DEVICE SPECIFICATIONS
Memory Built In n/a
Memory Expansion up to 32GB Micro SD card
Battery Type Internal Rechargeable,
Trickle power via phone line
Charger via USB port
Device Info
Please check our site for the latest available manual for this product.
Notes
File sizes shown are approximate.
Audio (10 min) 4-5 MB
File Sizes
www.SafetyBasement.com Phone: 877-345-2336 Fax: 888-236-2524
Page 15
 Loading...