

Page 1

INSTRUCTION MANUAL
PLATINUM Digital Voice Recorder
SB-VR9900
Revised: February 12, 2014
ank you for purchasing from SafetyBasement.com! We appreciate your business.
We made this simple manual to help you enjoy your new product as quickly and easily as
possible.
Be sure to check the TECH SUPPORT tab on your product page at SafetyBasement.com
for the latest available manual.
Page 2
PRODUCT MANUAL Digital Video Watch Recorder : SB-WR069B
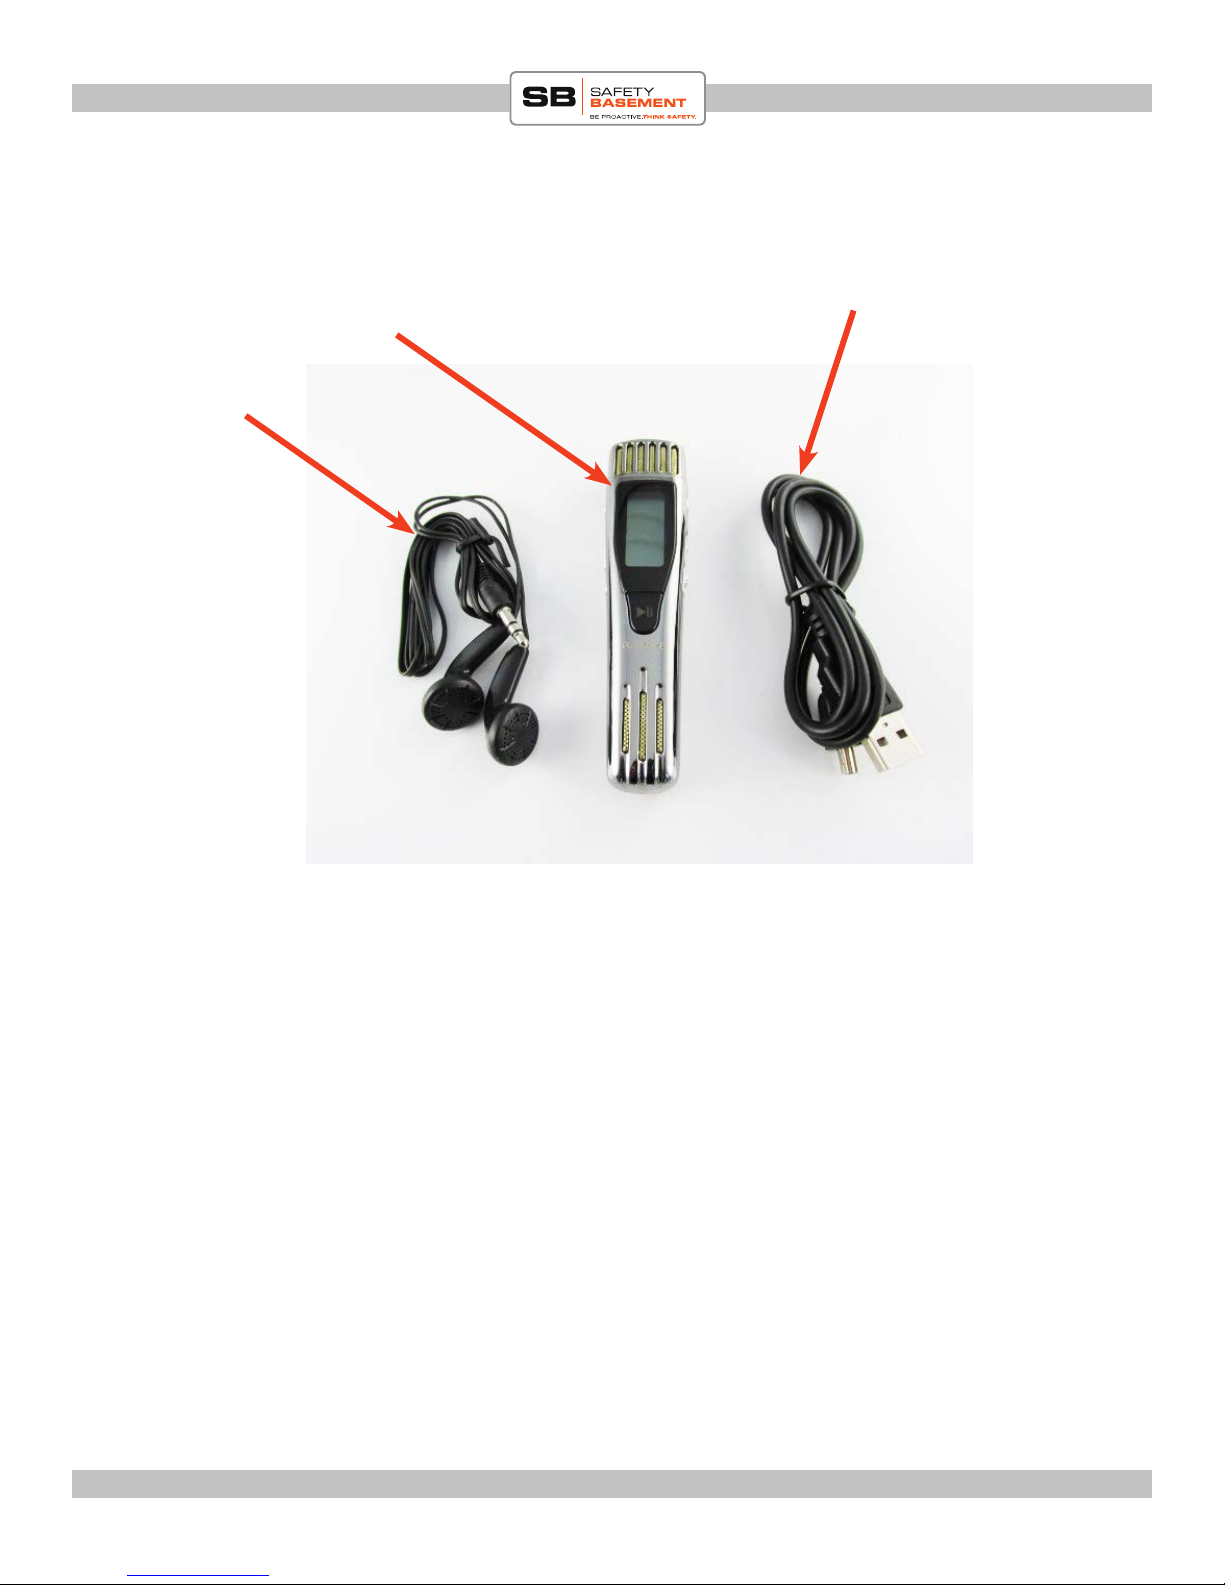
PRODUCT REFERENCE
Headphones
Digital voice recorder
USB Charger & Download cable
www.SafetyBasement.com Phone: 877-345-2336 Fax: 888-236-2524
Page 2
Page 3
PRODUCT MANUAL Digital Video Watch Recorder : SB-WR069B
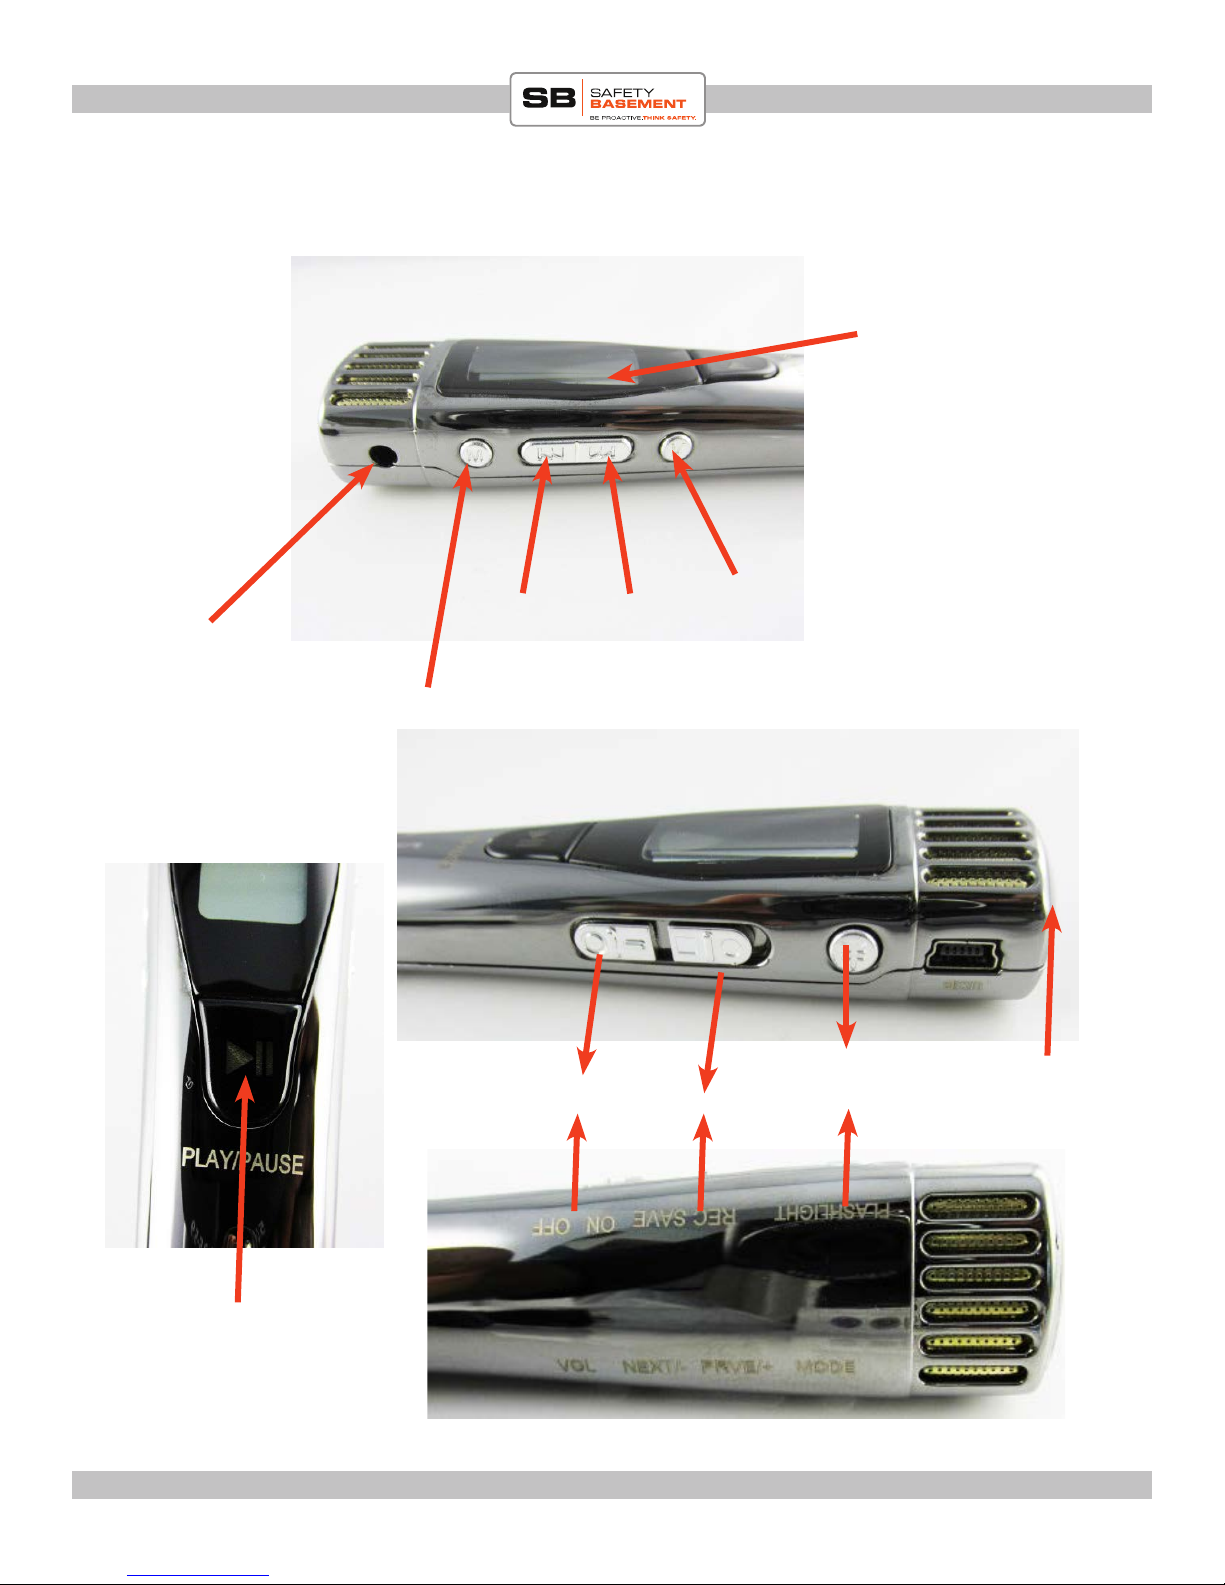
PRODUCT REFERENCE
Display
VOLUME
BACK/Vol + NEXT/Vol -
Headphone jack
(press this rst then Vol+ or Vol -)
MODE button
ON/OFF
REC/SAVE
Currency detector
light button
Curency
detector
light
PLAY/PAUSE
www.SafetyBasement.com Phone: 877-345-2336 Fax: 888-236-2524
Page 3
Page 4
PRODUCT MANUAL Digital Video Watch Recorder : SB-WR069B
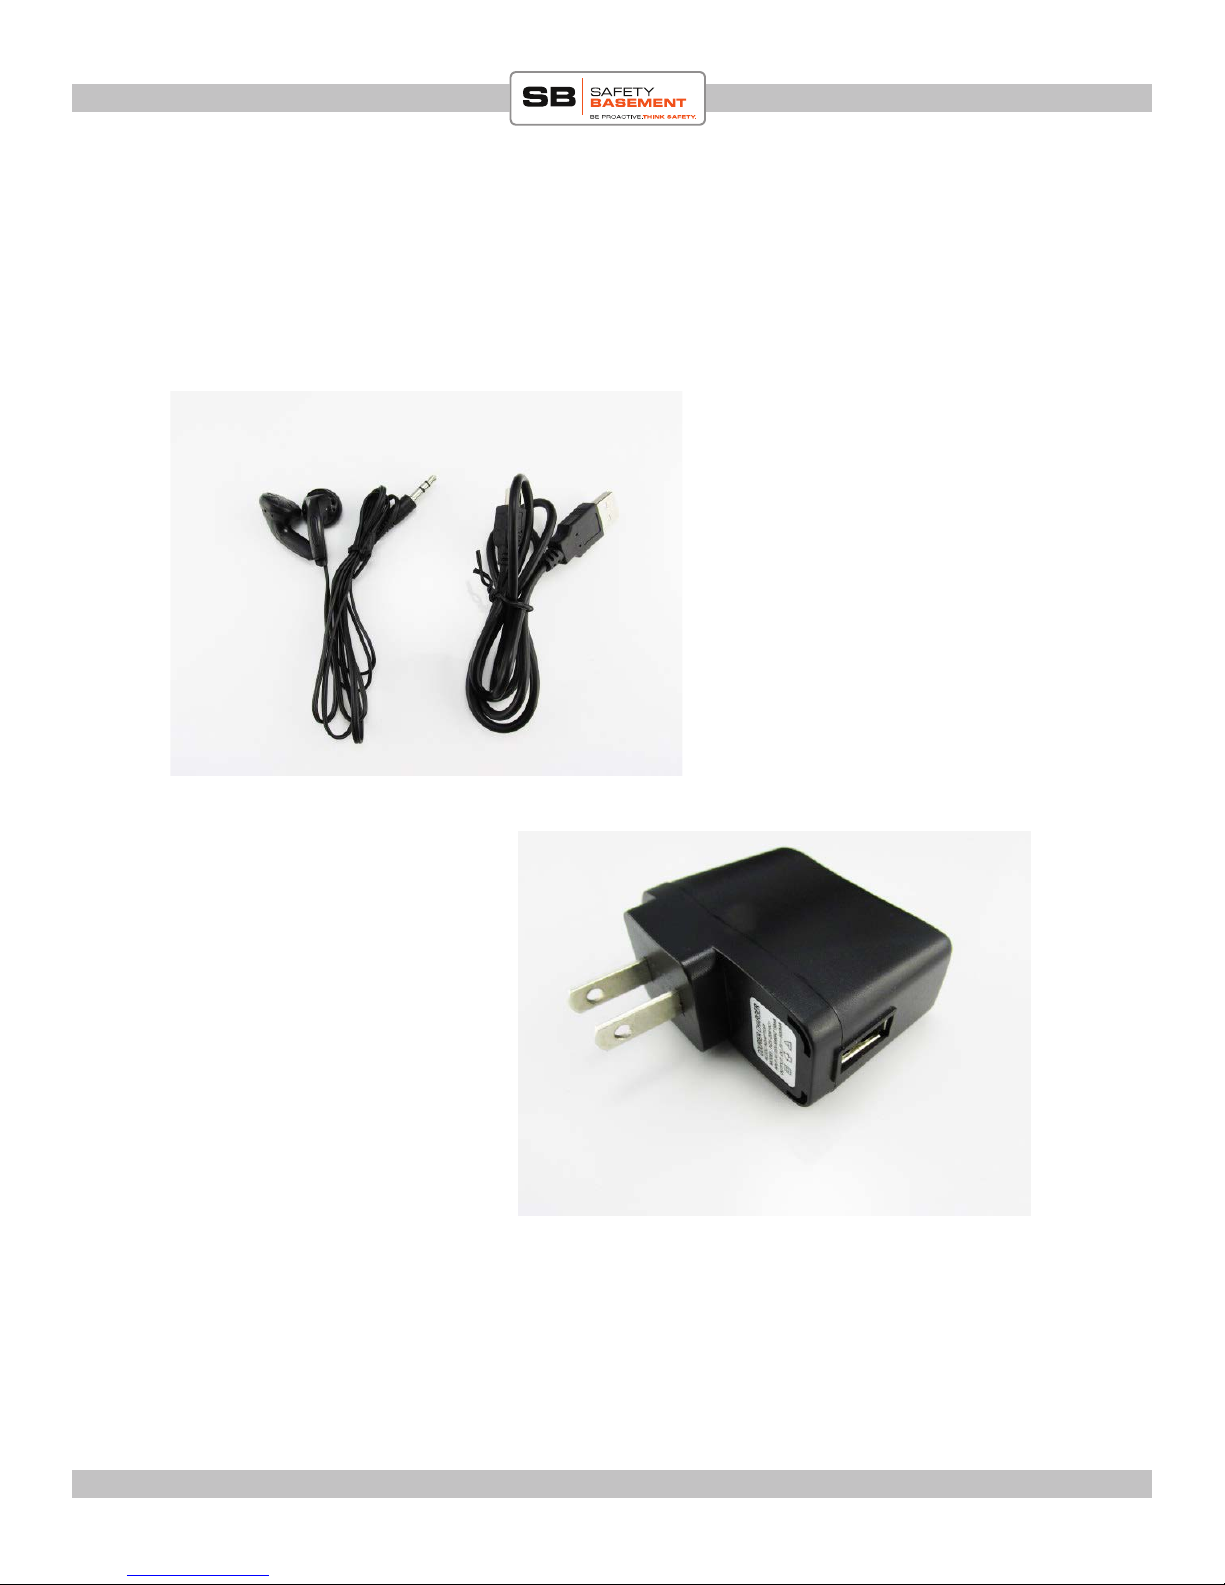
ACCESSORIES
Included: USB cable, Headphones
Optional: Wall adapter
www.SafetyBasement.com Phone: 877-345-2336 Fax: 888-236-2524
Page 4
Page 5
PRODUCT MANUAL Digital Video Watch Recorder : SB-WR069B
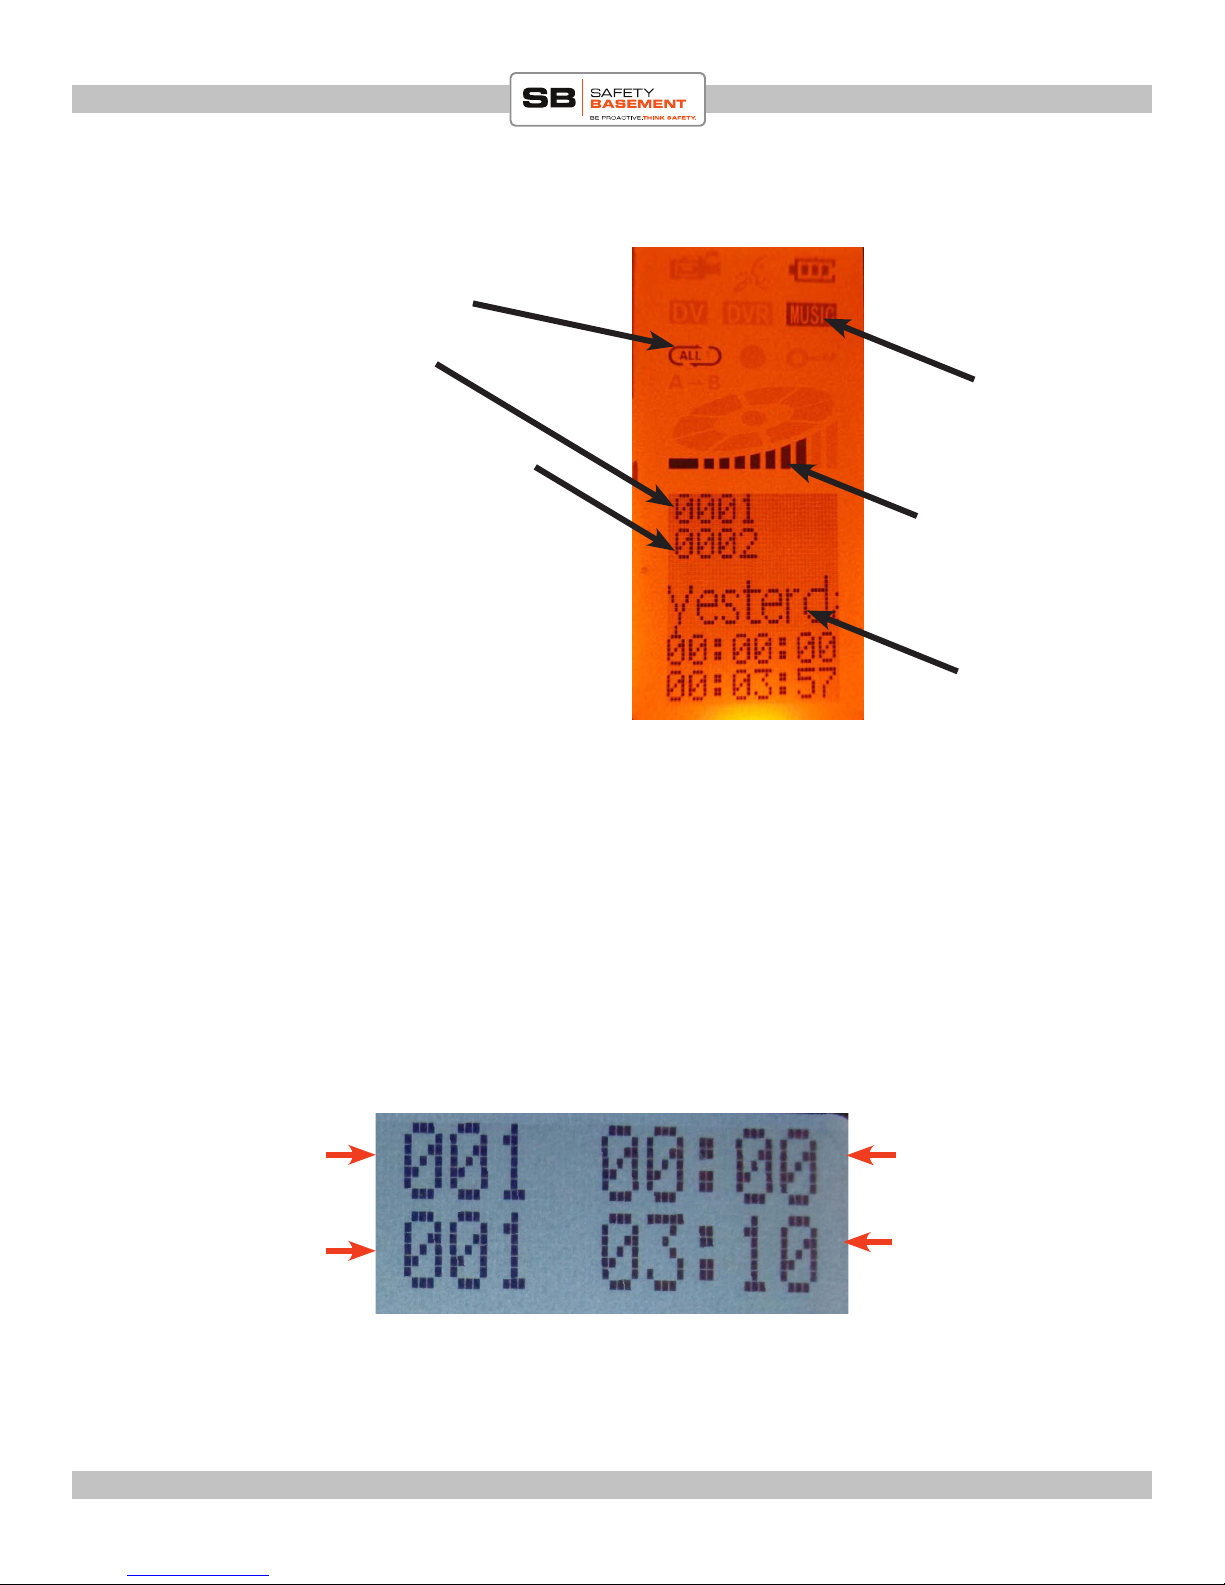
THE PLAYBACK SCREEN
A-B repeat
Current le number
Mode. MUSIC or DVR
Total les on recorder
volume bar
name of current
Current Track
# of Tracks in
Current Folder
www.SafetyBasement.com Phone: 877-345-2336 Fax: 888-236-2524
Current Time in
File
Length of
Current File
Page 5
Page 6

PRODUCT MANUAL Digital Video Watch Recorder : SB-WR069B
1. Record indicator: If this sign is on, it means unit is
in record mode
2. Battery indicator: Show remaining battery power
3. Voice mode:
4. Music mode: Play music in this mode
5. Cycle mode: If all lights are on it means it will cycle
through all recordings. If one arrow on it means single
cycle
6. Recording mode: If light blinks it means unit is recording. If it is not blinking it means recording paused
7. Repeat mode:
8. Working mode:
9. Volume: 10 levels of volume
10: Main display area
www.SafetyBasement.com Phone: 877-345-2336 Fax: 888-236-2524
Page 6
Page 7

PRODUCT MANUAL Digital Video Watch Recorder : SB-WR069B
Plug this end to computer
USB port. Allow atleast
4hrs for full charge or until battery indicator shows
FULL.
You should fully charge your Platinum mini recorder before rst use. Please use only your PC
or the adapter that came with your device. Do not use other adapters as they may damage your
device.
1. Be sure that your recorder is OFF.
2. Plug the USB cable into the side of the recorder.
3. If using the wall adapter, plug the other end of the USB cable into the adapter. en plug into
power.
4. If using your PC, plug the other end of the USB cable directly into a PC port on your PC. Do
not use a hub.
5. With a PC, your Platinum recorder will connect to your PC. is is also how you will
transfer data. Your PC may install standard drivers when you connect the rst time. is is
normal.
6. Charge your Platinum recorder for 3-5 hours or until battery indicator shows FULL
www.SafetyBasement.com Phone: 877-345-2336 Fax: 888-236-2524
Page 7
Page 8

PRODUCT MANUAL Digital Video Watch Recorder : SB-WR069B
AUDIO RECORD SETTINGS
1.e default audio record settings on this unit are as follows.
1. 32 kbps
2. continuous recording
If you are satised you can proceed to begin recording, otherwise
you can change your settings as follows:
AUDIO QUALITY SETTINGS:
1. Turn unit to ON position
2. Make sure DVR is highlighted on the screen. is is for voice
recording settings mode. If not press and hold the V button and
you will notice the highlight will move from MUSIC to DVR.
Release.
RECORD QUALITY:
is unit has 4 recording quality settings. e higher the number
the better the quality.
NOTE: e higher the quality setting the quicker memory is
consumed. See guide below to decide what quality setting to use
depending how how many hours of recording you will need:
- 32 kbps - 71 hours per GB
- 64 kbps - 32 hrs per GB
- 128 kbps - 17 hours per GB
- 192 kbps - 11hrs per GB
- 364 kbps - 6hrs per GB
erefore multiply any of the hours by 8 (which is the memory
size of this recorder) to get total recording hours on memory
based on quality settings:
3. To set recording quality, press M button (once if orange screen
light is on, or
TWICE if the orange screen light is o. Once to wake
unit up, and again to make selection)
4. you will see 3 les: DELETE FILE, DELETE ALL,
RECORD TYPE, AVR LEVEL, EXIT
5. USe the FF or RW button on le to move selection to
RECORD TYPE
6. Press M to select that option.
7. Again use FF or RW to select the
recording quality, then press M to conrm
ON/OFF
DVR
VOLUME button
REC/SAVE
www.SafetyBasement.com Phone: 877-345-2336 Fax: 888-236-2524
Page 8
Page 9

PRODUCT MANUAL Digital Video Watch Recorder : SB-WR069B
AUDIO RECORD SETTINGS..cont’d
VOICE ACTIVATED MODE:
1. Turn unit to ON position
2. Highlight DVR (not MUSIC)
3. See above instruction on how to get to AVR mode
4. use NEXT or PREV button to select AVR LEVEL. Select.
4. Highlight ENABLE(or DISABLE) then Select it (M button to select)
DELETING FILES:
You can opt to delete ONE or ALL les. Please use this feature carefully. You may opt to save your
les rst via your computer. Connect to computer via included USB cable to copy and save them.
However if you dont need to save then this is a fast way to delete unwanted les and clear memory space for your ext recording.
DELETE ONE FILE
1. Make sure DVR is highlighted on screen (refer to page 8 on how to do that)
2. Use the NEXT or PREV button to move to le you wish to delete
3. Press M button to bring up delete options.
4. Select DELETE FILE
5. Press M to select
6. Use NEXT/PREV button to highlight YES
7. Press M to select option
8. You just deleted current le
9. Repeat as necessary
Current le
DELETE ALL FILES:
Please use this option with caution. Use same method as above to delete all les
www.SafetyBasement.com Phone: 877-345-2336 Fax: 888-236-2524
Total number of les
Page 9
Page 10

PRODUCT MANUAL Digital Video Watch Recorder : SB-WR069B
AUDIO RECORDING
1. Turn unit to ON position (if it is already in On position and screen is o, press and hold the
PLAY butto to wake it back up)
2. Turn recording switch (see diagram below) to REC. Your unit will begin recording based on
selected settings (previous page)
3. To stop recording move recording switch to SAVE. is will save your current recording
and stop recording.
NOTE: At anypoint you can move switch to REC and unit will stop everything else and start
recording. it is a fast start button.
1. Turn to ON
2. Turn to REC
IMPORTANT: Turn recording o (SAVE) before turning system OFF. You
will lose your current le if you TURN SYSTEM OFF before turning recording o (SAVE).
Please make a note of this.
IMPORTANT: is recorder goes to sleep aer about a minute if it is idle
and not recording or playing les. it is a battery saving feature. To wake it up, simply press
and hold the PLAY button for about 3 seconds and unit will start up again.
www.SafetyBasement.com Phone: 877-345-2336 Fax: 888-236-2524
Page 10
Page 11

PRODUCT MANUAL Digital Video Watch Recorder : SB-WR069B
PLAYING BACK RECORDINGS?
ere are two ways to play back your voice recordings. e quickest way is to
play them right on your recorder. e other way it to connect to your computer
and play back.
VIA RECORDER:
1. Make sure unit is in DVR mode (refer to page 8 on how to do that)
2. Press PLAY on front to begin playing your voice recordings in sequence
VIA COMPUTER
Your voice recordings are located inside the RECORD folder. Double click inside this folder to
view your voice recordings (see diagram below)
You should COPY these les to your PC for archiving and best playback.
en, delete the les to make room for more.
NOTE TO MAC USERS! When deleting les, you MUST empty your trash BEFORE you Eject
the watch from your Mac.
RECORD folder
1. Connect USB cable to
recorder and other end to
computer
2. A window will pop up.
Open folder to view les
or nd the drive the unit is
connected to and you will
see the les to the le
3. Double click the RECORD les to nd your
recordings
4. Here you can play, move
or delete your les.
www.SafetyBasement.com Phone: 877-345-2336 Fax: 888-236-2524
Page 11
Page 12

PRODUCT MANUAL Digital Video Watch Recorder : SB-WR069B
PLAYING BACK MUSIC?
If you have music on your recorder, you can play back via the following
method. You can use listen via the speakers or headphones
VIA RECORDER:
1. Make sure unit is in MUSIC mode
2. Press PLAY on front to begin playing your songs in sequence
3. use the NEXT/PREV buttons on le side to manually move between songs
VIA COMPUTER:
1. Connected incuded USB cable to recorder and other end to computer
2.
www.SafetyBasement.com Phone: 877-345-2336 Fax: 888-236-2524
Page 12
Page 13

PRODUCT MANUAL Digital Video Watch Recorder : SB-WR069B
SUGGESTED SOFTWARE
Your Windows PC or Mac has built-in soware that will play most of the les created by devices
like yours. However, if you are having problems playing your les, or need more options, please
download and try these programs.
You can nd support and tutorials for these programs on their respective websites.
SafetyBasement can not provide soware support for these programs
As with ANY les you download from the internet, be sure to scan them for viruses using your
particular virus scanner. While most users report no issues using this soware, we can not be
responsible for any damage caused by this soware. Please proceed carefully. Back up your PC
before installing any new soware.
VIDEO PLAYBACK - VLC
(http://www.videolan.org/vlc/index.html)
e VLC Media Player can play almost any video or audio le type. ere is
a version for Windows and for Mac OS X.
VIDEO EDITING for WINDOWS - MOVIE MAKER 2012
(http://windows.microso.com/en-US/windows/get-movie-makerdownload)
Movie Maker is a simple video editing program from Microso. Please go
to this link, and choose the download for your version of Windows. Please
note: Movie Maker is part of the Windows Essentials package.
VIDEO EDITING for MAC OS X - iMOVIE
(Visit the Apple Mac App Store for latest version)
iMovie is a simple video editing program from Apple. It comes installed with
your new Mac. e latest version is also available at the Mac App Store at
additional cost.
AUDIO PLAYBACK and EDITING - AUDACITY
(http://audacity.sourceforge.net/)
Audacity is a popular audio editing program used by amateurs and
professionals to edit simple and complex audio projects. You can use
Audacity to convert your audio les to another format, such as MP3. ere
is a version for Windows and Mac OS X.
PHOTOS
Your Windows and Mac computers have the ability to do basic editing of
photos built in.
www.SafetyBasement.com Phone: 877-345-2336 Fax: 888-236-2524
Page 13
Page 14

PRODUCT MANUAL Digital Video Watch Recorder : SB-WR069B
DEVICE SPECIFICATIONS
Format Wave
Bit Rate Mode Constant
Bit Rate 32 Kbps, 64 Kbps, 128 Kbps, 192 Kbps,
384 Kbps
Playback MP3, WAV* (* playback of WAV creat-
Audio
ed on device)
Video
Photo
n/a
n/a
www.SafetyBasement.com Phone: 877-345-2336 Fax: 888-236-2524
Page 14
Page 15

PRODUCT MANUAL Digital Video Watch Recorder : SB-WR069B
DEVICE SPECIFICATIONS
Memory Built In 8 GB
Memory Expansion None
Battery Type Internal Rechargeable
Charger Type via USB port, wall adapter or PC
Device Info
Please check our site for the latest available manual for this product.
Recordings split at the 2 hour 40 minute mark.
Notes
File sizes shown are approximate.
Audio (10 minutes) 28 MB @ 384 Kbps
Audio (2 hrs 40 min) 220 MB @ 192 Kbps
File Sizes
www.SafetyBasement.com Phone: 877-345-2336 Fax: 888-236-2524
Page 15
 Loading...