

Page 1
HIGH PERFORMANCE
HIGH PERFORMANCE
COOL AIR INTAKE KIT
COOL AIR INTAKE KIT
INSTALLATION INSTRUCTIONS
INSTALLATION INSTRUCTIONS
75-3017-2
CHEVROLET/GMC
S10 Pickup; Blazer
S15 Sonoma; Jimmy
V6 4.3L
KIT WILL NOT FIT VEHICLES WITH BODY LIFT
10mm Open End Wrench Phillips head screw driver
10mm Socket & Ratchet Flat Head Screw Driver
4mm Allen Wrench 5/16” Nut Driver
5 mm Allen Wrench
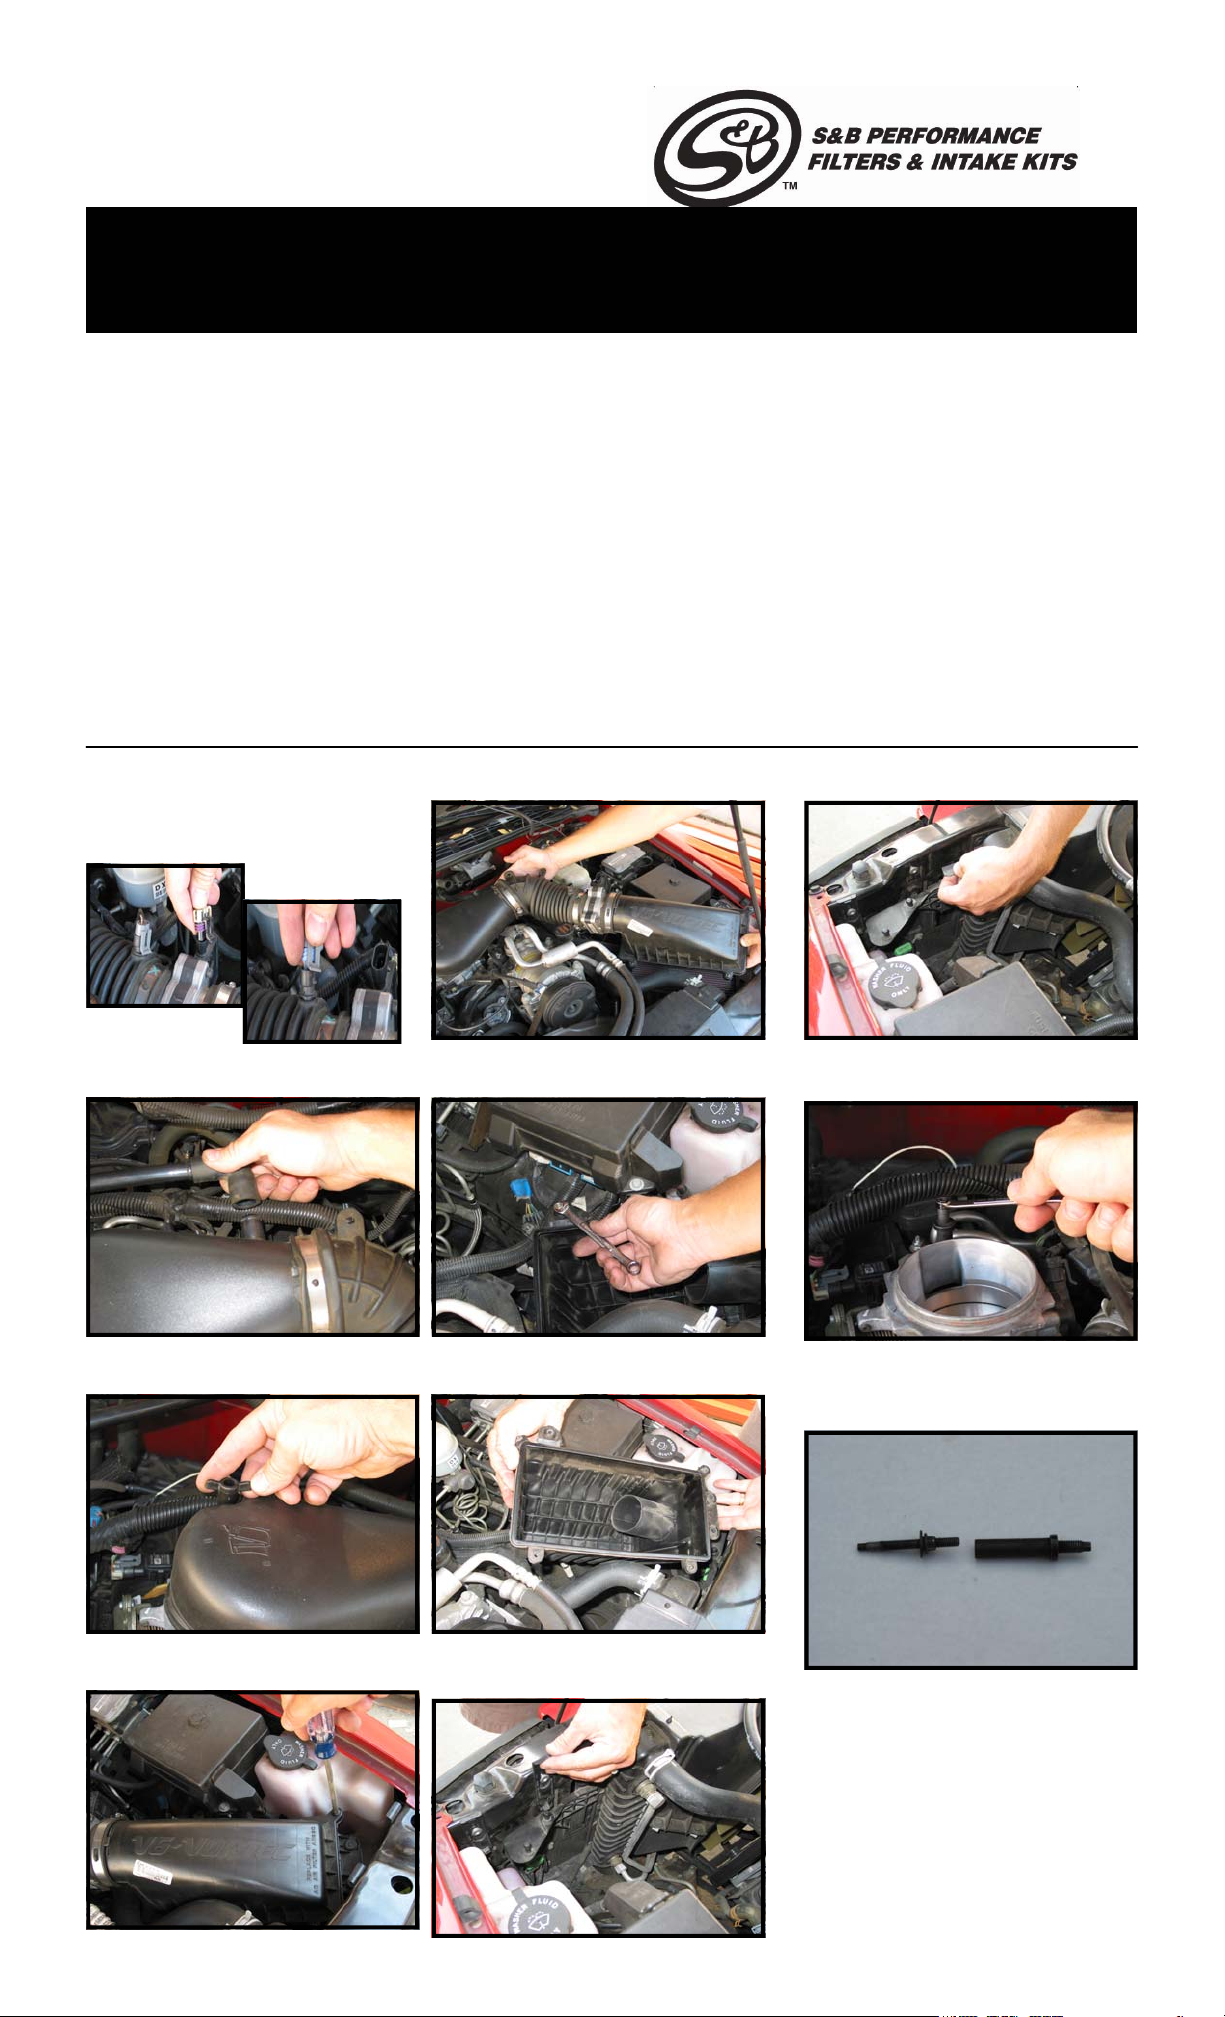
1. Turn off the vehicle’s engine and disconnect the negative battery terminal.
2. Disconnect the mass air sensor and the
air temperature senor electrical connections
as shown in the following two photos.
TOOLS NEEDED
6. Remove the upper air cleaner assembly unit.
QTY PARTS LIST QTY PARTS LIST
1 4” - 1.25” Adapter 1 1/8” Ring Gasket
1 3” - 3.25” x 3” Adapter 1 1/2” Grommet
1 Intake Tube 1 1/4” Finishing Washer
1 Intake Box 1 Saddle Clamp
1 CARB Sticker 3 1/4” Washers
1 Instruction Sheet 1 M6 Nylock Nut
1 #52 Hose Clamp 1 M6 SS Washer
2 #60 Hose Clamps 1 M6 x 1.24” Coupling Nuts
2 #64 Hose Clamps 1 Twisted Bracket
3 M6 x 16mm Screws 1 Air Filter
3 M6 Coupling Nuts
10. Remove retainer bracket from radiator support.
3. Disconnect the crankcase vent line from
the intake plenum.
4. Remove the wing nut that holding the
intake plenum.
7. Remove the nut that holds the air box base
and retain for later step.
8. Pull the air box up firmly to release the grom-
mets from the retainer bracket.
11. Use a 7/32” socket to remove the factory
stand off from the throttle body.
12. Use a 5/16” wrench to remove the factory bolt
from the stand off then reinstall the bolt in its proper
location.
5. Loosen the four screws that hold the air box
top to the air box base.
1/16/2008
9. Pull the release tab and slide the retainer
bracket up to disconnect it from the radiator
core support.
Page 2
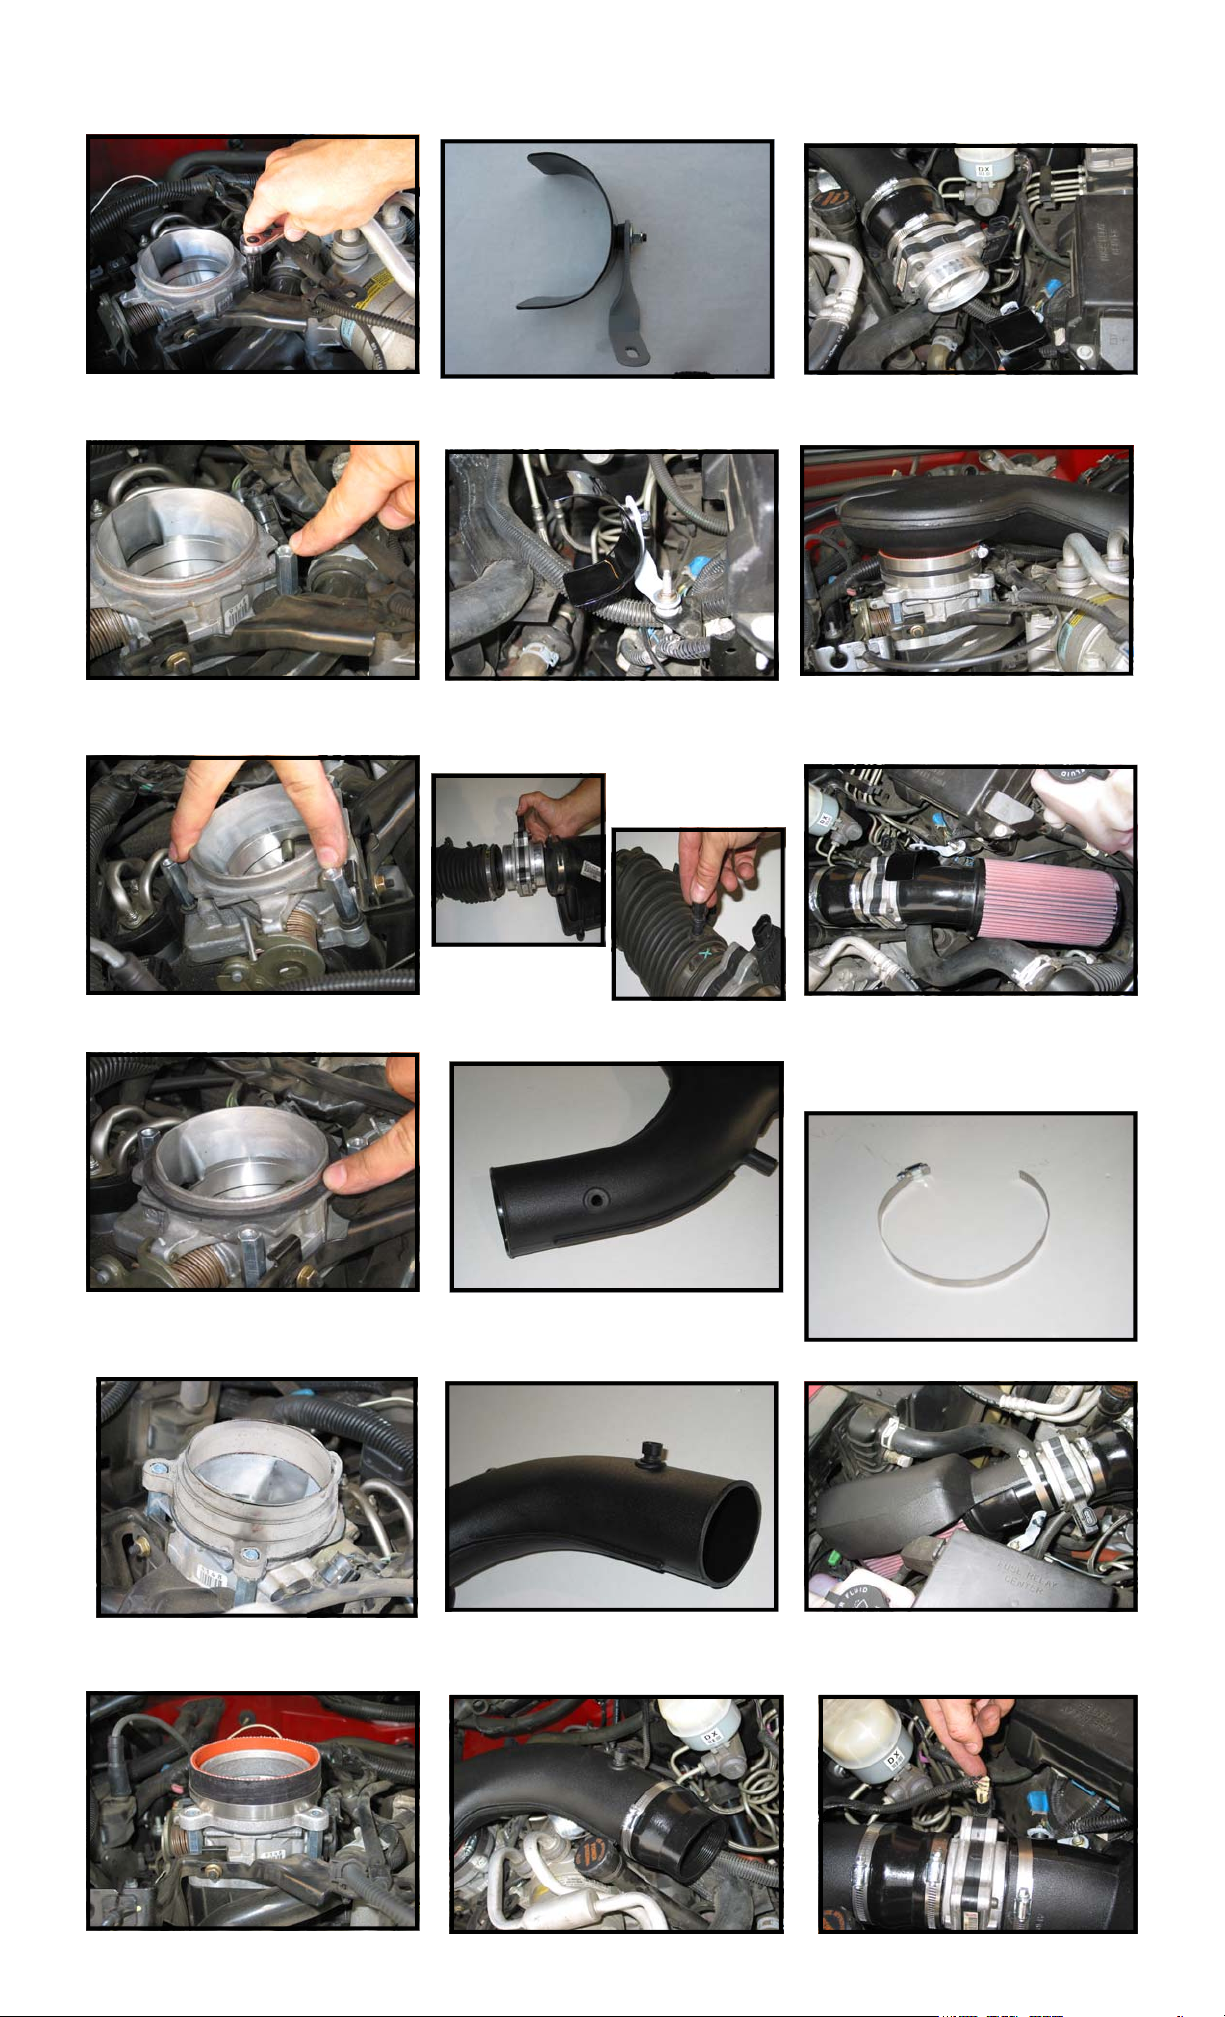
13. Remove the nut that holds the throttle cable
bracket.
14 Install the short coupling nut to the throttle
body stud.
19. Assemble the “L” bracket and saddle
bracket. Using the M6 hardware & nylon bushing.
20. Install the saddle bracket assembly to the
factory air box mounting stud then tighten with
hardware provided in this kit.
25. Attach the adapter sleeve to the mass air
sensor with the hose clamp provided in this kit.
26. Install the primary intake tube to the adapter
and tighten the second hose clamp.
15. Install the long coupling nuts (two each)
onto the other throttle body studs.
16. Install the gasket on the throttle body
flange.
21. Remove the mass air sensor from the factory intake tube and air box top. Remove the air
temp sensor from the factory tube.
22. Insert the 1” OD grommet into the existing
hole in the primary intake tube.
27. Install the S&B air filter onto the mass air
sensor and position saddle clamp against the
driver side of filter.
28. Slide shield between upper radiator hose
and S&B air filter. Push shield flange against
S&B air filter neck. Wrap hose clamp around
shield flange and saddle bracket then tighten.
(See Photos A & B below)
17. Install the adapter using the three (3)
SHCS bolts provided, being careful not to over
tighten.
18. Install the 4 x 1 1/4” adapter sleeve over
the adapter and tighten using the hose clamp
provided in this kit.
23. Install the air temperature sensor into the
grommet. If needed, lubricate grommet with a
mild mix of soap and water to ease insertion.
24. Attach the adapter sleeve to the end of the
primary intake tube using the hose clamp provided
in this kit.
A
B
29. Reconnect the mass air sensor plug.
1/16/2008
Page 3

30. Reconnect the air temperature sensor
plug.
31. Reconnect the breather tube to S&B air intake tube.
Photo depicting S&B High Performance Cool Air
Intake Kit fully installed on your vehicle.
PERFORMANCE TESTING
∗ Engage parking brake and start your
engine. To ensure that the system was
installed properly, listen for abnormal
noises. If an air leak is detected, reinspect hoses and connections as they
may need to be tightened.
∗ S&B FILTERS RECOMMENDS THAT
YOU KEEP YOUR OEM INTAKE SYSTEM IN THE EVENT IT IS REQURIED
IN THE FUTURE.
∗ In order to maintain proper warranty, all
connections and components must be
checked periodically for realignment
and to tighten all connections. Failure
to do so will void your warranty.
∗ Use only S&B cleaning and oil prod-
ucts to service your filter. Using another company’s oil and cleaner products may void your warranty.
Please call (909) 947-0015
should you have any questions or
comments.
RESTORE YOUR HIGH PERFORMANCE FILTER
S&B’S Precision Cleaning & Oiling Kit allows vehicle owners to
properly maintain their high performance air filters by precisely
applying the correct amount of oil. The clearly marked bottle and
easy-to-use applicator allow the user to measure and apply the
proper amount of oil for each application. S&B has conducted extensive testing with the Precision Cleaning Kit to ensure that it can
be used on most cotton high performance filters available today.
Order online today at www.sbfilters.com or though your local S&B Distributor
787 S. Wanamaker Avenue, Ontario, CA 91764
(909) 947-0015, (909) 947-0603 Fax
www.sbfilters.com
Part No. 88-0005
1/16/2008
 Loading...