


Pillar Ground Recessed
GH88042V - Square
GH98042V - Round

Thank you for purchasing this light fitting.
Please read the instructions carefully before use to ensure safe and satisfactory operation of this product.
Please retain these instructions for future reference.
Warning
This is a Class 1 product and must be earthed.
Please read these instructions carefully before commencing any work.
This system operates at Mains Voltage (240V), and must be installed by a qualified electrician and in accordance
with IEE Wiring Regulations and current Building Regulations.
An appropriate outdoor mains cable must be used to power this product.
To prevent electrocution switch off at mains supply before installing or maintaining this fitting. Ensure other persons
cannot restore the electrical supply without your knowledge. If you are in any doubt, please consult a qualified
electrician.
This light fitting should be connected to a circuit with a 30mA RCD fitted.
If replacing an existing fitting, make a careful note of the connections.
Always use the correct type and wattage bulb. Never exceed the wattage stated.
When changing a bulb, always switch off at the mains and allow the old bulb to cool down before handling.
Dispose of used bulbs carefully and responsibly.
This luminaire is designed for outdoor installation and is rated at IP67.
This will require an appropriate outdoor rated junction box (not supplied).
This product is not suitable for location in or near a marine environment.
This product is unsuitable for immersion in water or very wet areas.
The product bezel and glass get very hot whilst in use, care must be taken in locating this product.
Specification
Voltage: 240V 50Hz a.c.
Lamp: 1 x 50W GU10 Halogen
IP rating: 65
105mm Diameter
135mm
102mm Diameter
Housing
144mm
Layout
• Plan the desired layout of this fitting carefully, ensuring the cables will reach the distance between the junction
box and the light fitting.
• Avoid locating any cables in positions that would cause a hazard. Position cables and outdoor rated junction
boxes (not supplied) away from areas where they may be at risk from being cut, trapped or damaged.
• We recommend that you use H05RN-F specification cable (not supplied) which is an outdoor grade, rubber
sheathed cable. The mains supply cable must have a minimum cross sectional area of 1.0mm²
• Cables must be protected using suitable conduit or plastic trunking.
Installation
1. Undo the four allen screws holding the bezel and glass shade in place. Set aside.
2. Undo the four self tapping screws holding the cast fitting to the plastic housing. Separate the casting from the
housing by pulling gently. Set the cast fitting aside.
Concrete or Patio Fitting
SUPPLY
LIGHT FITTING
1. The product must be mounted in the supplied housing. It should not be directly installed in the soil.
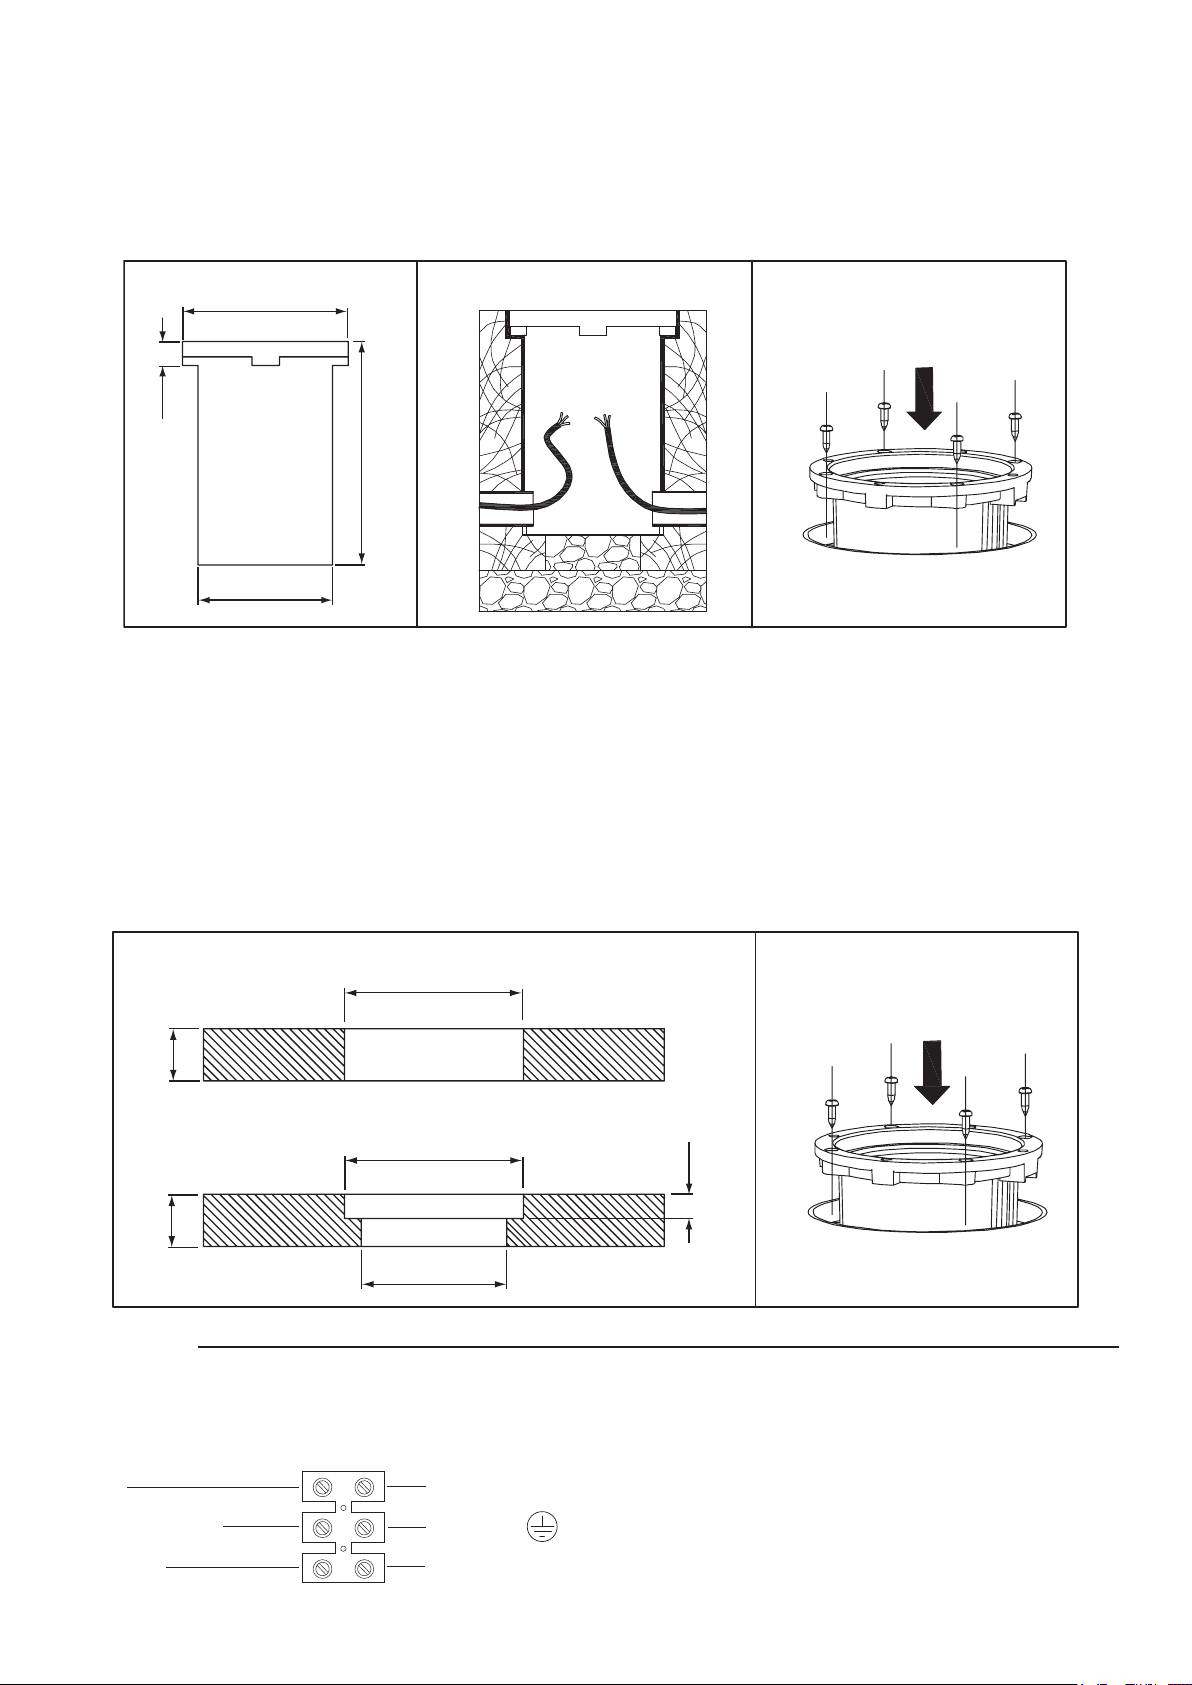
2. Form a T shaped cutout to fit the housing into. The dimensions of the housing are given below in Fig. 1. Ensure
that the counterbore at the top is used to hold the housing in position. Ensure that there is adequate drainage
below the product.
3. Position the conduit or plastic trunking at the grooves in the side of the housing and pull the cable through as
shown in Fig. 2. Ensure that the cables are not snagged. Screw the fitting to the housing.
102mm
20mm
144mm
88mm
2.1. 3.
Decking Fitting
If fitting this product in decking subject to foot traffic then we would recommend that CFL or LED
bulbs are used. If a halogen lamp is required then a 20W lamp should be fitted.
. Two options can be used to fit this product to a deck.
4
Option 1 - Drill a 97mm diameter hole. The product will sit in loose in position resting on the stainless steel
bezel, but will not be secured. Ensure that there is enough slack cable to allow the product to be lifted out when
changing the bulb. The fitting can be lightly held in position using silicone sealant.
Option 2 - Drill a 76mm diameter hole. Machine a 97mm diameter by 13mm deep counterbore. The product
will can then be secured.
. Ensure that conduit or plastic trunking is used to house the cables. Ensure that the cables are not snagged.
5
6. If using option 2, screw the product in place through the four holes in the housing into the surface
2.1.
Deck Option 1
min
28mm
Deck Option 2
min
28mm
97mm
97mm
13mm
76mm
Wiring
Having correctly identified the wiring from your existing light fitting, connect to the approved outdoor rated
external terminal block in the following way:
Check that.....
You have correctly identified the wires.
NEUTRAL
EARTH (GREEN/YELLOW)
SWITCHED LIVE
BLUE (N)
GREEN/YELLOW
BROWN (L)
The connections are tight.
No loose strands have been left out of the connection block.
Enusre that all cord grips are tightly secured on the
approved outdoor rated external terminal block.
Ensure that all seals are re-fitted correctly to the approved
outdoor rated external terminal block.

1. 2. 3.
7. Undo the two screws holding the lampholder in place and lift out. You may also need to undo the earth screw
on the body as well.
8. Undo the gland(s) at the bottom of the unit and pull the wire through as shown. If the cable is being looped
through to other units then pull that wire through at the same time. Ensure that the wire is fitted correctly in
the centre of the gland. Re-assemble the gland, but do not tighten yet.
9. Connect the supply wires to the product terminal block as shown. Ensure that you have correctly identified
the wires, that the connections are tight and no loose strands have been left out of the connection block.
10. Push the wiring carefully back into the fitting and refit the lampholder bracket into position.
11. Ensure that the wiring is pulled through the glands and then tighten them properly.
12. Replace fuse or circuit breaker and switch on. Your light is now ready for use.
Fitting / Replacing Bulbs
When changing a bulb, always switch off at the mains and allow the
bulb to cool before handling. Dispose of used bulbs carefully. Do not
7W MAX GU10
LOW ENERGY LAMP
exceed the wattage stated or use a different shape bulb from that
indicated on the fitting.
Unscrew the four screws on the front bezel using the supplied tool.
Lift off the bezel and glass and set aside.
Push the bulb in to the lampholder and twist anticlockwise to remove.
To refit bulb, reverse procedure.
GU10 240V
50W MAX
3W MAX GU10
LED LAMP
Ensure that the seal is fitted in position with the grooves facing down
before refitting decorative bezel.
GU10 240V
Care and Cleaning
20W MAX
We recommend cleaning with a soft dry cloth.
Do not use solvents or abrasive cleaners as these could damage the finish.
Glass parts - Remove and wash in warm water or just use a damp cloth. Do not use abrasive materials as these
will damage the finish.
To prolong the life and keep your outdoor lighting in good condition, it is recommended that periodically it is
cleaned using a soft cloth followed by the application of a light coating of oil, such as WD40.
Recycling Advice
Waste electrical products should not be disposed of with household waste. Please recycle where
facilities exist. Check with your Local Authority or retailer for recycling advice.
Safety Information
For your safety, always switch off the supply before maintaing this product.
This system contains non-replaceable parts and cannot be serviced. If damage occurs the part should be scrapped.
The shade must be replaced immediately should the shade become cracked or damaged. This
Replace Cracked
Shade
Saxby Lighting Ltd. BH23 3PE
tting must not be used without the shade in place.
Iss.2 13092011
 Loading...