


MANUAL CH-53, FOR EXTERNAL MOTOR
Before installation or use of the
product, please read this manual
carefully.
Important!
MAINTENANCE
SAFETY
Avoid using easily flammable fluids near the product. Do not flame under the product!
Always use extreme caution when frying with grease. Grease used several times is very flammable.
Keep nearby something you can use to extinquish possible flames.
Do not use open grill under the product.
THERE IS A DANGER OF FIRE IF THE PRODUCT IS NOT CLEANED
ACCORDING TO THE MANUAL!
Installation height: we recommend 50-60cm above stowe.
(Minimum 65cm with gas stowe)
Product must not be connected to flue exhausting smoke gas (for example fireplace)
Connecting to exhausting flue , loca l fire safety must be considered.
Adequate compensation air must be arranged if the product and for example fireplace are used
simultaneously. Negative pressure might direct smoke gases from fireplace back to the room.
This can be prevented by opening the window.
Class 1 electric product.
Product must be installed according to 3-pole overvoltage standards.
Product must be able to be switched off from power network!
Always unplug the product from power network before cleaning or maintenance.
GENERAL SAFETY
Unnecessary maintenance costs can be avoided and long life of product can be assured if the given
instructions will be followed.
Cleaning the grease filter: In maintenance of the product, it is very important to keep grease filters
clean. Grease filters must be cleaned after 30 hours of use, but at least every 2 months.
Product is equipped with grease filter cleaning reminder.
Removing the grease filter: Press the locking and remove the grease filter.
Wash by hand or in dishwasher. In handwash, use brush and alkaline washing liquid.
When the grease filters are replaced, press the R button (few seconds) of the control panel to reset the
timer. After 30 hours, cleaning reminder appears to display again.
Other functions of the control panel are mentioned in the last page section ”CONTRO L PAN EL”
Cleaning other surfaces: Product must be kept clean. Grease spatters must be cleaned punctually.
Do not use abrasive or corrosive liquids. Use only liquids suitable for metal surfaces.
Always follow the instructions from the washing liquid package!
EN
CH-53 11/2008

C
EN
CH-53 11/2008
In appartment buildings or similar central ventilating systems
connecting to exhausting flue is forbidden!
Hood without own motor should be connected to exhaustion flue with external motor installed.
Air and steam goes out from exhausting flue.
Control panel controls the function of external motor.
AIR VENTING
INSTALLATION
Before installation:
• Switch must be in available place
• Exhausting: reserve 150/125mm flue
(not included in delivery of product)
Detach grease filters by pressing the locking C.
Mounting: Use the enclosed drilling template and
drill the holes accordingly.
Secure the metal bracket B to the wall by using plugs
and screws (supplied with the unit).
Use the bracket’s triangular cuts to position the hood
vertically.
Place the hood on the bracket B.
Adjust the horizontal position.
If the height requires adjustment, use the screws V
(supplied with the unit).
Once regulation has been completed, finish securing the
hood with screws M.
Mark the points for the holes on the wall, remove the
hood and drill (8mm diameter) holes.
Use the plugs and screws to complete installation.
Adjust the width of the support bracket W using
screws A. Fix the bracket to the ceiling or wall.
Make sure that it is positioned along the axis with
your hood.

L
S
EN
CH-53 11/2008
EXHAUSTING (EXTERNAL MOTOR)
Use the non-return valve L at the beginning of
exhausting flue. This prevents cold air flow to room when
motor is not on.
Connect to 150mm flue in order to get the best
performance out of the hood. Flue must be as straight
and short as possible. (flue not included)
Make sure that flue is properly isolated.
If the flue is diam. 125mm, use the outlet reduction S.
Flue diam. under 125mm is not recommended.
CONNECTING
Check that hood and external
motor are compatible.
Manufacturer is not liable
for misinstallations!
Important !
Connecting to external motor:
• Text on lid B ”EXTERNAL MOTOR”
• Check the wire connections C
• Yellow/green ( ) ground
• Blue ( N ) neutral
• Red ( L ) line
Requires closed circuit installation !
Power input:
• White 150cm pre-installed cable
• Check the wire connections
• Yellow/green ( ) ground
• Blue ( N ) neutral
• Brown ( L ) line 230V
Insert the extension ducts setting them on the hood.
Extend the upper duct to the ceiling and secure with the 2
screws G to the bracket W.
Replace grease filters.
Connect to power network.
C
CH-53 11/2008
Winter start function:
When turned on, motor works
with speed 4 for a moment.
Then the hood goes to the speed
it was turned off at.
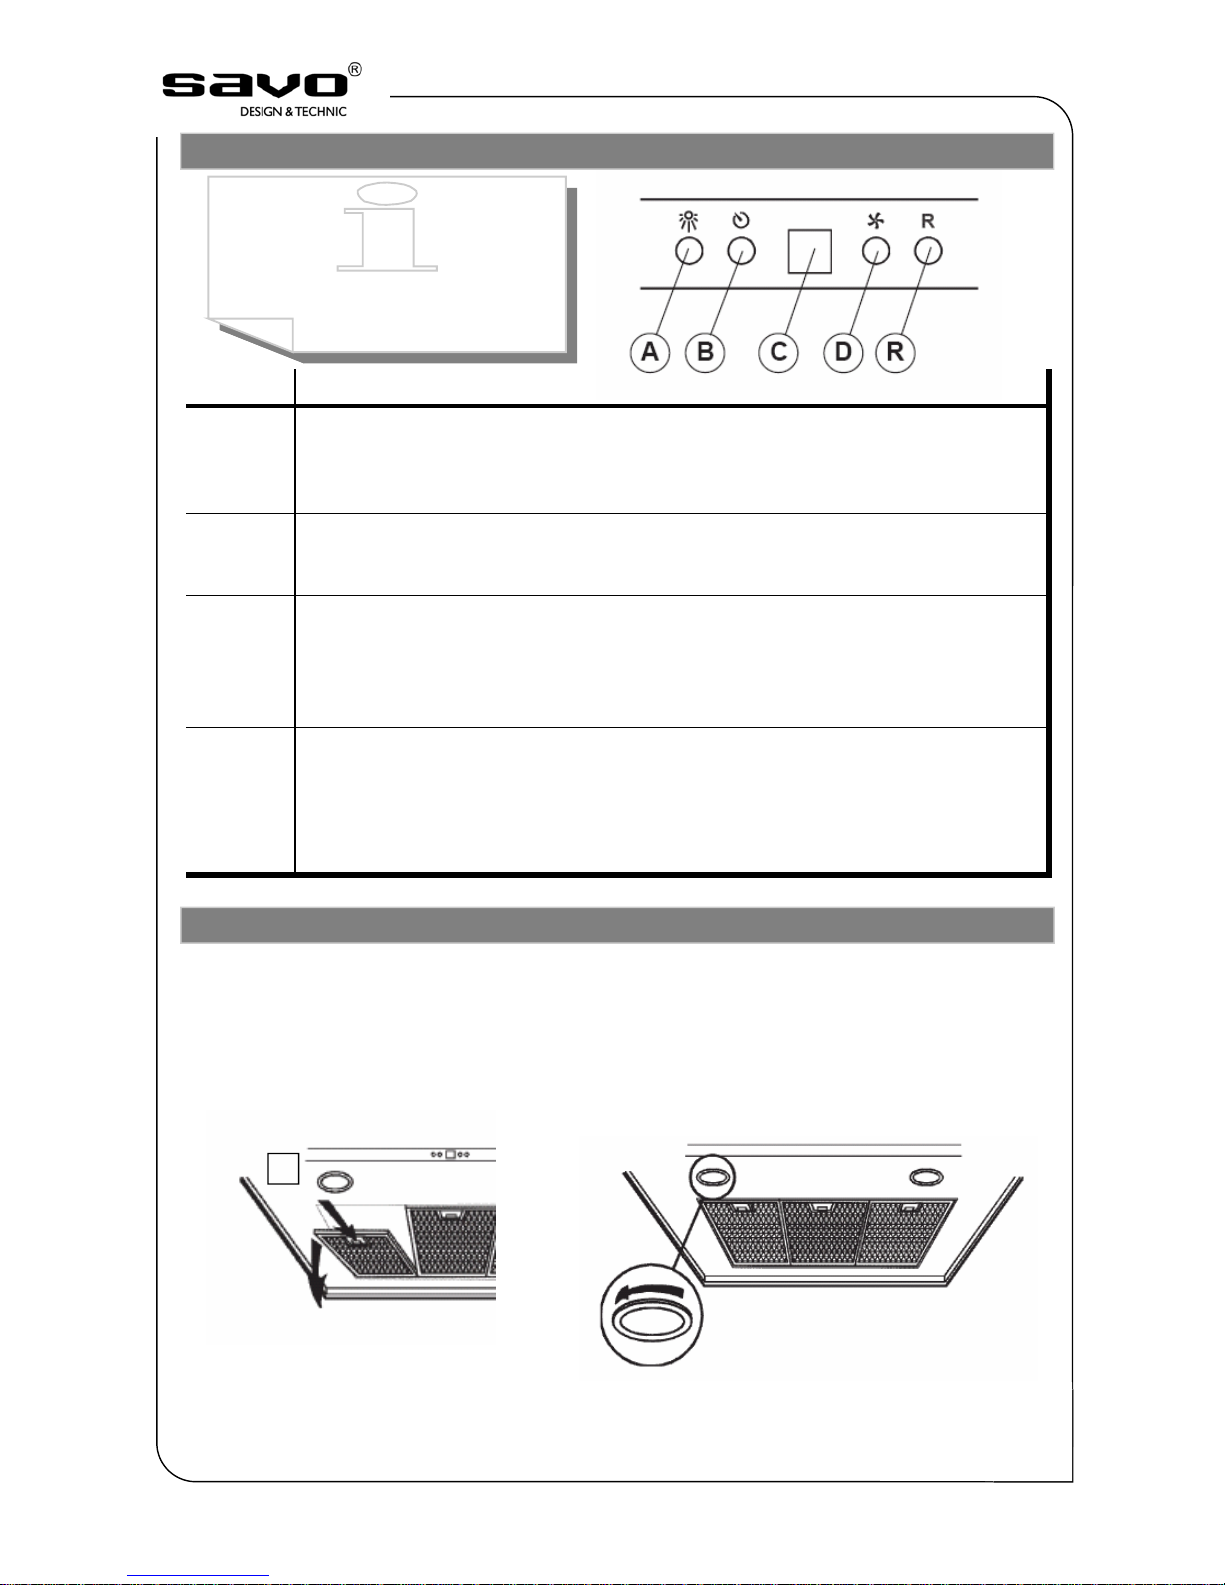
CONTROL PANEL
Button A
Light switch
Button B
Timer function on/off.
By pressing the button, timer fuction activates and after 5 minutes motor turns off.
Display C flashes the selected speed.
Timer function remains on even if the speed is changed
.
Display C
Displays selected motor speed.
Displays the timer function (selected speed is flashing )
Reminds of maintenance when central segment flashes.
Button D
Motor on.
Pushing the button again, speed of the external motor is sequentially changing
from 1 to 4.
Turn off the motor keeping this button pressed for 2 seconds.
Button R
Grease filter alarm reset.
When central segment flashes in display C, grease filters must be cleaned.
(30 hours)
Reset the hours after cleaning by keeping this button pressed for 2 seconds.
MAINTENANCE
Cleaning the grease filter: (30 hours / 2 months)
Press the locking C and remove the grease filter. Wash by hand or in dishwasher.
Use the first page instructions.
Changing the halogen bulb:
Turn the locknut counter-clockwise. Replace with the same type
of bulb (G4-20W). CAUTION: Do not handle glass bulb with bare hands.
Importer
SAVO Design & Technic Oy
www.savo.fi
 Loading...