


All rights reserved! Non authorized copy and/or not agreed usage of document prohibited. ! Page!1!
User’s Manual
Savvy
Personal CARDiac activity monitoring system - (PCARD)
Osebni sistem za spremljanje srčne aktivnosti - PCARD
Version: UM 1.19.3 Revision date: 31.05.2017

Page 2 All rights reserved! Non authorized copy and/or not agreed usage of document prohibited.
Sales and Service Information
SAVING d.o.o. sales and service centre network is world-wide.
Headquarters Address
SAVING d.o.o.
Finžgarjeva 4
SI-1000 Ljubljana,
Slovenia
Phone: +386 (0) 30.707.202
E-mail: info@savvy.si
Web: www.savvy.si
READ THIS FIRST
1. First read the Section 3.1. about General warnings.
2. Put the Savvy sensor into charging dock.
3. Connect charging dock to recommended charger and to the power supply (220V/110V).
4. The charging process takes approximately 2 hours.
5. Read Section 5 about device setup.
6. Install the mobile application MobECG on your PDA from Google Play Store
7. After the Savvy is charged, put the electrodes according to the instructions in Section
5.2.
8. Activate the mobile ECG service according to the instructions in Section 6.1.
9. Initialize measurements according to the instructions in Section 6.2.
10. Create ECG REPORT as described in Section 6.2.4

All rights reserved! Non authorized copy and/or not agreed usage of document prohibited. ! Page!3!
Contents
1. INTRODUCTION ......................................................................................................................................... 5
2. TERMS AND CONDITIONS .......................................................................................................................... 5
3. SAFETY ....................................................................................................................................................... 7
3.1. GENERAL WARNINGS .............................................................................................................................. 7
3.2. PRECAUTIONS ....................................................................................................................................... 8
3.3. INTENDED OPERATOR .............................................................................................................................. 9
4. PRODUCT DESCRIPTION AND TECHNICAL SPECIFICATIONS ........................................................................ 9
4.1. BASIC EQUIPMENT.................................................................................................................................. 9
4.1.1. Savvy sensor ................................................................................................................................. 9
4.1.2. Charging dock ..............................................................................................................................10
4.1.3. Charger .......................................................................................................................................10
4.1.4. Mobile application - MobECG .......................................................................................................10
4.2. ACCESSORIES OF THE MEDICAL DEVICE ........................................................................................................11
4.2.1. Personal Digital Assistant (PDA) ...................................................................................................11
4.2.2. Self-Adhesive Electrod es (SAE)......................................................................................................11
4.3. LABELS AND GRAPHIC SYMBOLS ................................................................................................................12
4.4. ENVIRONMENTAL AND TRANS PORT CONDITIONS ...........................................................................................15
5. DEVICE SETUP ...........................................................................................................................................15
5.1. INSTALLATION OF THE MOBILE APPLICATION .................................................................................................15
5.2. POSITIONING OF THE ELECTRODES .............................................................................................................15
6. DEVICE OPERATION ..................................................................................................................................17
6.1. INITIALIZATION .....................................................................................................................................17
6.1.1. Activating the MobECG service.....................................................................................................17
6.1.2. Selection of Savvy sensor .............................................................................................................17
6.2. MEASUREMENT/ACQUISITION .................................................................................................................18
6.2.1. Initiation of measurements ..........................................................................................................18
6.2.2. During measurement ...................................................................................................................19
6.2.3. Mark Event ..................................................................................................................................19
6.2.4. ECG REPORT ................................................................................................................................20
6.2.5. ECG graph ...................................................................................................................................21
6.2.6. Pause ECG graph during measurement ........................................................................................22
6.2.7. Application screen lock ................................................................................................................22
6.2.8. End measurements ......................................................................................................................22
6.3. APPLICATION SETTINGS ...........................................................................................................................23
6.4. FILE TRANSFER .....................................................................................................................................23
6.4.1. Transfer of the measurements on a storage server .......................................................................23
6.4.2. Manual transfer ...........................................................................................................................24
6.5. APPLICATION UPDATE ............................................................................................................................24
6.6. APPLICATION INFO ................................................................................................................................24
6.7. TURNING OFF THE DEVICE .......................................................................................................................24
6.7.1. Continuing measurement in the background ................................................................................24
6.7.2. Exiting from the MobECG application ...........................................................................................25
6.7.3. Removal of the electrodes ............................................................................................................25
7. PROGRAM FOR MEASUREMENT VISUALIZATION – VISECG .......................................................................25
7.1. SUMMARY OF MEASURED DATA ................................................................................................................25
7.2. ADDITIONAL ANALYS IS ............................................................................................................................26
8. INDICATIONS AND CONTRAINDICATIONS .................................................................................................27
8.1. INDICATIONS ........................................................................................................................................27
8.2. CONTRAINDICATIONS .............................................................................................................................27

Page 4 All rights reserved! Non authorized copy and/or not agreed usage of document prohibited.
9. MAINTENANCE .........................................................................................................................................27
9.1. CHARGING THE SAVVY SENSOR BATTERY .....................................................................................................27
9.2. VISUAL INSPECTION ...............................................................................................................................28
9.3. CLEANING INSTRUCTIONS ........................................................................................................................28
9.4. MOBECG APPLICATION - USER MAINTENANCE .............................................................................................28
9.5. PRODUCT LIFE AND STORAGE ...................................................................................................................29
9.6. EMC INFORMATION ..............................................................................................................................30
10. TROUBLESHOOTING .................................................................................................................................32
11. WARRANTY INFORMATION ......................................................................................................................32
12. MANUFACTURER DATA ............................................................................................................................32

All rights reserved! Non authorized copy and/or not agreed usage of document prohibited. ! Page!5!
1. Introduction
The medical device is a Personal device for CARDiac activity (PCARD), named and referenced as
SAVVY in the remainder of the document. The SAVVY medical device constitutes from a as Savvy
sensor, charger, charging dock and mobile application (MobECG). The core of the system is a
small and light (21g) Savvy sensor, fixed to the skin using standard self-adhesive electrodes. The
Savvy sensor measures the user's differential ECG between two proximal electrodes on the
distance of approx. 8,5 cm. The moderate resolution ECG is suitable for long-term personal
cardiac activity monitoring during every-day or sport activities, and for clinical use. With a single
charge of the built-in battery, the Savvy sensor can run continuously for up to seven days and
at least 14 days in stand-by mode. The SAVVY sensor can be recharged using a charging dock
station that comes with it. The measurements from the Savvy sensor are transferred through a
build-in low power Bluetooth BT4.0 radio to the mobile application on a personal digital
assistant (PDA), i.e. smartphone or tablet, which provides storage and graphical presentation
of the measurements. User can be a healthy person, person under screening or a patient. The
usage of the MD is not limited by age, sex, body weight or height and other personal
characteristics.
A Patient can generate ECG REPORT on mobile device in PDF format, which can be printed out
or sent by e-mail to the patient Doctor for further diagnose.
2. Te rm s an d co nd it io ns
1. Manufacturer and distributor Saving d.o.o., Finžgarjeva 4, Ljubljana, has, with the
participation of the Jozef Stefan Institute in Ljubljana, developed the device with the
commercial designation Savvy, in accordance with technical data which is an integral part of the
user manual of the device.
In accordance with Directive 93/42/EEC on medical devices with a valid amendment, Directive
2007/47/EEC, the developed device is intended to monitor cardiac activity in everyday life, and
accordingly with the introductory Directives classified as an active non-invasive medical device
labeled IIa.
Medical device Savvy is intended for daily individual use of potential buyer, user, for heart
activity monitoring through a single-channel recording of ECG.
Medical device is not intended for a treatment and is not a diagnostic tool in accordance with
the rules of the medical profession, as it is stated in the second paragraph of this document
(Directive EEC).
In the event that the user feels uncomfortable with regard to cardiac function, he must urgently
seek medical assistance, regardless of the conditions shown by the medical device Savvy.
2. Medical device Savvy cannot function independently. It is directly wirelessly connected to a
smartphone or tablet, provided it is in the immediate vicinity. Measured conditions of cardiac
activity are transmitted to the memory unit with the specific program.

Page 6 All rights reserved! Non authorized copy and/or not agreed usage of document prohibited.
3. Data transfer is carried out with the direct transmission of data from your smartphone or
tablet or with the transfer of data to a USB flash drive.
4. The price of a medical device Savvy is determined according to valid price list of the seller.
5. In accordance with warranty statement the seller gives one-year warranty for the medical
device Savvy, which is the subject of the sale.
6. An integral part of the contractual relationship is user manual of the medical device Savvy,
which together with the general terms and conditions form an integral part of each product
that is the subject of sale.
7. With the purchase of the device every customer obtains also user manual, general terms, pin
code and the warranty statement.
8. When you first launch mobile application it is required to confirm the statement that the
respective buyer is aware of the general terms and conditions of use, otherwise the app cannot
be used.
9. In accordance with the provisions of the protection of personal data, with the acceptance of
the medical device Savvy the respective buyer allows seller to use and process their personal
data and communication about possible novelties, new scientific knowledge, a possible upgrade
of the system for the said product and potential vigilance cases. Manufacturer and seller of
Saving d.o.o. are in no way obligated to enable access for any system upgrades of said product
to customers or users.
10. When buyer pays the invoice, he guarantees that the device is intended solely for his
personal or pin code holders use and is not transferable to third parties. The device is according
to an explicit request by the seller not transferable and cannot be left to third parties by the
buyer.

All rights reserved! Non authorized copy and/or not agreed usage of document prohibited. ! Page!7!
3. Safety
3.1. General warnings
WARNING! The SAVVY medical device is not intended for individuals with potentially life-
threatening arrhythmias or individuals who require inpatient or hospital monitoring.
WARNING! The user must carefully read the instructions for use in the user’s manual. The
user should be able to operate smart phones or tablets and understand the user’s manual. If
this is not the case, the device should be used only with the assistance of qualified caregivers
who fulfil the above basic requirements.
WARNING! The SAVVY medical device may not meet its performance specifications if stored
or used outside the specified temperature and humidity ranges.
WARNING! The SAVVY mobile application may not function properly if not installed on the
recommended PDA running recommended mobile operating system, defined in technical
specifications.
WARNING! The SAVVY mobile application may stop functioning properly because of
intermittent faults in the PDA, wireless connection or Savvy sensor. See troubleshooting section
for further instructions.
WARNING! Individuals with known allergies or hypersensitivities to adhesives or hydrogel
(electrode material) should not use the SAVVY medical device.
WARNING! To minimize skin irritation, do not place the Savvy sensor over broken or
damaged skin.
WARNING! The Savvy sensor is water resistant and it can be worn while showering, but do
NOT submerge it in water (for example, in a bath or hot tub, or while swimming).
WARNING! Do not dispose this product as ‘unsorted municipal waste’. Prepare it for reuse
or separate collection as specified by Directive 2002/96/EC of the European Parliament and the
Council of the European Union on Waste Electronic and Electrical Equipment (WEEE).
WARNING! To protect against electrical shock due to leakage currents, use only SAVVY
charging dock with recommended AC/DC power supply defined in technical specifications.
WARNING! When the SAVVY sensor is not in use, it shall be placed in the charging dock and
in charging mode in order to ensure that the battery will not be discharged.
WARNING! Use proper, non-aggressive and biocompatible cleaning agents. It is allowed to
wipe the device with wet cloth.
WARNING! Measurements obtained by SAVVY equipment/system are intended for use by
healthcare professionals only.

Page 8 All rights reserved! Non authorized copy and/or not agreed usage of document prohibited.
WARNING! This equipment/system may cause radio interference or may disrupt the
operation or can be disrupted by external nearby equipment.
WARNING! The housing of the Savvy sensor is not UV resistant which can cause
depigmentation.
WARNING! As in all ECG measurement procedures that use electrode contact to the skin,
body movements, muscle activities, or lose contact between the electrodes and the skin are
expected to influence the quality of the measurements.
WARNING! The user must keep the PDA with the SAVVY mobile application in his/her vicinity
during measurements. The Savvy sensor must be kept in the Bluetooth range of the PDA
(approximately 10 meters, but can vary depending on the PDA and the surrounding). In case of
exceeding this distance, the user simply needs to move the equipment within range and the
connection will be automatically re-established.
WARNING! Savvy is not recommended for use closer than 4 cm from other devices.
WARNING! Only prescribed charger can be used. Using other chargers can cause
unacceptable risks (related to electrical safety and electromagnetic compatibility).
WARNING! Mains plug of battery charger is considered as disconnecting device.
3.2. Precautions
• If you start to feel itching or any kind of discomfort after longer use of the same electrodes,
fix the Savvy sensor on another recommended position and/or replace the electrodes.
• The Savvy sensor should be removed prior to external defibrillation or an MRI scan.
• Make sure that the PDA has enough free storage space (at least 2 GB) for saving the
measurements.
• Visually check from time to time the quality of the ECG signal.
• Users of the SAVVY mobile application should be aware that the PDA can represent a weak
spot in the security chain of the system. By an appropriation of the PDA, a potential attacker
could get access to all of the measurements (which can be considered as personal data)
stored there. Make sure to secure your PDA, if necessary, to an adequate level using the
security features of your PDA.
• See precautions to be taken to prevent adverse events to the Patient and Operator due to
electromagnetic disturbances in table in item 9.6.

All rights reserved! Non authorized copy and/or not agreed usage of document prohibited. ! Page!9!
3.3. Intended operator
The user itself can normally act also as the operator; additionally, a caregiver can act as an
operator by assisting the user. In both cases, the operator should fulfil the following issues:
a) Education:
- Not prescribed, see item b),
b) Knowledge:
- Literacy,
- Understanding of all information in the User’s manual,
- Recognizing symbols on screen,
- Computer literacy,
c) Skills:
- Placing of two self-adhesive skin electrodes,
- Fixation of the Savvy sensor on the two electrodes,
- Charging the Savvy sensor battery,
- Managing smart phone and/or tablet basic functions
- Managing adequate OS
d) Language understanding
- Slovenian or English
- At least: language used in the User’s manual
e) Experience
- Recognition of usual graphical shapes of recorded ECG signal is advisable,
- No other special experience is required.
4. Product description and technical specifications
4.1. Basic equipment
4.1.1. Savvy sensor
The core of the SAVVY system is a small and light Savvy sensor (see Figure 1), fixed to the skin
of the user by two standard SAE. The Savvy sensor is covered with a waterproof and
biocompatible plastic housing. The flexible mechanical construction of the Savvy sensor housing
and the flexible connection to the SAE enable adaption of the distance between two SAEs, which
prevents an unexpected disconnection of the Savvy sensor during user's movements. The ECG
is recorded with a moderate resolution of 125 samples per second.
Figure 1: Savvy sensor in biocompatible housing with two self-adhesive electrodes attached.

Page 10 All rights reserved! Non authorized copy and/or not agreed usage of document prohibited.
4.1.2. Charging dock
The charging dock (see Figure 2) is essentially a cable extension from charger and the Savvy
sensor.
Output VDC: 6,0 V
Max. load: 150 mA
Figure 2: Savvy sensor placed in the charging dock.
4.1.3. Charger
The charger must have the following characteristics:
Model name: VEL05US090-EUJA
Input voltage: 90-264 VAC, Input frequency 47-63Hz
Output VDC: 9,0 V, Max. load: 550 mA, Output power: 6 W, Load regulation: < 5%
Switch type power supply
Operating Temperature range: -0˚C - +60˚C, Storage Temperature: - 40˚C - +85˚C
Efficiency: 78%. Insulation class: II
Electrical safety standard: EN 60950 – 1:2006 +A11:2009+A1:2010-A12:2011
EMC standards tested
• EN61000-3-2, 2006+A2:2009, class A, • EN61000-3-3:2008, class A
• EN61000-4-2 2, • EN61000-4-3 3 A, • EN61000-4-4
• EN61000-4-5, • EN61000-4-6, • EN61000-4-8, • EN55024:2010
Output terminals
• Connector type barrel Jack; 5.5 x 2.1 x 12 mm DC Jack
Dimensions without plug (L×W×H): 55.1 x 24.1 x 35.49 mm
Weight: 80 g
Declaration Reference: Z1A 14 07 57396 271
4.1.4. Mobile application - MobECG
The MobECG installed on the PDA main functionalities are:
• Establishing communication between the Savvy sensor and a PDA.

All rights reserved! Non authorized copy and/or not agreed usage of document prohibited. ! Page!11!
• Visualization of up to 10 seconds of the ongoing measurement.
• Storing the measured data on the PDA storage.
• Interaction with the user.
• Transferring the measurements to a secure storage server or cloud platform.
4.2. Accessories of the medical device
Accessories are sold separately and should be provided by user.
4.2.1. Personal Digital Assistant (PDA)
PDA is an electronic device that runs Android operating system, such as a tablet or a
smartphone. A PDA is compatible with the SAVVY software, if it includes:
• Hardware for Bluetooth 4.0 radio communication,
• Android versions 4.3 – 6.0,
• A colour screen,
• At least 2 GB of free storage space,
• Intermittent or permanent Internet connection, for example Wi-Fi radio, Ethernet port,
LTE capabilities, etc.; or other means of file transfer between a PDA and a PC,
• A means of point and click user input, such as touchscreen or computer mouse,
• A means of ASCII symbol set input, such as touchscreen or keyboard.
Note that the MobECG application is supported only on Android versions 4.3 - 6.0. The
manufacturer gives no guarantees that MobECG will work on later versions of Android until
those are thoroughly tested.
Shape, colour and other characteristics of PDA are not prescribed. Off the shelf devices can be
used. Two examples are shown in Figure 3.
Figure 3: Two examples of Android based personal digital assistants: smart phone (left) and tablet (right).
4.2.2. Self-Adhesive Electrodes (SAE)
SAE represent the mechanical and electrical interface between the Savvy sensor and skin. They
holds the weight of the Savvy sensor and therefore they have to be large enough with diameter
or edge dimensions > 50 mm. The SAE must be intended for long-term use which is > 48 hours
and must be medically certified, especially regarding the biocompatibility standards in order to
prevent skin inflammation or allergies. Below are two examples of recommended SAEs:

Page 12 All rights reserved! Non authorized copy and/or not agreed usage of document prohibited.
1. SKINTACT monitoring ECG electrodes (http://www.skintact.com/48.0.html, see Figure 4
(left)).
Type T-60
Gel Aqua-Wet, Silver/Silver Chloride (Ag/Ag Cl)
Backing Microporous tape
Dimensions 60 mm
Suggested Use Long term (> 48 hours)
2. NIKOMED monitoring ECG electrodes (www: http://www.nikomedusa.com/stress_lab.cfm),
see Figure 4 (right).
Type No. 2015
Gel Foam, solid gel, Silver/Silver Chloride (Ag/Ag Cl)
Backing Clear-Tape, Solid Gel
Dimensions 50 mm
Suggested Use Long term (> 48 hours)
Figure 4: Two examples of recommended self-adhesive electrodes (SAE).
Equivalent or better electrodes must be purchased from a manufacturer who possesses
required evidence for the requested quality. While purchasing electrodes, evidence documents
for quality are necessary. Alternative electrodes are matter of a safety testing according to EN
60601-1 and EN 60601-2-47.
4.3. Labels and graphic symbols
The following overview shows the safety symbols and pictograms used in this handbook.
Refer to instruction manual / booklet.

All rights reserved! Non authorized copy and/or not agreed usage of document prohibited. ! Page!13!
Consult the instructions of the device for information on how to properly use it.
Type BF medical equipment
"Keep dry".
Both temperature limits should be noted next to the upper and lower
horizontal lines.
Both humidity limits should be noted next to the upper and lower horizontal
lines.
Symbol accompanied by the name and address of the manufacturer.
Waste separation for batteries.
Waste separation for electronics.
Medical equipment with intended radiation (communication purposes)
CE marking with number of Notified body; SIQ, number 1304
Device labelling

Page 14 All rights reserved! Non authorized copy and/or not agreed usage of document prohibited.
Figure 5: Savvy labeling
Figure 6: Charging dock labeling
Figure 7: Labeling of packaging

All rights reserved! Non authorized copy and/or not agreed usage of document prohibited. ! Page!15!
4.4. Environmental and transport conditions
Environmental and transport conditions for the BG and the charging dock are given in the table
below:
All remaining HW components of SAVVY (SAE, PDA) should obey the conditions prescribed by
manufacturers.
5. Device setup
5.1. Installation of the mobile application
Install the mobile application MobECG on your PDA from Google Play Store and upon
installation confirm all requested permissions. If the user is not experienced with mobile
applications, should seek assistance from an operator. After successful installation, the MobECG
application icon should appear on the PDA screen. Check regulary for updated version on
Google play Store.
Note: in case any function is not understood please contact supplier or producer.
5.2. Positioning of the electrodes
Before initiating the measurements, fix the Savvy sensor to the skin using standard selfadhesive electrodes. First, while the electrodes still have a protective foil, attach them on the
Savvy sensor. Then, remove the protective foil from the electrodes and fix the Savvy sensor on
cleansed skin. The Savvy sensor should be placed on an appropriate position on the chest where
it does not cause discomfort for the user and where the ECG waves are clearly visible. Figure 8
shows several recommended positions of the electrodes, which should provide quality ECG
measurements. Additionally, the operator can suggest placing the electrodes on a specific
position on the body according to a specific user treatment.
Environmental conditions
NORMAL OPERATION
TRANSPORTATION AND
STORAGE
Environmental temperature:
-10 0C to +40 0C
-20 0C to +70 0C
Relative humidity:
10 % to 95 % (limited
condensation)
10 % to 95 % (limited
condensation)
Atmospheric pressure:
700 – 1060 hPa (mB)
700 – 1060 hPa (mB)

Page 16 All rights reserved! Non authorized copy and/or not agreed usage of document prohibited.
(1) (2)
(3) (4)
(5) (6)
(7)
Figure 8: Recommended electrode positions on the body.

All rights reserved! Non authorized copy and/or not agreed usage of document prohibited. ! Page!17!
6. Device operation
6.1. Initialization
In the following, we show a symbolic design of the MobECG application, because the actual
implementation is Android OS dependant.
6.1.1. Activating the MobECG service
Upon installation, the MobECG service is activated with tap on the application icon. When
activated, the MobECG application icon will appear on the top task bar of the PDA. For transfer
of the measurements from the Savvy sensor to the PDA, MobECG requires that the Bluetooth
on the PDA is activated. If not, the application displays a warning that it wants to turn on
Bluetooth. Make sure you allow for the Bluetooth to be turned on.
At start-up, the overview screen of MobECG is displayed (Figure 9a). This is considered as the
main screen where you can control the measurements (start and stop), and where details about
the measurement and paired Savvy sensors are displayed. All other options of the application
are available by clicking on the menu at the top left corner (Figure 9b), will appear.
NOTE: The main application screen is the only one that cannot be rotated.
(a) (b)
Figure 9: MobECG symbolic design of (a) the main overview screen and (b) the application menu.
6.1.2. Selection of Savvy sensor
The first step after starting MobECG is to connect the Savvy sensor placed on the body with the
application. Click on “Select Savvy” in the application menu. The application will open a screen
where it scans for wireless devices in the vicinity of the PDA (Figure 10). The scanning is
automatically refreshed with the devices with the highest signal strength floating at the top of
the list. You can pause the sorting of list items by clicking on the button named “STOP SORTING”.
To select your Savvy sensor, identify its name and MAC address on the list and click on it. A
Savvy sensor authorization windows pops up (Figure 10b). Enter the 4-digit PIN provided at the
end of this User’s manual and click “OK”. After successful authorization, the Savvy sensor is
highlighted yellow (Figure 10c).
NOTE: The PIN is requested only the first time when the Savvy sensor is paired with the PDA.

Page 18 All rights reserved! Non authorized copy and/or not agreed usage of document prohibited.
6.2. Measurement/Acquisition
6.2.1. Initiation of measurements
After the Savvy sensor is selected, go back to the main screen of the application by clicking
“Back” on the PDA or selecting “Overview” from the application menu. The Savvy sensor is listed
in the Select Savvy section of the main screen, displaying its status, signal strength and battery
level (Figure 11a). Before a measurement is initiated, the status of the Savvy sensor is
disconnected.
To start the measurement, click on the “Start” button. After a short time, the sensor connects
to the PDA. The status of the Savvy sensor changes to “Connected”. When a measurement is in
progress, the MobECG application icon in the task bar changes in an icon shaped like one ECG
beat. Two icons appers on “action bar” – seen on all menus: an icon of BPM and an icon of Mark
event, by pressing on bpm icon will open Ecg graph, pressing on Mark event will open Mark
event menu.
(a) (b) (c)
Figure 10: Symbolic design of the Savvy sensor selection.
(a) (b) (c)
Figure 11: Symbolic design of the main screen (a) after selection of the Savvy (b) during measurement. (c)
Current condition options.

All rights reserved! Non authorized copy and/or not agreed usage of document prohibited. ! Page!19!
6.2.2. During measurement
The main screen during measurement is shown in Figure 11b. During measurement, the main
information about the measurement is displayed in the Measurement Control section of the
main screen: status (running/not running), start of the measurement (date and time), running
time, and quality. Below the Measurement Control, the hearth activity is animated with a small
symbolic beating heart and numerical value of BPM (Beats per Minute).
Heart rate (HR) is calculated from the last 10 seconds of measurement (this is the default
value. Under “Settings” menu interval can be changed from 5 to 30 seconds. In case less than
5 beats are detected in the HR value in this interval, “NA” will be shown instead of the HR
value. The HR value is furthermore limited to between 20 and 250. In case calculated value is
outside those limits, “NA” will be shown on the user interface.
NOTE: The BPM detector can report incorrect values in the presence of excessive noise. Please,
consider the shown BPM value as informative.
6.2.3. Mark Event
This option is accessible by selecting “Mark Event” from the application menu. A measurement
must be started to use this feature. The application offers the option to mark events or specific
moments during a measurement, e.g., when some activity is initiated, or when some
inconvenience is felt. The button for marking events is also available from the Measurement
Control on the main screen, next to the heart icon, after the measurement has been started. To
mark an event, select either a predefined event or a custom event. For predefined events, click
on one of the displayed icons and then on the save button (Figure 11c). For a custom event,
either enter the text into the text field or leave it empty and then click on the save button.
Saving the event will change the screen back to the “Overview”.
ECG REPORT can be generated either from the Mark Event menu or from the “ECG Reports”
menu. The option in the “Mark Event” menu is purely for convenience and produces identical
reports. Note that when triggered from the “Mark Event” menu, or from the ongoing
measurement in the “ECG Reports” menu, application MobECG will first wait until the desired
interval of measurement is recorded and only then start report generation.
Before generating the report, MobECG will present the “Additional report information” dialog,
where additional information for the physicians analysing the report, might be presented. Note
that information typed in the fields is optional, the information entered will be used only on the
report that is being generated, and will be only cached by the MobECG for the use in the same
dialog the next time a report is requested. This dialog also gives the option to change the default
interval length of ECG plotted on the report. Note that the report will include the ECG from ¹/₂
interval before the event to ¹/₂ of interval after the event is marked.
After confirming the dialog, the report will be generated in the background. When it is
complete, a notification will appear, with options for viewing or sharing the report. At this point
the report will also be stored on the PDA storage to be viewed or shared later. The default
storage location is in Documents/MobEcg/Reports/.
NOTE: All feeling icons may indicate potential hazard states. The SAVVY system does not
prevent the consequences of the medical emergencies associated with the symbols.

Page 20 All rights reserved! Non authorized copy and/or not agreed usage of document prohibited.
6.2.4. ECG REPORT
This option offers a list of “Measurements” (Figure 12a) and a list of “Reports” (Figure 13b), as
two tabs of a tabbed interface.
The tab “Measurements” comprises a list of past and ongoing measurements, and the stored
events within those measurements. Measurements are displayed with their start time, end time,
and duration. If any events were marked during a given measurement, those events are
displayed within the measurement's area with an icon and event text. The icon for event is the
is the same that was used when marked the event, or an icon of a heart, if the event was marked
as custom text event.
Selecting an existing event gives the option of generating a short ECG report around that event.
Selecting a measurement displays a slider for picking a time from the measurement time
interval and generating a report around that time.
Sliding the tab “Measurements” (Figure: 12a) to the left brigs the tab “Reports” (Figure: 12b)
into the view. This tab comprises a list of reports generated so far. Selecting a given report will
open that report in the default PDF viewer, while selecting icon will bring forward all the
available sharing options (Figure 12c). Long pressing on a report will show the option of deleting
that report.
a.) b.) c.)
Figure 14: ECG REPORTS: (a) Measurements (b) Reports (c) PDA distribution options
The ECG report is a PDF file, that contains an interval of ECG measurement around a picked time
or around a marked event. Note that no diagnostic information is presented on the report, only
the pure and unmodified ECG measurement, together with the user-provided additional
information.
The report comprises the head and the ECG measurement on multiple pages on the size of
standard A4 paper. Head is filled with information about the user, the measurement, and the
marked event. ECG measurement if plotted in rows of 7,5 seconds each, on top of a blue graph
paper. The dimensions of the plotted ECG, which are also marked on the report, are 10 mm per

All rights reserved! Non authorized copy and/or not agreed usage of document prohibited. ! Page!21!
mV in amplitude and 25 mm per second in time axis (Fill last page of report if timespan ends in
the middle of page).
6.2.5. ECG graph
The application provides also an option to visualize the current ECG measurement and BPM. By
selecting “ECG Graph” from the application menu or click on the heart icon on the main screen.
To return to the main screen, click “Back” on the PDA or select “Overview” from the application
menu. Figure 12 shows an example of a good quality ECG signal. Interactive graph zooming
option enable zoom in or out x-axis ( from 1 to 10 seconds) or y-axis (mV) by fingers.
Note: in case zooming-out area where no grapf exist will appear as no ecg graph exist. Zoomin areas and graph should be seen on screen.
Figure 15: Full screen visualization of the ECG measurement.
Examples, but not limited to, of different signal forms that can be encountered during
measurements are shown and described in Figure 13. All forms, except the last one (Figure 16f),
are considered as ECG. Two examples of quality ECG signal are shown in Figure 16a and Figure
16b. An inverted ECG can be measured if the placement of the electrodes is reversed (Figure
16c). While this should not be of any concern, for usual ECG form, reverse the placement of the
electrodes. When moving the arms or while walking, the ECG base line may wander, which
should also not be of any concern (Figure 16d). Example of a noisy ECG signal is on Figure 16e;
heartbeat timings may still be obtained from such a signal. Figure 16f shows an example of noise,
such as might be caused by a disconnected electrode; there is no ECG signal left in it. Therefore,
during the measurement, make sure to check the quality of the ECG signal from time to time. If
the ECG signal is not adequate, fix the electrodes on another recommended position from
Figure 8, and insure that the ECG signal is good. Usually within a few minutes, a good galvanic
contact with the subcutaneous tissue is established and the ECG signal becomes stable.
NOTE: A measurement must be started to use this feature.

Page 22 All rights reserved! Non authorized copy and/or not agreed usage of document prohibited.
(a) Example of a quality ECG
(b) Example of a quality ECG
(c) Example of inverted ECG
(d) ECG while walking
(e) Noisy ECG
(f) Noise
Figure 16: Examples of different signals during measurement.
6.2.6. Pause ECG graph during measurement
To temporary pause the visualisation of ECG and see a particular segment currently being
detected, just tap on the graph. A pause icon will be displayed at the top of the graphic. To unpause, tap on the graph once more.
NOTE: This option pauses just the visualization of the measurement. However, the
measurement is still being recorded on the PDA. After unpausing, the application will continue
displaying the current measurement.
6.2.7. Application screen lock
In order to prevent unwanted actions during measurement, there is an option to lock the screen
of the application. When the application screen is locked, users cannot perform any actions,
like start/stop measurement or preform setup. However, the user can still browse through the
application menu.
To lock the screen of the application, select “Lock app” from the application menu. If the lock
option is activated for the first time, users are asked to enter and repeat a password for lockunlock. To unlock the application screen, select “Unlock app” from the application menu. On
the next lock-unlock action, the password will be required only for unlock (lock will be
performed without password request).
6.2.8. End measurements
To end the measurement, click on the “Stop” button on the main screen. The status of the
sensor will change to “Disconnected”. If you plan to use the same sensor for further
measurements, it is preferable to keep it in the list of paired Savvy sensors on the main screen.
If you want to remove the Savvy from the list of paired sensors on the main screen, first click

All rights reserved! Non authorized copy and/or not agreed usage of document prohibited. ! Page!23!
“Select Savvy” from the application menu. Then deselect the yellow highlighted Savvy with one
click. The Savvy will be un-highlighted. At the end, click “Back” on your PDA or select “Overview”
from the application menu to return to the main screen.
6.3. Application settings
The application settings are available by selecting “Settings” from the application menu. The
settings include:
• Visual settings:
o Oscilloscope gap [s]: Define how much of the ECG line will overlap (default: -0.5
s). If the gap is negative, new data will overlap some of the old data. Note that
if the fade interval is longer than the overlap interval, the line might not look
like it overlaps at all.
o Oscilloscope fade interval [s]: Define the length of the ECG line that will be
faded (default: 1.0 s). Fading will affect the oldest data shown.
o Allow automatic Bluetooth resetting: This settings allows application to reset
the Bluetooth adaptor without asking for permission. The application will only
reset the Bluetooth adaptor if it becomes unresponsive.
• Security settings:
o Lock the selection of Bluetooth SAVVY: Checking this option will lock current
selection of Bluetooth devices and thus guard against accidental changes.
(default: Not selected).
o Set lock screen password: Set or change lock screen password.
Please consult with an operator for further details about the application settings.
6.4. File transfer
The ECG measurements are stored in files in the subfolder MobECG in the Documents folder of
the Android operating system.
6.4.1. Transfer of the measurements on a storage server
If an Internet connection is available, there is an option to transfer the measurement files on a
secure storage server. For FTP transfer, select “FTP Upload” from the application menu. A
screen, as in Figure 17, appears that requires entering FTP server address, username and
password. The application provides options to delete the files on the PDA after upload (tick the
checkbox to do so). It is recommended to use this option to insure space availability for further
measurements. After entering the required data, click the “Upload” button to begin the
transfer.

Page 24 All rights reserved! Non authorized copy and/or not agreed usage of document prohibited.
Figure 17: Symbolic design of the FTP Upload screen.
6.4.2. Manual transfer
More advance users of PDAs can also manually transfer the measured data on a personal
computer by using means of file transfer from a PDA to other device. It is recommended to
delete the measurement files from the PDA after transfer in order to insure space availability
for further measurements.
6.5. Application update
To update the application, check regularly for updates on Google Play Store. The application
will guide you through the update process.
6.6. Application info
Information about the application, like version and brief description, are available by selecting
“About” from the application menu.
Information about the developers are available by selecting “Credits” from the application
menu.
6.7. Turning off the device
6.7.1. Continuing measurement in the background
To perform other tasks on the PDA, MobECG can be put in background by clicking on the “back”
button of the PDA. If a measurement was started it will continue. Only clicking on Stop button
in the “Overview”, Exiting the MobECG via “Exit” option, a MobECG crash, disabling Bluetooth,
or a PDA shutdown will stop the measurement.

All rights reserved! Non authorized copy and/or not agreed usage of document prohibited. ! Page!25!
MobEcg will also continue started measurement if the PDA screen is turned off. Turning the
screen off as it will decrease the PDA consumption and enable it to work for longer without
recharging.
6.7.2. Exiting from the MobECG application
To exit from MobECG, select “Exit” from the application menu.
NOTE: The application does not turn of the Bluetooth on the PDA on exit. The application stops
all measurements on exit.
6.7.3. Removal of the electrodes
After a phase of measurements is finished, you can remove the electrodes together with the
Savvy sensor from the body. You can keep the electrodes attached to the Savvy sensor for later
measurements, if the gel has started to degrade, detach the electrodes and attach new ones.
NOTE: When the Savvy sensor is not in use, it is necessary to be placed in the charging dock and
in charging mode in order to ensure that the battery will not be discharged.
7. Program for measurement visualization – VisECG
Visualization program available at http://www.savvy.si/ can be used to review the
measurements after they are finished. The program is originally intended for healthcare
professionals. However, there is an option to generate a summary of the measurements. This
summary is meant to be generated also by the user itself and further passed on to a medical
expert. Other additional analyses are intended for medical experts only. Note that the program
is not intended for diagnostics purposes.
7.1. Summary of measured data
To generate the summary of measured data, the measurements need to be first transferred on
a local PC (see Section 6.4 File transfer). Then, after starting up the program, select “Open folder
overview” from the File menu and point to the location of the measurement files in the
Directories window. When a directory selection is made, the Files window will display all the
measurement files within the directory. Next, click “OK” and wait for the program to generate
a graphical presentation of the ECG measurements (Figure 15). Note that when opening a
directory for the first time, this operation might take long time to complete, depending on the
number and size of files.
When interacting with the graphical presentation of the directory, the mouse pointer can be
positioned over an ECG measurement, the values for average heart rate in BPM (Beats per
Minute), number of beats, and percentage of useful ECG signal (beats coverage percentage) for
that interval are displayed in a tooltip.
To generate the summary, click on the button “Generate summary”. A PDF summary document
of all long-term measurements (longer than 15 minutes) will be generated in the same folder
as the measurements. A sample summary document is shown in Figure 16. For each ECG
measurement in the summary, the mean heart rate (averaged on 60 second intervals) is plotted
with line and all instantaneous heart rates (for all the detected heart beats) are displayed with
dots. A minute interval of ECG signal around a marked event is also displayed in the summary.
The events which were marked during the measurement on MobECG, e.g., when some activity
was initiated, or when some inconvenience has been felt (see Section 6.2.3 Mark Event), are
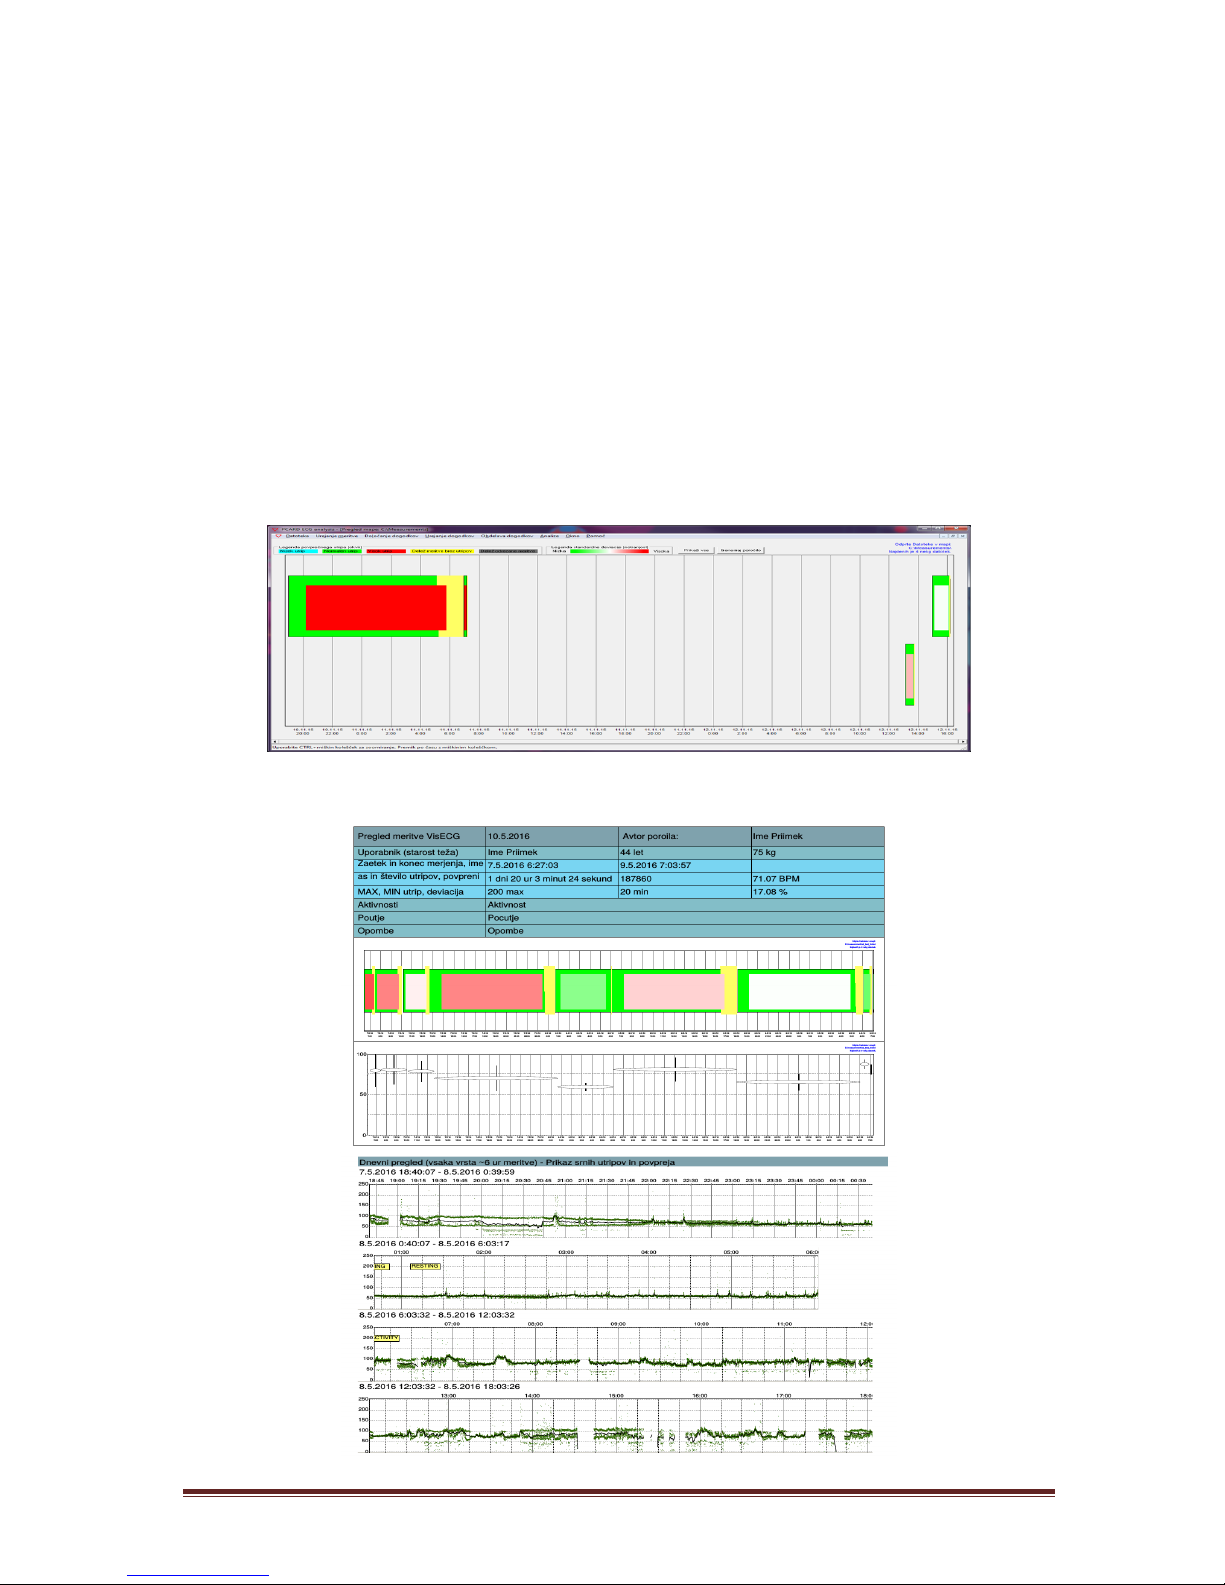
Page 26 All rights reserved! Non authorized copy and/or not agreed usage of document prohibited.
also marked on the graphs. The summary is intended to be used by medical doctors for
interpreting long-term measurement, which can last from a few days to a month.
NOTE: The design of the summary is subject to further changes. Check regularly for VisECG
update.
7.2. Additional analysis
A medical expert can further analyse the recorded ECG in more details by selecting any recorded
interval. The selected interval is then displayed for further processing and assessment of the
ECG waves. Based on the expert analysis, a supplement summary can be generated with
eventual remarks and proposals for further treatment procedures.
For more information, see the detailed instructions for the program available by selecting “User
manual” from the Help menu.
Figure 18: VisECG analysis – symbolic design of the measurement overview screen.

All rights reserved! Non authorized copy and/or not agreed usage of document prohibited. ! Page!27!
Figure 19: Summary example.
8. Indications and contraindications
8.1. Indications
The SAVVY system is intended to be used for the puposes of heart rhythm monitoring with
bluetooth devices. It is capable of detection of abnormally rapid and slow heart rate, and display
such in a graphical manner. In addition, recorded EKG signal is of sufficient quality, that, when
reviewed on a computer by competent medical personnel, it enables more specific
identification of potential arrhythmia.
SAVVY system monitors and displays the ECG instantly on the patient PDA during the
measurement (if display on smart phone or tablet is enabled) and after the measurement, the
ECG data can be reviewed and analysed by healthcare professionals.
8.2. Contraindications
The SAVVY system is not intended for use by individuals with potentially life-threatening
arrhythmias or by individuals who require inpatient or hospital monitoring. Individuals with
known allergies or hypersensitivities to adhesives or hydrogel (electrode material) should not
use the SAVVY system.
9. Maintenance
All maintenance work must be carried out by a qualified technician authorised by the
manufacturer. Only maintenance procedures given in this manual, for example battery charging,
visual inspection, cleaning etc., may be carried out by the user.
9.1. Charging the Savvy sensor battery
The Savvy sensor is an internally battery powered equipment.
For charging the Savvy sensor battery, place the Savvy sensor in the charging dock and plug the
charger. For full capacity, charge the Savvy sensor battery at least two hours. The light indicator
(orange) on the charging dock will turn off when the Savvy sensor battery is fully charged.

Page 28 All rights reserved! Non authorized copy and/or not agreed usage of document prohibited.
NOTE: When the Savvy sensor is not in use, it is necessary to be placed in the charging dock and
in charging mode in order to ensure that the battery will not be discharged. Discharged battery
void Guarantee.
Figure 20: Savvy sensor placed in the charging dock connected to a Charger, while charging.
9.2. Visual inspection
Visually inspect the device and cable assemblies for the following:
• Savvy sensor casing not broken or cracked
• Charging dock casing not broken or cracked
• Charger casing not broken or cracked
• Charger cable sheathing and connectors undamaged. No kinks in the cable.
Defective units or damaged cables void guarantee and must be replaced immediately prior
further use.
9.3. Cleaning instructions
The Savvy sensor, Charging dock, Charger can be cleaned and disinfected only when they are
disconnected from power supply and only when fully dry, they can be reconnected to power
supply.
The Savvy sensor can be cleaned and disinfected with medical ethyl alcohol or special cleaning
agent for medical devices, to ensure compliance with the following requirements:
• Biocompatibility of the housing,
• Aging of the polypropylene,
• Compatibility with adhesive endurance.
The damage caused when using the wrong cleaning agents void product/producer warranty.
It is allowed to wipe the device with wet cloth. While the Savvy sensor is water resistant, do not
immerse it in water.
9.4. MobECG application - User maintenance
User must keep the Android environment as specified in the requirements:
• Adequate storage space is maintained on the PDA and personal computer;
• Internet connection on the PDA and the PC is established as required – when
transferring measurements to PC or CS;
• Bluetooth radio is enabled on the PDA.
• The PDA is turned on while recording, while the screen can be off.

All rights reserved! Non authorized copy and/or not agreed usage of document prohibited. ! Page!29!
• Battery on the PDA should be kept charged enough to support long measurements or
the PDA should be placed on a charger.
9.5. Product life and storage
Lifetime of the MD is two years. Environmental conditions for storage are given in Section 3.4.
Environmental and transport conditions.

Page 30 All rights reserved! Non authorized copy and/or not agreed usage of document prohibited.
9.6. EMC information
The device is intended for use in the electromagnetic environment specified below. The customer or the user of the device
should assure that it is used in such environment.
Emissions test
Compliance
Electromagnetic environment - guidance
RF emissions
CISPR 11
Group 1
The device use RF energy only for its internal function. Therefore, their RF
emissions are very low and are not likely to cause any interference in nearby
electronic equipment.
RF emissions
CISPR 11
Class B
The device is suitable for use in all establishments and those directly
connected to the public low-voltage power supply network that supplies
buildings used for domestic purposes.
Harmonic emissions IEC
61000-3-2
Class A
Voltage fluctuations/
flicker emissions
IEC 61000-3-3
Compiles
Immunity test
IEC 60601
test level
Compliance
level
Electromagnetic environment - guidance
Electrostatic discharge
(ESD)
IEC 61000-4-2
±6 kV contact
±8 kV air
±2 kV contact (!)
±8 kV air
Floors should be wood, concrete or ceramic tile. If floors
are covered with synthetic material, the relative humidity
should be at least 30%. (!)
Savvy could lost connection; without intervention
reconnection is successful within 60s.
On charging dock LED could blink during ESD. After
discharge small peaks could appear on graph.
In case of malfunction due to electrostatic discharge,
reset the apparatus by putting it to charging dock.
Electrical fast
transient/burst
IEC 61000-4-4
±2 kV for power
supply lines
±1 kV for input/
output lines
±2 kV for power
supply lines (!)
±1 kV for input/
output lines
Mains power quality should be that of a typical
commercial or hospital environment. Temporary loss of
charging function may occur which is self-recoverable.
Surge
IEC 61000-4-5
±1 kV differential
mode
±2 kV common
mode
±1 kV differential
mode
±2 kV common
mode
Mains power quality should be that of a typical
commercial or hospital environment.
Voltage dips, short
interruptions and voltage
variations on power
supply input lines
IEC 61000-4-11
<5 % UT
(>95 % dip in UT)
for 0,5 cycle
40% UT
(60 % dip in UT)
for 0,5 cycle
40% UT
(60 % dip in UT)
for 0,5 cycle
40% UT
(60 % dip in UT)
for 0,5 cycle
<5 % UT
(>95 % dip in UT)
for 0,5 cycle
40% UT
(60 % dip in UT)
for 0,5 cycle
40% UT
(60 % dip in UT)
for 0,5 cycle
40% UT
(60 % dip in UT)
for 0,5 cycle
Mains power quality should be that of a typical
commercial or hospital environment.
Power frequency (50/60
Hz) magnetic field
IEC 61000-4-8
3 A/m
3 A/m
Power frequency magnetic fields be at levels
characteristic of a typical location in a typical commercial
or hospital environment.

All rights reserved! Non authorized copy and/or not agreed usage of document prohibited. ! Page!31!
Immunity test
IEC 60601
test level
Compliance
level
Electromagnetic environment - guidance
Conducted RF
IEC 61000-4-6
Radiated RF
IEC 61000-4-3
3 Vrms
150 kHz to 80 MHz
3 V/m
80 MHz to 2,5 GHz
[V1] 3 V
[E1] 3 V/m
Portable and mobile RF communications equipment
should be used no closer to any part of the device,
including cables, than the recommended separation
distance calculated from the equation applicable to the
frequency of the transmitter.
Recommended separation distance:
d=
d= 80 MHz to 800 MHz
d= 800 MHz to 2,5 GHz
where P is maximum output power rating of the
transmitter in watts (W) according to the transmitter
manufacturer and d is the recommended separation
distance in meters (m).
Recommended separation distance is 0,04m (4cm).
LED blinking on charging dock during Proximity field
immunity test.
At 710 MHz changes on graph appeared, without
influence on time-base of recording.
Field strength from fixed RF transmitters as determined
by an electromagnetic site survey, should be less than the
compliance level in each frequency range.
Interference may occur in the vicinity of equipment
marked with the following symbol:
PV]
5,3
[
1
PE]
5,3
[
1
PE]
7
[
1

Page 32 All rights reserved! Non authorized copy and/or not agreed usage of document prohibited.
10. Troubleshooting
Issue
Possible cause
Possible solution
The sensor does not
connect.
PDA Bluetooth is not turned
on.
The sensor battery is empty.
The sensor is not in the
range of the PDA Bluetooth.
Turn on the Bluetooth on
the PDA.
Charge the sensor battery.
Move in vicinity of the PDA.
The ECG signal does not look
good.
The contact of the
electrodes with the skin has
loosen.
Replace the electrodes
and/or place the electrodes
on another position.
The electrodes do not stick
to the skin very good.
The gel of the electrodes has
degraded or the skin is not
clean.
Clean the skin and/or change
the electrodes.
The ECG graph has
disappeared.
The sensor is not in the PDA
Bluetooth range.
Wireless connection
problems on the PDA or the
BG.
Move the Savvy sensor into
the vicinity of the PDA.
If the problem persists: turn
the Bluetooth radio OFF and
then back ON.
If the problem persists: exit
MobECG and start it again.
If the problem persists: Put
the Savvy sensor on the
plugged-in charging dock for
a second (the active charging
LED indicator should blink).
If the problem persists: ask
for a technical assistance.
11. Warranty information
For warranty information, please refer to the warranty declaration.
12. Manufacturer data
Name and address
Saving d.o.o.
Finžgarjeva ulica 4

All rights reserved! Non authorized copy and/or not agreed usage of document prohibited. ! Page!33!
1000 Ljubljana
Official Logo
Statutory representatives
Boris Simončič, PhD, MD
Tina Samardžija
Quality management system
(QMS) certificate
ISO 13485:2003
PIN:
MAC ADDRESS:
: : : : :
 Loading...