

Page 1

Printer Unit Type40
RCP40
Operating Instructions
Printer Reference 1
Getting Started
Installing the Printer Driver and Software
Basic Printing
For safe and correct use of this machine, please be sure to read the Safety Information in the
Operating Instructions that comes with the machine before you use it.
Page 2

Introduction
This manual contains detailed instructions on the operation and maintenance of this machine. To get
maximum versatility from this machine all operators should carefully read and follow the instructions in
this manual. Please keep this manual in a handy place near the machine.
Important
Parts of this manual are subject to change without prior notice. In no event will the company be liable
for direct, indirect, special, incidental, or consequential damages as a result of handling or operating
the machine.
Warning:
Use of controls or adjustment or performance of procedures other than those specified in this manual
might result in hazardous radiation exposure.
Trademarks
®
Microsoft
, Windows® and Windows NT® are registered trademarks of Microsoft Corporation in the
United States and/or other countries.
®
Adobe
and Acrobat® are registered trademarks of Adobe Systems Incorporated.
Ethernet® is a registered trademark of Xerox Corporation.
Other product names used herein are for identification purposes only and might be trademarks of their
respective companies. We disclaim any and all rights in those marks.
Notes:
Some illustrations in this manual might be slightly different from the machine.
Certain options might not be available in some countries. For details, please contact your local dealer.
Two kinds of size notation are employed in this manual. With this machine refer to the inch version.
Note:
The proper names of the Windows operating systems are as follows:
®
• The product name of Windows
95 is Microsoft® Windows® 95.
• The product name of Windows® 98 is Microsoft® Windows® 98.
®
• The product name of Windows
• The product names of Windows® 2000 are as follows:
Microsoft
Microsoft
Microsoft
• The product names of Windows® XP are as follows:
Microsoft
Microsoft
• The product names of Windows NT® 4.0 are as follows:
Microsoft
Microsoft
®
Windows® 2000 Advanced Server
®
Windows® 2000 Server
®
Windows® 2000 Professional
®
Windows® XP Professional
®
Windows® XP Home Edition
®
Windows NT® Server 4.0
®
Windows NT® Workstation 4.0
Me is Microsoft® Windows® Millennium Edition (Windows Me).
Page 3

Manuals for This Machine
The following manuals describe the operational procedures and maintenance of
this machine.
To enhance safe and efficient operation of this machine, all users should read
and follow the instructions carefully.
❖❖❖❖ Printer Reference 1 (this manual)
Describes the system settings, procedures and functions for using this machine. This manual is also included as a PDF file on the CD-ROM labeled
“Printer Drivers and Utilities”.
❖❖❖❖ Printer Reference 2
Describes the procedures and provides necessary information about using
this machine. This manual is included as a PDF file on the CD-ROM labeled
“Printer Drivers and Utilities”.
❖❖❖❖ Network Printing Guide
Describes the procedures and provides necessary information about setting
up and using the printer under the network environment. We recommend
this manual as your first choice to read, and it is included as a PDF file on the
CD-ROM labeled “Printer Drivers and Utilities”.
i
Page 4

How to Read This Manual
R
R
Symbols
In this manual, the following symbols are used:
WARNING:
This symbol indicates a potentially hazardous situation which, if instructions
are not followed, could result in death or serious injury.
CAUTION:
This symbol indicates a potentially hazardous situation which, if instructions
are not followed, may result in minor or moderate injury or damage to property.
* The statements above are notes for your safety.
Important
If this instruction is not followed, paper might be misfed, originals might be
damaged, or data might be lost. Be sure to read this.
Preparation
This symbol indicates the prior knowledge or preparations required before operating.
Note
This symbol indicates precautions for operation, or actions to take after misoperation.
Limitation
This symbol indicates numerical limits, functions that cannot be used together,
or conditions in which a particular function cannot be used.
Reference
This symbol indicates a reference.
[]
Keys that appear on the machine's display panel.
Keys and buttons that appear on the computer's display.
{}
Keys built into the machine's control panel.
Keys on the computer's keyboard.
ii
Page 5

TABLE OF CONTENTS
Manuals for This Machine......................................................................................i
How to Read This Manual .....................................................................................ii
1. Getting Started
Printer Drivers for This Machine ..........................................................................1
Software and Utilities Included on the CD-ROM.................................................2
Guide to This Machine...........................................................................................3
Type A........................................................................................................................3
Type B........................................................................................................................6
Network Settings.................................................................................................... 9
Setting on the Control Panel ...................................................................................... 9
Other Settings .......................................................................................................... 14
Connecting the Machine .....................................................................................16
Requirements ...........................................................................................................17
Connecting the Network Cable to the Machine........................................................ 18
Connecting the Machine to the Host Using the Parallel Cable ................................ 20
2. Installing the Printer Driver and Software
Installing the Printer Driver and Software .........................................................21
Installing the Raster Printer Language Printer Driver......................................23
Windows 95/98/Me - Installing the Raster Printer Language Printer Driver.............23
Windows 2000/Windows XP- Installing the Raster Printer Language Printer Driver
Windows NT 4.0 - Installing the Raster Printer Language Printer Driver ................. 28
...24
3. Basic Printing
Printing Data from Your Computer on the Printer ............................................ 31
Printing .....................................................................................................................31
Changing the Number of Prints During Printing ....................................................... 34
Printing (Master Making) with the Different Size of Paper from the Original............ 35
INDEX......................................................................................................... 36
iii
Page 6

iv
Page 7
1. Getting Started
Printer Drivers for This Machine
Printing requires installation of a printer driver for your operating system. The
following drivers are included on the CD-ROM labeled “Printer Drivers and
Utilities” that comes with the machine.
Printer Language Raster Printer
Language
Operating system
Windows 95
Windows 98
Windows Me
Windows 2000
Windows XP
Windows NT 4.0
*1
*2
*3
*4
*5
*6
√
√
√
√
√
√
*1
Microsoft Windows 95 operating system
*2
Microsoft Windows 98 operating system
*3
Microsoft Windows Millennium Edition
*4
Microsoft Windows 2000 Professional
Microsoft Windows 2000 Server
*5
Microsoft Windows XP Professional
Microsoft Windows XP Home Edition
*6
Microsoft Windows NT Server operating system version 4.0, Microsoft Windows NT
Workstation operating system version 4.0 in a computer using x86 processors.
❖❖❖❖ Raster Printer Language printer drivers
The Raster Printer Language printer driver is the mini-driver that belongs to
the operating system. Installing the file that is included on the CD-ROM sets
the mini-driver as the printer driver of this machine. Printer drivers allow the
computer to communicate with the printer via a printer language.
See p.23 “Windows 95/98/Me - Installing the Raster Printer Language Printer Driver”
See p.24 “Windows 2000/Windows XP- Installing the Raster Printer Language Printer Driver”
See p.28 “Windows NT 4.0 - Installing the Raster Printer Language Printer
Driver”
The Printer driver varies depending on the machine model.
Machine model Machine resolution Priter driver
Type A 600 dpi 600 dpi Type40 600
Type A 400 dpi 400 dpi Type40 400 A
Type B 400 dpi Type40 400 B
1
Page 8

Getting Started
Software and Utilities Included on the CDROM
1
There is a CD-ROM that comes with the machine. The CD-ROM is labeled
“Printer Drivers and Utilities”. The following items are included on the CDROM:
❖❖❖❖ SmartDeviceMonitor for Admin
This utility is for the system administrator to manage printers on the network.
Reference
See SmartDeviceMonitor for Admin online Help for more information
about using the SmartDeviceMonitor for Admin.
❖❖❖❖ SmartDeviceMonitor for Client
This utility is for users to manage their own print status on the network.
Reference
See SmartDeviceMonitor for Client online Help for more information
about using the SmartDeviceMonitor for Client.
❖❖❖❖ Acrobat Reader
This utility allows you to read PDF (Portable Document Format).
Note
❒ Documentation about using the machine is included on the CD-ROM in
PDF. See Acrobat Reader online Help for more information about using
Acrobat Reader.
Important
❒ If you upgrade to Windows 2000 from Windows 95/98/Me or Windows NT
4.0, the software and utilities must be uninstalled prior to installing Windows
2000. Reinstall them in the Windows 2000 environment.
2
Page 9
Guide to This Machine
Guide to This Machine
Note
❒ The location of keys and indicators vary depending on machine models, Type
A and Type B.
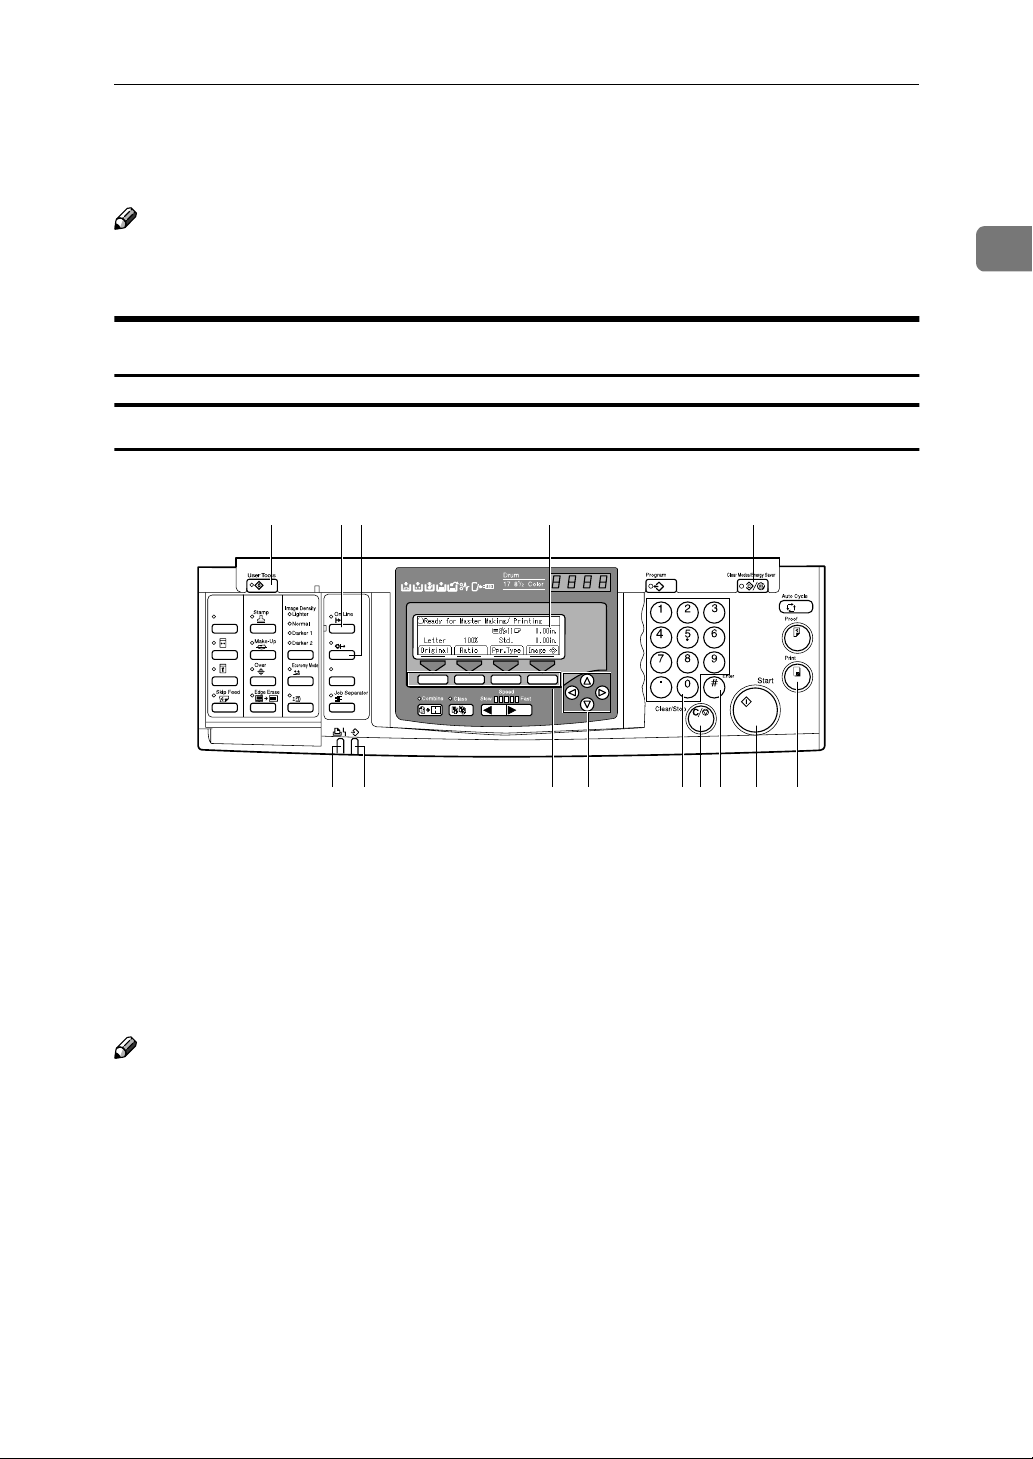
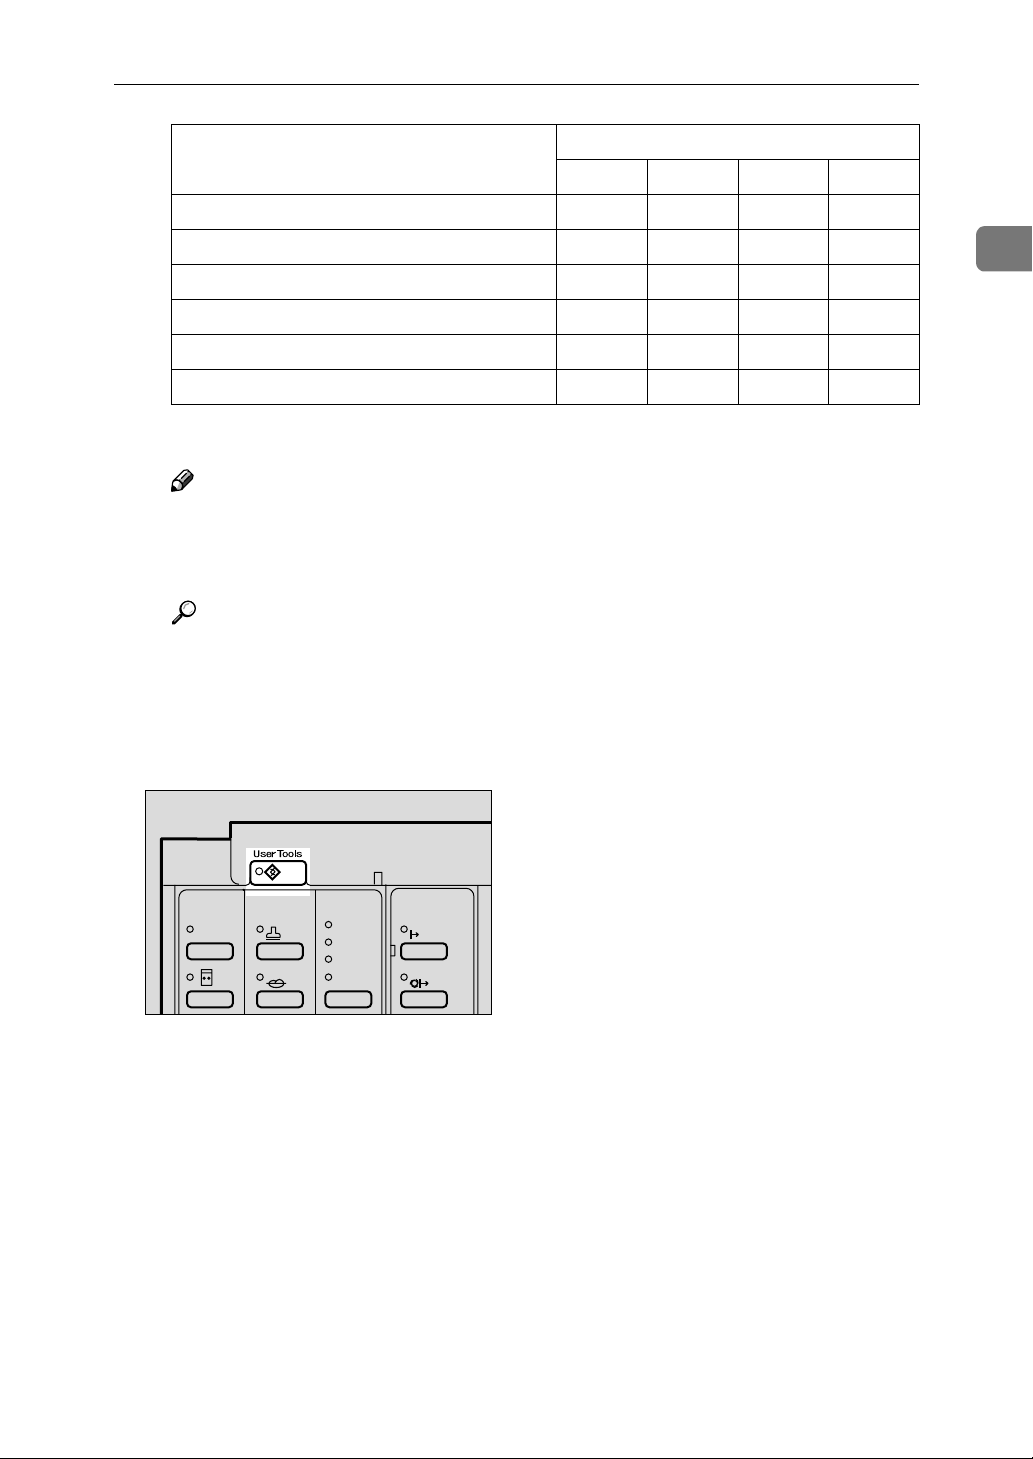
Type A
Control panel
12 43 5
Auto On Line
lay
Original Storage
1
14 13 12 11 10 9 7 68
1. {
{User Tools}}}} key
{{
Press to change the default to meet your
requirements.
2. {
{On Line}}}} key
{{
Allows data on a computer to be printed
on this machine (online status).
Note
❒ When the Auto On Line indicator is
lit, the machine will automatically enter the online status when receiving
data from a computer without having
to press the {{{{On Line}}}} key.
ZDZS200N
3. {
{Auto On Line}}}} key
{{
You can select whether the machine automatically switches to On Line mode
when it receives data from a computer.
When pressing this key to turn on Auto
On Line, the indicator will light. Then,
when data from a computer is received,
the machine will automatically enter the
On Line status (In this case, it is not necessary to press the {{{{On Line}}}} key).
4. Display Panel
Shows operation status, error messages,
and function menus.
5. {
{Clear Modes/Energy Saver}}}} key
{{
Press to cancel the current settings. The
machine settings return to their default.
When the machine is in Energy Saver status, press {{{{Clear Modes/Energy Saver}}}} key
to cancel Energy Saver status and to return to the normal status.
3
Page 10
1
Getting Started
{{{{Print}}}} key
6.
Press to start printing.
7. {
{Start}}}} key
{{
Press to start master making.
{{{{#}}}} key
8.
Press to confirm an entered value.
9. {
{Clear/Stop}}}} key
{{
Press to delete a number entered or to
stop printing.
10. Number keys
Press to enter the desired number of
prints and data for selected modes.
11. {
{~~~~}}}}{{{{}}}}}}}}{{{{||||}}}}{{{{{{{{}}}} keys
{{
Use to highlight items you wish to select
on the display panel.
12. Function keys
These keys correspond to the selectable
items on the display panel.
13. Data In indicator (Green)
Indicates the status of this machine:
• On: Data waiting for Master Making
and printing is in the machine.
• Blinking: Data is being received, or
Master Making or printing is in
progress.
• Off: Master Making and printing are
completed.
14. Error indicator (Red)
Indicates the status of this machine:
• On: An error has occurred. Master
Making and printing stop.
• Off: Normal status
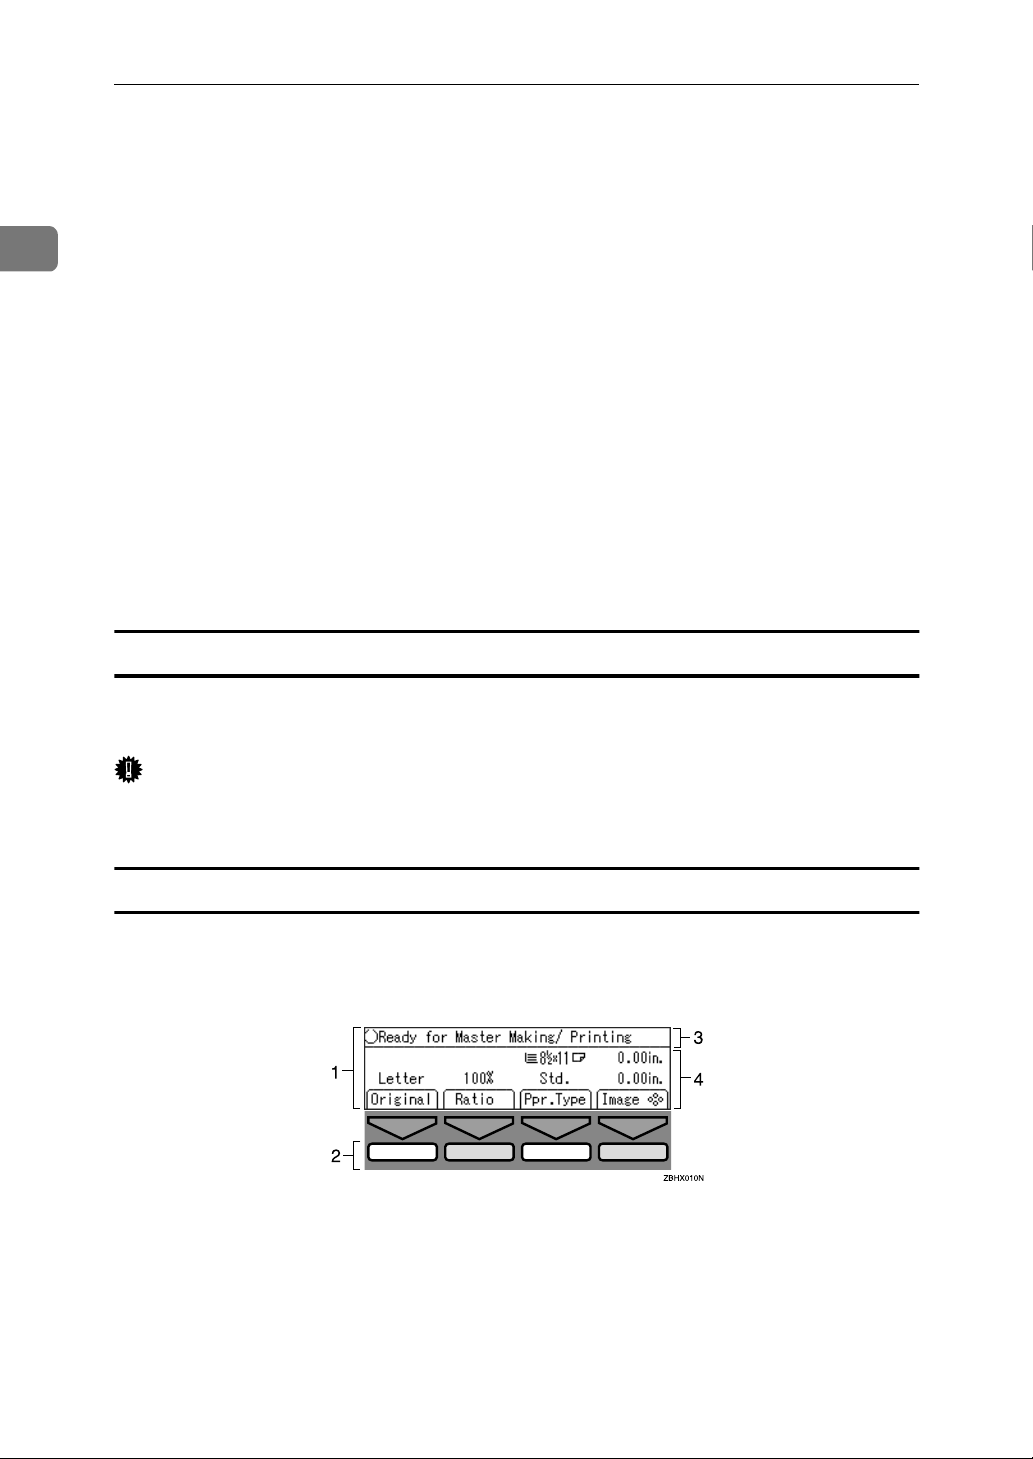
Display panel
The display panel shows the status of the machine, error messages and function
menus.
Important
❒ Do not apply a strong shock or force of about 30 N (about 3 kgf) or more to
the display panel. Otherwise, the display can get damaged.
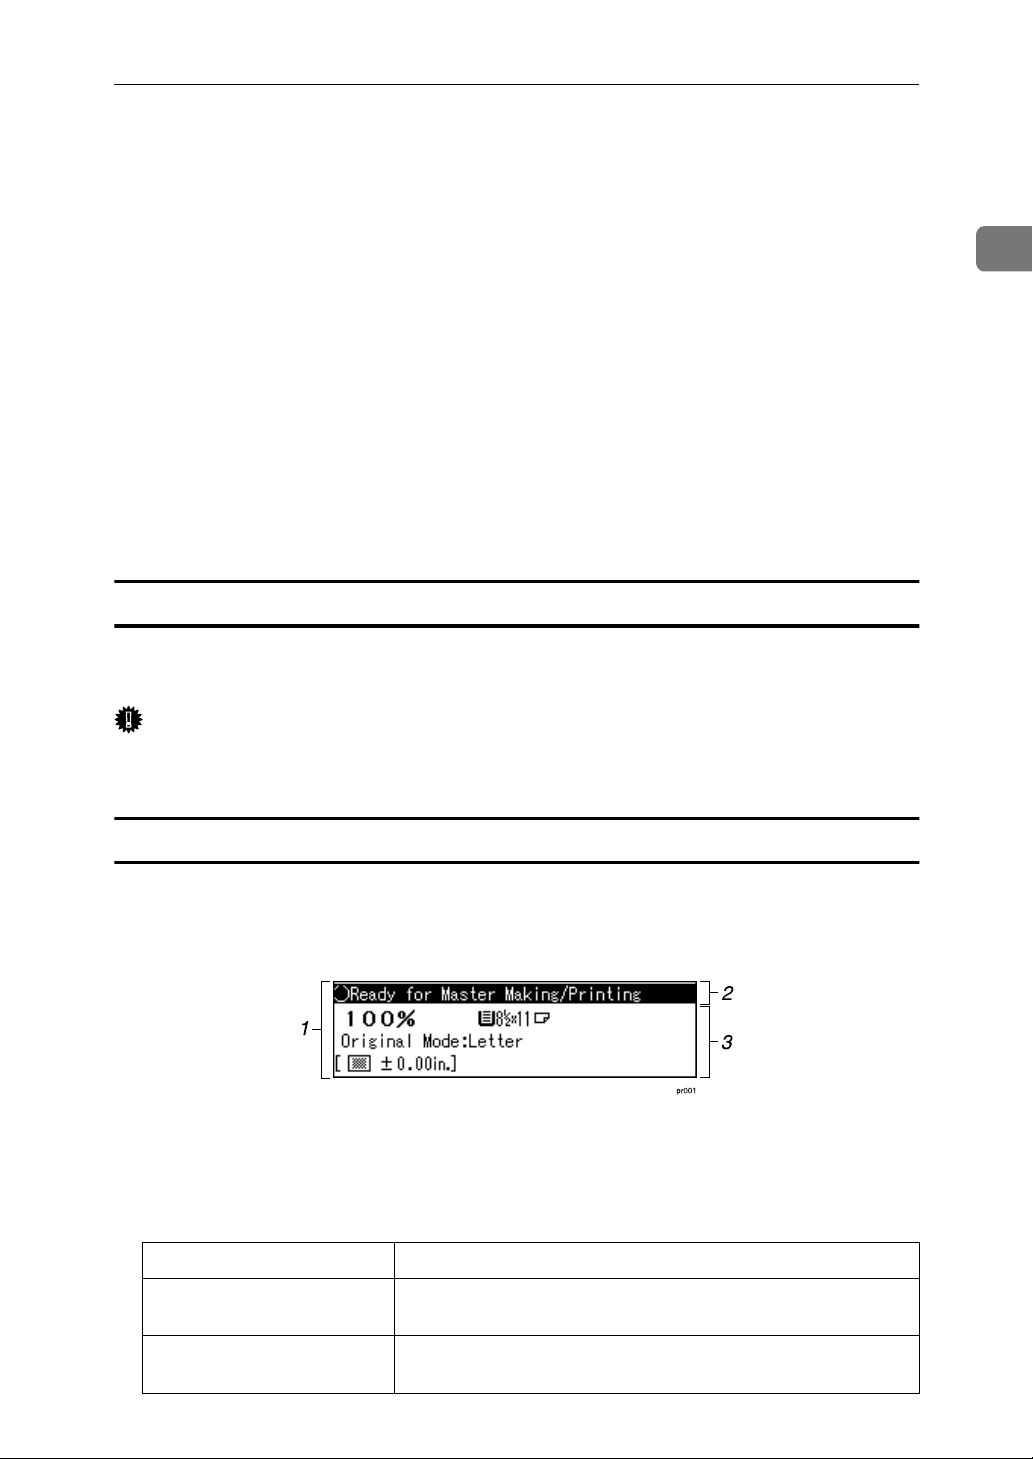
Displays and key operations
The display panel shows the machine status, error messages, and function menus.
1. Items for the selected function.
3. Machine status or messages.
2. These keys correspond to the se-
lectable items shown above them on
the display panel. To select an item
shown on the display panel, press
the key directly below it.
4
4. Items which can be selected.
Page 11
Guide to This Machine
❖❖❖❖ Common key explanations
[OK] Confirms a function selection or an entered value.
[Cancel] Cancels a function selection or an entered value and returns
to the previous display.
[Prev.][Next] When there are too many items to fit on the display panel, use
these keys to move between pages.
{{{{~~~~}}}}{{{{}}}}}}}}{{{{||||}}}}{{{{{{{{}}}}[←←←←][→→→→] Press to highlight items you wish to select on the display pan-
el.
[Select] Selects a value.
[Exit] Returns to the previous display.
Note
❒ When you select an item on the display panel, it is highlighted (e.g. ).
Items shown dimmed (e.g. ) cannot be selected.
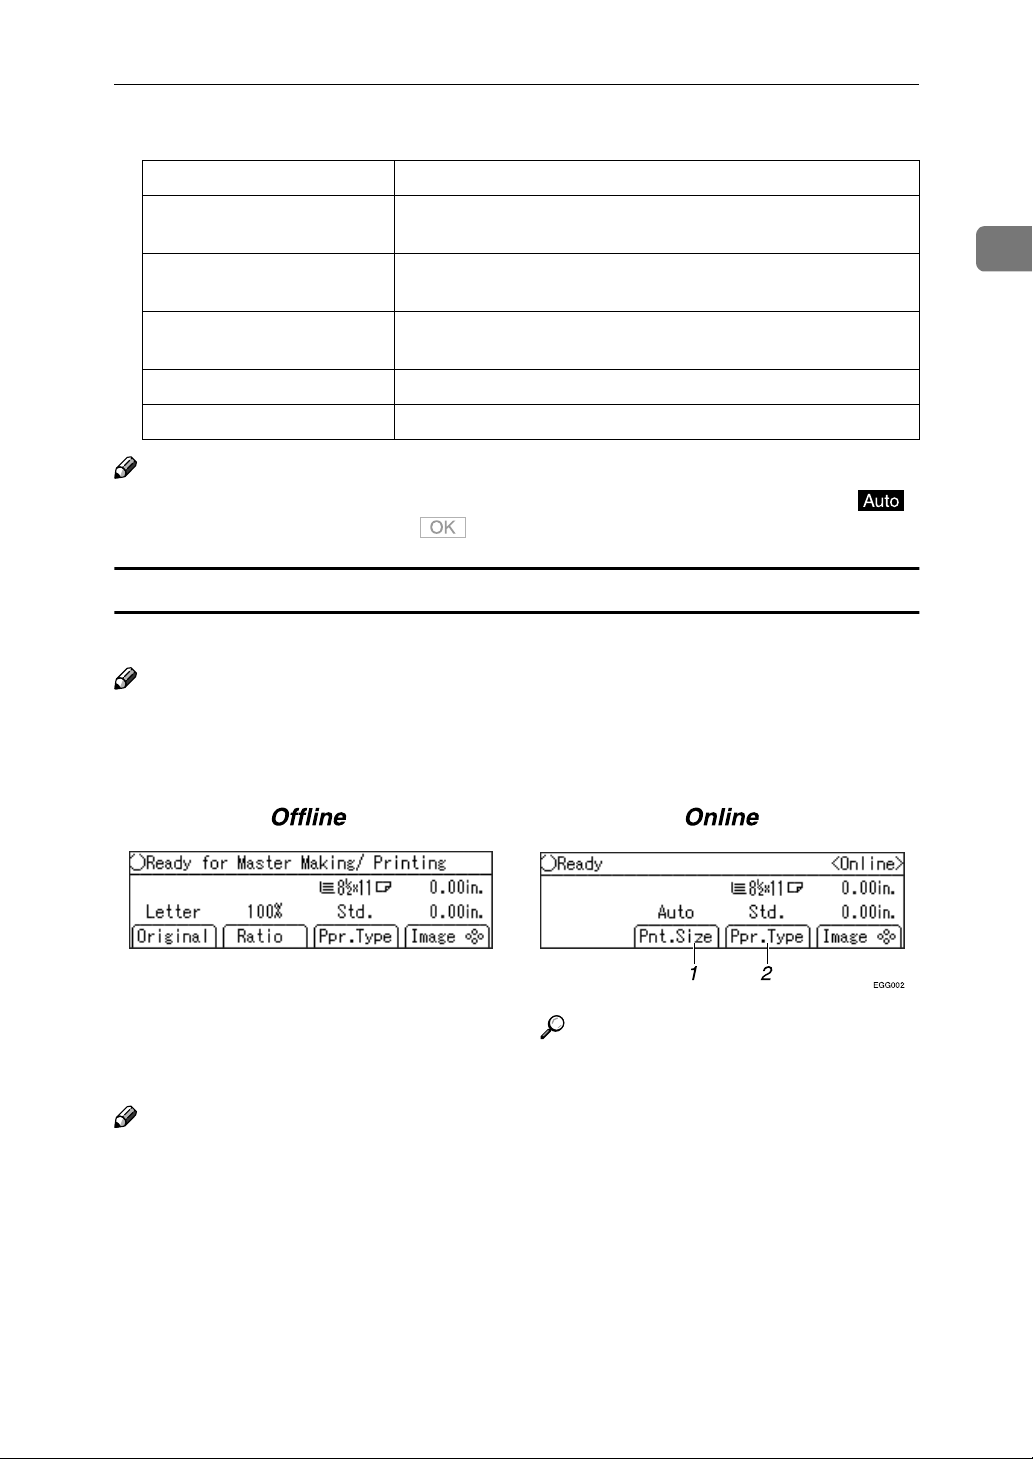
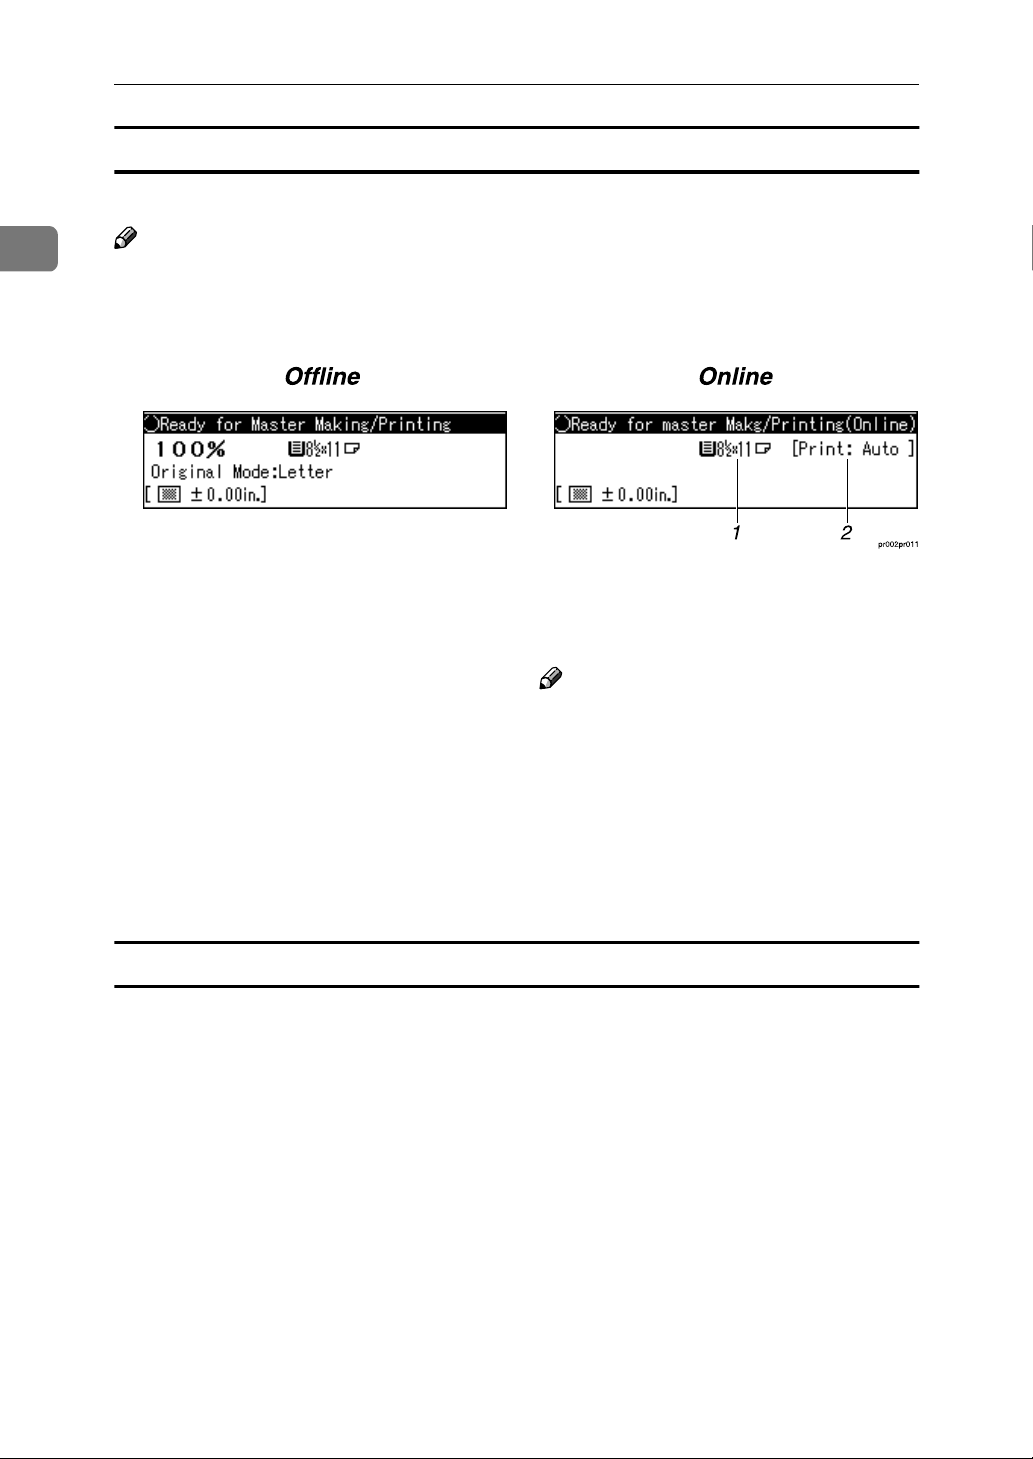
Offline/Online
The screens displayed are different in the online status and offline status.
1
Note
❒ When the machine is offline, it cannot receive data from a computer.
❒ When the machine is online, it can receive data from a computer.
1.
[Pnt.Size]
The paper size in the Paper Feed Tray can
be selected.
Note
❒ When “Auto” is selected, the paper
size in the Paper Feed Tray will be automatically detected.
❒ A message “Paper size mismatch...”
appears on the display panel when the
paper size in the Paper Feed Tray is
different from the paper size of data
set on the computer. Set paper of the
correct size.
Reference
For information about the other
setting items on the display panel,
see Operating Instructions.
2.
[Ppr.Type]
You can specify the type of paper on Paper Feed Tray.
5
Page 12

1
Getting Started
Setting the size of paper
The machine automatically detects the size of paper on Paper Feed Tray, and
then the size of paper appears on the display panel.
Type B
Control panel
1. {
{User Tools}}}} key
{{
Press to change the default to meet your
requirements.
2. {
{On Line}}}} key
{{
Allows data on a computer to be printed
on this machine (online status).
Note
❒ when the Auto On Line indicator is lit,
the machine will automatically enter
the online status when receiving data
from a computer without having to
press the {{{{On Line}}}} key.
3. {
{Auto On Line}}}} key
{{
You can select whether the machine automatically switches to On Line mode
when it receives data from a computer.
When pressing this key to turn on Auto
On Line, the indicator will light. Then,
when data from a computer is received,
the machine will automatically enter the
On Line status (In this case, it is not necessary to press the {{{{On Line}}}} key).
ZLKS010N
4. Display Panel
Shows operation status, error messages,
and function menus.
5. {
{Cancel}}}} key
{{
Cancels a function selection or an entered
value and returns to the previous display.
6. {
{~~~~}}}}{{{{}}}}}}}} keys
{{
Use to highlight items you wish to select
on the display panel.
7. {
{OK}}}} key
{{
Press to confirm a function selection or an
entered value.
8. {
{Clear Modes/Energy Saver}}}} key
{{
Press to cancel the current settings. The
machine settings return to their default
settings.
When the machine is in Energy Saver status, press {{{{Clear Modes/Energy Saver}}}} key
to cancel Energy Saver status and to return to the normal status.
6
Page 13
Guide to This Machine
{{{{Print Start}}}} key
9.
Press to start printing.
10. {
{Make Master}}}} key
{{
Press to start master making.
{{{{Clear/Stop}}}} key
11.
Press to delete a number entered or to
stop printing.
12. {
{#}}}} key
{{
Press to confirm an entered value.
13. Number key
Press to enter the desired number of
prints and data for selected modes.
{{{{Job Reset}}}} key
14.
Press to cancel master making.
15. Data In indicator (Green)
Indicates the status of this machine:
On: Data waiting for Master Making and
printing is in the machine.
Blinking: Data is being received, or Mas-
ter Making or printing is in progress.
Off: Master Making and printing are
completed.
16. Error indicator (Red)
Indicates the status of this machine:
On: An error has occurred. Master Mak-
ing and printing stops.
Off: Normal status.
Display panel
The display panel shows the status of the machine, error messages and function
menus.
1
Important
❒ Do not apply a strong shock or force of about 30 N (about 3 kgf) or more to
the display panel. Otherwise, the display can get damaged.
Displays and key operations
The display panel shows the machine status, error messages, and function menus.
1. Items for the selected function.
3. Items which can be selected.
2. Machine status or messages.
❖❖❖❖ Common key explanations
{{{{OK}}}} key Confirms a functions selection or an entered value.
{{{{Cancel}}}} key Cancels a function selection or an entered value and returns
to the previous display.
{{{{~~~~}}}}{{{{}}}}}}}} key Press to highlight items you wish to select on the display pan-
el.
7
Page 14
Getting Started
Offline/Online
The screens displayed are different in the online status and offline status.
1
Note
❒ When the machine is offline, it cannot receive data from a computer.
❒ When the machine is online, it can receive data form a computer.
1. Paper Size
The size of paper on Paper Feed Tray is
displayed.
2. Print Size
The paper size in the Paper Feed Tray can
be selected.
Note
❒ When “Auto” is selected, the paper
size in the Paper Feed Tray will be automatically detected.
❒ A message “Paper size mismatch...”
appears on the display panel when the
paper size in the Paper Feed Tray is
different from the paper size of data
set on the computer. Set paper of the
correct size.
Setting the size of paper
The machine automatically detects the size of paper on Paper Feed Tray, and
then the size of paper appears on the display panel.
8
Page 15

Network Settings
Network Settings
You can make the necessary network settings using the control panel of this machine.
It is also possible to use “SmartDeviceMonitor for Admin” when making settings for IP addresses in environments you can use TCP/IP.
Setting on the Control Panel
Make the settings for necessary items for the network environment you are going to use.
The followings are the items that can be set as well as the factory settings:
Item Factory settings
IP Address 011.022.033.044
Network boot None
1
Type A
Press the {{{{User Tools}}}} key.
AAAA
Image Density
Stamp
Make-Up
Lighter
Normal
Darker 1
Darker 2
On Line
Auto On Line
ZDZS110N
The User Tools screen appears.
Press [Next].
BBBB
Select [7 Set O/L Paramet's] using the {{{{~~~~}}}}, {{{{}}}}}}}}, {{{{||||}}}} or {{{{{{{{}}}} keys.
CCCC
Press [OK].
DDDD
The Online Parameter Settings items appear.
9
Page 16

1
Getting Started
Press [Next].
EEEE
Set the IP address.
FFFF
A Select [5 IP Address] using the {{{{~~~~}}}}, {{{{}}}}}}}}, {{{{||||}}}} or {{{{{{{{}}}} key.
B Press [OK].
The IP address setting screen appears.
C Enter the IP address using the number keys.
• You can change the numbers that are highlighted.
• The cursor can be moved using the {{{{~~~~}}}} key or the {{{{}}}}}}}} key.
• The numbers are entered 3 digits at a time.
D Press [OK].
After finishing the IP address settings, the screen returns to the screen on
step
If necessary, make the Network boot settings.
GGGG
A Select [7 Network] using the {{{{~~~~}}}}, {{{{}}}}}}}}, {{{{||||}}}} or {{{{{{{{}}}} keys.
B Press [OK].
The network boot settings screen appears.
C Select the Network boot to be set using the {{{{~~~~}}}}, {{{{}}}}}}}}, {{{{||||}}}} or {{{{{{{{}}}} keys.
.
E
Item
Valid method
AP RA BO DH
ARP+PING b
ARP&RARP bb
ARP&BOOTP bb
*1
10
Page 17
Network Settings
Item
ARP&RARP&BOOTP bbb
None (Factory Settings)
RARP+TFTP b
BOOTP b
RARP&BOOTP bb
DHCP b
*1
The valid methods are in order from the left: ARP+PING, RARP+TFTP,
AP RA BO DH
Valid method
*1
BOOTP, DHCP.
Note
❒ It is necessary to set the server when using RARP+TFTP, BOOTP, and
DHCP.
❒ When setting the IP address on the control panel, use None.
Reference
See Network Printing Guide when using DHCP.
D Press the [OK].
1
This completes the Network boot settings.
Press the {{{{User Tools}}}} key.
HHHH
Image Density
Stamp
Make-Up
Lighter
Normal
Darker 1
Darker 2
On Line
Auto On Line
ZDZS110N
A message “Parameter settings have been changed. You must restart the machine before the new settings take effect.” appears on the display panel.
Turn off and on the main power switch of the machine.
IIII
The set items become valid.
11
Page 18

1
Getting Started
Type B
Press the {{{{User Tools}}}} key
AAAA
The User Tools screen appears.
Select [6 Online Paramet's] using the {{{{~~~~}}}} key or the {{{{}}}}}}}} key.
BBBB
Press the {{{{OK}}}} key.
CCCC
The Online Parameter Settings items appear.
Set the IP address.
DDDD
A Select [5 IP Address] using the {{{{~~~~}}}} key or the {{{{}}}}}}}} key.
B Press the {{{{OK}}}} key.
The IP address setting screen appears.
C Enter the IP address using the number keys.
• You can change the numbers that are highlighted.
• The cursor can be moved using the {{{{~~~~}}}} key or {{{{}}}}}}}} key.
• The numbers are entered 3 digits at a time.
D Press the {{{{OK}}}} key.
12
After finishing the IP address settings, the screen returns to the screen on
step C.
Page 19

If necessary, make the Network boot settings.
EEEE
A Select [7 Network] using the {{{{~~~~}}}} key or {{{{}}}}}}}} key.
B Press the {{{{OK}}}} key.
Network Settings
The network boot settings screen appears.
C Select the Network boot to be set using the {{{{~~~~}}}} key or {{{{}}}}}}}} key.
Item
ARP+PING b
ARP&RARP bb
ARP&BOOTP bb
ARP&RARP&BOOTP bbb
None (Factory Settings)
RARP+TFTP b
BOOTP b
RARP&BOOTP bb
DHCP b
*1
The valid methods are in order from the left: ARP+PING, RARP+TFTP,
BOOTP, DHCP.
AP RA BO DH
Valid method
*1
1
Note
❒ It is necessary to set the server when using RARP+TFTP, BOOTP, and
DHCP.
❒ When setting the IP address on the control panel, use None.
Reference
See Network Printing Guide when using DHCP.
D Press the {{{{OK}}}} key.
This completes the Network boot settings.
13
Page 20

1
Getting Started
Press the {{{{User Tools}}}} key.
FFFF
A message “Parameter settings have been changed. You must restart the machine before the new settings take effect.” appears on the display panel.
Turn off and on the main power switch of the machine.
GGGG
The set items become valid.
Other Settings
The followings are other items you can set using the control panel besides the IP
address and the Network boot:
Note
❒ The settings are performed in Web Status Monitor or SmartDeviceMonitor
for Admin. See the corresponding online Help for details.
Items Factory Settings
Subnet mask 000.000.000.000
Default gateway address 000.000.000.000
Access control address 000.000.000.000
Access control mask 000.000.000.000
Frame Type (Netware) Automatic selection
Valid protocol All valid
14
Page 21

Network Settings
----About addresses
❖❖❖❖ Subnet mask
Mask value for using one part of an IP Address as a network address.
❖❖❖❖ Default gateway address
Host or router address used as a gateway when negotiating with (printing, information gathering) a workstation on a different network.
Note
❒ Check with your network administrator for the address to be set.
❒ If you do not know the address to be set, use the factory settings.
----About access control
The access control address and the access control mask are used to limit a printable workstation, by using an IP address. If it is not necessary to limit printing,
set “0.0.0.0”.
1
Note
❒ If the access control address mask and the mask of the address of the work-
station trying to print is the same, then access will be granted.
❒ For example, if the access control address is set to 192.168.15.16, depending
on the mask value, the address of the accessible workstation is as follows:
(XXX can be any value).
Access control mask Accessible Addresses
0. 0. 0. 0 XXX.XXX.XXX.XXX
255. 0. 0. 0 192.XXX.XXX.XXX
255.255. 0. 0 192.168.XXX.XXX
255.255.255. 0 192.168. 15.XXX
255.255.255.255 192.168. 15. 16
15
Page 22

1
Getting Started
Connecting the Machine
❖❖❖❖ Type A
2
1
ZGAH140E
❖❖❖❖ Type B
1
2
1. Ethernet Interface
Connector for the 100BASE-TX or
10BASE-T cable used when connecting to the network.
ZJXH150E
2. Parallel Interface
Connector for the parallel interface cable used when connecting to a computer.
16
Page 23

Requirements
Connecting the Machine
Requirements
Before using this machine, make sure that all the environmental and electrical
requirements have been met. Connect the machine to the host computer using
the parallel port, Network Interface Board, or both.
Make sure that all the cables, connectors, and electrical outlets necessary to attach the machine to the host computer or network are present.
Important
❒ The interface cable is not supplied. It is your responsibility to provide the in-
terface cable appropriate for the computer that you are using.
Reference
For Ethernet Board connection, see p.18 “Connecting the Network Cable to
the Machine”.
For more information about using the parallel port, see p.20 “Connecting the
Machine to the Host Using the Parallel Cable”.
Interface cable requirements
As the cables may differ depending on the type of computer, make sure you
check your computer and prepare the appropriate cable.
1
Note
❒ Use a shielded cable for the interface cable. Using another cable, instead of
shielded cables, may cause radio interference.
Parallel cable requirements
Connect the machine to the host computer using a parallel port. This machine
does not provide the parallel cable to connect the machine to the host computer.
The machine's parallel interface is a standard bidirectional interface. It requires
a standard 36-pin parallel cable compliant with IEEE 1284 and a parallel port
available on the host computer.
Note
❒ Do not use a parallel cable that is longer than 3 meters (10 feet).
17
Page 24

1
Getting Started
Connecting the Network Cable to the Machine
Important
❒ Before connecting an interface cable between the machine and a computer,
make sure that the machine is not operating, and then turn off the main power
switches of the machine and the computer.
❒ Be sure to use the designated interface cable. Using another cable may cause
radio interference.
After setting up this machine to support the network environment, connect the
Ethernet interface cable. Connect a 10BASE-T or 100BASE-TX cable to the Ethernet board.
Connect the Ethernet interface cable into the Ethernet interface at the right
AAAA
side of the back of the machine.
❖❖❖❖ Type A
18
❖❖❖❖ Type B
ZJXH170J
Page 25

Turn on the main power switch.
BBBB
❖❖❖❖ Using the switches and understanding the LEDs
Connecting the Machine
❖❖❖❖ Type A
❖❖❖❖ Type B
1
1
2
3
ZJXH131E
3
2
1
1. Is on while the Ethernet board is
working properly.
2. Is on while the 100BASE-TX is
working, and off when the 10BASET is working.
ZJXH141E
3. Is on while the machine is proper-
ly connected to the network.
19
Page 26

1
Getting Started
Connecting the Machine to the Host Using the Parallel Cable
Connect the machine to the host computer using a parallel cable compliant with
IEEE 1284 (available separately).
Follow these steps to connect the machine to the host computer.
Important
❒ Before connecting an interface cable between the machine and a computer,
make sure that the machine is not operating, and then turn off the main power
switches of the machine and the computer.
❒ Be sure to use the designated interface cable. Using another cable may cause
radio interference.
Plug the 36-pin end of the parallel cable into the parallel port at the right
AAAA
side on the back of the machine.
Squeeze the wire clips on each side of the connector together until they
BBBB
snap into place. The clips hold the cable securely in place.
❖❖❖❖ Type A
20
❖❖❖❖ Type B
ZJXH160J
Plug the other end of the parallel cable into the computer's parallel port.
CCCC
If there are the wire clips, squeeze them on each side of the connector together.
Page 27

2. Installing the Printer Driver
and Software
Installing the Printer Driver and Software
This manual assumes that you are familiar with general Windows procedures
and practices. If you are not, see the documentation that comes with Windows
for details.
Note
❒ In this manual, “CD-ROM” refers to the “Printer Drivers and Utilities” CD-
ROM that comes with the machine unless specified otherwise.
Reference
For more information about the printer drivers, see p.1 “Printer Drivers for
This Machine”.
For more information about the software and utilities, see p.2 “Software and
Utilities Included on the CD-ROM”.
Important
❒ Before starting the installation, close all documents and applications. In a net-
work environment, make sure that users who are logged on are disconnected.
❒ After installing a printer driver, you must restart the computer.
Note
❒ Use the appropriate language on the CD-ROM folder: ENGLISH (English),
DEUTSCH (German), FRANCAIS (French), ITALIANO (Italian), ESPANOL
(Spanish), NEDRLNDS (Dutch).
❒ The languages displayed in the WSMHLP folder (Web Status Monitor Help)
in the Help folder on the CD-ROM are as follows: DE (German), EN (English),
ES (Spanish), FR (French), IT (Italian), NL (Dutch).
21
Page 28

2
Installing the Printer Driver and Software
----Using the shared printer on Windows 2000/Windows XP or Windows
NT 4.0 for Windows 95/98/Me Client or Windows NT 4.0 Client
❖❖❖❖ Windows 2000/Windows XP
If you want to share the machine on Windows 2000/Windows XP, install the
printer driver of Windows 95/98/Me or Windows NT 4.0 as an alternate
driver.
❖❖❖❖ Windows NT 4.0
If you want to share the machine on Windows NT 4.0, install the printer driver of Windows 95/98/Me as an alternate driver.
Note
❒ When using the “alternate driver” function with the Windows NT 4.0, use the
Windows NT 4.0 Service Pack 6 or later.
For more information about installing the printer driver as an alternate driver,
see p.24 “Windows 2000/Windows XP- Installing the Raster Printer Language
Printer Driver”, p.28 “Windows NT 4.0 - Installing the Raster Printer Language
Printer Driver”.
22
Page 29

Installing the Raster Printer Language Printer Driver
Installing the Raster Printer Language
Printer Driver
This section describes basic instructions for installing the Raster Printer Language printer driver. The actual procedure may vary depending on the operating system. Follow the appropriate procedure below.
Important
❒ When updating the printer driver by installing the latest version, you should
uninstall the former version . See “Uninstalling the Printer Driver and Software” in Printer Reference 2.
Windows 95/98/Me - Installing the Raster Printer Language Printer Driver
Preparation
The Windows 95/98 CD-ROM may be required during installation. Make
sure to have the CD-ROM ready before installation.
2
Close all applications that are currently running.
AAAA
Click [Start] on the taskbar, point to [Settings], and then click [Printers].
BBBB
The [Printers] window appears.
Double-click the [Add Printer] icon.
CCCC
[Add Printer Wizard] starts.
Click [Next].
DDDD
Check [Local printer] and click [Next].
EEEE
A dialog box for selecting the manufacturer and model name appears.
Click [Have Disk].
FFFF
A dialog box for installing the printer driver from a disk appears.
Insert the CD-ROM into the CD-ROM drive.
GGGG
Click [Browse].
HHHH
Use the [Drives] list box to select the CD-ROM drive.
IIII
In the [Folders] box, double-click [Drivers], and then [WIN9x_ME]. Then dou-
JJJJ
ble-click the folder of the appropriate language for the operating system.
Click [OK].
KKKK
23
Page 30

2
Installing the Printer Driver and Software
Click [OK].
LLLL
A dialog box for selecting the machine model appears.
Click to select the name of the machine whose driver you want to install,
MMMM
and then click [Next].
Important
❒ Select the printer driver for your machine as shown.
Machine model Machine resolution Priter driver
Type A 600 dpi 600 dpi Type40 600
Type A 400 dpi 400 dpi Type40 400 A
Type B 400 dpi Type40 400 B
In the [Available ports] box, click to select [Printer Port], and then click [Next].
NNNN
A dialog box for changing the printer name appears.
Change the name of the machine if you want, and then click [Finish].
OOOO
The installation is complete.
PPPP
Windows 2000/Windows XP- Installing the Raster Printer Language Printer Driver
Limitation
❒ Installing a printer driver requires Manage Printers permission. Members of
the Administrators and Power Users groups have Manage Printers permission by default. When you install a printer driver, log on using an account
that has Manage Printers permission.
Note
❒ If you want to share the machine on Windows 2000/Windows XP, use the
[Sharing] tab in the [Printer Properties] dialog box to specify the alternate printer
driver. For details, see the operating instructions for Windows 2000/Windows XP.
❒ When prompted for the alternate printer driver location, select the following
folder on the CD-ROM:
• Windows 95/98/ME:\ Drivers \ WIN9x_ME \(Language)
• Windows 2000, Windows XP:\ Drivers \ WIN2000_XP \(Language)
• Windows NT4.0:\ Drivers \ WINNT40 \(Language)
❒ When Raster Printer Language driver of Windows 95/98/Me is shared on
Windows 2000, follow ARTICLE -ID:Q142667 of Microsoft Knowledge Base
to install a printer driver.
24
Page 31

Installing the Raster Printer Language Printer Driver
Close all applications that are currently running.
AAAA
Click [Start] on the taskbar, point to [Settings], and then click [Printers].
BBBB
The [Printers] window appears.
Note
❒ With Windows XP Professional, access the [Printers and Faxes] window
from [Start] on the taskbar.
❒ With Windows XP Home Edition, access the [Printers and Faxes] window by
clicking [Start] on the taskbar. Then click [Control Panel], [Printers and Other
Hardware] and then [Printers and Faxes].
Double-click the [Add Printer] icon.
CCCC
[Add Printer Wizard] starts.
Note
❒ With Windows XP, Click [Add a printer].
Click [Next].
DDDD
2
After making sure that the [Local Printer] option has been selected, click
EEEE
[Next].
A dialog box for selecting the printer port appears.
Select the port you want to use, and then click [Next].
FFFF
A dialog box for selecting the manufacturer and model name appears.
Click [Have Disk].
GGGG
A dialog box for installing the driver from a disk appears.
Insert the CD-ROM into the CD-ROM drive.
HHHH
Change the drive name in the list box to the name of the CD-ROM drive,
IIII
and then click [Browse].
Double-click [DRIVERS], and then [WIN2000_XP]. Then double-click the fold-
JJJJ
er of the appropriate language for the operating system.
Click [Open].
KKKK
Click [OK].
LLLL
A dialog box for selecting the machine model appears.
25
Page 32

2
Installing the Printer Driver and Software
Click to select the name of the machine whose driver you want to install,
MMMM
and then click [Next].
A dialog box for changing the printer name appears.
Important
❒ Select the printer driver for your machine as shown.
Machine model Machine resolution Priter driver
Type A 600 dpi 600 dpi Type40 600
Type A 400 dpi 400 dpi Type40 400 A
Type B 400 dpi Type40 400 B
Change the name of the machine if you want, and then click [Next].
NNNN
If you want to share this machine over the network, select [Share as]. If not,
OOOO
select [Do not share this printer]. Press [Next] to continue.
Note
❒ When selecting [Share as], if necessary enter the location of the machine
and a comment about the machine.
In the next dialog box you will be asked to print a test page. Select [No] and
PPPP
then click [Next].
A confirmation dialog box appears.
Note
❒ Print a test page after completing installation and restarting Windows.
Make sure that the settings you have set are correct, and then click [Finish].
QQQQ
Note
❒ If the [Digital Signature Not Found] dialog box appears, click [Yes] to continue
the installation.
The installation is complete.
RRRR
Note
❒ When the machine (Type A) is equipped with certain options, make set-
tings for them. See p.27 “Setting up options (Type A only)”.
26
Page 33

Installing the Raster Printer Language Printer Driver
Setting up options (Type A only)
Limitation
❒ Changing the settings of the machine requires Manage Printers permission.
Members of the Administrators and Power Users groups have Manage Printers permission by default. When you set up options, log on using an account
that has Manage Printers permission. For details about access authority, see
Help for Windows.
Important
❒ If the machine is equipped with certain options, you should set up the options
with the printer driver.
Note
❒ When setting up options, you should access the [Printer Properties] dialog box
from Windows. You cannot set up options by accessing the [Printer Properties]
dialog box from an application.
Click [Start] on the taskbar, point to [Settings], and then click [Printers].
AAAA
The [Printers] window appears.
2
Note
❒ With Windows XP Professional, access the [Printers and Faxes] window
from [Start] on the taskbar.
❒ With Windows XP Home Edition, access the [Printers and Faxes] window by
clicking [Start] on the taskbar. Then click [Control Panel], [Printers and Other
Hardware] and then [Printers and Faxes].
Click the icon of the machine you want to use.
BBBB
On the [File] menu, click [Properties].
CCCC
Click the [Device Settings] tab.
DDDD
Use the [Installable Options] group to select the option, and then select the ap-
EEEE
propriate setting for the option from the drop-down list box.
After making the setting you want, click [OK].
FFFF
27
Page 34

2
Installing the Printer Driver and Software
Windows NT 4.0 - Installing the Raster Printer Language Printer Driver
Preparation
The Windows NT CD-ROM may be required during installation. Make sure
to have the CD-ROM ready before installation.
Limitation
❒ Installing a printer driver requires Full Control access permission. Members
of the Administrators, Server Operators, Print Operators, and Power Users
groups have Full Control permission by default. When you install a printer
driver, log on using an account that has Full Control permission.
Note
❒ If you want to share the machine on Windows NT 4.0, use the [Sharing] tab in
the [Printer Properties] dialog box to specify the alternate printer driver. For de-
tails, see the operating instructions for Windows NT 4.0.
❒ When prompted for the Windows 95/98/Me alternate printer driver loca-
tion, select the following folder on the CD-ROM:
• \ DRIVERS \ WIN9x_ME \(Language)
❒ When Raster Printer Language driver of Windows 95/98/Me is shared on
Windows NT4.0, follow ARTICLE-ID:Q142667 of Microsoft Knowledge Base
to install a printer driver.
Close all applications that are currently running.
AAAA
Click [Start] on the taskbar, point to [Settings], and then click [Printers].
BBBB
The [Printers] window appears.
Double-click the [Add Printer] icon.
CCCC
[Add Printer Wizard] starts.
After making sure that the [My Computer] option has been selected, click
DDDD
[Next].
A dialog box for selecting the printer port appears.
Select the check box of the port you want to use, and then click [Next].
EEEE
A dialog box for selecting the manufacturer and model name appears.
Click [Have Disk].
FFFF
A dialog box for installing the driver from a disk appears.
28
Insert the CD-ROM into the CD-ROM drive.
GGGG
Page 35

Installing the Raster Printer Language Printer Driver
Change the drive name in the list box to the name of the CD-ROM drive,
HHHH
and then click [Browse].
Double-click [DRIVERS], and then [WINNT40]. Then double-click the folder of
IIII
the appropriate language for the operating system.
Click [Open].
JJJJ
Click [OK].
KKKK
A dialog box for selecting the machine model appears.
Click to select the name of the machine whose driver you want to install,
LLLL
and then click [Next].
A dialog box for changing the printer name appears.
Important
❒ Select the printer driver for your machine as shown.
Machine model Machine resolution Priter driver
Type A 600 dpi 600 dpi Type40 600
2
Type A 400 dpi 400 dpi Type40 400 A
Type B 400 dpi Type40 400 B
Change the name of the machine if you want, and then click [Next].
MMMM
If you want to share this machine over the network, select [Shared]. If not,
NNNN
select [Not shared]. Press [Next] to continue.
Note
❒ When selecting [Shared], if necessary enter the location of the machine and
a comment about the machine.
In the next dialog box you will be asked to print a test page. Select [No] and
OOOO
then click [Finish].
Note
❒ Print a test page after completing installation and restarting Windows.
The installation is complete.
PPPP
29
Page 36

2
Installing the Printer Driver and Software
30
Page 37

3. Basic Printing
Printing Data from Your Computer on the Printer
For general printing, printing done with the Auto On Line function is used as an
example for explanation purposes.
Note
❒ Auto On Line is a function that starts printing automatically once printing
starts from a computer. Pressing the {{{{Auto On Line}}}} key on the control panel
lights its indicator and enables the function.
Reference
See Operating Instructions for information about operation details.
Printing
Create some data beforehand to be printed from your computer.
Make sure that the machine is turned on, and press the {{{{Auto On Line}}}} key if
AAAA
the Auto On Line indicator is not lit.
Note
❒ When the machine is in Auto On Line status, the indicator will be lit.
Display the data to be printed on the computer, and then click [Print] from
BBBB
the [File] menu.
The [Print] dialog box appears.
Select the machine you want to use in the [Printer] box.
CCCC
Note
❒ When using Windows 95/98/Me, select the machine you want to use in
the [Name] list box.
Click [Preference] to display the [Printer Properties] dialog box, and then click
DDDD
[Advanced] on [Paper/Quality] tab or [Layout] tab.
Note
❒ When using Windows 95/98/Me/NT 4.0, enter the number of prints re-
quired, and select the print range, and then click [OK] to start printing.
❒ When using Windows 2000, click [Advanced] on the [Paper/Quality] tab or the
[Layout] tab.
31
Page 38

Basic Printing
Printing without proof printing
Note
❒ “Auto-Print after Master Making” in Auto On Line status is available to Win-
dows 2000/XP only.
Click “Auto-Print after Master Making” in [Printer features], and then select
AAAA
“On” in the [Change Setting for] box.
Click [Apply], and then [OK].
BBBB
3
Enter the number of prints required, and select the print range.
CCCC
Click [OK] to start printing.
DDDD
When the machine receives data from the computer, it enters the online status
and Data In indicator flashes.
Note
❒ To stop the machine before Master Making, press [Job Reset] (When using
Type B, press the {{{{Job Reset}}}} key). However, for a page where Master
Making has begun, Master Making cannot be cancelled even if [Job Reset]
(When using Type B, press the {{{{Job Reset}}}} key) is pressed.
❒ To stop the machine during printing, press the {{{{Clear/Stop}}}} key. If there is
incoming data from the computer to the machine, press [Job Reset] (When
using Type B, press the {{{{Job Reset}}}} key) to clear it.
Printing after proof printing
Note
❒ “Auto-Print after Master Making” in Auto On Line status is available to Win-
dows 2000/XP only.
Click “Auto-Print after Master Making” in [Printer features], and then select
AAAA
“Off” in the [Change Setting for] box.
32
Click [Apply], and then [OK].
BBBB
Enter the number of prints required, and select the print range.
CCCC
Click [OK] to start printing.
DDDD
When the machine receives data from the computer, it enters the online status
and Data In indicator flashes. The Proof Printing page is output.
Note
❒ To stop the machine before Master Making, press [Job Reset] (When using
Type B, press the {{{{Job Reset}}}} key).
❒ If the {{{{Proof}}}} key is pressed, Proof Printing can be performed again.
Page 39
Printing Data from Your Computer on the Printer
Check the result of the proof print.
EEEE
Press the {{{{Print}}}} key (When using Type B, press the {{{{Print Start}}}} key).
FFFF
Printing starts.
Note
❒ To stop the machine during printing, press the {{{{Clear/Stop}}}} key. If there is
incoming data from the computer to the machine, press [Job Reset] (When
using Type B, press the {{{{Job Reset}}}} key) to clear it.
❒ When there is no data to be printed afterwards, “Ready for Master Mak-
ing/Printing” is displayed on the display panel.
❒ As this machine performs Proof Printing, one more set than the set number
will be printed. For example, if the set number was two, three print sets
will be printed and delivered.
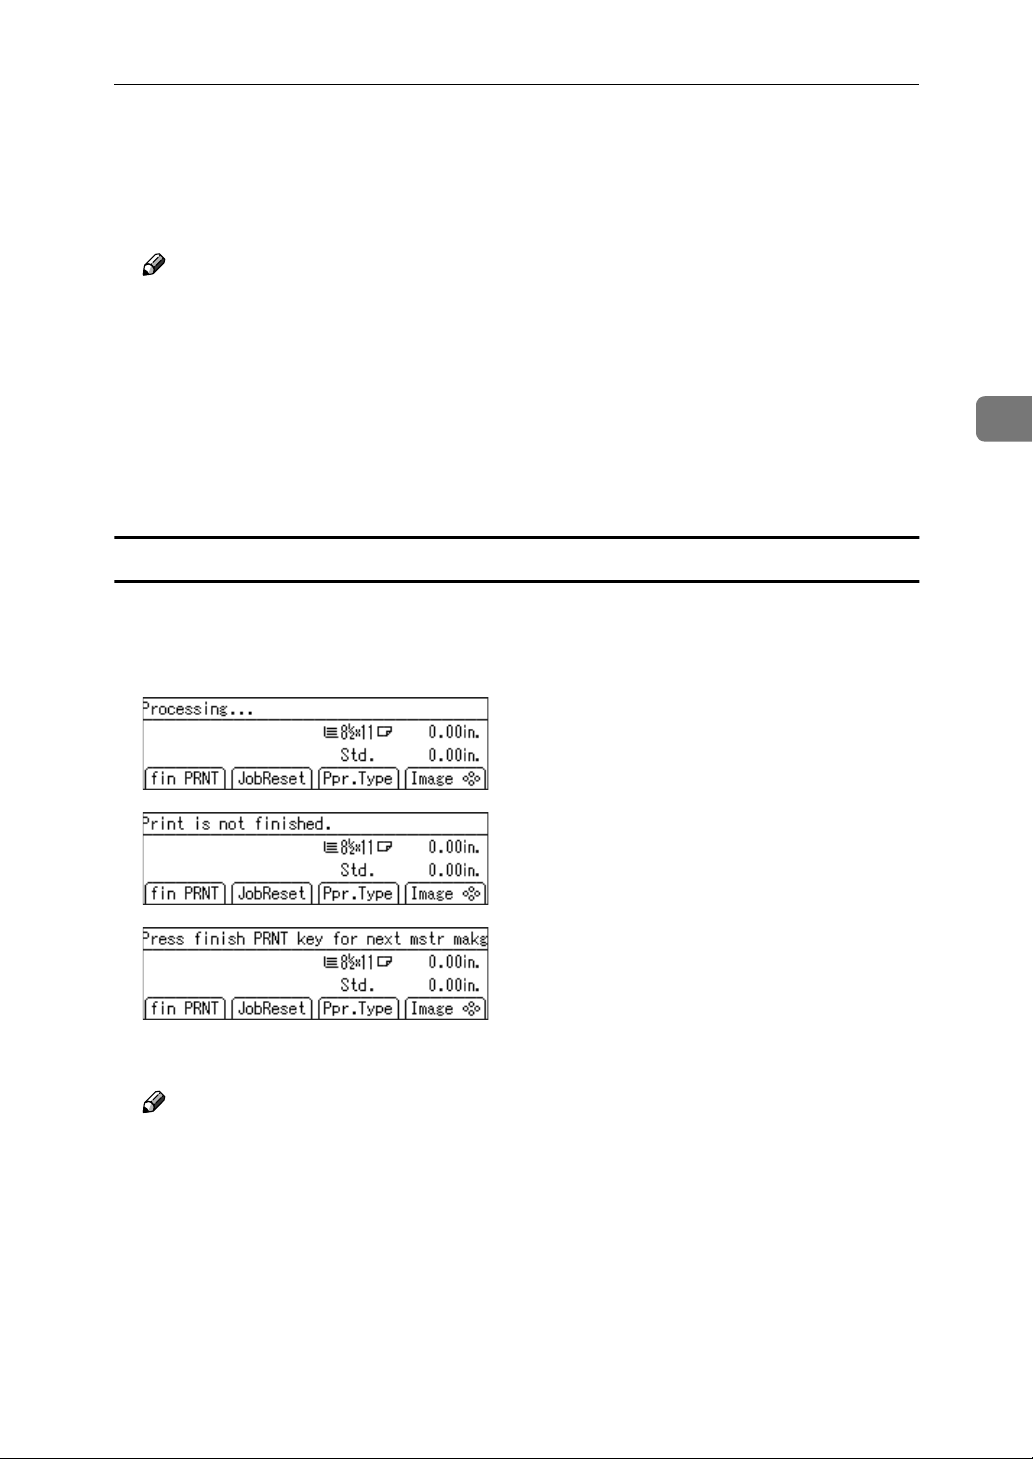
Printing a “waiting” print job
❖❖❖❖ Type A
When a print job acquires “waiting” status during printing, these three displays will appear alternately.
3
Press the {{{{Print}}}} key.
AAAA
Note
❒ When the printing is finished, the machine starts master making and print-
ing the next job. When all jobs are finished, the initial display returns.
33
Page 40

3
Basic Printing
❖❖❖❖ Type B
When a print job acquires “waiting” status during printing, these three displays will appear repeatedly.
Press the {{{{Print Start}}}} key.
AAAA
Note
❒ When the printing is finished, the machine starts master making and print-
ing the next jobs. When all jobs are printed, the initial display returns.
Changing the Number of Prints During Printing
You can change the number of prints on the machine while it is printing.
Important
❒ Change the number of prints for individual pages. For example, when the
machine is printing the second page and you change the number of prints
from one to two, the second page will be printed twice. The first page and
pages from the third page on will only be printed once.
Press the {{{{Clear/Stop}}}} key when printing a page for which you want to
AAAA
change the number of prints.
When printing is interrupted, “Processing” will be displayed.
Note
❒ When canceling printing from the following pages, press [Job Reset]
(When using Type B, press the {{{{Job Reset}}}} key).
Enter the number of prints using the number keys on the machine.
BBBB
Press the {{{{Print}}}} key (When using Type B, press the {{{{Print Start}}}} key).
CCCC
Printing restarts. When the specified number has been printed, Master Making of the next page begins.
34
Page 41

Printing Data from Your Computer on the Printer
Printing (Master Making) with the Different Size of Paper from the Original
When printing data with the different size of paper from the original, an error
message will appears on the machine's display panel, however, you can print it
forcibly.
Type A
Print data from your computer.
AAAA
The error message appears.
Press [MakeMstr].
BBBB
The status message appears.
3
Set the paper to use on Paper Feed Tray, and then press [OK].
CCCC
Note
❒ When you want to cancel printing, press [JobReset].
Type B
Print data from your computer.
AAAA
The error message appears.
Press the {{{{Make Master}}}} key.
BBBB
The status message appears.
Set the paper to use on Paper Feed Tray, and then press the {{{{OK}}}} key.
CCCC
Note
❒ When you want to cancel printing, press the {{{{Job Reset}}}} key.
35
Page 42

INDEX
A
,
,
,
15
,
14
,
14
3
6
Access Control
Access control address
Access control mask
Auto On Line key
Type A
Type B
C
Cancel key (Type B)
Cancel (Type A)
Clear Modes/Energy Saver key
,
Type A
,
Type B
Clear/Stop key
,
Type A
,
Type B
Connecting the Machine
Control panel
,
Type A
,
Type B
,
6
,
5
3
6
4
7
,
16
3
6
D
Data In indicator (Green)
,
,
4
,
7
,
4
,
3
,
6
,
4
Type A
Type B
Default gateway address
Display
Display Panel
Type A
Type B
Display panel
14
I
,
,
17
9
Interface cable
IP Address
K
# key
,
,
4
7
,
6
Type A
Type B
~} keys (Type B)
M
Make Master key (Type B)
N
,
,
,
,
7
4
9
,
9
5
Network boot
Network Settings
Next (Type A)
Number key
Type B
Number keys
Type A
O
,
,
,
,
5
,
6
5
3
6
Offline/Online
OK key (Type B)
OK (Type A)
On Line key
Type A
Type B
P
,
7
36
E
Error indicator (Red)
,
,
7
,
4
,
5
Type A
Type B
Ethernet Interface
Exit (Type A)
F
Frame Type (Netware)
,
Function keys
4
16
,
14
,
,
5
,
31
, 17,
,
,
8
,
1
,
31
20
16
5
,
4
Parallel Cable
Parallel Interface
Pnt.Size
Prev. (Type A)
Prinnt Size
Printer driver
Printing
Windows
Print key (Type A)
Print Start key (Type B)
,
7
Page 43

R
Raster Printer Language
Windows 2000, Install
Windows 95/98/Me, Install
Windows NT 4.0, Install
Windows XP, Install
,
,
1
,
24
S
,
,
14
5
,
4
Select (Type A)
SmartDeviceMonitor for Admin
SmartDeviceMonitor for Client
Start key (Type A)
Subnet mask
U
User Tools key
,
,
3
6
Type A
Type B
V
Valid protocol
,
14
W
24
,
,
28
,
23
,
2
2
Windows 2000
Raster Printer Language, Install
Windows 95/98/Me
Raster Printer Language, Install
Windows NT 4.0
Raster Printer Language, Install
Windows XP
Raster Printer Language, Install
,
,
,
,
24
23
28
24
37
Page 44

38
EN USA C624-8617
Page 45

Note to users in the United States of America
Notice:
This equipment has been tested and found to comply with the limits for a Class B digital device, pursuant to Part 15 of the FCC Rules. These limits are designed to provide reasonable protection against
harmful interference in a residential installation. This equipment generates, uses and can radiate radio
frequency energy and, if not installed and used in accordance with the instructions, may cause harmful
interference to radio communications.
However, there is no guarantee that interference will not occur in a particular installation. If this equipment does cause harmful interference to radio or television reception, which can be determined by turning the equipment off and on, the user is encouraged to try to correct the interference by one more of
the following measures:
Reorient or relocate the receiving antenna.
Increase the separation between the equipment and receiver.
Connect the equipment into an outlet on a circuit different from that to which the receiver is
connected.
Consult the dealer or an experienced radio/TV technician for help.
Warning
Changes or modifications not expressly approved by the party responsible for compliance could void
the user's authority to operate the equipment.
Caution (in case of 100BaseTX environment):
Network interface cable with ferrite core must be used for RF interference suppression.
Note to users in Canada
Note:
This Class B digital apparatus complies with Canadian ICES-003.
Remarque concernant les utilisateurs au Canada
Avertissement:
Cet appareil numérique de la classe B est conforme à la norme NMB-003 du Canada.
Copyright © 2003
Page 46

Printer Unit Type40 RCP40 Operating Instructions Printer Reference 1
EN USA C624-8617
 Loading...