

Page 1
Network Printing Guide
Windows 95/98/Me Configuration
1
Windows 2000 Configuration
2
Windows XP Configuration
3
Windows NT 4.0 Configuration
4
NetWare Configuration
5
Macintosh Configuration
6
Appendix
7
For safe and correct use of this machine, please be sure to read the Safety Information in the
“General Settings Guide” before you use it.
Page 2

Introduction
This manual describes detailed instructions on the operation and notes about the use of this machine.
To get maximum versatility from this machine all operators are requested to read this manual carefully
and follow the instructions. Please keep this manual in a handy place near the machine.
Important
Contents of this manual are subject to change without prior notice. In no event will the company be liable for direct, indirect, special, incidental, or consequential damages as a result of handling or operating the machine.
Software Version Conventions Used in this Manual
• NetWare 3.x means NetWare 3.12 and 3.2.
• NetWare 4.x means NetWare 4.1, 4.11 and IntranetWare.
Trademarks
Apple, AppleTalk, EtherTalk, LaserWriter, Macintosh and Mac are registered trademarks of Apple
Computer, Inc.
Ethernet is a registered trademark of Xerox Corporation.
Microsoft, Windows and Windows NT are registered trademarks of Microsoft Corporation in the United
States and/or other countries.
Netscape and Netscape Navigator are registered trademarks of Netscape Communications Corporation.
Novell, NetWare and NDS are registered trademarks of Novell, Inc.
PostScript is a registered trademark of Adobe Systems, Incorporated.
Sun is a registered trademark of Sun Microsystems, Inc.
SunOS is a trademark of Sun Microsystems, Inc.
Other product names used herein are for identification purposes only and might be trademarks of their
respective companies. We disclaim any and all rights in those marks.
The proper names of the Windows operating systems are as follows:
®
• The product name of Windows
• The product name of Windows
95 is Microsoft® Windows 95.
®
98 is Microsoft® Windows 98.
• The product name of Windows® Me is Microsoft® Windows Millennium Edition (Windows Me).
• The product names of Windows® XP are as follows:
Microsoft
Microsoft
• The product names of Windows® 2000 are as follows:
Microsoft
Microsoft
Microsoft
• The product names of Windows NT
Microsoft
®
Windows® XP Professional
®
Windows® XP Home Edition
®
Windows® 2000 Advanced Server
®
Windows® 2000 Server
®
Windows® 2000 Professional
®
®
Windows NT® Server 4.0
4.0 are as follows:
•Microsoft® Windows NT® Workstation 4.0
Page 3

TABLE OF CONTENTS
Manuals for This Machine.....................................................................................1
How to Read This Manual .....................................................................................2
Introduction............................................................................................................3
Setting Up the Machine on a Network..................................................................5
Windows 95/98/Me, Windows 2000/XP, Windows NT 4.0 .........................................5
NetWare .....................................................................................................................6
Macintosh ................................................................................................................... 7
UNIX........................................................................................................................... 8
Printing using the IEEE 802.11b Interface ................................................................. 8
Printing using the IEEE 1394 Interface ....................................................................10
1. Windows 95/98/Me Configuration
Configuring Windows 95/98/Me..........................................................................11
Printing without a Print Server.................................................................................. 11
Printing with a Windows 2000/XP or Windows NT Print Server............................... 11
Configuring Protocols ......................................................................................... 12
Configuring TCP/IP and IPP for Printing ..................................................................12
Configuring NetBEUI for Printing .............................................................................13
Using SmartNetMonitor for Client ...................................................................... 15
Installing SmartNetMonitor for Client ....................................................................... 16
Setting Up the Printer Driver .................................................................................... 17
Changing Port Settings ............................................................................................ 19
Setting Up a Client Computer .............................................................................20
2. Windows 2000 Configuration
Configuring Windows 2000.................................................................................23
Printing without a Print Server.................................................................................. 23
Printing with a Standard TCP/IP Port....................................................................... 23
Printing with a LPR Port ........................................................................................... 24
Printing with a Windows 2000/XP or Windows NT Print Server............................... 24
Configuring Protocols ......................................................................................... 25
Configuring TCP/IP and IPP for Printing ..................................................................25
Configuring NetBEUI for Printing .............................................................................26
Using SmartNetMonitor for Client ...................................................................... 27
Installing SmartNetMonitor for Client ....................................................................... 28
Setting Up the Printer Driver .................................................................................... 29
Changing Port Settings ............................................................................................ 31
Configuring LPR Port Printing............................................................................32
Setting Up a Client Computer .............................................................................33
i
Page 4

3. Windows XP Configuration
Configuring Windows XP....................................................................................35
Printing without a Print Server.................................................................................. 35
Printing with a Standard TCP/IP Port....................................................................... 35
Printing with a LPR Port ........................................................................................... 36
Printing with a Windows 2000/XP or Windows NT Print Server............................... 36
Configuring Protocols ......................................................................................... 37
Configuring TCP/IP and IPP for Printing ..................................................................37
Using SmartNetMonitor for Client ...................................................................... 39
Installing SmartNetMonitor for Client ....................................................................... 40
Setting Up the Printer Driver .................................................................................... 41
Changing Port Settings ............................................................................................ 43
Configuring LPR Port Printing............................................................................44
Setting Up a Client Computer .............................................................................45
4. Windows NT 4.0 Configuration
Configuring Windows NT 4.0..............................................................................47
Printing without a Print Server.................................................................................. 47
Printing with a LPR Port ........................................................................................... 47
Printing with a Windows 2000/XP or Windows NT Print Server............................... 47
Configuring Protocols ......................................................................................... 48
Configuring TCP/IP and IPP for Printing ..................................................................48
Configuring NetBEUI for Printing .............................................................................49
Using SmartNetMonitor for Client ...................................................................... 51
Installing SmartNetMonitor for Client ....................................................................... 52
Setting Up the Printer Driver .................................................................................... 53
Changing Port Settings ............................................................................................ 55
Configuring LPR Port Printing............................................................................56
Setting Up a Client Computer .............................................................................57
5. NetWare Configuration
Installing the NIB Setup Tool..............................................................................59
Installing SmartNetMonitor for Admin ..................................................................... 60
Running the NIB Setup Tool ...................................................................................60
Quick Setup Using the NIB Setup Tool Wizard .................................................61
NetWare 3.x, 4.x, 5/5.1- Advanced Settings.......................................................64
Setting Up as a Print Server.....................................................................................65
Using Pure IP in the NetWare 5/5.1 Environment ....................................................70
Setting Up as a Remote Printer ...............................................................................72
Setting Up a Client Computer .............................................................................78
Windows 95/98/Me...................................................................................................78
Windows 2000/XP, Windows NT 4.0 ....................................................................... 79
ii
Page 5

6. Macintosh Configuration
Configuring Macintosh........................................................................................81
Changing to EtherTalk ............................................................................................. 82
Configuring the Printer ............................................................................................. 82
Changing the Printer Name......................................................................................82
Changing the Zone...................................................................................................82
7. Appendix
Using SmartNetMonitor for Admin..................................................................... 83
Changing the Network Interface Board Configuration..............................................84
Locking the Operation Panel Menu ..........................................................................85
Selecting the Paper Type......................................................................................... 85
Managing the User Information ................................................................................ 86
Managing the E-mail Information ............................................................................. 87
Configuring the Energy Save Mode .........................................................................87
Configuring the Network Interface Board with a Web Browser ......................88
Going to the Top Page .............................................................................................89
Verifying the Network Interface Board Settings ....................................................... 90
Configuring the Network Interface Board Settings ...................................................91
Monitoring and Configuring the Printer.............................................................93
Changing Names and Comments ............................................................................93
Displaying the Status of Printer ................................................................................ 96
Using the IEEE 802.11b (Wireless LAN).............................................................99
Setting IEEE 802.11b (Wireless LAN)......................................................................99
Using in Infrastructure Mode ..................................................................................100
Using in Ad hoc Mode ............................................................................................ 100
Confirming the Connection..................................................................................... 101
Remote Maintenance by telnet .........................................................................102
Using telnet ............................................................................................................ 102
Commands List ...................................................................................................... 103
SNMP................................................................................................................... 120
Understanding the Displayed Information ......................................................121
Print Job Information .............................................................................................. 121
Print Log Information..............................................................................................121
Configuring the Network Interface Board ...............................................................122
Message List ......................................................................................................125
System Log Information ......................................................................................... 125
Precautions ........................................................................................................132
Connecting a Dial-Up Router to a Network ............................................................132
PostScript Printing from Windows ..........................................................................133
NetWare Printing....................................................................................................133
Using DHCP........................................................................................................... 134
Configuring a WINS Server .................................................................................... 135
When Using the NIB Setup Tool ............................................................................136
When Using IPP with SmartNetMonitor for Client ..................................................136
Specifications.....................................................................................................137
INDEX....................................................................................................... 138
iii
Page 6

iv
Page 7

Manuals for This Machine
The following manuals describe the operational procedures and maintenance of
this machine.
To enhance safe and efficient operation of this machine, all users should read
and follow the instructions carefully.
❖❖❖❖ General Settings Guide
Provides an overview of the machine. This manual introduces the functions
of the machine. It also introduces the options that allow you to use additional
functions and describes how to access the system user tools to make the machine easier to use.
❖❖❖❖ Copy Reference
Describes procedures and functions for using this machine as a copier.
❖❖❖❖ Printer/Scanner Kit Type 1232 Printer Reference 1
Describes system settings, procedures and functions for using this machine as
a printer.
❖❖❖❖ Printer/Scanner Kit Type 1232 Printer Reference 2
Describes procedures and provides information about using this machine as
a printer. This manual is included as a PDF file on the CD-ROM labeled “Operating Instructions”.
❖❖❖❖ Network Printing Guide Operating Instructions
Describes procedures and provides information about setting up and using
the machine as a printer in a network environment. We recommend you read
this manual first. It is included as a PDF file on the CD-ROM labeled “Operating Instructions” (this manual).
❖❖❖❖ PostScript 3 Board Type 1232 Operating Instructions Supplement
Describes menus and features you can set using the PostScript 3 printer driver. This manual is provided as a PDF file on the CD-ROM labeled “Operating
Instructions”.
Note
❒ Printing with the PostScript 3 printer driver is available when the Post-
Script 3 board option is installed on your machine.
❖❖❖❖ UNIX Supplement
Provides information about setting up and using the machine as a printer in
a UNIX environment. For UNIX printing information, please visit our web
site or consult your authorized dealer.
❖❖❖❖ Scanner Reference
Describes system settings, procedures and functions for using this machine as
a scanner.
Note
❒ Scanner function is available when the Printer/Scanner option is installed
on your machine.
1
Page 8

How to Read This Manual
R
R
Symbols
In this manual, the following symbols are used:
WARNING:
This symbol indicates a potentially hazardous situation which, if instructions
are not followed, could result in death or serious injury.
CAUTION:
This symbol indicates a potentially hazardous situation which, if instructions
are not followed, may result in minor or moderate injury or damage to property.
* The statements above are notes for your safety.
Important
If this instruction is not followed, paper might be misfed, originals might be
damaged, or data might be lost. Be sure to read this.
Preparation
This symbol indicates the prior knowledge or preparations required before operating.
Note
This symbol indicates precautions for operation, or actions to take after misoperation.
Limitation
This symbol indicates numerical limits, functions that cannot be used together,
or conditions in which a particular function cannot be used.
Reference
This symbol indicates a reference.
[]
Keys that appear on the machine's panel display.
Keys and buttons that appear on the computer's display.
{}
Keys built into the machine's control panel.
Keys on the computer's keyboard.
2
Page 9
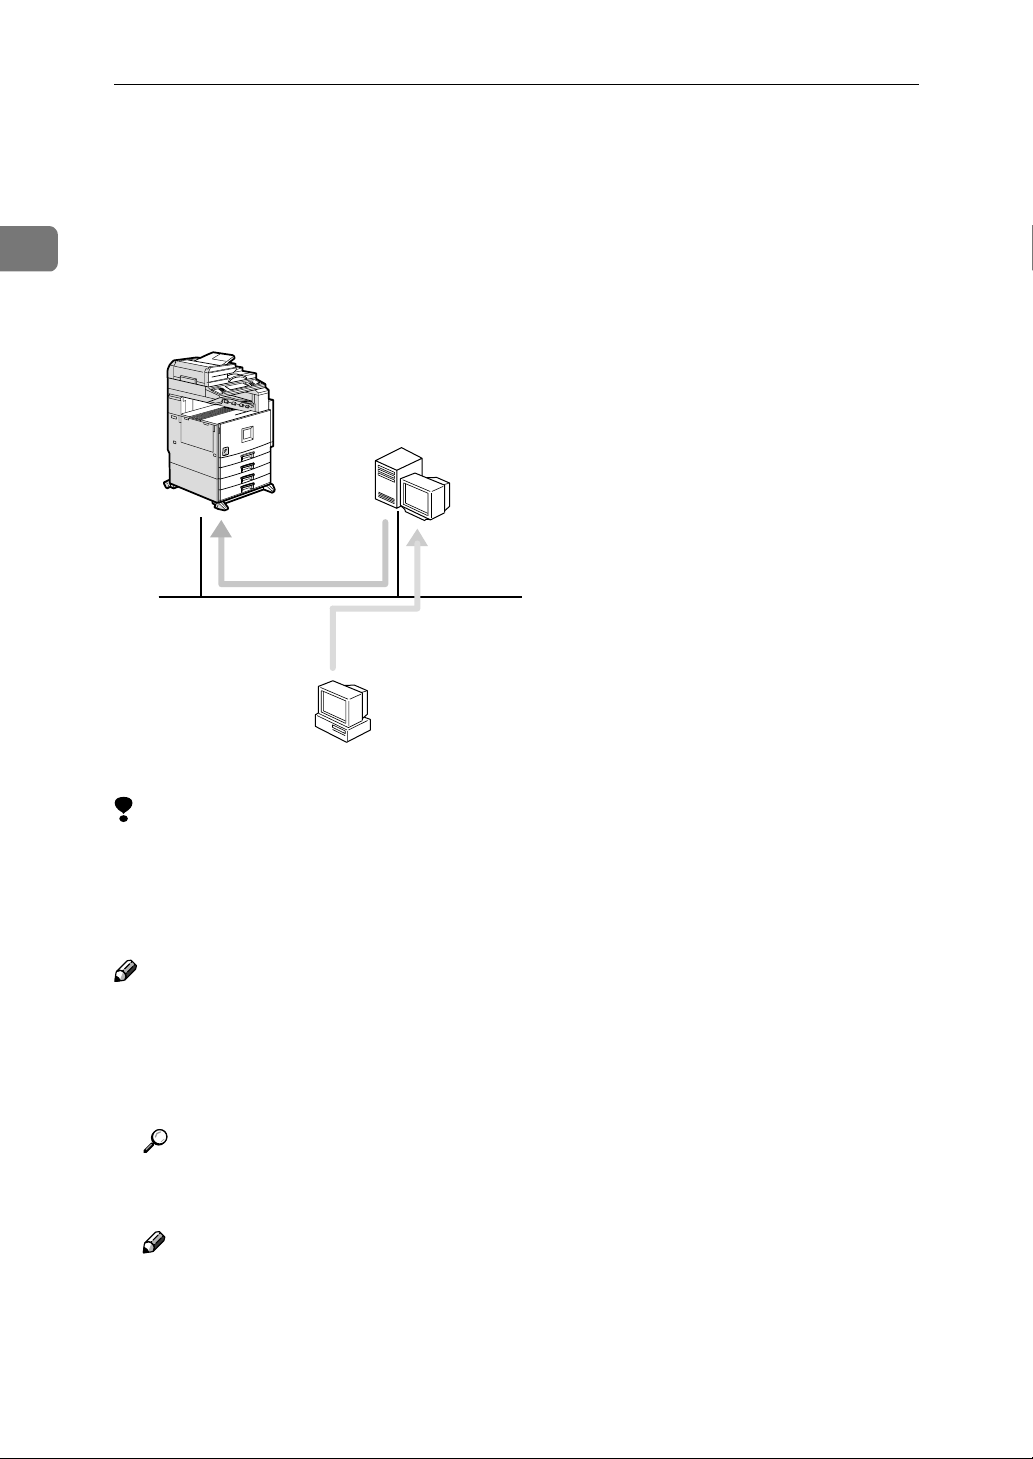
Introduction
This manual contains detailed instructions on configuring the machine as a network printer. Read the section appropriate to your network environment on
how to configure the machine correctly.
Windows 2000/XP or
Windows NT (Server)
NetWare (Server)
Windows 95/98/Me
Windows 2000/XP
Windows NT
NetWare
(Client)
Macintosh
UNIX
Important
❒ The procedures written in this manual assume that you are a network admin-
istrator. If you are not, be sure to consult your network administrator before
configuration.
Reference
For more information about configuring the Network Interface Board with
the control panel, see the General Settings Guide.
❖❖❖❖ Features
• Support for 100BASE-TX, 10BASE-T, IEEE 1394 (IP over 1394) and IEEE
802.11b.
*1
• The Network Interface Board is compatible with NetWare
TCP/IP), Windows NT 4.0 (TCP/IP, NetBEUI
(TCP/IP, NetBEUI
*2
95/98/Me (TCP/IP, NetBEUI
*4
(AppleTalk)
protocols. This allows you to use the machine in a network
, IPP
*3
), Windows XP (TCP/IP, IPP
*2
, IPP
*3
), UNIX (TCP/IP) and Macintosh
*2
, IPP
*3
(IPX/SPX,
), Windows 2000
*3
), Windows
that uses different protocols and operating systems.
• A computer used as a dedicated print server is not required because the
Network Interface Board can be configured as a NetWare print server.
3
Page 10

• The Network Interface Board can connect the machine to the network
without requiring its own power supply because the Network Interface
Board is installed inside the machine.
*1
If the optional 802.11b Interface Kit has been installed, you cannot use the ad hoc
mode.
*2
To use NetBEUI, use the SmartNetMonitor for Client port.
*3
IPP (Internet Printing Protocol) is a protocol for printing via the Internet.
*4
An optional PS3 module is necessary.
❖❖❖❖ Interface supported protocols
Interface
Ethernet IEEE 802.11b IEEE 1394
(IP over 1394)
TCP/IP ❍❍❍
Protocol
NetBEUI ❍❍
NetWare ❍❍
AppleTalk ❍❍ ×
*1
×
×
❍ means that the protocol is supported.
× means that the protocol is not supported.
*1
If the optional 802.11b Interface Kit has been installed, you cannot use the ad hoc
mode.
4
Page 11
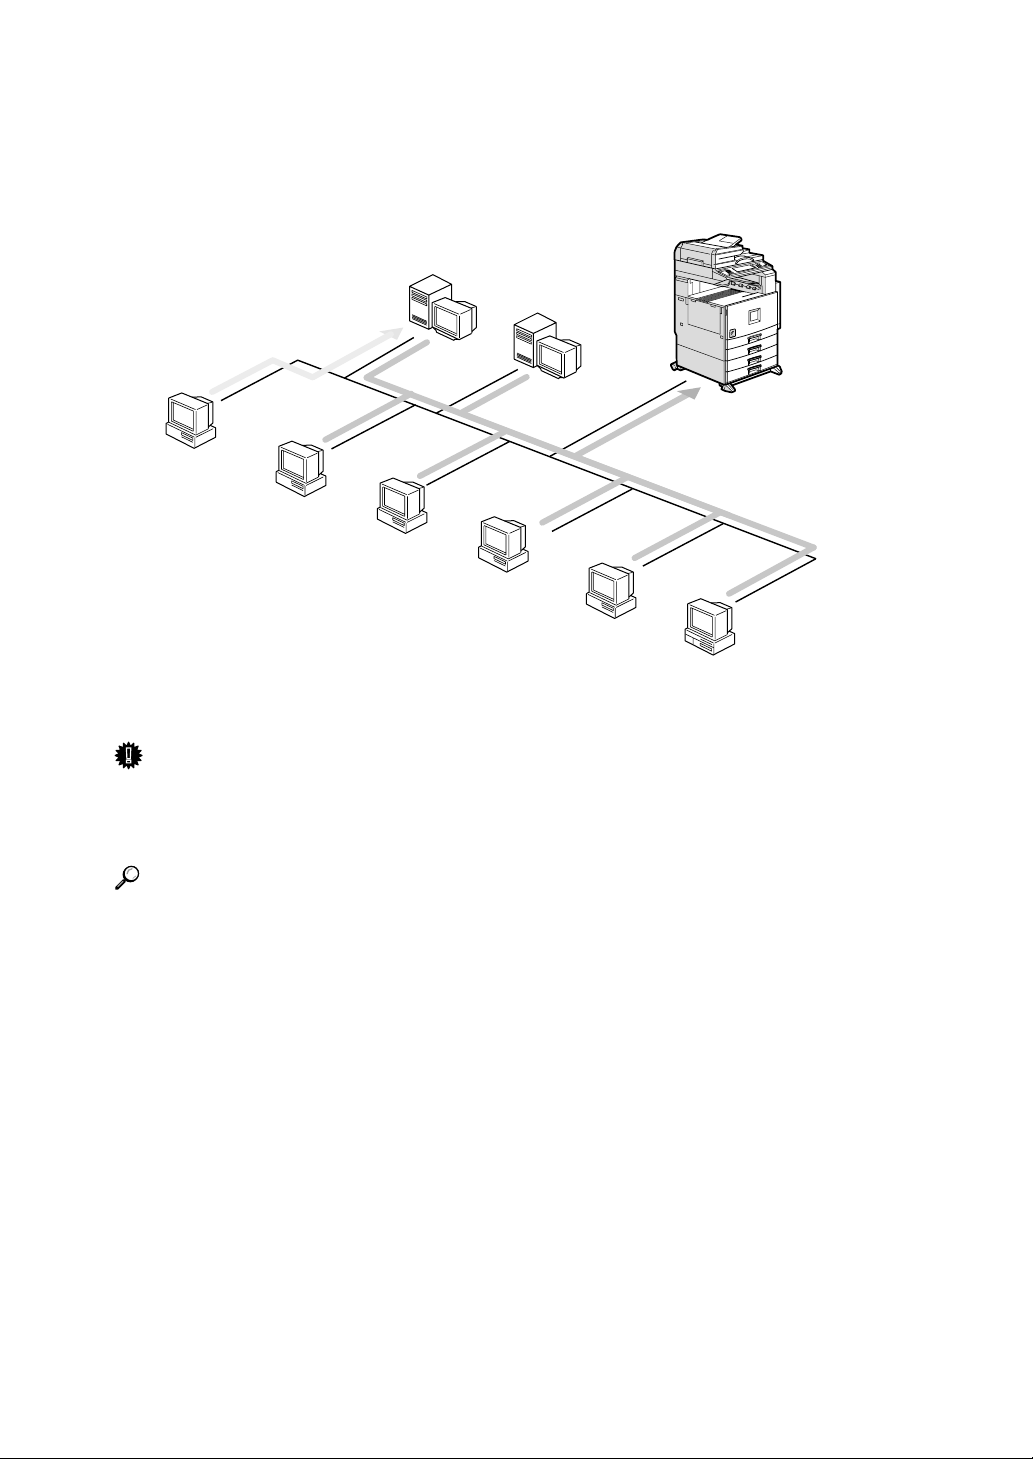
Setting Up the Machine on a Network
Windows 95/98/Me, Windows 2000/XP, Windows NT 4.0
For setting up the machine as a network printer in Windows 95/98/Me, Windows 2000/XP and Windows NT 4.0 environment;
See p.11 “Windows 95/98/Me Configuration”.
See p.23 “Windows 2000 Configuration”.
See p.35 “Windows XP Configuration”.
See p.47 “Windows NT 4.0 Configuration”.
❖ Printing Without a Print Server
❖ Printing With a
TCP/IP
NetBEUI
IPP
Windows 95/98/Me Windows 2000
Windows 2000/XP
Windows 2000/XP or
Windows NT Server (or Workstation)
Print Server
TCP/IP
NetBEUI
IPP
LPR
TCP/IP
IPP
LPR
or Windows NT Print Server
TCP/IP
NetBEUI
IPP
LPR
Windows XP Windows NT 4.0
Windows 95/98/Me Windows 2000/XP
Windows NT 4.0
5
Page 12
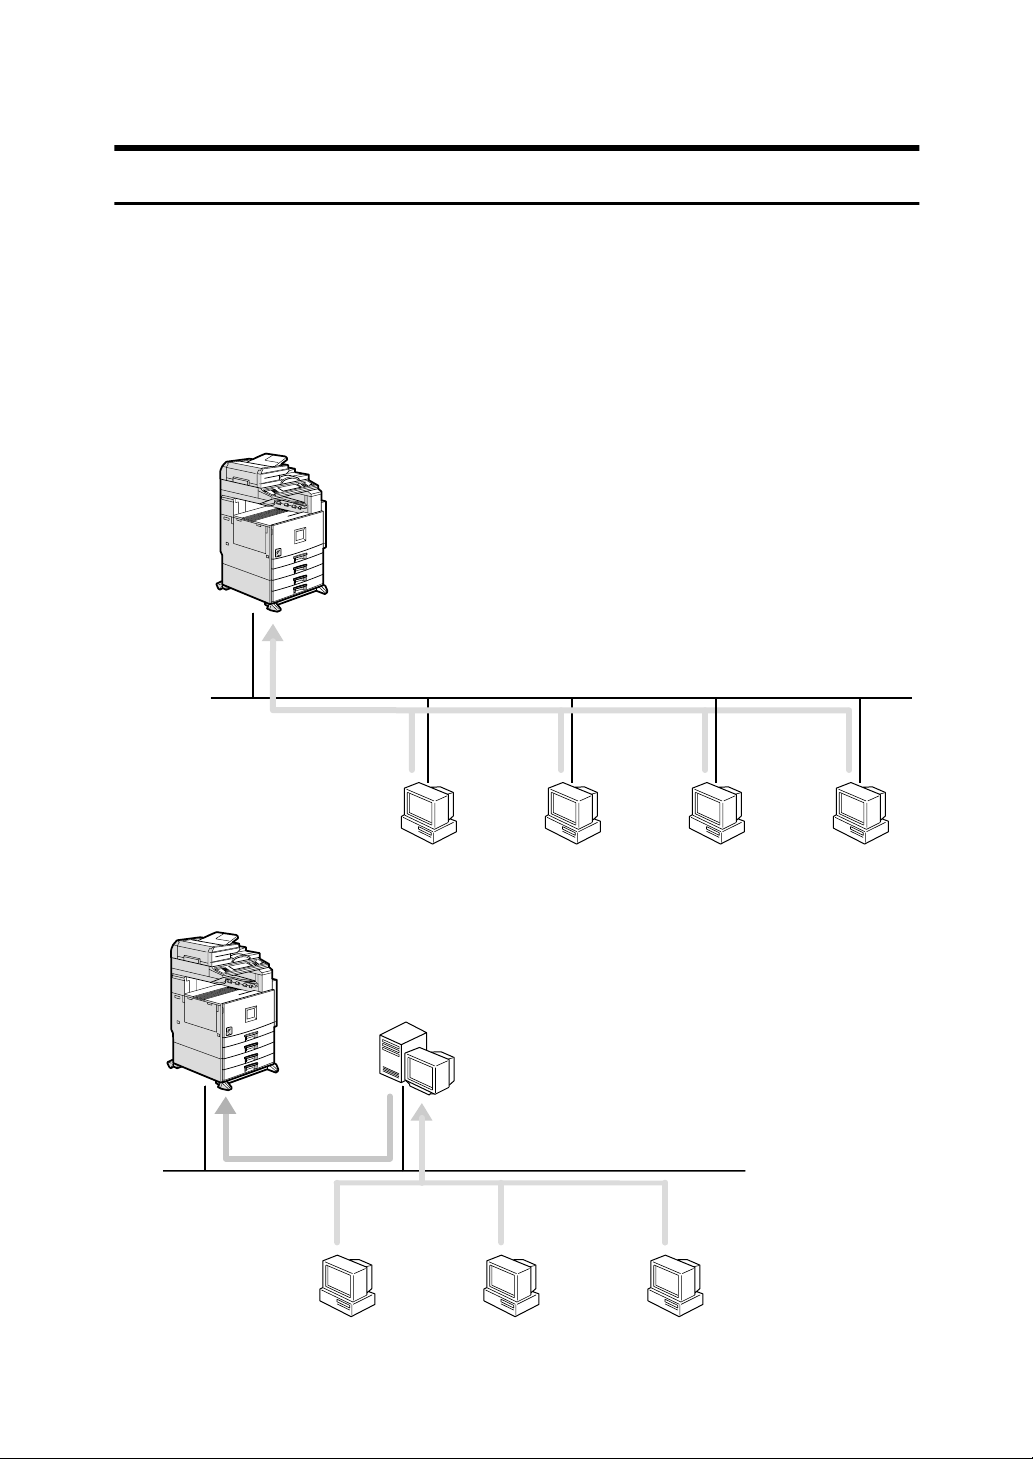
NetWare
For setting up the machine as a network printer in a NetWare environment, see
p.59 “NetWare Configuration”. The Network Interface Board allows you to use
the machine as either a print server or a remote printer.
For more information about setting up the clients, see the following pages.
• See p.78 “Windows 95/98/Me” .
• See p.79 “Windows 2000/XP, Windows NT 4.0” .
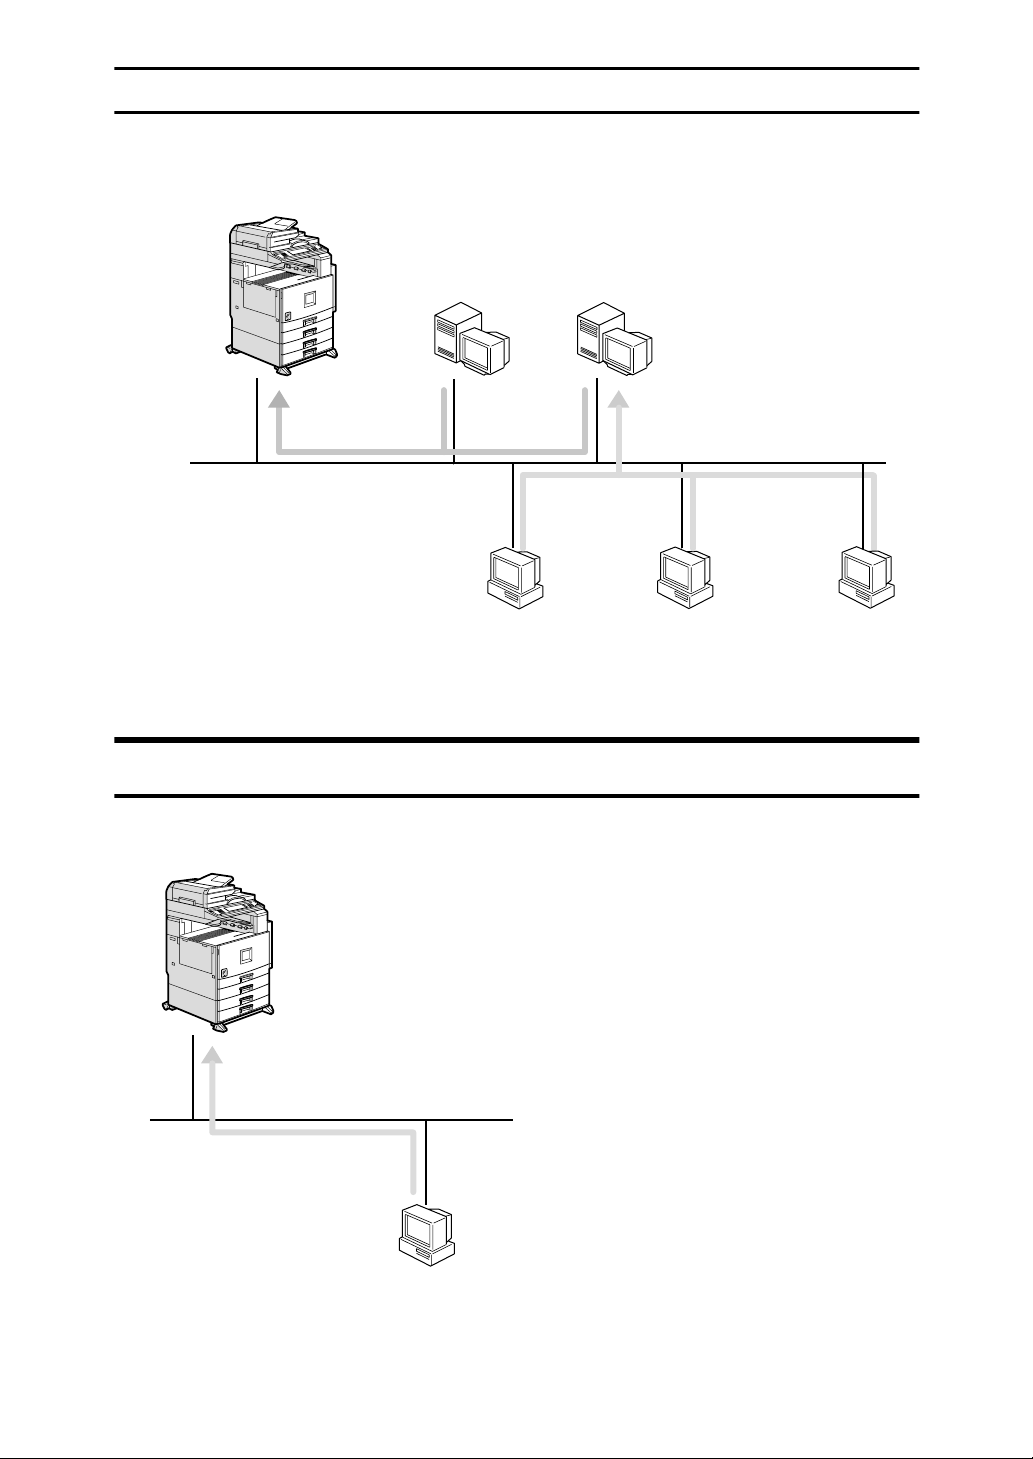
Configuring the machine as a print server
A dedicated NetWare print server is not required because the machine can be
configured as a print server.
Print Server
NetWare
File Server
Windows 95/98/Me
Windows 2000/XP
Actual procedures for configuring the machine depend on the NetWare version.
• NetWare 3.x, 4.x, 5/5.1
See p.65 “Setting Up as a Print Server”.
6
Windows NT 4.0
Page 13
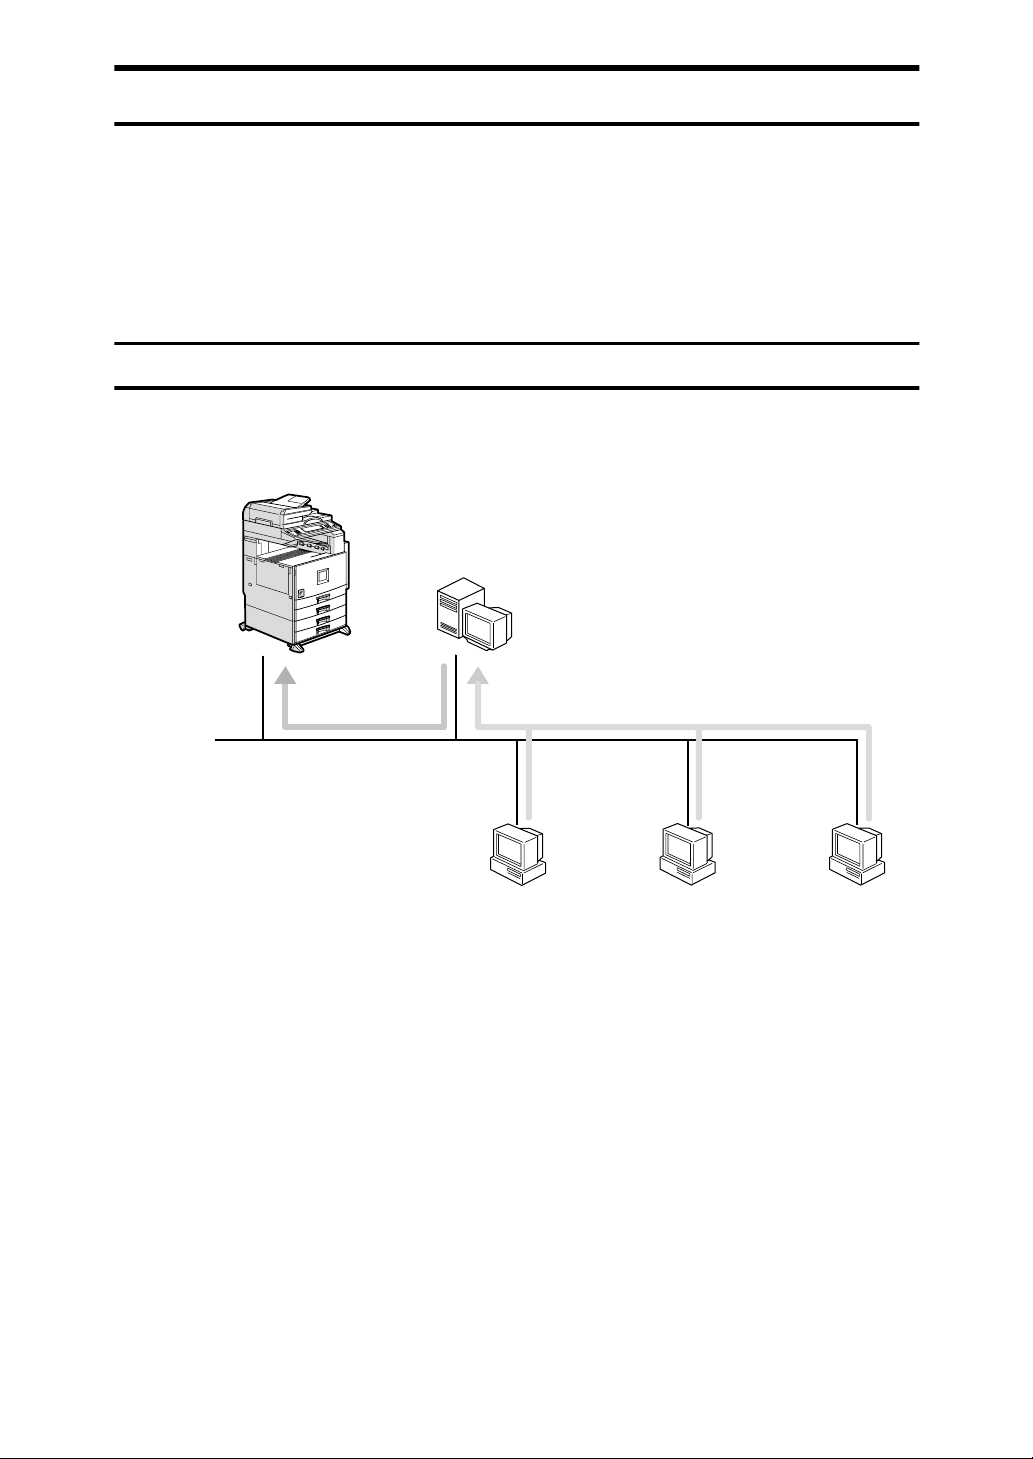
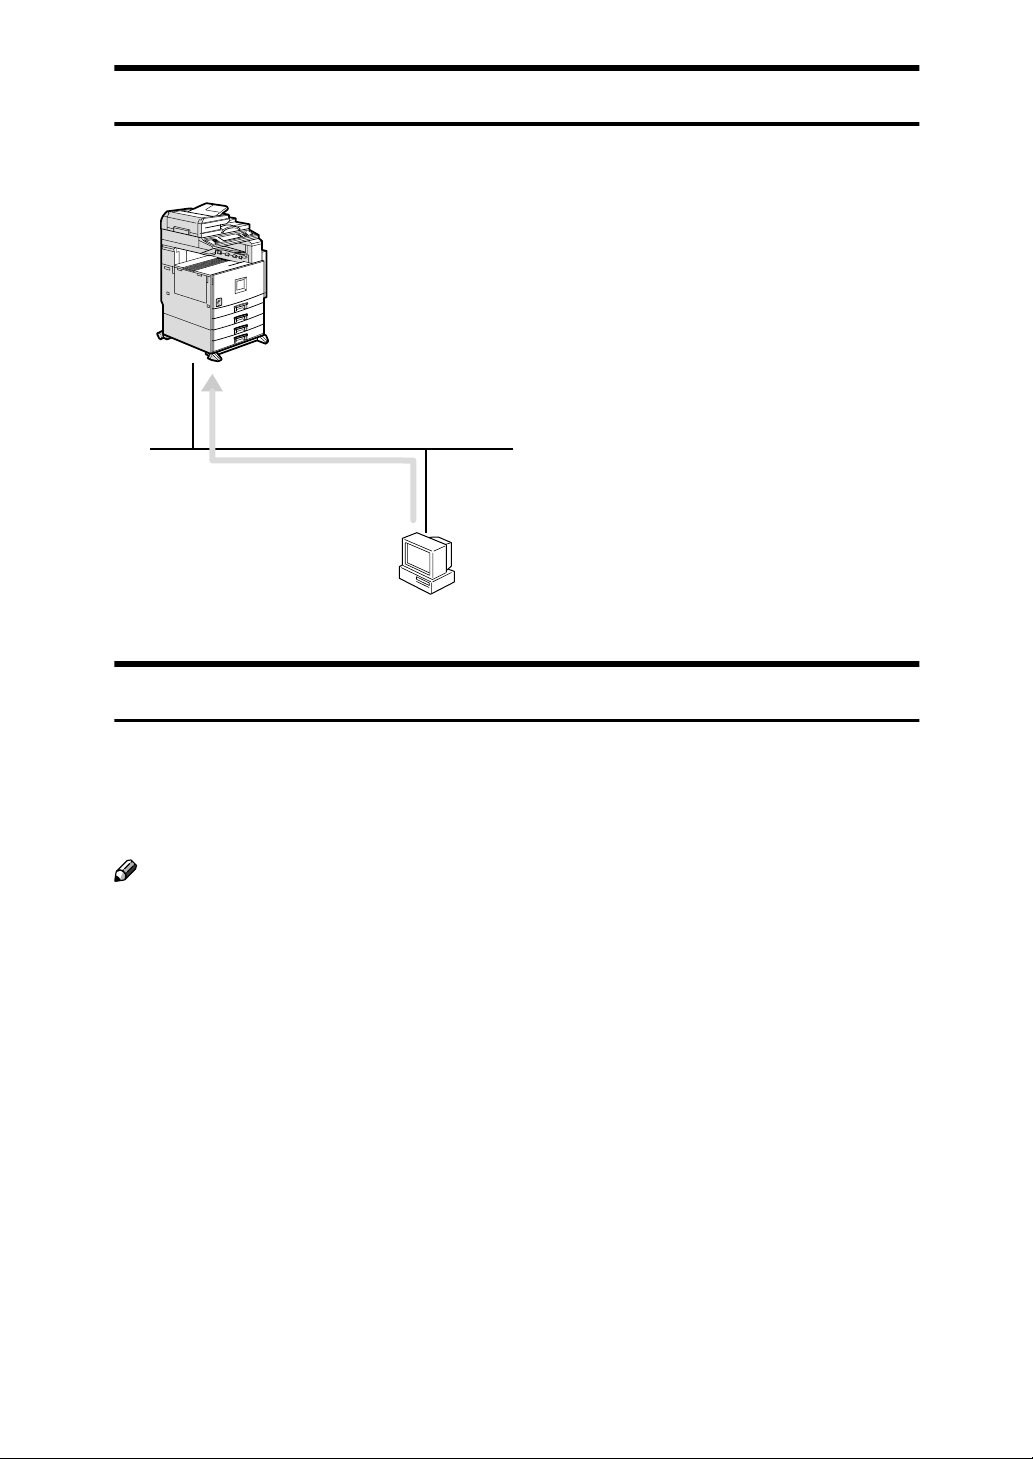
Configuring the machine as a remote printer
If a dedicated NetWare print server is being used, the machine should be configured as a remote printer.
Remote Printer
NetWare
Print Server
Windows 95/98/Me
NetWare
File Server
Windows 2000/XP
Windows NT 4.0
The actual procedures for configuring the machine depend on the NetWare version, see p.72 “Setting Up as a Remote Printer”.
Macintosh
For setting up the machine as a network printer in a Macintosh environment, see
p.81 “Macintosh Configuration”.
AppleTalk
Macintosh
7
Page 14
UNIX
For UNIX printing information, please visit our web site or consult your authorized dealer.
TCP/IP
UNIX
Printing using the IEEE 802.11b Interface
This section describes how to print after installing the optional 802.11b Interface
Kit.
There are two methods of using this machine as a network printer with IEEE
802.11b.
Note
❒ IEEE 802.11b (wireless LAN) is unavailable in some countries, or its use may
be limited.
❖❖❖❖ ad hoc mode (802.11 ad hoc mode/ad hoc mode)
This is the mode for transmitting between each wireless LAN client. You
must make the channels the same for each wireless LAN client to transmit using this basic transmitting method which does not require an access point.
When using “802.11b ad hoc mode”, the SSID must be set. The ad hoc mode
settings can be made from telnet or a Web Browser. See p.100 “Using in Ad
hoc Mode”.
8
Page 15
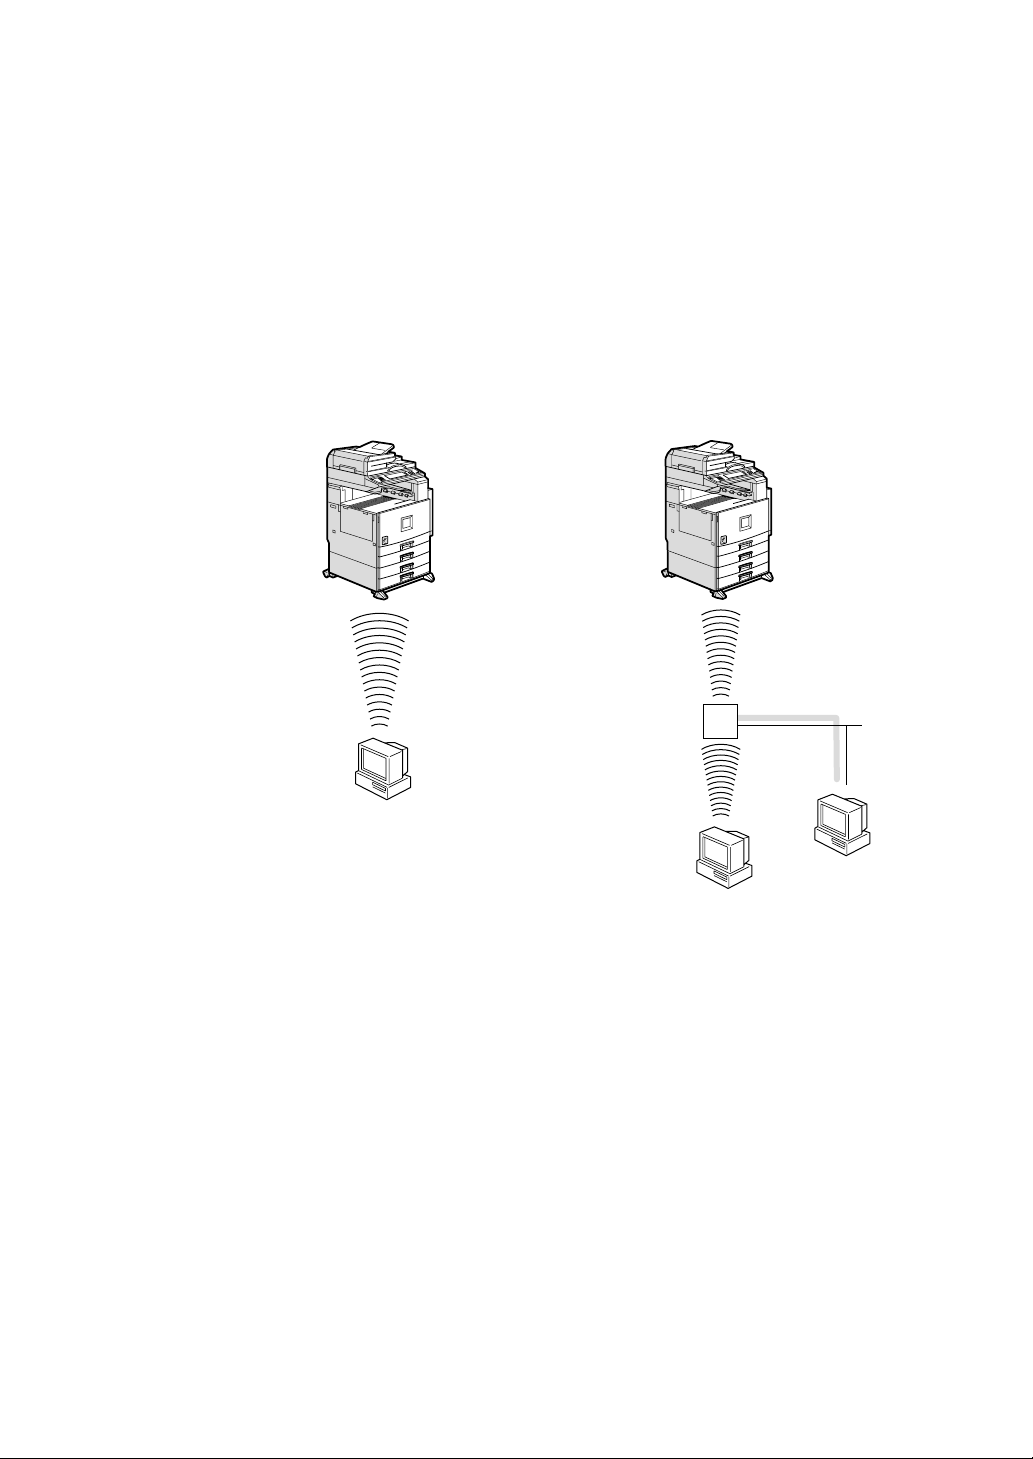
❖❖❖❖ infrastructure mode
This is the mode for transmitting via an access point. The SSID
same as the access point. When setting WEP
*2
, you must set the same values
*1
must be the
as an access point. By connecting the access point to Ethernet, you can transmit the current network environment. See p.100 “Using in Infrastructure
Mode”.
*1
This is called a Service Set ID and is used in the connection between the wireless
LAN client and the access point. Only a wireless LAN client and an access point
that have the same SSID can transmit to each other. (The character strings to be set
are in the range ASCII 0x20-0x7e and the SSID is case-sensitive to 32 bytes.)
*2
This is used to protect coded wireless data transmission. When both the wireless
LAN client and the transmission access point are coded using a 64-bit key, you
must set the same WEP key as the printer. (You can set only 10 hexadecimal characters when using 64-bit or 26 hexadecimal characters when using 128-bit.)
❖ad hoc mode
❖infrastructure mode
access point
9
Page 16
Printing using the IEEE 1394 Interface
This section describes how to print via the IEEE 1394 interface after installing the
1394 Interface Unit.
There are two methods of using the machine as a network printer with IEEE
1394.
❖❖❖❖ SCSI print
You can print using the SCSI print device provided by Windows 2000 and
Windows XP. For more information, see “Printing with SCSI Print”, Printer
Reference 1 and p.91 “Configuring the Network Interface Board Settings”.
❖❖❖❖ IP over 1394
You can print by setting the IP address for this machine and the computer on
which Windows Me or Windows XP is installed. For more information, see
“Printing with IP over 1394”, Printer Reference 1 and p.35 “Printing with a
Standard TCP/IP Port” in the Windows XP Configuration.
SCSI print
IP over 1394
10
Page 17
1. Windows 95/98/Me
Configuration
Configuring Windows 95/98/Me
Note
❒ Windows 95/98 does not support IP over 1394.
Printing without a Print Server
The following procedure describes how to configure Windows 95/98/Me to use
the machine on a network without a Windows 2000 Server, Windows 2000 Professional, Windows XP Server, Windows NT Server, Windows NT Workstation,
or NetWare based print server.
Specify the protocol to use.
AAAA
Consult your network administrator about which of the three protocols is appropriate.
• TCP/IP
• IPP
• NetBEUI
Configure the chosen protocol.
BBBB
• See p.12 “Configuring TCP/IP and IPP for Printing”.
• See p.13 “Configuring NetBEUI for Printing”.
Install the software and set the printer driver port.
CCCC
• Install SmartNetMonitor for Client from the CD-ROM labeled “Printer
Drivers and Utilities”. For more information about how to install the software and how to specify the printer driver port, see the Printer Reference 1.
Printing with a Windows 2000/XP or Windows NT Print Server
See p.20 “Setting Up a Client Computer” for configuring Windows 95/98/Me
with a Windows 2000/XP or Windows NT print server.
11
Page 18

Windows 95/98/Me Configuration
Configuring Protocols
1
Configuring TCP/IP and IPP for Printing
These instructions are for configuring the Network Interface Board and Windows 95/98/Me to use the TCP/IP protocol and IPP.
Configuring the machine
Configure the machine to use the TCP/IP protocol.
• Make sure that the TCP/IP protocol is set to active. (The default is active.)
• Assign an IP address and make other settings required for using the TCP/IP
protocol.
Reference
For more information about how to make the above settings, see the General
Settings Guide.
If DHCP is used to assign IP addresses, see p.134 “Using DHCP”.
Note
❒ After setting the IP address, use the ping command to make sure that it has
been set correctly.
Enable the use of the command prompt as follows:
A
• On Windows 95 or Windows 98
Click [Start], point to [Programs], and then click [MS-DOS Prompt].
• On Windows Me
Click [Start], point to [Programs], point to [Accessories], and then click
[MS-DOS Prompt].
Type the following: (Example IP address is 192.168.15.16)
B
C:\> ping 192.168.15.16
If the address has been configured correctly, the following message appears.
Reply from 192.168.15.16 : bytes=32 time<10ms TTL=32
If the address has been configured incorrectly, the following message appears.
Request timed out.
12
Page 19

Configuring Protocols
Configuring a Windows 95/98/Me computer
These steps are for configuring a Windows 95/98/Me computer to use the
TCP/IP protocol.
Open [Control Panel] and then double-click the [Network] icon. Make sure that
AAAA
“TCP/IP” is listed in the [The following network components are installed] box on
the [Configuration] tab.
Note
❒ If the TCP/IP protocol is not installed, click [Add] on the [Configuration] tab
to install it. For more information about installing the TCP/IP protocol, see
Windows 95/98/Me Help.
Configure the TCP/IP protocol with the appropriate IP address, subnet
BBBB
mask and other settings.
Check with the network administrator that the settings are correct.
Configuring NetBEUI for Printing
1
Follow these instructions to configure the Network Interface Board and Windows 95/98/Me to use the NetBEUI protocol.
Preparation
To use NetBEUI, use the SmartNetMonitor for Client port.
Configuring the machine
Configure the machine to use the NetBEUI protocol.
• Make sure that the NetBEUI protocol is set to active. (The default is active.)
Reference
For more information about how to make the above settings, see the General
Settings Guide.
13
Page 20

1
Windows 95/98/Me Configuration
Configuring a Windows 95/98/Me computer
Install the NetBEUI protocol on the Windows 95/98/Me computer and set it as
the default protocol.
Open [Control Panel], and then double-click the [Network] icon. Make sure
AAAA
that “NetBEUI” is listed in the [The following network components are installed]
box on the [Configuration] tab.
Note
❒ If the NetBEUI protocol is not installed, click [Add] on the [Configuration] tab
to install it. For more information about installing the NetBEUI protocol,
see Windows 95/98/Me Help.
❒ If “NetBEUI →Dial-Up Adaptor” is listed in the [The following network com-
ponents are installed] box, select it and click [Remove] to remove the binding.
Click [OK] to close the [Network] dialog box.
BBBB
14
Page 21

Using SmartNetMonitor for Client
Using SmartNetMonitor for Client
SmartNetMonitor for Client is a utility that helps you to use network printers effectively. It is useful in environments where two or more network printers are
used. It is recommended that you install SmartNetMonitor for Client to use Parallel Printing and Recovery Printing. For more information about SmartNetMonitor for Client, see SmartNetMonitor for Client Help.
❖❖❖❖ SmartNetMonitor for Client features
• Sends a print job directly to the network printers without using a print
server.
• Notifies when a printing error occurs.
• Prints documents using other printers in the printer group when the spec-
ified printer is busy (Recovery Printing).
• Notifies on print job (data sent) completion.
• Equally divides the number of copies to be printed among the selected
printers in the printer group (Parallel Printing).
1
Important
❒ The following must be the same for the specified printer and the print-
ers selected for Recovery Printing or Parallel Printing.
• Printer models (for Parallel Printing only)
• Installed options (e.g. Paper tray unit)
• Size and orientation of paper in each paper tray unit
• Total memory
• Installed fonts (including the downloaded fonts)
Note
❒ Failure to meet any of the conditions above may result in unexpected
print results.
15
Page 22

1
Windows 95/98/Me Configuration
Installing SmartNetMonitor for Client
Install SmartNetMonitor for Client from the CD-ROM labeled “Printer Drivers
and Utilities”. For more information about how to install, see the Printer Refer-
ence 1.
After the installation is complete, configure the printer port with SmartNetMonitor for Client. See p.17 “Setting Up the Printer Driver”.
Deleting the port
The following procedure allows you to delete the printer port. If you want to delete the port which is currently used in Windows, switch the port to another such
as “FILE”, and then delete it. For more information about SmartNetMonitor for
Client, see SmartNetMonitor for Client Help.
From the [Printers] window, click the icon of the printer which uses Smart-
AAAA
NetMonitor for Client to print. On the [File] menu, click [Properties].
Click the [Details] tab, and then make sure that the SmartNetMonitor for
BBBB
Client port is shown in the [Print to the following port] box.
Remember the port name because this port should be deleted later.
From the [Print to the following port] box, select [FILE].
CCCC
Click [Delete Port].
DDDD
Click the SmartNetMonitor for Client port name as in step
EEEE
[OK].
The port is deleted.
Click [OK] to close the printer properties.
FFFF
Uninstalling SmartNetMonitor for Client
Preparation
Before uninstalling SmartNetMonitor for Client, make sure that:
• The SmartNetMonitor for Client settings dialog box is closed.
• No printer is using the SmartNetMonitor for Client port as a printer port.
Open [Control Panel], and then double-click the [Add/Remove Programs] icon.
AAAA
On the [Install/Uninstall] tab, click [SmartNetMonitor for Client], and then click
BBBB
[Add/Remove].
, and then click
BBBB
16
After the confirmation message appears, click [Yes].
CCCC
UninstallShield removes all of the components of SmartNetMonitor for Client.
Page 23

Using SmartNetMonitor for Client
After the confirmation message, click [Yes].
DDDD
Acknowledge the [Question] dialog box.
EEEE
When the uninstallation is complete, click [OK].
FFFF
Setting Up the Printer Driver
The following procedure allows you to configure the printer port to use SmartNetMonitor for Client.
Preparation
The target printer must be turned on before starting the installation process.
Install the printer driver for the printer you want to use.
AAAA
From the [Printers] window, click the icon of the printer. On the [File] menu,
BBBB
click [Properties].
Click the [Details] tab and click [Add Port].
CCCC
1
Click [Other], click [SmartNetMonitor] from the list, and then click [OK].
DDDD
The [Add Port] dialog box appears.
The displayed items are as follows:
Model Name: The model name of the printer.
Name: The name of the Network Interface Board.
Comment: Additional information about the Network Interface Board.
Address: The IP address of the printer.
Select the printer.
EEEE
TCP/IP
A Click the printer you want to use, and then click [OK].
Note
❒ Printers that respond to an IP broadcast from the computer will be dis-
played. To print to a printer not listed here, click [Specify Address], and
then type the IP address or host name.
❒ You cannot add an address partially similar to that already used. For ex-
ample, when “192.168.0.2” is already used, “192.168.0.2xx” cannot be
used. Similarly, when “192.168.0.20” is already used, “192.168.0.2” cannot be used.
17
Page 24

1
Windows 95/98/Me Configuration
NetBEUI
A Click [NetBEUI].
A list of printers that can be printed to by the NetBEUI protocol appears.
B Click the printer you want to use, and then click [OK].
Note
❒ Printers that respond to a broadcast from the computer will be dis-
played. To print to a printer not listed here, click [Specify Address], and
then type the NetBEUI address. Make sure that the NetBEUI address is
on the configuration page. For more information about the printing of
the configuration page, see “Printing a Configuration Page”, Printer Ref-
erence 2. The NetBEUI address appears as “\\RNPxxxx\xxx” on the
configuration page. Type the printer's network path name in the form
of “%%Computer name\Share name”. Do not type “\\” as head characters but “%%”.
❒ You cannot print to printers beyond routers.
IPP
A Click [IPP].
The IPP setting dialog box appears.
B To specify the IP address of the printer, type “http://(printer's-ip-ad-
dress)/printer” or “ipp://(printer's-ip-address)/printer” in the [Printer
URL] field.
(Example IP address is 192.168.15.16)
http://192.168.15.16/printer
ipp://192.168.15.16/printer
C As necessary, type the names to distinguish the printer in [IPP Port Name].
Type a name different from any existing port names.
If you omit this, the address entered in [Printer URL] will be set as the IPP
port name.
D If using a proxy server and IPP user name, click [Detailed Settings] and
configure the necessary settings.
Note
❒ For more information about these settings, see SmartNetMonitor for
Client Help.
Click [OK].
FFFF
18
Make sure that the specified printing port is displayed in the [Print to the fol-
GGGG
lowing Port] box, and then click [OK].
This completes the settings.
To print, select the specified printer. SmartNetMonitor for Client will now direct print data to the printer automatically.
Page 25

Using SmartNetMonitor for Client
Changing Port Settings
Follow these steps to change SmartNetMonitor for Client settings, such as Parallel Printing, Recovery Printing, TCP/IP, the proxy server and IPP URL.
Note
❒ There are no settings for the NetBEUI protocol.
❒ You can configure Timeout Settings for the TCP/IP protocol.
From the [Printers] window, click the icon of the printer you want to use. On
AAAA
the [File] menu, click [Properties].
Click the [Details] tab, and then click [Port Settings].
BBBB
The [Port Settings] dialog box appears.
• For IPP, you can configure User Settings, Proxy Settings and Timeout Settings.
Note
❒ For more information about these settings, see SmartNetMonitor for Client
Help.
1
19
Page 26
1
Windows 95/98/Me Configuration
Setting Up a Client Computer
This section describes the procedures for setting up a client on a network that
uses Windows 2000/XP, Windows NT Server or Windows NT Workstation as a
print server.
When using a Windows 2000/XP or Windows NT print server, select a shared
printer on Windows 2000/XP or Windows NT.
Windows 2000/XP or
Windows NT Print Server
Windows 95/98/Me
Limitation
❒ When using a print server connected to the machine with SmartNetMonitor
for Client, you cannot use Recovery Printing and Parallel Printing.
❒ When using Windows XP as a print server, the client computer cannot receive
notification of print job completion.
Note
❒ This section assumes that the client has already been configured to communi-
cate with a Windows 2000/XP or Windows NT print server. Do not begin the
following procedure until the client has been set up and configured correctly.
Install the printer driver as a local printer.
AAAA
Reference
For more information about installing the printer driver, see the Printer
Reference 1.
Note
❒ Any port can be selected during the installation, however, LPT1 is recom-
mended.
20
Click [Start], point to [Settings], and then click [Printers].
BBBB
Page 27

Setting Up a Client Computer
Click the icon of the printer you want to use. On the [File] menu, click [Prop-
CCCC
erties].
Click the [Details] tab, and then click [Add Port].
DDDD
Click [Network], and then click [Browse].
EEEE
On the network tree, double-click the name of a computer used as the print
FFFF
server.
The printers connected to the network are displayed.
Click the name of the printer you want to use, and then click [OK].
GGGG
Click [OK].
HHHH
Make sure that the port name is displayed in the [Print to the following port]
IIII
box, and then click [OK].
1
21
Page 28

1
Windows 95/98/Me Configuration
22
Page 29

2. Windows 2000 Configuration
Configuring Windows 2000
Printing without a Print Server
The following procedure describes how to configure Windows 2000 to use the
machine on a network without a Windows 2000 Server, Windows 2000 Professional, Windows XP, Windows NT Server, Windows NT Workstation or NetWare based print server.
Specify the protocol to use.
AAAA
Consult your network administrator about which of the three protocols is appropriate.
• TCP/IP
• IPP
• NetBEUI
Configure the chosen protocol.
BBBB
• See p.25 “Configuring TCP/IP and IPP for Printing”.
• See p.26 “Configuring NetBEUI for Printing”.
Install the software and set the printer driver port.
CCCC
• Install SmartNetMonitor for Client from the CD-ROM labeled “Printer
Drivers and Utilities”. For more information about how to install the software and how to specify the printer driver port, see the Printer Reference 1.
Printing with a Standard TCP/IP Port
The Standard TCP/IP port is standard to Windows 2000, enabling Peer-to-Peer
printing in a network environment.
For more information about Standard TCP/IP port settings, see Windows 2000
Help.
Note
❒ If a device model selection dialog box appears during the procedure to add
the standard TCP/IP port, select “RICOH Network Printer C Model”.
23
Page 30

2
Windows 2000 Configuration
Printing with a LPR Port
See p.32 “Configuring LPR Port Printing” for configuring a LPR port in Windows 2000.
Printing with a Windows 2000/XP or Windows NT Print Server
See p.33 “Setting Up a Client Computer” for configuring Windows 2000 with a
Windows 2000/XP or Windows NT print server.
24
Page 31

Configuring Protocols
Configuring Protocols
Configuring TCP/IP and IPP for Printing
These instructions are for configuring the Network Interface Board and Windows 2000 to use the TCP/IP protocol and IPP.
Configuring the machine
Configure the machine to use the TCP/IP protocol.
• Make sure that the TCP/IP protocol is set to active. (The default is active.)
• Assign an IP address and make other settings required for using the TCP/IP
protocol.
Reference
For more information about how to make the above settings, see the General
Settings Guide.
If DHCP is used to assign IP addresses, see p.134 “Using DHCP”.
2
To use the IP over 1394, see the General Settings Guide.
Note
❒ After setting the IP address, use the ping command to make sure that it has
been set correctly.
Click [Start], point to [Programs], point to [Accessories], and then click [Com-
A
mand Prompt].
Type the following: (Example IP address is 192.168.15.16)
B
C:\> ping 192.168.15.16
If the address has been configured correctly, the following message appears.
Reply from 192.168.15.16 : bytes=32 time<10ms TTL=32
If the address has been configured incorrectly, the following message appears.
Request timed out.
Configuring a Windows 2000 computer
These steps are for configuring a Windows 2000 computer to use the TCP/IP
protocol.
Click [Start] on the taskbar, point to [Settings], and then click [Network and
AAAA
Dial-up Connections].
Double-click [Local Area Connection]. On the [General] tab, click [Properties].
BBBB
25
Page 32

2
Windows 2000 Configuration
Make sure that the “Internet Protocol (TCP/IP)” is selected in the [Compo-
CCCC
nents checked are used by this connection] box on the [General] tab.
Note
❒ Select the TCP/IP protocol if it is not already selected.
❒ If the TCP/IP protocol is not installed, click [Install] on the [General] tab to
install it. For more information about installing the TCP/IP protocol, see
Windows 2000 Help.
Configure the TCP/IP protocol with the appropriate IP address, subnet
DDDD
mask and other settings.
Check with the network administrator that the settings are correct.
Configuring NetBEUI for Printing
Follow these instructions to configure the Network Interface Board and Windows 2000 to use the NetBEUI protocol.
Preparation
To use NetBEUI, use the SmartNetMonitor for Client port.
Configuring the machine
Configure the machine to use the NetBEUI protocol.
• Make sure that the NetBEUI protocol is set to active. (The default is active.)
Reference
For more information about how to make the above settings, see the General
Settings Guide.
Configuring a Windows 2000 computer
Follow these steps to configure a Windows 2000 computer to use the NetBEUI
protocol.
Click [Start] on the taskbar, point to [Settings], and then click [Network and
AAAA
Dial-up Connections].
Double-click [Local Area Connection]. On the [General] tab, click [Properties].
BBBB
Make sure that the“NetBEUI Protocol” is selected in the [Components
CCCC
checked are used by this connection] box on the [General] tab.
Note
❒ Select the NetBEUI protocol if it is not already selected.
26
❒ If the NetBEUI protocol is not installed, click [Install] on the [General] tab
and install it. For more information about installing the NetBEUI protocol,
see Windows 2000 Help.
Page 33

Using SmartNetMonitor for Client
Using SmartNetMonitor for Client
SmartNetMonitor for Client is a utility that helps you to use network printers effectively. It is useful in environments where two or more network printers are
used. It is recommended that you install SmartNetMonitor for Client to use Parallel Printing and Recovery Printing. For more information about SmartNetMonitor for Client, see SmartNetMonitor for Client Help.
❖❖❖❖ SmartNetMonitor for Client features
• Sends a print job directly to the network printers without using a print
server.
• Notifies when a printing error occurs.
• Prints documents using other printers in the printer group when the spec-
ified printer is busy (Recovery Printing).
• Notifies on print job (data sent) completion.
• Equally divides the number of copies to be printed among the selected
printers in the printer group (Parallel Printing).
2
Important
❒ The following must be the same for the specified printer and the print-
ers selected for Recovery Printing or Parallel Printing.
• Printer models (for Parallel Printing only)
• Installed options (e.g. Paper tray unit)
• Size and orientation of paper in each paper tray unit
• Total memory
• Installed fonts (including the downloaded fonts)
Limitation
❒ When using a computer as a print server, do not use the notification of
print completion function. For more information about how to set this
function to off, see SmartNetMonitor for Client Help.
Note
❒ Failure to meet any of the conditions above may result in unexpected
print results.
27
Page 34

2
Windows 2000 Configuration
Installing SmartNetMonitor for Client
Install SmartNetMonitor for Client from the CD-ROM labeled “Printer Drivers
and Utilities”. For more information about how to install, see the Printer Refer-
ence 1.
After the installation is complete, configure the printer port with SmartNetMonitor for Client. See p.29 “Setting Up the Printer Driver”.
Deleting the port
The following procedure allows you to delete the printer port. If you want to delete the port which is currently used in Windows, switch the port to another such
as “FILE”, and then delete it. For more information about SmartNetMonitor for
Client, see SmartNetMonitor for Client Help.
From the [Printers] window, click the icon of the printer which uses Smart-
AAAA
NetMonitor for Client to print. On the [File] menu, click [Properties].
Click the [Ports] tab, and then make sure that the SmartNetMonitor for Cli-
BBBB
ent port is shown in the [Print to the following port(s)] box.
Remember the port name because this port should be deleted later.
Select the [FILE] check box in the [Port] column.
CCCC
Click [OK] to close the Printer Properties.
DDDD
The port which is currently in use is changed.
Open the Printer Properties of the same printer.
EEEE
Select the [Ports] tab.
FFFF
At the [Port] column in the [Print to the following port(s)] box, click the Smart-
GGGG
NetMonitor for Client port name as in step
Click [Delete Port].
HHHH
After the confirmation message appears, click [Yes].
IIII
The port is deleted.
Click [Close] to close the Printer Properties.
JJJJ
.
BBBB
28
Page 35

Using SmartNetMonitor for Client
Uninstalling SmartNetMonitor for Client
Preparation
Before uninstalling SmartNetMonitor for Client, make sure that:
• The port settings dialog box is closed.
• No printer is using the SmartNetMonitor for Client port as a printer port.
• You logged in with the same user authority as that used to install Smart-
NetMonitor for Client.
Open [Control Panel], and then double-click the [Add/Remove Programs] icon.
AAAA
Click the [Change or Remove Programs] tab, click [SmartNetMonitor for Client],
BBBB
and then click [Change/Remove].
After the confirmation message appears, click [Yes].
CCCC
UninstallShield removes all of the components of SmartNetMonitor for Client.
After the confirmation message appears, click [Yes].
DDDD
Acknowledge the [Remove Shared File?] dialog box.
EEEE
When the uninstallation is complete, click [OK].
FFFF
Setting Up the Printer Driver
The following procedure allows you to configure the printer port to use SmartNetMonitor for Client.
Preparation
The target printer must be turned on before starting the installation process.
2
Install the printer driver for the printer you want to use.
AAAA
From the [Printers] window, click the icon of the printer. On the [File] menu,
BBBB
click [Properties].
Click the [Ports] tab and click [Add Port].
CCCC
Click [SmartNetMonitor for Client] in the [Available port types] box, and then click
DDDD
[New Port].
The [Select Printer] dialog box appears and printers on the network are
browsed.
The displayed items are as follows:
Model Name: The model name of the printer.
Name: The name of the Network Interface Board.
Comment: Additional information about the Network Interface Board.
Address: The IP address of the printer.
29
Page 36

2
Windows 2000 Configuration
Select the printer.
EEEE
TCP/IP
A Click the printer you want to use, and then click [OK].
Note
❒ Printers that respond to an IP broadcast from the computer will be dis-
played. To print to a printer not listed here, click [Specify Address], and
then type the IP address or host name.
NetBEUI
A Click [NetBEUI].
A list of printers that can be printed by the NetBEUI protocol appears.
B Click the printer you want to use, and then click [OK].
Note
❒ Printers that respond to a broadcast from the computer will be dis-
played. To print to a printer not listed here, click [Specify Address], and
then type the NetBEUI address. Make sure that the NetBEUI address is
on the configuration page. For more information about the printing of
the configuration page, see “Printing a Configuration Page”, Printer Ref-
erence 2. The NetBEUI address appears as “\\RNPxxxx\xxx” on the
configuration page. Type the printer's network path name in the form
of “%%Computer name\Share name”. Do not type “\\” as head characters but “%%”.
❒ You cannot print to printers beyond routers.
30
IPP
A Click [IPP].
The IPP setting dialog box appears.
B To specify the IP address of the printer, type “http://(printer's-ip-ad-
dress)/printer” or “ipp://(printer's-ip-address)/printer” in the [Printer
URL] field.
(Example IP address is 192.168.15.16)
http://192.168.15.16/printer
ipp://192.168.15.16/printer
C As necessary, type the names to distinguish the printer in [IPP Port Name].
Type a name different from any existing port names.
If you omit this, the address entered in [Printer URL] will be set as the IPP
port name.
Page 37

Using SmartNetMonitor for Client
D If using a proxy server and IPP user name, click [Detailed Settings] and
configure the necessary settings.
Note
❒ For more information about these settings, see SmartNetMonitor for
Client Help.
Click [OK].
FFFF
Make sure that the specified printing port is displayed in the [Print to the fol-
GGGG
lowing Port(s)] box, and then click [Close].
This completes the settings.
To print, select the specified printer. SmartNetMonitor for Client will now direct print data to the printer automatically.
Changing Port Settings
Follow these steps to change SmartNetMonitor for Client settings, such as Parallel Printing, Recovery Printing, TCP/IP, the proxy server and IPP URL.
Note
❒ There are no settings for the NetBEUI protocol.
From the [Printers] window, click the icon of the printer you want to use. On
AAAA
the [File] menu, click [Properties].
Click the [Ports] tab, and then click [Configure Port].
BBBB
The [Port Settings] dialog box appears.
• For TCP/IP protocol, you can configure Parallel Printing, Recovery Printing and Timeout Settings.
2
• For IPP, you can configure User Settings, Proxy Settings and Timeout Settings.
Note
❒ For more information about these settings, see SmartNetMonitor for Client
Help.
31
Page 38

2
Windows 2000 Configuration
Configuring LPR Port Printing
This section explains the procedure for printing to a LPR port from Windows
2000.
Note
❒ The TCP/IP protocols must be installed and configured correctly. For more
information about configuring the protocols, see p.25 “Configuring TCP/IP
and IPP for Printing”.
Click [Start], point to [Settings], and then click [Printers].
AAAA
The [Printers] window appears.
Click the icon of the printer you want to use. On the [File] menu, click [Prop-
BBBB
erties].
Click the [Ports] tab and click [Add Port].
CCCC
In the [Available port types] box, click “LPR Port”, and then click [New Port].
DDDD
Note
❒ If “LPR Port” does not appear, “Print Services for Unix” has not been in-
stalled. For more information about how to install “Print Services for Unix”, see Windows 2000 Help.
Type the IP address of the Network Interface Board into the [Name or address
EEEE
of server providing lpd] box.
Type “lp” into the [Name of printer or print queue on that server box], and then
FFFF
click [OK].
Click [Close].
GGGG
Make sure that the port name is displayed in the [Print to the following port(s)]
HHHH
box and the check box is selected, and then click [OK].
32
Page 39

Setting Up a Client Computer
Setting Up a Client Computer
This section describes the procedures for setting up a client in a network that
uses Windows 2000/XP, Windows NT Server or Windows NT Workstation as a
print server.
When using a Windows 2000/XP or Windows NT print server, select a shared
printer on Windows 2000/XP or Windows NT.
Windows 2000/XP or
Windows NT Print Server
2
Windows 2000
Limitation
❒ When using a print server connected to the machine with SmartNetMonitor
for Client, you cannot use Recovery Printing and Parallel Printing.
Note
❒ This section assumes that the client has already been configured to communi-
cate with a Windows 2000/XP or Windows NT print server. Do not begin the
following procedure until the client has been set up and configured correctly.
❒ When using Windows NT 4.0 as the print server, make sure to install the Win-
dows NT 4.0 printer driver before connecting the print server. There is a Windows NT 4.0 printer driver on the CD-ROM labeled “Printer Drivers and
Utilities”.
Use the [Printers] window to set up the printer.
Click [Start], point to [Settings], and then click [Printers].
AAAA
Double-click the [Add Printer] icon.
BBBB
This launches the Add Printer Wizard.
Click [Next >].
CCCC
Click [Network printer], and then click [Next >].
DDDD
33
Page 40

Windows 2000 Configuration
Click [Next >].
EEEE
In the [Shared printers] box, double-click the name of the computer used as
FFFF
the print server.
The printers attached to the network are displayed.
Click the printer you want to use, and then click [Next >].
GGGG
2
Select if you want to use this printer as the default printer, and then click
HHHH
[Next >].
After the installation is complete, click [Finish].
IIII
The icon of the newly installed printer appears in the [Printers] window.
34
Page 41

3. Windows XP Configuration
Configuring Windows XP
Printing without a Print Server
The following procedure describes how to configure Windows XP to use the machine on a network without a Windows 2000 Server, Windows 2000 Professional, Windows XP Server, Windows NT Server, Windows NT Workstation or
NetWare based print server.
Specify the protocol to use.
AAAA
Consult your network administrator about which of the two protocols is appropriate.
• TCP/IP
• IPP
Configure the protocol.
BBBB
• See p.37 “Configuring TCP/IP and IPP for Printing”.
Install the software and set the printer driver port.
CCCC
• Install SmartNetMonitor for Client from the CD-ROM labeled “Printer
Drivers and Utilities”. For more information about how to install the software and how to specify the printer driver port, see the Printer Reference 1.
Printing with a Standard TCP/IP Port
The Standard TCP/IP port is standard to Windows XP, enabling Peer-to-Peer
printing in a network environment.
For more information about Standard TCP/IP port settings, see Windows XP
Help.
Note
❒ If a device model selection dialog box appears during the procedure to add
the standard TCP/IP port, select “RICOH Network Printer C Model”.
35
Page 42

3
Windows XP Configuration
Printing with a LPR Port
See p.44 “Configuring LPR Port Printing” for configuring a LPR port in Windows XP.
Printing with a Windows 2000/XP or Windows NT Print Server
See p.45 “Setting Up a Client Computer” for configuring Windows XP with a
Windows 2000/XP or Windows NT print server.
36
Page 43

Configuring Protocols
Configuring Protocols
Configuring TCP/IP and IPP for Printing
These instructions are for configuring the Network Interface Board and Windows XP to use the TCP/IP protocol and IPP.
Configuring the machine
Configure the machine to use the TCP/IP protocol.
• Make sure that the TCP/IP protocol is set to active. (The default is active.)
• Assign an IP address and make other settings required for using the TCP/IP
protocol.
Reference
For more information about how to make the above settings, see the General
Settings Guide.
If DHCP is used to assign IP addresses, see p.134 “Using DHCP”.
To use the IP over 1394, see the General Settings Guide.
Note
❒ After setting the IP address, use the ping command to make sure that it has
been set correctly.
Click [Start], point to [All Programs], point to [Accessories], and then click
A
[Command Prompt].
Type the following: (Example IP address is 192.168.15.16)
B
C:\> ping 192.168.15.16
If the address has been configured correctly, the following message appears.
Reply from 192.168.15.16 : bytes=32 time<10ms TTL=32
If the address has been configured incorrectly, the following message appears.
Request timed out.
3
37
Page 44

Windows XP Configuration
Configuring a Windows XP computer
These steps are for configuring a Windows XP computer to use the TCP/IP protocol.
Click [Start] on the taskbar, click [Control Panel], and then click [Network and
AAAA
Internet Connections].
Click [Network Connections], and then double-click [Local Area Connection].
BBBB
On the [General] tab, click [Properties].
CCCC
3
Note
❒ With the IP over 1394, click [1394 Connection].
Make sure that the “Internet Protocol (TCP/IP)” is selected in the [This con-
DDDD
nection uses the following items] box on the [General] tab.
Note
❒ Select the TCP/IP protocol if it is not already selected.
❒ If the TCP/IP protocol is not installed, click [Install] on the [General] tab to
install it. For more information about installing the TCP/IP protocol, see
Windows XP Help.
Configure the TCP/IP protocol with the appropriate IP address, subnet
EEEE
mask and other settings.
Check with the network administrator that the settings are correct.
38
Page 45

Using SmartNetMonitor for Client
Using SmartNetMonitor for Client
SmartNetMonitor for Client is a utility that helps you to use network printers effectively. It is useful in environments where two or more network printers are
used. It is recommended that you install SmartNetMonitor for Client to use Parallel Printing and Recovery Printing. For more information about SmartNetMonitor for Client, see SmartNetMonitor for Client Help.
❖❖❖❖ SmartNetMonitor for Client features
• Sends a print job directly to the network printers without using a print
server.
• Notifies when a printing error occurs.
• Prints documents using other printers in the printer group when the spec-
ified printer is busy (Recovery Printing).
• Notifies on print job (data sent) completion.
• Equally divides the number of copies to be printed among the selected
printers in the printer group (Parallel Printing).
3
Important
❒ The following must be the same for the specified printer and the print-
ers selected for Recovery Printing or Parallel Printing.
• Printer models (for Parallel Printing only)
• Installed options (e.g. Paper tray unit)
• Size and orientation of paper in each paper tray unit
• Total memory
• Installed fonts (including the downloaded fonts)
Limitation
❒ When using a computer as a print server, do not use the notification of
print completion function. For more information about how to set this
function to off, see SmartNetMonitor for Client Help.
Note
❒ Failure to meet any of the conditions above may result in unexpected
print results.
39
Page 46

Windows XP Configuration
Installing SmartNetMonitor for Client
Install SmartNetMonitor for Client from the CD-ROM labeled “Printer Drivers
and Utilities”. For more information about how to install, see the Printer Refer-
ence 1.
After the installation is complete, configure the printer port with SmartNetMonitor for Client. See p.41 “Setting Up the Printer Driver”.
Deleting the port
3
The following procedure allows you to delete the printer port. If you want to delete the port which is currently used in Windows, switch the port to another such
as “FILE”, and then delete it. For more information about SmartNetMonitor for
Client, see SmartNetMonitor for Client Help.
From the [Printers and Faxes] window, click the icon of the printer which uses
AAAA
SmartNetMonitor for Client to print. On the [File] menu, click [Properties].
Click the [Ports] tab, and then make sure that the SmartNetMonitor for Cli-
BBBB
ent port is shown in the [Print to the following port(s)] box.
Remember the port name because this port should be deleted later.
Select the [FILE] check box in the [Port] column.
CCCC
Click [OK] to close the Printer Properties.
DDDD
The port which is currently in use is changed.
Open the Printer Properties of the same printer.
EEEE
Select the [Ports] tab.
FFFF
At the [Port] column in the [Print to the following port(s)] box, click the Smart-
GGGG
NetMonitor for Client port name as in step
.
BBBB
40
Click [Delete Port].
HHHH
After the confirmation message appears, click [Yes].
IIII
The port is deleted.
Click [Close] to close the Printer Properties.
JJJJ
Page 47

Using SmartNetMonitor for Client
Uninstalling SmartNetMonitor for Client
Preparation
Before uninstalling SmartNetMonitor for Client, make sure that:
• The port settings dialog box is closed.
• No printer is using the SmartNetMonitor for Client port as a printer port.
• You logged in with the same user authority as that used to install Smart-
NetMonitor for Client.
Open [Control Panel], and then double-click the [Add or Remove Programs]
AAAA
icon.
Click the [Change or Remove Programs] category, click [SmartNetMonitor for Cli-
BBBB
ent], and then click [Change/Remove].
After the confirmation message appears, click [Yes].
CCCC
UninstallShield removes all of the components of SmartNetMonitor for Client.
After the confirmation message appears, click [Yes].
DDDD
3
Acknowledge the [Remove Shared File?] dialog box.
EEEE
When the uninstallation is complete, click [OK].
FFFF
Setting Up the Printer Driver
The following procedure allows you to configure the printer port to use SmartNetMonitor for Client.
Preparation
The target printer must be turned on before starting the installation process.
Install the printer driver for the printer you want to use.
AAAA
From the [Printers and Faxes] window, click the icon of the printer. On the
BBBB
[File] menu, click [Properties].
Click the [Ports] tab and click [Add Port].
CCCC
Click [SmartNetMonitor for Client] in the [Available port types] box, and then click
DDDD
[New Port].
The [Select Printer] dialog box appears and printers on the network are
browsed.
The displayed items are as follows:
Model Name: The model name of the printer.
Name: The name of the Network Interface Board.
Comment: Additional information about the Network Interface Board.
Address: The IP address of the printer.
41
Page 48

3
Windows XP Configuration
Select the printer.
EEEE
TCP/IP
A Click the printer you want to use, and then click [OK].
Note
❒ Printers that respond to an IP broadcast from the computer will be dis-
played. To print to a printer not listed here, click [Specify Address], and
then type the IP address or host name.
IPP
A Click [IPP].
The IPP setting dialog box appears.
B To specify the IP address of the printer, type “http://(printer's-ip-ad-
dress)/printer” or “ipp://(printer's-ip-address)/printer” in the [Printer
URL] field.
(Example IP address is 192.168.15.16)
http://192.168.15.16/printer
ipp://192.168.15.16/printer
C As necessary, type the names to distinguish the printer in [IPP Port Name].
Type a name different from any existing port names.
If you omit this, the address entered in [Printer URL] will be set as the IPP
port name.
D If using a proxy server and IPP user name, click [Detailed Settings] and
configure the necessary settings.
Note
❒ For more information about these settings, see SmartNetMonitor for
Client Help.
Click [OK].
FFFF
Make sure that the specified printing port is displayed in the [Print to the fol-
GGGG
lowing Port(s)] box, and then click [Close].
This completes the settings.
To print, select the specified printer. SmartNetMonitor for Client will now direct print data to the printer automatically.
42
Page 49

Using SmartNetMonitor for Client
Changing Port Settings
Follow these steps to change SmartNetMonitor for Client settings, such as Parallel Printing, Recovery Printing, TCP/IP, the proxy server and IPP URL.
Note
❒ There are no settings for the NetBEUI protocol.
Access the [Printers and Faxes] window from [Start] on the taskbar.
AAAA
Windows XP Professional
A Click [Start], and then click [Printers and Faxes].
Windows XP Home Edition
A Click [Start], and then click [Control Panel].
B Click [Printers and Other Hardware].
C Click [Printers and Faxes].
Click the icon of the printer. On the [file] menu, click [Properties].
BBBB
Click the [Ports] tab, and then click [Configure Port].
CCCC
The [Port Settings] dialog box appears.
• For TCP/IP protocol, you can configure Parallel Printing, Recovery Printing and Timeout Settings.
• For IPP, you can configure User Settings, Proxy Settings and Timeout Settings.
Note
❒ For more information about these settings, see SmartNetMonitor for Client
Help.
3
43
Page 50

3
Windows XP Configuration
Configuring LPR Port Printing
This section explains the procedure for printing to a LPR port from Windows
XP.
Note
❒ The TCP/IP protocols must be installed and configured correctly. For more
information about configuring the protocols, see p.37 “Configuring TCP/IP
and IPP for Printing”.
Access the [Printers and Faxes] window from [Start] on the taskbar.
AAAA
Windows XP Professional
A Click [Start], and then click [Printers and Faxes].
Windows XP Home Edition
A Click [Start], and then click [Control Panel].
B Click [Printers and Other Hardware].
C Click [Printers and Faxes].
Click the icon of the printer you want to use. On the [File] menu, click [Prop-
BBBB
erties].
Click the [Ports] tab and click [Add Port].
CCCC
In the [Available port types] box, click “LPR Port”, and then click [New Port].
DDDD
Note
❒ If “LPR Port” does not appear, “Print Services for Unix” has not been in-
stalled. For more information about how to install “Print Services for Unix”, see Windows XP Help.
Type the IP address of the Network Interface Board into the [Name or address
EEEE
of server providing lpd] box.
Type “lp” into the [Name of printer or print queue on that server] box, and then
FFFF
click [OK].
Click [Close].
GGGG
Make sure that the port name is displayed in the [Print to the following port(s)]
HHHH
box and the check box is selected, click [Apply] and then click [OK].
44
Page 51

Setting Up a Client Computer
Setting Up a Client Computer
This section describes the procedures for setting up a client in a network that
uses Windows 2000/XP, Windows NT Server or Windows NT Workstation as a
print server.
When using a Windows 2000/XP or Windows NT print server, select a shared
printer on Windows 2000/XP or Windows NT.
Windows 2000/XP or
Windows NT Print Server
Windows XP
Limitation
❒ When using a print server connected to the machine with SmartNetMonitor
for Client, you cannot use Recovery Printing and Parallel Printing.
Note
❒ This section assumes that the client has already been configured to communi-
cate with a Windows 2000/XP or Windows NT print server. Do not begin the
following procedure until the client has been set up and configured correctly.
❒ When using Windows NT 4.0 as the print server, make sure to install the Win-
dows NT 4.0 printer driver before connecting the print server. There is a Windows NT 4.0 printer driver on the CD-ROM labeled “Printer Drivers and
Utilities”.
3
Use the [Printers and faxes] window to set up the printer.
45
Page 52

3
Windows XP Configuration
Access the [Printers and Faxes] window from [Start] on the taskbar.
AAAA
Windows XP Professional
A Click [Start], and then click [Printers and Faxes].
Windows XP Home Edition
A Click [Start], and then click [Control Panel].
B Click [Printers and Other Hardware].
C Click [Printers and Faxes].
Click [Add a printer] in the Printer Tasks category.
BBBB
This launches the Add Printer Wizard.
Click [Next >].
CCCC
Click [A network printer, or a printer attached to another computer], and then click
DDDD
[Next >].
Click [Next >].
EEEE
In the [Shared printers:] box, double-click the name of the computer used as
FFFF
the print server.
The printers attached to the network are displayed.
Click the printer you want to use, and then click [Next >].
GGGG
Select if you want to use this printer as the default printer, and then click
HHHH
[Next >].
After the installation is complete, click [Finish].
IIII
The icon of the newly installed printer appears in the [Printers] window.
46
Page 53

4. Windows NT 4.0 Configuration
Configuring Windows NT 4.0
Note
❒ Windows NT 4.0 does not support IP over 1394.
Printing without a Print Server
The following procedure describes how to configure Windows NT 4.0 to use the
machine on a network without a Windows 2000 Server, Windows 2000 Professional, Windows XP Server, Windows NT Server, Windows NT Workstation or
NetWare based print server.
Specify the protocol to use.
AAAA
Consult your network administrator about which of the three protocols is appropriate.
• TCP/IP
• IPP
• NetBEUI
Configure the chosen protocol.
BBBB
• See p.48 “Configuring TCP/IP and IPP for Printing”.
• See p.49 “Configuring NetBEUI for Printing”.
Install the software and set the printer driver port.
CCCC
• Install SmartNetMonitor for Client from the CD-ROM labeled “Printer
Drivers and Utilities”. For more information about how to install the software and how to specify the printer driver port, see the Printer Reference 1.
Printing with a LPR Port
See p.56 “Configuring LPR Port Printing” for how to configure a LPR port in
Windows NT 4.0.
Printing with a Windows 2000/XP or Windows NT Print Server
See p.57 “Setting Up a Client Computer” for configuring Windows NT 4.0 with
a Windows 2000/XP or Windows NT print server.
47
Page 54

Windows NT 4.0 Configuration
Configuring Protocols
Configuring TCP/IP and IPP for Printing
These instructions are for configuring the Network Interface Board and Windows NT to use the TCP/IP protocol and IPP.
Configuring the machine
Configure the machine to use the TCP/IP protocol.
• Make sure that the TCP/IP protocol is set to active. (The default is active.)
4
• Assign an IP address and make other settings required for using the TCP/IP
protocol.
Reference
For more information about how to make the above settings, see the General
Settings Guide.
If DHCP is used to assign IP addresses, see p.134 “Using DHCP”.
Note
❒ After setting the IP address, use the ping command to make sure that it has
been correctly set.
Click [Start], point to [Programs], and then click [Command Prompt].
A
Type the following: (Example IP address is 192.168.15.16)
B
C:\> ping 192.168.15.16
If the address has been configured correctly, the following message appears.
Reply from 192.168.15.16 : bytes=32 time<10ms TTL=32
If the address has been configured incorrectly, the following message appears.
Request timed out.
48
Page 55

Configuring Protocols
Configuring a Windows NT computer
These steps are for configuring a Windows NT computer to use the TCP/IP protocol.
Open [Control Panel], and then double-click the [Network] icon. Make sure
AAAA
that “TCP/IP Protocol” is listed in the [Network protocols] box on the [Proto-
cols] tab.
Note
❒ If the TCP/IP protocol is not installed, click [Add] on the [Protocols] tab to
install it. For more information about installing the TCP/IP protocol, see
Windows NT Help.
Configure the TCP/IP protocols with the appropriate IP address, subnet
BBBB
mask and other settings.
Check with the network administrator that the settings are correct.
Configuring NetBEUI for Printing
4
Follow these instructions to configure the Network Interface Board and Windows NT to use the NetBEUI protocol.
Preparation
To use NetBEUI, use the SmartNetMonitor for Client port.
Configuring the machine
Configure the machine to use the NetBEUI protocol.
• Make sure that the NetBEUI protocol is set to active. (The default is active.)
Reference
For more information about how to make the above settings, see the General
Settings Guide.
49
Page 56

4
Windows NT 4.0 Configuration
Configuring a Windows NT computer
Install the NetBEUI protocol on the Windows NT computer, and then change the
LAN adapter number (Lana Number).
Open [Control Panel], and then double-click the [Network] icon. Make sure
AAAA
that “NetBEUI Protocol” is listed in the [Network Protocols] box on the [Proto-
cols] tab.
Note
❒ If the NetBEUI protocol is not installed, click [Add] on the [Protocols] tab to
install it. For more information about installing the NetBEUI protocol, see
Windows NT Help.
Change the Lana Number. Click the [Services] tab, click “NetBIOS Inter-
BBBB
face” in the [Services] tab, and then click [Properties].
Click the Lana Number corresponding the Nbf protocol of the [Network
CCCC
Route] headline, and then click [Edit].
Type “0” as the Lana Number.
DDDD
Note
❒ If the other protocol's Lana Number is configured with “0”, you must
change the Lana Number a number other than “0”.
Click [OK].
EEEE
Click [Close], and then close the [Network] dialog box.
FFFF
After checking the message to restart, click [Yes].
GGGG
Note
❒ After you change the Lana Number, you must restart the computer.
50
Page 57

Using SmartNetMonitor for Client
Using SmartNetMonitor for Client
SmartNetMonitor for Client is a utility that helps you to use network printers effectively. It is useful in environments where two or more network printers are
used. It is recommended that you install SmartNetMonitor for Client to use Parallel Printing and Recovery Printing. For more information about SmartNetMonitor for Client, see SmartNetMonitor for Client Help.
❖❖❖❖ SmartNetMonitor for Client features
• Sends a print job directly to the network printers without using a print
server.
• Notifies when a printing error occurs.
• Prints documents using other printers in the printer group when the spec-
ified printer is busy (Recovery Printing).
• Notifies on print job (data sent) completion.
• Equally divides the number of copies to be printed among the selected
printers in the printer group (Parallel Printing).
Important
❒ The following must be the same for the specified printer and the print-
ers selected for Recovery Printing or Parallel Printing.
• Printer models (for Parallel Printing only)
• Installed options (e.g. Paper tray unit)
• Size and orientation of paper in each paper tray unit
• Total memory
• Installed fonts (including the downloaded fonts)
Limitation
❒ When using a computer as a print server, do not use the notification of
print completion function. For more information about how to set this
function to off, see SmartNetMonitor for Client Help.
❒ On a computer that is used as a print server, do not use the features such
as Parallel Printing, Recovery Printing and Notify. For more information about turning off these features, see SmartNetMonitor for Client
Help.
4
Note
❒ Failure to meet any of the conditions above may result in unexpected
print results.
51
Page 58

4
Windows NT 4.0 Configuration
Installing SmartNetMonitor for Client
Install SmartNetMonitor for Client from the CD-ROM labeled “Printer Drivers
and Utilities”. For more information about how to install, see the Printer Refer-
ence 1.
After the installation is complete, configure the printer port with SmartNetMonitor for Client. See p.53 “Setting Up the Printer Driver”.
Deleting the port
The following procedure allows you to delete the printer port. If you want to delete the port which is currently used in Windows, switch the port to another such
as “FILE”, and then delete it. For more information about SmartNetMonitor for
Client, see SmartNetMonitor for Client Help.
From the [Printers] window, click the icon of the printer which uses Smart-
AAAA
NetMonitor for Client to print. On the [File] menu, click [Properties].
Click the [Ports] tab, and then make sure that the SmartNetMonitor for Cli-
BBBB
ent port is shown in the [Print to the following port] box.
Remember the port name because this port should be deleted later.
From the [Print to the following port] box, select [FILE].
CCCC
Click [Apply].
DDDD
The port which is currently in use is changed.
Click [Delete Port].
EEEE
After the confirmation message appears, click [Yes].
FFFF
The port is deleted.
Click [OK] to close the printer properties.
GGGG
52
Page 59

Using SmartNetMonitor for Client
Uninstalling SmartNetMonitor for Client
Preparation
Before uninstalling SmartNetMonitor for Client, make sure that:
• The port settings dialog box is closed.
• No printer is using the SmartNetMonitor for Client port as a printer port.
• You have performed login with the same user authority as that used to in-
stall SmartNetMonitor for Client.
Open [Control Panel], and then double-click the [Add/Remove Programs] icon.
AAAA
On the [Install/Uninstall] tab, click [SmartNetMonitor for Client], and then click
BBBB
[Add/Remove].
After the confirmation message appears, click [Yes].
CCCC
UninstallShield removes all of the components of SmartNetMonitor for Client.
After a confirmation message appears, click [Yes].
DDDD
4
Acknowledge the [Remove Shared File?] dialog box.
EEEE
When the uninstallation is complete, click [OK].
FFFF
Setting Up the Printer Driver
The following procedure allows you to configure the printer port to use SmartNetMonitor for Client.
Preparation
The target printer must be turned on before starting the installation process.
Install the printer driver for the printer you want to use.
AAAA
From the [Printers] window, click the icon of the printer. On the [File] menu,
BBBB
click [Properties].
Click the [Ports] tab and click [Add Port].
CCCC
Click [SmartNetMonitor] from the list, and then click [New Port].
DDDD
The [Select Printer] dialog box appears .
The displayed items are as follows:
Model Name: The model name of the printer.
Name: The name of the Network Interface Board.
Comment: Additional information about the Network Interface Board.
Address: The IP address of the printer.
53
Page 60

Windows NT 4.0 Configuration
Select the printer.
EEEE
TCP/IP
A Click the printer you want to use, and then click [OK].
Note
❒ Printers that respond to an IP broadcast from the computer will be dis-
played. To print to a printer not listed here, click [Specify Address], and
then type the IP address or host name.
NetBEUI
4
A Click [NetBEUI].
A list of printers that can be printed by the NetBEUI protocol appears.
B Click the printer you want to use, and then click [OK].
Note
❒ Printers that respond to a broadcast from the computer will be dis-
played. To print to a printer not listed here, click [Specify Address], and
then type the NetBEUI address. Make sure that the NetBEUI address is
on the configuration page. For more information about the printing of
the configuration page, see “Printing a Configuration Page”, Printer Ref-
erence 2. The NetBEUI address appears as “\\RNPxxxx\xxx” on the
configuration page. Type the printer's network path name in the form
of “%%Computer name\Share name”. Do not type “\\” as head characters but “%%”.
❒ You cannot print to printers beyond routers.
IPP
A Click [IPP].
The IPP setting dialog box appears.
B To specify the IP address of the printer, type “http://(printer's-ip-ad-
dress)/printer” or “ipp://(printer's-ip-address)/printer” in the [Printer
URL] field.
(Example IP address is 192.168.15.16)
54
http://192.168.15.16/printer
ipp://192.168.15.16/printer
C As necessary, type the names to distinguish the printer in [IPP Port Name].
Type a name different from any existing port names.
If you omit this, the address entered in [Printer URL] will be set as the IPP
port name.
Page 61

Using SmartNetMonitor for Client
D If using a proxy server and IPP user name, click [Detailed Settings] and
configure the necessary settings.
Note
❒ For more information about these settings, see SmartNetMonitor for
Client Help.
Click [OK].
FFFF
Make sure that the specified printing port is displayed in the [Print to the fol-
GGGG
lowing Port] box, and then click [OK].
This completes the settings.
To print, select the specified printer. SmartNetMonitor for Client will now direct print data to the printer automatically.
Changing Port Settings
Follow these steps to change SmartNetMonitor for Client settings, such as Parallel Printing, Recovery Printing, TCP/IP, the proxy server and IPP URL.
4
Note
❒ There are no settings for the NetBEUI protocol.
From the [Printers] window, click the icon of the printer you want to use. On
AAAA
the [File] menu, click [Properties].
Click the [Ports] tab, and then click [Port Configuration].
BBBB
The [Port Settings] dialog box appears.
• For TCP/IP protocol, you can configure Parallel Printing, Recovery Print-
ing and Timeout Settings.
• For IPP, you can configure User Settings, Proxy Settings and Timeout Set-
tings.
Note
❒ For more information about these settings, see SmartNetMonitor for Client
Help.
55
Page 62

4
Windows NT 4.0 Configuration
Configuring LPR Port Printing
This section explains the procedure for printing to a LPR port from Windows
NT.
Note
❒ The following procedure assumes that the printer drivers have already been
installed. This is the procedure to change the printer port to LPR.
❒ TCP/IP protocols must be installed and configured correctly. After setting
(p.48 “Configuring TCP/IP and IPP for Printing”), follow the procedure below.
Click the [Services] tab, and then make sure that “Microsoft TCP/IP Print-
AAAA
ing” is installed.
If “Microsoft TCP/IP Printing” is not installed, click [Add] on the [Services]
tab, to install it. For more information about installing and configuring network services, see Windows NT Help.
Click [Start], point to [Settings], and then click [Printers].
BBBB
Click the icon of the printer you want to use. On the [File] menu, click [Prop-
CCCC
erties].
Click the [Ports] tab and click [Add Port].
DDDD
In the [Available Printer Ports] box, click “LPR Port”, and then click [New Port].
EEEE
Note
❒ If “LPR Port” does not appear, “Microsoft TCP/IP Printing” has not been
installed.
Type the IP address of the Network Interface Board into the [Name or address
FFFF
of server providing lpd] box.
Type “lp” into the [Name of printer or print queue on that server] box, and then
GGGG
click [OK].
Click [Close].
HHHH
Make sure that the port name is displayed in the [Print to the following port(s)]
IIII
box and the check box is selected, and then click [OK].
56
Page 63

Setting Up a Client Computer
Setting Up a Client Computer
This section describes the procedures for setting up a client in a network that
uses Windows 2000/XP, Windows NT Server or Windows NT Workstation as a
print server.
When using a Windows 2000/XP or Windows NT print server, select a shared
printer on Windows 2000/XP or Windows NT.
Windows 2000/XP or
Windows NT Print Server
4
Windows NT 4.0
Limitation
❒ When using a print server connected to the machine with SmartNetMonitor
for Client, you cannot use Recovery Printing and Parallel Printing.
❒ When using Windows XP as a print server, the client computer cannot receive
notification of print job completion.
Note
❒ This section assumes that the client has already been configured to communi-
cate with a Windows 2000/XP or Windows NT print server. Do not begin the
following procedure until the client has been set up and configured correctly.
Use the [Printers] window to set up the printer.
Click [Start], point to [Settings], and then click [Printers].
AAAA
Double-click the [Add Printer] icon.
BBBB
This launches the Add Printer Wizard.
Click [Network printer server] and click [Next >].
CCCC
In the [Shared Printers] box, double-click the name of the computer used as
DDDD
the print server.
The printers attached to the network are displayed.
57
Page 64

4
Windows NT 4.0 Configuration
Click the printer you want to use, and then click [OK].
EEEE
Select if you want to use this printer as the default printer, and then click
FFFF
[Next >].
After the installation is complete, click [Finish].
GGGG
The icon of the newly installed printer appears in the [Printers] window.
58
Page 65

5. NetWare Configuration
This chapter describes how to configure the machine to use as a print server or
a remote printer in a NetWare environment.
Note
❒ NetWare must be set to active using the machine's control panel. For more in-
formation about how to set it, see the General Settings Guide.
Installing the NIB Setup Tool
A utility called the NIB Setup Tool is provided to configure the machine to work
in a network environment. This section describes how to install the SmartNetMonitor for Admin, and how to run the NIB Setup Tool.
Limitation
❒ The NIB Setup Tool is supported to work with the following operating sys-
tems.
• Microsoft Windows 95/98/Me
• Microsoft Windows 2000/XP
• Microsoft Windows NT 4.0
❖❖❖❖ SmartNetMonitor for Admin
Using a printer in a NetWare environment, configure the NetWare printing
environment by using SmartNetMonitor for Admin.
Note
❒ If you configure the NetWare printing environment by using SmartNet-
Monitor for Admin under the following environments, NetWare Client
provided by Novell is required.
• NDS mode in Windows 95/98/Me
• NDS or Bindery mode in Windows 2000/Windows NT 4.0
59
Page 66

NetWare Configuration
Installing SmartNetMonitor for Admin
Install SmartNetMonitor for Admin on your computer. For the installation procedure, see “Installing the SmartNetMonitor for Client/Admin”, Printer Refer-
ence 1.
After installing SmartNetMonitor for Admin, see one of the following sections:
• To configure the Network Interface Board as a NetWare print server for the
first time, see p.61 “Quick Setup Using the NIB Setup Tool Wizard”.
• To use this computer with NetWare 3.x, 4.x, 5/5.1 as a print server, see p.64
“NetWare 3.x, 4.x, 5/5.1- Advanced Settings”.
• To use this computer with NetWare 3.x, 4.x, 5/5.1 as a remote printer, see p.64
“NetWare 3.x, 4.x, 5/5.1- Advanced Settings”.
Running the NIB Setup Tool
5
Click [Start], point to [Programs], and then click [NIB Setup Tool] in the [Smart-
AAAA
NetMonitor for Admin] program folder.
60
Page 67

Quick Setup Using the NIB Setup Tool Wizard
Quick Setup Using the NIB Setup Tool
Wizard
With the NIB Setup Tool, you can easily set up a NetWare printing environment.
Reference
For more information about installing the NIB Setup Tool, see p.59 “Installing
the NIB Setup Tool”.
You can select [Wizard] or [Property Sheet] as an installation method.
When you configure the Network Interface Board for the first time, use the Wizard method.
If you want to use the Property Sheet method, see p.64 “NetWare 3.x, 4.x, 5/5.1Advanced Settings”.
Note
❒ This section assumes that NetWare is functional and that the necessary envi-
ronment for NetWare Print Services is available.
❒ If you configure the Network Interface Board in a NetWare environment us-
ing the NIB Setup Tool, you should install the client software released from
Novell in the following cases.
• Windows 95/98/Me in NDS mode configuration
5
• Windows NT 4.0 in NDS mode configuration
• Windows NT 4.0 in Bindery mode configuration
• Windows 2000 in NDS mode configuration
• Windows 2000 in Bindery mode configuration
Log on to the Netware file server or the NDS tree as an administrator or ad-
AAAA
ministrator equivalent.
Run the NIB Setup Tool.
BBBB
Reference
See p.60 “Running the NIB Setup Tool” .
Click [Wizard] and click [OK].
CCCC
The [NIB Setup Tool - Network board list] dialog box of the Network Interface
Board appears.
Click [IPX protocol].
DDDD
61
Page 68

5
NetWare Configuration
Click the IPX address of the Network Interface Board you are configuring,
EEEE
and then click [Next >].
Note
❒ If you do not know which Network Interface Board you are configuring,
print a network configuration page to check the MAC address (Network
address).
Make sure that the MAC address and IPX address are correct, and then click
FFFF
[Finish].
Type the print server name into the [Device Name] box, and then click [Next >].
GGGG
The default setting is “RDP_” followed by the 6-digit serial number. We recommend that you change it to something that is easier to remember or something based on the structure of the network.
In a dialog box for selecting a network environment, click the [NetWare]
HHHH
check box and click to clear the [TCP/IP] check box.
Click [Next >].
IIII
A dialog box for configuring the NetWare environment appears.
Select [Bindery] when printing under Bindery mode, or select [NDS] when
JJJJ
printing under NDS mode.
When you are using NetWare version 4.x, you should select [NDS].
If you selected [Bindery], type into the [File Server Name:] box the name of the
KKKK
file server in which a print server is to be created.
After clicking [Browse], you can select a file server among those listed in the
[Browse] dialog box.
If you selected [NDS], type into the [Tree:] box the name of the NDS tree in
LLLL
which the print server is created, and then type the context into the [Con-
text:] box.
Clicking [Browse], you can select an NDS tree and an NDS context among
those listed in the [Browse] dialog boxes.
As a context, object names are typed from a lower object and divided by a period. For example, if you want to create a print server into NET under DS,
type “NET.DS”.
62
Click [Next >].
MMMM
Page 69

Quick Setup Using the NIB Setup Tool Wizard
Type the name of the printer into the [Printer Name] box, and the name of the
NNNN
print queue into the [Print Queue Name] box.
The default setting for Printer Name is “Print Server Name” followed by “_1”
and for Print Queue Name is “Print Server Name” followed by “_Q” (quotation marks are not included). You can change them if necessary.
If you have selected the NDS mode, type the volume of the print queue into
OOOO
the [Queue Volume] box.
Clicking [Browse], you can select one of those shown in the [Browse] dialog
box.
Click [Next >].
PPPP
A dialog box to acknowledge the printing environment appears.
After checking the environment, click [Next >].
QQQQ
If you want to change the settings, click [< Back], and then make the settings
again.
Clicking [Next >], the NIB Setup Tool automatically creates the Print Server,
the Printer, and the Print Queue in the NetWare network.
5
After the confirmation dialog box appears, select [Quit] and click [Finish] to
RRRR
exit the NIB Setup Tool.
63
Page 70

NetWare Configuration
NetWare 3.x, 4.x, 5/5.1- Advanced Settings
The actual procedures for configuring the machine vary depending on whether
the Network Interface Board is configured as a print server or as a remote printer. This section describes how to configure the machine in the NetWare 3.x, 4.x,
5/5.1 environment.
NetWare 3.x Basic Procedure
Install the NIB Setup Tool
Print Server Remote Printer
Configure the Network Interface Board
5
Restart the printer
NetWare 4.x, 5/5.1 Basic Procedure
Install the NIB Setup Tool
Print Server Remote Printer
Configure the Network Interface Board
Configure the NetWare
Restart the printer
Configure the NetWare
Start the print server
Start the print server
64
Preparation
The following procedures use the Property Sheet method in configuring the
Network Interface Board. If you configure the Network Interface Board as a
NetWare print server for the first time, we recommend you use the Wizard
method. See p.61 “Quick Setup Using the NIB Setup Tool Wizard” .
Page 71

NetWare 3.x, 4.x, 5/5.1- Advanced Settings
Note
❒ This section assumes NetWare is functional and that the necessary environ-
ment for the NetWare Print Service is available.
❒ When using NetWare 4.x, 5/5.1, you should install the client software re-
leased from Novell in Windows, before running the NIB Setup Tool for configuring in NDS mode or using Windows NT 4.0.
❖❖❖❖ To use NetWare 5/5.1
• Use the printer as a print server. Do not use as a remote printer.
• If you use Pure IP, configure the machine to use the TCP/IP protocol. For more
information about how to make the settings, see the
General Settings Guide
.
Setting Up as a Print Server
Important
❒ You can set up the print server using NDS or Bindery mode in NetWare 4.x,
5/5.1. The following procedure is for NetWare 3.x and for setting up the print
server using NDS mode in NetWare 4.1. When you set up the print server using Bindery mode, use the NIB Setup Tool Wizard. See p.61 “Quick Setup Using the NIB Setup Tool Wizard”.
5
Note
❒ If you use Pure IP in NetWare 5/5.1, follow the procedure on p.70 “Using
Pure IP in the NetWare 5/5.1 Environment”.
Log on to the file server as a Supervisor or a Supervisor equivalent.
AAAA
Note
❒ When using NetWare 4.x, 5/5.1, log on the file server as an administrator
or an administrator equivalent.
Run the NIB Setup Tool.
BBBB
Reference
See p.60 “Running the NIB Setup Tool” .
Click [Property Sheet] and click [OK].
CCCC
The [NIB Setup Tool - Network board list] dialog box of the Network Interface
Board appears.
Click [IPX protocol].
DDDD
Click the IPX address of the Network Interface Board which is to be config-
EEEE
ured, and then click [Next >].
Note
❒ If you do not know which Network Interface Board you are configuring,
see the network configuration page to check the MAC address (Network
Address).
65
Page 72

5
NetWare Configuration
Make sure that the MAC address and IPX address are correct, and then click
FFFF
[Finish].
The [NIB Setup Tool] window appears.
Click [Configure].
GGGG
The property sheet appears.
Click the [General] tab, and then type the name of the print server into the
HHHH
[Device Name] box.
Click the [NetWare] tab, and then make the following settings.
IIII
NetWare 3.x
A Select [Bindery].
B In the [File Server Name] box, type the name of the file server in which a
print server is to be created.
Clicking [Browse], you can select a file server among those listed in the
[Browse] dialog box.
C Click [OK] to close the property sheet.
D After the confirmation dialog box appears, click [OK].
NetWare 4.1
A In the [Print Server Name] box, type the name of the print server.
B In the [File Server Name] box, type the name of the file server in which a
print server is to be created.
Clicking [Browse], you can select a file server among those listed in the
[Browse] dialog box.
C In the [NDS Context] box, type the context in which the print server is to
be created.
Clicking [Browse], you can select a context among those listed in the
[Browse] dialog box.
As a context, object names are typed from a lower object and divided by a
period. For example, if you want to create a print server into NET under
DS, type “NET.DS”.
66
D Click [OK] to close the property sheet.
E After the confirmation dialog box appears, click [OK].
Page 73

NetWare 3.x, 4.x, 5/5.1- Advanced Settings
On the [NIB] menu, click [Exit] to exit the NIB Setup Tool.
JJJJ
NetWare 3.x
A Type “PCONSOLE” from the command prompt.
F:> PCONSOLE
NetWare 4.1
A From Windows, run NWAdmin.
Reference
For more information about NWAdmin, see the documentation that
comes with the NetWare.
Create a print queue as follows:
KKKK
Note
❒ If you use a currently defined print queue, go to step
NetWare 3.x
A From the [Available Options] menu, select [Print Queue Information], and then
press the {{{{ENTER}}}} key.
B Press the {{{{INSERT}}}} key, and then type a print queue name.
C Press the {{{{ESC}}}} key to return to the [Available Options] menu.
NetWare 4.1
A Select the container object the print queue is located in among those in
the directory tree, and then click [Create] on the [Object] menu.
B In the [Class of new object] box, click “Print Queue”, and then click [OK].
C In the [Print Queue name] box, type the name of the print queue.
D In the [Print Queue volume] box, click [Browse].
E In the [Available objects] box, click the volume in which the print queue is
created, and then click [OK].
F After checking the settings, click [Create].
.
L
5
67
Page 74

NetWare Configuration
Create a printer as follows:
LLLL
NetWare 3.x
A From the [Available Options] menu, select [Print Server Information] , and then
press the {{{{ENTER}}}} key.
B To create a new print server, press the {{{{INSERT}}}} key, and then type a
print server name.
If you use a currently defined print server, select one of the print servers
shown in the [Print Server] list.
Important
❒ Use the same name as that specified in the NIB Setup Tool. (Step
C From the [Print Server Information] menu, select [Print Server Configuration].
D From the [Print Server Configuration] menu, select [Printer Configuration].
).
H
5
E Select the printer which is indicated as “Not Installed”.
F If you want to change the name of the printer, type a new name.
A name “Printer x” is assigned to the printer. “x” stands for the number of
the selected printer.
G For type, select [Remote Other/Unknown].
The IRQ, Buffer size, Starting form, and Queue service mode are automatically configured.
H Press the {{{{ESC}}}} key, and then click [Yes] in the confirmation dialog box.
I Press the {{{{ESC}}}} key to return to the [Print Server Configuration] menu.
NetWare 4.1
A Select the container object the printer is located in, and then click [Create]
on the [Object] menu.
B In the [Class of new object] box, click “Printer”, and then click [OK]. When
you are using NetWare 5/5.1, click “Printer (Non NDPS)”.
C In the [Printer name] box, type the name of the printer.
D Select the [Define additional properties] check box, and then click [Create].
68
Page 75

NetWare 3.x, 4.x, 5/5.1- Advanced Settings
Assign print queues to the created printer as follows:
MMMM
NetWare 3.x
A From the [Print Server Configuration] menu, select [Queues Serviced By Printer].
B Select the printer created in step
C Press the {{{{INSERT}}}} key to select a queue serviced by the printer.
Note
❒ You can select more than one queue at a time.
D Follow the instructions on the screen to make other necessary settings.
When you have finished the above steps, make sure that the queues are assigned.
E Press the {{{{ESC}}}} key until “Exit?” appears, and then select [Yes] to exit
PCONSOLE.
Note
❒ To make sure that the printer is correctly configured, type the following
from the command prompt.
F:> USERLIST
❒ If the printer works as configured, the name of the print server appears
as an attached user.
❒ NetWare 3.x ends here.
.
LLLL
NetWare 4.1
5
A Click [Assignments], and then click [Add] in the [Assignments] group.
B In the [Available objects] box, click the queue created in step
click [OK].
C Click [Configuration], and in the [Printer type] box, select [Parallel] using the
drop-down menu, and then click [Communication].
D Click [Manual load] in the [Communication type] group, and then click [OK].
E After checking the settings, click [OK].
Create a print server as follows:
NNNN
A Select the context specified using the NIB Setup Tool (step
the [Object] menu, click [Create].
B In the [Class of new object] box, click “Print Server”, and then click [OK].
When you are using NetWare 5/5.1, click “Print Server (Non NDPS)”.
C In the [Print Server name] box, type the name of the print server.
Important
❒ Use the same name as that specified using the NIB Setup Tool. (Step
D Select the [Define additional properties] check box, and then click [Create].
, and then
KKKK
-AAAA), and on
IIII
)
H
69
Page 76

NetWare Configuration
Assign the printer to the created print server as follows.
OOOO
A Click [Assignments], and then click [Add] in the [Assignments] group.
B In the [Available objects] box, click the printer created in step
click [OK].
C After checking the settings, click [OK].
Note
❒ If the printer works as configured, the name of the print server appears
as an attached user.
, and then
LLLL
Using Pure IP in the NetWare 5/5.1 Environment
Log on to the file server as an Administrator or an administrator equivalent.
AAAA
Run the NIB Setup Tool.
BBBB
5
Reference
See p.60 “Running the NIB Setup Tool” .
Click [Property Sheet] and click [OK].
CCCC
The [Network board list] dialog box appears.
Click [TCP/IP protocol].
DDDD
Click the IP address of the Network Interface Board which is to be config-
EEEE
ured, and then click [Next >].
Note
❒ If you do not know which Network Interface Board you are configuring,
see the network configuration page to check the MAC address (Network
Address).
Make sure that the MAC address and IP address are correct, and then click
FFFF
[Finish].
The [NIB Setup Tool] window appears.
Click [Configure].
GGGG
The property sheet appears.
70
Click the [General] tab, and then type the name of the print server into the
HHHH
[Device Name] box.
Page 77

NetWare 3.x, 4.x, 5/5.1- Advanced Settings
Click the [NetWare] tab, and then make the following settings.
IIII
A In the [Print Server Name] box, type the name of the print server.
B In the [File Server Name] box, type the name of the file server in which a
print server is to be created.
Clicking [Browse], you can select a file server among those listed in the
[Browse File Server] dialog box.
C In the [NDS Context] box, type the context of the print server.
Clicking [Browse], you can select an NDS tree and an NDS context among
those listed in the [Browse Context] dialog box.
As a context, object names are typed from a lower object and divided by a
period. For example, if you want to create a print server into NET under
DS, type “NET.DS”.
5
D In the [Print Server Operation Mode] group, click [As Print Server].
E Click [OK] to close the property sheet.
F After the confirmation dialog box appears, click [OK].
On the [NIB] menu, click [Exit] to exit the NIB Setup Tool.
JJJJ
After this step, go to step
Note
❒ When not using IPX, it is recommended that you change the print server
protocol in the Web Browser from [TCP/IP+IPX] to [TCP/IP].
on p.65 “Setting Up as a Print Server”.
J
71
Page 78

5
NetWare Configuration
Setting Up as a Remote Printer
Log on to the file server as a Supervisor or a Supervisor equivalent.
AAAA
Note
❒ When using NetWare 4.x, 5/5.1, log on to the file server as an administra-
tor or administrator equivalent.
Run the NIB Setup Tool.
BBBB
Reference
See p.60 “Running the NIB Setup Tool” .
Click [Property Sheet] and click [OK].
CCCC
The [NIB Setup Tool - Network board list] dialog box of the Network Interface
Board appears.
Click [IPX protocol].
DDDD
Click the IPX address of the Network Interface Board which is to be config-
EEEE
ured, and then click [Next >].
Note
❒ If you do not know which Network Interface Board you are configuring,
see the network configuration page to check the MAC address (Network
Address).
Make sure that the MAC address and IPX address are correct, and then click
FFFF
[Finish].
The [NIB Setup Tool] window appears.
Click [Configure].
GGGG
The property sheet appears.
Click the [General] tab, and then type the name of the print server into the
HHHH
[Device Name] box.
Click the [NetWare] tab, and then make the following settings.
IIII
NetWare 3.x
A In the [Print Server Name] box, type the name of the print server.
B In the [File Server Name] box, type the name of the file server in which a
print server is to be created.
72
Clicking [Browse], you can select a file server among those listed in the
[Browse] dialog box.
Page 79

NetWare 3.x, 4.x, 5/5.1- Advanced Settings
C In the [Print Server Operation Mode] group, click [As Remote Printer].
D In the [Remote Printer No.] box, type the printer number.
Important
❒ Use the same printer number as that to be created in the printer server.
E Click [OK] to close the property sheet.
F After the confirmation dialog box appears, click [OK].
NetWare 4.x, 5/5.1
A In the [Print Server Name] box, type the name of the print server.
B In the [File Server Name] box, type the name of the file server in which a
print server is to be created.
Clicking [Browse], you can select a file server among those listed in the
[Browse] dialog box.
C In the [NDS Context] box, type the context in which the print server is to
be created.
Clicking [Browse], you can select a context among those listed in the
[Browse] dialog box.
As a context, object names are typed from a lower level object and divided
by a period. For example, if you want to create a print server into NET under DS, type “NET.DS”.
5
D In the [Print Server Operation Mode] group, click [As Remote Printer].
E In the [Remote Printer No.] box, type the number of the printer.
Important
❒ Use the same number as that of the printer to be created in the print
server.
F Click [OK] to close the property sheet.
G After the confirmation dialog box appears, click [OK].
73
Page 80

NetWare Configuration
On the [NIB] menu, click [Exit] to exit the NIB Setup Tool.
JJJJ
NetWare 3.x
A Type “PCONSOLE” from the command prompt.
F:> PCONSOLE
NetWare 4.x, 5/5.1
A From Windows, run NWAdmin.
Reference
For more information about NWAdmin, see the documentation that
comes with the NetWare.
Create a print queue as follows:
KKKK
5
Note
❒ If you use a currently defined print queue, go to step
NetWare 3.x
A From the [Available Options] menu, select [Print Queue Information], and then
press the {{{{ENTER}}}} key.
B Press the {{{{INSERT}}}} key, and then type a print queue name.
C Press the {{{{ESC}}}} key to return to the [Available Options] menu.
NetWare 4.x, 5/5.1
A Select the container object the print queue is located in among those in
the directory tree, and then click [Create] on the [Object] menu.
B In the [Class of new object] box, click “Print Queue”, and then click [OK].
C In the [Print Queue name] box, type the name of the print queue.
D In the [Print Queue Volume] box, click [Browse].
E In the [Available objects] box, click the volume in which the print queue is
created, and then click [OK].
F After checking the settings, click [Create].
.
L
74
Page 81

NetWare 3.x, 4.x, 5/5.1- Advanced Settings
Create a printer as follows:
LLLL
NetWare 3.x
A From the [Available Options] menu, select [Print Server Information], and then
press the {{{{ENTER}}}} key.
B To create a new print server, press the {{{{INSERT}}}} key, and then type a
print server name.
If you use a currently defined print server, select one of the print servers
shown in the [Print Server] list.
Important
❒ Use the same name as that specified in the NIB Setup Tool. (Step
C From the [Print Server Information] menu, select [Print Server Configuration].
D From the [Print Server Configuration] menu, select [Printer Configuration].
).
H
E Select the printer which is indicated as “Not Installed”.
Important
❒ Use the same number as that specified as Remote Printer No. using the
NIB Setup Tool. (Step
F If you want to change the name of the printer, type a new name.
A name “Printer x” is assigned to the printer. x stands for the number of
the selected printer.
G Select [Remote Parallel, LPT1] as printer type.
The IRQ, Buffer size, Starting form, and Queue service mode are automatically configured.
H Press the {{{{ESC}}}} key, and then click [Yes] in the confirmation dialog box.
I Press the {{{{ESC}}}} key to return to [Print Server Configuration Menu].
I
-D).
NetWare 4.x, 5/5.1
A Select the container object the printer is located in, and then click [Create]
in the [Object] menu.
B In the [Class of new object] box, click “Printer”, and then click [OK]. When
you are using NetWare 5/5.1, click “Printer (Non NDPS)”.
C In the [Printer name] box, type the name of the printer.
5
D Select the [Define additional properties] check box, and then click [Create].
75
Page 82

NetWare Configuration
Assign print queues to the created printer as follows:
MMMM
NetWare 3.x
A From [Print Server Configuration Menu], select [Queues Serviced By Printer].
5
B Select the printer created in step
C Press the {{{{INSERT}}}} key to select a queue serviced by the printer.
Note
❒ You can select more than one queue at a time.
D Follow the instructions on the screen to make other necessary settings.
When you have finished the above steps, make sure that the queues are assigned.
E Press the {{{{ESC}}}} key until “Exit?” appears, and then select [Yes] to exit
PCONSOLE.
F Start the print server by typing the following from the console of the
NetWare Server.
If it is running, restart it after exiting it.
.
LLLL
❖❖❖❖ To exit
CAREE: unload pserver
❖❖❖❖ To start
CAREE: load pserver print_server_name
Note
❒ If the printer works as configured, “Waiting for job” appears.
❒ NetWare 3.x ends here.
76
NetWare 4.x, 5/5.1
A Click [Assignments], and then click [Add] in the [Assignments] group.
B In the [Available objects] box, click the queue created in step
click [OK].
C Click [Configuration], and in the [Printer type] box, select [Parallel] using the
drop-down menu, and then click [Communication].
D Click [Manual load] in the [Communication type] group, and then click [OK].
E After checking the settings, click [OK].
, and then
KKKK
Page 83

Create a print server as follows:
NNNN
NetWare 3.x, 4.x, 5/5.1- Advanced Settings
A Select the context specified using the NIB Setup Tool (Step
the [Object] menu, click [Create].
B In the [Class of new object] box, click “Print Server”, and then click [OK].
When you are using NetWare 5/5.1, click “Print Server (Non NDPS)”.
C In the [Print Server name] box, type the name of the print server.
Important
❒ Use the same name as that specified using the NIB Setup Tool. (Step
D Select the [Define additional properties] check box, and then click [Create].
Assign the printer to the created print server as follows.
OOOO
A Click [Assignments], and then click [Add] in the [Assignments] group.
B In the [Available objects] box, click the queue created in the step
then click [OK].
C In the [Printers] group, click the printer assigned in step
[Printer Number].
D Type the printer number and click [OK].
Important
❒ Specify the same printer No. as used with the NIB Setup Tool. (Step
E).
-AAAA), and on
IIII
, and then click
BBBB
, and
KKKK
).
H
5
-
I
E After checking the settings, click [OK].
Start the print server by typing the following from the console of the Net-
PPPP
Ware Server.
If it is running, restart it after exiting it.
❖❖❖❖ To exit
CAREE: unload pserver
❖❖❖❖ To start
CAREE: load pserver print_server_name
77
Page 84

5
NetWare Configuration
Setting Up a Client Computer
This section describes how to set up a client computer when using a NetWare
print server.
Note
❒ Use the version of Novell Client provided with your operating system or the
latest version.
❒ This section assumes that the client has NetWare client applications installed
and is correctly configured to communicate with a NetWare print server. If
not, install the necessary applications before starting the setting up procedure.
Windows 95/98/Me
Follow the procedure to set up a Windows 95/98/Me client.
Preparation
Log on to the NetWare file server before starting the following procedure.
Install the printer driver you want to use as “Local printer”.
AAAA
Reference
For more information about installing the printer driver, see the Printer
Reference 1.
Note
❒ Any port can be selected during the installation, however, LPT1 is recom-
mended.
Click [Start], point to [Settings], and then click [Printers].
BBBB
In the [Printers] window, click the icon of the printer you want to use.
CCCC
On the [File] menu, click [Properties].
DDDD
Click the [Details] tab, and then click [Add Port].
EEEE
Click [Network] and click [Browse].
FFFF
On the network tree, double-click the name of the file server.
GGGG
The queues are displayed.
Click the queue you want to print, and then click [OK].
HHHH
78
Click [OK].
IIII
In the [Print to the following port] box, a network path to the printer appears.
Click [OK] to close the Printer Properties, and again, open it.
JJJJ
Page 85

Setting Up a Client Computer
Click the [Printer Settings] tab.
KKKK
Select to clear the [Form feed] and [Enable banner] check boxes.
LLLL
Note
❒ You should not select these boxes because they should be specified in the
printer driver. If they are selected, the printer might not print correctly.
When using the PostScript printer driver
Follow these steps to set up for the PostScript printer driver.
A Click the [PostScript] tab.
B Click [Advanced].
C Click to clear the [Send CTRL+D before job] and [Send CTRL+D after job] check
boxes.
Click [OK] to close the Printer Properties.
MMMM
Windows 2000/XP, Windows NT 4.0
5
Follow the procedure to set up a Windows 2000/XP, Windows NT 4.0 client.
Preparation
Log on to the NetWare file server before starting the following procedure.
Double-click the [My Network Places] icon on the desktop and navigate to the
AAAA
queue you want to use, and then double-click it.
The [printers] dialog box appears.
Note
❒ When using Windows NT 4.0, the [Network Neighborhood] icon appears on
the desktop instead of the [My Network Places] icon.
Click [No].
BBBB
Close all the applications that are currently running.
CCCC
Insert the CD-ROM labeled “Printer Drivers and Utilities” into the CD-
DDDD
ROM drive.
If the setup menu starts automatically, you can go to the next step. If not, see
the Printer Reference 1.
The [Printer Installation] dialog box appears.
EEEE
From the [Port] list, select the queue you selected in step
FFFF
[Next >].
Follow the instructions on the screen to complete the installation of the
GGGG
printer driver.
, and then click
AAAA
79
Page 86

5
NetWare Configuration
80
Page 87

6. Macintosh Configuration
Configuring Macintosh
This section describes how to configure a Macintosh computer to use EtherTalk.
The actual procedures to configure a Macintosh may vary depending on the version of the Mac OS. The following procedure describes how to configure Mac OS
9.1. If you are not using Mac OS 9.1, see the manual that comes with your version
of Mac OS for more information.
Basic Procedure
Change to EtherTalk
Configure the printer
Change the printer name
Change the zone
Limitation
❒ The required version of Mac OS is 8.6 or later. (Mac OS X Classic environment
is supported.)
Note
❒ To print from a Macintosh, the optional module that includes PostScript 3
must be expanded.
❒ To use a Macintosh, you need to install Adobe PS Printer Driver from the CD-
ROM with the module that includes PostScript 3.
81
Page 88

Macintosh Configuration
Changing to EtherTalk
The following procedure is for configuring a Macintosh computer to use
EtherTalk.
Reference
For more information about installing the software required for EtherTalk,
see the Macintosh manuals.
Open [Control Panel], and then double-click the [AppleTalk] icon.
AAAA
From the [Connect via] pop-up menu, select “Ethernet”.
BBBB
If you change zones, select a name from the [Current zone] pop-up menu.
CCCC
Close the [AppleTalk] control panels.
DDDD
Restart the Macintosh.
EEEE
Configuring the Printer
6
Use the control panel to activate the EtherTalk protocol. (The default is active.)
Reference
For more information about configuration, see the General Settings Guide.
Changing the Printer Name
If the network has several similar model printers, the names will be the same.
Printers that have the same name will have their names slightly changed in the
Chooser. For example, three printers named “printer” will appear in the chooser
as “printer0”, “printer1” and “printer2”.
To change the printer name in the Macintosh EtherTalk environment, use the
Printer Utility for Mac included on the CD-ROM labeled “Printer Drivers and
Utilities”.
Changing the Zone
To change the zone configuration in the Macintosh EtherTalk environment, use
the Printer Utility for Mac included on the CD-ROM labeled “Printer Drivers
and Utilities”.
82
Reference
For more information about using Printer Utilities for Mac, see PostScript 3
Supplement provided as a PDF file on the CD-ROM labeled “Operating Instructions”.
Page 89

7. Appendix
Using SmartNetMonitor for Admin
Using SmartNetMonitor for Admin, you can not only monitor the status of network printers, but also change the configurations of the Network Interface
Board using the TCP/IP protocol or IPX/SPX protocol.
SmartNetMonitor for Admin is equipped with the following functions.
• Limits the settings to be done from the control panel, and disables changes to
be made to some of the items.
• Enables the selection of paper type loaded in the printer.
• Switches to the Energy Saver mode, and wakes up from the Energy Saver
mode.
• Checks the information on printing, paper exhaustion, and such, on the computer.
• Monitors multiple printers at the same time. When there are many printers,
you can create groups and classify the printers to facilitate management.
• Checks the printer's network settings and detailed information of devices.
• Enables you to change the printer's network settings.
• Checks the number of pages printed for each computer, using the user codes.
OS Protocol Stack
Microsoft Windows 95/98/Me TCP/IP provided with Windows 95/98/Me
IPX/SPX provided with Windows 95/98/Me
NetWare network client provided with Windows 95/98
Novell Client for Windows 95/98
Microsoft Windows 2000 TCP/IP provided with Windows 2000
IPX/SPX provided with Windows 2000
NetWare Client provided with Windows 2000
Novell Client for Windows NT/2000
Microsoft Windows XP TCP/IP provided with Windows XP
IPX/SPX provided with Windows XP
Microsoft Windows NT 4.0 TCP/IP provided with Windows NT
IPX/SPX provided with Windows NT
Client Service for NetWare provided with Windows NT
Novell Client for Windows NT/2000
Note
❒ Select the appropriate protocol stack for your operating system.
83
Page 90

Appendix
Changing the Network Interface Board Configuration
Limitation
❒ To use NIB Setup Tool, Internet Explorer 4.01 or a later version is required.
Run SmartNetMonitor for Admin.
AAAA
Click the [Group] menu, point to [Search Device], and then select [TCP/IP] or
BBBB
[IPX/SPX].
A list of printers appears.
Note
❒ Select the protocol of the printer you want to change its configuration.
On the list, Select a printer you want to change its configuration.
CCCC
From the [Tools] menu, select [NIB Setup Tool].
DDDD
The NIB Setup Tool starts up.
Select [Wizard] or [Property Sheet], and then click [OK].
EEEE
7
• When configuring the Network Interface Board for the first time, select
[Wizard].
• When changing the configuration of the Network Interface Board or con-
figuring it in detail, select [Property Sheet].
Selecting [Wizard]
A Fill in the necessary items, and then click [Next].
Selecting [Property Sheet]
A A configuration list appears on the dialog box.
For more information about each item on the dialog box, see Help.
84
Page 91

Using SmartNetMonitor for Admin
Locking the Operation Panel Menu
Limitation
❒ If you use User Code Maintenance Tool, you need a computer and devices
that communicate with TCP/IP (HTTP).
Run SmartNetMonitor for Admin.
AAAA
Click the [Group] menu, point to [Search Device], and then select [TCP/IP] or
BBBB
[IPX/SPX].
A list of printer appears.
Note
❒ Select the protocol of the printer you want to change its configuration.
On the list, select a printer whose statistics information you want to man-
CCCC
age.
From the [Tools] menu, point to [Device Settings], and then click [Lock Opera-
DDDD
tion Panel Menu].
The screen that prompts you to type a password appears.
Type the password, and then click [OK].
EEEE
Note
❒ The factory default password is “password”.
The Web Status Monitor starts up.
For more information about using the Device Settings, see SmartNetMonitor
for Admin Help.
Selecting the Paper Type
Limitation
❒ If you use User Code Maintenance Tool, you need a computer and devices
that communicate with TCP/IP (HTTP).
Run SmartNetMonitor for Admin.
AAAA
Click the [Group] menu, point to [Search Device], and then select [TCP/IP] or
BBBB
[IPX/SPX].
A list of printer appears.
Note
❒ Select the protocol of the printer you want to change its configuration.
7
85
Page 92

Appendix
On the list, select a printer whose statistics information you want to man-
CCCC
age.
From the [Tools] menu, point to [Device Settings], and then click [Select Paper
DDDD
Type].
The screen that prompts you to type a password appears.
Type the password, and then click [OK].
EEEE
Note
❒ The factory default password is “password”.
The Web Status Monitor starts up.
For more information about using the Device Settings, see SmartNetMonitor
for Admin Help.
Managing the User Information
Limitation
❒ If you use User Code Maintenance Tool, you need a computer and devices
that communicate with TCP/IP (HTTP).
7
Run SmartNetMonitor for Admin.
AAAA
Click the [Group] menu, point to [Search Device], and then select [TCP/IP] or
BBBB
[IPX/SPX].
A list of printer appears.
Note
❒ Select the protocol of the printer you want to change its configuration.
On the list, Select a printer whose statistics information you want to man-
CCCC
age.
From the [Tools] menu, select [User Management Tool].
DDDD
The screen that prompts you to type a password appears.
Type the password, and then click [OK].
EEEE
Note
❒ The factory default password is “password”.
The User Code Maintenance Tool starts up.
For more information about using the User Management Tool, see SmartNetMonitor for Admin Help.
86
Page 93

Using SmartNetMonitor for Admin
Managing the E-mail Information
Limitation
❒ If you use E-mail Management Tool, you need a computer and devices that
communicate with TCP/IP (HTTP).
Run SmartNetMonitor for Admin.
AAAA
Click the [Group] menu, point to [Search Device], and then select [TCP/IP] or
BBBB
[IPX/SPX].
A list of printer appears.
Note
❒ Select the protocol of the printer you want to change its configuration.
On the list, select a printer whose statistics information you want to man-
CCCC
age.
From the [Tools] menu, select [E-mail Management Tool].
DDDD
The screen that prompts you to type a password appears.
Type the password, and then click [OK].
EEEE
Note
❒ The factory default password is “password”.
The E-mail Management Tool starts up.
For more information about using the User Management Tool, see SmartNetMonitor for Admin Help.
Configuring the Energy Save Mode
Run SmartNetMonitor for Admin.
AAAA
Click the [Group] menu, point to [Search Device], and then select [TCP/IP] or
BBBB
[IPX/SPX].
A list of printer appears.
Note
❒ Select the protocol of the printer you want to change its configuration.
Click [Group], point to [Energy Save Mode], and select any energy saver mode
CCCC
from the menu that appears.
7
For more information about settings, see SmartNetMonitor for Admin Help.
Note
❒ When you point to [Set Individually], [Timer Settings] is not displayed.
87
Page 94

Appendix
Configuring the Network Interface Board with a Web Browser
The Network Interface Board functions as a Web server in addition to allowing
a printer to function as a network printer. You can use a Web Browser to view
the printer status and configure the Network Interface Board.
Note
❒ When using the proxy server, you must set up the Web Browser.
❖❖❖❖ Configuring the machine
This requires the TCP/IP protocol to be installed. After the machine has been
configured to use the TCP/IP protocol, it will be possible to adjust the settings
using a Web Browser.
Reference
For more information about configuring the machine to use the TCP/IP
protocol, see the General Settings Guide.
7
❖❖❖❖ Operating system browser requirements
OS Browser
Windows 95/98/Me
Windows 2000/XP
Windows NT 4.0
Mac OS 8.6 ∼ 9.1
Solaris 2.5/2.6/2.7/7/8
Limitation
❒ Sometimes after clicking [Back] , the previous page may not appear. In this
case, click [Refresh] or [Reload] .
❒ The text on the screen may disappear or be aligned incorrectly if the font
size settings of the browser are too large. It is recommended that you use
a font size equal to or smaller than “10 point” with Netscape Navigator,
and “Medium” or smaller with Internet Explorer.
❒ This machine information cannot reload automatically. Click [Reload] or
[Refresh] on the Web Browser when you want to reload this machine infor-
mation.
Microsoft Internet Explorer 4.01 or later
Netscape Navigator 4.06 or later
88
Page 95

Configuring the Network Interface Board with a Web Browser
Going to the Top Page
After launching the Web Browser, type the IP address of the machine. See the
example below. This example is for the English version.
http://192.168.15.16/
(In this example, the IP address of the Network Interface Board is 192.168.15.16.)
Note
❒ If a DNS server is used on the network, you can type the host name as a URL.
For example, http://webmonitor.netprinter.com/. In order to do this, you
must register the IP address and the host name of the Network Interface
Board with the DNS server. Consult the network administrator for information about how to do this.
❒ Make sure to set the appropriate proxy server settings in the Web Browser
you are using. Otherwise you may not be able to connect to the local network
printer. Consult the network administrator for information about how to set
the proxy server.
3
1. Header Buttons
You can register favorite URLs with
[URL]. To view the Help section, click
[Help].
Important
❒ When connecting via a dial-up
connection, please be aware that
there will be a communication
charge as you are logging onto the
Internet.
Note
❒ The Help files are stored on the CD-
ROM labeled “Operating Instructions” in HTML format.
1
2
Note
❒ When you click [
log box appears requesting the user
name and password. Type only the
password in this dialog box. The default password is “password”.
❒ The password is the same as that used
for remote maintenance and that used
in the NIB Setup Tool. If you change a
password with the Web Browser, the
other passwords are also changed.
Configuration
], a dia-
3. Status
Displays the name and comments of the
Network Interface Board, and the printer
status.
7
2. Menu Buttons
These Buttons are to configure the Network Interface Board and for checking
the status of the machine.
89
Page 96

Appendix
Verifying the Network Interface Board Settings
Start the Web Browser.
AAAA
Point your browser at the URL or IP address of the printer (e.g. ht-
BBBB
tp://XXX.XXX.XXX.XXX where the Xs are the number of the IP address).
The status of the printer you chose appears on the Web Browser.
Click [Config. Reference].
CCCC
The dialog box for entering the password and user name is displayed.
Click the item you want to check.
DDDD
The following items can be checked:
❖❖❖❖ [General]
Shows general settings for the machine.
❖❖❖❖ [IEEE 802.11b (Wireless LAN)]
Shows 802.11b Interface Kit settings related to communication.
7
❖❖❖❖ [TCP/IP]
Shows TCP/IP-related settings for Network Interface Board, 802.11b Interface Kit, and 1394 Interface Unit.
❖❖❖❖ [NetWare]
Shows Network Interface Board or 802.11b Interface Kit settings related to
a NetWare environment.
❖❖❖❖ [AppleTalk]
Shows Network Interface Board or 802.11b Interface Kit settings related to
the AppleTalk protocol.
❖❖❖❖ [NetBEUI]
Shows Network Interface Board or 802.11b Interface Kit settings related to
the NetBEUI protocol.
❖❖❖❖ [IEEE 1394]
Shows 1394 Interface Unit settings related to IP over 1394 and SCSI print
(SBP-2).
❖❖❖❖ [SMTP]
Shows SMTP settings.
90
Page 97

Configuring the Network Interface Board with a Web Browser
----Linking the address (URL) to the [Help] button
You can link the address (URL) of the [Help] button to the Help files on the computer or on a Web server.
Copy the Help files on the CD-ROM to the desired location. The Help files are
A
located in folders labeled with abbreviated language names; for example,
English Help files are in the [EN] folder. Make sure to copy the entire [EN] folder to the new location.
Using a Web Browser, navigate to the Top Page and click [Network config].
B
Type your password, (it is not necessary to type a user name) and click [OK].
C
Type the path to the Help files in the [Help URL] box.
D
If you copied the Help files to “C:\HELP\EN”, type “file ://C:/HELP/”. For
example, if you copied the files to a Web server and the index URL is “ht-
tp://a.b.c.d/HELP/EN/index.html”, type “http://a.b.c.d/HELP/”.
Click [Apply].
E
When a warning message appears, select to continue configuration.
Configuring the Network Interface Board Settings
Start the Web Browser.
AAAA
Point your browser at the URL or IP address of the printer (e.g. ht-
BBBB
tp://XXX.XXX.XXX.XXX where the Xs are the number of the IP address).
The status of the printer you chose appears on the Web Browser.
Click [Configuration].
CCCC
The dialog box for entering the password and user name is displayed.
Enter your user name and password, and then click [OK].
DDDD
To use the factory default account, enter no user name and type “password”
for the password.
Click the item you want to configure, and then make all the settings.
EEEE
The following items can be configured:
❖❖❖❖ [General]
Configure the general settings for the machine here.
❖❖❖❖ [IEEE 802.11b (Wireless LAN)]
Configure 802.11b Interface Kit settings related to communication.
7
Limitation
❒ This page is displayed when the 802.11b Interface Kit is installed.
91
Page 98

Appendix
❖❖❖❖ [TCP/IP]
Configure TCP/IP-related settings for Network Interface Board, 802.11b
Interface Kit, and 1394 Interface Unit.
❖❖❖❖ [SNMP]
Configure the appropriate community settings here. Up to 10 types of
community names can be registered.
❖❖❖❖ [NetWare]
Configure Network Interface Board or 802.11b Interface Kit settings related to a NetWare environment.
❖❖❖❖ [AppleTalk]
Configure Network Interface Board or 802.11b Interface Kit settings related to the AppleTalk protocol.
❖❖❖❖ [NetBEUI]
Configure Network Interface Board or 802.11b Interface Kit settings related to the NetBEUI protocol.
❖❖❖❖ [IEEE 1394]
Configure 1394 Interface Unit settings related to IP over 1394 and SCSI
print (SBP-2).
7
Limitation
❒ This page is displayed when 1394 Interface Unit is installed.
❖❖❖❖ [SMTP]
Configure SMTP settings.
❖❖❖❖ [IPP Authentication]
If using IPP protocol, configure the authentication settings for printing
here.
❖❖❖❖ [Paper Type]
Select the paper type loaded in the machine from the drop-down menu.
❖❖❖❖ [Password]
Follow the procedure below to change the password.
Enter the password to change the network and machine settings or delete
spooled print jobs.
92
Page 99

Monitoring and Configuring the Printer
Monitoring and Configuring the Printer
Changing Names and Comments
You can change printer names and make a comment on printers to easily identify the printers listed on SmartNetMonitor for Client.
The following utilities are used to change printer names and comments.
❖❖❖❖ SmartNetMonitor for Admin
Allows you to change names and comments when the TCP/IP protocol or
IPX/SPX protocol is available. You can install SmartNetMonitor for Admin
from the CD-ROM that comes with the printer. For more information about
installing SmartNetMonitor for Admin, see p.60 “Installing SmartNetMonitor for Admin”.
❖❖❖❖ Web Browser
Allows you to change names and comments when the TCP/IP protocol is
available.
Note
❒ Each of the names, in a TCP/IP protocol form (printer name) and in a Net-
BEUI protocol form, is changed individually. Comments are, however,
common to both of them.
❒ The factory default name consists of “RNP” and the last 3 bytes of the
MAC address on the Network Interface Board. For example, when the
MAC address is 00:00:74:62:7D:D5, the factory default name is
“RNP627DD5”. Comments are not configured.
SmartNetMonitor for Admin
Run SmartNetMonitor for Admin.
AAAA
Click the [Group] menu, point to [Search Device], and select [TCP/IP] or
BBBB
[IPX/SPX].
A list of printers appears.
Note
❒ Select the protocol of the printer you want to change its configuration.
On the list, Select a printer whose Network Interface Board you want to
CCCC
change its configuration.
7
From the [Tools] menu, select [NIB Setup Tool].
DDDD
The NIB Setup Tool starts up.
93
Page 100

Appendix
Select [Property Sheet], and then click [OK].
EEEE
TCP/IP
A Click the [General] tab, and then type the device name into the [Device
Name] box and comment into the [Comment] box.
• In the [Device Name] box, type the name of the printer in under 13 char-
acters. The factory default name consists of “RNP” and the last 3 bytes
of the MAC address on the Network Interface Board. For example,
when the MAC address is 00:00:74:62:7D:D5, the factory default name is
“RNP627DD5”. No name of 9 characters is permitted if the prefix is
“RNP”. Also, when DHCP is selected as an IP address setting, the
number of characters is limited to 13 characters.
• In the [Comment] box, type any comment on printers in under 31 charac-
ters.
NetBEUI
A Click the [General] tab, and then type the comment into the [Comment]
box.
7
In the [Comment] box, type any comment on printers in under 31 characters.
B Click the [NetBEUI] tab.
C Type the computer name into the [Computer Name] box.
• In the [Computer Name] box, type the name that helps you to identify
printers using the NetBEUI protocol. The factory default name consists
of “RNP” and the last 3 bytes of the MAC address on the Network Interface Board. For example, when the MAC address is
00:00:74:62:7D:D5, the factory default name is “RNP627DD5”. A maximum of 13 characters consisting of uppercase English letters, numeric,
or symbols (except "*+,/:;<=>?[\]|. and space) can be used. No name is
permitted if the prefix is “RNP”. You must avoid the duplication of the
same name on a network.
When the configuration message appears, click [OK].
FFFF
The NIB Setup Tool exits, and the setting is transmitted to the printer.
Exit SmartNetMonitor for Admin.
GGGG
94
 Loading...