

Savin CL7300, CLP135, C7535n, LP335c, CL7200 Maintenance Guide
...
Maintenance Guide
Read This First
Trademarks.............................................................................................................4
How to Read This Manual .....................................................................................5
Paper and Other Media
Paper and Other Media Supported by This Printer.............................................6
Paper Recommendations....................................................................................13
Loading Paper..........................................................................................................13
Storing Paper ...........................................................................................................13
Types of Paper and Other Media.............................................................................13
Paper not supported by this printer..........................................................................17
Print Area .................................................................................................................18
Loading Paper......................................................................................................20
Loading Paper in Tray 1/2 and the optional paper feed unit ....................................20
Loading Paper in the Bypass Tray ...........................................................................28
Switching between Paper Trays............................................................................... 34
Replacing Consumables and Maintenance Kit
Using the Screwdriver.........................................................................................36
Detaching and Reattaching the Options............................................................37
Detaching the SR960 (2 Tray Finisher)....................................................................37
Detaching the SR950 (Booklet Finisher)..................................................................38
Opening and Closing the Duplex Reversal Unit.......................................................38
Replacing the Toner Cartridge ...........................................................................40
Replacing the Photoconductor Unit...................................................................45
G1307528_1.00 EN USA G130-7509 Copyright © 2005 1

Replacing the Development Unit........................................................................52
Replacing the Fusing Unit...................................................................................58
Replacing the Dustproof Filter ...........................................................................62
Replacing the Waste Toner Bottle......................................................................65
Replacing the Paper Feed Roller........................................................................68
Cleaning
Cautions to Take When Cleaning .......................................................................72
Cleaning the Registration Roller ........................................................................73
Cleaning the DustProof Glass ............................................................................75
Checking the Earth Leakage Breaker ................................................................77
Adjusting the Printer
Adjusting the Color Registration........................................................................79
Auto Adjust...............................................................................................................79
Adjusting the Fuser for Thick Paper.........................................................................80
Test Sheet Samples.................................................................................................83
Correcting the Color Gradation ..........................................................................84
Set the Gradation Correction Value .........................................................................84
Viewing the Color Calibration Sample Sheet and Gradation Correction Sheet ....... 88
Resetting the gradation correction values to the initial values .................................89
Adjusting Image Density .....................................................................................92
Adjusting Tray Registration................................................................................94
Troubleshooting
Error & Status Messages on the Control Panel ................................................97
Printer Does Not Print .......................................................................................108
Checking the port connection.................................................................................110
Other Printing Problems ...................................................................................113
Additional Troubleshooting..............................................................................121
Removing Jammed Staples ..............................................................................123
SR960 (2 Tray Finisher).........................................................................................123
SR950 (Booklet Finisher) .......................................................................................125
Adding Staples...................................................................................................128
SR960 (2 Tray Finisher).........................................................................................128
SR950 (Booklet Finisher) .......................................................................................131
Removing Punch-hole Chips ............................................................................134
SR960 (2 Tray Finisher).........................................................................................134
SR950 (Booklet Finisher) .......................................................................................135
Removing Misfed Paper
Removing Misfed Paper ....................................................................................137
When “Remove Misfeed A:Internal Path” Appears ........................................138
2

When “Remove Misfeed B:Fusing Unit” Appears ..........................................139
When “Remove Misfeed R:Finisher” Appears ................................................142
When “Remove Misfeed R1” Appears .............................................................146
When “Remove Misfeed R2-4” Appears ..........................................................148
When “Remove Misfeed Y:Paper Tray” Appears............................................150
When “Remove Misfeed Z1:Duplex Unit” Appears ........................................151
When “Remove Misfeed Z2:Dup.Feed Unit” Appears .................................... 153
Appendix
When the Front Cover Does Not Close............................................................ 157
Moving and Transporting the Printer............................................................... 159
Moving the Printer ..................................................................................................159
Consumables .....................................................................................................161
Toner Cartridge ......................................................................................................161
Staple Cartridge .....................................................................................................161
Other consumables ................................................................................................162
Specifications.....................................................................................................163
Mainframe ..............................................................................................................163
Options...................................................................................................................166
3

Read This First
Trademarks
Microsoft, Windows and Windows NT are registered trademarks of Microsoft
Corporation in the United States and/or other countries.
IPS-PRINT Printer Language Emulation Copyright© 1999-2000 Oak Technology, Inc., All rights reserved.
The Bluetooth® word mark and logos are owned by the Bluetooth SIG, Inc. and
any use of such marks by Ricoh Company, Ltd. is under license.
Other product names used herein are for identification purposes only and might
be trademarks of their respective companies. We disclaim any and all rights to
those marks.
The proper names of the Windows operating systems are as follows:
•Microsoft® Windows® 95 operating system
®
•Microsoft
•Microsoft
• The product names of Windows® 2000 are as follows:
Microsoft
Microsoft® Windows® 2000 Server
Microsoft
• The product names of Windows® XP are as follows:
Microsoft
Microsoft
• The product names of Windows ServerTM 2003 are as follows:
Microsoft
Microsoft® Windows ServerTM 2003 Enterprise Edition
Microsoft
• The product names of Windows NT
Microsoft
Microsoft
Windows® 98 operating system
®
Windows® Millennium Edition (Windows Me)
®
Windows® 2000 Advanced Server
®
Windows® 2000 Professional
®
Windows® XP Professional
®
Windows® XP Home Edition
®
Windows ServerTM 2003 Standard Edition
®
Windows ServerTM 2003 Web Edition
®
®
Windows NT® Server 4.0
®
Windows NT® Workstation 4.0
4.0 are as follows:
G1307528_1.00 Copyright © 2005 4
Read This First
How to Read This Manual
The following set of symbols is used in this manual.
This symbol indicates a potentially hazardous situation that might result in death
or serious injury when you misuse the machine without following the instructions
under this symbol. Be sure to read the instructions, all of which are described in
the Safety Information section.
This symbol indicates a potentially hazardous situation that might result in minor
or moderate injury or property damage that does not involve personal injury
when you misuse the machine without following the instructions under this symbol. Be sure to read the instructions, all of which are described in the Safety Information section.
* The statements above are notes for your safety.
If this instruction is not followed, paper might be misfed, originals might be damaged, or data might be lost. Be sure to read this.
This symbol indicates information or preparations required prior to operating.
This symbol indicates precautions for operation, or actions to take after abnormal
operation.
This symbol indicates numerical limits, functions that cannot be used together,
or conditions in which a particular function cannot be used.
This symbol indicates a reference.
Keys that appear on the machine's display.
Keys and buttons that appear on the computer's display.
Keys built into the machine's control panel.
Keys on the computer's keyboard.
5
Paper and Other Media
Paper and Other Media Supported by This
Printer
This section describes the type, size, feed direction, and maximum amount of
paper that can be loaded into each tray.
❒ The following symbols and terminology are used to represent the feed direc-
tion.
In this manual On the display Paper feed direction
L ← (Feed direction)
K ← (Feed direction)
A4 (210 × 297)
8 1/2 × 11
A4 (297 × 210)
11 × 8 1/2
Short-edge feed direction
Long-edge feed direction
❒ Be careful of the paper feed direction. The direction is determined based on
paper size.
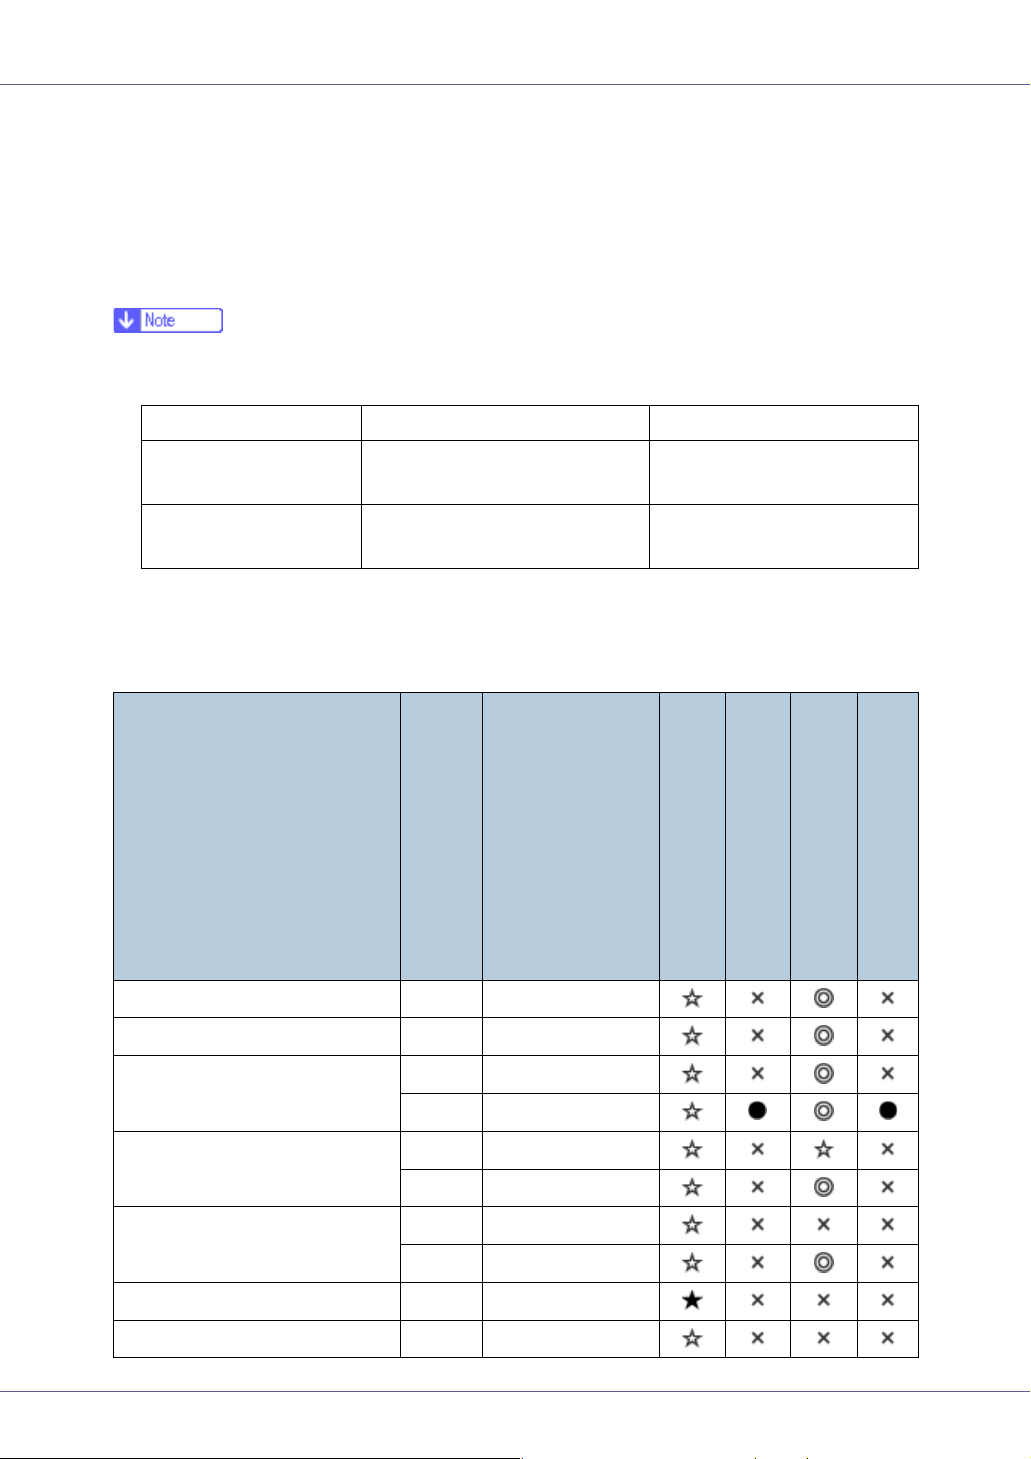
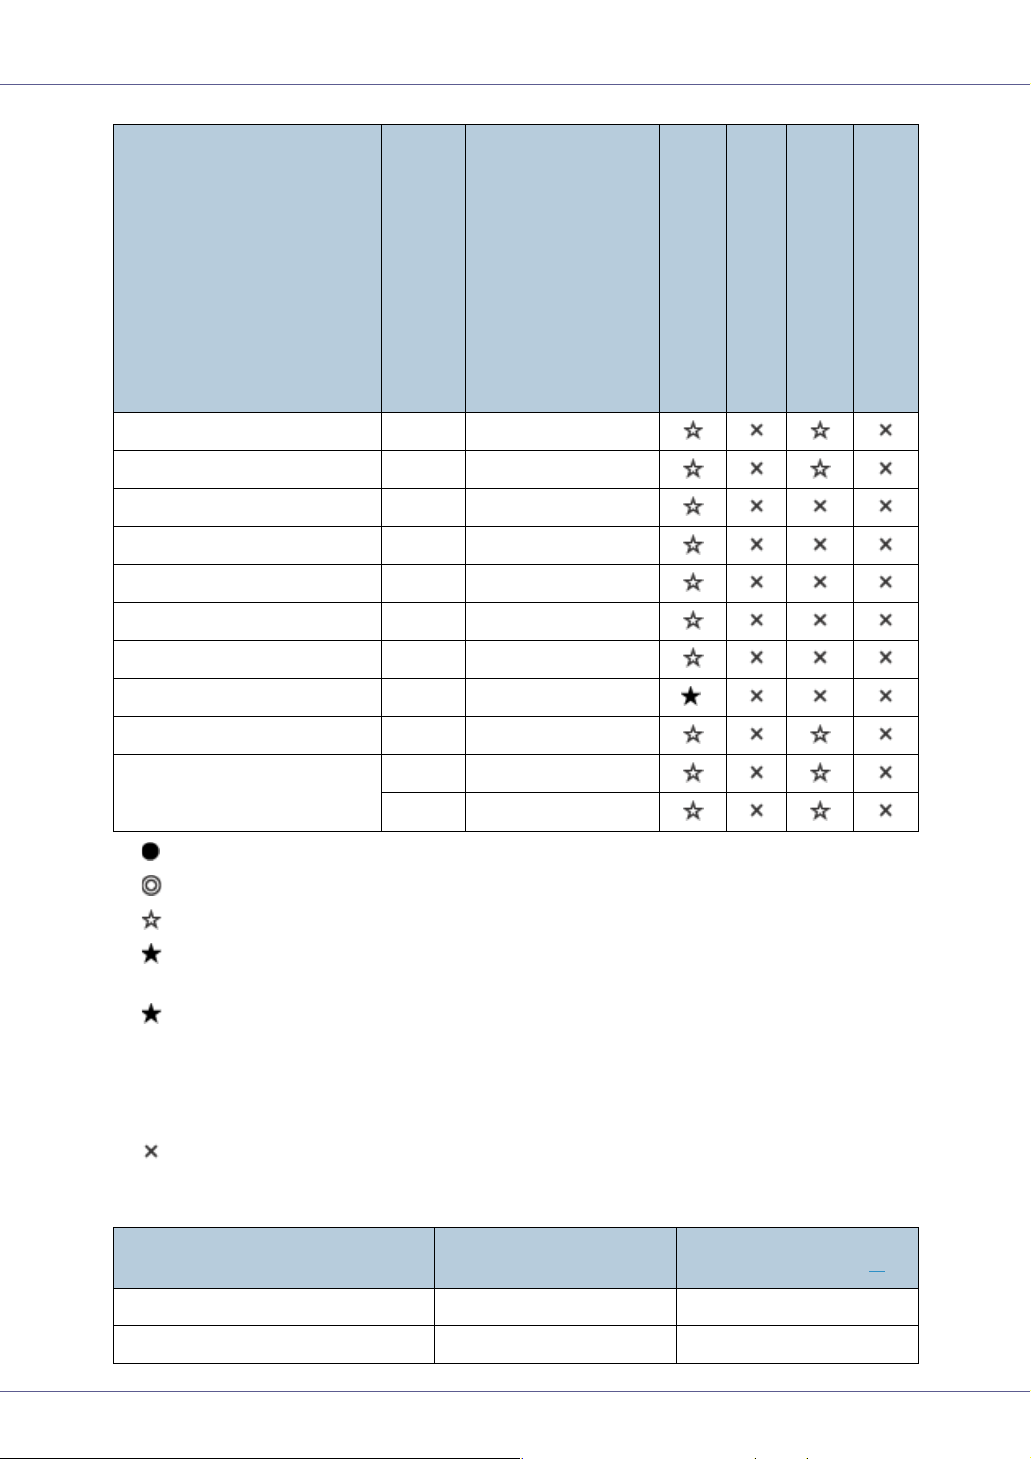
❖ Input Paper Sizes (Metric version)
Feed direction
A3 L 297 × 420
B4 L 257 × 364
Size (mm)
Bypass tray
Paper tray (Tray 1)
Paper tray (Tray 2)
Paper feed unit (Tray 3/4)
2000-sheet Large Capacity Tray
A4 L 210 × 297
K 297 × 210
B5 L 182 × 257
K 257 × 182
A5 L 148 × 210
K 210 × 148
B6 L 128 × 182
A6 L 105 × 148
G1307528_1.00 Copyright © 2005 6
Paper and Other Media
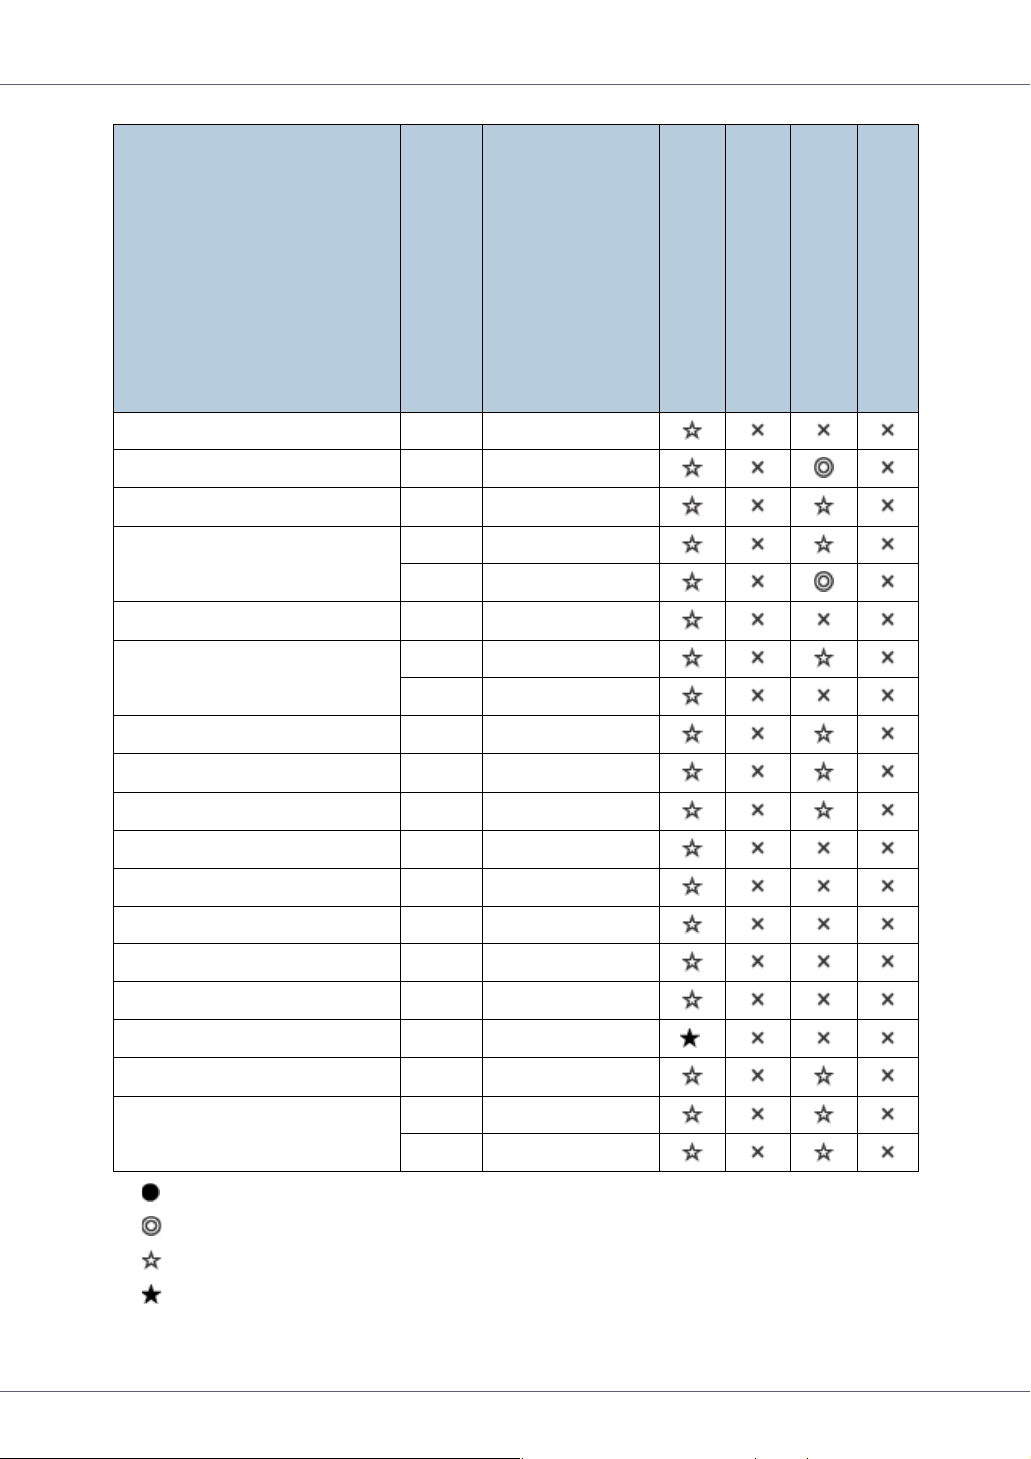
Feed direction
Size (mm)
12” × 18” L 305 × 457
DLT (11” × 17”) L 279 × 432
Legal (LG, 81/2” × 14”)
Letter (LT, 81/2” × 11”)
L 216 × 356
L 216 × 279
K 279 × 216
1
5
/2” × 81/2”
Executive (Exec., 7
1
/4” × 101/2”)
L 140 × 216
L 184 × 276
K 276 × 184
Folio (81/4” × 13”)
Foolscap (F4, 81/2” × 13”)
L 210 × 330
L 216 × 330
F/GL (8” × 13”) L 203 × 330
1
Com10 Env (9
/2” × 41/8”)
C5 (9.02” × 6.38”)
C6 (6.38” × 4.49”)
K 241.3 × 104.8
K 229 × 162
K 162 × 114
DL Env (8.66” × 4.33”) K 220 × 110
Bypass tray
Paper tray (Tray 1)
Paper tray (Tray 2)
Paper feed unit (Tray 3/4)
2000-sheet Large Capacity Tray
Monarch (71/2” × 37/8”)
Custom Size - -
8K (101/2” × 15.35”)
1
16K (7.68” × 10
/2”)
K 190.5 × 98.4
*
L 267 × 390
L 195 × 267
K 267 × 195
• The size is exclusive.
• The size is supported and the printer selects it automatically.
• The size is supported, but it should be selected using the control panel.
• The size is supported, but it should be set as a custom size using the control panel.
7
Paper and Other Media
*
•
The supported size is approximately 90 - 305 mm in width, and 148 - 457
mm in length. The supported size may differ depending on the printer language you use. Set as a custom size setting using the control panel.
When using the RPCS
TM
printer driver, sheets of up to 1260 mm(600 × 600
dpi, 1200 × 600 dpi) in length can be set.
• The size is not supported.
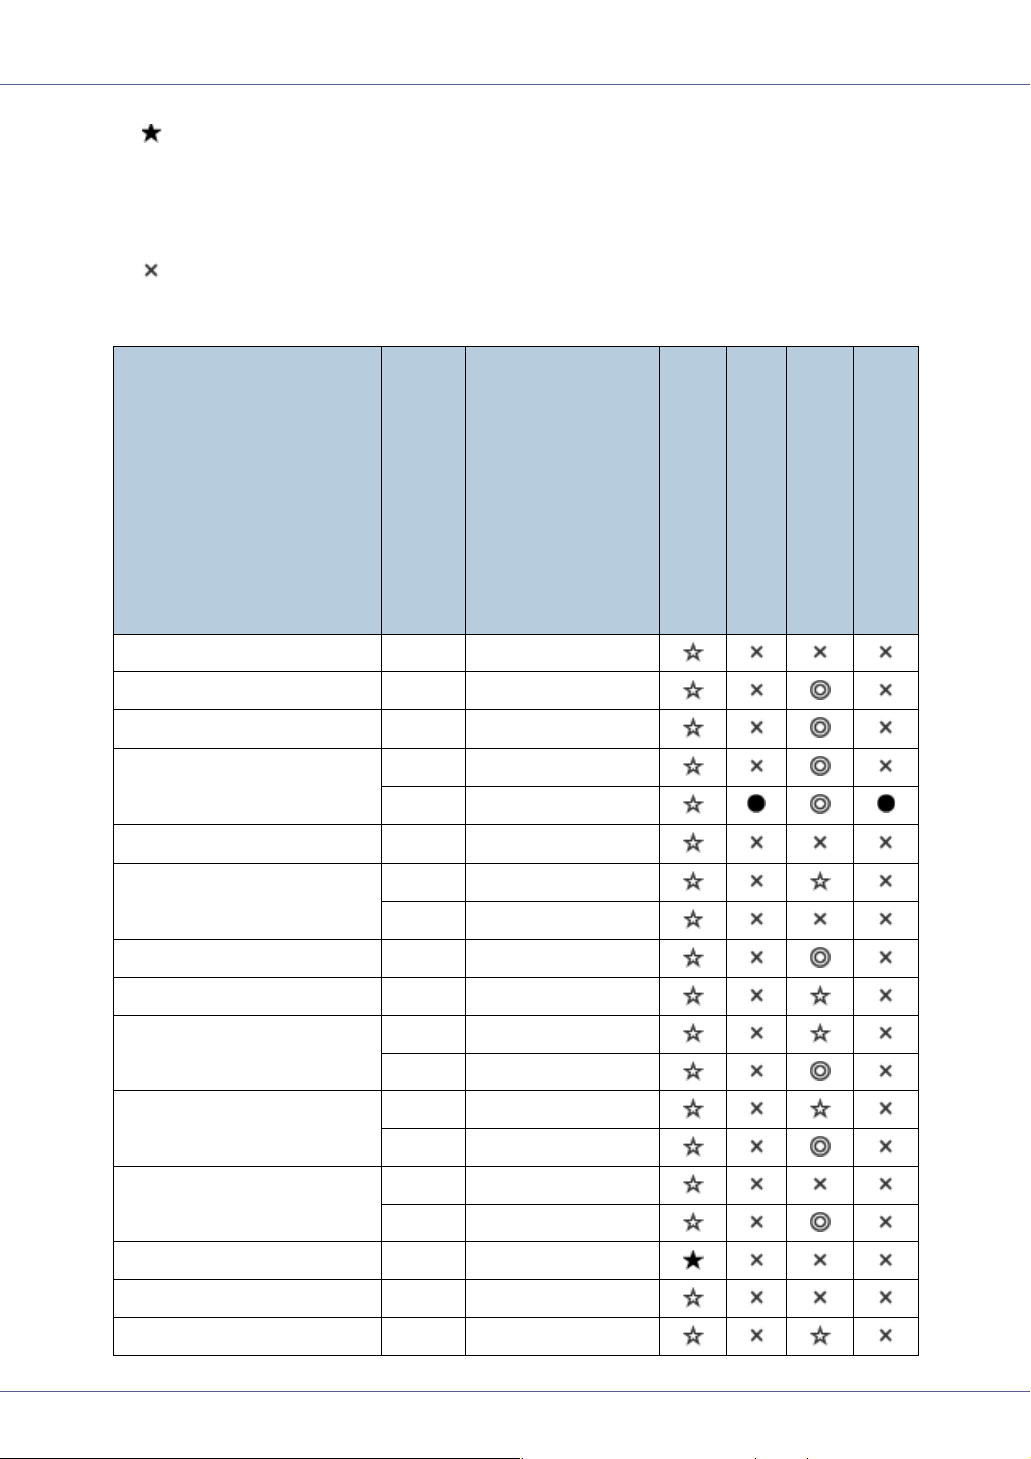
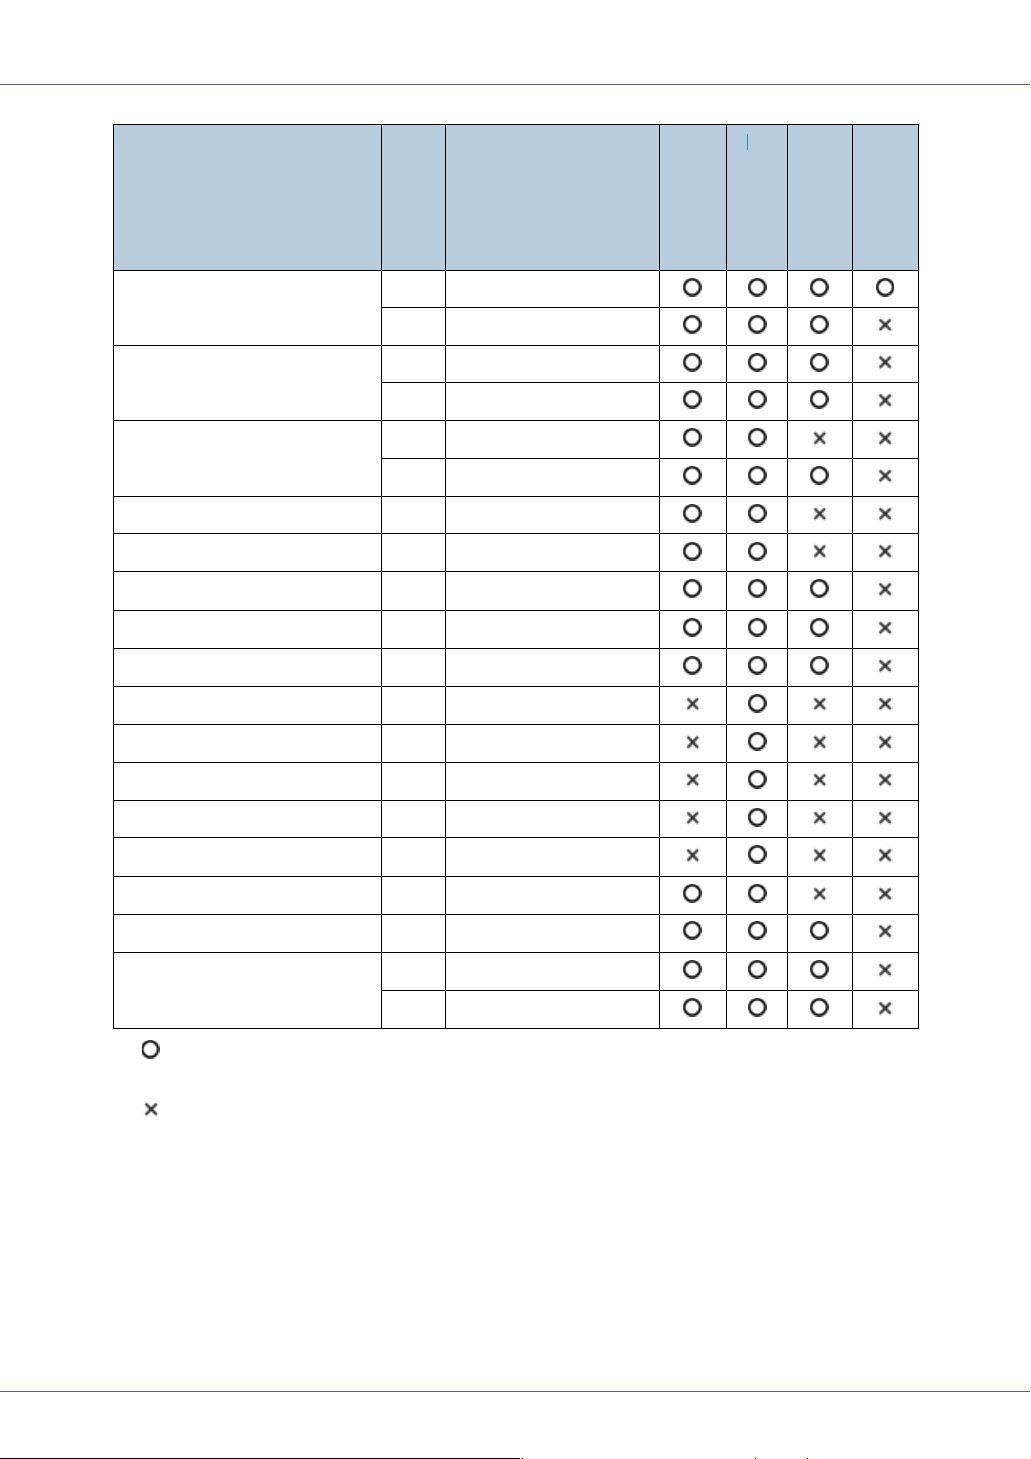
❖ Input Paper Sizes (Inch version)
Feed direction
12” × 18” L 12” × 18”
DLT (11” × 17”) L 11” × 17”
Legal (LG) L
Letter (LT) L
K
51/2” × 81/2”
Executive (Exec.) L
A3 L 11.26” × 16.54”
B4 L 10.12” × 14.33”
A4 L 8.26” × 5.83”
B5 L 7.17” × 10.12”
A5 L 5.83” × 8.26”
L
K
K 5.83” × 8.26”
K 10.12” × 7.17”
Size (inch)
81/2” × 14”
81/2” × 11”
11” × 81/2”
51/2” × 81/2”
71/4” × 101/2”
101/2” × 71/4”
Bypass tray
Paper tray (Tray 1)
Paper tray (Tray 2)
Paper feed unit (Tray 3/4)
2000-sheet Large Capacity Tray
K 8.26” × 5.83”
B6 L 5.04” × 7.17”
A6 L 4.13” × 5.63”
Folio L
13” × 8
1
/4”
8
Paper and Other Media
Feed direction
Foolscap F4 K
F/GL K 13” × 8”
Com10 Env K
C5 K 9.02” × 6.38”
C6 K 6.38” × 4.49”
DL Env K 8.66” × 4.33”
Monarch K
Custom Size - -
8K L
16K L
K
Size (inch)
1
13” × 8
9
71/2” × 37/8”
10
7.68” × 101/2”
101/2” × 7.68”
/2”
1
/2” × 41/8”
1
/2” × 15.35”
Bypass tray
Paper tray (Tray 1)
*
Paper tray (Tray 2)
Paper feed unit (Tray 3/4)
2000-sheet Large Capacity Tray
• The size is exclusive.
• The size is supported, and the printer selects it automatically.
• The size is supported, but it should be selected using the control panel.
• The size is supported, but it should be set as a custom size using the control panel.
*
The supported size is approximately 3.5 - 12.01 inch in width, and 5.8 - 18
•
inch in length. The supported size may differ depending on the printer language you use. Set as a custom size setting using the control panel.
When using the RPCS
TM
printer driver, sheets of up to 49.61 inch(600 × 600
dpi, 1200 × 600 dpi) in length can be set.
• The size is not supported.
❖ Paper weight and number of sheets to be set
Supported paper weight
Tray 1
Tray 2
60 - 105 g/m2 (16 - 28 lb.) 500 (80 g/m2, 20 lb.)
60 - 105 g/m2 (16 - 28 lb.) 500 (80 g/m2, 20 lb.)
Maximum number of
sheets (plain paper)
*1
9
Paper and Other Media
Maximum number of
sheets (plain paper)
Bypass tray
Paper Feed Unit Type 7300 (500 × 1)
Paper Feed Unit Type 7300 (500 × 2)
Paper Bank Type 7300
Supported paper weight
2
60 - 163 g/m
(14 - 42 lb.) 100 (80 g/m2, 20 lb.)
60 - 105 g/m2 (16 - 28 lb.) 500 (80 g/m2, 20 lb.)
2
60 - 105 g/m
(16 - 28 lb.) 1000 (80 g/m2, 20 lb.)
60 - 105 g/m2 (16 - 28 lb.) 2000 (80 g/m2, 20 lb.)
(2000-sheet large capacity tray)
SR960 (2 tray finisher)
*1
Check that the top of the stack is not higher than the limit mark inside the tray.
60 - 105 g/m
2
(16 - 28 lb.) 2000 (80 g/m2, 20 lb.)
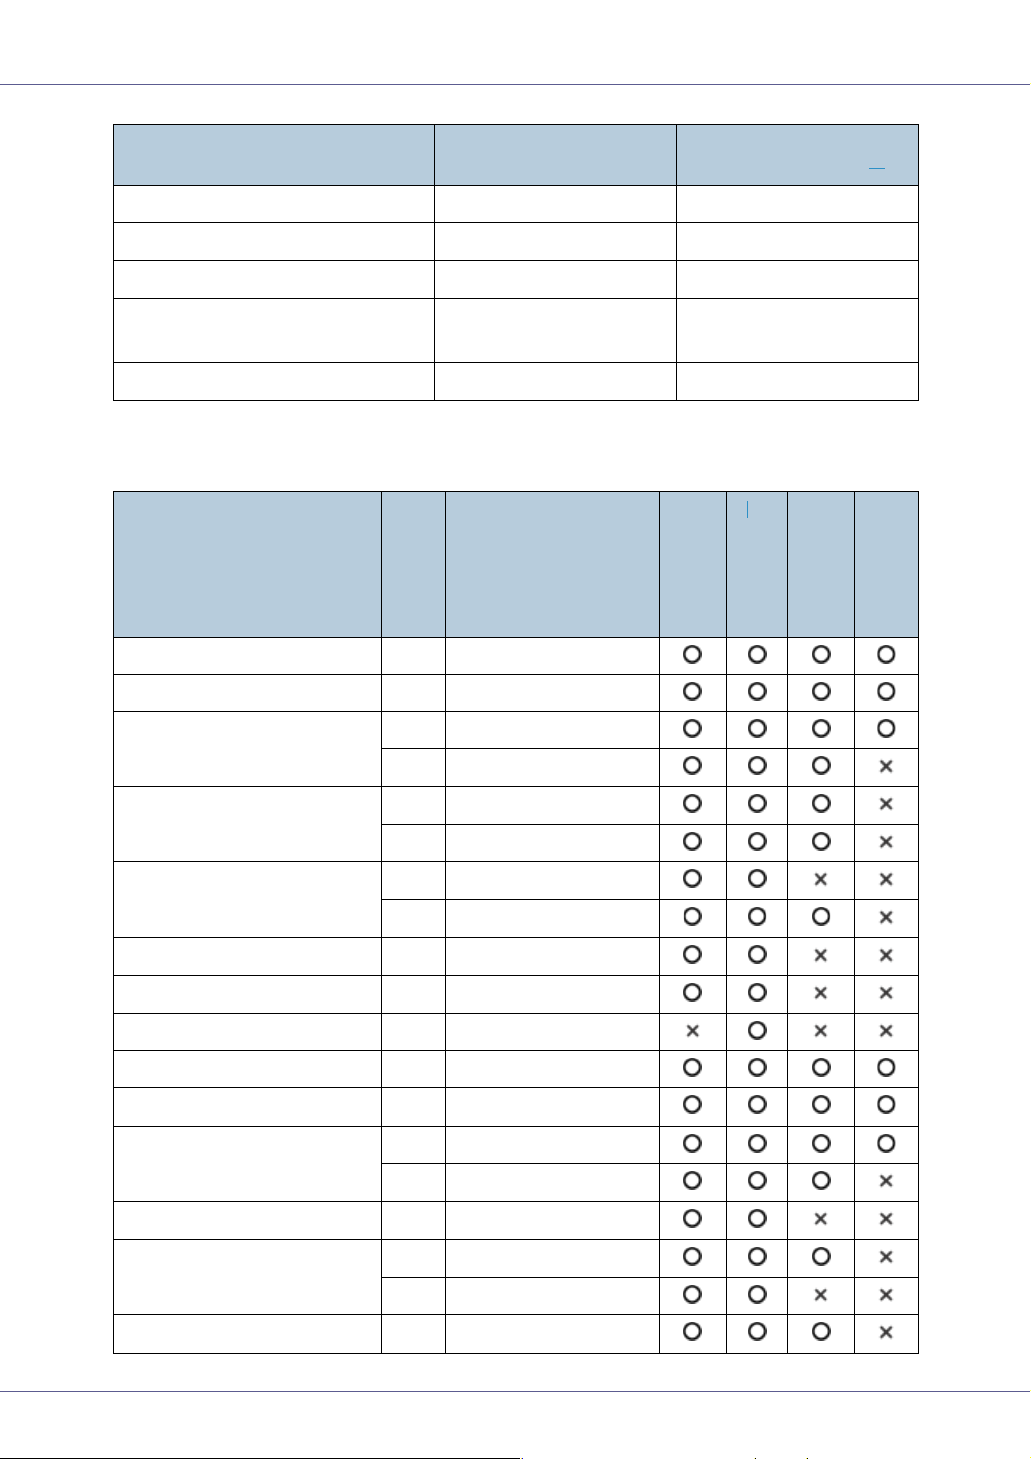
❖ Output Paper Sizes (Metric version)
*1
Feed direction
A3 L 297 × 420
B4 L 257 × 364
Size (mm)
Standard tray
External tray
*1
2 tray finisher
Booklet finisher
A4 L 210 × 297
K 297 × 210
B5 L 182 × 257
K 257 × 182
A5 L 148 × 210
K 210 × 148
B6 L 128 × 182
A6 L 105 × 148
12” × 18” L 305 × 457
DLT (11” × 17”) L 279 × 432
Legal (LG, 8
Letter (LT, 8
1
/2” × 14”)
1
/2” × 11”)
L 216 × 356
L 216 × 279
K 279 × 216
1
/2” × 81/2”
5
Executive (Exec., 71/4” ×
101/2”)
L 140 × 216
L 184 × 276
K 276 × 184
Folio (8
1
/4” × 13”)
L 210 × 330
10
Paper and Other Media
*1
Foolscap (F4, 81/2” × 13”)
Feed direction
L 216 × 330
Size (mm)
F/GL (8” × 13”) L 203 × 330
Com10 Env (9
1
/2” × 41/8”)
K 241.3 × 104.8
C5 (9.02” × 6.38”) K 229 × 162
C6 (6.38” × 4.49”) K 162 × 114
DL Env (8.66” × 4.33”) K 220 × 110
Monarch (7
1
/2” × 37/8”)
K 190.5 × 98.4
Custom Size - -
1
8K (10
/2” × 15.35”)
16K (7.68” × 10
1
/2”)
L 267 × 390
L 195 × 267
K 267 × 195
• The size is supported.
• The size is not supported.
*1
The external tray does not support duplex printing.
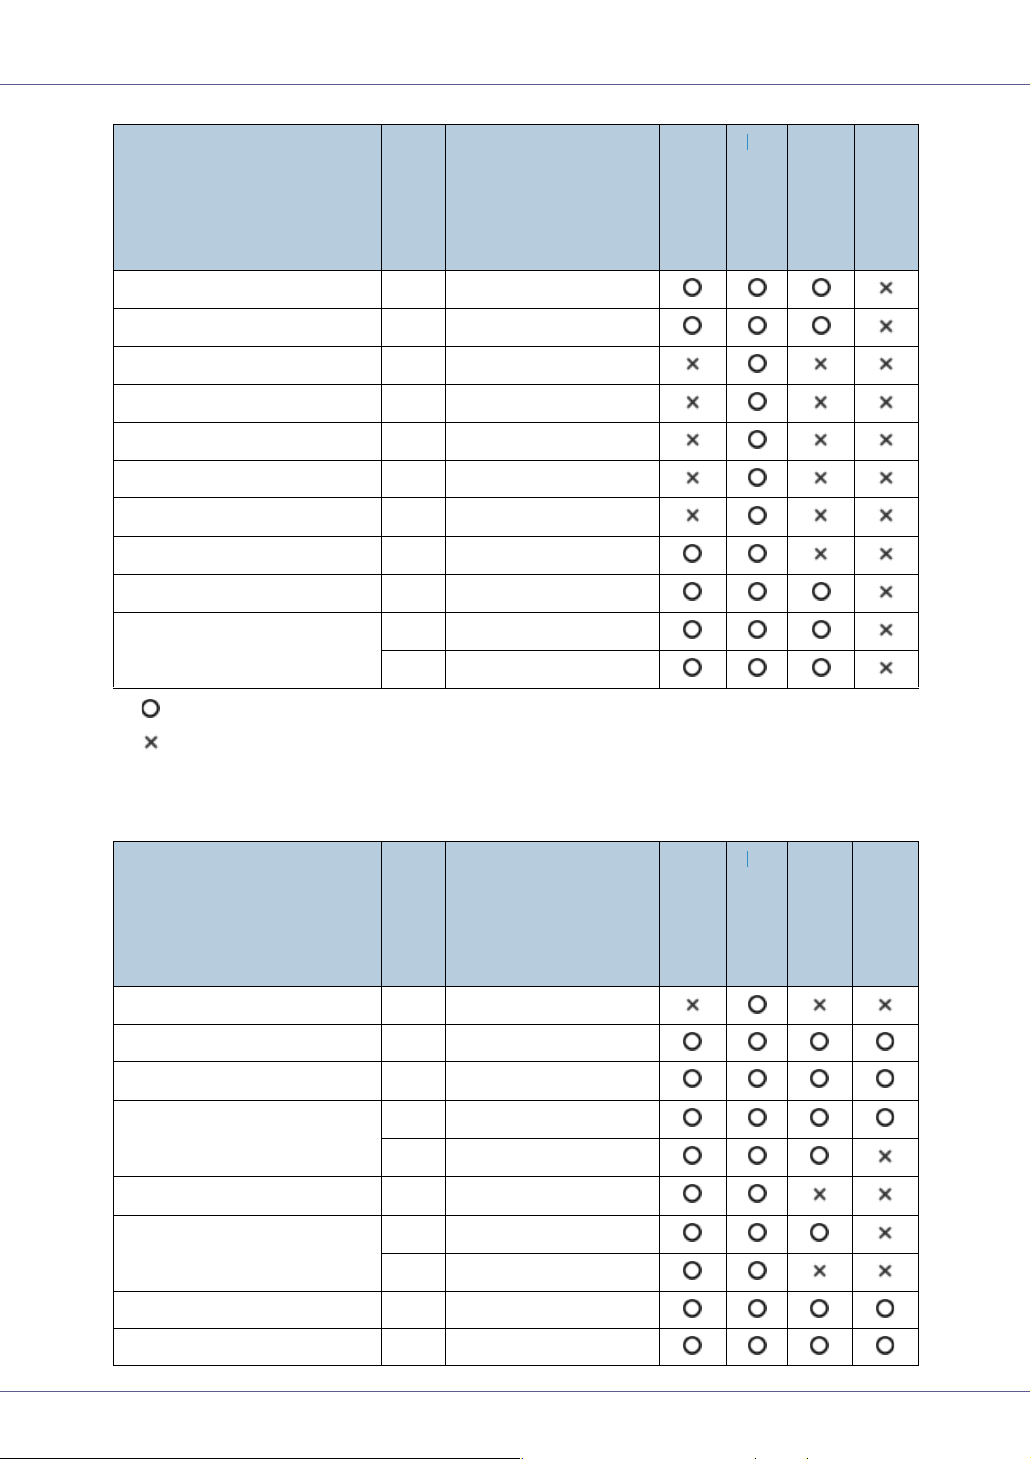
❖ Output Paper Sizes (Inch version)
Standard tray
External tray
2 tray finisher
Booklet finisher
Feed direction
Size (inch)
12” × 18” L 12” × 18”
DLT (11” × 17”) L 11” × 17”
Legal (LG) L
Letter (LT) L
K
51/2” × 81/2”
L
Executive (Exec.) L
K
1
/2” × 14”
8
81/2” × 11”
11” × 81/2”
51/2” × 81/2”
71/4” × 101/2”
101/2” × 71/4”
A3 L 11.26” × 16.54”
B4 L 10.12” × 14.33”
*1
Standard tray
External tray
2 tray finisher
Booklet finisher
11
Paper and Other Media
*1
Feed direction
Size (inch)
A4 L 8.26” × 5.83”
K 5.83” × 8.26”
B5 L 7.17” × 10.12”
K 10.12” × 7.17”
A5 L 5.83” × 8.26”
K 8.26” × 5.83”
B6 L 5.04” × 7.17”
A6 L 4.13” × 5.63”
Folio L
Foolscap F4 L
1
/4” × 13”
8
81/2” × 13”
F/GL L 8” × 13”
Com10 Env K
1
/2” × 41/8”
9
C6 K 6.38” × 4.49”
C5 K 9.02” × 6.38”
DL Env K 8.66” × 4.33”
Monarch K
1
/2” × 37/8”
7
Standard tray
External tray
2 tray finisher
Booklet finisher
Custom Size - -
8K L
16K L
K
1
/2” × 15.35”
10
7.68” × 101/2”
1
/2” × 7.68”
10
• The size is supported and it should be set using the control panel. There is
no dial in the tray.
• The size is not supported.
*1
The external tray does not support duplex printing.
12
Paper and Other Media
Paper Recommendations
Loading Paper
❒ Do not use ink-jet printer paper because it may stick to the fusing unit and
cause a paper misfeed.
❒ When printing on OHP transparencies that have a print side, load them with
the print side over on the bypass tray. Not taking this precaution may cause
them to stick to the fusing unit and cause misfeeds.
❒ Set the paper as described below
• Tray 1, Tray 2: Print side facing up
• Bypass Tray: Print side facing down
• Paper Feed Unit (Option): Print side facing down
❒ Print quality cannot be guaranteed if paper other than the ones recommended
is used. For more information about recommended paper, contact your sales
or service representative.
❒ Do not use paper that has already been printed onto by other printers.
Storing Paper
• Paper should always be stored properly. Improperly stored paper might result
in poor print quality, paper misfeeds, or printer damage. Recommendations
are as follows:
• Avoid storing paper in humid areas.
• Avoid exposing paper to direct sunlight.
• Store on a flat surface.
• Keep paper in the package in which the paper came.
Types of Paper and Other Media
Plain Paper
Paper thickness
60 - 105 g/m
• [Normal]: 60 - 90 g/m
• [MidThick]: 91 - 105 g/m
2
(16 - 28 lb.)
2
(16 - 24 lb.)
2
(24.2 - 28 lb.)
13

Paper and Other Media
Printer setup Make the following two settings using the control panel:
• Press [Paper Input] menu, [Paper Type], and then [Plain Paper].
• Press [Maintenance] menu, [Plain Paper] and then [Normal] or
[MidThick].
Printer driver setup Click [Plain] or [Plain & Recycled] in the [Type:] list.
Enabled paper feeding tray Any input tray can be used.
Number of sheets that can
be set
Both-sided printing Possible
Additional cautions When printing on the reverse side of plain paper that is already
• Tray 1/2: 500 × 2
• Paper Feed Unit Type 7300 (500×1): 500
• Paper Feed Unit Type 7300 (500×2): 1000
• Paper Bank Type 7300: 2000
• Bypass Tray: 100
❒ Make sure paper is not stacked higher than the upper limit
mark (T) inside the tray. Make sure paper is not stacked higher
than the paper guides inside the bypass tray.
printed on, select [Plain:Dup.Back] from [Paper Type] using the control panel or printer driver.
Thick Paper
Paper thickness
Printer setup Make the following two settings using the control panel:
106 - 163 g/m
• Press [Paper Input] menu, [Paper Type], and then [Thick Paper].
• Press [Maintenance] menu, [Thick Paper], and then [Thick Paper 1]
- [Thick Paper 4].
2
(28.2 - 42 lb.)
❒ From [Thick Paper 1] to [Thick Paper 4] in the menu, select the
paper thickness according to the paper you are loading.
Printer driver setup Click [Thick] in the [Type:] list.
Enabled paper feeding tray Bypass tray
❒ Make sure paper is not stacked higher than the paper guides
inside the bypass tray.
Both-sided printing Not possible
Additional cautions • Print speed is slightly slower than when using plain paper.
• When printing on the reverse side of thick paper that is already
printed on, select [Thick:Dup.Back] from [Paper Type] using the
control panel or printer driver.
14
Paper and Other Media
OHP transparencies
Printer setup Press [Paper Input] menu, [Paper Type], and then [Transparency] on
the control panel.
Printer driver setup Click [Transparency] in the [Type:] list.
Enabled paper feeding tray Bypass tray
Number of sheets that can
be set
Both-sided printing Not possible
Additional cautions • Print speed for OHP transparencies is slower than for plain pa-
100
❒ Make sure paper is not stacked higher than the paper guides
inside the bypass tray.
per.
• Paper settings can be set using the printer driver. Setting the
paper sizes using the display panel is not necessary when it is
set by the printer driver.
• Paper size settings set using the printer driver have priority
over those set using the machine's display panel.
• When the printer driver is not used, make settings using the
display panel.
• Select the [Maintenance] menu. Press [4C.Graphic Mode], [Text
Priority], and then print.
Special Paper
Printer setup Make the following two settings using the control panel:
• Press [Paper Input] menu, [Paper Type], and then [Special Paper]
on the control panel.
• Press [Maintenance] menu, [Special Paper], and then [Special Pa-
per 1] - [Special Paper 4].
❒ From [Special Paper 1] to [Special Paper 4] in the menu, select
the paper type according to the paper you are loading.
Printer driver setup Click [Special Paper] in the [Type:] list.
Enabled paper feeding tray Any input tray can be used.
❒ Make sure paper is not stacked higher than the upper limit
mark (T) inside the tray. Make sure paper is not stacked higher
than the paper guides inside the bypass tray.
Both-sided printing Possible
Additional cautions Print speed for special paper is slower than for plain paper.
15
Paper and Other Media
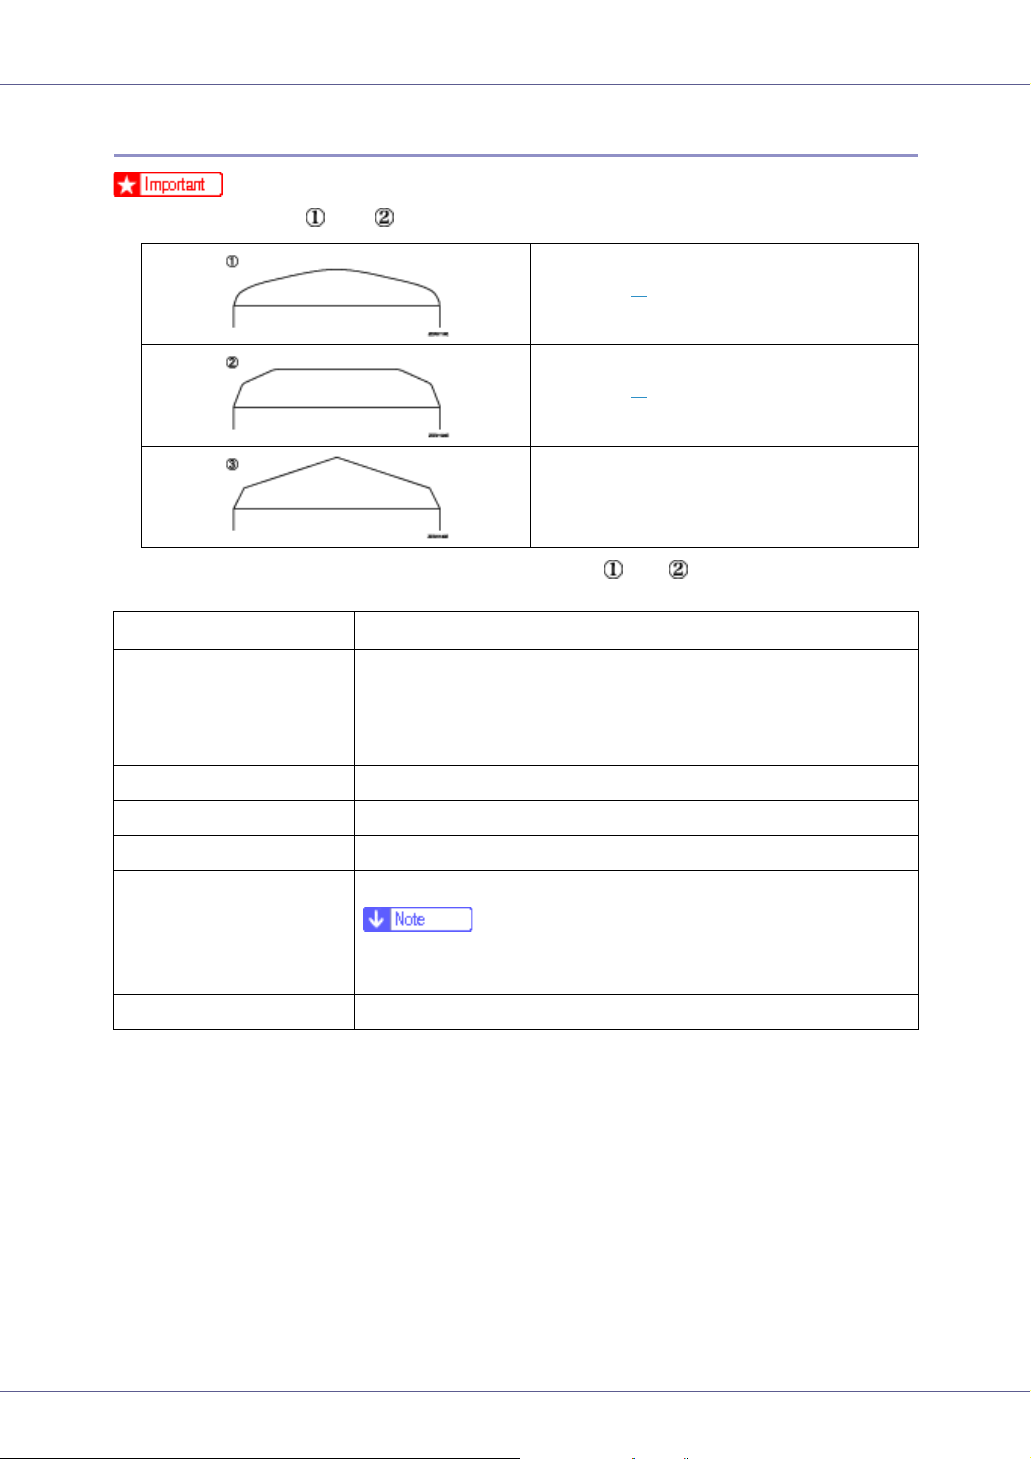
Envelopes
❒ Only envelopes and as shown below are supported.
Supported
Supported
*1
*1
Not supported
*1
Misfeeds might also occur when using envelopes and depending on the length
and shape of the flaps.
Paper thickness
Recommended weight and
size
72 - 90 g/m
• Metric version
72 g/m 2, 114 × 162 mm (C6 Env)
• Inch version
24 lb, 3 7/8” × 7 1/2” (Monarch)
Printer setup Press [Paper Input] menu, [Paper Type], and then [Thick Paper].
Printer driver setup Click [Thick] in the [Type:] list.
Enabled paper feeding tray Bypass tray
2
(19 - 24 lb.)
Enabled paper feeding tray 10
❒ Make sure paper is not stacked higher than the paper guides
inside the bypass tray.
Both-sided printing Not possible
16
Paper and Other Media
Additional cautions • Check the print side is facing up.
• Check there is no air in the envelopes before loading.
• For better print quality, we recommend the right, left, top, and
bottom print margins to be at least 15 mm (0.6”) each.
• Load only one size and type of envelope at a time.
• When loading envelopes, be sure to unfold the flaps and position them opposite to the paper feed direction.
• Before loading envelopes, flatten their leading edges (the edge
going into the printer) by running a pencil or ruler across them.
• Some kinds of envelope might cause misfeeds, wrinkles or
print poorly.
• Print quality on envelopes may be uneven if parts of an envelope have differing thicknesses. Print one or two envelopes to
check print quality.
Paper not supported by this printer
Avoid using the following paper as they are not supported by this printer.
• Paper meant for an ink-jet printer
• Bent, folded, or creased paper
• Curled or twisted paper
• Torn paper
• Wrinkled paper
• Damp paper
• Paper that is dry enough to emit static electricity
• Paper that has already been printed onto, except a preprinted letterhead.
Malfunctions are especially likely when using paper printed on by other than
a laser printer (e.g. monochrome and color copiers, ink-jet printers, etc.)
• Special paper, such as thermal paper, aluminum foil, carbon paper and conductive paper
• Paper whose weight is heavier or lighter than the limitation
• Paper with windows, holes, perforations, cutouts, or embossing
17
Paper and Other Media
• Adhesive label paper on which glue or base paper is exposed
• Paper with clips or staples
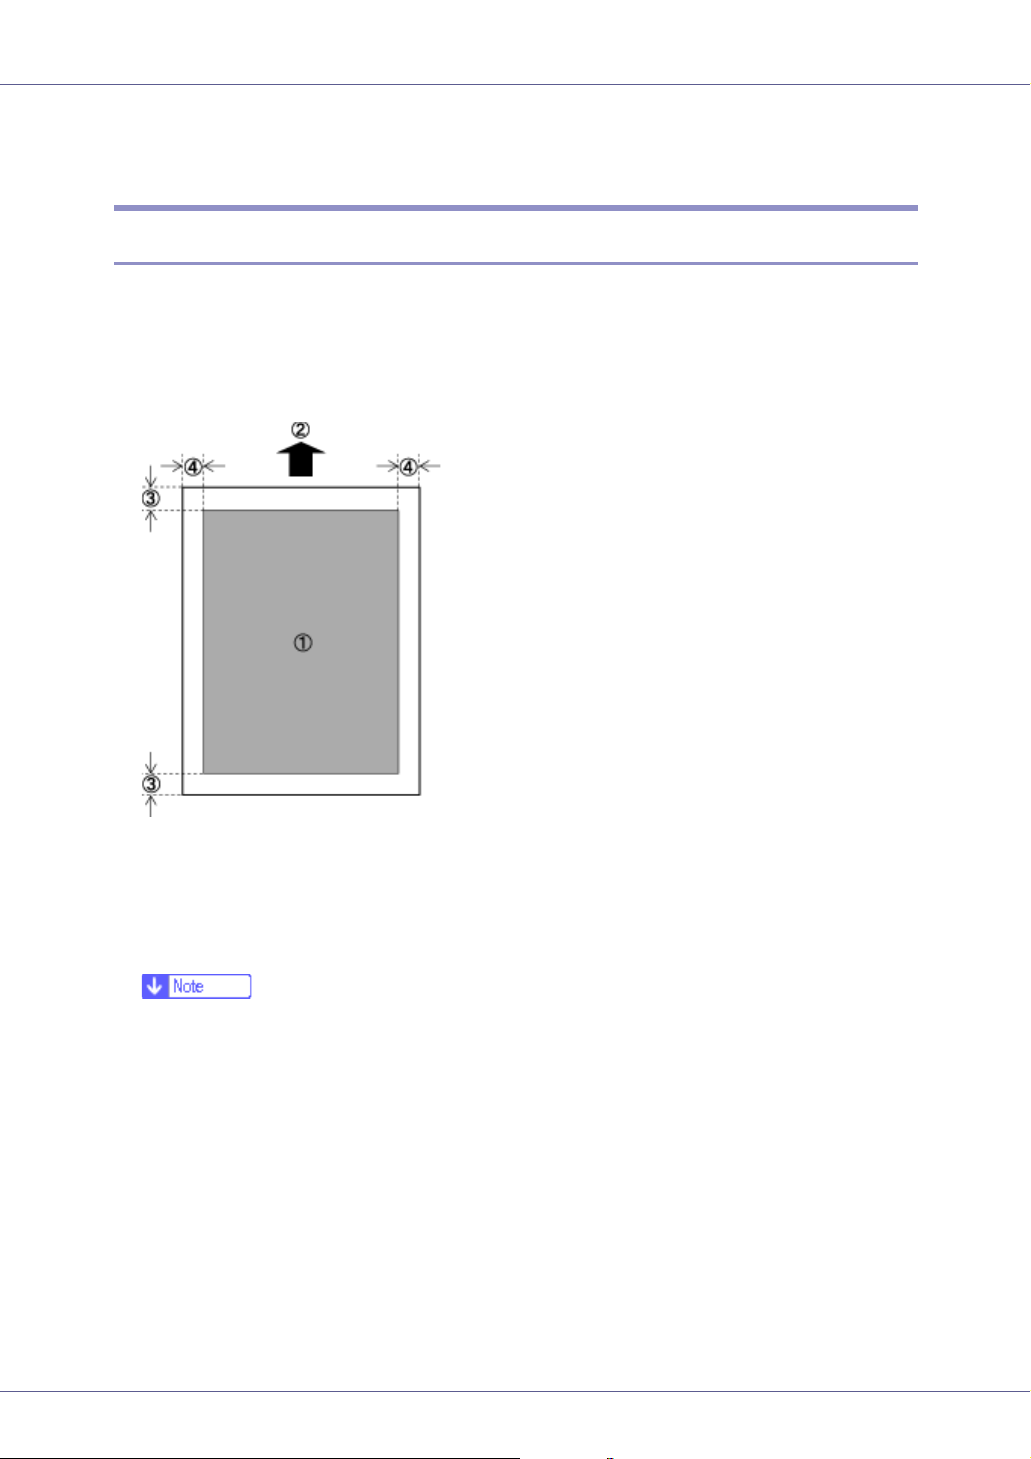
Print Area
The following shows the print area for this printer. Be sure to set the print margins
correctly by the application.
❖ Paper
A Print area
B Feed direction
C Approx. 4.2 mm (0.17 inches)
D Approx. 4.2 mm (0.17 inches)
❒ Print area may vary depending on paper size, printer language, and printer
driver settings.
❒ If you load paper larger than A3L in the bypass tray, hold it steady so it
feeds properly. Paper feed accuracy and print quality may vary according
to paper thickness and width. Do a test print to check the paper you want
to use gives satisfactory results.
❒ The maximum length of the print area is 457 mm (18”) in the paper feed
direction (at 1200×1200 dpi). If paper exceeding 457 mm (18”) in the paper
feed direction is used, the machine may not print properly.
18
Paper and Other Media
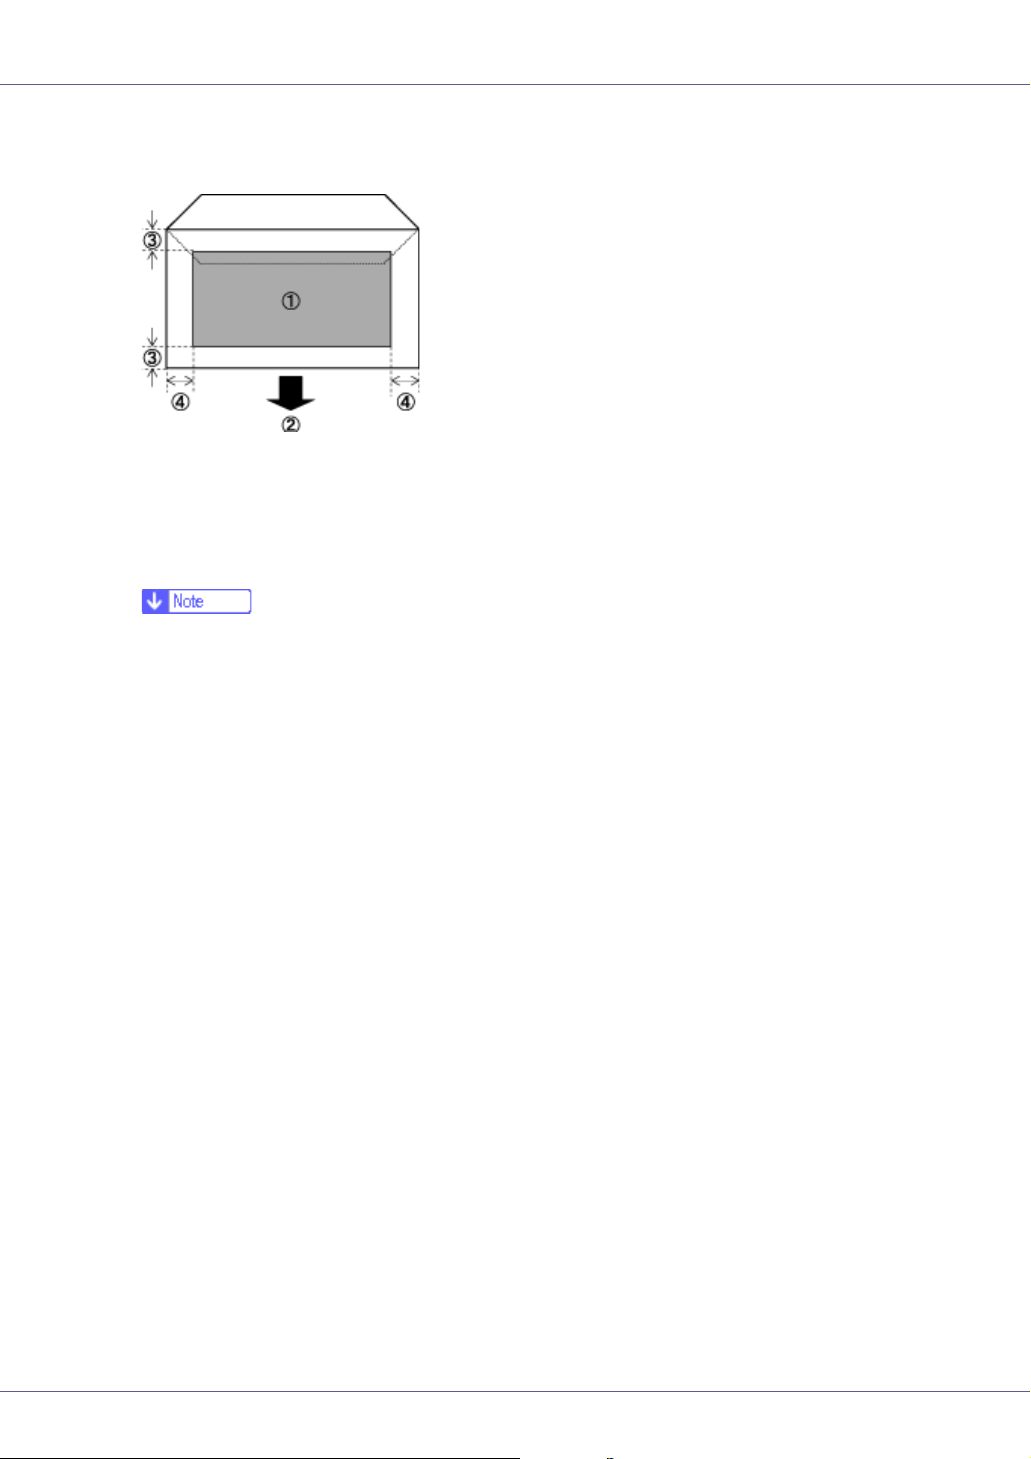
❖ Envelope
A Print area
B Feed direction
C Approx. 4.2 mm (0.17 inches)
D Approx. 4.2 mm (0.17 inches)
❒ The print area may vary depending on the paper size, printer language and
printer driver settings.
19
Paper and Other Media
Loading Paper
Load paper and change the paper size in tray 1, tray 2, and the optional paper
feed unit by following the procedures below.
❒ Tray 1 uses only letter size paper (11 × 81/2 K) exclusively. Load letter size
paper (11 × 8
❒ The 2000-sheet large capacity tray uses only letter size paper (11 × 8
exclusively. Load A4 paper at all times.
❒ If you want to load A4 K paper in tray 1 and the optional 2000-sheet large
capacity tray, contact your sales or service representative.
See p.6 “Paper and Other Media Supported by This Printer”, for details about
paper to be loaded in the paper tray and optional Paper Feed Unit Type 7300.
1
/2) at all times.
1
/2 K)
Loading Paper in Tray 1/2 and the optional paper feed unit
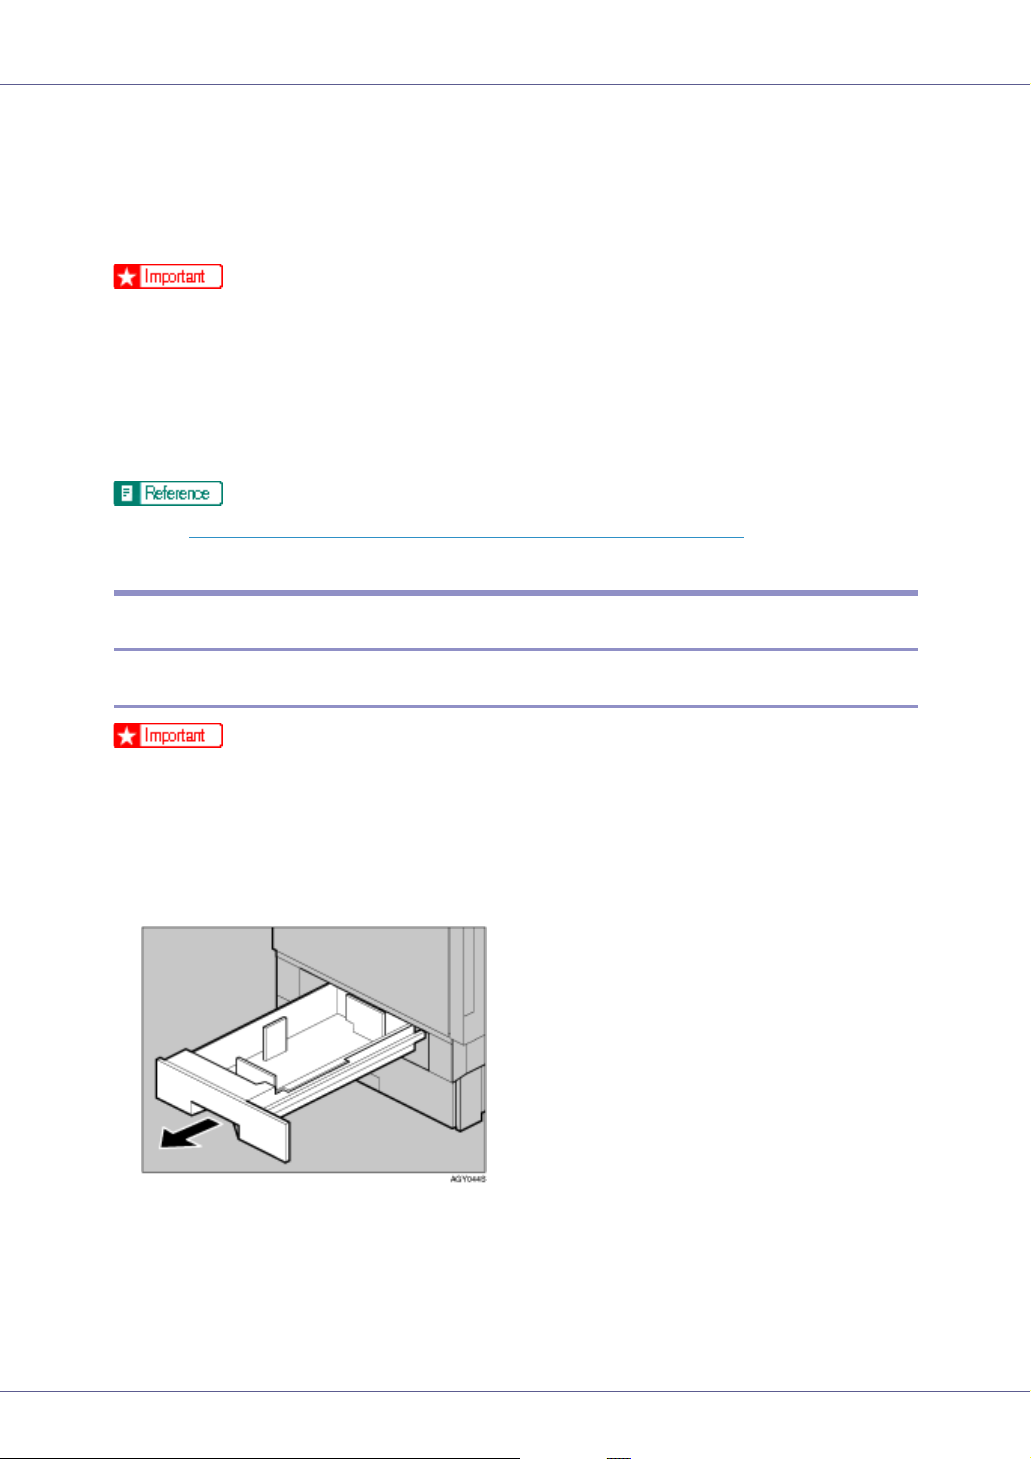
Loading Paper in Tray 1
❒ Tray 1 uses only letter size paper (11 × 81/2 K) paper exclusively. Load letter
size paper at all times.
❒ If you want to load A4 K paper in tray 1, contact your sales or service repre-
sentative.
A Slowly pull out the paper tray, until it stops.
20
Paper and Other Media
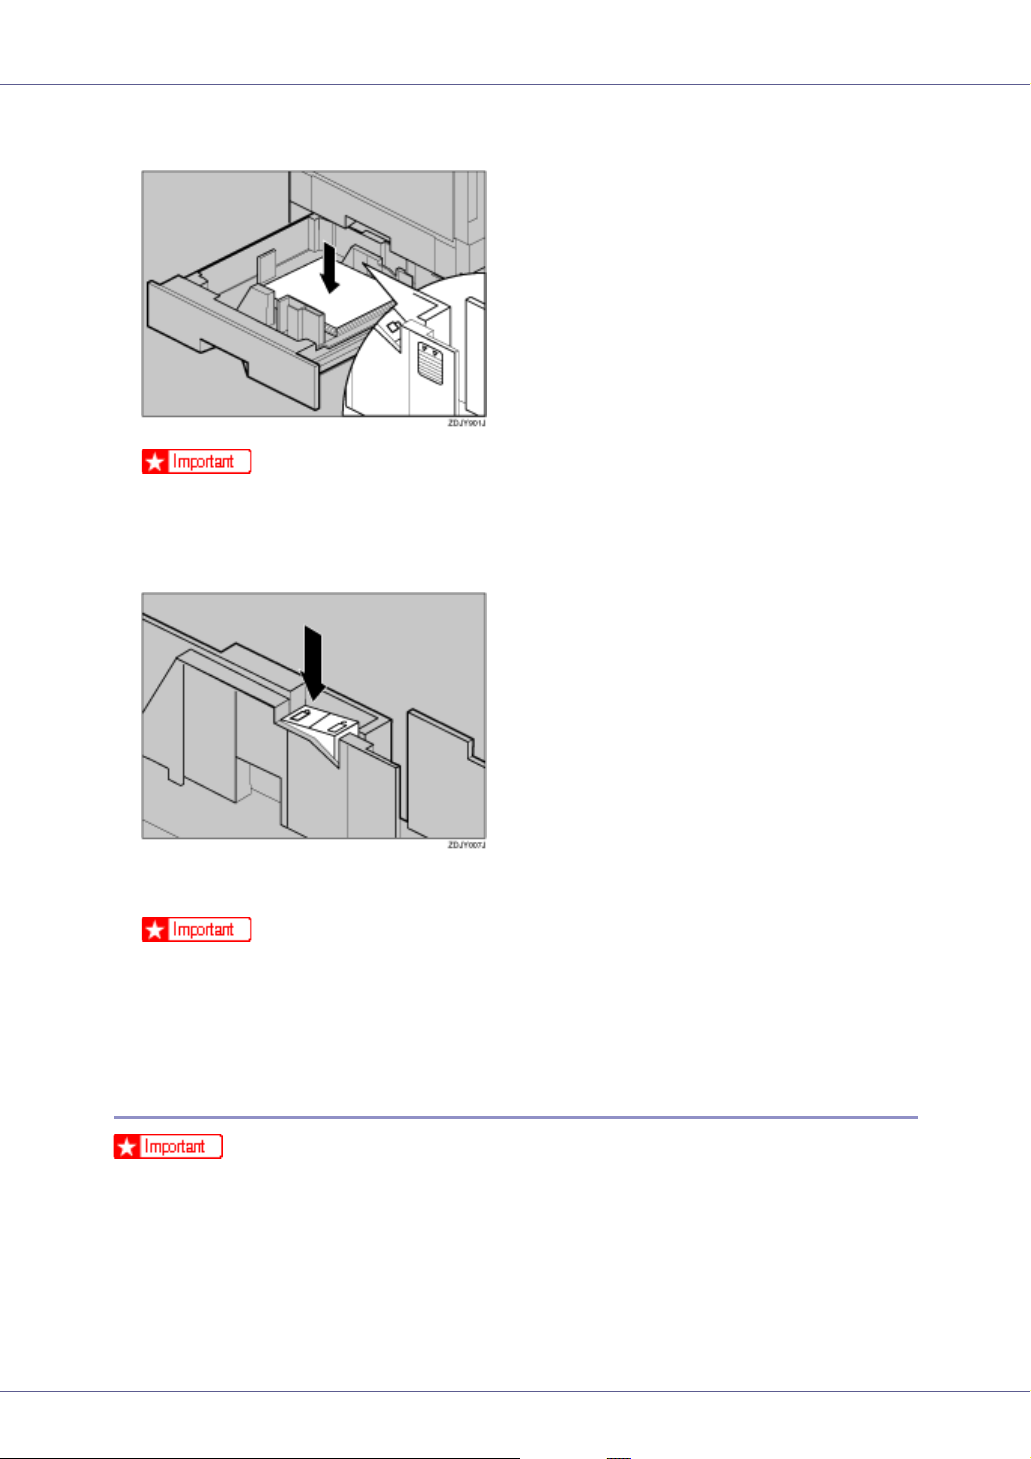
B Load paper into the tray with the print side down.
❒ Check that the top of the stack is not higher than the limit mark inside the
tray.
C Carefully slide the paper tray into the printer, until it stops.
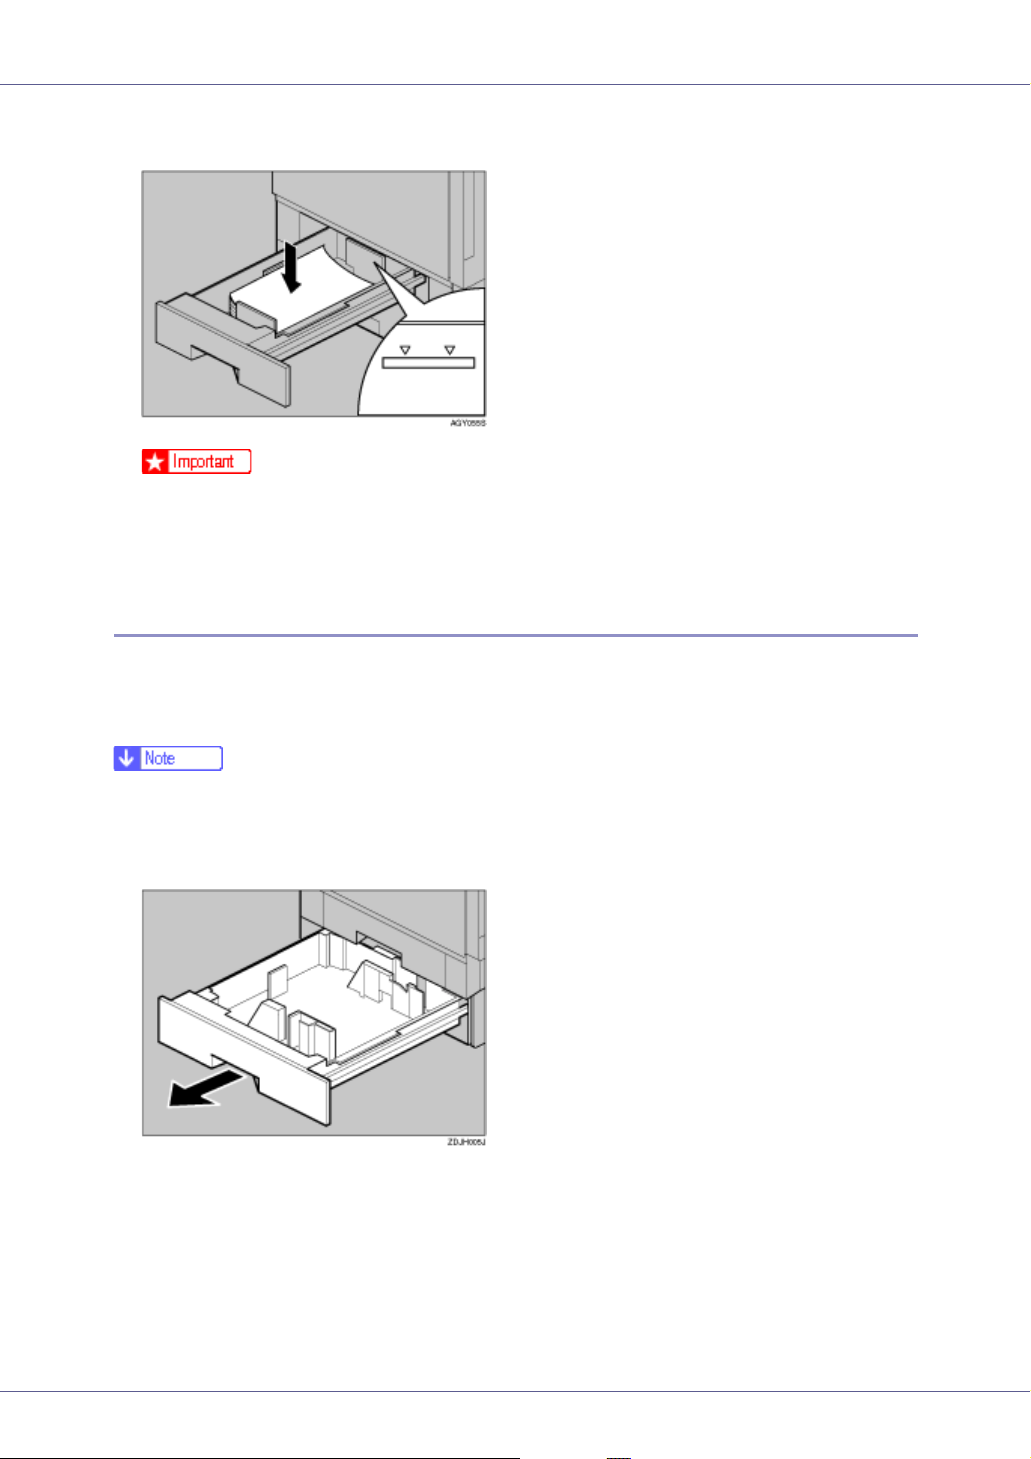
Loading Paper in Tray 2 and Paper Feed Unit Type 7300
Paper of different sizes can be loaded in tray 2 and the 500- and 1000-sheet paper feed units (optional) by adjusting the positions of the side and end guides.
This section describes loading paper in tray 2.
❒ If the side and end guides are in the right positions for the paper to be loaded,
they do not have to be adjusted.
A Slowly slide the paper tray out, until it stops.
B Adjust the side guide according to the size and orientation of the paper
as follows:
21

Paper and Other Media
Release the side guide lock.
C Press the side guide green lever ( ), adjust the position of the guide by
moving it in the direction of the arrow ( ).
D Adjust the end guide according to the size and orientation of the paper
by gripping both edges of the guide ( ), and then moving it in the direction of the arrow ( ).
22
Paper and Other Media
E Align all four sides of the paper stack, and then load it in the tray.
❒ Check that the top of the stack is not higher than the limit mark inside the
tray.
F Make sure the paper is fixed in place, and then lock the side guide.
G Slowly slide the paper tray back until it stops.
❒ Do not slide the paper tray in with force. If you do, the front and side guides
might move.
❒ Be sure to adjust the side guides to the paper size, or misfeeds might oc-
cur.
Loading Paper in Paper Bank Type 7300 (2000-sheet Large Capacity Tray)
❒ The 2000-sheet large capacity tray uses only letter size paper (11 × 81/2 K)
exclusively. Load letter size paper at all times.
❒ If you want to load A4 K paper in the 2000-sheet large capacity tray, contact
your sales or service representative.
23
Paper and Other Media
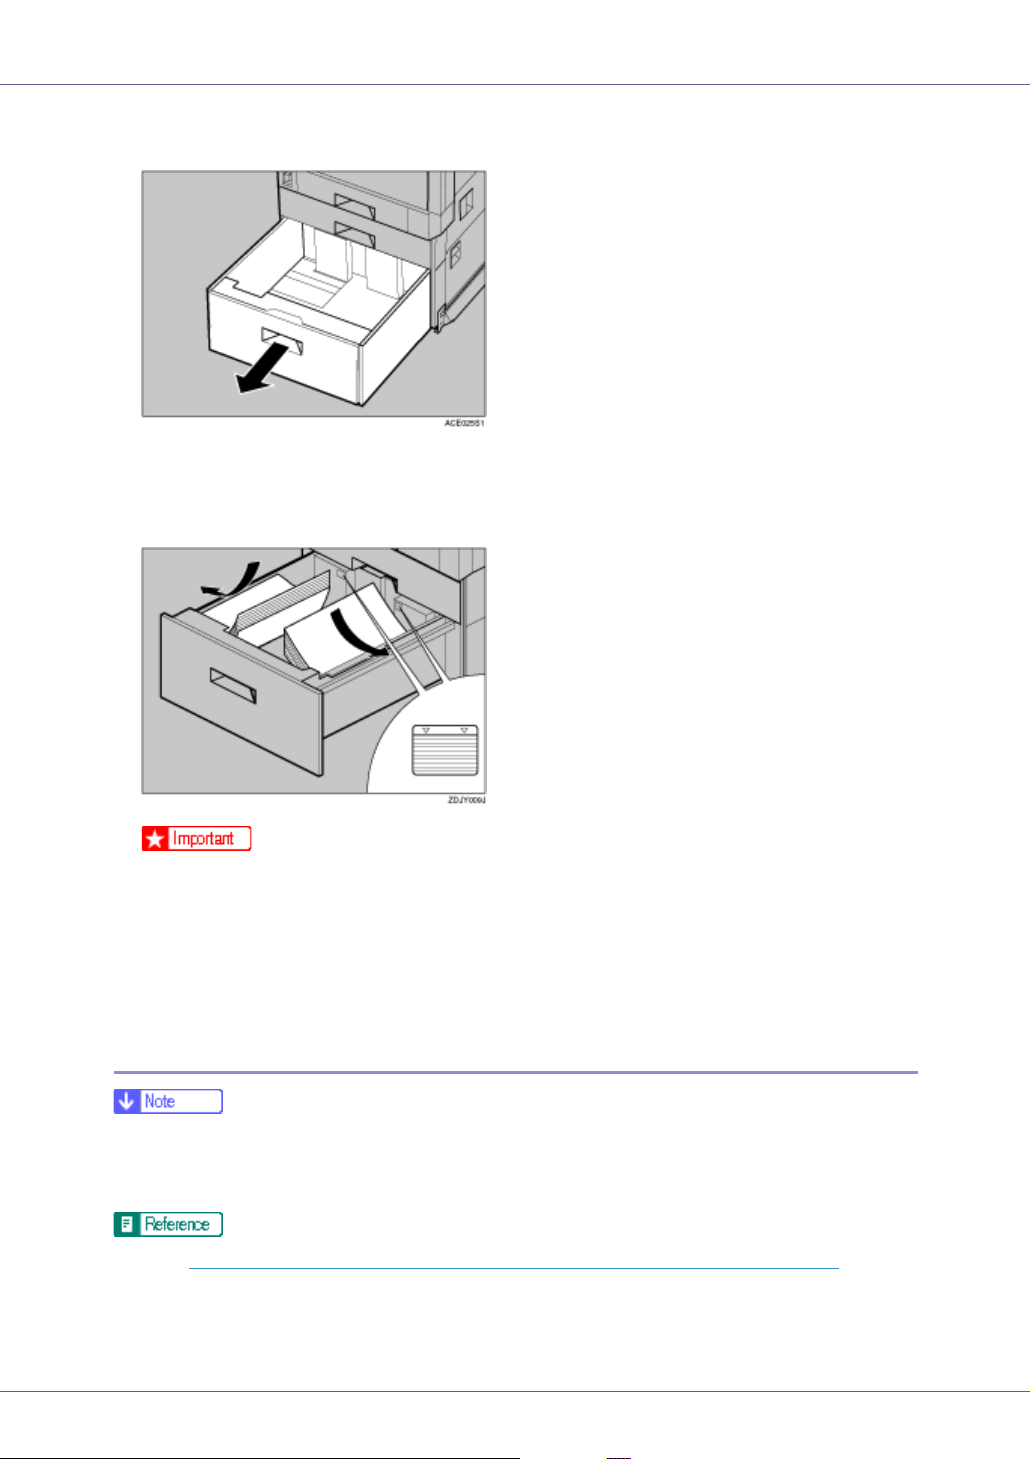
A Slowly pull out the paper tray, until it stops.
B With the print side down, align all four sides of the two paper stacks, and
then load them next to each other in the tray. Each side has a limit of
1,000 sheets.
❒ Align the paper and load the stacks against the left and right walls, or mis-
feeds might occur.
❒ Check that the top of the stack is not higher than the limit mark inside the
tray.
C Slowly push in the paper tray until it stops.
If you load a paper size that is not selected automatically
❒ Paper sizes not selected automatically are B4L, A4L, B5L, 71/4 × 101/2L,
8 × 13L, 81/2 × 13L, 81/4 × 13L, 8K (101/2 × 15.35)L, 16K (7.68 × 101/2)L,
16K (10
See p.21 “Loading Paper in Tray 2 and Paper Feed Unit Type 7300”, for details about how to load the paper.
1
/2 × 7.68)K.
24
Paper and Other Media
❒ Tray 1 uses only letter size paper (11 × 81/2 K) exclusively. Load letter size
paper at all times.
1
❒ 2000-sheet large capacity tray uses only letter size paper (11 × 8
sively. Load letter size paper at all times.
❒ If you want to load A4 K paper in tray 1 and the optional 2000-sheet large
capacity tray, contact your sales or service representative.
This section uses A4 (210 × 297) L as an example.
/2 K) exclu-
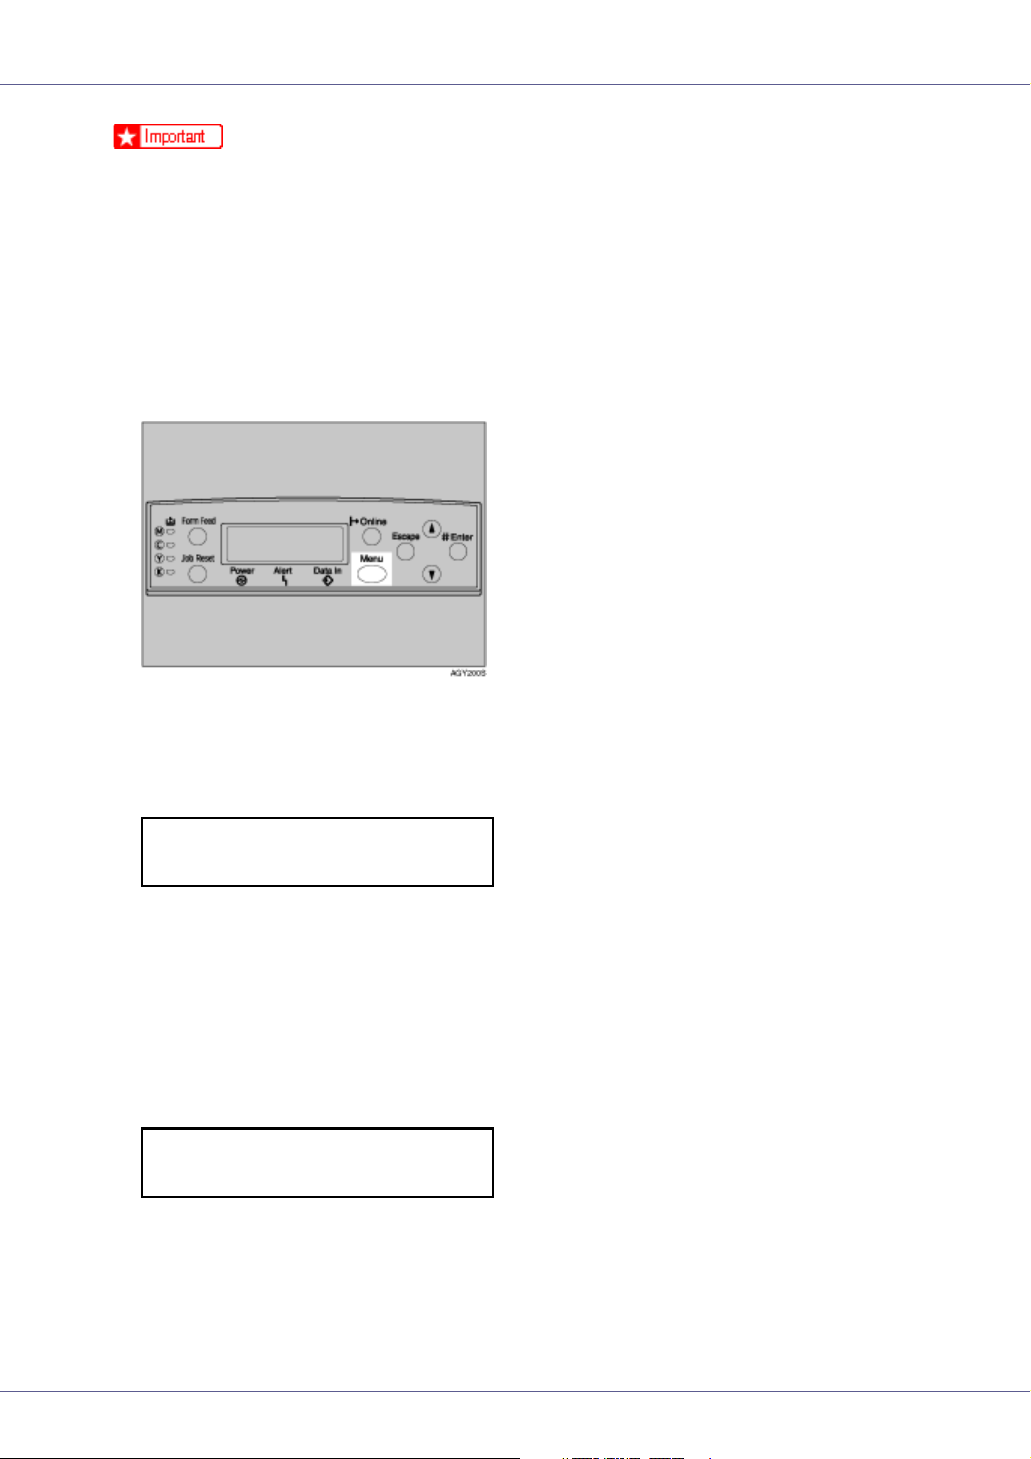
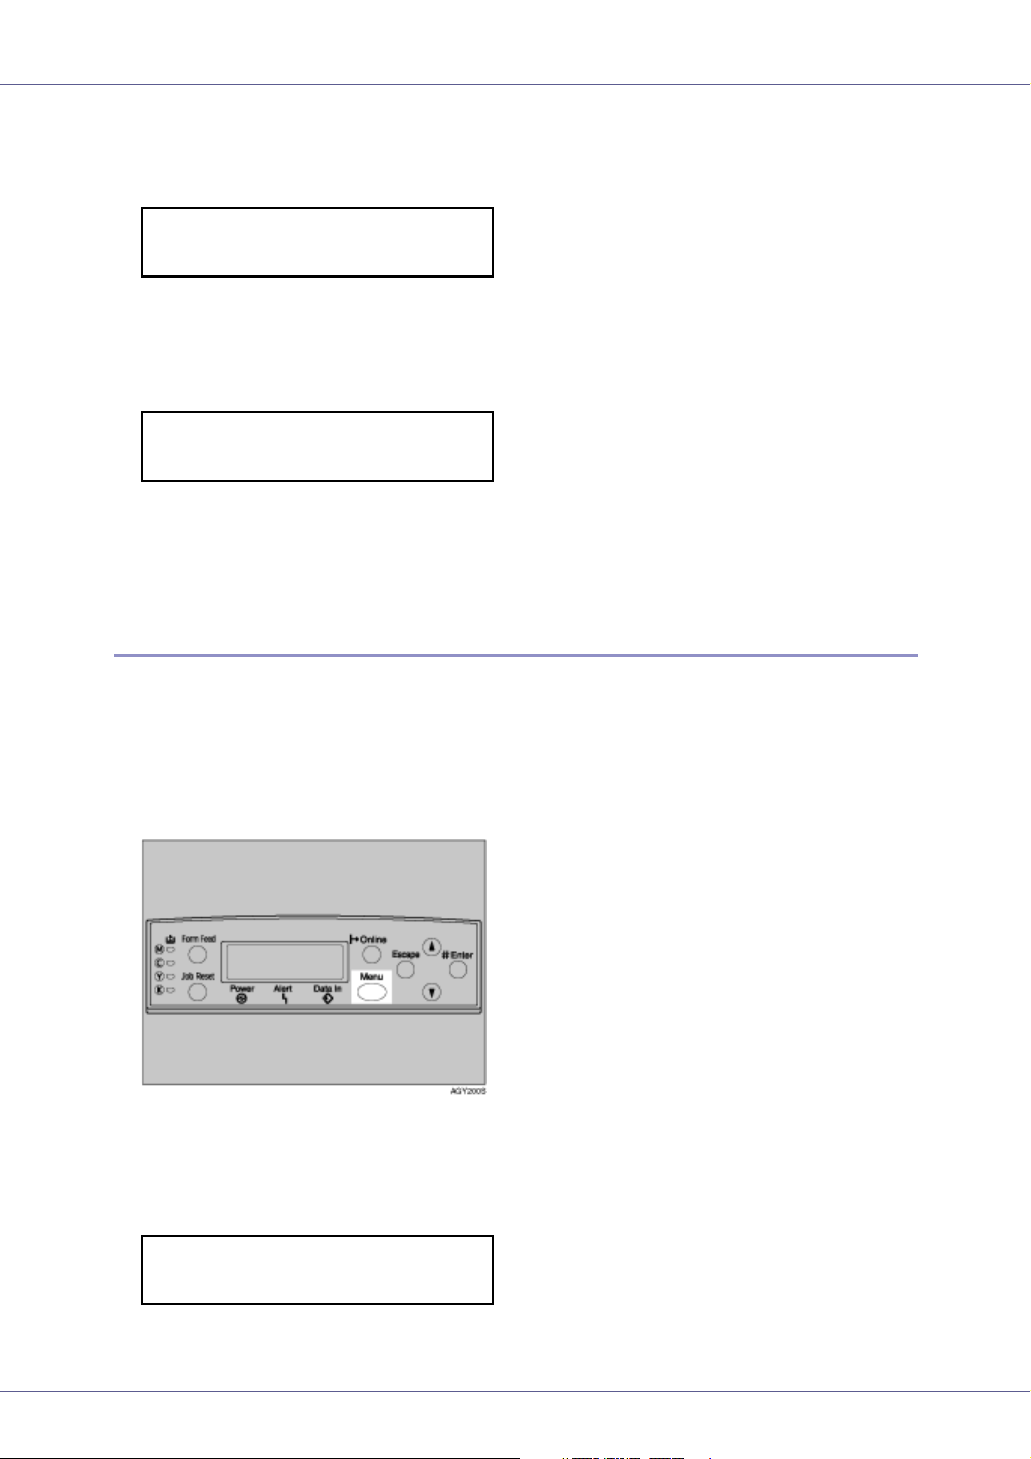
A Press the {Menu} key.
The [Menu] screen appears on the display.
B Press the {U} or {T} key to display [Paper Input], and then press the {#
Enter}.
Menu:
Paper Input
The paper selection menu appears.
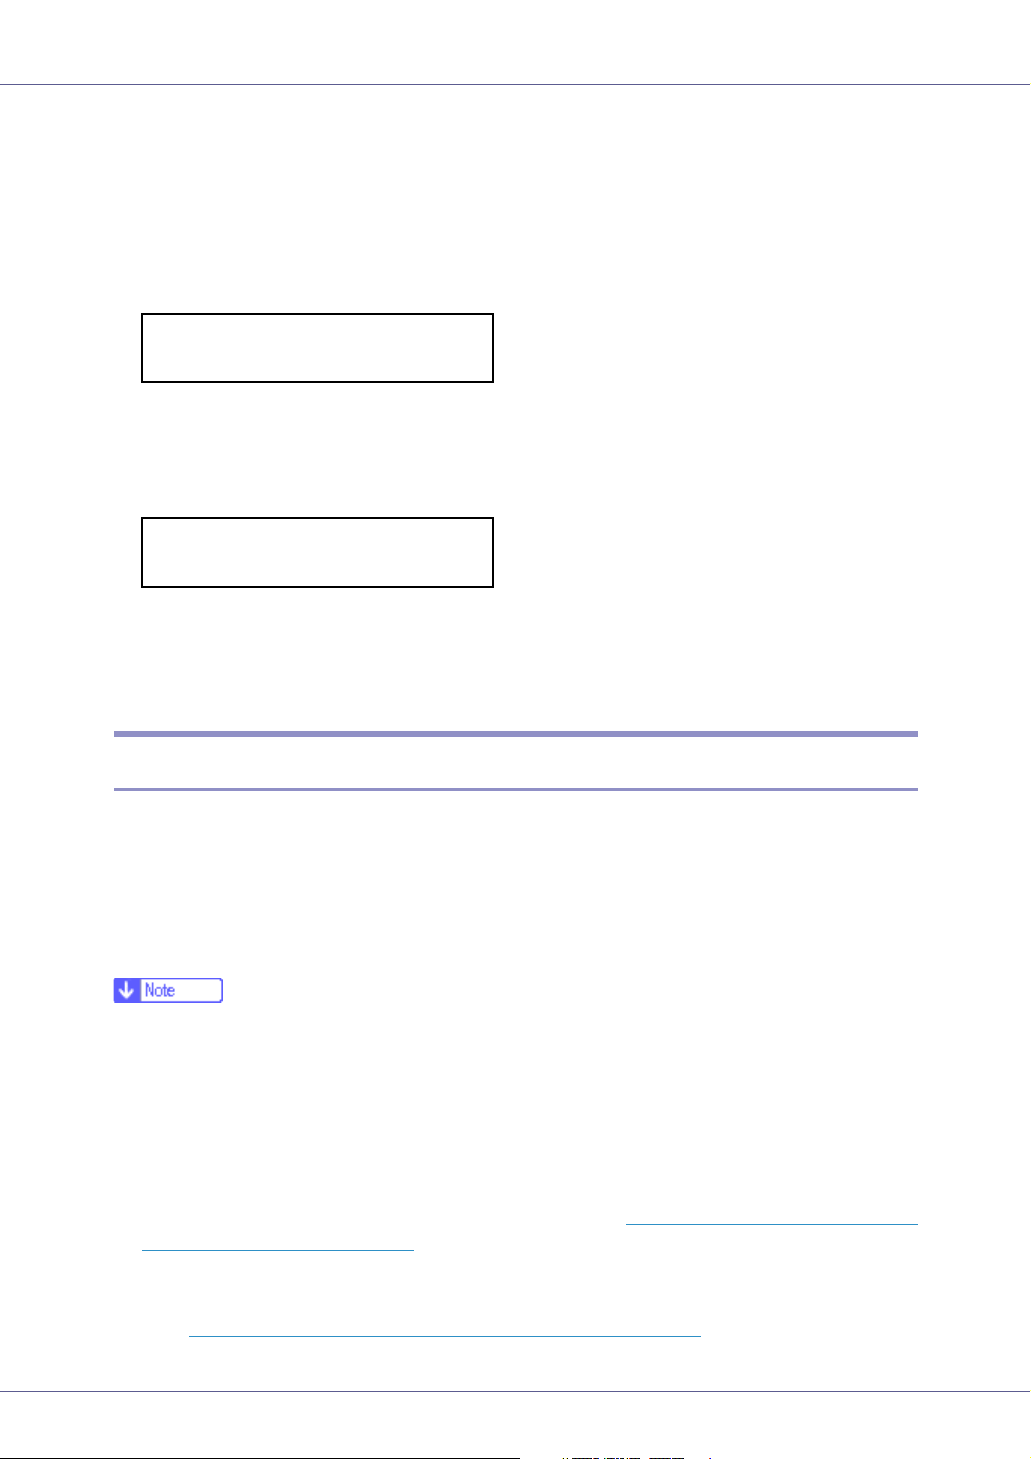
C Press the {U} or {T}key to display [Tray Paper Size], and then press the {#
Enter} key.
The paper tray selection menu appears.
D Press the {U} or {T}key to display the target paper tray, and then press
the {# Enter} key.
Tray Paper Size:
Tray 2
The paper size selection menu appears.
25
Paper and Other Media
E Press the {U} or {T} key to display the loaded paper size, and then
press the {# Enter} key.
Tray 2 :
*A4 (210 x 297)
After about two seconds, the display returns to the menu.
F Press the {Online} key.
The initial screen appears.
This completes the setting change.
❒ After printing on a paper size that is not selected automatically, if you want
to print on paper that is selected automatically again, reload the paper, proceed to step
, and return the setting to “Auto”.
G
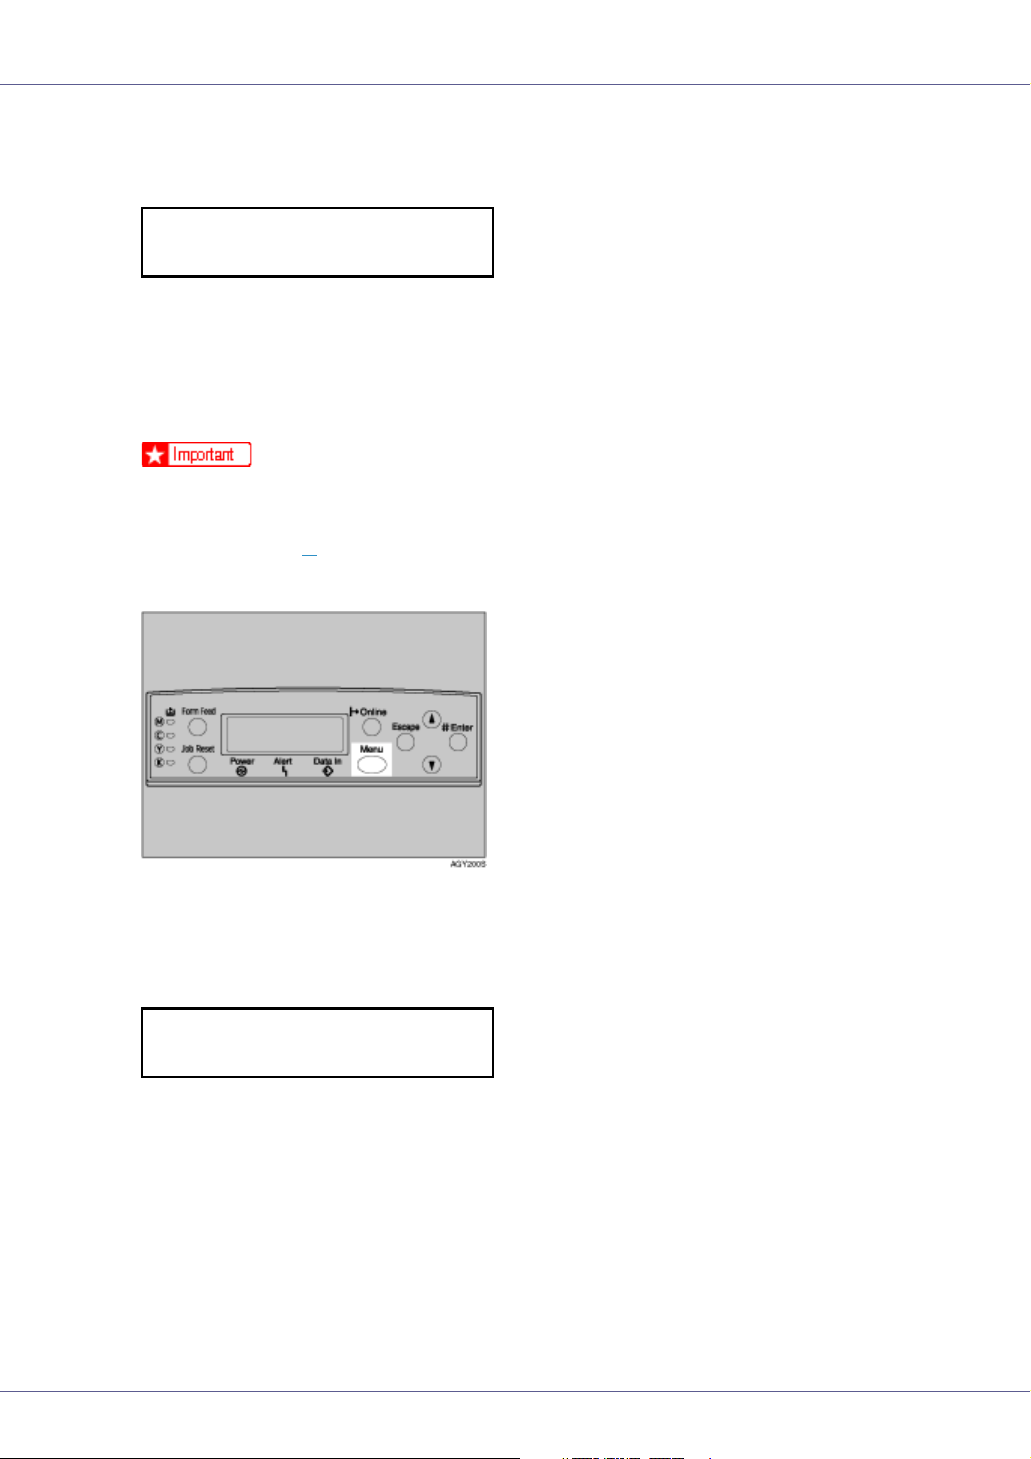
G Press the {Menu} key.
The [Menu] screen appears on the display.
H Press the {U} or {T} key to display [Paper Input], and then press the {#
Enter} key.
Menu:
Paper Input
The paper selection menu appears.
I Press the {U} or {T}key to display [Tray Paper Size], and then press the {#
Enter} key.
The paper tray selection menu appears.
26
Paper and Other Media
J Press the {U} or {T} key to display the target paper tray, and then press
the {# Enter} key.
Tray Paper Size:
Tray 2
The paper size selection menu appears.
K Press the {U} or {T} key to display [Auto], and then press the {# Enter}
key.
Tray 2
*Auto
After about two seconds, the display returns to the menu.
L Press the {Online} key.
The initial screen appears.
Specifying a paper type for Tray 1/2 and the optional paper feed unit
Improve printer performance by selecting the optimum paper type for the tray.
You can select from the following paper types:
• Plain Paper, Recycled Paper, Special Paper, Color Paper, Letterhead, Preprinted Paper
A Press the {Menu} key.
The [Menu] screen appears on the display.
B Press the {U} or {T} key to display [Paper Input], and then press the {#
Enter} key.
Menu:
Paper Input
The paper selection menu appears.
27
Paper and Other Media
C Press the {U} or {T} key to display [Paper Type], and then press the {# En-
ter} key.
The paper tray selection menu appears.
D Press the {U} or {T} key to display the target paper tray, and then press
the {# Enter} key.
Paper Type:
Tray 2
The paper type selection menu appears.
E Press the {U} or {T} key to display the loaded paper type, and then
press the {# Enter} key.
Tray 2
*Recycled Paper
After about two seconds, the display returns to the menu.
F Press the {Online} key.
The initial screen appears.
Loading Paper in the Bypass Tray
Besides plain paper, you can use the bypass tray to load thick paper, envelopes,
OHP transparencies, paper longer than A3L, and paper that cannot be loaded
in the paper trays or paper feed unit.
• Set the size and direction of the loaded paper on the control panel or with the
printer driver. Make sure the settings do not conflict. Otherwise, the paper
may jam or the print quality may be affected.
❒ The bypass tray can accommodate sheets 90-305 mm(3.5”-12.01”) wide and
148-457 mm(5.8”-18”) long. However, the paper size must be set using the
control panel. When using the RPCSTM printer driver, sheets of up to 1260
mm(49.61”) in length can be set.
❒ If you load custom size paper or special paper, select the paper size using the
control panel. The RPCS
printer driver properties. The paper size selected using the printer driver overrides that selected using the control panel. See
paper for the Bypass Tray”.
TM
printer driver can select the paper size using the
p.31 “
Specifying custom size
❒ If you load thick paper, OHP transparencies, or envelopes, make the settings
for thick paper or OHP transparencies using the control panel or printer driver.
p.32 “Specifying a paper type for the Bypass Tray”.
See
28
Paper and Other Media
❒ The number of pages that can be loaded in the bypass tray differs depending
on paper type. Check that the top of the stack is not higher than the limit mark
inside the tray.
❒ When loading paper in the bypass tray, use L orientation if possible.
❒ When loading the bypass tray with paper that will be delivered into the top-left
tray, load the paper so the side you want to print on faces up.
❒ You cannot use the following functions when printing on paper loaded in the
bypass tray:
•Duplex Print
• Job Separation
• Staple/Punch
• Auto Tray Select
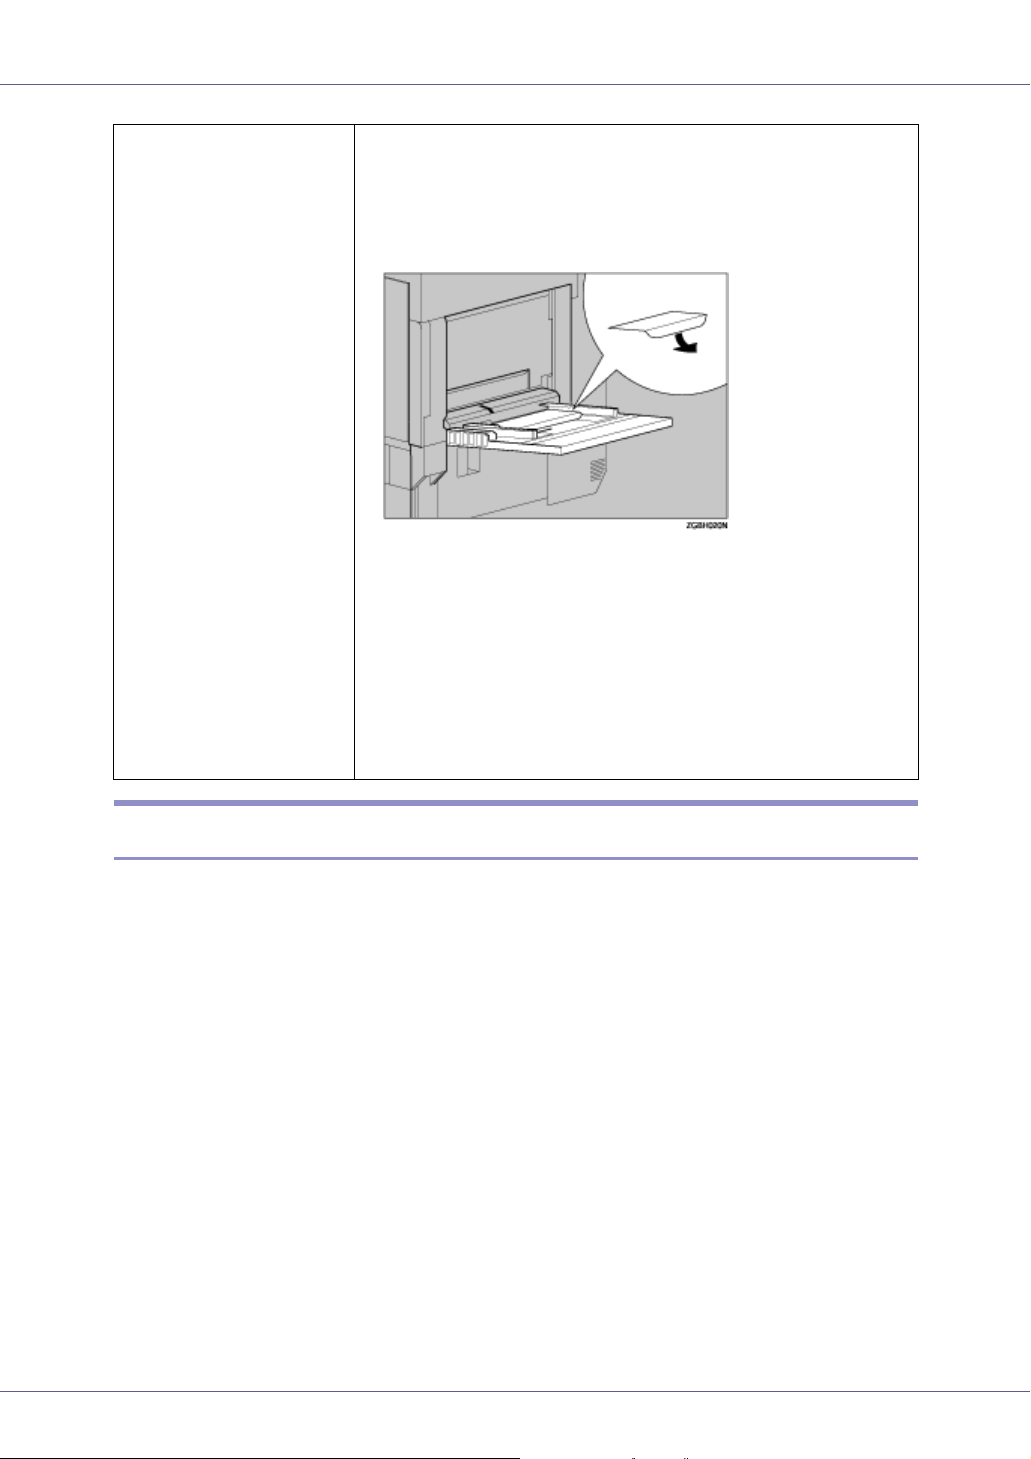
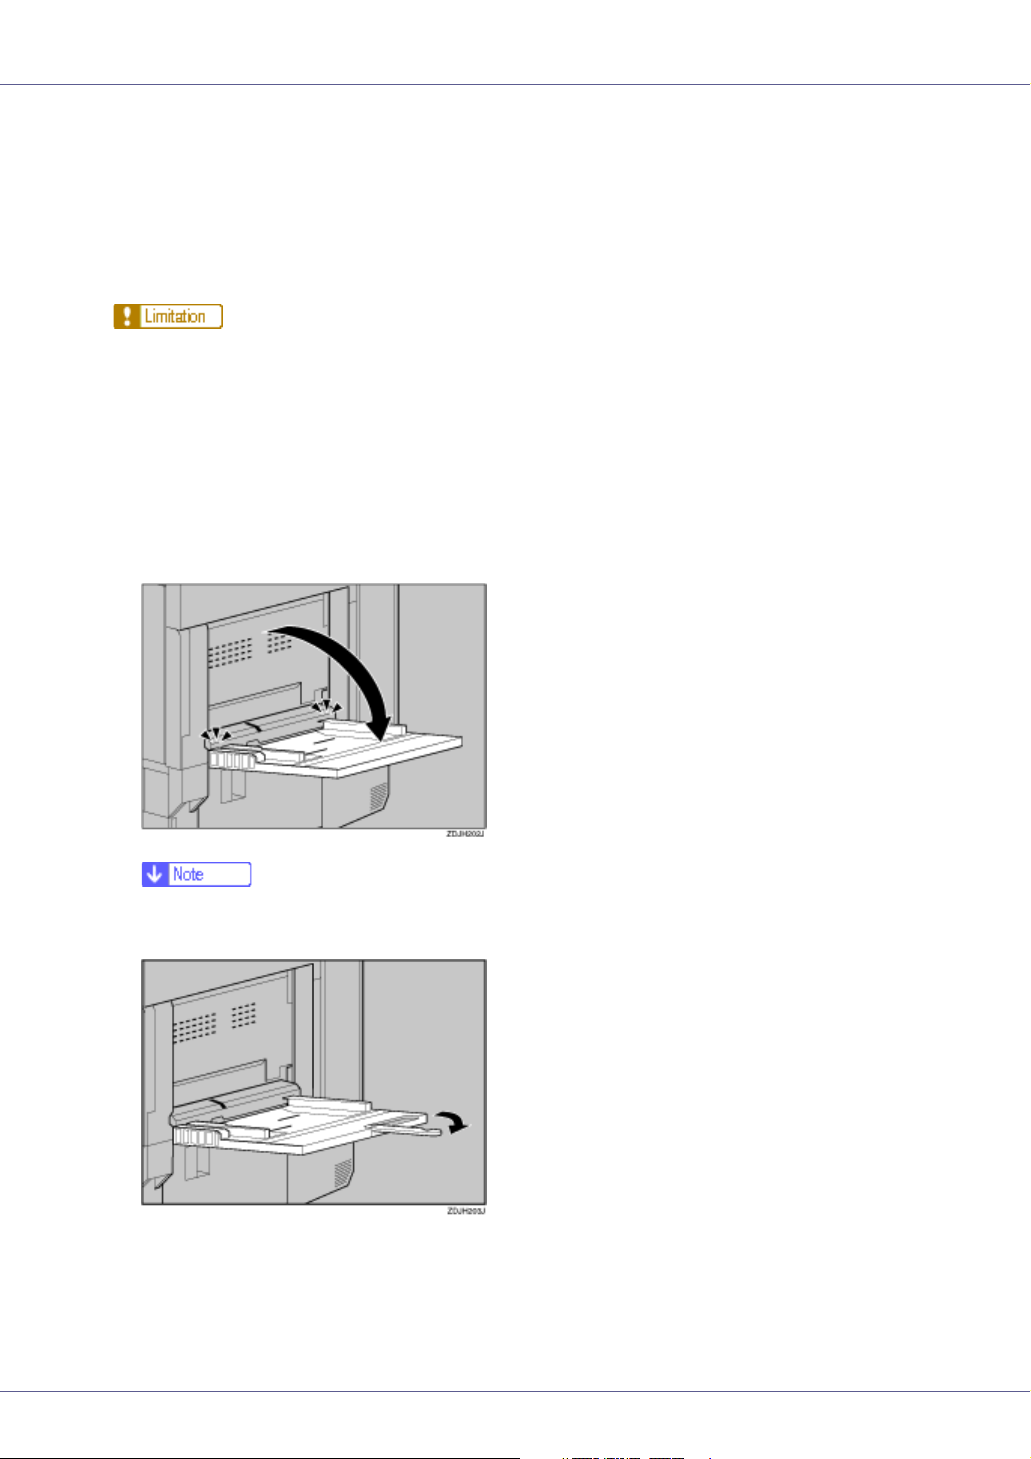
A Open the bypass tray.
❒ If you load A4 or larger size paper, pull out the bypass tray extension, and
then flip it open.
29
Paper and Other Media
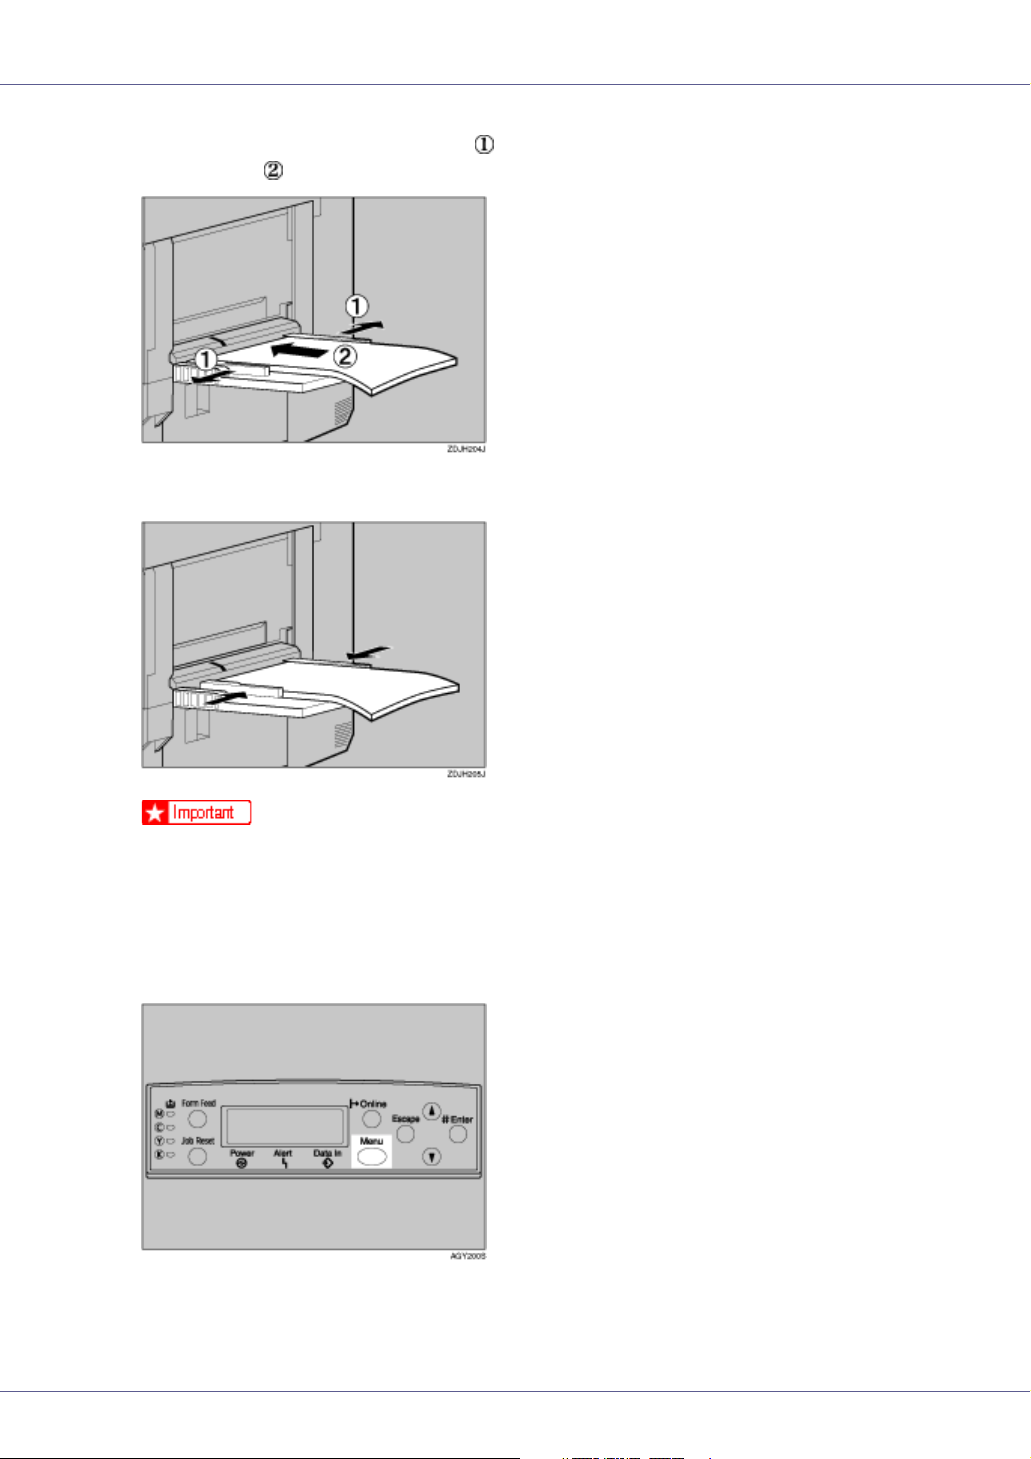
B Slide the side guides outward ( ), and then load paper print side up, un-
til it stops ( ).
C Adjust the side guides to fit the paper width.
❒ Check that the top of the stack is not higher than the limit mark inside the
tray.
❒ Shuffle the paper before loading the stack onto the tray, so multiple sheets
are not fed in together.
D Set the paper size using the control panel. Press the {Menu} key.
The [Menu] screen appears on the display.
30
 Loading...