

Page 1
Quick Installation Guide
89.6 F
54%
80.6 F 80%50 F80%
89.6 F 15%
50 F 15%
%RH
80
60
40
20
50 70 8060 90
F
59 F
70%
59 F
30%
77 F
30%
77 F
70%
32 C
54%
27 C 80%10 C 80%
32 C 15%
10 C 15%
%RH
80
60
40
20
10 20 30
C
15 C
70%
15 C
30%
25 C
30%
25 C
70%
Possible operation range Recommended range
The machine must be level within 5 mm,0.2" both front to rear
and left to right.
TDLH140E
AFJ145S
AFJ047S
AFJ048S
AFJ051S
AFJ301S
AFJ300S
AFJ033S
Please read the Safety Information in the Operating Instructions before using this machine. It contains important information related to
USER SAFETY and PREVENTING MACHINE PROBLEMS.
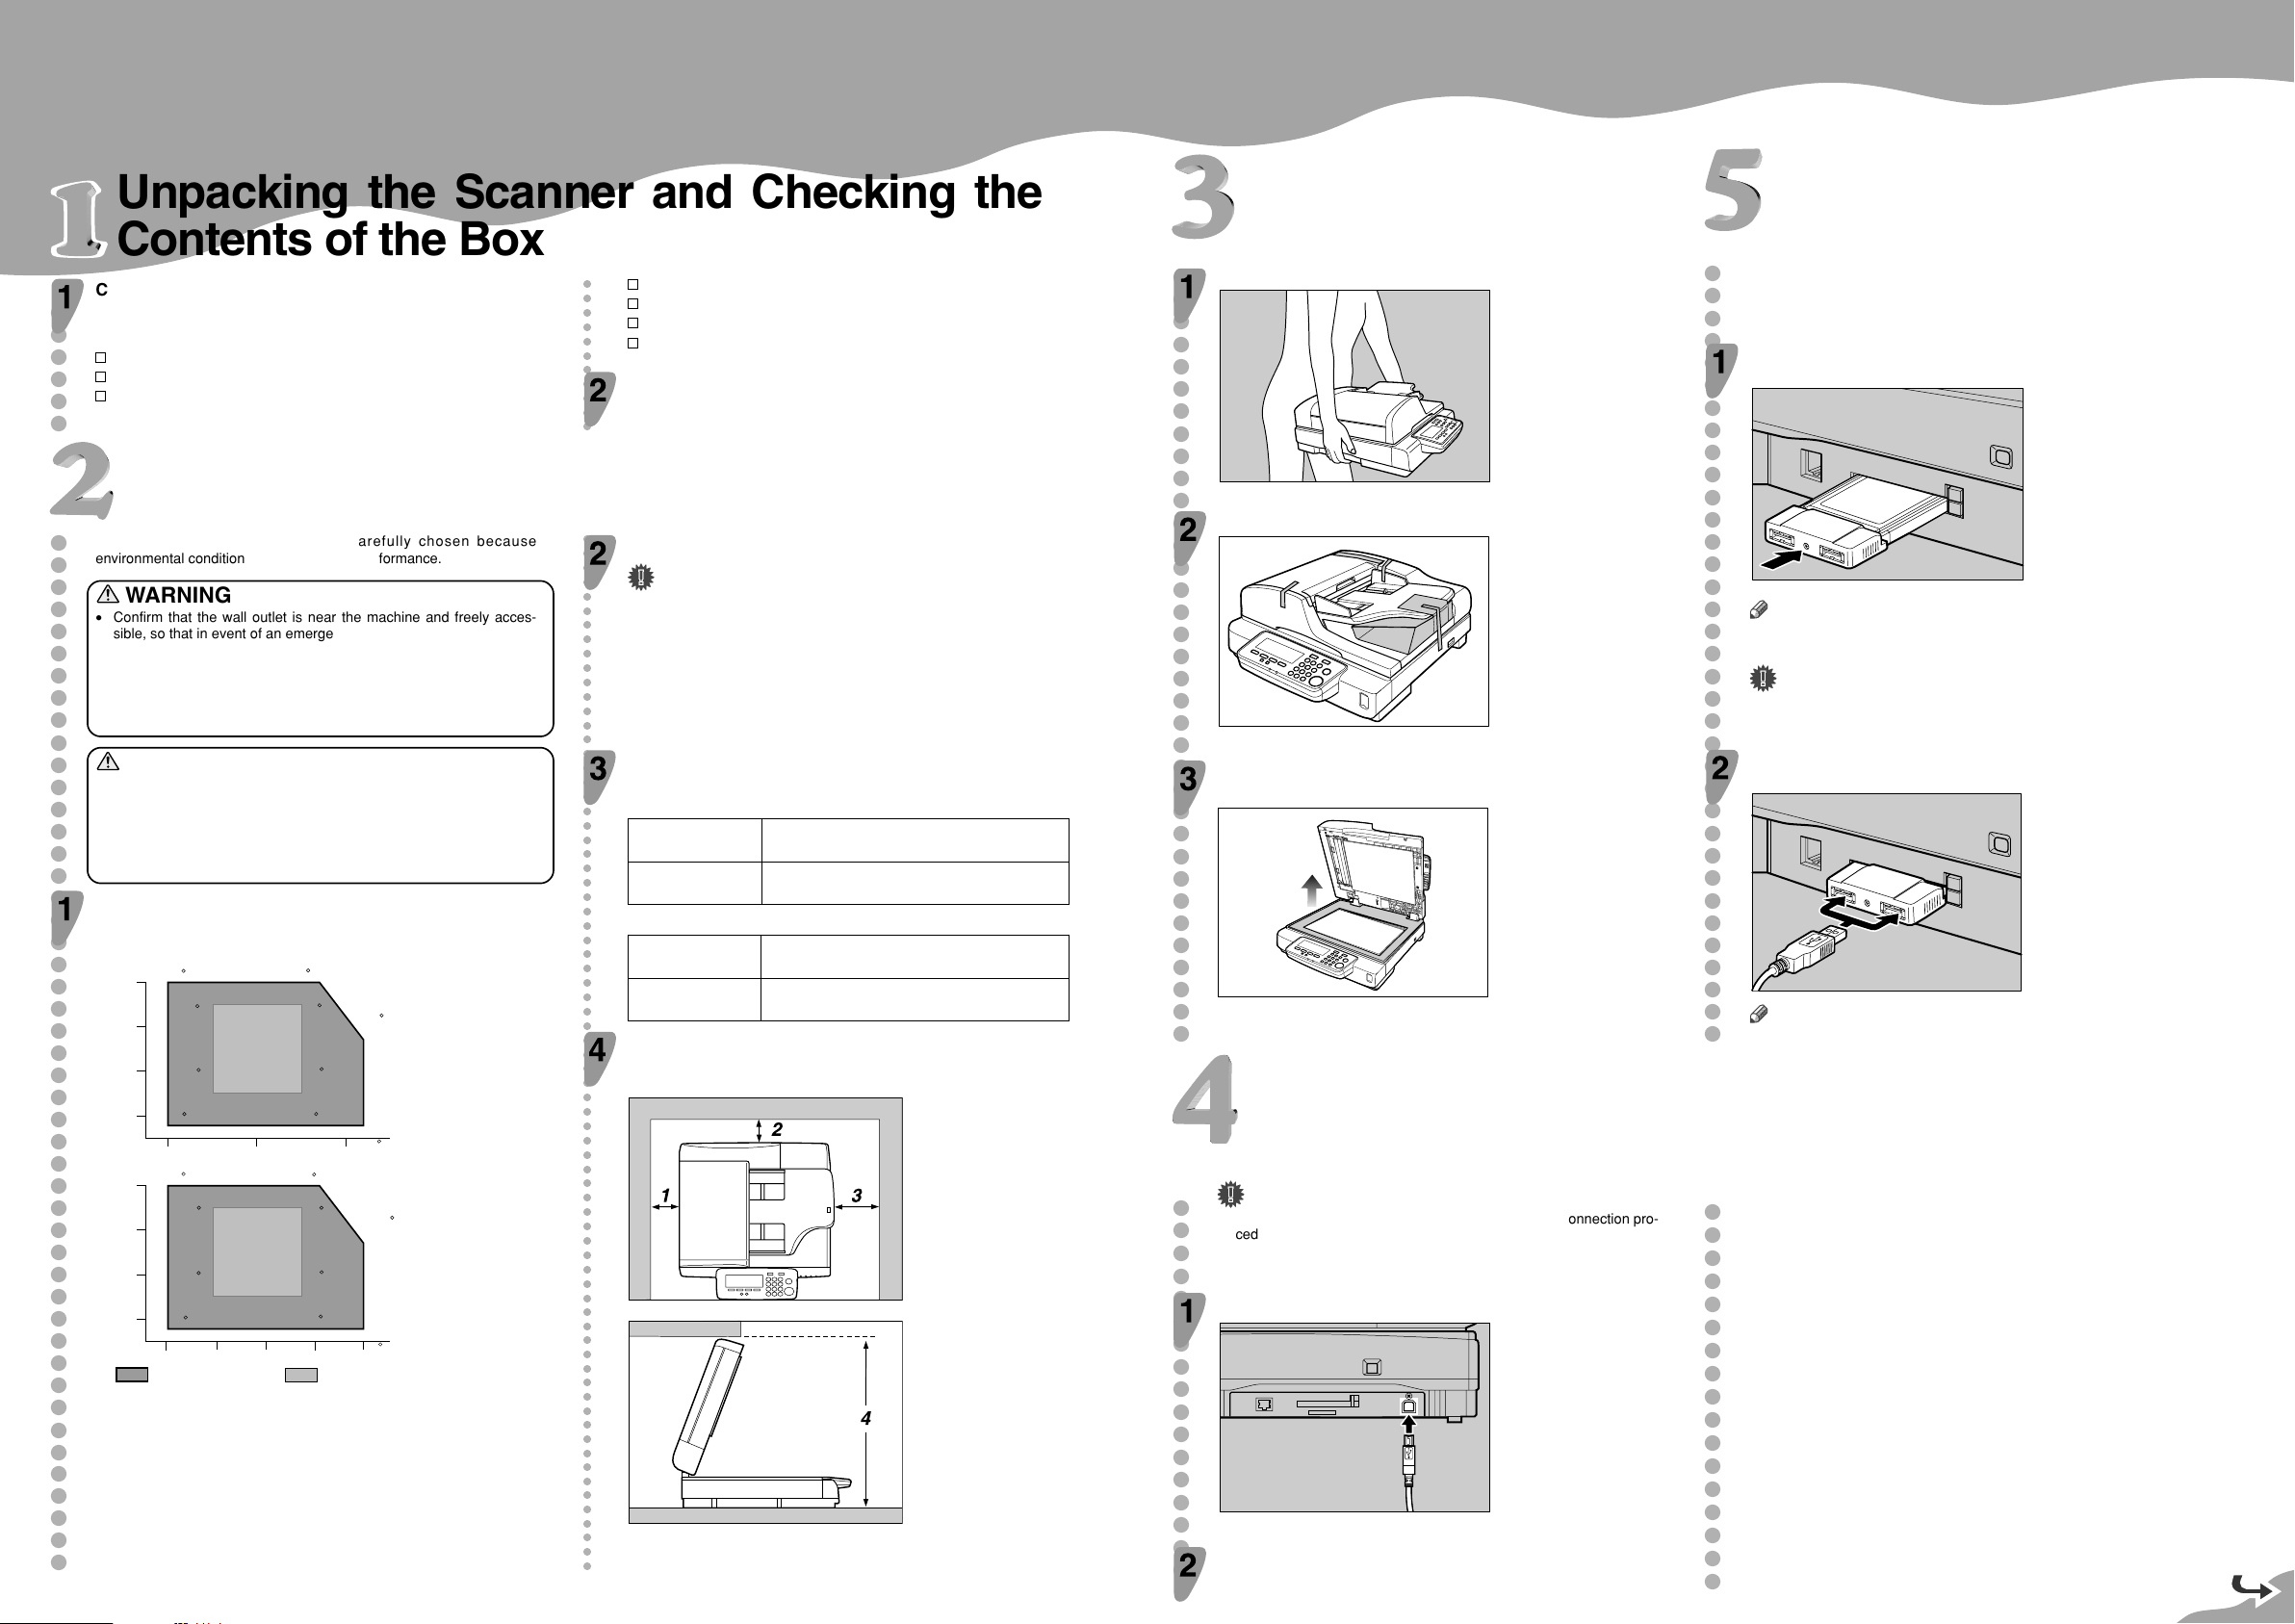
Unpacking the Scanner and Checking the
Contents of the Box
○○○○○○○○○○○
Check the contents of the box according to the follow-
○○○○○○
ing list. If any items are missing, please contact your
sales or service representative.
Quick Installation Guide(this sheet)
CD-ROM
USB Interface Card
Where to Put the Scanner
USB Cable
Power Cord
Safety Instruction Sheet
Card slot cover
Remove the plastic bag. Lift the scanner and move it to the place
where you want to install it.
Installing the Scanner
○○○○○○○○○○○○○○○○○○○○○○○○○○○○○○○○○○○
Take out the scanner main unit.
Image Scanner
Connecting the
Keyboard
Use the bundled USB keyboard to enter configuration of User Authenticate, to make search for the destinations of E-mails at Send Scan, and
to enter directly the E-mail addresses and subjects.
Insert the USB interface card with this machine to the
PC Card slot on the right side panel of this machine.
○○○○○○○○○○○○○○○○○○○○○○○○○○○○○○○○○○○○○○○○○○○○○○○
The Scanner's location should be carefully chosen because
environmental conditions greatly affect its performance.
WARNING
• Confirm that the wall outlet is near the machine and freely acces-
sible, so that in event of an emergency, it can be unplugged easily.
• Only connect the machine to the power source described on this sheet.
• Avoid multi-wiring.
• Do not damage, break or make any modifications to the power cord.
Do not place heavy object on it, pull it hard or bend it more than
necessary. These actions could cause an electric shock or fire.
CAUTION
• Keep the machine away from humidity and dust. A Fire or an electric
shock might occur.
• Place the machine on a strong and level surface. Otherwise, the
machine might fall and cause personal injury.
• If you use the machine in a confined space, confirm that there is a
continuous flow of air.
Optimum Environment Conditions
Recommended temperature and humidity
○○○○○○○○○○○○○○○○○○○○○○○○○○○○○○○○○○○○○○○○○○○○○○○○○○○○○○○○○○○○○○○○○○○○○○○○○
Environments to Avoid
Important
❒Locations exposed to direct sunlight or strong light
❒Dusty areas
❒Areas with corrosive gases
❒Areas excessively cold, hot, or humid
❒Locations near an air conditioner or humidifier
❒Locations near other electronic equipment
❒Locations where the scanner might be subjected to frequent strong
vibration
Power Connection
Connect the power cord to a power source with the following specifications:
Product Specifications
North America
Europe/Asia
Electrical Outlet Requirements
North America
Europe/Asia
Space Required for Installing the Scanner
Leave enough space around the scanner. This space is necessary to
operate the scanner. The recommended (or minimum) space
requirement is as follows.
G422-17 power supply rating:
AC 120V, 60Hz, 1.2A
G422-27 power supply rating:
AC 220-240V, 50/60Hz, 0.6A
G422-17 Electrical Outlet Requirements:
AC 120V, 60Hz, min.10A
G422-27 Electrical Outlet Requirements:
AC 220-240V, 50/60Hz, min.5A
Remove the tapes .
Open the automatic document feeder(ADF) and remove
the protective sheet on the exposure glass.
Connecting to a
Note
❒ Make sure that the card is securely inserted, until you feel the card
click into place.
Important
❒ If you remove the USB interface card while the machine is turned on,
it is necessary to restart the machine.
Connect the USB keyboard cable to one of the USB
ports.
Note
❒ You can insert either USB port of the two.
G422-8600
1
.
140 mm (5.5”) or more3. 190 mm (7.48”) or more
2
.
50 mm (1.96”) or more4. 378 mm (14.88”) or more
Computer via USB
cable
○○○○○○○○○○○○○○○○○
Important
❒ Prepare a marketed USB2.0 compliant cable before connection pro-
cedures.
❒ Before connection, install a TWAIN driver on the computer, before
turning on the power of this machine.
Connect a USB2.0 compliant cable to this machine.
Connect other end of the USB cable to the USB port of
the Computer.
○○○○○○○○○○○○○○○○○○○○○○○○○○○○○○○○○○○○○○○○○○○○○○○○○○○○
Page 2
GB GB EN USA
Connecting to a
AFJ048S
AFJ053S
AFJ059S
AFJ202S
AFJ054S
AFJ055S
AFJ056S
AFJ057S
Attaching the card slot
Connecting to a
Turning On the
Local Printer
○○○○○○○○○○○○○○○○○○○○○○○○○○○○○○○○
When you wish to use a local printer at Print Scan, USB connect this
machine with the printer.
Important
❒ You need to resister the printer with WebStatusMonitor before using
Print Scan function. See “Outline to Use Scan to Print” in the Operating Instructions for the outline of procedures to use the function.
Note
❒ See the manuals that comes with the printer you are going to con-
nect to this machine, for details about connections and setup information other than the USB cable.
❒ When you connect only a local printer without connecting the USB
keyboard, set up the USB interface card according to “5 Connecting
the Keyboard”.
Connect the bundled USB cable to one of the ports of
the USB interface card.
○○○○○○○○○○○○○○○○○○○○○○○○○○○○○○○○○○○○○○○○○○○○○○○○○○○○○○○○○○○○○○○
cover
Reeve the USB and network cable through the slits of
the card slot cover.
Align the two prongs of the card slot cover with the
two prong holes located at the upper left and right of
the PC card slot.
Power Source
○○○○○○○○○○○○○○○○○○○○○○○○○○○○○○○○○○○○○○○○○○○○○○○○○○○○○○○○○○○○○○○
WARNING
• Do not use with a power source with a voltage different from the speci-
fied voltage. Do not use a power outlet with multiple devices plugged
in. These could create the risk of fire or electric shock.
• Avoid the use of an extension cord.
• Do not damage, break, twist or modify the Power Cord. Placing heavy
objects on the cord, pulling on or bending it excessively can damage
the Power Cord, creating the risk of fire or electric shock.
• Never touch or unplug the power plug with wet hands. This can cre-
ate the risk of electric shock.
Power
○○○○○○○○○○○○○○○○○○○○○○○○○○○○○○○○○○○○○○○○○○○○○○○○○○○○○○
Make sure the power cord is firmly plugged into the
wall outlet.
Open the switch cover and turn on the power switch.
CAUTION
• When unplugging from an outlet, be sure to grasp the plug when
pulling. Never pull on the cord. This could damage the cord creating
the risk of fire or electrical shock.
Confirm that the power switch is set to off.
Confirm that the lock switch located on the right side
of the machine is set to the "Unlock" position.
Connect the other end of the cable to the USB port of
the printer.
Important
❒ Only one printer is available for printing at Print Scan. If you have
USB connected with multiple printers at the same time, the first printer
that this machine should recognize will be available.
Connecting to a
Network
○○○○○○○○○○○○○○○○○○○○
Important
❒ Use a 100BASE-TX (category 5) or 10BASE-T network cable when
you connect this machine to a network.
Insert the network cable’s end to the network interface
connector of this machine.
1
. Prong holes
Insert the prongs to the prong holes, and then push both
sides of the card slot cover until it is secured to the machine.
2
. Prongs
Important
❒ Be sure to set the lock switch to "Unlock". Turning on the power with
the lock switch set to "Lock" could result in failure in scanning or
malfunction of this machine.
Push the power cord plug all the way into the power
connector on this machine.
Note
❒ Be sure to use the power cord that comes with this machine.
Insert the power plug into the power outlet.
Insert the other end of the network cable to an appropriate connector of a network device, such as an
Ethernet hub.
Attach the card slot cover that comes with this machine.
Before turning off the power
Before you turn off the power of this machine, make sure that a standby
screen is displayed on the display panel.
If you turn off the power while the scanner features menu is displayed, all
the settings that you have configured could be discarded, and this machine could return to its factory default status.
You should also confirm that
indicator on the front of this machine is not lit, when you turn of the power.
Otherwise, loss of scan data or failure in sending files might occur.
is not displayed on the screen, or the
Copyright ©2004 G422-8600
Printed in China
Quick Installation Guide
Page 3
Image Scanner
Operating Instructions
What You Can Do With This Machine
Setting Up the Scanner
Configuring the Scanner Settings
Setting Originals
Sending Scan File by E-mail
Sending Scan File by Scan to Folder
Sending Scan File by Scan to FTP
Printing Scanned Image Files
Sending Scan Files Using Delivery Server
Using the TWAIN Scanner Function
Appendix
Read this manual carefully before you use this machine and keep it handy for future reference. For safe and correct use, be sure to read the Safety
Information in this manual before using the machine.
Page 4

Declaration of Conformity
“The Product complies with the requirements of the EMC Directive 89/336/EEC and its amending directives and the Low Voltage Directive 73/23/EEC and its amending directives.”
In accordance with IEC 60417, this machine uses the following symbols for the main power switch:
aaaa means POWER ON.
bbbb means POWER OFF.
Copyright © 2004
Page 5

TABLE OF CONTENTS
Safety Information ................................................................................................. 1
Safety During Operation............................................................................................. 1
Lithium Batteries (Memory Back-up) ..........................................................................2
Manuals for This Scanner .....................................................................................3
How to Read This Manual .....................................................................................4
1. What You Can Do With This Machine
Outline..................................................................................................................... 5
Scan to E-mail ............................................................................................................ 5
Scan to Folder ............................................................................................................ 6
Scan to FTP ............................................................................................................... 7
Scan to Print............................................................................................................... 8
Delivery Server........................................................................................................... 9
TWAIN Scanner ....................................................................................................... 10
Guide to this Scanner..........................................................................................12
Using Keys Displayed on the Screen ....................................................................... 14
How to Interpret the Indicators ................................................................................. 15
Front indicators ......................................................................................................15
Network interface indicators .................................................................................. 15
Scanner Features Menu........................................................................................... 16
Function Settings and Standby Screens ..................................................................16
Function Priority.....................................................................................................17
Select Method........................................................................................................18
Standby screens.................................................................................................... 18
When using [Send Function Permission] ...................................................................20
Login and Logout screens .....................................................................................21
2. Setting Up the Scanner
Checking the Scanner Location .........................................................................23
Connecting the Keyboard ...................................................................................25
Connecting to a Local Printer.............................................................................26
Connecting to a Computer via USB Cable ........................................................27
Connecting to a Network.....................................................................................28
Attaching the Card Slot Cover............................................................................29
Connecting to a Power Source........................................................................... 30
Turning On the Power ......................................................................................... 31
i
Page 6

3. Configuring the Scanner Settings
Outline to Use Scan to E-mail.............................................................................33
Outline to Use Scan to Folder.............................................................................35
Outline to Use Scan to FTP.................................................................................37
Outline to Use Scan to Print ...............................................................................38
Outline to Use the Network Delivery ..................................................................39
Outline to Use As a TWAIN Scanner ..................................................................41
To Use as a Network TWAIN Scanner..................................................................... 41
To Use as a USB TWAIN Scanner .......................................................................... 41
Initial Scanner Setup ...........................................................................................42
How to Read the Function Table..............................................................................42
Function Table ......................................................................................................... 44
Basic Settings ........................................................................................................ 44
Send File Settings .................................................................................................48
E-mail Settings ......................................................................................................49
Delivery Settings....................................................................................................51
Print Scan Settings ................................................................................................51
System Settings ...................................................................................................52
Information to Set in [System Settings]....................................................................... 52
Configuring [System Settings] .................................................................................... 57
SendScan Settings ..............................................................................................64
Information to Set in [Send Scan Settings] ..................................................................64
Configuring [Send Scan Settings]................................................................................ 70
Print Scan Settings..............................................................................................73
Information to Set in [Print Scan Settings]...................................................................73
Configuring [Print Scan Settings] ................................................................................ 74
Scan Settings .......................................................................................................76
Information to Register in [Scan Settings] .................................................................. 76
Registering [Scan Settings] ........................................................................................ 81
Print Settings........................................................................................................85
Information to Register in [Print Settings] ..................................................................85
Registering [Print Settings] ........................................................................................ 87
Configuring Settings Using a Web Browser .....................................................90
Accessing the Scanner ............................................................................................90
System requirements of a client computer ............................................................ 90
To access this machine from a Web browser........................................................ 91
General guide to the Web Status Monitor .............................................................91
Example Procedures Using [Configuration] Main Menu ............................................ 93
Configuring [Scan Settings] .....................................................................................93
Configuring [E-mail Address] ...................................................................................94
Information to Register from Web Status Monitor ....................................................97
Information to configure [Send Function Permission] ................................................ 97
Information to Register in [User Authentication Management] .................................... 98
Information to Register in [Time Server] .................................................................. 99
Information to register in [Send File Path] ................................................................99
Information to register in [FTP Server]................................................................... 102
Information to register in [E-mail Address]............................................................. 104
Information to Register in [Search Destinations]..................................................... 105
Information to register in [Printer]......................................................................... 106
ii
Page 7

Recalling the Settings ............................................................................................109
To recall the settings ...........................................................................................109
Creating a Backup File of All the Settings ..............................................................109
Setup items to be backed-up and restored.......................................................... 109
To create a backup file ........................................................................................109
To restore settings from a backup file .................................................................110
Installing Software ............................................................................................. 112
List of Files ............................................................................................................. 112
Auto Run Program ................................................................................................. 112
Software for Using a TWAIN Scanner.................................................................... 113
System requirements........................................................................................... 113
Installing TWAIN Driver ....................................................................................... 114
DeskTopBinder Lite................................................................................................115
System requirements........................................................................................... 115
Installing DeskTopBinder Lite .............................................................................. 116
SmartDeviceMonitor...............................................................................................116
About SmartDeviceMonitor for Admin and SmartDeviceMonitor for Client.........116
Installing SmartDeviceMonitor.............................................................................117
4. Setting Originals
Sizes and Weights of recommended Originals...............................................119
Originals that Require Special Care....................................................................... 119
Original Orientation ........................................................................................... 121
When Using Send Scan Function ..........................................................................121
When Using as TWAIN Scanner ............................................................................122
Placing the Original on the Exposure Glass...........................................................124
Placing the Originals in the ADF ............................................................................ 125
5. Sending Scan File by E-mail
Procedure Breakdown....................................................................................... 127
E-mail Content ....................................................................................................... 128
Sender .................................................................................................................128
Subject.................................................................................................................128
File name and file type of an E-mail attachment ................................................. 128
Related information .............................................................................................129
Before Sending Scan Data................................................................................130
Original Location .................................................................................................... 130
Original Orientation and Scanning Sides ............................................................... 130
E-mail/Send File standby screen ........................................................................... 131
Setting Destinations and a Subject..................................................................132
Setting Destinations ............................................................................................... 132
Setting Cc Destinations .......................................................................................... 136
Setting a Subject .................................................................................................... 137
Making Scan Settings........................................................................................138
Confirming the Scan Settings.................................................................................139
Selecting a Sender.............................................................................................140
Performing Scan Operation .............................................................................. 141
Starting a Scan Operation ...................................................................................... 141
To start with originals in the ADF......................................................................... 141
To start with an original on the exposure glass ................................................... 142
Checking Transmission Results ............................................................................. 143
iii
Page 8

6. Sending Scan File by Scan to Folder
Sending a Scanned File to a Registered Shared Folder ................................146
Procedure Breakdown............................................................................................146
Selecting a Shared Folder...................................................................................... 147
Selecting a File Name ............................................................................................148
Using [Enter Custom Send File] to Send a Scanned File to an Unregistered
Shared Folder................................................................................................... 150
Procedure Breakdown............................................................................................150
Using [Enter Custom Send File] Function...................................................................151
Scanned Image Files Sent to Shared Folders.................................................153
File Locations ......................................................................................................... 153
File Names ............................................................................................................. 153
7. Sending Scan File by Scan to FTP
Procedure Breakdown....................................................................................... 157
Selecting an FTP Server.................................................................................... 158
Scanned Image Files Sent to FTP Servers ...................................................... 160
File Locations ......................................................................................................... 160
File Names ............................................................................................................. 160
8. Printing Scanned Image Files
Procedure Breakdown....................................................................................... 163
Before Printing Scan Data.................................................................................164
Original Locations .................................................................................................. 164
About Paper Tray Settings ..................................................................................... 164
About Print Scan Ready screen .............................................................................165
Printing Scan Data ............................................................................................. 166
Specifying the Number of Copies...........................................................................167
Configuring Print Settings ...................................................................................... 167
Confirming the Print Settings .................................................................................169
Selecting a Printer..................................................................................................170
Selecting Colour/Black and White.......................................................................... 171
9. Sending Scan Files Using Delivery Server
Procedure Breakdown....................................................................................... 173
Selecting Delivery Destinations ....................................................................... 174
10.Using the TWAIN Scanner Function
Procedure Breakdown....................................................................................... 178
Scanning Originals ............................................................................................179
What You Can Do with the TWAIN Driver ........................................................ 181
Functions of the TWAIN Driver ..............................................................................181
iv
Page 9

11.Appendix
Troubleshooting.................................................................................................183
When An Original Is Jammed In ADF ....................................................................183
When Scanning is Not Performed as Expected ..................................................... 184
When an Error Message Appears.......................................................................... 184
Scanner unit error messages .............................................................................. 185
Scan settings error messages ............................................................................. 186
Send Scan (E-mail, Send File (SMB/FTP) or Delivery Server) operation error messages
Print Scan operation error messages ..................................................................189
Error messages displayed on the Web Status Monitor ....................................... 190
Other Problems ...................................................................................................... 191
Adjusting the position to start reading the originals................................................193
Cleaning..............................................................................................................195
Cleaning ADF Lifting Up.........................................................................................195
Cleaning the Interior of ADF...................................................................................196
Part Names and Replacing Intervals of the Consumable Parts ............................. 197
Replacing the Consumable Parts...........................................................................197
Displaying and Resetting the Counter of Consumable Parts ................................. 199
Moving and Transporting the Scanner ............................................................201
Moving Over Short Distance .................................................................................. 201
Transporting the Scanner.......................................................................................201
Disposing of the Scanner..................................................................................203
E-mail Address Book Data Format and Device Tag Information...................204
Entered Program Information .................................................................................204
About the e-mail address information ..................................................................205
Device Tag Information .......................................................................................... 206
How File Size Changes Depending on Scan Area and Resolution ...............207
When Using this Machine as a TWAIN Scanner.................................................... 207
When [Binary] or [Halftone] is selected .................................................................208
When [Gray-scale] is selected............................................................................... 208
When [8 colors] or [8 colors (halftone)] is selected ................................................. 209
When [256 colors] is selected ...............................................................................209
When [16770K colors] is selected.......................................................................... 210
When Using this Machine for Sending Scan Data ................................................. 210
When [Black and White:Text], [Black and White:Text/Photo] or
[Black and White:Photo] is selected...................................................................... 211
When [Black and White:Gray Scale] is selected....................................................... 211
When [Color:Full Color] is selected ....................................................................... 211
Option ................................................................................................................. 212
Specifications.....................................................................................................213
Software Information ......................................................................................... 215
GPL/LGPL Application Software ............................................................................ 215
BSD License Application Software......................................................................... 215
The Apache Software License Application Software ............................................ 216
JPEG Software ...................................................................................................... 216
TIFF Software ........................................................................................................218
UCD-SNMP Software............................................................................................. 218
MD5 Software License Agreement ........................................................................220
Expat ...................................................................................................................... 221
...187
INDEX....................................................................................................... 222
v
Page 10

vi
Page 11

Safety Information
R
R
When using this machine, the following safety precautions should always be followed.
Safety During Operation
In this manual, the following important symbols are used:
WARNING:
CAUTION:
Indicates a potentially hazardous situation which, if instructions
are not followed, could result in death or serious injury.
Indicates a potentially hazardous situation which, if instructions are not
followed, may result in minor or moderate injury or damage to property.
R WARNING:
• Connect the Power Cord directly into a wall outlet and never use an extension cord.
• Disconnect the power plug (by pulling the plug, not the cable) if the
power cable or plug becomes frayed or otherwise damaged.
• Turn off the power and disconnect the power plug (by pulling the plug,
not the cable) if any of the following conditions exists:
• You spill something into the equipment.
• You suspect that your equipment needs service or repair.
• Your equipment's cover has been damaged.
• Disposal can take place at our authorized dealer or at appropriate col-
lection sites.
1
Page 12

R CAUTION:
• Protect the equipment from dampness or wet weather, such as rain, snow,
and so on.
• Unplug the Power Cord from the wall outlet before you move the equipment.While moving the equipment, you should take care that the Power
Cord will not be damaged under the equipment.
• When you disconnect the power plug from the wall outlet, always pull the
plug (not the cable).
• Do not allow paper clips, staples, or other small metallic objects to fall inside
the equipment.
• For environmental reasons, do not dispose of the equipment or expended
supply waste at household waste collection points. Disposal can take place
at an authorized dealer or at appropriate collection sites.
• The inside of the machine could be very hot. Do not touch the parts with a
label indicating the “hot surface”. Otherwise it could cause a personal burn.
• Our products are engineered to meet high standards of quality and functionality, and we recommend that you only use the expendable supplies available at an authorized dealer.
Lithium Batteries (Memory Back-up)
R WARNING:
• Do not try to replace the lithium batteries by yourself. A battery of this
type can explode if incorrectly replaced. If the lithium batteries need to
be replaced, contact an authorized dealer to request servicing.
• Never dispose of the lithium batteries by incineration. This can cause
them to rupture resulting in injury.
Note
❒❒❒❒
Please return used NIC boards to our authorized dealer or service
representative. Your cooperation with our recycling activities is appreciated.
❒❒❒❒
NIC boards are equipped with a lithium battery. In the case NIC
boards are disposed of by the customer, please dispose them in accordance with national or local regulations after separating the lithium batteries from the NIC board.
2
Page 13

Manuals for This Scanner
The following manuals describe the operational and maintenance procedures of
this machine.
To enhance safe and efficient operation of this scanner, all users should read and
follow the instructions carefully.
❖❖❖❖ Quick Installation Guide
Describes how to install the scanner.
❖❖❖❖ Operating Instructions (this manual)
Provides all of the information how to install, set up, and use the scanner. This
manual is provided as a PDF file.
Note
❒ There is a CD-ROM that comes with this scanner.
3
Page 14

How to Read This Manual
R
R
Symbols
The following set of symbols is used in this manual.
WARNING:
This symbol indicates a potentially hazardous situation that might result in
death or serious injury when you misuse the machine without following the instructions under this symbol. Be sure to read the instructions, all of which are described in the Safety Information section.
CAUTION:
This symbol indicates a potentially hazardous situation that might result in minor or moderate injury or property damage that does not involve personal injury
when you misuse the machine without following the instructions under this
symbol. Be sure to read the instructions, all of which are described in the Safety
Information section.
* The statements above are notes for your safety.
Important
If this instruction is not followed, paper might be misfed, originals might be
damaged, or data might be lost. Be sure to read this.
Preparation
This symbol indicates information or preparations required prior to operating.
Note
This symbol indicates precautions for operation, or actions to take after abnormal operation.
Limitation
This symbol indicates numerical limits, functions that cannot be used together,
or conditions in which a particular function cannot be used.
Reference
This symbol indicates a reference.
[]
Keys that appear on the machine's display panel.
[]
Keys and buttons that appear on the computer's display.
{}
Keys built into the machine's control panel.
{}
Keys on the computer's keyboard.
4
Page 15
1. What You Can Do With This
Machine
This section introduces various functions of this machine, and provides most basic information such as control locations and standby screens, etc.
Outline
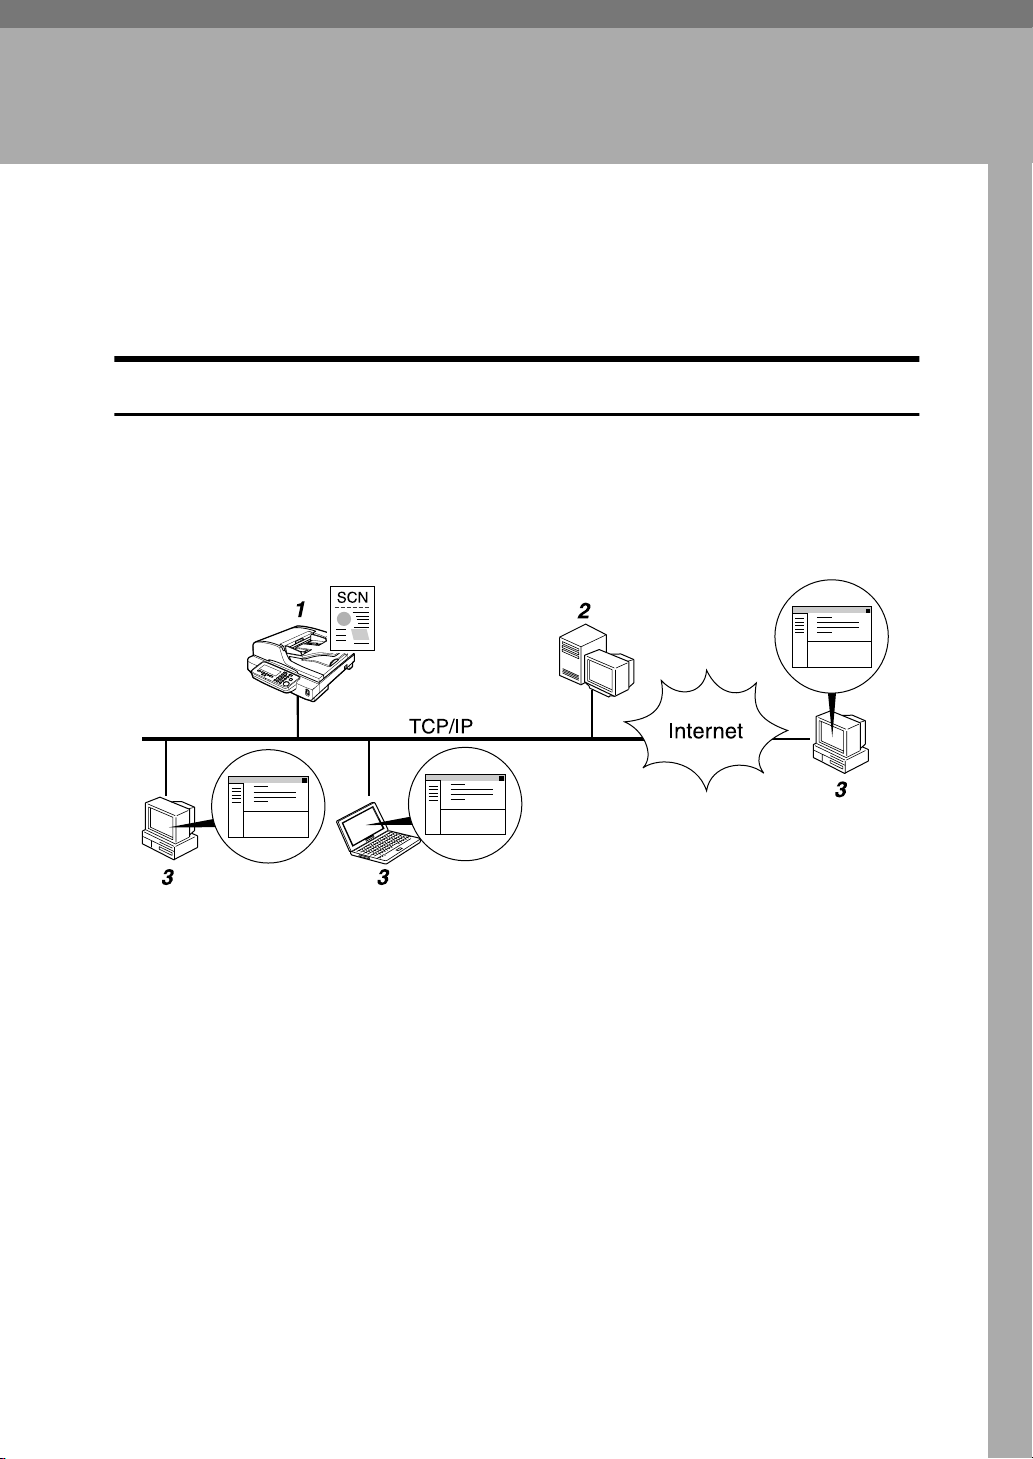
Scan to E-mail
You can directly send a scanned data as an attached file from this machine. The
e-mail destinations can be pre-registered, or entered directly using the bundled
USB-keyboard. On keyboard entry, you can use the LDAP server you are currently accessible.
1. This machine
Connect this machine to a network
(TCP/IP) using a 100BASE-TX, or
10BASE-T cable. Use the bundled USBkeyboard for the user authenticate processes, direct entry of E-mail destination,
and search for E-mail address using
LDAP server.
2. SMTP server
You need to have an access to an e-mail
server that supports SMTP (Simple Mail
Transfer Protocol), to use “Scan to Email” function. However, it is not essential to have an e-mail server inside the
LAN where this machine belongs.
AFJ038S
3. E-mail client software
Use e-mail client software (such as Microsoft Outlook) to receive e-mail messages and scan file attachments that are
generated by this machine.
5
Page 16
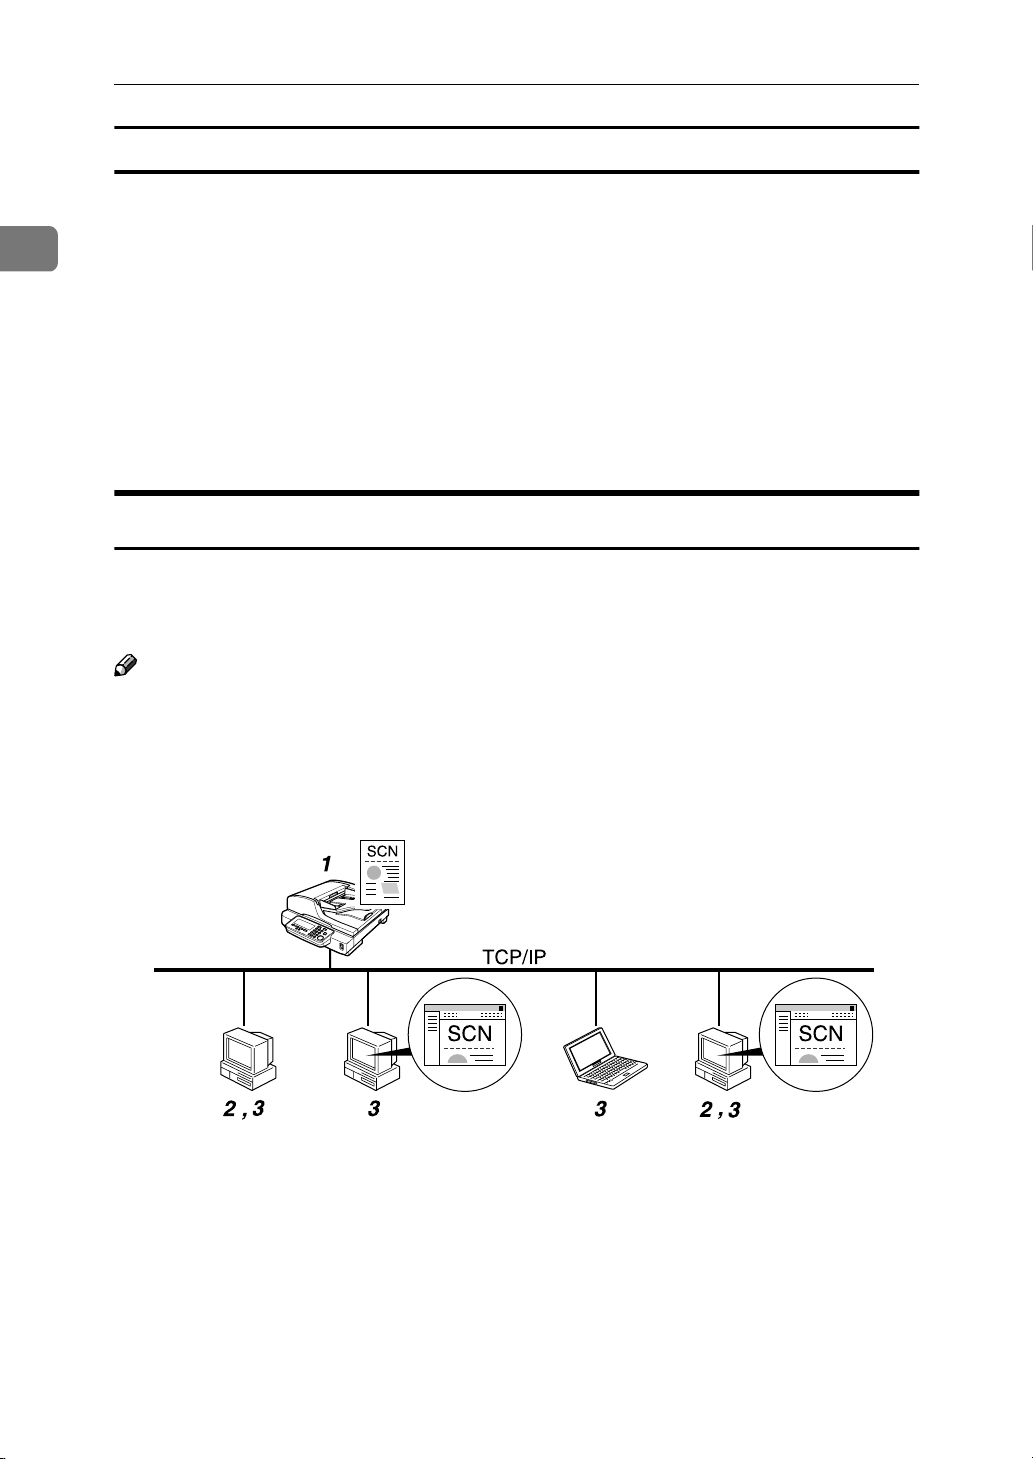
1
What You Can Do With This Machine
Process Flow
Specify an e-mail destination, subject, and make necessary settings for
AAAA
scanning using the control panel of “1. This machine.” The e-mail destinations can be searched or entered using the bundled USB-keyboard.
Originals are scanned by “1.This machine.”
BBBB
An E-mail message with a scan file attachment is sent to “2.SMTP server”
CCCC
from “1.This machine.”
The E-mail message is delivered to the specified destination’s POP server
DDDD
from “2.SMTP server”, and received by “3.E-mail client software”.
Scan to Folder
It is possible to register Windows shared folders to this machine, as destinations
for sending scan data. You can easily send and save scan files to a Windows
shared folder that is registered to this machine.
Note
❒ This function is displayed as “SMB” on the display panel of this machine. The
SMB (Server Message Block) standard, to which various operating systems
including Windows adhere, is a popular protocol for sharing files, folders,
printers and so on.
AFJ039S
1. This machine
Connect this machine to a network
(TCP/IP) using a 100BASE-TX, or
10BASE-T cable. Use the bundled USBkeyboard for the user authenticate processes, via the USB interface card installing at the PC Card slot.
2. Computer with a shared folder
To use this function, it is necessary to create a shared folder in advance. You can
specify a shared folder to save scan files.
6
Page 17
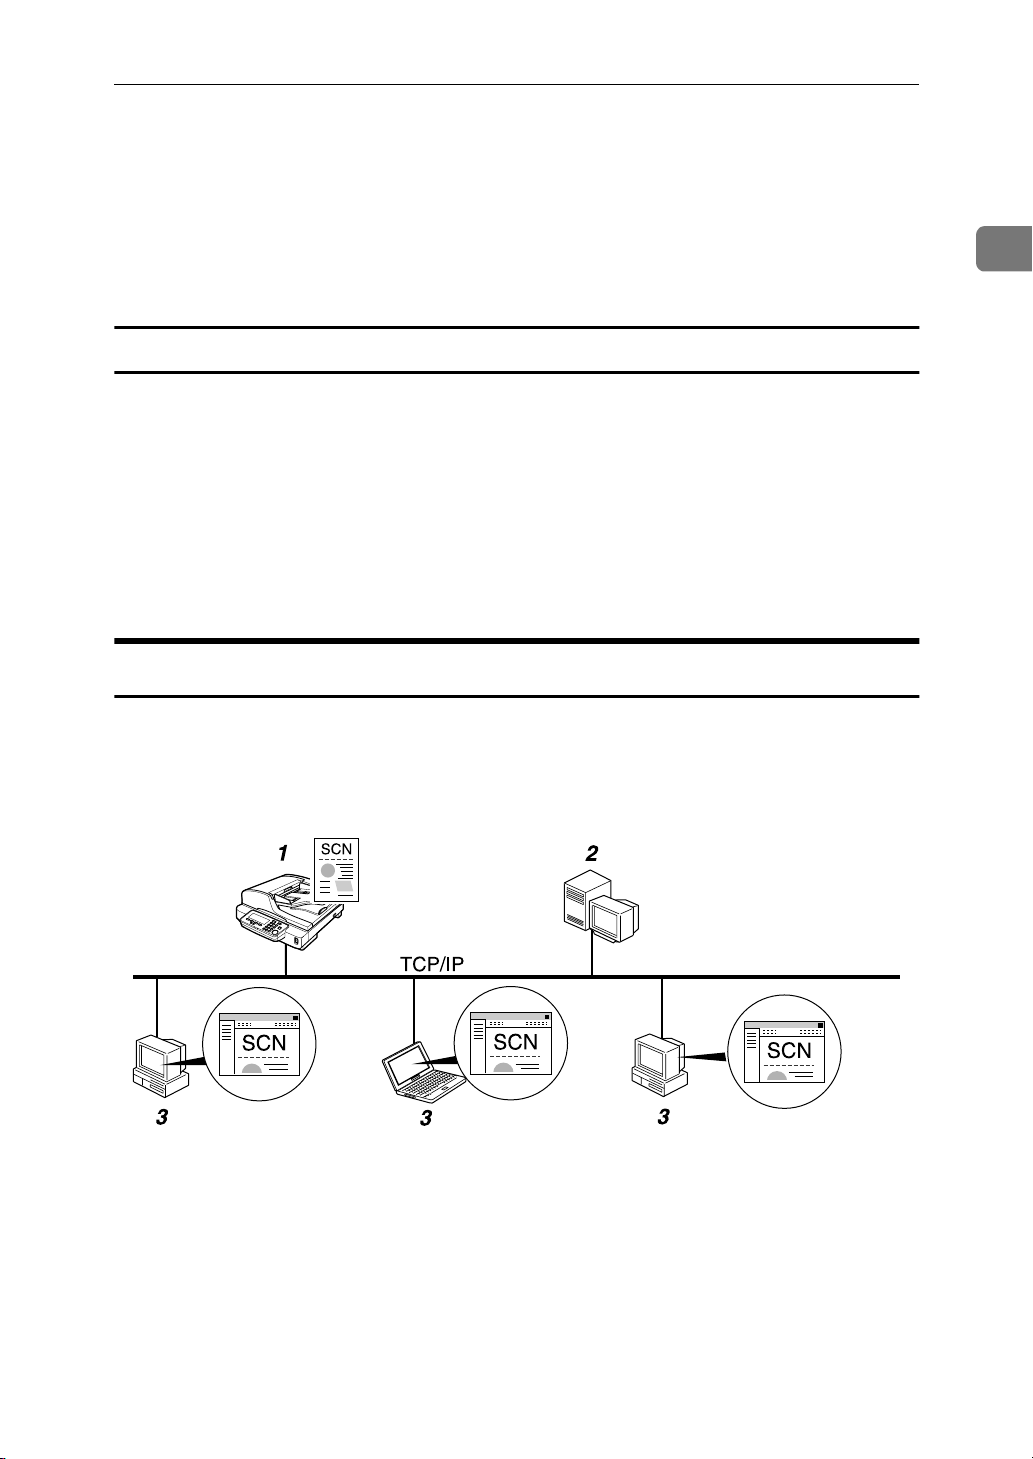
3. Client computer
You can use a client computer on the network to perform a scan to folder operation remotely (which requires a Web
browser). You can also browse scanned
files saved to a shared folder from a client
computer.
Process Flow
Specify a shared folder, file name, and make necessary settings for scan-
AAAA
ning using “3.Client computer”, or the control panel of “1.This machine.”
Originals are scanned by “1.This machine.”
BBBB
The scan data is saved in the specified shared folder on “2.Computer with
CCCC
a shared folder”.
You can use the scan data from “3.Client computer”.
DDDD
Outline
1
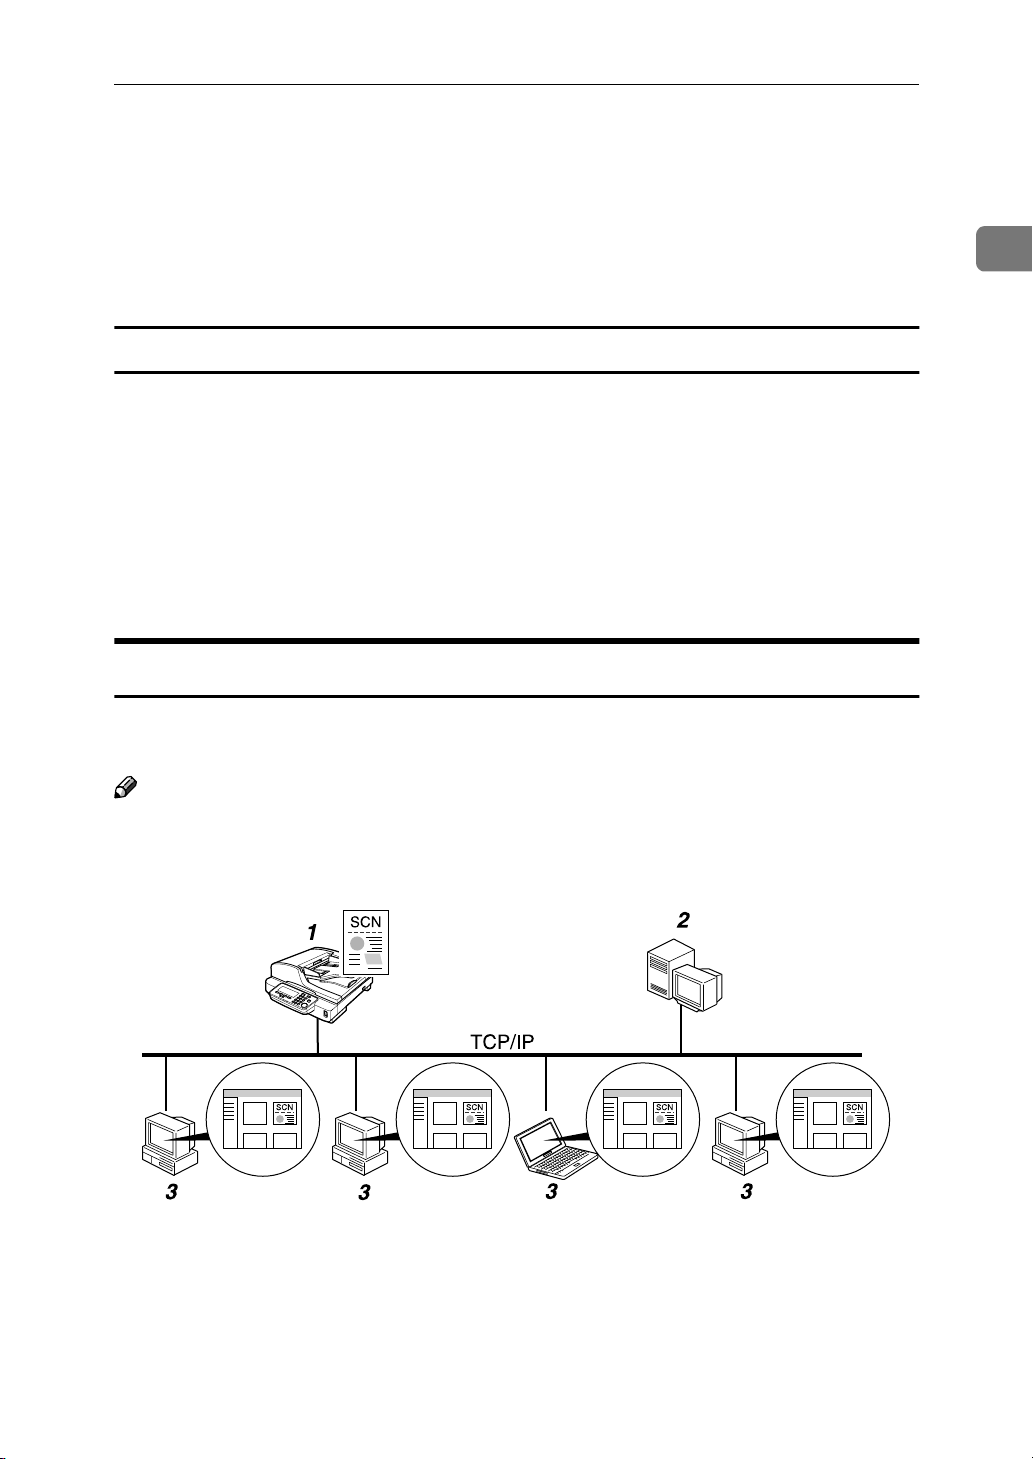
Scan to FTP
It is possible to register FTP servers to this machine as destinations for sending
scan data. You can easily send and save scan files to an FTP server that is registered to this machine.
AFJ040S
1. This machine
Connect this machine to a network
(TCP/IP) using a 100BASE-TX, or
10BASE-T cable. Use the bundled USBkeyboard for the user authenticate processes, via the USB interface card installing at the PC Card slot.
2. FTP server
You can specify an FTP server to save
scan files. Note, however, that it is essential to have the FTP server inside the
LAN/WAN where this machine belongs.
It is not possible to access an FTP server
via a proxy server.
7
Page 18

1
What You Can Do With This Machine
3. Client computer
You can browse scanned files saved to an
FTP server from a client computer. You
need to have an FTP client program on
the computer to connect to an FTP server.
Process Flow
Specify an FTP server, file name, and make necessary settings for scanning
AAAA
using the control panel of “1.This machine.”
Originals are scanned by “1.This machine.”
BBBB
The scan data is saved in the specified folder on “2.FTP server”.
CCCC
You can use the scan data from “3.Client computer”.
DDDD
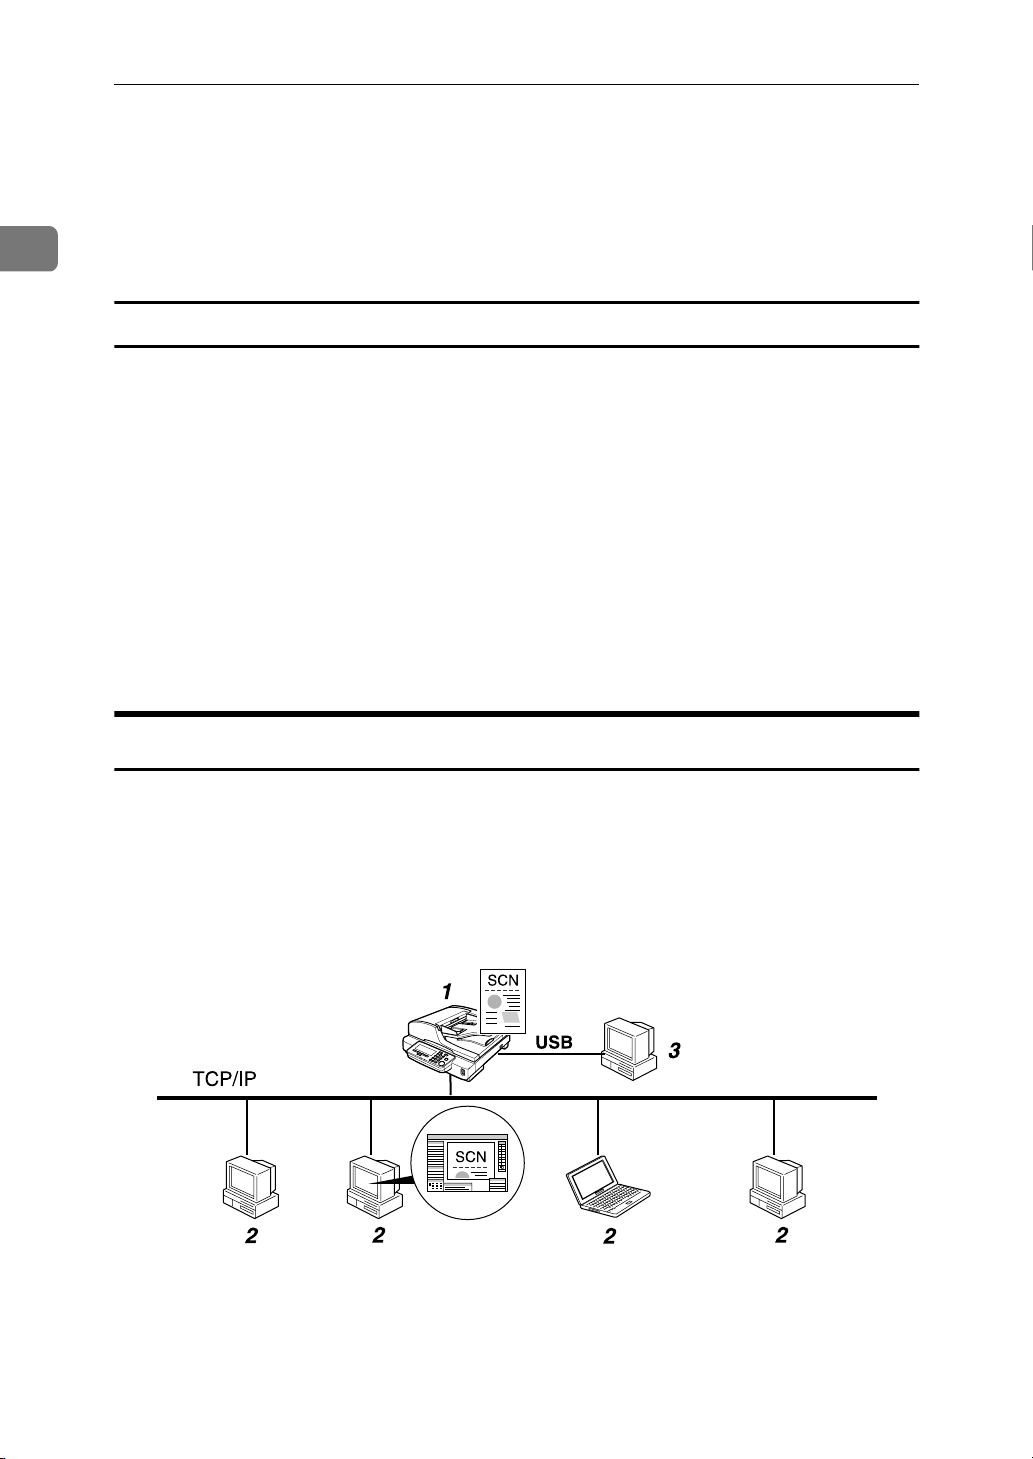
Scan to Print
You can send scan files directly to a printer, so it is possible to use this machine
like a copier.
1. This machine
When you use a network printer, connect
this machine to a network (TCP/IP) using a 100BASE-TX or 10BASE-T cable.
When using a local printer, connect the
printer cable to the USB port of the USB interface card installing at the PC Card slot.
For the user authenticate processes, connect the bundled USB-keyboard via the
other USB port of the USB interface card.
8
AFJ042S
2. Local printer
A printer connected to this machine using a USB cable. It is necessary to register
the printer to this machine.
Page 19
3. Network printers
Printers connected to a network
(TCP/IP) using a 100BASE-TX or
10BASE-T cable. It is necessary to assign
a fixed IP address to each of the network
printers. It is necessary to register the
printer to this machine.
Process Flow
Perform a Print Scan operation using the control panel of “1. This machine.”
AAAA
Originals are scanned by “1.This machine.”
BBBB
The scan data is interpreted to a printer language and sent to either “2.Local
CCCC
printer” or one of “3.Network printers” you specified.
The scan data is printed from the printer (either “2.Local printer” or one of
DDDD
“3.Network printers”) you specified.
Outline
1
Delivery Server
By using ScanRouter V2/Professional, it is possible to deliver scan data that is
scanned by this machine to multiple destinations.
Note
❒ To use the delivery scanner function, a delivery server installed with the op-
tional ScanRouter V2/Professional is required.
AFJ041S
1. This machine
Connect this machine to a network
(TCP/IP) using a 100BASE-TX or
10BASE-T cable. You can connect up to
two machines to a network where you
have a computer (a delivery server) with
ScanRouter V2/Professional.
2. Delivery server
A delivery server with ScanRouter
V2/Professional installed, which manages destinations including E-mail addresses, shared folders, groups, etc., and
document data files sorted by each of the
destinations.
9
Page 20
1
What You Can Do With This Machine
3. Client computer
You can browse document data files on a
delivery server from a client computer,
by using DeskTopBinder Lite. You can
also save those files on the local hard disk
of the client computer, as necessary.
Process Flow
Specify destinations, and make necessary settings for scanning using the
AAAA
control panel of “1.This machine.”
Originals are scanned by “1.This machine.”
BBBB
The scan data is sent to and saved on “2.Delivery server”.
CCCC
“2.Delivery server” performs jobs as configured, such as giving delivery
DDDD
notice to specified destinations, or storing the scan data on a specified hard
disk, etc.
You can use the scan data from “3.Client computer” by using DeskTop-
EEEE
Binder Lite.
TWAIN Scanner
You can use this machine as a TWAIN scanner, by operating this machine from
a client computer on the network. Originals can be scanned with the same operation used for USB-connected scanners.
Further, this machine can be used as a TWAIN-compliant scanner, by directly
connected with an off-line Computer over USB.
AFJ037S
1. This machine
Connect this machine to a network
(TCP/IP) using a 100BASE-TX or
10BASE-T cable.
2. Client computer
The scanner can be operated using a
TWAIN-compliant application (such as
DeskTopBinder Lite).
10
Page 21

3. Off-line computer
It is a PC that is USB-connected to this
machine. You need to install the USBcompliant TWAIN driver prior to use it.
You can use this scanner from a TWAINcompliant application (such as DeskTopBinder).
Process Flow
Use a TWAIN-compliant application on a “2. Client computer” or “3. Off-
AAAA
line computer” to send a command for scanning via the TWAIN driver.
Originals are scanned by “1. This machine.”
BBBB
The scanned data can be edited and stored using the TWAIN-compliant ap-
CCCC
plication on the “2. Client computer” or “3. Off-line computer.”
Outline
1
11
Page 22
1
What You Can Do With This Machine
Guide to this Scanner
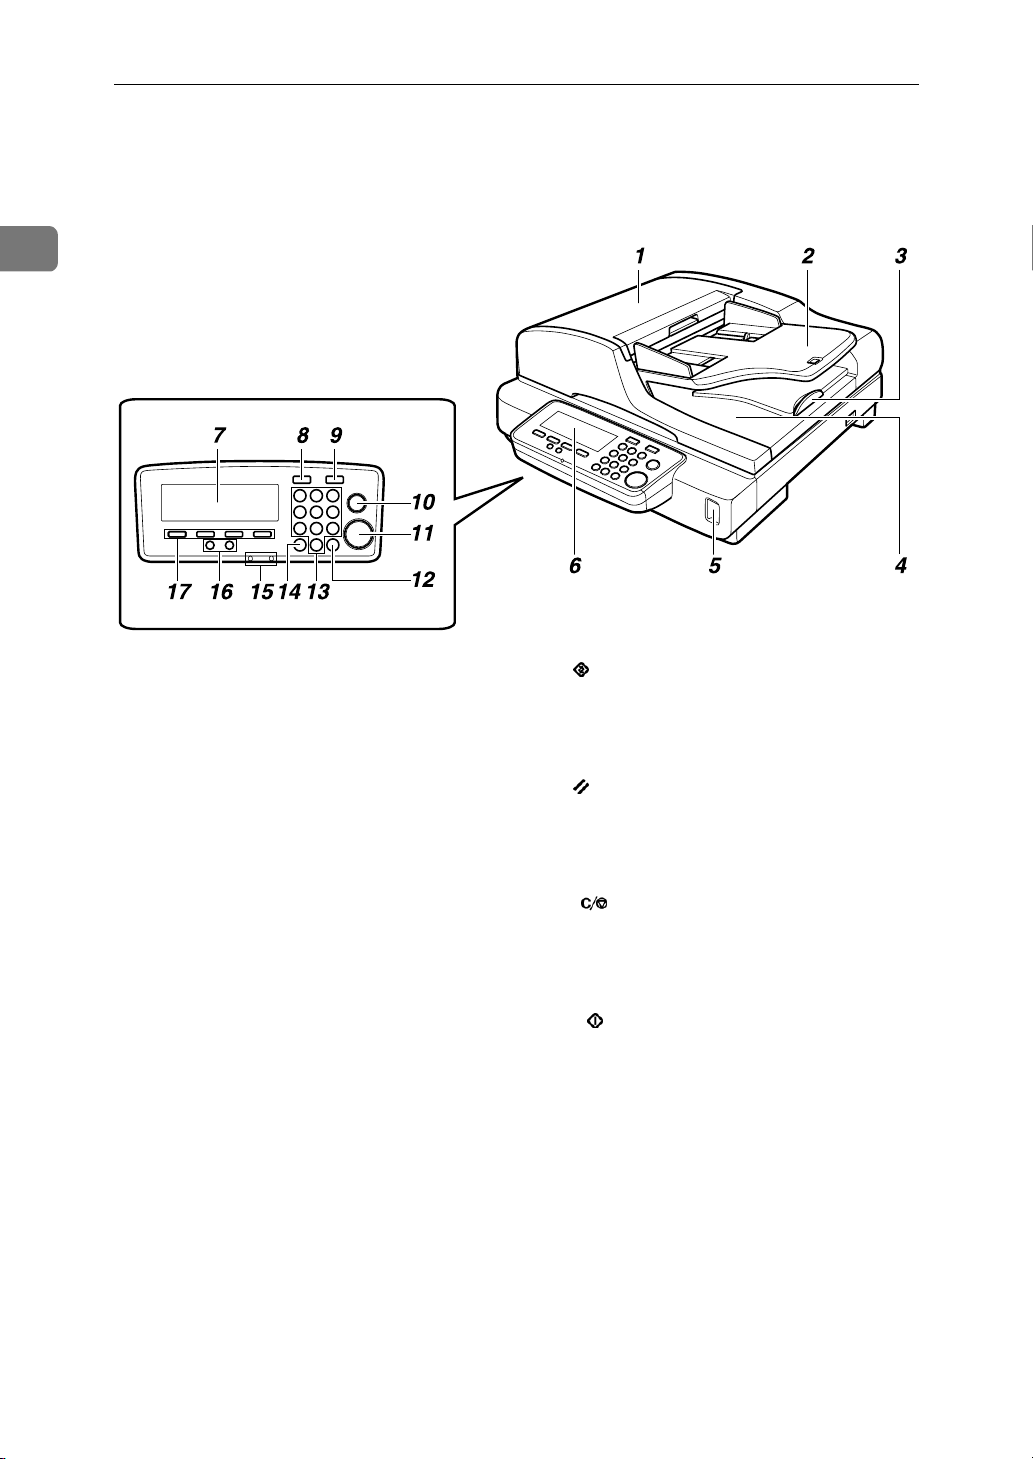
AFJ002S
1. ADF (Automatic Document Feed-
er)
Allows you to automatically load multiple originals into this machine. The ADF
also provides duplex scanning.
2. Original table
Set originals here to be loaded into this
machine using the ADF (Automatic Document Feeder).
3. Output stopper
Stops the ejected originals after scan using ADF. When scanning the legal size
originals, pull out to the end.
4. Output table
The originals that have been loaded by
the ADF are output here after scanning.
5. Power switch
Turns this machine’s power on and off.
6. Control panel
Used to configure settings and operate
this machine.
8. (User Tools) key
Press this key to configure various settings such as send scan, print scan, network, etc.
9. (Clear Modes) key
Press this key to return to the initial
screen that is displayed when you turn
the power on.
10. (Clear/Stop) key
Press this key when you want to clear the
value that you have entered, or stop scanning currently in progress.
11.
(Start) key
Press this key to start scanning.
12. {
{#}}}} key
{{
Used to enter various IP addresses. You
can move by every 3 digits toward the
right.
13. Number keys
Used to select a menu item displayed on
the screen, or enter numeric values.
7. Display panel
Displays the configuration items and
processes.
12
14. {
{./*}}}} (Title) key
{{
Press this key to display list of titles.
15. Indicators
Indicate status of this machine.
Page 23
{{{{0000}}}} / {{{{1111}}}} (Cursor) keys
16.
Used to move highlight on the screen for
selecting an option.
Guide to this Scanner
17. Function key
Used to select functions that appear on
the display panel of this machine. See
p.14 “Using Keys Displayed on the
Screen” for details.
1
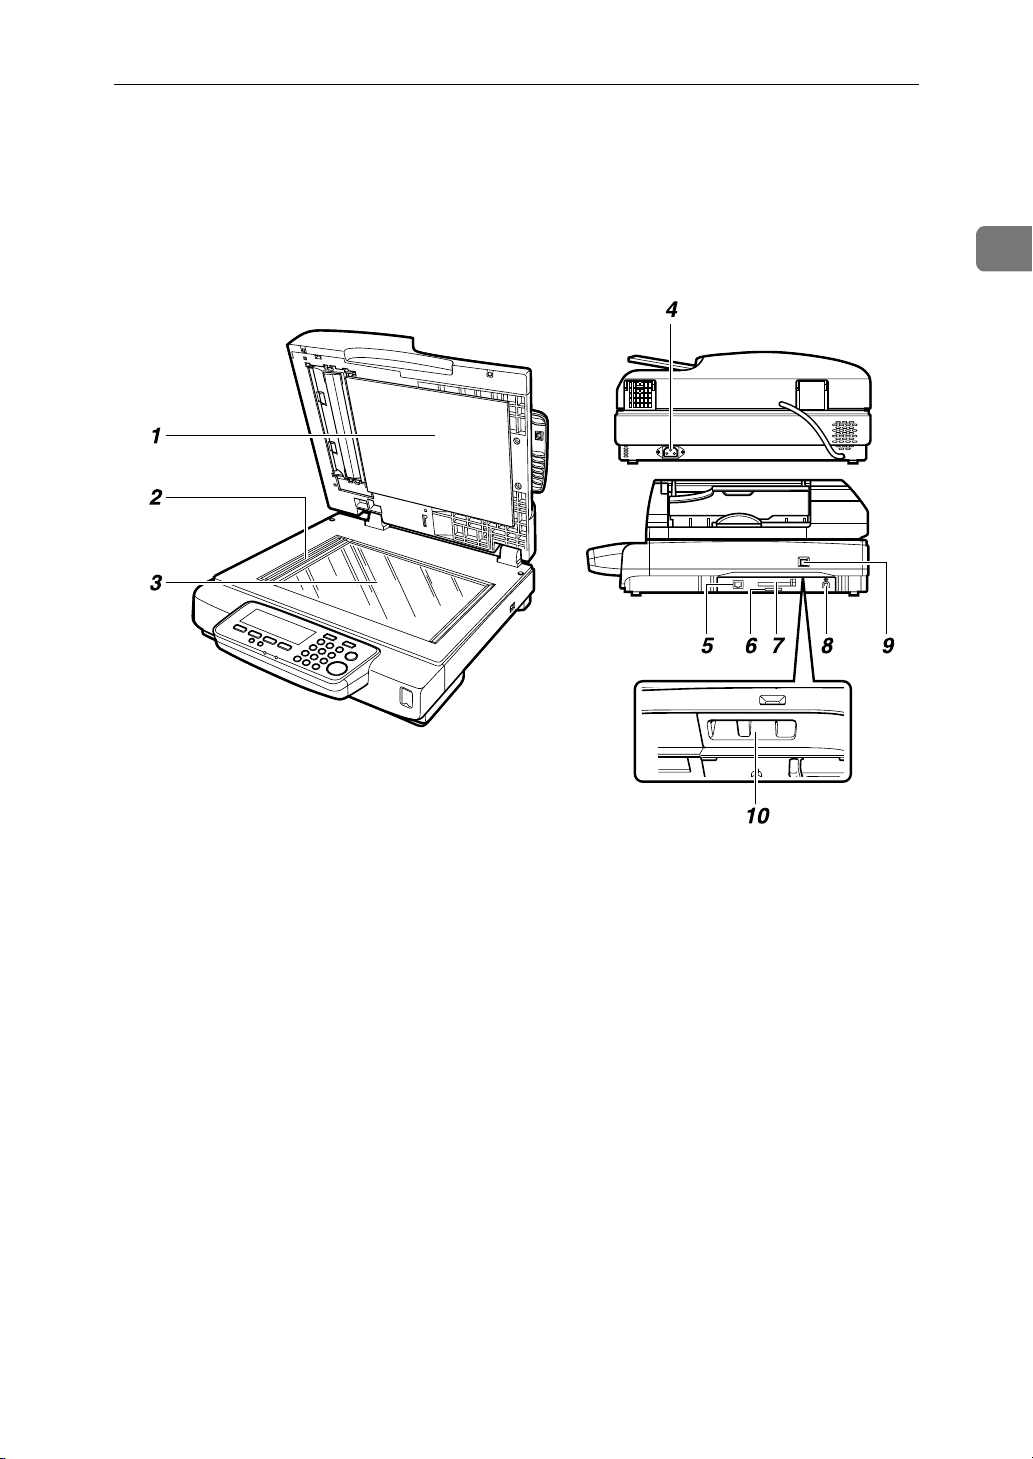
1. White Sheet
Holds the original down on the exposure
glass.
2. Exposure glass for the ADF
Scans originals when they are loaded in
the ADF.
3.
Exposure glass
Place the original here when you do not
use the ADF for scanning.
4. Power connector
For connection of the bundled AC power
cord.
5. Network interface connector
For connection of an Ethernet network
cable.
6. SD card slot
Used for an authorized customer engineer’s maintenance purpose only.
AFJ003S
7. PC card slot
This machine has one Type II PC Card
slot: By inserting the bundled USB interface card connecting with the bundled
USB-keyboard and a local USB printer for
Print Scan.
8. USB port
Used to directly USB connect this machine with a PC.
9. Status display of lock switch
Displays the status of the lock switch.
10. Lock switch
Set this switch to the “Lock” position
when you transport this machine.
13
Page 24

1
What You Can Do With This Machine
Using Keys Displayed on the Screen
You can use the function keys, located under the display panel, to operate keys
that appear on the display panel.
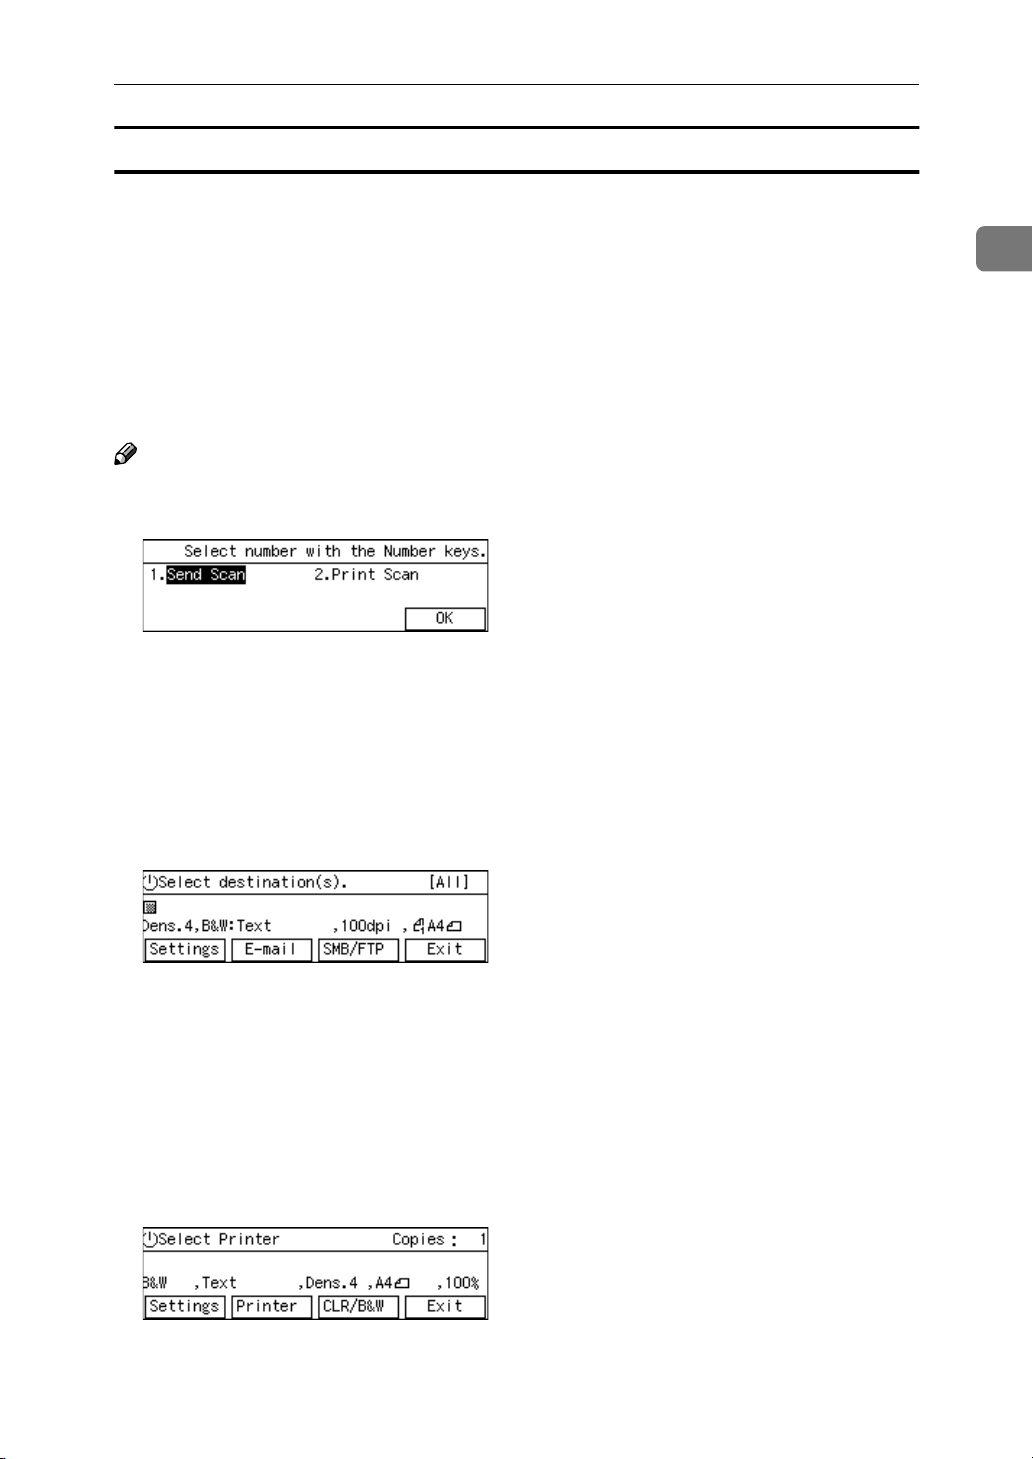
Example:
AFJ005S
To execute a key operation on the display panel, press the relevant function key.
• Press A to select [Settings].
• Press B to select [E-mail].
• Press C to select [SMB/FTP].
• Press D to select [Exit].
14
Page 25

How to Interpret the Indicators
Guide to this Scanner
Front indicators
This section explains how to interpret the indicators of this machine.
AFJ063S
Description
For a short while after turning the power on.
bb
b Power save mode.
Power is on.
Restart the machine.
If the error occurs again, contact your service representative.
1
: On
b : Blinking
: Off
Network interface indicators
The network interface connector on the right side panel of this machine is
equipped with the following two indicators.
ABK020S
1. Green indicator
Lights when this machine is connected to
the network correctly.
2. Yellow indicator
Lights when this machine is sending/receiving data through the network.
15
Page 26

1
What You Can Do With This Machine
Scanner Features Menu
Pressing the {{{{User Tools}}}} key displays the Scanner Features menu. You can configure settings for network, Send Scan, Print Scan, and Scan/Print conditions to
meet your requirements.
Function Settings and Standby Screens
You cannot use the following functions at the same time.
• E-mail (See p.5 “Scan to E-mail” )
• Send File (SMB) (See p.6 “Scan to Folder” )
• Send File (FTP) (See p.7 “Scan to FTP” )
• Print Scan (See p.8 “Scan to Print” )
• Delivery Server (See p.9 “Delivery Server” )
• TWAIN (See p.10 “TWAIN Scanner” )
To select the functions you use, you must configure the following settings in advance, referring to p.70 “Configuring [Send Scan Settings]”
• With the options in [6.Select Method], select a method that suits for the func-
tions you want to use.
• With the options in [Function Priority] and [1.Send File/TWAIN Priority], select the
initial screen that is displayed when you turn the machine's power on.
Note
❒ [1.Send File/TWAIN Priority] and [6.Select Method] are menu items that are includ-
ed in [2.Send Scan Settings] under Scanner Features menu, which is displayed
by pressing the {{{{User Tools}}}} key. [Function Priority] is a menu item that is in-
cluded in [1.System Settings] under Scanner Features menu.
Reference
p.64 “SendScan Settings” for details about how to configure the above settings.
16
Page 27
Guide to this Scanner
Function Priority
You can select the initial screen displayed each time you turn the machine's
power on. It is good idea to select the initial screen in accordance with how frequently you use Print Scan. The following three options are available.
• Select: Send/Print
Select this option if you use Print Scan as well as Delivery Server/Send File.
On the Select Method screen (which is initially displayed when you select this
option), pressing the {{{{1}}}} key displays the same screen as one of the Send Scan
initial screens, and pressing the {{{{2}}}} key displays the same screen as the Print
Scan initial screen.
Note
❒ Instead of pressing the number keys, you can also use the {{{{0000}}}} or {{{{1111}}}} key to
highlight “Send Scan” or “Print Scan” on the screen, and then press [OK].
1
• Send Scan
Select this option if you hardly ever use Print Scan. With this option, one of
the following screens is displayed as the initial screen, depending on the setting in [6.Select Method] :
Delivery Server standby screen, E-mail/Send File standby screen, or TWAIN
standby screen
If you want to print a scan data while a Send Scan initial screen is displayed,
press [Exit] to display the Select Method screen, and then press the {{{{2}}}} key.
• Print Scan
Select this option if you use Print Scan frequently. With this option, the Print
Scan Ready screen is displayed as the initial screen. If you want to use any one
of the functions other than Print Scan (Delivery server, e-mail, Send File or
TWAIN) while the Print Scan Ready screen is displayed, press [Exit] to display the Select Method screen, and then press the {{{{1}}}} key. At this time, Delivery Server standby screen, E-mail/Send File standby screen, or Network
TWAIN standby screen is displayed, depending on the settings in [1.Send
File/TWAIN Priority] and [6.Select Method].
17
Page 28

1
What You Can Do With This Machine
Select Method
• With the options in [6.Select Method], you can select a combination of the func-
tions that suits for the method how you use this machine. The following three
options are available.
• Delivery Server/TWAIN
Select this option if you want to use Delivery Server and TWAIN. With this
option, e-mail, Send File (SMB), and Send File (FTP) are not available.
• Send File/TWAIN
Select this option if you want to use e-mail, Send File (SMB), Send File
(FTP), and TWAIN. With this option, Delivery Server is not available.
• TWAIN
Select this option if you want to use TWAIN only. With this option, Delivery Server, e-mail, Send File (SMB), and Send File (FTP) are not available.
• The following table shows which standby screen will be displayed as the
Send Scan initial screen in accordance with the settings in [1.Send File/TWAIN
Priority] and [6.Select Method] (which settings are included in [2.Send Scan Settings] ).
1.Send File/TWAIN Priority
Send File TWAIN
6.Select Method
Delivery Server/
TWAIN
Send File/TWAIN E-mail/Send File
TWAIN - TWAIN exclusive
Delivery Server
standby screen
standby screen
TWAIN standby
screen
standby screen
Standby screens
• Select Method screen
While this screen is displayed, pressing the {{{{1}}}} key displays Delivery Server
standby screen, E-mail/Send File standby screen, TWAIN standby screen, or
TWAIN exclusive standby screen. Pressing the {{{{2}}}} key displays the Print
Scan Ready screen.
When you start the TWAIN driver from a TWAIN-compliant application on
a client computer, TWAIN standby screen is displayed. Press [Exit] to return
to the Select Method screen.
18
Page 29
Guide to this Scanner
• Delivery Server standby screen
While this screen is displayed, pressing [Dest.] enables you to deliver scan
data using the address book in ScanRouter V2/Professional. You can also
configure various settings using the control panel of this machine, or using a
Web browser on a client computer.
You can send any file by using a Web browser on a client computer; however,
you cannot send an e-mail or send a file by SMB/FTP by using the control
panel of this machine.
When you start the TWAIN driver from a TWAIN-compliant application on
a client computer, TWAIN standby screen is displayed. Press [Exit] to return
to the Delivery Server standby screen.
• E-mail/Send File standby screen
While this screen is displayed, pressing [E-mail] enables you to send an E-mail.
Pressing [SMB/FTP] enables you to send a file by SMB or FTP. You can also
send any file by using a Web browser on a client computer, and configure various settings using the control panel of this machine or a Web browser on a
client computer.
You cannot deliver scan data by using Delivery Server.
If you want to print scan data, press [Exit] and display the Select Method
screen.
When you start the TWAIN driver from a TWAIN-compliant application on
a client computer, TWAIN standby screen is displayed. Press [Exit] to return
to the E-mail/Send File standby screen.
1
• TWAIN standby screen
While this screen is displayed, you can use this machine as a TWAIN scanner,
by starting the TWAIN driver from a TWAIN-compliant application on a client computer. You can also configure various settings using the control panel
of this machine, or using a Web browser on a client computer.
When this screen is initially displayed after you turn the machine's power on,
pressing [Exit] will display the following standby screens according to the set-
tings in [1.Send File/TWAIN Priority] and [6.Select Method].
• Delivery Server standby screen
• E-mail/Send File standby screen
• Print Scan standby screen
19
Page 30
1
What You Can Do With This Machine
While Select Method screen, Delivery Server standby screen, E-mail/Send
File standby screen, or Print Scan standby screen is displayed, starting the
TWAIN driver from a TWAIN-compliant application on a client computer
will display the TWAIN standby screen. Press [Exit] to return to the previous
screen.
• TWAIN exclusive standby screen
While this screen is displayed, you can use this machine as a TWAIN scanner,
by starting the network TWAIN driver from a TWAIN-compliant application
on a client computer. You can also configure various settings using the control panel of this machine, or using a Web browser on a client computer.
However, you cannot use the following functions: Print Scan, Delivery Server, E-mail, Send File (SMB), Send File (FTP), sending custom file by using a
Web browser on a client computer.
• Print Scan standby screen
While this screen is displayed, you can print scan data.
If you want to use any other functions such as Delivery Server, e-mail or Send
File (SMB/FTP), press [Exit] and display the Select Method screen. At this
time, functions you can use changes depending on the settings in [1.Send
File/TWAIN Priority] and [6.Select Method].
When you start the TWAIN driver from a TWAIN-compliant application on
a client computer, TWAIN standby screen is displayed. Press [Exit] to return
to the Print Scan Ready screen.
When using [Send Function Permission]
When you have selected the mode [Send File/TWAIN] at [6.Select Method] in [Send
Scan Settings] from the User Tool, you can select a file send function among the
available send menu; [All Send Functions], [E-mail Only], [SMB Only (File Name
Changeable)], [SMB Only (File Name Unchangeable)], [FTP Only (File Name Changeable)],
[FTP Only (File Name Unchangeable).] This example screen shows that the [E-mail On-
ly] is configured.
20
Page 31
Guide to this Scanner
Login and Logout screens
If you have specified and configured your user ID and password at [Password]
menu of the Web Status Monitor, the Login menu will be displayed. Depending
on the system settings, the [Login] screen may be shown after you select [Send
Scan] or [Print Scan] on the Select Method screen. You must enter your ID and
password to log in to this machine. Logout from the machine after you finish
your operation.
• To login
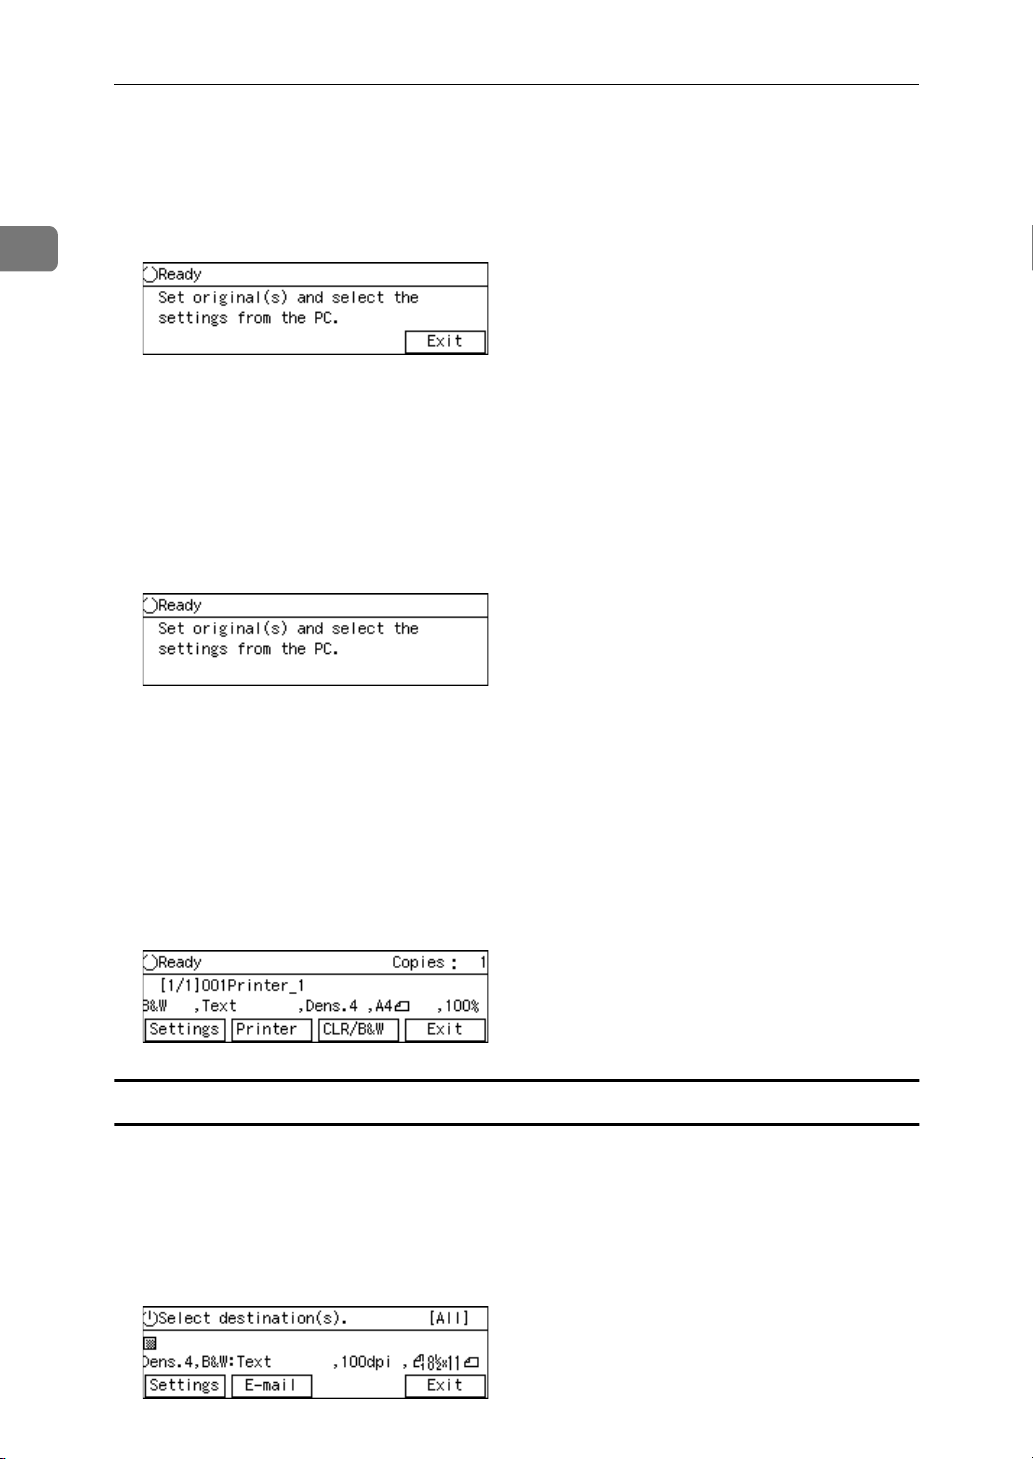
Select the method you want to use with the number keys.
A
Enter your [User Name] and [Password]. Press [OK].
B
1
User Authentication screen will appear. If you want to cancel, press [Can-
cel].
If authentication succeeds, the screen for your operation will appear. If not,
the error message screen will appear. Configure the message and press [Ex-
it] to retry the login.
Note
❒ Ask the administrator for your password.
• To logout
Press the {{{{Clear/Stop}}}}key after your operation. The screen with the message
“Are you sure you want to log out?” appears. Click [OK] if you want to log
out. Press [Cancel] to return to the previous screen.
Note
❒ Refer to Web Status Monitor Help for configuration of [User Authentication Man-
agement].
21
Page 32

1
What You Can Do With This Machine
22
Page 33

2. Setting Up the Scanner
R
R
This section explains how to setup the scanner to get it ready for use, and how
to make necessary connections.
Checking the Scanner Location
Before setting up the scanner, take a few minutes to check the location where
you are going to install the scanner.
WARNING:
• Make sure the wall outlet is near the machine and easily accessible so
that in event of an emergency it can be unplugged easily.
CAUTION:
• Keep the machine away from humidity and dust. A fire or an electric shock
might occur.
• Do not place the machine on an unstable or tilted surface. If it topples over,
it could cause injury.
• Place the scanner on a level, stable, vibrating-free surface. Allowable inclination of the surface for installation is within 5 mm (0.2”) (when measuring difference of heights between an end and the other end of this machine,
compared to a level surface).
❖❖❖❖ Installation space
Make sure that the scanner is in a location where there is enough space to provide the clearance as illustrated below, and also provide a comfortable working area in the front.
AFJ045S
1. 140 mm (5.5”) or more
3. 190 mm (7.48”) or more
2. 50 mm (1.96”) or more
4. 378 mm (14.88”) or more
23
Page 34

2
Setting Up the Scanner
❖❖❖❖ Installation environment
Important
❒ Do not set up the scanner in any of the following types of locations. Doing
so creates the risk of malfunction of the scanner.
• In a location exposed to direct sunlight
• In a location where the scanner will be subjected to blowing air or radi-
ant heat, such as near an air conditioner or heater
• In a location near other electronic devices, such as a radio or television
set
• In a location subject to extreme temperatures or humidity
• Near a humidifier
Set up the scanner in a location where the temperature and humidity will fall
within the ranges shown below.
ADC123S
Important
❒ Save the box and cushioning material in which the scanner was packed so
that they can be used if it is necessary to transport the scanner in the future.
❒ When the machine is moved from a cold location to a warm location, sudden
temperature changes cause condensation inside of the scanner. Wait one hour
or more before turning on the scanner to allow the condensation to evaporate.
24
Page 35

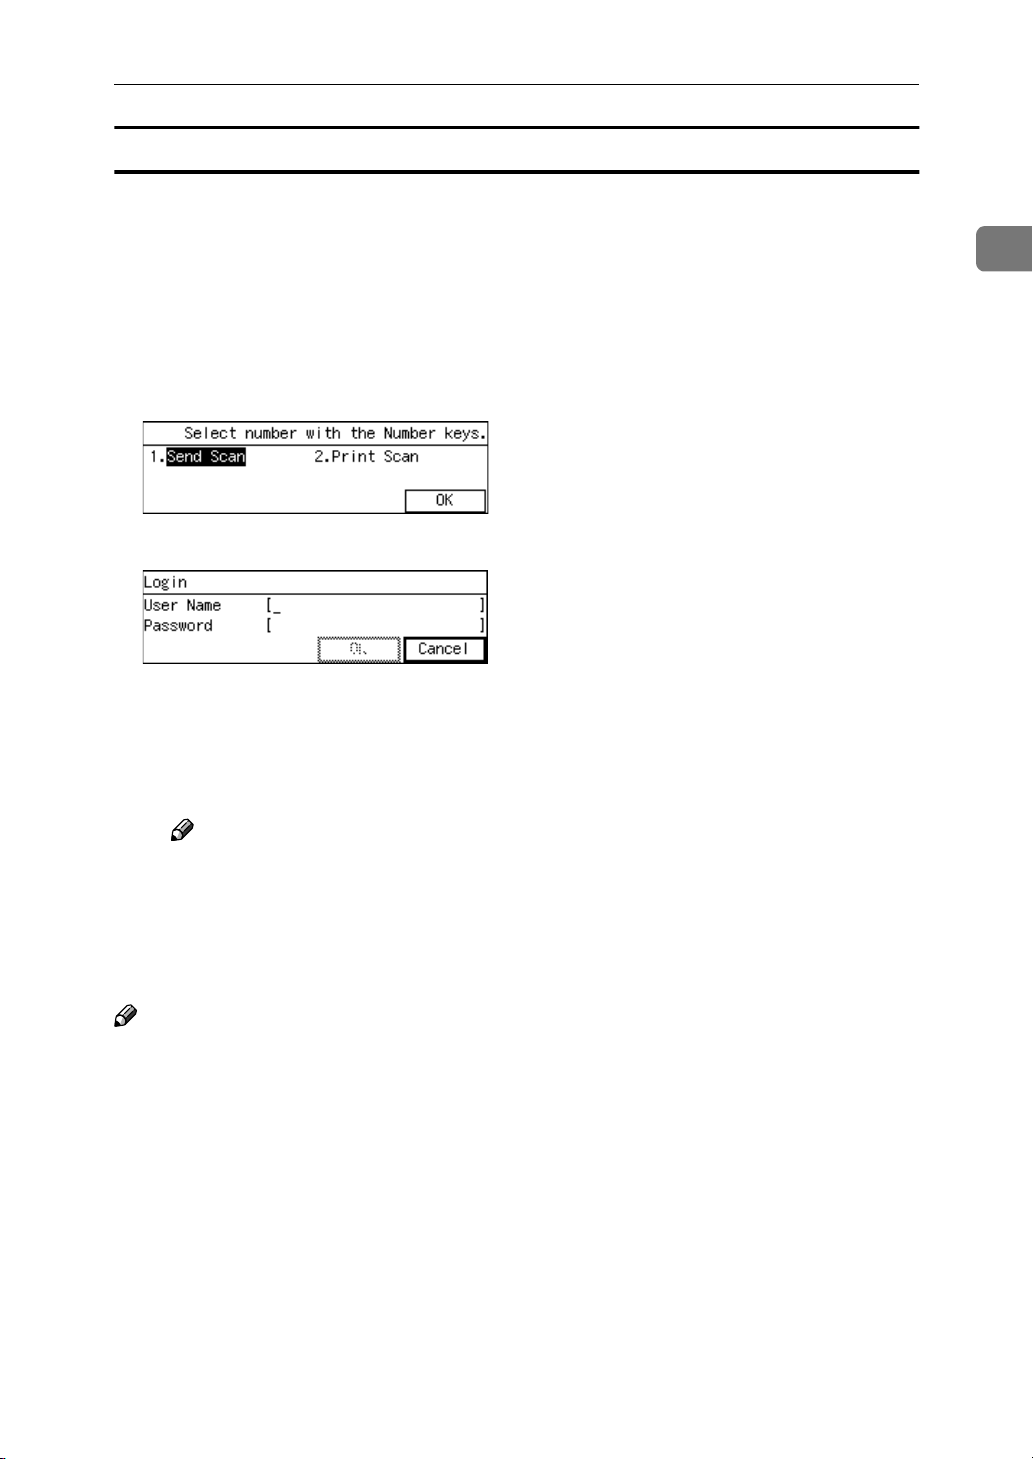
Connecting the Keyboard
Connecting the Keyboard
Use the bundled USB keyboard to enter configuration of User Authenticate, to make search for the
destinations of E-mails at Send Scan,
and to enter directly the E-mail addresses and subjects. This section explains how to connect the keyboard to
this machine.
Turn off the power of this ma-
AAAA
chine.
Insert the USB interface card with
BBBB
this machine to the PC Card slot
on the right side panel of this machine.
Connect the USB keyboard cable
CCCC
to one of the USB ports.
Note
❒ You can insert either USB port
of the two.
2
AFJ048S
AFJ047S
Note
❒ Make sure that the card is se-
curely inserted, until you feel
the card click into place.
Important
❒ If you remove the USB interface
card while the machine is
turned on, it is necessary to restart the machine.
25
Page 36
Setting Up the Scanner
Connecting to a Local Printer
2
When you wish to use a local printer
at Print Scan, USB connect this machine with the printer. This section
explains how to connect a local printer with this machine.
Important
❒ You need to register the printer
with Web Status Monitor before
using Print Scan function. See p.38
“Outline to Use Scan to Print” for
the outline of procedures to use the
function.
Note
❒ See the manuals that comes with
the printer you are going to connect to this machine, for details
about connections and setup information other than the USB cable.
❒ When you connect only a local
printer without connecting the
USB keyboard, set up the USB interface card according to p.25
“Connecting the Keyboard”.
Connect the other end of the cable
BBBB
to the USB port of the printer.
Important
❒ Only one printer is available for
printing at Print Scan. If you
have USB connected with multiple printers at the same time,
the first printer that this machine should recognize will be
available.
26
Connect the bundled USB cable
AAAA
to one of the ports of the USB interface card.
AFJ048S
Page 37

Connecting to a Computer via USB Cable
Connecting to a Computer via USB Cable
This section explains how to connect
an off-line computer to this machine.
Important
❒ Prepare a marketed USB2.0 com-
pliant cable before connection procedures.
❒ Before connection, install a TWAIN
driver on the computer.
Connect a USB2.0 compliant ca-
AAAA
ble to this machine.
2
Connect other end of the USB ca-
BBBB
ble to the USB port of the computer.
AFJ033S
27
Page 38

2
Setting Up the Scanner
Connecting to a Network
This section explains how to connect
this machine to a network.
Important
❒ Use a 100BASE-TX (category 5) or
10BASE-T network cable when
you connect this machine to a network.
Insert the network cable’s end to
AAAA
the network interface connector
of this machine.
Insert the other end of the net-
BBBB
work cable to an appropriate connector of a network device, such
as an Ethernet hub.
AFJ202S
28
Page 39

Attaching the Card Slot Cover
Attaching the Card Slot Cover
Reeve the USB and network ca-
AAAA
bles through the slits of the card
slot cover.
Align the two prongs of the card
BBBB
slot cover with the two prong
holes located at the upper left and
right of the PC card slot.
AFJ054S
Insert the prongs to the prong
CCCC
holes, and then push both sides of
the card slot cover until it is secured to the machine.
2
AFJ056S
1. Prong holes
2. Prongs
AFJ055S
29
Page 40

Setting Up the Scanner
R
R
Connecting to a Power Source
2
This section explains how to connect
this machine to a power source, using
the bundled AC power cord.
WARNING:
• Do not use with a power
source with a voltage different
from the specified voltage. Do
not use a power outlet with
multiple devices plugged in.
These could create the risk of
fire or electric shock.
• Avoid the use of an extension
cord.
• Do not damage, break, twist or
modify the Power Cord. Placing heavy objects on the cord,
pulling on or bending it excessively can damage the Power
Cord, creating the risk of fire
or electric shock.
• Never touch or unplug the
power plug with wet hands.
This can create the risk of electric shock.
CAUTION:
• When unplugging from an outlet,
be sure to grasp the plug when
pulling. Never pull on the cord.
This could damage the cord creating the risk of fire or electrical
shock.
Confirm that the lock switch lo-
BBBB
cated at the right side of the machine is set to the “Unlock”
position.
Important
❒ Be sure to confirm the Lock
Switch Status Display shows
“Unlock”, at the right side panel.
Turning on the power with this
lock switch set to “Lock” could
result in failure in scanning or
malfunction of this machine.
Push the power cord plug all the
CCCC
way into the power connector on
this machine.
AFJ053S
30
Confirm that the power switch is
AAAA
set to off.
Note
❒ Be sure to use the power cord
that comes with this machine.
Insert the power plug into the
DDDD
power outlet.
AFJ059S
Page 41

Turning On the Power
Make sure the power cord is firm-
AAAA
ly plugged into the wall outlet.
Open the switch cover and turn
BBBB
on the power switch.
AFJ057S
Turning On the Power
2
----Before turning off the power
Before you turn off the power of this
machine, make sure that a standby
screen is displayed on the display
panel.
If you turn off the power while the
Scanner Features menu is displayed,
all the settings that you have configured could be discarded, and this machine could return to its factory
default status.
You should also confirm that B is not
displayed on the screen when you
turn off the power. Otherwise, loss of
scan data or failure in sending files
might occur.
31
Page 42

2
Setting Up the Scanner
32
Page 43

3. Configuring the Scanner
Settings
Outline to Use Scan to E-mail
The following overview diagram shows the preparation steps for sending scan
files as e-mail attachments. Note that the underlined
Reference
There are three types of setup items: 1) items that you can configure settings
using the control panel of this machine, 2) items that you can configure settings using a Web browser on a client computer, 3) items that you can configure settings using both of the above. See p.42 “Initial Scanner Setup” for
details. This manual covers only the setting procedures that you can perform
using the control panel of this machine. For details about settings this manual
does not cover, see the Web Status Monitor Help. For information about how
to view the Web Status Monitor, see p.90 “Accessing the Scanner”
steps are essential.
Configure
Configure [General Settings] on the Web Status
Configure
Settings] on this machine or on the Web Status
Configure [Custom Title] settings on the Web
Configure
and [Subject] on the Web Status Monitor
[1.
System Settings
chine
Monitor
[2.
Send Scan Settings
Monitor
Status Monitor.
[
E-mail
, register
]
on this ma-
]
and [4.Scan
]
[
E-mail Address
See p.52 “System Settings”
See the Web Status Monitor Help.
See p.64 “SendScan Settings”.
See the Web Status Monitor Help.
See p.94 “Configuring [E-mail Ad-
dress]”
and p.104 “Information to register in
]
[E-mail Address]”
See the Web Status Monitor Help for
details about [E-mail] and [Subject].
Recall the Settings on the Web Status Monitor
See p.109 “Recalling the Settings” for
details.
33
Page 44

3
Configuring the Scanner Settings
Reference
For configuration items, see p.42 “Initial Scanner Setup” and for operation of
configuration, see p.127 “Sending Scan File by E-mail”.
34
Page 45

Outline to Use Scan to Folder
Outline to Use Scan to Folder
The following overview diagram shows the preparation steps for sending scan
files to shared folders of Windows using SMB protocol. Note that the underlined
steps are essential.
Reference
There are three types of setup items: 1) items that you can configure settings
using the control panel of this machine, 2) items that you can configure settings using a Web browser on a client computer, 3) items that you can configure settings using both of the above. See p.42 “Initial Scanner Setup” for
details.
This manual covers only the setting procedures that you can perform using
the control panel of this machine. For details about settings this manual does
not cover, see the Web Status Monitor Help. For information about how to
view the Web Status Monitor, see p.90 “Accessing the Scanner”.
Create a shared folder on a Windows computer See Windows Help.
3
Configure
Configure [General Settings] on the Web Status
Configure
Settings
Configure [Custom Title] settings on the Web
Configure [Send File], register
*1
and [File Name] on the Web Status Monitor
Recall the Settings on the Web Status Monitor
[
System Settings
1.
Monitor
[
SendScan Settings
2.
] on this machine or on the Web Status
Monitor
Status Monitor.
on this machine See p.52 “System Settings”
]
and [4.Scan
]
[
Send File Path
See the Web Status Monitor Help.
See p.64 “SendScan Settings”.
See the Web Status Monitor Help.
See p.99 “Information to register in
[Send File Path]”
]
See the Web Status Monitor Help for
details about [Send File] and [File Name].
See p.109 “Recalling the Settings” for
details.
*1
This setting becomes essential if you want to perform Scan to Folder (SMB) operation
from this machine. When you perform [Enter Custom Send File] operation using the
Web Status Monitor, it is not necessary to register [Send File Path] in advance.
35
Page 46

3
Configuring the Scanner Settings
Reference
For configuration items, see p.42 “Initial Scanner Setup” and for operation of
configuration, see p.145 “Sending Scan File by Scan to Folder”.
36
Page 47

Outline to Use Scan to FTP
Outline to Use Scan to FTP
The following overview diagram shows the preparation steps for sending scan
files to folders on an FTP server. Note that the underlined
Reference
There are three types of setup items: 1) items that you can configure settings
using the control panel of this machine, 2) items that you can configure settings using a Web browser on a client computer, 3) items that you can configure settings using both of the above. See p.42 “Initial Scanner Setup” for
details.
This manual covers only the setting procedures that you can perform using
the control panel of this machine. For details about settings this manual does
not cover, see the Web Status Monitor Help. For information about how to
view the Web Status Monitor, See p.90 “Accessing the Scanner”
steps are essential.
3
Configure
Configure [General Settings] on the Web Status
Configure
Settings] on this machine or on the Web Status
Configure [Custom Title] settings on the Web
Configure [Send File], register
and [File Name] on the Web Status Monitor
Recall the Settings on the Web Status Monitor
[
System Settings
1.
Monitor
[
SendScan Settings
2.
Monitor
Status Monitor.
on this machine See p.52 “System Settings”
]
and [4.Scan
]
[
FTP Server
]
See the Web Status Monitor Help.
See p.64 “SendScan Settings”
See the Web Status Monitor Help.
See p.102 “Information to register in
[FTP Server]”.
See the Web Status Monitor Help for
details about [Send File] and [File Name].
See p.109 “Recalling the Settings” for
details.
Reference
For configuration items, see p.42 “Initial Scanner Setup” and for operation of
configuration, see p.157 “Sending Scan File by Scan to FTP”.
37
Page 48

3
Configuring the Scanner Settings
Outline to Use Scan to Print
The following overview diagram shows the preparation steps for printing scan
data by Print Scan. Note that the underlined
Reference
There are three types of setup items: 1) items that you can configure settings
using the control panel of this machine, 2) items that you can configure settings using a Web browser on a client computer, 3) items that you can configure settings using both of the above. See p.42 “Initial Scanner Setup” for
details.
This manual covers only the setting procedures that you can perform using
the control panel of this machine. For details about settings this manual does
not cover, see the Web Status Monitor Help. For information about how to
view the Web Status Monitor, see p.90 “Accessing the Scanner”
steps are essential.
Configure
Configure
Configure [General Settings] on the Web Status
Recall the Settings on the Web Status Monitor
[
System Settings
1.
[
Printer
on the Web Status Monitor
and [Custom Title] settings
]
Monitor
on this machine See p.52 “System Settings”
]
See p.106 “Information to register in
[Printer]”
See the Web Status Monitor Help for
details about Custom Title settings.
See the Web Status Monitor Help.
See p.109 “Recalling the Settings” for
details.
Reference
For configuration items, see p.42 “Initial Scanner Setup” and for operation of
configuration, see p.163 “Printing Scanned Image Files”.
38
Page 49

Outline to Use the Network Delivery
Outline to Use the Network Delivery
The following overview diagram shows the preparation steps to use this machine as a network delivery scanner, which function is enabled using ScanRouter V2/Professional. Note that the underlined
Reference
There are three types of setup items: 1) items that you can configure settings
using the control panel of this machine, 2) items that you can configure settings using a Web browser on a client computer, 3) items that you can configure settings using both of the above. See p.42 “Initial Scanner Setup” for
details.
This manual covers only the setting procedures that you can perform using
the control panel of this machine. For details about settings this manual does
not cover, see the Web Status Monitor Help. For information about how to
view the Web Status Monitor, see p.90 “Accessing the Scanner”
steps are essential.
3
Install ScanRouter V2/Professional on a com-
puter used as a network delivery server, and
make necessary settings
Install DeskTopBinder
Lite on a client computer, and make necessary
settings
Configure
Configure [General Settings] on the Web Status
Configure
Settings] on this machine or on the Web Status
Configure [Delivery Settings] on the Web Status
[
System Settings
1.
chine
Monitor
[
SendScan Settings
2.
Monitor
Monitor.
on this ma-
]
and [4.Scan
]
See the manuals for ScanRouter
V2/Professional or ScanRouter
V2/Professional Help.
See DeskTopBinder Lite Help or the
manuals for DeskTopBinder Lite.
See p.52 “System Settings”
See the Web Status Monitor Help.
See p.64 “SendScan Settings”
See the Web Status Monitor Help.
Recall the Settings on the Web Status Monitor
See p.109 “Recalling the Settings” for
details.
39
Page 50

Configuring the Scanner Settings
3
Register this machine
V2/Professional
*1
Enter the IP address directly using [Set I/O Device].
*1
using ScanRouter
See the manuals for ScanRouter
V2/Professional or ScanRouter
V2/Professional Help.
Reference
For configuration items, see p.42 “Initial Scanner Setup” and for operation of
configuration, see p.173 “Sending Scan Files Using Delivery Server”.
40
Page 51

Outline to Use As a TWAIN Scanner
Outline to Use As a TWAIN Scanner
To Use as a Network TWAIN Scanner
The following overview diagram shows the preparation steps for using this machine as a network TWAIN scanner.
Configure [
Install the network TWAIN driver on a client computer
1.System Settings
] on this machine See p.52 “System Settings”
See p.113 “Software for Us-
*1
ing a TWAIN Scanner”.
To Use as a USB TWAIN Scanner
The following overview diagram shows the preparation steps for using this machine as a TWAIN scanner.
Install the USB TWAIN driver on a client computer
Connect the scanner and client computer with a USB cable.
*1
See p.113 “Software for Using a TWAIN Scanner”.
See p.27 “Connecting to a
Computer via USB Cable”.
3
*1
If you use this machine as a TWAIN scanner, you need a TWAIN-compliant application on the client computer you use. DeskTopBinder Lite that comes with this machine is a TWAIN-compliant application.
Reference
For configuration items, see p.42 “Initial Scanner Setup” and for operation of
configuration, see p.177 “Using the TWAIN Scanner Function”.
41
Page 52

3
Configuring the Scanner Settings
Initial Scanner Setup
The table on the next page shows all the setup items and their factory default values. The table also includes information about for which of the functions each of
the setup items is used (see the columns under “Purpose”), and the available
method for configuration (see the columns under “Method”).
For information about how to configure each of the setup items and how it
works, see the sections from p.52 “System Settings” to p.90 “Configuring Settings Using a Web Browser”, and also see the Web Status Monitor Help.
How to Read the Function Table
Note
❒ (WSM) signifies the names of Setup Items in Web Status Monitor.
❖❖❖❖ The Purpose Row
Under “Purpose” in the table on the next page, there is a column for each of
the functions listed below.
Note
❒ It is not necessary to set up configuration when using as a USB TWAIN scan-
ner.
Column name: Means the function for:
Delivery Server Sending scan files by a delivery server using ScanRouter V2/Pro-
fessional.
Mail Sending scan files as e-mail attachments.
SMB Sending scan files to a Windows shared folder.
FTP Sending scan files to an FTP server.
Print Printing scan files.
TWAIN Using this machine as a network TWAIN scanner.
• A “” in a column means that the setup item to the left is essential to use the
function. Be sure to configure these settings before using this machine.
• A “b” in a column means that the setup item to the left is related to the function, but is not essential. Configure these settings as necessary.
• No mark in a column means that the setup item to the left has no direct relation to the function.
42
Page 53

Initial Scanner Setup
❖❖❖❖ The Method Row
Under “Method” in the table on the next page, there is a column for each of
the setup method listed below.
Column name: Means if:
Scanner Each of the setup items to the left can be configured using the
control panel of this machine.
Web Each of the setup items to the left can be configured using the
Web Status Monitor.
• A “b” in a column means that the setup item to the left can be configured using the method.
• A “x” in a column means that the setup item to the left cannot be configured
using the method. Use the other available method for the setting.
• A “-” in a column means that the item to the left cannot be changed (for the
display information purpose only).
• A “(null)” in the “Default” column means that the setup item to the left has
no factory default value.
3
43
Page 54
3
Configuring the Scanner Settings
Function Table
Basic Settings
Purpose Method
Setup Item Default
Delivery
E-mail
SMB
FTP
Print
Device Name
RNP******
*1
Comment (null) × b
URL Name URL × b
URL /cgibin/url.cgi/ × b
Help URL /cgibin/help.cgi × b
General Settings
Function Priority Select: Send/Print bbbbbbb ×
bbbb b× b
TWAIN
Scanner
Web
IP Address 11.22.33.44
Subnet Mask 0.0.0.0
Default Gateway Address
0.0.0.0
*2 *2 *2 *2 *2
*2 *2 *2 *2 *2
*2 *2 *2 *2 *2
*3
*3
*3
*2
*2
*2
bb
bb
bb
Access Control 0.0.0.0 bb b
Access Mask 0.0.0.0 bb b
DNS Server 1 IP Address
DNS Server 2 IP Address
DNS Server 3 IP Address
Network Boot NONE bbbbb
Transmission Speed Auto bbbbb
Destination Search Priority
TCP/IP(WSM), System Settings
Community Name 1 to 10
Access Type 1 to 10
*5
0.0.0.0 × b
(null) b × b
(null) b × b
bb b
*3
bb b
*3
*6
*7
public
read-only
*7
bb×
bb× b
bb× b
Protocol 1 to 10 TCP/IP bb×
*4
44
Manager IP Address 0.0.0.0 ×
SNMP
Page 55

Initial Scanner Setup
Purpose Method
Setup Item Default
Delivery
E-mail
SMB
FTP
Print
TWAIN
Current Password (null) × b
New Password (null) × b
Password
Scan Type Binary:Text bbbb b b
Resolution 100dpi bbbb b b
Scan Size A4 bbbb b b
*8
Position 0 bbbb b b
Scanning Area 0 bbbb b b
Image Density 4 bbbb b b
Filter None bbbb b b
Inversion Off bbbb b b
Erase Colour None bbbb b b
Scanner
Web
3
File Type Single Page bbbb b b
Original Setting/
Orientation
Scan Settings(WSM), Scan Settings
Image Density 4 bbb
*8
Original Size (Scan Size) A4 bbb
Reduce/Enlarge 1 bbb
Duplex 1 Sided Orig. -> 1 Sided
Create Margin Off bb×
Quality/Speed Speed bb
Print Settings(WSM), Print Settings
: 1 Sided
Print
bbbb b b
bbb
45
Page 56

Configuring the Scanner Settings
Purpose Method
Setup Item Default
Delivery
E-mail
SMB
FTP
Print
TWAIN
Function Priority Send bbbbbbb b
TWAIN Standby Time Off bbbbbbb b
Auto Reset Timer Off bbbbb b b
Compression(Binary) On bbbb b b
Scanner
Web
3
Compression
(Color/Gray Scale)
Auto Update Destination
List
Unit of Measure mm bbbbb b b
sRGB Off bbbb b b
End of Scan Option Clear Settings after Each
Border Erase 0mm bbbb b b
Language Select English bbbbb b b
Wait Time for Additional
Scanning
Function Options Send File/TWAIN bbbbbbb b
Send Function Permission
Title Priority All bbbbb × b
Select Title Alphabets bbbbb × b
Time Zone GMT bbbbb b b
Scanner(WSM), Send Scan Settings
Custom Title 1: to 5: 1 to 5 bbbb × b
Normal Compression bbbb b b
Off bbb
bbbb b b
Scan Job
3 second(s) bbbbb × b
All Send Functions bbbb b b
46
Custom Title
Send File Path (Null) bbbbbb×
Login User Name (Null) bbbbbb× b
Login Password (Null) bbbbbb× b
Backup File Name (Null) bbbbbb× b
Backup
Page 57

Setup Item Default
Authentication at Sending
File
Off bbbb × b
Initial Scanner Setup
Purpose Method
Delivery
E-mail
SMB
FTP
Print
TWAIN
Scanner
Web
Authentication at Printing
Authentication Method LDAP Authentication bbbbb × b
Domain Name (Null) bbbbb × b
Main Host Name (Null) bbbbb × b
Sub Host Name (Null) bbbbb × b
LDAP Server IP Address 0.0.0.0 bbbbb × b
Search Base (Null) bbbbb × b
User Authentication Management
Time Server IP Address 0.0.0.0 bbbbb b b
Polling Interval 30 bbbbb b b
Time Server(WSM), Date/Time
*1
****** is the last six digits of the machine's MAC address.
*2
An essential setting when [Network Boot] is set to “NONE”. Do not enter anything
when [
*3
When you use no network printers, you don't have to configure this setting.
*4
Be sure to configure this setting on this machine first. You can change the setting on
the Web Status Monitor after you configure the first time setting on the machine.
*5
Available up to 10 registrations.
*6
See p.55 “Destination Search Priority”and p.105 “Information to Register in [Search
Destinations]” for details.
*7
The default value applied to the Community Name 1.
*8
Available up to 4 registrations, including “Default”.
Network Boot
] is set to “DHCP”.
Off b × b
3
47
Page 58

Configuring the Scanner Settings
Send File Settings
Purpose Method
Setup Item Default
Delivery
E-mail
SMB
FTP
Print
Interval Time for
Resending
No. of Times to Resend Off bb × b
Off bb × b
TWAIN
Scanner
Web
3
Job Delivery Data Max.
Setting
File Name + Time On bb × b
Create Device Name
Folder
Send File
Program No. (Automatically assigned) × b
File Send Path Name (null) × b
Key Display (null) × b
Assign Title ABC/1/On × b
Send File Path (null) × b
*1
Login User Name (null) × b
Login Password (null) × b
Sender's Password On × b
Protected Password (null) × b
Send File Path
Program No. (Automatically assigned) × b
FTP Server Name (null) × b
Key Display (null) × b
Off bb × b
On bb × b
48
Assign Title ABC/1/On × b
Server Name/Path
Name
Login User Name (null) × b
Login Password (null) × b
*1
PASV Mode Configuration
Sender's Password On × b
Protected Password (null) × b
FTP Server
(null) × b
Off × b
Page 59

Initial Scanner Setup
Purpose Method
Setup Item Default
Delivery
E-mail
SMB
FTP
Print
No.1 to 30 (null) bb × b
*2
File Name
*1
Available up to 1000 registrations.
*2
Available up to 30 registrations.
E-mail Settings
Purpose Method
Setup Item Factory Default Value
Delivery
E-mail
SMB
FTP
Print
POP Server Address (null) b × b
TWAIN
Scanner
Web
3
TWAIN
Scanner
Web
POP Server Port No. 110 b × b
SMTP Server Address (null) × b
SMTP Server Port No. 25 b × b
Domain Name (null) × b
Authentication Method Off b × b
Authentication User
Name
Authentication Password
Sender's Name Default
Administrator's Name (null) b × b
Administrator's E-mail
Address
Interval Time for
Resending E-mails
No. of Times to Resend
E-mails
Max. E-mail Size Off b × b
E-mail
(null) × b
(null) × b
Administrator's Address
(null) b × b
30 b × b
1 b × b
b × b
49
Page 60

3
Configuring the Scanner Settings
Purpose Method
Setup Item Factory Default Value
Delivery
E-mail
SMB
FTP
Print
Program No. (Automatically assigned) b × b
Name (null) b × b
Key Display (null) b × b
Assign Title ABC/1/On b × b
*1
E-mail Address (null) × b
Register as Sender On b ×
Sender's Password On b × b
Protected Password (null) b × b
E-mail Address
1 to 30 (null) b × b
Subject
LDAP Server IP Address 0.0.0.0 b × b
TWAIN
Scanner
Web
LDAP Server IP Address 389 b × b
Search Base (Null) b × b
Max. Number of Search
Results
Connection Wait Time 2 b × b
Search Object E-mail Address b × b
Advanced Search
Conditions
Search Address BookSearch Object
Search Destinations
*1
Available up to 2000 destinations.
100 b × b
Include One of Words b × b
Name b × b
50
Page 61

Delivery Settings
Setup Item Default
Delivery Server IP Address
0.0.0.0
Initial Scanner Setup
Purpose Method
Delivery
E-mail
SMB
FTP
Print
TWAIN
Scanner
Web
*1
*2
Interval Time for
Redelivery
No. of Times to Redeliver Off b × b
Job Delivery Data Max.
Setting
Delivery
*1
Automatically configured when you register this machine on ScanRouter V2/Professional. It is essential to register this machine on ScanRouter V2/Professional.
*2
Display using [1.System Settings] on this machine.
*3
Configure using [2.SendScan Settings] on this machine.
Off b × b
1 bb
*3
Print Scan Settings
Purpose Method
Setup Item Default
Delivery
E-mail
SMB
FTP
Print
TWAIN
Scanner
Max. Number of Copies 999 bbb
Color/Black and White Black and White bbb
Print Scan
Program No. (Automatically assigned) b × b
3
b
Web
Name(s) (null) b × b
Key Display (null) b × b
Assign Title ABC/1/On b × b
Attachment Type Network Printer × b
Default Printer
*1
Locked Print Off b × b
Paper Source Tray Auto Tray Select b × b
Printer
*1
Available up to 99 registrations.
*2
“Yes” is automatically selected for the first printer that is registered. “No” is selected
No
*2
b × b
for all other printers.
51
Page 62

3
Configuring the Scanner Settings
System Settings
This section describes the setup items contained in the System Settings menu.
They include an item used to select the initial screen of the machine, and basic
setup items for operating this machine on a network, such as an IP address setting. This section also shows you how to configure these settings using the control panel of this machine.
Reference
The System Settings menus are available by pressing the {{{{User Tools}}}} key.
For configuration using the System Settings menus, see p.57 “Configuring
[System Settings]”.
Note
❒ The items marked with (WSM) on the titles signify that they are configured
on the website at Web Status Monitor.
Information to Set in [System Settings]
Note
❒ You can configure the settings that are mentioned in this section, using the
Web Status Monitor. However, you must configure the IP address setting using the control panel of this machine first. And then, you can change the setting on the Web Status Monitor.
❖❖❖❖ Function Priority
This item lets you select the initial screen that is displayed when you turn the
power on.
• Select: Send/Print
When you select this option, “Select Method” screen is initially displayed.
On this screen, pressing the {{{{1}}}} key displays the Delivery Server standby
screen or the E-mail/Send File standby screen, depending on the settings
in [6.Select Method]. Pressing the {{{{2}}}} key displays the Print Scan initial
screen for printing scan data.
• Send Scan
52
When you select this option, the Delivery Server standby screen or the Email/Send File standby screen is initially displayed. The screen initially
displayed depends on the settings in [6.Select Method].
Page 63

System Settings
• Print Scan
When you select this option, the Print Scan Ready screen is displayed as
the initial screen.
❖❖❖❖ IP Address
When a fixed IP address is assigned to this machine on the network you use,
enter the IP address to this item in the form of xxx.xxx.xxx.xxx (xxx:0 through
255).
Do not specify this item manually when you use this machine on a DHCP environment. An IP address is automatically assigned to this machine by selecting “DHCP” for [Network Boot].
❖❖❖❖ Subnet Mask
When a fixed IP address is assigned to this machine on the network you use,
enter the subnet mask to this item in the form of xxx.xxx.xxx.xxx (xxx:0
through 255).
Do not specify this item manually when you use this machine on a DHCP environment, because this item is automatically assigned to this machine by selecting “DHCP” for [Network Boot].
3
❖❖❖❖ Default Gateway Address
When a fixed IP address is assigned to this machine on the network you use,
enter the default gateway address to this item in the form of xxx.xxx.xxx.xxx
(xxx:0 through 255).
Do not specify this item manually when you use this machine on a DHCP environment, because this item is automatically assigned to this machine by selecting “DHCP” for [Network Boot].
❖❖❖❖ Access Control and Access Mask
Use these setup items together to determine which of client computers has
right to access this machine when it works as a network TWAIN scanner.
Each of the client computers is granted or denied its access to this machine by
its IP address, which is determined by an access control entry and an access
mask entry in combination. An access control entry is used as a reference value of the IP address, while an access mask entry determines the range of the
IP addresses.
• Access control is the value that becomes the reference for restricting the cli-
ent that uses this product as a network TWAIN scanner
• Access mask is the value to specify the restriction range. It is collated (log-
ically multiplied) with access control to limit clients that can use this prod-
uct as a network TWAIN scanner.
Specify both the access control and the access mask in the form of
xxx.xxx.xxx.xxx (xxx:0 through 255).
53
Page 64

3
Configuring the Scanner Settings
Note
❒ When you want to set no limitation of access to this machine, leave these
settings as their default values.
❒ When an IP address of a client computer falls within the logical products
of the access control entry and the access mask entry, the client computer
is granted its access to this machine.
❒ For example, a client computer that has an IP address within the range
shown under “Access-enabled IP address” column in the following table
has right to access this machine, in accordance with the entry of the access
mask to the left, when you set the access control to 192.168.15.18. In the fol-
lowing table, “xxx” means any value is available.
Access mask entry Access-enabled IP address
000.000.000.000 xxx.xxx.xxx.xxx
255.255.000.000 192.168.xxx.xxx
255.255.240.000 192.168.0.xxx
∼192.168.15.xxx
255.255.255.000 192.168.15.xxx
255.255.255.240 192.168.15.16
∼192.168.15.31
255.255.255.255 192.168.15.18
❖❖❖❖ Network Boot
Use this item to select whether you use this machine on a DHCP environment
or not. Set this item to “NONE” when a fixed IP address is assigned to this
machine on the network you use. Set this item to “DHCP” when you use this
machine on a DHCP environment.
Note
❒ If you plan to use delivery server function, assign an IP address of this ma-
chine statistically, even when you use this machine on a DHCP environ-
ment. You still have to select “DHCP” for [Network Boot], and do not enter
any value to the following setup items: [IP Address], [Subnet Mask], [Default
Gateway Address].
❒ After you have changed the setting of this item, turn off the power and
then back on to activate the change.
❖❖❖❖ DNS Server 1 IP Address (WSM)
Specify the IP address of the primary DNS server on the network you use this
machine, in the form of xxx.xxx.xxx.xxx (xxx:0 through 255).
54
Note
❒ This setting can only be configured using the Web Status Monitor.
Page 65

System Settings
❖❖❖❖ DNS Server 2 IP Address (WSM)
When a secondary DNS server runs on the network you use this machine,
specify the IP address of the secondary DNS server in the form of
xxx.xxx.xxx.xxx (xxx:0 through 255).
Note
❒ This setting can only be configured using the Web Status Monitor.
❖❖❖❖ DNS Server 3 IP Address (WSM)
When a third DNS server runs on the network you use this machine, specify
the IP address of the third DNS server in the form of xxx.xxx.xxx.xxx (xxx:0
through 255).
Note
❒ This setting can only be configured using the Web Status Monitor.
❖❖❖❖ Delivery Server IP Address
This item is automatically configured when you register this machine to a delivery server operated by ScanRouter V2/Professional. Do not specify this
item manually.
3
❖❖❖❖ MAC Address
This item is automatically configured.
❖❖❖❖ Transmission Speed
Use this item to select a network transmission speed from “Auto”,
“100Mbps” or “10Mbps”.
❖❖❖❖ LAN Type
Ethernet is fixed for this machine.
❖❖❖❖ Wireless LAN Signal
This item is disabled with this machine.
❖❖❖❖ Destination Search Priority
Set this item to specify the objects to use in higher priority when searching for
the E-mail addresses.
Make the settings to access the E-mail address registered in LDAP server before using this function to enable the settings in [LDAP Search Object] and
[LDAP Search Conditions].
Reference
See p.105 “Information to Register in [Search Destinations]”.
❖❖❖❖ Send Function Permission
Use this item to limit the function that the users can use with this machine.
With this mode, this machine can be limited to use; [E-mail Only], [SMB Only (File
Name Changeable)], [SMB Only (File Name Unchangeable)], [FTP Only (File Name
Changeable)], or [FTP Only (File Name Unchangeable)].
55
Page 66

Configuring the Scanner Settings
❖❖❖❖ Date/Time(Yr/Month/Day/Hr/Min/Sec)
This item lets you adjust the machine's date and time. The current date and
time affects all the related operations of this machine, such as a time stamp
inserted in each of e-mail messages sent from this machine. Also, you can assign a poling interval of the time server.
❖❖❖❖ Prepare Carriage Lock
When you transport the machine over a distance, you must lock the Lock
Switch which is located on the back of the machine. Before locking the switch,
execute the carriage lock preparation. See p.201 “Transporting the Scanner”
for details.
3
❖❖❖❖ Supply Counter
You can check and manage the number of scanning by the ADF to know the
timing of replacing of the Pick Roller Unit and ADF Pad. Also you will be
alerted on the timing of replacing the parts by resetting this counter after replacement of the new ones. See p.199 “Displaying and Resetting the Counter
of Consumable Parts”
❖❖❖❖ Select Language
This item lets you select a language for displaying messages on the screen.
Note
❒ This setting will be effective after reboot.
❖❖❖❖ Firmware Version
This item displays the number of the firmware version.
56
Page 67

Configuring [System Settings]
Reference
See p.14 “Using Keys Displayed on
the Screen” for information about
how to select items displayed on
the screen.
Press the {{{{User Tools}}}} key.
AAAA
AFJ004S
System Settings
Select the option you want among
DDDD
“Select: Send/Print”, “Send Scan”
and “Print Scan”.
• The option that is currently selected is displayed first.
•“*” mark appears along with the
option currently selected
• Use [↑↑↑↑] and [↓↓↓↓] to display the
option you want to select.
While the option you want to se-
EEEE
lect is displayed, press [OK].
This saves the setting you have
configured, and returns to the System Settings menu.
3
The Scanner Features menu is displayed.
Press the {{{{1}}}} key.
BBBB
The System Settings menu is displayed, and “1. Function Priority”
appears as the setup item currently
selected.
Press [Settings].
CCCC
The setting screen for “1. Function
Priority” appears.
Note
❒ Pressing [Exit] returns to the
parent menu screen.
Note
❒ Pressing [Cancel] discards the
selected option, and returns to
the previous screen.
Configure the necessary settings
FFFF
in accordance with your network
environment.
To configure network boot and
related settings when a fixed IP
address is assigned to this machine
A Press [↓↓↓↓Next].
“2. IP Address” appears as the
setup item currently selected.
B Press [Settings].
The setting screen for “2. IP Address” appears.
57
Page 68

Configuring the Scanner Settings
3
C Specify the IP address of this
machine.
• Input the IP address using
the number keys.
• An IP address consists of four
parts, and each part has a
number within the range of 0
to 255. Make sure that you input each part of the IP address in three digits. For
example, when you want to
specify “8” for a part, highlight the part and then input
“008” using the number keys.
You can use {{{{1111}}}} (or {{{{#}}}} )
and {{{{0000}}}} keys to move the
highlighting to right and left.
Note
❒ When you want to set no lim-
itation of access to this machine, it is not necessary to
specify “5. Access Control”,
while you need to confirm
that “6. Access Mask” is set
to “000.000.000.000”.
G Press [Settings].
The setting screen for “7. Network Boot” appears.
H Use [↑↑↑↑] and [↓↓↓↓] to display
“NONE”.
Note
❒ You can use the {{{{Clear/Stop}}}}
key to clear the three-digit
number currently highlighted.
D When you are finished, press
[OK].
This returns to the System Settings menu.
Note
❒ Pressing [Cancel] discards the
value that you have specified, and returns to the previous screen.
E Press [↓↓↓↓Next]
“3. Subnet Mask” appears as the
setup item currently selected.
F Specify each value for “3. Sub-
net Mask”, “4. Default Gateway
Address”, “5. Access Control”
and “6. Access Mask” in the
same way that you have done in
steps BBBB through EEEE.
Note
❒ “*” mark appears along with
the option currently selected.
I While “NONE” is displayed,
press [OK].
This returns to the System Settings menu.
Note
❒ Pressing [Cancel] leaves the
setting as it was (the option
marked with “*” remains active), and returns to the previous screen.
58
“7. Network Boot” appears as the
setup item currently selected.
Page 69

System Settings
To configure network boot
settings when you use this
machine on a DHCP environment
A Press [↓↓↓↓Next] three times at 2. IP
Address.
“5. Access Control” appears as
the setup item currently selected.
Note
❒ It is not necessary to specify
“2. IP Address”, “3. Subnet
Mask” and “4. Default Gateway Address”. The DHCP
server on your network assigns these values automatically.
B Specify each value for “5. Ac-
cess Control” and “7. Network
Boot”.
You can specify these values in
the same way that you have
done in steps B through E under p.57 “To configure network
boot and related settings when
a fixed IP address is assigned to
this machine”. When you are
finished, “7. Network Boot” appears as the setup item currently selected.
C Press [Settings].
The setting screen for “7. Network Boot” appears.
D Use [↑↑↑↑] and [↓↓↓↓] to display “DH-
CP”.
Note
❒ “*” mark appears along with
the option currently selected.
E While “DHCP” is displayed,
press [OK].
This returns to the System Settings menu.
Note
❒ Pressing [Cancel] leaves the
setting as it was (the option
marked with “*” remains active), and returns to the previous screen.
Press [↓↓↓↓Next].
GGGG
3
Note
❒ When you want to set no lim-
itation of access to this machine, it is not necessary to
specify “5. Access Control”,
while you need to confirm
that “6. Access Mask” is set
to “000.000.000.000”.
“8. Delivery Server IP Address”
appears as the setup item currently
selected.
59
Page 70

Configuring the Scanner Settings
3
Note
❒ This item is automatically con-
figured when you register this
machine to a delivery server operated by ScanRouter V2/Professional. Press [OK] to confirm
this setting after you have registered this machine to a delivery
server, and then press [Cancel]
to return to the System Settings
menu.
Press [↓↓↓↓Next].
HHHH
“9. MAC Address” appears as the
setup item currently selected.
Note
❒ MAC address is a hardware ad-
dress that uniquely identifies
each machine, and cannot be
changed. Press [Settings] to see
the MAC address of this machine, and then press [Cancel] to
return to the System Settings
menu.
Press [↓↓↓↓Next].
KKKK
“13. Destination Search Priority”
appears.
To specify the LDAP Search
Object
A Press [Settings].
B Press [Settings] while “1. LDAP
Search Object” is selected.
You can specify the E-mail destination, by either selecting “E-
mail Address”, “Name (of a
person)”, “Company Name” or
“Fax Number”, with [↓↓↓↓] or [↑↑↑↑].
C Press [OK], to select the menu
you wish.
60
By pressing [↓↓↓↓Next] to display “10.
IIII
Transmission Speed” and “11.
LAN Type” as the setup item, select options for each of them in
the same way that you have done
for setting “7. Network Boot”.
Note
❒ “11. LAN Type” is fixed to “Eth-
ernet” for this machine.
Press [↓↓↓↓Next].
JJJJ
“12. Wireless LAN Signal” appears
in gray tone.
Note
❒ The selected menu is marked
with “*” in front of the item.
❒ By pressing [Cancel] if you do
not wish to change.
D Press [Exit].
You will return to the “13. Destination Search Priority”.
Page 71

System Settings
To specify the LDAP Advanced
Search Conditions
A Press [Settings].
B Press [↓↓↓↓Next].
C Press [Settings] while “2. LDAP
Advanced Search Conditions”
is selected.
You can search the E-mail destination, by entering word(s) of
conditions, among: “Search Beginning Word”, “Search End
Word”, “Exact Match”, “Include One of Words”, “Exclude
Words” or “Fuzzy Search”,
with [↓↓↓↓] or [↑↑↑↑].
D Press [OK], to select the menu
you wish.
To specify the Address Book
Search Object
A Press [Settings].
B Press [↓↓↓↓Next] twice.
C Press [Settings] while “3. Ad-
dress Book Search Object” is
selected.
You can search the E-mail destination, by entering either “E-
mail Address” or “Name (of a
person)”, with [↓↓↓↓] or [↑↑↑↑].
D Press [OK], to select the menu
you wish.
3
Note
❒ The selected menu is marked
with “*” in front of the item.
❒ By pressing [Cancel] if you do
not wish to change.
E Press [Exit].
You will return to the “13. Destination Search Priority”.
Note
❒ The selected menu is marked
with “*” in front of the item.
❒ Press [Cancel] if you do not
wish to change.
E Press [Exit].
You will return to the “13. Destination Search Priority”.
61
Page 72

Configuring the Scanner Settings
3
Press [↓↓↓↓Next].
LLLL
“14. Send Function Permission”
appears.
To specify the Send Function
Permission
A Press [Settings].
You can specify a type of Send
Functions to be available by selecting among: “All Send Functions”, “E-mail Only”, “SMB
Only (File Name Changeable)”,
“SMB Only (File Name Unchangeable)”, “FTP Only (File
Name Changeable)”, or “FTP
Only (File Name Unchangeable)” with [↓↓↓↓] or [↑↑↑↑].
B Press [OK], to select the func-
tion you wish.
Press [↓↓↓↓Next].
MMMM
“15. Date/Time(Yr/Month/Day/
Hr/Min/Sec)” appears.
To set the date and time
A Press [Settings].
B Enter the numeric values to
correct the date and time.
C Press [OK].
To specify the IP address of the
Time Server
Note
❒ Set the necessary settings to ac-
cess the internet to use this function.
62
Note
❒ The selected menu is marked
with “*” in front of the item.
❒ By pressing [Cancel] if you do
not wish to change, you will
return to the “14. Send Function Permission”.
A Press [Settings].
B Press [Time Svr].
C Enter the IP address of your lo-
cal time server.
Page 73
System Settings
Note
❒ Press [Cancel] twice if you do
not wish to change. You will
return to the “15. Date/Time
(Yr/Month/Day/Hr/Min/S
ec)”.
D Press [OK] twice.
Press [↓↓↓↓Next].
NNNN
“16. Prepare Carriage Lock” appears.
Reference
See p.201 “Transporting the
Scanner” for the operating details.
Press [↓↓↓↓Next].
OOOO
“17. Supply Counter” appears.
Reference
See p.199 “Displaying and Resetting the Counter of Consumable Parts” for the operating
details.
Press [↓↓↓↓Next].
PPPP
“18. Select Language”appears.
Press [Settings] and select a language you wish to use with [↓↓↓↓] or
[↑↑↑↑]. Press [OK] to return to the
menu.
Note
❒ Press [Cancel] if you do not wish
to change.
Press [Exit].
RRRR
This returns to the System Settings
menu.
Press [Exit].
SSSS
This exits the Scanner Features
menu, and returns to the standby
screen that is displayed when you
turn the power on.
Important
❒ Never turn off the power of this
machine before the standby
screen is displayed. Doing so
can discard all the settings you
have configured, and return this
machine to its factory default
status.
Note
❒ Instead of pressing [Exit], you
can press a number key to enter
another setting menu.
If you have changed the settings
TTTT
of “7. Network Boot”, turn off the
power and then back on.
The changes to the above settings
are activated.
3
Press [↓↓↓↓Next].
QQQQ
“19. Firmware Version” appears.
Press [Settings] to confirm the
firmware version with this screen.
63
Page 74

3
Configuring the Scanner Settings
SendScan Settings
This section describes the setup items contained in the SendScan Settings, and
shows you how to configure the settings in the SendScan Settings menu (which
includes main setup items in the SendScan Settings) using the control panel of
this machine.
Reference
The SendScan Settings menus are available by pressing the {{{{User Tools}}}} key.
For configuration using the SendScan Settings menus, see p.70 “Configuring
[Send Scan Settings]”.
Note
❒ The items marked with (WSM) on the titles signify that they are configured
on the website at WebStatusMonitor.
Information to Set in [Send Scan Settings]
❖❖❖❖ Send File/TWAIN Priority
This item lets you select which of the functions of this machine has priority,
when you use this machine. You can select from the following two options.
• TWAIN
With this option, the TWAIN standby screen is displayed as the Send Scan
initial screen. This means that the machine stands by for receiving a scanning command from a client computer. While the TWAIN standby screen
is displayed, press [Exit] to use the Delivery Server function or the Send
Mail/Send File function (except for performing a Custom Send File operation).
• Send File
With this option, the Delivery Server standby screen or the E-mail/Send
File standby screen is displayed as the Send Scan initial screen. While either of these screens is displayed, you can use this machine as a TWAIN
scanner or perform a Custom Send File operation from a client computer,
whenever no operation is performed on this machine.
Note
❒ When you set “6. Select Method” to “TWAIN”, this setup item is dimmed
and cannot be configured.
❖❖❖❖ TWAIN Standby Time
This item lets you specify the time after which this machine stands by for a
network TWAIN command (or a [Enter Custom Send File] command), from the
last operation of the control panel of this machine. When you set this item to
“Off”, this machine always stands by for these commands. When you set this
item to “On”, you can set the time within the range of 3 to 30 seconds in 1second increments.
64
Page 75

SendScan Settings
Note
❒ When this machine receives a network TWAIN command (or a [Enter Cus-
tom Send File] command) before the specified TWAIN standby time goes
by, the message “
is currently in use. Please try again later.
ent computer.
Unable to make configurations because Scanner
” appears on the cli-
❖❖❖❖ Auto Reset Timer
This item lets you select whether to return to the state immediately after power-on when this machine is not used for the specified time period. When you
set this item to “Off”, the screen currently displayed remains until another
operation is performed or the power is turned off. When you set this item to
“On”, you can set the time within the range of 10 to 999 seconds in 1-second
increments.
❖❖❖❖ Compression (Black and White)
This item determines whether to compress scan data, created under the following conditions.
• Scan is performed for sending the scan data using Delivery Server function
or Send Mail/Send File function.
3
• Scan is performed with one of the following options is selected for [Scan
Settings] → [Scan Type] : “Black and White:Text”, “Black and
White:Text/Photo”, or “Black and White:Photo”.
Note
❒ Compressing data increases the number of original pages that can be proc-
essed at a time. The number of original pages changes depending on the
status of the originals.
❒ When not compressing scanned data, file size is determined by the scan-
ning size and resolution, regardless of the status of the original. See p.211
“When [Black and White:Text], [Black and White:Text/Photo] or [Black and
White:Photo] is selected”.
❖❖❖❖ Compression (Gray Scale/Full Color)
This item determines whether to compress scan data, created under the following conditions.
• Scan is performed for sending the scan data using Delivery Server function
or Send Mail/Send File function.
• Scan is performed with one of the following options that is selected for
[Scan Settings] → [Scan Type] : “Black and White:Gray Scale” or “Color:Full
Color”.
You can select from the following four options. JPEG compression is performed when you select any of the compression options.
• Normal Compression
Intermediate compression is performed with the scan data, and intermediate file size and image quality can be obtained.
65
Page 76

3
Configuring the Scanner Settings
• High Compression
Higher compression is performed with the scan data so that the file size becomes much smaller, while the image quality gets relatively lower (in comparison with normal compression).
• Low Compression
Lower compression is performed with the scan data so that the image quality becomes relatively higher, while the file size gets larger (in comparison
with normal compression).
• Off
Scanned data is not compressed. Quality is not lost, but file size and memory usage increase. File size is determined by the scanning size and resolution, regardless of the status of the original.
Note
❒ The size of compressed data varies among originals even if the same qual-
ity setting is made for them. The number of original pages that can be processed at a time also varies.
❖❖❖❖ Select Method
You can select a method that suits for a combination of the functions you
want to use when you perform a Send Scan operation. The following three
options are available.
• Delivery Server/TWAIN
Select this option if you want to use Delivery Server and network TWAIN.
• Send File/TWAIN
Select this option if you want to use e-mail, Send File (SMB), Send File
(FTP), and network TWAIN.
• TWAIN
Select this option if you want to use Network TWAIN only.
❖❖❖❖ Auto Update Destination List
• When “Delivery Server/TWAIN” is selected under [6.Select Method]
Select whether to update the contents of the Address Book automatically
with the latest data from the delivery server. When “On” is selected, the
Address Book is updated each time you press [Dest.] or [Sender] on this ma-
chine. When “Off” is selected, the Address Book is updated only when the
power is turned on.
• When “Send File/TWAIN” is selected under [6.Select Method]
Select whether to update the contents of the destination lists of e-mail addresses, send file paths, and FTP servers automatically with the latest data
registered using the Web Status Monitor’s [E-mail Address], [Send File Path]
and [FTP Server]. When “On” is selected, the destination list is updated
each time you press [E-mail] on this machine. When “Off” is selected, the
destination list is updated only when the power is turned on.
66
Page 77

SendScan Settings
Note
❒ You can select “Off” if you do not plan to update the Address Book or the
destination lists frequently. Selecting “Off” makes this machine react
quickly when you press [E-mail].
❖❖❖❖ Unit of Measure
This item lets you select a unit of measurement that is used when you specify
values for [Custom Size] of [Original Size] setting. You can select between “mm”
and “inch”.
❖❖❖❖ sRGB
This item lets you select whether to scan originals with the sRGB Colour
matching function enabled. This function is available only when you select
“Color:Full Color” in [Scan Type] under [Scan Settings].
• When “Off” is selected, the sRGB Colour matching function is disabled.
• When “sRGB 1” is selected, the original's Colour tone is accurately repro-
duced, but the paper's yellowish tone may be reproduced also.
• Selecting “sRGB 2” reduces the paper's yellowish tone.
Note
❒ Selecting “sRGB 1” or “sRGB 2” disables the [Image Density] setting. (⇒
p.79)
3
❖❖❖❖ End of Scan Option
This item lets you select how this machine behaves after a scanning operation
ends. The option selected for this item applies scanning performed in a Send
Scan (Delivery Server or Send Mail/Send File) operation.
Note
❒ You can perform additional scan operation after a scanning from the expo-
sure glass is finished, regardless of the setting of this item.
❒ When you perform a Print Scan operation, the option selected for this set-
up item does not apply.
• Show Options after Each Scan Job
The screen for selecting the next operation appears on the display panel of
this machine.
When scanning is performed from the ADF
The following screen appears when all the originals in the ADF are
scanned.
• Press [Add] to continue scanning to add scanned data to the current im-
age file.
67
Page 78

3
Configuring the Scanner Settings
• Pressing [New Job] finishes the current scanning job and sends the
scanned data. You can start a new job with the current settings after the
scanned data is sent.
• Pressing [OK] finishes the current scanning job, sends the scanned data,
and then returns to the initial screen when the power is turned on.
When scanning is performed from the exposure glass
The following screen appears when you press [Finish] after scanning the
original on the exposure glass.
• Pressing [New Job] finishes the current scanning job and sends the
scanned data. You can start a new job with the current settings after the
scanned data is sent.
• Pressing [OK] finishes the current scanning job, sends the scanned data,
and then returns to the initial screen when the power is turned on.
Note
❒ You can specify the time during which the screen for selecting the next
operation remains displayed using [Configuration] → [Basic Settings] →
[Scanner] → [Wait Time for Additional Scanning] on the Web Status Monitor.
See the Web Status Monitor Help.
❒ When you perform an [Enter Custom Send File] operation from the Web
Status Monitor, selecting [New Job] and [OK] on the selection screen both
finishes the current scanning job, sends the scanned data, and the [Enter
Custom Send File] settings are retained. Press [PrevMenu] to return to the
initial screen when the power is turned on.
• Clear Settings after Each Scan Job
The initial screen displayed immediately after power-on appears on the
display panel of this machine, and files are sent.
❖❖❖❖ Erase Border
68
Note
❒ When you perform the [Enter Custom Send File] operation from the Web
Status Monitor, the [Enter Custom Send File] settings are retained after
files are sent. Press [PrevMenu] to return to the initial screen when the
power is turned on.
When you perform a scan operation, it may happen that a borderline is reproduced on scan data by the shadow of paper ends of the original. This machine
can erase the borderline using a white line, which width you can specify using [Erase Border]. You can select a line width from 1mm (0.04”) to 5mm (0.2”).
Select “0mm” if you do not want to have the borderline erased. The option se-
lected for this item applies scanning performed in a Send Scan (Delivery Server or Send Mail/Send File) operation.
Page 79

SendScan Settings
❖❖❖❖ ADF Thin Paper
This item is disabled in this machine.
❖❖❖❖ Job Delivery Data Max. Setting
This item lets you select whether to limit the maximum file size of a document
to be sent by using the delivery server. When you set limitation of the size,
you can specify it within the range of 1 MB to 64 MB, in 1MB increments.
Note
❒ You can also configure this setting by selecting [Configuration] → [Delivery
Settings] → [Delivery] on the Web Status Monitor.
❖❖❖❖ Wait Time for Additional Scanning (WSM)
When “Show options after each scan job” is selected for [End of Scan Option],
enter the time during which the setting menu appears. Specify the time in seconds within the range of 3 through 900. When the specified time elapses, the
initial screen displayed immediately after power-on appears on the control
panel and files are sent.
Note
❒ This setting can only be configured using the Web Status Monitor.
❖❖❖❖ Scanned Sheet Counter
This item displays the number of scanned sheets, by ADF and the exposure
glass respectively.
❖❖❖❖ Scanned Page Counter
This item displays the number of scanned pages, by ADF and the exposure
glass respectively.
❖❖❖❖ Registration
This item allows you to register the “Vertical” and/or “Horizontal” positions
of the original at values you have specified; among “1. Exposure Glass”, “2.
ADF Front Side” and “3. ADF Back Side”.
3
❖❖❖❖ Select Title (WSM)
This item lets you select the titles that are displayed when you press the {{{{./*}}}}
(Title) key. You can select between “Alphabet” and “Custom Title”.
Note
❒ This setting can only be configured using the Web Status Monitor.
❒ Before using “Custom Title”, it is necessary to register custom titles using
the Web Status Monitor, and restart this machine.
❖❖❖❖ Time Zone (WSM)
This item lets you specify your local time zone, by selecting the time offset
from GMT (Greenwich Mean Time).
Note
❒ This setting can only be configured using the Web Status Monitor.
69
Page 80

Configuring the Scanner Settings
Configuring [Send Scan
Press [Settings]
CCCC
3
Settings
Follow the steps below to configure
Send Scan Settings using the control
panel of this machine.
Note
❒ You can also configure these set-
tings using the Web Status Monitor.
Reference
See p.14 “Using Keys Displayed on
the Screen” for information about
how to select items displayed on
the screen.
If your machine has been configured with User Authenticate, then
enter your user ID and password,
according to the instruction on
p.21 “Login and Logout screens”.
Press the {{{{User Tools}}}} key
AAAA
]
The setting screen for “1. Send
File/TWAIN Priority” appears.
Select the function that you mainly
DDDD
use from “Send File” or “TWAIN”.
• The option that is currently selected is displayed first.
•“*” mark appears along with the
option currently selected.
• Use [↑↑↑↑] and [↓↓↓↓] to display the
option you want to select.
Press [OK].
EEEE
This saves the setting you have
made, and returns to the SendScan
Settings menu.
70
The Scanner Features menu is displayed.
Press the {{{{2}}}} key.
BBBB
The Send Scan Settings menu is displayed, and “1. Send File/TWAIN
Priority” appears as the setup item
currently selected.
AFJ004S
Note
❒ Pressing [Cancel] discards the
selected option, and returns to
the previous screen.
Press [↓↓↓↓Next].
FFFF
“2. TWAIN Standby Time” appears as the setup item currently
selected.
Press [Settings].
GGGG
The setting screen for “2. TWAIN
Standby Time” appears.
Page 81

SendScan Settings
Select the option you want for “2.
HHHH
TWAIN Standby Time”.
If you select “On”, specify the time
after which this machine stands by
for a network TWAIN command
(or a [Enter Custom Send File] com-
mand) using the number keys.
• Use the {{{{1111}}}} and {{{{0000}}}} keys to
highlight the setting you want.
Note
❒ To correct the number, press the
{{{{Clear/Stop}}}} key to clear the
number you have entered.
❒ Pressing [Cancel] discards the
adjusted time value, and returns to the previous screen.
Press [ OK ]
IIII
This saves the setting you have
configured, and returns to the
SendScan Settings menu.
Note
❒ Pressing [Cancel] discards the
selected option, and returns to
the previous screen.
By pressing [Next] to display “4.
LLLL
Compression (Black and White)”
through “12. ADF Thin Paper” as
the setup item, select options for
each of them in the same way that
you have done in the steps
through
After all, “14. Job Delivery Data
Max. Setting” appears as the setup
item currently selected.
Select the options you wish to re-
MMMM
fer in “13. Job Delivery Data Max.
Setting”, “14. Scanned Sheet
Counter”, “15. Scanned Page
Counter”, “16. Registration”, in
the same way that you have done
in the steps
Reference
For operation of “16. Registration”, see p.193 “Adjusting the
position to start reading the
originals”.
Press [Exit].
NNNN
.
EEEE
through
GGGG
.
IIII
CCCC
3
Press [↓↓↓↓Next].
JJJJ
“3. Auto Reset Timer” appears as
the setup item currently selected.
Note
❒ Pressing [↑↑↑↑Prev.] displays the
previous setup item.
Set the auto reset timer in the
KKKK
same way that you have done in
the steps
through
GGGG
.
IIII
This returns to the Scanner Features menu.
Press [Exit].
OOOO
This exits the Scanner Features
menu, and returns to the standby
screen that is displayed when you
turn the power on.
71
Page 82

3
Configuring the Scanner Settings
Important
❒ Never turn off the power of this
machine before the standby
screen is displayed. Doing so
can discard all the settings you
have configured, and return this
machine to its factory default
status.
❒ Reboot this machine after con-
figuring [Send File/TWAIN Priority]
and [6. Select Method] to activate
your configuration values.
Note
❒ Instead of pressing [Exit], you
can press a number key to enter
another setting menu.
72
Page 83

Print Scan Settings
Print Scan Settings
This section describes all the setup items included in Print Scan Settings menu, and
shows you how to configure these settings using the control panel of this machine.
Reference
The System Settings menus are available by pressing the {{{{User Tools}}}} key.
For configuration using the System Settings menus, see p.57 “Configuring
[System Settings]”.
Information to Set in [Print Scan Settings]
❖❖❖❖ Max. Number of Copies
This item lets you set an upper limit for the number of copies that you can
specify when you perform a Print Scan operation, within the range of 1 to 999.
Note
❒ You can also configure this setting by selecting [Configuration] → [Print Scan
Settings] → [Print Scan] on the Web Status Monitor.
3
❖❖❖❖ Color/Black and White
This item lets you select default scan setting for Print Scan, between “Color”
and “Black and White”.
• Colour:Text
Scans standard originals containing mainly text as colour images.
• Colour:Text/Photo
Scans originals containing graphs, photos, and text as colour images.
• Colour:Photo
Scans originals containing mainly colour photos and graphs as colour images.
• Black and White:Text
Scans standard originals containing mainly text as black-and-white binary
images.
• Black and White:Text/Photo
Scans originals containing graphs, photos, and text as black-and-white binary images.
• Black and White:Photo
Scans originals containing mainly black-and-white photos and graphs as
black-and-white binary images.
Note
❒ Scan is performed with black and white or in gray scale, depending on the set-
ting you have configured in the Print Settings menu. If you select “Text” as
[Scan Type] in the Print Settings menu, scan is performed with black and white.
If you select “Text/Photo” or “Photo”, scan is performed with gray scale.
73
Page 84

Configuring the Scanner Settings
Configuring [Print Scan
Press [Settings].
CCCC
3
Settings
Follow the steps below to configure
Print Scan Settings using the control
panel of this machine.
Note
❒ You can also configure these set-
tings using the Web Status Monitor.
Reference
See p.14 “Using Keys Displayed on
the Screen” for information about
how to select items displayed on
the screen.
Press the {{{{User Tools}}}} key.
AAAA
]
The setting screen for “1. Max.
Number of Copies” appears.
Note
❒ Pressing [Exit] returns to the
parent menu screen.
Input maximum number of cop-
DDDD
ies you want to set using the
number keys.
Note
❒ To correct the number, press
{{{{Clear/Stop}}}} key to clear the
number you have entered.
The Scanner Features menu is displayed.
Press the {{{{3}}}} key.
BBBB
The Print Scan Settings menu is
displayed, and “1. Max. Number
of Copies” appears as the setup
item currently selected.
AFJ004S
Press [OK].
EEEE
This saves the setting you have
made, and returns to the Print Scan
Settings menu.
Note
❒ Pressing [Cancel] discards the
entered value, and returns to
the previous screen.
Press [↓↓↓↓Next].
FFFF
“2. Color/Black and White” appears as the setup item currently
selected.
Press [Settings].
GGGG
The setting screen for “2.
Color/Black and White” appears.
74
Page 85

Print Scan Settings
Display the option you wish to se-
HHHH
lect.
• The option that is currently selected is displayed first.
•“*” mark appears along with the
option currently selected.
• Use [↑↑↑↑] and [↓↓↓↓] to display the
option you want to select.
Press [OK].
IIII
This saves the setting you have
configured, and returns to the
Print Scan Settings menu.
Important
❒ Never turn off the power of this
machine before the standby
screen is displayed. Doing so
can discard all the settings you
have configured, and return this
machine to its factory default
status.
Note
❒ Instead of pressing [Exit], you
can press a number key to enter
another setting menu.
3
Note
❒ Pressing [Cancel] discards the
selected option, and returns to
the previous screen.
Press [Exit].
JJJJ
This returns to the Scanner Features menu.
Press [Exit].
KKKK
This exits the Scanner Features
menu, and returns to the standby
screen that is displayed when you
turn the power on.
75
Page 86

3
Configuring the Scanner Settings
Scan Settings
You can configure and register up to four sets of settings for scanning, when performing a Send Scan (e-mail, Send File (SMB/FTP) or Delivery Server) operation.
Memory areas named “Default”, “User 1”, “User 2”, and “User 3” are available
for registering Scan Settings. You can easily recall the settings you have registered to “User 1”, “User 2”, or “User 3”, which means you don’t have to config-
ure detailed settings each time you send scan data. Settings registered to
“Default” apply when you send scan data without selecting “User 1”, “User 2”,
or “User 3”, or without manually configuring Scan Settings.
Reference
The System Settings menus are available by pressing the {{{{User Tools}}}} key.
For configuration using the System Settings menus, see p.57 “Configuring
[System Settings]”.
Information to Register in [Scan Settings]
❖❖❖❖ Scan Type
This item lets you select a scan type. The number of colours and gradation
levels are automatically selected according to the selected scan type.
• Color:Full Color
Scans high-definition colour photos.
• Black and White:Text
Scans standard originals containing mainly text as black-and-white binary
images.
• Black and White:Text/Photo
Scans originals containing graphs, photos, and text as black-and-white binary images.
• Black and White:Photo
Scans originals containing mainly black-and-white photos and graphs as
black-and-white binary images.
• Black and White:Gray Scale
Scans originals containing mainly black-and-white photos, and colour
photos as black-and-white photos.
Selecting [ Gray Scale ] reduces the number of original pages that can be
scanned at a time.
Note
❒ Selecting [Color:Full Color] reduces the number of original pages that can be
scanned at a time.
76
Page 87

Scan Settings
❖❖❖❖ Resolution
This item lets you select the scan resolution. You can select from 100dpi,
200dpi, 300dpi, 400dpi, 600dpi and Custom Resolution.
Note
❒ The higher the resolution, the smaller the number of original pages that
can be scanned at a time.
❒ When you select Custom Resolution, you can specify the resolution within
the range of 100dpi through 1200dpi in 1dpi increments.
❖❖❖❖ Scan Size
This item lets you select the size of the area to be scanned. You can select from
the following options.
A4S, A5R, A5S, B5JIS (Japanese Industrial Standard)S, 8
1
/2x13S, 81/2x11S, 51/2x81/
8
Note
R, 5
2
1
/2x81/
S, Custom Area Setting
2
1
/2x14S,
❒ When [Custom Area Setting] is selected, specify the scanning area for [Start
Positn.] and [Scanning Area].
❖❖❖❖ Start Positn.
Specify the position where scanning starts when [Custom Area Setting] is selected in the [Scan Size] list.
Enter the offset from the reference (start) point in millimeters or inches.
3
Note
❒ This setting is enabled only when [Custom Area Setting] is selected in the
[Scan Size] list.
❒ You can select millimeters or inches to specify the position using [Unit of
Measure] in [2.SendScan Settings] under the Scanner Features menu. See ⇒
p.67 “Unit of Measure” for details.
❖❖❖❖ Scanning Area
Specify the position where scanning ends when [Custom Area Setting] is selected in the [Scan Size] list.
Enter the offset from the position specified for [Start Positn.], in millimeters or
inches.
Note
❒ This setting is enabled only when [Custom Area Setting] is selected in the
[Scan Size] list.
❒ You can select millimeters or inches to specify the position using [Unit of
Measure] in [2.SendScan Settings] under the Scanner Features menu. See p.67
“Unit of Measure” for details.
❒ Make sure that you specify vertical/horizontal positions and scanning areas
to be within the available scan area. The available scan area varies depending on where you place the originals (on the exposure glass or on the ADF).
The following illustrates the reference point and actual scanning area in accordance with the place where you set the originals.
77
Page 88

3
Configuring the Scanner Settings
When the original is set on the Exposure glass
A
ADG012S
When you place an original on the Exposure glass, the available area for
scanning is 215mm (8.5”) (vertical) and 297mm (11.7”) (horizontal) from the
reference point, regardless of the setting in [Scan Type]. Be sure to specify [Po-
sition] and [Scanning Area] to be within the available area for scanning.
When you place the originals in the ADF
B
ADG013S
When you place the originals in the ADF, the available area for scanning is as
follows depending on the setting in [Scan Type] and [Original Settings].
• When [Scan Type] is set to “Black and White:Text”, “Black and
White:Text/Photo” or “Black and White:Photo” and [Original Settings] is set
to a 1-sided option:
215mm (8.5”) (vertical) and 2000mm (80”) (horizontal) from the reference
point
• When [Scan Type] is set to other than the above, and [Original Settings] is set
to a 1-sided option:
215mm (8.5”) (vertical) and 630mm (24.8”) (horizontal) from the reference
point
• When [Original Settings] is set to a 2-sided option:
215mm (8.5”) (vertical) and 297mm (11.7”) (horizontal) from the reference
point
Be sure to specify [Start Positn.] and [Scanning Area] to be within the available
area for scanning.
Note
❒ The inside line of the original table’s guide on the side of the control panel
exactly passes the vertical reference point for the ADF scanning, when the
guide is fully expanded.
78
Page 89

Scan Settings
❖❖❖❖ Image Density
This item lets you select the scan density in one of the seven steps. The larger
the value, the darker the scanned image becomes.
❖❖❖❖ Erase Colour
This setting is available only when “Black and White:Text”, “Black and
White:Text/Photo”, “Black and White:Photo”, or “Black and White:Gray
Scale” is selected in the [ Scan Type ] list. You can select an erase colour from
red, green, or blue, which colour is deleted (ignored) when scanning is performed. Select “Off” when you want to disable erase colour.
Note
❒ The erase colour function may not work as expected depending on the col-
ours on the originals.
❖❖❖❖ Noise Reduction
This function is disabled in this machine.
❖❖❖❖ Edge Smoothing
This function is disabled in this machine.
❖❖❖❖ Filter
This item lets you select whether to use a filter for scanning.
• Off
No filter for scanning.
• MTF
Images are scanned with sharpened borders.
• Fine Noise
Images are scanned with softened borders.
❖❖❖❖ Inversion
This item lets you select whether to scan an original with white and black portions inverted, when “Black and White:Text”, “Black and White:Text/Photo”,
“Black and White:Photo”, or “Black and White:Gray Scale” is selected in the
[Scan Type] list.
3
❖❖❖❖ File Type
This item lets you select the format for saving scanned images. The option
you select for this setup item affects the Send File operations, including sending a file as an e-mail attachment, sending a file to a Windows shared folder,
and sending a file to an FTP server.
Note
❒ When a send file operation is performed using the delivery server func-
tion, the file type is determined in accordance with the delivery server setting.
79
Page 90

Configuring the Scanner Settings
• Single Page
Each page is saved as a single, separate file. When an original of two or
more pages is scanned, the same number of files as the number of original
pages is created.
Note
❒ When “Black and White:Gray Scale” or “Color:Full Color” is selected in
the [ Scan Type ] list, and “High Compression”, “Normal Compression”,
or “Low Compression” is selected in the [Compression (Gray Scale/Full
Color)] list under [System Settings], the scanned image is saved as a JPEG
file. Otherwise, it is saved as a TIFF file.
3
• PDF
The scanned image is saved as a PDF file.
• Multi-page TIFF
An original of two or more pages is saved as one file.
When “Black and White:Gray Scale” or “Color:Full Color” is selected in
the [Scan Type ] list, and “High Compression”, “Normal Compression”, or
“Low Compression” is selected in the [Compression (Gray Scale/Full Color)]
list under [System Settings], the scanned image is saved as a PDF file. Otherwise, it is saved as a TIFF file.
Single Page PDF Multi-page
TIFF
“Image file format when B&W:Gray
Scale or Color:Full Color and High Compression, Normal Compression or Low
Compression are made:”
Image file format when settings other
than the cell above are made:
JPEG PDF PDF
TIFF PDF TIFF
❖❖❖❖ Original Settings
This item lets you select the orientation of the original, and whether to scan
one side or both sides of the original. See p.121 “Original Orientation” for details.
80
Note
❒ An original orientation is not available when an image file format is saved
in JPEG or TIFF.
Page 91

Registering [Scan Settings]
Follow the steps below to configure
and register Scan Settings using the
control panel of this machine.
Note
❒ You can also configure these set-
tings using the Web Status Monitor.
Reference
See p.14 “Using Keys Displayed on
the Screen” for information about
how to select items displayed on
the screen.
Press the {{{{User Tools}}}} key.
AAAA
Scan Settings
Press the {{{{1}}}} key.
CCCC
The Default Scan Settings menu is
displayed, and “1. Scan Type” appears as the setup item currently
selected.
This example shows that all the users have already been configured;
if a user has not been configured,
the item is displayed in gray tone.
Press [Settings].
DDDD
3
The Scanner Features menu is displayed.
Press the {{{{4}}}} key.
BBBB
The Scan Settings menu is displayed.
On this menu, you can select a
memory area (“Default”, “User 1”,
“User 2”, or “User 3”) for registering the Scan Settings configuration.
AFJ004S
The setting screen for “1. Scan
Type” appears.
Note
❒ Press [Exit] to return to the par-
ent menu screen.
Select a scan type.
EEEE
• The option that is currently selected is displayed first.
•“*” mark appears along with the
option currently selected.
• Use [↑↑↑↑] and [↓↓↓↓] to display the
option you want to select.
While the option you want to se-
FFFF
lect is displayed, press [OK].
This saves the setting you have selected, and returns to the Default
Scan Settings menu.
81
Page 92

Configuring the Scanner Settings
3
Note
❒ Pressing [Cancel] discards the
selected option, and returns to
the Default Scan Settings menu.
Press [↓↓↓↓Next].
GGGG
“2. Resolution” appears as the setup item currently selected.
Note
❒ Press [Exit] to return to the par-
ent menu screen.
Press [Settings].
HHHH
The setting screen for “2. Resolution” appears.
Select the resolution you want.
IIII
To specify the resolution manually
using [Custom Resolution]
A While [Custom Resolution] is dis-
played, press [Settings].
The setting screen for “Custom
Resolution” appears.
B Specify the resolution manual-
ly by using the number keys.
Note
❒ To correct the number, press
the {{{{Clear/Stop}}}} key to clear
the number you have entered.
82
• The option that is currently selected is displayed first.
•“*” mark appears along with the
option currently selected.
• Use [↑↑↑↑] and [↓↓↓↓] to display the
option you want to select.
To select a preset resolution
A While the preset resolution
you want to select is displayed,
press [OK].
This saves the setting you have
selected, and returns to the Default Scan Settings menu.
Note
❒ Pressing [Cancel] discards the
selected option, and returns
to the Default Scan Settings
menu.
C Press [OK].
This saves the setting you have
entered, and returns to the Default Scan Settings menu.
Note
❒ Pressing [Cancel] discards the
values you have entered, and
returns to the Default Scan
Settings menu.
Press [↓↓↓↓Next].
JJJJ
“3. Scan Size” appears as the setup
item currently selected.
Press [Settings].
KKKK
The setting screen for “3. Scan
Size” appears.
Page 93

Scan Settings
Select the Scan size.
LLLL
• The option that is currently selected is displayed first.
•“*” mark appears along with the
option currently selected.
• Use [↑↑↑↑] and [↓↓↓↓] to display the
option you want to select.
To select a scan size from preset
sizes
A While the preset scan size you
want to select is displayed,
press [OK].
This saves the setting you have
selected, and returns to the Default Scan Settings menu.
B Use the {{{{1111}}}} and {{{{0000}}}} keys to
highlight the item you want to
input, and then use the number
keys to input the value.
Note
❒ To correct the number you
have entered, use the {{{{1111}}}} and
{{{{0000}}}} keys to highlight it, and
then press the {{{{Clear/Stop}}}} key
to clear the number.
❒ You can also use the {{{{#}}}} key
as well as the {{{{1111}}}} and {{{{0000}}}}
keys to move selection.
C Press [OK].
This saves the setting you have
entered, and returns to the Default Scan Settings menu.
3
Note
❒ Pressing [Cancel] discards the
selected option, and returns
to the Default Scan Settings
menu.
To set a custom area
A While the option “Custom
Area Setting” is displayed,
press [Settings].
The setting screen for “Custom
Area Setting” appears.
Note
❒ Pressing [Cancel] discards the
values you have entered, and
returns to the Default Scan
Settings menu.
Press [↓↓↓↓Next].
MMMM
“4. Image Density” appears as the
setup item currently selected.
Press [Settings].
NNNN
The setting screen for “4. Image
Density” appears.
Use the {{{{1111}}}} and {{{{0000}}}} keys to
OOOO
highlight the setting you want.
83
Page 94

Configuring the Scanner Settings
3
Press [OK].
PPPP
This saves the setting you have selected, and returns to the Default
Scan Settings menu.
Note
❒ Pressing [Cancel] discards the
selected setting, and returns to
the Default Scan Settings menu.
By pressing [↓↓↓↓Next] to display “5.
QQQQ
Erase Colour” through “11. Original Settings” as the setup item, select options for each of them in
the same way that you have done
in steps
After all the settings are the way
RRRR
you want, press [Exit].
This registers the Scan Settings you
have configured to the “Default”
memory area, and returns to the
Scan Settings menu.
through
DDDD
.
GGGG
Press [Exit].
VVVV
This exits the Scanner Features
menu, and returns to the standby
screen that is displayed when you
turn the power on.
Important
❒ Never turn off the power of this
machine before the standby
screen is displayed. Doing so
can discard all the settings you
have configured, and return this
machine to its factory default
status.
Note
❒ Instead of pressing [Exit], you
can press a number key to enter
another setting menu.
84
While the Scan Settings menu is
SSSS
displayed, press the {{{{2}}}}, {{{{3}}}} or
{{{{4}}}} key to display a correspond-
ing User Scan Settings menu.
For example, press the {{{{2}}}} key to
display the User 1 Scan Settings
menu.
Repeat steps
TTTT
of “User 1”, “User 2”, and “User
3” memory areas.
When you are finished, press [Ex-
UUUU
it].
This returns to the Scanner Features menu.
through
DDDD
for each
RRRR
Page 95

Print Settings
Print Settings
You can configure and register up to four sets of settings for printing scan data.
Memory areas named “Default”, “User 1”, “User 2”, and “User 3” are available
for registering Print Settings. You can easily recall the settings you have registered to “User 1”, “User 2”, or “User 3”, which means you don't have to configure detailed settings each time you print scan data. Settings registered to
“Default” apply when you print scan data without selecting “User 1”, “User 2”,
or “User 3”, or without manually configuring Print Settings.
Reference
The System Settings menus are available by pressing the {{{{User Tools}}}} key.
For configuration using the System Settings menus, see p.57 “Configuring
[System Settings]”.
Information to Register in [Print Settings]
❖❖❖❖ Image Density
Use this item to adjust density of the image for scanning. You can select one
of seven steps from 1 (lightest) to 7 (darkest).
❖❖❖❖ Original Size
Use this item to select the size of the originals to be scanned. You can select
from the following options.
A4S, A5R, A5S, B5JISS, 8
1
/2x81/
5
• When you select [Custom Size], you can specify the dimensions of the scan
area (width and height).
S, Custom Size
2
❖❖❖❖ Duplex
Use this item to select a type of duplex prints.
1
/2x14S, 81/2x13S, 81/2x11S, 51/2x81/
2
3
R,
• (1 Sided Orig. -> 1 Sided Print)
Scans a single-sided original and prints onto a single-sided page.
• (1 Sided Orig. -> 2 Sided Print)
Scans two single-sided originals and prints onto a two-sided page.
• (2 Sided Orig. -> 1 Sided Print)
Scans each side of a two-sided original and prints onto two separate pages.
• (2 Sided Orig. -> 2 Sided Print)
Scans a two-sided original and prints onto a two-sided page.
85
Page 96

Configuring the Scanner Settings
❖❖❖❖ Reduce/Enlarge
This item lets you print scan data with the image reduced or enlarged using
a preset ratio, or even changing the reproduction ratio in 1% increments.
• 25%
• 50%:
• 61%: A4 → B6
• 71%:
• 80%:
• 82%: B5 → A5
3
• 87%: A4 → B5
• 100%:
• 115%: B5 →A4
• 122%: A5 → B5
• 141%: A5 → A4
• 200%:
• 400%
• Custom Ratio: By selecting this option, you can change the reproduction
ratio in 1% increments within the range of 25% to 400%.
Note
❒ This setup item appears as “Zoom” on the Web Status Monitor.
❖❖❖❖ Create Margin
Use this item to reduce the image to 93% of the original size.
Note
❒ This setup item is included under [Reduce/Enlarge] on the Web Status Mon-
itor.
❒ When [Create Margin] is set to “On”, the image is reduced to 93%, regardless
of the settings in [Reduce/Enlarge].
❖❖❖❖ Quality/Speed
86
Use this item to select scanning resolution.
• Quality
Scanning is performed in 600 dpi.
• Speed
Scanning is performed in 300 dpi.
Note
❒ This setup item does not affect printing resolution. The resolution for
printing is determined by the printer's maximum resolution.
Page 97

Registering [Print Settings]
Follow the steps below to configure
and register Print Settings using the
control panel of this machine.
Note
❒ You can also configure these set-
tings using the Web Status Monitor.
Reference
See p.14 “Using Keys Displayed
on the Screen” for information
about how to select items displayed on the screen.
Press the {{{{User Tools}}}} key.
AAAA
Print Settings
Press the {{{{1}}}} key.
CCCC
The Default Print Settings menu is
displayed, and “1. Image Density”
appears as the setup item currently
selected.
Note
❒ Pressing [Exit] returns to the
parent menu screen.
Press [Settings].
DDDD
3
The Scanner Features menu is displayed.
Press the {{{{5}}}} key.
BBBB
The Print Settings menu is displayed.
On this menu, you can select a
memory area (“Default”, “User 1”,
“User 2”, or “User 3”) for registering the Print Settings configuration.
AFJ004S
The setting screen for “1. Image
Density” appears.
Use the {{{{1111}}}} and {{{{0000}}}} keys to
EEEE
highlight the setting you want.
Press [OK].
FFFF
This saves the setting you have selected, and returns to the Default
Print Settings menu.
Note
❒ Pressing [Cancel] discards the
selected setting, and returns to
the Default Print Settings menu.
Press [↓↓↓↓Next].
GGGG
“2. Original Size” appears as the
setup item currently selected.
87
Page 98

3
Configuring the Scanner Settings
Press [Settings].
HHHH
The setting screen for “2. Original
Size” appears.
Select the original size.
IIII
• The option that is currently selected is displayed first.
•“*” mark appears along with the
option currently selected.
• Use [↑↑↑↑] and [↓↓↓↓] to display the
option you want to select.
Note
❒ Pressing [Cancel] discards the
selected option, and returns to
the Default Print Settings menu.
To set a custom size
A While the option “Custom Size”
is displayed, press [Setting].
The setting screen for “Custom
Size” appears.
B Use the {{{{1111}}}} and {{{{0000}}}} keys to
highlight the item you want to
input, and then use the number
keys to input the value.
Note
❒ To correct the number you
have entered, use the {{{{1111}}}} and
{{{{0000}}}} keys to highlight it, and
then press the {{{{Clear/Stop}}}} key
to clear the number.
88
To select an original size from
preset sizes
A While the preset original size
you want to select is displayed,
press [OK].
This saves the setting you have
selected, and returns to the Default Print Settings menu.
Note
❒ Pressing [Exit] discards the
selected option, and returns
to the Default Print Settings
menu.
❒ You can also use the {{{{#}}}} key
as well as the {{{{1111}}}} and {{{{0000}}}}
keys to move selection.
C Press [OK].
This saves the setting you have
entered, and returns to the Default Print Settings menu.
Note
❒ Pressing [Cancel] discards the
values you have entered, and
returns to the Default Print
Settings menu.
Press [↓↓↓↓Next], and then select an
JJJJ
option for “3. Duplex” in the
same way that you have done in
the steps
through
HHHH
.
IIII
Page 99

Print Settings
Press [↓↓↓↓Next], and then select an
KKKK
option for “4. Reduce/Enlarge” in
the same way that you have done
in the steps
Note
❒ When you select the “Custom
Ratio” option, use the number
keys or [-] / [+] to enter the val-
ue.
By pressing [↓↓↓↓Next] to display “5.
LLLL
Create Margin” and “6. Quality/Speed” as the setup item, select
options for each of them in the
same way that you have done in
steps
After all the settings are the way
MMMM
you want, press [Exit].
through
HHHH
through
HHHH
.
IIII
.
IIII
When you are finished, press [Ex-
PPPP
it].
This returns to the Scanner Features menu.
Press [Exit].
QQQQ
This exits the Scanner Features
menu, and returns to the standby
screen that is displayed when you
turn the power on.
Important
❒ Never turn off the power of this
machine before the standby
screen is displayed. Doing so
can discard all the settings you
have configured, and return this
machine to its factory default
status.
3
This registers the print settings
you have configured to the “De-
fault” memory area, and returns to
the Print Settings menu.
While the Print Settings menu is
NNNN
displayed, press {{{{2}}}}, {{{{3}}}} or {{{{4}}}}
key to display a corresponding
User Print Settings menu.
For example, press the {{{{2}}}} key to
display the User 1 Print Settings
menu.
Repeat steps
OOOO
of “User 1”, “User 2”, and “User
3” memory areas.
through
HHHH
for each
MMMM
89
Page 100

3
Configuring the Scanner Settings
Configuring Settings Using a Web Browser
This section describes the procedure to make various settings using a web
browser on a client computer.
Important
❒ Before making any settings, connect this machine to the network and specify
its IP address. p.57 “Configuring [System Settings]”
❒ To confirm the IP address of this machine that you have specified, press the
{{{{User Tools}}}} key, press the {{{{1}}}} key to select [1.System Settings], select [2.IP Ad-
dress], and then press [OK]. When you are finished, press [Cancel], and then
press the {{{{User Tools}}}} key to return to a standby screen.
Accessing the Scanner
System requirements of a client computer
❖❖❖❖ OS
• Microsoft Windows 95/98/98 SE/Me/2000 XP
• Microsoft Windows Server 2003
• Microsoft Windows NT4.0
❖❖❖❖ Web browser
• Microsoft Internet Explorer 4.0, 5.0, 5.5, 6.0
When you use a proxy server, set the web browser not to use the proxy server
when accessing this machine.
When using Internet Explorer, you can make this setting by selecting [Internet
Options] on the [Tools] menu, click [LAN Settings] on the [Connections] tab, and
then select the [Bypass proxy server for local addresses] check box in the [Proxy
Server] area. The setting can also be configured by entering the IP address of
this machine to [Exceptions] box on the dialog box that appears when you click
[Advanced] in the [Proxy Server] area.
90
 Loading...