

Page 1
General Settings Guide
Getting Started
1
Combined Function Operations
2
Document Server
3
User Tools (System Settings)
4
Troubleshooting
5
Remarks
6
Entering Text
7
Security
8
Specifications
9
Operating Instructions
For safe and correct use of this machine, please be sure to read the Safety Information in this
manual before you use it.
Page 2

Introduction
This manual describes detailed instructions on the operation and notes about the use of this machine.
To get maximum versatility from this machine all operators are requested to read this manual carefully
and follow the instructions. Please keep this manual in a handy place near the machine.
Important
Contents of this manual are subject to change without prior notice. In no event will the company be liable for direct, indirect, special, incidental, or consequential damages as a result of handling or operating the machine.
Notes:
Some illustrations in this manual might be slightly different from the machine.
Certain options might not be available in some countries. For details, please contact your local dealer.
Laser Safety:
CDRH Regulations
This equipment complies with requirements of 21 CFR subchapter J for class 1 laser products. This
equipment contains two 5- milliwatt, 760-800 nanometer wavelength, two GaAlAs laser diodes. This
equipment does not emit hazardous light, since the beam is totally enclosed during all customer modes
of operation and maintenance.
Warning:
Use of controls or adjustment or performance of procedures other than those specified in this manual
might result in hazardous radiation exposure.
Notes:
The model names of the machines do not appear in the following pages. Check the type of your machine before reading this manual. (For details, see P.15 “Machine Types”.)
• Type 1: 4022/DSm622/LD122/Aficio 2022
• Type 2: 4027/DSm627/LD127/Aficio 2027
• Type 3: not available
Certain types might not be available in some countries. For details, please contact your local dealer.
Two kinds of size notation are employed in this manual. With this machine refer to the inch version.
For good copy quality, the supplier recommends that you use genuine toner from the supplier.
The supplier shall not be responsible for any damage or expense that might result from the use of parts
other than genuine parts from the supplier with your office products.
Power Source
120V, 60Hz, 12A or more
Please be sure to connect the power cord to a power source as above. For details about power source,
see P.134 “Power Connection”.
Page 3

Manuals for This Machine
The following manuals describe the operational procedures of this machine. For
particular functions, see the relevant parts of the manual.
Note
❒ Manuals provided are specific to machine type.
❒ Adobe Acrobat Reader is necessary to view the manuals as a PDF file.
❒ Two CD-ROMs are provided:
• CD-ROM 1 "Operating Instructions for Printer/Scanner"
• CD-ROM 2 "Scanner Driver & Document Management Utilities"
❖❖❖❖ General Settings Guide (this manual)
Provides an overview of the machine and describes System Settings (paper
trays, Key Operator Tools, etc.), Document Server functions, and troubleshooting.
Refer to this manual for Address Book procedures such as registering fax
numbers, e-mail addresses, and user codes.
❖❖❖❖ Network Guide (PDF file - CD-ROM1)
Describes procedures for configuring the machine and computers in a network environment.
❖❖❖❖ Copy Reference
Describes operations, functions, and troubleshooting for the machine's copier
function.
❖❖❖❖ Facsimile Reference <Basic Features>
Describes operations, functions, and troubleshooting for the machine's facsimile function.
❖❖❖❖ Facsimile Reference <Advanced Features>
Describes advanced functions and settings for key operators.
❖❖❖❖ Printer Reference 1
Describes system settings and operations for the machine's printer function.
❖❖❖❖ Printer Reference 2 (PDF file - CD-ROM1)
Describes operations, functions, and troubleshooting for the machine's printer function.
❖❖❖❖ Scanner Reference (PDF file - CD-ROM1)
Describes operations, functions, and troubleshooting for the machine's scanner function.
i
Page 4

❖❖❖❖ Manuals for DeskTopBinder V2 Lite
DeskTopBinder V2 Lite is a utility included on the CD-ROM labeled "Scanner
Driver & Document Management Utilities".
• DeskTopBinder V2 Lite Setup Guide (PDF file - CD-ROM2)
Describes installation of, and the operating environment for DeskTopBinder V2 Lite in detail. This guide can be displayed from the [Setup] display when DeskTopBinder V2 Lite is installed.
• DeskTopBinder V2 Lite Introduction Guide (PDF file - CD-ROM2)
Describes operations of DeskTopBinder V2 Lite and provides an overview
of its functions. This guide is added to the [Start] menu when DeskTopBinder V2 Lite is installed.
• Auto Document Link Guide (PDF file - CD-ROM2)
Describes operations and functions of Auto Document Link installed with
DeskTopBinder V2 Lite. This guide is added to the [Start] menu when
DeskTopBinder V2 Lite is installed.
❖❖❖❖ Manuals for ScanRouter V2 Lite
ScanRouter V2 Lite is a utility included on the CD-ROM labeled "Scanner
Driver & Document Management Utilities".
• ScanRouter V2 Lite Setup Guide (PDF file - CD-ROM2)
Describes installation of, settings, and the operating environment for ScanRouter V2 Lite in detail. This guide can be displayed from the [
play when ScanRouter V2 Lite is installed.
• ScanRouter V2 Lite Management Guide (PDF file - CD-ROM2)
Describes delivery server management and operations, and provides an
overview of ScanRouter V2 Lite functions. This guide is added to the [Start]
menu when ScanRouter V2 Lite is installed.
Setup
] dis-
❖❖❖❖ Other manuals
• PS3 Supplement (PDF file - CD-ROM1)
• Unix Supplement (Available from an authorized dealer, or as a PDF file on
ii
our Web site.)
Page 5
What You Can Do with This Machine
The following introduces the functions of this machine, and the relevant manuals containing detailed information about them.
Products marked with * are optional. For details about optional products, see
p.156 “Options”, or contact your local dealer.
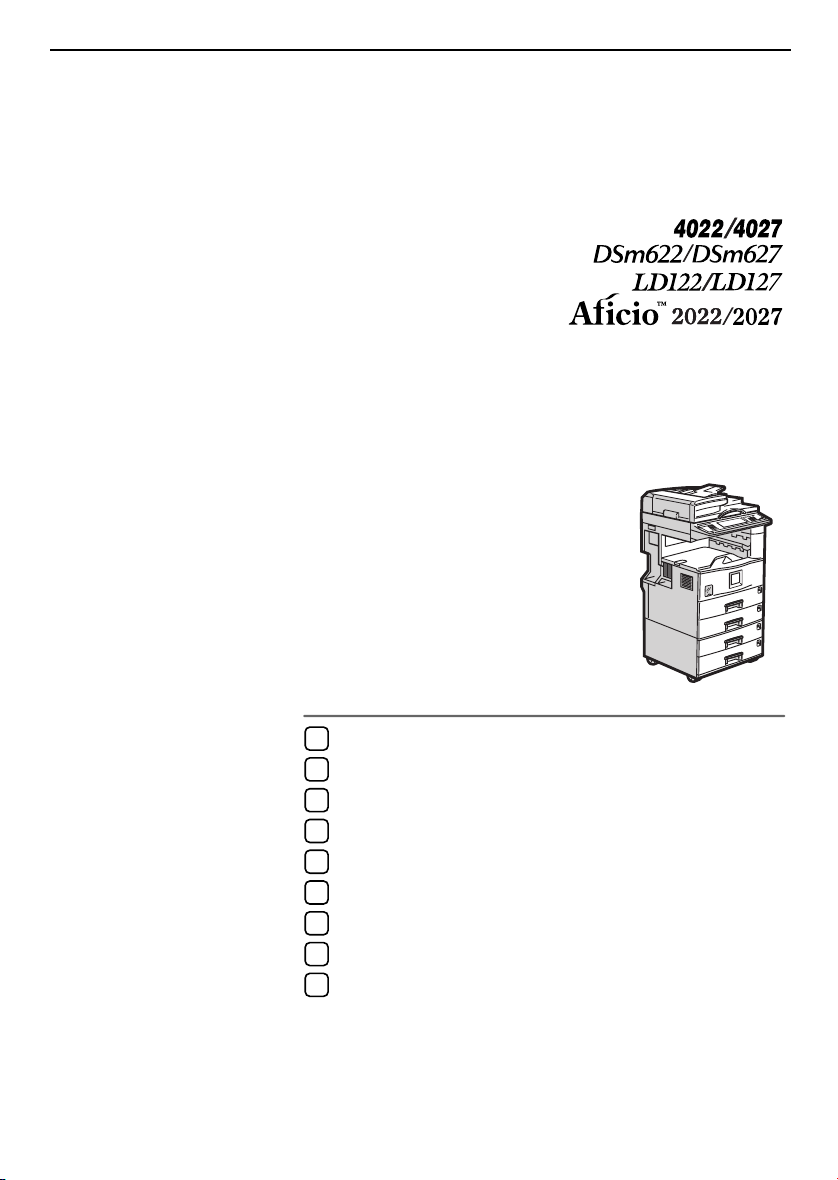
Copier, Facsimile, Printer, and
Scanner Functions
GCKONN1J
This machine provides copier, facsimile*, printer*, and scanner* functions.
• You can make copies of originals.
With a finisher*, you can sort and
staple copies. See Copy Reference.
• You can send originals by fax and
receive faxes from other parties.
See Facsimile Reference <Basic Fea-
tures> , and Facsimile Reference
<Advanced Features>.
• You can print documents created
using applications. See Printer Ref-
erence 1, Printer Reference 2.
• You can scan originals and send
the scan file to a computer. See
Scanner Reference.
Utilizing Stored Documents
GCKONN2J
• You can store file from originals
scanned by this machine, or file
sent from other computers, into
the machine's hard disk. You can
print and fax stored documents as
required. You can also change
print settings and print multiple
documents (Document Server).
See p.35 “Using the Document
Server”.
• With DeskTopBinder V2 Professional*/Lite, you can search,
check, print, and delete stored documents using your computer. You
can also retrieve stored documents
scanned in scanner mode. With
File Format Converter*, you can
even download documents stored
in copy and printer functions to
your computer. See Network Guide.
iii
Page 6

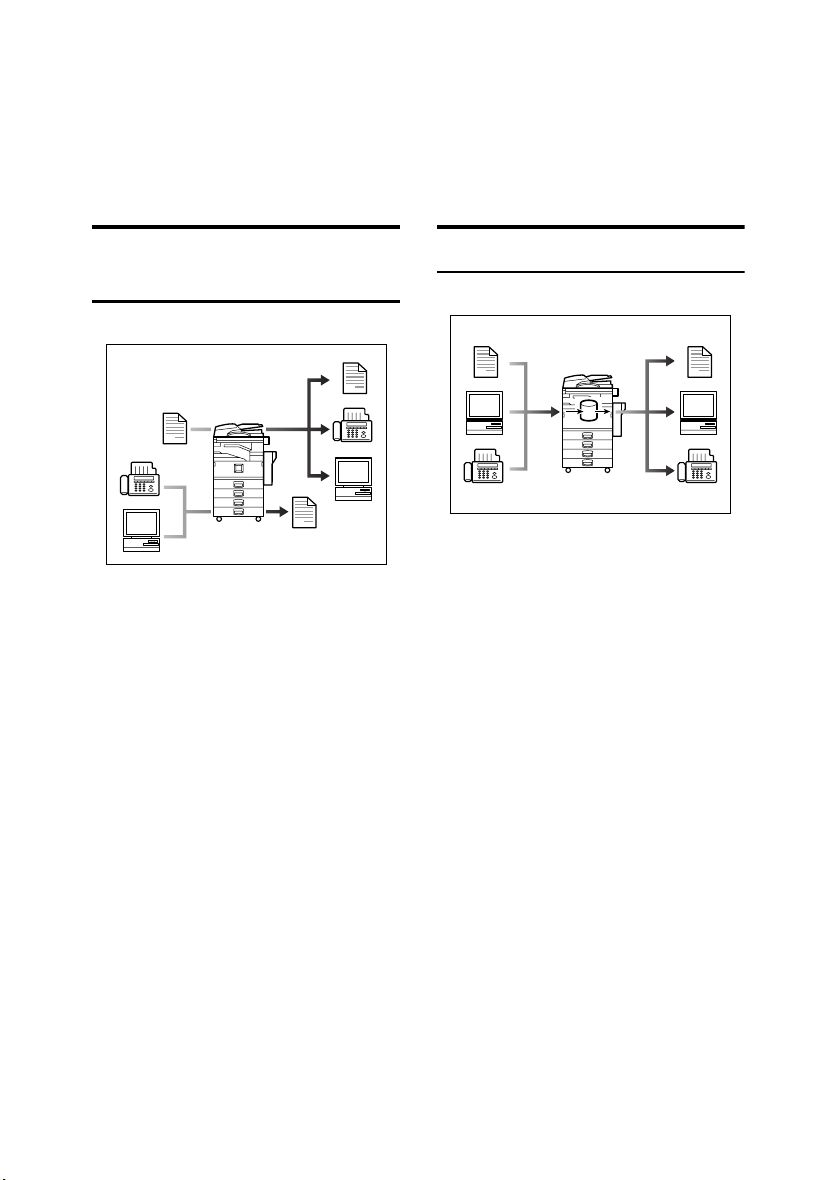
Paperless Fax Transmission
and Reception
Reception
GCKONN3J
• You can store received fax messages on the machine's hard disk, instead of printing them onto paper.
You can use DeskTopBinder V2
Professional*/Lite or a Web
browser to check, print, delete, retrieve, or download documents using your computer (Storing
received documents). See Facsimile
Reference <Advanced Features>.
Fax Transmission and
Reception Through the
Internet
GCKONN9J
You can send fax documents through
e-mail by specifying the recipient's email address (Internet Fax Transmission).
You can receive sent documents via
Internet Fax, or from computers (Internet Fax Reception). See Facsimile
Reference <Basic Features>
Transmission
• You can send documents created
using applications to another party's fax machine directly, without
performing a print job (LAN-Fax).
See Facsimile Reference <Advanced
Features>.
iv
GCKONN4J
Page 7
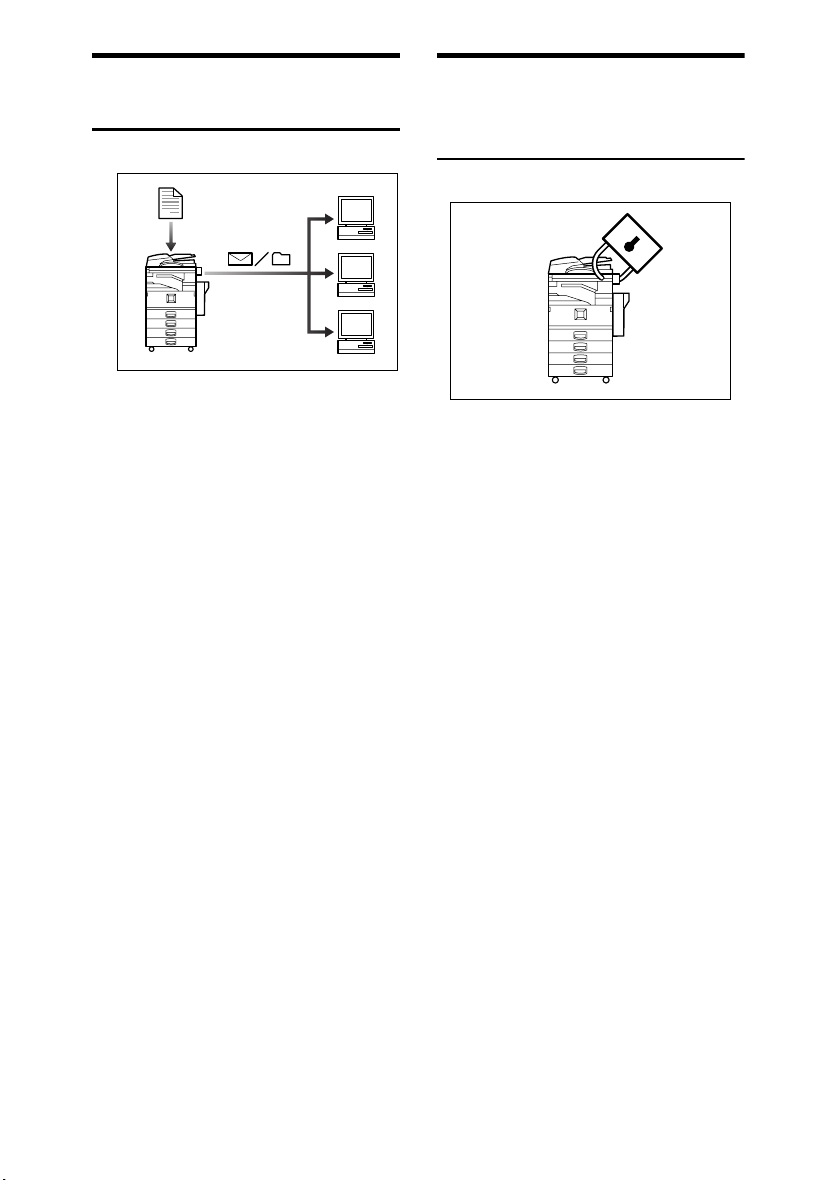
Using the Scanner in a
Network Environment
GCKONN5J
• You can send scanned documents
to other network computers using
e-mail (Sending stored scan file by
e-mail). See Scanner Reference.
• With ScanRouter V2 Professional*/Lite, you can save scanned
documents in specified destinations on network computers (File
storage). See Scanner Reference.
• You can send scanned documents
to other network folders (Scan to
Folder). See Scanner Reference
Administrating the
Machine/Protecting Documents
(Security Functions)
GCKONN6J
The security functions protect documents from being copied without
permission or unauthorized access
via the network. See p.145 “Security”.
❖❖❖❖ Security Functions
• Protecting stored documents
(setting passwords)
• Protecting file remaining in
memory
• Protecting against unauthorized access via phone line
• Authenticating administrator
(setting the key operator code).
See p.60 “Key Operator Code”.
❖❖❖❖ Extended Security Function
By setting a password, documents
are protected against unauthorized access. See p.60 “Extended
Security”.
v
Page 8
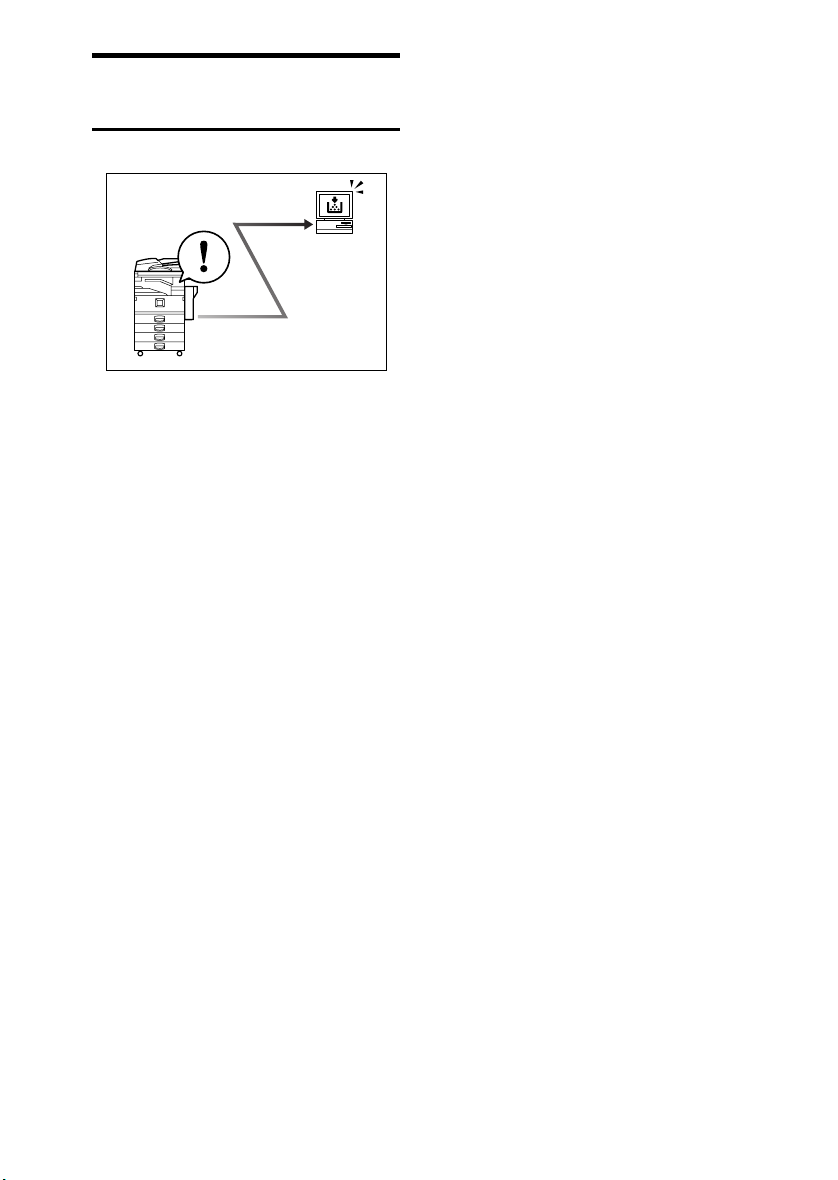
Monitoring the Machine Via
Computer
GCKONN7J
You can monitor machine status and
change settings using a computer.
• Using SmartNetMonitor for Admin, SmartNetMonitor for Client,
or a Web browser, you can use a
computer to view the machine's
status, such as to check on paper
quantities, or misfeeds, etc. See
Network Guide.
• You can also use a Web browser to
make network settings. See Net-
work Guide.
• You can also use a Web browser to
register and manage items such as
user codes, fax numbers, e-mail
addresses, and folders in the Address Book. See the Web browser's
Help.
vi
Page 9

TABLE OF CONTENTS
Manuals for This Machine......................................................................................i
What You Can Do with This Machine..................................................................iii
Copier, Facsimile, Printer, and Scanner Functions................................................... iii
Utilizing Stored Documents....................................................................................... iii
Paperless Fax Transmission and Reception............................................................. iv
Fax Transmission and Reception Through the Internet............................................ iv
Using the Scanner in a Network Environment ...........................................................v
Administrating the Machine/Protecting Documents (Security Functions) ..................v
Monitoring the Machine Via Computer...................................................................... vi
Notice......................................................................................................................1
Copyrights and Trademarks .................................................................................3
Trademarks ................................................................................................................3
Information about Installed Software..........................................................................4
How to Read This Manual .....................................................................................9
Safety Information ...............................................................................................10
Safety During Operation...........................................................................................10
Positions of Labels and Hallmarks forRRRRWARNING and RRRRCAUTION.............12
ENERGY STAR Program.....................................................................................13
Machine Types .....................................................................................................15
1. Getting Started
Guide to Components .........................................................................................17
External Options.......................................................................................................19
Internal Options........................................................................................................20
Control Panel........................................................................................................21
Display Panel ...........................................................................................................23
Turning On the Power .........................................................................................24
Turning On the Main Power .....................................................................................24
Turning On the Power..............................................................................................24
Turning Off the Power..............................................................................................25
Turning Off the Main Power .....................................................................................25
Saving Energy..........................................................................................................26
2. Combined Function Operations
Changing Modes..................................................................................................27
Multi-Access......................................................................................................... 29
vii
Page 10

3. Document Server
Relationship between Document Server and Other Functions .......................33
Document Server Display ........................................................................................34
Using the Document Server................................................................................35
Storing Data .............................................................................................................35
Changing a Stored Document's File Name, User Name, or Password....................38
Selecting a Document..............................................................................................38
Searching for Stored Documents.............................................................................39
Printing Stored Documents ......................................................................................40
Deleting Stored Documents .....................................................................................43
Viewing Stored Documents Using a Web Browser ..................................................44
Downloading Stored Documents..............................................................................44
Settings for the Document Server......................................................................45
4. User Tools (System Settings)
User Tools Menu (System Settings)...................................................................47
Accessing User Tools (System Settings) ..........................................................50
Changing Default Settings .......................................................................................50
Exiting User Tools ....................................................................................................50
Settings You Can Change with User Tools .......................................................51
General Features .....................................................................................................51
Tray Paper Settings .................................................................................................55
Timer Settings ..........................................................................................................58
Key Operator Tools..................................................................................................59
Address Book.......................................................................................................67
Registering Destination Information.........................................................................68
Registering Sender Information ...............................................................................69
User Codes...........................................................................................................70
Registering a New User Code..................................................................................70
Changing a User Code.............................................................................................72
Deleting a User Code...............................................................................................73
Displaying the Counter for Each User Code ............................................................73
Printing the Counter for Each User Code.................................................................74
Clearing the Number of Prints..................................................................................75
Fax Destination....................................................................................................76
Registering a Fax Destination..................................................................................77
Changing a Registered Fax Destination ..................................................................79
Deleting a Registered Fax Destination.....................................................................81
E-mail Destination................................................................................................82
Registering an E-mail Destination............................................................................82
Changing a Registered E-mail Destination ..............................................................84
Deleting a Registered E-mail Destination ................................................................84
Registering Folders .............................................................................................85
Using SMB to Connect.............................................................................................85
Using FTP to Connect..............................................................................................89
Registering a Protection Code ...........................................................................93
Registering a Protection Code To a Single User .....................................................93
Registering a Protection Code To a Group User .....................................................94
viii
Page 11

Registering Destinations to a Group .................................................................95
Registering a New Group.........................................................................................95
Registering Destinations to a Group ........................................................................96
Removing a Destination from a Group.....................................................................96
Displaying Destinations Registered in Groups.........................................................97
Changing a Group Name .........................................................................................97
Deleting a Group......................................................................................................98
Registering the Transfer Request ......................................................................99
Registering a Transfer Station/Receiving Station ....................................................99
Changing a Registered Transfer Station/Receiving Station...................................101
Deleting a Registered Transfer Station/Receiving Station .....................................102
Programming/Changing LDAP Server.............................................................103
Programming an LDAP Server...............................................................................103
Changing an LDAP Server.....................................................................................105
5. Troubleshooting
If Your Machine Does Not Operate As You Want............................................107
General ..................................................................................................................107
Document Server ...................................................................................................109
BBBB Loading Paper...............................................................................................110
Loading Paper into Paper Trays ............................................................................110
Loading Paper into Large Capacity Tray (optional)................................................111
DDDD Adding Toner.................................................................................................113
Removing Toner.................................................................................................114
Inserting Toner...................................................................................................115
xxxx Clearing Misfeeds .........................................................................................116
Changing the Paper Size...................................................................................122
Changing the Paper Size of the Paper Tray .........................................................122
dddd Adding Staples..............................................................................................125
500-Sheet Finisher.................................................................................................125
1000-Sheet Finisher...............................................................................................126
Removing Jammed Staples ..............................................................................128
500-Sheet Finisher.................................................................................................128
1000-Sheet Finisher...............................................................................................129
6. Remarks
Dos and Don'ts...................................................................................................131
Toner...................................................................................................................132
Handling Toner.......................................................................................................132
Toner Storage ........................................................................................................132
Used Toner ............................................................................................................132
Where to Put Your Machine..............................................................................133
Machine Environment ............................................................................................133
Moving....................................................................................................................134
Power Connection..................................................................................................134
Access to the Machine...........................................................................................135
ix
Page 12

Maintaining Your Machine ................................................................................136
Cleaning the Exposure Glass.................................................................................136
Cleaning the Exposure Glass Cover......................................................................136
Cleaning the Auto Document Feeder.....................................................................136
Replacing the Photo Conductor Unit (PCU) ...................................................137
Other Functions .................................................................................................140
Inquiry ....................................................................................................................140
Changing the Display Language ............................................................................140
Counter ...............................................................................................................141
Displaying the Total Counter..................................................................................141
7. Entering Text
Entering Text......................................................................................................143
Available Characters ..............................................................................................143
Keys .......................................................................................................................143
How to Enter Text ..................................................................................................144
8. Security
Security...............................................................................................................145
Primary Security Functions ....................................................................................145
Extended Security Function ...................................................................................145
Temporarily Disabling Document Security.............................................................147
Operating Environment and Notes...................................................................148
Operating Environment ..........................................................................................148
For Administrator....................................................................................................148
For User .................................................................................................................149
9. Specifications
Main Unit.............................................................................................................151
Options ...............................................................................................................156
Exposure Glass Cover ...........................................................................................156
Auto Document Feeder ..........................................................................................156
500-Sheet Finisher.................................................................................................157
1000-Sheet Finisher...............................................................................................158
Shift Sort Tray ........................................................................................................159
Duplex Unit.............................................................................................................159
Bypass Tray ...........................................................................................................160
Bridge Unit .............................................................................................................160
Internal Tray 2 (1 bin tray)......................................................................................160
Large Capacity Tray...............................................................................................161
Paper Tray Unit......................................................................................................161
Copy Paper.........................................................................................................163
Recommended Paper Sizes and Types.................................................................163
Envelopes ..............................................................................................................166
Unusable Paper .....................................................................................................169
Paper Storage ........................................................................................................169
INDEX....................................................................................................... 170
x
Page 13

Notice
Notice To Wireless LAN Interface (option) Users
Notes to users in the United States of America
Notice:
This equipment has been tested and found to comply with the limits for a Class
B digital device, pursuant to Part 15 of the FCC Rules. These limits are designed
to provide reasonable protection against harmful interference in a residential installation. This equipment generates, uses and can radiate radio frequency energy and, if not installed and used in accordance with the instructions, may cause
harmful interference to radio communications. However, there is no guarantee
that interference will not occur in a particular installation. If this equipment does
cause harmful interference to radio or television reception, which can be determined by turning the equipment off and on, the user is encouraged to try to correct the interference by one more of the following measures:
• Reorient or relocate the receiving antenna.
• Increase the separation between the equipment and receiver.
• Connect the equipment into an outlet on a circuit different from that to which
the receiver is connected.
• Consult the dealer or an experienced radio/TV technician for help.
This device complies with part 15 of the FCC Rules.
Operation is subject to the following two conditions:
(1) This device may not cause harmful interference, and (2) this device must accept any interference received, including interference that may cause undesired
operation.
Warning
Changes or modifications not expressly approved by the party responsible for
compliance could void the user's authority to operate the equipment.
Note to users in Canada
Note:
This Class B digital apparatus complies with Canadian ICES-003.
Operation is subject to the following two conditions:
(1) This device may not cause interference, and (2) this device must accept any
interference, including interference that may cause undesired operation of the
device.
1
Page 14

IEEE 802.11b Interface Kit Type B:
This device complies with RSS-210 of Industry Canada.
The term “IC:” before the certification/registration number only signifies that
the Industry Canada technical specifications were met.
To prevent radio interference to the licensed service, this device is intended to
be operated indoors and away from windows to provide maximum shielding.
Equipment (or its transmit antenna) that is installed outdoors is subject to licensing.
To reduce potential radio interference to other users, the antenna type and its
gain should be so chosen that the equivalent isotropically radiated power (EIRP)
is not more than that required for successful communication.
This device has been designed to operate with an antenna having a maximum
gain of [0.45] dBi. Antenna having a higher gain is strictly prohibited per regulations of Industry Canada. The required antenna impedance is [50] ohms.
Remarque concernant les utilisateurs au Canada
Avertissement:
Cet appareil numérique de la classe B est conforme á la norme NMB-003 du Canada.
L'utilisation de ce dispositif est autorisée seulement aux conditions suivantes: (1)
il ne doit pas produire de brouillage et (2) l'utilisateur du dispositif doit être prêt
á accepter tout brouillage radioélectrique reçu, même si ce brouillage est susceptible de compromettre le fonctionnement du dispositif.
IEEE 802.11b Interface Kit Type B:
Ce dispositif est conforme á la norme CNR-210 d'Industrie Canada.
L'expression «IC:» avant le numéro d'homologation/enregistrement signifie
seulement que les spécifications techniques d'Industrie Canada ont été respectées.
Pour empêcher que cet appareil cause du brouillage au service faisant l'objet
d'une licence, il doit être utilisé á l'intérieur et devrait être placé loin des fenêtres
afin de fournir un écran de blindage maximal.
Si le matériel (ou son antenne d'emission) est installe á l'extérieur, il doit faire
l'objet d'une licence.
Afin de réduire le risque d'interférence aux autres utilisateurs, le type d'antenne
et son gain doivent être choisis de façon á ce que la puissance isotrope rayonnée
équivalente (p.i.r.e.) ne soit pas supérieure au niveau requis pour obtenir une
communication satisfaisante.
Ce dispositif a été conçu pour fonctionner avec une antenne ayant un gain maximal de [0.45] dBi.Une antenne ayant un gain plus élevé est strictement interdite
par les réglements d'Industrie Canada.L'impédance d'antenne requise est [50]
ohms.
2
Page 15

Copyrights and Trademarks
Trademarks
Microsoft®, Windows® and Windows NT® are registered trademarks of Microsoft Corporation in the United States and/or other countries.
®
Acrobat
Bluetooth™ is a trademark of the Bluetooth SIG, Inc. (Special Interest Group)
and is used by RICOH Company Limited under license.
Copyright ©2001 Bluetooth SIG, Inc.
The Bluetooth Trademarks are owned by Bluetooth SIG, Inc. USA
Other product names used herein are for identification purposes only and might
be trademarks of their respective companies. We disclaim any and all right in
those marks.
Other product names used herein are for identification purposes only and might
be trademarks of their respective companies. We disclaim any and all right in
those marks.
The proper names of the Windows operating systems are as follows:
• The product name of Windows
• The product name of Windows
• The product name of Windows
• The product names of Windows
• The product names of Windows
• The product names of Windows Server™ 2003 are as follows:
• The product names of Windows
is a registered trademark of Adobe Systems Incorporated.
®
95 is Microsoft® Windows® 95
®
98 is Microsoft® Windows® 98
®
Me is Microsoft® Windows® Millennium
Edition (Windows Me)
®
2000 are as follows:
®
XP are as follows:
®
NT are as follows:
Microsoft
Microsoft
Microsoft
Microsoft
Microsoft
Microsoft
Microsoft
Microsoft
Microsoft
Microsoft
®
Windows® 2000 Advanced Server
®
Windows® 2000 Server
®
Windows® 2000 Professional
®
Windows® XP Professional
®
Windows® XP Home Edition
®
Windows Server™ 2003 Standard Edition
®
Windows Server™ 2003 Enterprise Edition
®
Windows Server™ 2003 Web Edition
®
Windows NT® Server 4.0
®
Windows NT® Workstation 4.0
3
Page 16

Information about Installed Software
Expat
• The software including controller, etc. (hereinafter "software") installed on
this product uses the expat Version 1.95.2 (hereinafter "expat") under the conditions mentioned below.
• The product manufacturer provides warranty and support to the software of
the product including the expat, and the product manufacturer makes the initial developer and copyright holder of the expat, free from these obligations.
• Information relating to the expat is available at:
http://expat.sourceforge.net/
Copyright © 1998, 1999, 2000 Thai Open Source Software Center, Ltd. and Clark
Cooper.
Permission is hereby granted, free of charge, to any person obtaining a copy of
this software and associated documentation files (the "Software"), to deal in the
Software without restriction, including without limitation the rights to use,
copy, modify, merge, publish, distribute, sublicense, and/or sell copies of the
Software, and to permit persons to whom the Software is furnished to do so, subject to the following conditions:
The above copyright notice and this permission notice shall be included in all
copies or substantial portions of the Software.
THE SOFTWARE IS PROVIDED "AS IS", WITHOUT WARRANTY OF ANY
KIND, EXPRESS OR IMPLIED, INCLUDING BUT NOT LIMITED TO THE
WARRANTIES OF MERCHANTABILITY, FITNESS FOR A PARTICULAR
PURPOSE AND NONINFRINGEMENT. IN NO EVENT SHALL THE AUTHORS OR COPYRIGHT HOLDERS BE LIABLE FOR ANY CLAIM, DAMAGES OR OTHER LIABILITY, WHETHER IN AN ACTION OF CONTRACT,
TORT OR OTHERWISE, ARISING FROM, OUT OF OR IN CONNECTION
WITH THE SOFTWARE OR THE USE OR OTHER DEALINGS IN THE SOFTWARE.
NetBSD
1. Copyright Notice of NetBSD
For all users to use this product:
This product contains NetBSD operating system:
For the most part, the software constituting the NetBSD operating system is not
in the public domain; its authors retain their copyright.
The following text shows the copyright notice used for many of the NetBSD
source code. For exact copyright notice applicable for each of the files/binaries,
the source code tree must be consulted.
A full source code can be found at http://www.netbsd.org/.
Copyright © 1999, 2000 The NetBSD Foundation, Inc.
All rights reserved.
4
Page 17

Redistribution and use in source and binary forms, with or without modification, are permitted provided that the following conditions are met:
A Redistributions of source co de must retain the abov e copyr ight no tice, this list
of conditions and the following disclaimer.
B Redistributions in binary form must reproduce the above copyright notice,
this list of conditions and the following disclaimer in the documentation
and/or other materials provided with the distribution.
All advertising materials mentioning features or use of this software must
C
display the following acknowledgment:
This product includes software developed by The NetBSD Foundation, Inc.
and its contributors.
D Neither the name of The NetBSD Foundation nor the names of its contribu-
tors may be used to endorse or promote products derived from this software
without specific prior written permission.
THIS SOFTWARE IS PROVIDED BY THE NETBSD FOUNDATION, INC. AND
CONTRIBUTORS ''AS IS'' AND ANY EXPRESS OR IMPLIED WARRANTIES,
INCLUDING, BUT NOT LIMITED TO, THE IMPLIED WARRANTIES OF MERCHANTABILITY AND FITNESS FOR A PARTICULAR PURPOSE ARE DISCLAIMED. IN NO EVENT SHALL THE FOUNDATION OR CONTRIBUTORS
BE LIABLE FOR ANY DIRECT, INDIRECT, INCIDENTAL, SPECIAL, EXEMPLARY, OR CONSEQUENTIAL DAMAGES (INCLUDING, BUT NOT LIMITED TO, PROCUREMENT OF SUBSTITUTE GOODS OR SERVICES; LOSS OF
USE, DATA, OR PROFITS; OR BUSINESS INTERRUPTION) HOWEVER
CAUSED AND ON ANY THEORY OF LIABILITY, WHETHER IN CONTRACT, STRICT LIABILITY, OR TORT (INCLUDING NEGLIGENCE OR OTHERWISE) ARISING IN ANY WAY OUT OF THE USE OF THIS SOFTWARE,
EVEN IF ADVISED OF THE POSSIBILITY OF SUCH DAMAGE.
Sablotron
Sablotron (Version 0.82) Copyright © 2000 Ginger Alliance Ltd. All Rights Reserved
a) The application software installed on this product includes the Sablotron software Version 0.82 (hereinafter, “Sablotron 0.82”), with modifications made by
the product manufacturer. The original code of the Sablotron 0.82 is provided by
Ginger Alliance Ltd., the initial developer, and the modified code of the Sablotron 0.82 has been derived from such original code provided by Ginger Alliance Ltd.
b) The product manufacturer provides warranty and support to the application
software of this product including the Sablotron 0.82 as modified, and the product manufacturer makes Ginger Alliance Ltd., the initial developer of the Sablotron 0.82, free from these obligations.
c) The Sablotron 0.82 and the modifications thereof are made available under the
terms of Mozilla Public License Version 1.1 (hereinafter, “MPL 1.1”), and the application software of this product constitutes the “Larger Work” as defined in
MPL 1.1. The application software of this product except for the Sablotron 0.82
as modified is licensed by the product manufacturer under separate agreement(s).
5
Page 18

d) The source code of the modified code of the Sablotron 0.82 is available at: http://support-download.com/services/device/sablot/notice082.html
e) The source code of the Sablotron software is available at: http://www.gingerall.com
f) MPL 1.1 is available at: http://www.mozilla.org/MPL/MPL-1.1.html
Authors Name List
All product names mentioned herein are trademarks of their respective owners.
The following notices are required to satisfy the license terms of the software
that we have mentioned in this document:
• This product includes software developed by the University of California,
Berkeley and its contributors.
• This product includes software developed by Jonathan R. Stone for the NetBSD Project.
• This product includes software developed by the NetBSD Foundation, Inc.
and its contributors.
• This product includes software developed by Manuel Bouyer.
• This product includes software developed by Charles Hannum.
• This product includes software developed by Charles M. Hannum.
• This product includes software developed by Christopher G. Demetriou.
• This product includes software developed by TooLs GmbH.
• This product includes software developed by Terrence R. Lambert.
• This product includes software developed by Adam Glass and Charles Han-
num.
• This product includes software developed by Theo de Raadt.
• This product includes software developed by Jonathan Stone and Jason R.
Thorpe for the NetBSD Project.
• This product includes software developed by the University of California,
Lawrence Berkeley Laboratory and its contributors.
• This product includes software developed by Christos Zoulas.
• This product includes software developed by Christopher G. Demetriou for
the NetBSD Project.
• This product includes software developed by Paul Kranenburg.
• This product includes software developed by Adam Glass.
• This product includes software developed by Jonathan Stone.
• This product includes software developed by Jonathan Stone for the NetBSD
Project.
• This product includes software developed by Winning Strategies, Inc.
• This product includes software developed by Frank van der Linden for the
NetBSD Project.
• This product includes software developed for the NetBSD Project by Frank
van der Linden
6
Page 19

• This product includes software developed for the NetBSD Project by Jason R.
Thorpe.
• The software was developed by the University of California, Berkeley.
• This product includes software developed by Chris Provenzano, the Univer-
sity of California, Berkeley, and contributors.
JPEG LIBRARY
• The software installed on this product is based in part on the work of the Independent JPEG Group.
SASL
CMU libsasl
Tim Martin
Rob Earhart
Rob Siemborski
Copyright © 2001 Carnegie Mellon University. All rights reserved.
Redistribution and use in source and binary forms, with or without modification, are permitted provided that the following conditions are met:
A Redistributions of source co de must retain the abov e copyr ight no tice, this list
of conditions and the following disclaimer.
Redistributions in binary form must reproduce the above copyright notice,
B
this list of conditions and the following disclaimer in the documentation
and/or other materials provided with the distribution.
C The name "Carnegie Mellon University" must not be used to endorse or pro-
mote products derived from this software without prior written permission.
For permission or any other legal details, please contact:
Office of Technology Transfer
Carnegie Mellon University
5000 Forbes Avenue
Pittsburgh, PA 15213-3890
(412) 268-4387, fax: (412) 268-7395
tech-transfer@andrew.cmu.edu
D Redistributions of any form whatsoever must retain the following acknowl-
edgment:
"This product includes software developed by Computing Services at Carnegie Mellon University (http://www.cmu.edu/computing/)."
CARNEGIE MELLON UNIVERSITY DISCLAIMS ALL WARRANTIES WITH REGARD TO THIS SOFTWARE, INCLUDING ALL IMPLIED WARRANTIES OF
MERCHANTABILITY AND FITNESS, IN NO EVENT SHALL CARNEGIE MELLON UNIVERSITY BE LIABLE FOR ANY SPECIAL, INDIRECT OR CONSEQUENTIAL DAMAGES OR ANY DAMAGES WHATSOEVER RESULTING
FROM LOSS OF USE, DATA OR PROFITS, WHETHER IN AN ACTION OF CONTRACT, NEGLIGENCE OR OTHER TORTIOUS ACTION, ARISING OUT OF OR
IN CONNECTION WITH THE USE OR PERFORMANCE OF THIS SOFTWARE.
7
Page 20

MD4
Copyright © 1990-2, RSA Data Security, Inc. All rights reserved.
License to copy and use this software is granted provided that it is identified as
the "RSA Data Security, Inc. MD4 Message-Digest Algorithm" in all material
mentioning or referencing this software or this function.
License is also granted to make and use derivative works provided that such
works are identified as "derived from the RSA Data Security, Inc. MD4 MessageDigest Algorithm" in all material mentioning or referencing the derived work.
RSA Data Security, Inc. makes no representations concerning either the merchantability of this software or the suitability of this software for any particular
purpose. It is provided "as is" without express or implied warranty of any kind.
These notices must be retained in any copies of any part of this documentation
and/or software.
MD5
Copyright © 1991-2, RSA Data Security, Inc. Created 1991. All rights reserved.
License to copy and use this software is granted provided that it is identified as
the "RSA Data Security, Inc. MD5 Message-Digest Algorithm" in all material
mentioning or referencing this software or this function.
License is also granted to make and use derivative works provided that such
works are identified as "derived from the RSA Data Security, Inc. MD5 MessageDigest Algorithm" in all material mentioning or referencing the derived work.
RSA Data Security, Inc. makes no representations concerning either the merchantability of this software or the suitability of this software for any particular
purpose. It is provided "as is" without express or implied warranty of any kind.
These notices must be retained in any copies of any part of this documentation
and/or software.
8
Page 21

How to Read This Manual
R
R
Symbols
This manual uses the following symbols:
WARNING:
This symbol indicates a potentially hazardous situation that might result in
death or serious injury if you misuse the machine by not following these instructions under this symbol. Be sure to read these instructions, all of which are included in the Safety Information section in the General Settings Guide.
CAUTION:
This symbol indicates a potentially hazardous situation that might result in minor or moderate injury or property damage not involving bodily injury, if you
misuse the machine by not following these instructions under this symbol. Be
sure to read the instructions, all of which are included in the Safety Information
section in the General Settings Guide.
* The above statements are for your safety.
Important
If this instruction is not followed, paper might be misfed, originals damaged, or
data lost. Be sure to read this.
Preparation
This symbol indicates the prior knowledge or preparation required before operation.
Note
This symbol indicates precautions for operation, or actions to take following
mal-operation.
Limitation
This symbol indicates numerical limits, functions that cannot be used together,
or conditions under which a particular function cannot be used.
Reference
This symbol indicates where further relevant information can be found.
[]
Keys that appear on the machine's display panel.
{}
Keys built into the machine's control panel.
9
Page 22

Safety Information
R
R
When using this machine, the following safety precautions should always be followed.
Safety During Operation
In this manual, the following important symbols are used:
WARNING:
CAUTION:
Indicates a potentially hazardous situation which, if instructions
are not followed, could result in death or serious injury.
Indicates a potentially hazardous situation which, if instructions are not
followed, may result in minor or moderate injury or damage to property.
R WARNING:
• Connect the power cord directly into a wall outlet and never use an extension cord.
•
Disconnect the power plug (by pulling the plug, not the cable) if the
power cable or plug becomes frayed or otherwise damaged.
• To avoid hazardous electric shock or laser radiation exposure, do not
remove any covers or screws other than those specified in this manual.
• Turn off the power and disconnect the power plug (by pulling the plug,
not the cable) if any of the following occurs:
• You spill something into the machine.
•
You suspect that your machine needs service or repair.
• The external housing of your machine has been damaged.
•
Do not incinerate spilled toner or used toner. Toner dust might ignite
when exposed to an open flame.
•
Disposal can take place at our authorized dealer.
• Dispose of the used toner bottle in accordance with the local regulations.
10
Page 23

R CAUTION:
• Protect the machine from dampness or wet weather, such as rain and snow.
• Unplug the power cord from the wall outlet before you move the machine.
While moving the machine, you should take care that the power cord will not
be damaged under the machine.
• When you disconnect the power plug from the wall outlet, always pull the
plug (not the cable).
• Do not allow paper clips, staples, or other small metallic objects to fall inside
the machine.
• Keep toner (used or unused) and toner bottle out of the reach of children.
• For environmental reasons, do not dispose of the machine or expended
supply waste at household waste collection points. Disposal can take place
at an authorized dealer.
• The inside of the machine could be very hot. Do not touch the parts with a
label indicating the “hot surface”. Otherwise, an injury might occur.
11
Page 24
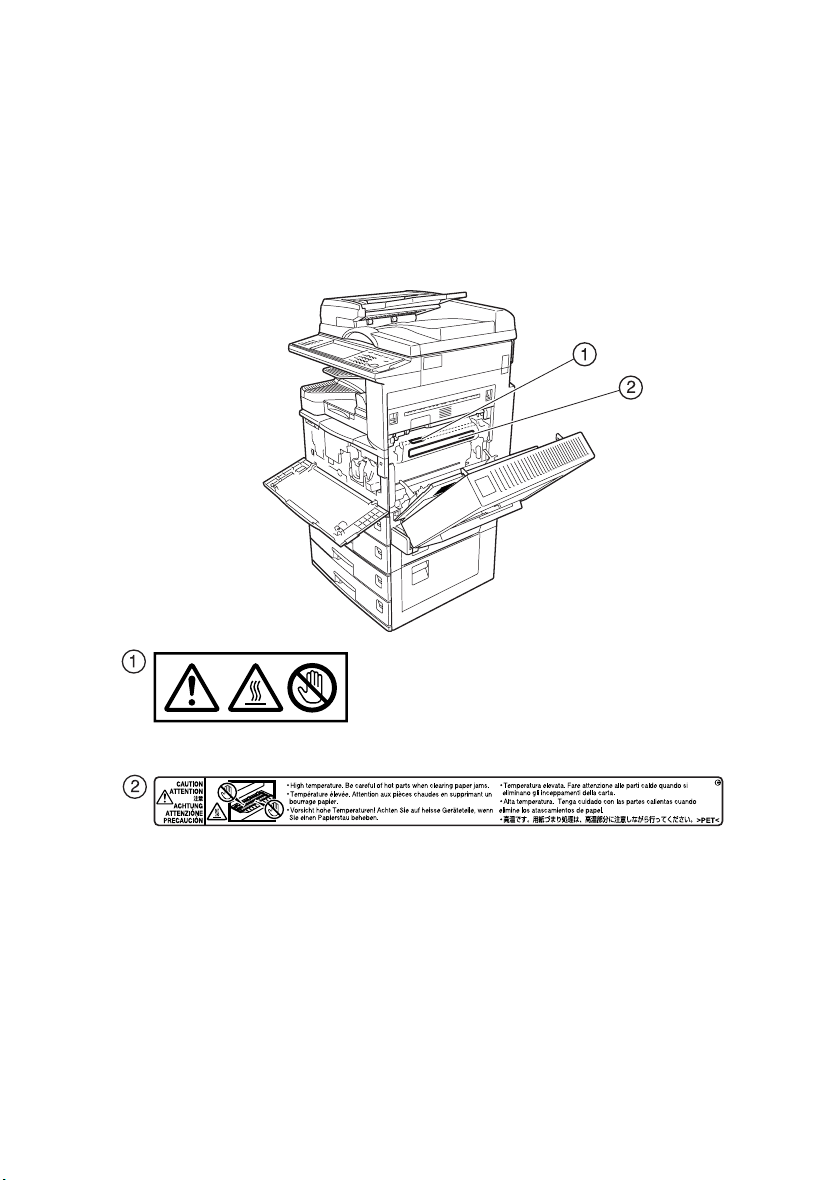
Positions of Labels and Hallmarks
forRRRRWARNING and RRRRCAUTION
This machine has labels for RWARNING and RCAUTION at the positions
shown below. For safety, please follow the instructions and handle the machine
as indicated.
12
ZLEH010J
Page 25
ENERGY STAR Program
As an ENERGY STAR Partner, we have determined
that this machine model meets the ENERGY STAR
Guidelines for energy efficiency.
The ENERGY STAR Guidelines intend to establish an international energy-saving system for
developing and introducing energy-efficient office equipment to deal with environmental issues, such as global warming.
When a product meets the ENERGY STAR Guidelines for energy efficiency, the Partner shall
place the ENERGY STAR logo onto the machine model.
This product was designed to reduce the environmental impact associated with office equipment by means of energy-saving features, such as Low-power mode.
❖❖❖❖ Low-Power mode and Off mode or Sleep mode
This product automatically lowers its power consumption when it is not operated for a fixed time (standard setting time: 1 minute). This is called “Off
mode” on a single function copying machine, and “Sleep mode” on a multiple
function machine equipped with optional facsimile and printing functions.
• Off mode: Same as the condition when the operation switch is turned off.
• Sleep mode: Same as the condition when the operation switch is turned off.
Receiving fax messages and printing from a computer are possible.
If you want to operate this product while it is in either of these modes, do one
of the following:
• Turn on the operation switch.
• Place an original in the Auto Document Feeder (ADF).
• Lift and lower the exposure glass cover or the ADF.
The default interval before entering Off mode or Sleep mode can be adjusted.
To change it, see p.58 “Auto Off Timer”.
The ENERGY STAR Program establishes two modes which lower the power
consumption of the product when it is not operated for a fixed time. These
modes are the Low-power mode and the Off mode or Sleep mode. This product has only one mode, the Off mode or Sleep mode. This mode meets the requirements of both the Low-power mode and Off mode or Sleep mode. In this
manual, the Off mode is called the Auto Off mode.
13
Page 26

❖❖❖❖ Duplex Priority
The ENERGY STAR Program recommends the duplex function. By conserving paper resources this function is less of a burden to the environment. For
applicable machines, duplex function (one-sided originals→ two-sided copies) is selected preferentially when the operation switch or the main power
switch is turned on, the {{{{Energy Saver}}}} key is pressed, or the machine resets
automatically.
Reference
To change the settings of the Duplex Priority mode, see “Duplex Mode Pri-
ority”in “General Features 2/4”, Copy Reference.
Specifications
Low- Power mode, Off
Mode
Duplex Priority 1 Sided→2 Sided
Power consumption 6 W
Default interval 1 minute
Recovery time 10 seconds or less
❖❖❖❖ Recycled Paper
In accordance with the ENERGY STAR Program, we recommend use of environmentally friendly recycled paper. Please contact your sales representative
for recommended paper.
14
Page 27

Machine Types
This machine comes in three models which vary in copy speed. To ascertain
which model you have, see the inside front cover.
Type 1Type 2Type 3
Copy speed 22 copies/minute
(A4K, 8
1
/2" × 11"K)
27 copies/minute
(A4K, 81/2" × 11"K)
32 copies/minute
(A4K, 81/2" × 11"K)
15
Page 28

16
Page 29
1. Getting Started
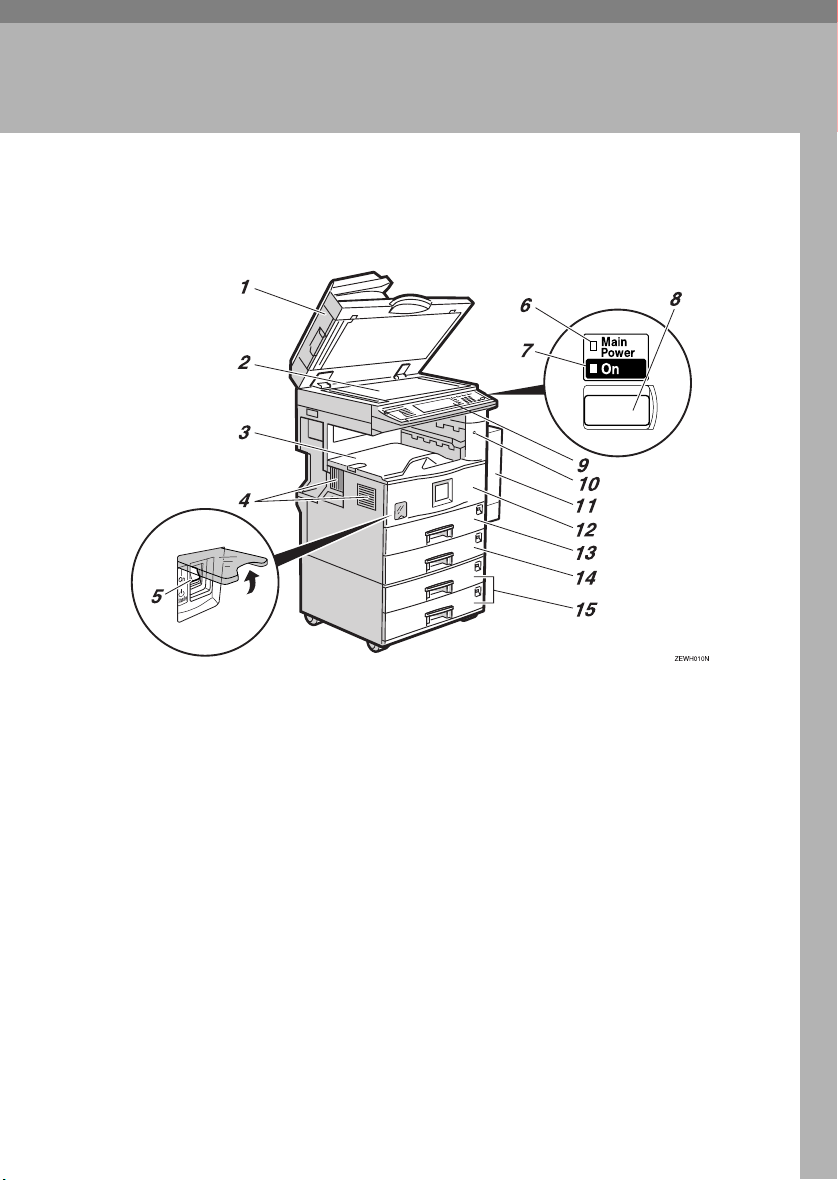
Guide to Components
1.
Exposure glass cover (optional) or
Auto Document Feeder (ADF) (optional)
Lower the exposure glass cover over
originals placed on the exposure glass. If
you have the ADF, load a stack of originals here. They will be fed automatically,
one by one.
(The illustration shows the ADF.)
2.
Exposure glass
Place originals face down.
3.
Internal tray
Copied, printed paper or fax messages
are delivered here.
4.
Ventilation holes
Prevents overheating. Do not obstruct
the ventilation holes by placing anything
near it or leaning objects against it. If the
machine overheats, a fault might occur.
5.
Main power switch
If the machine does not operate after
turning on the operation switch, check
the main power switch is turned on. If it
is off, turn it on.
6.
Main power indicator
This indicator lights when the main power switch is turned on, and goes off when
the switch is turned off.
7.
On indicator
This indicator lights when the operation
switch is turned on, and goes off when
the switch is turned off.
8.
Operation switch
Press this switch to turn the power on
(the On indicator lights up). To turn the
power off, press this switch again (the On
indicator goes off).
17
Page 30
Getting Started
9.
Control panel
See p.21 “Control Panel”.
10.
Remove Paper Indicator
The indicator lights when paper is deliv-
1
ered to the internal tray 2 (1 bin tray).
When paper is removed from the internal
tray 2, the indicator goes off.
Note
❒ Internal tray 2 (1 bin tray) is optional.
11.
Duplex unit (Unit for two-sided
copies) (optional)
Makes two-sided copies.
See p.19 “External Options”
12.
Front cover
Open to access the inside of the machine.
13.
Paper tray
Load paper. See p.110 “B Loading Paper”.
14.
Paper tray 2
Use when copying onto OHP transparencies, label paper (adhesive labels), translucent paper, postcards, envelopes and
custom size paper. See p.110 “B Loading
Paper”.
15.
Paper tray unit (optional)
Load paper. See p.110 “B Loading Paper”, p.19 “External Options”.
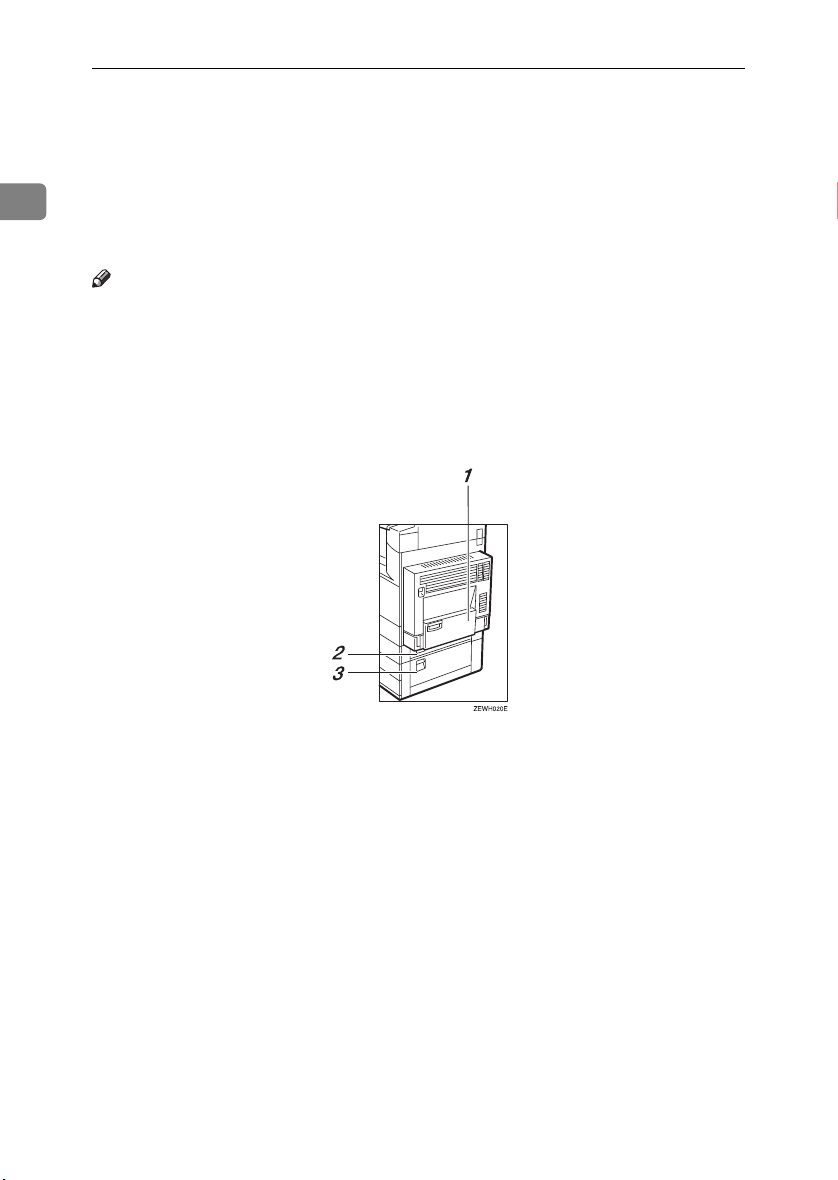
1.
Bypass tray (optional)
See p.19 “External Options”
2.
Paper tray cover
Open this cover to remove jammed paper.
3.
Lower right cover
Open this cover to remove jammed paper.
18
Page 31

External Options
Guide to Components
1
1.
500-sheet finisher
Sorts, stacks and staples copies.
2.
Bridge unit
Relays copies to the finisher.
3.
Exposure glass cover
Lower this cover over originals.
4.
ADF
Load a stack of originals. They will feed
in automatically.
5.
Internal tray 2 (1 bin tray)
If you select this as the output tray, copies
are delivered face down.
6.
1000-sheet finisher
Sorts, stacks and staples copies.
*1
: Finisher upper tray
*2
: Finisher shift tray
7.
Shift sort tray
Sorts and stacks copies.
*1
*1
8.
Paper tray unit
Consists of two paper trays.
9.
Large Capacity Tray (LCT)
Holds up to 2000 sheets of paper.
10.
Bypass tray
Use when copying onto OHP transparencies, label paper (adhesive labels), translucent paper, postcards, envelopes and
custom size paper. See “Copying from
the Bypass tray”, Copy Reference.
11.
Duplex unit
Use to make two-sided copies.
12.
Inter change unit
Required when installing the internal
tray 2 (1 bin tray) and duplex unit.
19
Page 32

Getting Started
Internal Options
A HDD
1
Allows you to use the Document Server function.
B Fax unit
Allows you to use the facsimile function.
Printer/Scanner unit
C
*2
Allows you to use the printer and scanner functions.
D IEEE 1394 interface board
*3
Connects to an IEEE 1394 cable.
E Bluetooth
*3
Allows you to expand the interface.
F File Format Converter
*3
Allows you to download documents from the Document Server stored by
copier and printer functions. See p.44 “Downloading Stored Documents”.
G IEEE 802.1b Wireless LAN Board
*3
You can install a wireless LAN interface.
USB 2.0 Interface Board
H
*3
Allows you to connect a variety of external devices.
I User account enhance unit
Allows you to increase the number of user codes.
Note
❒ You can install only one interface board from items D to H.
*1
You cannot install two finishers simultaneously.
*2
The 128 MB memory and network board are included.
*3
You cannot install two or more of the options below:
IEEE 1394 interface board, IEEE 802.1b wireless LAN board, USB 2.0 Interface Board,
Bluetooth, file format converter.
20
Page 33

Control Panel
Control Panel
This illustration shows the control panel of a machine that has all options fully
installed.
ZLFS280N
1
1.
Screen contrast knob
Adjusts display panel brightness.
2.
Indicators
Show errors and machine status.
• d: Add Staple indicator. See p.125
“d Adding Staples”.
• D: Add Toner indicator. See p.113
“D Adding Toner”.
• B: Load Paper indicator. See p.110
“B Loading Paper”.
• L: Service Call indicator
• M: Open Cover indicator
• x: Misfeed indicator. See p.116 “x
Clearing Misfeeds”.
• m: Data In indicator. See “Control
Panel”, Printer Reference 1.
• Communicating: Communicating in-
dicator. See “Control Panel”, Facsimile
Reference <Basic Features>.
• i: Confidential File indicator. See
“Control Panel”, Facsimile Reference
<Basic Features>.
• Receiving File: Receiving File indicator. See “Control Panel”, Facsimile Ref-
erence <Basic Features>.
3.
{{{{User Tools/Counter}}}} key
• User Tools
Press to change defaults and conditions to meet your requirements. See
p.50 “Accessing User Tools (System
Settings)”.
• Counter
Press to check or print the counter value. See p.141 “Counter”.
• Inquiry
Press to check where to contact for
machine repairs and ordering toner.
See p.140 “Inquiry”
4.
Display panel
Displays operation status, error messages, and function menus.
5.
{{{{Check Modes}}}} key
Press to check settings.
6.
{{{{Program}}}} key (copier/facsimi-
le/scanner mode)
Press to register frequently used settings,
or recall registered settings.
7.
{{{{Clear Modes}}}} key
Press to clear previous copy job settings.
21
Page 34

Getting Started
8.
{{{{Energy Saver}}}} key
Press to switch to and from Energy Saver
mode. See p.26 “Energy Saver Mode”.
9.
{{{{Interrupt}}}} key (copier/scanner
1
mode)
Press to make interrupt copies during
copying or scanning. See “Interrupt
Copy”, Copy Reference.
10.
Main power indicator and On
indicator
The main power indicator goes on when
you turn on the main power switch.
The On indicator lights when the power
is on.
Important
❒ Do not turn off the main power
switch while the power indicator is
lit or blinking. Doing so may damage the hard disk.
11.
Operation switch
Press to turn the power on (the On indicator goes on). To turn the power off,
press again (the On indicator goes off).
12. {
{Sample Copy}}}} key
{{
Press to make a single set of copies or
prints to check print quality before making multiple sets.
13. {
{Start}}}} key
{{
Press to start copying. Start scanning or
printing documents stored using the
Document Server function.
14.
{{{{Clear/Stop}}}} key
• Clear
Press to delete a number entered.
• Stop
Press to stop a job in progress, such as
scanning, faxing, or printing.
15.
{{{{#}}}} key
Press to enter after a numerical value.
16.
Number keys
Use to enter the numbers for copies, fax
numbers and data for the selected function.
17. {
{Start Manual RX}}}} key, {{{{On Hook Di-
{{
al}}}} key, {{{{Pause/Redial}}}} key, and
{{{{Tone}}}} key
Reference
Facsimile Reference <Basic Features>
and Facsimile Reference <Advanced
Features>
18.
Function keys
Press to select one of the following functions:
• Copy:
• Document Server:
• Facsimile:
• Printer:
• Scanner:
19.
Function status indicators.
These show the status of the above functions:
• Yellow: selected.
• Green: active.
• Red: interrupted.
22
Page 35

Control Panel
Display Panel
The display panel shows machine status, error messages, and function menus.
Important
❒ A force or impact of more than 30 N (about 3 kgf) will damage the display
panel.
The copying screen is displayed as default after power on.
The following display shows a machine with options fully installed.
The function items displayed serve as selector keys. You can select or specify an
item by lightly pressing them.
When you select or specify an item on the display panel, it is highlighted thus
. Keys appearing as cannot be used.
Common key operations
The following keys are common to all screens:
❖❖❖❖ Key list
[OK]
[Cancel]
[UUUUPrev.] [TTTTNext]
[OK] [Yes]
[Clear]
[Exit]
Acknowledges a selected function or entered values, and then returns
to the previous display.
Deletes a selected function or entered values, and then returns to the
previous display.
Moves to the previous or next display when all items cannot be shown
on the same display.
Closes displayed messages.
Cancels entered values but does not change the settings.
Returns to the previous display.
1
23
Page 36

Getting Started
Turning On the Power
This machine has two power switches
1
❖❖❖❖ Operation switch (right side of the
control panel)
Press to activate the machine.
When the machine has finished
warming up, you can make copies.
❖❖❖❖ Main power switch (left side of the ma-
chine)
Turning off this switch makes the
main power indicator on the right
side of the control panel go off.
When this is done, machine power
is completely off.
When the fax unit (optional) is installed, fax files in memory may be
lost if you turn this switch off. Use
this switch only when necessary.
Note
❒ This machine automatically enters
Energy Saver mode or turns itself
off if you do not use it for a while.
See p.58 “Auto Off Timer”.
Turning On the Main Power
Make sure that the power cord is
AAAA
firmly plugged into the wall outlet.
.
Important
❒ Do not turn off the main power
switch immediately after turning it on. Doing so may result in
damage to the hard disk or
memory, leading to malfunctions.
Turning On the Power
Press the operation switch.
AAAA
The On indicator goes on.
Note
❒ If the power does not come on
when the operation switch is
pressed, check the main power
sw itch is on. If i t is of f, turn it on.
24
Open the switch cover, and then
BBBB
turn on the main power switch.
The main power indicator goes on.
ZFFH250E
Page 37

Turning Off the Power
Make sure the exposure glass cov-
AAAA
er or the ADF is in the right position.
Press the operation switch.
BBBB
The On indicator goes out.
Note
❒ Even if you press the operation
switch, the indicator does not
go out, the blinks in the following cases:
• When the exposure glass
cover or ADF is open.
• During communication with
external equipment.
• When the hard disk is active.
Turning Off the Main Power
Important
❒ Do not turn off the main power
switch when the On indicator is lit
or blinking. Doing so may result in
damage to the hard disk or memory.
❒ Be sure to turn off the main power
switch before pulling out the power plug. Not doing this may result
in damage to the hard disk or
memory.
Turning On the Power
Make sure the On indicator is not
AAAA
lit.
Open the switch cover, and then
BBBB
turn off the main power switch.
The main power indicator goes
out.
----When the fax unit (optional) is
installed
When the main power switch is
turned off while using the facsimile
function, waiting fax and print jobs
may be canceled, and incoming fax
documents not received. If you have
to turn off this switch for some reason, follow the procedure below.
Important
❒ Make sure 100% is shown as avail-
able memory on the display before
turning off the main power switch
or unplugging the power cord. Fax
files in memory are deleted an
hour after you turn off the main
power switch or unplug the power
cord. See ”Power Failure Report”,
Facsimile Reference <Advanced Features>.
❒ The On indicator does not go out,
but blinks in dial-in mode even if
you press the operation switch.
When this happens, check the explanations below, and turn off the
main power switch.
• The computer is not controlling
the machine.
• The machine is not receiving a
fax.
1
25
Page 38

Getting Started
Saving Energy
1
----Energy Saver Mode
If you do not use the machine for a
certain period after an operation, or
when you press the {{{{Energy Saver}}}}
key, the display disappears and the
machine goes into Energy Saver
mode. When you press the {{{{Energy
Saver}}}} key again, the machine returns
to the ready condition. The machine
uses less electricity in Energy Saver
mode.
Note
❒ You can change the amount of time
the machine waits before switching to Energy Saver mode after
copying has finished or the last operation is performed. See p.58
“Panel Off Timer”.
----Auto Off
The machine automatically turns itself off when the job is finished, after
a certain period of time has elapsed.
This function is called "Auto Off".
Note
❒ You can change the Auto Off time.
See p.58 “Auto Off Timer”.
❒ The Auto Off Timer function will
not operate in the following cases:
• When a warning message appears
• When the service call message
appears
• When paper is jammed
• When the cover is open
• When the "
appears
• When toner is being replenished
• When the User Tools/Counter
screen is displayed
• When fixed warm-up is in
progress
• When the facsimile, printer, or
other functions are active
• When operations were suspended during printing
• When the handset is in use
• When the On-hook dialing
function is in use
• When a recipient is being registered in the address list or
group dial list
• When the Data In indicator is on
or blinking
• When the sample print or
locked print screen is displayed
Add Toner
" message
26
Page 39

2. Combined Function
Operations
Changing Modes
Note
❒ You cannot switch modes in any of the following situations:
• When scanning in a fax message for transmission
• During immediate transmission
• When accessing User Tools
• During interrupt copying
• During On hook dialing for fax transmission
• While scanning an original
27
Page 40

Combined Function Operations
❒ The copying screen is displayed as default after power on. You can change
this default setting. See p.51 “Function Priority”.
2
----System Reset
The machine returns automatically to its initial condition when the job is finished, after a certain period of time has elapsed. This function is called "System
Reset".
Note
❒ You can change the System Reset time. See p.58 “System Auto Reset Timer”.
28
ZLFS290N
Page 41

Multi-Access
Multi-Access
You can carry out another job using a different function while the current job is
being performed. Performing multiple functions simultaneously like this is
called "Multi-accessing".
This allows you to handle jobs efficiently, regardless of how the machine is being
used. For example:
• While making copies, you can scan documents to store in the Document Server.
• While printing documents stored in the Document Server, the machine can
receive print data.
• You can make copies while receiving fax data.
• While printing print data, you can make operations for copying.
Note
❒ See p.52 “Print Priority” for setting function priority. As default, [Display
mode] is set to first priority.
❒ When the Internal Tray 2 (1 bin tray), Shift Sort Tray, 500–sheet finisher, or
1000–sheet finisher is installed on the machine, you can specify the output
tray where documents are delivered. For details about how to specify the output tray for each function, see the following descriptions:
• p.53 “Output: Copier (copier)”
• p.53 “Output: Document Server (Document Server)”
• p.53 “Output: Facsimile (facsimile)”
• p.53 “Output: Printer (printer)”
2
----Function Compatibility
The chart shows Function Compatibility when print priority is set to "Interleave". See p.52 “Print Priority”.
|: Simultaneous operations are possible.
$: Operation is enabled when the relevant function key is pressed and remote
switching (of the scanner) is done.
❍: Operation is enabled when the {{{{Interrupt}}}} key is pressed to interrupt the pre-
ceding operation.
→: Operation is performed automatically once the preceding operation ends.
×: The operation must be started once the preceding operation ends. (Simulta-
neous operations are not possible.)
29
Page 42

Combined Function Operations
Mode after you select Copy
Facsimile Printer
Interrupt Copying
Transmission
Reception
Scanner
Document Server
DeskTopBinder V2
Professional/Lite
Print
Web-Document Server
2
Mode before you select
Copy Operations for
Interrupt Copying Operations for
Facsimile Transmission
Printer Data Reception |||||||||||→→→||||||||
Scanner Operations for
Copying
Stapling
Sort
Copying
Copying ❍❍❍××××| × | → | →→ЧЧЧЧЧ→| →
Operation/Manual
Reception Operation
Scanning an original for Memory
Transmission
Memory
Transmission
Immediate
Transmission
Transmission
Memory
Reception
Printing
Received Data
Reception
Sort Print |||❍❍|||||||→→||||||||
Stapling | → | ❍
Print
scanning
Scanning ЧЧЧЧЧЧЧ| × |||||ЧЧЧЧЧ|||
Operations for Copying
Stapling
×××❍❍$$| $ |||||$$$$$|||
|
*1 → *1 → *1
|
*1 → *1 → *1
❍❍❍××××| × |||||ЧЧЧЧЧ|||
$$$❍❍××| × |||||$$$$$|||
ЧЧЧЧЧЧЧ| × |||||ЧЧЧЧЧ|||
|||||||
ЧЧЧЧЧЧЧ
|||||||
|||||||
$$$❍❍$$| $ |||||××$$$|||
Transmission Operation/Manual Reception Operation
Sort
Operations for Copying
Copying
Scanning an Original for Memory Transmission
Memory Transmission
|
$
❍
❍
$
*5
❍❍$
❍
*5
$
*2
*2
|
$
$
*2
*2
|
|
*3
*3
×
|
*3
|
|
*3
*3
|
|
*7
|||||||→→||||
Data Reception
Immediate Transmission
Memory Reception
Printing Received Data
||||→ $
|||||$
|||||||||
|
|
*3
*7
||||ЧЧЧЧЧ|
|
*3
|||||||||
|
|
*3
*7
× |||||||||
|
*7
Printing
Stapling
Operations for Scanning
Scanning
Operations for Document Server
$
$
$
*2
$
$
$
*2
Scanning a Document to Store in Document Server
Printing from Document Server
Printing from Document Server
Sending a Facsimile from Document Server
Printing
→
|
|
*2
*2
|
*4
*4
→ |||
|
→
*3
|
→
*3
|
→
*3
|
→
*3
|
|
|
|
*4
*4
*4
30
Page 43

Multi-Access
Mode after you select Copy
Mode before you select
Document Server Operations for
DeskTopBinder V2
Professional/Lite
WebDocument
Document Server
Scanning a Document to Store in
Document Server
Printing from
Document Server
Printing from
Document Server
Sending a
Facsimile from
Document Server
Printing |
Server
*1
Simultaneous operations are only possible after the preceding job documents are all
scanned and the [
*2
You can scan a document after the preceding job documents are all scanned.
*3
When multiple lines are available, select a line which is currently not in use. Otherwise, operation will not be possible.
*4
During stapling, printing automatically starts after the current job.
*5
Stapling is not available.
*6
Simultaneous operations become possible after you press the [
*7
During parallel receptions, any subsequent job is suspended until the receptions are
Next Job
Operations for Copying
Stapling
$$$❍❍$$| $ |||||$$×××|||
$ ××❍❍$ × | × |||||$ ××××|||
$ →→❍❍|||||||||||
|
|
*4
|||||||
|
*4
] key appears.
Facsimile Printer
Interrupt Copying
Transmission
Reception
Transmission Operation/Manual Reception Operation
Sort
Operations for Copying
Copying
Scanning an Original for Memory Transmission
Memory Transmission
Immediate Transmission
Memory Reception
Printing Received Data
|||||||||||||||||→ ||
|
*3
|||||||||||||||||||→
|||||||||→ |
|
|
|
*3
*3
*3
Print
Data Reception
Printing
Stapling
Next Job
Scanner
Document Server
Operations for Scanning
Scanning
Operations for Document Server
|
|
*6
*6
] key.
Scanning a Document to Store in Document Server
Printing from Document Server
|
*6
completed.
Limitation
❒ Stapling cannot be used at the same time for multiple functions.
DeskTopBinder V2
Professional/Lite
Web-Document Server
Printing from Document Server
Sending a Facsimile from Document Server
Printing
|||
2
31
Page 44

Combined Function Operations
Note
❒ A machine with the 500–sheet finisher installed cannot accept other jobs
while printing with the stapling operation.
❒ A machine with the 1000–sheet finisher installed, that is printing with the sta-
pling operation on paper larger than A4 size, starts the subsequent job (for
which Shift Sort Tray is specified as the output tray) only after the current
print job finishes.
2
❒ While printing is in progress, scanning using another function may take more
time.
32
Page 45

3. Document Server
Relationship between Document Server
and Other Functions
The following table describes the relationship between the Document Server
and other functions.
function
Copy
Printer
Facsimile Facsimile Available Available
Scanner Scanner
*1
You can send stored documents using the facsimile function. See “Sending a Stored
File”, Facsimile Reference <Advanced Features>.
*2
You can display stored documents using the scanner function. See Scanner Reference .
*3
You can send stored documents using the scanner function. See Scanner Reference.
Where to store
documents
Copy/Document
Server
Document Server
Displaying a list
Available Available Not Available
Available Available Not Available
Not Available
Printing stored
documents
*2
Not Available
Note
❒ The following table shows the capacity of the Document Server.
Copy
Printer
Scanner
Facsimile
Number of pages for
each file
1,000 pages 3,000 files 9,000 pages
Number of files Number of pages in
Available
Available
total
Sending
documents
*1
*3
33
Page 46

Document Server
Document Server Display
❖❖❖❖ Document Server Main Display
3
ZLFS300N
1.
Operating status and messages.
2.
The title of the currently selected
screen.
3.
The numbers of originals, copies,
and printed pages.
The icons below show the functions active when the documents were stored
in the Document Server.
Function Copier Facsimile Printer Scanner
Icon --
4.
The operation keys.
5.
The functions under which the
documents were stored.
34
Page 47

Using the Document Server
Using the Document Server
Storing Data
❖❖❖❖ File name
Stored documents are automatically
named "COPY0001", "COPY0002".
You can change assigned file
names.
❖❖❖❖ User name
You can register a user name to
identify the user or user group that
stored the documents. To assign it,
you can register the user name using the name assigned to the user
code, or by entering the name directly.
Reference
For details about user codes, see
p.70 “User Codes”.
❖❖❖❖ Password
You can set a password for stored
documents, and use it to prevent
others printing them. When a password is set for the documents,
appears next to the documents.
Reference
To store documents without using
Document Server function, see the
manuals for those modes.
Note
❒ Data stored in the Document Serv-
er is set to be deleted after three
days (72 hours) by default. You can
specify the period after which
stored data is automatically deleted. See p.65 “Auto Delete File”.
❒ If you do not want stored data to
be automatically deleted, select
[No] in Auto Del ete Fil e befor e storing a document. If you select [Yes]
later, data stored after will be automatically deleted.
Press the {{{{Document Server}}}} key.
AAAA
ZLFH360N
Press [Scan Original].
BBBB
3
Important
❒ Data stored in the machine might
be lost if some kind of failure occurs. The manufacture shall not be
responsible for any damage resulting from loss of data.
35
Page 48

Document Server
Enter a user name, file name, or
CCCC
password if necessary.
Note
❒ If you do not enter a file name,
one is automatically assigned.
Reference
p.36 “To register or change a
user name”
3
p.37 “To change a file name”
p.37 “To set or change a password”
Place originals either on the expo-
DDDD
sure glass or in the ADF.
Reference
For information about types of
originals and how to place
them, see Copy Reference.
Make any required settings.
EEEE
❒ If you placed originals on the
exposure glass, press [Scanning
Finished] after all the originals
have been scanned. The Select
Files to Print display appears.
To register or change a user name
Press [Scan Original].
AAAA
The scan original display appears.
Press [User Name].
BBBB
If user names are already registered,
the Change User Name display appears. To use an unregistered user
name, press [
When no user name are registered
in the Address Book, the User
(Destination) Name entry display
appears.
Non-programed Name
].
36
Reference
For details, see Copy Reference.
Press the {{{{Start}}}} key.
FFFF
The document is stored in the Document Server.
Note
❒ To stop scanning, press the
{{{{Clear/Stop}}}} key. To restart a
paused scanning job, press [Con-
tinue] in the confirmation dis-
play. To delete saved images
and cancel the job, press the
[Stop] key.
❒ When a password is set, ap-
pears on the left side of the file
name.
Reference
p.70 “User Codes”
When using a registered user
name in the Address Book
A
Select a registered user name
from the list, and then press [
To change your user name to an
unregistered user name, proceed to the next step.
Reference
p.70 “ Registering a New
User Code”
OK
].
Page 49

When using an unregistered user
name in the Address Book
A To enter an unregistered user
name, press [Non-programed
Name].
B Enter a new user name, and
then press [OK].
Reference
p.143 “Entering Text”
Using the Document Server
Enter a new file name, and then
DDDD
press [OK].
Note
❒ Up to 20 characters can be en-
tered as a file name. Note that
only 16 characters of each file
name appear in the document
list.
Reference
p.143 “Entering Text”
3
When no user name has been
registered in the Address Book
A Enter a new user name, and
then press [OK].
Reference
p.143 “Entering Text”
To change a file name
Press [
AAAA
BBBB
Scan Original
The Scan Original display appears.
Press [
File Name
].
].
To set or change a password
Press [
AAAA
BBBB
CCCC
DDDD
EEEE
Scan Original
The Scan Original display appears.
Press [
Password
Enter a password using the number keys (four digits), and then
press the {{{{#}}}} key.
Reenter the password (four digits) for verification, and then
press the {{{{#}}}} key.
Press [OK].
].
].
The Change File Name display appears.
Press [Delete All] to delete the old
CCCC
file name.
Note
❒ You can also use [Backspace] to
delete unnecessary characters.
37
Page 50

Document Server
Changing a Stored
Selecting a Document
Document's File Name, User
Press the {{{{Document Server}}}} key.
Name, or Password
Press the {{{{Document Server}}}} key.
AAAA
Select the document with the user
BBBB
name, file name, or password you
want to change.
AAAA
Select a document you want to
BBBB
print.
3
Note
❒ If a password is already set for
the document, enter that pass-
Note
❒ If a password is already set for
the document, enter that password, and then press [OK].
Press [File Management].
CCCC
Press [Change User Name], [Change
DDDD
File Name], or [Change Password].
Enter the new user name, file
EEEE
name, or password using the letter keys or number keys, and then
press [OK].
Reference
p.36 “To register or change a
user name”
p.37 “To change a file name”
p.37 “To set or change a password”
word, and then press [OK].
❒ You can search for the docu-
ment using [Search by User Name]
or [Search by File Name] at the left
top of the display. See p.39
“Searching for Stored Documents”.
❒ You can sort document names
in the list by user name, file
name, or date. To sort documents, press [User Name], [File
Name], or [Date].
❒ If you cannot determine docu-
ment content from the file
name, you can print just the first
page of the document for checking purposes. See p.42 “Printing
first page”.
❒ To cancel document selection,
press it again.
38
Press [OK].
FFFF
Page 51

Using the Document Server
To print multiple documents, re-
CCCC
peat step
to print.
Note
❒ You can select up to 30 docu-
ments.
❒ If the sizes or resolution of se-
lected documents are not the
same, it may not be possible to
print them.
❒ If you want to change the print-
ing order, cancel the selection,
and select documents again,
this time in the order you want.
❒ If you press the {{{{Clear Modes}}}}
key, selection of all documents
will be canceled.
❒ If you press [Printg Odr], the doc-
uments in print order.
To check the details of stored documents
Select a document to display its
AAAA
detailed information.
in the order you want
BBBB
Note
❒ If you selected several docu-
ments, use [UUUU] and [TTTT] to view
the details of each.
❒ Press [OK]. The Select Files to
Print display reappears.
Searching for Stored
Documents
You can use either [Search by File
Name] or [Search by User Name] to
search for documents stored in the
Document Server. You can also list
stored documents in a preferred order.
Note
❒ If you install DeskTopBinder V2
Professional or DeskTopBinder V2
Lite on your computer, you can
search for and rearrange documents using your computer.
Reference
Manuals for DeskTopBinder V2
Professional/Lite or Help
3
Note
❒ If a password is already set for
the document, enter that password, and then press [OK].
Press [Detail].
BBBB
Detailed information about the
document appears.
To search by file name
Press the {{{{Document Server}}}} key.
AAAA
Press [Search by File Name].
BBBB
39
Page 52

Document Server
Enter the file name using the let-
CCCC
ter keys, and then press [OK].
Only files beginning with the
name entered appear in the Select
Files to Print display.
Reference
p.143 “Entering Text”.
Note
3
❒ To display all files stored in the
Document Server, press [File
List].
To search by user name
Press the {{{{Document Server}}}} key.
AAAA
Press [
BBBB
CCCC
DDDD
Search by User Name
To specify a registered user name,
select the user name from the displayed list, and then press [OK].
Note
❒ To specify an unregistered user
name, follow the procedure below.
To specify an unregistered user
name, press [Non-programed Name].
Enter a user name, and then press
[OK].
].
Press [OK].
EEEE
Only files beginning with the
name entered appear in the Select
Files to Print display.
Note
❒ To display all files stored in the
Document Server, press [File
].
List
Printing Stored Documents
Note
❒ You can print stored documents
from a network computer using a
Web browser. For details about
how to start the Web browser, see
Network Guide.
Select a document you want to
AAAA
print.
Note
❒ If a password is already set for
the document, enter that password, and then press [OK].
❒ You can print multiple docu-
ments. See p.38 “Selecting a
Document”.
If you need to change print set-
BBBB
tings, press [Print Settings].
The Print Settings display appears.
User names, file names, and print
order of documents appear.
40
Reference
p.143 “Entering Text”
Page 53

Using the Document Server
Note
❒ Print settings made for printing
in copier or printer function remain after printing and applied
to the next job. Print settings
made in facsimile mode, however, do not remain.
❒ If you select multiple docu-
ments, print settings remain applied to the first document, but
not to other documents.
❒ Print setting items are listed be-
low. For details about print results of each setting, see Copy
Reference.
❖❖❖❖ Binding format
• 2 Sided Copy Top to Top
• 2 Sided Copy Top to Bot-
tom
• Booklet
• Magazine
❖❖❖❖ Cover handling
• Cover/Slip sheet
• Edit/Stamp
❖❖❖❖ Finish
• Sort
• Stack
• Staple
❒ If you print more than one set
using the Sort function, you can
check the print result by printing out only the first set. See
p.42 “Sample copy”.
❒ When multiple documents are
printed at the same time, you
can combine them into a single
set by adjusting the print order.
❒ When multiple documents are
printed at the same time, print
settings made for the document
printed first are applied to all
other documents.
❒ If you select multiple files, you
can check file names or print order selected in step A by scrolling the list using [TTTT] and [UUUU].
❒ Press [Select File] to return to the
Select Files to Print display.
❒ "Booklet", "Magazine", and
"Stamp" cannot be set for documents saved in facsimile mode.
❒ "Booklet" and "Magazine" can-
not be set for documents saved
under multiple functions.
Enter the required number of
CCCC
prints using the number keys.
Note
❒ Up to 99 can be entered.
Press the {{{{Start}}}} key.
DDDD
Printing starts.
To stop printing
Press the {{{{Clear/Stop}}}} key.
AAAA
Press [Stop].
BBBB
3
41
Page 54

Document Server
Changing the number of copies
during printing
Limitation
❒ The number of copies can only be
changed when the Sort function is
selected in the print settings.
Press the {{{{Clear/Stop}}}} key.
AAAA
Press [Change Quantity].
3
BBBB
Enter a new number of copies us-
CCCC
ing the number key.
Press the {{{{#}}}} key.
DDDD
Press [Continue].
EEEE
Printing restarts.
Sample copy
If you print multiple sets using the
Sort function, you can check the print
order or print settings are correct by
printing only the first set using the
{{{{Sample Copy}}}} key.
Limitation
❒ This function can only be used
when the Sort function is selected.
Select the document.
AAAA
Note
❒ If a password is already set for
the document, enter that password, and then press [OK].
❒ You can search for the docu-
ment by using [Search by User
Name] or [Search by File Name] at
the left top of the display. See
42
p.39 “Searching for Stored Documents”.
❒ You can sort document names
in the list by user name, file
name, or date. To sort documents, press [User Name], [File
Name], or [Date].
❒ To cancel a document selection,
press it again.
Press the {{{{Sample Copy}}}} key.
BBBB
The first set prints out.
If the sample is acceptable, press
CCCC
[Print].
Note
❒ Press [Suspend] to cancel print-
ing and return to the Print Settings menu to change settings.
Printing first page
You can print the first page of the document selected in the Select Files to
Print display to check its content.
If more than one document selected,
the first page of each is printed.
Select the document.
AAAA
Note
❒ If a password is already set for
the document, enter that password, and then press [OK].
❒ You can search for the docu-
ment by using [Search by User
Name] or [Search by File Name] at
the left top of the display. See
p.39 “Searching for Stored Documents”.
❒ You can sort document names
in the list by user name, file
name, or date. To sort documents, press [User Name], [File
Name], or [Date].
❒ To cancel a document selection,
press it again.
Page 55

Using the Document Server
Press [Print 1st Page].
BBBB
Press the {{{{Start}}}} key.
CCCC
Deleting Stored Documents
Important
❒ You can store up to 3,000 docu-
ments in the Document Server. No
more documents can be stored
when the total is 3,000. You should
delete unnecessary documents to
increase available memory.
Note
❒ You can delete all stored docu-
ments at once with User Tools. See
p.66 “Delete All Files”.
❒ You can delete stored documents
from a network computer using
the Web browser. For details about
how to start the Web browser, see
Network Guide.
❒ You can sort document names
in the list by the user name, file
name, or date. To sort documents, press [User Name], [File
Name], or [Date].
❒ If you cannot find the document
by name, you can print the first
page of a document to check its
contents. See p.42 “Printing first
page”.
❒ Press the selected line again to
cancel the print job.
Press [Delete File].
CCCC
Press [Delete] to delete the docu-
DDDD
ment.
3
Press the {{{{Document Server}}}} key.
AAAA
Select the document to delete.
BBBB
Note
❒ If a password is already set for
the document, enter that password, and then press [OK].
❒ You can delete multiple docu-
ments at once. See p.38 “Select-
ing a Document”.
❒ You can search for a document
by using [
[Search by File Name] at the left
top of the display. See p.39
“Searching for Stored Documents”.
Search by User Name
] or
43
Page 56

Document Server
Viewing Stored Documents
Using a Web Browser
Reference
The Web browser's Help
Start a Web browser.
AAAA
Enter “http:// (IP address of this
BBBB
3
machine) /” in the [Address] box.
The top page appears on the Web
browser.
Click [Document Server].
CCCC
The [Document Server File List] appears.
Note
❒ To switch the display format,
click [Details], [Thumbnails] or
[Icons] from the [Display method]
list.
Click the properties button of the
DDDD
document you want to check.
Information about that document
appears.
Check the document's content.
EEEE
Note
❒ To enlarge the document pre-
view, click [Enlarge Image].
Downloading Stored
Documents
Note
❒ File Format Converter is required
when downloading documents
stored in copier or printer mode.
Start a Web browser.
AAAA
Enter “http:// (IP address of this
BBBB
machine) /” in the [Address] box.
The top page appears on the Web
browser.
Click [Document Server].
CCCC
The [Document Server File List] appears.
Note
❒ To switch the display format,
click [Details], [Thumbnails] or
[Icons] from the [Display method]
list.
Click the properties button of the
DDDD
document you want to download.
Select [PDF], [JPEG], or [Multi-page
EEEE
TIFF] in the [File format] list.
Note
❒
[JPEG] can only be selected for
documents stored in scanner
mode.
❒
[Multi-page TIFF] is available
when file Format Converter is
installed.
44
Click [Download].
FFFF
Click [OK].
GGGG
Page 57

Settings for the Document Server
Settings for the Document Server
❖❖❖❖ Copier/Document Server Features (See "General Features 4/4", Copy Refer-
ence.)
Items Default
General Features Document Server Storage
Key: F1
Document Server Storage
Key: F2
Document Server Storage
Key: F3
Document Server Storage
Key: F4
Document Server Storage
Key: F5
❖❖❖❖ System Settings (See p.51 “General Features”, p.55 “Tray Paper Settings”, p.58
“Timer Settings”, and p.59 “Key Operator Tools”.)
Items Default
General Features Warm Up Notice ON
Copy Count Display Up
Output: Document Server Internal tray 1
Tray Paper Settings Paper Tray Priority: Copier Tray 1
Cover Sheet Tray Off
Slip Sheet Tray Off
Timer Settings Copier/Document Server
Auto Reset Timer
Key Operator Tools Auto Delete File Yes After 3 day(s)
Delete All Files --
Password Management for
Stored Files
2 Sided Original Top to top
→
1 Sided Combine
1 Sided
1 Sided→1 Sided Combine:
4 originals
→
1 Sided Combine:
1 Sided
8 originals
Create Margin
60 seconds
Do not Unlock
3
45
Page 58

Document Server
3
46
Page 59

4. User Tools (System Settings)
User Tools Menu (System Settings)
Reference
For details about Interface Settings and File Transfer, see “User Tools Menu
(System Settings)”, Network Guide.
For details about parallel interface, see “System Settings (Parallel Connection)”, Printer Reference 2.
❖❖❖❖ General Features (See p.51 “General Features”.)
Default
Panel Tone ON
Warm Up Notice ON
Copy Count Display Up
Function Priority Copier
Print Priority Display mode
Function Reset Timer Set Time
Output: Copier Internal tray 1
Output: Document Server Internal tray 1
Output: Facsimile Internal tray 2
Output: Printer Internal tray 1
<F/F4> Size Setting
1
/2" × 13"
8
L
47
Page 60

User Tools (System Settings)
❖❖❖❖ Tray Paper Settings (See p.55 “Tray Paper Settings”.)
Default
Paper Tray Priority: Copier Tray 1
Paper Tray Priority: Facsimile Tray 1
Paper Tray Priority: Printer Tray 1
Tray Paper Size: Tray 1
Tray Paper Size: Tray 2 A3L, 11" × 17"
Tray Paper Size: Tray 3
Tray Paper Size: Tray 4
Paper Type: Bypass tray No display
4
Paper Type: Tray 1 No display/2 Sided Copy/Auto Paper Select on
Paper Type: Tray 2 No display/2 Sided Copy/Auto Paper Select on
Paper Type: Tray 3 No display/2 Sided Copy/Auto Paper Select on
Paper Type: Tray 4 No display/2 Sided Copy/Auto Paper Select on
Cover Sheet Tray Off
Slip Sheet Tray Off
1
/2" × 11"
A4K, 8
A4L, 81/2" × 11"
1
A4L, 8
/2" × 14"
K
L
L
L
❖❖❖❖ Timer Settings (See p.58 “Timer Settings”.)
Default
Auto Off Timer 1 minute(s)
Panel Off Timer 1 minute(s)
System Auto Reset Timer 60 seconds
Copier/Document Server Auto Reset Timer 60 seconds
Facsimile Auto Reset Timer 30 seconds
Scanner Auto Reset Timer 60 seconds
Set Date --
Set Time --
❖❖❖❖ Interface Settings
• For details about network settings, see “User Tools Menu (System Set-
tings)”, Network Guide.
• For details about parallel interface, see “System Settings (Parallel Collec-
tion)”, Printer Reference 2.
❖❖❖❖ File Transfer
• For details about network settings, see “User Tools Menu (System Set-
tings)”, Network Guide.
48
Page 61

User Tools Menu (System Settings)
❖❖❖❖ Key Operator Tools (See p.59 “Key Operator Tools”.)
Default
User Code Management Copier OFF
Document Server OFF
Facsimile OFF
Scanner OFF
Printer Auto Program
Key Counter Management All OFF
External Charge Unit Management --
Key Operator Code OFF
Extended Security OFF
Display/Print Counter --
Display/Clear/Print Counter per User Code --
Print Address Book: Destination List --
Address Book Management --
Address Book: Program/Change/Delete Group --
Address Book: Program/Change/Delete Transfer Request --
Address Book: Change Order --
Address Book: Edit Title --
Address Book: Select Title Title 1
Auto Delete File After 3 day(s)
Delete All Files --
Password Management for Stored Files Do not Unlock
AOF (Always ON) ON
Program/Change LDAP Server --
Use LDAP Server OFF
4
49
Page 62

User Tools (System Settings)
Accessing User Tools (System Settings)
This section is for key operators in
charge of this machine.
User Tools allow you to change or set
defaults.
Note
❒ Operations for system settings dif-
fer from normal operations. Always quit User Tools when you
have finished. See p.50 “Exiting
User Tools”.
4
❒ Any changes you make with User
Tools remain in effect even if the
main power switch or operation
switch is turned off, or the {{{{Energy
Saver}}}} or {{{{Clear Modes}}}} key is
pressed.
Select the menu, and then press
CCCC
the appropriate key.
Reference
p.47 “User Tools Menu (System
Settings)”
Change settings by following in-
DDDD
structions on the display panel,
and then press [OK].
Note
❒ To cancel changes made to set-
tings and return to the initial
display, press the {{{{User
Tools/Counter}}}} key.
Exiting User Tools
Changing Default Settings
Press the {{{{User Tools/Counter}}}} key.
AAAA
Note
❒ If a key operator code is already
set, the key operator code entry
display appears. Enter the key operator code, and then press [OK].
See p.60 “Key Operator Code”.
50
Press the {{{{User Tools/Counter}}}} key.
AAAA
Press [System Settings].
BBBB
Note
❒ You can also exit User Tools by
pressing [Exit].
Page 63

Settings You Can Change with User Tools
Settings You Can Change with User Tools
Reference
To access User Tools, see p.50 “Accessing User Tools (System Settings)”.
General Features
❖❖❖❖ Panel Tone
The beeper (key tone) sounds when a key is pressed.
Note
❒ Default: ON
❖❖❖❖ Warm Up Notice (copier/Document Server)
You can have the beeper sound when the machine becomes ready to copy after leaving Energy Saver mode, or when the power is turned on.
Note
❒ If the Panel Tone setting is “OFF”, the beeper does not sound, whatever the
Warm Up Notice setting.
❒ Default: ON
❖❖❖❖ Copy Count Display (copier/Document Server)
The copy counter can be set to show the number of copies made (count up) or
the number of copies yet to be made (count down).
4
Note
❒ Default: Up (count up)
❖❖❖❖ Function Priority
You can specify the mode to be displayed immediately after the operation
switch is turned on, or when System Reset mode is turned on.
Note
❒ Default: Copier
51
Page 64

User Tools (System Settings)
❖❖❖❖ Print Priority
Print Priority is given to the mode selected.
Reference
p.29 “Multi-Access”
Note
❒ Default: Display mode
❒ When [Interleave] is selected, the current print job will be interrupted after
a maximum of five sheets.
❒ When the Internal Tray 2 (1 bin tray), Shift Sort Tray, 500–sheet finisher, or
1000–sheet finisher is installed on the machine, you can specify an output
tray for each documents are delivered. For details about how to specify an
output tray for each function, see the following sections:
4
• p.53 “Output: Copier (copier)”
• p.53 “Output: Document Server (Document Server)”
• p.53 “Output: Facsimile (facsimile)”
• p.53 “Output: Printer (printer)”
❖❖❖❖ Function Reset Timer
You can set the length of time the machine waits before changing modes
when using the multi-access function (see p.29 “Multi-Access”). This is useful
if you are making many copies and have to change settings for each copy. If
you set a longer reset period, you can prevent interruption from other functions.
52
Note
❒ Default: Set Time
❒ The Function Reset Timer setting is ignored if [Interleave] is set for Print Pri-
ority (see p.52 “Print Priority”).
❒ When you select [Set Time], enter the time (3–30 seconds, in 1 second incre-
ments) using the number keys.
❒ The default time is three seconds.
Page 65

Settings You Can Change with User Tools
❖❖❖❖ Output: Copier (copier)
You can specify a tray to which documents are delivered.
3
4
1.
Internal Tray 1
2.
Internal Tray 2
Note
1
4
2
1
ZLFH150E
3.
Finisher Upper Tray
4.
Finisher Shift Tray
❒ Default: Internal Tray 1
❖❖❖❖ Output: Document Server (Document Server)
You can specify a tray to which documents are delivered.
Note
❒ Default: Internal Tray 1
❒ For details about output trays, see p.53 “Output: Copier (copier)”.
❖❖❖❖ Output: Facsimile (facsimile)
You can specify a tray to which documents are delivered.
4
Note
❒ Default: Internal Tray 2
❒ For details about output trays, see p.53 “Output: Copier (copier)”.
❖❖❖❖ Output: Printer (printer)
You can specify a tray to which documents are delivered.
Note
❒ Default: Internal Tray 1
❒ The output trays set on the printer driver have priority over the output tray
specified above.
❒ For details about output trays, see p.53 “Output: Copier (copier)”.
53
Page 66

User Tools (System Settings)
❖❖❖❖ <F/F4> Size Setting
Currently three types of F size are available; 81/2"×13"L, 81/4"×13"L and
8"×13"L. The ADF or exposure glass cover sensor cannot distinguish these
three types of originals. This function sets the F size from the ADF or exposure glass cover sensor. Auto Paper Select or Auto Reduce/Enlarge can be
used for F size originals based on this setting.
Note
❒ Default: 8
1
/2"×13"L
Output tray settings
Limitation
4
❒ You cannot interrupt the current job with a different function job that speci-
fies stapling or sorting.
❒ You can interrupt the current job with an ordinary copy job or facsimile re-
ception. The output tray used when the job is interrupted varies depending
on the type of finisher shift tray and output tray specified for interruption.
❖❖❖❖ When 500–sheet finisher is the finisher shift tray:
• When the output tray specified for the interrupting job is the finisher
tray, the interrupting job will be delivered to internal tray 1.
• When the output tray specified for the interrupting job is not the finisher tray, the interrupting job will be delivered to the specified output
tray.
❖❖❖❖ When 1000–sheet finisher is the finisher shift tray:
• When the output tray specified for the interrupting job is the finisher
tray, the interrupting job will be delivered to the finisher upper tray.
• When the output tray specified for the interrupting job is not the finisher tray, the interrupting job will be delivered to the specified output
tray.
❒ When the 500–sheet finisher or 1000–sheet finisher is installed and stapling is
specified for a job, the job will be delivered to the finisher shift tray, regardless
of the output tray specified.
54
Page 67

Settings You Can Change with User Tools
Tray Paper Settings
❖❖❖❖ Paper Tray Priority: Copier (copier/Document Server)
You can specify the tray to supply paper for output.
Note
❒ Default: Tray 1
❖❖❖❖ Paper Tray Priority: Facsimile (facsimile)
You can specify the tray to supply paper for output.
Note
❒ Default: Tray 1
❖❖❖❖ Paper Tray Priority: Printer (printer)
You can specify the tray to supply paper for output.
Note
❒ Default: Tray 1
❖❖❖❖ Tray Paper Size: Tray 1–4
Select the size of the paper loaded in the paper tray.
❖❖❖❖ The paper sizes you can set for trays 1, 3 and 4 are as follows:
• A3L, B4 JISL, A4K, A4L, B5 JISK, B5 JISL, A5L, 8KL, 16KK,
16KL
1
• 11"×17"L, 8
1
/4"×101/2"L, 8"×13"L, 81/2"× 13"L, 81/4"×13"L, 11"×14"L,
7
1
/4"×14"L, 8"×101/2"L, 8"×101/2"K, custom size (140-297 mm (5.52"-
8
/2"×14"L, 81/2"×11"K, 81/2"×11"L, 51/2"×81/2"L,
11.69") wide x 182-432 mm (7.17"-17.00") long)
❖❖❖❖ The paper sizes you can set for tray 2 are as follows:
• A3L, B4 JISL, A4K, A4L, B5 JISK, B5 JISL, A5L, B6 JISL, A6L,
PostcardL , 8KL, 16KK, 16KL
1
• 11"×17"L, 8
1
/4"×101/2"L, 71/4"×101/2"K, 8"×13"L, 81/2"×13"L, 81/4"×13"L,
7
11"×14"L, 11"×15"L, 10"×14"L, 10"×15"L, 8
1
/2"K, 8"×10"L, 8"×10"K, C5L, C6L, DL EnvL, 41/8"×91/2"L,
8"×10
7
/8"×71/2"L, custom size (100-297 mm (3.97"-11.69") wide x 148-432
3
/2"×14"L, 81/2"×11"K, 81/2"×11"L, 51/2"×81/2"L,
1
/4"×14"L, 8"×101/2"L,
mm (5.83"-17.00") long)
Reference
p.122 “Changing the Paper Size”
4
Important
❒ If the specified paper size differs from the actual size of the paper loaded
in the paper tray, a misfeed might occur because the correct paper size was
not detected.
55
Page 68

User Tools (System Settings)
Note
❒
The paper guide for the optional LCT is fixed for A4K, 81/2"×11"K size paper. Contact your service representative if you need to change the paper size.
❒ If the paper size set for the selector in paper tray is different to the paper
size for this setting, the paper size of the dial has priority.
❒ If you load paper of a size not indicated on the paper size selector in the
paper tray, set the dial to " ".
❒ Default:
• Tray 1: A4K, 8
1
/2" × 11"K
• Tray 2: A3L, 11" × 17"L
1
• Tray 3: A4L, 8
• Tray 4: A4L, 8
/2" × 11"L
1
/2" × 14"L
4
Reference
p.122 “Changing the Paper Size”
❖❖❖❖ Paper Type: Bypass tray
Sets the display so you can see what type of paper is loaded in the bypass tray.
❖❖❖❖ The paper types you can set for the bypass tray are as follows:
• No Display, Recycled Paper, Special Paper, Color Paper, Letterhead,
Preprinted Paper, Label Paper, Bond Paper, Thick Paper, OHP, Thin Paper, Cardstock
Note
❒ Default: No display
❖❖❖❖ Paper Type: Tray 1–4
Sets the display so you can see what type of paper is loaded in each paper
tray. The print function uses this information to automatically select the paper tray.
❖❖❖❖ The paper types you can set for trays 1, 3 and 4 are as follows:
• No Display, Recycled Paper, Special Paper, Color Paper, Letterhead,
Preprinted Paper, Bond Paper, Cardstock
❖❖❖❖ The paper types you can set for tray 2 are as follows:
• No Display, Recycled Paper, Special Paper, Color Paper, Letterhead,
Preprinted Paper, Label Paper, Bond Paper, Thick Paper, OHP, Thin Paper, Cardstock
Note
❒ Default:
• Paper Type: No Display
• Copying Method in Duplex: 2 Sided Copy
• Apply Auto Paper Select: Yes
56
Page 69

Settings You Can Change with User Tools
❒ When paper of the same type and size is loaded in two different paper
trays and you want to specify tray for 2 Sided Copy and tray for 1 Sided
Copy, specify the upper tray for 2 Sided Copy. If one of the trays is specified as the default in Paper Tray Priority, assign 2 Sided Copy to that tray.
❒ A appears next to the paper tray if [No] is selected in Auto Paper Select.
Limitation
❒ [Auto Paper Select] can only be selected for the copier function if [No display]
and [Recycled paper] are selected. If [No] is selected, Auto Paper Select is not
valid for the tray.
❖❖❖❖ Cover Sheet Tray
Allows you to specify and display the paper tray that is setting cover sheets.
After selecting the paper tray, you can also specify the display timing and
copy method for two-sided copying.
Note
❒ Default:
• Tray to Program: Off
❒ Functions using the cover sheet tray setting are the front cover function
and front/back cover function.
❒ When [At Mode Selected] is selected, cover sheet tray settings only appear
when the cover function or slip sheet function is selected.
❒ When [Full Time] is selected, the cover sheet tray is always displayed.
❒ You can set Copying Method in Duplex only when [At Mode Selected] is se-
lected.
4
Reference
“Covers”, Copy Reference
❖❖❖❖ Slip Sheet Tray
Allows you to specify and display the paper tray that is inserting slip sheets.
After selecting the paper tray, you can also specify the display timing and
copy method for two-sided copying.
Note
❒ Default:
• Tray to Program: Off
❒ When [At Mode Selected] is selected, slip sheet tray settings only appear
when the cover function or slip sheet function is selected.
Reference
"Slip Sheets", Copy Reference
57
Page 70

User Tools (System Settings)
Timer Settings
❖❖❖❖ Auto Off Timer
After a specified period has passed, following job completion, the machine
automatically turns off, in order to conserve energy. This function is called
"Auto Off".
The machine status after the Auto Off operation is referred to as "Off mode",
or "Sleep mode". For the Auto Off Timer, specify the time to elapse before
Auto Off.
Note
❒ Default: 1 minute
❒ Enter a time interval between 10 seconds and 240 minutes, using the num-
4
ber keys
❒ From “Off mode” or “Sleep mode”, the machine is ready to use within 10
seconds.
❒ Auto Off may not work when error messages appear.
❖❖❖❖ Panel Off Timer
Set the amount of time the machine waits before switching the panel off after
copying has finished or performing the last operation.
Note
❒ Default: 1 minute
❒ Enter a time interval between 10 seconds and 240 minutes, using the num-
ber keys.
❖❖❖❖ System Auto Reset Timer
The System Reset setting automatically switches the screen to that of the function set in Function Priority. When no operations are in progress, or when an
interrupted job is cleared. This setting determines the system reset interval.
See p.51 “Function Priority”.
Note
❒ Default: ON, 60 seconds
❒ The time can be set from 10 to 999 seconds, using the number keys.
❖❖❖❖ Copier/Document Server Auto Reset Timer (copier/Document Server)
Specifies the time to elapse before copier and Document Server modes reset.
Note
❒ If [OFF] is selected, the machine does not automatically switch to the user
code entry screen.
❒ Default: ON, 60 seconds
❒ The time can be set from 10 to 999 seconds, using the number keys.
58
Page 71

Settings You Can Change with User Tools
❖❖❖❖ Facsimile Auto Reset Timer (facsimile)
Specifies the time to elapse before the facsimile mode resets.
Note
❒ Default: 30 seconds
❒ The time can be set from 30 to 999 seconds, using the number keys.
❖❖❖❖ Scanner Auto Reset Timer (scanner)
Specifies the time to elapse before the scanner function resets.
Note
❒ If [OFF] is selected, the machine does not automatically switch to the user
code entry screen.
❒ Default: ON, 60 seconds
❒ The time can be set from 10 to 999 seconds, using the number keys.
❖❖❖❖ Set Date
Set the date for the copier's internal clock using the number keys.
Note
❒ To change between year, month, and day, press [←←←←] and [→→→→].
❖❖❖❖ Set Time
Set the time for the copier's internal clock using the number keys.
Note
❒ To change between hours, minutes and seconds, press [←←←←] and [→→→→].
❒ Enter the time using the 24–hour format (in 1 second increments).
4
Key Operator Tools
The key operator must set the following items. For settings or more information,
contact the key operator.
The key operator is recommended to program an key operator code when performing the settings. See p.60 “Key Operator Code”.
❖❖❖❖ User Code Management
Allows you to control who uses the machine by setting codes for users.
User codes must be registered for user code management. See p.70 “User
Codes”.
Note
❒ Default: Copier/OFF, Document Server/OFF, Facsimile/OFF, Scanner/OFF,
Printer/Auto Program
❒ By using Auto Program for the printer, you can keep a print log for each
user code entered from the driver.
59
Page 72

User Tools (System Settings)
❖❖❖❖ Key Counter Management
Use the key counter to specify whether users are restricted or not.
Note
❒ Default: Copier/OFF, Document Server/OFF, Facsimile/OFF, Scanner/OFF,
Printer/OFF
❖❖❖❖ External Charge Unit Management
Use the external charge unit to manage usage charges.
Note
❒ Default: Copier/OFF, Document Server/OFF, Facsimile/OFF, Scanner/OFF,
Printer/OFF
❖❖❖❖ Key Operator Code
4
Specifies whether or not to use passwords (max. eight digits) to control Key
Operator Tools settings for key operator codes.
Note
❒ Default: OFF
❒ If you select [ON], enter the key operator code (max. eight digits) using the
number keys, and then select [Partial] or [All Initial Settings] to set the access
limit.
• If you selected [Partial]
An key operator code is only required for the Timer Setting, Key Operator Tools for System Settings, and Key Operator Tools for Facsimile
Features. [Menu Protect] can be set for [Maintenance] in Printer Features. If
you set [Menu Protect], you can set the key operator code for some Printer
Features. See "Printer Features Parameters", Printer Reference 2.
• If you selected [All Initial Settings]:
An key operator code is required to access all items in System Settings,
Copier/Document Server Features, Facsimile Features, Printer Features, and Scanner Features.
❒ If you select [All Initial Settings], you must enter an key operator code to ac-
cess the Key Operator Code display.
❖❖❖❖ Extended Security
Specify whether or not to use the security function.
Note
❒ Default : OFF
❒ You have to set a 6-digit key operator code to enable Extended Security.
See p.60 “Key Operator Code”.
❒ When the Extended Security function is on, a security mark appears on
the left side of the date, in the upper right of the display panel.
Reference
For details about security, see p.145 “Security”.
60
Page 73

Settings You Can Change with User Tools
❖❖❖❖ Display/Print Counter
Allows you to view and print the number of prints.
• Display/Print Counter
Displays the number of prints for each function (Total, Copier, Facsimile,
Printer, A3/DLT, Duplex, and Staple).
• Print Counter List
Prints out a list of the number of prints made under each function.
• To print the counter list:
A Press the {
B Press [
Press [Key Operator Tools].
C
D Press [Display/Print Counter].
E Press [
{User Tools/Counter}}}} key.
{{
System Settings
Print Counter List
].
].
4
F Press the {
G Press [Exit].
{Start}}}} key.
{{
❖❖❖❖ Display/Clear/Print Counter per User Code
Allows you to view and print the numbers of prints accessed with user codes,
and to set those values to 0.
Note
❒ Press [UUUU] and [TTTT] to show all the numbers of prints.
❒ The number of prints may differ from the counter value shown in Dis-
play/Print Counter.
• Print counter per user code
Prints the number of prints made under each user code
• Clear counter per user code
Sets the number of prints made under each user code to 0.
Note
❒ Print list for each user code, see p.74 “Printing the Counter for Each User
Code”.
• Print counter for all user codes
Prints the number of prints made under all user codes.
• Clear counter for all user codes
Sets the number of prints made under all user codes to 0.
61
Page 74

User Tools (System Settings)
❖❖❖❖ Print Address Book: Destination List
You can print the destination list registered in the Address Book.
• Print in Title 1 Order
Prints the Address Book in Title 1 order.
• Print in Title 2 Order
Prints the Address Book in Title 2 order.
• Print in Title 3 Order
Prints the Address Book in Title 3 order.
• Print Group Dial List
Prints the group Address Book.
A Select the print format.
To print the list on two-sided pages, select [Print on 2 Sides].
B
4
C Press the {
The list prints out.
{Start}}}} key.
{{
❖❖❖❖ Address Book Management
You can add, change, or delete user information in the Address Book, and facsimile/scanner functions destinations.
For details about these operations, see p.70 “User Codes”, p.76 “Fax Destination”, and p.82 “E-mail Destination”, p.85 “Registering Folders”, p.93 “Registering a Protection Code”.
• [Program/Change]
This registers new user codes. You can register and change the items below:
• User Name
User (destination) name, key display, registration number, title selection
• User Code
User code, available functions
• Fax Dest.
Fax number, international TX mode, fax header, label insertion
• E-mail
E-mail address, sender registration
• Folder
Protocol, path, user name, password, port no., server name
• Protect Dest.
Sender's name, folder, protection code
• Group
• [Delete]
Deletes a user.
62
Note
❒ You can register up to 100 user codes. If you add the optional User Account
Enhance Unit, you can register up to 500 user codes.
❒ You can also register user codes using SmartNetMonitor for Admin (print-
er option required).
❒ You can also register user codes using a Web browser.
Page 75

Settings You Can Change with User Tools
❖❖❖❖ Address Book: Program/Change/Delete Group
You can register multiple users in a group.
This allows you to easily control registered users in each group.
For details about operations, see p.95 “Registering Destinations to a Group”.
• [Program/Change]
This registers new groups, or changes the group name, key display, title selection, registration number or protection code. You can also protect e-mail
destinations and folders.
• [Delete]
Deletes a group.
• [Protect Dest.]
Note
❒ You can register up to 100 groups.
❒ You can also group users (destinations) using a Web browser. See the Web
browser's Help.
❖❖❖❖ Address Book: Program/Change/Delete Transfer Request
You can register fax destinations for the Transfer Request function in facsimile mode.
For details about operations, see p.99 “Registering the Transfer Request”.
• [Program/Change]
This registers new transfer requests and receiving stations, or changes the
transfer request name, key name, title selection, registration number, fax
destination or e-mail address.
• [Delete]
Deletes a transfer request.
4
Note
❒ You can register up to 100 transfer requests.
63
Page 76

User Tools (System Settings)
❖❖❖❖ Address Book: Change Order
Changes the order of registered users (destinations).
Note
❒ You can rearrange the order of items on the same page, but you cannot
move items to another page. For example, you cannot move an item from
“PLANNING” ([OPQ]) to “DAILY” ([CD]).
A Press the {
B Press [System Settings].
C Press [Key Operator Tools], and then press [T
D Press [Address Book: Change Order].
{User Tools/Counter}}}} key.
{{
TNext].
TT
4
E Press the user (destination) key you want to move.
64
Note
❒ You can select a user using the number key.
F Press the user (destination) key that is in the place you want to move to.
The user (destination) moves to the selected place, and the other users'
keys will shift also.
Note
❒ You can select a user using the number key.
Page 77

❖❖❖❖ Address Book: Edit Title
You can edit the title to easily find a user.
A Press the {
B Press [System Settings].
C Press [Key Operator Tools], and then press [T
D Press [
Press the title key you want to change.
E
F Enter the new name, and then press [OK].
Press [OK].
G
H Press [Exit].
{User Tools/Counter}}}} key.
{{
Address Book: Edit Title
].
❖❖❖❖ Address Book: Select Title
Specifies the title to select a user.
Settings You Can Change with User Tools
TNext].
TT
4
Note
❒ Default: Title 1
❖❖❖❖ Auto Delete File
Specifies whether documents stored in the Document Server are to be deleted
or not after a specified period of time elapses.
Note
❒ Default: Yes After 3 days
❒ If you select [
], documents stored subsequently are deleted after the
Yes
specified period.
❒ If you select [No], documents are not automatically deleted.
❒ If you select [
], enter a number of days from of 1 to 180 (in 1 day incre-
Yes
ments).
❒ The default is three days, this means documents are deleted three days (72
hours) after they are stored.
65
Page 78

User Tools (System Settings)
❖❖❖❖ Delete All Files
Deletes all documents stored in the Document Server.
Note
❒ Even if a password is already set, all documents are deleted.
❒ A confirmation message appears. To delete all documents, select [Yes].
❖❖❖❖ Password Management for Stored Files
• Unlocking a locked document
When a document is locked due to a wrong password being entered, this
function unlocks the document, allowing access.
• Temporarily disabling document security
Password-protected documents can be temporarily accessed, without entering the password.
4
Note
❒ Default: Do not Unlock
❒ Select [Unlock] only when you forget the password. After accessing the
document, be sure to select [Do not Unlock].
Reference
p.147 “Unlocking a locked document”
p.147 “Temporarily Disabling Document Security”
❖❖❖❖ AOF (Always ON)
Specify whether or not to use Auto Off.
Note
❒ Default: ON
❖❖❖❖ Program/Change LDAP Server
Programming an LDAP server allows you to look up e-mail destinations from
the LDAP server Address Book directly. This function is available when you
send scan files by e-mail in scanner mode.
You can program and change the identification name, server name, search
base, port no., authentication, user name, password, and search options.
Reference
For details about these operations, see p.103 “Programming/Changing
LDAP Server”.
❖❖❖❖ Use LDAP Server
Specify whether or not to use the LDAP server.
Note
❒ Default: OFF
❒ If you select [OFF], [Search LDAP] will not appear on the searching display.
66
Page 79

Address Book
Address Book
Registering user information, such as
fax number and e-mail address, in the
Address Book allows you to manage
them together.
Important
❒ Address Book data is stored on the
hard disk. It can be lost if there is
some kind of hard disk failure. The
manufacturer shall not be responsible for any damage resulting
from data loss.
Note
❒ Using [Address Management Tool] in
SmartNetMonitor for Admin, you
can backup Address Book data.
We recommend backing up data
when using the Address Book.
Reference
For details about SmartNetMonitor for Admin and how to install it,
see Printer Reference 1.
For operating instructions, see
SmartNetMonitor for Admin
Help.
You can register and manage the following items in the Address Book:
Reference
p.70 “User Codes”
2. Protect Dest.
Reference
p.69 “When using the scanner
function”
p.69 “Registering Sender Information”
3. Group
Use this to display the group that
the selected user (destination) belongs to.
You can group registered fax destinations, e-mail destinations, and
folders to manage them better. For
details about operations, see p.95
“Registering Destinations to a
Group”.
❖❖❖❖ Items to register
4. User Name
Reference
p.68 “Registering the destination name and key display”
p.69 “Registering Sender Information”
5. Fax Dest.
4
1
4
567
23
❖❖❖❖ To manage registered items
1. User Code
Register user codes to restrict particular functions to certain users,
and check their use of each function.
Reference
p.68 “When using the fax function”
ZKZS030E
67
Page 80

User Tools (System Settings)
6. E-mail
Reference
p.68 “When using the fax function”
p.69 “When using the scanner
function”
p.69 “Registering Sender Information”
4
7. Folder
Reference
p.69 “When using the scanner
function”
• SMB
• FTP
Registering Destination
Information
❖❖❖❖ Registering the destination name and
key display
• User Name
Register the destination name
and key display name. This is
the basic information required
for managing destinations.
Reference
p.70 “User Codes”
❖❖❖❖ When using the fax function
• Fax Dest.
Register fax numbers in the Address Book. To send a fax, select
the destination key as it appears
on the initial fax function display, so you can specify the fax
number. When you set Label Insertion to ON, the registered
destination name, preceded by
“To”, is printed at the top of the
page when it is received at the
other end.
68
Reference
p.76 “Fax Destination”
• E-mail
Register e-mail addresses in the
Address Book. To send an Internet Fax, select the destination
key as it appears on the initial
fax function display, so you can
specify the e-mail address.
Reference
p.82 “E-mail Destination”
Page 81

❖❖❖❖ When using the scanner function
• E-mail
Register e-mail addresses in the
Address Book. To send a scan
file by e-mail, select the destination key as it appears on the initial scanner function display, so
you can specify the e-mail address.
Reference
p.82 “E-mail Destination”
• Folder
Register the path name, user
name, and password. To send
files directly to shared folders,
select the destination key as it
appears on the initial scanner
function display, so you can
specify the folder.
Select SMB when sending files
to shared Windows folders.
Select FTP when uploading files
to an FTP server.
Reference
p.85 “Registering Folders”
You can stop unauthorized users accessing folders from the
machine by setting a protection
code.
Reference
p.93 “Registering a Protec-
tion Code”
Address Book
Registering Sender
Information
❖❖❖❖ When using the scanner function
You can set Register as Sender to
ON for an e-mail address. If you do
this, you can use it as the sender
address when sending scan files by
e-mail.
• User Name
Register the user name and key
display name. This is useful
when selecting the sender from
the Attach Sender's Name list.
Register the user name so it will
be recorded under Sender in
Scanned Files Status. Also, the
user name automatically appears in the From field of the email.
Reference
p.70 “User Codes”
• E-mail
Register the e-mail address. You
can use it as the sender address
when sending scan files by email using the scanner function.
Also, the sender address automatically appears in the From
field of the e-mail.
To display a user key on the Attach Sender's Name list, you
must register an e-mail address
to it.
4
Reference
p.82 “E-mail Destination”
You can prevent misuse of
sender name by setting a protection code on the e-mail address.
Reference
p.93 “Registering a Protec-
tion Code”
69
Page 82

User Tools (System Settings)
User Codes
Register user codes to limit users to
the following functions and check
their use of each function:
• Copier
• Document Server
• Facsimile
• Scanner
• Printer
Note
4
❒ The number of copies made of doc-
uments stored in the Documents
Server using the facsimile function
is counted for each user code. This
allows you to check each user's usage.
❒ The number of copies scanned us-
ing the scanner function is counted
for each user code. This allows you
to check each user's usage.
❒ To automatically register the print-
er driver user code, select [Auto Pro-
gram] for the printer in User Code
Management. To use the user code
set in User Tools, select [ON]. Set
the user codes registered in User
Tools for the printer driver. See
p.59 “User Code Management”.
Reference
For details about setting user codes
for the printer driver, see Printer
Reference 1 or the printer driver
Help.
Important
❒ The functions associated with each
user code are the same. If you
change or delete user codes, management data and limits associated
with that code become invalid.
Registering a New User Code
Press the {{{{User Tools/Counter}}}} key.
AAAA
Press [System Settings].
BBBB
Press [Key Operator Tools], and then
CCCC
press [TTTTNext].
Press [Address Book Management].
DDDD
Press [New Program].
EEEE
Note
❒ To assign a user code to a regis-
tered user, press the user (destination) key whose user code is
to be registered, or enter the
registered number using the
number keys.
Set the user information.
FFFF
Note
❒ To register a user code to a reg-
istered user, proceed to step
.
G
70
Page 83

To register the user name and
key display
A Press [Change] on the right of
the user name or key display.
The user name or key display
entry display appears.
B Enter the user name or key dis-
play, and then press [OK].
Note
❒ You can use the same user
name as that assigned to the
documents using the Document Server function. For
this, the user code is not necessary. p.33 “ Document
Server”
Reference
p.143 “Entering Text”
To select the title
A Press the key for the classifica-
tion you want to use under Select Title.
User Codes
Press [User Code].
GGGG
Enter the user code using the
HHHH
number keys, and then press [#].
Note
❒ If you make a mistake, press
[Clear] or the {{{{Clear/Stop}}}} key,
and then enter the code again.
Select the functions to be used
IIII
with the user code from Available
Functions.
To continue registering user
JJJJ
codes, press [Continue to Program],
and then repeat the procedure
from step
.
FFFF
4
Note
❒ The keys you can select are as
follows:
• [Freq.]
• [AB],[CD],[EF],[GH],[IJK],
❒ You can select [
more page for each title.
… Added to the
page that is displayed first.
[LMN],[OPQ],[RST],[UV
W],[XYZ], [1] to [10]…
Added to the list of items
in the title selected.
] and one
Freq.
Press [OK].
KKKK
Press [Exit].
LLLL
Press the {{{{User Tools/Counter}}}} key.
MMMM
71
Page 84

User Tools (System Settings)
Changing a User Code
Note
❒ Even if you change a user code, the
counter value will not be cleared.
Press the {{{{User Tools/Counter}}}} key.
AAAA
Press [System Settings].
BBBB
Press [Key Operator Tools], and then
CCCC
press [TTTTNext].
Press [Address Book Management].
DDDD
Changing the user code
A Press [User Code].
B Press [Change], and then enter
the new user code using the
number keys.
C Press [#].
4
Select the registered user code
EEEE
you want to change.
Press the user (destination) key, or
enter the registered number using
the number keys.
Note
❒ If you press , you can search
for a user by user name/index,
user code, fax destination, or email address.
Enter the new information for the
FFFF
item you want to change.
To change the user (destination)
name or key display
To change the available functions
A Press [User Code].
B Press the key to select the func-
tions to enable.
Note
❒ Press the key to highlight it,
and then the function is en-
abled.
Press [OK].
GGGG
Press [Exit].
HHHH
Press the {{{{User Tools/Counter}}}} key.
IIII
72
A Press [Change] on the right of
the user (destination) name or
key display.
B Enter the user (destination)
name, and then press [OK].
Reference
p.143 “Entering Text”
To change the title
A Press the key for the classifica-
tion you want to use from Select Title.
Page 85

User Codes
Deleting a User Code
Important
❒ This operation also deletes user
codes registered to multiple functions. User control via the deleted
user code is disabled.
Press the {{{{User Tools/Counter}}}} key.
AAAA
Press [System Settings].
BBBB
Press [Key Operator Tools], and then
CCCC
press [TTTTNext].
Press [Address Book Management].
DDDD
To delete the user code
A Select the user (destination)
whose code is to be deleted.
Press the user (destination) key,
or enter the registered code using the number keys.
B Press [User Code].
C Press [Change] to delete the user
code, and then press [#].
To delete a user (destination)
A Press [Delete].
B Select the user (destination)
you want to delete.
Press the user (destination) key,
or enter the registered code using the number keys.
Note
❒ If you press , you can
search for a user by user
name/index, user code, fax
destination, or e-mail ad-
dress.
C Press [Yes] in the confirmation
screen.
Press [Exit].
EEEE
Press the {{{{User Tools/Counter}}}} key.
FFFF
Displaying the Counter for
Each User Code
You can check the number of prints
made under each function's user
code.
4
D Press [OK].
Press the {{{{User Tools/Counter}}}} key.
AAAA
Press [System Settings].
BBBB
Press [Key Operator Tools].
CCCC
Press [Display/Clear/Print Counter per
DDDD
User Code].
Select [Print Counter], [Transmission
EEEE
Counter] or [Scanner Counter].
Counters for individual function
usage under each user code appear.
73
Page 86

User Tools (System Settings)
Select the function usage you
Printing the Counter for Each
User Code
You can print out the number of
prints made under each user code using [ Print Counter], [Transmission
Counter] or [Scanner Counter].
To print the number of prints made
under each user code
Press the {{{{User Tools/Counter}}}} key.
AAAA
4
Press [
BBBB
CCCC
DDDD
EEEE
System Settings
Press [Key Operator Tools].
Press [Display/Clear/Print Counter per
User Code].
Select a user code from the left
side of the display.
].
GGGG
want to print from [
[Transmission Counter], and [Scanner
].
Counter
Press [Print].
HHHH
To print the number of prints for all
user codes
Press the {{{{User Tools/Counter}}}} key.
AAAA
Press [System Settings].
BBBB
Press [Key Operator Tools].
CCCC
Press [Display/Clear/Print Counter per
DDDD
User Code].
Press [Print Counter List] under All
EEEE
User Codes.
Print Counter
],
74
Note
❒ Press [Select all on the page] to se-
lect all user codes on the page.
Press [
FFFF
Print Counter List
User Code.
Note
❒ Enter the user code, and then
press [#] if the user code is registered.
] under Per
Note
❒ Enter the user code, and then
press [#] if the user code is registered.
Select the function usage you
FFFF
want to print from [
[Transmission Counter], and [Scanner
Counter].
GGGG
Press [
Print
].
Print Counter
],
Page 87

User Codes
Clearing the Number of Prints
Press the {{{{User Tools/Counter}}}} key.
AAAA
Press [System Settings].
BBBB
Press [
CCCC
DDDD
EEEE
Key Operator Tools
Press [Display/Clear/Print Counter per
User Code].
Select the user code to clear.
To clear the number of prints
made under a user code
A Select the user code from the
left side of the display.
Note
❒ Press [Select all on the page] to
select all user codes on the
page.
B Press [Clear] under Per User
Codes.
].
To clear the number of prints for
all user codes
A Press [Clear] under All User
Codes.
B Select the function usage you
want to clear from [Print
Counter], [Transmission Counter],
and [Scanner Counter].
C Press [OK].
4
C Select the function usage you
want to clear from [Print
Counter], [Transmission Counter],
and [Scanner Counter].
D Press [OK].
75
Page 88

User Tools (System Settings)
Fax Destination
Register a fax destination so you do
not need to enter fax numbers each
time, and can send documents
scanned in using the facsimile function.
• It is easy to select the fax destination if you register a “User (Destination) Name” and “Key Display”
for the fax destination.
• You can register fax destinations as
4
a group.
You can program the following items
in a fax destination:
❖❖❖❖ Fax number
Registers the destination's fax
number. You can enter a fax number using up to 128 digits. You
must include every digit in the
number.
❖❖❖❖ SUB Code
Registering a SUB Code allows
you to use Confidential Transmission to send messages to the other
fax machines which support a similar function called “SUB Code”.
You can also program an SID Code
(Sender ID) under this function. A
code can be up to 20 digits long.
❖❖❖❖ SEP Code
Registering a SEP Code allows you
to use Polling Reception to receive
faxes from the other fax machines
which support Polling Reception.
You can also program a PWD
Code when you want to use a password under this function. A code
can be up to 20 digits long.
❖❖❖❖ Line
If the optional extra G3 interface
unit is installed, you can select the
line type per destination.
❖❖❖❖ Fax header
You can select to print a fax header
on fax messages the other party receives. The default is “1st Name”.
See Facsimile Reference <Advanced
Features>.
❖❖❖❖ Label insertion
With this function you can have
the receiver's name printed on the
message when it is received at the
other end. The name is printed at
the top of the page and will be preceded by “To”. You can also have a
standard message stamped on the
second and third lines after that.
Note
❒ Fax header and label insertion
are also printed when sending
by e-mail using fax functions.
❒ You can program a standard
message apart from one of those
registered in the machine. See
“Programming, Changing, and
Deleting Standard Messages”,
Facsimile Reference <Advanced
Features>.
❖❖❖❖ International TX mode
When setting the International TX
mode to [ON], the machine transmits more carefully by lowering
transmission speed. However,
communication times increase.
76
Page 89

Fax Destination
Registering a Fax Destination
Press the {{{{User Tools/Counter}}}} key.
AAAA
Press [
BBBB
CCCC
DDDD
EEEE
System Settings
Press [Key Operator Tools], and then
press [TTTTNext].
Press [Address Book Management].
Press [New Program].
Note
❒ To register a fax destination to a
registered user, press the user
(destination) key, or enter the
registered number using the
number keys.
].
To register the user (destination)
name and key display
A
B Enter the user (destination)
To select the title
A To associate a user with a title,
[Change]
Press
tination) Name or Key Display.
The user (destination) name or
key display entry display appears.
name or key display, and then
press [OK].
Note
❒ You can use the user name
when selecting a fax destination.
❒ You can register the user
code after the user name. For
details, see p.70 “ User
Codes”.
Reference
p.143 “Entering Text”
press the title key under Select
Title.
under User (Des-
4
Set the user's information.
FFFF
Note
❒ To register a fax destination to a
registered user, proceed to step
G.
Note
❒ The keys you can select are as
follows:
• [
•
❒ You can select [Freq.], and
one more page for each title.
]
… Added to the
Freq.
page that is displayed first.
[AB], [CD], [EF], [GH],
[IJK], [LMN], [OPQ],
[RST], [UVW], [XYZ], [1] to
[10]… Added to the list of
items in the selected title.
77
Page 90

User Tools (System Settings)
Press [Fax Dest.].
GGGG
Enter the fax number using the
HHHH
number keys, and then press [OK].
To select the line
A Press [Select Line].
4
To program the SEP Code
A Press [Adv. Features], and then
select [
SEP Code
B Press [Change] under RX SEP
Code.
C Enter a SEP Code using the
number keys, and then press
[OK].
D To enter a password, press
[Change] under Password
(PWD).
E Enter a password using the
number keys, and then press
[OK].
F Press [OK].
].
To set the International TX mode
B Select the line, and then press
[OK].
To program the SUB Code
A Press [
B Press [Change] under TX SUB
C Enter a SUB Code using the
D To enter a password, press
E Enter a password using the
F Press [OK].
Adv. Features
select [SUB Code].
Code.
number keys, and then press
[OK].
[
Change
(SID).
number keys, and then press
[OK].
] under Password
], and then
A Press [Change] under Interna-
tional TX Mode.
B Select [
press [OK].
] or [ON], and then
OFF
To select the fax header
Note
❒ You can register the fax header
name in Program Fax Information under the system settings
of Facsimile Features. See Fac-
simile Reference <Advanced Features>.
A Press [Change] under Fax Head-
er.
B Select [
and then press [OK].
1st Name
] or [
2nd Name
],
78
Page 91

Fax Destination
To set label insertion
When Label Insertion is set to ON,
the receiver's name and standard
messages are printed on the fax
message when it is received at the
other end.
A Press [Change] under Label In-
sertion.
B Select [ON].
C Press [Change] under Line 2.
D Select a standard message to
print on the second line. To
stamp a customized message,
press [Custom Message].
E Enter a message, and then
press [OK].
Reference
p.143 “Entering Text”
F Press [OK].
G Press [Change] under Line 3.
H Select a standard message, and
then press [OK].
I Press [OK].
Changing a Registered Fax
Destination
Press the {{{{User Tools/Counter}}}} key.
AAAA
Press [System Settings].
BBBB
Press [Key Operator Tools], and then
CCCC
press [TTTTNext].
Press [Address Book Management].
DDDD
Select the registered fax destina-
EEEE
tion user you want to change.
Press the user (destination) key, or
enter the registered number using
the number keys.
Note
❒ If you press , you can search
for a user by user name/index,
user code, fax destination, or email address.
Press [Fax Dest.].
FFFF
Enter the items.
GGGG
To change the fax number
A Press [Change] under Facsimile
No..
4
Press [OK].
IIII
Note
❒ When a group is registered, you
can add this fax destination to
the group. See p.95 “Registering
Destinations to a Group”.
B Enter the new fax number us-
ing the number keys, and then
press [OK].
79
Page 92

User Tools (System Settings)
To change the line
A Press [Select Line].
To change the fax header
A Press [Change] under Fax Head-
er.
B Select the fax header, and then
press [OK].
To change the label insertion
B Select the line type.
C Press [OK].
To change the SUB Code
4
A Press [Adv. Features].
B Press [SUB Code].
C Press [Change] under TX SUB
Code.
D Enter the new SUB Code, and
then press [OK].
E To change the password, press
[
Change
(SID).
F Enter the new password, and
then press [OK].
G Press [OK].
] under Password
A Press [Change] under Label In-
sertion.
B Press [Change] under Line 2.
C Select the new standard mes-
sage, or press [Custom Message]
to enter the new message.
D Press [OK].
E Press [Change] under Line 3.
F Select the new standard mes-
sage, and then press [OK].
G Press [OK].
Press [OK].
HHHH
Note
❒ To change the user name, see
p.72 “To change the user (destination) name or key display”.
80
To change the SEP Code
A Press [Adv. Features].
B Press [SEP Code].
C Press [
Code.
D Enter the new SEP Code, and
then press [OK].
E To change the password, press
[Change] under Password
(PWD).
F Enter the new password, and
then press [OK].
G Press [OK].
] under RX SEP
Change
Page 93

Fax Destination
Deleting a Registered Fax
Destination
Note
❒ If you delete a destination that is a
specified delivery destination,
messages to its registered Personal
Box, for example, cannot be delivered. Be sure to check the settings
in the fax function before deleting
any destinations.
Press the {{{{User Tools/Counter}}}} key.
AAAA
Press [System Settings].
BBBB
Press [Key Operator Tools], and then
CCCC
press [TTTTNext].
Press [Address Book Management].
DDDD
To delete only the fax number
A Select the fax destination user
you want to delete.
Press the user (destination) key,
or enter the registered number
using the number keys.
B Press [Fax Dest.].
C Press [Change] under Facsimile
No..
D Press [Delete All], and then press
[OK].
To delete all user information
A Press [Delete].
B Select a user you want to de-
lete.
Press the user (destination) key,
or enter the registered number
using the number keys.
C Press [Yes].
Press [Exit].
EEEE
Note
❒ To delete user codes together,
see p.73 “Deleting a User
Code”.
Press the {{{{User Tools/Counter}}}} key.
FFFF
4
E Press [OK].
81
Page 94

User Tools (System Settings)
E-mail Destination
Register e-mail destinations so you
do not need to enter an e-mail address
every time, and can send scan files
from scanner or fax function by email.
• It is easy to select the e-mail destination if you register “User (Destination) Name” and “Key Display”
as the e-mail destination.
• You can register e-mail destina-
4
tions as a group.
• You can use the e-mail address as
the sender's address when sending
scan files in scanner mode. If you
do this, set a protection code on the
sender address to prevent use by
unauthorized people. See p.93
“Registering a Protection Code”.
• You can select an e-mail address
from an LDAP server, and then
register it in the Address Book. For
details about programming an
LDAP server, See p.103 “Program-
ming/Changing LDAP Server”.
For details about searching an email address from an LDAP server, See “Sending Scan File by Email”, Scanner Reference.
Registering an E-mail
Destination
Press the {{{{User Tools/Counter}}}} key.
AAAA
Press [
BBBB
CCCC
DDDD
EEEE
System Settings
Press [Key Operator Tools], and then
press [TTTTNext].
Press [Address Book Management].
Press [New Program].
].
82
Note
❒ To register an e-mail address to
a registered user, press the user
(destination) key, or enter the
registered number using the
number keys.
Set the user's information.
FFFF
Note
❒ To register an e-mail address to
a registered user, proceed to
.
step
G
Page 95

To register the user (destination)
name and key display
A
B Enter the user (destination)
[Change]
Press
tination) Name or Key Display.
The user (destination) name or
key display entry display appears.
name or key display, and then
press [OK].
under User (Des-
E-mail Destination
Press [E-mail].
GGGG
Press [Change] under E-mail Ad-
HHHH
dress.
Enter the e-mail address.
IIII
Note
❒ You can use the user name
when selecting an address to
send an e-mail to.
You can register the user code
❒
after the user name. For details, see
Reference
p.143 “Entering Text”
p.70 “User Codes”
To select the title
A To associate a user with a title,
press the title key under Select
Title.
Note
❒ The keys you can select are as
follows:
• [Freq.]
•
❒ You can select [Freq.] and one
more page for each title.
… Added to the
page that is displayed first.
[AB], [CD], [EF], [GH],
[IJK], [LMN], [OPQ],
[RST], [UVW], [XYZ], [1] to
[10]… Added to the list of
items in the selected title.
Entering the e-mail address
A Enter the e-mail address.
.
B Press [OK].
4
Using the e-mail address as the
sender
A Press [ON] under Register as
Sender.
Press [OK].
JJJJ
Note
❒ When a group is registered, oth-
er e-mail destinations can be
added to the group. See p.95
“Registering Destinations to a
Group”.
83
Page 96

User Tools (System Settings)
Press [OK].
Changing a Registered E-mail
Destination
Press the {{{{User Tools/Counter}}}} key.
AAAA
Press [System Settings].
BBBB
Press [Key Operator Tools], and then
CCCC
press [TTTTNext].
Press [Address Book Management].
DDDD
Select the registered e-mail ad-
EEEE
4
dress user you want to change.
Press the user (destination) key, or
enter the registered number using
the number keys.
Note
❒ If you press , you can search
for a user by user name/index,
user code, fax destination, or email address.
Press [E-mail].
FFFF
Enter the items.
GGGG
To change the e-mail address
A Press [Change] under E-mail
Address.
HHHH
Note
❒ To change the user name, see
p.72 “To change the user (destination) name or key display”.
Deleting a Registered E-mail
Destination
Press the {{{{User Tools/Counter}}}} key.
AAAA
Press [System Settings].
BBBB
Press [Key Operator Tools], and then
CCCC
press [TTTTNext].
Press [Address Book Management].
DDDD
To delete only the e-mail address
A Select the e-mail address user
you want to delete.
Press the user (destination) key,
or enter the registered number
using the number keys.
B Press [E-mail].
C Press [Change] under E-mail
Address.
D Press [Delete All], and then press
[OK].
E Press [OK].
84
B Enter the e-mail address, and
then press [OK].
Reference
p.143 “Entering Text”
To delete all user information
A Press [
B Select a user you want to de-
lete.
Press the user (destination) key,
or enter the registered number
using the number keys.
C Press [Yes].
Press [Exit].
EEEE
Delete
].
Page 97

Registering Folders
By registering a shared folder, you
can send scan files to it directly.
There are two types of protocol you
can use:
• SMB
For sending files to shared Windows folders
• FTP
Use when sending files to an FTP
server.
Note
❒ For details about protocols, server
names, and folder levels, ask your
network administrator.
❒ You can stop unauthorized users
accessing folders from the machine. See p.93 “Registering a Protection Code”.
❒ You can only select either SMB or
FTP. If you change protocol after
finishing your settings, all previous entries are cleared.
❒ You can register up to 50 folders
per group. Files cannot be sent to a
group with over 50 folders registered.
Registering Folders
Using SMB to Connect
Note
❒ To register a folder in an FTP serv-
er, see p.89 “Using FTP to Connect”.
To register an SMB folder
Press the {{{{User Tools/Counter}}}} key.
AAAA
Press [System Settings].
BBBB
4
Reference
For details about network settings,
see Network Guide.
For details about Scan to Folder,
see Scanner Reference.
Press [Key Operator Tools], and then
CCCC
press [TTTTNext].
Press [Address Book Management].
DDDD
Press [New Program].
EEEE
Note
❒ To register a folder to a regis-
tered user, press the user (destination) key, or enter the
registered number using the
number keys.
85
Page 98

User Tools (System Settings)
Set the user's information.
FFFF
Note
❒ To register a folder to a regis-
tered user, proceed to step
.
G
To select the title
A To associate a user with a title,
press the title key under Select
Title.
To register the user (destination)
name and key display
A Press [Change] under User
(Destination) Name or Key
Display.
The user (destination) name or
4
key display entry display appears.
B Enter the user (destination)
name or key display, and then
press [OK].
Note
❒ You can use the user name as
the folder name.
❒ You can register the user
code after the user name. For
details, see p.70 “ User
Codes”.
Reference
p.143 “Entering Text”
GGGG
HHHH
Note
❒ The keys you can select are as
follows:
• [Freq.]
•
❒ You can select [Freq.] and one
more page for each title.
Press [Folder].
Press [SMB].
Note
❒ To specify a folder, you can ei-
ther enter the path manually, or
locate the folder by browsing
the network.
… Added to the
page that is displayed first.
[AB], [CD], [EF], [GH],
[IJK], [LMN], [OPQ],
[RST], [UVW], [XYZ], [1] to
[10]… Added to the list of
items in the selected title.
86
Reference
p.87 “To locate the folder manu-
ally”
p.87 “Using Browse Network to
locate the folder”
Page 99

Registering Folders
To locate the folder manually
A Press [Change] under Path.
B Enter the path where the folder
is located.
Note
❒ Enter the path using this for-
mat: “\\ServerName\ShareName\PathName”.
❒ You can also enter an IP ad-
dress.
❒ You can enter a path using
up to 128 characters.
C Press [OK].
Note
❒ If the format of the entered
path is not correct, a message
appears. Press [Exit], and
then enter the path again.
D Press [Change] under User
Name.
E Enter the user name, and then
press [OK].
Using Browse Network to locate
the folder
A Press [Browse Network].
The client computers sharing
the same network as the machine appear.
Note
❒ You can enter your user
name and password before
pressing [Browse Network]. If
you do, the Browse Network
display only lists client computers you are authorized to
access.
B Select a client computer.
Shared folders under it appear.
Note
❒ You can press [Up One Level]
to switch between levels.
C Select the folder you want to
register.
The Logon display appears.
4
Note
❒ This is a user name which is
authorized to access the folder.
F Press [Change] under Password.
G Enter the user's password, and
then press [OK].
Note
❒ If you have already entered
an authorized user name and
password, the Logon display
will not appear. Proceed to
step F.
D Enter the user name.
Note
❒
This is a user name which is
authorized to access the folder.
87
Page 100

User Tools (System Settings)
E Enter the user's password, and
then press [OK].
The Browse Network display
reappears.
Note
❒ If the entered user name or
password is not correct, a
message appears. Press [Exit],
and then enter the user name
and password again.
F Press [OK].
Press [Connection Test] to check the
IIII
4
path is set correctly.
Press [Exit].
JJJJ
Note
❒ If the connection test fails, check
the settings, and then try again.
Press [OK].
KKKK
Changing a registered SMB folder
Press the {{{{User Tools/Counter}}}} key.
AAAA
Select the items you want to
GGGG
change.
To change the protocol
A Press [
B A confirmation message ap-
pears. Press [Yes].
Note
❒ Changing the protocol will
clear all settings made under
the previous protocol.
C Enter each item again.
Reference
See steps I to T on p.89 “To
register an FTP folder”.
Changing items under SMB
FTP
].
88
Press [System Settings].
BBBB
Press [Key Operator Tools], and then
CCCC
press [TTTTNext].
Press [Address Book Management].
DDDD
Select the user of the registered
EEEE
folder you want to change.
Press the user (destination) key, or
enter the registered number using
the number keys.
Note
❒ If you press , you can search
for a user by user name/index,
user code, fax destination, or email address.
Press [Folder].
FFFF
A Press [Change] under Path.
B Enter the new path where the
folder is located, and then
press [OK].
Note
❒ You can also use Browse Net-
work to specify a new folder.
For details, see p.87 “Using
Browse Network to locate
the folder”.
C Press [Change] under User
Name.
D Enter the new user name, and
then press [OK].
This is a user name which is authorized to access the folder.
E Press [Change] under Password.
F Enter the new password, and
then press [OK].
 Loading...