

Page 1
Quick Installation Guide
Read this manual carefully before you use the product and keep it handy for future reference.
For safe and correct use, please be sure to read the Safety Information in “Safety Information”
before using the machine.
CLP27DN/CLP31DN/C7526dn/C7531dn/LP226cn/
LP231cn/Aficio SP C410DN/Aficio SP C411DN
Where to Put the Printer
The printer’s location should be carefully chosen
because environmental conditions greatly affect its
performance.
Warning
•
Confirm that the wall outlet is near the machine and
freely accessible, so that in event of an emergency, it
can be unplugged easily.
•
Only connect the machine to the power source
described on this manual.
•
Avoid multi-wiring.
•
Do not damage, break or make any modifications to
the power cord. Do not place heavy objects on it, pull
it hard or bend it more than necessary. These actions
could cause an electric shock or fire.
•
The supplied power cord is for use with this equipment
only. Do not use with other appliances. Doing so may
result in fire, electric shock, or injury.
Caution
•
Do not handle the plug with wet hands. Doing so might
cause an electrical shock.
•
Keep the machine in an area that is within optimum
environmental conditions. Operating the machine in
an environment that is outside the recommended
ranges of humidity and temperature can cause an
electrical fire hazard. Keep the area around the socket
free of dust. Accumulated dust can become an
electrical fire hazard.
•
Place the machine on a strong and level surface.
Otherwise, it might fall and injure someone.
•
If you use the machine in a confined space, ensure
there is continuous air circulation.
❖
Space Required for Installation
Leave enough space around the printer. This space is
necessary to operate the printer. The recommended (or
minimum) space requirements are as follows:
❖
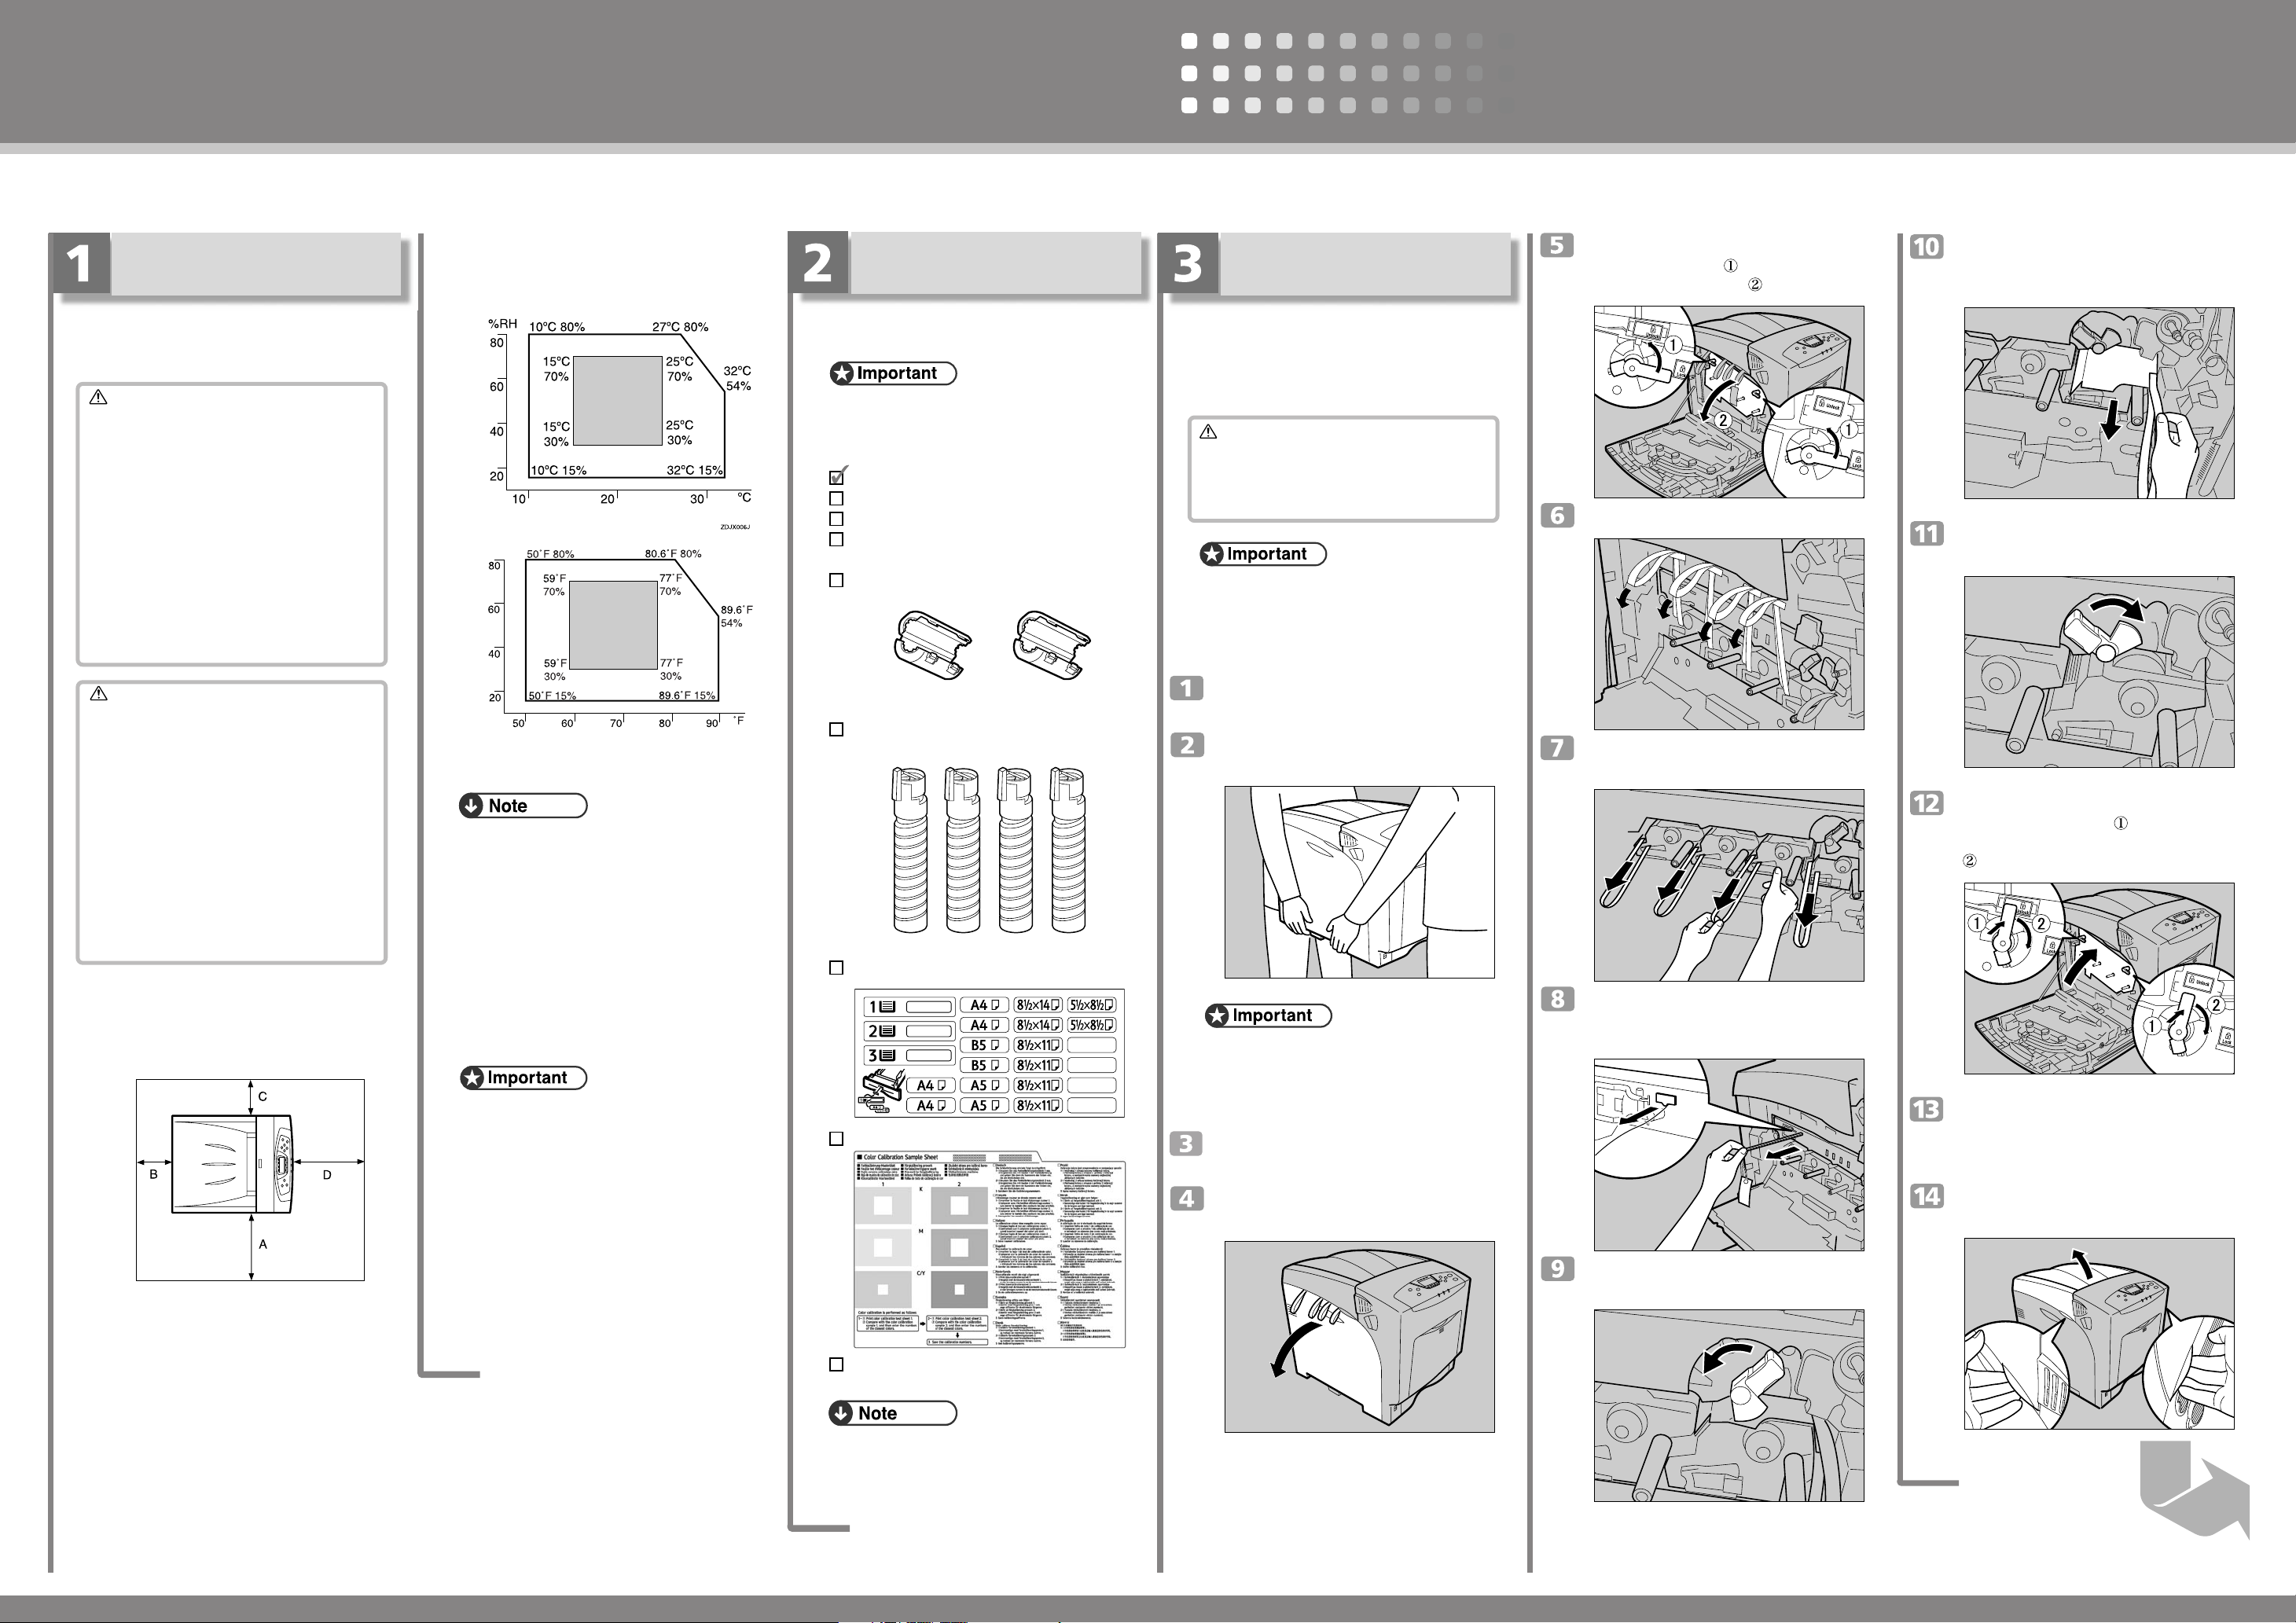
Optimum Environmental Conditions
Permissible and recommended temperature and
humidity ranges are as follows:
%RH
• White area: Permissible Range
• Gray area: Recommended Range
• The machine must be level within 5 mm, 0.2˝ from
both front to rear and left to right.
• To avoid possible build-up of ozone, locate this
machine in a large well ventilated room that has an
air turnover of more than 30 m
• When you use this machine for a long time in a
confined space without good ventilation, you may
detect an odd smell. To keep the workplace
comfortable, we recommend you keep it well
ventilated.
❖
Space Required for Installation
• Areas exposed to direct sunlight or strong light
• Dusty areas
• Areas with corrosive gases
• Areas that are excessively cold, hot, or humid
• Locations near air conditioners or humidifiers
• Locations near other electronic equipment
• Locations subject to frequent strong vibration
3
/hr/person.
TS4K031KE
Checking the Contents of
the Box
Follow the procedure below to verify the items that
come with the printer.
• Ensure that the box contains all items listed below. If
there are any missing or defective items, contact your
sales representative.
❖
Manuals and CD-ROMs
Quick Installation Guide (This manual)
CD-ROM “Printer Drivers and Utilities”
CD-ROM “Manuals”
CD-ROM “Document Management Utility”
Ferrite Core x 2
AET510S
Toner Cartridges: Black (K), Magenta (M), Cyan
(C), Yellow (Y)
AET028S
Paper Feed Unit Labels
AET031S
Color Calibration Sample Sheet
Unpacking
To protect it from shock and vibration during transit,
this printer comes packaged in cushioning foam and
secured with tape. Remove these protective materials
after bringing the machine to where it will be installed.
Caution
•
When lifting the machine, use the inset grips on both
sides. The printer could break or cause an injury if
dropped.
•
Place no objects on the left or inner cover.
• Be sure to remove all four strips of tape from the
photo conductor unit to avoid malfunction.
• Removed tape is dirty. Be careful not to let it touch
your hands or clothes.
Remove the plastic bag.
Lift the printer with two people by using
the inset grips on both sides of the printer.
• Leave the tape holding the paper feed tray and cover
in place while moving the printer.
• Lower the machine slowly and carefully to prevent
trapping your hands.
Remove the orange adhesive tape from
the printer body.
Open the left cover. Do not remove the
orange tape attached to the left cover.
AET034S
Turn the two green levers
counterclockwise (
open the inner cover (
), and then slowly
).
AQC032S
Remove the end of the tape from the pinter.
Remove the four pieces of tape from
AET802S
the photo conductor unit.
Remove the securing pin, as shown,
AET803S
from the transfer unit. Pinch it, and
then pull it out.
Remove the protective sheet, as shown.
Pinch the orange tape, and then pull it
out.
Turn the green lever clockwise to lock
the unit.
Close the inner cover. Lock the inner
cover by pressing in (
) and then
turning the two green levers clockwise
).
(
Close the left cover.
Close the left cover firmly using both hands, until it
clicks into place.
Open the top cover by grasping the
handles on the left and right sides.
AET806S
AET146S
AQC014S
A: 50 cm (19.7 inches) or more
B: 10 cm (4 inches) or more
C: 10 cm (4 inches) or more
D: 70 cm (27.6 inches) or more
AQC025S
❖
Power Source
Connect the power cable to a power source of the
following specification:
• 120 V, 60 Hz, 11 A or more
Additional Documentation
• This package does not include an interface cable.
Purchase one to use with your host computer. See
“Appendix”, Hardware Guide.
AQC026S
Tu rn the green lever of the transfer unit
AET804S
counterclockwise to unlock the unit.
AQC007S
AET805S
Page 2
Quick Installation Guide
Be sure to remove the caution sheet,
which is put on the toner cartridge’s
compartment.
Remove the tapes and cover as shown.
AQC950S
Remove the clips protecting the mouths
of all four toner cartridges.
AQC027S
Put labels “1” on the front of the paper
tray.
AET032S
Be sure to read the label, which is
attached on the front surface of the
printer. This warns you that ink-jet
paper cannot be used with this printer.
AQC028S
Installing the Toner Cartridge
The following procedure describes how to install the
toner cartridge.
Warning
•
Do not incinerate spilled toner or used toner. Toner
dust is flammable and might ignite when exposed to
an open flame.
Disposal should take place at an authorized dealer
or an appropriate collection site.
If you dispose of the used toner cartridges yourself,
dispose of them according to local regulations.
Do not store toner, used toner, or toner containers
in a place with an open flame. The toner might ignite
and cause burns or a fire.
Caution
•
Keep ink (used or unused) and ink containers out
of reach of children.
•
If toner or used toner is inhaled, gargle with plenty
of water and move into a fresh air environment.
Consult a doctor if necessary.
•
If your skin comes into contact with toner or used
toner, wash the affected area thoroughly with soap
and water.
•
If toner or used toner gets into your eyes, flush
immediately with large amounts of water. Consult a
doctor if necessary.
Caution
•
If toner or used toner is swallowed, dilute by drinking
a large amount of water. Consult a doctor if
necessary.
•
Avoid getting toner on your clothes or skin when
removing a paper jam or replacing toner. If your skin
comes into contact with toner, wash the affected area
thoroughly with soap and water.
•
If toner gets on your clothing, wash with cold water.
Hot water will set the toner into the fabric and may
make removing the stain impossible.
• When you first use this printer, use the four toner
cartridges supplied with the printer.
• The toner cartridges that comes with the printer will
allow you to print up to about 3,000 pages. These
numbers were obtained from printing A4 5%
charts, but the actual number of pages will vary
depending on the paper type, size, contents, and
settings.
• The toner cartridge for replacement comes in two
types for different number of printable pages: 15,000
pages and 5,000 pages.
• Toner Cartridges (consumable) are not covered by
warranty. However, if there is a problem, contact the
dealer where you purchased the printer.
• Toner cartridge mouths may become dirty during
quality inspection.
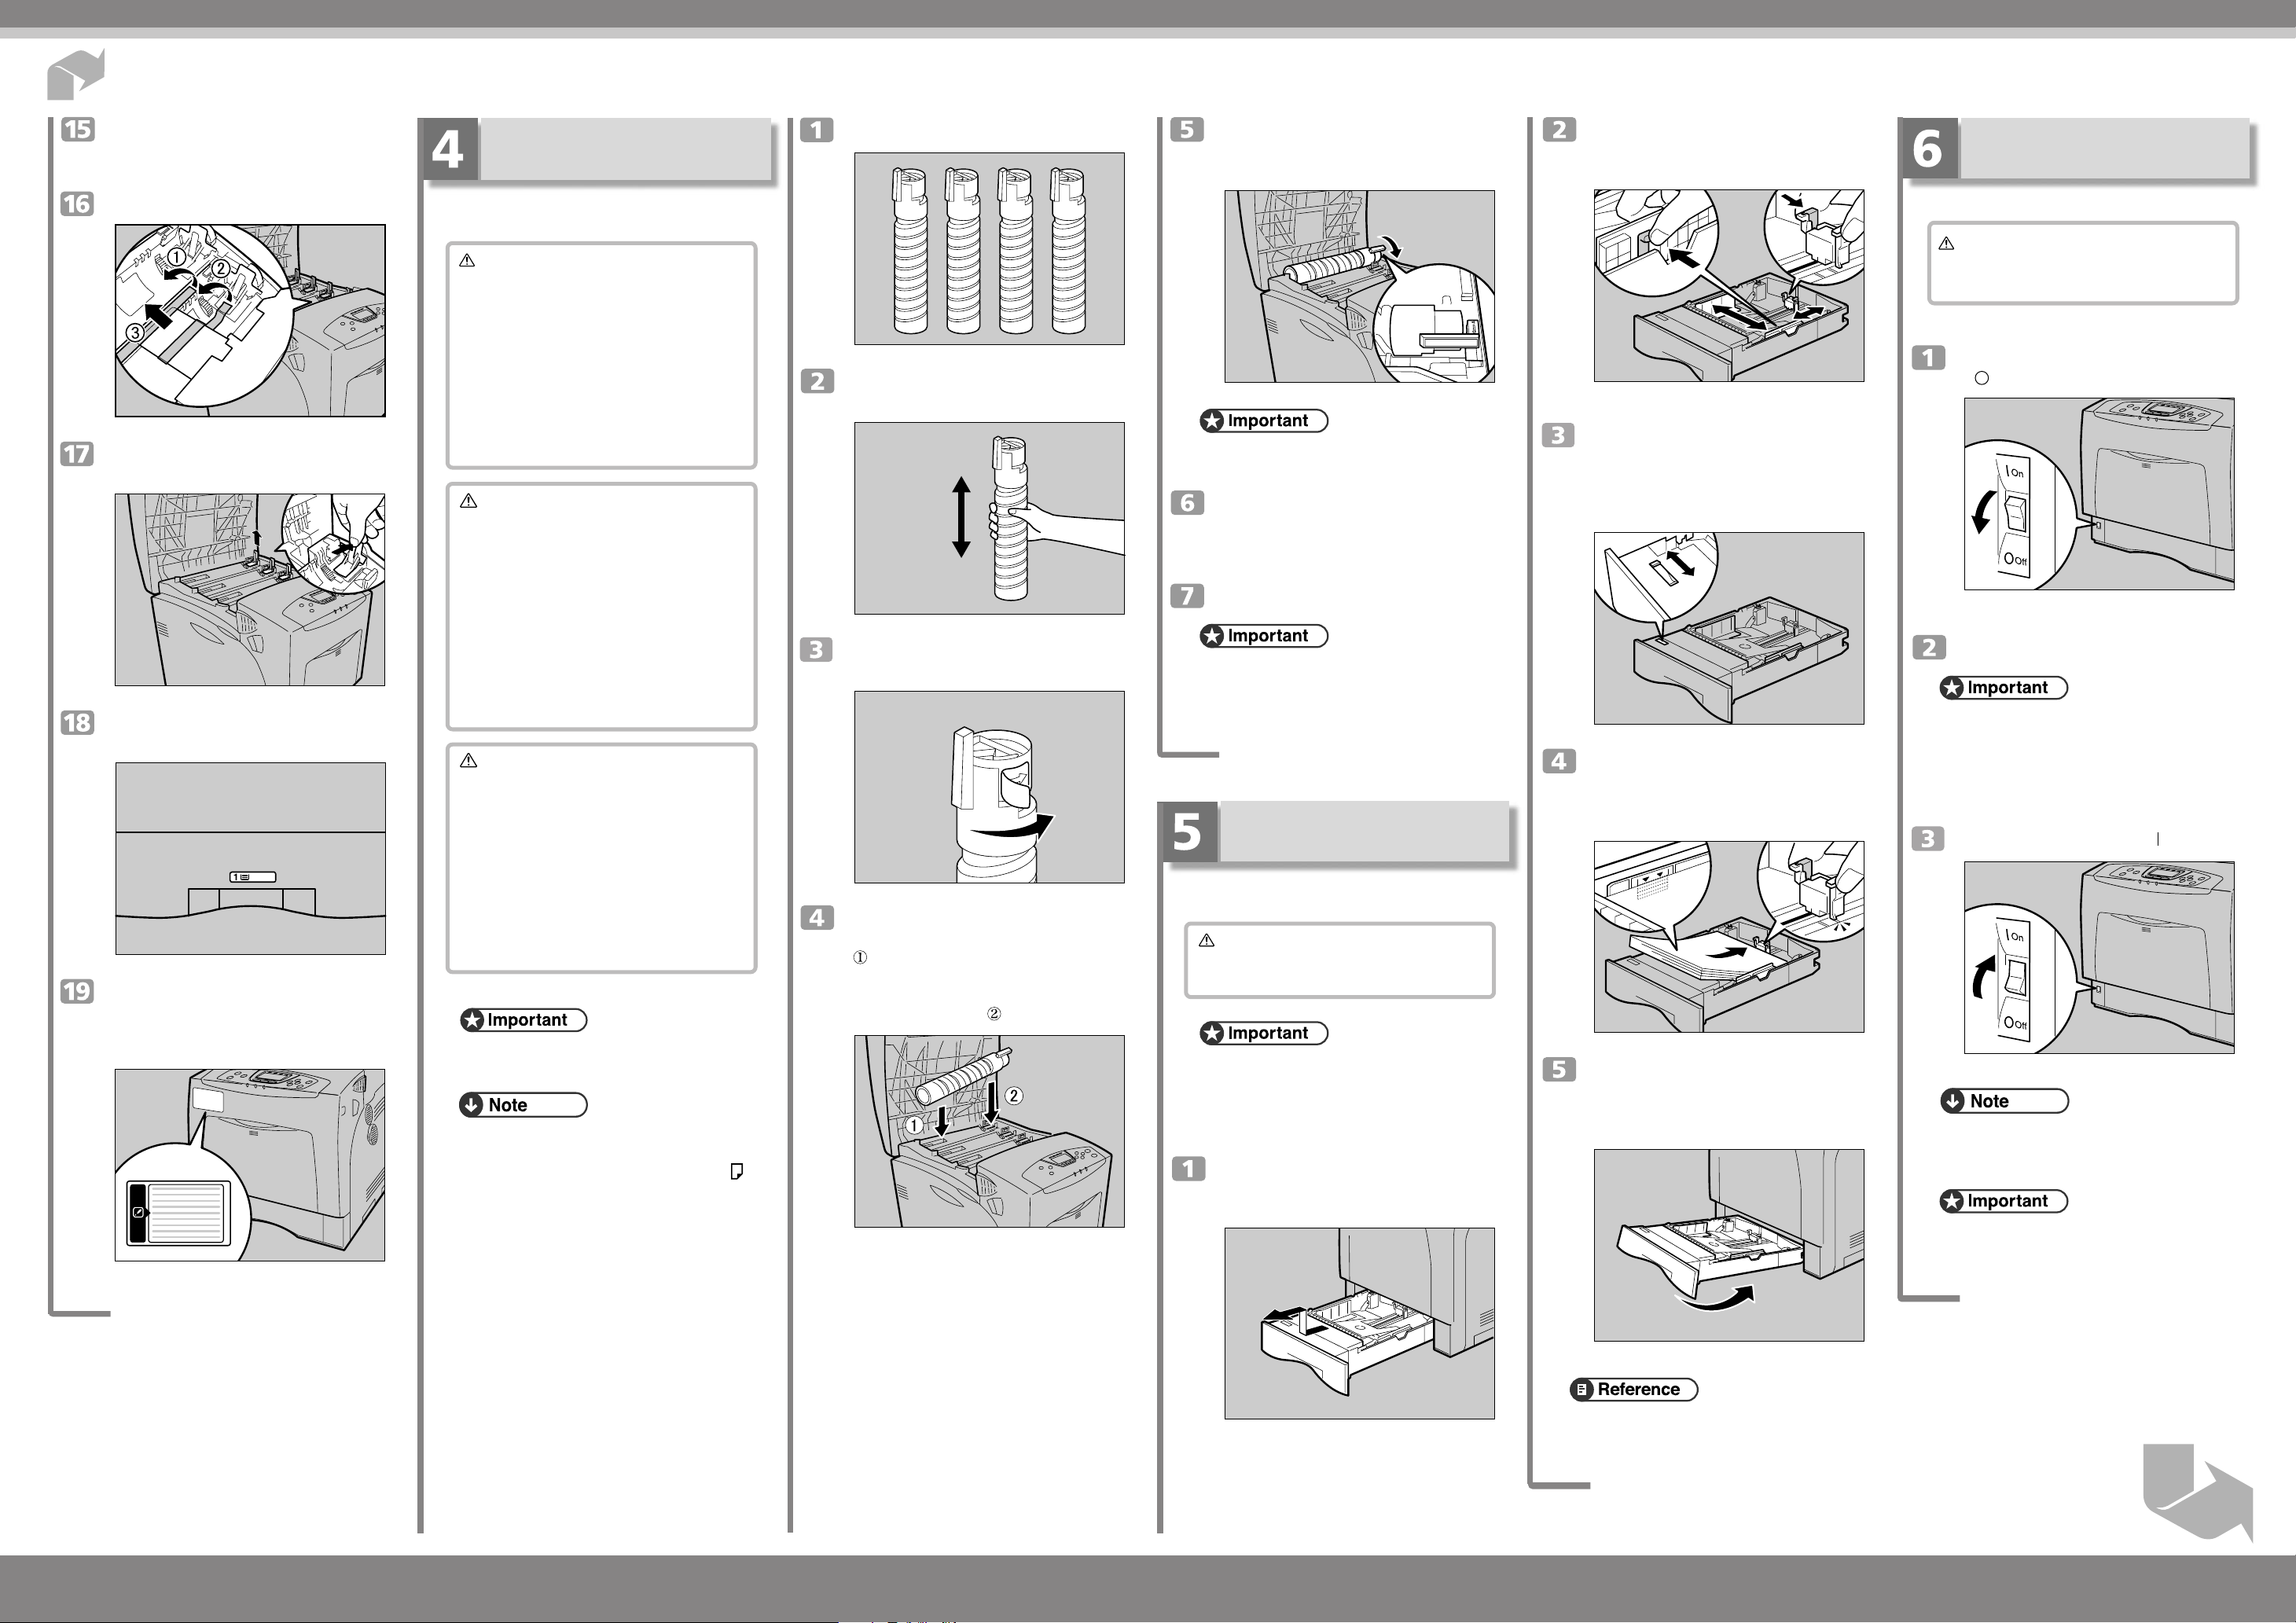
Take the toner cartridges out of the box.
AET131S
Shake the toner cartridge up and down
seven or eight times.
AET132S
Remove the tape holding the toner
cartridge.
AET133S
First, install the yellow toner cartridge.
Holding the toner cartridge horizontally
) with the locking lever on the upper
(
side, install the toner cartridge bottom
first, and then move the locking lever to
the triangle mark (
).
AQC009S
Turn the locking lever to the circle mark.
Pull the locking lever toward you, until
it locks and clicks into place.
AQC011S
• Do not repeatedly insert and remove toner cartridges.
Doing so results in toner leakage.
Use the same procedures to insert the
remaining three toner cartridges: cyan
(C), magenta (M), and black (K).
Close the top cover.
• Do not turn off the power switch while “Loading
Toner...” appears on the display. Doing so results in
malfunction.
LOADING PAPER
The following describes how to load paper into the
standard paper tray (Tray 1).
Caution
•
Do not pull out the paper tray forcefully. If you do,
the tray might fall and cause an injury.
• To avoid paper jams, make sure paper is not stacked
above the limit mark inside the tray. Misfeeds might
occur.
• Do not mix different types of paper in a single paper
tray.
Slowly slide out the paper tray (Tray1),
until it stops. Then, lift it slightly, and
then pull it out completely.
Pinch the green clips of the side guide
and the end guide and adjust the
guides to the paper size being loaded.
AET042S
Slide the green switch on the front of
the tray to the type of paper to be
loaded. When loading paper of 75 g/m
20 lb., or thicker, slide the switch to the
right.
AET043S
Load the new paper stack print side
up, making sure the paper is flush
against the paper guides. Adjust the
paper guides to close any gaps.
AET044S
Lift the front of the paper tray (Tray 1),
and slowly slide the paper tray back,
until it stops. Make sure the tray is fully
inserted to prevent paper jams.
AET045S
Turning the Power On
Follow the procedure below to turn the power on.
Warning
•
Plug and unplug the power cable with dry hands, or
an electric shock could occur.
Make sure the power switch is set to
” Off.
“
2
,
AQC029S
Plug in the power cable.
• Make sure the power cable is plugged securely into
the wall outlet.
• Turn the power switch off when plugging and
unplugging the power plug.
Turn the power switch to “ ”On.
The power indicator on the control panel lights up.
• Wait until “Ready” appears on the display panel.
• The machine may make a noise while initializing.
This noise does not indicate a malfunction.
• Do not turn off the power switch until initializing is
completed. Doing so results in malfunction.
AQC030S
Place it on a flat surface.
AET041S
• For details about usable types of paper, see “Loading
Paper”, Hardware Guide.
CLP30DN/CLP27DN/C7531dn/C7526dn/LP231cn/LP226cn/Aficio SP C411DN/Aficio SP C410DN
Next Sheet
Quick Installation Guide 1/2
Page 3

Quick Installation Guide 2/2
Selecting the Display
Language
Select a language using the procedure described here.
The message for the selected language will appear on
the display. If you want to use the display in English,
the following procedures are unnecessary.
Test Printing
The following explains the procedure for test printing
of the configuration page.
Test printing in order to verify that the printer is working
normally. Test printing checks printer performance
only; it does not test the connection to the computer.
{{
Press the
{
Menu
{{
}}
} key.
}}
Network Connection
Follow the procedure below to connect the printer to
the computer through the network. Prepare the hub and
other network devices before connecting the 10 BASET or 100 BASE-TX cable to the machine's Ethernet
port.
Reading the LED Lamps
❖
For standard ethernet port
Ethernet Configuration
Make the following network settings according to the
network interface you are using.
You can use SmartDeviceMonitor for Admin or a Web
browser to make IP address-related settings in a TCP/
IP-capable environment.
Quick Installation Guide
}}
{{
Press the
{
Menu
{{
} key.
}}
YMCK
• The default setting is English.
{{
Press the
{
Menu
{{
}}
} key.
}}
Select [Language] using
}}
{{
OK
then press the
} key.
{
}}
{{
Select the language using
{{
and then press the
{
{{
OK
{{
{▼
{{
{{
{▼
{{
}}
} key.
}}
}}
} or
}}
}}
} or
}}
{{
{▲
{{
YMCK
AQC001S
}}
}, and
}}
{{
}}
{▲
},
{{
}}
Select [List/Test Print] using
{{
}}
{▲
}, and then press the
{{
}}
Select [Config. Page] using
}}
{{
} key.
and then press the
{
{{
OK
}}
{{
{
{{
OK
{{
{▼
{{
}}
} key.
}}
}}
} or
}}
{{
{▼
{{
YMCK
AQC001S
}}
} or
}}
{{
{▲
{{
}}
},
}}
• Use shielded Ethernet cable. Unshielded cables
create electromagnetic interference that could
cause malfunctions.
• The Ethernet cable is not supplied with this
machine. Select your cable according to the
network environment.
Attach one ferrite core at the printer
end of the Ethernet cable, and then
attach the other ferrite core about 10
cm (4 inches) (
) from this core.
AET121S
Connect the Ethernet cable to the
Ethernet port.
1. Yellow: comes on when 100BASE-TX is being
used. It comes off when 10BASE-T is
being used.
2. Green: comes on when the printer is properly
connected to the network.
USB Connection
• USB2.0 interface cable is not supplied. Obtain it
separately, according to the computer you are
using.
• USB connection is possible under Windows 98 SE/
Me/2000/XP, Windows Server 2003, Mac OS 9.x,
and Mac OS X.
• Windows 98SE/Me supports USB1.1 speeds.
• USB connection with Macintosh is only possible
via the printer's USB port.
AQC070S
• Configure the printer for the network using the
control panel.
• The following table shows the control panel
settings and their default values.
These items appear in the “Host Interface” menu.
• After configuring the network settings, making
security settings is recommended. For details, see
the “Notes to Administrator” sheet.
Setting Name Value
Auto-Obtain (DHCP) On
IPv4 Address 011.022.033.044
Subnet Mask 000.000.000.000
Gateway Address 000.000.000.000
Frame Type (NW) Auto
Effective Protocol IPv4 Effective
IPv6 Effective
NetWare Effective
SMB Effective
AppleTalk Effective
Ethernet Speed Auto
LAN Type Auto
AQC001S
{{
Select [Host Interface] using ,
{{
}}
{▲
}, and then press the
{{
}}
Select [Network] using
}}
{{
OK
then press the
{
{{
} key.
}}
{{
{▼
{{
{{
{
OK
{{
}}
} or
}}
{▼
{{
}}
} key.
}}
{{
{▲
{{
}}
} or
}}
}}
}, and
}}
Select [Machine IPv4 Address] using
{{
}}
{{
{▼
{{
} or
}}
}}
{▲
}, and then press the
{{
}}
{{
{
{{
OK
key.
}}
}
}}
Press the
{{
{
Menu
{{
initial screen.
}}
} key to return to the
}}
The configuration page will be printed.
If printing is not normal, check to see if an error
message appears on the display. If there is an error
message, see “Troubleshooting”, Hardware Guide.
Check the options.
For details about the configuration page, see
“Interpreting the Configuration Page”, Software
Guide.
{{
Press the
}}
{
Menu
} key to return to the
{{
}}
initial screen.
AET122S
Connect the other end of the cable to the
printer's network, such as a hub.
• The printer's ethernet and USB ports are not
available when the gigabit ethernet board is
attached to the printer.
• For details about network environment settings, see
Software Guide.
Connect the square-shaped connector
of the USB2.0 cable to the USB port.
AET124S
Connect the opposite end's flat
connector to devices such as your
computer's USB interface, or a USB
hub.
• If Auto Obtain (DHCP) is in use, the IPv4 address,
subnet mask, and gateway address are all set
automatically.
• Make this setting only when it is necessary. See
Software Guide.
Detecting the Network Address
Automatically (Using DHCP)
• When you use this printer in DHCP environment,
select [Auto-Obtain (DHCP)] following this
procedure.
• When [Auto-Obtain (DHCP)] is selected, you
cannot make settings for the following items:
• IP Address
• Subnet Mask
• Gateway Address
• Consult your network administrator for information
about making network settings.
Select [Auto-Obtain (DHCP)] using
{{
}}
or
{▲
}, and then press the
{{
}}
The address detected by the printer will appear.
To check the detected addresses, press the followings:
• [IP Add.] : IP address
• [Subnet] : Subnet Mask
Press the
{{
{
{{
}}
MENU
} key to return to the
}}
{{
{
{{
OK
{{
{▼
{{
}}
} key.
}}
initial screen.
Print a configuration page to confirm
the settings made.
• For details about printing the configuration page, see
“Test Printing”.
}}
}
}}
CLP30DN/CLP27DN/C7531dn/C7526dn/LP231cn/LP226cn/Aficio SP C411DN/Aficio SP C410DN
Page 4

Specifying a Network
Address
{{
Press the
Select [Host Interface] using ,
{{
}}
{▲
}, and then press the
{{
}}
{
Menu
{{
}}
}
key.
}}
{{
{
{{
OK
{{
{▼
{{
}}
} key.
}}
YMCK
AQC001S
}}
} or
}}
Press the
{{
{
Escape
{{
}}
} key until the screen
}}
returns to the [Network] menu.
If you use IPv4, assign the IPv4 address
to the printer. Select [Machine IPv4
{{
}}
{{
Address] using
press the
To get the IPv4 address for the printer, contact your
network administrator.
{{
{
{{
OK
{▼
{{
}}
} key.
}}
} or
}}
}}
{▲
}, and then
{{
}}
To specify the IPv4 Address, press [IP
Add.].
INSTALLING THE PRINTER
DRIVER
You can install the printer drivers and software easily
from the CD-ROM labeled “Printer Drivers and
Utilities”.
Click [Quick Install] in the window of the CD-ROM
to install PCL and RPCS printer drivers. To install the
PostScript 3 printer driver, click the [PostScript 3 Printer
Driver] button. For more information about the
PostScript 3 printer driver, see Software Guide on the
CD-ROM labeled “Manuals”.
When the TCP/IP protocol is used, SmartDevice
Monitor for Client will be installed as well.
When using with TCP/IP protocol, confirm the
followings:
The printer is connected to a network with the 5
interface cable.
The TCP/IP protocol is set.
The IP (IPv4) address is set for the printer and the
computer.
Click
[Quick Install]
The software license agreement appears in the
[License Agreement] dialog box.
This is an example when English is selected in
.
step
.
After reading through all of the contents,
[I accept the agreement]
click
to agree with
the License Agreement, and then click
[Next >]
.
Click
[Finish
].
A message about restarting the computer may appear.
Restart the computer to complete installation.
Click
[Exit]
in the first dialog box of the
installer, and then take out the CD-ROM.
Quick Installation Guide
{{
}}
{{
Select [Network] using
{{
then press the
{
{{
OK
}}
} key.
}}
{▼
{{
} or
}}
Select [Effective Protocol] using
{{
}}
{▲
}, and then press the
{{
}}
{{
{
{{
OK
{▲
{{
{{
{▼
{{
}}
} key.
}}
}}
}, and
}}
Select the network protocol using
{{
}}
or
{▲
}, and then press the
{{
}}
{{
{
{{
OK
}}
} key.
}}
}}
} or
}}
{{
{▼
{{
If you use IPv4, assign also Subnet Mask and
Gateway Address. To assign these, press [Subnet M]
or [Gateway] instead.
{{
}}
{{
Enter the address using
{{
then press the
Press the {▼} or {▲} key to enter the left most entry
field of the address. After entering the left field, press
the {OK} key, and then you can enter the next field.
After completing to enter in the all fields, press the
OK
} key. Use this
{
method to assign Subnet Mask and Gateway Address.
• Do not set “011.022.033.044” as the IPv4 address.
• The value moves by 10 if the {▼} or {▲} key is
kept pressed.
{
{{
OK
{▼
} or
{{
}}
}}
} key. settings made.
}}
{▲
{{
}}
}, and
}}
• To install printer driver under Windows 2000/XP
Professional, Windows Server 2003, and Windows
NT 4.0, you must have an account that has Manage
Printers permission. Log on as an Administrator.
• Only the printer driver, and not the SmartDevice
Monitor for Client is installed when using this printer
under USB or parallel. If you connect using USB,
see Software Guide.
Quit all applications currently running.
Insert the CD-ROM into the CD-ROM
drive.
The installer starts.
Auto Run may not work with the certain operating
system settings. If this happens, launch
“Setup.exe” on the CD-ROM root directory.
Select the printer model you want to
install in the “Select Printer” dialog box.
• To stop installation of the selected software, click
[Cancel] before installation is completed.
• Auto Run may not work with the certain operating
system settings. If this happens, launch “Setup.exe”
on the CD-ROM root directory.
• Select a printer to whose IP (IPv4) address is displayed
in [Connect To] to install SmartDeviceMonitor for
Client when using TCP/IP.
• Quick Install is not available unless bidirectional
communication between the printer and computer is
enabled via parallel connection. For details about
bidirectional communication between printer and
computer, see “Printing with Parallel Connection”,
Software Guide.
Select an interface language, and then click
{{
}}
{{
Select [Specify] using
}}
}
}}
then press the
{{
{
{{
OK
{▼
{{
}}
} key.
}}
} or
}}
{▲
{{
}}
}, and
}}
{{
}}
{
OK
}
.
{{
}}
The default interface language is English.
• For a network connection via TCP/IP, select the printer
whose IP address is displayed in [Connect to].
• For parallel connection, select the printer whose
printer port is displayed in [Connect to].
Select [Effective] or [Invalid] using
{{
}}
or
{▲
}, and then press the
{{
}}
Set other protocols you need to set in the same way.
• Select [Invalid] for unused protocols.
• Enable IPv4 to use the Pure IPv4 environment of
NetWare 5/5.1, NetWare 6/6.5.
{{
{
{{
OK
{{
{▼
{{
}}
} key.
}}
Click
[Install]
.
The following display appears while installing the
printer driver.
If you do not select [Specify] in this step, the address
you set will not be saved.
}}
}
}}
Press the
{{
}}
{
Menu
} key to return to the
{{
}}
initial screen.
Print a configuration page to confirm the
settings made.
• For details about printing the configuration page, see
“Test Printing”.
Copyright © 2006
EN USA G160-8606
CLP30DN/CLP27DN/C7531dn/C7526dn/LP231cn/LP226cn/Aficio SP C411DN/Aficio SP C410DN
Quick Installation Guide 2/2
 Loading...