

Page 1

AC205L/AC205
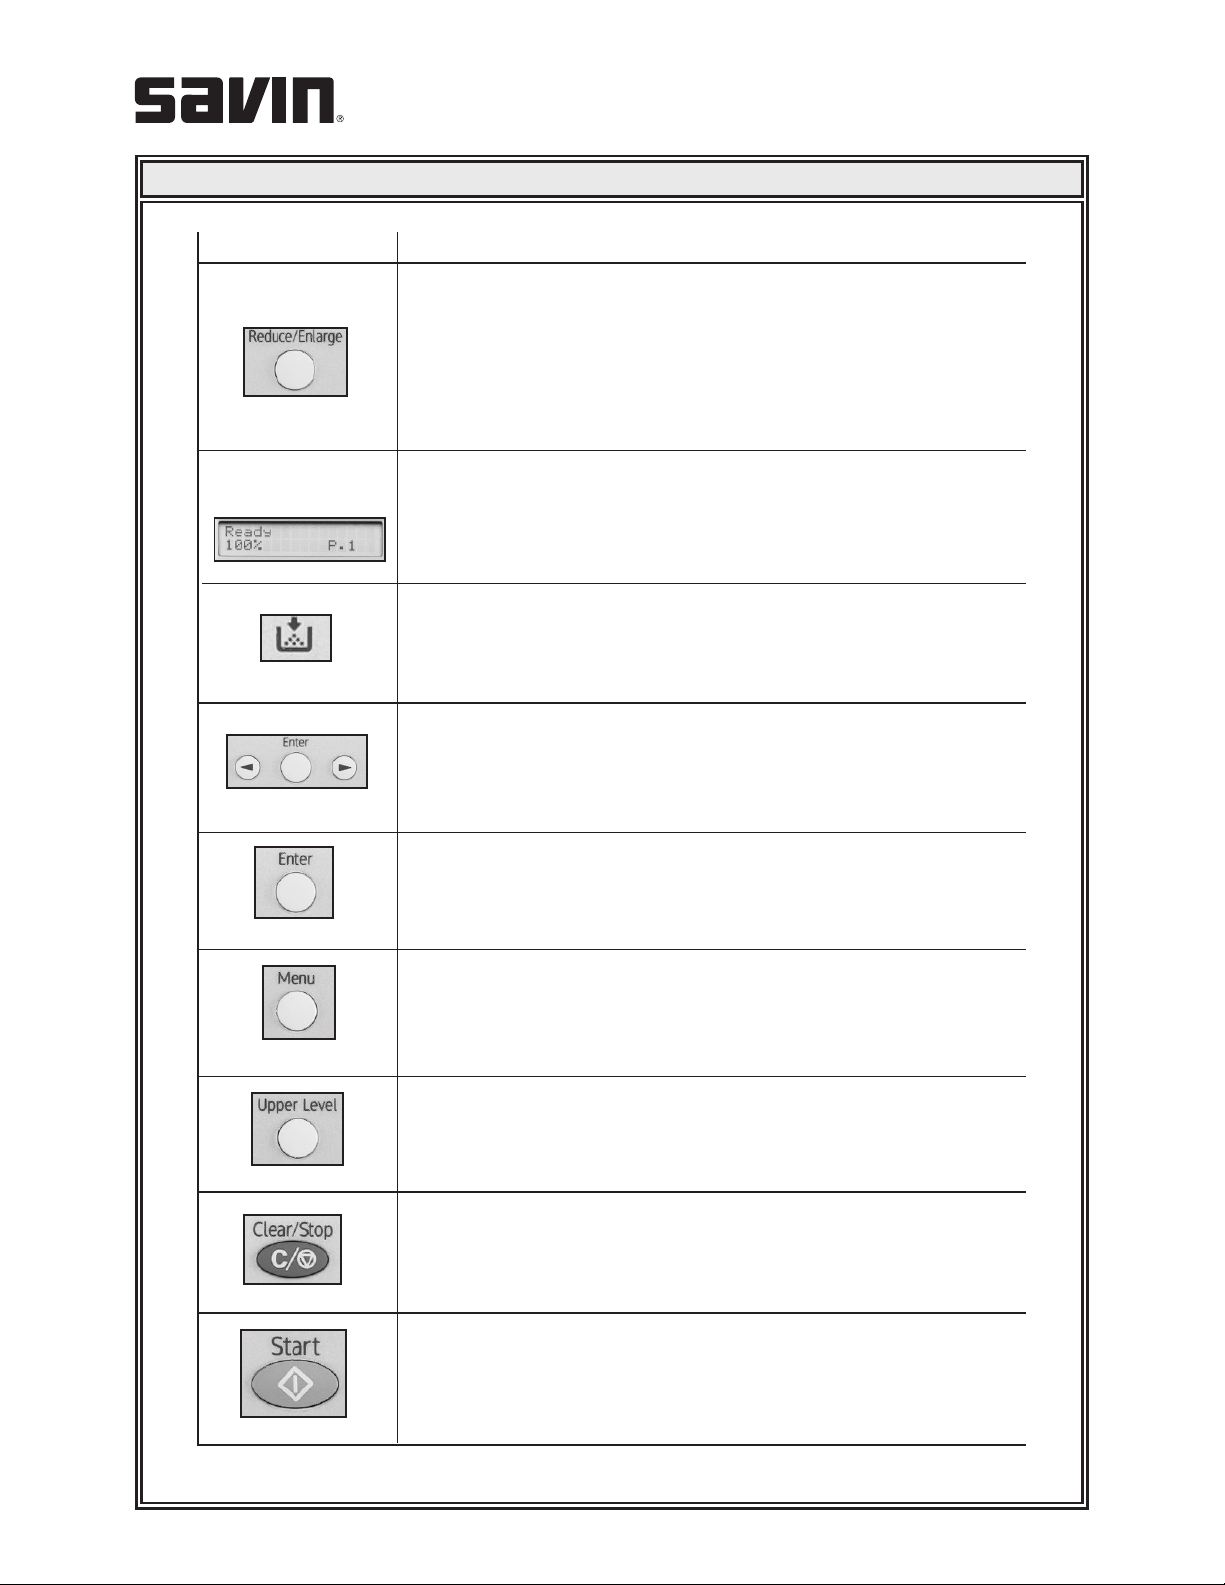
Control Panel Features
Button(s)
Description
Allows you to store frequently dialed fax numbers and then dial
them with the touch of a few buttons.
Allows you to shift the one-touch buttons to the numbers
21 through 40.
Allows you to access a list of your PC software programs that an
image can be scanned to. You must create the scan list using the
Printer Settings Utility provided with the system.
Also allows you to scan and save documents to a USB Flash Drive
and manage when it is inserted into the USB Flash Drive Port of
your system.
Adjusts the brightness of the documents for the current copy job.
Selects the document type for the current copy job.
Selects the number of copies.
Page 2
Control Panel Features (continued)
Button(s)
2-line x 16-
character LCD
Description
Makes a copy smaller or larger than the original.
Displays the current status and prompts during an operation.
Turns on when the toner cartridge is empty.
Used to scroll through the available options for the selected
menu item.
Confirms the selection on the display.
Enters Menu mode and scrolls through the menus available.
Sends you back to the upper menu level.
Stops an operation at any time. In Standby mode, clears/cancels
the copy options, such as the darkness, the document type
setting, the copy size, and the number of copies.
Starts a job.
Page 3

Control Panel Features (continued)
Button(s)
Description
Dials a number or enters alphanumeric characters.
Allows you to enter fax numbers.
Adjusts the resolution of the documents for the current fax job.
Allows you to send a fax to multiple destinations.
Allows you to store frequently dialed fax numbers as one
or two-digit speed dial or group dial numbers for automatic
dialing and edit the stored numbers. Also allows you to print
a Phone Book list.
In Standby mode, redials the last number or in Edit mode, inserts
a pause into a fax number.
Engages the telephone line.
Allows you to directly print files stored on a USB Flash Drive
when it is inserted into the USB Flash Drive Port located in the
front of your system.
Allows you to enter fax number, and shows memory status
and fax reception mode.
Page 4
AC205L/AC205
Operator Training Exercises
COPIER EXERCISES
Job #1 Reduced/Enlarged Copy
Demonstrates: Reducing or enlarging the size of a copied image, from 25% to 400% when
you copy originals from the platen or 25% to 100% from the Automatic
Document Feeder.
To select from the predefined copy sizes:
Instructions: 1. Press “Reduce/Enlarge.”
2. Press “Reduce/Enlarge” or the scroll button ( or ) to find the size
setting you want.
3. Press “Enter” to save the selection.
4. Press “Start” to begin copying.
To fine-tune the size of the copies:
Instructions: 1. Press “Reduce/Enlarge.”
2. Press “Reduce/Enlarge” or the scroll button ( or ) until
“Custom: 25-100%” or “Custom: 25-400%” displays on the bottom line.
3. Press “Enter.”
4. Press the scroll button ( or ) until the copy size you want appears on
the display or you can enter the value using the number keypad.
5. Press “Enter” to save the selection.
6. Press “Start” to begin copying.
▲
▲
▲
▲
▲
▲
Job #2 Auto Fit
Demonstrates: Automatically reducing or enlarging the original image to fit on the paper
currently loaded in the system.
Instructions: 1. Place the document to be copied on the platen and close the cover.
2. Press “Special Copy.”
3. Press “Special Copy” or the scroll button ( or ) until “Auto Fit” appears
on the bottom line.
4. Press “Enter” to make your selection.
5. Press “Start” to begin copying.
▲
▲
Page 5

Job #3 2 Sides on 1 Page (ID Copy)*
Demonstrates:
Instructions: 1. Place the document to be copied on the platen and close the cover.
*This feature does not work when using the Automatic Document Feeder.
Copying 2-sided original document on one side of paper from the platen.
2. Press “Special Copy.”
3. Press “Special Copy” or the scroll button ( or ) until “2 sides in 1 pg”
displays on the bottom line.
4. Press “Enter” to make your selection.
5. Press “Start” to begin copying. Your system begins scanning the
front side.
6. When “Set Backside” displays on the bottom line, open the platen then flip
the document over. Close the platen.
7. Press “Start” again to complete copying.
▲
▲
Job #4 Collation Copying
Demonstrates: The sorting of copy jobs.
Instructions: 1. Load the documents to be copied in the Automatic Document Feeder.
2. Press “Special Copy.”
3. Press “Special Copy” or the scroll button ( or ) until “Copy Collate”
displays on the bottom line.
4. Press “Enter” to make your selection.
5. Press the number “3”.
6. Press “Start” to begin copying.
▲
▲
Page 6

AC205L/AC205
Operator Training Exercises
PRINTING EXERCISES
Job #1 Printing from the USB Flash Drive
Demonstrates: Printing files (PRN, BMP, TIFF, JPEG) stored on the USB Flash Drive.
Instructions: 1. Insert the USB Flash Drive into the USB port in the front of your system.
Your system will automatically detect the USB Flash Drive and read data
stored to it.
2. Press the scroll button ( or ) to select the folder or file you want to
print and press “Enter” twice.
3. Press 3 to output 3 copies of the file.
4. Press “Enter” to output the prints.
5. Select “Yes” to print another job or “No” if you are done printing from the
USB Flash Drive.
6. Press “Clear/Stop” to return to Standby Mode.
▲
▲
Job #2 N-Up Printing
Demonstrates: Printing multiple pages on one sheet of paper (up to 16 pages on
one sheet).
Instructions: 1. Open the document you want to print.
Click “File” then select “Print” and choose “Type 103” from your list
2.
of printers.
3. Click “Properties” and select the “Layout” tab.
4. Choose “Multiple Pages per Side” from the “Type” drop-down list.
Select the number “6” on the “Pages per Side” drop-down list.
5.
6. Select “Down then Right” on the “Page Order” drop-down list.
7. Check “Print Page Border” to print a border around each page
on the sheet.”
8. Click the “Paper” tab and select the paper source, size and type.
9. Click “OK” twice to print the document.
Page 7

Job #3 Using Watermarks
Demonstrates: Printing text over an existing document.
Using an Existing Watermark
Instructions: 1. Open the document you want to print.
2. Click “File” then select “Print” and choose “Type 103” from your list
of printers.
3. Click “Properties” and select the “Extras” tab.
4. Select “Draft” from the “Watermark” drop-down list.
5. Click “OK” twice to print the document.
Creating a Watermark
Instructions: 1. Open the document you want to print.
2. Click “File” then select “Print” and choose “Type 103” from your list
of printers.
3. Click “Properties” and select the “Extras” tab.
4. Click “Edit” in the “Watermark” section.
5. Enter the text “Version 2” in the “Watermark Message” box.
6. Click on the “First Page Only” box to only print on the first page of
the document.
7. Change the Angle to “65” Degrees.
8. Choose a different font, from the “Font Attributes/Name” drop-down list.
9. Choose a different “Style”, “Size” and “Shade” from the “Font Attributes”
drop-down list.
10. Click “OK.”
11. Type “Version 2” in the “Favorites” box.
12. Click on “Save.”
13. Click “OK” twice to print the document.
Page 8

Job #4 Creating a New Page Overlay
Demonstrates:
Instructions: 1. Create a document containing the text or image for use in a new page
NOTE: The file will not print, but will be stored on your computer hard disk drive.
Instructions: 1. Create or open the document you want to print.
Printing text or an image stored on your computer hard disk drive onto your
documents such as a company logo.
Creating a New Page Overlay
overlay. Position the items exactly as you wish them to appear when
printed as an overlay. Save the file.
2. Select “File” then “Print.”
3. Select the “Print Driver Type 103” from the drop down menu.
4. Select “Properties.”
5. Click on the “Extras” tab and click “Edit” in the “Overlay” section.
6. Click on “Create Overlay.”
7. In the “Create Overlay” window, type “Logo” in the “File Name” box.
Select the destination path if necessary. The default is c:\Formover.
8. Click “Save.”
9. Click “OK” four times to finish creating.
Using a Page Overlay
2. Select “File” then “Print.”
3. Select the “Printer Driver Type 103” from the drop down menu.
4. Select “Properties.”
5. Click on the “Extras” tab.
6. Select the overlay you want to print from the “Overlay” drop-down list.
7. If the overlay file you want doesn’t appear on the Overlay List, click “Edit”
and “Load Overlay”, and select the overlay file.
8. Click “Open.” Then select the overlay from the “Overlay List”.
9. If necessary, click “Confirm Page Overlay When Printing.” This will
create a message window each time you submit a document for printing
asking you to confirm your wish to print an overlay on the document.
10. Click “OK” twice until the printing starts.
Page 9

AC205L/AC205
Operator Training Exercises
SCANNING EXERCISES
Job #1 Scan to an Application (i.e. Paint or Adobe PhotoShop)
from the Control Panel
Demonstrates: Scanning a document to your PC from the control panel of the system.
Instructions: 1. Load the document(s) face up into the Automatic Document Feeder or
place a single document face down on the document glass.
2. Press “Scan To.” Press the scroll button ( or ) until “Application”
appears on the bottom line.
3. Press “Enter” and press the scroll button ( or ) to select an application
to which you want to send the scanned image.
4. Press “Enter.”
▲
▲
▲
▲
Job #2 Scan to Email Using SmarThru*
Demonstrates: Scanning a document to E-mail using SmarThru software.
Instructions: 1. Load the document(s) face up into the Automatic Document Feeder or
place a single document face down on the document glass.
2. Click on “Start” from your PC. Choose “Programs” and select
“SmarThru.”
3. Click on “Scan To”, then “E-mail.”
4. Click on “Prescan.” Then click on “Continue.”
5. Adjust the “Image Type”, “Resolution”, “Scan Area” and “Source Scan.”
6. Click on “Scan.”
7. Click on “No” to not scan another image.
8. Click “Continue.”
9. Change the “File Name” to “Test.”
10. Change the “Type of File” to TIFF.”
11. Click on “Scan To.”
12. Type in the E-mail Address and Click on “Send.”
*Outlook Express 5.0 or later is required.
Page 10

Job #3 Scan to OCR Using SmarThru
Demonstrates:
Instructions:
Scanning a document to the OCR program for text recognition.
1. Load the document(s) face up into the Automatic Document Feeder or
place a single document face down on the document glass.
2. Click on “Start” from your PC. Choose “Programs” and select
“SmarThru.”
3. Click on “Scan To”, then “OCR.”
4. Click on “Prescan.” Then click on “Continue.”
5. Using the “Select” tool on the top left outline your document.
6. Adjust the “Image Type”, “Resolution”, and “Source.”
7. Choose “Selection” for “Scan Area.”
8. Click on “Scan.”
9. Click on “No” to not scan another image.
10. Click on “Continue.”
11. Choose the folder you would like to store the scan in from the “In” area.
12. Change the “File Name” to “Test 2”.
13. Change the “File Type” to “Word.”
14. Click on “Scan To.”
Job #4 Scanning to the USB Flash Drive
Demonstrates: Scanning a document and saving the scanned image on the
USB Flash Drive.
Scanning with Default Settings
Instructions: 1. Load the document face up in the Automatic Document Feeder or place
a single document face down on the platen.
2. Insert the USB Flash Drive into the USB Flash Drive Port located on
front, left panel of the system.
3. Press “Scan to” on the control panel. USB Memory will appear on the
bottom line of the display.
4. Press “Enter.” The display will show the available memory space.
5. Auto Scan will appear on the bottom line of the display. Press “Enter” to
start scanning.
6. When using the platen, “Another Page” will appear on the display. Press
the scroll button ( or ) until “No” appears and then press “Enter.”
▲
▲
Page 11

Job #5 Backing Up Data to the USB Flash Drive
Demonstrates: Backing up your Phone Book entries and the system settings to the
USB Flash Drive.
To Back Up the Data
Instructions: 1. Insert the USB Flash Drive into the USB Flash Drive Port located on
front, left panel of the system.
2. Press “Menu” until “Machine Setup” appears on the top line of
the display.
3. Press the scroll button ( or ) until you see “Export Setting” on the
bottom line. Press “Enter.”
4. Press the scroll button ( or ) until “Phone Book” appears to back up
the Phone Book entries or “All Settings” to back up the system settings.
Press “Enter.”
5. The data is now backed up on the USB Flash Drive.
To Restore the Data
Instructions: 1. Insert the USB Flash Drive into the USB Flash Drive Port located on
front, left panel of the system.
2. Press “Menu” until “Machine Setup” appears on the top line of
the display.
3. Press the scroll button ( or ) until you see “Import Setting” on the
bottom line. Press “Enter.”
4. Press the scroll button ( or ) until “Phone Book” appears to restore
the Phone Book entries or “All Settings” to restore the system settings.
Press “Enter.”
5. Press the scroll button ( or ) until the back up file appears and
press “Enter.”
6. Press “Enter” to select “Yes” to restore the back up file to the system.
▲
▲
▲
▲
▲
▲
▲
▲
▲
▲
Page 12

AC205L/AC205
Operator Training Exercises
FAXING EXERCISES
Job #1 One Touch Dialing
Demonstrates: Storing frequently dialed fax numbers in the 40 one-touch buttons on
the control panel. The “Shift” button enables you to store the 21-40
one-touch buttons.
Storing a Number for One-T
Instructions: 1. Press and hold one of the one-touch dial buttons for about 2 seconds.
2. Enter the number you want to store using the number keypad and
press “Enter.”
3. Enter the name you want to store using the number keypad.
To advance to the next letter, use the arrows.
4. Press “Enter” when the name appears correctly.
Sending a Fax using a One-Touch Number
Instructions: 1. Load the document(s) face up in the Automatic Document Feeder or
place a single document face down on the platen.
2. Press and hold the one-touch button where you stored the appropriate
fax number.
3. The document will scan into memory and will be sent when the receiving
fax machine answers.
ouch Dialing
Page 13
Job #2 Speed Dialing
Demonstrates: Storing frequently dialed fax numbers on one, two or three digit speed
locations (0-199).
Storing a Number for Speed Dialing
Instructions: 1. Press “Phone Book” on the control panel.
2. Press “Phone Book” or the scroll button ( or ) to display “Store&Edit”
on the bottom line of the display. Press “Enter.”
3. When “Speed Dials” appears on the display, press “Enter.”
4. Enter a speed dial number between 0 and 199, using the number
keypad or the scroll button ( or ) and press “Enter.”
5. Enter the fax number you want to store using the number keypad and
press “Enter.”
6. Enter the name you want to store using the number keypad.
To advance to the next letter, use the arrows.
7. Press “Enter” when the name appears correctly.
Sending a Fax using a Speed Dial Number
Instructions: 1. Load the document(s) face up in the Automatic Document Feeder
or place a single document face down on the platen.
2. Press and hold the speed dial number. The entry’s name will briefly
be displayed.
3. The document will be scanned into memory, the fax number will be
automatically dialed and the document will be sent when the receiving
fax machine answers.
▲
▲
▲
▲
Job #3 Searching for a Number in Memory with
a Particular First Letter
Demonstrates:
Instructions:
Searching for a number in the system’
name associated with the number.
Press “Phone Book.”
1.
2. When “Search&Dial” appears, press “Enter.”
3. Press the button labeled with the letter you want to search.
Press the scroll button ( or ) to display the next name.
4.
5. When the name and/or number you want displays, press “Start” or
“Enter” to dial.
▲
s memory using the first letter of the
▲
Page 14

Job #4 Printing a Phone Book
Demonstrates: Printing the Phone Book list which contains the automatic dial settings,
which have been saved in the system.
Instructions: 1. Press “Phone Book.”
2. Press “Phone Book” or the scroll button ( or ) until “Print” appears on
the bottom line of the display. Press “Enter.”
▲
▲
 Loading...