

Page 1

9. Key Operator Tools
Key Operator Tools
These settings allow you to set up functions you frequently use as well as store
important information, such as your fax machine's identification. In addition,
you can also customize the default settings of each function to suit your requirements. The Key Operator Tools settings are split into the following three categories:
❖
System Settings⇒ P.230
Use to store your own name and fax number, the type of line your machine is
connected to, Polling ID and other IDs, Internet Fax Settings (option required)
etc.
Also use to adjust the sounds that the machine makes, change the date and
time, and check on how many pages the machine as sent or received.
❖
Initial Set Up⇒ P.259
Use to set up Collate, Authorized Reception, Specified Tray, Memory Lock,
TX/RX File In HD, Specified Senders, Backup File Transmission, Program
Scan Area etc.
❖
Box Settings⇒ P.289
With these settings you can register, edit and delete Personal Boxes, Information Boxes, and Transfer Boxes.
Note
❒
For the order in which the Key Operator Tools settings are displayed,
seeP.322
❒
For detailed information on the above functions, refer to the page reference
given.
❖
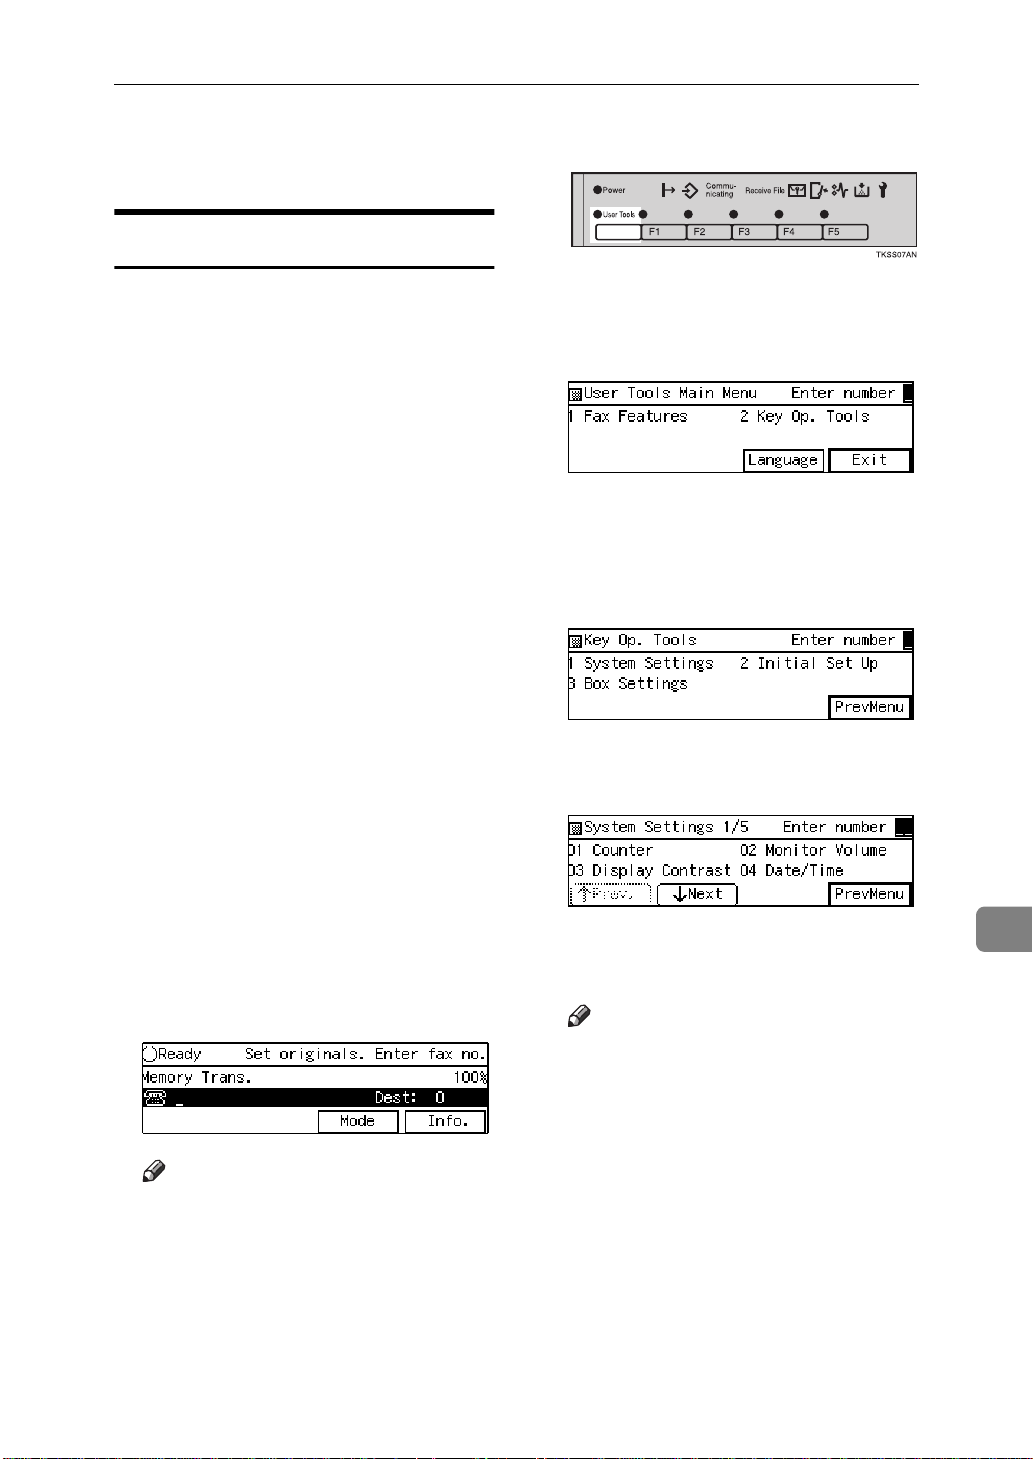
Navigating Menus
• To access the Key Operator Tools, enter the code for "Kep Op. Tools"
• Press
• Press
• When you have finished, press
• Press
“Function List”
from the User Tools main menu, then press the
onds.
↑
Prev.
[
PrevMenu
[
es to the Key Operator Tools settings you have made are not applied.
Cancel
[
menu.
.
{
}
#
key within 3 sec-
↓
Next
]
[
or
]
to move to the previous menu.
]
to cancel the current setting and return to the previous
]
to switch between screens.
OK
[
]
. If you do not press
[OK]
, any chang-
229
Page 2

Key Operator Tools
System Settings
Counters
This function allows you to check the
total number of transmitted, received,
scanned, and printed pages on the
display.
• Transmissions
: Total number of transmitted pages
• Receptions
: Total number of received pages
•Scanning
: The combined total number of
pages that have been scanned in
when copying and sending faxes.
•Printing
: The combined total number of
pages that have been printed
through fax reception, copying,
and PC printing (option).
C Enter the code for “Key Op.
Tools” with the number keys.
Then press the
The “Key Op. Tools” main menu
appears.
key.
}
{
#
D Enter the code for “System Set-
tings” with the number keys.
E Enter the code for “Counter” with
the number keys.
9
A Make sure that the machine is in
standby mode.
Note
❒
If the “Fax Features” or “Key
Op. Tools” screen is shown,
{
press the
other display is shown, press
the
key.
B Press the
User Tools
{
Clear Modes/Energy Saver
{
User Tools
}
key. If any
key.
}
The totals are displayed.
F When you have checked the total
}
pages, press
Note
❒
Press
switch between page 1 and 2.
Page 1 shows the total number
of pages sent and received, page
2 shows the total number of
pages scanned and printed.
G Press
↑
[
PrevMenu
[
OK
[
Prev.
.
]
]
or
twice.
]
[
↓
Next
]
to
230
Page 3
System Settings
H Press
mode.
to return to standby
Exit
]
[
Monitor Volume
You can change the volume of the following sounds the machine makes:
❖
On Hook
{
Sounds made when the
}
Dial
key has been pressed.
❖
Transmission
Sounds made when the machine is
sending a message.
❖
Reception
Sounds made when the machine is
receiving a message.
❖
Dialling
Sounds made after pressing the
}
{
Start
key while establishing a
connection with the other party.
❖
Scroll Key
Sound made when an operation
panel key is pressed.
On Hook
B Press the
{
User Tools
key.
}
C Enter the code for “Key Op.
Tools” with the number keys.
Then press the
The “Key Op. Tools” main menu
appears.
key.
}
{
#
D Enter the code for “System Set-
tings” with the number keys.
E Enter the code for “Monitor Vol-
ume” with the number keys.
❖
Alarm
Sound made when a cover is
opened etc.
A Make sure that the machine is in
standby mode.
Note
❒
If the “Fax Features” or “Key
Op. Tools” screen is shown,
{
press the
other display is shown, press
the
key.
User Tools
{
Clear Modes/Energy Saver
}
key. If any
F Select an item you want to adjust
pressing
Note
❒
On Hook, Transmission, Reception, Dialling, Scroll Key, and
Alarm are shown in that order.
}
↑
[
Prev.
and
]
[
↓
Next
9
.
]
231
Page 4

Key Operator Tools
❖
On Hook
G Adjust the volume using the 0 or
1 keys and press
OK
[
.
]
A Make sure that the machine is in
standby mode.
Note
❒
If the “Fax Features” or “Key
Op. Tools” screen is shown,
{
press the
other display is shown, press
the
key.
User Tools
{
Clear Modes/Energy Saver
}
key. If any
}
9
Note
❒
When you press
volume setting is canceled and
the display shown in E appears
again.
❒
Lowest = OFF
H Press
I Press
by mode.
PrevMenu
[
Exit
]
[
twice.
]
to return to the stand-
Cancel
[
]
, the
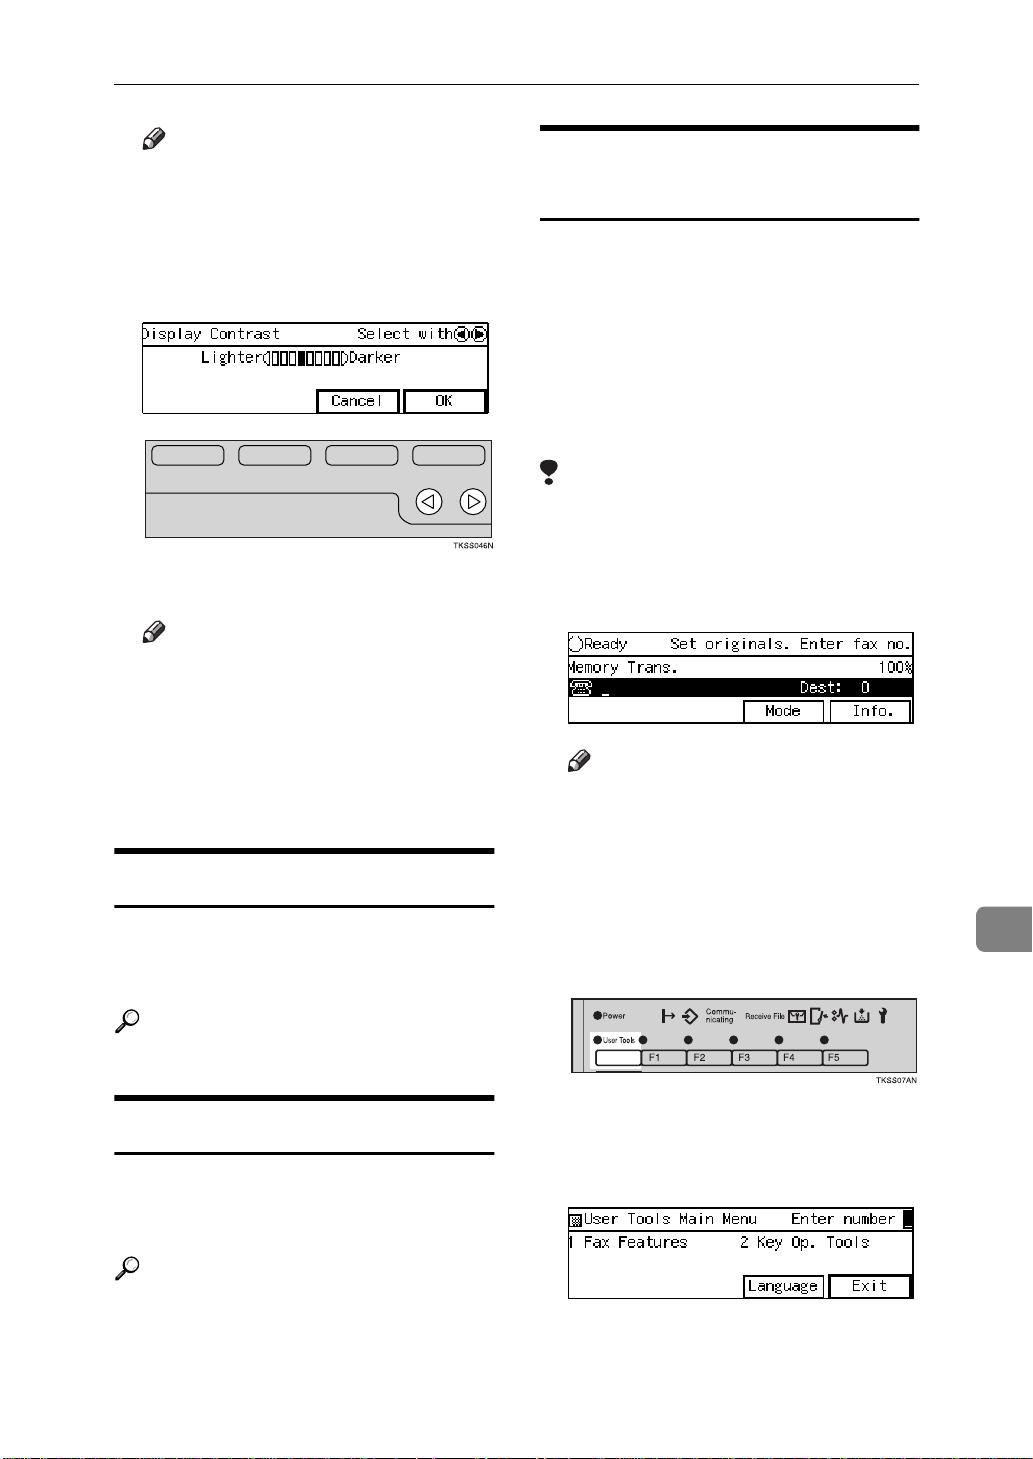
Adjusting the Dis play Contrast
Follow these steps to adjust the contrast of the operation panel display.
Eight levels of contrast are available.
B Press the
{
User Tools
key.
}
C Enter the code for “Key Op.
Tools” with the number keys.
Then press the
key.
}
{
#
D Enter the code for “System Set-
tings” with the number keys.
E Enter the code for “Display Con-
trast” with the number keys.
232
Page 5
System Settings
Note
❒
If the item you require is not
displayed, press
ext
]
until it is.
↑
[
Prev.
]
or
↓
N-
[
F Press the 0 or 1 keys to adjust
the contrast.
G Press
Note
❒
If you press
in step E reappears.
OK
[
.
]
Cancel
[
]
, the display
Registering the Economy
Transmission Time
Economy Transmission allow you to
take advantage of off-peak line rates
by delaying transmission of messages
until a later time.
Use the procedure below to program
the Economy Transmission Time for
when your phone rates are cheaper.
P.104
❒
“Send Later”
Limitation
You can program only one Economy Transmission time.
⇒
A Make sure that the machine is in
standby mode.
H Press
I Press
by mode.
PrevMenu
[
Exit
]
[
twice.
]
to return to the stand-
Date/Time
Use this function to set your machine's internal clock to the current
time and date.
Reference
“Date/Time”
P.20
Summer Time/DST
Whenever local custom requires advancing the clock or setting the clock
back, use this feature.
Reference
“Summer Time/DST”
P.21
Note
❒
If the “Fax Features” or “Key
Op. Tools” screen is shown,
{
press the
other display is shown, press
the
key.
B Press the
User Tools
{
Clear Modes/Energy Saver
{
User Tools
}
key. If any
key.
}
C Enter the code for “Key Op.
Tools” with the number keys.
Then press the
The “Key Op. Tools” main menu
appears.
key.
{
}
#
}
9
233
Page 6

Key Operator Tools
9
D Enter the code for “System Set-
tings” with the number keys.
E Enter the code for “Economy TX”
with the number keys.
F Enter the economy transmission
time with the number keys. To
change AM/PM, press
(North America only). When the
setting is correct, press
Note
❒
If you press
tered time is canceled and the
display shown in E appears
again.
G Press
PrevMenu
[
Cancel
[
twice.
]
AM ↔ PM
[
.
OK
[
]
]
, the en-
Note
❒
You can program the timer to turn
on or off twice daily over a 1-week
cycle.
❒
Incoming faxes are received to
memory (Substitute Reception)
when the heater is off and not
printed until the heater comes back
on.
❒
To edit settings already stored for
this feature, follow the same procedure for storing settings (the following procedure).
A Make sure that the machine is in
standby mode.
]
Note
❒
If the “Fax Features” or “Key
Op. Tools” screen is shown,
{
press the
other display is shown, press
the
key.
B Press the
User Tools
{
Clear Modes/Energy Saver
key.
{
User Tools
}
}
key. If any
}
H Press
by mode.
to return to the stand-
Exit
]
[
Night Timer
Use this feature to have the machine
turn it's heater on and off automatically at the times that you prescribe.
For example, by having the heater
turned off during the evening, on holidays or at other times when you are
absent, you can cut on power costs.
234
C Enter the code for “Key Op.
Tools” with the number keys.
Then press the
The Key Op. Tools menu appears.
key.
}
{
#
Page 7

System Settings
D Enter the code for “System Set-
tings” with the number keys.
E Enter the code for “Night Timer”
with the number keys.
Note
❒
If the item you require is not
displayed, press
ext
]
until it is.
↑
[
Prev.
]
or
↓
N-
[
F Press the 0 or 1 keys to turn the
timer on or off.
G Press
H Press
days of the week and timers (1 or
2).
[
[
Set
↓
.
]
to scroll through the
Next
]
To turn the timer Off
A Press the arrow keys to select
“Off”.
B Press
C Press
press
.
OK
]
[
PrevMenu
[
.
Exit
[
]
twice, then
]
I Press the
current timer setting.
{
key to clear the
}
Stop
J Enter the time in 24-hour format
on the number keys.
Note
❒
If you make a mistake, press the
{
}
Clear
key and enter it again.
K Press the 0 or 1 keys to select
whether to turn the heater on or
off at this time.
9
235
Page 8

Key Operator Tools
Note
❒
If you are programming both
timers for this day, then press
↓
Next
[
er (e.g. “Set 2”) and repeat this
procedure.
❒
To set a timer for another day,
press
er and adjust it as necessary.
L Press
]
to display the other tim-
↓
Next
]
to display the tim-
.
]
OK
[
[
M Press
N Press
O Press
mode.
.
OK
]
[
PrevMenu
[
Exit
[
twice.
]
to return to standby
]
9
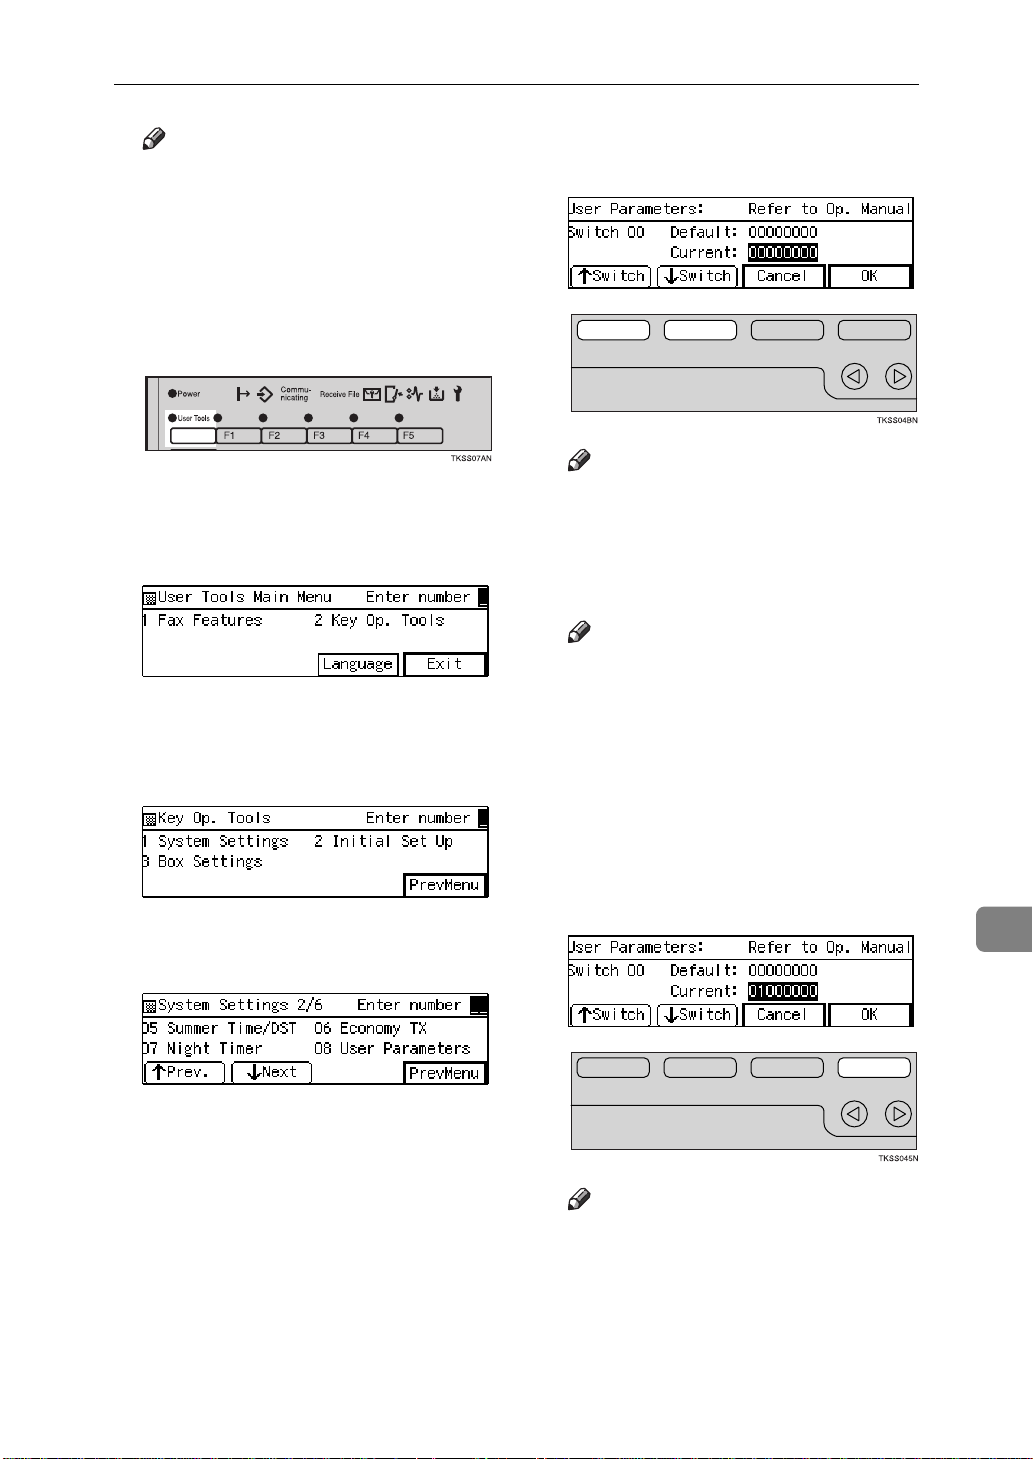
Changing the User Parameters
The User Parameters allow you to customize various settings to match your
needs.
Preparation
Access to some User Parameter Settings requires installation of optional
equipment or that other settings be made beforehand.
❖
Switches and Bits
User Parameters are divided into switches, and each switch is divided into
eight bits. The right most bit is bit 0 and the left most is bit 7.
Switch 00 01000000
↓↓↓↓↓↓↓↓
76543210
236
Page 9

❖
User Parameter List
*: Default Settings
Switch Bit Item 0 1
00 0 Stamp home position Off* On
3,2,1 Image density adjustment level home position
000: Normal*, 001: Lighten, 010: Darken
5,4 Resolution home position
00: Standard*, 01: Detail, 10: Fine
System Settings
6 Transmission Mode home position Memory
Transmission*
7 Halftone home position Off* On
01 7 Return the machine to the home set-
tings after each communication
02 0 Forwarding Mark Off On*
1 Center Mark Off* On
2 Print RX Time Off* On
3 TSI Print Off* On
4 Checkered Mark Off On*
5 CIL Print (optional G4 Unit re-
quired)
6 TID Print (optional G4 Unit re-
quired)
03 0 Print Communication Result Report
(Memory Transmission) automatically
Off On*
Off On*
Off* On
Off On*
Immediate
Transmission
9
2 Print File Reserve Report (Memory
Transmission) automatically
3 Print File Reserve Report (Polling
Reception) automatically
4 Print Communication Result Report
(Polling Reception)
5 Print Transmission Result Report
automatically
6 Print Polling Transmission Clear Re-
port automatically
7 Print Journal automatically Off On*
Off* On
Off* On
Off On*
Off On*
Off On*
237
Page 10

Key Operator Tools
Switch Bit Item 0 1
04 0 Print Confidential File Report auto-
matically
1 Print Fax On Demand Report auto-
matically (optional Fax On Demand
required)
7 Print portion of image on some re-
ports
05 0 Substitute Reception Off On*
1 Memory Reception if no RTI or CSI
received
3 High Temperature Standby mode Off* On
5,4 Restricted Access
00: Off*, 01: On, 10: On when the Night Timer is on
7,6 Energy Saver Mode
00: Low Power Standby mode*, 01: Fax Standby mode, 11: Do not
change to Energy Saver Mode
06 0 Print the TTI or CIL (optional G4
Unit required) on messages at the
other end
Off On*
Off* On
Off On*
Possible Not possible*
Off On*
9
2 ID Transmission Off* On
4 Batch Transmission Off On*
5 Skip Transmission home setting (op-
tional Function Upgrade Card re-
quired)
6 ISDN Directory Number Select
(SPID)
7 Backup File Transmission Off* On
07 2 Parallel Memory Transmission Off On*
3 Auto Reduction Off On*
7,6 Fax On Demand (optional Fax On Demand required)
00: Off*
01: The other party is not required to enter the password to access
the Fax On Demand service
10: The other party is required to enter the password to access the
Fax On Demand service
Off* On
Off On*
238
Page 11

Switch Bit Item 0 1
08 1,0 Collate
00: Off*
01: Messages from senders whose RTI/CSI/G4 TIDs are pro-
grammed are collated
11: Messages from senders whose RTI/CSI/G4 TIDs are not pro-
grammed are collated
3,2 Authorized Reception
00: Off*
01: Receive messages only from senders whose RTI/CSI/G4 TIDs
are programmed
11: Receive messages only from senders whose RTI/CSI/G4 TIDs
are not programmed
5,4 Specified Tray Selection
(optional Paper Supply Unit required)
00: Off*
01: Messages from senders whose RTI/CSI/G4 TIDs are pro-
grammed are printed from the main paper tray
11: Messages from senders whose RTI/CSI/G4 TIDs are not pro-
grammed are printed from the main paper tray
System Settings
7,6 Forwarding
00: Off*
01: Forward Messages only from senders whose RTI/CSI/G4 TIDs
are programmed
11: Forward Messages only from senders whose RTI/CSI/G4 TIDs
are not programmed
09 1,0 Memory Lock
00: Off*
01: Messages from senders whose RTI/CSI/G4 TIDs are pro-
grammed are not printed unless you enter the Memory Lock ID
11: Messages from senders whose RTI/CSI/G4 TIDs are not pro-
grammed are not printed unless you enter the Memory Lock ID
3,2 TX/RX File In HD
(optional 40M Expanded Memory Card and optional Function Up-
grade Card are required)
00: Off*
01: Messages from senders whose RTI/CSI/G4 TIDs are pro-
grammed are stored in the memory disk
11: Messages from senders whose RTI/CSI/G4 TIDs are not pro-
grammed are stored on the memory disk
9
239
Page 12

Key Operator Tools
Switch Bit Item 0 1
10 1 Two in One Off* On
2 Image Rotation Off* On
3 Page Reduction Off* On
4 Rotate Sort Off* On
9
7 Halftone mode Standard
Mode*
11 0 Transfer Request By Tonal Signals Off* On
1 Selection of tone (PB) or UUI after
tone (·) (when the optional G4 Unit
is installed)
5 Whether "To" prefixes the label
when Label Insertion is turned on.
6 Print Forwarded Messages Locally Off On*
7 Polling Files After Transmission Delete* Standby
12 2 Toner Saving Mode Off* On
4,3 Print Image Density
00: Normal*, 01: Lighten, 10: Darken
7 Copying Possible* Not Possible
13 1,0 Use the main G3 line as an internal extension, or an outside line.
00:Outside Line, 01:Extension (PREFIX), 10:Extension (GND),
11:Extension (FLASH)
3,2 Use the extended G3 line as an internal extension, or an outside line.
00:Outside Line, 01:Extension (PREFIX), 10:Extension (GND),
11:Extension (FLASH)
UUI PB*
No Yes*
Speed Mode
How to set the User Parameters
This example shows how to change
the default transmission mode when
the machine is shipped from Memory
Transmission to Immediate Transmission. To do this, we must change
switch 00 bit 6 from 0 to 1.
Important
• We recommend that you print
the User Parameter list and
keep it when you register or
change a user parameter.
240
⇒
P.242
“Printing the User Parame-
ter List”
• Do not change any bit switches
other than those shown on the
previous pages.
A Make sure that the machine is in
standby mode.
Page 13
System Settings
Note
❒
If the “Fax Features” or “Key
Op. Tools” screen is shown,
{
press the
other display is shown, press
the
key.
B Press the
User Tools
{
Clear Modes/Energy Saver
{
User Tools
}
key. If any
key.
}
C Enter the code for “Key Op.
Tools” with the number keys.
Then press the
The “Fax Features” menu appears.
key.
}
{
#
D Enter the code for “System Set-
tings” with the number keys.
F Make sure that switch 00 is dis-
played.
}
Note
❒
To show other switches, press
↑
Switch
[
G Press number key
bit 6 to 1.
Note
❒
Each time your press number
key 6, the value will switch between 1 and 0.
❒
The bits are displayed in ascending order from right to left,
the right most bit being bit 0.
❒
You can adjust several bits at
the same time from this screen.
]
or
↓
Switch
[
{
6
]
.
to change
}
E Enter the code for “User Parame-
ters” with the number keys.
H Press
❒
I Press
OK
]
[
Note
If you press
in step E reappears.
PrevMenu
[
.
9
cancel
[
]
twice.
]
, the display
241
Page 14

Key Operator Tools
J Press
by display.
Printing the User Parameter List
Print this list to see the current User
Parameter settings.
to return to the stand-
Exit
]
[
A Make sure that the machine is in
standby mode.
Note
❒
If the “Fax Features” or “Key
Op. Tools” screen is shown,
{
press the
other display is shown, press
the
key.
B Press the
User Tools
{
Clear Modes/Energy Saver
{
User Tools
}
key. If any
key.
}
E Enter the code for “Prt. User.
Param.” with the number keys.
F Press the
G Press
}
H Press
{
list.
Note
❒
If you press
printing starts, the printing
stops and the display shown in
E
appears again.
PrevMenu
[
to return to the stand-
Exit
]
[
by display.
key to print the
}
Start
Cancel
[
twice.
]
]
before
9
C Enter the code for “Key Op.
Tools” with the number keys.
Then press the
The “Fax Features” menu appears.
key.
}
{
#
D Enter the code for “System Set-
tings” with the number keys.
File Retention
If a connection could not be made to
the other party during a Memory
Transmission even though the number was redialed the stipulated number of times, this setting specifies
whether or not the file/document is
preserved in memory.
If a file/document is stored in memory, you can easily resent it without
having to scan it in again.
A Make sure that the machine is in
standby mode.
242
Page 15

System Settings
Note
❒
If the “Fax Features” or “Key
Op. Tools” screen is shown,
{
press the
other display is shown, press
the
key.
B Press the
User Tools
{
Clear Modes/Energy Saver
{
User Tools
}
key. If any
key.
}
C Enter the code for “Key Op.
Tools” with the number keys.
Then press the
key.
}
{
#
D Enter the code for “System Set-
tings” with the number keys.
E Enter the code for “File Reten-
tion” with the number keys.
F Press the 0 or 1 keys to select
the time or turn this feature off.
}
G Press
H Press
I Press
mode.
RTI/TTI
The RTI (Receive Terminal Identification) is used to identify your machine
to the other party when communicating with machines of the same make.
The TTI (Transmitter Terminal Identification) is printed on the header of
every fax you send and aids the other
party identify your fax messages.
Reference
P.21
.
OK
]
[
PrevMenu
[
Exit
[
“Registering your RTI and TTI”
twice.
]
to return to standby
]
9
Note
❒
If the item you require is not
↑
Prev.
displayed, press
ext
]
until it is.
[
]
or
G3-1 Analog Line
You need to register the following
items before you connect the machine
↓
N-
[
to a G3 analog line:
• PSTN Line Type
Select whether the connected line
uses tone or pulse dialing.
• CSI (up to 20 digits)
The CSI (Called Station Identification) is passed to the other party
when you send or receive a fax.
243
Page 16

Key Operator Tools
When the CSI is received, it is
shown on the display or printed on
reports on the receiver's or sender's machine. The CSI works even
if the receiver or sender uses a different make machine. The CSI can
be up to 20 characters long and
contain a plus sign (+), numbers
and spaces. Register your country
code, area code (minus the leading
zero) and your fax number in that
order.
Note
❒
The CSI feature is not available in
some countries.
❒
When using sending to Transfer
Stations or machines set up with
Transfer Boxes, you need to register the CSI with your own analog
number (the telephone number to
which your machine is connected)
so that the transfer station can return the Transfer Result report to
you. Be sure to enter a pause after
the area code.
C Enter the code for “Key Op.
Tools” with the number keys.
Then press the
The “Fax Features” menu appears.
key.
}
{
#
D Enter the code for “System Set-
tings” with the number keys.
E Enter the code for “G3-1 Analog
Line” with the number keys.
F Enter the code for “PSTN Line
Type” with the number keys.
9
A Make sure that the machine is in
standby mode.
Note
❒
If the “Fax Features” or “Key
Op. Tools” screen is shown,
{
press the
other display is shown, press
the
key.
B Press the
244
User Tools
{
Clear Modes/Energy Saver
User Tools
[
key.
]
}
key. If any
G Select your line type with the ar-
row keys then press
}
[
H Enter the code for “CSI” with the
number keys.
OK
.
]
Page 17

System Settings
I Enter your CSI then press
J Press
K Press
by mode.
PrevMenu
[
Exit
]
[
three times.
]
to return to the stand-
OK
[
.
]
G3-2 Analog Line
This function requires the optional G3
Unit.
You need to register the following
items before you connect the machine
to a second G3 analog line:
•PSTN Line Type
Select whether the connected line
uses tone or pulse dialing.
• CSI (up to 20 digits)
The CSI (Called Station Identification) is passed to the other party
when you send or receive a fax.
When the CSI is received, it is
shown on the display or printed on
reports on the receiver's or sender's machine. The CSI works even
if the receiver or sender uses a different make machine. The CSI can
be up to 20 characters long and
contain a plus sign (+), numbers
and spaces. Register your country
code, area code (minus the leading
zero) and your fax number in that
order.
Note
❒
The CSI feature is not available in
some countries.
❒
When using sending to Transfer
Stations or machines set up with
Transfer Boxes, you need to register the CSI with your own analog
number (the telephone number to
which your machine is connected)
so that the transfer station can return the Transfer Result report to
you. Be sure to enter a pause after
the area code.
A Make sure that the machine is in
standby mode.
Note
❒
If the “Fax Features” or “Key
Op. Tools” screen is shown,
{
press the
other display is shown, press
the
key.
B Press the
User Tools
{
Clear Modes/Energy Saver
{
User Tools
}
key. If any
key.
}
C Enter the code for “Key Op.
Tools” with the number keys.
Then press the
The Key Op. Tools menu appears.
key.
{
}
#
}
9
245
Page 18

Key Operator Tools
D Enter the code for “System Set-
tings” with the number keys.
E Enter the code for “G3-2 Analog
Line” using the number keys.
F Enter the code for “PSTN Line
Type” using the number keys.
G Select the desired line type and
press
OK
[
.
]
J Press
K Press
by mode.
PrevMenu
[
Exit
]
[
three times.
]
to return to the stand-
G3 Digital Line
This function requires the optional G4
Unit.
The following settings are available
for G3 communications over ISDN:
• Own Fax Number 1
Enter the number of the line the
machine is connected to.
• SPID (Own Fax Number 2)
Enter the number of SPID. If the
“ISDN Directory Number Select
(SPID)” setting in the User Parameters is turned off, the display
shows "Own Fax Number 2" instead of "SPID". These settings are
identical.
9
H Enter the code for “CSI” with the
number keys.
I Enter your CSI and press
OK
[
.
]
• Sub-address
• CSI (maximum 20 characters)
Enter the international identification number that is transferred to
the other party during transmission or reception.
Note
❒
Before storing the sub-address,
store the sub-address function in a
User Function key.⇒ P.211
signing User Function Keys”
❒
The CSI is an international identification number that is transferred
to the other party during transmission or reception. This information
appears on the display of the other
party's fax machine and is printed
on their lists and reports. The CSI
feature works with other manufacturer's fax machines that support
this feature.
“As-
246
Page 19

❒
The CSI can obtain digits 0-9, “+”
and spaces.
A Make sure that the machine is in
standby mode.
Note
❒
If the “Fax Features” or “Key
Op. Tools” screen is shown,
{
press the
other display is shown, press
the
key.
B Press the
User Tools
{
Clear Modes/Energy Saver
{
User Tools
}
key. If any
key.
}
System Settings
Note
❒
If the item you require is not
displayed, press
ext
]
until it is.
↑
[
Prev.
]
or
↓
N-
[
Registering your Own Fax
Number 1
A Enter the code for “Own Fax
Number 1” with the number
keys.
}
B Enter the fax number.
C Enter the code for “Key Op.
Tools” with the number keys.
Then press the
key.
}
{
#
D Enter the code for “System Set-
tings” with the number keys.
E Enter the code for “G3 Digital
Line” with the number keys.
C Press
OK
[
.
]
Registering a SPID (or Own Fax
Number 2)
A Enter the code for “SPID” with
the number keys.
Note
❒
When “Own Fax Number 2”
is displayed, the following
screen appears. Enter the
code for "Own Fax Number
2" with the number keys.
B Enter the fax number.
9
247
Page 20

Key Operator Tools
Note
❒
If you choose “Own Fax
Number 2”, the following
screen appears. Enter your
second fax number with the
number keys.
C Press
OK
[
.
]
Registering the Sub-address
A Enter the code for “Sub-ad-
dress” with the number keys.
B Enter the sub-address.
G4 Digital Line
This function requires the optional G4
unit.
Register these settings before connecting to the ISDN. You can store the
following items:
• Own Fax Number 1
Enter the fax number of the PSTN
the machine is connected to.
• SPID (Own Fax Number 2)
Enter the number of SPID. If the
“ISDN Directory Number Select
(SPID)” setting in the User Parameters is turned off, the display
shows "Own Fax Number 2" instead of "SPID". These settings are
identical.
• Sub-address
• TID (maximum 22 characters)
9
C Press
OK
[
.
]
Registering the CSI
A Enter the code for “CSI” with
the number keys.
B Enter the CSI.
C Press
F Press
G Press
mode.
PrevMenu
[
[
.
OK
[
]
three times.
]
to return to standby
Exit
]
A Make sure that the machine is in
standby mode.
Note
❒
If the “Fax Features” or “Key
Op. Tools” screen is shown,
{
press the
other display is shown, press
the
key.
B Press the
User Tools
{
Clear Modes/Energy Saver
{
User Tools
}
key. If any
key.
}
}
248
Page 21

System Settings
C Enter the code for “Key Op.
Tools” with the number keys.
Then press the
key.
}
{
#
D Enter the code for “System Set-
tings” with the number keys.
E Enter the code for “G4 Digital
Line” with the number keys.
Note
❒
If the item you require is not
↑
Prev.
displayed, press
ext
]
until it is.
[
Registering your Own Fax
Number 1
A Enter the code for “Own Fax
Number 1” with the number
keys.
]
or
↓
N-
[
Registering a SPID (or Own Fax
Number 2)
A Enter the code for “SPID” with
the number keys.
When Own Fax Number 2 is
displayed, the following screen
appears. Enter the code for
"Own Fax Number 2" with the
number keys.
B Enter the fax number.
Note
❒
If you choose Own Fax Number 2, the following screen
appears. Enter your second
fax number with the number
keys.
C Press
OK
[
.
]
Registering the Sub-address
A Enter the code for “Sub-ad-
dress” with the number keys.
9
B Enter the fax number.
C Press
OK
[
.
]
B Enter the sub-address.
C Press
OK
[
.
]
249
Page 22

Key Operator Tools
Registering the TID
A Enter the code for “TID” with
the number keys.
B Enter the code for “Country
Code” with the number keys.
C Enter your country code with
the number keys.
D Press
E Enter the code for “Own Digi-
tal No.” with the number keys.
OK
[
.
]
H Enter the code for “Terminal
Name” with the number keys.
I Enter the Terminal Name.
Reference
For how to enter characters,
“Entering and Modi-
.
.
OK
]
PrevMenu
to return to the stand-
]
.
]
three times.
]
J Press
K Press
F Press
G Press
by mode.
seeP.303
fying Text”
[
[
PrevMenu
[
Exit
[
Registering ID Codes
9
250
F Enter the Own digital Number
with the number keys.
Note
❒
You must store the Own Digital Number.
❒
Always enter a pause before
the area code.
G Press
OK
[
.
]
Use this procedure to register the following kinds of ID code:
❖
Confidential ID
This ID is usually required for
printing a message received with
the Confidential Reception feature.⇒ P.138
tial Message”
❖
Polling ID
This ID is required for using the
Transfer Request (⇒ P.124), Transfer Station (⇒ P.92), Default ID
Polling Transmission (⇒ P.120),
Default ID Polling Reception (
P.117), ID Transmission (⇒ P.84),
and the ID Reception (⇒ P.96)
functions.
“Printing a Confiden-
⇒
Page 23

❖
Memory Lock ID
This ID is required for printing a
message received using the Memory Lock feature.⇒ P.140
File Received with Memory Lock”
❖
Remote ID
Register the ID that is entered during a remote transfer request and
used as a password for the Fax On
Demand feature.
Limitation
❒
A Polling ID can be any combination of digits (0 - 9) and letters (A F) except for 0000 and FFFF. When
you use Transfer Request, Transfer
Station, or ID Transmission, register the same ID code as that registered on the sender's machine.
❒
A Confidential ID and Memory
Lock ID can be any a 4 digit numeric code except for 0000.
❒
Register a 4 digit number for the
Remote ID.
“Printing a
A Make sure that the machine is in
standby mode.
System Settings
C Enter the code for “Key Op.
Tools” with the number keys.
Then press the
The “Fax Features” menu appears.
key.
}
{
#
D Enter the code for “System Set-
tings” with the number keys.
E Enter the code for “ID Code” with
the number keys.
F Enter the code of the ID you wish
to register with the number keys.
Note
❒
If the “Fax Features” or “Key
Op. Tools” screen is shown,
{
press the
other display is shown, press
the
key.
B Press the
User Tools
{
Clear Modes/Energy Saver
key.
{
User Tools
}
}
key. If any
G Enter the ID code then press
}
Note
❒
For a Confidential ID, Memory
Lock ID, or a Remote ID use the
number keys to enter an ID
code. For a Polling ID, use the
number keys, and the Quick
Dial keys (A to F) to enter letters.
OK
[
.
9
]
251
Page 24

Key Operator Tools
❒
If you make a mistake, press the
{
}
Clear
key and enter the correct
code.
H Press
I Press
by mode.
PrevMenu
[
Exit
]
[
three times.
]
to return to the stand-
Note
❒
If the “Fax Features” or “Key
Op. Tools” screen is shown,
{
press the
other display is shown, press
the
key.
User Tools
{
Clear Modes/Energy Saver
}
key. If any
}
9
Transfer Report
When the optional G4 unit is installed,
register the G4 fax number.
Follow these steps to store the fax
number of the line your machine is
connected to as the return address for
when making transfer requests.
When you make a Transfer Request
from this machine, this number is
passed to the transfer station. The
transfer station then sends back the
Transfer Result Report to this fax
number.
You can store the following settings:
• G3 direct number
• G3 PABX number
• G4 fax number
Limitation
❒
If the line in being used (i.e. communication is in progress), you
cannot register or edit these settings. Please wait until the communication has finished.
❒
Transfer request transmission will
not function unless the return address is stored.
A Make sure that the machine is in
standby mode.
B Press the
{
User Tools
key.
}
C Enter the code for “Key Op.
Tools” with the number keys.
Then press the
key.
}
{
#
D Enter the code for “System Set-
tings” with the number keys.
E Enter the code for “Transfer Re-
port” with the number keys.
Note
❒
If the Item you require is not
displayed, press
ext
]
until it is.
↑
[
Prev.
]
or
↓
N-
[
252
Page 25

System Settings
Registering a G3 Direct Number
A Enter the code for “G3 Direct
Number” with the number
keys.
B Enter the fax number to use as
the return address.
Note
❒
You can store digits and
pauses as the G3 Direct number.
C Press
OK
[
.
]
Registering a G4 Fax Number
A Enter the code for “G4 Fax
Number” with the number
keys.
B Enter the fax number to use as
the return address.
Note
❒
You can store digits, pauses
and slash (sub-address) as
the G4 fax number.
C Press
OK
[
.
]
Registering a G3 PABX Number
A Enter the code for “G3 PABX
Number” with the number
keys.
B Enter the fax number to use as
the return address.
Note
❒
You can store digits and
pauses as the G3 PABX number.
C Press
OK
[
.
]
F Press
G Press
mode.
PrevMenu
[
Exit
[
three times.
]
to return to standby
]
Network Settings
Use of these settings requires the optional
NIC Fax Kit.
Adjust these settings to set up the Internet Fax Feature.
For details, please refer to the optional NIC Fax Kit manual.
System Parameter
Transmission
This feature sends information about
the condition of your machine to your
nearest service representative. Follow
9
253
Page 26

Key Operator Tools
these steps when your service representative requests you to.
Important
❒
This information is sent to the destination that has been registered in
your machine by a customer engineer.
A Make sure that the machine is in
standby mode.
Note
❒
If the “Fax Features” or “Key
Op. Tools” screen is shown,
{
press the
other display is shown, press
the
key.
User Tools
{
Clear Modes/Energy Saver
}
key. If any
E Enter the code for “System Param.
TX” with the number keys.
Note
❒
If the item require is not dis-
↑
Prev.
[
key.
}
Start
twice.
]
to return to the stand-
}
played, press
until it is.
F Press the
G Press
H Press
by mode.
PrevMenu
[
Exit
[
{
]
]
or
↓
[
Next
]
9
B Press the
{
User Tools
key.
}
C Enter the code for “Key Op.
Tools” with the number keys.
Then press the
key.
{
}
#
D Enter the code for “System Set-
tings” with the number keys.
Memory File Transfer
Follow this procedure if you wish to
send all messages currently stored in
memory to another fax and have
them printed out there (e.g. if your
machine cannot print for some reason).
Note
❒
Once all messages have been sent,
they are deleted from memory.
Limitation
❒
You cannot choose an e-mail address as the forwarding destination.
❒
Even if a transmission error occurs,
messages are not resent.
Note
❒
All messages are sent in a single
transmission.
254
Page 27

❒
All documents are not erased from
memory regardless of whether forwarding was successful or not.
❒
Details of the forwarding operation are not printed in the Journal.
A Make sure that the machine is in
standby mode.
Note
❒
If the “Fax Features” or “Key
Op. Tools” screen is shown,
{
press the
other display is shown, press
the
key.
User Tools
{
Clear Modes/Energy Saver
}
key. If any
E Enter the code for “Mem. File
Transf” with the number keys.
Note
❒
If the item require is not dis-
↑
Prev.
played, press
until it is.
❒
If no messages are stored in
memory, the following message
is displayed: “
document found.
[
No matching
”
F Enter the number of the fax ma-
}
chine you wish to send to.
System Settings
↓
or
[
Next
]
]
B Press the
{
User Tools
key.
}
C Enter the code for “Key Op.
Tools” with the number keys.
Then press the
key.
{
}
#
D Enter the code for “System Set-
tings” with the number keys.
Note
❒
If you make a mistake, press the
{
}
Clear
key or
try again.
❒
❒
G Press the
❒
{
The
character at a time, and the
{
line.
If you press
in step E reappears.
Note
When transmission has finished, the machine will return
to standby mode.
Clear
}
Stop
key deletes the whole
{
Start
{
Stop
}
key deletes one
Cancel
[
key.
}
Reset PM Counters
}
key and
]
the display
9
Follow these steps when replacing
the ADF Maintenance Kit or Fusing
Maintenance Kit to clear the counters.
255
Page 28

Key Operator Tools
• When replacing the ADF Maintenance Kit, clear the ADF roller
counter.
• When replacing the Fusing Maintenance Kit, clear the fusing unit
counter and the transfer roller
counter (clearing one counter will
automatically clear the other).
A Make sure that the machine is in
standby mode.
Note
❒
If the “Fax Features” or “Key
Op. Tools” screen is shown,
{
press the
other display is shown, press
the
key.
User Tools
{
Clear Modes/Energy Saver
}
key. If any
E Enter the code for “Reset PM
Counter” with the number keys.
Note
❒
If the item you require is not
↑
or
[
[
↓
Next
}
displayed, press
ext
]
until it is.
F Press
counter you wish to clear is displayed.
↑
[
Prev.
]
Prev.
]
or
until the
]
↓
N-
[
9
B Press the
{
User Tools
key.
}
C Enter the code for ”Key Op.
Tools” with the number keys.
Then press the
key.
}
{
#
D Enter the code for “System Set-
tings” with the number keys.
Note
❒
When changing the ADF Maintenance Kit, clear the ADF roller
counter.
❒
When changing the Fusing
Maintenance Kit, clear the fusing unit or transfer roller
counter (clearing one counter
will automatically clear the other).
G Press
[
Reset
.
]
256
Page 29

System Settings
Note
❒
If you press
step E will reappear.
H Press
Note
❒
If you press
step F will reappear.
I Press
Yes
[
OK
[
.
]
.
]
OK
[
]
, the display in
No
[
]
, the display in
with your machine. The service technician can also use RDS to change
some of your machine's settings if
you request it.
A Make sure that the machine is in
standby mode.
Note
❒
If the “Fax Features” or “Key
Op. Tools” screen is shown,
{
press the
other display is shown, press
the
key.
B Press the
User Tools
{
Clear Modes/Energy Saver
{
User Tools
}
key. If any
key.
}
}
If you wish to clear another
counter, press
select the item.
J Press
K Press
by mode.
PrevMenu
[
Exit
[
↑
Prev.
[
twice.
]
to return to the stand-
]
]
or
[
↓
Next
]
to
RDS (Remote Diagnostic
System)
If your machine has a problem, a service representative can perform various diagnostic tasks over the
telephone line from the service station to try to find out what is wrong
C Enter the code for ”Key Op.
Tools” with the number keys.
Then press the
key.
}
{
#
D Enter the code for “System Set-
tings” with the number keys.
E Enter the code for “RDS” with the
number keys.
9
257
Page 30

Key Operator Tools
Note
❒
If the item you require is not
displayed, press
ext
]
until it is.
↑
[
Prev.
]
or
↓
N-
[
F Press the 0 or 1 keys to turn this
function on or off.
9
G Press
H Press
I Press
by mode.
.
OK
]
[
PrevMenu
[
Exit
]
[
twice.
]
to return to the stand-
258
Page 31

Initial Set Up
Initial Set Up
This section describes how to set up
the following functions:
“Collate”
•
“Authorized Reception”
•
“Specified Tray”
•
“Forwarding”
•
“Memory Lock”
•
“TX/RX File In HD”
•
“Backup File Transmission Settings”
•
⇒
P.284.
“Program Scan Area”
•
Limitation
❒
The above functions are not available for the e-mail reception feature provided by the optional NIC
Fax Kit.
Specified Senders
-
⇒
P.260.
⇒
⇒
P.268.
⇒
P.265.
P.276.
⇒
P.279.
⇒
⇒
P.262.
P.286.
cept those from these fax
machines.
When registering a Specified Sender,
you need to know the RTI or CSI that
of their fax machine (if the other party's fax machine is of the same make,
register their RTI, otherwise register
their CSI). Ask the other party, or if
you have received messages from
them before, you can easily find this
out by checking the Journal.
When you register or edit Specified
Senders we recommend that you
print the Specified Sender list and
keep it nearby.
Note
❒
If the other party has not registered
their RTI or CSI, you cannot register them as a Specified Sender.
All the above functions, with the exception of Backup Transmission and
Program Scan Area, can be applied to
all incoming messages. Alternatively,
you can choose the senders from who
you wish to have these functions applied to by registering the identifications of their fax machines as
Specified Senders.
When registering Specified Senders,
you can have the machine treat messages from these fax machines in two
ways:
• Only apply the function to messages from Specified Senders, e.g.
only forward messages from these
fax machines.
• Apply the function to all messages
except those from Specified Senders, e.g. forward all messages ex-
Wildcards
-
The combined total number of Specified Senders that you can register for
Collate, Authorized Reception, Specified Tray, Forwarding, Memory Lock
and TX/RX File Save is 30 (50 when
the optional function expander card
is installed).
However, you can vastly increase the
number of senders that are covered
by using wildcards.
For example, if you wish to accept
messages from all 150 branches of
XYZ company (using Authorized Reception) and forward them on to head
office (using Forwarding), register
“XYZ” as a wildcard for each of these
functions. If the RTIs of all branches
contain an “XYZ” somewhere in the
9
259
Page 32

Key Operator Tools
9
RTI, messages coming in from them
will be accepted and sent on to head
office.
Opening the Initial Set Up
Menu
To access any of the function settings
described in this section, you need to
navigate to the Initial Set Up menu by
following the steps below.
A Make sure that the machine is in
standby mode.
Note
❒
If the “Fax Features” or “User
Tools” menu is shown, press the
{
User Tools
display is shown, press the
{
Clear Modes/Energy Saver
B Press the
}
key. If any other
key.
{
User Tools
}
}
key.
C Enter the code for “Key Op.
Tools” with the number keys
then press the
{
}
#
key.
The “Initial Set Up” menu appears.
E Continue from step B of any of
the procedures described in the
rest of this section.
Collate
(Printing Multiple Copies of Messages From Certain Senders)
Use this feature to have the machine
print multiple copies of messages
from Specified Senders. If no Specified Senders are registered, the machine prints multiple copies of all
messages, regardless of the sender.
You can register the following items
with the procedure below:
• Number of copies (1-9)
• Specified Senders (maximum 30
items, each G3 item can be up to 20
characters long, each G4 item can
be up to 24 characters long)
• Wildcards
Limitation
❒
Multiple copies cannot be made of
messages received using Polling
Reception, Confidential Reception
or Memory Lock.
Setting up Collate
The Key Operator Tools menu appears.
D Enter the code for “Initial Set Up”
with the number keys.
260
Reference
For how to delete Specified Senders, see P.282
Senders”
For how to print a list of Specified
Senders, see P.283
Specified Sender List”
.
A Follow steps A–D on
Initial Set Up Menu”
“Deleting Specified
“Printing the
.
“Opening the
⇒⇒
P.260. to
Page 33

Initial Set Up
bring up the “Initial Set Up”
menu.
B Enter the code for “Collate” with
the number keys.
Note
❒
If the item you require is not
shown, press
until it is.
C Press
Sender
[
↑
Prev.
[
.
]
]
or
[
↓
Next
E Enter the 2-digit code of the Spec-
ifed Sender you wish to register
with the number keys.
Note
❒
If you make a mistake, press the
{
}
Clear
key and try again.
]
F Press
RTI/CSI
[
.
]
Note
❒
If you do not wish to register a
Specified Sender, proceed to
step M.
D Enter the code for “Program
Sender” with the number keys.
Note
❒
If you do not register any Specified Senders, multiple copies of
all incoming messages will be
made.
I Choose whether to store this item
G Enter the RTI or CSI of the other
party's fax machine you wish to
register as a Specified Sender.
Reference
P.303
Text”
H Press
“Entering and Modifying
.
OK
]
[
9
261
Page 34

Key Operator Tools
as a wildcard.
Reference
P.259
J Press
K Press
OK
[
PrevMenu
[
“Wildcards”
.
]
.
]
L Press
Exit
[
.
]
M Enter the number of copies of
messages you require printed
with the number keys.
Note
❒
You can have 1-9 copies made.
❒
Values of 2 and above are valid
settings for Multi-copy Reception.
N Press
OK
[
.
]
9
262
Note
❒
To register another Specified
Sender, continue from step E.
O Press
P Press
❒
PrevMenu
[
Exit
]
[
Note
The standby display reappears.
twice.
]
.
Authorized Receptio n
(Blocking Out Messages from Certain Senders)
Page 35

Initial Set Up
You can block out incoming messages
from certain fax machines by registering them as Specified Senders. If a fax
machine from which you do not wish
to receive messages from tries to send
you a message, the line is disconnected immediately after the connection
is established. This feature is useful,
for example, if you wish to block out
junk faxes.
You can register the following items:
• Specified Senders (maximum 30
items, each G3 item can be up to 20
characters long, each G4 item can
be up to 24 characters long)
• Wildcards
Important
❒
It is recommended that you print
the Sender/Authorized Reception
list keep it when you register or
change a sender.⇒ P.283
the Specified Sender List”
“Printing
Setting up Authorized Reception
Reference
For how to delete Specified Senders, see P.282
Senders”
.
A Follow steps A–D on
Initial Set Up Menu”
bring up the “Initial Set Up”
menu.
“Deleting Specified
“Opening the
⇒⇒
P.260. to
B Enter the code for “Authorized
RX” with the number keys.
Note
❒
If the item you require is not
shown, press
until it is.
↑
[
Prev.
]
or
↓
[
Next
]
Limitation
❒
You cannot register a Specified
Sender who does not have an RTI
or CSI.
Note
❒
You can choose to receive messages from Specified Senders only, or
from all senders except those registered as Specified Senders. Adjust
this setting with the User Parameters. When shipped, the default
setting is “Only Receive Messages
From Specified Senders”.
❒
You can edit these settings using
the same procedure as used for
registering them.
C Press
❒
Sender
[
Note
If you do not wish to register a
Specified Sender, proceed to
step P.
.
]
D Enter the code for “Program
Sender” with the number keys.
9
263
Page 36

Key Operator Tools
Limitation
❒
If you do not register any Specified Senders, you cannot set up
this function.
E Enter the 2-digit code of the Spec-
ified Sender you wish to register
with the number keys.
Note
❒
If you make a mistake, press the
{
}
Clear
key and try again.
F Press
RTI/CSI
[
.
]
I Choose whether to store this item
as a wildcard.
Reference
P.259
J Press
“Wildcards”
.
OK
]
[
9
G Enter the RTI or CSI of the other
party's fax machine you wish to
register as a Specified Sender.
Reference
P.303
Text”
H Press
264
“Entering and Modifying
.
OK
]
[
K Press
❒
PrevMenu
[
Note
To register another Specified
Sender, continue from step E.
.
]
Page 37

Initial Set Up
L Press
Exit
[
.
]
M Press the 0 or 1 keys to turn this
function on or off.
N Press
OK
[
.
]
Use this function to have messages
from Specified Senders printed on
different paper from that used to
print messages from all other senders.
For example, imagine green paper is
set in the main paper tray, and white
paper is set in the optional Paper Supply Unit. By choosing to have messages from Specified Senders printed
on green paper and all others printed
on white paper, you can distinguish
between them at a glance.
You can register the following items:
• Specified Senders (maximum 30
items, each G3 item can be up to 20
characters long, each G4 item can
be up to 24 characters long)
• Wildcards
Important
❒
When storing Specified Senders, it
is a good idea to print out the Specified Sender list to check on which
numbers are currently stored.
P.283
List”
“Printing the Specified Sender
⇒
O Press
P Press
❒
PrevMenu
[
Exit
]
[
Note
The standby display reappears.
twice.
]
.
Specified Tray
(Having Messages from Certain Senders Printed on D ifferent Paper)
This function requires the optional Paper
Supply Unit.
Limitation
❒
If messages from Specified Senders
are received using Polling Reception or Free Polling Reception, this
feature is not available.
Note
❒
You can choose to have only messages from Specified Senders
printed on paper from the main
paper tray, or all messages except
those from Specified Senders. Adjust this setting with the User Parameters. When shipped, the
default setting is Only Print Messages From Specified Senders Using the Main Paper Tray.
❒
When one optional Paper Supply
Unit is installed, load the Paper
Supply Unit with paper of the
9
265
Page 38

Key Operator Tools
same size as that loaded in the
Main Paper Tray. When two Paper
Supply Units are installed, load the
Main Paper Tray with paper of the
same width as the widest of the paper sizes loaded in the Paper Supply Units.
❒
If you do not set paper in the way
outlined above, Substitute Reception may take place even if paper is
set.
❒
You can edit these settings using
the same procedure as used for
registering them.
Setting up Specified Tray
Reference
For how to delete Specified Senders, see P.282
Senders”
.
“Deleting Specified
C Press
❒
Sender
[
Note
If you do not wish to register a
Specified Sender, proceed to
step M.
.
]
D Enter the code for “Program
Sender” with the number keys.
9
A Follow steps A–D on
Initial Set Up Menu”
bring up the “Initial Set Up”
menu.
“Opening the
⇒⇒
P.260. to
B Enter the code for “Specified
Tray” with the number keys.
Note
❒
If the item you require is not
shown, press
until it is.
↑
[
Prev.
]
or
[
↓
Next
Note
❒
If you do not register any Specified Senders, all incoming faxes
will be printed on different paper.
E Enter the 2-digit code of the Spec-
ified Sender you wish to register
with the number keys.
]
Note
❒
If you make a mistake, press the
{
Clear
}
key and try again.
266
Page 39

Initial Set Up
F Press
RTI/CSI
[
.
]
G Enter the RTI or CSI of the other
party's fax machine you wish to
register as a Specified Sender.
Reference
P.303
Text”
H Press
“Entering and Modifying
.
OK
]
[
I Choose whether to store this item
as a wildcard.
J Press
K Press
Note
❒
To register another Specified
Sender, continue from step E.
L Press
.
OK
]
[
PrevMenu
[
.
Exit
]
[
.
]
Reference
P.259
“Wildcards”
9
267
Page 40

Key Operator Tools
9
M Press the 0 or 1 keys to turn this
function on or off.
N Press
O Press
P Press
Note
❒
The standby display reappears.
Forwarding
(Having Messages From Certain Senders Forw arded)
With this feature, messages from
Specified Senders are printed then
forwarded to a pre-registered destination (referred to here as the Forwarding Address). For example, if
you are away on a trip, you can have
messages automatically sent to where
you are staying.
You can register the following items:
• Forwarding Addresses (up to 5 fax
numbers, each fax number up to
254 digits long)
.
OK
]
[
PrevMenu
[
.
Exit
]
[
twice.
]
• Specified Senders (10 items for
each Forwarding Address up to a
combined maximum of 30 items
for all Forwarding Addresses, 50
items when the optional Function
Upgrade Card is installed. Each G3
item can be up to 20 characters
long, each G4 item can be up to 24
characters long).
• Wildcards
Important
❒
When you register or edit Specified Senders we recommend that
you print the Forwarding Address
List and keep it nearby.⇒ P.275
“Printing the Specified Sender List
(Forwarding)”
Limitation
❒
Messages received using Confidential Reception, Memory Lock,
Polling Reception, or messages
sent using Transfer Request from
another fax cannot be forwarded.
❒
Register the RTI or CSI of the other
party as the Specified Sender. If the
other party has not registered their
RTI or CSI, you cannot register
them as a Specified Sender and forwarding is not possible.
Note
❒
You can choose to forward only
messages from Specified Senders
or forward all messages except
those from Specified Senders. Adjust this setting with the User Parameters. When shipped, the
default setting is “Only Forward
Messages From Specified Senders”.
❒
You can choose whether the machine prints out messages it forwards with the User Parameters
(⇒ P.236). When shipped, the default setting is “On”.
268
Page 41

❒
You can edit these settings using
the same procedure as used for
registering them.
❖
Forwarding Mark
You can have a mark stamped on
documents to indicate that they
have been forwarded.
At the forwarding destination this
can help distinguish between standard faxes and faxes that have
been forwarded.
Note
❒
Turn the Forwarding Mark on
or off with the User Parameters
(⇒ P.236). When shipped, this
feature is turned on.
Initial Set Up
Note
❒
If the item you require is not
shown, press
until it is.
C Press
Receiver
[
↑
Prev.
[
.
]
]
or
↓
[
Next
D Enter the code for “Prog. Receiv-
er” with the number keys.
]
Setting up Memory Forwarding
Reference
For how to delete Specified Senders, see P.273
Senders (Forwarding)”
A Follow steps A–D on
Initial Set Up Menu”
bring up the “Initial Set Up”
menu.
“Deleting Specified
.
“Opening the
⇒⇒
P.260. to
B Enter the code for “Forwarding”
with the number keys.
E Enter the item number of the For-
warding Address you wish to register with the number keys.
Note
❒
If you make a mistake, press the
Clear
]
[
❒
You can store up to 5 Forwarding Addresses.
key and try again.
F Enter the fax number of the For-
warding Address with the number keys.
9
269
Page 42

Key Operator Tools
Note
❒
If you make a mistake, press the
{
try again. The
letes one character at a time, and
the
❒
When the optional NIC Fax Kit
is installed, you can also enter
an e-mail address.
G Press
Note
❒
If you do not wish to register a
Specified Sender, proceed to
step Q.
Clear
{
Stop
Sender
[
}
key or
}
clears the whole line.
]
{
}
Stop
key and
{
}
Clear
key de-
.
H Enter the code for “Program
Sender” with the number keys.
Note
❒
If you make a mistake, press the
{
}
Clear
key and try again.
J Press
RTI/CSI
[
.
]
K Enter the RTI or CSI of the other
party's fax machine you wish to
register as a Specified Sender.
Reference
P.303
Text”
L Press
“Entering and Modifying
.
OK
]
[
9
Note
❒
If you do not register any Specified Senders, all incoming faxes
will be forwarded.
I Enter the 2-digit code of the Spec-
ified Sender you wish to register
with the number keys.
270
M Choose whether to store this item
as a wildcard.
Reference
P.259
“Wildcards”
Page 43

Initial Set Up
N Press
O Press
.
OK
]
[
PrevMenu
[
Q Press
.
]
R Press
.
OK
]
[
PrevMenu
[
twice.
]
S Press the 0 or 1 keys to turn this
function on or off.
Note
❒
To register another Specified
Sender, continue from step L.
P Press
Exit
[
.
]
Note
❒
You can choose to forward only
messages from Specified Senders, or forward all messages except those from Specified
Senders. Adjust this setting
with the User Parameters.
T Press
U Press
.
OK
]
[
PrevMenu
[
twice.
]
9
V Press
Exit
[
.
]
271
Page 44

Key Operator Tools
Note
❒
The standby display reappears.
Deleting Forwarding
Addresses
A Follow steps A–D on
Initial Set Up Menu”
bring up the “Initial Set Up”
menu.
“Opening the
⇒⇒
P.260. to
B Check Enter the code for “Prog.
Receiver” with the number keys.
Note
❒
If the item you require is not
shown, press
until it is.
C Press
Receiver
[
↑
Prev.
[
.
]
]
or
[
↓
Next
E Enter the item number of the For-
warding Address you wish to delete with the number keys.
Yes
[
Yes
[
.
]
No
[
]
. The display
.
]
]
F Press
Note
❒
If you make a mistake, or do not
wish to delete this Forwarding
Address, press
in step E will reappear.
G Press
9
D Enter the code for “Delete Receiv-
er” with the number keys.
272
Note
❒
If you press
step E will reappear.
[
No
]
, the display in
Page 45

Initial Set Up
H Press
I Press
PrevMenu
[
PrevMenu
[
.
]
Deleting Specified Sender s
(Forwarding)
A Follow steps A–D on
Initial Set Up Menu”
bring up the “Initial Set Up”
menu.
“Opening the
⇒⇒
P.260. to
B Enter the code for “Forwarding”
with the number keys.
.
]
Note
❒
If the item you require is not
shown, press
until it is.
C Press
Receiver
[
↑
Prev.
[
.
]
]
or
↓
[
Next
]
J Press
Note
❒
Select “off” when you want to
invalidate setting.
K Press
L Press
Note
❒
The standby display reappears.
.
OK
]
[
PrevMenu
[
.
Exit
]
[
twice.
]
9
D Enter the code for “Prog. Receiv-
er” with the number keys.
E Enter the item number of the For-
warding Address whose Speci-
273
Page 46

Key Operator Tools
fied Sender you wish to delete
with the number keys.
Note
❒
If you make a mistake, press the
{
}
Clear
key and try again.
F Press
Sender
[
.
]
I Press
❒
J Press
Yes
]
[
Note
If you press
step H will reappear.
Yes
]
[
.
No
[
]
, the display in
.
9
G Enter the code for “Delete Send-
er” with the number keys.
H Enter the 2-digit code of the Spec-
ifed Sender you wish to delete
with the number keys.
Note
❒
If you make a mistake, press
No
]
[
and try again.
Note
❒
If you press
step H will reappear.
K Press
❒
PrevMenu
[
Note
To delete another Specified
Sender, continue from step K.
No
[
]
, the display in
.
]
274
Page 47

Initial Set Up
L Press
M Press
N Press
O Press
.
Exit
]
[
.
OK
]
[
PrevMenu
[
.
OK
]
[
twice.
]
Printing the Speci fied Sender
List (Forwarding)
You can check which Specified Senders are registered for a Forwarding
Address.
Follow the steps below to print this
list.
A Follow steps A–D on
Initial Set Up Menu”
bring up the “Initial Set Up”
menu.
“Opening the
⇒⇒
P.260. to
B Enter the code for “Forwarding”
with the number keys.
Note
❒
If the item you require is not
shown, press
until it is.
↑
[
Prev.
]
or
↓
[
Next
]
Note
❒
Select “off” when you want to
invalidate setting.
P Press
Q Press
❒
PrevMenu
[
Exit
]
[
Note
The standby display reappears.
twice.
]
.
C Press
Receiver
[
.
]
D Enter the code for “Prog. Receiv-
er” with the number keys.
9
275
Page 48

Key Operator Tools
9
E Enter the item number of the For-
warding Address you wish to
print out with the number keys.
F Press
Sender
[
.
]
G Enter the code for “Print Sender
List” with the number keys.
H Press the
Note
❒
To stop the list being printed,
press
step G reappears.
I Press
Exit
[
{
Cancel
[
]
Start
.
key.
}
]
. The display in
J Press
K Press
L Press
M Press
N Press
Note
❒
The standby display reappears.
.
OK
]
[
PrevMenu
[
.
OK
]
[
PrevMenu
[
.
Exit
]
[
twice.
]
twice.
]
Memory Lock
(Having Messages from Certain Senders Stored in M emory Instead of Being Printed Out)
You can have only messages from
Specified Senders received using
Memory Lock. Register these senders.
If you do not register any Specified
Senders, all incoming messages are
received using Memory Lock.
Preparation
Be sure to register the Memory
Lock ID beforehand.⇒ P.250
istering ID Codes”
You can register the following items:
“Reg-
276
• Specified Senders (maximum 30
items, each G3 item can be up to 20
characters long, each G4 item can
be up to 24 characters long)
• Wildcards
Limitation
❒
Memory Lock is not available with
manual reception.
Page 49

Initial Set Up
Note
❒
You can choose to only lock messages from Specified Senders, or
lock all messages except those
from Specified Senders. Adjust
this setting with the User Parameters. When shipped, the default
setting is “Only Lock Messages
From Specified Senders”.⇒ P.236
“Changing the User Parameters”
❒
You can edit these settings using
the same procedure as used for
registering them.
Setting up Memory Lock
Reference
For how to delete Specified Senders, see P.282
Senders”
For how to print a list of Specified
Senders, see P.283
Specified Sender List”
.
A Follow steps A–D on
Initial Set Up Menu”
bring up the “Initial Set Up”
menu.
“Deleting Specified
“Printing the
.
“Opening the
⇒⇒
P.260. to
B Enter the code for “Memory
Lock” with the number keys.
C Press
❒
Sender
[
Note
If you do not wish to register a
Specified Sender, proceed to
step M.
]
D Enter the code for “Program
Sender” with the number keys.
Note
❒
If you do not register any Specified Senders, all incoming faxes
will locked in memory.
E Enter the 2-digit code of the Spec-
ified Sender you wish to register
with the number keys.
9
Note
❒
If the item you require is not
↑
Prev.
shown, press
until it is.
[
]
or
[
↓
Next
Note
❒
If you make a mistake, press the
{
}
Clear
key and try again.
]
277
Page 50

Key Operator Tools
F Press
RTI/CSI
[
.
]
G Enter the RTI or CSI of the other
party's fax machine you wish to
register as a Specified Sender.
Reference
P.303
Text”
H Press
“Entering and Modifying
.
OK
]
[
I Choose whether to store this item
as a wildcard.
J Press
K Press
Note
❒
To register another Specified
Sender, continue from step E.
L Press
.
OK
]
[
PrevMenu
[
.
Exit
]
[
.
]
9
278
Reference
P.259
“Wildcards”
Page 51

Initial Set Up
M Press the 0 or 1 keys to turn this
function on or off.
Note
❒
You can choose to only lock
messages from Specified Senders, or lock all messages except
those from Specified Senders.
Adjust this setting with the User
Parameters.
N Press
OK
[
.
]
you do not register any Specified
Senders, all messages will be received
using the TX/RX File In HD function.⇒ P.146
You can register the following items:
• Specified Senders (maximum 30
items, each G3 item can be up to 20
characters long, each G4 item can
be up to 24 characters long)
• Wildcards
Note
❒
You can choose to forward only
messages from Specified Senders,
or forward all messages except
those from Specified Senders. Adjust this setting with the User Parameters. When shipped, the
default setting is “Only Apply To
Messages From Specified Senders”.
❒
You can edit these settings using
the same procedure as used for
registering them.
“TX/RX File Save”
O Press
P Press
❒
PrevMenu
[
Exit
]
[
Note
The standby display reappears.
twice.
]
.
TX/RX File In HD
(Having Message s from Certain Senders Sto red in Memory )
This function requires the optional Function Upgrade Card and optional 40M Expanded Memory Card.
Use this function to have messages
from Specified Senders received using the TX/RX File In HD function. If
Setting up TX/RX File In HD
Reference
For how to delete Specified Senders, see P.282
Senders”
For how to print a list of Specified
Senders, see P.283
Specified Sender List”
.
A Follow steps A–D on
Initial Set Up Menu”
bring up the “Initial Set Up”
menu.
“Deleting Specified
“Printing the
.
“Opening the
⇒⇒
P.260. to
9
279
Page 52

Key Operator Tools
B Enter the code for “TX/RX File In
HD” with the number keys.
Note
❒
If the item you require is not
shown, press
until it is.
C Press
Sender
[
↑
Prev.
[
.
]
]
or
[
↓
Next
E Enter the 2-digit code of the Spec-
ified Sender you wish to register
with the number keys.
Note
]
❒
If you make a mistake, press the
{
}
Clear
key and try again.
F Press
RTI/CSI
[
.
]
9
Note
❒
If you do not wish to register a
Specified Sender, proceed to
step M.
D Enter the code for “Program
Sender” with the number keys.
Note
❒
If you do not register any Specified Senders, all incoming faxes
will be received using TX/RX
File In HD.
G Enter the RTI or CSI of the other
party's fax machine you wish to
register as a Specified Sender.
Reference
P.303
Text”
H Press
“Entering and Modifying
.
OK
]
[
280
Page 53

Initial Set Up
I Choose whether to store this item
as a wildcard.
Reference
P.259
J Press
“Wildcards”
.
OK
]
[
L Press
Exit
[
.
]
M Press the 0 or 1 keys to turn this
function on or off.
K Press
❒
PrevMenu
[
Note
To register another Specified
Sender, continue from step E.
.
]
Note
❒
You can choose to save only
messages from Specified Senders, or save all messages except
those from Specified Senders.
Adjust this setting with the User
Parameters.
N Press
O Press
P Press
.
OK
]
[
PrevMenu
[
.
Exit
]
[
twice.
]
9
281
Page 54

Key Operator Tools
Note
❒
The standby display reappears.
Deleting Specified Senders
General Procedure for Deleting Specified Senders
Use this procedure to delete Specified
Senders for the following features:
Reference
“Collate”
“Authorized Reception”
“Specified Tray”
“Memory Lock”
“TX/RX File In HD”
“Backup File Transmission Settings”
⇒
P.284.
“Program Scan Area”
Note
❒
For how to delete Specified Senders for the Forwarding function,
see P.273
(Forwarding)”
How to delete Specified Senders
⇒
P.260.
⇒
P.262.
⇒
P.265.
⇒
P.276.
⇒
P.279.
⇒
P.286.
“Deleting Specified Senders
.
Note
❒
If the item you require is not
shown, press
until it is.
C Press
Sender
[
↑
Prev.
[
.
]
]
or
↓
[
Next
D Enter the code for “Delete Send-
er” with the number keys.
E Enter the 2-digit code of the Spec-
ified Sender you wish to register
with the number keys.
]
9
The example below describes how to
delete Specified Senders for the Collate feature. The procedure for other
functions is identical except for steps
C
and J.
A Follow steps A–D on
Initial Set Up Menu”
bring up the “Initial Set Up”
menu.
“Opening the
B Enter the code for “Collate” with
the number keys.
282
⇒⇒
P.260. to
Note
❒
If you make a mistake, press the
{
}
Clear
key and try again.
F Press
Yes
[
.
]
Page 55

Initial Set Up
Note
❒
If you press
step D reappears.
G Press
❒
H Press
Yes
[
Note
If you press
step D reappears.
PrevMenu
[
J Press
No
[
]
, the display in
.
]
Note
❒
Select “off” when you want to
invalidate setting.
K Press
No
[
]
, the display in
L Press
.
]
Note
❒
The standby display reappears.
.
OK
]
[
PrevMenu
[
.
Exit
]
[
twice.
]
Note
❒
To delete more Specified Senders, go back to step D.
I Press
Exit
[
.
]
Printing the Speci fied Sender
List
(General Procedure for Printing a List of Registered Specified Senders)
Follow the steps below to print a single-page list of Specified Senders registered for each of the following
features:
Reference
“Collate”
“Authorized Reception”
“Specified Tray”
“Memory Lock”
“TX/RX File In HD”
“Backup File Transmission Settings”
⇒
P.284.
“Program Scan Area”
⇒
P.260.
⇒
⇒
P.276.
⇒
P.265.
⇒
P.279.
⇒
P.262.
P.286.
9
283
Page 56

Key Operator Tools
How to Print Specif ied Se nder
List
The example below describes how to
print Specified Senders List for the
Collate feature. The procedure for
other functions is identical except for
steps C and F.
A Follow Steps A–D on
Initial Set Up Menu”
bring up the “Initial Set Up”
menu.
“Opening the
⇒⇒
P.260. to
B Enter the code for “Collate” with
the number keys.
Note
❒
If the item you require is not
shown, press
until it is.
C Press
Sender
[
↑
Prev.
[
.
]
]
or
[
↓
Next
E Press the
F Press
G Press
]
H Press
I Press
key.
}
{
Start
Note
❒
To cancel printing, press
cel
]
. The display in step D will
reappears.
.
Exit
]
[
.
OK
]
[
PrevMenu
[
Exit
]
[
twice.
]
.
Can-
[
9
D Enter the code for “Print Sender
List” with the number keys.
284
Backup File Transmission
Settings
(Specifying a Destination to Send Backups of Faxes)
By registering a destination for administrative use you can automatically have backups made of all sent
faxes.
You can register the following items:
• Administrators Address
Store a single fax number, or an email address (option required).
• Administrator Name
Backup Transmission applies to the
following features:
• Memory Transmission
• Transfer Request Transmission
Page 57

Initial Set Up
• Confidential Transmission
• SUB Code Transmission
• E-mail Transmission (optional
NIC Fax Kit required)
Limitation
❒
You cannot specify the administrator address using a Quick Dial or
Speed Dial.
❒
Immediate Transmission is not
available when Backup Transmission is turned on.
❒
If memory runs out while a message is on transmission standby, or
cannot be sent documents, transmission cannot take place.
Note
❒
You check the result of a Backup
Transmission by reading the Memory Communication Result Report
(Memory Transmission).
C Press the 0 or 1 keys to turn this
function on or off.
D Press
Backup
[
.
]
A Follow steps A–D on
Initial Set Up Menu”
bring up the “Initial Set Up”
menu.
“Opening the
⇒⇒
P.260. to
B Enter the code for “Backup File
TX” with the number keys.
Note
❒
If the item you require is not
shown, press
until it is.
↑
[
Prev.
]
or
[
↓
Next
E Enter the fax number of the back-
up destination (Administrator
Address).
Note
❒
If the optional NIC Fax Kit is installed, you can press the User
{
}-{F5}
Function Key (
the Mail Address function reg-
]
istered in it and enter an e-mail
address. ⇒optional NIC Fax Kit
manual
Registering/Editing the
administrator name
A Press
Name
[
F1
.
]
9
) with
285
Page 58

Key Operator Tools
B Enter a name for the adminis-
trator address.
Reference
“Entering and Modifying
P.303
Text”
C Press
F Press
OK
[
OK
[
]
.
]
.
Program Scan Area
(Setting the Scan Area)
This function requires the optional Function Upgrade Card.
If you register the scan area beforehand, only the area of documents you
have specified will be scanned in and
sent.
Transmission time is shorter compared to sending the whole page. This
feature is useful, for example, when
you do not need to send the whole
page, or when the page contains confidential information.
Preparation
You must store the Scan Area fea-
{
}
ture in a User Function key (
{
}
F5
) beforehand. Press this key to
turn Scan Area on and off.
F1
–
9
G Press
H Press
I Press
Note
❒
The standby display reappears.
.
OK
]
[
PrevMenu
[
.
Exit
]
[
twice.
]
Transmitter
A
B
C
Scan Length
• Skip Length
The length that is not scanned
measured from the leading edge.
E.g. if you set it to 2 inch, the area 2
inch from the leading edge is not
scanned in.
• Scan Length
The length of the area to be
scanned. E.g. if you set it to 5 inch,
an area 5 inch long starting at the
end of the skip length will be
scanned.
(This machine)
Skip Length
Receiver
B
GFSKPS0N
286
Page 59

Initial Set Up
• You can use Scan Area with Memory Transmission (including Confidential Transmission and
Transfer Request Transmission),
Polling Transmission, Free Polling
Transmission, SUB Code Transmission, and when registering
Auto Documents.
Limitation
❒
You can only store one scan area.
❒
The area up to about 0.08 inch from
the leading edge cannot be
scanned no matter how you set the
skip length.
❒
The area up to about 0.12 inch from
the trailing edge cannot be
scanned no matter how you set the
skip length.
❒
If you try and scan in a document
that is shorter than the skip length,
the operation is canceled and the
document is erased from memory.
above (⇒ P.211). When shipped,
this feature is turned off.
A Follow steps A–D on
Initial Set Up Menu”
bring up the “Initial Set Up”
menu.
“Opening the
⇒⇒
P.260. to
B Enter the code for “Prog. Scan Ar-
ea” with the number keys.
Note
❒
If the item you require is not
shown, press
until it is.
↑
[
Prev.
]
or
↓
[
Next
C Enter the skip length with the
number keys.
]
Note
❒
The skip length can be in the range
0–499 mm. The default when
shipped is 0 mm. However, the
area up to about 2 mm from the
leading edge cannot be scanned no
matter how you set the skip length.
❒
The scan length can be in the range
0–499 mm. The default when
shipped is 0 mm. However, the
area up to about 5 mm from the
leading edge cannot be scanned no
matter how you set the scan
length.
❒
We recommend that you specify a
slightly larger scan area (5 mm)
than is necessary to allow for the
scan margin of error.
❒
Turn Skip Scan permanently on or
off with the User Parameters (
P.236), or assign Skip Scan to a
User Function key as explained
⇒
Note
❒
If you make a mistake, press the
{
}
Clear
key and try again.
D Press the 1 key to move the cur-
sor to the scan length.
9
287
Page 60

Key Operator Tools
E Enter the scan length.
Note
❒
If you make a mistake, press the
{
}
Clear
key and try again.
9
F Press
G Press
H Press
Note
❒
The standby display reappears.
.
OK
]
[
PrevMenu
[
.
Exit
]
[
twice.
]
288
Page 61

Box Settings
Box Settings
See the following pages for how to set
up and delete Personal Boxes, Information Boxes and Transfer Boxes.
This feature provides the following
functions:
❖
Registering/Editing Personal Boxes⇒ P.289
Registering or editing Personal
Boxes
❖
Deleting Personal Boxes⇒ P.292
Deleting Personal Boxes
❖
Registering/Editing Information Boxes⇒ P.294
Registering or editing Information
Boxes
❖
Deleting Information Boxes⇒ P.295
Deleting Information Boxes
❖
Registering/Editing Transfer Boxes
⇒
P.297
Registering or editing Transfer
Boxes
❖
Deleting Transfer Boxes⇒ P.300
Deleting Transfer Boxes
❖
Printing the Box List⇒ P.301
Print this list to view the contents
of Personal Boxes, Information
Boxes, and Transfer Boxes.
Limitation
❒
SUB or SEP codes registered in
Personal Boxes, Information Boxes
or Transfer Boxes cannot be identical.
❒
The combined maximum number
of Personal Boxes, Information
Boxes, and Transfer Boxes that you
can store is 150 (400 when the op-
tional Function Upgrade Card is
installed).
❒
If memory runs out, you may not
be able to receive messages or register settings. The available memory capacity depends on installed
options.
❒
You can edit boxes in the same
way as registering them. However,
to change the SUB Code itself, you
must delete it then register a new
SUB Code.
Registering/Editing Personal
Boxes
This section describes how to register
Personal Boxes.
You can store the following items:
• SUB Code (required)
Up to 20 characters long and can be
composed of digits 0-9, "#", "*" and
spaces (the first character cannot
be a space).
• Name (required)
Up to 20 characters long.
• Password (optional)
Up to 20 characters long and can be
composed of digits 0-9, "#", "*" and
spaces (the first character cannot
be a space).
• Receiver (optional)
You can register one delivery destination for each Personal Box.
Specify the Quick Dial or Speed
Dial that the delivery destination is
stored in.
• Quick Dial key (optional)
If you assign this SUB Code to a
Quick Dial key, press this key to
enter the associated Personal Code
9
289
Page 62

Key Operator Tools
9
(Personal Box SUB Code) with a
single key press.
Important
❒
When using the following functions, you can use SUB codes registered in Personal Boxes in place of
Personal Codes.
• Restricted Access(⇒ P.29)
• Personal Code Transmission(
P.108)
• Printing the Journal(⇒ P.142)
• Searching By Personal Code of
TX/RX File Save(⇒ P.146)
Note
❒
The TTI is not printed on delivered
messages.
❒
If a message cannot be delivered, a
Communication Failure Report is
printed and the message is saved
as a Confidential Reception document.
❒
You can specify a Quick Dial or
Speed Dial containing an e-mail
address as the receiver when the
optional NIC Fax Kit is installed.
❒
You can edit boxes in the same
way as registering them. However,
to change the SUB Code itself, you
must delete it then register a new
SUB Code.
Reference
“Personal Boxes”
P.28
⇒
A Make sure that the machine is in
standby mode.
{
press the
other display is shown, press
the
key.
B Press the
User Tools
{
Clear Modes/Energy Saver
{
User Tools
}
key. If any
key.
}
C Enter the code for “Key Op.
Tools” with the number keys.
Then press the
key.
}
{
#
D Enter the code for “Box Settings”
with the number keys.
E Enter the code for “Personal Box”
with the number keys.
Note
❒
If the item require is not displayed, press
until it is.
↑
[
Prev.
]
or
↓
[
Next
F Enter the SUB Code you wish to
register as a Personal Box.
}
]
290
Note
❒
If the “Fax Features” or “Key
Op. Tools” screen is shown,
Page 63

Box Settings
Note
❒
You can enter up to 20 characters which can be digits 0-9, "#",
"*" and spaces (the first character cannot be a space).
❒
If you make a mistake, press the
{
}
Clear
key and try again.
❒
If a password is already stored,
enter the password.
G Press
H Press
OK
[
Name
[
.
]
.
]
I Enter the name of the box.
K Press
Others
[
.
]
Registering a Password
A Enter the code for “Program
Password” with the number
keys.
B Enter the password you wish to
store.
Note
❒
To change a previously stored
{
}
name, press the
enter a new one.
Reference
P.303
Text”
J Press
[
“Entering and Modifying
.
OK
]
Clear
key then
Registering a Receiver
A Enter the code for “Program
Receiver” with the number
Note
❒
You can enter up to 20 characters which can be digits 09, "#", "*" and spaces (the first
character cannot be a space).
❒
If you make a mistake, press
{
}
Clear
the
C Press
keys.
OK
[
key and try again.
.
]
9
291
Page 64

Key Operator Tools
9
B Specify the Quick Dial or
Speed Dial in which the delivery destination is stored.
C Press
OK
[
.
]
Assigning a Quick Dial Key
A Enter the code for “Assign
Key” with the number keys.
B Press the Quick Dial key you
wish to assign the box to.
Note
❒
To check the current contents
Status
of Quick Dials, press
❒
You cannot assign the box to
a Quick Dial that is already
has programmed with another feature.
C Press
OK
[
.
]
[
Press
OK.
]
PrevMenu
[
Exit
[
three times.
]
to return to the stand-
]
M
[
N Press
O Press
by mode.
Deleting Personal Boxes
This section describes how to delete
Personal Boxes.
Limitation
❒
If the specified SUB Code is not
registered as a Personal Box, or the
messages of the box are registered,
you cannot delete it.
A Make sure that the machine is in
]
.
standby mode.
292
L Press
Exit
[
.
]
Note
❒
If the “Fax Features” or “Key
Op. Tools” screen is shown,
{
press the
other display is shown, press
the
key.
User Tools
{
Clear Modes/Energy Saver
}
key. If any
}
Page 65

B Press the
{
User Tools
key.
}
Box Settings
❒
If you make a mistake, press the
{
}
Clear
key and try again.
❒
If a password is already stored,
enter the password.
C Enter the code for “Key Op.
Tools” with the number keys.
Then press the
key.
}
{
#
D Enter the code for “Box Settings”
with the number keys.
E Enter the code for “Del. Personal
Box” with the number keys.
G Press
H Press
Note
❒
If you press
deleted and the display in step
F
reappears.
I Press
OK
[
Yes
[
Yes
[
.
]
.
]
No
[
]
, the box is not
.
]
Note
❒
If the item you require is not
displayed, press
ext
]
until it is.
↑
[
Prev.
]
or
↓
N-
[
F Enter the SUB Code of the Person-
al Box you wish to delete.
Note
❒
You can enter up to 20 characters which can be digits 0-9, "#",
"*" and spaces (the first character cannot be a space).
Note
❒
If you press
deleted and the display in step
F
reappears.
J Press
K Press
by mode.
PrevMenu
[
Exit
[
No
[
]
, the box is not
three times.
]
to return to the stand-
]
9
293
Page 66

Key Operator Tools
Registering/Editing
Information Boxes
This section describes how to set up
an Information Box.
You can store the following items:
• SEP Code (required)
Up to 20 characters long and can be
composed of digits 0-9, "#", "*" and
spaces (the first character cannot
be a space).
• Password (optional)
Up to 20 characters long and can be
composed of digits 0-9, "#", "*" and
spaces (the first character cannot
be a space).
• Name (required)
Up to 20 characters long.
Note
❒
You can edit boxes in the same
way as registering them. However,
to change the SEP Code itself, you
must delete it then register a new
SEP Code.
B Press the
{
User Tools
key.
}
C Enter the code for “Key Op.
Tools” with the number keys.
Then press the
key.
}
{
#
D Enter the code for “Box Settings”
with the number keys.
E Enter the code for “Prog. Infor.
Box” with the number keys.
9
Reference
“Information Boxes”
P.28
A Make sure that the machine is in
standby mode.
Note
❒
If the “Fax Features” or “Key
Op. Tools” screen is shown,
{
press the
other display is shown, press
the
key.
294
User Tools
{
Clear Modes/Energy Saver
}
key. If any
Note
❒
If the item require is not dis-
↑
Prev.
played, press
until it is.
[
F Enter the SEP code you wish to
register as an Information Box.
Note
❒
You can enter up to 20 charac-
}
ters which can be digits 0-9, "#",
"*" and spaces (the first character cannot be a space).
]
or
↓
[
Next
]
Page 67

❒
If you make a mistake, press the
{
}
Clear
key and try again.
❒
If a password is already stored,
enter the password.
G Press
OK
[
.
]
Box Settings
Note
❒
If you do not wish to register a
password, go to step N.
L Enter the password you wish to
store.
H Press
[
Name
.
]
I Enter the name of the box.
Note
❒
To change a previously stored
{
}
name, press the
enter a new one.
Reference
P.303
Text”
“Entering and Modifying
Clear
key then
Note
❒
You can enter up to 20 characters which can be digits 0-9, "#",
"*" and spaces (the first character cannot be a space).
❒
If you make a mistake, press the
{
}
Clear
key and try again.
M Press
N Press
OK
[
OK
[
.
]
.
]
9
J Press
K Press
.
OK
]
[
Password
[
O Press
.
]
P Press
by mode.
PrevMenu
[
Exit
[
three times.
]
to return to the stand-
]
Deleting Information Boxes
This section describes how to delete
Information Boxes.
Limitation
❒
If the specified SEP Code is not
registered as an Information Box
or the messages of the box are registered, you cannot delete it.
295
Page 68

Key Operator Tools
A Make sure that the machine is in
standby mode.
Note
❒
If the “Fax Features” or “Key
Op. Tools” screen is shown,
{
press the
other display is shown, press
the
key.
B Press the
User Tools
{
Clear Modes/Energy Saver
{
User Tools
}
key. If any
key.
}
C Enter the code for “Key Op.
Tools” with the number keys.
Then press the
key.
}
{
#
Note
❒
If the item require is not dis-
↑
Prev.
played, press
until it is.
[
F Enter the SEP Code of the Infor-
mation box you wish to delete.
}
Note
❒
You can enter up to 20 characters which can be digits 0-9, "#",
"*" and spaces (the first character cannot be a space).
❒
If you make a mistake, press the
{
}
Clear
key and try again.
❒
If a password is already stored,
enter the password.
G Press
H Press
OK
[
Yes
[
.
]
.
]
]
or
↓
[
Next
]
9
D Enter the code for “Box Settings”
with the number keys.
E Enter the code for “Del. Infor.
Box” with the number keys.
296
Note
❒
If you press
deleted and the display in step
F
reappears.
No
[
]
, the box is not
Page 69

Box Settings
I Press
Note
❒
If you press
deleted and the display in step
F
reappears.
J Press
K Press
by mode.
.
Yes
]
[
No
[
]
, the box is not
PrevMenu
[
Exit
]
[
three times.
]
to return to the stand-
Registering/Editing Transfer
Boxes
This section describes how to set up a
Transfer Box for forwarding incoming SUB transfer request messages
onto end receivers.
You can store the following items:
• SUB (required)
Up to 20 characters long and can be
composed of digits 0-9, "#", "*" and
spaces (the first character cannot
be a space).
• Name (required)
Up to 20 characters long.
• SID (optional)
Up to 20 characters long and can be
composed of digits 0-9, "#", "*" and
spaces (the first character cannot
be a space).
fy end receivers with Quick Dials,
Speed Dials, or Groups assigned to
Quick Dials that have been registered beforehand.
Limitation
❒
After messages are transferred, a
Transfer Result Report is not sent
back to the sender.
Note
❒
After messages are transferred
they are deleted.
❒
By default, the machine prints out
received messages and the Transfer Result Report that it transfers
after the transfer has finished. If
you want to turn this feature off,
please contact your service representative.
❒
You can have received messages
sent using Economy Transmission.
Please contact your service representative for details.
❒
When the registered receiver is a
Multi-step Transfer Group Dial,
Multi-step Transfer takes place.
❒
You can specify a Quick Dial or
Speed Dial containing an e-mail
address as the receiver when the
optional NIC Fax Kit is installed.
❒
You can edit boxes in the same
way as registering them. However,
to change the SUB Code itself, you
must delete it then register a new
SUB Code.
Reference
“Transfer Boxes”
P.29
A Make sure that the machine is in
standby mode.
9
• End Receiver (required)
You can store 5 end receivers (destinations to which messages will
be forwarded) for each box. Speci-
297
Page 70

Key Operator Tools
Note
❒
If the “Fax Features” or “Key
Op. Tools” screen is shown,
{
press the
other display is shown, press
the
key.
B Press the
User Tools
{
Clear Modes/Energy Saver
{
User Tools
}
key. If any
key.
}
C Enter the code for “Key Op.
Tools” with the number keys.
Then press the
key.
}
{
#
D Enter the code for “Box Settings”
with the number keys.
F Enter the SUB code you wish to
register as a Transfer Box.
}
Note
❒
You can enter up to 20 characters which can be digits 0-9, "#",
"*" and spaces (the first character cannot be a space).
❒
If you make a mistake, press the
{
}
Clear
key and try again.
❒
If a password is already stored,
enter the password.
G Press
H Press
OK
[
Name
[
.
]
.
]
9
E Enter the code for “Prog. Transf.
Box” with the number keys.
Note
❒
If the item require is not dis-
↑
Prev.
played, press
until it is.
298
[
]
or
[
↓
Next
I Enter the name for the Transfer
Box.
]
Note
❒
To change a previously stored
{
name, press the
enter a new one.
Reference
P.303
Text”
“Entering and Modifying
Clear
}
key then
Page 71

Box Settings
J Press
K Press
OK
]
[
Others
[
.
.
]
Registering a Password (SID)
A Enter the code for “Program
Password” with the number
keys.
B Enter the password you wish to
store.
Registering End Receivers
A Enter the code for “Prog. Re-
ceiver” with the number keys.
B Enter the number of the end re-
ceiver you wish to register with
the number keys.
Note
❒
You can register up to 5 end
receivers.
C Specify the Quick Dial, Speed
Dial or Group in which the end
receiver is stored.
Note
❒
You can enter up to 20 characters which can be digits 09, "#", "*" and spaces (the first
character cannot be a space).
❒
If you make a mistake, press
{
}
Clear
the
C Press
OK
[
key and try again.
.
]
D Press
E Press
L Press
OK
[
PrevMenu
[
Exit
]
[
.
]
.
]
9
.
299
Page 72

Key Operator Tools
M Press
N Press
O Press
by mode.
.
OK
]
[
PrevMenu
[
Exit
]
[
three times.
]
to return to the stand-
Deleting Transfer Boxes
This section describes how to delete
Transfer Boxes.
Limitation
❒
If the specified SUB Code is not
registered as a Transfer Box, or the
messages of the box are registered
you cannot delete it.
B Press the
{
User Tools
key.
}
C Enter the code for “Key Op.
Tools” with the number keys.
Then press the
key.
}
{
#
D Enter the code for “Box Settings”
with the number keys.
E Enter the code for “Del. Transfer
Box” with the number keys.
9
A Make sure that the machine is in
standby mode.
Note
❒
If the “Fax Features” or “Key
Op. Tools” screen is shown,
{
press the
other display is shown, press
the
key.
300
User Tools
{
Clear Modes/Energy Saver
}
key. If any
Note
❒
If the item require is not dis-
↑
Prev.
played, press
until it is.
[
F Enter the SUB code of the Trans-
fer Box you wish to delete.
}
Note
❒
You can enter up to 20 characters which can be digits 0-9, "#",
"*" and spaces (the first character cannot be a space).
]
or
↓
[
Next
]
Page 73

❒
If you make a mistake, press the
{
}
Clear
key and try again.
❒
If a password is already stored,
enter the password.
G Press
H Press
Note
❒
If you press
deleted and the display in step
F
reappears.
OK
[
Yes
[
.
]
.
]
No
[
]
, the box is not
Box Settings
Printing the Box Li st
Follow the procedure below to print a
list showing the currently registered
Personal Boxes, Information Boxes
and Transfer Boxes.
A Make sure that the machine is in
standby mode.
Note
❒
If the “Fax Features” or “Key
Op. Tools” screen is shown,
{
press the
other display is shown, press
the
key.
User Tools
{
Clear Modes/Energy Saver
}
key. If any
}
I Press
Note
❒
If you press
deleted and the display in step
F
reappears.
J Press
K Press
by mode.
.
Yes
]
[
No
[
]
, the box is not
PrevMenu
[
Exit
]
[
three times.
]
to return to the stand-
B Press the
{
User Tools
key.
}
C Enter the code for “Key Op.
Tools” with the number keys.
Then press the
key.
{
}
#
D Enter the code for “Box Settings”
with the number keys.
9
301
Page 74

Key Operator Tools
E Enter the code for “Print Box List”
with the number keys.
Note
❒
If the item require is not displayed, press
until it is.
↑
[
Prev.
]
or
[
↓
Next
]
9
F Press the
The list is printed.
Note
❒
To cancel printing, press
cel
reappear.
G Press
H Press
by mode.
{
]
. The display in step E will
PrevMenu
[
Exit
]
[
key.
}
Start
twice.
]
to return to the stand-
Can-
[
302
 Loading...