

Page 1
9922DP/9927DP
OPERATING INSTRUCTIONS
COPY REFERENCE
Read this manual carefully before you use this product and keep it handy for future
reference.
For safety, please follow the instructions in this manual.
Page 2

Introduction
This manual contains detailed instructions on the operation and maintenance of this machine. To get
maximum versatil ity from this ma chine all opera tors sho uld careful ly read an d follow the ins tructi ons in
this manual. Please keep this manual in a handy place near the machine.
Please read the Safety Information before using this machine. It contains important information related
to USER SAFETY and PREVENTING EQUIPMENT PROBLEMS.
Notes:
Some illustrations may be slightly different from your machine.
Certain options may not be available in some countries. For details, please contact your local dealer.
Operator Safety:
This machine is considered a CDRH Class I laser device, safe for office/EDP use. The machine contains a 5-milliwat, 760 – 800 nanometer wavelength, GaAIAs laser diode. Direct (or indirect reflected)
eye contact with the laser beam may cause serious eye damage. Safety precautions and interlock
mechanism have been designed to prevent any possible laser beam exposure to the operator.
Laser Safety:
The Center for Devices and Radiological Health (CDRH) prohibits the repair of laser-based optical unit
in the field. The optical housing unit can only be repaired in a factory or at a location with the requisite
equipment. The laser subsystem is replaceable in the field by a qualified Customer Engineer. The laser
chassis is not repairable in the field. Customer engineers are therefore directed to return all chassis
and laser subsystems to the fac tory or se rvice d epot when replace ment or the op tical subsyste m is required.
Warning:
Use of controls or adjustment or performance of procedures other than those specified in this manual
might result in hazardous radiation exposure.
Notes:
The model names of the machines do not appear in the following pages. Check the type of your machine before reading this manual. (For details, see ⇒ P.4
•Type 1: Savin 9922DP
•Type 2: Savin 9927DP
Certain types might not be available in some countries. For details, please contact your local dealer.
Two kinds of size notation are employed in this manual. With this machine refer to the inch version.
For good copy quality, Ricoh recommends that you use genuine Ricoh toner.
Ricoh shall not be resp onsib le for any damag e or exp ense that m ight res ult fr om the u se of part s other
than genuine Ricoh parts in your Ricoh office product.
Power Source:
120V, 60Hz, 12A or more
Please be sure to connect the power cord to a power source as above. For details about the power
source, see ⇒ P.131
“Power Connection”
.
“Machine Types”
.)
Page 3

USA (This information is for facsimile option users only.)
❖
FCC Requirements
1. This equipment complies with Part 68 of the FCC rules. On the cover of this equipment is a label that
contains, among other information, the FCC registration number and ringer equivale nce number
(REN) for this equipment. If requested, this information must be provided to the telephone company.
2. This equipment uses the following USOC jack: RJ11C
3. The REN is us ed to determine the quantity of devic es which may be co nnected to the tele phone
line. Excessive REN 's on th e tele phone l ine m ay res ult in t he dev ices not ring ing in respon se to
an incoming call. In most, but not all areas, the sum of the REN's should not exceed five (5.0).
Contact the telephone company to determine the maximum REN for the calling area.
4. If this equipment causes harm to the telephone network, the telephone company will notify you
in advance that temporary discontinuance of service may be required. If advance notice is not
practical, the tele pho ne co mp any w il l n oti fy the customer as s oon as p os sib le . Als o, you will be
advised of your right to file a complaint with the FCC if you believe it is necessary.
5. The telephone company may make changes in its facilities, equipment, operations, or procedures that could affect the operation of the equipment. If this happens, the telephone company
will provide advance notice in order for yo u to make necess ary modifications i n order to maintain
uninterrupted service.
6. In the event of operation problems (document jam, copy jam, communication error indication),
refer to the solving problems section in this manual.
7. If you cannot correct the problem, please contact the RICOH CORP. CUSTOMER SUPPORT
DEPT. at 1-800-FASTFIX for repair and warranty information. If it is causing harm to the telephone network, the telephone com pa ny m ay request you to di sc onn ec t the equipment f rom t he
network until the problem is resolved.
8. This equipment cannot be used on telephone company-provided coin service. Connection to
Party Line Service is subject to state tariffs.
❖
WHEN PROGRAMMING EMERGENCY NUMBERS AND/OR MAKING TEST CALLS TO
EMERGENCY NUMBERS:
1. Remain on the line and briefly explain to the dispatcher the reason for the call before hanging up.
2. Perform such activities in the off-peak hours, such as early morning hours or late evenings.
CANADA (This information is for facsimile option users only.)
The Industry Canada label identifies certified equipment. This certification means that the equipment
meets telecommunications network protective, operational, and safety requirements as prescribed in
the appropria te Termin al Equ ipm ent Te chni cal Re quir emen ts docu men t(s) . The de part ment do es no t
guarantee the equipment will operate to the user's satisfaction.
Before installing this eq uipment, us ers sho uld ensu re that it is pe rmiss ible to be conn ected to th e facilities of the local telecommunications company. The equipment must also be installed using an acceptable method of connection. The customer should be aware that compliance with the above conditions
may not prevent degradation of service in some situations.
Repairs to certified equipment should be coordinated by a representative designated by the supplier.
Any repairs or alterations mad e by the user to this equ ipment, or equip ment malfunct ions, may give the
telecommunications company cause to request the user disconnect the equipment.
Users should ensur e for their own pro tectio n that t he elect rical gro und con necti ons of the po wer utilit y,
telephone lines, and internal metallic water pipe system, if present, are connected together. This precaution may be particularly important in rural areas.
Caution: Users should not attempt to make such connections themselves, but should contact the appropriate electric inspection authority, or electrician, as appropriate.
The Ringer Equivalenc e Numbe r (REN) as signe d to eac h t erminal de vice provid es an i ndica tion of t he
maximum number of terminals allowed to be connected to a telephone interface. The termination on
an interface may consist of any com binati on of devi ces sub ject onl y to the requi rement tha t the sum of
the Ringer Equivalence Numbers of all the devices does not exceed 5.
In accordance with IEC 60417, this machine uses the following symbols for the main power switch:
a
means POWER ON.
c
means STAND BY.
Copyright © 1999 Ricoh Co., Ltd.
Page 4

Safety Information
R
When using your machine, the following safety precautions should be always
followed.
Safety During Operation
In this manual, the following important symbols are used:
R
WARNING:
CAUTION:
Ignoring this warning could cause serious injury or even death.
Ignoring this caution could cause injury or damage to property.
i
Page 5

R
WARNING:
•
Connect the power cord directly into a wall outlet and never use an extension cord.
•
Disconnect the power plug (by pulling the plug, not the cable) if the
power cable or plug becom es frayed or otherwise damaged.
•
To avoid hazardous electric shock or laser radiation exposure, do not
remove any covers or screws other than those specified in this manual.
•
Turn off the powe r and disconnect the power plug (by pu lling the plug,
not the cable) if any of the following conditions exists:
•
You spill something into the equipment.
•
You suspect that your equipment needs service or repair.
•
Your equipment's cover has been damaged.
•
Do not incinerate spilled tone r or used toner. Toner dust might igni te
when exposed to an open flame.
•
Disposal can take place at our authorized dealer or at appropriate collection sites.
•
Dispose of the used toner bottle in accordance with the local regulation.
ii
Page 6

R
CAUTION:
•
Protect the equipment from dampness or wet weather, such as rain, snow,
and so on.
•
Unplug the power cord from the wall outlet before you move the equipment.
While moving the equipment, you should take care that the power cord will
not be damaged under the equipment.
•
When you disconnect the power plug from the wall outlet, always pull the
plug (not the cable).
•
Do not allow paper clips, staples, or other small metallic objects to fall inside
the equipment.
•
Keep toner (used or unused) and toner bottle out of the reach of children.
•
For environmental reasons, do not dispose of the equipment or expended
supply's wastes at household waste collection point. Disposal can take
place at our authorized dealer or at appropriate collection sites.
•
The inside of the machine could be very hot. Do not touch the parts with a
label indicating the “hot surface”. Otherwise it could cause a personal burn.
•
Our products are engineered to meet high standards of quality and functionality, and we recommend that you only use the expendable supplies available at an authorized dealer.
iii
Page 7

How to Read this Manual
R
R
Symbols
In this manual, the following symbols are used:
WARNING:
This symbol indicates a potentially hazardous situation that might result in
death or serious injury when you misuse the machine without following the instructions under this symbol. Be sure to read the instructions, all of which are described in the Safety Information section.
CAUTION:
This symbol indicates a potentially hazardous situation that might result in minor or moderate injury or property damage that does not involve personal injury
when you misuse the machine without following the instructions under this
symbol. Be sure to read the instructions, all of which are described in the Safety
Information section.
* The statements above are notes for your safety.
Important
If this instruction is not followed, paper might be misfed, originals might be
damaged, or data might be lost. Be sure to read this.
Preparation
This symbol indicates the prior knowledge or preparations required before operating.
Note
This symbol indicates precautions for operation, or actions to take after misoperation.
Limitation
This symbol indicates numerical limits, functions that cannot be used together,
or conditions in which a particular function cannot be used.
Reference
This symbol indicates a reference.
[ ]
Keys that appear on the machine's panel display.
{
}
Keys built into the machine's operation panel.
iv
Page 8

TABLE OF CONTENTS
What You Can do with this Machine (Copy Mode)................................. 2
Machine Types........................................................................................... 4
Guide to Components............................................................................... 5
Options....................................................................................................... 7
Operation Panel......................................................................................... 8
Panel Display........................................................................................... 11
Displays and Key Operations...................................................................... 11
1.Basics
Starting the Machine............................................................................... 13
Turning on the Power.................................................................................. 13
Turning off the Power.................................................................................. 14
Changing Modes..................................................................................... 15
Originals................................................................................................... 16
Sizes and Weights of Recommended Originals.......................................... 16
Sizes Difficult to Detect............................................................................... 17
Original Sizes and Scanning Area/Missing Image Area.............................. 18
Copy Paper............................................................................................... 19
Recommended Paper Sizes and Types...................................................... 19
Non-recommended Paper........................................................................... 22
Paper Storage............................................................................................. 22
Toner......................................................................................................... 23
Handling Toner.................................................................... .................. ...... 23
Toner Storage........................................................................ ..................... 23
Photo Conductor Unit (PCU).................................................................. 24
Handling Photo Conductor Unit................................................................... 24
Photo Conductor Unit Storage.................................................................... 24
Replacing Photo Conductor Unit................................................................. 24
2.Copying
Basic Procedure...................................................................................... 25
Setting Originals...................................................................................... 27
Setting Originals on the Exposure Glass .................................................... 27
Setting Originals in the Document Feeder.................................................. 27
Setting Non-Mstandard Sized Originals in the Document Feeder .............. 29
Basic Functions....................................................................................... 30
Adjusting Copy Image Density....................... .................. ........................... 30
Selecting Your Original Type...................................................................... 31
Selecting Copy Paper ....................... .......................................................... 31
Auto Reduce/Enlarge—Having the Machine Choose the Reproduction Ratios
... 33
v
Page 9

Sort/Stack/Staple..................................................................................... 35
Sort—Sorting into Sets (123, 123, 123)...................................................... 35
Stack—Delivering Copies in Page Batches (111, 222, 333)....................... 37
Staple.......................................................................................................... 38
Copying from the Bypass Tray.............................................................. 41
Program—Storing Your Copy Settings in Memory.............................. 45
Storing a Program....................................................................................... 45
Deleting a Program..................................................................................... 46
Recalling a Program.................................................................................... 46
Other Functions....................................................................................... 47
Energy Saver Mode—Saving Energy ......................................................... 47
Interrupt—Temporarily Stopping One Job to Copy Something Else........... 47
User Codes .............................................................................................. ... 48
Auto Start—Entering Copy Job Settings During the Warm-up Period ........ 48
Original Tone........................ ....................................................................... 49
How to Set the Papers with Letterhead....................................................... 49
Preset Reduce/Enlarge—Reducing and Enlarging Using Preset Ratios
... 50
Zoom—Reducing and Enlarging in 1% Steps....................................... 52
Directional Size Magnification (inch)—Stretching and Squeezing
the Image into the Copy Area............................................................. 53
Directional Magnification (%)—Stretching and Squeezing
the Image in 1% Steps......................................................................... 55
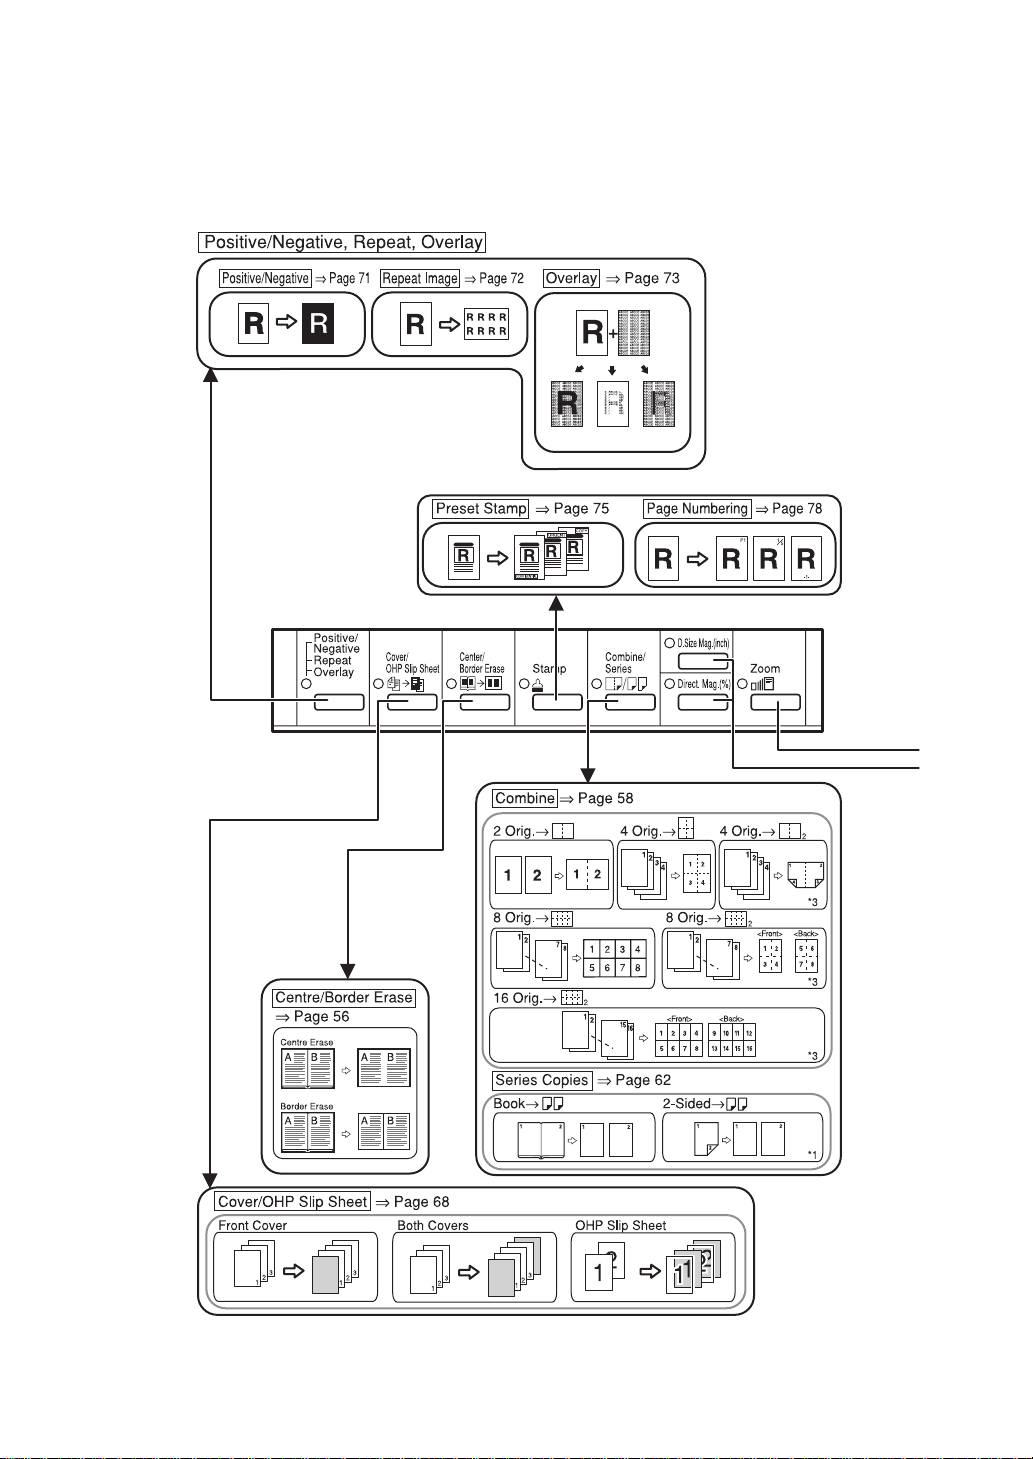
Center/Border Erase—Erasing the Center and the Border................. 56
Combine—Combining Originals into One Copy................................... 58
Series Copies—Making One-sided Copies from Various Originals ... 62
Book —Making One-sided Copies from Two Facing Page of a Bound
Original (Book)......................................................................................... 62
2-Sided —Making One-sided Copies from Two-sided Originals................. 63
Duplex—Making Two-Sided Copies...................................................... 64
1 Sided —Making Two-sided Copies from One-sided Originals ................. 64
2 Sided —Making Two-sided Copies from Two-sided Originals ................. 66
Book —Making Two-Sided Copies from Facing Pages of a Bound
Original (Book)......................................................................................... 67
Cover—Adding or Inserting Sheets....................................................... 68
Front Cover—Copying or Adding a Front Cover......................................... 68
Both Covers—Copying or Adding Front and Back Covers ......................... 69
OHP Slip Sheet—Copying or Inserting Slip Sheets............................. 70
Positive/Negative—Copying in Complementary Colors...................... 71
Repeat Image—Repeating an Image over the Entire Copy ................. 72
Merging Images (Overlay)—Merging Two Different Originals ............ 73
Preset Stamp—Printing Preset Messages on Your Copies................. 75
Page Numbering—Printing Page Numbers........................................... 78
Combination Chart.................................................................................. 80
vi
Page 10

3.What to do If Something Goes Wrong
If Your Machine does not Operate as You Want................................... 83
Message....................... ............................................................................... 83
Display .................... .................................................................................... 84
If You Cannot Make Clear Copies.......................................................... 85
If You Cannot Make Copies as You Want.............................................. 86
Adjust Image.......................................................................... ..................... 86
Combine.................... .................................................. ................................ 87
Stamp.......................................................................................................... 87
Duplex............................. ............................................................................ 88
B
Loading Paper..................................................................................... 89
Loading Paper in the Large Capacity Tray.......................... ........................ 90
D
Changing the Toner Bottle ................................................................ 91
Replacing Photo Conductor Unit (PCU) ............................................... 93
x
Clearing Misfeeds............................................................................... 98
Changing the Paper Size...................................................................... 103
Changing the Paper Size in Tray 1 or the Optional Paper Table.............. 103
Changing the Paper Size in Tray 2........................................................... 105
d
Adding Staples ................................................................................. 107
e
Removing Jammed Staples............................................................. 109
4.User Tools (Copy Features)
Accessing the User Tools (Copy Features)........................................ 111
Exiting the User Tools............................................................................... 112
User Tools Menu (Copier Features)..................................................... 114
Settings You Can Change with the User Tools .................................. 116
1. General Features 1/4............................................................................. 116
1. General Features 2/4............................................................................. 117
3
1. General Features
1. General Features 4/4............................................................................. 119
2. Adjust Image
2. Adjust Image 2/3.................................................................................... 122
3. Input/Output
3. Input/Output 2/2..................................................................................... 125
4 Stamp Setting
4 Stamp Setting 2/3................................................................................... 126
4 Stamp Setting
1
/4............................................................................. 118
1
/3.................................................................................... 121
/2..................................................................................... 124
1
/3................................................................................... 125
3
/3................................................................................... 127
vii
Page 11

5.Remarks
Do's and Don'ts ..................................................................................... 129
Where to Put Your Machine.................................................................. 130
Machine Environment ............................................................................... 130
Power Connection..................................................................................... 131
Access to Machine.................................................................................... 131
Maintaining Your Machine.................................................................... 132
Cleaning the Exposure Glass.................................................................... 132
Cleaning the Platen Cover........................................................................ 132
Cleaning the Document Feeder ................................................................ 132
6.Specification
Mainframe............................................................................................... 133
Document Feeder (Option)................................................................... 137
Paper Tray Unit (Option)....................................................................... 138
Internal Tray 2 (1bin tray) (Option)....................................................... 139
Finisher (Option).................................................................................... 140
Shift Sort Tray (Option)......................................................................... 141
Large Capacity Tray (LCT) (Option)..................................................... 142
Duplex Unit (Option).............................................................................. 143
Bypass Tray (Option)............................................................................ 144
48MB Copier Memory Unit (Option)..................................................... 145
INDEX...................................................................................................... 146
viii
Page 12

This page is intentionally blank.
1
Page 13
What You Can do with this Machine (Copy
Mode)
2
Page 14

3
Page 15

Machine Types
This machine comes in two models which vary in copy speed. To make sure
which model you have, see the inside front cover.
Type 1 Type 2
Copy speed 22 copies/minute (A4K,
1
8
/2" × 11"K)
Fax unit Option Option
Printer unit Option Option
27 copies/minute (A4K,
81/2" × 11"K)
4
Page 16

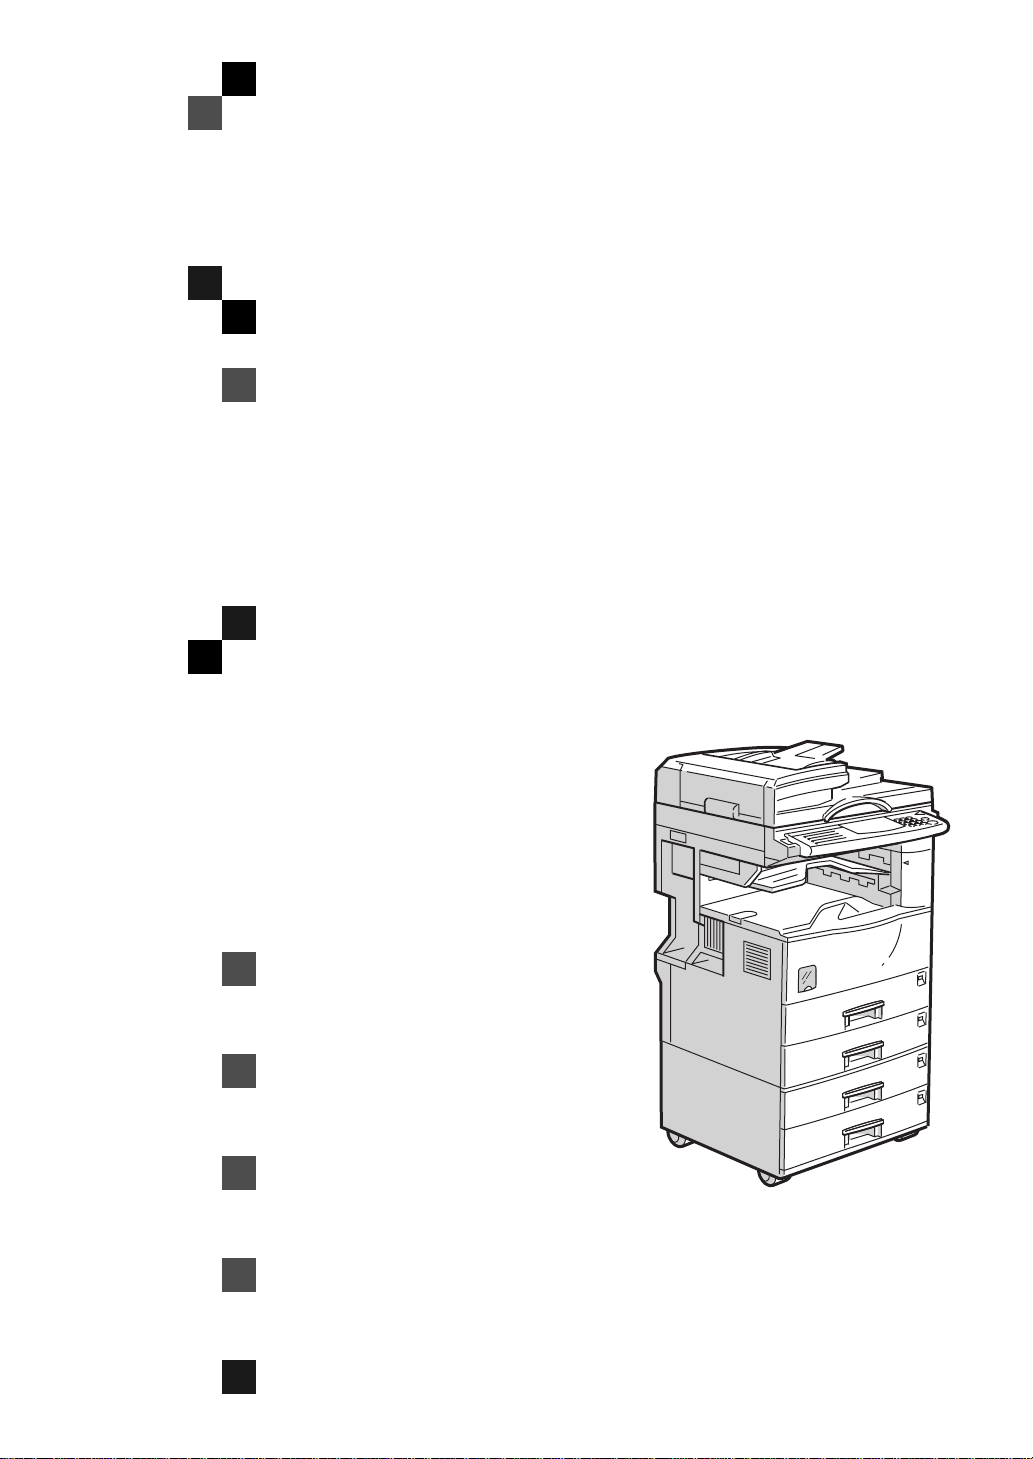
Guide to Components
1. Platen cover (option) or document
feeder (ADF) (option)
Lower the platen cover over originals
placed on the exposure glass for copying.
If you have the document feeder, insert a
stack of originals here. They will be fed
automatically.
(The illustration shows the document
feeder.)
2. Exposure glass
Position originals here face down for
copying. See ⇒ P.16
“Originals”
.
3. Internal tray
Copied paper is delivered here face
down.
4. Ventilation hole
Prevents overheating. Do not obstruct
the ventilation hole by placing or leaning
an object near it. If the machine overheats, a fault might occur.
5. Main power switch
Press this switch to turn the power on or
off.
This switch should only be used by a service representative.
Note
If the machine does not operate after
❒
turning on the operation switch, check
if the main power switch is turned on.
If it is off, turn it on.
6. Behind cover
Flip up when you use the keys underneath.
5
Page 17
7. Main Power indicator
This indicator lights up when the main
power switch is turned on, and goes off
when the switch is turned off.
8. On indicator
This indicator lights up when the operation switch is turned on, and goes off
when the switch is turned off.
9. Operation switch
Press this switch to turn the power on
(the On indicator lights up). To turn the
power off, press this switch again (the
indicator goes off).
On
10. Operation panel
See ⇒ P.8
“Operation Panel”
.
11. Front cover
Open to access the inside of the machine.
12. Paper tray
Set paper here. See ⇒ P.89
.
per”
“B Loading Pa-
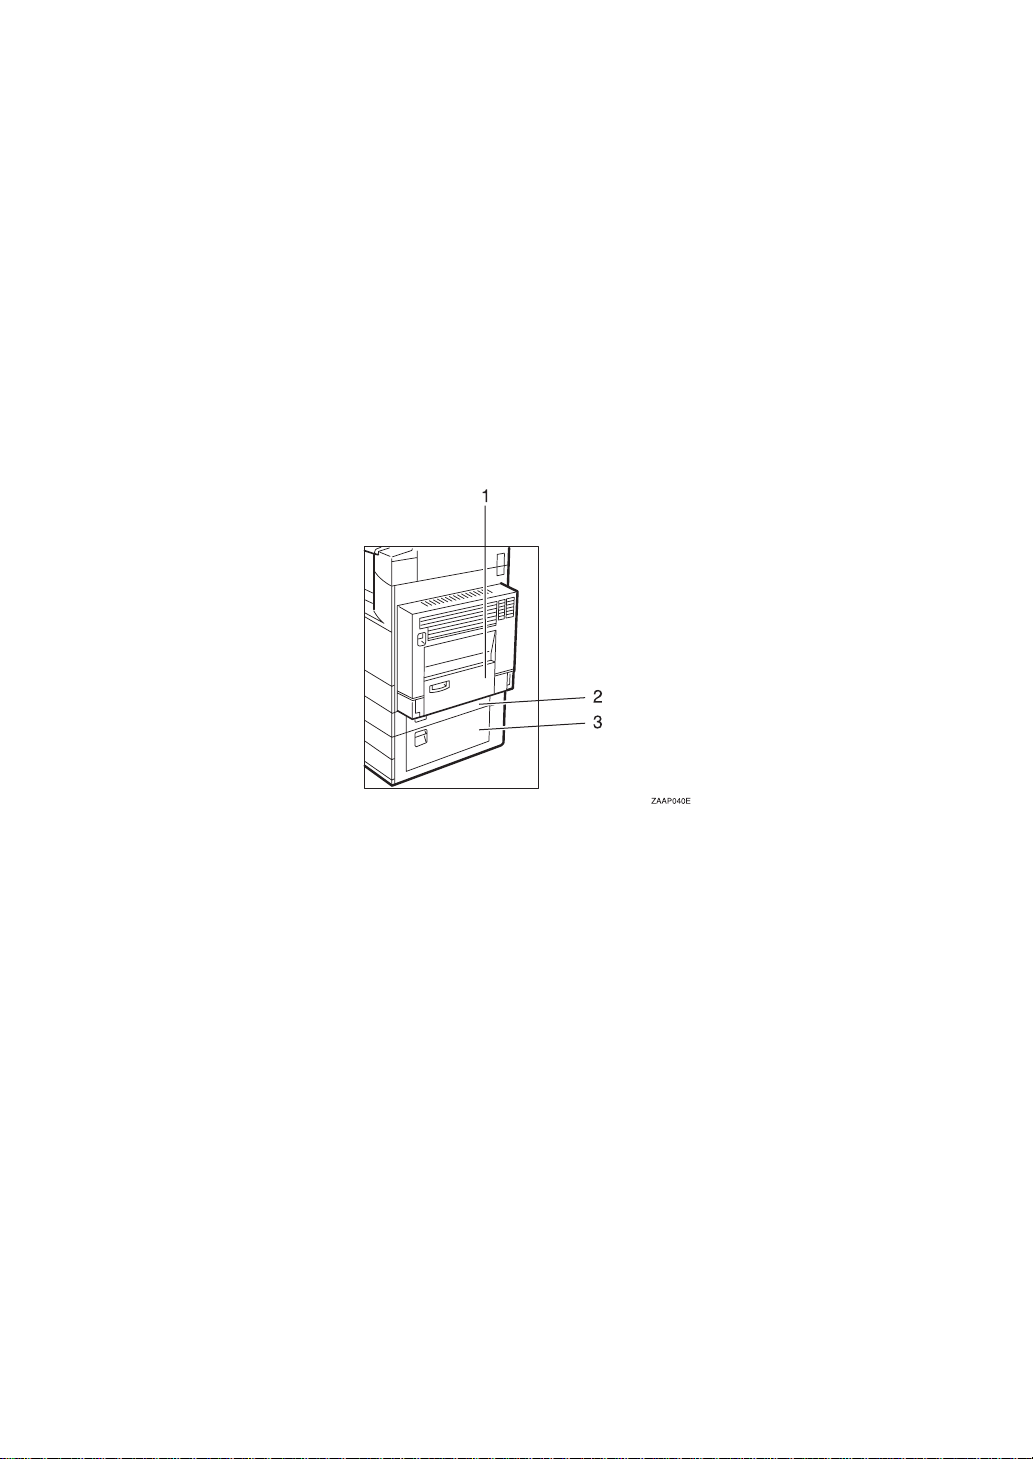
13. Paper tray unit (option)
1. Bypass tray (option)
Use to copy onto OHP transparencies,
adhesive labels, translucent paper, post
cards, and non-standard size paper. See
P.41
⇒
“Copying from the Bypass Tray”
2. Paper tray cover
Open this cover to remove jammed paper
fed from the optional paper tray unit.
3. Lower right cover
Open this cover to remove jammed paper.
6
.
Page 18

Options
1. Finisher
Sorts, stacks, and staples copies.
2. Bridge unit
Relays copies to the finisher.
3. Platen cover
Lower this cover over originals for copying.
4. Document feeder (ADF)
Insert a stack of originals here.
They will be fed automatically.
5. Internal tray 2 (1 bin tray) (Op-
tional Interchange unit required.)
If you selected this as the output tray,
copied paper is delivered here face
down. See “15. Output Tray ” in the System Settings.
Other options:
•Interchange unit
• 48MB copier memory unit
6. Shift sort tray
Sorts and Stacks copies.
7. Paper tray unit
Consists of two paper trays.
8. Large capacity tray (LCT)
Holds 2,000 sheets of paper.
9. Bypass tray
Use to copy onto OHP transparencies,
adhesive labels, translucent paper, post
cards, and non-standard size paper. See
⇒
P.41
“Copying from the Bypass Tray”
.
10. Duplex unit (Optional Inter-
change unit required.)
Use to make two-sided copies.
7
Page 19
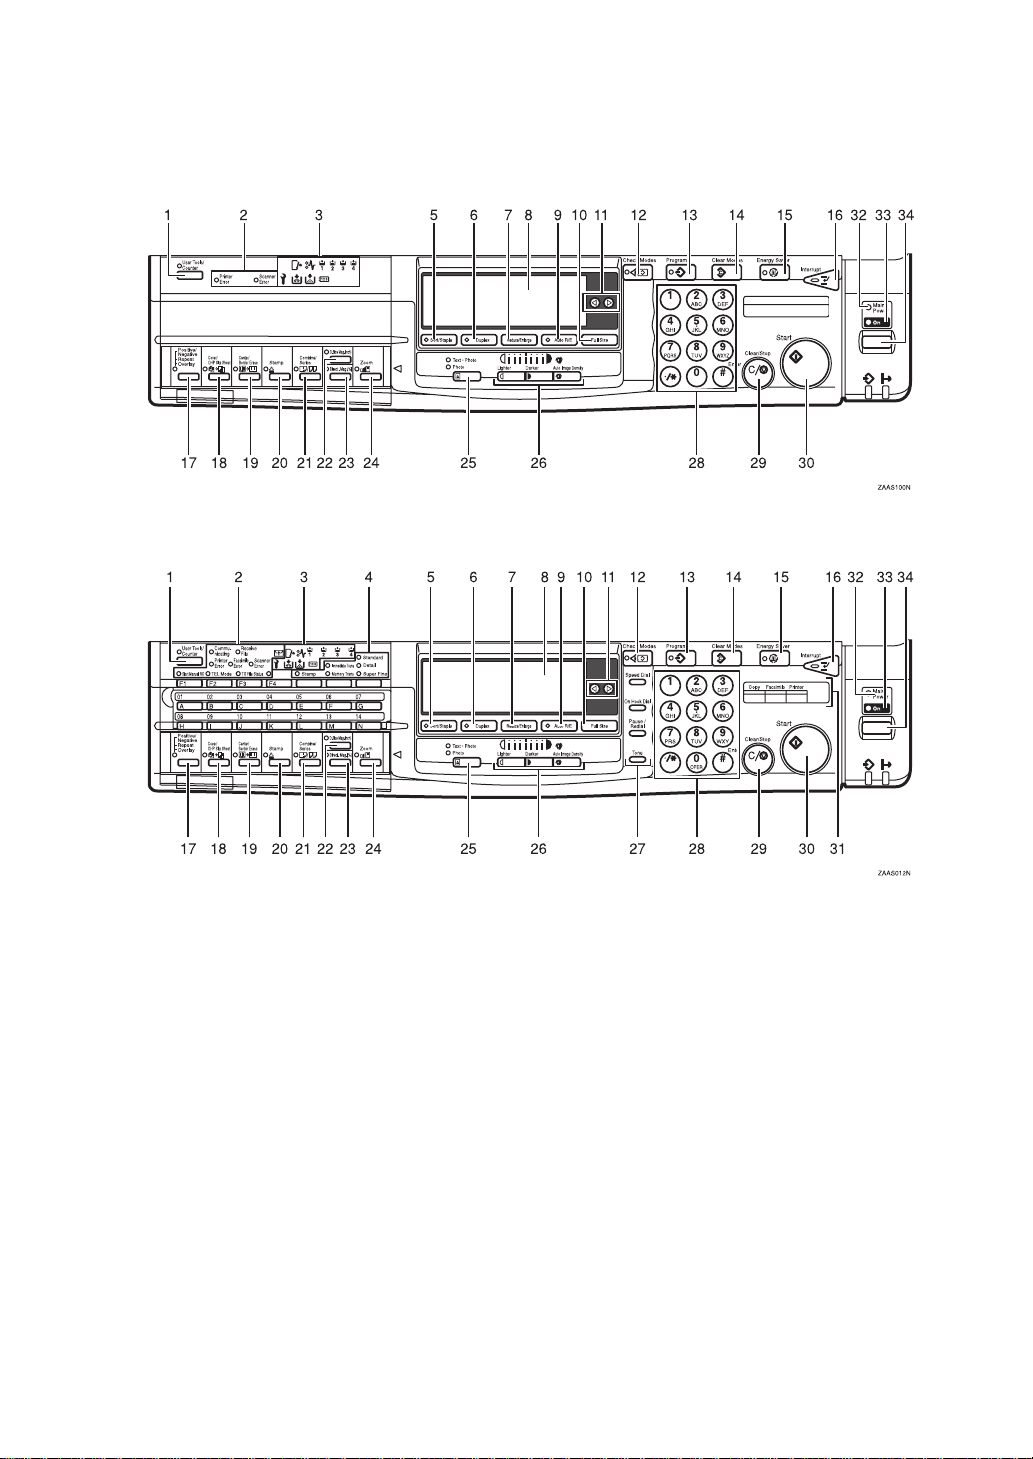
Operation Panel
❖
Copier only
❖
Fax or printer installed
1.
User Tools/Counter
{
Press to change the default settings and
conditions to meet your requirements.
See ⇒ P.111
“User Tools (Copy Features)”
key
}
2. Keys and indicators for fax mode
(for machines with the optional fax
function)
See the “Fax Reference”.
3. Indicators
These indicators show errors or the status
of the machine. See ⇒ P.83
Something Goes Wrong”
8
.
“What to do If
4. More indicators for fax mode (for
machines with the optional fax function)
.
See the “Facsimile Reference”.
key
]
key
]
5.
[
Sort/Staple
Sort/Rotate Sort/Shift Sort: automatically sorts copies.
Shift Stack: stacks together copies of each
page.
Staple: staples each set of copies together.
6.
[
Duplex
Makes two-sided copies. See ⇒ P.64
plex—Making Two-Sided Copies”
“Du-
.
Page 20

7.
[
Reduce/Enlarge
Press to make reduced or enlarged copies. See ⇒ P.50
Reducing and Enlarging Using Preset Ra-
.
tios”
key
]
“Preset Reduce/Enlarge—
8. Panel display
Shows operation status, error messages,
and function menu. See ⇒ P.11
Display”
9.
Enlarges or reduces the image automatically according to the specified paper
size.
10.
For making full size copies.
.
[
Auto R/E
[
Full Size
key
]
key
]
“Panel
11. 01 keys (Cursor keys)
Press to select an item on the panel display.
12.
Check Modes
{
Press to check the entered copy job settings.
13.
Program
{
Press to select the program mode. See
P.45
“Program—Storing Your Copy Set-
tings in Memory”
14.
Clear Modes
{
Press to clear the previously entered copy
job settings.
15.
Energy Saver
{
Press to switch to and from Energy Saver
mode. See ⇒ P.47
Saving Energy”
16.
Interrupt
{
Press to make interrupt copies during a
copy run. See ⇒ P.47
rarily Stopping One Job to Copy Something
.
Else”
17.
{
Overlay
• Positive/Negative
Positive/Negative
{
key
}
Press to make positive/negative copies. See ⇒ P.71
Copying in Complementary Colors”
key
}
key
}
.
key
}
key
}
“Energy Saver Mode—
.
key
}
“Interrupt—Tempo-
}, {
“Positive/Negative—
Repeat
.
⇒
}
• Repeat
Press to make repeat copies. See
P.72
“Repeat Image—Repeating an Im-
age over the Entire Copy”
•Overlay
Press to make overlay image copies.
See ⇒ P.73
lay)—Merging Two Different Origi-
.
nals”
18.
•Cover
• OHP Slip Sheet
19.
Press to erase the center and /or all four
sides of the original image. See ⇒ P.56
“Center/Border Erase—Erasing the Center
and the Border”
20.
Press to have a stamp mark printed on
copies. See ⇒ P.75
ing Preset Messages on Your Copies”
P.78
Numbers”
21.
•Combine
• Series
22.
Press to make Directional Size Magnification copies. See ⇒ P.53
Magnification (inch)—Stretching and
,
Squeezing the Image into the Copy Area”
23.
Press to make Directional Magnification
copies. See ⇒ P.55
tion (%)—Stretching and Squeezing the Image in 1% Steps”
Cover/OHP Slip Sheet
{
Press to add or insert cover paper. See
P.68
⇒
Sheets”
Press to make copies or insert slip
sheets. See ⇒ P.70
Copying or Inserting Slip Sheets”
Press to make combine copies. See
P.58
into One Copy”
Press to make series copies. See
P.62
Copies from Various Originals”
.
Center/Border Erase
{
Stamp
{
“Page Numbering—Printing Page
.
Combine/Series
{
“Combine—Combining Originals
“Series Copies—Making One-sided
D. Size Mag. (inch)
{
Direct. Mag.(%)
{
“Merging Images (Over-
“Cover—Adding or Inserting
.
key
}
“Preset Stamp—Print-
.
“Directional Magnifica-
.
.
}
“OHP Slip Sheet—
key
}
key
}
key
}
“Directional Size
key
}
key
.
.
and
⇒
⇒
⇒
⇒
.
9
Page 21

24.
Zoom
{
Changes the reproduction ratio in 1%
steps.
key
}
25.
Original Type
{
Press to select the type of your originals.
26.
and
Adjusts the copy image density.
Lighter
{
Auto Image Density
{
}
key
}
key and
Darker
{
key
}
keys
}
27. Operation panel for facsimile
mode (for machines with the optional fax function)
See the “Facsimile Reference”.
28. Number keys
Use to enter the desired number of copies
and data for selected modes.
key
key
}
“Auto Start—En-
29.
Clear/Stop
{
While entering numbers, press to cancel a
number you have entered. While copying, press to stop copying.
30.
Start
}
{
Press to start copying. Also use to initiate
Auto Start. See ⇒ P.48
tering Copy Job Settings During the Warmup Period”
31. Function keys (Fax or printer in-
stalled machine only)
Press to change modes. To use copy functions, press the
{
Copy
key.
}
32. Main Power indicator
This indicator lights up when the main
power switch is turned on, and goes off
when the main power switch is turned
off.
33. On indicator
This indicator lights up when the operation switch is turned on, and goes off
when the operation switch is turned off.
34. Operation switch
Press this switch to turn the power on
(the
power off, press this switch again (the
indicator goes off).
indicator lights up). To turn the
On
On
10
Page 22
Panel Display
The panel display shows operational status, error messages, and function
menus.
Important
❒
Do not apply a strong shock or force of about 30N (about 3kgf) or more to the
panel display. Otherwise, the display might be damaged.
Note
❒
Currently selected items are displayed white on black (e. g. ).
❒
Keys that are displayed grayed-out (e. g. ) can not be used.
❒
By default, the machine is in Copy mode when you switch on. This can be
changed. See “Settings You Can Change With The User Tools” of the System
Settings.
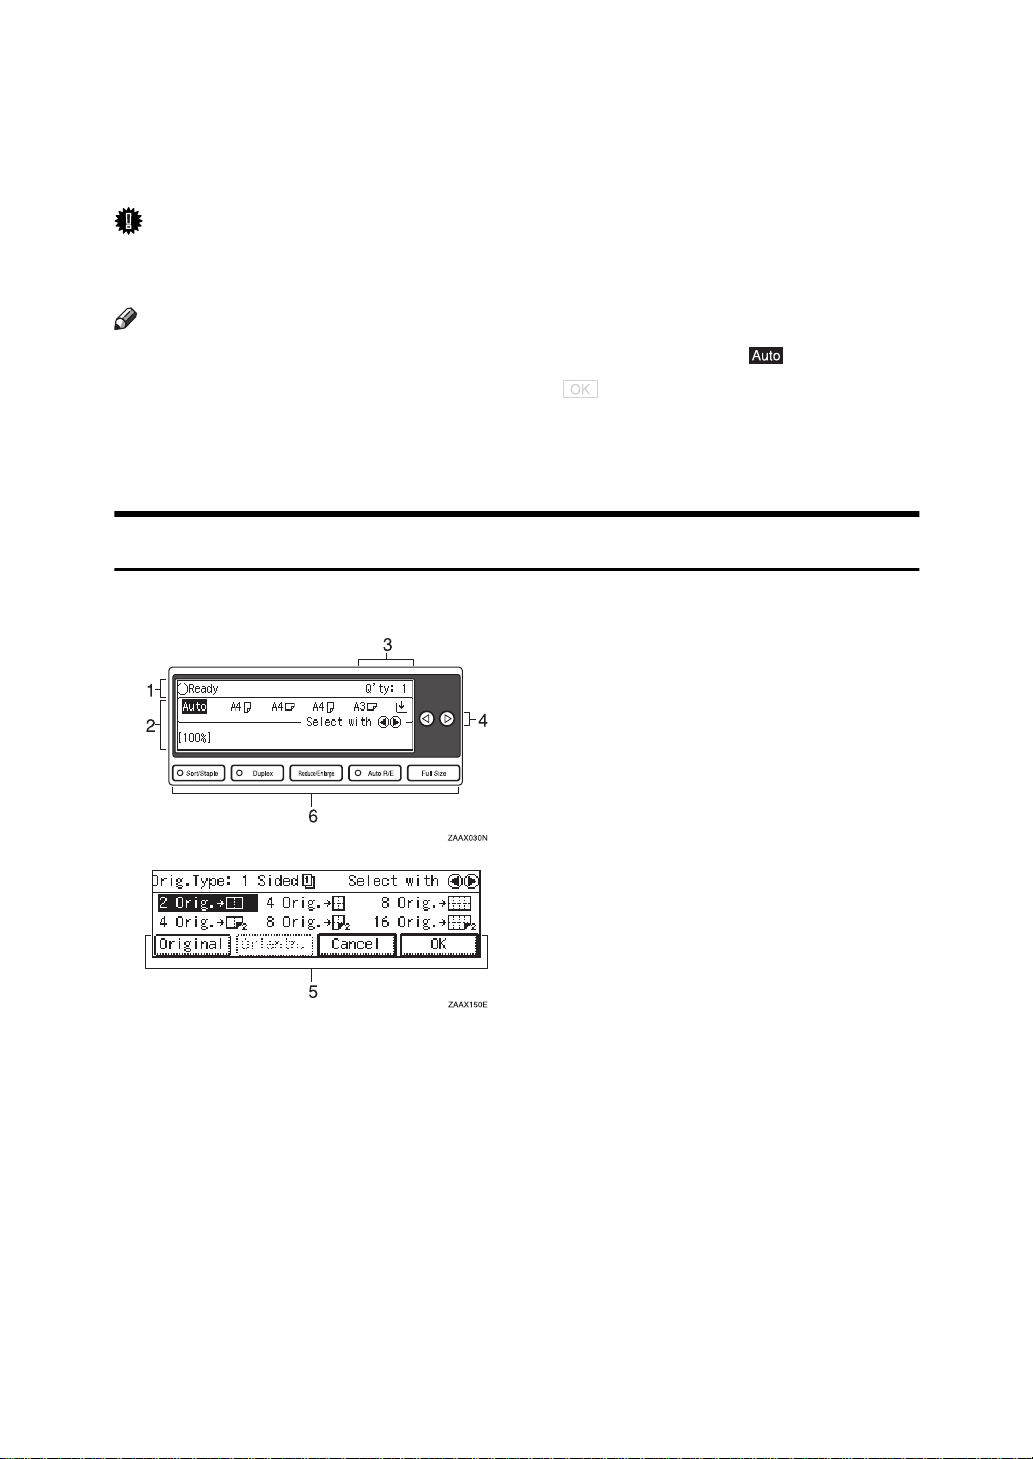
Displays and Key Operations
❖
Copy display
1. The machine status and messages
appear here.
2. Items which can be selected or
specified.
3. Number of copies set.
4. Press these keys to select an item.
5. Settings for this function.
6. Press these keys to select or con-
firm settings.
11
Page 23

❖
Common keys
[
] Sets a selected function or entered value and returns to the previ-
OK
ous display.
[
[
01
[
[
] Cancels a selected function or entered value and returns to the
Cancel
previous display.
] [
Prev.
↑
PrevMenu
] Sets a selected function or entered value and returns to the initial
Exit
] When there are too many items fit on the display, use these keys
Next
↓
to move between pages.
Press to highlight the selection you wish to select.
] Press to return to the previous menu.
display.
12
Page 24
Starting the Machine
To start the machine, turn on the main
power switch (copier only) or the operation switch (fax or printer installed
machine).
Note
❒
This machine automatically enters
Energy Saver mode or turns itself
off if you do not use the machine
for a while. See “07. Energy Saver
Level”, “06. Panel Off Timer”, “09.
Auto Off Timer” in the System Settings Reference.
1. Basics
Turning on the Power
Starting the Machine
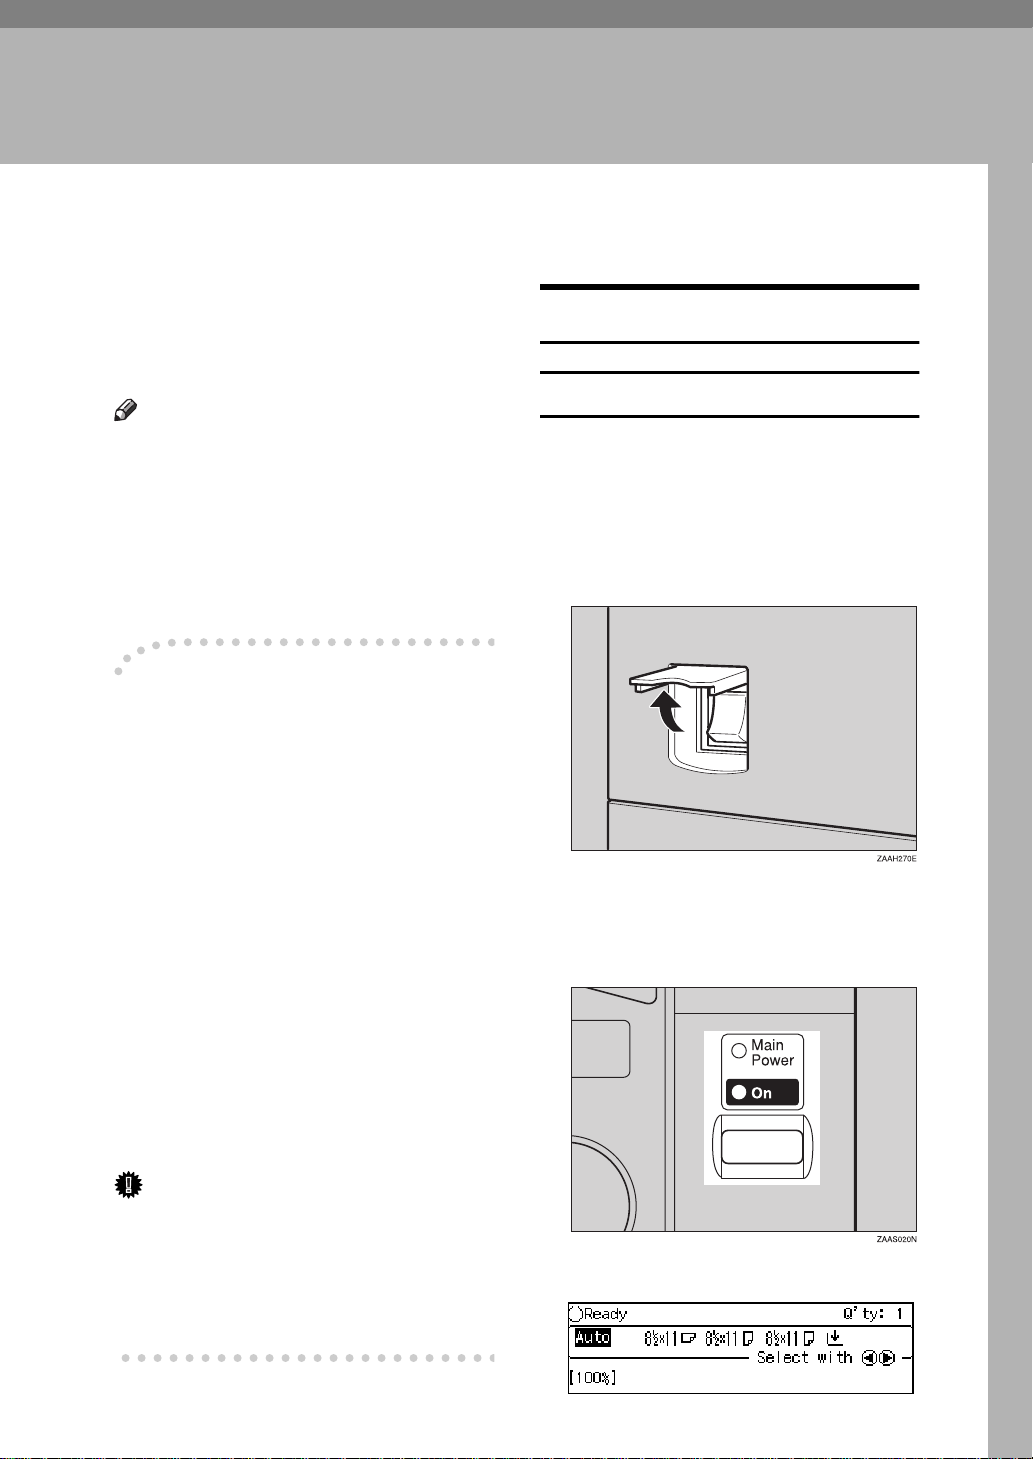
A Make sure that the power cord is
plugged into the wall outlet firmly.
B Open the switch cover and turn
on the main power switch.
Power switches for fax or
-
printer installed machine
This machine has two power switches: See ⇒ P.5
❖
Operation switch (right side of the operation panel)
Turn on this switch to activate the
machine. When the machine has
warmed up, you can make copies
or send faxes.
❖
Main power switch (front of the machine)
Do not touch the main power
switch. It should be used only by a
service representative when the
optional fax unit is installed.
Important
❒
If you leave the main power switch
off for more than about one hour,
all fax files in memory will be lost.
See “Turning off the Power” in the
Facsimile Reference.
“Guide to Components”
.
C If the On indicator goes off, press
the operation switch to make the
On indicator light up.
The panel display will come on.
13
Page 25
Basics
1
Note
❒
If the power is not turned on
when the operation switch is
pressed, check if the main power switch is on. If off, turn it on.
❒
During the warm-up period,
you can use the Auto Start function. See ⇒ P.48
Entering Copy Job Settings During the Warm-up Period”
❒
Warm-up period is 45 seconds.
“Auto Start—
.
When the machine is set for user codes
A Enter your user code using the
Number keys. Then press the
key.
Note
❒
To prevent others from making
copies with your user code,
press the
the
{
neously after copying.
Clear Modes
{
Clear/Stop
key simulta-
}
key and
}
#
{
Reference
See “06. Panel Off Timer” in the
System Settings Reference.
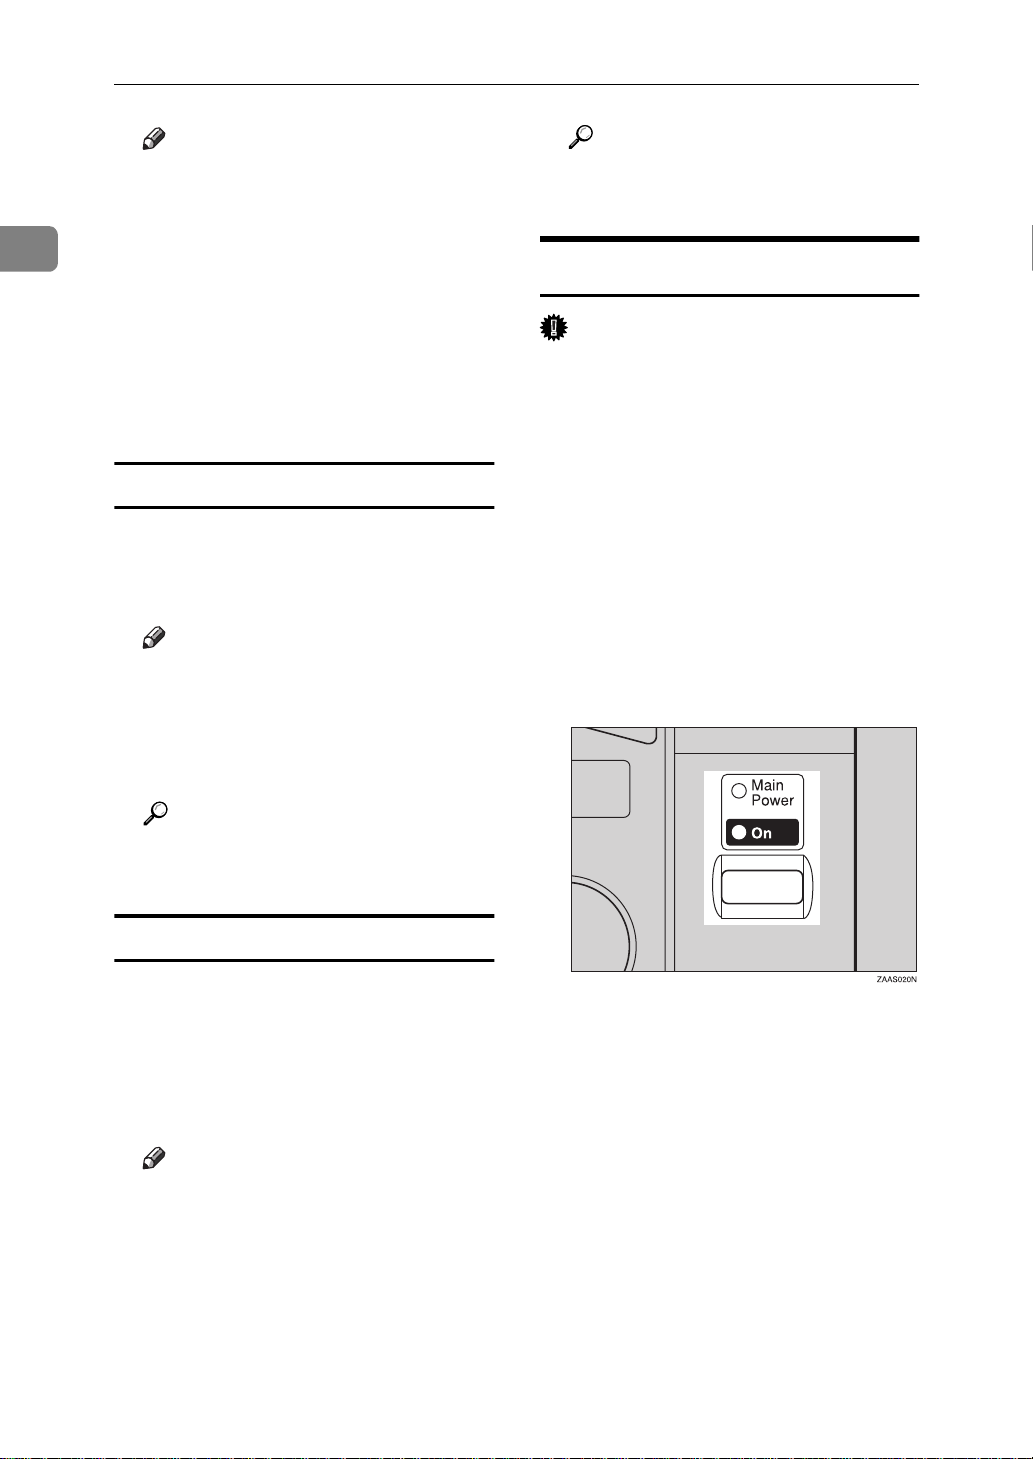
Turning off the Power
Important
❒
If you wish to unplug the power
cord or turn off the main power
switch, make sure that the remaining memory space indicates 100%
on the display for fax mode.
❒
Fax files stored in memory will be
lost an hour after you turn the
main power switch off or you un-
}
plug the power cord. See “Turning
off the Power” in the Fax Reference.
A Press the operation switch to
make the On indicator go off.
Reference
For how to set user codes, see
P.119
“1. General Features 4/4”
⇒
.
When the {Energy Saver} indicator is lit
The machine is in Energy Saver
mode.
A Press the
The machine will return to the
ready condition.
Note
❒
The machine will also return to
the ready condition when an
original is set in the document
feeder, or when the platen cover
or document feeder is opened.
Energy Saver
{
key.
}
14
Page 26

Changing Modes
Changing Modes
You can use this machine not only as a copier, but optionally as a fax machine or
a printer as well. Press the
simile
If the display shows a mode other than copy mode, press the
switch to copy mode.
For how to change the mode the machine starts in when you turn the operation
switch on, see “01. Function Priority” in the System Settings Reference.
key to use facsimile functions.
}
{
key to use copy functions, or press the
Copy
}
Copy
{
{
key to
}
Fac-
1
Limitation
❒
You cannot switch modes in any of the following cases:
• When scanning in a fax message for transmission.
• During immediate transmission.
• When accessing the user tools.
• During interrupt copying.
• During on hook dialing for fax transmission.
• During Energy Saver mode.
• When the fax handset is lifted.
• While scanning in a document with the scan feature.
15
Page 27
Basics
Originals
1
Sizes and Weights of Recommended Origi nals
❖
Metric version
Where original is set Original Size Original Weight
Exposure glass Up to A3 -Document feeder 1-sided originals:
A3L – A5KL
2-sided originals:
A3L – A5KL
❖
Inch version
Where original is set Original Size Original Weight
Exposure glass Up to 11" × 17" --
1-sided originals: 11" × 17"L –
1
5
/2" × 81/2"KL
2-sided originals: 11" × 17"L –
1
/2" × 81/2"KL
5
40 – 128g/m
52 – 105g/m
11 – 34 lb
14 – 28 lb
2
2
Non-recommended originals for the document feeder
Setting the following originals in the document feeder might cause paper misfeeds or damage to the originals. Set these originals on the exposure glass.
• Originals other than those specified in ⇒ P.16
mended Originals”
“Sizes and Weights of Recom-
• Stapled or clipped originals
• Perforated or torn originals
• Curled, folded, or creased originals
• Pasted originals
• Originals with any kind of coating, such as thermal fax paper, art paper, aluminum foil, carbon paper, or conductive paper
• Originals with indexes, tags, or other projecting parts
• Sticky originals such as translucent paper
• Thin originals that have low stiffness
• Originals of inappropriate weight ⇒ P.16
Originals”
“Sizes and Weights of Recommended
• Bound originals such as books
16
• Transparent originals such as OHP transparencies or translucent paper
Page 28

Originals
Sizes Difficult to Detect
It is difficult for the machine to detect the sizes of the following originals, so select the paper size manually.
• Originals with indexes, tags, or other projecting parts
• Transparent originals such as OHP transparencies or translucent paper
• Dark originals with many letters and drawings
• Originals which partially contain solid images
• Originals which have solid images at their edges
1
• Originals other than those (marked by ❍) in the table below. See ⇒ P.17
detectable by the Auto Paper Select”
.
Sizes detectable by the Auto Paper Select
❖
Metric version
Size A3LB4
Where setting
original
Exposure glass
Document feeder
❖
Inch version
Size A3LB4
Where setting
original
Exposure glass
A4
K
JIS
L
L
❍❍❍❍
❍❍❍❍❍
A4
K
JIS
L
L
ЧЧЧЧЧ
A5
B5
K
JIS
L
K
L
××
A5
B5
K
JIS
L
K
L
8
×
L
1
/2"
14"
1
8
14"
L
/2" ×
❍
8
×
KL
11" ×
17"L
××××
11"
×
17"
L
❍❍ ❍
1
/2"
11"
1
/2" ×
8
11"
KL
××
1
5
×
1
8
KL
/2"
/2"
×
1
/2" ×
5
1
/2"
8
KL
1
8
/2"
13"
×
L
❍❍❍
10"
×
8"
K
“Sizes
1
8
/2" ×
13"
L
❍
❍
10"
×
14"
L
Document feeder
ЧЧЧЧЧ
❍❍ ❍ ❍
××
❍
17
Page 29
1
Basics
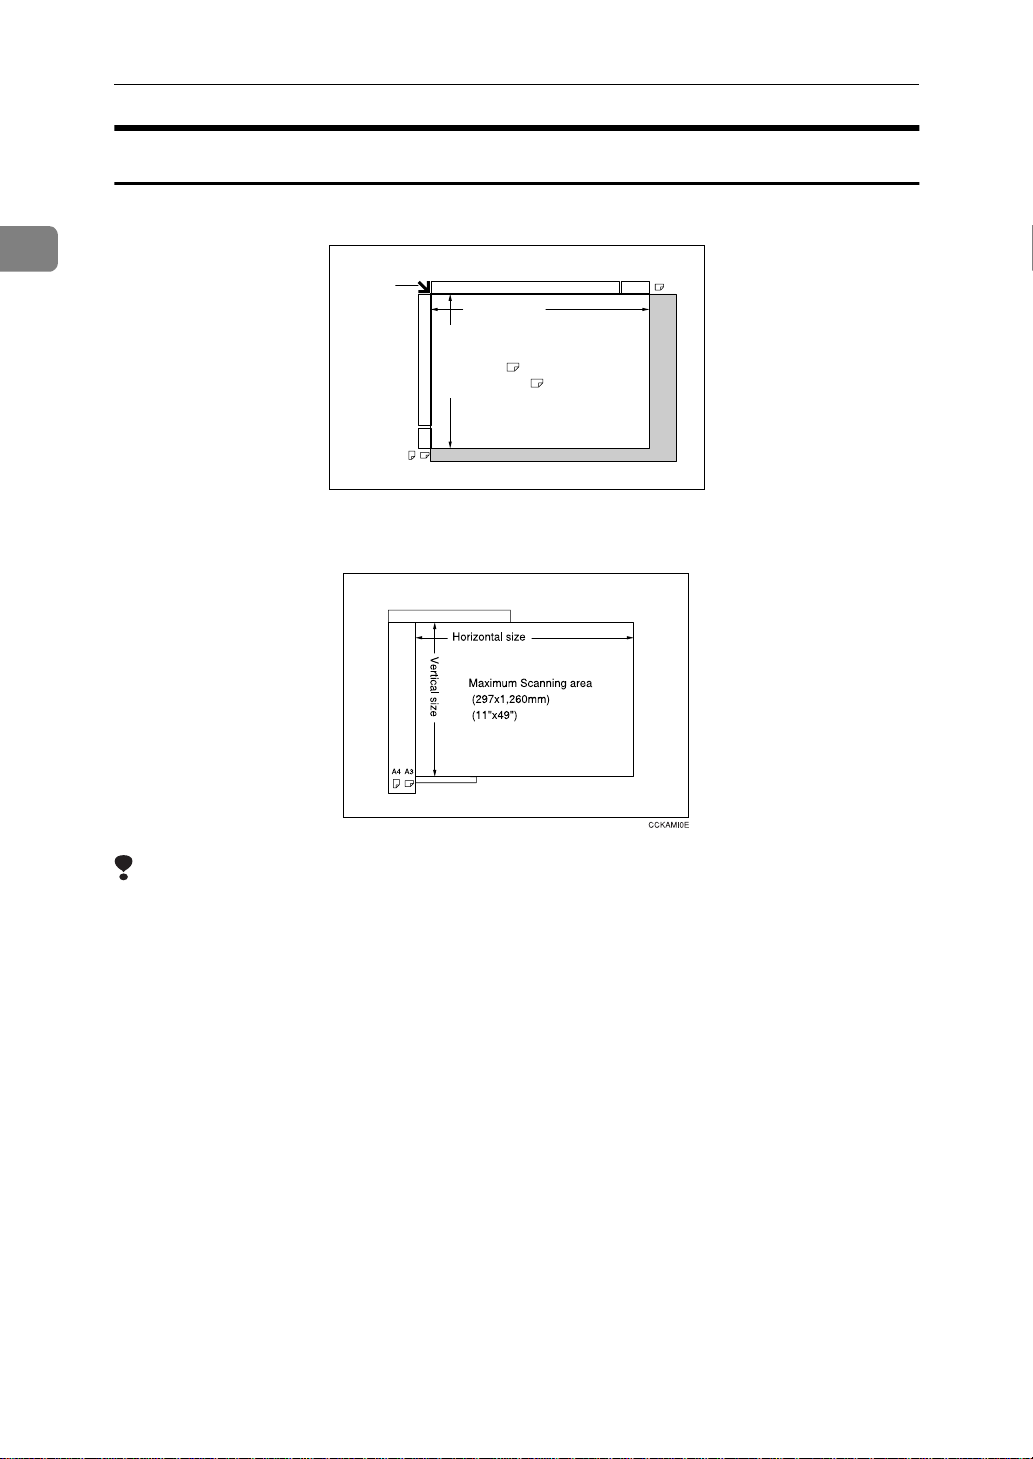
Original Sizes and Scanning Area/Missing Image Area
❖
Exposure glass
❖
Document feeder
Reference
position
Horizontal size
Vertical size
Maximum Scanning area
A3 (297x420mm)
11"x17" (279x432mm)
A3A4
A3
CP01AEE
18
Limitation
❒
Even if you correctly set originals in the document feeder or on the exposure
glass, 3mm, 0.1" margins on all four sides might not be copied.
Page 30

Copy Paper
Copy Paper
Recommended Paper Sizes and Types
The following limitations apply to each tray:
Metric version Inch version Paper
Tray 1 A3L, B4JISL, A4KL, B5JISKL,
Paper tray unit
(option)
A5L, 11" × 17"L, 8
1
11"KL, 5
/2" × 81/2"L, 71/4" × 101/2"
KL, 8" × 13"L, 8
13"L, 8" × 10"KL, 10" × 14"L
Note
You have to specify the paper size
❒
with the user tools. See ⇒ P.103
“Changing the Paper Size”
Tray 2 A3L , B4JISL , A4KL , B5JISKL ,
A5L , B6JISL
1
L, 4
/8" × 91/2"L, 11" × 17"L , 81/2" ×
1
14" L, 8
1
10
13"L, 8
14"L, 8KL
/2" × 11" KL, 81/2" × 51/2"L,
/2" × 71/4"KL, 8" × 13"L, 81/2" ×
1
/4" × 13"L, 8" × 10"KL, 10" ×
*3
, C5 Env.L, C6 Env.L, DL Env.L
1
/2" × 14"L, 81/2" ×
1
/2" × 13"L, 81/4" ×
.
*2
, A6L ,37/8" × 71/2"
, 16KKL
*4
weight
60 – 105g/
2
m
, 16 – 28
lb
60 – 105g/
2
m
, 16 – 28
lb
Paper capacity
500 sheets
500 sheets
1
*1
*1
Tray 2Non-stan-
dard sizes
Note
You have to specify the paper size
❒
with the user tools. See ⇒ P.103
“Changing the Paper Size”
.
A3L, B4JISL, A4KL, B5JISKL,
A5L, B6L, A6L, 11" × 17"L, 8
1
14"L, 8
10
13", 8
/2" × 11"KL, 81/2" × 51/2"L,
1
/2" × 71/4"KL, 8" × 13"L, 81/2" ×
1
/4" × 13"L, 8" × 10"KL
1
/2" ×
Translucent paper (A3L, B4JISL,
A4KL, B5JISKL
OHP transparencies (A4KL)
Adhesive lebels (B4JISL, A4L)
60 – 157g/
2
, 16 – 42
m
lb
*5
19
Page 31

Basics
1
Bypass
tray
(option)
Standard
Sizes
Metric version Inch version Paper
weight
A3L , B4JISL 60 – 105g/
2
m
A4KL,
B5JISKL, A5L,
B6JISL
*2
A6L, 11" × 17"
1
L, 8
/2" × 14"L,
1
/2" × 11"KL,
8
1
/2" × 51/2"L,
8
1
/2" × 71/4"KL,
10
1
8" × 13"(F)L, 8
13"(F4)L, 8
×
/2"
1
/4" ×
13"L, 8" ×10"KL,
10" × 14"L
A4KL,
B5JISKL, A5L,
B6JISL
*2
A6L, 11" × 17"
1
L, 8
/2" × 14"L,
1
/2" × 11"KL,
8
1
/2" × 51/2"L,
8
1
/2" × 71/4"KL,
10
1
8" × 13"(F)L, 8
13"(F4)L, 8
×
/2"
1
/4" ×
13"L, 8" ×10"KL,
7
10" × 14"L, 3
1
/2"L, 41/8"
7
1
9
/2"L, C5
/8" ×
×
, 16 – 28
lb
Env.L, C6 Env.L,
DL Env.L
*2
11" × 15"L, 11"
14"L, 10" × 15"
×
1
L, 8
/4" × 14"L,
1
8" × 10
/2"KL
*2
11" × 15"L, 11"
14"L, 10" × 15"
×
1
L, 8
/4" × 14"L,
1
8" × 10
/2"KL
Paper capacity
10 sheets
100 sheets
*1
*1
20
Non-standard sizes
*6
A3L, B4JISL 60 – 157g/
2
, 16 – 42
A4KL, B5JISKL, A5L, B6JISL
m
lb
A6L, 11" × 17"L, 81/2" × 14"L, 81/2" ×
1
11"KL, 8
KL, 8" × 13"L, 8
/2" × 51/2"L, 101/2" × 71/4"
1
/2" × 13"L, 81/4" ×
13"L, 8" × 10"L
Note
You have to specify the paper size
❒
with the user tools. See ⇒ P.103
“Changing the Paper Size”
.
Translucent paper (A3L , B4JISL ),
OHP transparencies
Translucent paper (A4KL, B5JISKL ),
postcards
Adhesive labels (B4JISL, A4L)
10 sheets
40 sheets
10 sheets
40 sheets
1 sheets
*1
*1
*1
*1
*1
Page 32

Copy Paper
Metric version Inch version Paper
weight
Large capacity
tray
(option)
*1
Paper weight: 20 lb, 64g/m 2
*2
When you set non-standard size paper in the bypass tray, you have to specify the
size. See ⇒ P.41
*3
8K(Ba-Kai) = 267 × 390 mm, 10.6" × 15.4"
*4
16K(Shi-Lui-Kai) = 195 × 267 mm, 7.7" × 10.6"
*5
Do not stack copy paper above the Tray 2 lower limit mark. See ⇒ P.105
the Paper Size in Tray 2”
*6
Always set one sheet at a time. See ⇒ P.41
A4K
“Copying from the Bypass Tray”
.
1
/2" × 11"K
8
.
“Copying from the Bypass Tray”
60 – 105g/
2
, 16 – 28
m
lb
Paper capacity
2,000 sheets
*1
“Changing
.
Important
❒
If you use damp or curled paper, a misfeed might occur. In such a case, try
turning over the paper stack in the paper tray. If there is no improvement,
change to copy paper with less curl.
Note
❒
When you use the bypass tray, it is recommended to set the copy paper direction to L.
❒
When you use the color paper, set it in the tray 2. Do not stack the paper above
the lower limit mark of the tray 2.
❒
Postcards should be fed from the bypass tray.
1
❒
If you load paper of the same size and in the same direction in two or more
trays, the machine automatically shifts to another tray when the tray in use
runs out of paper. This function is called Auto Tray Switch. (If you put recycled paper in paper trays using the Special Paper Indicate menu, this function
is not available with these trays unless their settings are identical.) This saves
interrupting a copy run to replenish paper even when you make a large number of copies. You can cancel this setting. See “13. Auto Tray Switch” and “14.
Special Pap. Indict” of the System Settings.
Reference
If you want to add paper, see ⇒ P.89
“B Loading Paper”
If you want to change the paper size, see ⇒ P.103
.
“Changing the Paper Size”
.
21
Page 33

1
R
Basics
Non-recommended Paper
CAUTION:
•
Do not use aluminum foil, carbon paper, or similar conductive paper to avoid
a fire or equipment failure.
Important
❒
Do not use paper with any kind of coating such as:
• Thermal fax paper
•Art paper
• Aluminum foil
• Carbon paper
• Conductive paper
❒
Otherwise, a fault might occur.
❒
Do not use copy paper that has been already copied on. Otherwise, a fault
might occur.
Note
❒
Do not use the following type of paper because a paper misfeed might occur.
• Bent, folded, or creased paper
•Torn paper
• Slippery paper
• Perforated paper
• Rough paper
• Thin paper that has low stiffness
• Paper with much paper dust on its surface
❒
If you make copies on rough grain paper, the copy image might be blurred.
❒
Do not use paper which has been copied or printed on.
Paper Storage
Note
❒
When storing paper, the following precautions should always be followed:
• Do not store paper where it will be exposed to direct sunlight.
• Avoid storing paper in humid areas (humidity: 70% or less).
• Store on a flat surface.
22
❒
Keep open reams of papers in the package, and store as you would unopened
paper.
❒
Under high temperature and high humidity, or low temperature and low humidity conditions, store papers in a vinyl bag.
Page 34

Toner
R
R
R
Toner
Handling Toner
WARNING:
•
Do not incinerate used toner or toner containers. Toner dust might ignite when exposed to an open flame. Dispose of used toner containers
in accordance with local regulations for plastics.
CAUTION:
•
Keep toner (used or unused) and toner containers out of reach of children.
CAUTION:
•
Our products are engineered to meet high standards of quality and functionality, and we recommend that you only use the expendable supplies available at an authorized dealer.
Important
❒
If you use toner other than that recommended, a fault might occur.
Reference
If you want to add toner, see ⇒ P.91
“D Changing the Toner Bottle”
.
Toner Storage
1
Note
❒
When storing toner, the following precautions should always be followed:
• Store toner containers in a cool, dry place free from direct sunlight.
• Do not store toner where it will be exposed to heat.
• Do not eat or swallow toner, and keep it out of reach of children.
• Store on a flat surface.
23
Page 35

Basics
R
R
Photo Conductor Unit (PCU)
1
Handling Photo Conductor Unit
WARNING:
•
Do not incinerate the photoconductor unit. Toner dust might ignite
when exposed to an open flame. Dispose of the used photoconductor
unit in accordance with local regulations for plastics.
Photo Conductor Unit Storage
CAUTION:
•
Our products are engineered to meet high standards of quality and functionality, and we recommend that you only use the expendable supplies available at an authorized dealer.
Note
❒
When storing photo couductor units, the following precautions should always be followed:
• Store PCU in a cool, dark place free from direct sunlight.
• Do not store PCU in a wet place.
• Follow the instructions on the carton box of PCU
Replacing Photo Conductor Unit
Reference
See ⇒ P.93
24
“Replacing Photo Conductor Unit (PCU)”
Page 36

Basic Procedure
2. Copying
A When the machine is set for user
codes, enter the user code with
the Number keys and then press
the
key.
#
{
}
Reference
See ⇒ P.48
“User Codes”
.
B Make sure that the machine is in
Copy mode.
Note
❒
If not, press the
{
Copy
key.
}
C Make sure that there are no previ-
ous settings remaining.
Note
❒
To clear settings, press the
Clear Modes
{
key.
}
F Enter the number of copies re-
quired with the Number keys.
Note
❒
The maximum copy quantity
can be set between 1 and 99 (default: 99 ). See “05. Max. Copy
Q'ty” in ⇒ P.117
tures 2/4”
❒
To change the number entered,
press the
enter the new number.
.
{
“1. General Fea-
Clear/Stop
key and
}
D Set your originals.
Reference
See ⇒ P.27
“Setting Originals”
E Set your desired settings.
G Press the
The machine starts copying.
.
Note
❒
To stop the machine during the
multi-copy run, press the
Stop
❒
To return the machine to the initial condition after copying,
press the
key.
}
{
key.
Start
}
Clear Modes
{
key.
}
Clear/
{
25
Page 37

2
Copying
System Reset
-
The machine returns to its initial condition automatically after your job is
finished, after a certain period of
time. This function is called “System
Reset”.
Note
❒
You can change the System Reset
time. See “04. System Reset” in the
System Settings Reference.
Auto Off
-
The machine turns itself off automatically after your job is finished, after a
certain period of time. This function is
called “Auto Off”.
Note
❒
How to exit Auto Off mode depends on your machine configuration:
• Press the operation switch
❒
You can change the Auto Off time.
See “09. Auto Off Timer” in the
System Settings.
❒
You can change the default settings for basic functions. See
P.116
with the User Tools”
Tools (System Settings)” in the
System Settings Reference.
“Settings You Can Change
and “User
⇒
26
Page 38

Setting Originals
Setting Originals
Note
❒
Basically the originals should be
aligned to the rear left corner.
However, some copy functions
may produce different results depending on the direction of the
originals. For details, see explanations of each function.
Originals Set in the
document
feeder
Set on the
exposure
glass
B Set the original face down on the
exposure glass. The original
should be aligned to the rear left
corner.
2
1: Reference mark
2: Scale
C Lower the platen cover or the doc-
ument feeder.
Reference
See ⇒ P.16
“Originals”
.
Setting Originals on the
Exposure Glass
A Lift the platen cover or the docu-
ment feeder.
Note
❒
Be sure to open the platen cover
or the document feeder by more
than 30°, otherwise the original
size might not be detected correctly.
Setting Originals in the
Document Feeder
Note
❒
The original might become dirty if
it is written with a pencil or similar
tools.
❒
You cannot set a multi-page original with pages of different sizes in
the document feeder. If your original contains pages of different sizes, use the SADF function and set
each page one at a time. Alternatively, set pages one at a time on
the exposure glass.
❒
Do not place any foreign objects on
the document feeder or cover it
with your hand. This could cause
the size not to be detected properly.
27
Page 39

2
Copying
Note
❒
Do not stack originals above the
limit mark.
❒
To avoid a multi-sheet feed,
shuffle the originals before setting them in the document feeder.
When SADF mode is selected
1: Sensor
Reference
Regarding originals that the document feeder can handle, see ⇒ P.16
“Originals”
Setting a stack of originals in the
document feeder
.
A Adjust the guide to the original
size.
B Set the aligned originals face up
into the document feeder.
A Set one original face up into the
document feeder. Then press the
key.
Start
}
{
The Auto Feed indicator is shown
on the display.
B When the machine instructs you
to set another original, set the
next page.
The second and subsequent originals can be fed automatically without pressing the
Note
❒
You can adjust the time the machine waits before being ready
for the next original. See “04.
SADF Auto Reset” in ⇒ P.124
“3. Input/Output 1/2”
{
Start
key.
}
.
28
1: Limit mark
2: Document guide
Page 40

Setting Originals
Setting Non-Mstandard Size d
Originals in the Document
Feeder
Limitation
❒
Enter the size of your original if it
is not one of the following: A3 L,
B4JISL, A4
KL
A5
1
8
/2" × 11"
❒
The paper size that can be set with
this function is vertical 105–
297mm (4" × 11"), horizontal 1281,260mm (5" × 49").
❒
The maximum copy paper size is
297 × 432mm (11" × 17").
❒
You cannot use the Auto Paper Select function with this function.
KL
, B5JIS
, 11" × 17"L, 8
KL
, 51/2" × 81/2"
1
KL
/2" × 14"L,
KL
A Set one original face up into the
document feeder.
E Enter the horizontal size of the
original with the Number keys,
then press the
F Enter the vertical size of the origi-
,
nal with the Number keys, then
press the
G Press the
[
OK
Start
{
{
key.
]
}
key.
#
}
key.
2
B Press the 1 key to select your de-
sired paper tray or bypass tray.
C Press the
Note
❒
When you select the paper tray,
go to step E.
key.
#
}
{
D If you select the bypass tray in
step B, press the
[
Orig. Size
key.
]
29
Page 41

Copying
Basic Functions
2
The following basic functions are explained in this section.
❖
Adjusting Copy Image Density
Auto and Manual Image Density
❖
Selecting the Original Type
Text, Text·Photo, Photo
❖
Selecting the Copy Paper
Auto Paper Select and Manual Paper Select
❖
Auto Reduce/Enlarge
The machine can choose an appropriate reproduction ratio based on
the paper and original sizes you select.
Note
❒
You can select functions to be activated when System Reset is turned
on, when Energy Saver is turned
off, or after the machine is powered on. See ⇒ P.116
Features 1/4”
❒
You can change default settings for
basic functions. See ⇒ P.116
tings You Can Change with the User
Tools”
.
.
“1. General
“Set-
❖
Manual Image Density
If you require darker or lighter
copies, adjust the image density
yourself.
❖
Combined Auto and Manual Image
Density
Use when copying originals with a
dirty background (such as newspapers). You can adjust the foreground density while leaving the
background unchanged.
Reference
You can change the density level
with the user tools. See “10. Text
Density” in ⇒ P.118
Features 3/4”
.
“1. General
A Select one of the Image Density
modes.
Auto Image Density
A Make sure that the Auto Image
Density indicator is lit.
Adjusting Copy Image Densit y
You can adjust the copy image density to match your originals.
There are three ways to specify image
density:
❖
Auto Image Density
The machine automatically adjusts
the image density.
30
Note
❒
If it is not, press the
age Density
key.
}
Manual Image Densit y
A Press the
key so the indicator goes out.
Auto Image Density
{
Auto Im-
{
}
Page 42

Basic Functions
B Press the
key to adjust the image density.
Lighter
{
}
or
Darker
{
Combined Auto and Manual
Image Density
A Make sure that the Auto Image
Density indicator is lit.
B Press the
key to adjust the density.
Lighter
{
}
or
Darker
{
Selecting Your Original Type
Select one of the following types to
match your originals:
❖
Text
If you do not select any mode, your
originals will be scanned with the
settings suitable for text originals
(Text mode).
❖
Text·Photo
Select Text·Photo when your originals contains photographs or pictures with letters.
❖
Photo
Delicate tones of photographs and
pictures can be reproduced with
this mode.
}
A Press the
}
select the original type.
Note
❒
Press the
step through the following
types:
No indicator lit Text
Upper indicator lit Text·Photo
Lower indicator lit Photo
Original Type
{
Original Type
{
Selecting Copy Paper
There are two ways to select copy paper:
❖
Auto Paper Select
The machine selects a suitable size
of copy paper automatically based
on the original size and the reproduction ratio.
Note
❒
When the original is set at a different direction from the copy
paper in the paper tray the machine automatically rotates the
original image by 90° to match
the copy paper direction. This
applies to the following paper
sizes:
Metric version
Inch version
A4 KL, B5JIS KL
1
/2" × 11" KL, 51/2" ×
8
1
/2"KL (document
8
feeder)
key and
}
key to
}
2
31
Page 43

2
Copying
❖
Manual Paper Select
You can select the desired copy paper size manually. You can also select the bypass tray.
Reference
See ⇒ P.41
pass Tray”
“Copying from the By-
.
Note
❒
When you use Auto Paper Select,
refer to the following table for possible copy paper sizes and directions (if the ratio is 100%).
❖
Metric version
❒
When you set special paper in the
paper tray, you can have the kind
of paper shown on the display. See
“14. Special Pap. Indict” of the System Settings.
❒
If a paper tray has been specified
as containing special paper, Auto
Paper Select cannot use it. See “14.
Special Pap. Indict”.
❒
If you specify all papers trays as
containing special paper you cannot use Auto Paper Select.
❒
If you set the all paper tray to special paper, you cannot use the
Auto Paper Select function.
Where
original is
set Paper size and direction
Exposure
glass
Document
feeder
❖
Inch version
Where
original is
set Paper size and direction
Exposure
glass
Document
feeder
A3 L, B4JIS L, A4 KL,
B5JIS KL, 8
1
/2" × 14" L
8
A3 L, B4JIS L, A4 KL,
B5JIS KL, A5 KL , 8
13"L
×
11" × 17" L, 8
1
/2" × 11" KL, 81/2" ×
8
13" L, 10" × 14" L, 8" × 10"
K
11" × 17" L, 8
1
/2" × 11" KL, 51/2" ×
8
1
/2" KL
8
1
/2" × 13" L,
1
/2"
1
/2" × 14" L,
1
/2" × 14" L,
A Select the copy paper.
Auto Paper Select
A Make sure that Auto (Auto Pa-
per Select) is selected.
Manual Paper Select
A Select the paper tray or bypass
tray by pressing the 01 keys.
32
❒
For some originals, the original
size might not be detected correctly. See ⇒ P.17
.
tect”
“Sizes Difficult to De-
Page 44

Basic Functions
Rotate Copy
-
If the direction in which your original
is set (landscape or portrait) is different from the paper you are copying
onto, this function rotates the original
image by 90° and fits it on the copy
paper. This function works when
Auto Paper Select or Auto Reduce/
Enlarge are selected. See “Auto Paper
Select” in ⇒ P.31
and ⇒ P.33
per”
large—Having the Machine Choose the
Reproduction Ratios”
Original
orientation
“Selecting Copy Pa-
“Auto Reduce/En-
.
Paper orientation
Rotates the
image and
copies it
R
R
Copy paper Size
and Direction
❒
You cannot use the Rotated Copy
function when Staple function is
selected. See ⇒ P.38
B4JIS, A3 B4JIS, A3
“Staple”
.
Auto Reduce/Enlarge—Having
the Machine Choose the
Reproduction Ratios
The machine can choose an appropriate reproduction ratio based on the
paper and original sizes you select.
2
Limitation
❒
You cannot use the Rotated Copy
function when enlarging onto
B4JIS or A3 size paper. In this case,
set your original in the landscape
direction.
Original
Size and
Direction
You cannot
rotate:
A4, B5JIS, or
A5 portrait
when en-
↓
larging to
However,
you can rotate:
A4, B5JIS, or
A5 landscape
when en-
↓
larging to
GCROTA0E
Limitation
❒
You cannot use the bypass tray
with this function.
Note
❒
When you use Auto Reduce/Enlarge, refer to the following table
for possible original sizes and directions:
33
Page 45

Copying
❖
Metric version
Where
original is
set
B Select the paper tray by pressing
the 01 keys.
Original size and direction
2
Exposure
glass
Document
feeder
❖
Inch version
Where
original is
set
Exposure
glass
Document
feeder
❒
The machine will choose a repro-
A3 L, B4JIS L, A4 KL,
B5JIS KL, 8
1
/2" × 14" L
8
A3 L, B4JIS L, A4 KL,
B5JIS KL, A5 KL , 8
13"L
×
Original size and direction
11" × 17" L, 8
1
/2" × 11" KL, 81/2" ×
8
13" L
11" × 17" L, 8
1
/2" × 11" KL, 51/2" ×
8
1
/2" KL
8
1
/2" × 13" L,
1
/2" × 14" L,
1
/2" × 14" L,
duction ratio in the range 25–400
%.
1
/2"
34
❒
When you set the originals in the
document feeder, you can change
the reproduction ratio from 50–200
%.
❒
For some originals, the original
size might not be detected correctly. See ⇒ P.17
.
tect”
A Press the
“Sizes Difficult to De-
key.
[
Auto R/E
]
Page 46

Sort/Stack/Staple
Sort/Stack/Staple
The machine can scan your originals
into memory and automatically sort
the copies.
❖
Sort
•Sort
• Rotate Sort
• Shift Sort (the optional finisher
required or shift sort tray)
❖
Stack
• Shift Stack (optional finisher re-
quired or shift sort tray)
❖
Staple (the optional finisher required)
Limitation
❒
You cannot use the bypass tray
with this function.
Note
❒
The maximum tray capacity is as
follows. When the number of copies exceeds the tray capacity, remove copies from the tray.
❖
Inch version
Internal tray 1
1
•8
/2" × 14" or larger:
250 sheets (20 lb)
1
•8
/2" × 11" or small-
er: 500 sheets (20 lb)
Internal tray 1
(with optional
shift sort tray)
1
/2" × 14" or larger:
•8
125 sheets (20 lb)
1
/2" × 11" or small-
•8
er: 250 sheets (20 lb)
Internal tray 2 125 sheets (20 lb)
Finisher
1
•8
/2" × 14" or larger:
500 sheets (20 lb)
1
/2" × 11" or small-
•8
er: 1,000 sheets (20
lb)
❒
The maximum tray capacity might
be less than the above when you
use the Rotate Sort, or Staple function.
❒
The maximum tray capacity might
also be reduced when copy paper
is considerably curled.
2
❖
Metric version
Internal tray 1 • B4JIS or larger: 250
sheets (80g/m
2
)
• A4 or smaller: 500
2
)
2
)
2
)
2
)
Internal tray 1
(with optional
shift sort tray)
Internal tray 2
sheets (80g/m
• B4JIS or larger: 125
sheets (80g/m
• A4 or smaller: 250
sheets (80g/m
125 sheets (80g/m
Finisher • B4JIS or larger: 500
sheets (80g/m
2
)
• A4 or smaller: 1,000
sheets (80g/m
2
)
Sort—Sorting into Sets (123,
123, 123)
Copies can be assembled as sets in sequential order.
❖
Sort
3
2
1
3
2
1
3
2
1
3
2
1
35
Page 47

2
Copying
❖
Rotate Sort
❖
Shift Sort
❒
To use the Rotate Sort function,
two paper trays identical in size
and different in direction (K L)
are required.
1
3
2
1
2
3
2
3
1
3
2
1
❒
The paper sizes that can be used in
Shift Sort function are as follows:
1000-sheet finisher
A3L, B4JISL, A4KL, B5JISKL, 8
" × 13"L, 11" × 17"L, 81/2" × 14"L, 81/
2
" × 11"KL
2
1
/
3
2
1
1
2
3
1
1
2
2
3
3
Three sorting methods are available:
❖
Sort
Copies can be assembled as sets in
sequential order.
❖
Rotate Sort
Every other copy set is rotated by
KL
90
°
and delivered to the copy
tray.
❖
Shift Sort (optional finisher or shift
sort tray required)
Every other copy set is shifted for
ease of separation. The shift tray of
the finisher or shift sort tray provides this function by sliding from
side to side.
Note
❒
To switch among Sort, Rotate Sort,
and Shift Sort modes, access the
user tools. See “6. Sort” on ⇒ P.125
“3. Input/Output 2/2”
❒
The paper sizes that can be used
.
with the Rotate Sort function are as
follows:
Metric version A4KLB5JISKL
Inch version
1
/2" × 11"KL
8
Reference
For the paper capacity of the optional finisher, see ⇒ P.38
A Press the
B Make sure that
[
Sort/Staple
[
Sort
lected, then press the
key.
]
[
“Staple”
]
OK
is se-
]
key.
C Enter the number of copy sets
with the Number keys.
Limitation
❒
The maximum number of sets is
99.
D Set your originals.
When setting a stack of originals
in the document feeder
A Set a stack of originals in the
document feeder, then press
Start
key.
}
the
{
.
36
Page 48

After all the originals are
scanned, the copies are delivered to the tray.
Note
❒
If an original is misfed, reset
your originals in the document feeder according to the
instruction on the display.
The display will indicate the
number of originals you
should return.
When setting an original on the
exposure glass or in the
document feeder
Reference
See ⇒ P.28
selected”
“When SADF mode is
A Set the original, then press the
key.
Start
{
}
B Set the next original, then
press the
Note
❒
Set the original in the same
{
Start
key.
}
direction as the first one.
C After all originals are scanned,
press the
key.
#
}
{
The copies are delivered to the
tray.
Sort/Stack/Staple
Stack—Delivering Copies in
Page Batches (111, 222, 333)
The optional finisher or shift sort tray is
required to use this function.
Copies can be assembled with each
page set.
❖
Shift Stack (optional finisher or shift
sort tray required)
Every other page set is shifted for
ease of separation. The shift tray of
the finisher or shift sort tray provides this function by sliding from
side to side.
1
3
2
1
Reference
For the maximum tray capacity of
the optional finisher, see ⇒ P.38
“Staple”
A Press the
.
[
Sort/Staple
1
1
3
3
3
key.
]
2
2
2
2
B Select the
[
Stack
the 1 key. Then, press the
by pressing
]
[
OK
key.
C Enter the number of copies with
the Number keys.
D Set your originals.
]
37
Page 49

Copying
2
When setting a stack of originals
in the document feeder
A Set a stack of originals in the
document feeder, then press
Start
key.
}
the
{
After all the originals are
scanned, the copies are delivered to the tray.
When setting an original on the
exposure glass or in the
document feeder
A Set the original, then press the
key.
Start
}
{
Note
❒
Start with the first page to be
copied.
B Set the next original, then
press the
{
Start
key.
}
Note
❒
Set the original in the same
direction as the first one.
C After all originals are scanned,
press the
key.
#
{
}
The copies are delivered to the
tray.
Staple
The optional finisher is required to use
this function.
Each copy set can be stapled together.
Limitation
❒
You cannot use the following paper with this function:
• Post cards
• Translucent paper
• OHP transparencies
• Adhesive labels
• Curled paper
• Low stiffness paper
• Paper of different sizes
Note
❒
See the tables below for allowable
paper sizes and capacities available with this feature. When the
number of copies exceeds the tray
capacity, copying stops. In this
case, remove the copies from the
shift tray and then resume copying.
1000-sheet finisher
Paper size A3L, B4JISL, A4KL,
B5JISKL, 8" × 10"KL,
1
8
/2" × 11"KL, 8" × 13"L,
1
/2" × 13"L, 81/2" × 14"L,
8
1
/4" × 13"L, 10" × 14"L,
8
11" × 17"L, 8K L, 16K
KL
Stapler capacity
Shift tray
capacity
(A4K, 8
" × 11"K)
2
1
•A4, 8
•B4JIS, 8
1,000 sheets (80g/m
lb)
/
1
/2" × 11" or smaller
: 30 sheets (80g/m
lb)
1
/2" × 14" or
larger
: 20 sheets (80g/m
lb)
2
, 20
2
, 20
2
, 20
38
❒
In the following cases, the copies
will be delivered to the shift tray
without stapling.
Page 50

Sort/Stack/Staple
• When the number of copies for
one set is over the stapler capacity.
• When memory reaches 0% during copying.
❒
When you select Staple, Sort mode
is automatically selected.
Reference
If you want to add staples, see
P.107
“d Adding Staples”
When staples are jammed, see
P.109
“e Removing Jammed Staples”
Staple position and original
-
.
direction
Original setting Stapling
Exposure
glass
K
L
Document
Feeder
position
⇒
⇒
A Press the
B Press the
.
the
[
OK
[
Sort/Staple
[
Staple
key.
]
key.
]
key, then press
]
C Enter the number of copy sets
with the Number keys.
D Set your originals.
When setting a stack of originals
in the document feeder
A Set a stack of originals in the
document feeder, then press
Start
key.
}
the
{
After all the originals are
scanned, the copies are delivered to the tray.
2
Limitation
❒
Original images are not rotated.
Note
❒
To staple in combination with
Combine: 2 pages or 4 pages
, select L paper for K originals, or select K paper for L originals.
When setting an original on the
exposure glass or in the
document feeder
A Set the original, then press the
key.
Start
{
}
B Set the next original, then
press the
Note
❒
Set the original in the same
direction as the first one.
C After all originals are scanned,
press the
The copies are delivered to the
tray.
{
{
Start
key.
#
}
key.
}
39
Page 51

Copying
2
To stop scanning
When you are using the Sort, Stack, or
Staple function, the originals are
scanned into memory.
A Press the
Clear/Stop
{
key.
}
To resume scanning
A Press the
Scanning is resumed.
Note
❒
Scanned images in memory
are not cleared.
{
Start
key.
}
To clear all scanned images
A Press the
Scanning is stopped and the settings are cleared.
Clear Modes
{
key.
}
To copy scanned so far originals
A Press the
The scanned pages are delivered to
the tray then the image data in
memory is cleared.
[
Print
key.
]
B Remove the copies and continue
copying by following the instructions on the display.
To cancel the copy operation
A Press the
Scanning is stopped and the settings are cleared.
[
Clear
key.
]
When memory reaches 0%
Scanning will be stopped if the size of
scanned image data exceeds memory
capacity.
Note
❒
The number of originals that can
be stored in memory varies depending on the memory setting
and original type.
❒
The maximum number of originals
that can be stored is about 100 pages.
Reference
For details, see “08. Print Quality”
and “09. Image Adjustment” in
P.117
“1. General Features 2/4”
⇒
40
Page 52

Copying from the Bypass Tray
The optional bypass tray is required to use this function.
Copying from the Bypass Tray
Use the bypass tray to copy onto OHP
transparencies, adhesive labels, translucent paper, post cards, and copy paper that cannot be set in the paper
tray.
Note
❒
The machine can automatically detect the following sizes as standard
size copy paper:
Metric
version
Inch
version
❒
If you do not use standard size
copy paper, you should input vertical and horizontal dimensions.
The sizes that you can input are as
follows:
A3L, A4L, A5L, 8" ×
13"L
1
11" × 17"L, 8
8" × 13"L, 8
1
/2" × 81/2" L
5
/2" × 14"L,
1
/2" × 11"L,
A Open the bypass tray.
2
B Push up the paper guide release
lever.
Metric
version
Inch
version
Reference
For details about paper capacity of
the bypass tray, see ⇒ P.19
Paper”
• Vertical: 90 – 305mm
• Horizontal: 148 –
432mm
• Vertical: 3.5" – 12"
• Horizontal: 6.0" – 17.0"
“Copy
.
1: Paper guide release lever
C Lightly insert the copy paper face
down and adjust the paper guide.
41
Page 53

Copying
2
1: Horizontal size
2: Vertical size
3: Extender
4: Paper guide
Important
❒
If the guides are not flush with
the copy paper, a skew image or
paper misfeeds might occur.
Note
❒
Do not stack paper over the limit mark; otherwise a skew image
or paper misfeeds might occur.
❒
Set the direction of the copy paper to L.
❒
Swing out the extender to support larger size copy paper
(larger than A4L, 8
11"L).
❒
Fan paper to get air between the
sheets and avoid a multi-sheet
feed.
1
/2"
Important
❒
The side of OHP transparencies that is copied is fixed. Before you set the OHP
transparencies in the bypass
tray, check the cutting position of the OHP transparencies.
D Push down the paper guide re-
lease lever.
is selected automatically.
×
When copying onto OHP
transparencies
A Lightly insert the OHP trans-
parencies face up and adjust
the paper guide.
Note
❒
If you set A4, 8
er copy paper, hold the edge of
the paper and push down the
paper guide release lever.
❒
If you do not push down the paper guide release lever, a misfeed might occur.
1
/2" × 11" or larg-
When copying onto n on-standard
size copy paper
Important
❒
You should specify the size of
copy paper to avoid paper misfeeds.
42
Page 54

Copying from the Bypass Tray
A Press the
B Press the
C Select
pressing the 1 key. Then press
the
[
OK
key.
#
}
{
[
Pap.Size
[
Custom Size
key.
]
key.
]
key by
]
Note
❒
To change the number entered, press the
key and enter the new number.
❒
When you copy onto plain
paper, go to step G.
F Press the
copying onto thick paper.
G Select
ing the 1 key. Then press the
key.
]
[
OK
H Press the
[
Pap.Type
[
Non Standard
key.
[
]
Exit
Clear/Stop
{
key when
]
by press-
]
When copying onto non-de tected
standard size paper
}
2
D Enter the horizontal size of the
paper with the Number keys,
then press the
Note
❒
To change the number entered, press the
key and enter the new number.
E Enter the vertical size of the pa-
per with the Number keys,
then press the
#
{
[
OK
key.
}
Clear/Stop
{
key.
]
Important
❒
You should specify the size of
paper to avoid paper misfeeds.
A Press the
}
B Press the
key.
{#}
[
Pap.Size
key.
]
43
Page 55

Copying
2
C Select the
the 1 key, then press the
key.
]
tom
D Press the
desired size is displayed.
E Select the desired size by
pressing the 01 keys. Then
press the
Note
❒
When copying onto plain paper, go to step F.
F Press the
copying onto thick paper.
[
Std. Size
[↓
Next
[
]
OK
[
Pap.Type
by pressing
]
key until your
]
key.
key when
]
[
Cus-
G Select the
pressing the 1key. Then press
the
[
OK
Important
❒
You should specify the size
of copy paper to avoid paper
misfeeds.
key.
]
[
Non Standard
E Set your originals, then press the
key.
Start
}
{
44
by
]
Page 56

Program—Storing Your Copy Settings in Memory
Program—Storing Your Copy Settings in
Memory
You can store frequently used copy
job settings in machine memory, and
recall them for future use.
❖
Storing Your Settings
You can store your settings you
frequently use.
❖
Deleting A Program
You can delete a stored program.
❖
Recalling A Program
You can recall a stored program.
Storing a Program
A Edit the copy settings so that all
functions you want to store in this
program are selected.
B Press the
Program
{
key.
}
2
Note
❒
You can store up to ten programs.
❒
You can select the standard mode
or program No. 10 as the mode to
be set when modes are cleared, the
machine is reset, or immediately
after the operation switch is turned
on.
❒
Paper settings are stored based on
paper size. So if you place more
than one paper tray of a same size,
the paper tray prioritized with the
user tools will be selected first. See
“12. Pap.Tray Priority ” in the System Settings Reference.
❒
Programs are not cleared by turning the power off or by pressing
the
Clear Modes
{
canceled only when you delete or
overwrite them with another program.
key. They are
}
C Press the
[
Store
key.
]
D Select the program number you
want to store these settings in
with the 01 keys. Then press
the
When the settings are successfully
stored, the m symbol appears.
❒
❒
key.
[
]
OK
Note
Program numbers with m already have settings in them.
If this program number is already being used, the machine
will ask you if you wish to overwrite it - press the
key.
[
Yes
or
]
[No]
45
Page 57

Copying
2
Deleting a Program
You can delete a stored program.
A Press the
B Press the
Program
{
[
Delete
}
key.
]
key.
C Select the program number you
want to delete with the 01 keys.
Then press the
[
OK
key.
]
Recalling a Program
You can recall a stored program.
A Press the
Program
{
key.
}
B Select the program number you
want to recall with the 01 keys.
Then press the
The stored settings are displayed.
Note
❒
You can only select program
numbers marked with the
symbol.
[
OK
key.
]
m
D Press the
Note
❒
To cancel the deletion, press the
key.
]
[
No
[
Yes
key.
]
E To delete another program, repeat
steps C and D.
F Press the
[
Exit
key.
]
C Set your originals, then press the
key.
Start
{
}
46
Page 58

Other Functions
Other Functions
Energy Saver Mode—Saving
Energy
If you do not operate the machine for
a certain period after copying, or
when you press and hold the
Saver
the display goes blank and the machine enters Energy Saver mode.
When you press the
key again, when the originals are set
in the document feeder, or when the
platen cover or document feeder is
opened, the machine returns to the
ready condition. In Energy Saver
mode, the machine uses less electricity.
Energy Saver mode makes a two-step
reduction in electricity: one for the period up to the time set for Low Power
mode, the other for the period after
that time.
key for more than one second,
}
Energy Saver
{
Energy
{
Interrupt—Temporarily
Stopping One Job to Copy
Something Else
You can make urgently needed copies
during a multi-copy run.
Note
❒
The procedure for making inter-
}
rupt copies depends on which
kind of operation the machine is
currently carrying out.
While a document is being fed
A Press the
The key indicator lights.
Interrupt
{
key.
}
B Remove the originals currently
set for copying, and set your originals for interrupt copying.
2
Note
❒
The period for which the machine
remains in Energy Saver mode (i.e.
the period until the mode is turned
off to return to the ready condition) varies with the effectiveness
of energy saving.
Reference
See “06. Panel Off Timer”, “07. Energy Saver Level”, “08. Energy
Saver Timer” of the System Settings Reference.
Reference
For functions that cannot be
used together with this function, see ⇒ P.80
Chart”
.
“Combination
C Press the Start key.
The machine starts making your
copies.
D After interrupt copying, remove
the originals for interrupt copying and the copies.
E Press the
The key indicator goes off.
Interrupt
{
key again.
}
F Reset the previous originals.
Then press the
{
Start
key.
}
47
Page 59

Copying
2
Note
❒
The previous copy settings are
recalled and the previous copy
job can be resumed by pressing
the
{
Interrupting copying after all
originals have been fed
A Press the
The Interrupt key lights and copying will stop.
Start
Interrupt
{
key.
}
key.
}
B Set your original.
Reference
For functions that cannot be
used together with this function, see ⇒ P.80
Chart”
C Press the
The machine starts making your
copies.
.
{
Start
}
“Combination
key.
User Codes
When user codes are turned on, operators must input their user codes before the machine can be operated. The
machine keeps count of the number
of copies made under each user code.
Note
❒
When user codes are turned on,
the machine will prompt you for
your user code after the power
switch is turned on or System Reset comes into effect.
❒
To prevent others from making
copies using your user code, press
the
Clear Modes
{
keys simultaneously after copying.
Reference
For setting user codes, see ⇒ P.119
“1. General Features 4/4”
and
}
Clear/Stop
{
.
Auto Start—Entering Copy
}
D When copying is complete, re-
move your originals and copies.
E Press the
The Interrupt indicator goes out.
F Press the
The previous copy job settings will
be restored and the machine will
continue copying from where it
left off.
Interrupt
{
Start
{
key again.
}
key.
}
Job Settings During the Warmup Period
If you press the
warm-up period, the
blink and your copies will be made as
soon as warm-up finishes.
{
key during the
Start
}
Start
{
key will
}
A Make any adjustments to copy
settings during the warm-up period.
B Set your originals.
C Press the
The
ly flashes red and green.
Note
❒
To cancel Auto Start, press the
{
{
Start
{
}
Clear/Stop
key.
Start
}
key indicator alternate-
key.
}
48
Page 60

Other Functions
Original Tone
The key tone sounds and an error
message is displayed when you leave
your originals on the exposure glass
for about two seconds after copying.
Note
❒
To cancel this function, see “06.
Original Tone” on ⇒ P.117
eral Features 2/4”
.
“1. Gen-
How to Set the Papers with
Letterhead
You can make the copies on the papers with letterhead.
When you want to make one sided
copies
When you want to make two sided
copies
A Set your original on the exposure
glass.
B Store the papers in the tray with
the first page face-down.
For the orientation, see the illustration below.
2
A Set your original on the exposure
glass.
B Set the papers in the tray with the
first page face-up.
For the orientation, see the illustration below.
49
Page 61

Copying
Preset Reduce/Enlarge—Reducing and
Enlarging Using Preset Ratios
2
You can select a preset ratio for copying.
Note
❒
You can select one of 12 preset ratios (5 enlargement ratios, 7 reduction ratios).
❒
You can change the preset ratios to
other ratios you frequently use. See
“07. Re./En. Priority” in ⇒ P.117
“1. General Features 2/4”
❒
You can select a ratio regardless of
.
the size of an original or copy paper. With some ratios, parts of the
image might not be copied or margins will appear on copies.
❒
Copies can be reduced or enlarged
as follows:
❖
Metric version
Original → Copy
Ratio (%)
*1
400
(enlarge
area by 16)
200 (enlarge area
by 4)
141 (enlarge area
by 2)
paper size
--
A5→A3
A4→A3, A5→A4
Original → Copy
Ratio (%)
115 B4JIS→A3
93 A little reduced.
87 A3→B4JIS
82 F→A4, B4JIS→F
71 (reduce area
1
by
/2)
65 A3→F
50 (reduce area
1
by
/4)
*1
(reduce area
25
1
by
/16)
*1
When you set the originals in the
document feeder, you cannot use
25% and 400 % ratio.
❖
Inch version
Ratio(%) Original → Copy
*1
400
(enlarge
area by 16)
200 (enlarge area
by 4)
155 (enlarge area
by 2)
129
121
93 A little reduced.
85
paper size
A3→A4, A4→A5
A3→A5, F→A5
--
paper size
--
1
5
/2" × 81/2"→11" ×
17"
1
/2" × 81/2"→81/2"
5
14"
×
1
/2" × 11"→11" ×
8
17"
1
/2" × 14"→11" ×
8
17"
F→81/2" × 11"
50
122 F→A3, A4→B4JIS
Page 62

Preset Reduce/Enlarge—Reducing and Enlarging Using Preset Ratios
Ratio(%) Original → Copy
paper size
78
73
65
50 (reduce area
1
by
/4)
1
8
/2" × 14"→81/2" ×
11"
1
11" × 15"→8
11"
11" × 17"→8
11"
11" × 17"→5
1
/2"
8
/2" ×
1
/2" ×
1
/2" ×
2
*1
(reduce area
25
1
by
/16)
*1
When you set the originals in the
document feeder, you cannot use
25% and 400 % ratio.
A Press the
--
[
Reduce/Enlarge
key to
]
select a ratio.
B Press the
[
Reduce
or
]
[
Enlarge
key.
]
C Select the ratio by pressing the
01 keys.
Note
❒
The ratio changes everytime
you press the 01 keys.
D Press the
[
OK
key.
]
E Set your originals, then press the
key.
Start
{
}
51
Page 63

Copying
Zoom—Reducing and Enlarging in 1%
Steps
2
You can change the reproduction ratio in 1% steps.
Note
❒
You can change the reproduction
ratio from 25–400 %.
❒
When you set the originals in the
document feeder, you can change
the reproduction ratio from 50–200
%.
❒
You can select a ratio regardless of
the size of an original or copy paper. With some ratios, parts of the
image might not be copied or margins will appear on copies.
❒
You can select a preset ratio which
is near the desired ratio, then adjust the ratio with the
key.
[n]
or
[o]
key.
]
[n]
[o]
{
When using the
A Enter the desired reproduction
ratios with the
When using the Number keys
A Enter the desired ratio with the
Number keys.
Note
❒
To change the ratio entered,
press the
and enter the new ratio.
C Press the
[
OK
[o]
or
or
[n]
Clear/Stop
key
key.
key
}
D Set your originals, then press the
key.
Start
{
}
A Press the
B Enter the ratio.
52
Zoom
{
key.
}
Page 64

Directional Size Magnification (inch)—Stretching and Squeezing the Image into the Copy Area
Directional Size Magnification (inch)—
Stretching and Squeezing the Image into
the Copy Area
❒
The suitable reproduction ratios will
be automatically selected when you
enter the horizontal and vertical
lengths of the original and copy image you want.
Preparation
Specify the vertical and horizontal
sizes of the original and those of
the copy, as shown in the illustration.
When you set the originals in the
document feeder, you can change
the reproduction ratio from 50–200
%.
❒
If the calculated ratio is over the
maximum or under the minimum
ratio, it is corrected within the
range of the ratio automatically.
However, with some ratios, parts
of the image might not be copied
or blank margins will appear on
copies.
2
A Press the
1
24
3
D. Size Mag. (inch)
{
B Enter the horizontal size of the
original with the Number keys.
CP2M01EE
1: Horizontal original size
2: Vertical original size
3: Horizontal copy size
4: Vertical copy size
Note
❒
You can enter sizes within the following ranges:
Metric version 1 – 999mm (in
1mm steps)
Inch version 0.1" – 99.9" (in 0.1"
steps)
❒
You can change the reproduction
ratio from 25–400 %.
Then press the
Note
❒
To change the value entered,
press the
enter the new value.
C Enter the horizontal size of the
copy with the Number keys.
Then, press the
D Enter the vertical size of the origi-
nal with the Number keys. Then
press the
or 1 key.
#
}
{
or 1 key.
#
}
{
Clear/Stop
{
or 1 key.
#
{
}
key.
}
key and
}
53
Page 65

2
Copying
E Enter the vertical size of the copy
with the Number keys. Then
press the
Note
❒
To change the length, press the
D. Size Mag. (inch)
{
press the 01 keys.
[
OK
key.
]
key, then
}
F Set your originals, then press the
key.
Start
{
}
54
Page 66

Directional Magnification (%)—Stretching and Squeezing the Image in 1% Steps
Directional Magnification (%)—Stretching
and Squeezing the Image in 1% Steps
Copies can be reduced or enlarged at
different reproduction ratios horizontally and vertically.
1: Horizontal %
2: Vertical %
Note
❒
You can change the reproduction
ratio from 25–400 %.
❒
When you set the originals in the
document feeder, you can change
the reproduction ratio from 50–200
%.
B Enter the desired horizontal ratio
with the Number keys. Then,
press the
key or the 1 key.
#
{
}
C Enter the desired vertical ratio
with the Number keys. Then,
press the
Note
❒
To change the ratio, press the
Direct. Ma g.(%)
{
the 01 keys, then enter the
new ratio.
[
OK
key.
]
key, then press
}
D Set your originals, then press the
key.
Start
}
{
2
❒
You can select a ratio regardless of
the size of an original or copy paper. With some ratios, parts of the
image might not be copied or
blank margins will appear on copies.
A Press the
Direct. Mag.(%)
{
key.
}
55
Page 67

Copying
Center/Border Erase—Erasing the Center
and the Border
2
This function erases the center and/
or all four sides of the original image,
such as book originals.
❖
Center Erase
B
A
❖
Border Erase
B
A
Two methods are available:
❖
Center
This mode erases the center margin of the original image.
B
A
CenterEE
B
A
BorderEE
Metric version 10mm
Inch version 0.4"
❒
The position of the margin to be
erased is determined according to
the copy paper size.
L copy paper K copy paper
1
❒
1: Erased part
❒
You can use the Center Erase and
Border Erase functions together.
A Press the
key.
Center/Border Erase
{
}
56
❖
Border
This mode erases the surrounding
area of the original image.
Note
❒
You can change the width of the
erased margin as follows:
Metric version 3 – 50mm (in 1mm
steps)
Inch version 0.1" – 2.0" (in 0.1"
steps)
❒
The default size of the erased margin is as follows. You can change
this with the user tools. See “01.
Border Erase Width” and “02. Center Erase Width” in ⇒ P.121
just Image 1/3”
.
B Select the part to be erased.
“2. Ad-
Page 68

Center/Border Erase—Erasing the Center and the Border
Center
A Press the
B Enter the center width with the
Number keys. Then press the
[
]
OK
Note
❒
To change the value entered,
press the
and enter the new value.
C Press the
key.
[
Center
[
Exit
key.
]
Clear/Stop
{
key.
]
key
}
C Press the
[
Exit
key.
]
C Set your originals, then press the
key.
Start
}
{
2
Border
A Press the
B Enter the border width with
the Number keys. Then press
the
[
Note
❒
To change the value entered,
press the
and enter the new value.
OK
[
key.
]
Border
key.
]
Clear/Stop
{
key
}
57
Page 69

Copying
Combine—Combining Originals into One
Copy
2
Use this feature to combine several
original images onto one or more
pages.
❖
2 Orig.
12
❖
4 Orig. , 4 Orig.
1
2
3
4
12
Combine1
12
43
1
4
Combine2
2
3
❖
8 Orig.
❖
16 Orig.
1
2
1
2
5
6
7
3
8
4
12
7
Combine3
8
58
❖
8 Orig.
1: Front
2: Back
Six methods are available:
❖
2 Orig.
This mode copies two facing pages
onto a one-sided copy.
❖
4 Orig.
4 one-sided pages are copied onto
a single one-sided sheet.
❖
4 Orig. (optional duplex unit is
required.)
4 one-sided pages are copied onto
1 two-sided sheet, 2 original images on each side.
Page 70

❖
8 Orig.
Copies eight 1-sided originals together onto one side of copy paper.
❖
8 Orig. (optional duplex unit is required.)
8 one-sided pages are copied onto
1 two-sided sheet, 4 original images on each side.
❖
16 Orig. (optional duplex unit is
required.)
16 one-sided pages are copied onto
1 two-sided sheet, 8 original images on each side.
Original direction (when set in document feeder)
• Originals reading from left to right
1
2
3
4
1
3
2
4
Combine—Combining Originals into One Copy
Note
❒
The number of originals copied
(combined) can be 2, 4, 8, or 16.
❒
In this mode, the machine selects
the reproduction ratio automatically. This reproduction ratio depends on the copy paper sizes and
the number of originals.
❒
You can change the reproduction
ratio from 25–400 %.
❒
When you set the originals in the
document feeder, you can change
the reproduction ratio from 50–200
%.
❒
If the calculated ratio is under the
minimum ratio, it is corrected
within the range of the ratio automatically. However, with some ratios, parts of the image might not
be copied or blank margins appear
on copies.
2
Combine5
• Originals reading from top to bottom
1
2
3
4
2
4
1
Combine6
3
Limitation
❒
You cannot use the bypass tray
with this function.
❒
The machine cannot copy originals
different in size and direction.
❒
A separation line between originals can be printed with the user
tools. See “06. Line(Combine)” in
P.122
⇒
❒
Even if the direction of originals is
“2. Adjust Image 2/3”
different from that of the copy paper, the machine will automatically rotate the image by 90° to make
copies properly. (When the Auto
Reduce/Enlarge function is selected)
❒
You can make copies even if the
number of originals is less than the
number required in the selected
mode. You can also disable this
function with the user tools. See “2.
Comb. Auto Eject ” in ⇒ P.124
Input/Output 1/2”
.
.
“3.
59
Page 71

Copying
❒
When the number of originals
placed is less than the number
specified for combining, the last
page(s) will be copied blank as
shown in the illustration.
C Press the
[
Original
key.
]
2
1
2
3
❒
Direction of the originals and ar-
21
3
rangement of combined images
❖
Portrait (K) origin als
1
2
1
2
8
❖
Landscape (L) originals
1
2
1
2
4
2
1
21
3
5678
43
1234
8
1
3
5
7
GCSHUY1E
2
4
6
8
D Select your original type with the
01 keys. If your original type is
1 sided, go to Step G.
E Press the
[
Orientn.
the original orientation.
F Press the
G Press the
[
OK
[
OK
key, then select
]
key.
]
key.
]
60
A Press the
B Press the
Combine/Series
{
key.
[
Combine
]
key.
}
GCSHUY2E
H Select the desired combine modes
with the 01 keys. Then press
the
[
OK
key.
]
Note
❒
In 4 pages→ mode, 8 pages
→
mode or 16 pages→ mode, you
can specify the orientation of
originals (
Bottom
). See .
]
[
Top to Top
] [
Top to
I Press the 01 keys to select the
copy paper.
J Set your originals.
Page 72

When setting an original on the
exposure glass or in the
document feeder
A Set the original, then press the
key.
Start
{
}
B Set the next original, then
press the
Note
❒
To finish copying, press the
{
{
key to eject the copy.
#
}
Start
key.
}
When setting a stack of originals
in the document feeder
A Set your originals, then press
the
{
Start
key.
}
Combine—Combining Originals into One Copy
2
61
Page 73

Copying
Series Copies—Making One-sided Copies
from Various Originals
2
You can make one-sided copies from
two facing pages of bound (book)
originals and from two-sided originals.
Two methods are available:
❖
Book
You can make one-sided copies
from two facing pages of a bound
original (book).
❖
2-Sided (The optional document
feeder is required.)
You can make one-sided copies
from two-sided originals.
A Press the
Limitation
❒
You cannot use the bypass tray
with this function.
Book —Making One-sided
Copies from Two Facing Pag e
B Press the
❖
Metric version
Original Copy paper
A3L A4K × 2 sheets
B4JISL B5JISK × 2 sheets
A4L A5K × 2 sheets
❖
Inch version
Original Copy paper
11" × 17"L
1
/2" × 11"L 51/2" × 81/2"K × 2 sheets
8
1
/2" × 11"K × 2 sheets
8
Combine/Series
{
key.
Series
]
[
key.
}
of a Bound Original (Book)
12
Note
❒
Refer to the following table when
you select original and copy paper
sizes with a ratio of 100%:
62
C Select
12
D Select the paper by pressing the
E Set your originals, then press the
[
Book→
keys. Then press the
01 keys.
key.
Start
}
{
]
with the 01
key.
[
]
OK
Page 74

Series Copies—Making One-sided Copies from Various Originals
2-Sided —Making Onesided Copies from Two-sided
Originals
The optional document feeder is required
to use this function.
1
2
A Press the
Combine/Series
{
12
key.
}
E Press the
[
OK
key.
]
F Select the paper by pressing the
01 keys.
G Set your originals, then press the
key.
Start
{
}
2
B Press the
[
Series
C Make sure that the
is selected then press the
]
key.
Orientn.
]
key.
]
[
2 Sided
D Select the original orientation.
→
[
63
Page 75

Copying
Duplex—Making Two-Sided Copies
The optional duplex unit is required to use this function.
2
Three methods are available:
❖
1 sided
This mode makes two-sided copies
from one-sided originals.
❖
2-sided
This mode makes two-sided copies
from two-sided originals.
❖
Book
This mode makes two-sided copies
from facing pages of a bound original (book).
Limitation
❒
You cannot use the following types
of copy paper in this function:
• Paper smaller than A5K, 5
1
K
/2"
8
×
• Translucent paper
• Adhesive labels
1
/2"
Metric
version
Inch version
Minimum size
Weight
Minimum size
Weight 20 – 28 lb
A5L
64 – 105g/m
1
5
/2" × 81/2"L
2
1 Sided —Making Twosided Copies from One-sided
Originals
12
1
2
64
• OHP transparencies
• Post cards
❒
You cannot use the bypass tray
with this function.
❒
When the paper type is set to
“Non-Standard” in the “Changing
the Paper Size in the Tray 2”, duplex copying is not available with
the tray 2. Select another paper
tray, change the paper in the tray 2,
or set the paper type to Normal or
Recycled. See ⇒ P.31
Copy Paper”
, ⇒ P.105
Paper Size in Tray 2”
Note
❒
The following paper limitations
“Selecting
“Changing the
.
apply:
Note
❒
If you set an odd number of 1-sided originals in the document feeder (ADF), the reverse side of the
last page is left blank. You can disable this function to make the delivered last page not be blank. See
“1. Duplex Auto Eject” in ⇒ P.124
“3. Input/Output 1/2”
❒
When original images are copied,
.
the images are shifted by the width
of the binding margin. You can adjust the binding margin or binding
position. You can also change their
default values. See “03. Left Dup.
Margin”, “04. Top Dup. Margin”
in ⇒ P.121
“2. Adjust Image 1/3”
.
Page 76

Duplex—Making Two-Sided Copies
ABC
Duplex3
BA
Duplex4
Originals and copy direction
-
You can select the orientation (
Top
], [
Top to Bottom
). See .
]
• Top to Top
• Top to Bottom
[
Top to
Duplex1
Duplex2
Original direction and
-
completed copies
The resulting copy image will differ
according to the direction in which
you set your original (lengthwise
K
or widthwise L).
Original Orientation
ABC
Duplex5
ABC
Duplex6
Result
• [
• [
*1
Top to
]
Top
Duplex9
Top to
Bottom
Duplex10
]
2
• [
Top to
Top
BA
Duplex7
• [
Top to
Bottom
BA
Duplex8
*1
The illustrations show the directions
of copied images on the front and
back, not the directions of delivery.
]
Duplex11
]
Duplex12
65
Page 77

Copying
2
A Press the
[
Duplex
B Make sure that
lected.
key.
]
[
1 Sided
When setting the copy direction
Select the orientation of the copy
paper.
Note
❒
If you do not set the copy direction,
[
Top to Top
automatically.
A Press the
[
will be selected
]
key.
Orientn.
]
is se-
]
B Set the next original, then
press the
{
Start
key.
}
When setting a stack of originals
in the document feeder
A Set your originals, then press
Start
key.
}
the
{
2 Sided —Making Twosided Copies from Two-sided
Originals
The optional document feeder is required
to use this function.
1
2
1
2
66
B Select the desired orientation
with the 01 keys. Then press
the OK key.
C Press the
D Set your originals.
[
OK
key.
]
When setting an original on the
exposure glass or in the
document feeder
A Set the original, then press the
key.
Start
{
}
A Press the
B Select
key, then press the
Duplex
{
[
2 Sided
}
C Set your originals.
key.
with the 1
]
key.
[
]
OK
Page 78

When setting an original on the
exposure glass or in the
document feeder
Duplex—Making Two-Sided Copies
❖
Inch version
Original Copy paper
11" × 17"L
1
/2" × 11"K (2-sided)
8
A Set the original, then press the
key.
Start
{
}
B Set the next original, then
press the
{
Start
key.
}
A Press the
When setting a stack of originals
in the document feeder
A Set your originals, then press
the
{
Start
key.
}
B Select
Book —Making Two-Sided
Copies from Facing Pages of a
Bound Original (Book)
12
1
2
C Set your originals.
1
/2" × 11"L 51/2" × 81/2"K (2-sided)
8
key.
[
Duplex
[
Book
then press the
]
with the 1key,
]
key.
]
[
OK
When setting an original on the
exposure glass or in the
document feeder
A Set the original, then press the
key.
Start
}
{
B Set the next original, then
press the
{
Start
key.
}
2
Note
❒
Refer to the following table when
you select original and copy paper
sizes with a ratio of 100%:
❖
Metric version
Original Copy paper
A3L A4K (2-sided)
B4JISL B5JISK (2-sided)
A4L A5K (2-sided)
When setting a stack of originals
in the document feeder
A Set your originals, then press
the
{
Start
key.
}
67
Page 79

Copying
Cover—Adding or Inserting Sheets
2
Use this feature to have cover pages
inserted/copied onto using different
paper.
Preparation
Before you can use this function,
you need to select the “Tray 2” or
the “Bypass” as Cover Only Tray
with the “12. Cover/OHP Tray”.
P.118
⇒
There are two types in this function:
❖
Front Cover
The first page of your original is
copied on a specific paper for covers.
❖
Both Covers
The first and last pages of your
originals are copied on specific paper sheets for covers.
Note
❒
The cover or slip sheets should be
identical in size and direction with
the copy paper.
“1. General Features 3/4”
❖
Blank
3
2
1
Note
❒
You can specify whether to copy
onto cover paper. If you select
[
on the cover sheet. If you select
[
serted before the first copy.
A Press the
key.
B Press the
, the first page will be copied
]
Copy
, a cover sheet will just be in-
]
Blank
Cover/OHP Slip Sheet
{
key.
]
[
Front
1
3
2
}
❒
If Blank Cover mode is selected,
the cover will not be counted as a
copy.
Front Cover—Copying or
Adding a Front Cover
The first page of your original is copied on a specific paper for covers.
❖
Copy
3
2
1
68
C Specify whether to copy on the
cover sheet with the 01 keys.
Then press the
D Press the
3
2
1
[
Exit
]
[
OK
key.
key.
]
Page 80

Cover—Adding or Inserting Sheets
E Set cover sheets on the bypass
tray or in the 2nd paper tray.
F Select the tray which identical in
size and direction with the copy
paper with the 01 keys.
G Set your originals, then press the
key.
Start
}
{
Both Covers—Copying or
Adding Front and Back Covers
The first and last pages of your originals are copied on specific paper for
covers.
❖
Copy
4
3
2
1
4
3
2
1
A Press the
key.
B Press the
Cover/OHP Slip Sheet
{
key.
]
[
Both
C Specify whether to copy on the
cover sheet with the 01 keys.
Then press the
D Press the
[
Exit
]
[
OK
key.
key.
]
}
2
❖
Blank
3
2
1
Note
❒
You can specify whether to copy
onto the cover sheet. If you select
[
be copied on the cover sheets. If
you select
will just be inserted before the first
copy and another sheet after the
last copy.
, the first and last pages will
]
Copy
[
, a cover sheet
]
Blank
2
1
E Set cover sheets on the bypass
tray or in the tray 2.
F Select the copy paper tray con-
3
taining paper indentical in size
and direction to the cover paper
with the 01keys.
G Set your originals, then press the
key.
Start
}
{
69
Page 81

Copying
OHP Slip Sheet—Copying or Inserting Slip
Sheets
2
For each original page, a slip sheet
will be placed after each copy, or a
slip sheet will be fed and the same
original image copied onto this slip
sheet.
❖
Copy
1
2
22
22
2
❖
1
Blank
11
2
1
Preparation
Before you can use this function,
you need to select the “Tray 2” or
the “Bypass” as Cover Only Tray
with the “12. Cover/OHP Tray”.
P.118
⇒
Note
❒
Set slip sheets of the same size and
in the same orientation as OHP
transparencies.
❒
You can specify whether to make
copies onto the inserted slip sheets.
❒
If you do not copy onto a slip sheet,
the sheet is excluded from the
number of copies counted.
“1. General Features 3/4”
11
A Press the
key.
B Press the
Cover/OHP Slip Sheet
{
key.
[
OHP Slip
]
C Specify whether to copy on the
slip sheet with the 01 keys.
Then press the
[
OK
key.
]
D Set OHP transparencies in the by-
pass tray or tray 2.
E Press the
[
Exit
key.
]
F Set the slip sheets in the paper
tray, then select this tray by pressing the 01 keys.
G Set your originals, then press the
key.
Start
}
{
}
70
Page 82

Positive/Negative—Copying in Complementary Colors
Positive/Negative—Copying in
Complementary Colors
If your original is black and white,
copy images are inverted.
2
A Press the
B Press the
C Press the
Positive/Negative
{
key.
key.
]
]
[
Pos/Neg.
[
Exit
key.
}
D Set your originals, then press the
key.
Start
}
{
71
Page 83

Copying
Repeat3
Repeat Image—Repeating an Image over
the Entire Copy
2
The original image is copied repeatedly.
Note
❒
The number of repeated images
depends on the original size, copy
paper size, and reproduction ratio.
Refer to the following table.
❖
Original: 51/2" × 81/2"K/Copy
paper: 81/2" × 11"K or Original: 51/
" × 81/2"L/Copy paper 81/2" ×
2
L
11"
2 repeats (100%) 8 repeats (50%)
Repeat4
❒
Part of a repeated image might not
be copied depending on the copy
paper size, copy paper direction or
reproduction ratio.
❒
You can insert separate lines between repeated images. See “07.
Line (Repeat)” in ⇒ P.122
just Image 2/3”
.
“2. Ad-
A Select the size of the copy paper
and the reproduction ratio.
B Press the
Repeat
{
key.
}
72
4 repeats (71%)
Repeat1
❖
Original: 51/2" × 81/2"K/Copy
paper: 81/2" × 11"L or Original: 51/
" × 81/2"L/Copy paper 81/2" ×
2
K
11"
key.
]
key.
]
C Press the
D Press the
[
Repeat
[
Exit
E Set your original, then press the
key.
Start
{
}
Page 84

Merging Images (Overlay)—Merging Two Different Originals
Merging Images (Overlay)—Merging Two
Different Originals
Preparation
There are three ways to make
Overlay copies.
•Overlay-1
Two different originals can be
merged onto the same copy paper.
•Overlay-2
The machine merges two originals and only the overlapped
image will be copied.
•Overlay-3
Originals are merged and
where black overlaps black the
image is inverted (see the above
illustration).
The machine can merge two different
originals onto the same copy paper.
Limitation
❒
You cannot change the paper size
once you have selected the Overlay feature.
❒
When you set different sized originals in the document feeder, parts
of the image might not copied. Set
the original on the exposure glass.
A Press the
B Press the
Overlay
{
[
Overlay
key.
}
key.
]
C Select the desired mode with the
01 keys. Then press the
key.
[
OK
2
]
1: Overlay-1
2: Overlay-2
3: Overlay-3
D Press the
[
Exit
key.
]
73
Page 85

2
Copying
E Set your originals, then press the
key.
Start
{
}
Note
❒
When setting originals on the
exposure glass, start with the
first page to be copied. After the
first original is scanned, remove
originals and repeat step E.
74
Page 86

Preset Stamp—Printing Preset Messages on Your Copies
Preset Stamp—Printing Preset Messages
on Your Copies
One of the following seven messages
can be stamped on copies.
•CONFIDENTIAL
•COPY
• URGENT
• PRIORITY
• For Your Information
Original setting, stamp position
-
and orientation
You can select the following positions
and orientations.
Key on Display Stamp Position
2
• PRELIMINARY
• For Internal Use Only
Limitation
❒
You cannot use the bypass tray
with this function.
❒
One message can be stamped at a
time.
Note
❒
You can change the stamp position
and orientation. See “10. Stamp Position” in ⇒ P.127
.
3/3”
❒
You can select the print page. See
P.77
⇒
ing format”
❒
You can change the stamp size and
stamp density. See “08. Stamp
Size” in ⇒ P.126
3”
“4 Stamp Setting 3/3”
“When changing the number-
, “09. Stamp Density” in ⇒ P.127
“4 Stamp Setting
“4 Stamp Setting 2/
.
A
B
C
D
E
F
G
H
I
75
Page 87

Copying
2
Original
Setting
Orientation
Copy Results
B Press the
[
Preset
key.
]
C Select the desired message by
pressing the 01 keys. Then
press the
When changing the stamp
position and orientation
A Press the
[
OK
[
key.
]
Position
key.
]
A Press the
Stamp
{
key.
}
B Select the desired stamp posi-
tion by pressing the 01 keys.
Then press the
C If you want to change the
stamp orientation, press the
[
Orientn.
D Press the
key.
]
[
OK
]
[
OK
key.
key.
]
76
Page 88

When changing the numbering
format
Preset Stamp—Printing Preset Messages on Your Copies
key.
]
key.
]
A Press the
B Select the desired mode by
pressing the 01 keys. Then
press the
D Press the
E Press the
[
OK
[
Exit
[
[
Prt.Page
OK
key.
]
key.
]
F Set your originals, then press the
key.
Start
{
}
Note
❒
When you set the original on the
exposure glass and select the
key, press the
[
1st Page Only
key after all originals are
scanned.
]
#
{
2
}
77
Page 89

Copying
Page Numbering—Printing Page Numbers
2
You can print page numbers on your
copy. There are three types of page
numbering ( P.1, P2…, 1/5, 2/5…, or
-1-, -2-…).
Note
❒
You can change the numbering position. See “05. Page No. Position”
in ⇒ P.126
❒
If you want to adjust the numbering position or numbering size, See
“02. Page No. Size” or “05. Page
No. Position” in ⇒ P.125
Setting 1/3”
❒
If the page number is up to 999,
page numbering is not printed.
❒
If you select numbering format
2/5
,... and if the total pages are
over, page numbering is not printed.
❒
When you select page numbering,
Sort mode is automatically selected.
“4 Stamp Setting 2/3”
“4 Stamp
.
.
1/5
❖
Original
Setting
,
A Press the
B Press the
Original setting, stamp position and
orientation
Orientation
{
[
Page No.
Stamp
Copy Results
key.
}
key.
]
78
Page 90

Page Numbering—Printing Page Numbers
C Select the desired mode by press-
ing the 01 keys. Then press the
key.
[
]
OK
If you selected numberi ng format
[
Posi-
C
P1, P2, … or -1-, -2-, … in step
A If you wish, do one of the fol-
lowing:
• To change the page on which
numbering starts, press the
key.
key.
]
]
[
Prt.Page
• To change the position of
page number, press the
tion
• To change the position of
page numbers, press the
key.
]
sition
D Press the
Note
❒
If you want to change the entered
numbers, press the
[
OK
key.
]
[
To change the numbering
position
A Press the
[
Position
key.
]
Prt.Page
[
Po-
key.
]
2
If you selected numberi ng format
key.
]
key.
C
1/5, 2/5, … in step
A Enter the page on which num-
bering will start (Start Page),
the total number of pages (Total Pages).
B Press the
C If you wish, do one of the fol-
lowing:
• To change the page on which
numbering starts, press the
[
Prt.Page
[
OK
]
B Select the desired numbering
position by pressing the 1 key.
Note
❒
If you want to change the
original orientation, press
the
[
Original
C Press the
E Press the
F Press the
Note
❒
When you set the original on the
exposure glass, press the
after all originals are scanned.
[
OK
[
Exit
[
OK
key.
]
]
key.
]
key.
]
key.
{
#
}
key
79
Page 91

Copying
Combination Chart
The combination chart given below shows which modes can be used together.
When you read the chart, please refer to the following table.
2
✩
→
means that these modes can be used together.
means that these modes cannot be used together. The mode
after you select will be the mode you're working in.
×
means that these modes cannot be used together. The mode
before you select will be the mode you're working in.
The following shows the combinations of functions.
Mode after you select
Combine
1-sided
1-sided
→
→
Non-standard Originals
Original Type Selection
Auto Paper Select
Auto Reduce/Enlarge
Sort
Rotate Sort
Shift Sort
Shift Stack
Staple
Copying From The Bypass Tray
Preset Reduce/Enlarge
Zoom
Directional Size Magnification (inch)
Directional Magnification (%)
Erase Center
Erase Border
2 pages
Non-standard
Originals
Original Type
Selection
Auto Paper
Select
Auto Reduce/
Enlarge
Sort ✩✩✩✩-Rotate Sort ✩✩✩✩
Shift Sort ✩✩✩✩
Shift Stack ✩✩✩✩
Staple ✩✩✩✩✩
Copying From
The Bypass Tray
Preset Reduce/
Enlarge
Mode before you select
Zoom ✩✩✩→✩✩✩✩✩✩
Directional Size
Magnification
(inch)
Directional
Magnification
(%)
Erase Center ✩✩✩✩✩✩✩✩✩×✩✩✩✩-- ✩
Erase Border ✩✩✩✩✩✩✩✩✩×✩✩✩✩✩--
-- ✩×✩✩✩✩✩✩✩✩✩✩✩✩✩✩✩✩✩✩✩✩✩✩✩✩✩✩✩✩✩✩
✩ -- ✩✩✩✩✩✩✩✩✩✩✩✩✩✩✩✩✩✩✩✩✩✩✩✩✩✩✩✩✩✩✩
→
×
✩✩
✩✩
✩✩✩→✩✩✩✩✩✩--
✩✩✩→✩✩✩✩✩✩
✩✩✩→✩✩✩✩✩✩
✩✩✩✩✩→✩✩✩✩✩✩
✩ --
×
-- ✩✩✩✩✩
→→→✩×
→--→→→×
→→--→→×
→→→--××
×→→--×
→ЧЧЧЧЧЧ
× →→→→
-- ✩✩✩✩
✩✩✩✩✩✩✩✩✩✩✩✩✩✩✩✩✩✩✩→✩
✩✩✩✩✩✩✩✩✩✩✩✩✩✩✩✩→✩✩→✩
✩✩✩✩✩✩✩✩✩✩✩✩✩✩✩✩✩✩✩→✩
✩✩✩✩✩✩✩✩✩✩✩✩✩✩✩✩→✩✩→✩
✩✩✩✩✩✩✩✩✩✩✩✩✩✩✩✩✩✩✩→✩
→→→✩✩→→→→→
→--→→✩✩→→→→→
→→--→
→→→
-- ✩✩
✩✩✩✩✩✩✩✩→✩✩→✩✩✩✩✩→✩
ЧЧЧЧЧЧЧ✩ЧЧЧЧЧЧЧЧ✩Ч
✩✩
4 pages
→→→→→✩→
→→→→→
→→→→→
→→→→→✩→
→→→→→
Series Copies
Duplex
2-sided
1-sided
2-sided
1-sided
2-sided
2-sided
→
4 pages
1-sided
→
→
→
→
8 pages
8 pages
2-sided
Book
✩✩✩✩✩✩✩✩✩✩✩✩
✩✩✩✩✩✩✩✩✩✩✩✩
✩✩✩✩✩✩✩✩✩✩✩✩
✩✩✩✩✩✩✩✩✩✩✩✩
✩✩✩✩✩✩✩✩✩✩
2-sided
→
→
→
Cover
1-sided
2-sided
Book
✩✩→→✩✩→✩→✩
✩✩→✩✩✩✩✩
Preset Stamp
Page Numbering
OHP Slip Sheet
Positive/Negative
Image Repeat
Overlay
→×
→×
→×
→×
→×
✩
→→
→→
80
Page 92

Mode after you select
Combination Chart
Combine
1-sided
1-sided
→
→
Non-standard Originals
Original Type Selection
Auto Paper Select
Auto Reduce/Enlarge
Sort
Rotate Sort
Shift Sort
Shift Stack
Staple
Copying From The Bypass Tray
Preset Reduce/Enlarge
Zoom
Directional Size Magnification (inch)
Directional Magnification (%)
Erase Center
Erase Border
2 pages
2 pages →
1-sided
4 pages →
1-sided
4 pages →
2-sided
Combine
8 pages →
1-sided
8 pages →
2-sided
2-sided →
1-sided
Book →
1-sided
Series Copies
1-sided →
2-sided
Mode before you select
2-sided →
2-sided
Duplex
Book →
2-sided
Cover ✩✩×✩✩×✩×✩×✩✩✩✩✩✩
Preset Stamp ✩✩✩✩✩✩✩✩✩×✩✩✩✩✩✩✩✩✩✩✩✩✩✩✩✩✩-- ✩✩×✩✩
Page Numbering ✩✩✩✩✩✩✩✩✩×✩✩✩✩✩✩✩✩✩✩✩✩✩✩✩✩✩✩-- ✩×✩✩
OHP Slip Sheet ✩✩×✩
Positive/Negative ✩✩✩✩✩✩✩✩✩✩✩✩✩✩✩✩✩✩✩✩✩✩✩✩✩✩✩→→✩ -- ✩
Image Repeat ✩✩
Overlay ✩✩✩✩
Interrupt ✩✩✩✩
*1
When you select the mode after you select, the machine returns to Auto Reduce/En-
✩✩×✩✩✩✩✩✩×✩✩✩✩
✩✩×✩✩✩✩✩✩×✩✩✩✩
✩✩×✩✩✩✩✩✩×✩✩✩✩
✩✩×✩✩✩✩✩✩×✩✩✩✩
✩✩×✩✩✩✩✩✩×✩✩✩✩
✩✩✩✩✩✩✩✩✩✩✩✩✩✩✩✩
✩✩××✩✩✩✩✩×✩✩✩✩×✩
✩✩✩✩✩✩✩✩✩×✩✩✩✩✩✩
✩✩✩✩✩✩✩✩✩×✩✩✩✩✩✩
✩✩××✩✩✩✩✩×✩✩✩✩×✩
ЧЧЧЧЧЧ
ЧЧЧЧЧЧЧЧ
→→→→→
ЧЧЧЧЧ
✩✩✩✩✩✩
✩✩✩✩
✩✩✩✩✩
✩✩✩✩✩✩✩
××--→→→→→→→→→→✩✩→✩→×
××→--→→→→→→→→→✩✩→✩→×
××→→--→→→→→→→→✩✩→✩→×
× × →→→--→→→→→→→✩✩→✩→×
× × →→→→--→→→→→→✩✩→✩→×
× × →→→→→→→→→→→
× × →→→→→→→→→→→
4 pages
→→→→→--→→→→→
→→→→→→--→→→→
→→→→→→→--→→
→→→→→→→→--→
→→→→→→→→→--→
→→→→→→→✩✩→
→→→→→
ЧЧЧЧЧ
2-sided
→
4 pages
1-sided
→
8 pages
Series Copies
Duplex
2-sided
1-sided
2-sided
2-sided
→
8 pages
→
2-sided
✩✩
✩✩
1-sided
→
Book
2-sided
→
→
→
Cover
1-sided
2-sided
Book
✩✩✩→✩
✩✩✩→✩
-- ✩✩→✩
→→→→
××××✩✩××××
Preset Stamp
Page Numbering
OHP Slip Sheet
✩✩✩✩
✩✩✩✩
✩✩→✩
✩✩-- ✩✩✩
✩✩✩✩-✩✩✩
large mode. However, you can select the mode before you select again.
Positive/Negative
→×
→×
→×
→×
→×
→×
→→
Image Repeat
Overlay
→
→
--
2
81
Page 93

2
Copying
82
Page 94

3. What to do If Something
Goes Wrong
If Your Machine does not Operate as You
Want
Message
Machine's Condition Problem/Cause Action
The machine instructs
you to wait.
The machine cannot
detect the original
size.
The machine is warming up. Wait for the machine to
warm-up.
Reference
You can use Auto Start
mode during the warm-up
Unsuitable original is set. See
P.17
⇒
tect”
“Sizes Difficult to De-
.
period. See ⇒ P.48
Start—Entering Copy Job
Settings During the Warmup Period”
Set non-standard size original
on the exposure glass.
Input the both horizontal and
vertical sizes of the non-standard original. See ⇒ P.27
ting Originals on the Exposure
.
Glass”
Select paper manually, not in
Auto Paper Select mode.
Do not use Auto Reduce/Enlarge mode.
“Auto
“Set-
The machine instructs
you to check the original direction.
The machine instructs
you to check paper
size.
The machine cannot
staple this size paper.
Original is not set. Set your originals.
There is no copy paper that is
the same direction as the originals.
Unsuitable original size is set. Select the proper paper size.
-- Select the proper paper size
Set the original in the same direction as the copy paper.
that can be used in Staple
mode. See ⇒ P.38
“Staple”
83
Page 95

What to do If Something Goes Wrong
Machine's Condition Problem/Cause Action
3
You cannot enter the
desired copy set number.
The machine instructs
you to set the duplex
tray.
The machine instructs
you to set the key
counter.
The number of copies exceeds
the maximum copy quantity.
-- Reset the duplex tray correct-
You can change the maximum
copy quantity that you can
make at a time. See “05. Max.
Copy Q'ty” in ⇒ P.117
General Features 2/4”
ly. See ⇒ P.5
nents”
Set the key counter.
Display
Problem Cause Action
The panel display is
off.
The machine is in Energy Saver mode.
The operation switch is
turned off.
The main power switch is
turned off.
Press the
cancel Energy Saver mode.
Turn on the operation switch.
Turn on the main power
switch.
“Guide to Compo-
.
Energy Saver
{
“1.
key to
}
Nothing happens
when the operation
switch is turned on.
The main power switch is
turned off.
The power cord is unplugged. Maker sure that the power
Turn on the main power
switch. See ⇒ P.5
Components”
cord is plugged into the wall
outlet firmly.
“Guide to
84
Page 96

If You Cannot Make Clear Copies
If You Cannot Make Clear Copies
Problem Cause Action
Copies appear dirty. The image density is too dark. Adjust the image density. ⇒
P.30
“Adjusting Copy Image
Density”
.
Auto Image Density is not selected.
The reverse side of an
original image is copied.
A shadow appears on
copies if you use the
pasted originals.
The same copy area is
dirty whenever making copies.
Copies are too light. The image density is too light. Adjust the image density. ⇒
The image density is too dark. Adjust the image density. ⇒
Auto Image Density is not selected.
The image density is too dark. Adjust the image density. ⇒
The exposure glass, platen
cover, or document feeder
white sheet is dirty.
Select Auto Image Density.
P.30
“Adjusting Copy Image
Density”
Select Auto Image Density.
P.30
Density”
Change the direction of the
original.
Put mending tape on the pasted part.
Clean them. ⇒ P.132
taining Your Machine”
P.30
Density”
.
“Adjusting Copy Image
.
“Main-
.
“Adjusting Copy Image
.
3
Damp or rough grain paper is
used.
Toner cartridge is almost
empty.
Parts of the image are
not copied.
Copies are blank. The original is not set correct-
A moire pattern is
produced on copies.
The original is not set correctly.
An improper paper size is selected.
ly.
Your original has a dot pat-
tern image or many lines.
R
Use dry paper without rough
grain.
Add toner. ⇒ P.91
ing the Toner Bottle”
Set originals correctly. ⇒ P.27
“Setting Originals”
Select the proper paper size.
Set originals correctly. ⇒ P.27
“Setting Originals”
Change the original direction.
“D Chang-
.
.
.
85
Page 97

What to do If Something Goes Wrong
If You Cannot Make Copies as You Want
Problem Cause Action
3
Copies are not stapled.
Staples are wrongly
positioned.
Misfeeds occur frequently.
You cannot combine
several functions.
There are jammed staples in
the stapler.
Remove jammed staples. See
P.109
⇒
Staples”
“e Removing Jammed
.
Note
After removing jammed
❒
staples or adding staples,
staples might not be ejected the first few times you
try to use the stapler.
The number of copies exceeds
the capacity of the stapler.
The stapler has run out of staple.
Originals are not set correctly. Set originals correctly. See ⇒
Copy paper size setting is not
correct.
Selected functions cannot be
used together.
Check the stapler capacity.
See ⇒ P.38
Add staples. See ⇒ P.107
Adding Staples”
P.38
“Staple”
Set the proper paper size. See
P.103
⇒
.
Size”
Refer to the combination
chart. See ⇒ P.80
tion Chart”
“Staple”
.
“Changing the Paper
.
.
“d
.
“Combina-
Adjust Image
Problem Cause Action
In Center/Border
mode, parts of the
original image are not
copied.
In Image Repeat
mode, the original image is not copied repeatedly.
86
The margin is too wide. Set a narrower margin with
Your original has narrow
margins on four sides.
You selected the same size
copy paper as originals, and
did not select the proper reproduction ratio.
the user tools. See “01. Border
Erase Width” in ⇒ P.121
Adjust Image 1/3”
Center Erase Width” in ⇒
P.121
“2. Adjust Image 1/3”
Select copy paper larger than
the originals. See ⇒ P.72
peat Image—Repeating an Image
over the Entire Copy”
Select the proper reproduction ratio. See ⇒ P.72
Image—Repeating an Image over
the Entire Copy”
. See “02.
.
“2.
.
“Re-
.
“Repeat
Page 98

If You Cannot Make Copies as You Want
Combine
Problem Cause Action
Parts of the image are
not copied.
Order of copies is not
correct.
Stamp
You specified an improper reproduction ratio that does not
meet the sizes of your originals and copy paper.
Your originals are not identical in size and direction.
You set originals in the incorrect order.
When you specify a reproduction ratio using Manual Paper
Select mode, make sure the ratio matches your originals and
the copy paper.
Note
Select the correct repro-
❒
duction ratio before using
Combine mode.
Use originals that are identical
in size and direction.
When setting a stack of original in the document feeder,
the last page should be on the
bottom.
If you set an original on the
exposure glass, start with the
first page to be copied.
3
Problem Cause Action
Stamps do not appear
on copies.
Original image and
stamp overlap on copies and original image
cannot be read.
Page numbers do not
appear in the position
you require.
The original is not set correctly.
The stamp is set to solid. Change to screen. See ⇒ P.127
Your original has narrow
margins on four sides.
The numbering position is
wrong.
Set original correctly.
See ⇒ P.75
Printing Preset Messages on
Your Copies”
“4 Stamp Setting 3/3”
Change the stamp position.
See ⇒ P.127
.
3/3”
Change the numbering position.
See ⇒ P.126
.
2/3”
“Preset Stamp—
.
.
“4 Stamp Setting
“4 Stamp Setting
87
Page 99

What to do If Something Goes Wrong
Duplex
Problem Cause Action
3
Order of copies is not
correct.
In Margin Adjustment mode, parts of
the original image are
not copied.
Orientation of copies
(Top to Top, or Top to
Bottom) is not correct.
You set originals in the incorrect order.
The margin is too wide. Set a narrower margin with
You set originals in an incorrect direction or the orientation setting is incorrect.
When setting a stack of originals in the document feeder,
the last page should be on the
bottom.
If you set an original on the
exposure glass, start with the
first page to be copied.
the user tools. See “03. Left
Dup. Margin” in ⇒ P.121
Adjust Image 1/3”
Dup. Margin” in ⇒ P.121
Adjust Image 1/3”
Select the correct orientation,
or set originals correctly. ⇒
P.64
“Duplex—Making Two-
Sided Copies”
. See “04. Top
.
“2.
“2.
Note
If you set A3, 11" × 17" or
❒
B4JIS, 8
as shown below, for example, take one of the two ac-
tions described below the
illustration.
1
/2" × 14" originals
88
Select [
❒
make copies in “Top to
Top” orientation. Select
[
in “Top to Bottom” orientation.
Alternate the originals as
❒
shown below when setting
them.
Top to Bottom
Top to Top
] to make copies
] to
Page 100

Loading Paper
B
Loading Paper
B
Note
❒
If you want to change the paper
size, see ⇒ P.103
per Size”
Reference
Regarding paper types and sizes
that can be set, see ⇒ P.19
Paper”
.
.
“Changing the Pa-
“Copy
A Pull out the paper tray until it
stops.
B Square the paper and set it in the
tray.
Loading non-stan dard size paper
in the tray 2
A When you set the non-standard
size paper in tray 2, do not
stack the paper above the lower limit mark of tray 2.
3
C Reinstall the back fence.
D Push the paper tray in until it
stops.
Important
❒
Do not stack paper over the limit mark.
❒
If paper is left in the paper tray
and then you add paper, a misfeed might occur.
Note
❒
Shuffle the paper before setting
it in the tray.
89
 Loading...