


Final Version
RW-470 PLOTBASE
RW-470 CLIENTS
Installation Manual
Installationsanleitung
Instructions d'installation
Instrucciones de instalación
Istruzioni per l’installazione
Installatiehandleiding

Contents
English
Installation Manual .......................................................................................3
I. Package list ............................................................................................5
II. Installations and settings on the server PC ...........................................5
III. Installation of Clients on work stations ...............................................11
Deutsch
Installationsanleitung..................................................................................14
I. Lieferumfang........................................................................................16
II. Installationen und Einstellungen auf dem Server-Rechner ................16
III. Installation der Clients auf den Arbeitsplatzrechnern........................22
Français
Instructions d'installation ............................................................................26
I. Etendue de livraison ............................................................................28
II. Installations et configurations exigées sur l'ordinateur serveur.........28
III. Installation des Clients sur les ordinateurs de postes de travail........34
Español
Instrucciones de instalación ........................................................................37
I. Volumen de entrega ............................................................................39
II. Instalaciones y ajustes en el ordenador Servidor ...............................39
III. Instalación de los Clients en los ordenadores de puestos de trabajo 45
Italiano
Istruzioni per l’installazione........................................................................49
I. Volume di fornitura..............................................................................51
II. Installazione e impostazioni sul calcolatore-server............................51
III. Installazione dell’Clients sulle stazioni di lavoro................................57
Nederlands
Installatiehandleiding .................................................................................61
I. Bij de levering inbegrepen..................................................................63
II. Installaties en instellingen op de server .............................................63
III. Installatie van de Clients op de gebruikersstations............................69
RW-470 PLOTBASE Installation 2

Installation Manual
RW-470 PLOTBASE
RW-470 CLIENTS
RW-470 PLOTBASE Installation 3

Trademarks
Adobe
, Acrobat, PostScript and PostScript3TM are registered trademarks of Adobe Systems Incorporated.
Apple, Macintosh, Mac and TrueType are registered trademarks of Apple Computer, Incorporated.
AutoCAD
HPGL, HPGL/2 and HP-RTL are registered trademarks of Hewlett-Packard Company.
Ethernet
Microsoft
countries.
Netscape Navigator
PLOTBASE
PLOTCLIENT
RATIO SSL is a registered trademark of RATIO Entwicklungen GmbH, Hamburg, Germany.
Calcomp is a registered trademark of Calcomp Inc..
CALS is a registered trademark of U.S. Department of Defense, USA.
CGM is a registered trademark of Henderson Software Inc., Boulder, USA.
CIT is a registered trademark of Intergraph GmbH, Ismaning, Germany
PCX is a registered trademark of Zsoft, Microsoft Inc.
WMF is a registered trademark of Microsoft Corporation in the United States and/or other countries.
Other product names used herein are for identification purposes only and might be trademarks of their respective companies. We
disclaim any and all rights in those marks.
The proper names of the Windows operating systems are as follows:
Microsoft
Microsoft
Microsoft
Microsoft
Microsoft
Microsoft
Microsoft
Note:
“RW-470 PS” stands for RW-470 Postscript Level 3 Compatible Option
and DWG are registered trademarks of Autodesk, Inc.
is a registered trademark of Xerox Corporation.
, Outlook, Windows and Windows NT are registered trademarks of Microsoft Corporation in the United States and/or other
is a registered trademark of RATIO Entwicklungen GmbH, Hamburg, Germany.
Windows 95 operating system
Windows 98 operating system
Windows Millennium Edition
Windows 2000 Professional
Windows 2000 Server
Windows NT Server operating system Version 4.0
Windows NT Workstation operating system Version 4.0
is a registered trademark of Netscape Communications Corporation, Mountain View/USA.
is a registered trademark of RATIO Entwicklungen GmbH, Hamburg, Germany.
4 RW-470 PLOTBASE Installation
INTRODUCTION
Introduction
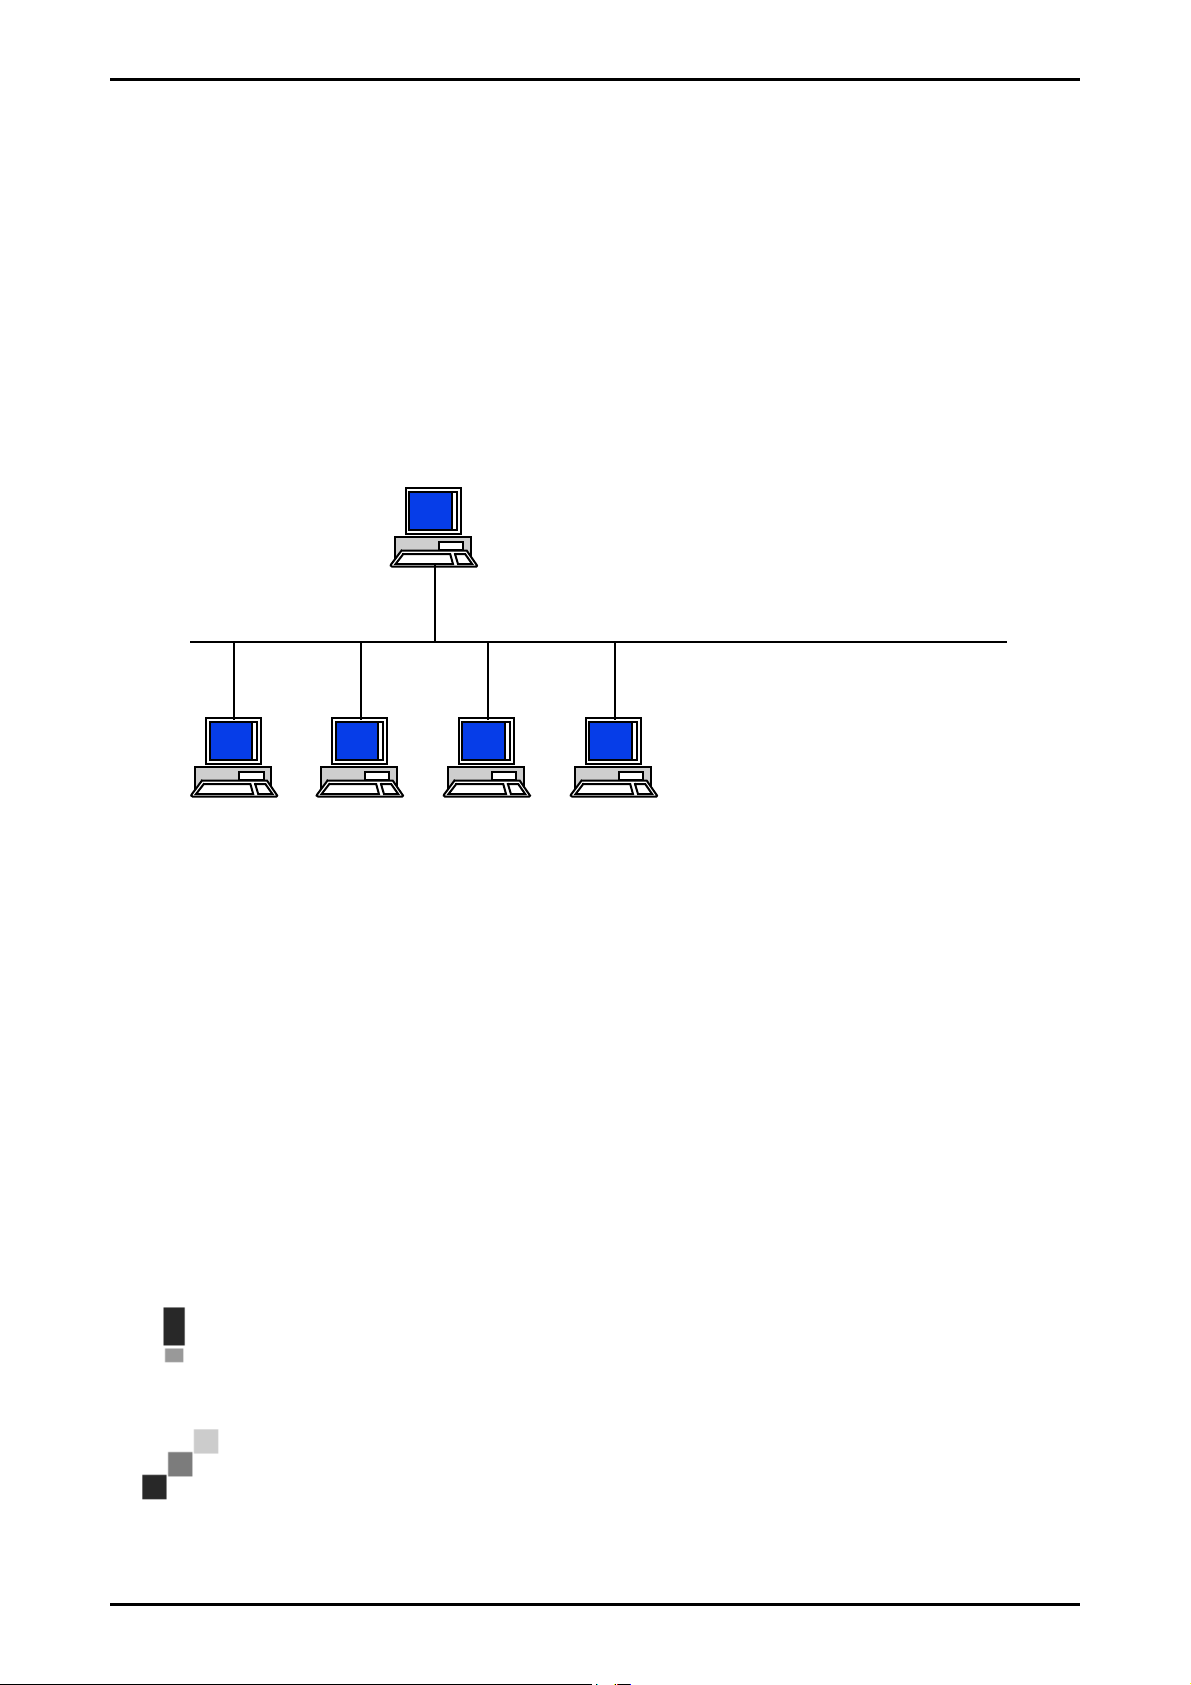
In this manual the installation of the controller and the software programs are explained. It is a server-client system,
which requires to install a part of the software on a server PC and the other parts on work stations.
Installation of RW-470 PLOTBASE has to be done on the server PC. The programs RW-470 SCANTOOL and RW-470
PLOTCLIENT WEB with Apache Web Server are also installed on the server PC automatically. This installation and
necessary settings are described in the following chapter.
Other RW-470 CLIENTS then are installed on the work stations. The description of this software installation you can
find in the section „Installation of “ from page 11. The following illustration makes clear, which programs should be
installed on the different PCs:
RW-470 PLOTBASE
Software to install on server:
RW-470 PLOTBASE with
- RW-470 SCANCLIENT
Server PC
MS Windows 2000 ®
with Controller Board
SERVER site
- RW-470 PLOTCLIENT WEB
RW-470 WINPRINT
RW-470 Kernel Driver (Device Driver)
optionally AutoCAD 2000
( for use with RW-470 PLOTCLIENT HDI/ADI )
( AutoCAD 2000i required for file format DWG )
CLIENT site
Client PC
Windows 9x/ME
Client PC
Windows NT/2000
Client PC
UNIX/LINUX
Client PC
Macintosh
I. Package list
The delivery includes
• Installation sheet,
• the Controller Board Type 470,
• one CD with Software and PDF-Manuals,
• one 3,5 inch disc with RSP-License files.
II. Installations and settings on the server PC
This chapter explains,
• What system requirements must be fulfilled for the server,
• How to install the drivers and the program and
• What adjustments you have to make to the operating system settings.
Software to install or set up on clients:
RW-470 PLOTCLIENT WIN
RW-470 PLOTCLIENT HDI/ADI
RW-470 PLOTCLIENT MAC
RW-470 PLOTCLIENT LPR/FTP
RW-470 WINPRINT
( not to install, only as shared printer )
MS Internet Explorer 5.5 ®
( for use with RW-470 PLOTCLIENT WEB )
Attention: Adjustment of the settings in the operating system and installation of the program should only be
carried out by a user with administrator rights.
Note: The setting of the language is only applied to installation procedure itself. If you want to change the
language for the complete RW-470 software, you have to do so in the "Regional Options" of the "Control
Panel" of your Windows operating system. Instructions you will find in the Reference Manuals of Windows.
RW-470 PLOTBASE Installation 5

SYSTEM REQUIREMENTS
System requirements
Please read through the following recommendations carefully. They can be very helpful in finding the optimum
hardware for your needs
• Operating system:
Microsoft Windows 2000 Professional with Service Pack 1 or higher
• Processor:
Pentium III, 800 Mhz or higher
• Front Side Bus:
133 Mhz
• PCI Bus:
The PCI bus system must meet up-to-date standards (PCI 2.0 or higher – 3.3 V or 5 V autoadaptive,
maximum load 5 A). If your computer does not fulfill this standard, it is possible that the plotter controller will not
be identified.
• System memory:
Use a system memory with at least 256 MB RAM. With this system memory, you can plot or scan the maximum
drawing size. However, a system memory of 512 MB RAM is recommended if you wish to simultaneously plot
and scan drawings with maximum drawing size. Simultaneous scanning and plotting of smaller formats also
enables the use of smaller system memory. Please ask your dealer or the support technician for further information.
• Hard drive:
The hard drive should have at least 10 GB memory. We recommend installing of the program not to do in the drive
where you already install your operating system.
• Network controller:
10/100 Base T Ethernet, the TCP/IP configuration is necessary
• RW-470 Controller:
Physical dimension: 190 mm x 128 mm
PCB dimension: 174,63 mm x 106,8 mm
• Monitor:
At least 1024 x 768 pixels resolution
Controller Board Type 470
The RW-470 software only works, if the controller board is installed. To do it install the Controller Board Type 470 and
the appropriate software.
Installation Controller Board Type 470
Note: The Controller Board Type 470 is – like all other high integrated circuits – sensitive to electrostatic
charge. Therefore, remove the controller carefully from the shipping container and do only touch it at the
side or at the bracket. Do never touch any of the circuits on the controller with your finger. If you need to do
so, touch a metal object before you touch the controller.
1. Switch off your PC before you install the controller.
2. Select a free PCI slot. Note that on certain computers the PCI slot #5 is not fully compatible to PCI specification
2.0. In that case use slot #1 to #4.
3. Insert the controller into the PCI slot and fasten the fixing screw. Make sure the controller is sitting well, no
components touch surrounding cards or the case and that the fixing screw is set properly.
4. Re-mount the PC case. Connect the cable(s) to the plotter.
RW-470 Kernel Driver installation
Proceed as follows to install the driver:
1. Start your PC. After installing the Controller Board Type 470, the operating system automatically reports that new
hardware has been found and that assistant has been started for installation of the driver RW-470 Kernel. Click
on the “Next“ button to start the installation program.
2. In the next window the assistant asks where it can obtain the Driver files required. Select the topmost option
“Search for a suitable driver for my device (recommended)“ and the click on “Next“, to continue with the
installation.
6 RW-470 PLOTBASE Installation

OPERATING SYSTEM ADJUSTMENTS
3. Insert the installation CD in your CD drive. If the installation program of RW-470 PLOTBASE is starting
automatically, close it with „Cancel“.
4. The assistant now asks where it should look for the driver files. Select “CD-ROM drives“ and then click on “Next“.
5. In the next window you are now informed that the driver file (d1kernel.inf) have been found. Click on “Next“ to
continue with the installation.
6. You are now informed that the driver files have been installed. Click on “Finish“ to quit the installation program.
Note: You can test the perfect function of Controller Board Type 470 by checking if the LED-control on the
board is lighting. As it is not the case test, if the board is fixed correctly. You can check the working of the
kernel driver as follows: Select on your desktop „My computer“ and open the context menu by using the right
mouse button. Select „Properties – Hardware – Device Manager – Multifunction Adapters – Controller Board
Type 470“. Open the context menu and select „Properties“. Here you can find information about the status of
the Controller Board Type 470. If problems appear, please use the Windows help.
Operating system adjustments
Several adjustments still have to be made to the operating system for the cooperation between the server and clients as
well as the configuration of the scanner. These adjustments, as well as the whole installation should only be carried out
by an administrator. The procedures described in the following refer to the set up of an individual computer. Should
you wish to set up a network computer, the configuration can differ slightly.
After you have finished making the adjustments you must restart the computer.
Installing user accounts and groups
If you have to manage a big number of users we recommend to install user accounts and groups. Especially if you use
the FTP protocol the installing of user accounts and groups is necessary.
Proceed as follows:
1. Open the “Control Panel“ via “Start – Settings – Control Panel“. Open “Users and Passwords“ in the control panel.
Click on “Add”.
2. Enter the relevant information in the “User name“, “Full name“, and “Description“ fields. Then click on “Next“.
3. You are then asked for the password. Enter a password and confirm it by entering it again in the “Confirm
password“ field below. Click on “Next“.
4. Select the “Standard user“ option in the next window. Click on “Finish“.
5. Close any windows still open by clicking on “OK“.
You can find further explanations about installing user accounts in Windows Help.
Activating Windows components
The adjustments listed in the following are necessary for correct functioning of the RW-470 PLOTBASE and RW-470
SCANTOOL programs as well as for the connecting the clients.
• SNMP:
The settings for this protocol must be activated. Proceed as follows:
1. Open the settings window with “Start – Settings – Control Panel – Add/Remove Programs - Add/Remove
Windows Components“.
2. Activate the “Management and Monitoring Tools” (SNMP) option by clicking on the check box.
3. Click on “Next“ and follow the instructions given in the further windows.
• FTP protocol:
To be able to use the FTP protocol, you must adjust the settings in “Internet Information Services (IIS)“.
1. Open the settings window with “Start – Settings – Control Panel – Add/Remove Programs - Add/Remove
Windows Components“.
2. Click on “Internet Information Services (IIS)“. The check box is still non-active. Click on the “Details“ button.
3. Activate the “File Transfer Protocol (FTP) Server“ option by clicking on the check box. The other options
“Common files“ and “Internet Information Services Snap-In“ are also activated automatically. If all three
services are actually activated, click on “OK“ to confirm the information.
4. Click on ”Next“ and follow the instructions given in the further windows.
Note: If you want to use the FTP protocol, you must also set up user groups. The procedures are described in
the chapter “Installing user accounts and groups“ on Page 7. Also you have to install a FTP folder with some
presettings. But this should be done after the installation of RW-470 PLOTBASE. It is explained in chapter
„Setting up the FTP default folder“, page 9.
RW-470 PLOTBASE Installation 7

INSTALLATION OF RW-470 PLOTBASE AND RW-470 SCANTOOL
• For LPR:
This settings are also required for MAC/OS. Proceed as follows:
1. Open the settings window with “Start – Settings – Control Panel – Add/Remove Programs - Add/Remove
Windows Components“.
2. Activate the „Other Network Files and Print Services“ option by clicking on the check boxes.
3. Click on “Next“ and follow the instructions given in the following windows.
• For RW-470 PLOTCLIENT MAC:
To use RW-470 PLOTCLIENT MAC you have to install RW-470 WINPRINT on the server PC at first: This is described in
chapter “Installation of RW-470 WINPRINT” page 9.
After you have activated all the services required, adjust the settings so that the “TCP/IP Print Server“ and the “FTP
Publishing Service“ are automatically started when the computer is started up. To do this, proceed as follows.
1. Click once on the “My computer“ desktop.
2. Open the context menu using the right hand mouse button and select “Manage“. The “Computer
Management“ window opens.
3. Double click “Services and Applications“ so that the secondary directories are shown. Now double click on
“Services“.
4. Double click on “TCP/IP Print Server“. Set the “Automatic“ option in the window under “Startup Type“. Repeat
the procedure for the “FTP Publishing Service“.
5. Close all windows.
RW-470 SCANTOOL settings
The following settings are absolutely necessary for RW-470 SCANTOOL. In the RW-470 SCANTOOL program it is
possible to reserve part of the user memory for the scanning process. However, to do this, special user rights have to
be set up. Proceed as follows:
1. Open the system control using “Start – Settings – Control Panel“. Open “Administrative Tools“.
2. Open the following directories one after the other: “Local Security Policy“, “Local Policies“, and „User right
Assignment“.
3. In the list of guidelines select the “Lock pages in memory“ option with a double click. The “Local Security Policy
Setting“ window opens.
4. Click on “Add“. Now determine the users, who are to have the right to adjust the size of the user memory. Select
one or more of the following users by double clicking on them: “Administrator“, “Administrators“,<user name>.
5. Confirm the entries with “OK“. Close the still open window also with “OK”.
6. The window “Local Security Settings” is still open. Click with the right mouse button on “Security Settings”. Select
“reload”.
7. Close the remaining windows still open.
Settings for the Response function
Users can be informed of successful completion of their jobs by an in-house or external mail system. For using the EMail option, Microsoft Outlook Express or Microsoft Outlook have to be installed on the server. Another prerequisite is
that you have installed “Internet Mail“ using the Windows setup.
Further informations about installing your e-mail program you can get in the Windows Help or your mail program
manual.
Installation of RW-470 PLOTBASE and RW-470 SCANTOOL
This section describes the installation of the program and what file types and directories you should find on your hard
drive flowing the installation. We recommend installing of the program not to do in the drive where you already install
your operating system.
To install the program, please proceed as follows:
1. Start for Windows 2000 installation as a user with administrator rights.
2. If Windows 2000 has already been started [with administrator rights], close all programs that are running and
secure all the data.
3. Place the installation CD in your drive. The installation program is now started automatically. If not, open the
Windows Explorer window and double click on the “Setup.exe“ file in the “Install“ CD-folder.
4. First you can select a language for the installation from the list box of the next window. Confirm with “OK“.
Attention: It is imperative that the SNMP protocol has been installed on your computer so that the data
exchange between the server and clients functions. An error message appears is you have not installed an
SNMP protocol. Read the chapter on „Activación de los componentes de Windows“, on Page 41, to find out
how to set up the SNMP protocol. Start again with step 3.
8 RW-470 PLOTBASE Installation

SETTING UP THE FTP DEFAULT FOLDER
5. A new window opens. Follow the instructions given in the window: Close any Windows programs, which are still
open. Then click on „Next“.
6. Click on „Yes“ in the next window if you agree to the license agreement terms. Click on „No“, if you do not agree
to them and wish to cancel the installation.
7. A new window opens, where you can set the destination folder. A destination folder is offered. Confirm with „Next“
or select another one.
8. In the next window you are suggest a target path for the program. Confirm the suggestion with “Next“ or select
another target folder.
9. The Apache Web Server is required for operation of the RW-470 PLOTCLIENT WEB. If you install the version 1.3.9
or a higher version, it will be sufficient. The Apache Web Server is a so called „freeware“, that is why we can’t
guarantee a perfect function. Especially for older versions we can’t guarantee, that they comply with the
requirements without problems. We recommend to remove older versions. If the Apache isn’t installed yet, the
installation program will be started automatically and the supplied Apache version will be installed. After reading
the information in the first window, click on “Next“.
10. In the next window you are now asked whether you accept the terms of the license. Click on “Yes“ if you agree to
the license agreement. Click on “No“ if you do not agree and wish to cancel the installation.
11. The next window gives you information about the Apache Web Server. Click on “Next“ after you have read
everything.
12. A target path is suggested for the program in the next window. Confirm the suggested one with “Next“ or select
another target folder.
13. Various types of setup are suggested in the next window. Select the “Typical“ setup type and click on „Next“.
14. A program folder is suggested. Enter another folder name or confirm the suggested name by clicking on “Next“.
15. In the next window you are informed that installation of the Apache Web Server can now be completed. Decide
whether you wish to view the “Readme” file. To do this, activate the check box. The Readme file contains
information about the Apache Web Server. Click on “Finish“.
16. The next dialog informs you, that the license files (RSP) will be installed now. You are requested to insert the license
disk into the disc drive. Then click „OK“.
17. A new window is open. You have the choice to install the standard program version or a demo program version.
The demo program version can be used to demonstrate the program options, which you can additionally buy from
your dealer. However each scanned file and each print out is marked by stamps. After you have tested the demo
program version, you can remove it by installing the license file of the standard program version (License.rsp).
Install a license file as follows: In the top of the window you can see a small searching symbol.
Click it to open a file selection dialog. Afterwards select a license file (*.rsp), which is on your license disk, and
confirm the selection with „Open“. Click „Install“. The license files will be copied in the correct folder. Close the
window.
18. You can now complete the installation by clicking on “Finish“ in the still opened window.
19. Configure the Internet Explorer as far as you haven’t done this. This is required to be able to use RW-470
PLOTCLIENT WEB.
Setting up the FTP default folder
This FTP default folder is needed as the spool folder, if you use ftp command to send print jobs to RW-470 PLOTBASE.
These settings should not be made until you have completed installation of RW-470 PLOTBASE and RW-470
SCANTOOL. Proceed as follows:
1. Click once on “My Computer“ on the desktop and open the context menu using the right hand mouse button.
Select “Manage“.
2. Open the “Services and Applications“ folder with a double click. Select “Internet Information Services“. Select
„Default FTP Site“ and open the context menu using the right-hand mouse button.
3. Select “Properties“. A window with the name “Default FTP Site Properties“ now opens.
4. Select the “Home Directory“ tab. Activate the Option “A directory located on this computer“ option. Enter the local
path in the “FTP site directory“ box. To do this click on the “Browse“ button and select the folder “[drive]:\spool“.
Activate the “write access“ option and the “Unix” option under “Directory Listing Style“.
5. Confirm all entries by clicking on “OK“.
Installation of RW-470 WINPRINT
The Windows printer driver RW-470 WINPRINT allows print jobs to be recorded from Windows applications, to then
pass them to RW-470 PLOTBASE as a job. Install the printer driver as follows:
1. Open in the Windows Explorer the installation folder \\<Server>\RW-470\PLOTBASE\Tools\WINPRINT. You can
also find this folder on the installation CD. Start the file “Setup.exe“. The installation program start.
2. A information window opens at first. After you have read the notes, click on „Next“.
3. In the next window you are asked to confirm the prescribed port name by clicking on “OK“ or to enter another
name.
RW-470 PLOTBASE Installation 9

INSTALLATION OF RW-470 WINPRINT
4. Confirm the printer name, that means the name of the printer driver.
5. Confirm shared name of the printer driver in the next windows.
6. Detect which operating system is installed on the client PCs, which will use RW-470 WINPRINT for printing. If it is
Windows 95, 98 or ME, click on „Yes“ and confirm the entry with „Next“.
7. If one of the appointed operating systems (Windows 95, 98 or ME) is used, more files are required, that probably
may not be installed on your PC. In that case put corresponding installation CD of Windows into the drive or select
a network path, if the installation files are on a server PC.
8. The installation is finished successfully.
9. Now you have to confirm the spooler folder. Open at first window by opening „Start – Settings – Printer“.
10. Select printer driver RW-470 WINPRINT.
11. Select „Properties“ in the context menu (right mouse button). Select the tab „Port“.
12. Open the following window with „Configure“ and confirm the spooler folder. As a standard spooler folder is set
on c:\spool\cfg. If you installed the spool folder of RW-470 PLOTBASE on another drive, you have to change the
drive path.
10 RW-470 PLOTBASE Installation

INSTALLATION OF RW-470 PLOTCLIENT WIN ON A WINDOWS PC
III. Installation of Clients on work stations
Installation of RW-470 PLOTCLIENT WIN on a Windows PC
In this chapter you can read about which system requirements have to be fulfilled and how to carry out the installation.
System requirements for RW-470 PLOTCLIENT WIN
Please read through the following recommendations carefully. They can be very helpful in finding the optimum
hardware for your requirements.
• Operating system
Windows NT 4.0, Windows 95/98/ME or Windows 2000. For Windows 2000 we recommend Service Pack 1. You can
use a higher Service Pack version, too, but if it does not run, please change back again to Service Pack 1
• Network interface/Configuration:
10/100 Base T Ethernet, the TCP/IP configuration is necessary
• Processor
Pentium II.
• System memory
We recommend at least 64 MB RAM.
• Harddrive
Each harddrive at least 500 MB.
• Monitor
At least 1024 x 768 pixels resolution.
Installation of RW-470 PLOTCLIENT WIN
This section describes the installation of the program.
To install the program, please proceed as follows:
1. Start Windows as a user with administrator rights and open Windows Explorer.
2. If Windows was already started [with administrator rights], please quit all running programs or backup the data
stocks.
3. Open in the Windows Explorer \\<Server>\Tools\PLOTCLIENT_WIN. You can also find the “tools” folder on your
installation CD.
4. Start the file SETUP.EXE.
5. Select the SETUP language, and then click on OK.
6. Click on “NEXT”.
7. Click on “Yes”, if you agree to the license agreement. Click on “NO”, if you do not agree and want to cancel the
installation.
8. Answer the question about the Readme-file, and click on NEXT.
9. Click on “NEXT”, to confirm the target folder, in which RW-470 PLOTCLIENT WIN is to be installed.
10. Click on “NEXT”, to confirm the unchanged or changed program folder.
11. Determine the SSL Spool folder. The standard preset is the folder “\\<Server>\Spool\SSL“.
The first part “\\<Server>“ gives the destination computer, on which RW-470 PLOTBASE is installed. The second
part “\Spool\SSL“ gives the spool folder released there.
12. RW-470 PLOTCLIENT WIN is then installed. End the installation program with „Finish“.
Installation of RW-470 WINPRINT as a network printer
Before you can use the RW-470 WINPRINT, you have to install it on your client PC as a „network printer“, as you have
already done with every in-house network printer on your PC before.
To install RW-470 WINPRINT as network printer, please proceed as follows:
1. Open „Printers“ window via „Start – Settings – Printers“.
2. Open „Add Printer“ and click on „Next“.
3. Choose „Network Printer“ and click on „Next“.
4. Type printer name including complete network path of the server PC, where RW-470 PLOTBASE is running or click
„Next“ to browse in your in-house network.
5. Search for the server PC and choose RW-470 WINPRINT.
6. Choose RW-470 WINPRINT as standard printer or not and finsih installation.
Now you can choose the RW-470 WINPRINT from your Windows application menu „file – print“.
RW-470 PLOTBASE Installation 11

INSTALLATION OF RW-470 PLOTCLIENT HDI/ADI ON A WINDOWS PC
Installation of RW-470 PLOTCLIENT HDI/ADI on a Windows PC
The installation of the program is carried out on a workstation, on which an AutoCAD-program is installed. You will
find the installation program in the released “Tools“ folder of RW-470 PLOTBASE:
\\<Server>\Tools\PLOTCLIENT_HDI_ADI\
Start the installation by double clicking on the “Setup.exe” file in the folder “PLOTCLIENT_HDI“. The installation
program is started. Proceed as follows:
1. First select the language, in which you wish to carry out the installation and confirm with “OK“:
2. In the window that opens you are asked to close all Windows programs before beginning the installation.
Continue the installation by clicking once on "Next".
3. In the next window read the license terms and confirm with "Yes".
4. In the next window read some latest information about RW-470 PLOTCLIENT HDI/ADI.
5. Make your decision if the installation program shall search automatically for any AutoCAD software on your PC or
if you want to inform the program where your AutoCAD is installed.
6. In the new window you are asked to confirm the path of the target folder for the program that is given or to
choose your own target folder. If you wish to save the program in another target folder save, click on the “Browse“
button and choose a folder. Confirm your selection. Continue with the installation by clicking on “Next“.
7. Only if you have installed AutoCAD 13/14, activate in the next window the option “Yes, write the file name“, if you
want to see the original file names as well as the freely selected file name picked by the AutoCAD program on
printing.
8. A new window opens, in which you can confirm the suggested folder name for the start menu or enter your own
name. Click on “Next“ to continue the installation program.
9. In the new window all the directories for the installation are listed again. Click on “Next“, so that all files are
copied to your computer.
10. In this window you are informed that the installation is completed. If you have installed AutoCAD 13 or 14 and like
to start the configuration now, please let check box activated.
11. If you have opened AutoCAD, you must first close it to carry out the specific configuration for AutoCAD 13/14, that
will be described in the following chapter. Confirm with “OK“.
Configuration for AutoCAD 13/14 via configuration tool
If you have deactivated during installation the check box for the start of the configuration tool in step 9, start the
configuration tool now via “Start - programs - RW-470 - RW-470 PLOTCLIENT HDI ADI - Config“ and enter the
following settings:
• Select Program
Select RW-470 PLOTCLIENT WIN, from which you wish to send your print jobs to RW-470 PLOTBASE for printing. If
you use the HDI/ADI Client, your presets always only apply for the current print job. If you take RW-470 PLOTCLIENT
WIN, you can add several other print jobs to your current print job and have the same presets for all.
• Select AutoCAD version
If you work with one of the two AutoCAD versions R13 or R14, inform RW-470 PLOTCLIENT WIN which Version you
use.
• Configuration
If AutoCAD 13 has not been installed with the standard paths, inform RW-470 PLOTCLIENT WIN the two paths in
which the configuration file “ACADNT.cfg“ and initialization file “ACAD.ini“ are. For AutoCAD 14 no settings are
required.
After you have entered the settings in the configuration tool, you now only have to set up your new printer driver and
enter the final presets in the print dialog of AutoCAD. You can then start printing.
Settings for AutoCAD 13/14 in print dialog
1. Start your AutoCAD 13/14 program.
2. If not done before, please install a HP-GL/2 printer driver, e.g. HP DesignJet 650C. If you cannot find this printer
driver in the printer list of your AutoCAD program, you will find it on your AutoCAD installation CD. In the
program folder of RW-470 PLOTCLIENT HDI/ADI you will find a readme file with a detailed description of how to
install a HP-GL/2 printer driver.
3. Open any drawing.
4. Open via „File - Print“ the window „Print/Plot Configuration“.
5. Click on „Device and Default Selection“ and choose the HP-GL/2 printer from the list, e.g. HP DesignJet 650C.
Confirm with „OK“.
6. Activate option „Plot To File“ on the tab „Plot Configuration“ in the section „Additional Parameters“. In AutoCAD
14 you have to activate additionally the option „Autospool“. Confirm with „OK“.
7. If you have preset in the configuration tool, that you want to use RW-470 PLOTCLIENT HDI/ADI to edit your print
jobs and when you start your first print job the window „Enter spool folder“ will be opened. Enter here the spool
path of the server program RW-470 PLOTBASE as follows:
12 RW-470 PLOTBASE Installation

INSTALLATION OF RW-470 PLOTCLIENT MAC ON A MACINTOSH PC
\\<Server>\Spool\cfg
If required the spool path can be changed again in the section „Option“ of RW-470 PLOTCLIENT HDI/ADI.
8. According to your settings in the configuration tool, either RW-470 PLOTCLIENT WIN or RW-470 PLOTCLIENT
HDI/ADI will be opened to edit your plot jobs. Please confirm in RW-470 PLOTCLIENT WIN, that the correct spool
path is set to:
\\<Server>\Spool\ssl
In the chapter RW-470 PLOTCLIENT HDI/ADI of the manual RW-470 CLIENTS all print parameters will be described
Settings for AutoCAD 2000 in print dialog
To set up the printer with the print dialog proceed as follows:
1. Start your AutoCAD program.
2. Open the “Plotter Manager“ in menu „File“.
3. Open the dialog “Add A Plotter Wizard“ and click on “Next“.
4. Choose “My computer“ to get to the printer list.
5. From the manufacturer list of “Widecontroller“ choose the “RW-470 PLOTBASE“ printer and click on “Next“.
6. In the next window click on “Next“, without importing a “PCP or PC2 file“!
7. Now choose the option “Plot to file“ and click on “Next“.
8. Confirm the plotter name.
9. Click on “Edit Plotter Configuration“ and enter your plotter configuration.
10. Open the user-specific “Properties“, to enter specific driver settings as well as the medium and resolution settings:
• Do not warn of over lengths: If you do not want to receive the warning message for an overlong print, switch
this off here . The warning message would draw your attention to the overlong print with additional
information, so that you would have the opportunity to prematurely abort.
• Raster gamma correction: With the gamma correction, to put it simply, you set the brightness of the print. The
gamma correction can be used in all plotters, which work with raster data. You can set a value between 1 and
5, whereby 5 means the greatest brightness.
• Choose RW-470 program mode: Here you can choose whether you always want to print your print jobs from
AutoCAD as individual print jobs or whether you need to process several drawings in one drawing set
together. If you want to process several drawings simultaneously for printing, activate “Make set with RW-470
PLOTCLIENT WIN“. If you always only want to send individual jobs from AutoCAD to print and always want to
use the same plot parameter settings, tell the program “Hide RW-470 PLOTCLIENT HDI dialog“. If you want
to decide before each print and enter new print parameters, simply let program “Show RW-470 PLOTCLIENT
HDI dialog” each time.
• Plot color merge control: You have two options to choose. By activating „Colors merge“ all levels of your
drawing will be merged. So at parts, where two or more colors lie on top of each other, colors will be
merged. If activating the option „Colors overwrite each other“ higher levels overwrite completely levels below.
Transparent parts do not overwrite any color.
11. Quit the plotter settings by clicking once on “Finish“.
After you have now carried out the configurations, you can now either send you print jobs from AutoCAD directly to
RW-470 PLOTBASE or to the RW-470 PLOTCLIENT WIN. In the chapter RW-470 PLOTCLIENT HDI/ADI of the manual
RW-470 CLIENTS all print parameters will be described.
Installation of RW-470 PLOTCLIENT MAC on a Macintosh PC
1. Start your Microsoft Explorer browser
2. Open “http://<Server>/tools/PLOTCLIENT_MAC”.
3. Save the file “RW-470.ppd” on the Macintosh Desktop.
4. Open the “New” window via “Macintosh HD – Apple Extras – Apple LaserWriter Software – Printer Symbols
Service Program”.
5. Select “LaserWriter 8“.
6. Select “Create Printer Symbol for TCP/IP printer“ and confirm with “OK“.
7. Change the PPD file in the file “RW-470.ppd” already saved on the Macintosh via the button “Change”.
8. In the same window, change the TCP/IP printer. Under “Queue”, enter the host name or the IP-address of server
PC. Enter the “Printer address” as the enabler name that you gave during installation of WINPRINT32. Confirm
with “OK”.
9. Finally, click on “Create” and save the “Printer symbol”, if possible under the name already given.
RW-470 PLOTBASE Installation 13

Installationsanleitung
RW-470 PLOTBASE
RW-470 CLIENTS
RW-470 PLOTBASE Installation 14

INSTALLATION OF RW-470 PLOTCLIENT MAC ON A MACINTOSH PC
Warenzeichen
Adobe, Acrobat, PostScript und PostScript3TM sind eingetragene Warenzeichen von Adobe Systems Incorporated.
Apple, Macintosh, Mac und TrueType sind eingetragene Warenzeichen von Apple Computer, Incorporated.
AutoCAD
HPGL, HPGL/2 und HP-RTL sind eingetragene Warenzeichen von Hewlett-Packard Company.
Ethernet
Microsoft
Staaten und/oder anderen Ländern.
Netscape Navigator
PLOTBASE
PLOTCLIENT
RATIO SSL ist ein eingetragenes Warenzeichen von RATIO Entwicklungen GmbH, Hamburg, Germany.
Calcomp ist ein eingetragenes Warenzeichen von Calcomp Inc..
CALS ist ein eingetragenes Warenzeichen von U.S. Department of Defense, USA.
CGM ist ein eingetragenes Warenzeichen von Henderson Software Inc., Boulder, USA.
CIT ist ein eingetragenes Warenzeichen von Intergraph GmbH, Ismaning, Germany
PCX ist ein eingetragenes Warenzeichen von Zsoft, Microsoft Inc.
WMF ist ein eingetragenes Warenzeichen von Microsoft Corporation in den Vereinigten Staaten und/oder anderen Ländern.
Andere Produktnamen werden nur zur Identifikation genutzt und könnten Warenzeichen eines jeweiligen Unternehmens sein. Wir
verzichten auf sämtliche Rechte an diesen Produkten.
Die vollständigen Namen der Windows-Betriebssystemse sind:
Microsoft
Microsoft
Microsoft
Microsoft
Microsoft
Microsoft
Microsoft
Hinweis:
“RW-470 PS” steht für RW-470 Postscript Level 3 Compatible Option
und DWG sind eingetragene Warenzeichen von Autodesk, Inc.
ist ein eingetragenes Warenzeichen von Xerox Corporation.
, Outlook, Windows und Windows NT sind eingetragene Warenzeichen von Microsoft Corporation in den Vereinigten
ist ein eingetragenes Warenzeichen von RATIO Entwicklungen GmbH, Hamburg, Germany.
Windows 95 operating system
Windows 98 operating system
Windows Millennium Edition
Windows 2000 Professional
Windows 2000 Server
Windows NT Server operating system Version 4.0
Windows NT Workstation operating system Version 4.0
ist ein eingetragenes Warenzeichen von Netscape Communications Corporation, Mountain View/USA.
ist ein eingetragenes Warenzeichen von RATIO Entwicklungen GmbH, Hamburg, Germany.
RW-470 PLOTBASE Installation 15
EINLEITUNG
Einleitung
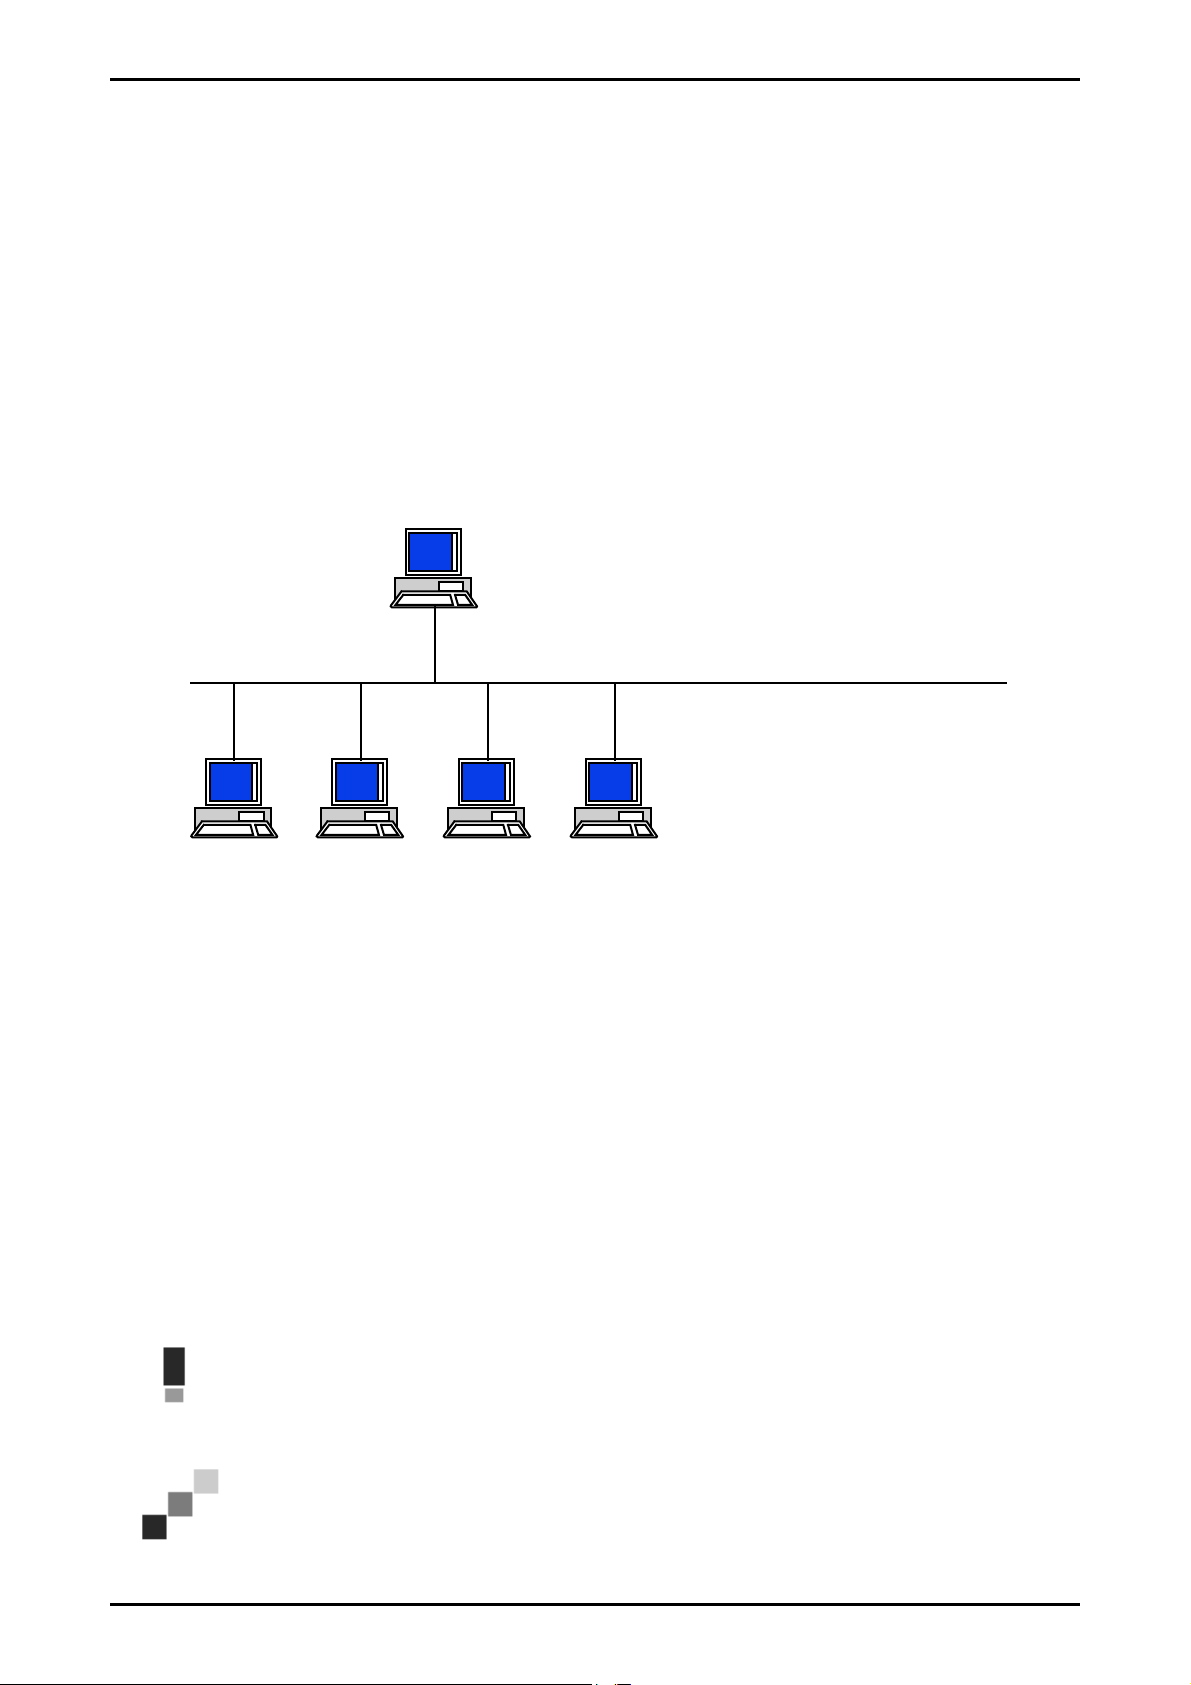
In dieser Anleitung wird die Installation des Controllers und der Softwareprogramme beschrieben. Es handelt sich um
ein Server-Client-System, das die Installation eines Teils der Software auf einem Server-Rechner und auf
Arbeitsplatzrechnern vorsieht.
Die Installation des Hauptprogramms RW-470 PLOTBASE muß auf dem Serverrechner durchgeführt werden. Die
Programme RW-470 SCANTOOL und RW-470 PLOTCLIENT WEB inklusive Apache Web Server werden automatisch
ebenfalls auf dem Server-Rechner installiert. Diese Installation und die dazugehörigen Einstellungen werden im
nachfolgendem Hauptkapitel beschrieben.
Die anderen RW-470 CLIENTS werden dann auf den Arbeitsplatzrechnern installiert. Die Beschreibung dieser
Softwareinstallation finden Sie in dem Abschnitt „Installation der Clients auf den Arbeitsplatzrechnern“ ab Seite 22.
Nachfolgende Grafik verdeutlicht nochmal, welche Programme auf welchen Rechnern installiert werden sollten:
RW-470 PLOTBASE
Software to install on server:
RW-470 PLOTBASE with
- RW-470 SCANCLIENT
Server PC
MS Windows 2000 ®
with Controller Board
SERVER site
- RW-470 PLOTCLIENT WEB
RW-470 WINPRINT
RW-470 Kernel Driver (Device Driver)
optionally AutoCAD 2000
( for use with RW-470 PLOTCLIENT HDI/ADI )
( AutoCAD 2000i required for file format DWG )
Client PC
Windows 9x/ME
Client PC
Windows NT/2000
CLIENT site
Client PC
UNIX/LINUX
Client PC
Macintosh
Software to install or set up on clients:
RW-470 PLOTCLIENT WIN
RW-470 PLOTCLIENT HDI/ADI
RW-470 PLOTCLIENT MAC
RW-470 PLOTCLIENT LPR/FTP
RW-470 WINPRINT
( not to install, only as shared printer )
MS Internet Explorer 5.5 ®
( for use with RW-470 PLOTCLIENT WEB )
I. Lieferumfang
Die Lieferung umfasst
• eine Installationsanleitung,
• ein Controller Board Type 470,
• eine CD mit der Software und den PDF-Handbüchern,
• eine 3,5 Zoll-Diskette mit RSP-Lizenzdateien.
II. Installationen und Einstellungen auf dem Server-Rechner
In diesem Kapitel lesen Sie,
• welche Systemvoraussetzungen für den Server erfüllt sein müssen,
• wie Sie den Treiber und das Programm installieren
• welche Einstellungen Sie im Betriebssystem vornehmen.
Achtung: Die Einstellungen in dem Betriebssystem sowie die Installation des Programms dürfen nur von
einem Benutzer mit Administrator-Rechten durchgeführt werden.
Hinweis: Die Spracheneinstellung während der Installation gilt nur für den Installationsvorgang. Wenn Sie
die Sprache für die gesamte RW-470 Software umstellen wollen, müssen Sie das über die
16 RW-470 PLOTBASE Installation

SYSTEMVORAUSSETZUNGEN
Ländereinstellungen der Systemsteuerung von Windows tun. Anleitungen dazu finden Sie in den WindowsHandbüchern.
Systemvoraussetzungen
Lesen Sie sich die nachfolgenden Empfehlungen aufmerksam durch. Sie können sehr hilfreich dabei sein, die optimale
Hardware für Ihre Bedürfnisse zu finden.
• Betriebssystem:
Microsoft Windows® 2000 Professional mit ServicePack 1 oder höher
• Prozessor:
Pentium III, 800 Mhz oder höher
• Front Side Bus:
133 Mhz
• PCI-Bus:
Das PCI-Bussystem muss dem aktuellem Standard (PCI 2.0 oder höher – 3.3 V oder 5 V autoadaptive,
maximale Ladung 5 A) entsprechen. Wenn ihr Rechner diesen Standard nicht erfüllt, kann möglicherweise der
Plotter-Controller nicht erkannt werden.
• Systemspeicher:
Benutzen Sie einen Systemspeicher mit mindestens 256 MB RAM. Mit diesem Systemspeicher können Sie die
maximale Zeichnungsgröße plotten oder scannen. Wenn Sie jedoch Zeichnungen mit maximaler Zeichnungsgröße
simultan plotten und scannnen möchten, wird ein Systemspeicher von 512 MB RAM empfohlen. Das simultane
Scannen und Plotten kleinerer Formate ermöglicht auch die Verwendung eines kleineren Systemspeichers. Für
weitere Einzelheiten wenden Sie sich an Ihren Händler oder Support-Techniker.
• Festplatte:
Die Festplatte sollte mindestens über 10 GB Speicherplatz verfügen. Wir empfehlen Ihnen, die Software nicht auf
dem Laufwerk zu installieren, auf dem Sie das Betriebssystem installiert haben.
• Netzwerkschnittstelle:
10/100-Base T Ethernet, die TCP/IP Konfiguration ist unbedingt erforderlich
• RW-470 Controller:
Physikalische Größe: 190 mm x 128 mm
PCB Ausmaße: 174,63 mm x 106,8 mm
• Monitor:
mind. 1024 x 768 Pixel Auflösung
Controller Board Type 470
Die RW-470 Software funktioniert nur, wenn Sie ein Controller für den Plotter eingerichtet haben. Dazu müssen Sie das
Controller Board Type 470 und die dazugehörige Software installieren.
Installation Controller Board Type 470
Hinweis: Das Controller Board Type 470 kann durch elektostatische Aufladung beschädigt werden.
Nehmen Sie daher das Controller vorsichtig aus der Verpackung und berühren Sie es nur an den Rändern
oder an den äußeren Halterungen. Berühren Sie möglichst nicht die Stromkreise mit Ihren Fingern. Wenn
dieses doch notwendig ist, berühren Sie zuvor ein Metallobjekt, um eine möglicherweise vorhandene
statische Ladung abzuleiten.
1. Schalten Sie Ihren Rechner aus, bevor Sie das Controller installieren.
2. Wählen Sie einen freien PCI Steckkartenplatz. Beachten Sie, dass auf einigen Rechnern der PCI Anschluß Nr. 5
nicht mit den PCI Standards 2.0 übereinstimmen. Nutzen Sie in diesem Fall Steckkartenplatz Nr.1 bis 4.
3. Stecken Sie das Controller in die PCI Anschlußbuchse und drehen Sie die Befestigungsschraube fest. Testen Sie ,
ob das Controller richtig befestigt ist, keine Teile benachbarte Karten oder das Gehäuse berühren und die
Befestigungsschraube fest sitzt.
4. Starten Sie den Rechner neu. Verbinden Sie die Kabel mit dem Plotter.
Installation des Kernel-Treibers RW-470 Kernel
Gehen Sie nun folgendermaßen vor, um den Treiber zu installieren:
RW-470 PLOTBASE Installation 17

EINSTELLUNGEN IM BETRIEBSSYSTEM
1. Starten Sie den Rechner. Nach dem Einbau des Controller Board Type 470 meldet das Betriebssystem automatisch,
dass eine neue Hardware gefunden und der Assistent für die Installation des Kernel-Treibers (RW-470 Kernel)
gestartet wurde.
2. Klicken Sie die Schaltfläche „Weiter“ an, um das Installationsprogramm zu starten.
3. Im nächsten Fenster fragt der Assistent, wie er die notwendigen Treiberdateien erhalten soll. Wählen Sie die obere
Option „Nach einem passenden Treiber für das Gerät suchen (empfohlen)“ und klicken Sie anschließend „Weiter“,
um mit der Installation weiter fortzufahren.
4. Legen Sie die Installations-CD in Ihr CD-Laufwerk. Falls das Installationsprogramm für RW-470 PLOTBASE
automatisch gestartet wird, schließen Sie es wieder mit „Abbrechen“.
5. Nun fragt der Assistent, wo er die Treiber-Dateien suchen soll. Wählen Sie “CD-ROM-Laufwerke“ und klicken Sie
anschließend „Weiter“ an.
6. In dem nächsten Fenster wird Ihnen nun mitgeteilt, dass die Treiberdatei (d1kernel.inf) gefunden wurden. Klicken
Sie “Weiter” an, um die Installation fortzusetzen.
7. Nun wird Ihnen mitgeteilt, dass die Treiber-Dateien installiert worden sind. Klicken Sie auf „Fertigstellen“, um das
Installationsprogramm zu beenden.
Hinweis: Sie können die richtige Funktion des Controller Board Type 470 überprüfen, indem Sie zunächst
nachsehen, ob die LED-Anzeige am Board leuchtet. Ist dieses nicht der Fall, testen Sie nochmals, ob das
Board richtig eingesetzt wurde. Zusätzlich können Sie den Zustand überprüfen, indem Sie „My computer“
wählen und das Kontextmenü mit der rechten Maustaste öffnen. Wählen Sie dann „Eigenschaften –
Hardware – Geräte Manager – Multifunctionadapter – RW-470 Controller (D1) V1.3“. Öffnen Sie das
Kontextmenü und wählen Sie aus der Liste „Eigenschaften“ aus. In dem Fenster wird der Status des Controller
Board Type 470 beschrieben. Falls Probleme auftreten, benutzen Sie bitte die angebotene Windows-Hilfe.
Einstellungen im Betriebssystem
Für die Zusammenarbeit zwischen Server und Clients sowie die Konfiguration des Scanners sind noch einige
Einstellungen in dem Betriebssystem erforderlich. Diese Einstellungen sollten wie auch die gesamte Installation nur von
einem Administrator durchgeführt werden. Die nachfolgend beschriebenen Vorgehensweisen beziehen sich auf die
Einrichtung eines Einzelrechners. Sollten Sie einen Netzwerkrechner einrichten, kann die Konfiguration geringfügig
abweichen.
Nachdem Sie die Einstellungen vorgenommen haben, müssen Sie den Computer neu starten.
Einrichtung von Benutzerkonten und Gruppen
Wir empfehlen bei einer großen Anzahl von Nutzern Benutzerkonten und auch Gruppen einzurichten. Insbesondere bei
der Nutzung des FTP-Protokolls ist die Einrichtung von Benutzerkonten und Gruppen notwendig.
Gehen Sie folgendermaßen vor:
1. Öffnen Sie die „Systemsteuerung“ über „ Start – Einstellungen – Systemsteuerung “. Öffnen Sie das Control Panel
„Benutzer und Kennwörter“. Klicken Sie die Schaltfläche „Hinzufügen“ an.
2. Nehmen Sie die Einträge in den Feldern „Benutzername“, „Vollständiger Name“, „Beschreibung“ vor. Klicken Sie
danach „Weiter“ an.
3. Sie werden nun nach dem Passwort gefragt. Tragen Sie ein Passwort ein und bestätigen Sie es durch nochmaliges
Eintragen im darunterliegenden Feld „Kennwortbestätigung“. Klicken Sie „Weiter“ an.
4. Wählen Sie im nächsten Fenster die Option „Standardbenutzer“. Klicken Sie „Fertig stellen“ an.
5. Schließen Sie das noch geöffnete Fenster mit „OK“.
Weitere Informationen zur Einrichtung von Bennutzerkonten und Gruppen finden Sie in der Windows-Hilfe.
Aktivierung von Windows-Komponenten
Die nachfolgend aufgeführten Einstellungen sind für das richtige Funktionieren der Programme RW-470 PLOTBASE
und RW-470 SCANTOOL sowie für die Anbindung der Clients unbedingt notwendig.
• SNMP:
Die Einstellungen für dieses Protokoll müssen aktiviert sein. Gehen Sie folgendermaßen vor:
1. Öffnen Sie das Einstellungsfenster mit „Start – Einstellungen – Systemsteuerung – Software - WindowsKomponenten hinzufügen/entfernen“.
2. Aktivieren Sie durch Anklicken des Kontrollkästchens die Option „Verwaltungs- und
Überwachungsprogramme“.
3. Klicken Sie „Weiter“ an und folgen Sie den Anweisungen der weiteren Fenster.
• FTP-Protokoll:
Um das FTP-Protokoll nutzen zu können, müssen Sie Einstellungen in den „Internet Information Services (IIS)“
vornehmen.
18 RW-470 PLOTBASE Installation

EINSTELLUNGEN IM BETRIEBSSYSTEM
1. Öffnen Sie das Einstellungsfenster mit „Start – Einstellungen – Systemsteuerung – Software - WindowsKomponenten hinzufügen/entfernen“.
2. Klicken Sie „Internet Informationsdienste (IIS)“ an, das Kontrollkästchen bleibt deaktiviert. Klicken Sie die
Schaltfläche „Details“ an.
3. Aktivieren Sie durch Anklicken des Kontrollkästchens die Option „FTP-Server (File Transfer Protocol)“. Die
weiteren Optionen „Gemeinsame Dateien“ und „Internet Informationdienste Snap-In“ werden ebenfalls
automatisch aktiviert. Falls tatsächlich alle drei Dienste aktiviert sind, klicken Sie „OK“ an, um die Angaben
zu bestätigen.
4. Klicken Sie „Weiter“ an und folgen Sie den Anweisungen der weiteren Fenster.
Hinweis: Wenn Sie das FTP-Protokoll nutzen wollen, müssen Sie auch noch Nutzergruppen einrichten. Die
Vorgehensweise wird in Kapitel „Einrichtung von Benutzerkonten und Gruppen“, Seite 18, beschrieben.
Außerdem müssen Sie ein FTP-Verzeichnis mit Voreinstellungen einrichten. Dieses wird aber erst nach der
RW-470 PLOTBASE-Installation durchgeführt und ist in Kapitel „Einrichten des FTP-Standard Verzeichnisses“,
Seite 21, beschrieben.
• LPR:
Diese Einstellung ist auch für MAC/OS erforderlich. Gehen Sie folgendermaßen vor:
1. Öffnen Sie das Einstellungsfenster mit „Start – Einstellungen – Systemsteuerung – Software - WindowsKomponenten hinzufügen/entfernen“.
2. Aktivieren Sie durch Anklicken des Kontrollkästchens die Option „Weitere Datei- und Druckdienste für das
Netzwerk“.
3. Klicken Sie „Weiter“ an und folgen Sie den Anweisungen der weiteren Fenster.
• Für RW-470 PLOTCLIENT MAC:
Für diesen Client müssen Sie RW-470 WINPRINT auf dem Plotserver installieren. Dieses ist im Kapitel “Installation RW470 WINPRINT” Seite 21 beschrieben.
1. Nachdem Sie alle erforderlichen Dienste aktiviert haben, stellen Sie nun ein, dass der „TCP/IP Druck Server“ und
die „FTP Publishingdienste“ automatisch mit dem Hochfahren des Rechners gestartet werden. Gehen Sie dazu
folgendermaßen vor.
2. Klicken Sie auf dem Desktop „Arbeitsplatz“ einmal an.
3. Öffnen Sie das Kontextmenü mit der rechten Maustaste und wählen Sie „Verwalten“. Das Fenster
„Computerverwaltung“ wird geöffnet.
4. Klicken Sie „Dienste und Anwendungen“ doppelt an, damit die untergeordneten Verzeichnisse angezeigt werden.
Führen Sie wieder einen Doppelklick auf „Dienste“ aus.
5. Führen Sie einen Doppelklick auf „TCP/IP Druck Server“ durch. Stellen Sie in dem Fenster unter „Starttyp“ die
Option „automatic“ ein. Wiederholen Sie das Vorgehen für „FTP Publishingdienste“.
6. Schließen Sie alle Fenster.
Einstellungen für RW-470 SCANTOOL
Folgende Einstellungen sind für RW-470 SCANTOOL unbedingt erforderlich. In dem Programm RW-470 SCANTOOL
gibt es die Möglichkeit, einen Teil des Arbeitsspeichers für den Scanprozeß zu reservieren. Dazu müssen aber
besondere Benutzerrechte eingestellt werden. Gehen Sie folgendermaßen vor:
1. Öffnen Sie die Systemsteuerung mit „Start – Einstellungen – Systemsteuerung“. Öffnen Sie „Verwaltung“.
2. Öffnen Sie folgende Verzeichnisse nacheinander: Lokale Sicherheitsrichtlinie“, „Lokale Richtlinie“, „Zuweisen von
Benutzerrechten“.
3. Wählen Sie in der Richtlinienliste die Option „Sperren von Seiten im Speicher“ mit einem Doppelklick aus. Es geht
das Fenster „Lokale Sicherheitseinstellungen“ auf.
4. Klicken Sie „Hinzufügen“ an. Bestimmen Sie nun die Benutzer, die das Recht haben sollen, die Größe des
Arbeitsspeichers einzustellen. Wählen Sie dazu einen oder mehrere Benutzer durch Doppelklick aus:
„Administrator“, „Administratoren“, <Benutzername>.
5. Bestätigen Sie die Angaben mit „OK“. Schließen Sie auch das nächste Fenster durch Anklicken von „OK“.
6. Das Fenster „Lokale Sicherheitseinstellungen“ ist weiter geöffnet. Klicken Sie mit der rechten Maustaste auf
„Sicherheitseinstellungen“. Wählen Sie im dem Menü „Neu laden“ aus.
7. Schließen Sie die restlichen geöffneten Fenster.
Einstellungen für die Response-Funktion
Sie können RW-470 PLOTBASE anweisen, nach erfolgreichem Auftragsabschluß automatisch eine E-Mail oder eine
Nachricht via Netzwerk an den Auftragersteller zu senden. Um die E-Mail-Funktion nutzen zu können, muss Microsoft
Outlook Express oder Microsoft Outlook auf dem Server installiert sein. Außerdem sollte „Internet Mail“ installiert sein.
Weitere Informationen über die Einrichtung Ihres Mailprogramms erhalten Sie in der Windows Hilfe oder der Hilfe Ihres
Mailprogramms.
RW-470 PLOTBASE Installation 19

INSTALLATION RW-470 PLOTBASE UND RW-470 SCANTOOL
Installation RW-470 PLOTBASE und RW-470 SCANTOOL
In diesem Abschnitt ist die Installation der Programme beschrieben und welche Dateitypen und Verzeichnisse Sie nach
der Installation auf Ihrer Festplatte vorfinden sollten. Wir empfehlen Ihnen, die Software nicht auf dem Laufwerk zu
installieren, auf dem Sie das Betriebssystem installiert haben.
Zur Installation gehen Sie bitte wie folgt vor:
1. Starten Sie für die Installation Windows 2000 als Benutzer mit Administrator-Rechten.
2. Falls Windows 2000 bereits [mit Administrator-Rechten] gestartet war, beenden Sie alle laufenden Programme
bzw. nehmen Sie eine Sicherung der Datenbestände vor.
3. Legen Sie die Installations-CD in Ihr Laufwerk. Das Installationsprogramm wird nun automatisch gestartet. Falls
das Setup-Programm nicht automatisch gestartet wurde, öffnen Sie bitte den Windows Explorer und klicken die
Datei „Setup.exe“ im CD-Verzeichnis „Install“ an.
4. Sie können zunächst aus dem Listenfeld des folgenden Fensters eine Sprache für die Installation auswählen.
Bestätigen Sie mit „OK“.
Achtung: Auf Ihrem Rechner muss unbedingt das SNMP-Protokoll installiert sein, damit der Datenaustausch
zwischen Server und Clients funktioniert. Es erscheint eine Fehlermeldung, wenn Sie kein SNMP-Protokoll
installiert haben. Lesen Sie im Kapitel „Aktivierung von Windows-Komponenten“, Seite 18, wie Sie das
SNMP-Protokoll einrichten. Beginnen Sie dann nochmal mit der Installation ab Schritt 3.
5. Es wird ein neues Fenster geöffnet. Beachten Sie die Anweisungen des Fensters: Beenden Sie alle WindowsProgramme, die noch geöffnet sind. Klicken Sie anschließend auf „Weiter“.
6. Klicken Sie im nächsten Fenster auf „Ja“, wenn Sie dem Lizenzvertrag zustimmen. Klicken Sie auf „Nein“, wenn Sie
nicht zustimmen und die Installation abbrechen wollen.
7. Ein neuer Dialog wird geöffnet, in dem der Zielordner festgelegt wird. Ihnen wird ein Zielpfad für das Programm
vorgeschlagen. Bestätigen Sie den Vorschlag mit „Weiter“ oder wählen Sie einen anderen Zielordner.
8. Nun wird ein Programmordner vorgeschlagen. Bestätigen Sie den vorgeschlagenen Namen, indem Sie „Weiter“
anklicken oder tragen Sie einen anderen Ordnernamen ein.
9. Für den Betrieb des RW-470 PLOTCLIENT WEB wird der Apache Web Server benötigt. Sofern Sie die Version
1.3.9 oder eine aktuellere Version installiert haben, ist diese vollkommen ausreichend. Der Apache Web Server
wird zur sogenannten „Freeware“ gezählt, daher kann für dieses Produkt nicht die Garantie übernommen
werden, dass alle Funktionen fehlerfrei sind. Insbesondere für ältere Versionen kann nicht garantiert werden, dass
sie die Anforderungen für eine reibungslose Funktion des RW-470 PLOTCLIENT WEB erfüllen. Deinstallieren Sie
ggf. eine ältere Version. Wenn der Apache noch nicht auf Ihrem Rechner installiert ist, wird automatisch das
Installationsprogramm gestartet und die mitgelieferte Apache-Version installiert. Nachdem Sie die Informationen
im ersten Fenster gelesen haben, klicken Sie „Next“ an.
10. Im nächsten Fenster werden Sie nun gefragt, ob Sie die Lizenzbedingungen akzeptieren. Klicken Sie auf „Yes“,
wenn Sie dem Lizenzvertrag zustimmen. Klicken Sie auf „No“, wenn Sie nicht zustimmen und die Installation
abbrechen wollen.
11. Im nächsten Fenster erhalten Sie Informationen über den Apache Web Server. Klicken Sie „Next“, nachdem Sie
alles gelesen haben.
12. Im nächsten Fenster wird Ihnen ein Zielpfad für das Programm vorgeschlagen. Sie können Sie den
vorgeschlagenen Zielpfad mit „Weiter“ bestätigen oder einen anderen Zielpfad auswählen.
13. Im nächsten Fenster werden verschiedene Setup-Typen vorgeschlagen. Ändern Sie nicht die voreingestellte
Einstellung „Typical“. Klicken Sie „Next“ an.
14. Nun wird ein Programmordner vorgeschlagen. Tragen Sie einen anderen Ordnernamen ein oder bestätigen Sie
den vorgeschlagenen Namen, indem Sie „Next“ anklicken.
7. Ihnen wird im nächsten Fenster nun mitgeteilt, dass die Installation des Apache Web Server nun abgeschlossen
werden kann. Entscheiden Sie, ob Sie die „Readme“ Datei sehen möchten. Aktivieren Sie dazu das
Kontrollkästchen. In der Readme Datei stehen Informationen zu dem Apache Web Server. Klicken Sie auf „Finish“.
15. Der nächste Dialog informiert Sie, dass nun Sie nun die Lizenzdateien (RSP) installiert werden. Sie werden
aufgefordert, die Lizenz-Diskette in Ihrem Diskettenlaufwerk einzulegen. Klicken Sie danach „OK“.
16. Es wird ein neues Fenster geöffnet. Sie haben die Wahl, ob Sie eine Standardversion oder eine Demoversion des
Programms installieren möchten. Die Demo-Version dient dazu, die Optionen zu testen, die Sie zusätzlich bei
Ihrem Händler erwerben können. Allerdings wird jede gescannte Datei und jeder Ausdruck mit einem Stempel
versehen. Nachdem Sie die Demo-Version getestet haben, können Sie Standard-Version (License.rsp) später
„überinstallieren“. Zur Installation der Lizenzdateien gehen Sie folgendermaßen vor: Oben im Fenster sehen Sie
ein kleines Suchsymbol.
Klicken Sie es an, um eine Dateiauswahl zu öffnen. Wählen Sie anschließend die neue Lizenz-Datei (*.rsp), die
sich auf Ihrer Diskette befindet, aus und bestätigen Sie die Auswahl mit „Öffnen“. Anschließend klicken Sie im
20 RW-470 PLOTBASE Installation

EINRICHTEN DES FTP-STANDARD VERZEICHNISSES
unteren Bereich des Fensters „Installieren“ an. Die Lizenzdateien werden automatisch in das richtige Verzeichnis
kopiert. Schließen Sie das Fenster.
17. Nun können Sie auch die Installation abschliessen. Klicken Sie dazu im nächsten Fenster „Finish“ an.
18. Konfigurieren Sie, soweit Sie es nicht bereits durchgeführt haben, den Internet Explorer, der für die Benutzung von
RW-470 PLOTCLIENT WEB benötigt wird.
Einrichten des FTP-Standard Verzeichnisses
Sie benötigen dieses FTP Default Verzeichnis als Spoolverzeichnis, wenn Sie mit dem ftp-Befehl Druckaufträge an RW470 PLOTBASE schicken wollen.
Diese Einstellungen sollten erst nach der Installation von RW-470 PLOTBASE und RW-470 SCANTOOL durchgeführt
werden. Gehen Sie folgendermaßen vor:
1. Klicken Sie auf dem Destop einmal „Arbeitsplatz“ an und öffnen Sie das Kontextmenü mit der rechten Maustaste.
Wählen Sie „Verwalten“.
2. Öffnen Sie das Verzeichnis „Dienste und Anwendungen“ durch Doppelklick. Öffnen Sie „Internet
Informationsdienste“. Wählen Sie dann „Standard FTP Site“ und öffnen Sie mit der rechten Maustaste das
Kontextmenü.
3. Wählen Sie „Eigenschaften“. Nun wird ein Fenster mit der Bezeichnung „Eigenschaften der Standard FTP Site“
geöffnet.
4. Wählen Sie die Karte „Basisverzeichnis“. Aktivieren Sie die Option „ einem Verzeichnis auf diesem Computer “. Im
Bereich „Verzeichnis der FTP-Site“ geben Sie den lokalen Pfad an. Klicken Sie dazu die Schaltfläche
„Durchsuchen“ an und wählen Sie das Verzeichnis „[Laufwerk]:\spool“. Aktivieren Sie die Option „schreiben“ und
im Bereich „Verzeichnisformat“ die Option „Unix“.
5. Bestätigen Sie alle Angaben mit „OK“.
Installation RW-470 WINPRINT
Der Windows Druckertreiber RW-470 WINPRINT dient dazu, Druckaufträge von anderen Windows-Programmen
aufnehmen zu können, um Sie als Auftrag an RW-470 PLOTBASE weiterzuleiten. Folgendermaßen installieren Sie
diesen Druckertreiber:
1. Öffnen Sie im Windows Explorer das Installationsverzeichnis \\<Server>\Tools\WINPRINT. Alternativ können Sie
dieses Verzeichnis auch auf der Installations-CD finden. Starten Sie die Datei „Setup.exe“. Das
Installationsprogramm startet.
2. Zunächst wird ein Informationsfenster geöffnet. Nachdem Sie alles gelesen haben, klicken Sie „Weiter“ an.
3. Im nächsten Fenster werden Sie aufgefordert, den vorgegebenen Portnamen durch Anklicken von „OK“ zu
bestätigen oder einen anderen Namen einzutragen.
4. Bestägigen Sie den „Druckernamen“, d.h. Namen des Druckertreibers.
5. Bestätigen Sie im nächsten Fenster den Freigabenamen des Druckertreibers.
6. Stellen Sie fest, welche Betriebssysteme auf den Client-Rechnern installiert sind, die mit Hilfe von RW-470
WINPRINT drucken möchten. Sofern es auch Windows 95, 98 oder ME sind, klicken Sie „Ja“ an und bestätigen
die Eingabe mit „Weiter“.
7. Sofern eines der zuvor genannten Betriebssysteme (Windows 95, 98 oder ME) benutzt wird, werden noch Dateien
benötigt, die auf Ihrem Rechner möglicherweise noch nicht installiert sind. Legen Sie in diesem Falle die
entsprechende Installations-CD von Windows ein oder geben Sie einen entsprechenden Pfad an, wenn Sie die
Installationsdaten auf einem hausinternen Server liegen haben.
8. Die Installation ist erfolgreich abgeschlossen.
9. Öffnen Sie nun mit „Start – Einstellungen – Drucker“ einen Dialog, um den Spoolpfad zu bestätigen.
10. Wählen Sie den Druckertreiber RW-470 WINPRINT.
11. Wählen Sie im Kontextmenü (rechte Maustaste) „Eigenschaften“. Öffnen Sie die Karte „Anschlüsse“.
12. Öffnen Sie das folgende Fenster mit „Konfigurieren“ und bestätigen Sie den Spoolpfad. Der Pfad c:\spool\cfg ist
voreingestellt. Wenn Sie das Spoolverzeichnis des RW-470 PLOTBASE auf einem anderen Laufwerk installiert
haben, ändern Sie es.
RW-470 PLOTBASE Installation 21

INSTALLATION RW-470 PLOTCLIENT WIN AUF EINEM WINDOWS RECHNER
III. Installation der Clients auf den Arbeitsplatzrechnern
Installation RW-470 PLOTCLIENT WIN auf einem Windows Rechner
In diesem Kapitel lesen Sie, welche Systemvoraussetzungen erfüllt sein müssen und wie Sie zur Installation vorgehen.
Systemvoraussetzungen
Lesen Sie sich die nachfolgenden Empfehlungen aufmerksam durch. Sie können sehr hilfreich dabei sein, die optimale
Hardware für Ihre Bedürfnisse zu finden.
• Betriebssystem
Windows NT 4.0, Windows 95/98/ME oder Windows 2000. Für Windows 2000 empfehlen wir Service Pack 1 zu
installieren. Sie können gerne auch eine höhere Service Pack Version nehmen, doch sollten Sie wieder zu Service Pack
1 zurückwechseln, falls es mit den höheren Versionen zu Problemen kommen sollte
• Netzwerk/Konfiguration:
10/100 Base T Ethernet, TCP/IP Konfiguration ist erforderlich
• Prozessor
Pentium II
• Systemspeicher
empfohlen mindestens 64 MB RAM.
• Festplatte
Jede Festplatte größer 500 MB.
• Monitor
Mindestauflösung 1024 x 768 Pixel
Installation
Zur Installation gehen Sie bitte wie folgt vor:
1. Starten Sie für die Installation Windows als Benutzer mit Administrator-Rechten und öffnen Sie den Windows
Explorer.
2. Falls Windows bereits [mit Administrator-Rechten] gestartet war, beenden Sie alle laufenden Programme bzw.
nehmen Sie eine Sicherung der Datenbestände vor.
3. Öffnen Sie im Windows Explorer das Installationsverzeichnis \\<Server>\Tools\PLOTCLIENT_WIN. Alternativ
können Sie dieses Verzeichnis auch auf der Installations-CD finden.
4. Starten Sie die Datei SETUP.EXE.
5. Wählen Sie die SETUP-Sprache aus, und klicken Sie auf OK.
6. Klicken Sie auf WEITER.
7. Klicken Sie auf JA, wenn Sie dem Lizenzvertrag zustimmen. Klicken Sie auf NEIN, wenn Sie nicht zustimmen und
die Installation abbrechen wollen.
8. Beantworten Sie die Frage zur Readme-Datei, und klicken Sie auf WEITER.
9. Klicken Sie auf WEITER, um den Zielordner zu bestätigen, in welchem der RW-470 PLOTCLIENT WIN installiert
werden soll.
10. Klicken Sie auf WEITER, um den Programmordner ungeändert bzw. geändert zu bestätigen.
11. Legen Sie das SSL-Spool-Verzeichnis fest. Als Standard ist das Verzeichnis
\\<Server>\Spool\SSL
vorgegeben. Klicken Sie WEITER an.
12. Der RW-470 PLOTCLIENT WIN wird installiert. Beenden Sie das Installationsprogramm mit „Beenden“.
Installation des RW-470 WINPRINT als Netzwerkdrucker
Bevor Sie den RW-470 WINPRINT nutzen können, müssen Sie ihn auf Ihrem Client-Rechner als „Netzwerkdrucker“
installieren, genau so wie es bereits von ihren anderen Druckern in Ihrer Firma kennen.
Um den RW-470 WINPRINT als Netzwerkdrucker zu installieren, gehen Sie wie folgt vor:
1. Öffnen Sie das Fenster „Drucker“ über „Start – Einstellungen – Drucker“.
2. Klicken Sie auf „Neuer Drucker“.
3. Wählen Sie die Option „Druck-Server im Netzwerk“ und klicken Sie auf „Weiter“.
4. Geben Sie den Druckernamen inkusive vollständiger Netzwerkpfadangabe des Server PCs ein, auf dem RW-470
PLOTBASE läuft, oder wählen Sie den WINPRINT direkt aus der untenstehenden Liste aller freigegebenen Drucker
aus.
22 RW-470 PLOTBASE Installation
 Loading...