

OPERATOR'S MANUAL <BASIC FEATURES> 3740NF/9940NF

Read this manual carefully before you use this product and keep it handy for future reference. For safety, please follow the instructions in this manual.
SUPPLIES
CAUTION : Savin shall not be responsible for any damage or expense that may result from the use of parts other than recommended parts.
SAVIN CORPORATION
Type for Savin 3740/9940
Printed in China (S1404) UE(USA) H535-8630
How to Read this Manual
How to Read this Manual
Symbols
In this manual, the following symbols are used:
A WARNING:
This symbol indicates a potentially hazardous situation that might result in death or serious injury when you misuse the machine without following the instructions under this symbol. Be sure to read the instructions, all of which are described in the Safety Information section in the Advanced Features manual.
This symbol indicates a potentially hazardous situation that might result in minor or moderate injury or property damage that does not involve personal injury when you misuse the machine without following the instructions under this symbol. Be sure to read the instructions, all of which are described in the Safety Information section in the Advanced Features manual.
* The statements above are notes for your safety.
∰Important
If this instruction is not followed, paper might be misfed, originals might be damaged, or data might be lost. Be sure to read this.
Preparation
This symbol indicates the prior knowledge or preparations required before operating.
🖉 Note
This symbol indicates precautions for operation, or actions to take after misoperation.
This symbol indicates numerical limits, functions that cannot be used together, or conditions in which a particular function cannot be used.
This symbol indicates a reference.
Keys built into the machine's operation panel.
TABLE OF CONTENTS
| Manuals for this machine | 1 |
|---|---|
| Basic Features (This Manual) | 1 |
| Advanced Features | 1 |
1. Introduction
| Part Names | 3 |
|---|---|
| Operation Panel | 5 |
| Symbols and Conventions Used in This Manual | 8 |
2. Faxing
| Transmission Modes | . 9 |
|---|---|
| Suitable Document Types | 10 |
|
Memory Transmission and Immediate Transmission
Memory Transmission Canceling a Memory Transmission Immediate Transmission Canceling an Immediate Transmission |
11
13 14 15 |
|
Very Fine Detail Faxing
Resolution |
16
16 |
|
Dialing
Entering Numbers Directly Entering Pauses Switching to Tone Signals Using Quick Dial Using Speed Dial Using Groups |
17
18 18 18 19 20 |
|
Reception Modes
How to Select the Reception Mode |
22
22 |
3.Setup
| Initial Settings24Storing and Editing Fax Numbers27Storing Quick Dial Numbers27Editing Quick Dial Numbers29Deleting Quick Dial Numbers30Printing a Quick Dial Key Label31Quick Dial Key Labels32Storing Speed Dial Numbers33Editing Speed Dial Numbers34Deleting Speed Dial Numbers36Storing and Editing a Group of Fax Numbers37Storing a Group of Fax Numbers37Editing a Group40 | Initial Settings and Adjustments | 23 |
|---|---|---|
| Storing and Editing Fax Numbers.27Storing Quick Dial Numbers27Editing Quick Dial Numbers29Deleting Quick Dial Numbers30Printing a Quick Dial Key Label.31Quick Dial Key Labels32Storing Speed Dial Numbers33Editing Speed Dial Numbers34Deleting Speed Dial Numbers36Storing and Editing a Group of Fax Numbers37Storing a Group of Fax Numbers37Editing a Group40 | Initial Settings | 24 |
| Storing Quick Dial Numbers27Editing Quick Dial Numbers29Deleting Quick Dial Numbers30Printing a Quick Dial Key Label31Quick Dial Key Labels32Storing Speed Dial Numbers33Editing Speed Dial Numbers34Deleting Speed Dial Numbers36Storing and Editing a Group of Fax Numbers37Storing a Group of Fax Numbers37Editing a Group40 | Storing and Editing Fax Numbers | 27 |
| Editing Quick Dial Numbers29Deleting Quick Dial Numbers30Printing a Quick Dial Key Label.31Quick Dial Key Labels32Storing Speed Dial Numbers33Editing Speed Dial Numbers34Deleting Speed Dial Numbers36Storing and Editing a Group of Fax Numbers37Storing a Group of Fax Numbers37Editing a Group40 | Storing Quick Dial Numbers | 27 |
| Deleting Quick Dial Numbers30Printing a Quick Dial Key Label.31Quick Dial Key Labels32Storing Speed Dial Numbers33Editing Speed Dial Numbers34Deleting Speed Dial Numbers36Storing and Editing a Group of Fax Numbers37Storing a Group of Fax Numbers37Editing a Group40 | Editing Quick Dial Numbers | 29 |
| Printing a Quick Dial Key Label. 31 Quick Dial Key Labels 32 Storing Speed Dial Numbers 33 Editing Speed Dial Numbers 34 Deleting Speed Dial Numbers 36 Storing and Editing a Group of Fax Numbers 37 Storing a Group of Fax Numbers 37 Editing a Group 40 | Deleting Quick Dial Numbers | 30 |
| Quick Dial Key Labels 32 Storing Speed Dial Numbers 33 Editing Speed Dial Numbers 34 Deleting Speed Dial Numbers 36 Storing and Editing a Group of Fax Numbers 37 Storing a Group of Fax Numbers 37 Editing a Group 40 | Printing a Quick Dial Key Label | 31 |
| Storing Speed Dial Numbers 33 Editing Speed Dial Numbers 34 Deleting Speed Dial Numbers 36 Storing and Editing a Group of Fax Numbers 37 Storing a Group of Fax Numbers 37 Editing a Group 40 | Quick Dial Key Labels | 32 |
| Editing Speed Dial Numbers 34 Deleting Speed Dial Numbers 36 Storing and Editing a Group of Fax Numbers 37 Storing a Group of Fax Numbers 37 Editing a Group 40 | Storing Speed Dial Numbers | 33 |
| Deleting Speed Dial Numbers 36 Storing and Editing a Group of Fax Numbers 37 Storing a Group of Fax Numbers 37 Editing a Group 40 | Editing Speed Dial Numbers | 34 |
| Storing and Editing a Group of Fax Numbers 37 Storing a Group of Fax Numbers 37 Editing a Group 40 | Deleting Speed Dial Numbers | 36 |
| Storing a Group of Fax Numbers | Storing and Editing a Group of Fax Numbers | 37 |
| Editing a Group | Storing a Group of Fax Numbers | 37 |
| Editing a Group | 40 | |
| Deleting a Group 43 | Deleting a Group | 43 |
| Entering Characters | Entering Characters | 46 |
| Entering Symbols | Entering Symbols | 46 |
| Wild Card 46 | Wild Card | 46 |
4. Troubleshooting
| Adjusting the Volume and Sounds the Machine Makes 51 | 1 |
|---|---|
| Adjusting the volume and obunds the machine makes initiation of | ~ |
| If an Indicator Lights on the Operation Panel | 3 |
| Communication Problems 54 | 4 |
| Clearing a Document Jam 55 | 5 |
| Clearing a Copy, Fax, or Print Jam 56 | 6 |
| Print Delivery Tray | 6 |
| Inside the Machine 56 | 6 |
| Cassette Entrance 57 | 7 |
| Upper Rear Unit 58 | 8 |
| Error Messages | 0 |
| Solutions to Common Problems 62 | 2 |
5. Appendix
| Options | 67 |
|---|---|
| INDEX | 68 |
Manuals for this machine
This machine is provided with a Basic Features manual and an Advanced Features manual. Please consult the manual that suits your needs.
Basic Features (This Manual)
The Basic Features manual explains the most frequently used fax functions and operations.
Advanced Features
The Advanced Features manual describes more advanced functions, and also explains settings for key operators.
Chapter 1 Transmission Options
Explains transmission features such as scheduling transmission for a specific time, setting personal codes, sending confidential documents; and storing documents for pick-up by polling transmission.
Chapter 2 Communication Information
Explains how to obtain information about stored documents, confidential documents, and memory-locked documents; explains how to print the Journal.
Chapter 3 Other Transmission Features
Discusses special dialing features, switching between G3 and G4 communication; and explains advanced transmission features such as broadcasting and batch transmission.
Chapter 4 Reception Features
Explains various reception features. You can find out about receiving documents in telephone mode, and printing two pages of received documents on one page.
Chapter 5 Copying
Read this chapter when you would like to know about copying operations and functions.
Chapter 6 Facsimile User Tools
Explains about programming frequently used functions for Quick Dial Key and User Function Key.
Chapter 7 Key Operator Settings
Explains a variety of settings that can be made by the fax machine's key operator to control and monitor usage of the machine. You can find out about setting up the phone line type, and how to store the Memory Locked ID and the Confidential ID.
Chapter 8 Troubleshooting
Discusses troubleshooting topics such as printing the help list, clearing jams, and reading reports.
Chapter 9 Maintaining Your Machine
Explains about loading paper in the optional bypass feeder, cleaning the rollers and scanner and so on.
Chapter 10 Installation
Explains installation considerations, connection to a telephone line, and connecting the power.
Chapter 11 Appendix
Lists specifications and the machine's advanced communication features.
1. Introduction
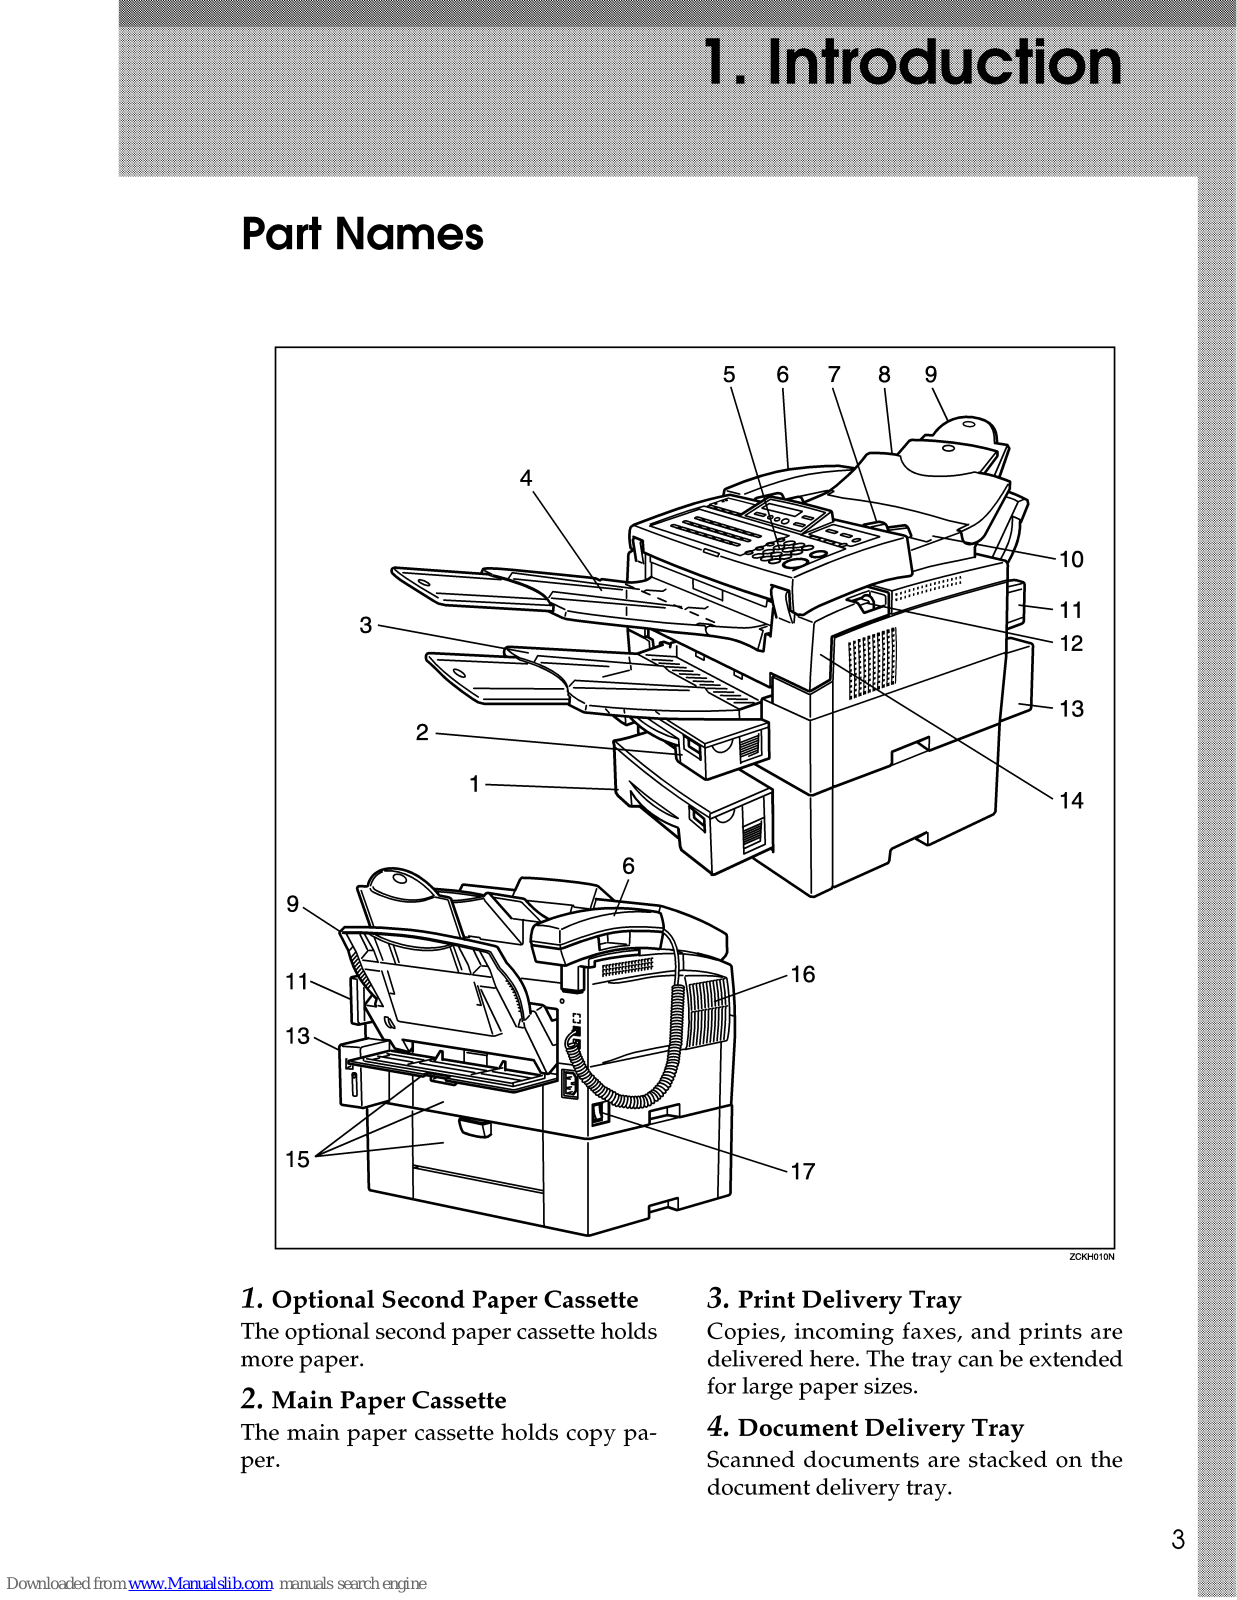
Part Names

1. Optional Second Paper Cassette
The optional second paper cassette holds more paper.
2. Main Paper Cassette
The main paper cassette holds copy paper.
3. Print Delivery Tray
Copies, incoming faxes, and prints are delivered here. The tray can be extended for large paper sizes.
4. Document Delivery Tray
Scanned documents are stacked on the document delivery tray.
5. Operation Panel
Key panel for operating the machine.
6. Optional Handset
7. Document Guide
Match the document guide to the size of your original documents.
8. Document Table
Document table holds up to 50 sheets which are fed one at a time. Place your original documents here.
9. Optional Bypass Feeder
Expands paper delivery capability to handle A4, Legal and F4 sizes.
10. Auto Document Feeder (ADF)
Set multi-page documents here to have them automatically scanned in one page at a time.
11. Memory Card Cover
Protects the machines optional memory card.
12. Front Cover Release Lever
Pull this lever to release the front cover.
13. G4 Interface Unit
Allows the fax machine to be connected for G4 (ISDN) communication.
14. Front Cover
15. Rear Covers
16. Ventilation Port
Provides ventilation for internal parts of the machine in order to prevent overheating.
17. Main Switch
The main switch turns your machine on and off.
Operation Panel

1. Add Toner indicator
Blinks when toner is about to run out and lights continuously when toner has run out.
2. Add Paper indicator
Lights when a cassette is empty or the paper cassette is not fully inserted.
3. Receive File indicator
Lights when an incoming document is received into memory, and flashes when confidential or memory-locked document is received. (See P.53 "If an Indicator Lights on the Operation Panel" ).
4. User Function keys
There are four User Function keys.
Four User Function keys are provided to store frequently used functions and operations.
The following functions are registered by default:
| Key | Function |
|---|---|
| F1 | Prints a transmission management report. |
| F2 |
Initiates entry of an E-mail ad-
dress. |
| F3 |
Immediately checks for and re-
ceives any incoming E-mail. |
| F4 | Switches stamping off/on. |
5. [Resolution] key
Selects the scanning resolution or the halftone scanning mode. When the Detail mode, Fine mode, or Halftone mode is selected, the corresponding indicator lights. Standard mode is selected when no indicator is lit.
The Detail and Fine modes offer progressively higher scanning resolutions. The Halftone mode is used for faxing photographs or drawings that contain halftones.
61
6. [User Tools] key
Press to access User Tool Settings and customize various functions.
7. [Cancel] key
Press when you want to cancel an operation or return to the previous display.
8. Control panel display
Guides you through tasks and informs you of the status of the machine. Messages appear here.
9. Scroll Keys
Use these keys to move the cursor in the display, or to change the display.
10. [OK] key
Press to answer "Yes" to a question displayed on the display.
11. [Job Information] key
Press to search for information on a specific job.
12. [Trans. Option] key
Press to change the transmission option settings. The indicator lights when option settings are changed.
13. [Reception Mode] key
Press to select the reception mode. When the Manual Receive indicator is on, Manual Receive is selected.
14. [Help] key
Press the Help key when you want to print a help list.
15. [G4] key
When the optional G4 unit is installed, press to select G3 or G4 mode. When the indicator is lit, G4 is selected.
16. [Memory] key
Press to select Immediate Transmission. When the Memory indicator is not lit, Immediate Transmission is selected, and when the indicator is lit, Memory Transmission is selected.
17. [Quick Dial] keys
There are 30 Quick Dial keys. Use them to store individual fax numbers (see P.27 "Storing and Editing Fax Numbers" ), or to enter characters (see P.46 "Entering Characters" ). In addition, you can use the Quick Dial keys to register functions such as groups, programs, and auto documents.
You can select either a QWERTY key board layout (as shown in the illustration) or an ABC layout. See Chapter 7, "Key Layout" in the Advanced Features manual.
When attaching the Quick Dial label, make sure you remove the Quick Dial cover (transparent).
18. Status Indicators
These indicators keep you informed about the current status of the unit.
• \ Alarm
When the alarm indicator flashes, check the display and read the message to identify a problem (such as paper jam or open cover).
• $Communicating Lights during fax transmission or reception.
19. [Pause/Redial] key
Inserts a pause when you are dialing or storing a fax number, or redials the last number dialed when pressed by itself. (The redial feature does not work once you have started dialing a new number.)
20. [On Hook Dial] key
Press to dial a phone call from the keypad without lifting the external telephone or taking the handset off the hook (if the machine is equipped with the optional telephone or handset).
21. [Clear] key
Press to delete the last character or digit entered, or press () or (>) to move the cursor, and then press the [Clear] key to delete whatever is at the cursor.
22. [Speed Dial/Tel Directory] key
Press when you want to use the Speed Dial or Telephone Directory feature.
23. [X] (Tone) key
If your telephone line uses pulse dialing, press this button to switch temporarily to tone dialing if you want to use telephone services that utilize telephone touch tones.
24. Number keys
Use the number keys to dial fax numbers, to enter the number of copies, and so forth.
25. [Energy Saver/ Dear Modes] key
Energy Saver: Hold down for 2 seconds to select or deselect energy saver mode. When the machine is not used or no data is received for a fixed period, the machine goes into energy saver mode automatically.
Clear Modes: Press to clear any selected settings and return the machine to its previous condition.
26. [Copy] key
Press to copy the document currently loaded in the feeder.
27. [Stop] key
Stops transmissions or document scanning, reception, and long copy runs. The machine finishes printing out the current page, then stops.
28. [Start] key
Press to start transmission, copy operation, or output of reports.
Symbols and Conventions Used in This Manual
Documents:
A document is anything you put on the document table of your machine, whether you are faxing it or copying it.
Prints:
A print is anything that comes out of the machine, whether: a received fax or a copy you made.
Procedures:
Procedures are described step by step. Perform them in order. When you see a display, it always shows what comes after performing the step it accompanies. Other illustrations accompanying steps help you find the right key or handle, or show you how to perform the step. 1 This is a step in a procedure.
THIS CORRESPONDS TO THE PANEL DISPLAY.
2. Faxing
Transmission Modes
There are two types of transmission.
Memory Transmission
When a fax document is stored in memory, then transmission starts automatically.
It is convenient when you would like to take documents back in a hurry. You can send the same message to more than one destination in a single operation. This technique is referred to as Broadcasting.

Immediate Transmission
The machine dials immediately, and transmits the fax while scanning. It is convenient when you would like to send a document immediately, and would like to check whether you have successfully connected with the other party's fax machine. A fax document is not stored in memory.

∰Important
If there is a power failure, the power switch is turned off, or the plug is pulled out for more than 1 hour, all documents stored in memory are deleted. As soon as power is restored, the Power Failure Report is printed to help you identify deleted documents. See Chapter 8 "Power Failure Report" in the Advanced Features manual.
🖉 Note
Using the Internet Fax feature of your fax machine, you can also scan documents and send them over the Internet as E-mail, as well as receive document images sent as E-mail by another Internet Fax machine or PC. See the NIC FAX KIT manual for details.
Suitable Document Types
Never load damaged originals in the ADF (Auto Document Feeder) for scanning. Always check the stack of originals before loading.
- Always check the sheets and remove staples, pins, paper clips, or any other type of fasteners.
- If the sheets are curled or folded. flatten them.
- Separate all the sheets to ensure that they will not jam or double feed during scanning.
- If the sheets are heavily creased, torn, punched with holes for binding, or patched together with tape, make copies and then load the copies in the ADF.
- Before loading a stack of originals, make sure that they are all the same size. Do not mix sheets of different sizes.
- Before loading a stack of originals, always fan them to remove static cling.
- To protect fragile or legal documents from damage due to document jams, copy such documents and then load the copies for scanning.
雅Important
-
□ Never place the following types of originals in the ADF:
- Sheets marked with crayon, paint, charcoal, or soft pencil.
- Sheets pasted up with tape or glue.
- Specially treated paper, including thermal paper, OHP sheets, vinyl sheets or film, waxed paper, carbon paper, deed paper, or paper treated with silicone oil
- Paper that is not perfectly dry. If documents have ink or correction fluid that is still wet, all them to dry thoroughly before loading them into the ADF.
Memory Transmission and Immediate Transmission
Memory Transmission
Memory Transmission is convenient because:
- Fax documents can be scanned much more quickly. Your scanned document is stored in the memory, and then sent automatically, meaning you do not have to wait for your document to send.
- While your fax document is being sent, another user can operate the machine (people do not have to wait long to use the fax machine).
- You can send the same document to more than one place with the same operation.
- There are two kinds of Memory Transmission: Parallel and Normal. Parallel Memory Transmission is the default. See Chapter 3, "Parallel Memory Transmission" in the Advanced Features manual.
If 0% is displayed, you cannot perform Memory Transmission. Send your document using Immediate Transmission.
🖉 Note
□ If your document jams while it is being scanned, press the [Stop] key, and then refer to P.55 "Clearing a Document Jam" for instructions on how to safely remove the original.
See Chapter 2, "Transmission" in the NIC FAX KIT manual for how to scan and send documents as Email.
1 Make sure that the machine is in standby mode.
The display should look like this:

Note 🖉
- If the display is blank, press the [Energy Saver] key to exit Energy Saving mode.
- 2 Fan your document stack (maximum: 50 pages, 20 lb) to make sure all pages are loose, and then tap the edges to square the stack.

All pages set in the feeder must be of the same size.
3 Insert the document facedown into the feeder until the machine beeps. Then adjust the guides to match the width of the document.

🖉 Note
- You can dial before you set the document. Place the document after you dial the number and go to step 2.
- Set your document straight in the feeder. If you set more than 15 sheets, make sure the leading ends of the documents are even.

4 The display will look like this:
Ready 100% 02:39PM Enter Fax Number
5 If the memory indicator is not lit, press the [Memory] key.
6 Dial the number in one of the following ways.

- *1 In this example, Group Dial is programmed in Quick Dial 08.
- *2 In this example, the [F4] key is programmed as the Group key, and Group dial number 1 is programmed.
Note 🖉
- If you want to erase a digit of the phone number, press the [Clear] key.
- The number of pages that you can store in memory depends on the original document images and the scan settings. You can store up to 160 standard pages (ITU-T No.1 chart, Resolution: Standard, halftone mode: off).
✓ Reference
Programming Quick Dial: see P.27 "Quick Dials".
Programming Speed Dial: see P.27 "Speed Dials".
Programming Group Dial: see P.37 "Storing and Editing a Group of Fax Numbers"
Programming Group key: see P.37 "Programming groups in the {Group} key"
Press the [OK] key to enter another fax number.
Dest.2 OK to Add 9876543210_ ########## ##
🖉 Note
- □ Repeat steps ① and ② until all destinations are entered.
- □ If you enter only one destination, press the [Start] key.
- □ The machine stores your message and dials the first number (or, if you selected Send Later, it will return to standby mode and the fax document will be sent at the time that you selected).
Press the [Start] key.
The machine dials the other party's number.
0123456789 File No.001 P.001
🖉 Note
- □ If the other party's line is busy, your machine will redial.
- If the other party's fax machine answers, both machines connect and your machine sends the document. The other party's Own Name or Own Fax Number appears on the upper line.
- □ If your line goes through a local switchboard (a PBX) remember to dial the exit code. Press the [Pause] key immediately after the code. If the number includes a country code, press the [Pause] key after the country code, and then dial the rest of the number. Pauses are displayed as a dash (-) on the display.
The File number. is used for managing documents in memory, and is required when canceling transmission of a document or printing out its contents.
Canceling a Memory Transmission
Before the [Start] key is pressed
Press the [Stop] key or [Clear Modes] key, or remove the document set in the feeder.
While the document is being scanned in
Press the [Stop] key.
All parts of the document that have been scanned in are cleared.
Confirm and press the [OK] key.
During transmission
Confirm the destination.
The destination name or fax number for the current transmission is displayed.
Press the [Stop] key.
Cancel Trans.? 41/20K [Yes] No
Confirm and press the [OK] key.
Transmission is canceled.
While the document is awaiting transmission
Pages already being sent to the destination cannot be canceled, even if you cancel the transmission. The transmission may be sent before you can cancel it, even if you start canceling the transmission before it is fully sent.
Press the [Job Information] key, and confirm that "1. Cancel TX/ RX" is displayed.

2 Press the [OK] key.

B Display the file you want to delete.
Enter the file number with the number keys, or search using ④ or ⑤.
If you are unable to find the file, it has already been sent.
Cancel File? ₩/OK NO.005
4 If the document you want to delete is displayed, press the [OK] key.
Cancel? 4 ⊮∠OK [Yes] No
5 Confirm and press the [OK] key.
Trans.Cancelled File Deleted
Immediate Transmission
Immediate Transmission is convenient when:
- You wish to send a document immediately as it is scanning.
- You wish to quickly check whether you have successfully connected with the other party's fax machine.
- Your machine's memory is getting full.
The machine dials immediately after you press the [Start] key. The message is scanned and transmitted page by page without being stored in memory.
🖉 Note
- You can only specify one destination for Immediate Transmission.
- 1 Make sure that the machine is in standby mode.
The display should look like this:

Note 🖉
- □ The Memory indicator should be out. If the Memory indicator is lit, press the [Memory] key.
- 2 Place the document facedown in the feeder.

Note 🖉
- Do not load more than 50 pages into the feeder at one time.
- You can set the document at any point up until you press the [Start] key.
B Dial the other party's number.
| Dest. | Pr | 1833 | Start |
|---|---|---|---|
| 012345678 | 39. |
If you want to erase a digit of the number, press the [Clear] key and enter the correct number.
4 Press the [Start] key.
0123456789 Dialin≋...
The machine dials and connects to the other party's machine. The number that you dialed and the other party's Own Name or Own Fax Number is displayed.
After the transmission, the machine returns to standby mode.
🖉 Note
If you install the optional handset or an external telephone, you can send the document manually. Simply pick up the handset and dial.
Canceling an Immediate Transmission
Before the [Start] key is pressed
Press the [Stop] key or [Clear Modes] key.
4
If a document is set in the feeder, remove it.
While dialing or during transmission
Press the [Stop] key.
However, the part that has already been scanned is sent to the other party. After you have canceled the transmission, remove the document from the feeder.
Very Fine Detail Faxing
To ensure that text, diagrams and images stand out clearly in your document, the machine automatically detects the image density and makes adjustments.
However, if you need to send a document which requires optimum clarity, select the resolution setting appropriate to your needs.
You can select different settings for each page of your document. Simply change the settings for page 2 while page 1 is being scanned.
□ High resolution images and text are scanned into the machine. If the other party's machine does not support the resolution at which you are sending, this machine automatically switches to a resolution supported by the other party's machine. This machine can send documents in Standard, Detail, and Fine resolution. It can receive documents in Standard and Detail resolution.
Resolution
The [Resolution] key gives you control over document quality. The indicators above the button show the current setting. Choose a setting that matches your document.
Standard:
Standard quality. Use for most printed or typewritten documents. This is selected when the other resolution indicators are not lit.
Detail :
High quality. Use for documents with small print or fine details. Detail resolution is twice the clarity of Standard resolution.
♦ Fine :
Very high quality. Use this for high quality reproduction. Fine resolution is four times the clarity of Standard resolution.
Halftone:
Use this for optimum quality if your document contains photographs or diagrams with complex shading patterns or gray tones. If you choose this setting, resolution will automatically be Detail.
Note
- □ You can confirm the resolution for previously sent documents in the Īournal.
- □ Faxing at a higher resolution requires more time. Frequent use of high resolution could cause an increase in your phone bill, especially for long distance transmissions.
- □ There are two methods for sending documents that contain photographic images - Image priority and Speed priority. If you select Speed priority, you can send your image faster, but the quality of the image may be inferior to when sending with Image priority. See Chapter 7, "User Parameters" (switch 10, bit 7) in the Advanced Features manual.
Dialing
The number keys, Quick Dial, Speed Dial, and Group dial can all be used for dialing.
Entering Numbers Directly
Enter numbers directly using the number keys (1234567890*#) on the right side of the operation panel. Press the [Pause] key or [X] (Tone) key to enter a pause or tone.
🖉 Note
- Maximum length of a fax number: 254 digits.
- Maximum number of documents that can be stored for Memory Transmission: 100
- Maximum number of destinations per Memory Transmission: 140
- The combined total number of destinations that can be stored is 300. However, only 197 destinations can be specified if all of the destinations specified are different.
- The maximum destinations you can specify with the number keys is 67. However, this limitation is subject to memory capacity.
When sending documents as Email, see Chapter 2, "Transmission" in the NIC FAX KIT manual for how to enter E-mail addresses.
Make sure that the machine is in standby mode.
2 Carefully place your document into the document table and select any settings you require.

Enter the number with the number keys.
🖉 Note
- □ The number you entered appears in the display.
- □ If you want to enter another destination, press the [OK] key and repeat step B above.
- □ If you make a mistake, press the [Clear] key and try again.
- You can enter a pause, tone, or dial options.
Pause: see P.18 "Entering Pauses".
Tone: see Chapter 3, "Tone Signals" in the Advanced Features manual.
4 Press the [Start] key.
| 01234 | 56789 | |
|---|---|---|
| File | No.001 | P.001 |
Limitations when dialing with the number keys:
- Destinations entered with the number keys are stored in the machine's internal memory (separate to document storage memory) until they have finished sending. You can store up to 67 destinations for Memory Transmission (including Polling Reception), Transfer Stations and End Receivers when making Transfer Requests, and Groups. (Quick Dials and Speed Dials are not included.) Example: If 60 destinations have already been registered with the number keys for Groups, you can register another 7 destinations for Memory Transmission with the number keys.
- The remaining memory for storing documents appears in the display. Because destinations are stored in a different memory, the remaining memory in the display does not change when you store new destinations.
Entering Pauses
When dialing an outside line through a PBX, you must enter a number, such as "0", at the beginning of the number, and it may take a moment after you have dialed the number before a connection is made to an outside line. If this occurs, enter a pause after the "0". If you enter a pause, a 2-second pause is inserted before the outside number is dialed.
🖉 Note
- □ A pause is shown as a "-" character on the display.
- You can enter a pause in numbers stored in Quick Dials and Speed Dials.
□ You cannot enter a pause at the beginning of a fax number
Switching to Tone Signals
This feature allows a machine connected to a pulse dialing line to send tone signals (for example if you want to use a special service on a tone dialing line). For details on basic services, please contact your service representative. This feature is not necessary with a Tone dialing line. See Chapter 3, "Tone Signals" in the Advanced Features manual.
Using Quick Dial
You can specify destinations simply be pressing the Quick Dial.
You must program the destination's fax number in a Quick Dial beforehand.
Additionally, you can store a name for the destination in Quick Dials.
🖉 Note
- □ To store, edit, or delete a Quick Dial, see P.27 "Storing and Editing Fax Numbers" .
- To check the contents of all Quick Dials, print the Quick Dial list. See Chapter 6, "Lists You Can Print Out Yourself" in the Advanced Features manual.
When sending documents as Email, see Chapter 2, "Transmission" in the NIC FAX KIT manual for how to enter E-mail addresses.
Make sure that the machine is in standby mode.
2 Carefully place your fax document into the auto document feeder and select any settings you require.
Ready 100% 02:39PM Enter Fax Number
B Press the Quick Dial that is programmed with the destination.
Dest.1 OK to Add 1001 ABC COMPANY
🖉 Note
- When a name is stored for the destination, the name is displayed, and when no name is stored, the fax number is displayed.
- □ If you want to enter another destination, press the [OK] key and repeat step B above or enter a number manually.
- When dialing another destination using a Quick Dial, you do not need to press the [OK] key.
- □ If you make a mistake, press the [Stop] key, and the display will return to that in step 2 .
4 Press the [Start] key.

Using Speed Dial
You can specify destinations simply be pressing the [Speed Dial] key and a Speed Dial code (00 to 99).
You must store the destination's fax number in a Speed Dial beforehand. Additionally, you can store a name for the destination in Speed Dials.
🖉 Note
- □ To store, edit, or delete Speed Dial entries, see P.27 "Storing and Editing Fax Numbers" .
- To check the contents of all Speed Dials, print the Speed Dial list. See Chapter 6, "Lists You Can Print Out Yourself" in the Advanced Features manual.
When sending documents as Email, see Chapter 2, "Transmission" in the NIC FAX KIT manual for how to enter E-mail addresses.
- 1 Make sure that the machine is in standby mode.
- 2 Carefully place your fax document into the auto document feeder and select any settings you require.

Press the [Speed Dial] key.

Dest.1 OK to Add 800 DEF COMPANY
Note
- When a name is stored for the destination, the name is displayed, and when no name is stored, the fax number is displayed.
- If you want to enter another destination, press the [OK] key and repeat steps B and C above.
- □ If you make a mistake, press the [Stop] key, and the display will return to that in step 2 .
5 Press the [Start] key.

Using Groups
You can store multiple destinations as a single Group and simply specify a particular Group.
You must store the destinations' fax number in a Group beforehand.
Additionally, you can store destination names and a Group name in Groups.
Limitation
- Quick Dials programmed with Groups cannot be used for any other function.
- You cannot use Immediate Transmission to send Groups. You can only use Memory Transmission.
🖉 Note
- To store, edit, or delete Groups, see P.37 "Storing and Editing a Group of Fax Numbers".
-
To check the contents of all Groups, print the Group Dial list. See Chapter 6, "Lists You Can Print Out Yourself" in the Advanced Features manual. The method for specifying Groups differs according to the way they were programmed.
- When programmed in a Quick Dial: Press the Quick Dial.
- When not programmed in a Quick Dial: First, Program the Group function in a User Function key. When you want to specify a destination, press the Group key, and then press the Group number. (See Chapter 6, "User Function Keys" in the Advanced Features manual.)
- You can program the Group function in User Function keys [F1] to [F4]. (See Chapter 6, "User Function Keys" in the Advanced Features manual.)
When specifying a Group with a Quick Dial
Make sure that the Memory indicator is lit, and if it is not lit, press the [Memory] key to light it.
- 1 Make sure that the machine is in standby mode.
- 2 Carefully place your fax document into the auto document feeder and select any settings you require.


| Dest.1 | OK to | Add |
|---|---|---|
| 001:GP.D1 | GROUP | 1 |
🖉 Note
- □ If you want to specify another Group, press the [OK] key, and then repeat step B above.
- □ If you make a mistake, press the [Clear] key, and the display will return to that in step 2 .
Press the [Start] key.
Storinš...Memory 99% File No.001 P.001
When specifying a Group with the Group key
Confirm that the Memory indicator is not lit, and if it is not lit, press the [Memory] key to light it.
🖉 Note
- Before using the [Group] key, you must program the Group function in a User Function key. (See Chapter 6, "User Function Keys" in the Advanced Features manual.)
- 1 Make sure that the machine is in standby mode.
- 2 Carefully place your fax document into the auto document feeder and select any settings you require.
| Ready | 10 | 30% | 02 | :39 | ΡM |
|---|---|---|---|---|---|
| Enter | Fax | Nun | пре | ľ |
B Press the User Function key programmed with the Group function.

2
Enter the Group number (1 to 7) with the number keys.
Dest.1 OK to Add G1 GROUP 1
🖉 Note
- □ If you want to specify another Group, press the [OK] key, and then repeat step B above.
- □ If you make a mistake, press the [Clear] key, and the display will return to that in step 2 .
5 Press the [Start] key.
| Stori | nε. | Memor | У | 99% |
|---|---|---|---|---|
| File | NO. | 001 | P. | 001 |


 Loading...