

Page 1
Before You
Use This
Machine
Before you can send or receive fax messages,
please take about 30 minutes to set up your machine.
Set up your machine using the following procedures.
Keep going...
Page 2
R
WARNING:
• Disconnect the power plug (by pulling the plug, not
the cable) if the power cable or plug becomes frayed
or otherwise damaged.
• To avoid hazardous electric shock or laser radiation
exposure, do not remove any covers or screws other
than those specified in this manual.
• Turn off the power and disconnect the power plug (by
pulling the plug, not the cable) if any of the following
occurs:
• You spill something into the machine.
• You suspect that your machine needs service or re-
pair.
• The external housing of your machine has been dam-
aged.
• Disposal can take place at our authorized dealer.
R
CAUTION:
• Protect the machine from dampness or wet weather,
such as rain and snow.
• Do not allow paper clips, staples, or other small metallic objects to fall inside the machine.
1
• For environmental reasons, do not dispose of the machine or expended supply waste at household waste
collection points. Disposal can take place at an authorized dealer.
• The inside of the machine could be very hot. Do not
touch the parts with a label indicating the “hot surface”. Otherwise an injury might occur.
• Our products are engineered to meet high standards
of quality and functionality, and we recommend that
you use only the expendable supplies available at an
authorized dealer.
Preparing the
Toner Cassette
1
R
WARNING:
• Do not incinerate spilled toner or used toner. Toner
dust might ignite when exposed to an open flame.
• Dispose of the used toner cartridge in accordance with
the local regulations.
R
CAUTION:
• Keep toner (used or unused) and toner cartridge out
of the reach of children.
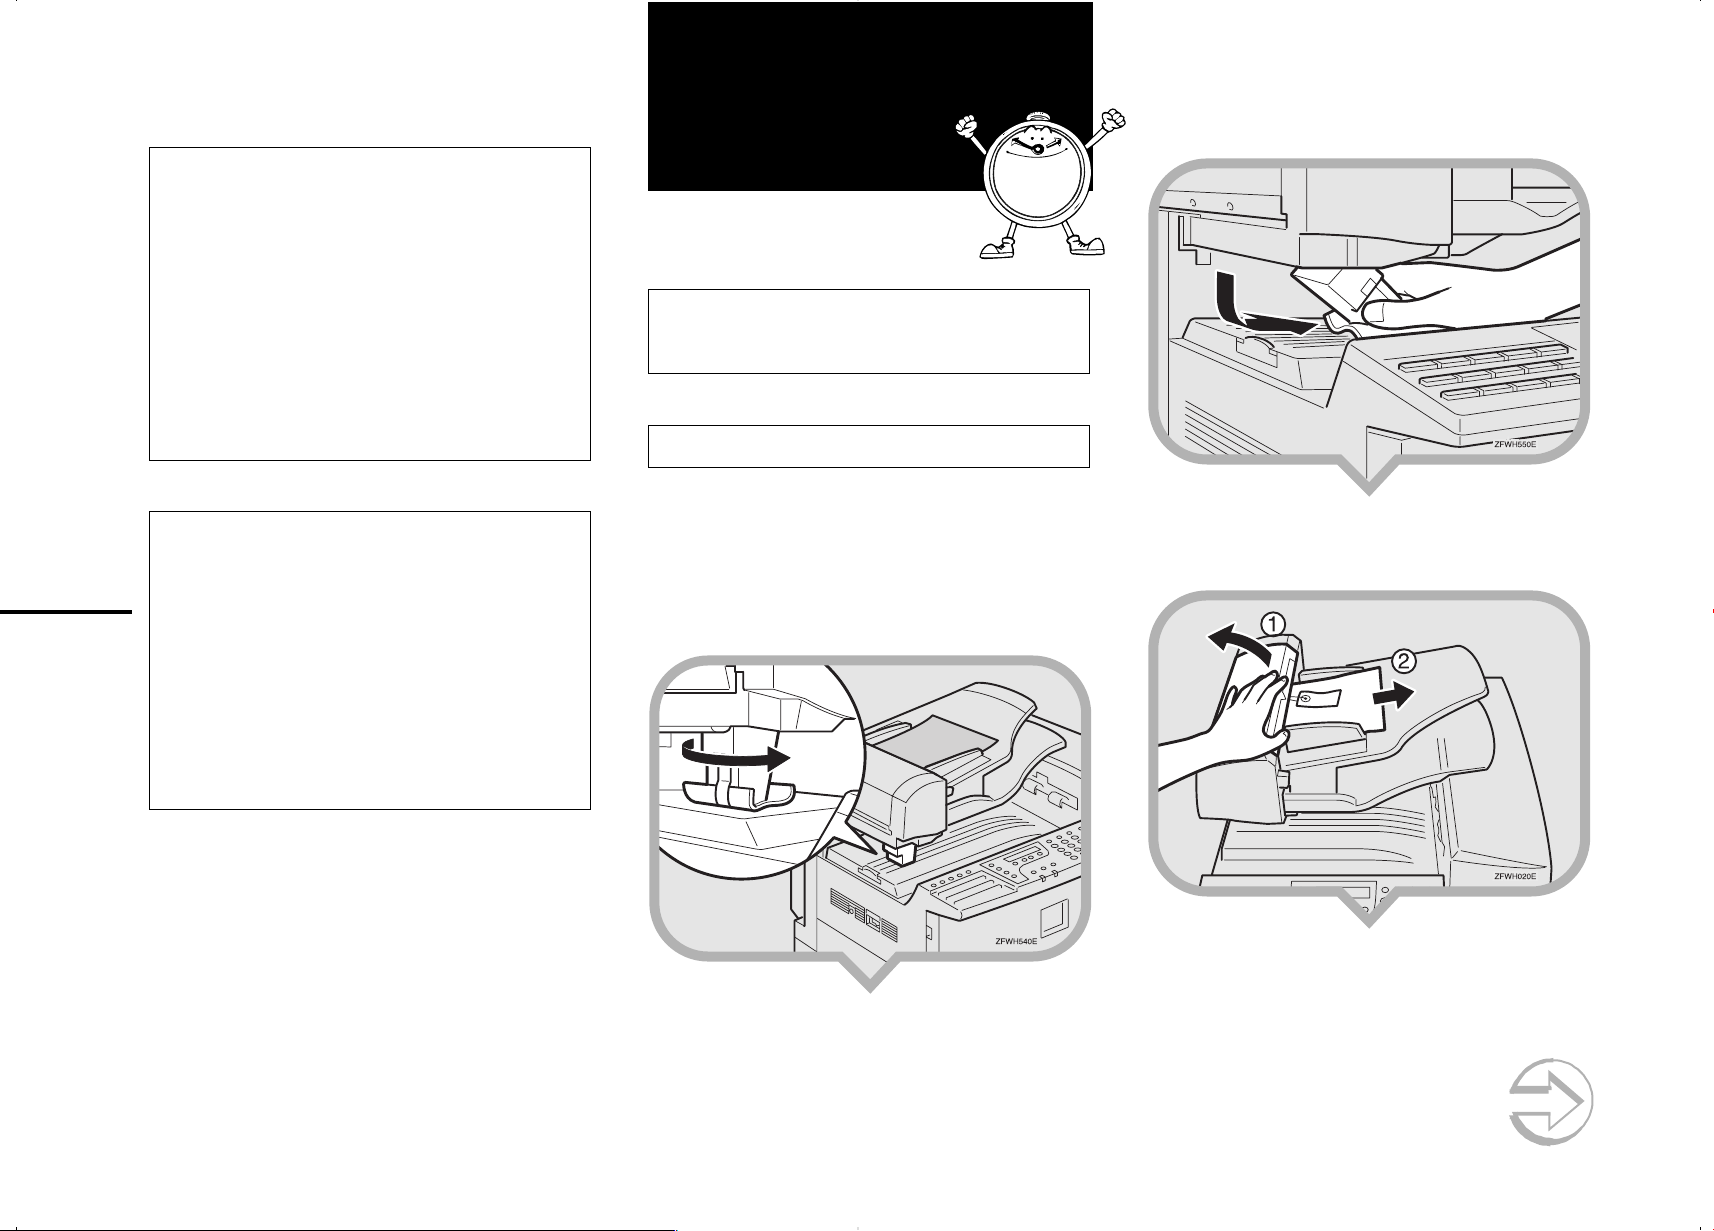
1.Remove the plastic wrapping sheet from
the machine, and then remove all shipping
tape.
2.Turn the fixing material 90° counterclock-
wise.
3.Remove the fixing material to the right.
4.Open the Document Feeder (ADF) and take
out the protective sheet.
Continued on next page
Page 3
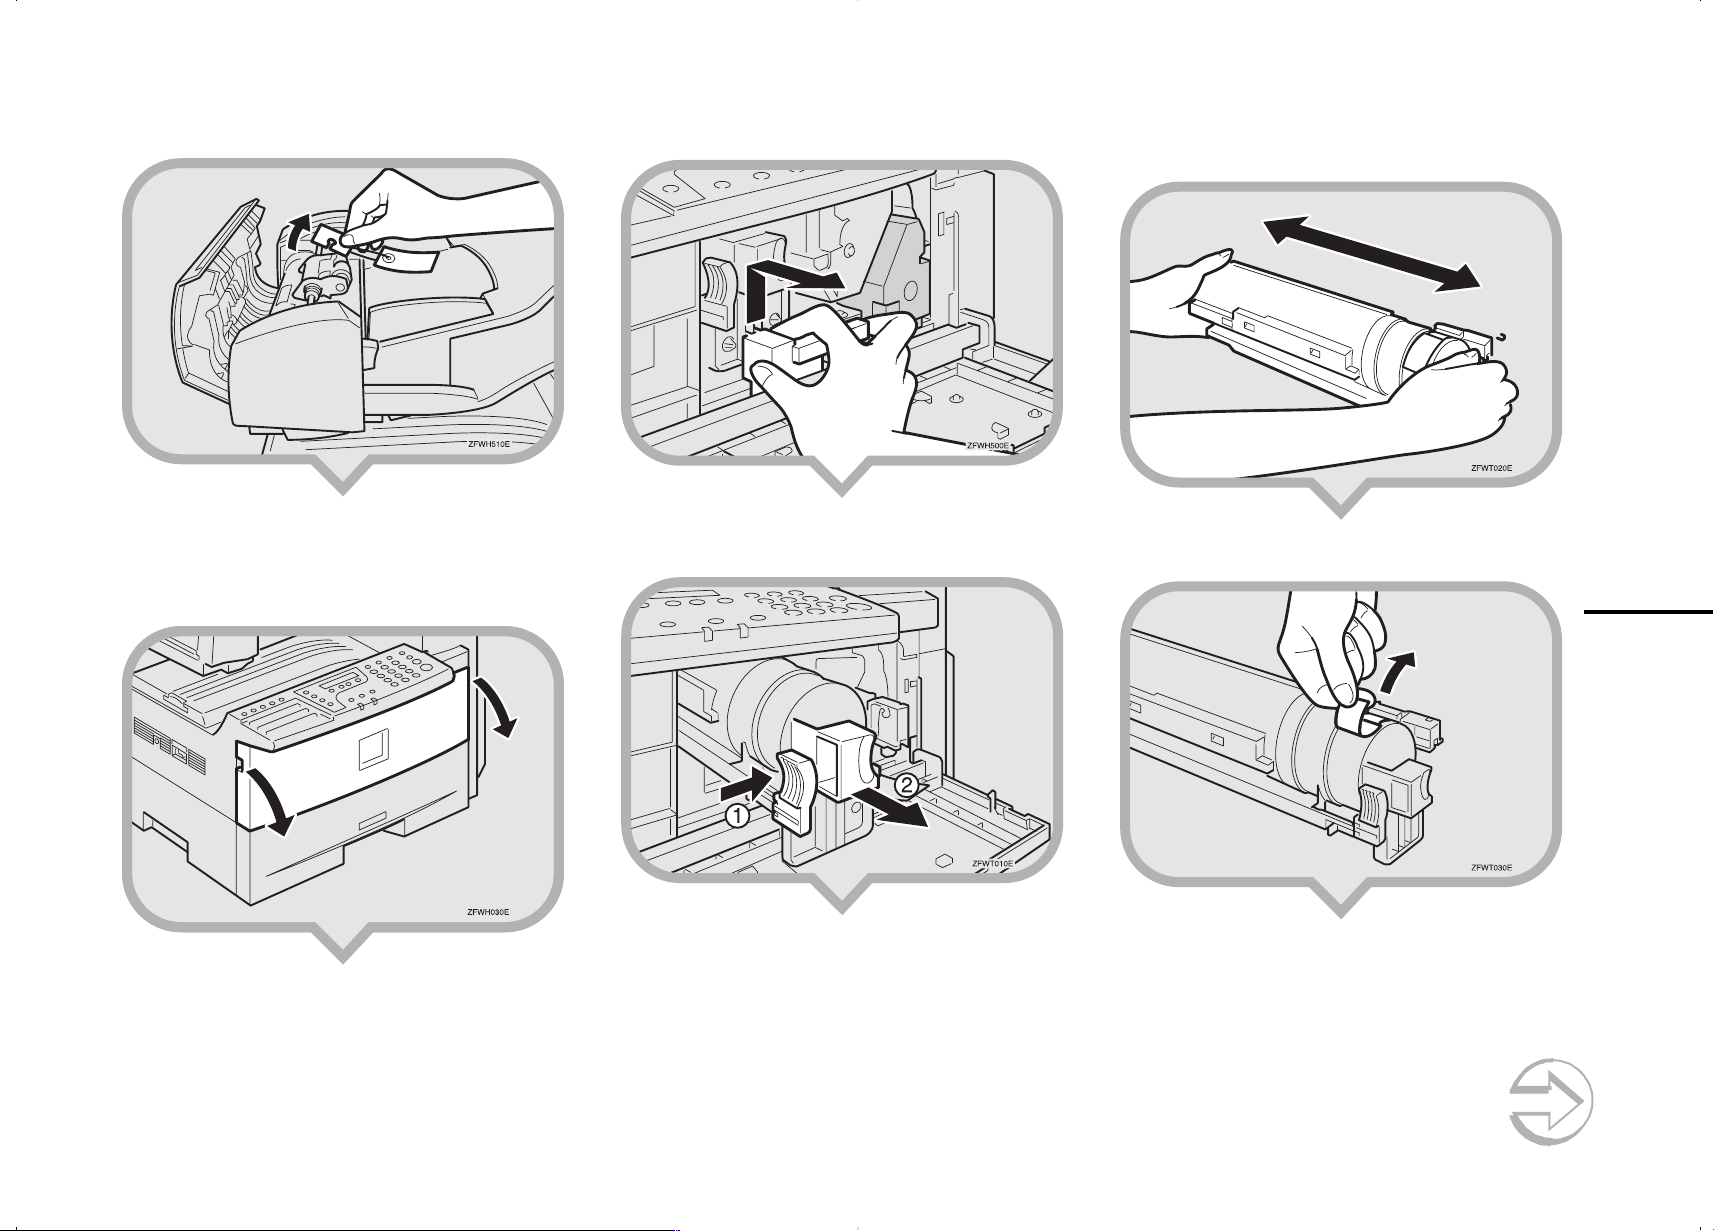
5.Remove the fixing material from the axis.
8.Remove the fixing material.
10
.Hold the cassette horizontally and shake it
gently from side to side a few times.
6.Close the Document Feeder (ADF) and
make sure it locks securely into place.
7.Open the front cover.
9.Push the lever (햲) and pull out the toner
cassette holding 햲 and 햳.
11
.Remove the tape from the toner cassette.
Continued on next page
2
Page 4
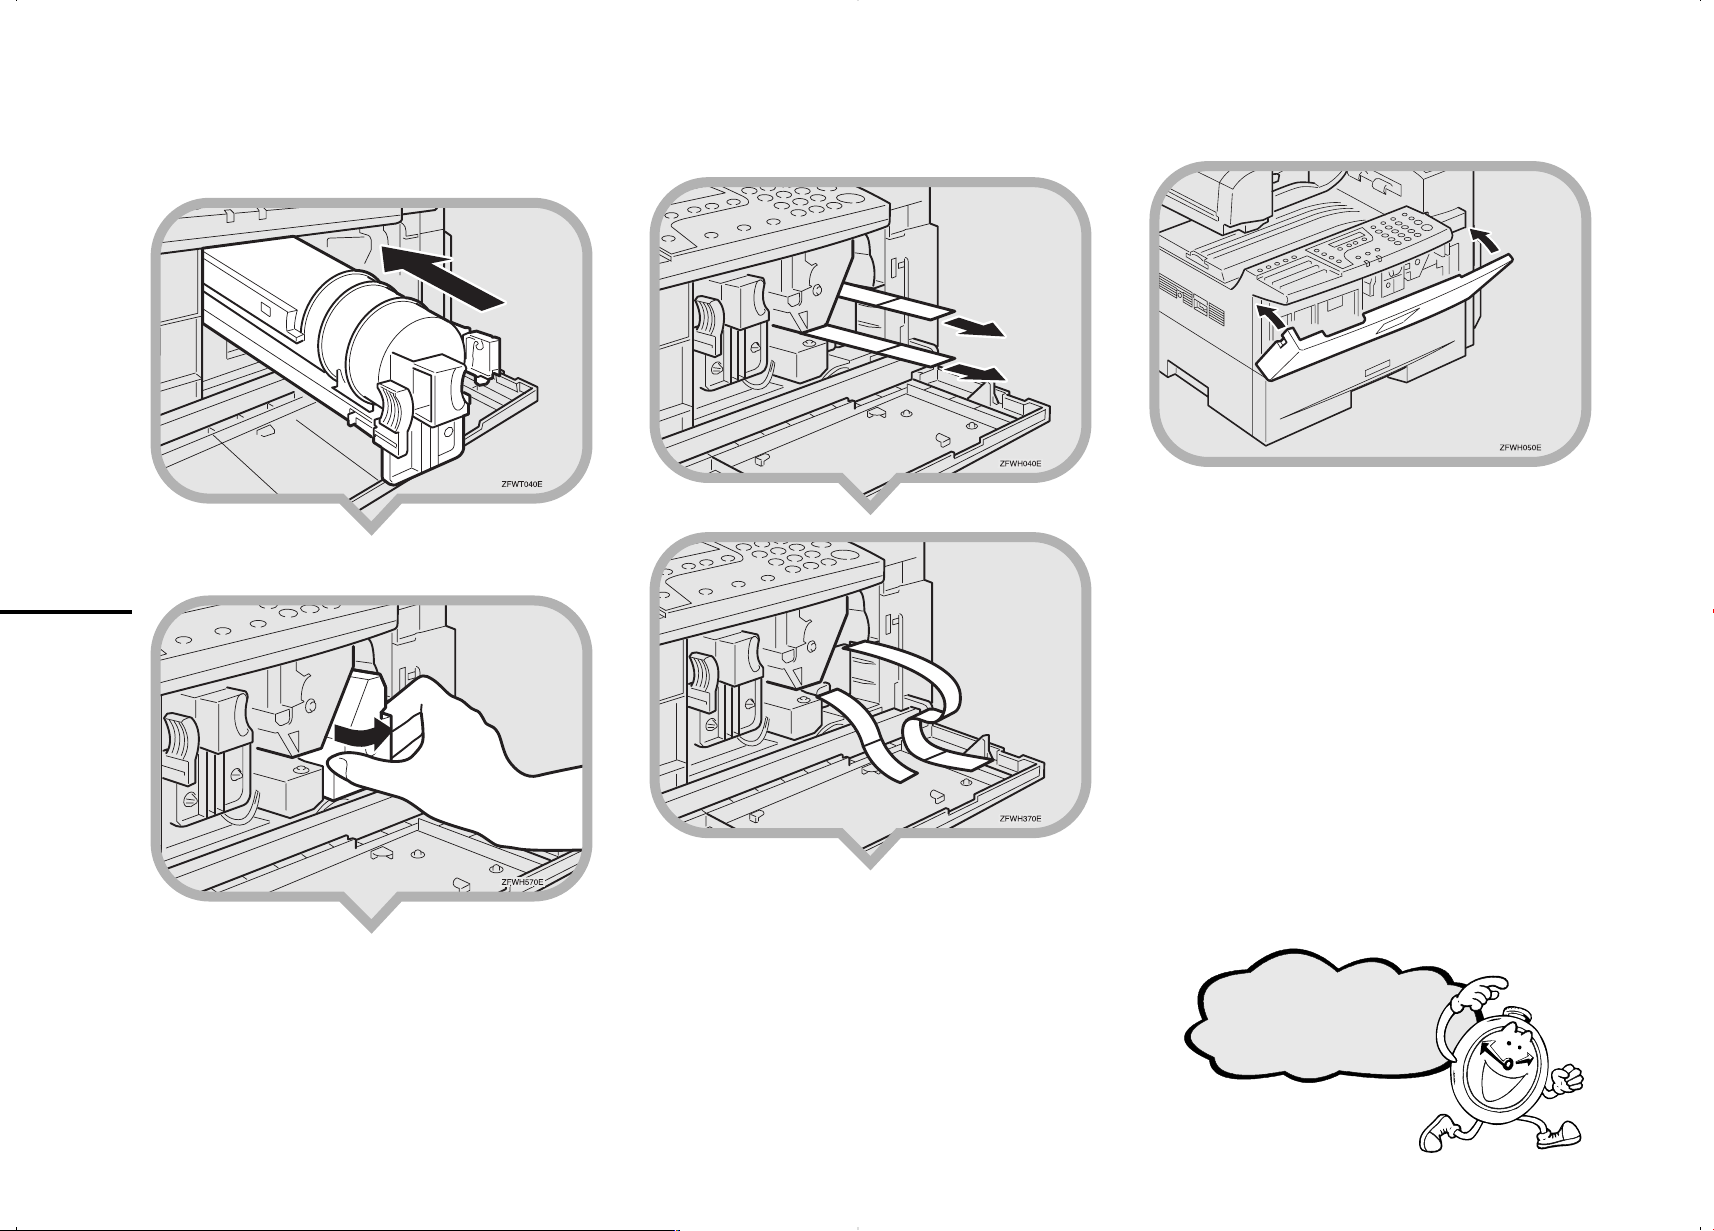
12
.Return the toner cassette.
Push the toner cassette in until it locks
securely into place.
13
.Remove the fixing material.
3
14
.Pull the two red tags to remove the plastic
strips.
15
. Close the front cover.
Keep going...
Page 5

Preparing the
Main Paper
Tray
1.Pull the paper tray out of the
main unit.
2
3.Push the metal base plate firmly down until
it locks into place.
5.Push the paper tray firmly until it locks into
place.
2.If necessary, adjust the paper size.
As a default, the paper size in the tray is set
as 81/2" 11".
Reference
TTo change the paper size in the paper tray, see
“Changing the Paper Size in the Main paper tray”
in the Advanced Features manual.
4. Load the paper into the paper tray.
6.Stick the appropriate tray-number decal
and paper size decal on the locations
indicated in the illustration.
7.If you changed the paper size of the paper
tray, set the paper size with the User Tools.
Reference
TSee “Changing the Paper Size Setting” in the
Advanced Features manual.
4
Page 6

Installing the Optional
햲 Turn off the power switch of the machine.
Paper Tray Unit
햳 Unplug the power cord of the machine
2.Pull the paper tray part out of the unit, and
then remove the tape and cardboard at [C].
from the outlet.
If you install the Optional Paper Tray Unit later, read the
following WARNING, CA UTION and Impor tant, and then
perform 햲 to 햴.
R
WARNING:
• Connect the power cord directly into a wall outlet and
never use an extension cord.
R
CAUTION:
• Unplug the power cord from the wall outlet before you
move the machine.
While moving the machine, you should take care that
the power cord will not be damaged under the
machine.Unplug the power cord from the wall outlet
before you move the machine. While moving the ma-
5
chine, you should take care that the power cord will
not be damaged under the machine.
• When you disconnect the power plug from the wall
outlet, always pull the plug (not the cable).
Important
• Do not plug or unplug the power cord with
wet hands or an electric shock might occur.
• Check the facsimile machine nameplate to
confirm the model code.
• Make sure that 100% is shown on the display
before you turn the power switch off or unplug
the power cord. Fax files programmed in
memory will be deleted 12 hours after you turn
the power switch off or unplug the power cord.
• Do not pull two paper trays out at the same
time. Having two paper trays filled with paper
in a fully extended position could cause the
machine to fall over.
3
햴 Unplug the telephone line from the
machine.
Note
After the installation, plug the power cord of the
machine back into the outlet, turn the power switch
on, and then connect the telephone line to the
machine.
1.Remove the tape at [A], and then remove
the tape and cardboard at [B].
3.If necessary, adjust the paper size of the
paper tray.
Reference
TFor information about changing paper size, see
“Changing the Paper Size in the Optional Paper
Tray Unit” in the Advanced Features manual.
4.Push the paper tray in until it stops.
Continued on next page
Page 7

5.There are two pins on the top of the Paper
Tray Unit that point straight up. On the
bottom of the machine there are two holes.
Align the holes over the pins and lower the
machine gently onto the Paper Tray Unit.
Note
• Two people are better for lifting the machine.
• Be careful not to pinch your fingers.
6.Stick the appropriate tray-number decal
and paper-size decal on the locations
indicated in the illustration.
7.If you changed the paper size of the paper
tray, set the paper size with the User Tools.
Reference
TFor information about setting paper size, see
“Changing the Paper Size Setting” in the Advanced
Features manual.
Installing the
Optional
Memory Card
If you install the optional memory card later, read the
following Important, and then perform 햲.
Important
• Turn the power switch off before installing
cards or they could be damaged.
• Fax files programmed in memory will not be
deleted while the optional memory card is
installed.
• When you install the optional memory card to
the machine, make sure that 100% is shown
on the display and turn off the power switch.
햲 Turn off the power switch.
4
6
Important
When lifting the machine, use the inset grips
on both sides. The machine could be
damaged or cause injury if dropped.
After Setting the Paper Tray Unit
Reference
TFor information about loading paper, see “Loading
Paper in the Optional Paper Tray Unit” in the Advanced
Features manual.
Continued on next page
Page 8

1.Insert the memory card carefully into the
slot on the left side of the machine.
2.Attach the memory card cover.
Insert the tab of the cover in the slot (햲),
and fix the cover with the screw (햳).
Note
• You can use a coin-like object to fix the screw.
Connecting the
Power and
Switching On
5
R
WARNING:
• Connect the power cord directly into a wall outlet and
never use an extension cord.
1.Plug the cable into the outlet.
Warning
TPower requirements : 115V, 60Hz
TInsert the power plug securely into the outlet.
TMake sure that the outlet is near the machine and
readily accessible.
TDo not connect other equipment to the same outlet.
7
Note
• Insert the Memory Card firmly or the machine may
not work properly.
2.Turn the power switch on.
Note
• If "Call Service" appears on the display after the
power switch is turned on, turn the power switch
off, and check whether the tape has been removed
from the toner cassette and PCU.
See "1. Preparing the Toner Cassette".
Page 9

Connecting the
Telephone
Installing the
3.Replace the information card.
Optional
Line
6
There are similar sockets located at the left side
of the machine:
TEL:
For the optional handset or the external telephone
LINE: Telephone line connection
1.Insert the line cable into the socket labeled
“Line”.
2.
Connect the other end to your telephone line.
Handset
1.Remove the information card from the
holder.
2.Attach the holder to the bracket with the
two screws provided.
Note
• You can use a coin-like object to fix the screw.
7
4.Attach the bracket to the machine with the
two screws provided.
Note
• You can use a coin-like object to fix the screw.
8
Continued on next page
Page 10

5.Insert the handset jack into the “TEL”
socket.
Initial Settings &
Adjustments
Note
When entering characters, use the following
keys.
Entering Letters
8
The following display appears after the power
is turned on for the first time. Do not turn off
the power until you have completed the
following procedure.
Year: Press OK
[2002]
Before using the machine, please adjust the following settings:
• Date & Time
• Line Type
• Own Name, Fax Header, Fax Number
9
Important
For mistakes, press the Cancel key, and then
the OK key to register again.
(A-Z, a-z)
Entering a Space
Entering Symbols
Switching between
uppercase and
lowercase
Entering digits
Deleting characters
Moving the cursor
ABC - YZ keys
(Quick Dial Keys 01-09 or 16-24)
Space key
(Quick Dial key 14 or 29)
Symbols key
(Quick Dial Keys 15 or 30)
Shift key
(Quick Dial key 13 or 28)
Number keys
Clear/Stop key
keys
1.Make sure the current year setting is
correct. If it is not, enter the year with the
number keys.
Year: Press OK
[2002]
2.Press the OK key.
3.Press or key to select the month.
Month: WV/O K
March
4.Press the OK key.
EN USA H555-8580
Page 11

5.Enter the date with the number keys.
Day: Press OK
[ 1]
6.Press the OK key.
7.Press
AM/PM:
[AM] PM
the or key to select AM or PM.
WV
/O K
14.
Enter your office, company, or personal
name or any other appropriate identification.
Own Name:[ABC] /OK
XYZ COMPANY
Note
• The [Shift] key does not work when entering “Own
Name”. Only uppercase is available for “Own
Name”.
❚❚❚❚❚❚❚❚❚
18.
Press the OK key.
“Intial Setup Completed” will flash on the
display.
The following display appears.
Ready 100% 12:30AM
Set Orig./Enter NO.
8.Press the OK key.
9.Enter the current hour setting (1 to 12) with
the number keys.
Time: Press OK
[12:00]
10
. Enter the current minute setting (00 to 59)
with the number keys.
Time: Press OK
[12:30]
11.
Press the OK key.
12.
Press the or key to set your
machine for a tone dial line or a pulse dial
line.
Line Type:
Pulse [Tone]
13.
Press the OK key.
“Programmed” will flash on the display.
The following display appears.
Own Name:[ABC]
❚❚❚❚❚❚❚❚❚❚❚❚❚❚❚❚❚❚❚❚
[
WV
/O K
]
15.
Press the OK key.
“Programmed” will flash on the display.
The Own Name programmed in step 14 appears.
After Own Name, enter your fax number so the
Own Name and fax number are printed in the
Fax Header when you fax documents.
Header:[ABC] /OK
XYZ COMPANY
Important
In the USA, this must contain the telephone
number of the line your machine is connected
to. It will be printed on the header of every page
you send. Required in the USA.
16.
Press the OK key to keep the Fax Header
as it is.
“Programmed” will flash on the display.
Fax Number:
❚❚❚❚❚❚❚❚❚❚❚❚❚❚❚❚❚❚❚❚
17.
Enter your Fax Number including the
country and area code (but no pauses).
Fax Number: /OK
+111234567890
Note
• Enter “+” with the Symbols key.
• The fax number you set here will not be printed in
the Fax Header. It will appear in reports,and on the
receivers’ display, etc.
❚❚❚❚❚❚❚❚❚
❚❚❚❚❚❚
10
After Initial Settings
• You can check and adjust these settings using function
keys.
TDate & Time : See Chapter 6, "Setting the Data
and Time" in the Advanced Features manual.
TLine Type : See Chapter 7, "Line Type" in the
Advanced Features manual.
TOwn Name, Fax Header, Fax Number : See Chap-
ter 3, "Own Name/Fax Header/Own Fax
Number" in the Basic Features manual.
Reference
See Chapter 10, “Installation” in the Advanced Features
manual for further information regarding installation.
Please keep this manual and any leftover
parts in a safe place.
Page 12

That’s it!
Printed in China
EN USA H555-8580
 Loading...