

Page 1
Operation
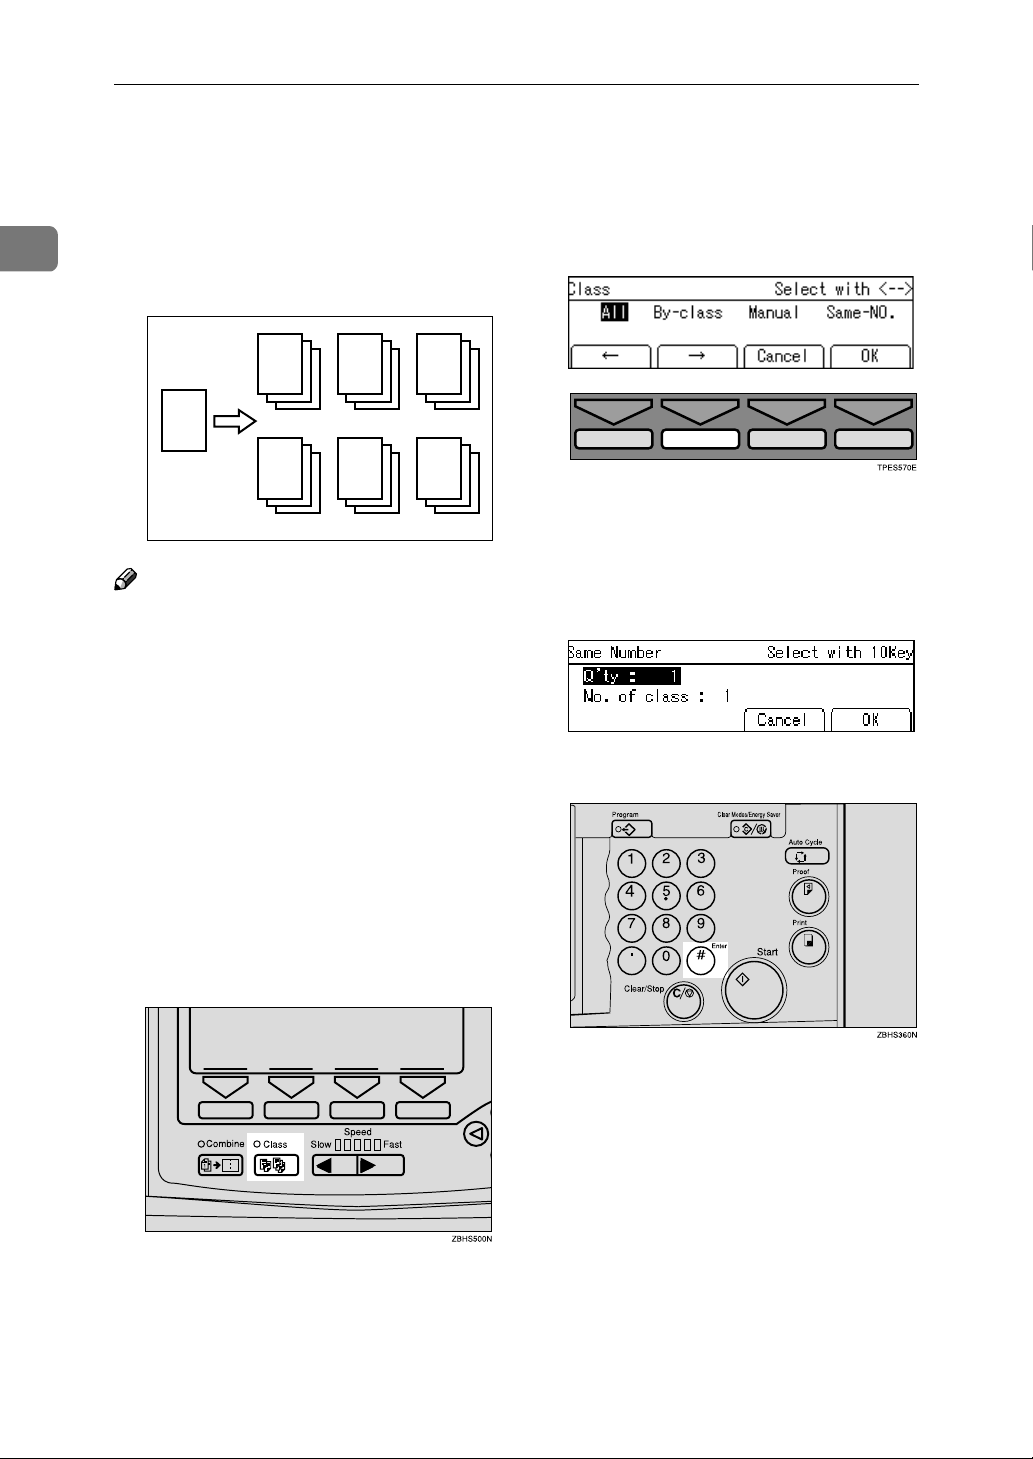
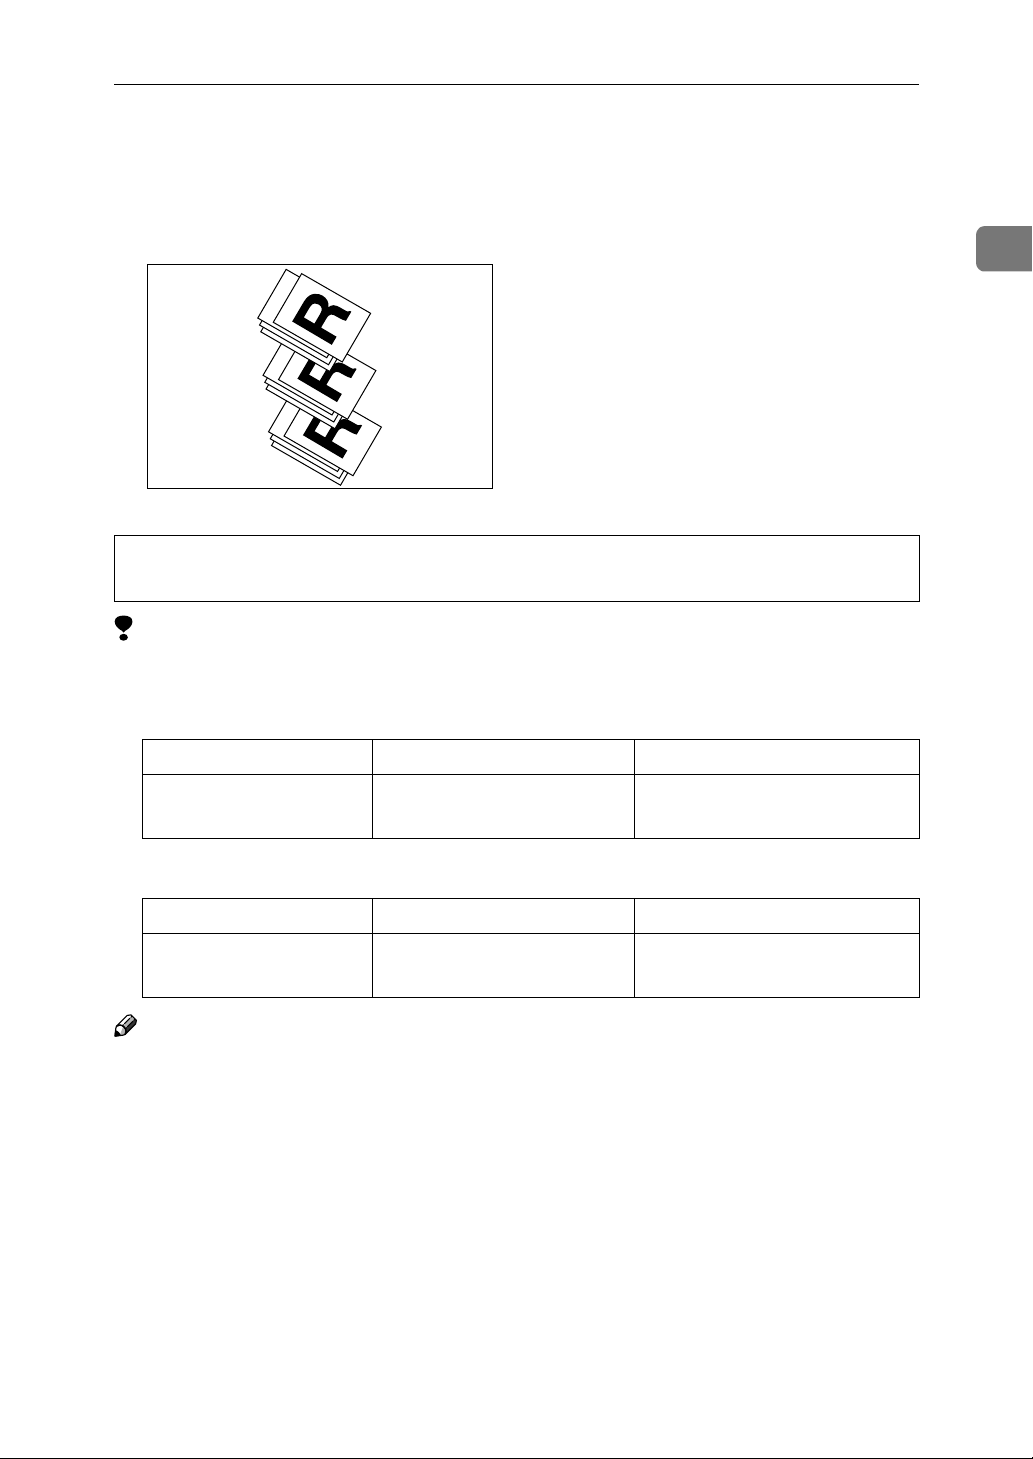
Class Mode
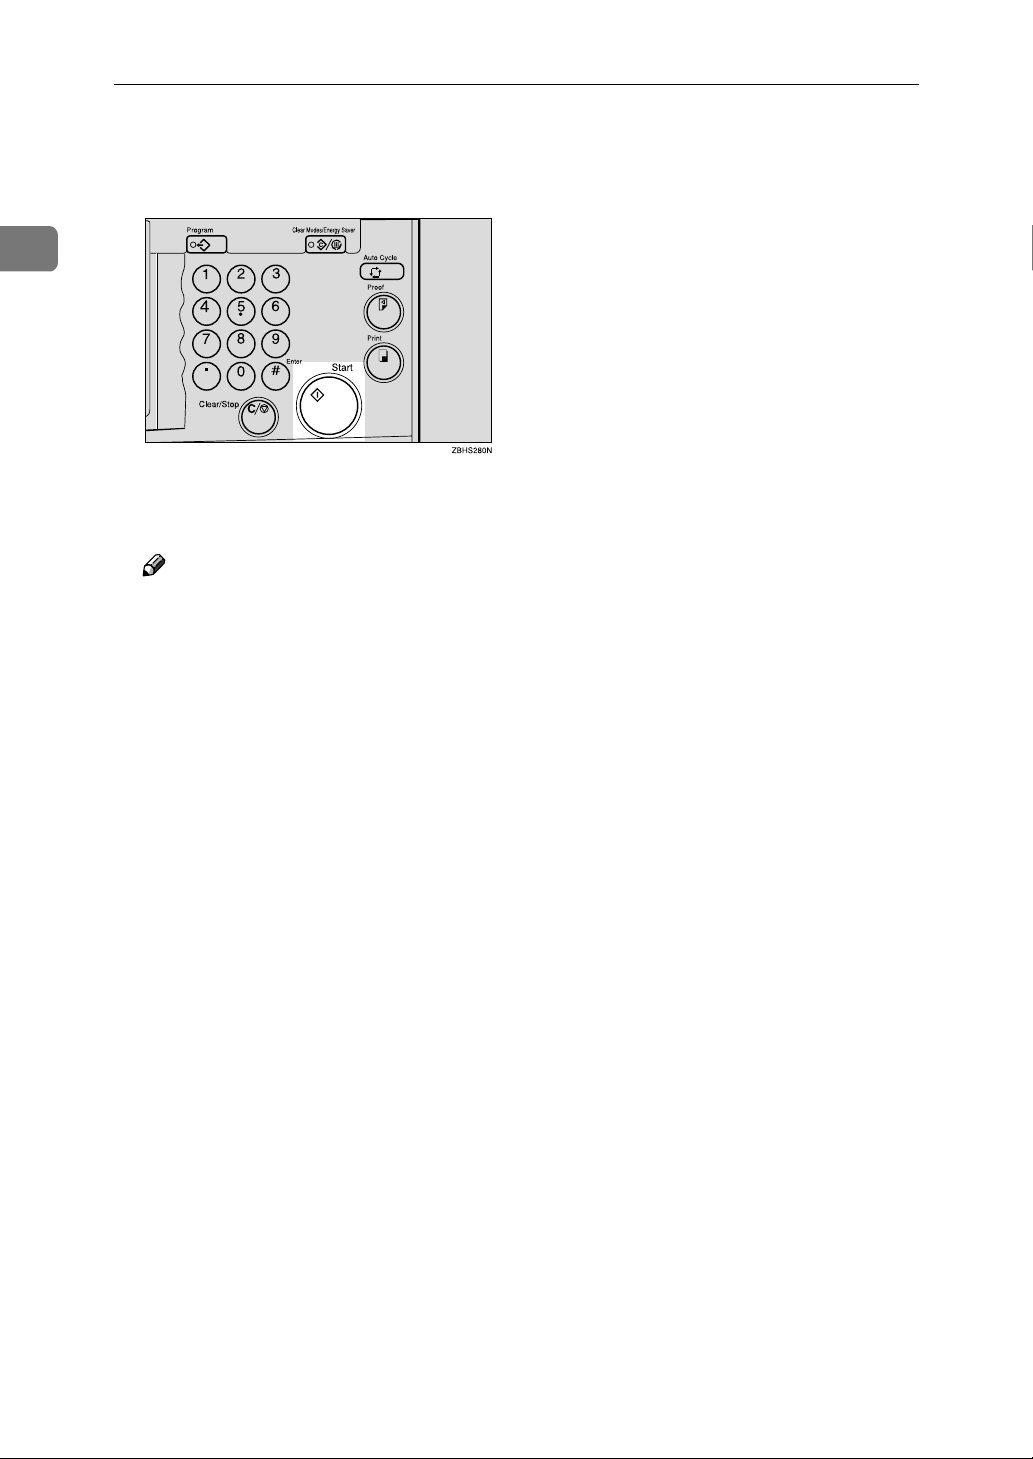
1
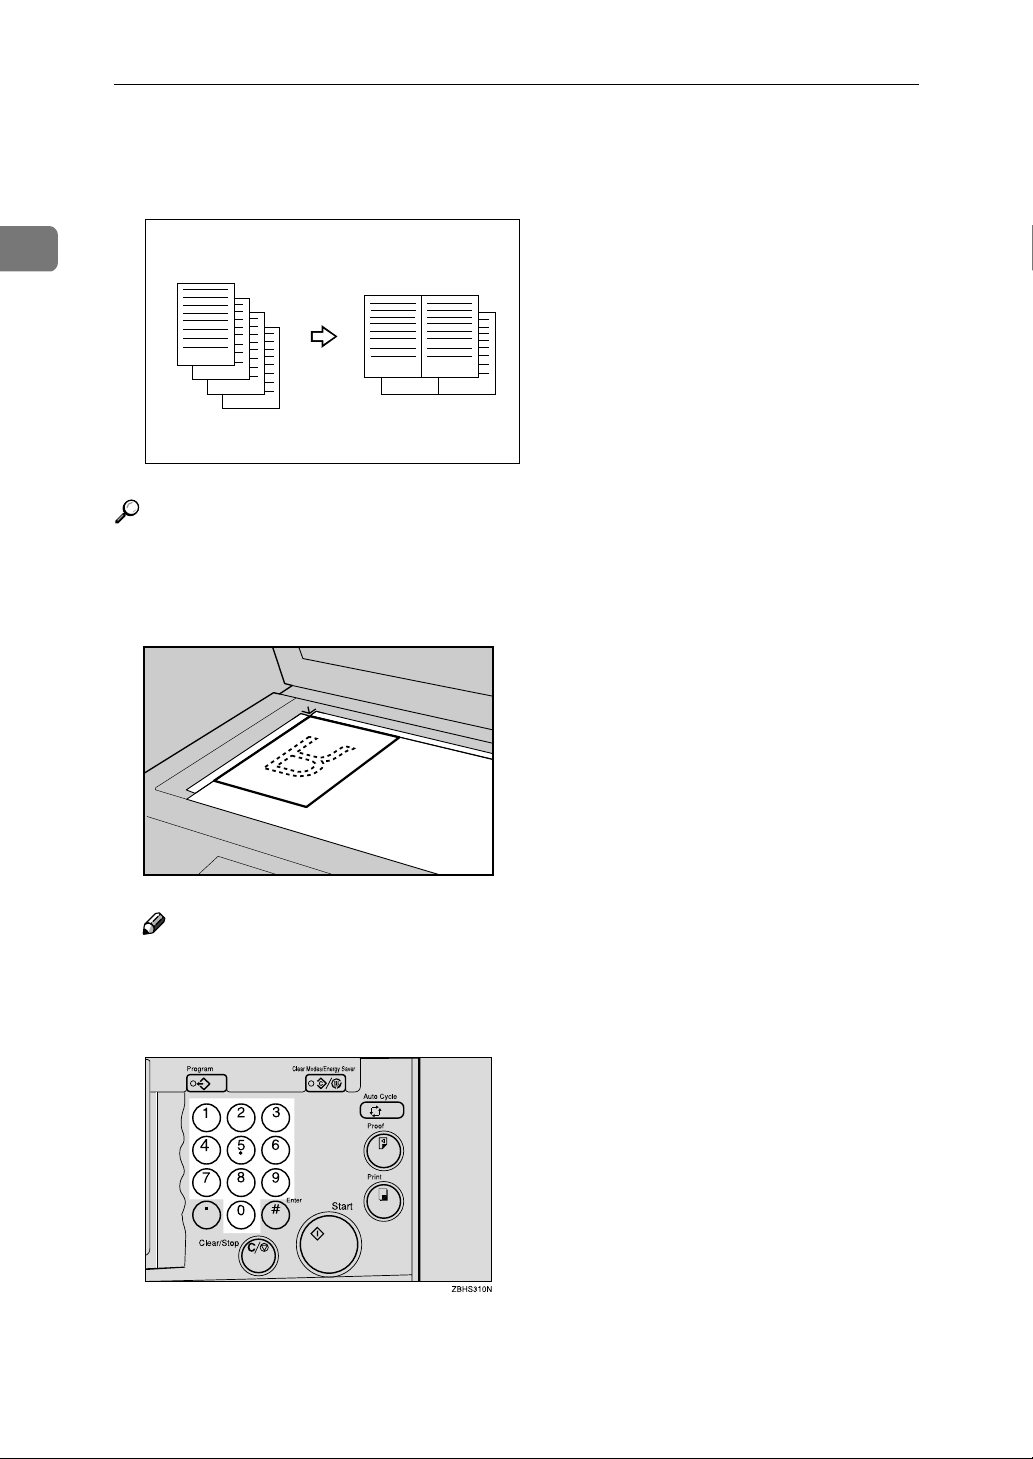
Use the {{{{Class}}}} key to make sets of
prints from the same original. The
same numbers of prints are made for
each set.
R
R R
R
R R R
GRCLAS0E
Note
❒ When you choose Class mode, Job
Separation mode is automatically
turned on. The job separator pulls
the top sheet of each set delivered
to the paper delivery tray to mark
the end of each printed set. The
next cycle begins automatically.
See p.79 “Job Separation”.
Select [Same-NO.] with the [→→→→] or
BBBB
{{{{}}}}}}}} key.
Press the [OK] key.
CCCC
With the number keys, enter the
DDDD
desired number of prints for each
set.
Press the {{{{qqqq}}}} key.
EEEE
❒ You can suspend Job Separation
mode whenever you set the Class
mode with the user tools. See “Au-
to Separate” on p.146 “4. Mode Set-
ting”.
Press the {{{{Class}}}} key.
AAAA
62
Page 2
With the number keys, enter the
FFFF
number of sets you wish to make.
Note
❒ Up to 99 sets can be selected for
an original.
Press the [OK] key.
GGGG
Place one original on the expo-
HHHH
sure glass or in the optional document feeder.
Class Mode
1
Press the {{{{Start}}}} key.
IIII
Check the image position on the
JJJJ
trial or proof print.
Note
❒ If the image position is not cor-
rect, adjust it using the [Image
====] key. See p.24 “Adjusting the
Position of Printed Images”.
Make your prints.
KKKK
63
Page 3
1
Operation
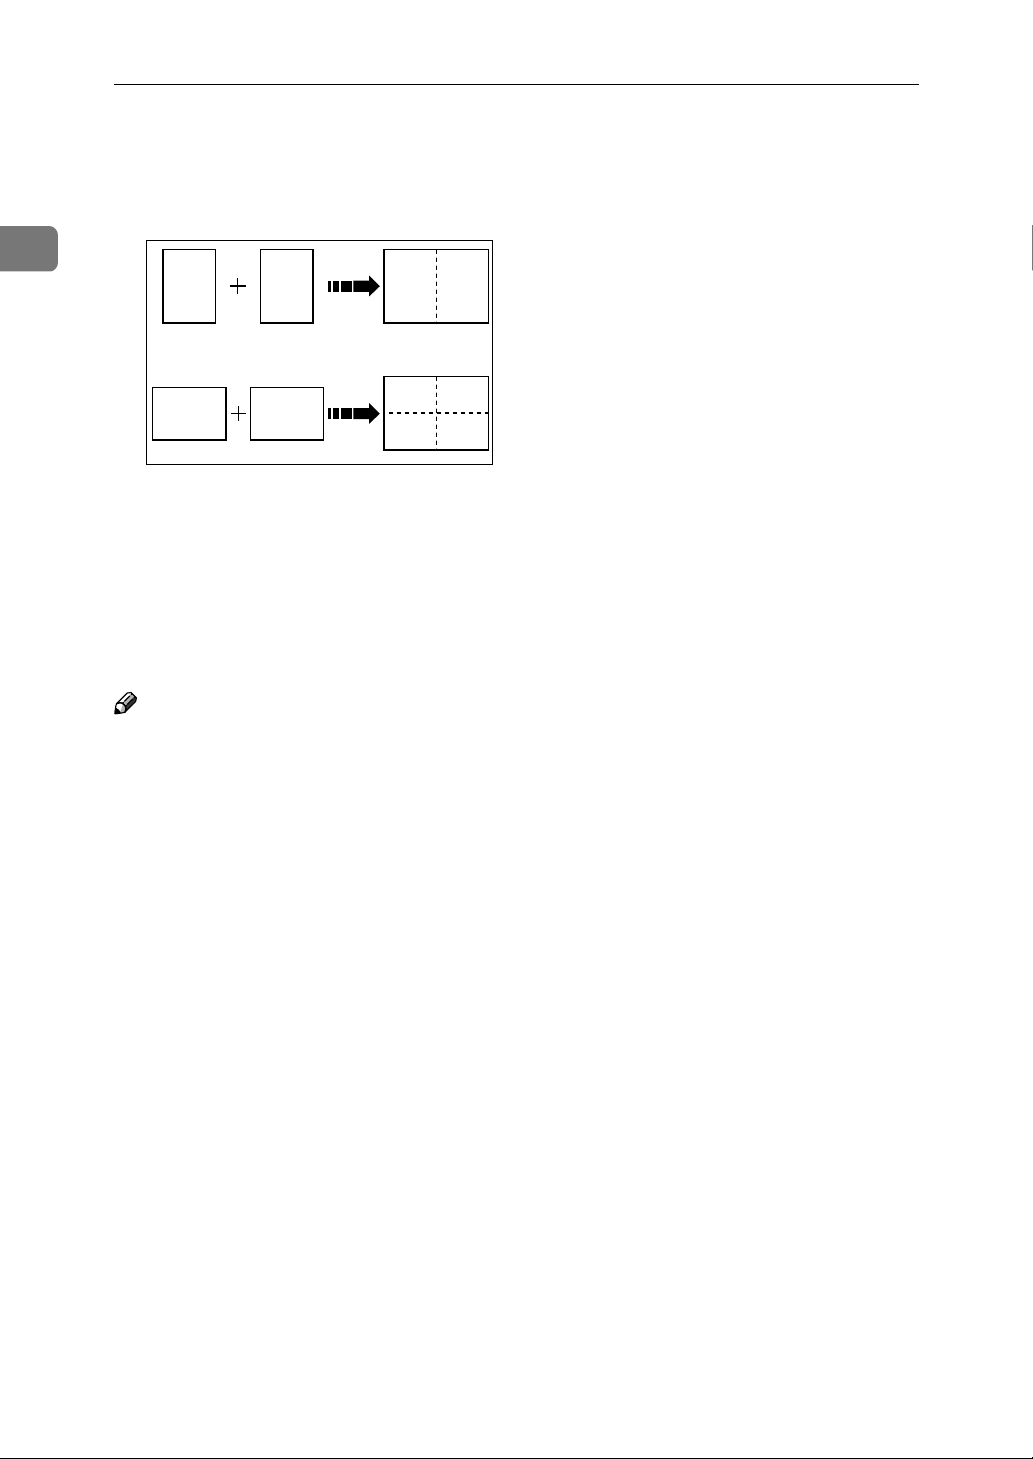
Combine Originals
You can combine originals in two ways:
11
1
❖❖❖❖ 2 single-sided originals →→→→ 1 single-sided print with 2 images
Combine two single-sided originals onto one single-sided print with the two
images placed side-by-side.
❖❖❖❖ 2 single-sided originals →→→→ 1 single-sided print with 4 images
Combine two single-sided originals onto one single-sided print with each image duplicated (total of four images).
Note
❒ You can also use Memory Combine mode. See p.118 “Memory Combine”.
❒ You can set the machine to cancel Combine Originals mode after finishing
your print job with the user tools. See “Cancel Comb.” on p.146 “4. Mode Set-
ting”.
❒ Any image closer than 8mm, 0.32" to the leading edge of the first original will
not be printed. Any image closer than 4mm, 0.16" to the leading edge of the
second original will also not be printed. When the image is too close to the
leading edge, use copies of the originals with the image shifted at least 8mm,
0.32" for the first original (4mm, 0.16" for the second original) from the leading
edge.
22
22
11
2
GRCOMB2E
❒ You can select different image settings for the first and second original.
❒ Make sure that the paper feed side plates touch the paper lightly and that the
paper size and direction shown on the panel display match the size and direction of paper actually placed in the paper feed tray. Either case can cause the
two original images not to appear in the proper position on prints.
❒ The following tables list the combinations that can be used with the Combine
feature (2 single-sided originals → 1 single-sided print with 2 images).
64
Page 4
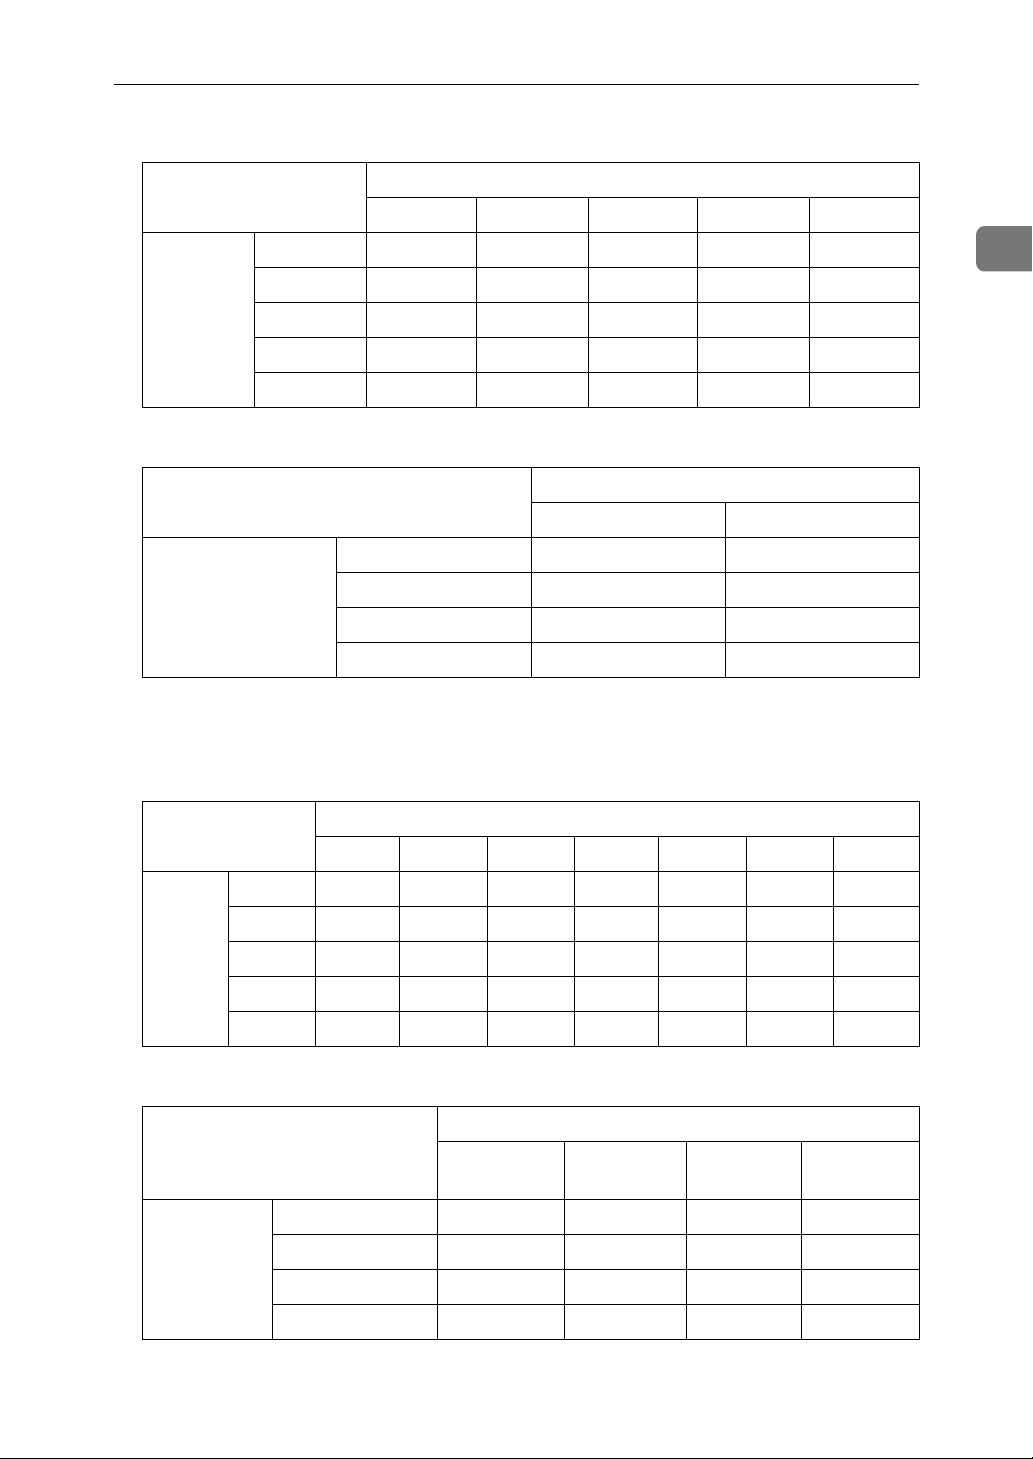
❖❖❖❖ Metric version
Combine Originals
Original Size
A4K B5K A5K B6K A6K
Paper Size A3L 100% 115% 141% 163% 200%
B4L 87% 100% 122% 141% 173%
A4L 71% 82% 100% 115% 141%
B5L 61% 71% 87% 100% 122%
A5L 50% 58% 71% 82% 100%
❖❖❖❖ Inch version
Original Size
1
8
/2" × 11"K 51/2" × 81/2"K
Paper Size 11" × 17"L 100% 129%
1
8
/2" × 14"L 77% 100%
1
8
/2" × 11"L 65% 100%
1
5
/2" × 81/2"L 50% 65%
❒ The following tables list the combinations that can be used with the Combine
feature (2 single-sided originals → 1 single-sided print with 4 images).
❖❖❖❖ Metric version
Original Size
1
A3L B4L A4L B5L A5L B6L A6L
Paper
Size
A3L 50% 58% 71% 82% 100% 115% 141%
B4L - 50% 61% 71% 87% 100% 122%
A4L - - 50% 58% 71% 82% 100%
B5L - - - 50% 61% 71% 87%
A5L - - - - 50% 58% 71%
❖❖❖❖ Inch version
Original Size
11" × 17"L 8
1
/2" ×
14"L
Paper Size 11" × 17"L 50% 65% 65% 100%
1
8
/2" × 14"L - 50% 50% 77%
1
/2" × 11"L - - 50% 77%
8
1
5
/2" × 81/2"L ---50%
1
8
/2" ×
11"L
1
5
1
8
/2" ×
/2"L
65
Page 5
1
Operation
❒ If a suitable reproduction ratio is not selected, images might not completely
appear on prints.
❒ Originals reading from left to right.
1
2
3
4
2
1
4
3
ZDZX160E
Reference
When you use the optional document feeder with this function, see p.129
“Combine Printing”.
Place the first original face down.
AAAA
ZDCH110E
Note
❒ When you place an original sideways (K), the top should be toward the
operation panel as shown above.
66
Enter the number of prints using the number keys.
BBBB
Page 6
Combine Originals
Check the print paper size and the reproduction ratio.
CCCC
Note
❒ To have the machine choose a suitable ratio automatically, use Auto Mag-
nification mode. See p.31 “Auto Magnification”.
Press the {{{{Combine}}}} key.
DDDD
1
Select [Combine 2] or [Quadruple] with the [←←←←] [→
EEEE
Press the [OK] key.
FFFF
Press the {{{{Start}}}} key.
GGGG
→] or {{{{~~~~}}}} {{{{}}}}}}}} keys.
→→
67
Page 7
1
Operation
The beeper sounds after the first original has been stored. Place the second
HHHH
original face down.
ZDCH110E
Press the {{{{Start}}}} key.
IIII
Check the image position on the trial or proof print.
JJJJ
Note
❒ If the image position is not correct, adjust it using the [Image ====] key. See
p.24 “Adjusting the Position of Printed Images”.
Make your prints.
KKKK
68
Page 8
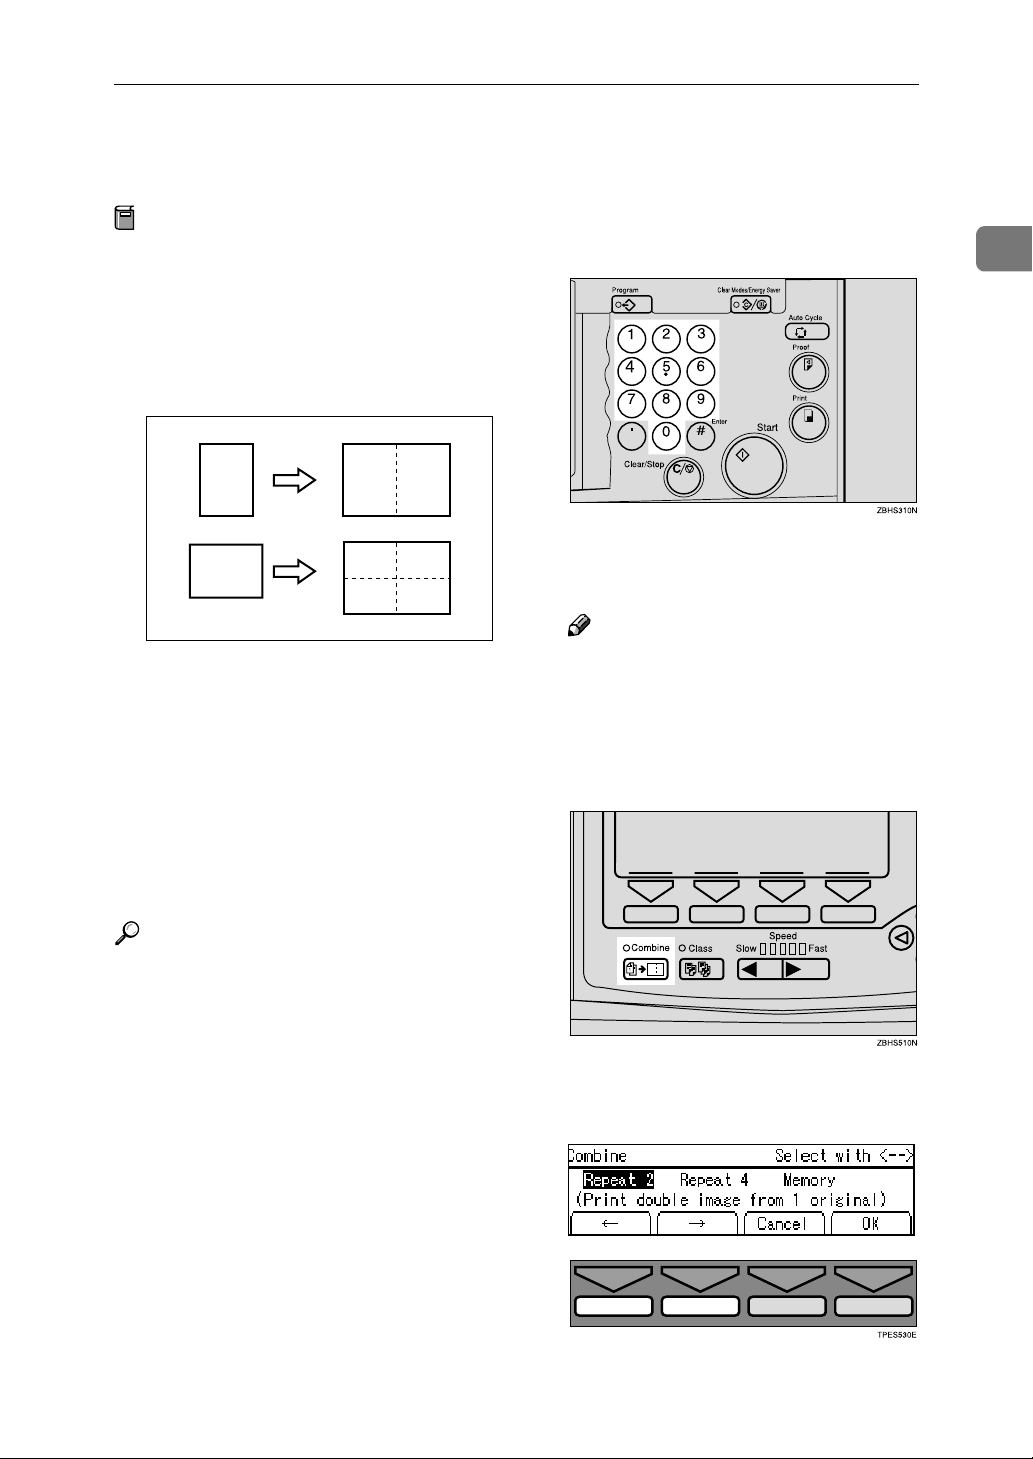
Auto Combine Mode
Auto Combine Mode
Preparation
To use this function, you have to
select Auto Combine mode with
the user tools. See “Combine” on
p.146 “4. Mode Setting”.
You can have images duplicated in
two ways:
1 11
11
1
❖❖❖❖ 1 single-sided original →→→→ 1 single-sid-
ed print of 2 images
The original image is duplicated
twice on one print.
❖❖❖❖ 1 single-sided originals →→→→ 1 single-
sided print of 4 images
The original image is duplicated
four times on one print.
11
GRACOM0E
Enter the number of prints using
BBBB
the number keys.
Check the print paper size and the
CCCC
reproduction ratio.
Note
❒ To have the machine choose a
suitable ratio automatically, use
Auto Magnification mode. See
p.31 “Auto Magnification”.
Press the {{{{Combine}}}} key.
DDDD
1
Reference
See p.64 “Combine Originals” for
details.
Place your original on the expo-
AAAA
sure glass or in the optional document feeder.
Select [Repeat 2] or [Repeat 4] with
EEEE
the [←←←←] [→
→] or {{{{~~~~}}}} {{{{}}}}}}}} keys.
→→
69
Page 9
1
Operation
Press the [OK] key.
FFFF
Press the {{{{Start}}}} key.
GGGG
Check the image position on the
HHHH
trial or proof print.
Note
❒ If the image position is not cor-
rect, adjust it using the [Image
====] key. See p.24 “Adjusting the
Position of Printed Images”.
Make your prints.
IIII
70
Page 10
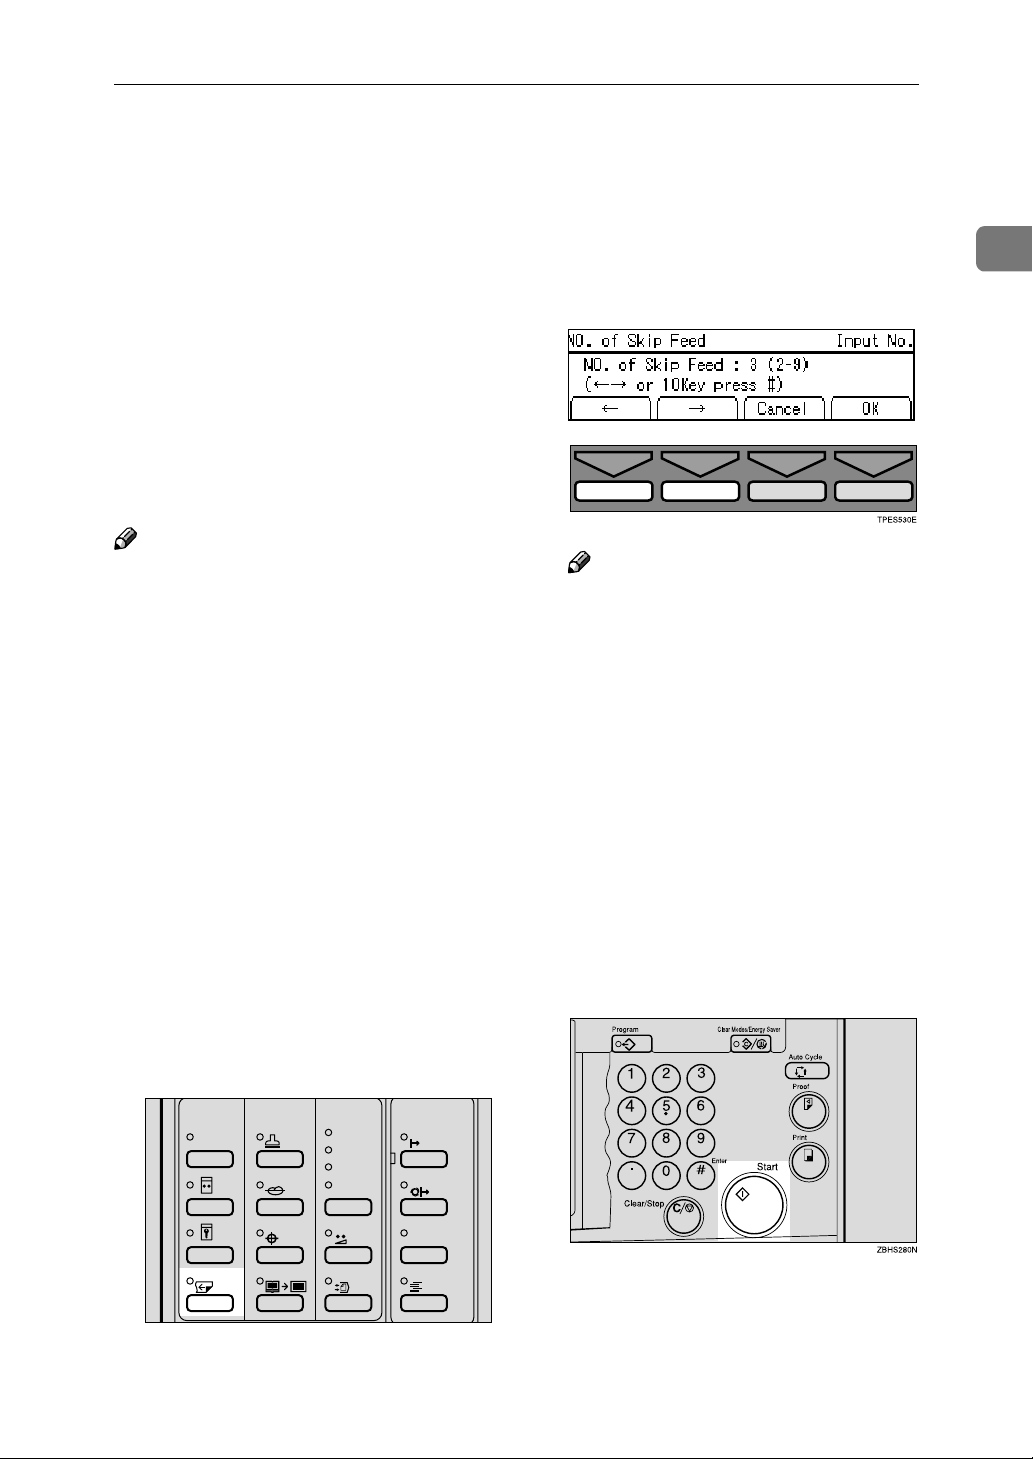
Skip Feed Printing
Skip Feed Printing
You can increase the time between
prints using the {{{{Skip Feed}}}} key. By
default, when one sheet of paper is
fed, the drum rotates twice. However,
you can select the number of drum rotations. This gives you a chance to remove prints one by one from the
paper delivery tray or insert one sheet
of paper between two prints. If you
use this function, you can also use paper longer than the length limitation
of 432mm, 17.0".
Note
❒ For every sheet of paper fed, the
drum rotates twice by default. You
can change this default setting
with the user tools. See “No. of
Skip Feed” on p.146 “4. Mode Setting”.
❒ The maximum length of paper in
Skip Feed mode is 460mm, 18.1".
❒ When you use paper longer than
432mm, 17.0", prints will not be delivered to the paper delivery tray
properly, so lower the paper delivery end plate and take out the
prints by hand.
Place your original on the expo-
AAAA
sure glass or in the optional document feeder.
If necessary select the number of
CCCC
drum rotations per sheet of paper
fed with the [←←←←] [→
→] or {{{{~~~~}}}} {{{{}}}}}}}}
→→
keys.
Note
❒ You can also select the number
of rotations with the number
keys.
❒ You can select from 2 to 9 rota-
tions.
❒ By default, the machine asks
you to confirm the number of
rotations. You can have this step
omitted by adjusting the user
tool settings. See “No. of Skip
Feed” on p.146 “4. Mode Setting”.
Press the [OK] key.
DDDD
Press the {{{{Start}}}} key.
EEEE
1
Press the {{{{Skip Feed}}}} key.
BBBB
Image Density
Stamp
Make-Up
Over lay
Skip Feed
Edge Erase
Lighter
Normal
Darker 1
Darker 2
Economy Mode
Original Storage
On Line
Auto On Line
Job Separator
ZDZS030N
71
Page 11

1
Operation
Check the image position on the
FFFF
trial or proof print.
Note
❒ If the image position is not cor-
rect, adjust it using the [Image
====] key. See p.24 “Adjusting the
Position of Printed Images”.
Make your prints.
GGGG
Note
❒ After printing is completed, the
Skip Feed setting returns to the
default.
72
Page 12
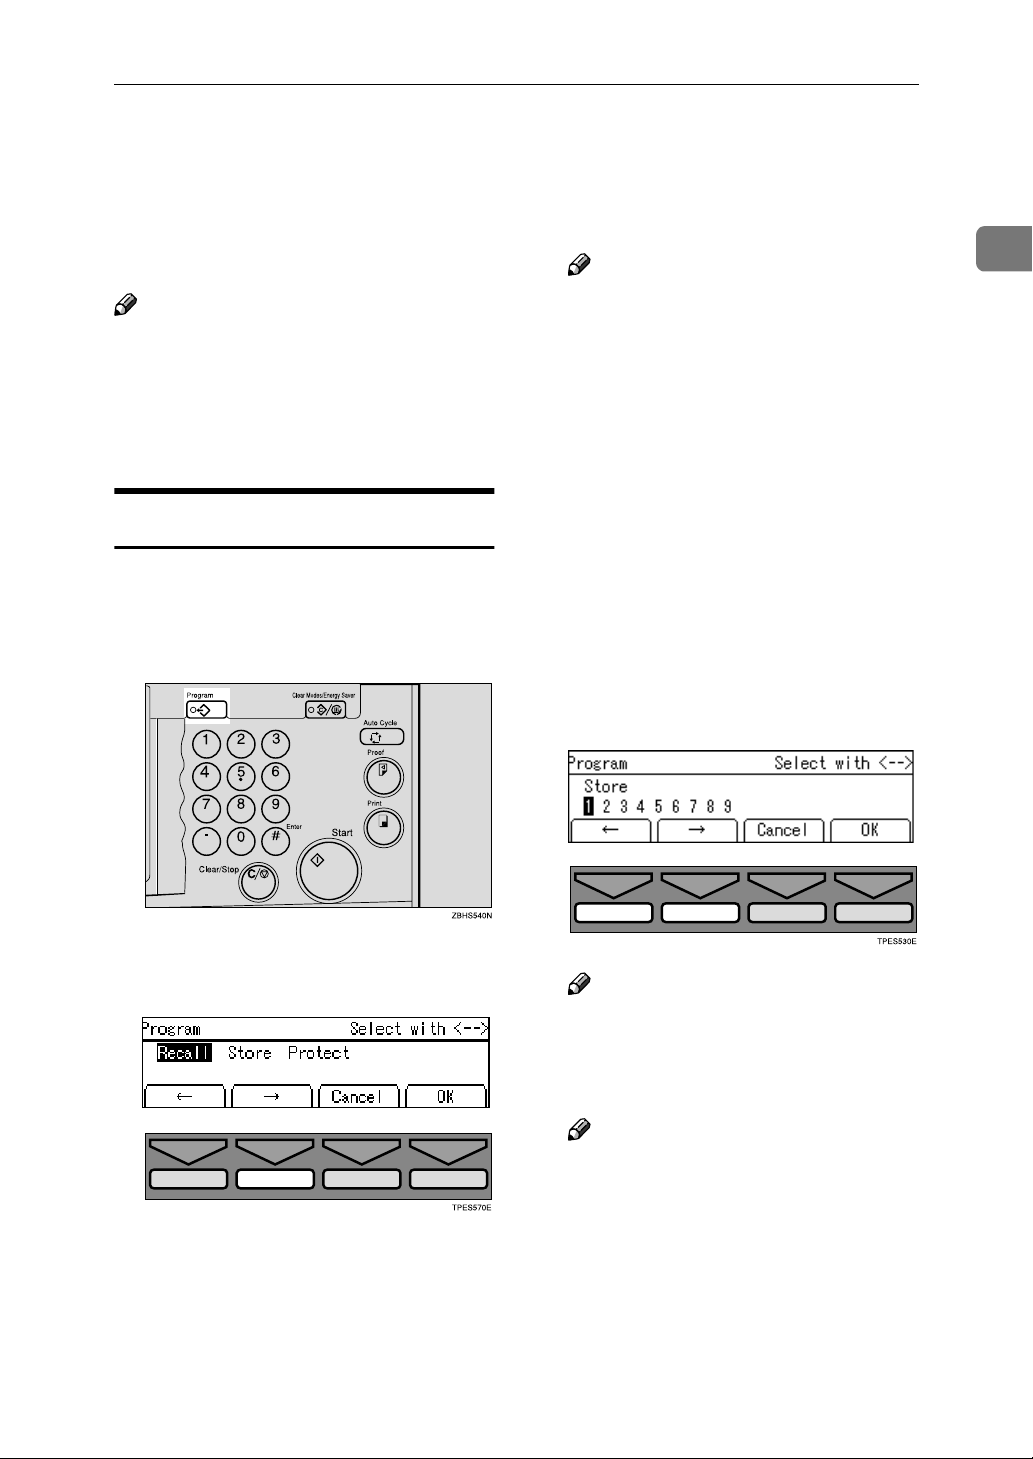
Programs
Programs
You can store up to 9 frequently used
print job settings in machine memory
and recall them for future use.
Note
❒ Stored programs are not cleared
when you turn off the main switch.
❒ Stored programs cannot be delet-
ed. If you want to change a stored
program, overwrite it.
Storing a Program
Make the print settings you want
AAAA
to put into memory.
Press the {{{{Program}}}} key.
BBBB
Press the [OK] key.
DDDD
Note
❒ The program numbers (1 to 9)
will be displayed in the panel
display.
❒ If a user program has been pro-
tected, that program number
will not appear in the panel display. To change a protected user
program, see p.74 “Protecting a
Program”.
❒ If all the user programs have
been protected, you cannot
store any settings. Press the
[Cancel] key.
Select the program number you
EEEE
want to store the settings in with
the [←←←←] [→
→] or {{{{~~~~}}}} {{{{}}}}}}}} keys.
→→
1
Select [Store] with the [→
CCCC
key.
→] or {{{{}}}}}}}}
→→
Note
❒ You can also select the program
number with the number keys.
Press the [OK] key.
FFFF
Note
❒ If this program number is al-
ready used, the machine asks
whether you wish to overwrite
it or not. Press the [Yes] or [No]
key.
73
Page 13
Operation
1
Protecting a Program
If you want to prevent someone from
writing over your program, do the
following:
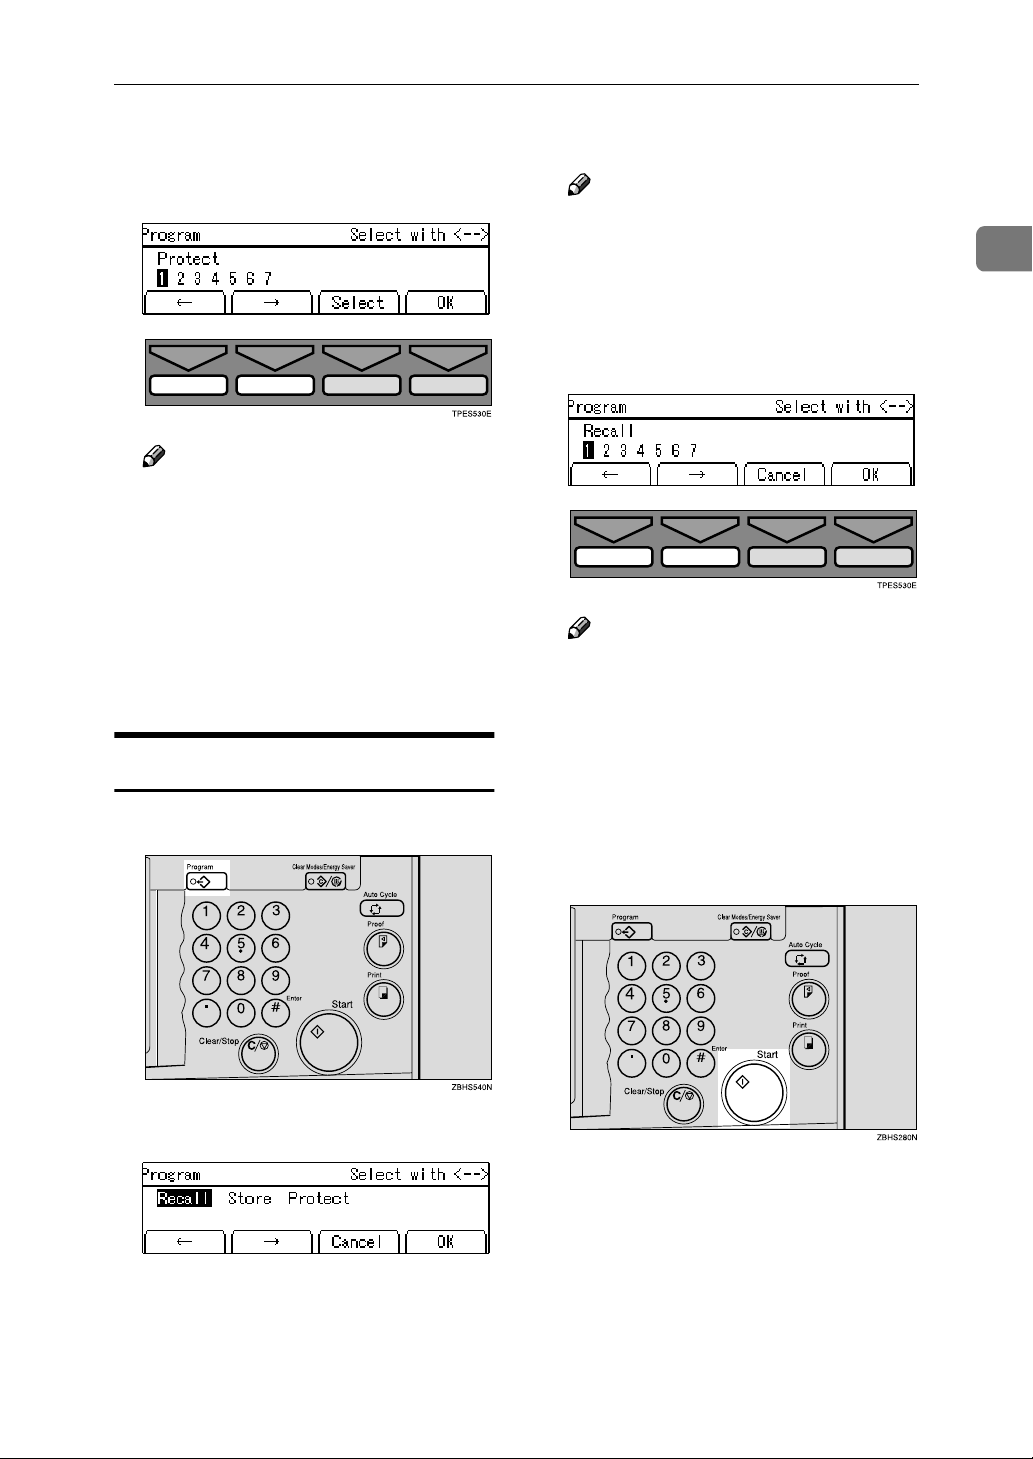
Press the {{{{Program}}}} key.
AAAA
Select [Protect] with the [→→→→] or
BBBB
{{{{}}}}}}}} key.
Note
❒ Already protected program num-
bers are shown with a black background (e.g. A).
❒ You can also select the program
number with the number keys.
Press the [Select] key.
EEEE
Press the [OK] key.
FFFF
Removing Program Protection
Press the {{{{Program}}}} key.
AAAA
Press the [OK] key.
CCCC
Select the program number you
DDDD
want to protect with the [←←←←] [→→→→]
or {{{{~~~~}}}} {{{{}}}}}}}} keys.
Select [Protect] with the [→→→→] or
BBBB
{{{{}}}}}}}} key.
Press the [OK] key.
CCCC
74
Page 14
Programs
Select the program number you
DDDD
want to remove protection from
with the [←←←←] [→
Note
❒ Already protected program num-
bers are shown with a black background (e.g. A).
❒ You can also select the program
number with the number keys.
Press the [Select] key.
EEEE
Press the [OK] key.
FFFF
→] or {{{{~~~~}}}} {{{{}}}}}}}} keys.
→→
Press the [OK] key.
CCCC
Note
❒ Programs that have been stored
beforehand are represented by a
number.
Select the program number you
DDDD
want to recall with the [←←←←] [→→→→] or
{{{{~~~~}}}} {{{{}}}}}}}} keys.
Note
❒ You can also select the program
number with the number keys.
1
Recalling a Program
Press the {{{{Program}}}} key.
AAAA
Make sure that [Recall] is selected.
BBBB
Press the [OK] key.
EEEE
Place your original on the expo-
FFFF
sure glass or in the optional document feeder.
Press the {{{{Start}}}} key.
GGGG
75
Page 15
1
Operation
Security Mode
This function prevents others from making prints of confidential documents
from the master. For example, if you
want to print some documents with sensitive information, use this function after
making your prints so that nobody can
access that master again.
Make your prints.
AAAA
Press the {{{{Security}}}} key.
BBBB
Image Density
Stamp
Make-Up
Lighter
Normal
Darker 1
Darker 2
On Line
Auto On Line
Over lay
Skip Feed
Press the [Yes] key.
CCCC
Edge Erase
Economy Mode
Original Storage
Job Separator
Note
❒ If you set Security Mode, you
cannot make prints after finishing one job even if you press the
{{{{Proof}}}} key or {{{{Print}}}} key. Press
the [Exit] key.
ZDZS040N
76
❒ You cannot cancel Security
mode even if you turn off the
main switch.
❒ Security mode is canceled when
you make a new master.
❒ You cannot pull out the drum
unit when in security mode.
Page 16
Quality Start Mode
Quality Start Mode
If the machine is not used for a long
period of time or you change the color
drum unit, the ink on the drum might
dry causing print quality to deteriorate. To solve this problem, you can
have the machine carry out a few idle
spins of the drum before a print run.
This will restore image quality and
save you having to make a repeat
print run.
You can use this feature in two ways:
❖❖❖❖ Manual Quality Start
Choose Quality Start mode for the
next print run manually using the
{{{{Quality Start}}}} key.
❖❖❖❖ Auto Quality Start
Have the machine check automatically how long ago it was used before each print run. If the machine
has not been used for a long time,
Quality Start will be used for the
print job. By default, Auto Quality
Start mode is on. You can turn it off
with the user tools. See “Setting
Q.start” on p.146 “4. Mode Setting”.
You can set whether Auto Quality
Start mode is used for Before print
and After print by selecting “Yes”
or “No” in Auto Quality Start
mode with the user tools. See p.146
“4. Mode Setting”.
If Before print is selected for Auto
Quality Start mode, the machine
carries out a few idle spins before a
print run.
If After print is selected for Auto
Quality Start mode, the machine
carries out ink removal before entering Energy Saver mode to prevent ink bleeding for the print.
Note
❒ You can change the number of
spins in Manual Quality Start
mode with the user tools. See
“Idling for Q.start” on p.146 “4.
Mode Setting”.
❒ You can change the number of
spins after the fixed time period
has passed in Auto Quality Start
mode with the user tools. See “No.
of Q.start” on p.146 “4. Mode Setting”.
❒ Use this mode in combination with
Energy Saver mode to produce
even better results.
Using Quality Start Manually
Press the {{{{Quality Start}}}} key.
AAAA
Image Density
Stamp
Make-Up
Over lay
Skip Feed
Place your original on the expo-
BBBB
Edge Erase
sure glass or in the optional document feeder.
Lighter
Normal
Darker 1
Darker 2
Economy Mode
Original Storage
On Line
Auto On Line
Job Separator
ZDZS050N
1
77
Page 17
1
Operation
Press the {{{{Start}}}} key.
CCCC
The drum unit idles.
Make your prints.
DDDD
78
Page 18
Job Separation
R
Job Separation
The print on the top of each print set in the paper delivery tray is pulled by the
job separator. This function is useful when you make two or more print sets.
GRJOBS0E
CAUTION:
• While printing, do not touch the belt at the end of the paper delivery tray or
the job separator. Otherwise, an injury might occur.
Limitation
❒ In Job Separation mode, the following limitations apply.
1
❖❖❖❖ Metric version
Minimum paper size Maximum paper weight Paper delivery tray capacity
Length: 210mm
Width: 128mm
127.9g/m
2
600 sheets (64g/m2)
❖❖❖❖ Inch version
Minimum paper size Maximum paper weight Paper delivery tray capacity
Length: 8.3"
Width: 5.1"
Note
34 lb 600 sheets (17 lb)
❒ When you use thin paper, it is not recommended to use Job Separation mode.
The job separator might tear the paper.
❒ If the job separator touches the print image, prints might be marked. In this
case, it is not recommended to use Job Separation mode.
❒ When you do not use Job Separation mode, you can select the machine con-
dition after each print set is fed out to the paper delivery tray with the user
tools. See “Auto Class” on p.146 “4. Mode Setting”.
❒ If there are less than 10 sheets of paper in the paper delivery tray, the machine
may not be able to use Job Separation mode.
79
Page 19
1
Operation
Press the {{{{Job Separator}}}} key.
AAAA
Image Density
Stamp
Make-Up
Lighter
Normal
Darker 1
Darker 2
On Line
Auto On Line
Skip Feed
Make your prints.
BBBB
Over lay
Edge Erase
Economy Mode
Original Storage
Job Separator
ZDZS060N
Note
❒ After the last page of each print set is fed out to the paper delivery tray, the
job separator pulls the last sheet of each group in Job Separation mode. The
next job separation begins.
ZDZH110E
80
Page 20
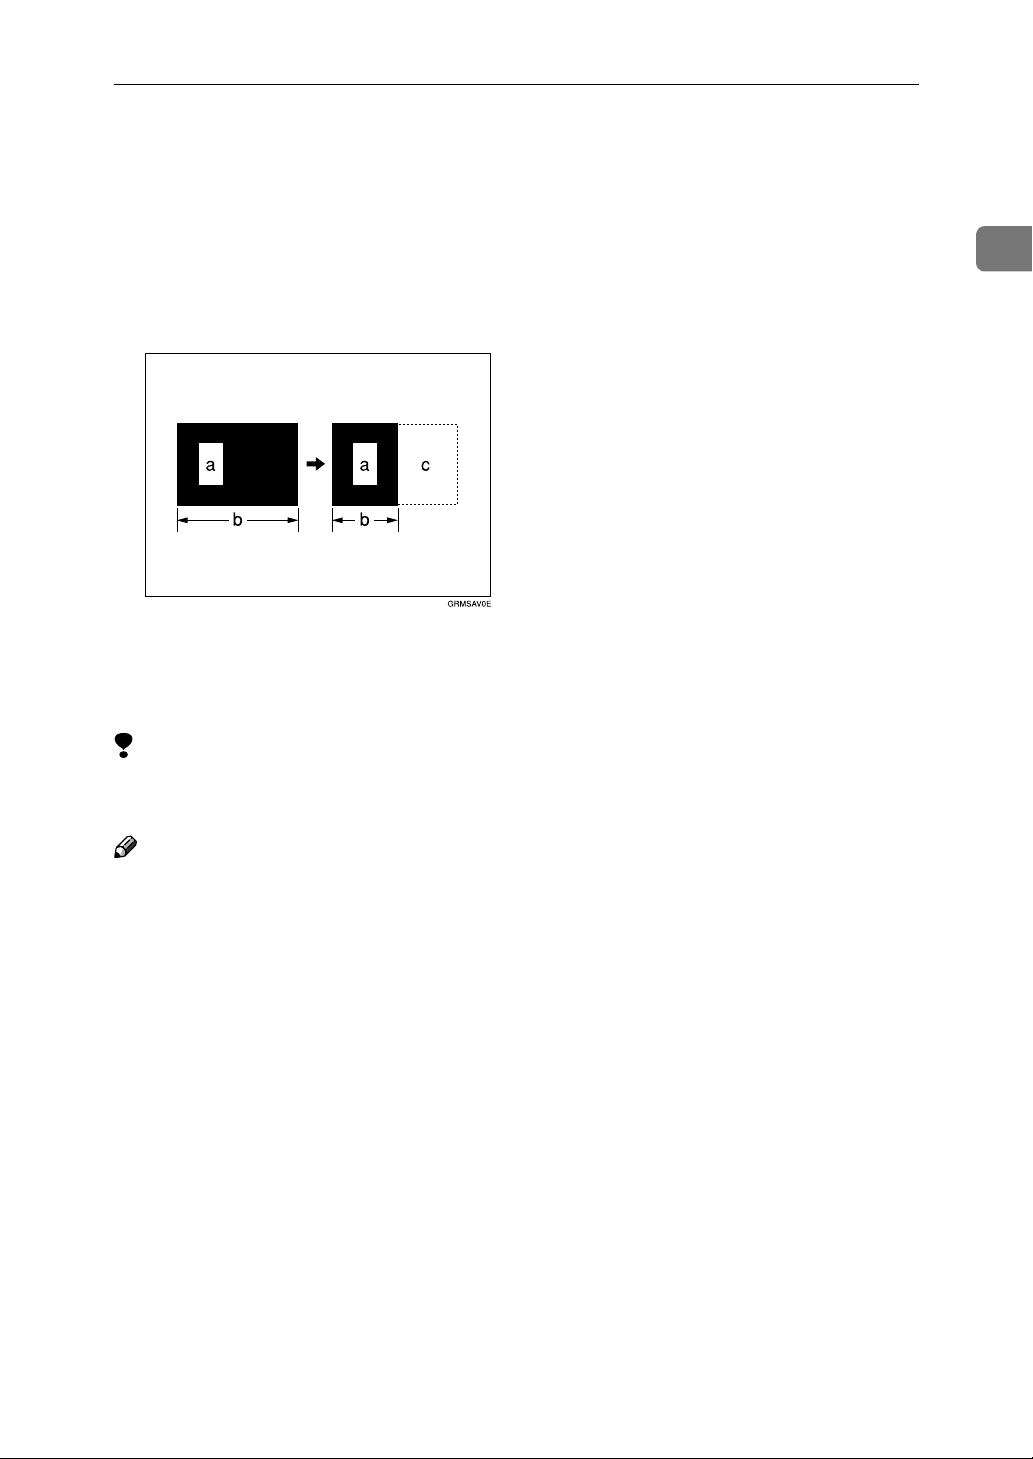
Conserving the Master
The machine automatically changes
the master length depending on the
paper size you use. This saves both
master and ink.
a = Images on the master
Conserving the Master
1
b = Masters
c = Conserved area
Limitation
❒ The optional document feeder is
required.
Note
❒ This function is turned on when
you use A4K, 8
B5K paper and you set 2 or more
originals in the optional document
feeder.
❒ This function does not apply to the
last page.
❒ You can cancel Master Saving
mode with the user tools. See
“Master length” on p.146 “4. Mode
Setting”. You can also save master
using the optional A4, 8
drum. See p.136 “Changing the
Drum Size”.
1
/2" × 11" K or
1
/2" × 11"
81
Page 21
1
Operation
Double Feed
When two or more sheets of paper
feed at once, the machine stops and a
warning message appears on the panel display.
Preparation
To use the double feed function,
select “On” for the “Double Feed
Warng” with the user tools. See
p.146 “4. Mode Setting” No.28.
Note
❒ Double Feed function may not de-
tect the paper properly when:
• There is a mixture of different
colored paper.
• There is a mixture of paper of
differing thickness.
❒ Double feed is possible with paper
size from A6 to Double letter.
When a Double Feed is Detected
When a double feed is detected, the
machine stops and a warning message appears on the panel display.
Check the output and press [Exit]
AAAA
key.
Note
❒ When the misfeeds message is
displayed, remove the misfed
paper. See p.175 “x Clearing
Misfeeds”.
❒ When paper is wrapped around
the drum, open the front door
and remove it. See p.177 “When
paper is wrapped around the
drum”.
Remove the misfed paper.
BBBB
Note
❒ If a double feed is wrongly de-
tected while printing on the reverse side of paper or the face of
printed paper, select “Off” for
“Double Feed Warng” with the
user tools. See p.146 “4. Mode
Setting” No.28.
❒ How to prevent double feed.
See p.197 “Do's and Don'ts”.
82
Page 22
On Line Printing
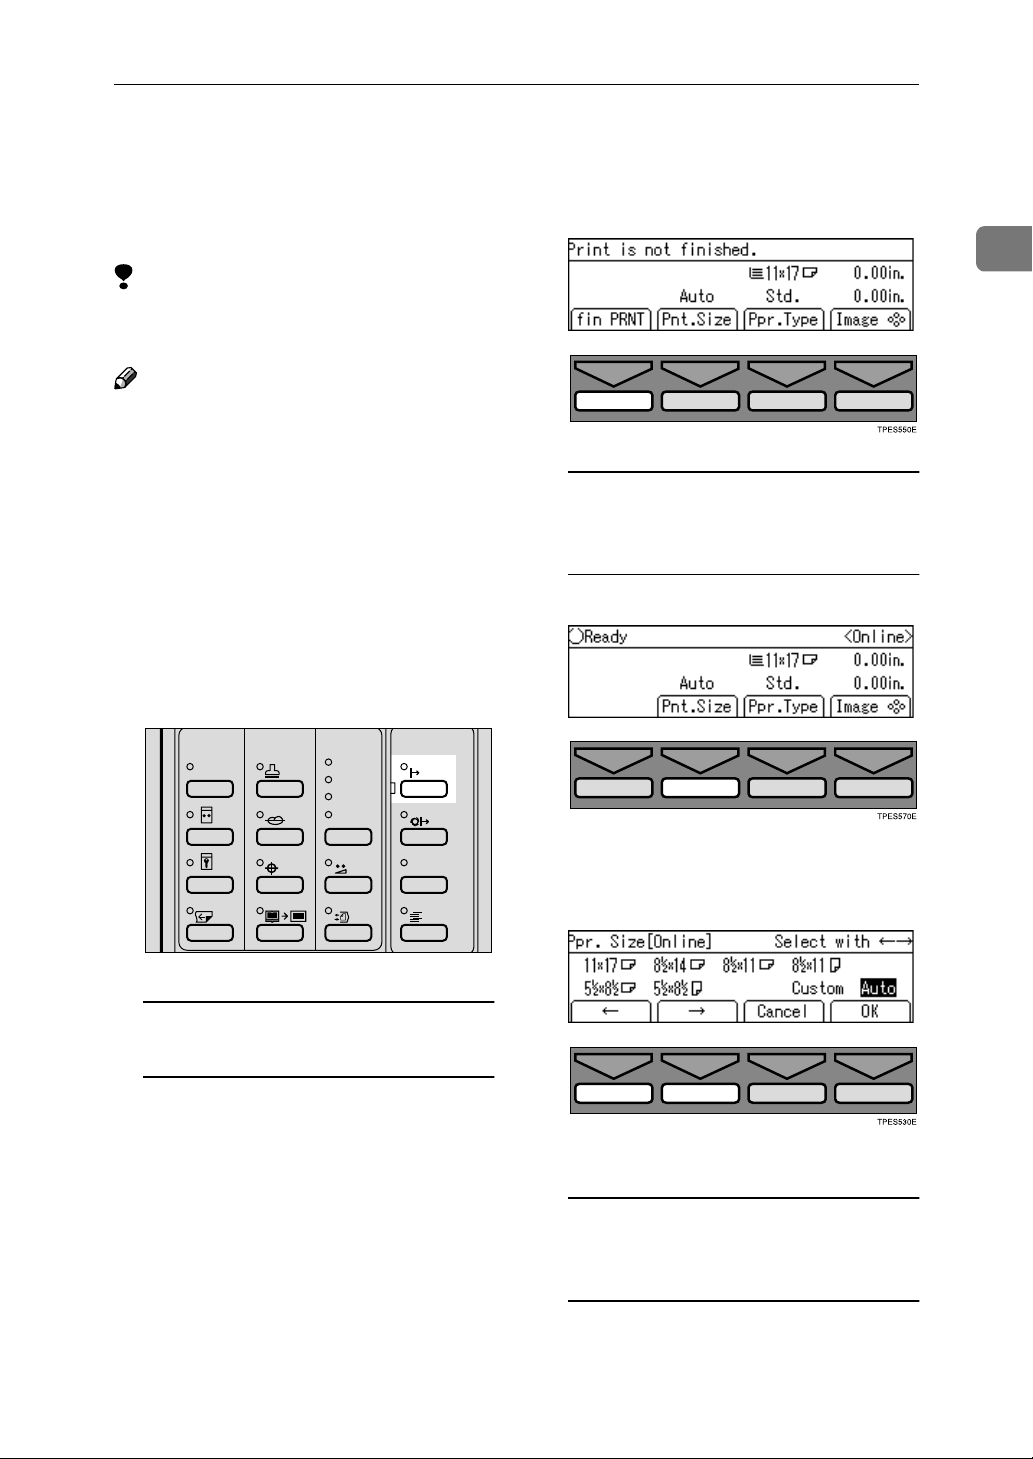
On Line Printing
On Line printing allows you to use
this machine as a PC printer.
Limitation
❒ The optional PC controller is re-
quired.
Note
❒ Before printing onto A5K, 5
1
8
/2" K, or non-standard size pa-
1
/2" ×
per, you need to select the paper
size with the [Pnt.Size] key.
❒ When printing onto thick paper,
thin paper or special kinds of paper from the paper feed tray, select
the paper type before pressing the
{{{{On Line}}}} key. See p.43 “Printing
onto Various Kinds of Paper”.
Press the {{{{On Line}}}} key.
AAAA
Image Density
Skip Feed
Stamp
Make-Up
Over lay
Edge Erase
Lighter
Normal
Darker 1
Darker 2
Economy Mode
Original Storage
On Line
Auto On Line
Job Separator
A Press the [fin PRNT] key.
When printing onto A5K, 51/2" ×
81/2" K, or non-standard paper
sizes
A Press the [Pnt.Size] key.
1
B Select A5KKKK, 5
/2" ×××× 81/2"KKKK, or
Custom (non-standard) with
the [←←←←] or [→→→→] key.
1
ZDZS070N
When a print job has not finished
printing while in online mode
If a print job has not finished printing and the job is interrupted, the
machine cannot receive data from
the PC. To print the next job from
the PC, cancel the interrupted
print job.
C Press the [OK] key.
When printing onto standard
paper sizes or sizes other than
A5K, 51/2" × 81/2"K
A Refer to the PC controller man-
ual.
83
Page 23
1
Operation
Auto On Line
You can select whether the machine
automatically switches to On Line
mode when it receives data from a
PC.
Preparation
• The default setting for On Line
mode is On. However, you can
change the setting to Off if required.
• You can press the {{{{Auto On Line}}}}
key to switch Auto On Line on
or off. If the Auto On Line indicator is lit, Auto On Line is active. If the indicator is off, Auto
On Line is inactive.
• When the Auto On Line indicator is lit, Auto On Line has priority when data is received
from a PC. If you want to prevent the machine from interrupting a print job when it
receives data from a PC, press
the {{{{Auto On Line}}}} key so the
Auto On Line indicator goes off
and Auto On Line becomes inactive.
84
Press the {{{{Auto On Line}}}} key.
AAAA
Image Density
Skip Feed
Stamp
Make-Up
Over lay
Edge Erase
Lighter
Normal
Darker 1
Darker 2
Economy Mode
Original Storage
On Line
Auto On Line
Job Separator
ZDZS160N
Page 24

Image Rotation
Image Rotation
When your original setting direction is different from the paper direction, the
machine automatically rotates the original image by 90° to match the paper direction.
Note
❒ The following tables list the combinations that can be used in Image Rotation
mode.
❖❖❖❖ Metric version
Original A3L B4L A4L A4K B5L B5K A5L✩ A5K✩
Paper
A4L -- -- -- ★ -- ★ -- ★
A4K ★★★-- ★ -- ★ --
B5L -- -- -- ★ -- ★ -- ★
B5K ★★★-- ★ -- ★ --
1
A5L -- -- -- ★ -- ★ -- ★
B6L -- -- -- ★ -- ★ -- ★
★: The machine automatically rotates the original image by 90° to match the pa-
per direction.
✩: Place these originals in the optional document feeder.
❖❖❖❖ Inch version
1
Original 11" ×
Paper
1
8
/2" × 11"L -- -- -- ★ -- ★
1
8
/2" × 11"K ★★ ★ -- ★ --
1
5
/2" ×
1
/2"L
8
17"L
-- -- -- ★ -- ★
8
/2" ×
14"L
1
8
/2" ×
11"L
1
8
/2" ×
11"K
1
5
/2" ×
1
/2"L✩
8
1
5
/2" ×
1
/2" K✩
8
★: The machine automatically rotates the original image by 90° to match the pa-
per direction.
✩: Place these originals in the optional document feeder.
Note
❒ If you use Zoom mode, non-standard size originals or paper, the image will
not be rotated.
❒ It takes longer than usual to make masters in Image Rotation mode.
❒ You can cancel Image Rotation mode with the user tools. See “Auto Rotation”
on p.146 “4. Mode Setting”.
85
Page 25

1
MAKE
UP!
Operation
Make-up Printing Features
Make-up mode enables you to do more than just make an exact copy of the original. A variety of editing and image processing functions allow you to quickly
and easily customize your prints.
Main Features
Command sheets allow you to create special effects without cutting and pasting—up to 4 commands can be given for an original. By combining Make-up
modes and printing with different color drums, you can create a variety of printing effects.
Make-up Modes for Designated Areas
Mode Sample
Designated Area Command sheet/Original
(Closed area method)
1. Letter mode
WORLD
World computer and
peripheral devices
are equipped with
2. Photo mode
HAWAII
Please enjoy your
Summer vacation.
3. Delete Area mode
Hello!
How are you?
4. Outline mode
MAKE
UP!
Print
WORLD
World computer and
peripheral devices
are equipped with
HAWAII
Please enjoy your
Summer vacation.
Hello!
How are you?
86
5. P./N. mode (Positive Negative mode)
BALLET
BALLET
Page 26

Mode Sample
Make-up Printing Features
Designated Area Command sheet/Original
(Closed area method)
6. Solid mode (Image Pattern
mode)
BALLET
7. All Page Pattern mode
(Area Pattern mode)
LUNCH
MENU
8. All + Outline (Image Outline and Area Pattern
mode)
CAT
Print
BALLET
LUNCH
MENU
CAT
1
87
Page 27

Operation
HAWAII
Make-up Modes for Outside Designated Areas
Mode Sample
1
Undesignated Area Command sheet/Original Print
1. Letter mode: The area outside designated areas is
HAWAII
printed in Letter mode.
Please enjoy your
Summer vacation.
2. Photo mode: The area outside designated areas is
WORLD
printed in Photo mode.
World computer and
peripheral devices
are equipped with
3. Save Area mode: The area
outside the designated ar-
HAWAII
eas is deleted.
Please enjoy your
Summer vacation.
4. Outline mode: The area
outside the designated
area is printed in Outline
mode.
HAWAII
HAWAII
Please enjoy your
Summer vacation.
WORLD
World computer and
peripheral devices
are equipped with
Note
❒ In Make-up mode, commands must be given for both designated areas and
areas outside the designated areas.
88
Page 28

Make-up Printing Features
Background Patterns
A total of 164 background patterns is available in Make-up mode:
• 40 basic patterns
• 40 patterns similar to the basic patterns but with patterns elements at 4 times
the size.
• 80 variants based on 90° rotations of all the basic and enlarged patterns.
• 4 registered user patterns.
1
* Paper Feed Direction
Note
❒ The basic patterns are numbered 1 to 40.
❒ You can make your own make-up background patterns with the user tools.
See p.165 “5-11 Make/Chg. Pattern”.
89
Page 29

1
Operation
Command Sheets for Make-Up Printing
Command sheets are fed first so that the machine can recognize the areas of the
original which are to be edited as designated areas.
Command Sheets
The command sheet is a sheet of paper designating the areas to be edited. Command sheets must be made on white or translucent paper, and should be the
same size as the original.
Do not designate areas within 5 mm, 0.2" from the top.
Note
❒ Poor quality paper (such as newsprint, recycled paper, etc.) should not be
used for command sheets because any dark spots or streaks will be read as
designated areas.
❒ Do not use blotting paper or other absorbent paper for command sheets be-
cause ink might leak through the paper and get the exposure glass dirty.
Making a Command Sheet
There are two ways of designating areas: the diagonal line method and the
closed area method.
----Features
• You can combine up to 4 command sheets when making a master.
• You cannot use both the closed and diagonal line method on the same com-
mand sheet.
90
Page 30

Command Sheets for Make-Up Printing
• There is no limit to the number of areas you can designate on a single command sheet.
• If designated areas on two or more command sheets overlap, the last command sheet will apply to the overlapping portion.
• If you use Outline mode for letter images with a thickness of less than 3mm,
0.12", the print image might come out as expected.
1
----Notes
The image might differ depending on how the designated area is drawn, so remember the following when making the command sheet.
Designated area Area recognized Preferred designated area
Part of the designated area is
surrounded by 3 sides of the entire area.
Double line pattern. Only the outer line is
recognized.
Make a space of at least 2mm,
0.08", in front of the area surrounded by 3 sides (relative to the feed
direction).
12
1, 2 = 2mm, 0.08"
Make a gap of at least 2mm, 0.08"
in width.
91
Page 31

Operation
Designated area Area recognized Preferred designated area
1
The designated area is surrounded by 3 sides of another
designated area.
Non-closed line Designate the area with a closed
Make a space of at least 2mm, 0.08"
in front of the area surrounded by
3 sides (relative to the feeding direction).
2
1
1, 2 = 2mm, 0.08"
line.
Diagonal line method
Note
❒ A diagonal line must be drawn through the area that you wish to edit.
Put the command sheet on top of the original.
AAAA
ZM-20
92
Page 32

Command Sheets for Make-Up Printing
Draw a line using a felt tip pen (black, red or blue) with a thickness of at
BBBB
least 1mm.
ZM-21
Note
❒ Make sure there is no break in the line.
❒ The diagonal line can be drawn from left to right or vice versa.
❒ Draw the line at least 2mm, 0.08", away from the image so that the whole
image can be recognized.
a
b
1
c
d
GRCOMM1E
a, b, c, d = 2mm, 0.08"
❒ The line marking the designated area should be more than 2mm, 0.08",
from any neighboring image.
a
b
c
GRCOMM2E
a, b, c = 2mm, 0.08"
93
Page 33

1
Operation
Closed area method
Note
❒ The line designating the area must be a closed loop.
Put the command sheet on top of the original.
AAAA
ZM-20
Using a black, red, or blue felt tip pen, draw a line around the area to des-
BBBB
ignate. The line should have a thickness of at least 1mm.
ZM-26
Note
❒ Make sure there is no break in the line.
❒ Draw the line at least 2mm, 0.08", away from the image so that the whole
image can be recognized.
a = Line marking the designated area
b = 2mm, 0.08"
c = Image within the designated area
94
Page 34

Command Sheets for Make-Up Printing
❒ The line marking the designated area should be more than 2mm, 0.08",
from any neighboring image.
1
a
d
b
c
GRCOMM4E
a = 2mm, 0.08"
b = Neighboring image
c = Line marking the designated area
d = Image within the designated area
Command Sheets and Finished Prints
The following illustrations will help you understand how to draw a command
sheet.
❖❖❖❖ Drawing a command sheet using a diagonal line
The diagonal line method is easy to use for designating rectangular areas. It is
also more precise, but it is difficult to use for designating complex areas.
95
Page 35

1
Operation
❖❖❖❖ Drawing a command sheet using a closed line
fruit
The closed line method is easier to use for complex areas, but it is less precise. It
also takes longer to draw a command sheet with the closed line method.
96
Page 36

Make-up Printing
Make-up Printing
Press the {{{{Make-Up}}}} key.
AAAA
Image Density
Stamp
Make-Up
Over lay
Skip Feed
Make sure that [1] is selected.
BBBB
Edge Erase
Lighter
Normal
Darker 1
Darker 2
Economy Mode
Original Storage
On Line
Auto On Line
Job Separator
Then press the [OK] key.
ZDZS080N
Select the mode for the first com-
EEEE
mand sheet with the [←←←←] [→→→→] or
{{{{~~~~}}}} {{{{}}}}}}}} {{{{||||}}}} {{{{{{{{}}}} keys.
Press the [OK] key.
FFFF
If necessary, select the pattern for
GGGG
the first command sheet with the
{{{{~~~~}}}}, {{{{}}}}}}}}, {{{{||||}}}}, or {{{{{{{{}}}} key. Then
press the [OK] key.
1
Select the frame shape with the
CCCC
[←←←←] [→
→] or {{{{~~~~}}}} {{{{}}}}}}}} keys.
→→
Press the [OK] key.
DDDD
If necessary, select the size and
HHHH
direction of the pattern you selected in step GGGG with the [←←←←] [→→→→]
or {{{{~~~~}}}} {{{{}}}}}}}} keys.
97
Page 37

Operation
1
Press the [OK] key.
IIII
Note
❒ Follow steps B – I for the other
command sheets.
❒ You can select a pattern regis-
tered with the user tools for
only one command sheet.
❒ To change the value entered,
press the {{{{Clear/Stop}}}} key and
enter the new value.
After you have finished designat-
JJJJ
ing modes for all the command
sheets, select [Outside Area] with
the [←←←←] [→
→] or {{{{~~~~}}}} {{{{}}}}}}}} keys.
→→
Press the [OK] key.
LLLL
Note
❒ When you select Photo mode
for both inside and outside areas, you cannot select different
dot patterns and contrast.
❒ When you want to confirm your
settings, press the {{{{Make-Up}}}}
key twice. Then press the [OK]
key repeatedly until the panel
display reaches the setting you
want to confirm.
If you have selected Photo mode,
MMMM
select the dot pattern and the contrast with the [←←←←] [→
keys.
→] or {{{{~~~~}}}} {{{{}}}}}}}}
→→
Select the mode for the outside
KKKK
area with the [←←←←] [→
keys.
→] or {{{{~~~~}}}} {{{{}}}}}}}}
→→
Note
❒ Four dot patterns settings are
available:
• Setting 1: clearest
• Setting 2: clearer than setting 3
• Setting 3: clearer than setting 4
• Setting 4: clearer than the
standard setting
98
Page 38

Press the [OK] key.
NNNN
Place the first command sheet
OOOO
face down on the exposure glass
and press the {{{{Start}}}} key.
The beeper sounds after the command sheet is scanned.
Note
❒ Repeat step O for the other com-
mand sheets.
Make-up Printing
1
Place the original face down on
PPPP
the exposure glass or face up into
the document feeder and press
the {{{{Start}}}} key.
Note
❒ If a command sheet or original
misfeeds from the document
feeder, remove the misfed sheet
or original and reset it in the
document feeder.
❒ It is not necessary to reset the
previous command sheets or
original.
99
Page 39

Operation
Make-up Samples
1
----Sample 1
Command Sheet No. 1, Frame shape , Designated area: Delete Area mode
A
Outside area: Letter mode
B
Print
C
1 2
1. Original
2. Command sheet No.1
100
3
ZM-50
3. Print
Page 40

Make-up Samples
----Sample 2
Command Sheet No. 1, Frame shape/, Designated area: All + Outline No. 30
A
Command Sheet No. 2 Frame shape , Designated area: All page pattern No.
B
17
Outside area: Fn1
C
Print
D
1
1. Original
2. Command sheet No.1
1
3
2
4
ZM-51
3. Command sheet No.2
4. Print
101
Page 41

1
Operation
----Sample 3
Print the original as it is
A
Change the drum unit for color printing
B
Command Sheet No. 1, Frame shape , Designated area: All page pattern
C
No. 39
Outside area: Letter mode
D
Print
E
1. Original
2. Command sheet No.1
1
3
2
ZM-52
3. Print
102
Page 42

Original Storage
Original Storage
You can store frequently used originals in machine memory and then
easily recall them later to make prints
whenever they are needed.
Preparation
• You can store up to 8 Original
Storage settings in machine
memory.
• The number of Original Storage
settings you can store depends
on the type of originals.
• You may not be able to store
Original Storage settings for
some types of original.
• The machine remembers Origi-
nal Storage settings even after
the power to the machine has
been switched off or the {{{{Clear
Modes/Energy Saver}}}} key has
been pressed to clear.
Press the {{{{Original Storage}}}} key.
AAAA
Image Density
Stamp
Make-Up
Over lay
Skip Feed
Select [Store] with the [→
BBBB
Edge Erase
Lighter
Normal
Darker 1
Darker 2
Economy Mode
Original Storage
→] or {{{{}}}}}}}}
→→
key.
1
On Line
Auto On Line
Job Separator
ZDZS170N
Storing Originals
Store the print images of the originals
you want to use frequently.
Note
❒ You can use this feature with:
• Reproduction Ratio
• Selecting Original Modes
• Adjusting the Image Density of
Prints
• Edge Erase
Press the [OK] key.
CCCC
Select the desired number to store
DDDD
with the [←←←←][→
→] or {{{{~~~~}}}}{{{{}}}}}}}} keys.
→→
103
Page 43

1
Operation
Place the original on the exposure
EEEE
glass as shown, then press the
{{{{Start}}}} key.
Note
❒ If print images for an original
have already been stored in machine memory, check the stored
images and choose whether to
overwrite them or not. To overwrite the images, press the [Yes]
key. To keep the images, press
the [No] key.
Non-standard size originals
A If you place non-standard size
original, this display will be
shown.
Press the [OK] key.
ZDCH110E
B Enter the vertical length with
the number key, and then
press the {{{{#}}}} key.
C Enter the horizontal width
with the number key, and then
press the {{{{#}}}} key.
104
TPES580E
❒ If you select overwrite, the doc-
ument stored in memory will be
erased unless it is write protected.
D Place your originals on the ex-
posure glass, and then press
the {{{{Start}}}} key.
Page 44

Original Storage
Selecting Stored Originals
To select the images of originals that
have been stored in machine memory, do the following:
Press the {{{{Original Storage}}}} key.
AAAA
Image Density
Stamp
Make-Up
Over lay
Skip Feed
Select [Select] with the [←←←←][→→→→] or
BBBB
Edge Erase
{{{{~~~~}}}}{{{{}}}}}}}} keys.
Lighter
Normal
Darker 1
Darker 2
Economy Mode
Original Storage
On Line
Auto On Line
Job Separator
ZDZS170N
Protecting Stored Originals
If you want to protect the images of
originals stored in machine memory,
do the following:
Protecting Originals
Press the {{{{Original Storage}}}} key.
AAAA
Image Density
Stamp
Make-Up
Over lay
Skip Feed
Select [Protect] with the [→→→→] or
BBBB
Edge Erase
{{{{}}}}}}}} key.
Lighter
Normal
Darker 1
Darker 2
Economy Mode
Original Storage
On Line
Auto On Line
Job Separator
ZDZS170N
1
Press the [OK] key.
CCCC
Select the number of the stored
DDDD
original with the [←←←←][→→→→] or
{{{{~~~~}}}}{{{{}}}}}}}} keys.
Press the [OK] key.
EEEE
Press the {{{{Start}}}} key.
FFFF
Press the [OK] key.
CCCC
Select the number of the original
DDDD
to be protected with the [←←←←][→→→→] or
{{{{~~~~}}}}{{{{}}}}}}}} keys.
Press the [Select] key.
EEEE
105
Page 45
Operation
Press the [OK] key.
FFFF
Deleting Stored Originals
1
Removing Original Protection
Press the {{{{Original Storage}}}} key.
AAAA
Image Density
Stamp
Make-Up
Over lay
Skip Feed
Select [Protect] with the [→→→→] or
BBBB
Edge Erase
Lighter
Normal
Darker 1
Darker 2
Economy Mode
Original Storage
On Line
Auto On Line
Job Separator
{{{{}}}}}}}} key.
ZDZS170N
If you want to delete the images of
originals stored in machine memory,
do the following:
Important
❒ You cannot restore the images
once they have been deleted.
Press the {{{{Original Storage}}}} key.
AAAA
Image Density
Stamp
Make-Up
Over lay
Skip Feed
Select [Delete] with the [→
BBBB
Edge Erase
Lighter
Normal
Darker 1
Darker 2
Economy Mode
Original Storage
On Line
Auto On Line
Job Separator
ZDZS170N
→] or {{{{}}}}}}}}
→→
key.
106
Press the [OK] key.
CCCC
Press the [Cancel] key.
DDDD
Select the number of the original
CCCC
to be deleted with the [←←←←][→→→→] or
{{{{~~~~}}}}{{{{}}}}}}}} keys.
Page 46

Select the [Yes] or [No] key.
DDDD
Note
❒ Press the [No] key if you do not
wish to delete the Stored Original.
Original Storage
1
TPES580E
107
Page 47

Operation
Image Overlay
1
The machine can merge two different
originals onto the same print paper.
Two types of merging are available:
❖❖❖❖ Overlay
ABCDE ABCDE ABCDE ABCDE ABCDE
ABCDE ABCDE ABCDE ABCDE ABCDE
ABCDE ABCDE ABCDE ABCDE ABCDE
ABCDE ABCDE ABCDE ABCDE ABCDE
ABCDE ABCDE ABCDE ABCDE ABCDE
ABCDE ABCDE ABCDE ABCDE ABCDE
ABCDE ABCDE ABCDE ABCDE ABCDE
ABCDE ABCDE ABCDE ABCDE ABCDE
ABCDE ABCDE ABCDE ABCDE ABCDE
ABCDE ABCDE ABCDE ABCDE ABCDE
ABCDE ABCDE ABCDE ABCDE ABCDE
ABCDE ABCDE ABCDE ABCDE ABCDE
ABCDE ABCDE ABCDE ABCDE ABCDE
ABCDE ABCDE ABCDE ABCDE ABCDE
ABCDE ABCDE ABCDE ABCDE ABCDE
ABCDE ABCDE ABCDE ABCDE ABCDE
ABCDE ABCDE ABCDE ABCDE ABCDE
ABCDE ABCDE ABCDE ABCDE ABCDE
ABCDE ABCDE ABCDE ABCDE ABCDE
ABCDE ABCDE ABCDE ABCDE ABCDE
ABCDE ABCDE ABCDE ABCDE ABCDE
ABCDE ABCDE ABCDE ABCDE ABCDE
ABCDE ABCDE ABCDE ABCDE ABCDE
ABCDE ABCDE ABCDE ABCDE ABCDE
ABCDE ABCDE ABCDE ABCDE ABCDE
ABCDE ABCDE ABCDE ABCDE ABCDE
ABCDE ABCDE ABCDE ABCDE ABCDE
ABCDE ABCDE ABCDE ABCDE ABCDE
ABCDE ABCDE ABCDE ABCDE ABCDE
ABCDE ABCDE ABCDE ABCDE ABCDE
ABCDE ABCDE ABCDE ABCDE ABCDE
ABCDE ABCDE ABCDE ABCDE ABCDE
ABCDE ABCDE ABCDE ABCDE ABCDE
ABCDE ABCDE ABCDE ABCDE ABCDE
ABCDE ABCDE ABCDE ABCDE ABCDE
ABCDE ABCDE ABCDE ABCDE ABCDE
ABCDE ABCDE ABCDE ABCDE ABCDE
ABCDE ABCDE ABCDE ABCDE ABCDE
ABCDE ABCDE ABCDE ABCDE ABCDE
ABCDE ABCDE ABCDE ABCDE ABCDE
ABCDE ABCDE ABCDE ABCDE ABCDE
ABCDE ABCDE ABCDE ABCDE ABCDE
ABCDE ABCDE ABCDE ABCDE ABCDE
ABCDE ABCDE ABCDE ABCDE ABCDE
GROVER0E
Two different originals are merged
onto the same print paper.
❖❖❖❖ Format
RR
R
GROVER1E
The image of the original which is
copied first will become the background image for all copies. The
following originals will be copied
with this background.
❖❖❖❖ On Line overlay
When your machine is equipped
with the optional PC controller, an
image sent from a PC and the original image can be merged onto the
same print paper.
❖❖❖❖ Storage overlay
ABCDE ABCDE ABCDE ABCDE ABCDE
ABCDE ABCDE ABCDE ABCDE ABCDE
ABCDE ABCDE ABCDE ABCDE ABCDE
ABCDE ABCDE ABCDE ABCDE ABCDE
ABCDE ABCDE ABCDE ABCDE ABCDE
ABCDE ABCDE ABCDE ABCDE ABCDE
ABCDE ABCDE ABCDE ABCDE ABCDE
ABCDE ABCDE ABCDE ABCDE ABCDE
ABCDE ABCDE ABCDE ABCDE ABCDE
ABCDE ABCDE ABCDE ABCDE ABCDE
ABCDE ABCDE ABCDE ABCDE ABCDE
ABCDE ABCDE ABCDE ABCDE ABCDE
ABCDE ABCDE ABCDE ABCDE ABCDE
ABCDE ABCDE ABCDE ABCDE ABCDE
ABCDE ABCDE ABCDE ABCDE ABCDE
ABCDE ABCDE ABCDE ABCDE ABCDE
ABCDE ABCDE ABCDE ABCDE ABCDE
ABCDE ABCDE ABCDE ABCDE ABCDE
ABCDE ABCDE ABCDE ABCDE ABCDE
ABCDE ABCDE ABCDE ABCDE ABCDE
ABCDE ABCDE ABCDE ABCDE ABCDE
ABCDE ABCDE ABCDE ABCDE ABCDE
A
ABCDE ABCDE ABCDE ABCDE ABCDE
ABCDE ABCDE ABCDE ABCDE ABCDE
ABCDE ABCDE ABCDE ABCDE ABCDE
ABCDE ABCDE ABCDE ABCDE ABCDE
ABCDE ABCDE ABCDE ABCDE ABCDE
ABCDE ABCDE ABCDE ABCDE ABCDE
ABCDE ABCDE ABCDE ABCDE ABCDE
ABCDE ABCDE ABCDE ABCDE ABCDE
ABCDE ABCDE ABCDE ABCDE ABCDE
ABCDE ABCDE ABCDE ABCDE ABCDE
ABCDE ABCDE ABCDE ABCDE ABCDE
ABCDE ABCDE ABCDE ABCDE ABCDE
ABCDE ABCDE ABCDE ABCDE ABCDE
ABCDE ABCDE ABCDE ABCDE ABCDE
ABCDE ABCDE ABCDE ABCDE ABCDE
ABCDE ABCDE ABCDE ABCDE ABCDE
ABCDE ABCDE ABCDE ABCDE ABCDE
ABCDE ABCDE ABCDE ABCDE ABCDE
ABCDE ABCDE ABCDE ABCDE ABCDE
ABCDE ABCDE ABCDE ABCDE ABCDE
ABCDE ABCDE ABCDE ABCDE ABCDE
ABCDE ABCDE ABCDE ABCDE ABCDE
BB
A
Combines the images of originals
stored in Original Storage with the
originals placed on the machine.
Storage Overlay
Press the {{{{Overlay}}}} key.
AAAA
Image Density
Stamp
Make-Up
Over lay
Skip Feed
Select [Storage overlay] with the
BBBB
[←←←←][→
→] or {{{{~~~~}}}}{{{{}}}}}}}} keys.
→→
Edge Erase
Lighter
Normal
Darker 1
Darker 2
Economy Mode
Original Storage
On Line
Auto On Line
Job Separator
ZDZS090N
108
Page 48

Image Overlay
Press the [OK] key.
CCCC
Note
❒ If the one of the stored originals
already chosen, the display in
step C does not show. Skip to
step D.
Press the [OK] key.
DDDD
Place your originals, and then
EEEE
press the {{{{Start}}}} key.
On Line Overlay
Press the {{{{On Line}}}} key.
AAAA
Image Density
Stamp
Make-Up
Over lay
Lighter
Normal
Darker 1
Darker 2
Economy Mode
On Line
Auto On Line
Place you originals and print start
CCCC
with your PC.
Limitation
❒ The optional PC controller is re-
quired to use On Line Overlay
mode.
❒ In order to get a correct print
image, the size of the original
and the PC image should be
identical.
Overlay Format
Press the {{{{Overlay}}}} key.
AAAA
Image Density
Stamp
Make-Up
Over lay
Lighter
Normal
Darker 1
Darker 2
Economy Mode
On Line
Auto On Line
1
Skip Feed
Press the {{{{Overlay}}}} key.
BBBB
Skip Feed
Edge Erase
Stamp
Make-Up
Over lay
Edge Erase
Original Storage
Image Density
Lighter
Normal
Darker 1
Darker 2
Economy Mode
Original Storage
Job Separator
ZDZS070N
On Line
Auto On Line
Job Separator
ZDZS090N
Skip Feed
Select one of Image Overlay
BBBB
modes with the [←←←←] [→
Edge Erase
Original Storage
→] or {{{{~~~~}}}}
→→
Job Separator
{}}}}}}}} keys.
Press the [OK] key.
CCCC
ZDZS090N
109
Page 49

Operation
Place your originals, and then
DDDD
press the {{{{Start}}}} key.
Placing originals in the optional
document feeder
1
Placing originals on the exposure
glass
A Place the first original on the
exposure glass.
ZDCH110E
B Press the {{{{Start}}}} key.
Note
❒ When you select [Format] in
step B, the original for the
template should be placed
first.
❒ To change the background
image in Format mode, press
the {{{{qqqq}}}} key. Then place the
next original for the template
and press the {{{{Start}}}} key.
C Place the next original on the
exposure glass.
D Press the {{{{Start}}}} key.
A Place originals in the docu-
ment feeder.
ZDCH120E
Note
❒ To avoid originals misfeed-
ing, fan the originals before
placing them in the document feeder.
B Press the {{{{Start}}}} key.
Note
❒ When you select [Format] in
step B, the original for the
template should be on the
top.
❒ To change the background
image in Format mode, press
the {{{{qqqq}}}} key. Then set the
next original for the template
and press the {{{{Start}}}} key.
110
Note
❒ When you select [Format] in
step B, repeat steps C and D.
Page 50

Date Stamp
Date Stamp
Use this function to have the date
stamped on prints.
Preparation
Before you use this function, you
have to set the machine's internal
clock with the user tools. See p.156
“1-6 Time Setting”.
Limitation
❒ The font size of the date cannot be
changed.
❒ If you select Page Stamp and Date
Stamp together, the last stamp direction selected takes priority.
Date Stamp
direction
on the display
Print image
1
Note
❒ The default format of Date Stamp
is “Month Day Year”. You can
change this setting with the user
tools. See “Date Style Set” on p.151
“5. Stamp”.
❒ You can edit the Date Stamp posi-
tion. See p.163 “5-7 Position
(Date)”.
❒ The Date Stamp directions on the
panel display and actual print images are as follows.
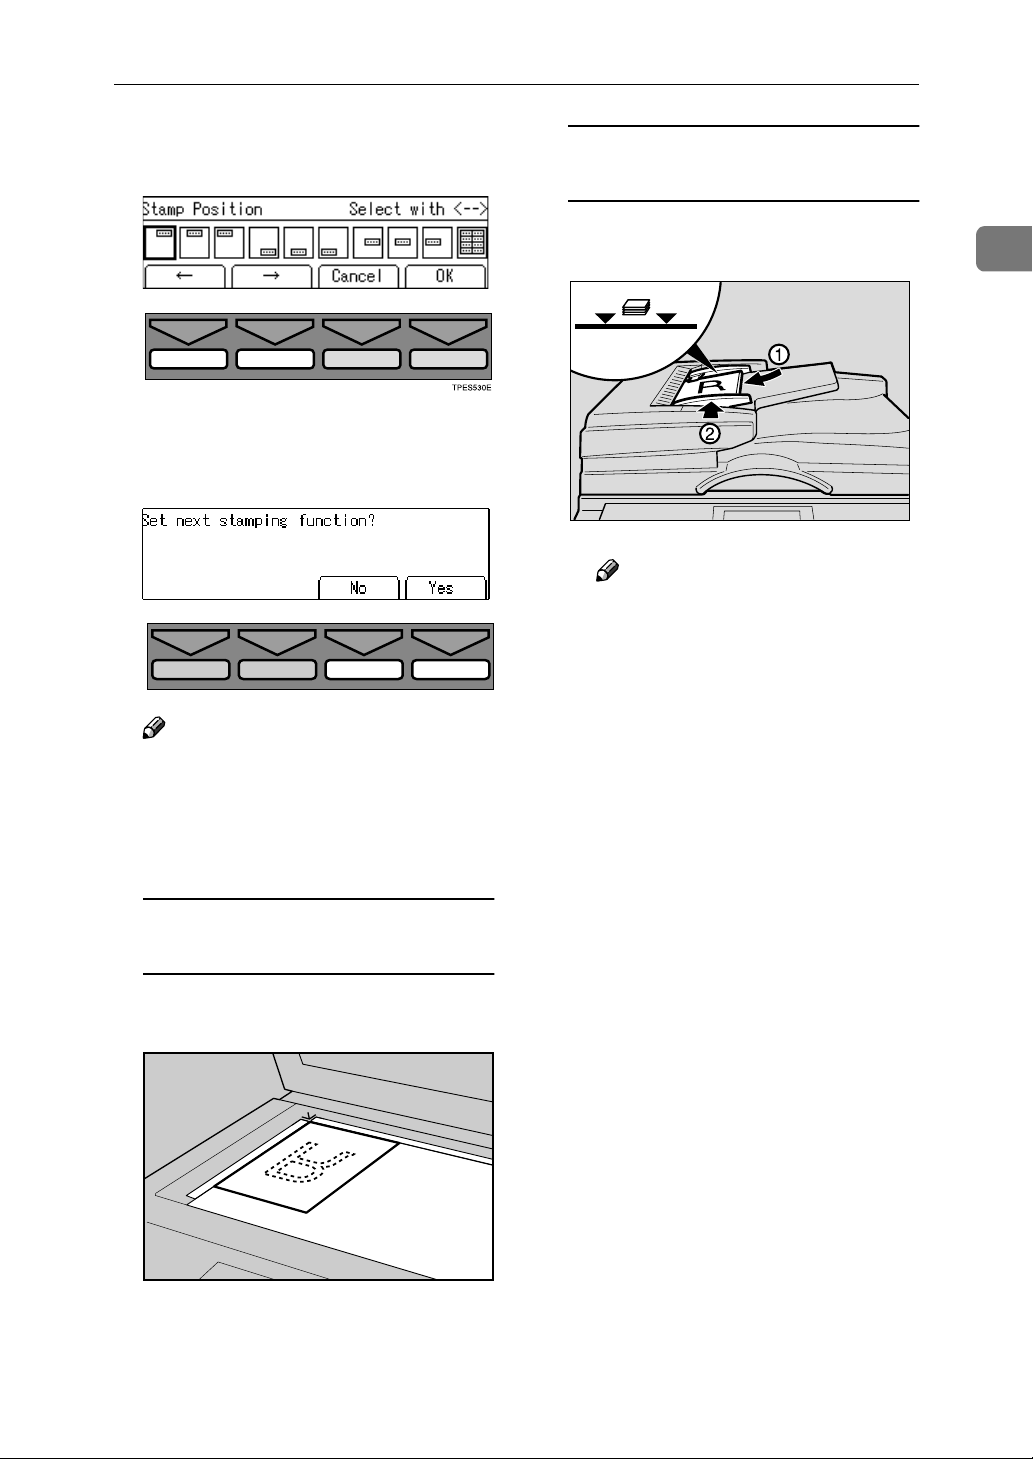
Press the {{{{Stamp}}}} key.
AAAA
Stamp
Make-Up
Over lay
Skip Feed
Edge Erase
Image Density
Lighter
Normal
Darker 1
Darker 2
Economy Mode
Original Storage
On Line
Auto On Line
Job Separator
ZDZS100N
111
Page 51

Operation
1
Make sure that [Date] is selected.
BBBB
Press the [OK] key.
CCCC
Select the desired position and di-
DDDD
rection with the [←←←←] [→
{{{{}}}}}}}} keys.
Press the [OK] key.
EEEE
Select the [Yes] or [No] key.
FFFF
→] or {{{{~~~~}}}}
→→
Place your original, and then
GGGG
press the {{{{Start}}}} key.
Placing your original (K) on the
exposure glass
A Place your original as shown in
the illustration.
Placing your originals (K) in the
optional document feeder
A Place your originals as shown
in the illustration.
ZDCH110E
112
TPES580E
Note
❒ Press the [Yes] key if you wish
to set the other Stamp functions.
ZDCH120E
Note
❒ To avoid originals misfeed-
ing, fan the originals before
placing them in the document feeder.
Page 52

Page Stamp
Page Stamp
Use this function to have page numbers stamped on prints.
1
5
– 1 –
GRPAGE0E
Three numbering formats are available:
• P1, P2,....., P5
• 1/5, 2/5,....., 5/5
• -1-, -2-,....., -3-
Limitation
❒ The size and font of Page Stamp
cannot be changed.
❒ If you select Page Stamp and Date
Stamp together, the last stamp direction selected takes priority.
❒ You can edit the preset page num-
bering position with the user tools.
See p.164 “5-10 Position (Page)”.
❒ [P1, P2,…, P5] is the default format.
You can change this default setting
with the user tools. See
“Type(Page)” on p.151 “5. Stamp”.
Press the {{{{Stamp}}}} key.
AAAA
Image Density
Stamp
Make-Up
Over lay
Skip Feed
Select [Page] with the [→
BBBB
Edge Erase
Lighter
Normal
Darker 1
Darker 2
Economy Mode
Original Storage
On Line
Auto On Line
Job Separator
ZDZS100N
→] or {{{{}}}}}}}}
→→
key.
1
Note
❒ Check the following table for the
relationship between the Page
Stamp direction on the panel display and the actual print image.
Page
Stamp direction on
the display
P.1
P.1
–1–
GRPPOS6E
–1–
GRPPOS7E
Print image
P.1
1/5
–1–
1/5
P.1
P.1
1/5
–1–
GRPPOS4E
1/5
–1–
P.1
–1–
GRPPOS5E
Press the [OK] key.
CCCC
Select the desired format with the
DDDD
[←←←←] [→
→] or {{{{~~~~}}}} {{{{}}}}}}}} keys.
→→
113
Page 53

Operation
1
Press the [OK] key.
EEEE
If you selected [P1,P2] or [-1-,-2-]
A Enter the first page number
with the [←←←←] [→
keys.
Note
❒ You can also enter the page
number with the number
keys.
❒ To change the value entered,
press the {{{{Clear/Stop}}}} key
and enter the new value.
B Press the [OK] key.
→] or {{{{~~~~}}}} {{{{}}}}}}}}
→→
B Press the [OK] key.
C Enter the first page number
with the [←←←←] [→
keys.
Note
❒ You can also enter the page
number with the number
keys.
❒ To change the value entered,
press the {{{{Clear/Stop}}}} key
and enter the new value.
D Press the [OK] key.
Select the desired orientation
FFFF
with the [←←←←] [→
→] or {{{{~~~~}}}} {{{{}}}}}}}}
→→
→] or {{{{~~~~}}}} {{{{}}}}}}}} keys.
→→
114
If you selected [1/5,2/5]
A Enter the last page number
with the [←←←←] [→
keys.
Note
❒ You can also enter the page
number with the number
keys.
❒ To change the value entered,
press the {{{{Clear/Stop}}}} key
and enter the new value.
→] or {{{{~~~~}}}} {{{{}}}}}}}}
→→
Press the [OK] key.
GGGG
Select the [Yes] or [No] key.
HHHH
Note
❒ Press the [Yes] key if you wish
to set the other Stamp modes.
TPES580E
Page 54

Place your original, and then
IIII
press the {{{{Start}}}} key.
Placing your originals (K) on the
exposure glass
A Place the first original as
shown in the illustration.
Note
❒ Repeat step I for the other
originals.
Page Stamp
1
ZDCH110E
Placing your originals (K) in the
optional document feeder
A Place your originals as shown
in the illustration.
ZDCH120E
Note
❒ The first original should be
on the top.
❒ To avoid originals misfeed-
ing, fan the originals before
placing them in the document feeder.
115
Page 55

1
Operation
Stamp
Priority
R
R
Preliminary
Confidential
GRSTAM0E
One of the following 3 messages can
be stamped on prints.
CONFIDENTIAL
PRIORITY
PRELIMINARY
Select [Stamp] with the [←←←←] [→→→→] or
BBBB
{{{{~~~~}}}} {{{{}}}}}}}} keys.
Press the [OK] key.
CCCC
Select the desired message with
DDDD
the [←←←←] [→
→] or {{{{~~~~}}}} {{{{}}}}}}}} keys.
→→
Limitation
❒ Only one message can be stamped
at a time.
Note
❒ You can change some Stamp set-
tings (size, density, or position)
with the user tools. See “Size”,
“Stamp Density”, “Stamp Position” on p.151 “5. Stamp”.
❒ The message “CONFIDENTIAL”
is selected as a default. You can
change this setting with the user
tools. See “Type” on p.151 “5.
Stamp”.
Press the {{{{Stamp}}}} key.
AAAA
Image Density
Stamp
Make-Up
Over lay
Lighter
Normal
Darker 1
Darker 2
Economy Mode
On Line
Auto On Line
Press the [OK] key.
EEEE
Select the page to be stamped
FFFF
with the [←←←←] [→
Press the [OK] key.
GGGG
→] or {{{{~~~~}}}} {{{{}}}}}}}} keys.
→→
116
Skip Feed
Edge Erase
Original Storage
Job Separator
ZDZS100N
Page 56
Select the stamp position with the
HHHH
[←←←←] [→
→] or {{{{~~~~}}}} {{{{}}}}}}}} keys.
→→
Press the [OK] key.
IIII
Select the [Yes] or [No] key.
JJJJ
TPES580E
Stamp
Placing your originals (K) in the
optional document feeder
A Place your originals as shown
in the illustration.
ZDCH120E
Note
❒ To avoid originals misfeed-
ing, fan the originals before
placing them in the document feeder.
1
Note
❒ Press the [Yes] key if you wish
to set the other Stamp modes.
Place your original and press the
KKKK
{{{{Start}}}} key.
Placing your original (K) on the
exposure glass (contact glass)
A Set your original as shown in
the illustration.
ZDCH110E
117
Page 57

Operation
Memory Combine
You can combine originals in four ways:
1
❖❖❖❖ 4 single-sided originals →→→→ 1 single-sided print of 4 images
4 one-sided pages are printed onto 1 one-sided sheet, 4 original images on one
side.
❖❖❖❖ 8 single-sided originals →→→→ 1 single-sided print of 8 images
8 one-sided pages are printed onto 1 one-sided sheet, 8 original images on one
side.
❖❖❖❖ 16 single-sided originals →→→→ 1 single-sided print of 16 images
16 one-sided pages are printed onto 1 one-sided sheet, 16 original images on
one side.
❖❖❖❖ Repeating an image over the entire print
1 original image is printed repeatedly.
Note
❒ A separation line between images can be printed with the user tools. See
“Comb. Sep. Line” on p.146 “4. Mode Setting”.
Combining onto a Single–sided Print
❖❖❖❖ 4 single-sided originals →→→→ 1 single-sided print of 4 images
118
1
2
3
4
12
43
GRMCOM0E
Page 58

❖❖❖❖ 8 single-sided originals →→→→ 1 single-sided print of 8 images
1
2
41
2
3
12
4
3
6
5
8
7
GRMCOM1E
8567
7
8
1
2
7
8
❖❖❖❖ 16 single-sided originals →→→→ 1 single-sided print of 16 images
Memory Combine
1
1
2
15
16
4123
8567
12
9
10 11
1613 14 15
GRMCOM2E
Limitation
❒ To use “16 one-sided originals → 1 one-sided print of 16 images” mode, the
optional document feeder is required.
❒ If the calculated ratio is under the minimum ratio, it is corrected within the
range of the ratio automatically. However, with some ratios, parts of the image might not be copied.
❒ The machine cannot copy originals different in size and direction.
Note
❒ The number of originals printed (combined) can be 4, 8, or 16.
❒ In this mode, the machine selects the reproduction ratio automatically. This
reproduction ratio depends on the print paper size and the number of originals.
❒ When the original is placed at a different direction from the print paper, the
machine automatically rotates the original image by 90° to match the print paper direction.
119
Page 59

Operation
❒ You can set the machine to cancel Memory Combine mode after finishing
your print job with the user tools. See “Cancel Comb.” on p.146 “4. Mode Set-
ting”.
❒ Refer to the following table when you select the original and paper sizes.
1
❖❖❖❖ Placing originals in the optional document feeder (metric version)
Original A3L B4L A4KL B5KL A5KL
Paper
A3L
*3
B4L --
A4KL -- --
B5KL -- -- --
*1
You can use these original and paper sizes in Combine 4, 8, 16 Originals mode.
*2
You can use these original and paper sizes in Combine 4, 8 Originals mode.
*3
You can use these original and paper sizes in Combine 4 Originals mode.
*3
*3
*2
*3
*3
*2
*2
*3
*3
*1
*2
*2
*3
❖❖❖❖ Placing originals in the optional document feeder (inch version)
Original 11" × 17"L 81/2" × 14"L 81/2" × 11"KL 81/2" × 51/2"KL
Paper
11" × 17"L
*3
81/2" × 14"L --
81/2" × 11"KL -- --
51/2" × 81/2" L -- -- --
*3
*3
*2
*3
*3
*1
*2
*2
*3
120
*1
You can use these original and paper sizes in Combine 4, 8, 16 Originals mode.
*2
You can use these original and paper sizes in Combine 4, 8 Originals mode.
*3
You can use these original and paper sizes in Combine 4 Originals mode.
❖❖❖❖ Placing originals on the exposure glass (metric version)
Original A3L B4L A4KL B5KL
Paper
A3L
*2
B4L --
A4KL -- --
B5KL -- -- --
*1
You can use these original and paper sizes in Combine 4, 8 Originals mode.
*2
You can use these original and paper sizes in Combine 4 Originals mode.
*2
*2
*1
*2
*2
*1
*1
*2
*2
Page 60

❖❖❖❖ Placing originals on the exposure glass (inch version)
Original 11" × 17"L 81/2" × 14"L 81/2" × 11"KL
Paper
11" × 17"L
81/2" × 14"L --
81/2" × 11"KL -- --
51/2" × 81/2" L -- -- --
*1
You can use these original and paper sizes in Combine 4, 8 Originals mode.
*2
You can use these original and paper sizes in Combine 4 Originals mode.
Press the {{{{Combine}}}} key.
AAAA
*2
*2
*2
*1
*2
*2
Memory Combine
1
Select [Memory Combine] with the [→
BBBB
Press the [OK] key.
CCCC
Select your desired mode.
DDDD
Press the [OK] key.
EEEE
→] or {{{{}}}}}}}} key.
→→
121
Page 61

Operation
Place your originals.
FFFF
Placing your original (K) on the exposure glass
1
A Place your original as shown in the illustration.
ZDCH110E
Placing your originals (K) in the optional document feeder
A Place your originals as shown in the illustration.
122
ZDCH120E
Note
❒ The first original should be on the top.
❒ To avoid originals misfeeding, fan the originals before placing them in
the document feeder.
Page 62

Memory Combine
Press the {{{{Start}}}} key.
GGGG
Note
❒ Even if the number of originals is less than the number required in the se-
lected mode, prints can be made as shown in the illustration. In this case,
press the {{{{qqqq}}}} key after all the originals have been scanned.
1
2
3
12
3
GRMCOM3E
❒ When placing an original on the exposure glass or one sheet at a time in the
optional document feeder, repeat steps F and G. After placing the last original, press the {{{{qqqq}}}} key, and then the {{{{Start}}}} key.
Repeat
1
GRREPE0E
Limitation
❒ Part of the repeated image might not be printed depending on the paper size,
direction and reproduction ratio.
Note
❒ The number of repeated images depends on the original and paper size, and
reproduction ratio.
❒ Check the following table for the relationship between the direction of the
original and paper, and the number of repeated images.
123
Page 63

Operation
❖❖❖❖ Example: copying A4 LLLL originals onto A3LLLL paper.
1
The number of repeated images
4 71%
Reproduction ratio Print image
GRREPE3E
❖❖❖❖ Example: copying A5LLLL originals placed in the optional document feeder onto
A3LLLL paper.
Number of repeated images Reproduction ratio Print image
16 50%
GRREPE4E
❖❖❖❖ Example: copying 81/2" ×××× 11" KKKK originals onto 11" ×××× 17" LLLL paper.
Number of repeated images Reproduction ratio Print image
2 100%
124
GRREPE5E
❖❖❖❖ Example: copying A5LLLL originals placed in the optional document feeder onto
A4KKKK paper.
Number of repeated images Reproduction ratio Print image
8 50%
GRREPE6E
Page 64

Press the {{{{Combine}}}} key.
AAAA
Memory Combine
1
Select [Memory Combine] with the [→
BBBB
Press the [OK] key.
CCCC
Select [Repeat] with the [→
DDDD
Press the [OK] key.
EEEE
→] or {{{{}}}}}}}} key.
→→
→] or {{{{}}}}}}}} key.
→→
Select the reproduction ratio.
FFFF
Reference
See p.29 “Reducing and Enlarging Using Preset Ratios”.
125
Page 65

Operation
Set your original.
GGGG
Placing your original (K) on the exposure glass
1
A Place your original as shown in the illustration.
ZDCH110E
Placing your originals (K) in the optional document feeder
A Place your originals as shown in the illustration.
126
ZDCH120E
Note
❒ To avoid originals misfeeding, fan the originals before placing them in
the document feeder.
Press the {{{{Start}}}} key.
HHHH
Page 66

2. Optional Functions
Optional Document Feeder
Insert a stack of originals in the document feeder. It will be fed automatically.
Originals
Placing the following originals in the
document feeder might cause misfeeds or damage to the originals.
Place the following kinds of originals
on the exposure glass:
• Originals heavier than 128g/m2, 34
lb
2
• Originals lighter than 52g/m
lb
• Originals smaller than 148mm ×
210mm, 5.9" × 8.3"
• Originals larger than 297mm ×
864mm, 11.6" × 34.0"
• Stapled or clipped originals
, 14
The following original sizes placed in
the document feeder can be detected.
Metric version A3 L, B4 L, A4 KL,
B5 KL, A5KL
Inch version
Note
❒ Place originals after correction flu-
id and ink have completely dried.
Not taking this precaution could
mark the exposure glass and cause
marks to be printed.
For standard printing functions, set
originals as shown below.
11" × 17" L, 8
1
/2" × 11"KL, 51/2"
L, 8
1
× 8
/2"KL
1
/2" × 14"
R
• Perforated or torn originals
• Curled, folded, or creased origi-
nals
• Originals with any kind of coating,
such as thermal fax paper, art paper, aluminum foil, carbon paper,
or conductive paper
• Bound originals such as books
• Damaged originals
• Originals with glue on them
• Pasted originals
• Originals written in pencil
• Thin originals that are a little stiff
• Originals with index tabs
• Transparent originals such as OHP
transparencies or translucent paper
R
GRSETT1E
If the original is placed in a different
direction from the print paper, the
machine automatically rotates the
original image by 90° to match the
print paper direction.
You cannot place originals of different sizes at the same time.
When you use thin originals, place
one original at a time in the document
feeder or place them on the exposure
glass.
127
Page 67

Optional Functions
2
The first 8mm, 0.32", of the leading
edge and the last 2mm, 0.08" of the
trailing edge cannot be printed. Make
sure the leading edge margin is at
least 8mm, 0.32", and the trailing edge
margin is at least 2mm, 0.08".
Do not stack originals above the limit
mark.
Placing Originals
Adjust the guide to the original
AAAA
size.
Insert the aligned originals face
BBBB
up into the document feeder.
Adjust print settings as necessary,
CCCC
and then press the {{{{Start}}}} key.
Make your prints.
DDDD
ZDCH120E
Note
❒ To avoid originals misfeeding,
fan the originals before placing
them in the document feeder.
Limitation
❒ Approximately 50 originals
(80g/m
at one time in the document
feeder. The first (top) original
will be fed first.
Note
❒ To avoid jamming, fan the orig-
inals before placing them in the
document feeder.
❒ The guides must fit snugly
against both sides of the stack.
2
, 21 lb) can be inserted
Note
❒ If the next original has been
placed in the document feeder
before the machine stops, that
original is fed automatically
and a trial print is delivered to
the paper delivery tray after the
print of the first original is completed. Check the image position on the trial print of the next
original. If necessary, make
proof prints using the {{{{Proof}}}}
key to check the image position
again.
128
Page 68

Combine Printing
Reference
See p.64 “Combine Originals” for
details.
Insert the two originals face up.
AAAA
Note
❒ The first original will be printed
on the left side of the paper.
❒ To avoid originals misfeeding,
fan the originals before placing
them in the document feeder.
ZDCH120E
Optional Document Feeder
Press the {{{{Combine}}}} key.
DDDD
Select [Combine 2] or [Quadruple]
EEEE
with the [←←←←][→
Press the [OK] key.
FFFF
Press the {{{{Start}}}} key.
GGGG
→] or {{{{~~~~}}}} {{{{}}}}}}}} keys.
→→
2
Enter the number of prints with
BBBB
the number keys.
Check the print paper size and the
CCCC
reproduction ratio.
Note
❒ To have the machine choose a
suitable ratio automatically, use
Auto Magnification mode. See
p.31 “Auto Magnification”.
Check the image position on the
HHHH
trial or proof print.
Note
❒ If the image position is not cor-
rect, adjust it using the [Image
====] key. See p.24 “Adjusting the
Position of Printed Images”.
❒ After the first original has been
stored, the second original is
fed.
129
Page 69

Optional Functions
2
❒ If you place only one original,
the beeper sounds after the first
original has been scanned in.
Place the second original and
any print settings you require.
Then press the {{{{Start}}}} key.
Manual Class Mode with Two
or More Originals
Reference
See p.59 “Manual Class Mode with
two or More Originals”.
Press the {{{{Class}}}} key.
AAAA
Press the {{{{qqqq}}}} key.
EEEE
Enter the desired number of
FFFF
prints for the second original
with the number keys.
Select [Manual] with the [→→→→] or
BBBB
{{{{}}}}}}}} key.
Press the [OK] key.
CCCC
Enter the desired number of
DDDD
prints for the first original with
the number keys.
Press the {{{{qqqq}}}} key.
GGGG
Note
❒ Repeat steps F and G for each
original.
❒ Up to 20 classes can be set.
Press the [OK] key.
HHHH
Place your originals face up in the
IIII
document feeder.
ZDCH120E
130
Page 70

Optional Document Feeder
Note
❒ To avoid originals misfeeding,
fan the originals before placing
them in the document feeder.
❒ The originals are fed from the
top of the stack. Make sure that
the originals are placed in the
correct sequence with the first
on the top.
Press the {{{{Start}}}} key.
JJJJ
Check the image position on the
KKKK
trial or proof print.
Press the {{{{Print}}}} key.
MMMM
2
Note
❒ If the image position is not cor-
rect, adjust it using the [Image
====] key. See p.24 “Adjusting the
Position of Printed Images”.
Press the {{{{Auto Cycle}}}} key.
LLLL
Note
❒ In Auto Cycle mode, printing
starts automatically after a trial
print is delivered.
131
Page 71

2
Optional Functions
Color Printing Using the Optional Color
Drum
Color drum units are available as options in addition to the standard black
unit. For making color prints, a separate drum unit is necessary for each
color.
Note
❒ If the ink on the color drum dries,
use the Quality Start mode. See
p.77 “Quality Start Mode”.
Making Color Prints
Make sure that the color drum in-
AAAA
dicator is lit.
Changing the Color Drum Unit
Open the front door.
AAAA
Lower the drum unit lock lever
BBBB
(B1).
Press the {{{{Start}}}} key.
BBBB
Check the image position on the
CCCC
trial or proof print.
Note
❒ If the image position is not cor-
rect, adjust it using the [Image
====] key. See p.24 “Adjusting the
Position of Printed Images”.
Make your prints.
DDDD
Note
❒ Make sure the green light be-
side the drum unit lock lever is
on before sliding out the drum.
If the light is off, close the front
door, wait for five seconds, and
then open.
132
Page 72

Color Printing Using the Optional Color Drum
Pull the drum unit handle out
CCCC
slowly (B2).
Lift the upper drum stay (B3) a lit-
DDDD
tle to unlock the drum unit, and
then pull out the drum unit while
holding the drum unit handle
(B2) and the upper drum stay (B3).
Insert the color drum unit along
FFFF
the guide rail.
Lower the drum unit lock lever
GGGG
(B1) of the inserted drum.
2
TPEH290E
Important
❒ Be careful not to let the drum
unit fall.
Make sure the optional color
EEEE
drum lock is securely set.
Slide in the drum unit until it
HHHH
locks in position.
TPEH091E
133
Page 73

Optional Functions
2
Lift drum unit lock lever (B1).
IIII
TPEH081E
Close the front door.
JJJJ
Note
❒ Make sure that the Open Cov-
er/Unit indicator turns off, and
the Color Drum indicator turns
on.
Printing in Two Colors
After printing in one color, you can
print in another color on the same
side of the print.
Prepare the two originals. Place
AAAA
the first original on the exposure
glass.
Enter the number of prints with
BBBB
the number keys.
ZDCH110E
R
P
Note
❒ Let the ink on the prints dry for a
while before printing on them
again.
❒ If the prints are not dry, the paper
feed roller might become dirty. In
this case, wipe the roller with a
cloth.
❒ You cannot print in two colors at
one time.
134
R
P
GRCOLO0E
Press the {{{{Start}}}} key.
CCCC
Check the image position on the
DDDD
trial or proof print.
Note
❒ If the image position is not cor-
rect, adjust it using the [Image
====] key. See p.24 “Adjusting the
Position of Printed Images”.
Page 74

Press the {{{{Print}}}} key.
EEEE
Remove the prints from the paper
FFFF
delivery tray and place them on
the paper feed tray again as
shown in the illustration.
Color Printing Using the Optional Color Drum
2
Change the drum unit. See p.132
GGGG
“Changing the Color Drum Unit”.
Place the second original and
HHHH
press the {{{{Start}}}} key.
Check the image position.
IIII
Press the {{{{Print}}}} key.
JJJJ
ZDZY010E
TPEH101E
135
Page 75

2
Optional Functions
Changing the Drum Size
To save costs on master rolls and ink,
you can shorten the length of each
master by changing to an optional
smaller drum.
Printing Area (At 23
°°°°
65% RH)
❖❖❖❖ Metric version
A3 drum More than 290 × 410mm,
11.4" × 16.2"
A4 drum More than 290 × 200mm
❖❖❖❖ Inch version
C/73
°°°°
F,
11" × 17"
drum
1
/2" × 11"
8
drum
More than 290 × 420mm,
11.4" × 16.6"
More than 11.4" × 7.8"
Master Cut Length
A3 drum…320mm × 530mm, 12.5" ×
20.9", 255 masters/roll
11" × 17" drum…320 × 540mm, 12.5" ×
21.3", 245 masters/roll
1
Optional A4, 8
drum…320mm × 325mm, 12.5" ×
12.8", 410 masters/roll
Note
❒ For changing the drum unit, see
p.132 “Changing the Color Drum
Unit”.
/2" × 11"
136
 Loading...