

Page 1
Savin 2555
Operating Instructions
COPY REFERENCE
Read this manual carefully before you use this product and keep it handy for future
reference.
For safety, please follow the instructions in this manual.
Page 2
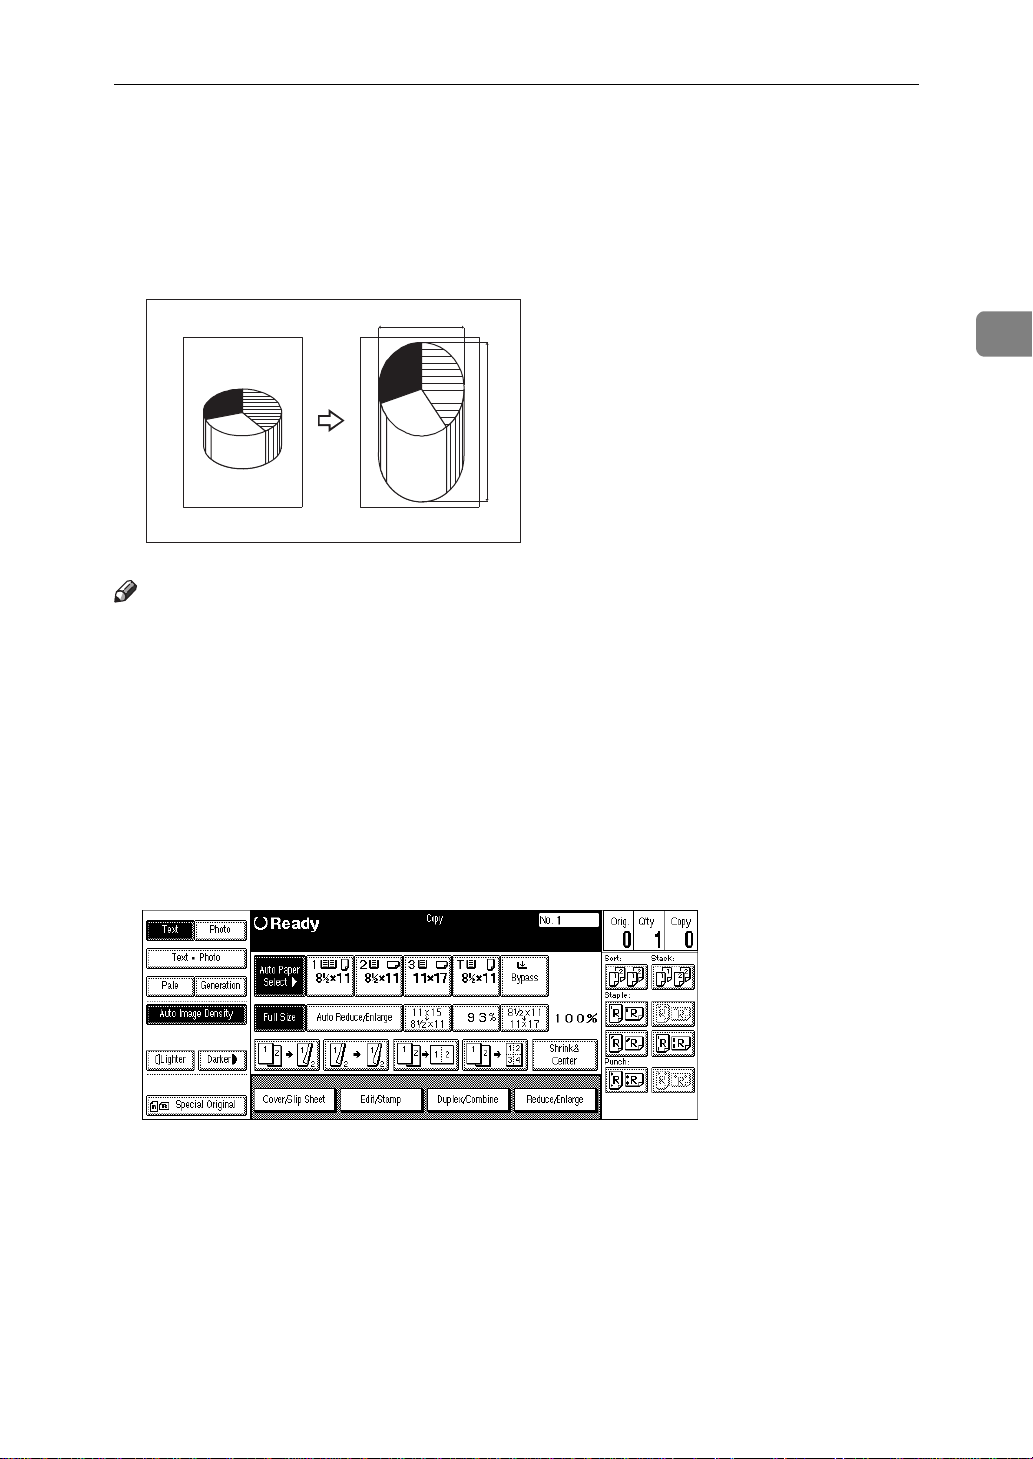
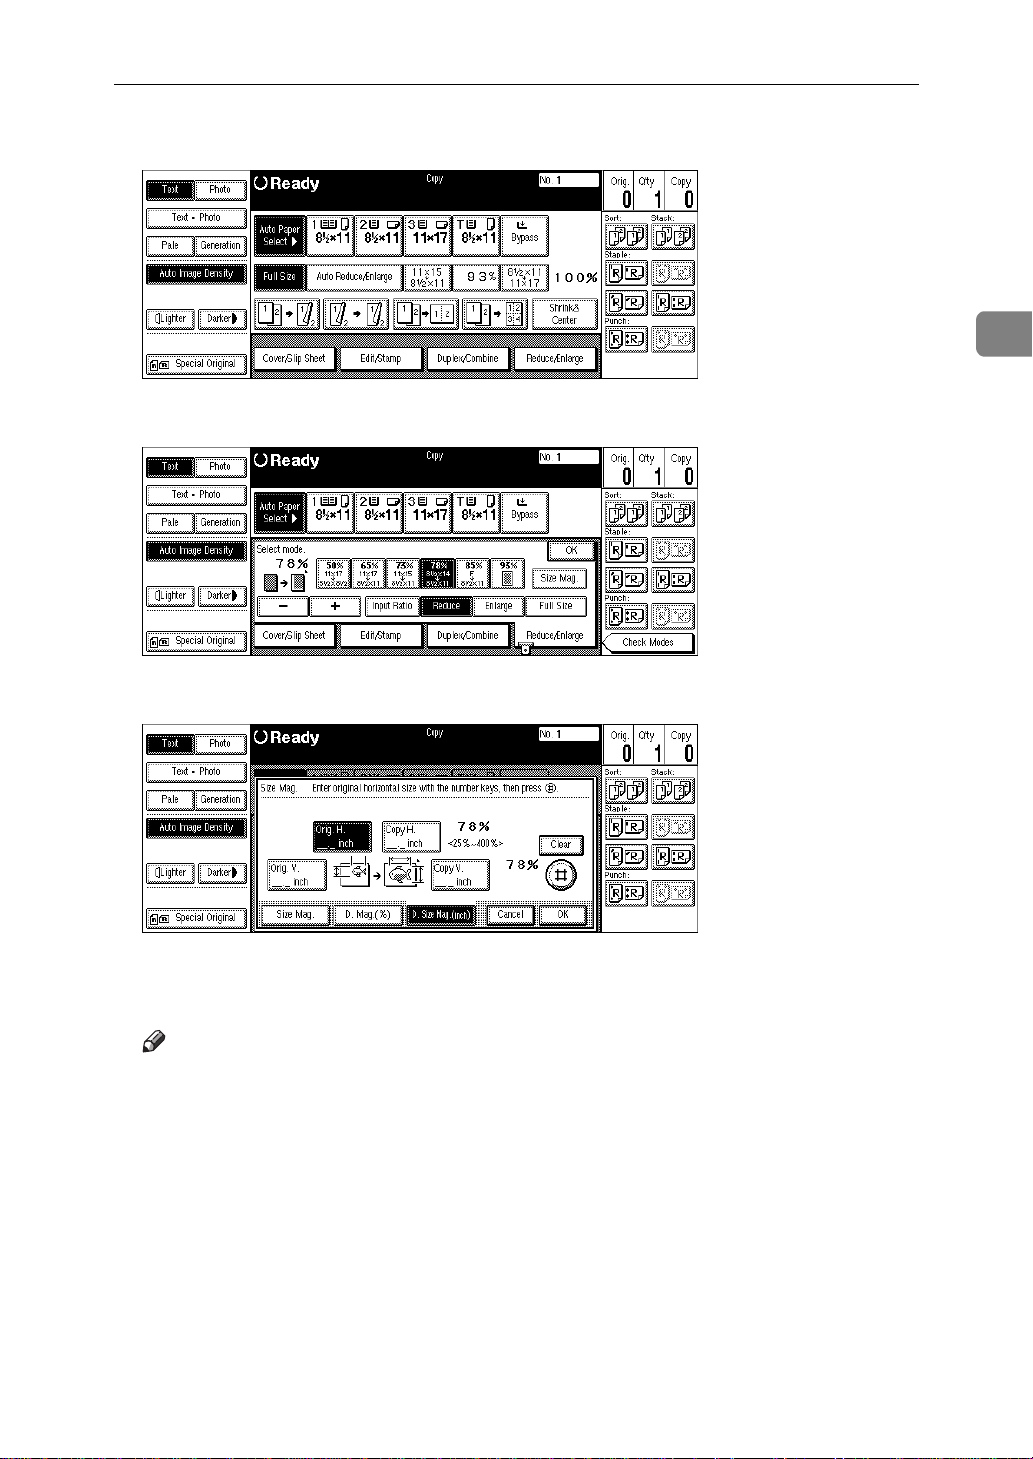
Directional Magnification (%)
Directional Magnification (%)
Copies can be reduced or enlarged at different reproduction ratios horizontally
and vertically.
a%
b%
CP2P01EE
Note
❒
The following ratios can be selected:
• Metric version: 25 – 400%
2
• Inch version: 25 – 400%
❒
You can select a ratio regardless of the size of an original or copy paper. With
some ratios, parts of the image might not be copied or blank margins will appear on copies.
❒
You can also select a preset ratio which is close to the desired ratio by using
Reduce or Enlarge, then adjust the ratio with the
A Press the
[
Reduce/Enlarge
key.
]
[n]
or
[o]
key.
101
Page 3
Copying
2
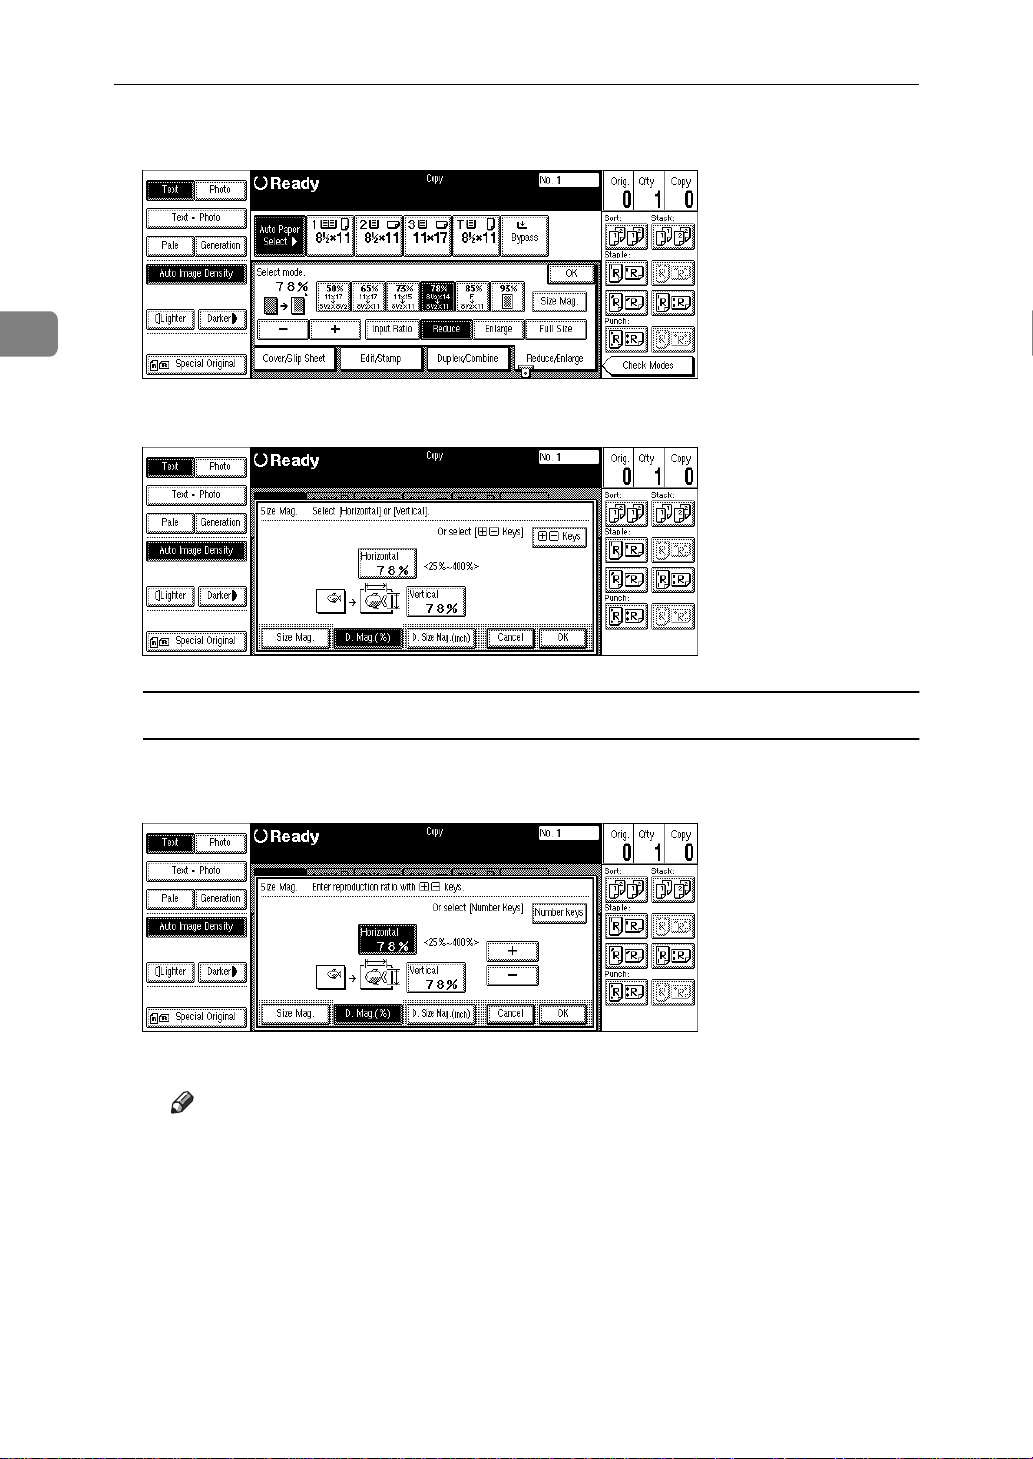
B Press the
C Press the
[
Size Mag.
[
D. Mag.(%)
key.
]
]
To specify a ratio with the
key.
[n]
and
[o]
keys
[o]
no
[
[
Horizontal
key.
[
Vertical
key.
[
]
OK
A Press the
B Press the
C Adjust the ratio using the
Note
❒
Pressing the
holding down the
❒
If you have incorrectly entered the ratio, readjust the ratio with the
or
D Press the
E Adjust the ratio with the
F Press the
Keys
[n]
key.
]
key.
]
key.
]
or
[n]
or
[n]
key changes the ratio in 1% steps. Pressing and
[o]
or
[o]
or
[n]
key.
[o]
key changes it in 10% steps.
key.
[o]
[n]
102
Page 4
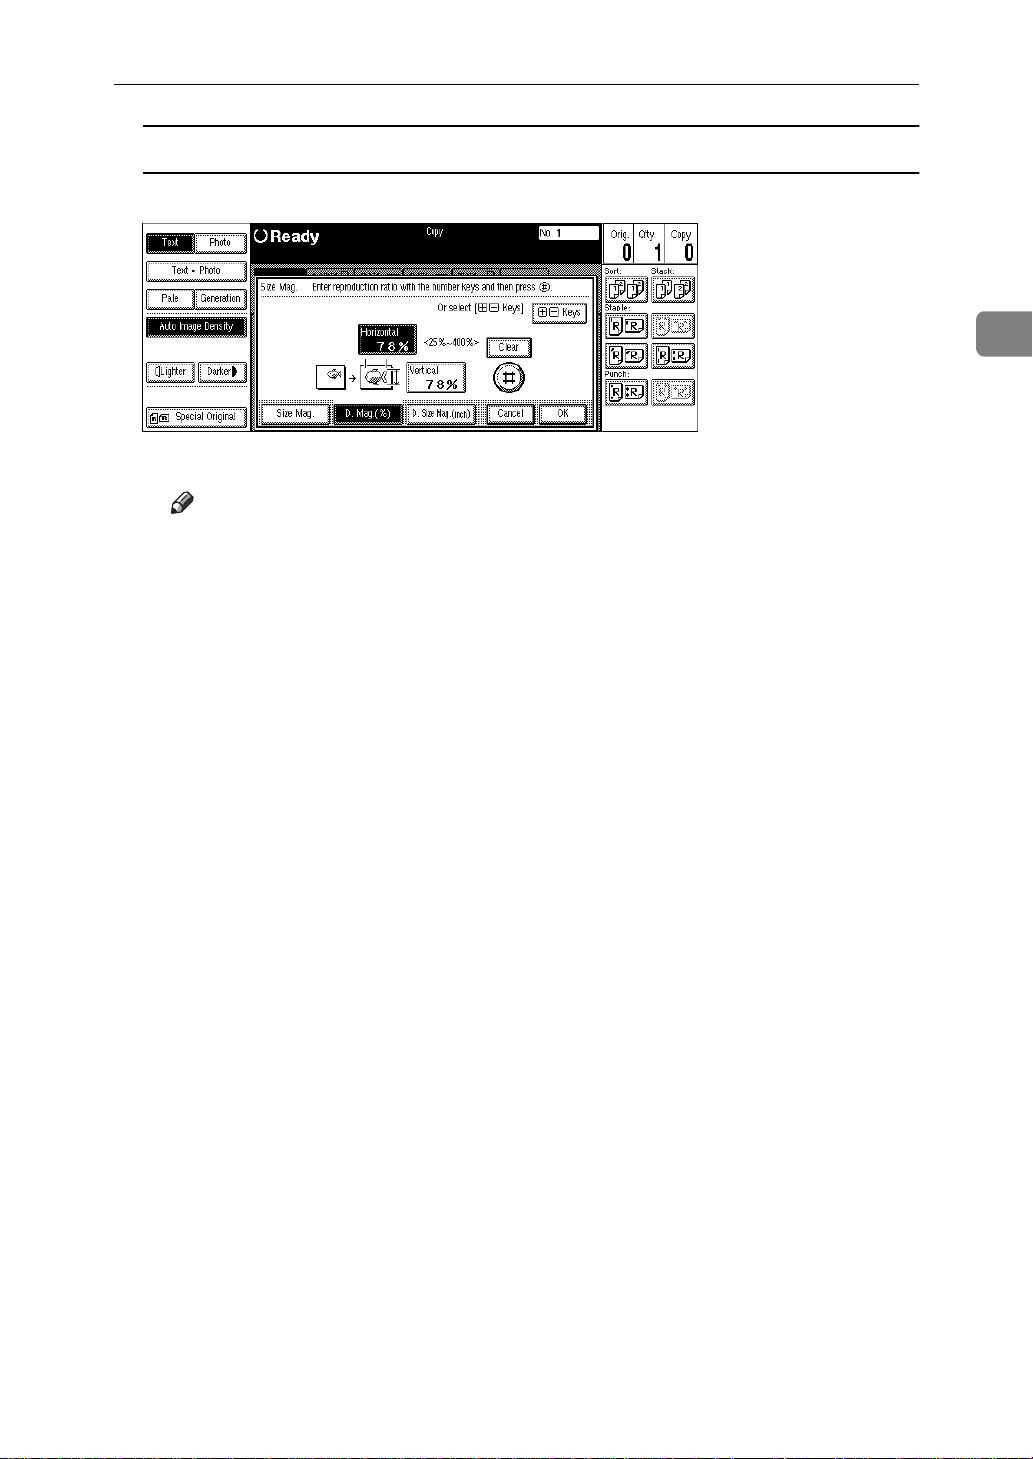
To enter the ratio with the number keys
Directional Magnification (%)
A Press the
B Enter the desired ratio with the number keys, followed by the
Note
❒
To change the ratio entered, press the
ter the new ratio.
C Press the
D Enter the desired ratio with the number keys, followed by the
E Press the
D Press the
[
Horizontal
[
Vertical
[
OK
]
[
OK
key.
]
key.
E Set your originals, then press the
]
key.
]
key.
{
Start
key.
}
[
Clear
or
]
{
Clear/Stop
key.
[
]
#
key and en-
}
key.
[
]
#
2
103
Page 5

Copying
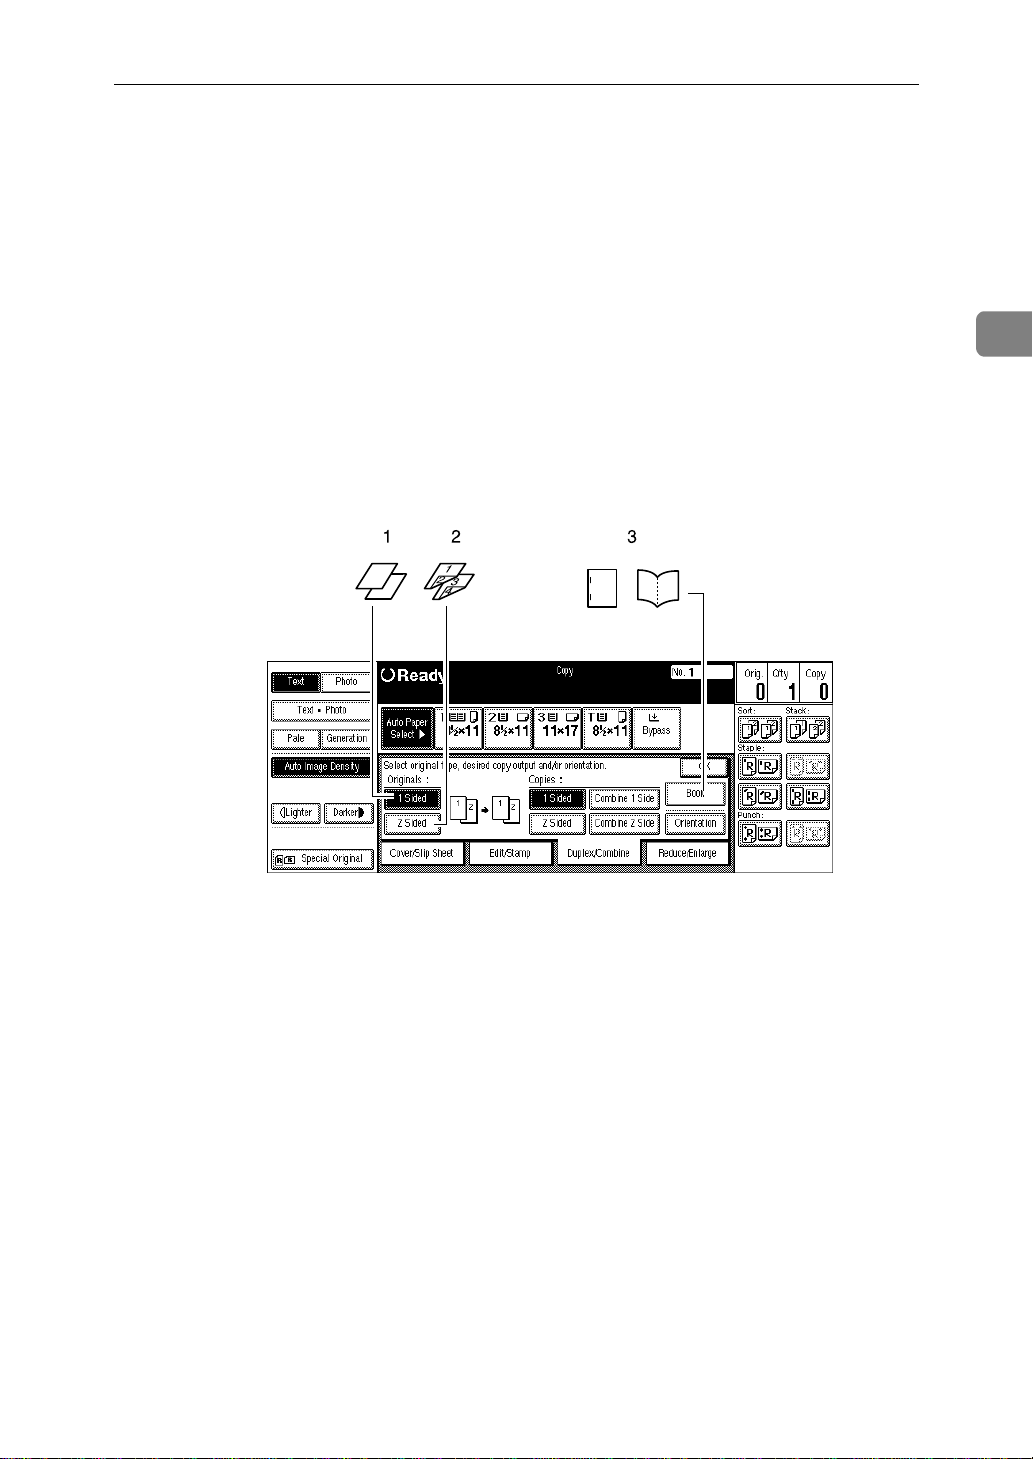
Directional Size Magnification (inch)
The suitable reproduction ratios will be automatically selected when you enter
the horizontal and vertical lengths of the original and copy image you require.
2
1
24
3
CP2M01EE
1: Horizontal original size
2: Vertical original size
3: Horizontal copy size
4: Vertical copy size
Preparation
Specify the vertical and horizontal sizes of the original and those of the copy,
as shown in the illustration.
Limitation
❒
If the calculated ratio is over the maximum or under the minimum ratio, it is
corrected within the range of the ratio automatically. However, with some ratios, parts of the image might not be copied or blank margins will appear on
copies.
104
Note
❒
You can enter sizes within the following ranges:
Metric version 1 – 999mm (in 1mm steps)
Inch version 0.1" – 99.9" (in 0.1" steps)
❒
The following ratios can be selected:
• Metric version: 25 – 400%
• Inch version: 25 – 400%
Page 6
Directional Size Magnification (inch)
A Press the
B Press the
C Press the
key.
]
]
[
Reduce/Enlarge
[
Size Mag.
[
D. Size Mag.(inch)
key.
key.
]
2
D Enter the horizontal size of the original with the number keys, then press
the
❒
key.
[
]
#
Note
To change the value entered, press the
the new value.
[
Clear
or
]
{
Clear/Stop
key and enter
}
E Enter the horizontal size of the copy with the number keys, then press the
key.
]
[
#
F Enter the vertical size of the original with the number keys, then press the
key.
]
[
#
G Enter the vertical size of the copy with the number keys, then press the
key.
[
#
]
105
Page 7

Copying
Note
❒
To change the length, press the place you wish to change and enter the new
value.
2
H Press the
I Press the
[
OK
[
OK
key.
]
key.
]
J Set your originals, then press the
{
Start
key.
}
106
Page 8
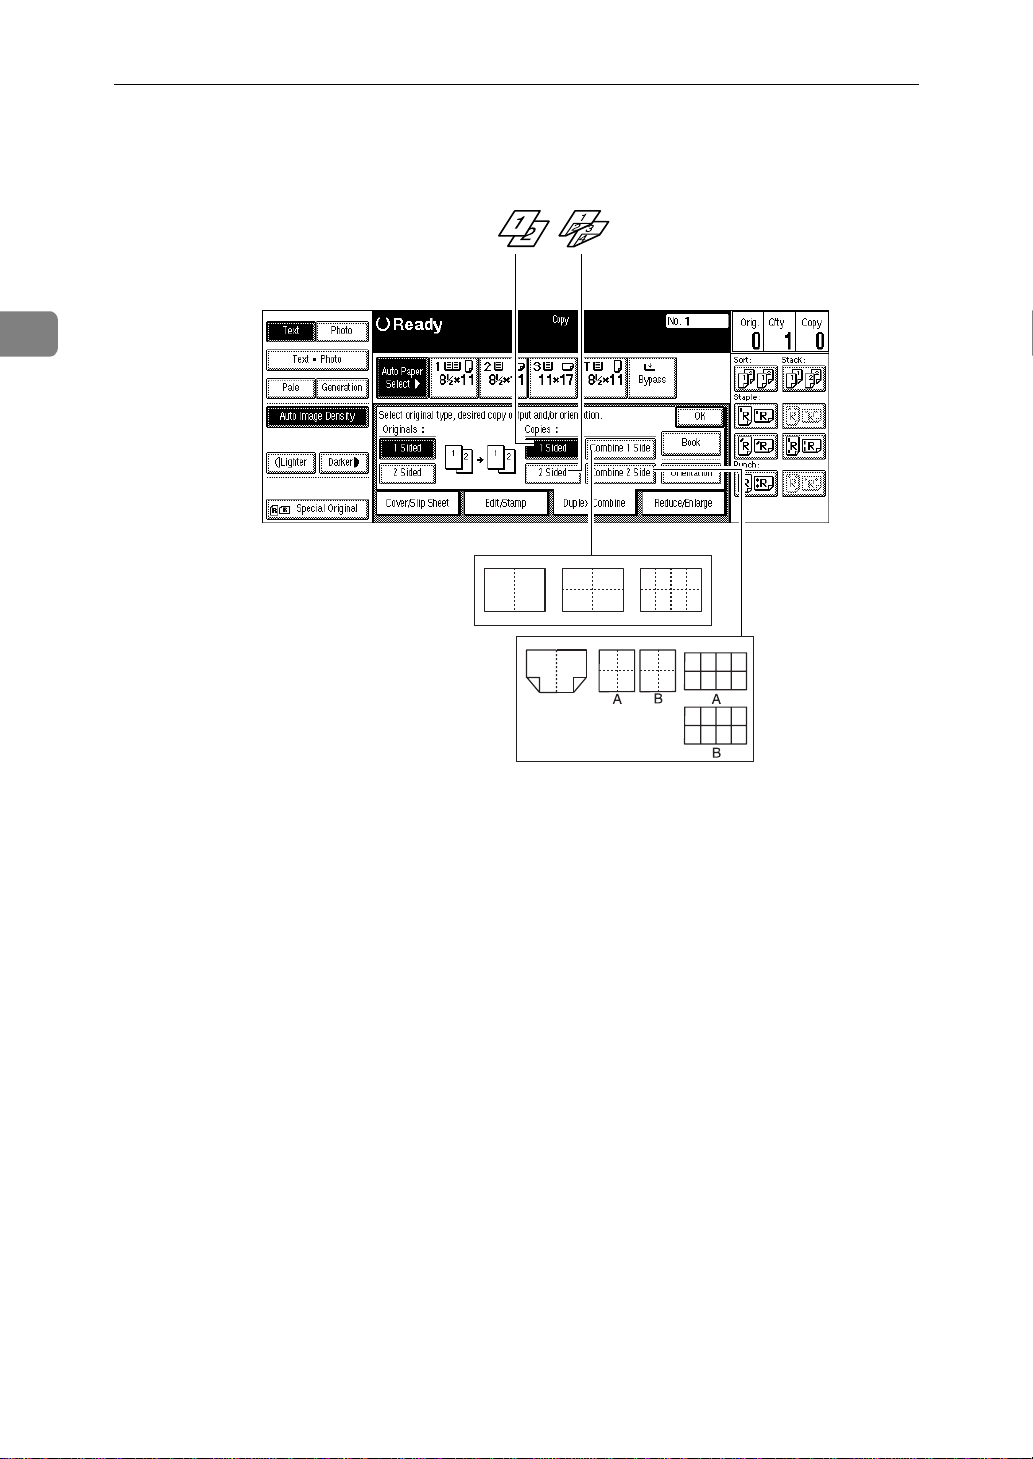
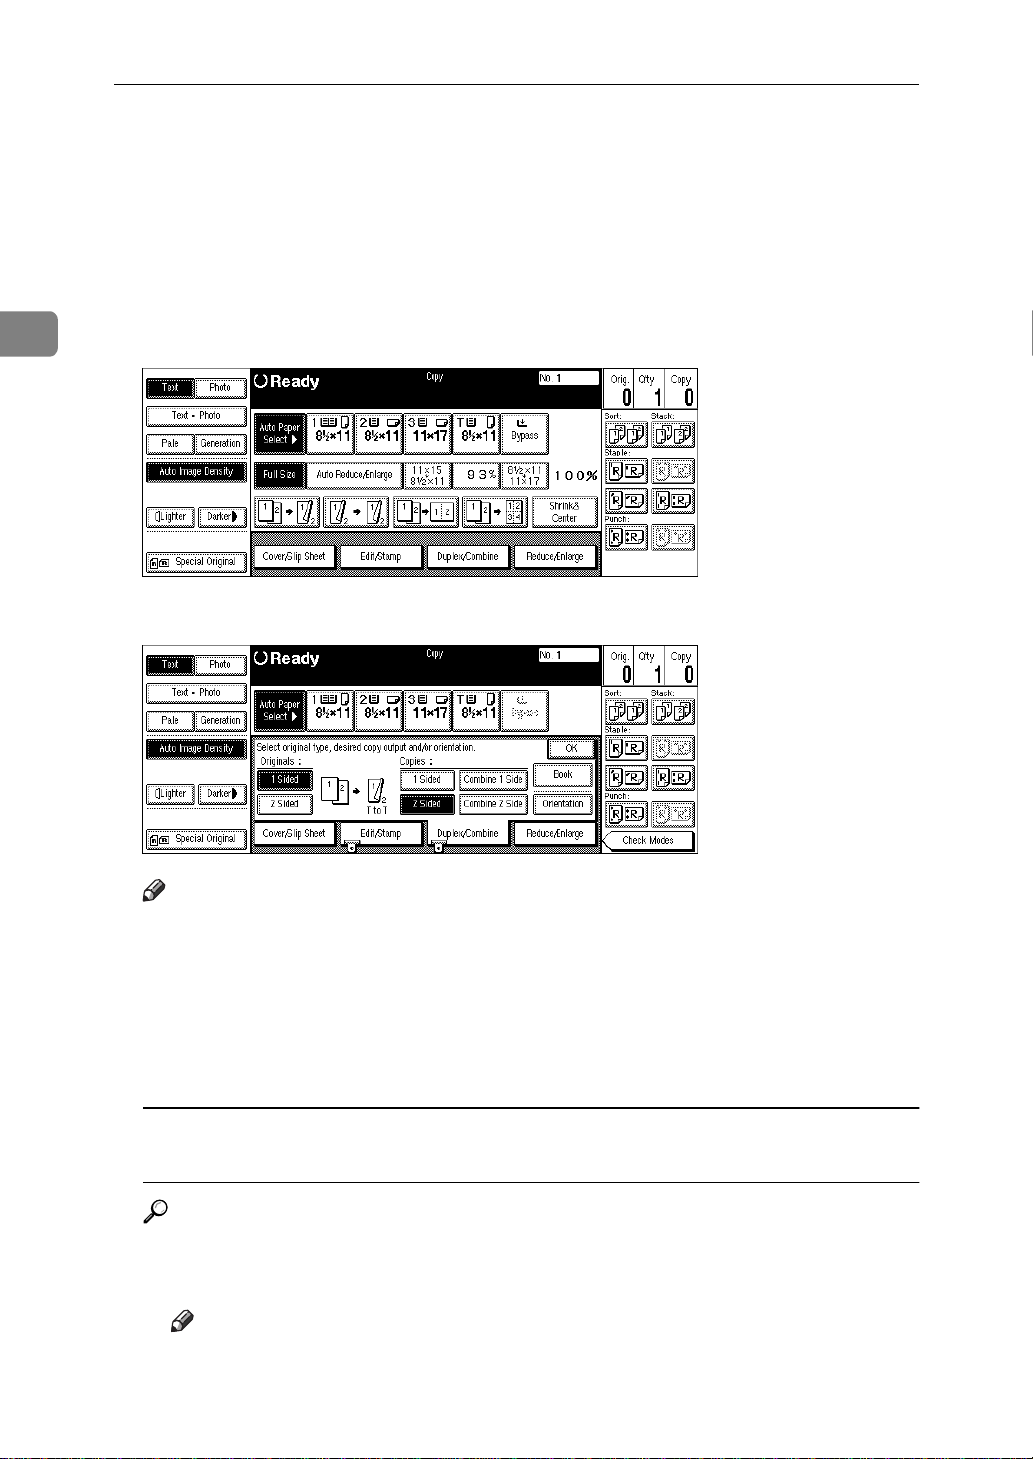
Duplex/Combine
Duplex/Combine
You can make copies in a variety of formats by combining the following modes:
• 1 Sided/2 Sided originals
• 1 Sided/2 Sided copies
•Duplex
•Combine
• Book
•Series
2
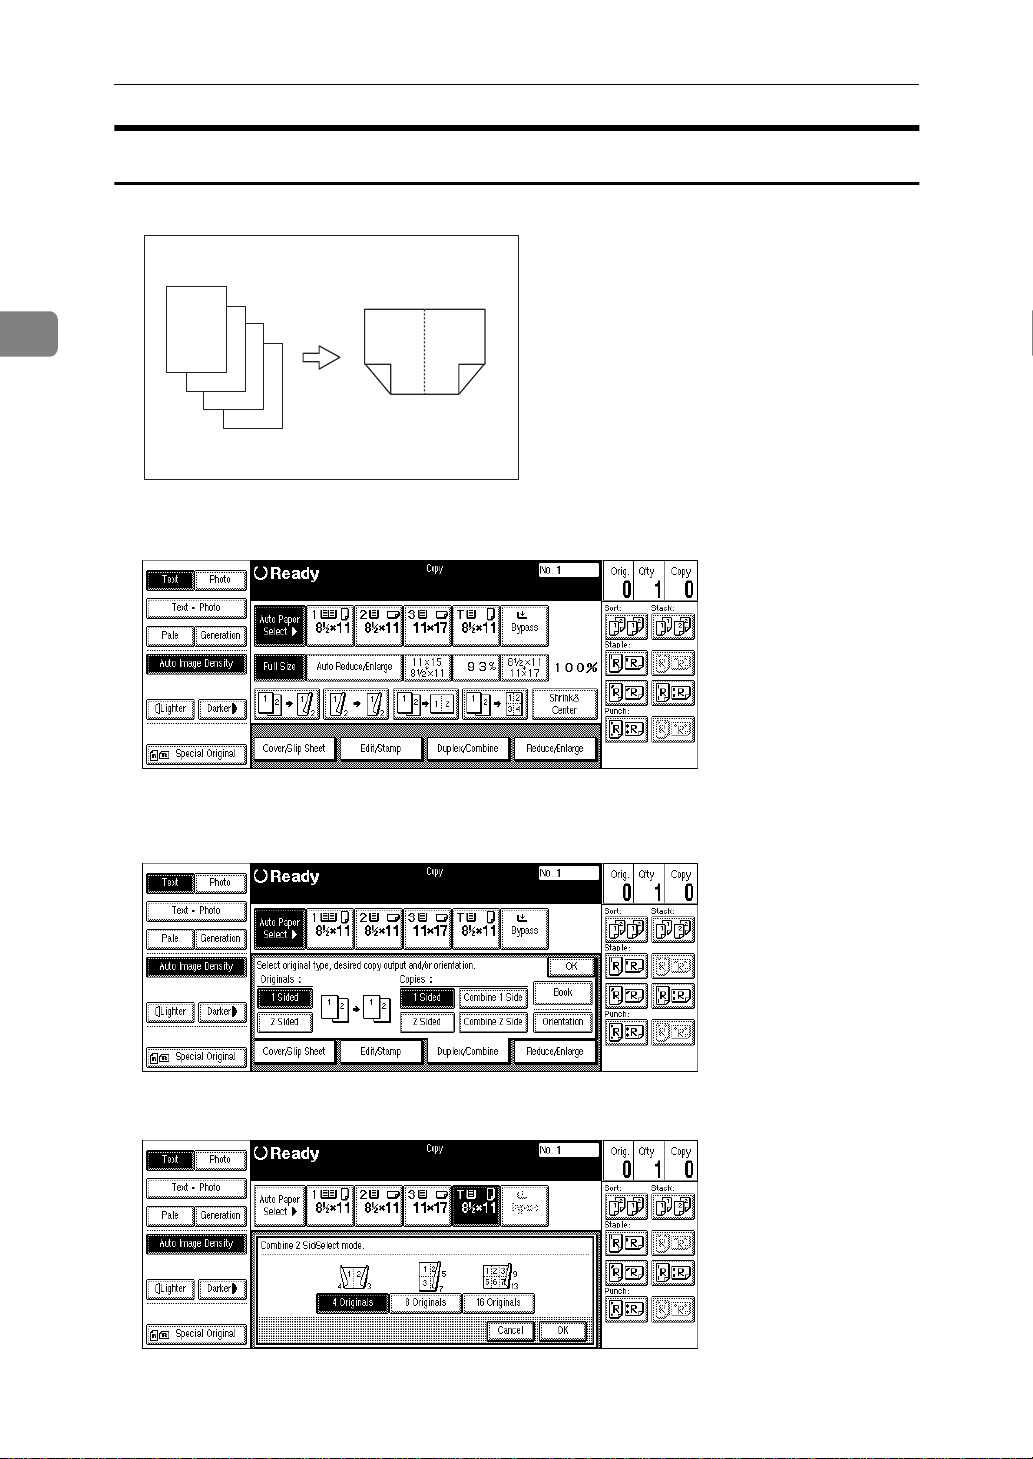
A Check your originals and select
1
2
1: 1-sided
2: 2-sided
3: Book
B Select
[
1 Sided
or
]
[
2 Sided
for copying.
]
[
1 Sided
or
]
[
2 Sided
for the originals.
]
ZBQS100N
107
Page 9
2
Copying
12
1 2
1
2 1234
34
5678
1: 1-sided
2: 2-sided
A: Front
B: Back
C Press the
[
OK
key.
]
21
4
3
1 2
34
5 6
78
1 234
5678
9
10 11 12
13 14 15 16
ZBQS110E
108
Page 10

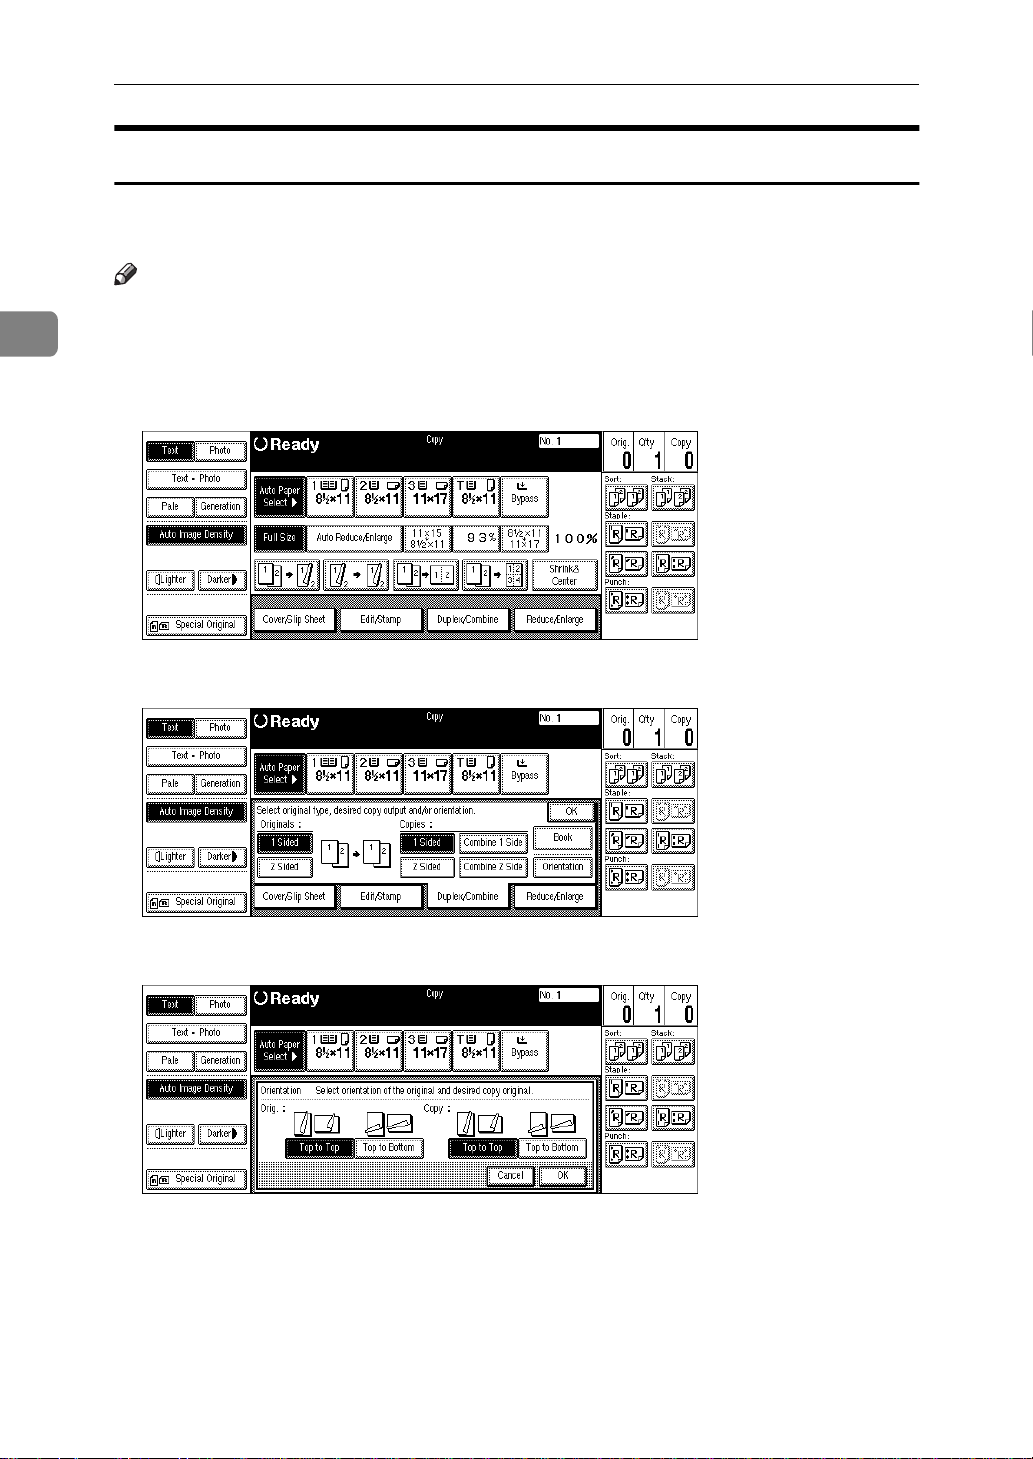
Duplex/Combine
Original Direction and Compl eted Copies
The resulting copy image will differ according to the direction in which you set
your original (lengthwise K or widthwise L).
2
GCRYOU1E
Note
❒
The illustrations show the directions of copied images on the front and back,
not the directions of delivery.
Originals and Copy Direction
You can select the orientation (
[
Top to Top
fying Orientation of Bound Originals”
• Top to Top
Duplex1
• Top to Bottom
], [
Top to Bottom
.
). See ⇒ P.110
]
“Speci-
Duplex2
109
Page 11
2
Copying
Specifying Orientation of Bound Originals
You can specify the orientation of bound originals (how you turn the pages). The
default setting is
Note
❒
You can change the orientation default with the User Tools. See “Copy Orientation in Duplex Mode” and “Original Orientation in Duplex Mode” in
P.313
“General Features
[
Top to Top
2
]
/3”
.
⇒
.
key.
]
key.
]
A Press the
B Press the
[
Duplex/Combine
[
Orientation
C Select an original orientation and a copy orientation.
110
D Press the
[
OK
key.
]
Page 12
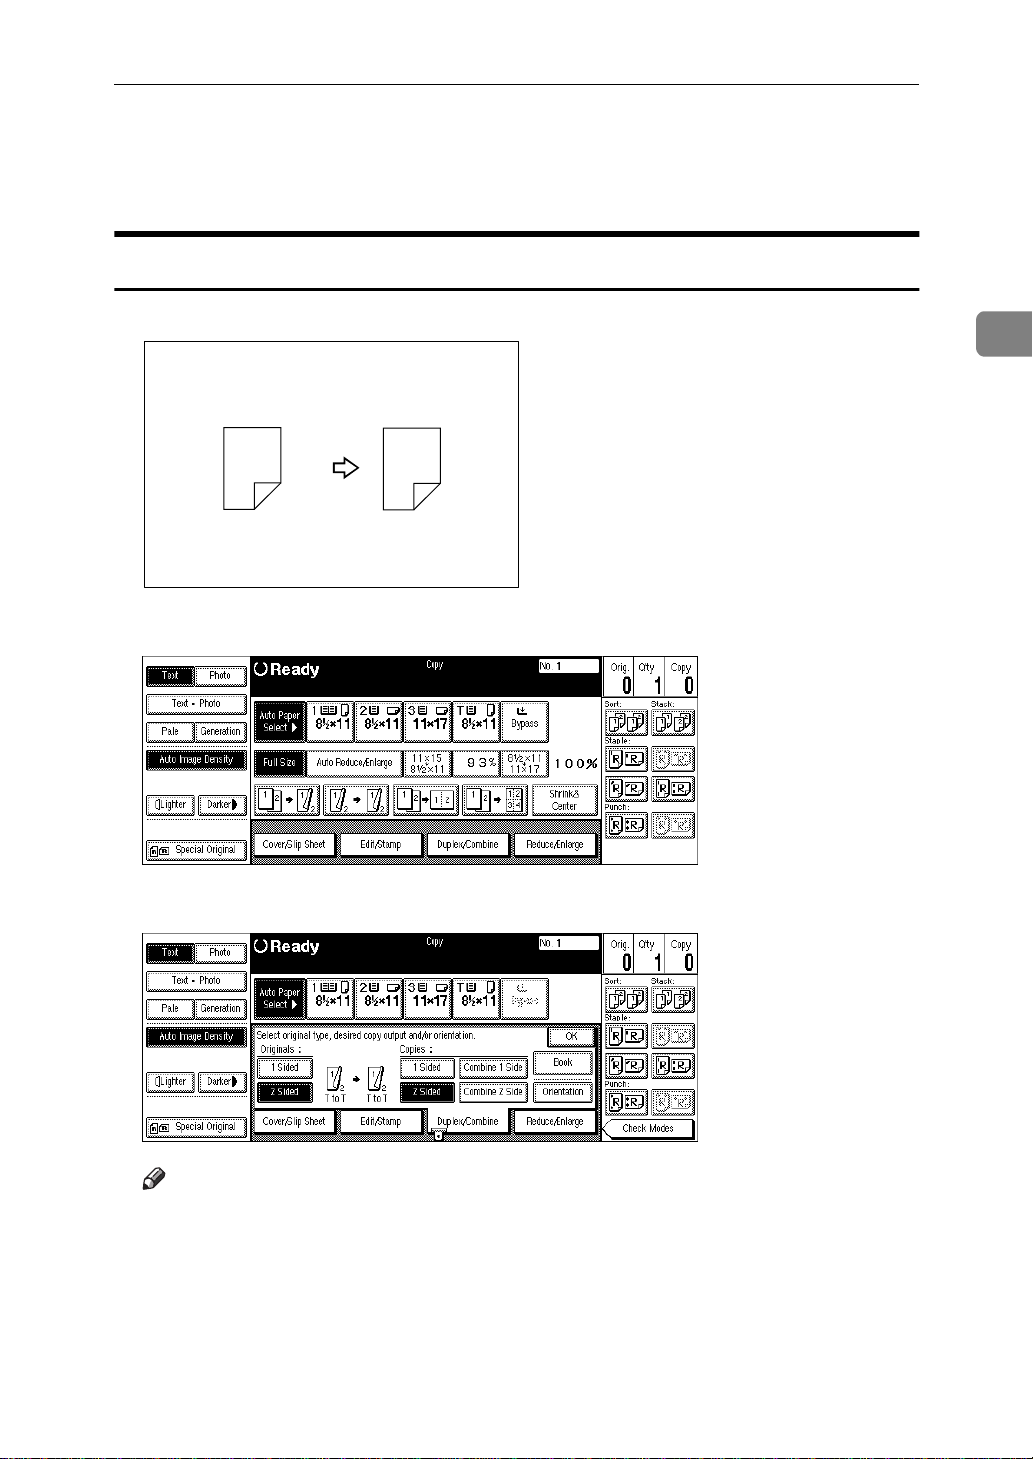
Duplex
This function can be used in two ways:
❖
1 Sided → 2 Sided
This mode makes two-sided copies from one-sided originals.
❖
2 Sided → 2 Sided
This mode makes two-sided copies from two-sided originals.
Limitation
❒
You cannot use the following copy paper in this function:
• Paper smaller than A5K, 5
"L)
2
• Paper thicker than 105g/m
• Paper thinner than 64g/m
• Translucent paper
• Adhesive labels
• OHP transparencies
1
/2" × 81/2"K (possible on A5L, 51/2" × 81/
2
, 28 lb. Bond
2
, 17 lb. Bond
Duplex
2
• Postcards
❒
You cannot use the bypass tray with this function.
1 Sided → 2 Sided
12
Note
❒
If you set an odd number of 1-sided originals in the document feeder, the reverse side of the last page is left blank.
❒
If you set originals in the document feeder and select Sort mode, all the originals will be scanned before being copied. Therefore, the copy speed is faster
than that when Sort mode is not selected. See “Auto Sort Mode” in ⇒ P.329
“Input/Output”
.
1
2
111
Page 13
Copying
❒
When original images are copied, the images are shifted by a width of the
binding margin. You can adjust the binding margin or binding position. You
can also change their default values. See “Front Margin: Left/Right”, “Back
Margin: Left/Right”, “Front Margin: Top/Bottom” and “Back Margin: Top/
Bottom” in ⇒ P.317
❒
A binding margin can be automatically made on the back side. See “1 → 2 Duplex Auto Margin Adjust” in ⇒ P.317
“Page Format
1
.
/2”
“Page Format
1
/2”
.
2
A Press the
B Press the
Note
❒
To change the copy orientation to “Top to Bottom”, press the
key and select
Originals”
[
Duplex/Combine
key for original, then press the
[
1 Sided
]
[
Top to Bottom
.
key.
]
. See ⇒ P.110
]
[
2 Sided
“Specifying Orientation of Bound
key for copy.
]
[
Orientation
]
C Press the
[
OK
key.
]
D Set your originals, then press the
When setting an origin al on the exposure gl ass or in the document fee der
using Batch (SADF) mode
Reference
P.36
⇒
A Set the original, then press the
❒
112
“Batch (SADF) mode”
Note
Start with the first page to be copied.
key.
}
{
Start
.
Start
key.
}
{
Page 14
B Set the next original. When it is placed on the exposure glass, press the
Start
key.
}
key after the last original has been scanned.
{
}
#
{
C Press the
2 Sided → 2 Sided
Duplex
2
A Press the
B Press the
1
2
[
Duplex/Combine
key for original, then press the
[
2 Sided
]
1
]
2
key.
[
2 Sided
key for copy.
]
Note
❒
To change the copy orientation to “Top to Bottom”, press the
key and select
Originals”
C Press the
[
OK
[
Top to Bottom
.
key.
]
D Set your originals, then press the
. See ⇒ P.110
]
key.
}
{
Start
“Specifying Orientation of Bound
[
Orientation
]
113
Page 15

Copying
When setting an origin al on the exposure gl ass or in the document fee der
using Batch (SADF) mode
Reference
P.36
⇒
A Set the original, then press the
“Batch (SADF) mode”
.
key.
}
{
Start
2
Note
❒
Start with the first page to be copied.
B Set the next original. When it is placed on the exposure glass, press the
key.
}
{
Start
C Press the
key after the last original has been scanned.
{
}
#
114
Page 16

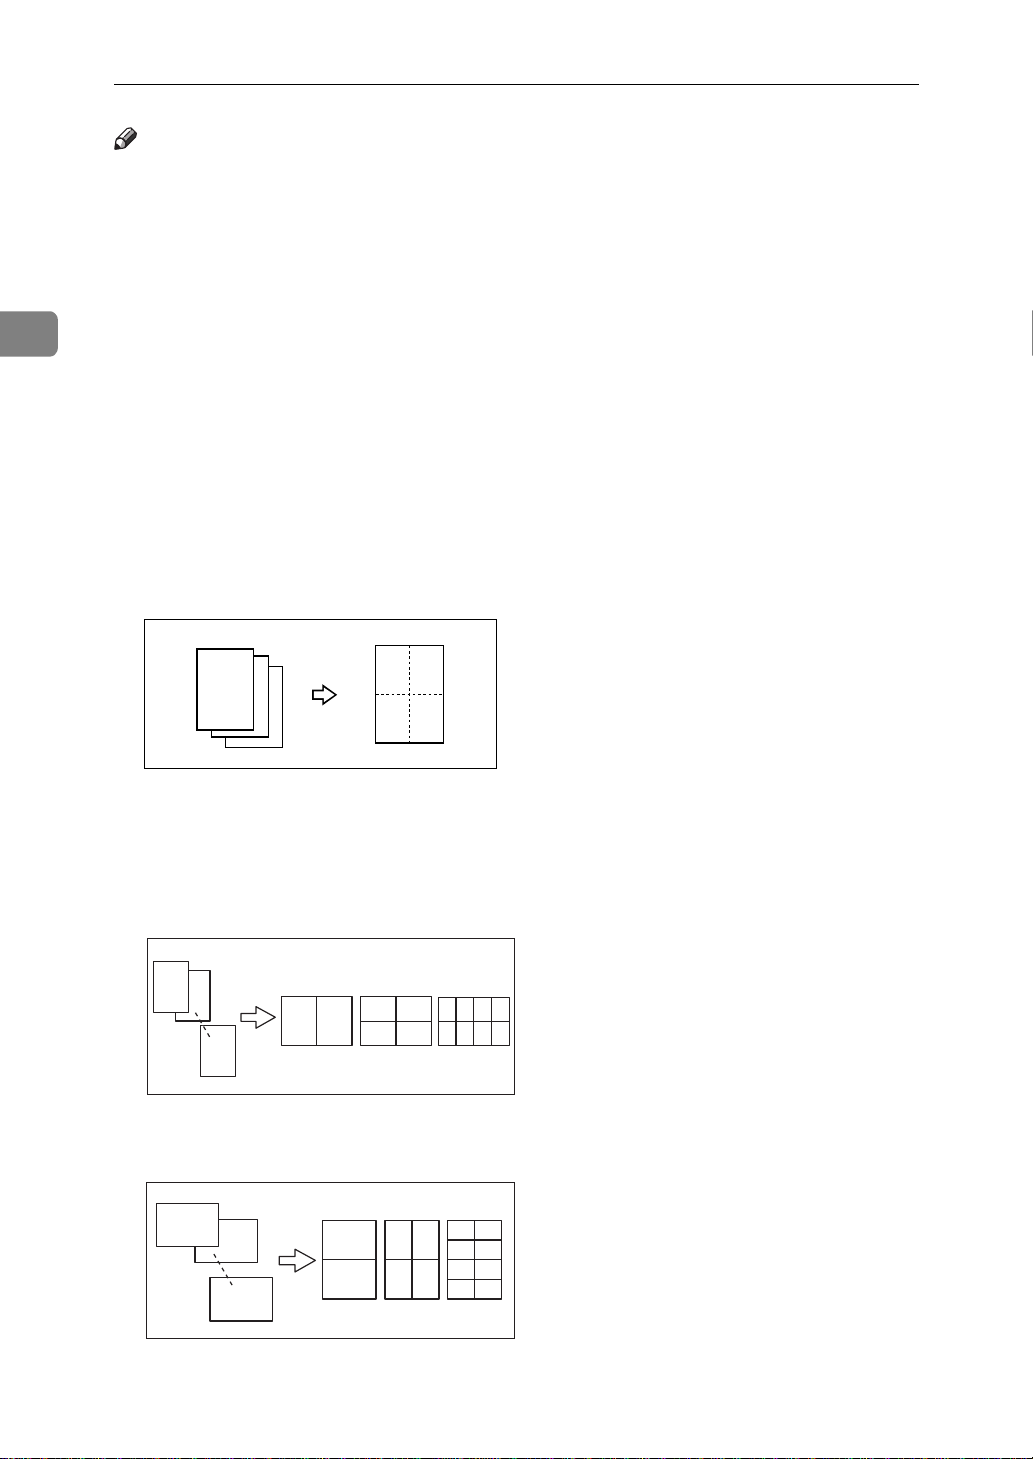
Combine
Combine
You can combine two or more originals into one copy. 1 Sided Combine mode is
for 1-sided copies, and 2 Sided Combine mode for 2-sided copies.
This function can be used in twelve ways:
❖
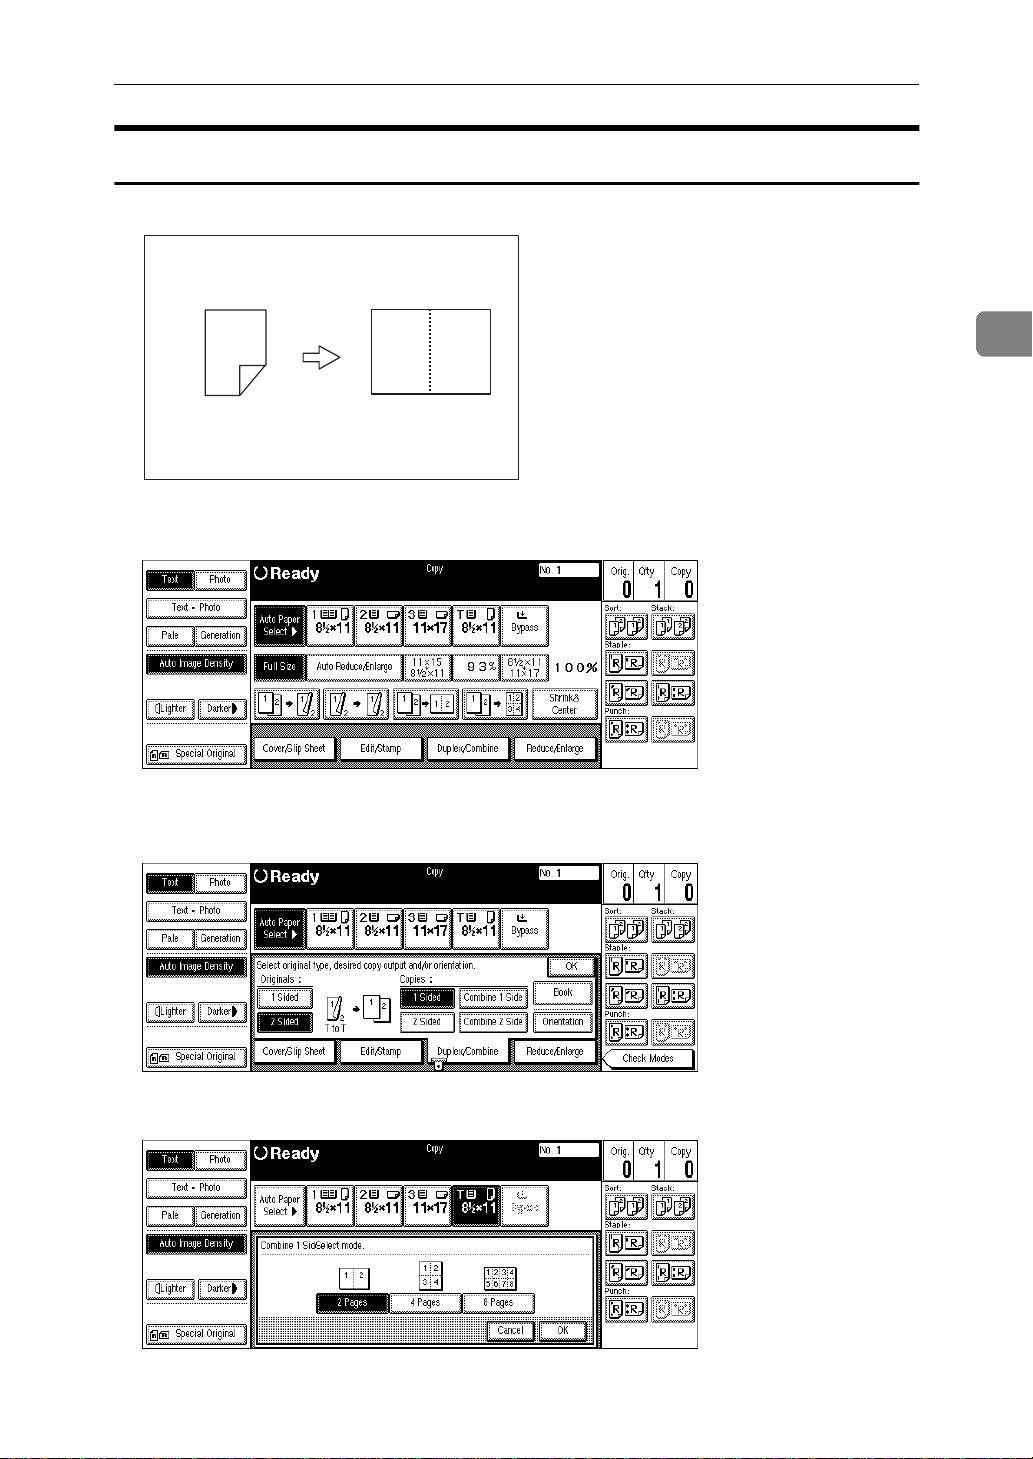
1 Sided 2 Pages → Combine 1 Side
Copies two 1-sided originals to one side of a sheet.
❖
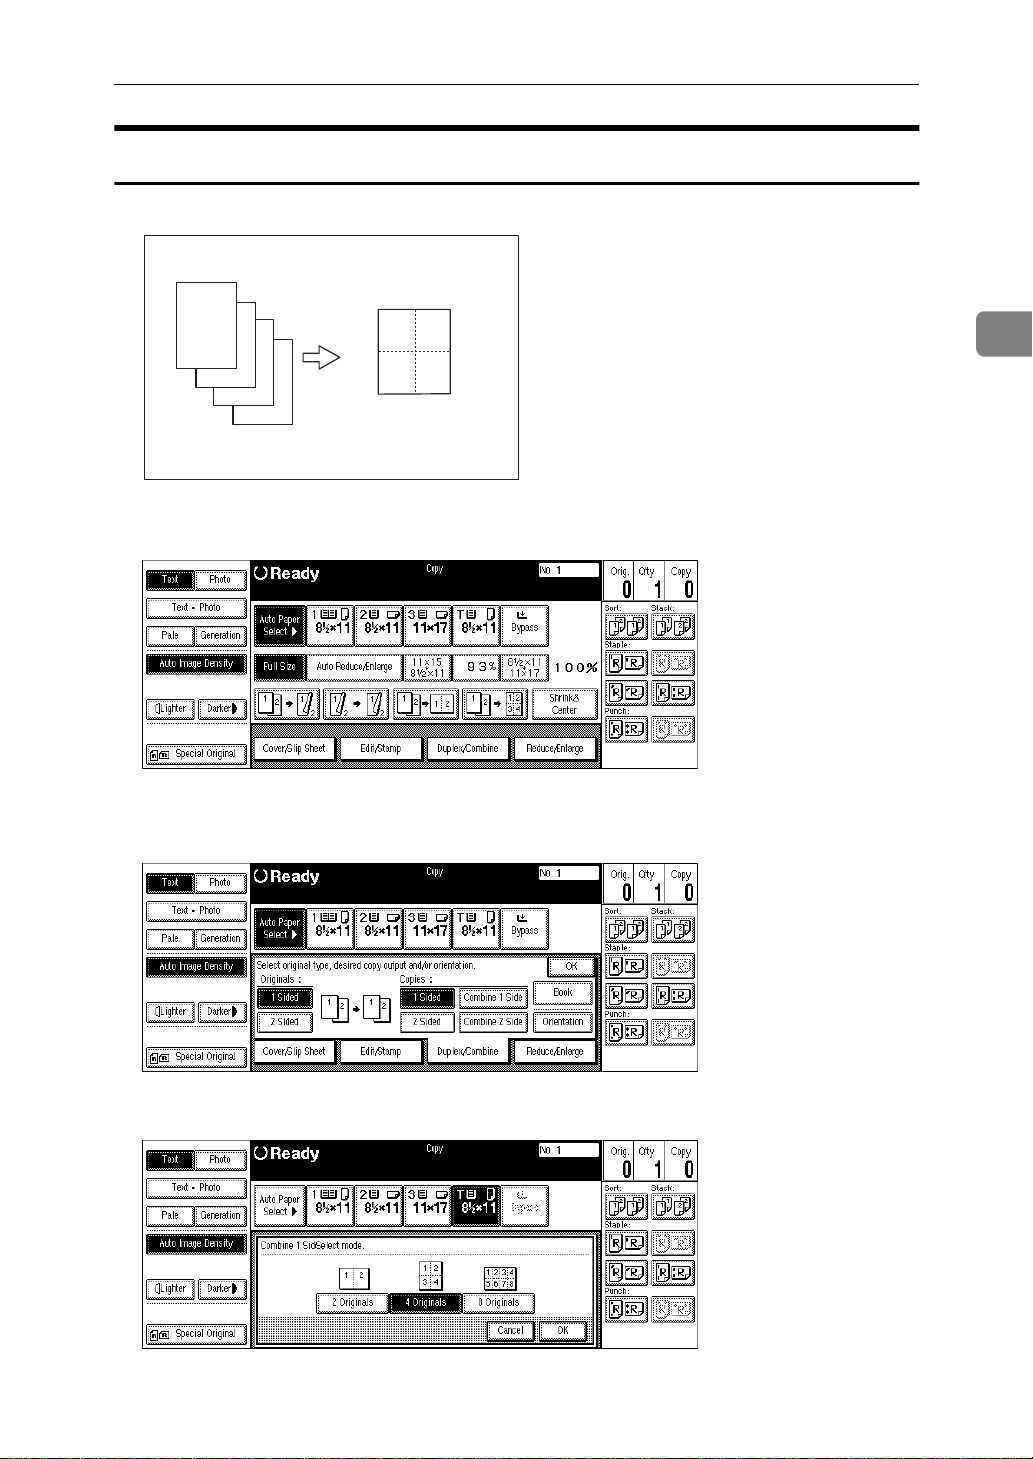
1 Sided 4 Pages → Combine 1 Side
Copies four 1-sided originals together to one side of a sheet.
❖
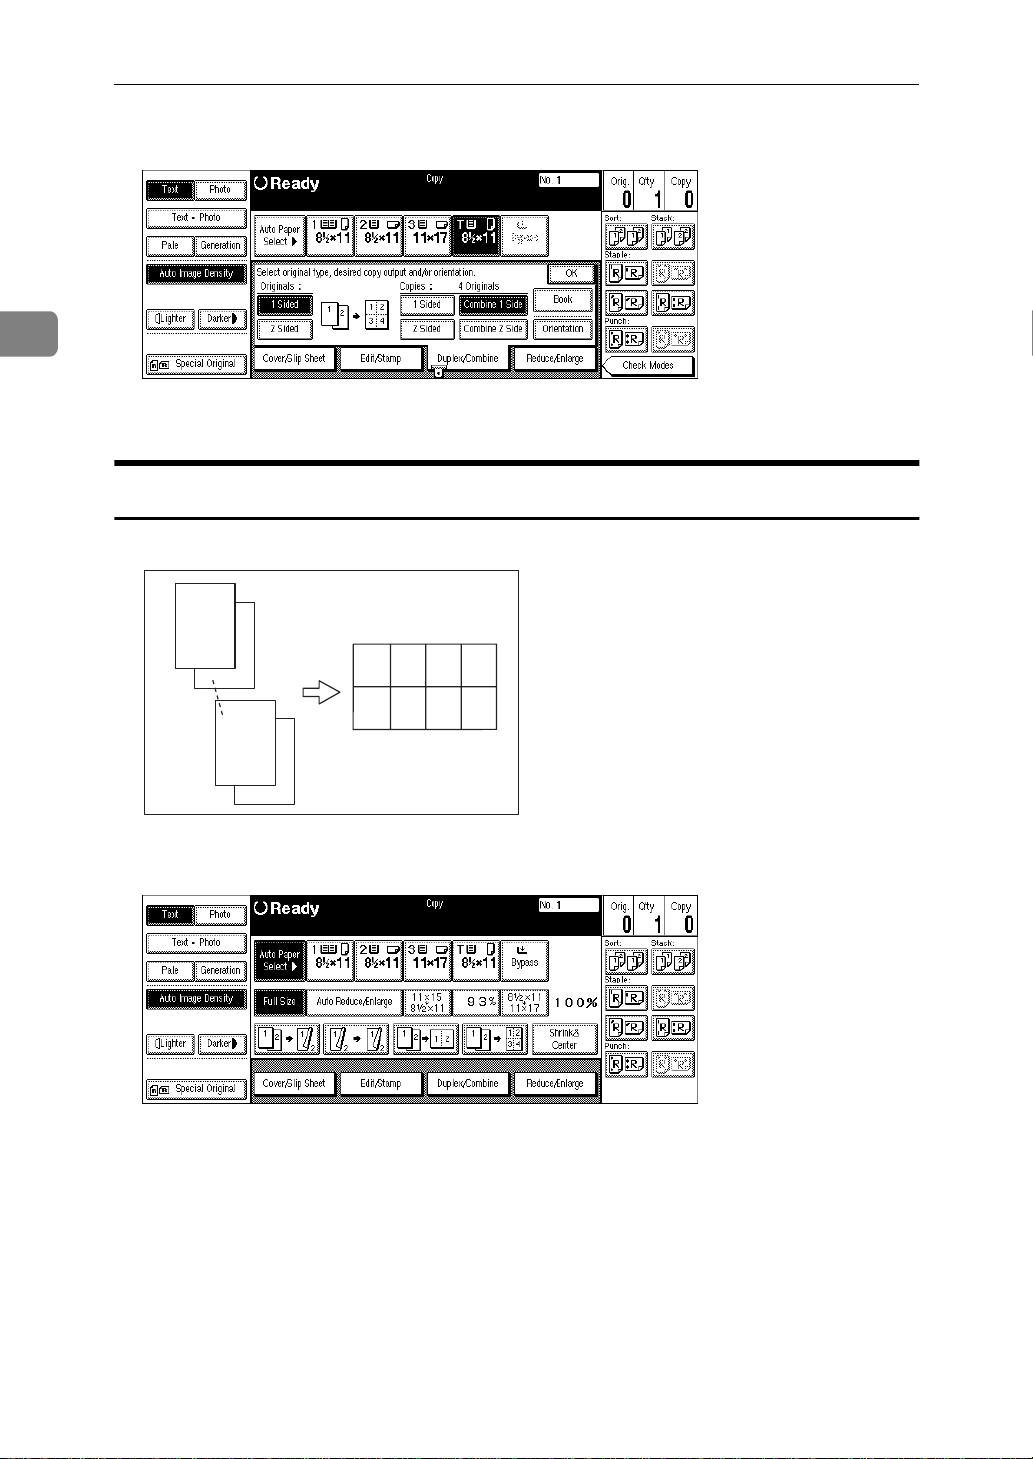
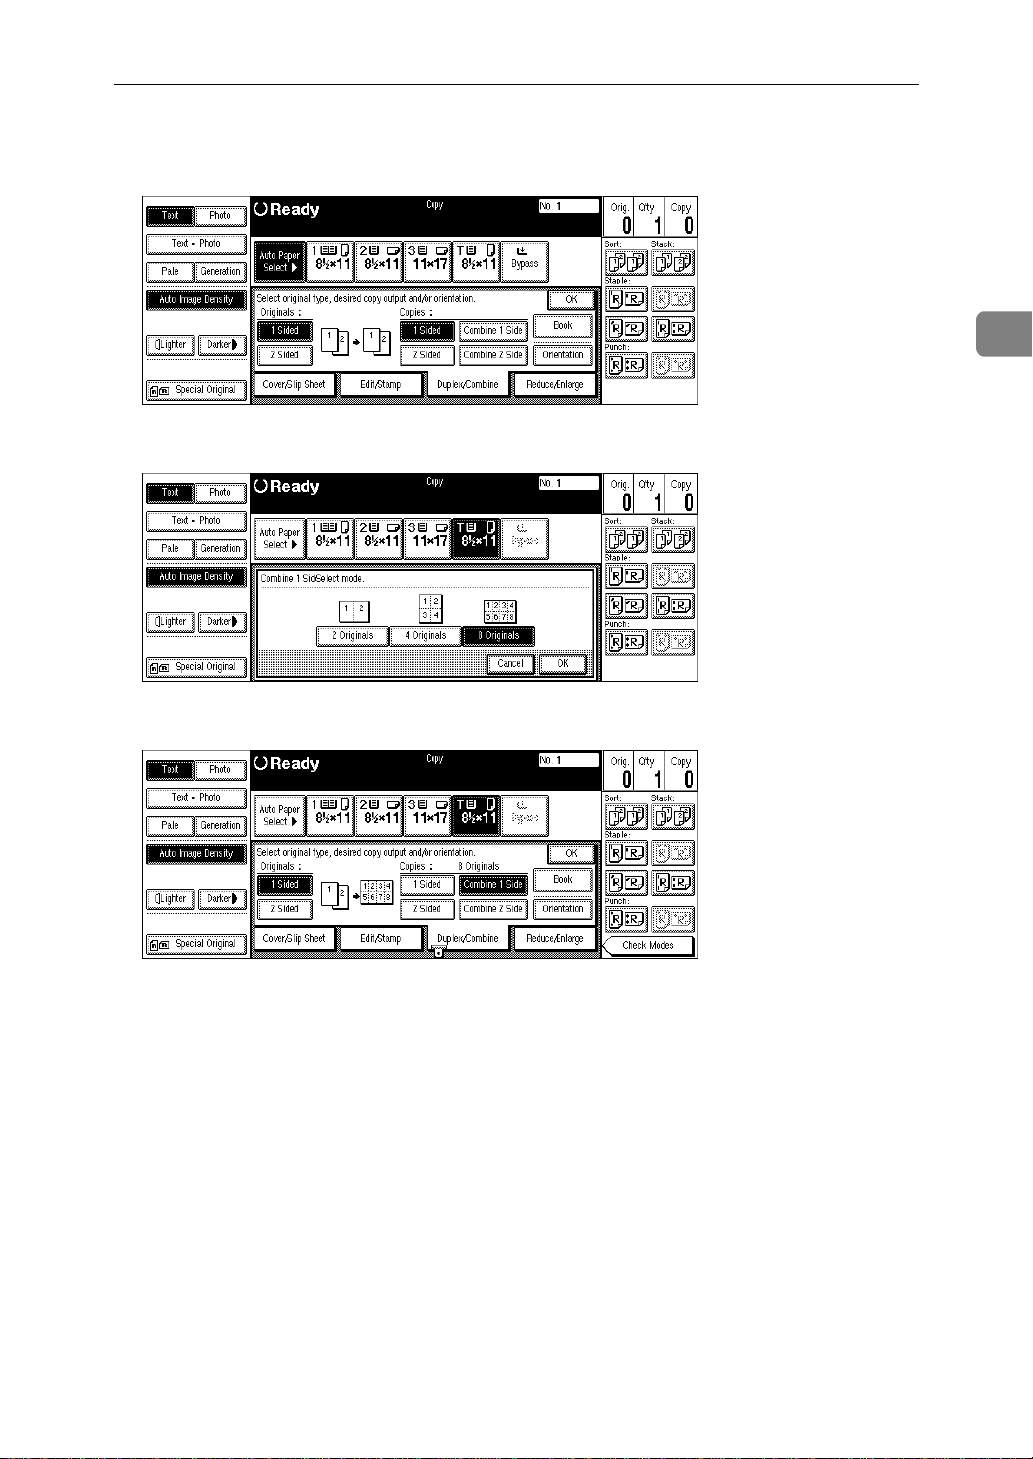
1 Sided 8 Pages → Combine 1 Side
Copies eight 1-sided originals together to one side of a sheet.
❖
1 Sided 4 Pages → Combine 2 Side
Copies four 1-sided originals to the two-page spread on both sides of a sheet.
❖
1 Sided 8 Pages → Combine 2 Side
Copies eight 1-sided originals together to both sides of a sheet.
2
❖
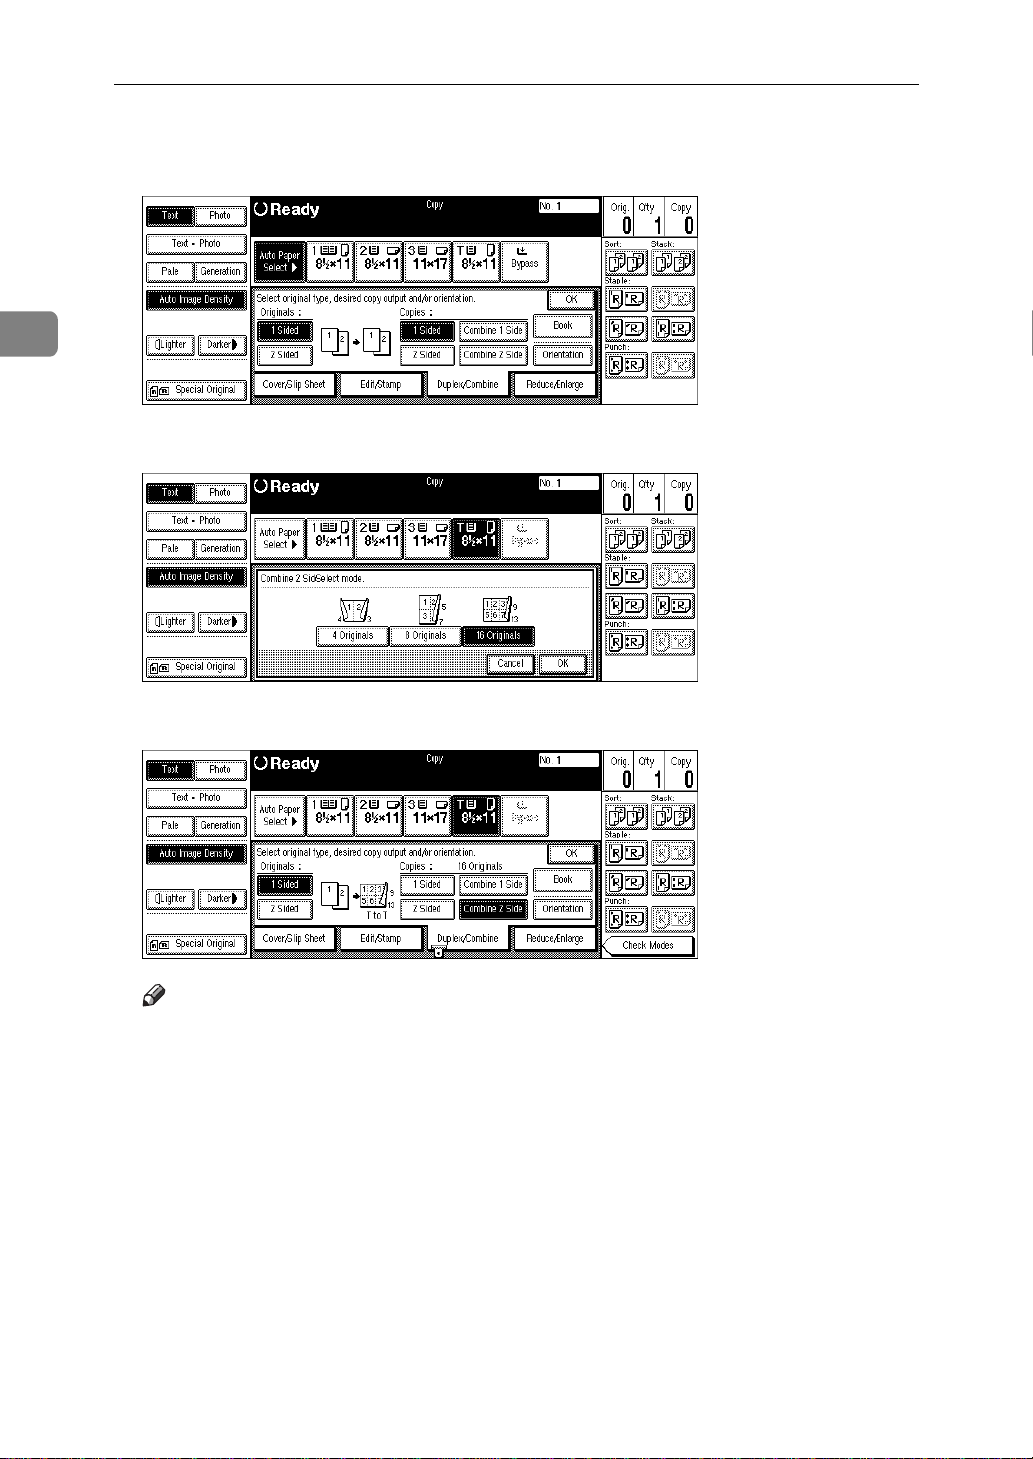
1 Sided 16 Pages → Combine 2 Side
Copies 16 1-sided originals together to both sides of a sheet.
❖
2 Sided 2 Pages → Combine 1 Side
Copies one 2-sided original to one side of a sheet.
❖
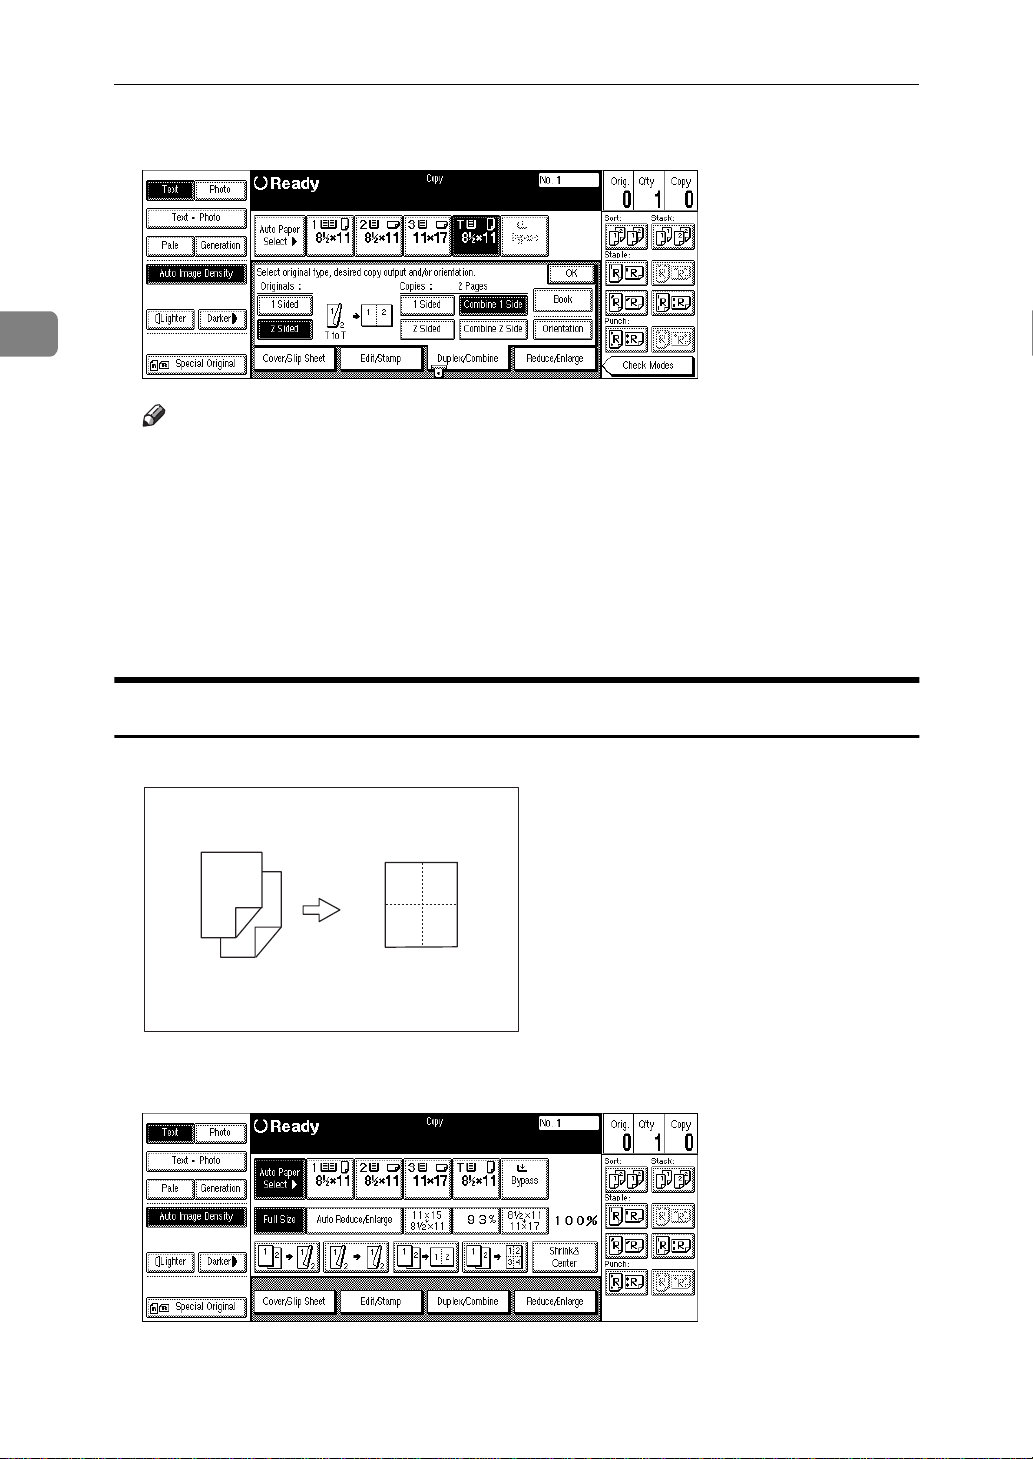
2 Sided 4 Pages → Combine 1 Side
Copies two 2-sided originals to one side of a sheet.
❖
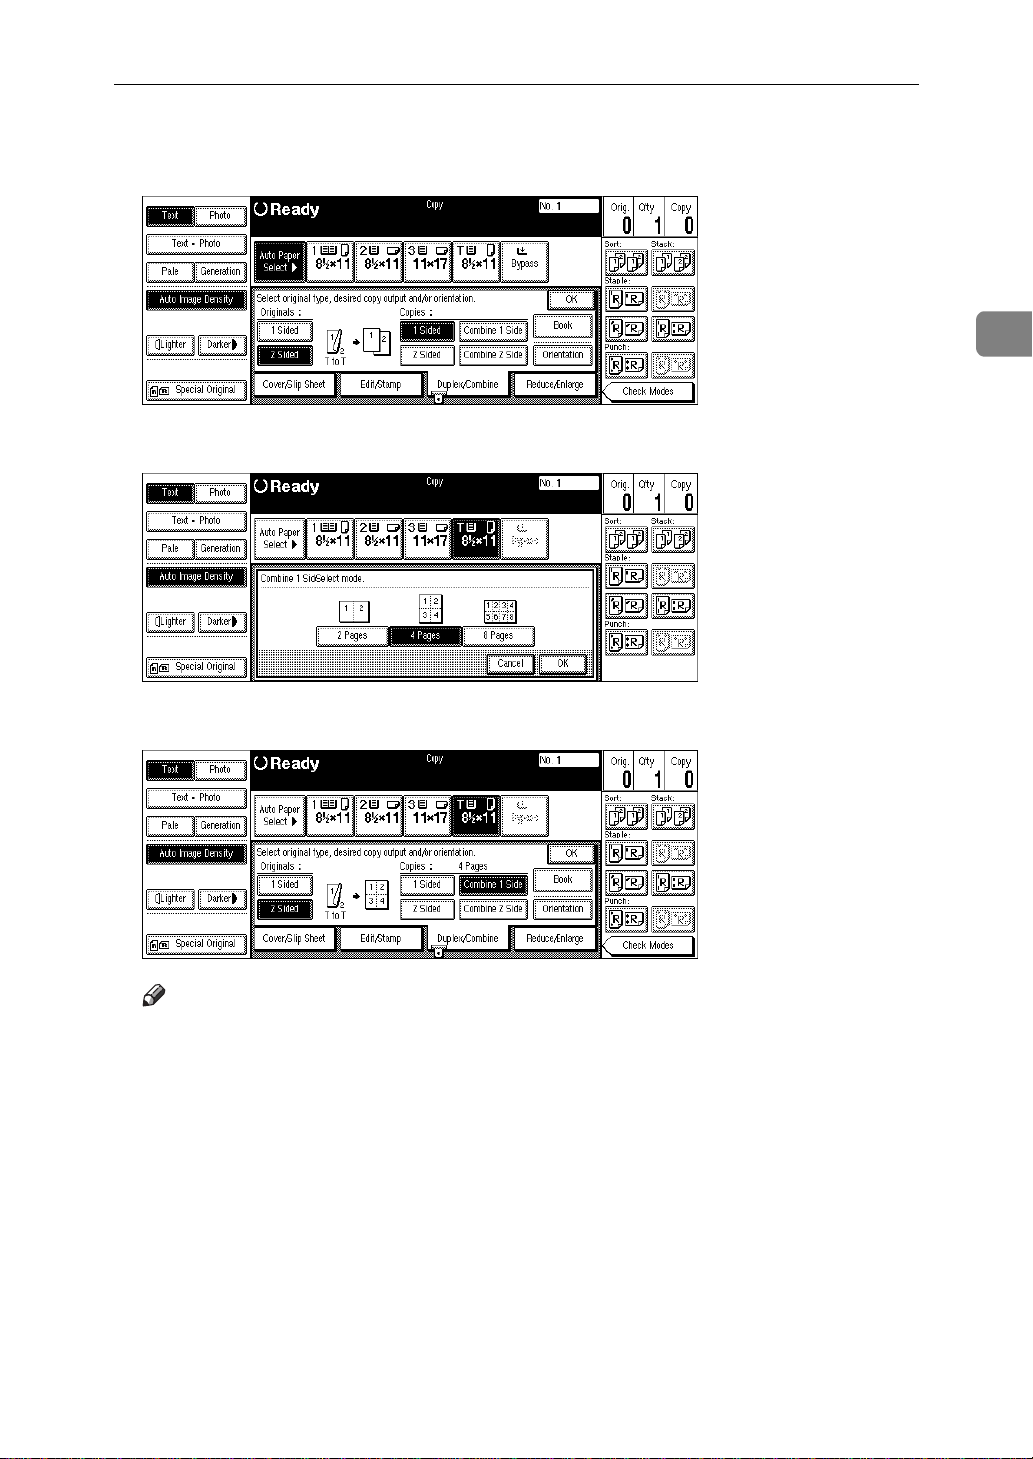
2 Sided 8 Pages → Combine 1 Side
Copies four 2-sided originals to one side of a sheet.
❖
2 Sided 4 Pages → Combine 2 Side
Copies two 2-sided originals together to both sides of a sheet.
❖
2 Sided 8 Pages → Combine 2 Side
Copies four 2-sided originals together to both sides of a sheet.
❖
2 Sided 16 Pages → Combine 2 Side
Copies eight 2-sided originals together to both sides of a sheet.
Limitation
❒
You cannot use the bypass tray with this function.
❒
If the calculated ratio is under the minimum ratio, it is corrected within the
range of the ratio automatically. However, with some ratios, parts of the image might not be copied.
115
Page 17
Copying
Note
❒
In this mode, the machine selects the reproduction ratio automatically. This
reproduction ratio depends on the copy paper sizes and the number of originals.
❒
The machine uses ratios in the following range:
• Metric version: 25 – 400%
2
• Inch version: 25 – 400%
❒
A separation line between originals can be printed with the User Tools. See
“Combine Separation Line” in ⇒ P.320
❒
Even if the direction of originals is different from that of the copy paper, the
“Page Format
2
/2”
.
machine will automatically rotate the image by 90° to make copies properly.
❒
When making copies in Combine mode, the border of each original can be automatically erased by 3mm, 0.1". See “Combine Orig. Shadow Erase” in
P.317
“Page Format
❒
If the number of originals placed is less than the number specified for com-
1
/2”
.
bining, the last page is copied blank as shown in the illustration.
1
2
3
❒
You can change the copy order in Combination mode. See “Copy Order In
Combine Mode” in ⇒ P.320
❒
Direction of the originals and arrangement of combined images
21
3
“Page Format
2
/2”
.
⇒
116
❖
Portrait (K) origin als
1
2
1
2
8
❖
Landscape (L) originals
1
2
8
4
2
1
1
2
21
3
43
1234
5678
GCSHUY1E
1
2
3
4
5
6
7
8
GCSHUY2E
Page 18
1 Sided 2 Pages → Combine 1 Side
Copies two 1-sided originals to one side of a sheet.
Combine
1 2
❖
Setting originals (Originals set in the document feeder)
1
2
GC SHVY 7J
• Originals read from left to right
1
2
3
4
1
3
2
Combine5
4
• Originals read from top to bottom
1
2
3
4
2
4
1
3
2
A Press the
[
Duplex/Combine
Combine6
key.
]
117
Page 19

Copying
2
B Press the
the copy.
C Press the
[
1 Sided
[
2 Originals
D Select the paper.
key for the original, then press the
]
key, then press the
]
[OK]
key.
[
Combine 1 Side
key for
]
E Set your originals, then press the
118
{
Start
key.
}
Page 20
1 Sided 4 Pages → Combine 1 Side
Copies four 1-sided originals together to one side of a sheet.
1
2
3
4
1 2
34
GC SHVY 8J
Combine
2
A Press the
B Press the
the copy.
C Press the
[
Duplex/Combine
key for the original, then press the
[
1 Sided
[
4 Originals
]
key, then press the
]
key.
]
[OK]
key.
[
Combine 1 Side
key for
]
119
Page 21
2
Copying
D Select the paper.
E Set your originals, then press the
{
Start
key.
}
1 Sided 8 Pages → Combine 1 Side
Copies eight 1-sided originals together to one side of a sheet.
1
2
1 234
A Press the
7
8
[
Duplex/Combine
5678
GC SHVY 3J
key.
]
120
Page 22
Combine
B Press the
the copy.
C Press the
[
1 Sided
[
8 Originals
D Select the paper.
key for the original, then press the
]
key, then press the
]
[OK]
key.
[
Combine 1 Side
key for
]
2
E Set your originals, then press the
{
Start
key.
}
121
Page 23
2
Copying
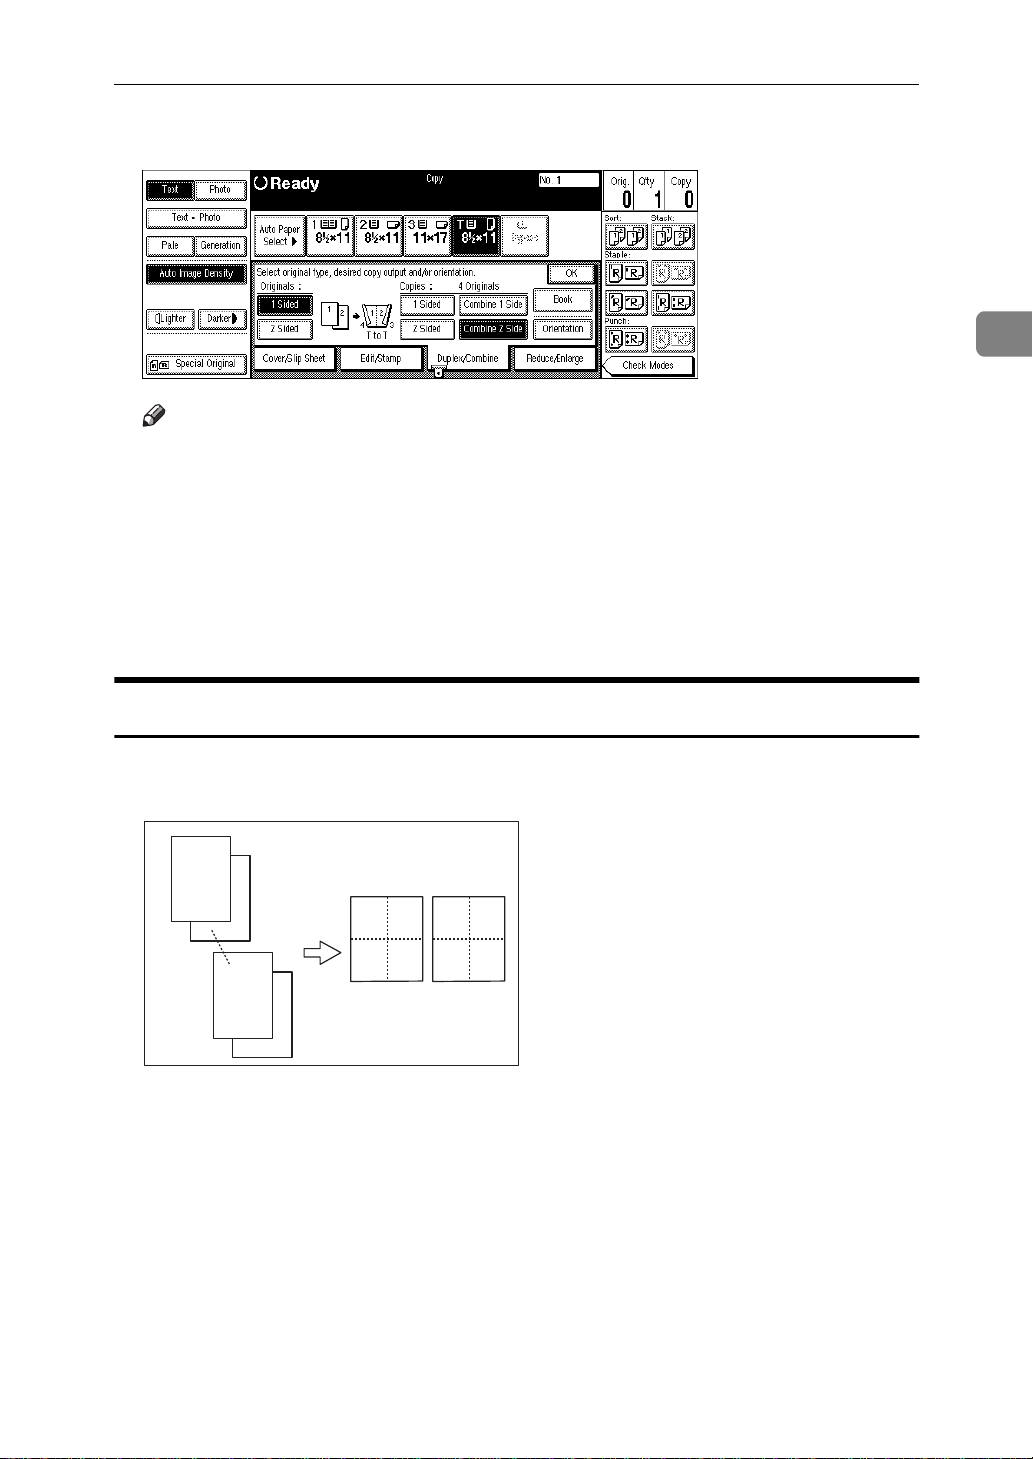
1 Sided 4 Pages → Combine 2 Side
Copies four 1-sided originals to the two-page spread on both sides of a sheet.
1
2
3
4
4
21
3
GC SHVY 9J
A Press the
B Press the
the copy.
C Press the
[
Duplex/Combine
key for the original, then press the
[
1 Sided
[
4 Originals
]
key, then press the
]
key.
]
[OK]
key.
[
Combine 2 Side
key for
]
122
Page 24
D Check the orientation.
Note
❒
To change the copy orientation to “Top to Bottom”, press the
key and select
Originals”
.
[
Top to Bottom
. See ⇒ P.110
]
“Specifying Orientation of Bound
Combine
[
Orientation
2
]
E Press the
[
OK
key.
]
F Select the paper.
G Set your originals, then press the
{
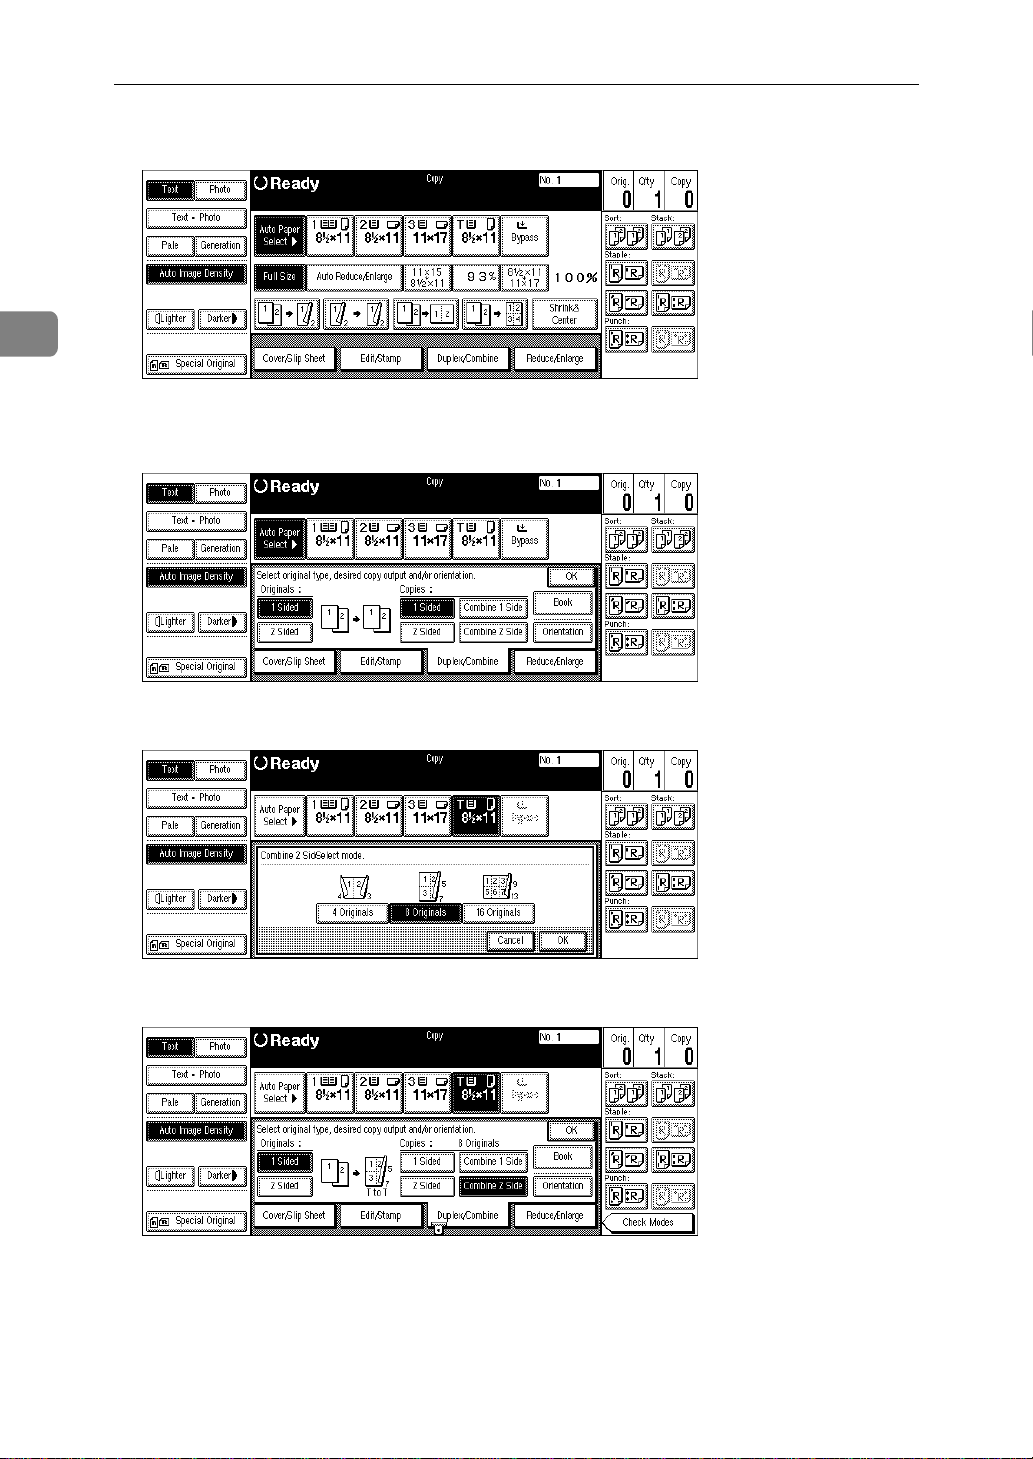
1 Sided 8 Pages → Combine 2 Side
Copies eight 1-sided originals together to both sides of a sheet.
1
2
1. Front
1 2
7
8
34
12
5 6
78
GCSHVYAE
Start
key.
}
2. Back
123
Page 25
Copying
2
A Press the
B Press the
the copy.
C Press the
[
Duplex/Combine
key for the original, then press the
[
1 Sided
[
8 Originals
]
key, then press the
]
key.
]
[OK]
key.
[
Combine 2 Side
key for
]
D Check the orientation.
124
Page 26
Note
❒
To change the copy orientation to “Top to Bottom”, press the
key and select
Originals”
.
[
Top to Bottom
. See ⇒ P.110
]
“Specifying Orientation of Bound
Combine
[
Orientation
]
E Press the
[
OK
key.
]
F Select the paper.
G Set your originals, then press the
{
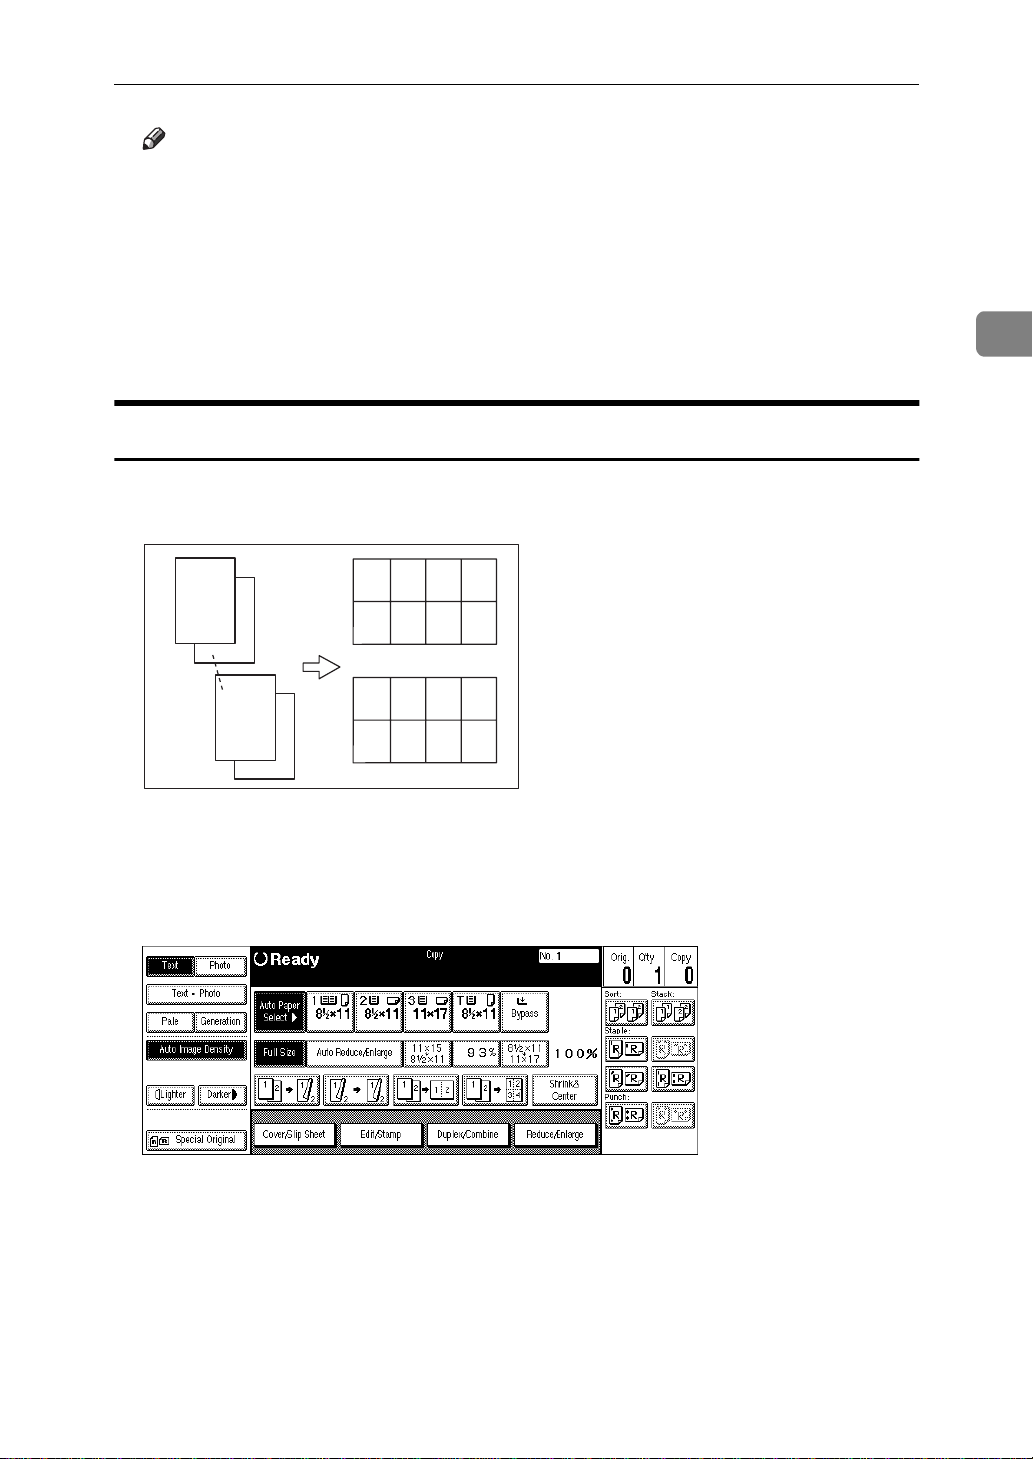
1 Sided 16 Pages → Combine 2 Side
Copies sixteen 1-sided originals together to both sides of a sheet.
1
2
15
16
1. Front
1 234
5678
1
9 10 11 12
13 14 15 16
2
GCSHVY5E
Start
key.
}
2
2. Back
A Press the
[
Duplex/Combine
key.
]
125
Page 27
Copying
2
B Press the
the copy.
C Press the
[
1 Sided
[
16 Originals
key for the original, then press the
]
]
D Check the orientation.
key, then press the
[OK]
key.
[
Combine 2 Side
key for
]
Note
❒
To change the copy orientation to “Top to Bottom”, press the
key and select
Originals”
E Press the
[
OK
[
Top to Bottom
.
key.
]
F Select the paper.
G Set your originals, then press the
126
. See ⇒ P.110
]
key.
}
{
Start
[
Orientation
“Specifying Orientation of Bound
]
Page 28
2 Sided 2 Pages → Combine 1 Side
Copies one 2-sided original to one side of a sheet.
1
1 2
2
GC SHVY OJ
Combine
2
A Press the
B Press the
the copy.
C Press the
[
Duplex/Combine
key for the original, then press the
[
2 Sided
[
2 Pages
]
key, then press the
]
key.
]
[OK]
key.
[
Combine 1 Side
key for
]
127
Page 29
2
Copying
D Check the orientation.
Note
❒
To change the copy orientation to “Top to Bottom”, press the
key and select
Originals”
.
[
Top to Bottom
. See ⇒ P.110
]
“Specifying Orientation of Bound
[
Orientation
]
E Press the
[
OK
key.
]
F Select the paper.
G Set your originals, then press the
{
2 Sided 4 Pages → Combine 1 Side
Copies two 2-sided originals to one side of a sheet.
1
A Press the
3
2
4
[
Duplex/Combine
1 2
34
key.
]
GC SHVY BJ
Start
key.
}
128
Page 30
Combine
B Press the
the copy.
C Press the
[
2 Sided
[
4 Pages
key for the original, then press the
]
key, then press the
]
D Check the orientation.
[OK]
key.
[
Combine 1 Side
key for
]
2
Note
❒
To change the copy orientation to “Top to Bottom”, press the
key and select
Originals”
E Press the
[
OK
[
Top to Bottom
.
key.
]
. See ⇒ P.110
]
“Specifying Orientation of Bound
F Select the paper.
G Set your originals, then press the
{
Start
key.
}
[
Orientation
]
129
Page 31

2
Copying
2 Sided 8 Pages → Combine 1 Side
Copies four 2-sided originals to one side of a sheet.
1
3
5
2
7
4
6
8
1 234
5678
GC SHVY 4J
A Press the
B Press the
the copy.
C Press the
[
Duplex/Combine
key for the original, then press the
[
2 Sided
[
8 Pages
]
key, then press the
]
key.
]
[OK]
key.
[
Combine 1 Side
key for
]
130
Page 32

D Check the orientation.
Note
❒
To change the copy orientation to “Top to Bottom”, press the
key and select
Originals”
.
[
Top to Bottom
. See ⇒ P.110
]
“Specifying Orientation of Bound
Combine
[
Orientation
2
]
E Press the
[
OK
key.
]
F Select the paper.
G Set your originals, then press the
{
2 Sided 4 Pages → Combine 2 Side
Copies 2-sided originals together to both sides of a sheet.
A Press the
1
3
2
4
[
Duplex/Combine
4
key.
]
21
3
GC SHVY 1J
Start
key.
}
131
Page 33

Copying
2
B Press the
the copy.
C Press the
[
2 Sided
[
4 Pages
key for the original, then press the
]
key, then press the
]
D Check the orientation.
[OK]
key.
[
Combine 2 Side
key for
]
Note
❒
To change the copy orientation to “Top to Bottom”, press the
key and select
Originals”
E Press the
[
OK
[
Top to Bottom
.
key
]
F Select the paper.
G Set your originals, then press the
132
. See ⇒ P.110
]
key.
}
{
Start
[
Orientation
“Specifying Orientation of Bound
]
Page 34

2 Sided 8 Pages → Combine 2 Side
Copies four 2-sided originals together to both sides of a sheet.
Combine
1
2
1. Front
2. Back
A Press the
3
5
7
4
6
8
[
Duplex/Combine
key.
]
5 6
78
GCSHVY2E
1 2
34
12
2
B Press the
the copy.
[
2 Sided
key for the original, then press the
]
[
Combine 2 Side
key for
]
133
Page 35

Copying
2
C Press the
[
8 Pages
key, then press the
]
[OK]
key.
D Check the orientation.
Note
❒
To change the copy orientation to “Top to Bottom”, press the
key and select
Originals”
.
[
Top to Bottom
. See ⇒ P.110
]
“Specifying Orientation of Bound
[
Orientation
]
E Press the
[
OK
key
]
F Select the paper.
G Set your originals, then press the
{
Start
key.
}
134
Page 36

2 Sided 16 Pages → Combine 2 Side
Copies eight 2-sided originals together to both sides of a sheet.
Combine
2
1. Front
2. Back
A Press the
1
3
4
13
15
14
16
[
Duplex/Combine
1 234
5678
1
9 10 11 12
13 14 15 16
2
GCSHVY6E
key.
]
2
B Press the
the copy.
[
2 Sided
key for the original, then press the
]
[
Combine 2 Side
key for
]
135
Page 37

Copying
2
C Press the
[
16 Pages
key, then press the
]
[OK]
key.
D Check the orientation.
Note
❒
To change the copy orientation to “Top to Bottom”, press the
key and select
Originals”
.
[
Top to Bottom
. See ⇒ P.110
]
“Specifying Orientation of Bound
[
Orientation
]
E Press the
[
OK
key.
]
F Select the paper.
G Set your originals, then press the
{
Start
key.
}
136
Page 38

Series/Book
Series/Book
Series copies are made by separately copying the front and back of a 2-sided
original or the two facing pages of a spread original onto two sheets of paper. A
book is made by copying two or more originals in page order.
The following types of Series and Book modes can be used:
Series Copies
❖
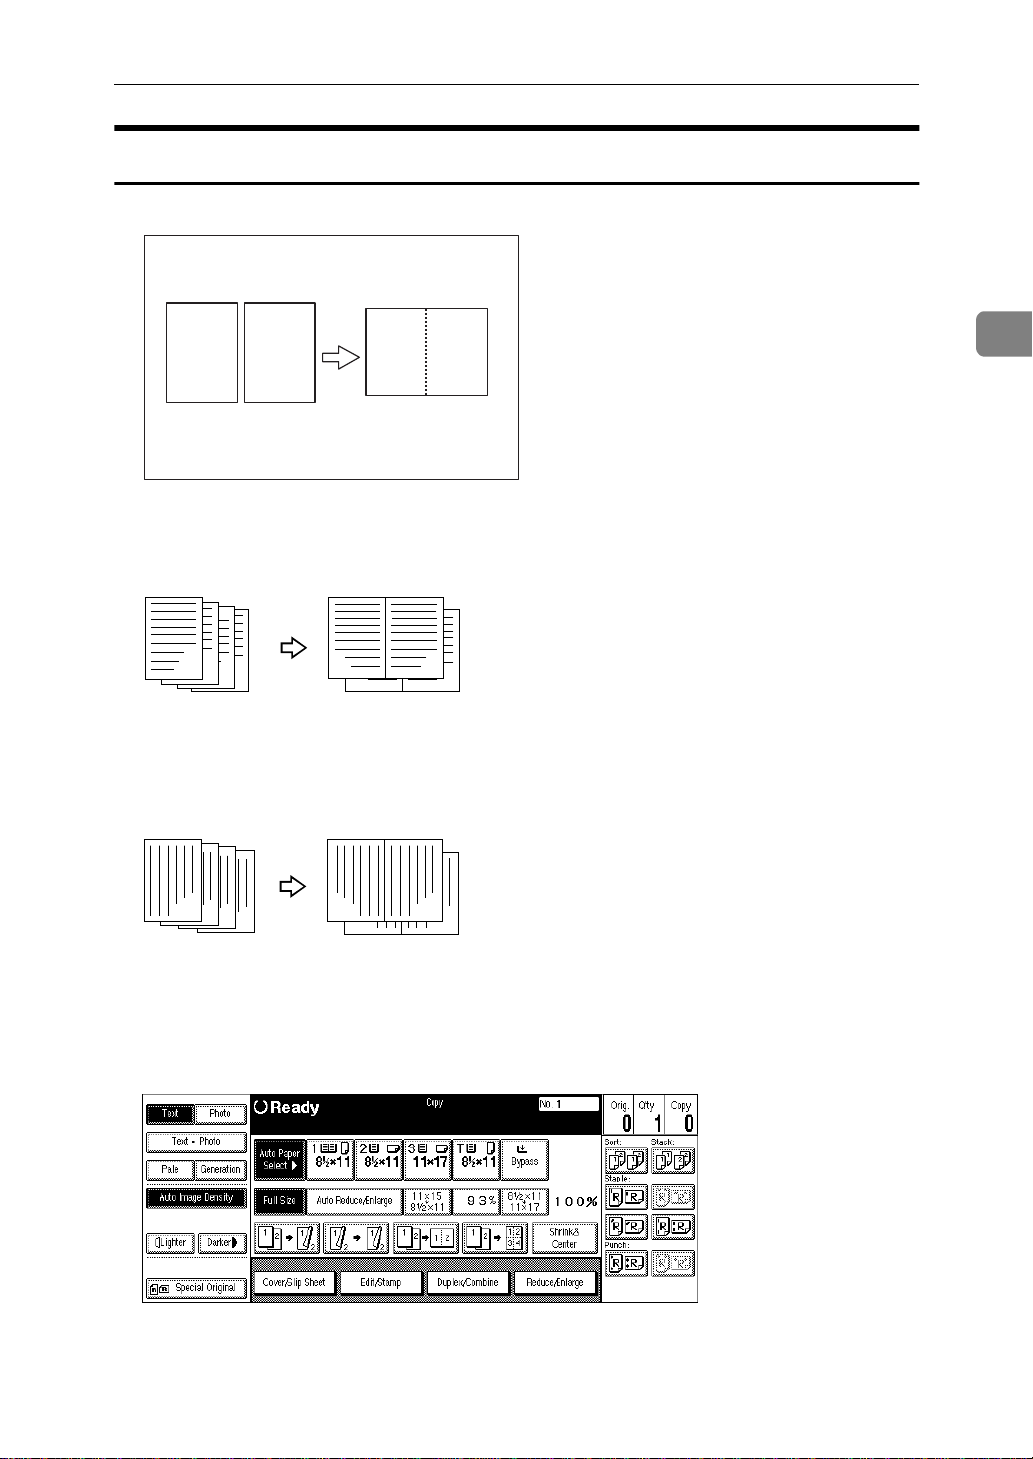
Book → 1 Sided
Copies the two facing pages of a spread original to make two 1-sided copies.
❖
2 Sided → 1 Sided
Copies the front and back of a 2-sided original to make two 1-sided copies.
Book
❖
Book → 2 Sided
Copies a spread two-page original onto both sides of a sheet.
❖
Multi → 2 Sided
Copies each spread two-page original as it is onto both sides of a sheet.
2
❖
Booklet
Make copies in page order for a folded booklet.
❖
Magazine
Copies two or more originals to make copies in page order (as when they are
folded and stacked).
137
Page 39

2
Copying
Series Copies
Book → 1 Sided
You can make one-sided copies from two facing pages of a bound original
(book).
12
Note
❒
See the following table when you select original and copy paper sizes with
12
100% ratio:
❖
Metric version
Original Copy paper
A3L A4K × 2 sheets
B4L B5K × 2 sheets
A4L A5K × 2 sheets
❖
Inch version
Original Copy paper
11" × 17"L
1
8
/2" × 11"L 51/2" × 81/2"K × 2 sheets
1
/2" × 11"K × 2 sheets
8
138
A Press the
[
Duplex/Combine
key.
]
Page 40

Series/Book
B Press the
C Press the
D Press the
key.
]
[
Book
[
Book→1 Sided
key.
]
[
OK
key.
]
2
E Press the
F Make sure that the
Note
❒
If the
G Set your originals, then press the
2 Sided→1 Sided
You can make one-sided copies from two-sided originals.
1
key.
]
[
OK
[
Auto Paper Select
[
Auto Paper Select
12
2
key is selected.
]
key is not selected, press the
]
key.
}
{
Start
[
Auto Pape r Sel ect
key.
]
139
Page 41

Copying
2
A Press the
B Press the
copy.
[
Duplex/Combine
key for the original, then press the
[
2 Sided
]
C Check the orientation.
key.
]
[
1 Sided
key for the
]
Note
❒
To change the original orientation to “Top to Bottom”, press the
key, then select
]
tion
Bound Originals”
D Press the
[
OK
key
]
[
Top to Bottom
.
E Set your originals, then press the
. See ⇒ P.110
]
key.
}
{
Start
“Specifying Orientation of
[
Orienta-
Copying Book Originals
Limitation
❒
You cannot use the bypass tray with this function.
❒
The machine cannot copy originals different in size and direction.
Note
❒
The machine sets the reproduction ratio automatically to meet the paper size
and copies the originals together onto the paper.
❒
The machine uses ratios in the range of 25 to 400%.
140
Page 42

Series/Book
❒
If the calculated ratio is under the available minimum ratio, it will be adjusted
to the minimum ratio. However, with some ratios, parts of the image might
not be copied.
❒
Even if the direction of originals is different from that of the copy paper, the
machine will automatically rotate the image by 90° to make copies properly.
Book→2 Sided
Copies a two-page spread original onto both sides of a sheet.
2
12
1
2
Note
❒
See the following table when you select original and copy paper sizes with
100% ratio:
❖
Metric version
Original Copy paper
A3L A4 (2-sided)
B4L B5 (2-sided)
A4L A5 (2-sided)
❖
Inch version
Original Copy paper
11" × 17"L
1
8
/2" × 11"L 51/2" × 81/2" (2-sided)
1
/2" × 11" (2-sided)
8
141
Page 43

Copying
2
A Press the
B Press the
C Press the
[
Duplex/Combine
key.
]
[
Book
[
Book→2 Sided
key.
]
key.
]
D Press the
E Press the
[
Book→2 Sided
key.
]
[
OK
F Select the paper.
G Set your originals, then press the
142
key.
]
{
Start
key.
}
Page 44

Multi → 2 Sided
Copies each two-page spread original as it is onto both sides of a sheet.
Series/Book
12
3
1
2
3
Note
❒
See the following table when you select original and copy paper sizes with
100% ratio:
❖
Metric version
Original Copy paper
A3L A4 (2-sided)
B4L B5 (2-sided)
A4L A5 (2-sided)
❖
Inch version
Original Copy paper
11" × 17"L
1
8
/2" × 11"L 51/2" × 81/2" (2-sided)
1
/2" × 11" (2-sided)
8
2
A Press the
[
Duplex/Combine
key.
]
143
Page 45

Copying
2
B Press the
C Press the
D Press the
key.
]
[
Book
[
Book→2 Sided
[
Multi→2 Sided
key.
]
key.
]
E Press the
[
OK
key.
]
F Select the paper.
G Set your originals, then press the
Note
❒
When placing one original on the exposure glass or in the document feeder
in Batch (SADF) mode, press the
144
key.
}
{
Start
key after all originals are scanned.
}
{
#
Page 46

Series/Book
Booklet
Make copies in page order for a folded booklet as shown in the following illustrations:
❖
Portrait
❖
Landscape
1
2
3
4
1
1
2
3
4
4
32
4
GCBOOK0E
23
1
GCBOOK1E
2
Important
❒
Before selecting this function, select “Portrait” or “Landscape” with the User
Tools. See “Booklet/Magazine Original Orientation” in ⇒ P.320
.
”
2
“Page Format
Note
❒
Four originals are copied onto each sheet of copy paper.
❒
In this mode, the machine sets the reproduction ratio automatically to meet
the paper size and copies the originals together onto the paper.
❒
A ratio is selected in the range of 25 to 400%.
❒
If the calculated ratio is under the available minimum ratio, it will be adjusted
to the minimum ratio. However, with some ratios, parts of the image might
not be copied.
❒
If the number of originals scanned is less than a multiple of 4, the last page is
copied blank.
❒
You can have a 3mm, 0.1" bounding margin around all four edges of the original left blank (erased). See “Combine Orig. Shadow Erase” in ⇒ P.317
1
Format
/2”
.
“Page
2
/
145
Page 47

Copying
How to fold copies to make a booklet
12
2
1. Portrait
2. Landscape
A Press the
B Press the
3
1
[
Duplex/Combine
key.
]
[
Book
3
1
]
GCBOOK2E
key.
146
Page 48

Series/Book
C Press the
[
Booklet
key, followed by the
]
[OK]
key.
D Select the paper.
E Set your originals, then press the
{
Note
❒
When placing one original on the exposure glass or in the document feeder
in Batch (SADF) mode, press the
Magazine
Copies two or more originals to make copies in page order when they are folded
and stacked.
key.
}
Start
key after all originals are scanned.
}
{
#
2
❖
Portrait
1
2
72
7
8
8
16
3
54
GCBOOK3E
147
Page 49

Copying
❖
Landscape
1
2
2
27
7
8
1
83
6
45
GCBOOK4E
Important
❒
Before selecting this function, select “Portrait” or “Landscape” with the User
Tools. See “Booklet/Magazine Original Orientation” in ⇒ P.320
2
.
/2”
“Page Format
Note
❒
To use this function with two-sided originals, select this function from the
Shortcut Keys. See “Shortcut Keys” in ⇒ P.314
❒
Four originals are copied onto each sheet of copy paper.
❒
In this mode, the machine sets the reproduction ratio automatically to meet
“General Features
3
/3”
.
the paper size and copies the originals together onto the paper.
❒
A ratio is selected in the range of 25 to 400%.
❒
If the calculated ratio is under the available minimum ratio, it will be adjusted
to the minimum ratio. However, with some ratios, parts of the image might
not be copied.
❒
If the number of originals scanned is less than a multiple of 4, the last page is
copied blank.
❒
You can have a 3mm bounding margin around all four edges of the original
left blank (erased). See “Combine Orig. Shadow Erase” in ⇒ P.317
1
/2”
.
mat
❒
The copying may take some time after scanning originals.
“Page For-
148
Page 50

How to fold and unfold copies to make a magazine
❖
Portrait
Series/Book
❖
Landscape
7 5
1
3
3
7
1
5
1
3
GCBOOK5E
55
1
3
GCBOOK6E
Note
❒
If you select “Saddle Stitch” with the optional booklet finisher in Magazine
mode, the machine staples the paper, and folds it like a book, then delivers
the folded pages.
2
Limitation
❒
If you select “Saddle Stitch” with the optional booklet finisher in Magazine
mode when the number of originals is only one, the original image is copied
onto the second page of the copy paper.
A Press the
[
Duplex/Combine
key.
]
149
Page 51

Copying
2
B Press the
C Press the
]
[
Book
[
Magazine
D Select the paper.
key.
key, followed by the
]
[OK]
key.
E Set your originals, then press the
Note
❒
When placing one original on the exposure glass or in the document feeder
in Batch (SADF) mode, press the
{
key.
}
Start
key after all originals are scanned.
{
}
#
150
Page 52

Cover/Slip Sheet
Cover/Slip Sheet
Using this function, you can add or insert cover or paper designate.
There are four types in this function:
❖
Front Cover
The first page of your originals is copied on a specific paper sheet for covers.
❖
Front/Back Covers
The first and last pages of your originals are copied on specific paper sheets
for covers.
❖
Paper Designate
Use this function to have certain pages of your original copied onto slip
sheets.
❖
Chapters
If you specify the first page of each chapter with this function, those pages
will always appear on the front of copies when using 1 sided → 2 sided mode.
2
Preparation
Before selecting this function, set the tray for front cover paper and slip sheet
paper. See “Cover”, “Slip Sheet 1” and “Slip Sheet 2” in the System Settings
manual.
The cover or slip sheets should be identical in size and direction with the copy
paper.
Limitation
❒
You cannot set the copy paper in the bypass tray. Only set the cover or slip
sheets in the bypass tray.
Note
❒
If Blank mode is selected, the cover will not be counted as a copy.
Front Cover
The first page of your originals is copied on specific paper sheet for covers, or a
cover sheet is inserted before the first copy.
151
Page 53

Copying
❖
Copy
2
3
2
1
❖
Blank
3
2
1
Note
❒
You can specify whether to make a copy on a sheet for covers. If you select
, the first page will be copied on the cover sheet. If you select
]
[
Copy
3
2
1
3
2
1
[
Blank
cover sheet will just be inserted before the first copy.
❒
When choosing
[
, select whether the front and back covers are copied
]
Copy
single-sided (“1 Sided Only”) or double-sided (“Duplex Copy”). See “Cover”
in the System Settings manual.
❒
In “Cover” of the User Tools (System Settings), if you selected “Mode Selected” for “Tray Display” setting, the machine refers to the settings in “Cover”
about whether the front and back covers are copied single-sided (“1 Sided
Only”) or double-sided (“Duplex Copy”). If you selected “Display Always”
for “Tray Display”, the machine refers to the settings in “Special Paper Indication” about whether the front and back covers are copied single-sided (“1
Sided Copy”) or double-sided (“Duplex Copy”). See “Special Paper Indication” and “Cover” in the System Settings manual.
❒
When you use this function with Combine mode, you can specify whether to
combine the front cover or not. See “Cover page in combine mode” in ⇒ P.320
2
“Page Format
/2”
.
, a
]
152
A Press the
[
Cover/Slip Sheet
key.
]
Page 54

Cover/Slip Sheet
[
Blank
key.
]
for a cover sheet, and then press the
]
B Press the
C Select
[
Copy
[
Front Cover
or
]
D Select the paper tray containing the non-cover sheet paper.
[OK]
2
key.
E Set your originals in the document feeder, then press the
{
Start
key.
}
153
Page 55

2
Copying
Front/Back Covers
The first and last pages of your originals are copied on specific paper sheets for
covers.
❖
Copy
4
3
2
1
❖
Blank
3
2
1
Note
❒
You can specify whether to make a copy on a cover sheet. If you select
the first and last pages will be copied on the cover sheets. If you select
4
3
2
1
GCCOVE0E
3
2
1
[
a cover sheet will just be inserted before the first copy and another sheet after
the last copy.
❒
When choosing
[
, select whether the front and back covers are copied
]
Copy
single-sided (“1 Sided Only”) or double-sided (“Duplex Copy”). See “Cover”
in the System Settings manual.
❒
In “Cover” of the User Tools (System Settings), if you selected “Mode Selected” for “Tray Display” setting, the machine refers to the settings in “Cover”
about whether the front and back covers are copied single-sided (“1 Sided
Only”) or double-sided (“Duplex Copy”). If you selected “Display Always”
for “Tray Display”, the machine refers to the settings in “Special Paper Indication” about whether the front and back covers are copied single-sided (“1
Sided Copy”) or double-sided (“Duplex Copy”). See “Special Paper Indication” and “Cover” in the System Settings manual.
❒
When making a 1-sided cover copy, you can specify whether to issue the back
cover outside (outside page) or inside (inside page). See “Copy Back Cover”
in ⇒ P.320
“Page Format
2
/2”
.
[
Copy
Blank
,
]
,
]
154
Page 56

Cover/Slip Sheet
A Press the
B Press the
C Select
[
Copy
[
Cover/Slip Sheet
key.
[
Blank
]
]
[
F/ B Cover
or
]
key.
]
for the cover sheets, and then press the
[OK]
2
key.
D Select the paper tray containing the non-cover sheet paper.
E Set your originals in the document feeder, then press the
{
Start
key.
}
155
Page 57

Copying
Designate
Use this function to have certain pages of your original copied onto slip sheets.
2
10
5
1
Preparation
Before using this function, set the special paper tray for slip sheets. See “Slip
Sheet 1”, “Slip Sheet 2” in the System Settings manual.
Limitation
❒
You cannot use this function with Slip Sheet mode.
Note
❒
You can specify the pages up to 20.
❒
When Combine mode (“1 Sided → 2 Sided”) has been selected, the page numbers you designate will always be copied onto the front of copies in the same
way as Chapters mode.
A Press the
[
Cover/Slip Sheet
1
]
10
5
key.
156
Page 58

Cover/Slip Sheet
B Press the
[
Designate/Chapter
key.
]
C Press the key to select the chapter number.
D Enter the page number of the original's location you want to copy onto a
slip sheet with the number keys. Then, press the
key.
}
{
#
2
Note
❒
To change the value entered, press the
the new value.
E Select
[
Copy
or
]
[
for a slip sheet.
]
Blank
[
Clear
or
]
{
Clear/Stop
F Select the paper tray for slip sheets.
G Press the
Note
❒
To display the settings for the next chapter, press the
[
OK
key.
]
H To specify another page location, repeat steps C to G.
key and enter
}
[
To next chapter
key.
]
157
Page 59

Copying
Note
❒
To select chapters 11 to 20, press the
T
[
11-20
key.
]
2
I When you wish to finish specifying page location, press the
[
OK
This display shows example settings.
Note
❒
To change the number entered, enter the new number in the same way as
steps C to G.
J Select the paper tray containing the non-slip sheet paper.
key.
]
K Set your originals, then press the
{
Start
key.
}
Chapters
The page locations you specify with this function will appear on the front of
copy sheets.
6
4
3
5
GC SHOW OJ
158
4
1
1
2
Page 60

Cover/Slip Sheet
Preparation
Before selecting this function, press the
plex (1 Sided → 2 Sided) mode or Combine mode.
Limitation
❒
You cannot use this function with Slip Sheet mode.
Note
❒
You can specify the pages up to 20.
❒
This function can be used only when you use the Duplex (1 Sided→2 Sided)
or Combine function.
❒
This function can be combined with the Designate function.
[
Duplex/Combine
key and select Du-
]
2
A Press the
B Press the
[
Cover/Slip Sheet
[
Designate/Chapter
key.
]
key.
]
C Press the key to select the chapter number.
Note
❒
To select chapters 11 to 20, press the
T
[
11-20
key.
]
159
Page 61

Copying
2
D Press the
[
Chapters
key.
]
E Enter the page location of the first page of the first chapter with the number
keys. Then, press the
Note
❒
To change the value entered, press the
the new value.
key.
{
}
#
[
Clear
or
]
{
Clear/Stop
key and enter
}
F Press the
Note
❒
To display the settings for the next chapter, press the
before pressing the
[
OK
key.
]
[
OK
key.
]
G To specify another page location, repeat steps C to F.
Note
❒
To select chapters 11 to 20, press the
T
[
11-20
key.
]
H When you finish specifying the page location, press the
This display shows example settings.
[
To next chapter
key.
]
[
OK
key
]
160
Page 62

Cover/Slip Sheet
Note
❒
To change the number entered, enter the new number in the same way as
in steps C to F.
I Set your originals, then press the
{
Start
key.
}
2
161
Page 63

2
Copying
Slip Sheets
Every time the original's page changes, a slip sheet is inserted. This function can
be used to insert a slip sheet automatically between each OHP transparency copied or used as a stack function. You can also copy onto the inserted slip sheets.
1
1
2
3
Preparation
Before selecting this function, specify the paper tray for slip sheets. See “Slip
Sheet 1”, “Slip Sheet 2” in the System Settings manual.
Limitation
❒
You cannot use this function with Chapters and Paper Designate modes.
❒
In Connect Copy mode, you cannot use the non-standard size paper.
Note
❒
Set the slip sheets in the same orientation as originals.
❒
You can specify whether to make copies onto the inserted slip sheets or not.
❒
If you do not copy onto slip sheets, they are excluded from the number of copies counted.
❒
In Connect Copy mode, specify the paper settings before you press the
key.
]
nect
2
3
[
Con-
When using OHP transparencies set on the bypass tray
❖
Blank
2
1
162
1
2
Page 64

Slip Sheets
Limitation
❒
When copying two or more originals using the bypass tray, the copies are delivered in the reversed page order.
Note
❒
Press the
“When Copying onto OHP Transparencies or Thick Paper”
❒
When you select
the “Face-Up/Down Selection in Bypass Mode” setting to “Face Down Exit”.
See “Face-Up/Down Selection in Bypass Mode” in ⇒ P.331
key and set the “Special Paper” setting to
}
{
#
, copy paper is delivered face up even if you have set
]
[
OHP
. See ⇒ P.76
[
]
OHP
.
“Count Manager”
2
.
A Press the
B Press the
C Select
[
Copy
[
Cover/Slip Sheet
key.
[
Blank
]
]
[
Slip Sheet
or
]
key.
]
, followed by the
[OK]
key.
163
Page 65

2
Copying
D Select the paper tray containing the non-slip sheet paper.
When using OHP transparencies, open the bypass tray.
E Set your originals, then press the
{
Start
key.
}
164
Page 66

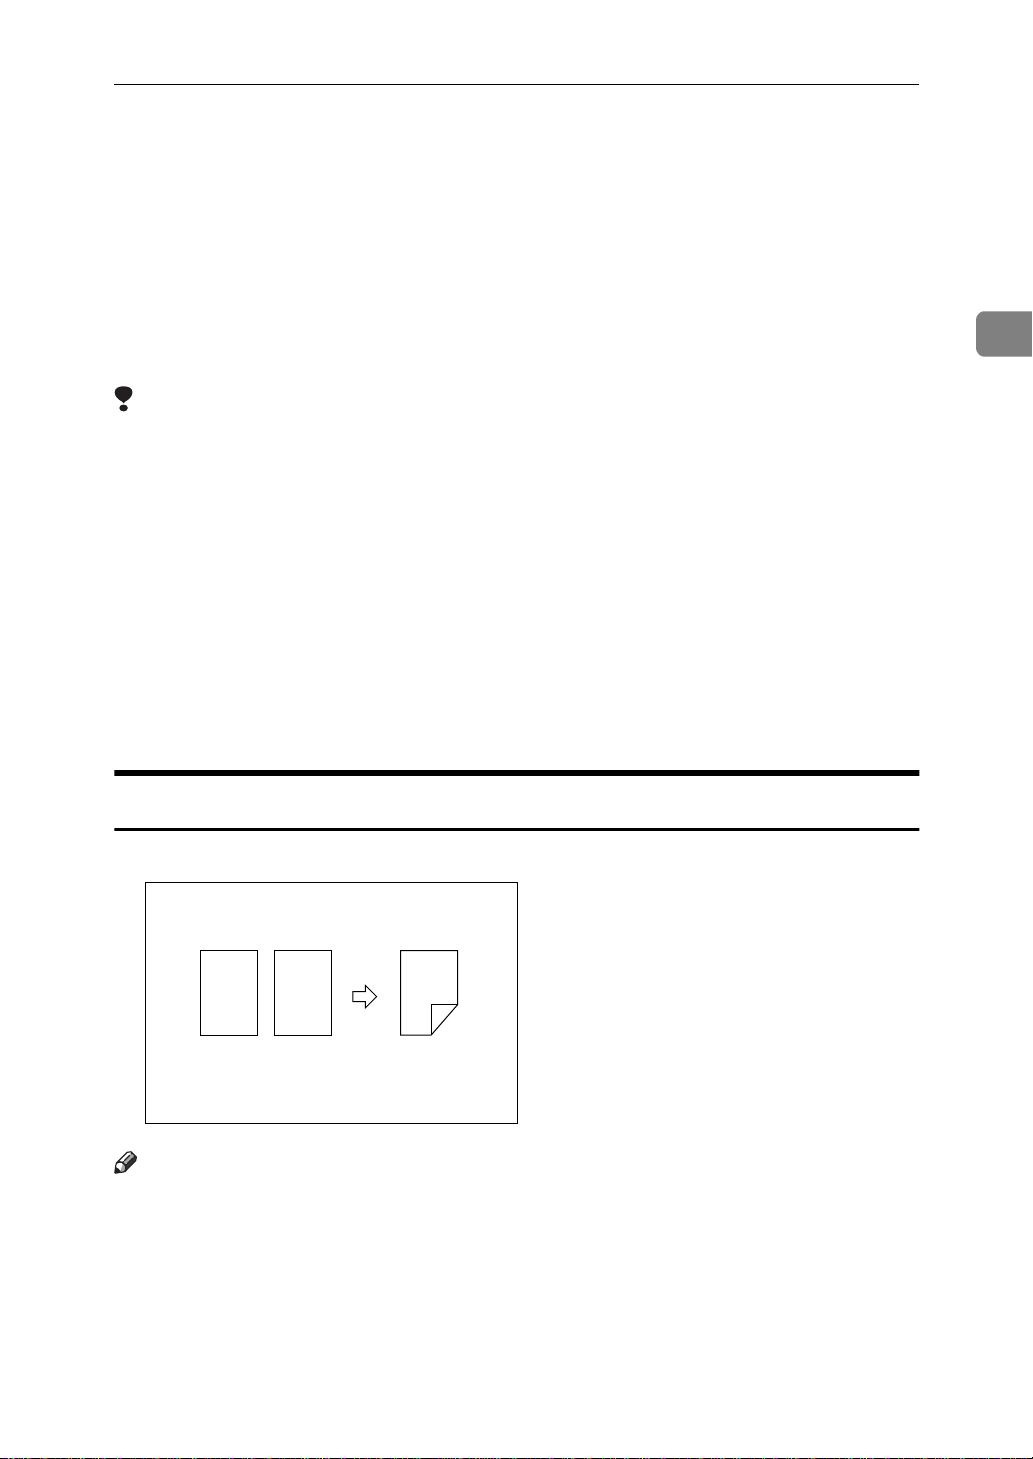
Double Copies
Double Copies
One original image is copied twice on one copy as shown in the illustration.
Limitation
❒
The following originals cannot be detected properly on the exposure glass. Be
sure to select the copy paper manually or set the originals in the document
feeder.
2
Metric version A5L, B6KL
Inch version
❒
You cannot use the bypass tray with this function.
Note
❒
You can insert separation lines between repeated images. See “Double Copies
Separation Line” in ⇒ P.320
❒
See the following table when you select original and copy paper sizes with
1
/2" × 81/2"L
5
“Page Format
2
/2”
.
100% ratio:
❖
Metric version
Original Size and Direction Copy Paper Size and Direction
A5L A4K
B6L B5K
A4K A3L
A5K A4L
B6K B5L
165
Page 67

Copying
❖
Inch version
Original Size and Direction Copy Paper Size and Direction
1
5
/2" × 81/2"L 81/2" × 11"K
1
/2" × 81/2"K 81/2" × 11"L
5
1
/2" × 11"K
8
11" × 17"L
2
A Press the
B Press the
C Press the
[
Edit/Stamp
key.
]
]
[
Double
[
OK
]
key.
key.
D Select the paper.
E Set your originals, then press the
166
{
Start
key.
}
Page 68

Image Repeat
Image Repeat
The original image is copied repeatedly.
Note
❒
The number of repeated images depends on the original size, copy paper size,
and reproduction ratio. See the following table:
2
❖
Original: A5K/Copy paper: A4K or Original: A5L/Copy paper A4
4 repeats (71%) 16 repeats (35%)
Repeat1
❖
Original: A5K/Copy paper: A4L or Original: A5L/Copy paper A4
2 repeats (100%) 8 repeats (50%)
Repeat3
❒
Part of a repeated image might not be copied depending on copy paper size,
Repeat2
Repeat4
L
K
copy paper direction or reproduction ratio.
❒
You can insert separation lines between repeated images. See “Repeat Separation Line” in ⇒ P.317
❒
You can select the area of the images to be repeated. See ⇒ P.169
image of the selected area”
“Page Format
.
1
/2”
.
“To repeat the
A Select the size of the copy paper and the reproduction ratio.
167
Page 69

Copying
2
key.
]
key.
]
B Press the
C Press the
[
Edit/Stamp
[
Repeat
D Specify the area to be repeated.
To repeat the whole image of the original
A Press the
[
All area
key.
]
168
Page 70

To repeat the image of the selected area
Image Repeat
A Press the
B Enter the horizontal size of the area with the number keys, then press the
key.
]
[
#
Note
❒
To change the number entered, press the
enter the new number.
[
Selected area
key.
]
[
Clear
or
]
{
Clear/Stop
key and
}
2
C Enter the vertical size of the area with the number keys, then press the
key.
[
]
#
Note
❒
To change the number entered, press the
enter the new number.
E Press the
F Press the
[
OK
[
OK
key.
]
key.
]
G Set your original, then press the
{
Start
key.
}
[
Clear
or
]
{
Clear/Stop
key and
}
169
Page 71

Copying
Margin Adjustment
You can shift the image left, right, top or bottom to make a binding margin.
2
A
Limitation
❒
If you set the margin too wide, areas you do not want to delete might be
erased.
Note
❒
You can change the width of the binding margin as follows:
Metric version 0 – 30mm (in 1mm steps)
Inch version 0" – 1.2" (in 0.1" steps)
❒
The margin width default is as follows. You can change this default setting
with the User Tools. See “Front Margin: Left/Right”, “Back Margin: Left/
Right”, “Front Margin: Top/Bottom”, “Back Margin: Top/Bottom” in
P.317
“Page Format
Metric version • Front: 5mm Left
A
1
.
/2”
• Back: 5mm Right
⇒
170
Inch version • Front: 0.2" Left
• Back: 0.2" Right
❒
When making two-sided copies from one-sided originals, you can set a binding margin for back pages. See “1 → 2 Duplex Auto Margin Adjust” in
P.317
“Page Format
❒
When making copies in Combine mode, the binding margins are made on the
copies after the combining is finished.
❒
When “2 Sided → 1 Sided” is selected, set the binding margins for front and
back pages of the original.
1
/2”
.
⇒
Page 72

Margin Adjustment
A Press the
B Press the
[
Edit/Stamp
[
Margin Adj.
key.
]
key.
]
C Set a binding margin for a front page. Press the
ting the left and right margins, and the
top and bottom margins.
[↓]
and
and
[←]
keys when setting the
[↑]
keys when set-
[→]
2
Note
❒
To change the value entered, press the
new value.
D Set a binding margin for back pages. Press the
ting the left and right margins, and the
top and bottom margins.
Note
❒
You can specify the back margin only when the Duplex or the Two Sided
copy with Combine is selected.
❒
If you do not need to specify the back margin, press the
step E.
E Set your originals, then press the
{
[←], [→], [↓], [↑]
and
[↓]
key.
}
Start
[←]
[↑]
and
keys and enter the
keys when set-
[→]
keys when setting the
key and go to
[
]
OK
171
Page 73

Copying
Erase
This function erases the center and/or all four sides of the original image. This
is useful for avoiding shadows on the copy image caused by the bound originals,
such as books.
This function can be used in three ways:
2
❖
Border
This mode erases the edge margin of the original image.
❖
Center
This mode erases the center margin of the original image.
❖
Center/Border
This mode erases both the center and edge margins of the original image.
Note
❒
You can change the width of the erased margin as follows:
Metric version 3 – 50mm (in 1mm steps)
Inch version 0.1" – 2.0" (in 0.1" steps)
❒
The default setting of the erased margin is as follows. You can change this settings with the User Tools. See “Erase Border” and “Erase Center” in ⇒ P.317
1
“Page Format
Metric version 10mm
Inch version 0.4"
❒
The width of the erased margin varies depending on the reproduction ratio.
❒
If the size of the original is different from sizes listed in the following chart,
/2”
.
the erased margin might be shifted.
172
❖
Metric version
Where Original Is Set Paper Size and Orientation
Exposure glass
Document feeder A3L, B4L, A4KL, B5KL, A5KL, B6KL,
*1
You can select from 81/2" × 13", 81/4" × 13" and 8" × 13" with the User Tools (System Settings). See “<F/F4>Size Setting” in the System Settings manual.
A3L, B4L, A4KL, B5KL, 8
11" × 17"L, 11" × 15"L, 8
*1
13"L
1
/2" × 13"L
2
/1" × 11"KL, 81/2" ×
*1
Page 74

❖
0.1"~2.0"
1
Inch version
Where Original Is Set Paper Size and Orientation
Exposure glass
Document feeder
*1
You can select from 81/2" × 13", 81/4" × 13" and 8" × 13" with the User Tools (System Settings). See “<F/F4>Size Setting” in the System Settings manual.
❒
The relationship between the original orientation and the erased part is as fol-
11" × 17"L, 8
A4KL, 11" × 17"L, 11" × 15"L, 8
1
8
/2" × 11"KL, 51/2" × 81/2"KL, 81/2" × 13"L
*1
1
/2" × 14"L, 81/2" × 11"KL
1
/2" × 14"L,
lows:
L original K original
Erase
2
1
❒
1: Erased part
Border Erase
This function erases the edge margins. You can set the same margin width for all
four sides, or you can set different margin widths for each side.
Note
❒
If you want to erase the center margin too, use the Center/Border function.
See ⇒ P.177
“Center/Border Erase”
.
173
Page 75

Copying
2
A Press the
B Press the
C Press the
[
Edit/Stamp
key.
]
[
Erase
key.
[
Border
]
key.
]
D Set the erase border width.
Selecting
A Press the
174
[
Same Width
[
Same Width
]
key.
]
Page 76

Erase
B Set an erase border width with the
key.
]
[
OK
Note
❒
To change the value entered, press the
new value.
Selecting
A Press the
B Press the key for the border you wish to change and set an erase border
width with the
❒
C Press the
[
4 Sides
Note
To change the value entered, press the
new value.
]
[
4 Sides
key.
]
[
OK
key.
]
[n]
and
[o]
keys.
[n]
and
[n]
[n]
keys, followed by the
[o]
and
and
keys and enter the
[o]
keys and enter the
[o]
2
E Set your originals, then press the
{
Start
key.
}
Center Erase
This function erases the center margin.
Note
❒
If you want to erase the border margin too, use the Center/Border function.
See ⇒ P.177
“Center/Border Erase”
.
175
Page 77

Copying
2
A Press the
B Press the
C Press the
[
Edit/Stamp
key.
]
[
Erase
key.
Center
]
[
key.
]
D Set the erase center width with the
key.
Note
❒
To change the value entered, press the
value.
E Set your originals, then press the
176
[n]
{
Start
and
[n]
key.
}
keys. Then press the
[o]
and
keys and enter the new
[o]
[
OK
]
Page 78

Erase
Center/Border Erase
This mode erases both the center and edge margins. You can set the same margin
width for all four sides and center, or you can set different margin widths for each.
2
A Press the
B Press the
C Press the
[
Edit/Stamp
key.
]
[
Erase
[
Center/Border
key.
]
key.
]
D Set the erase margin width.
177
Page 79

Copying
2
Selecting
A Press the
[o]
❒
B Press the
C Press the
[o]
❒
D Press the
[
Same Width
[
Center
keys.
Note
To change the value entered, press the
new value.
[
Same Width
[
Border
keys.
Note
To change the value entered, press the
new value.
]
[
OK
]
key, then set the erase center width with the
]
key.
]
key, then set the erase border width with the
]
key.
[n]
[n]
and
and
keys and enter the
[o]
keys and enter the
[o]
[n]
[n]
and
and
Selecting
A Press the
B Press the key for the part you wish to change and set an erase margin
width with the
❒
C Press the
[
4 Sides
Note
To change the value entered, press the
new value.
]
[
4 Sides
key.
[
]
OK
key.
]
[n]
E Set your originals, then press the
178
and
[o]
keys.
{
Start
key.
}
[n]
and
keys and enter the
[o]
Page 80

Centering
Centering
You can make copies by moving the image to the center of the copy paper.
Limitation
❒
You cannot use the bypass tray with this function.
❒
If the direction of originals is different from that of the copy paper, the machine will not rotate the image by 90°(rotated copy).
❒
If the original size cannot be measured, the centering function will not work.
2
Note
❒
The original sizes and directions for centering are listed below.
❖
Metric version
Original placed on: Original size and direction
Exposure glass
Document feeder A3L, B4L, A4KL, B5KL, A5KL, B6KL, 11" ×
*1
You can select from 81/2" × 13", 81/4" × 13" and 8" × 13" with the User Tools (System Settings). See ”<F/F4>Size Setting” in the System Settings manual.
❖
Inch version
Original placed on: Original size and direction
Exposure glass
Document feeder
*1
You can select from 81/2" × 13", 81/4" × 13" and 8" × 13" with the User Tools (System Settings). See “<F/F4>Size Setting” in the System Settings manual.
A3L, B4L, A4KL, B5KL, 8
16KKL
1
17"L, 11" × 15"L, 8
11" × 17"L, 8
A4KL, 11" × 17"L, 11" × 15"L, 8
11"KL, 5
1
1
/2" × 81/2"KL, 81/2" × 13"L
/2" × 11"KL, 81/2" × 13"L
/2" × 14"L, 81/2" × 11"KL
1
/2" × 13"L
1
/2" × 14"L, 81/2" ×
*1
*1
, 8KL,
*1
A Select the paper.
179
Page 81

Copying
2
B Press the
C Press the
D Press the
[
Edit/Stamp
[
Centering
key.
]
[
OK
key.
]
key.
]
E Set your originals, then press the
{
Start
key.
}
180
Page 82

Stamp
This function prints stamp on the copies. Stamp modes are as follows:
❖
Background Numbering
This function prints numbers on the background of copies.
❖
Preset Stamp
This function prints preset messages on copies.
❖
User Stamp
This function prints custom messages on copies.
❖
Date Stamp
This function prints the date on copies.
❖
Page Numbering
This function prints page numbers on copies.
Stamp
2
Background Numbering
Use this function to have numbers printed on the background of copies.
This function can help you to keep track of confidential documents.
GCSTMP2E
Limitation
❒
You cannot use the bypass tray with this function.
Note
❒
You can change the size of the numbers with the User Tools. See “Size” in
P.323
“Background Numbering”
❒
You can change the density of the numbers with the User Tools. See “Density” in ⇒ P.323
❒
Numbers are printed on all pages.
❒
You can select whether the Background Numbering is printed negative if it
overlaps black parts of image. See “Superimpose” ⇒ P.323
bering”
❒
You can change the starting number of the Background Numbering (1 – 999).
.
“Background Numbering”
.
.
“Background Num-
⇒
181
Page 83

Copying
2
A Press the
B Press the
C Press the
key.
key.
]
]
[
Edit/Stamp
[
Stamp
[
Background Numbering
key.
]
D Enter the number to start counting from with the number keys. Then press
the
❒
❒
182
key.
[
]
OK
Note
The number can be set from 1 to 999.
To change the entered number, press the
ter the new number.
[
Clear
or
]
{
Clear/Stop
}
key and en-
Page 84

Stamp
E Press the
F Set your originals, then press the
[
OK
key.
]
{
Start
key.
}
Preset Stamp
Limitation
❒
You cannot use the bypass tray with this function.
❒
One message can be stamped at a time.
2
Note
❒
One of the following eight messages can be stamped on copies with a frame
around it: “COPY”, “URGENT”, “PRIORITY”, “For Your Info.”, “Preliminaray”, “For internal use”, “CONFIDENTIAL”, “DRAFT”.
❒
You can change the print page with the User Tools.
❒
You can change the size and density of the stamp with the User Tools.
❒
Depending on the paper size, if you change the stamp size, parts of the stamp
might not be printed.
❒
You can choose the default settings for the position, size and density of the
stamp with the User Tools. See “Stamp position”, “Stamp condition” in
P.323
“Preset Stamp”
❒
You can choose the default settings for the print page with the User Tools. See
“Stamp condition” in ⇒ P.323
❒
You can change the stamp language with the User Tools. See “Stamp Language” in ⇒ P.323
❒
You can select whether the Preset Stamp is printed negative if it overlaps
black parts of the image. See “Superimpose” in ⇒ P.323
❒
You cannot combine the Preset Stamp function with the Image Repeat or
Double Copies function.
❒
When you combine this function with the Magazine or Booklet function, only
the first page is stamped.
.
“Preset Stamp”
“Preset Stamp”
.
.
“Preset Stamp”
⇒
.
183
Page 85

2
Copying
❒
The relationship between the direction in which you set the original and
stamp orientation/position is as follows:
GCSTMP5E
❒
You can change the stamp position to top, bottom, left and right each way in
1mm, 0.1" steps. See “Stamp position” in ⇒ P.323
key.
]
key.
]
A Press the
B Press the
[
Edit/Stamp
[
Stamp
“Preset Stamp”
.
184
Page 86

Stamp
C Press the
[
Preset Stamp
key.
]
D Select the desired message.
E Press the
[
All Pages
or
]
[
1st Page Only
key to select the print page.
]
2
Limitation
❒
If you combine this function with the Magazine or Booklet function, “1st
Page Only” is selected automatically.
F Change the stamp position, size or density.
If you do not wish to change, go to step G.
To change the stamp position, size or density
A Press the
[
Change
key.
]
185
Page 87

2
Copying
B Select the desired position, size and density.
C Press the
G After you specified all the desired settings, press the
H Press the
Note
❒
To cancel the settings, press the
[
OK
I Set your originals, then press the
[
OK
key.
]
key.
]
[
Cancel
{
Start
]
key.
}
key.
[
OK
key.
]
User Stamp
Up to four messages which you use frequently can be stored in the machine's
memory and stamped on copies.
186
GCSTMP0E
Preparation
Before using this function, you have to store your messages with the User
Tools. See ⇒ P.189
“Program/Delete User Stamp”
.
Page 88

Limitation
❒
You cannot use the bypass tray with this function.
❒
One message can be stamped at a time.
❒
In Connect Copy mode, register the same user stamp on the master unit and
sub-unit.
❒
If the position exceeds the page boundary, the stamp will not be printed on
copies.
Note
❒
You can change the print page with the User Tools.
❒
You can choose the default settings for the print page and the stamp position
with the User Tools. See “Stamp condition” and “Stamp position”in ⇒ P.325
“User Stamp”
❒
You can combine this function with only one Preset Stamp.
❒
You cannot combine the User Stamp function with the Image Repeat or Dou-
.
ble Copies function.
❒
The relationship between the direction in which you set the original and
stamp Orientation/Position is as follows:
Stamp
2
GCSTMP6E
❒
You can change the stamp position to top, bottom, left and right each way in
1mm, 0.1" steps. See “Stamp position” in ⇒ P.325
“User Stamp”
.
187
Page 89

Copying
2
A Press the
B Press the
C Press the
[
Edit/Stamp
key.
[
[
]
Stamp
User Stamp
key.
]
key.
]
D Select the stamp you require.
E Press the
188
[
All Pages
or
]
[
1st Page Only
key to select the print page.
]
Page 90

To change the stamp position
Stamp
key.
]
key.
]
A Press the
B Select the desired position.
C Press the
[
Change
[
OK
F After you specified all the desired settings, press the
Note
❒
To cancel the settings, press the
G Press the
[
OK
key.
]
[
Cancel
key.
]
[
OK
key.
]
2
H Set your originals, then press the
{
Start
key.
}
Program/Delete User Stamp
A Make sure that the machine is in Copy mode.
B Press the
{
User Tools/Counter
Screen
Contrast
User Tools/
Counter
key.
}
TSPS040N
189
Page 91

Copying
2
C Press the
D Press the
E Press the
[
Copy/Document Server Features
key.
[
Stamp Setting
[
User Stamp
]
key.
]
key.
]
190
F Press the
[
Program/Delete Stamp
key.
]
Page 92

To program the Us er Stamp
Stamp
A Press the
B Press the stamp number (1 – 4) you want to program.
Note
❒
Stamp numbers with m already have settings in them.
❒
If the stamp number is already being used, the machine will ask you if
you wish to overwrite it — Press the
C Enter the user stamp name with the letter keys on the display panel.
[
Program
key.
]
[
Yes
or
]
[No]
key.
2
Note
❒
You can register up to 8 characters.
❒
To change the name entered, press the
key and enter new letters.
}
Stop
D Press the
[
OK
key.
]
[
Back Space
], [
Clear
or
]
{
Clear/
191
Page 93

2
Copying
E Enter the horizontal size of the stamp with the number keys, then press
the
❒
❒
key.
[
]
#
Note
To change the value entered, press the
ter the new value.
You can enter sizes within 10 – 432mm, 1.0" – 17.0" horizontal, and 10 –
297mm, 1.0" – 11.7" vertical. However, if the value exceeds the maximum value of the area (5,000mm
range of the area automatically.
[
2
, 7.75 inch2), it is corrected within the
Clear
]
or
{
Clear/Stop
key and en-
}
F Press the
E.
G Set the user stamp on the exposure glass, and then press the
key.
Note
❒
Do not set the original in the document feeder.
❒
The machine scans the original three times. Do not lift the document
feeder until the main menu of the Copy features appears.
❒
If you press the
with nothing programmed.
H Press the
[
Vertical
[
Exit
key, and enter the vertical size in the same way as step
]
key, the main menu of the Copy features appears
[
]
Exit
key.
]
[
Scan Start
]
192
Page 94

To delete the Us er Stamp
Important
❒
You cannot restore a deleted stamp.
Stamp
A Press the
B Press the stamp number (1 – 4) you want to delete.
Note
❒
Only programs with m contain a user stamp.
C Press the
[
Delete
[
Delete
key.
]
key.
]
2
Note
❒
To cancel the deletion, press the
D Press the
E Press the
G Press the
The initial display appears.
[
Exit
[
Exit
[
Exit
key.
]
key.
]
key.
]
[
Stop
key.
]
193
Page 95

2
Copying
Date Stamp
Limitation
❒
You cannot use the bypass tray with this function.
Note
❒
You can select the following styles:
• MM/DD/YYYY
• MM.DD.YYYY
• DD/MM/YYYY
•DD.MM.YYYY
• YYYY.MM.DD
• DD.JUN.YYYY
❒
You can change the Date Stamp settings with the User Tools. See ⇒ P.325
“Date Stamp”
❒
The font and size of the Date Stamp can be changed with the User Tools. See
“Font” and “Size” in ⇒ P.325
❒
You can select whether the Date Stamp is printed negative if it overlaps black
parts of an image. See “Superimpose” in ⇒ P.325
❒
For how to set the date, see “Set Date” in the System Settings manual.
❒
You can choose the default settings for the stamp position with the User
Tools. See “Position Priority” in ⇒ P.325
❒
The size, font and superimpose settings are linked with the Page Numbering
functions.
❒
You cannot combine the Date Stamp function with the Image Repeat or Double Copies function.
.
“Date Stamp”
.
“Date Stamp”
“Date Stamp”
.
.
194
Page 96

❒
The relationship between the direction in which you set the original and the
stamp position is as follows:
GCSTMP7E
Stamp
2
❒
You can change the stamp position to top, bottom, left and right each way in
1mm, 0.1" steps. See “Position Priority” in ⇒ P.325
❒
If you combine this function with the Combine, Magazine or Booklet function, the page is stamped as follows.
• Combined with the Combine function
• Combined with the Magazine or Booklet function
“Date Stamp”
.
195
Page 97

Copying
2
A Press the
B Press the
C Press the
[
Edit/Stamp
key.
[
[
]
Stamp
Date Stamp
key.
]
key.
]
196
D Press the
To change the style of date
A Press the
[
All Pages
[
Change style
]
or
[
1st Page Only
key.
]
to select the print page.
]
Page 98

B Select the style of date.
Stamp
2
C Press the
[
OK
key.
]
To change the stamp position
A Press the
B Select the desired position of the Date Stamp.
[
Change
key.
]
C Press the
[
OK
key.
]
E After you specified all the desired settings, press the
Note
❒
To cancel the settings, press the
[
Cancel
key.
]
[
OK
key.
]
197
Page 99

Copying
2
F Press the
G Set your originals, then press the
[
OK
key.
]
{
Start
key.
}
Page Numbering
Use this function to print page numbers on your copies. There are six types of
Page Numbering (n is the total number of pages in your original):
• Type A: P1,P2,…Pn
• Type B: 1/n,2/n,...n/n
• Type C: -1-,-2-,...-n-
• Type D: P.1,P.2,...P.n
• Type E: 1, 2…n
• Type F: 1-1,1-2,..1-n
Limitation
❒
You cannot use the bypass tray with this function.
Note
❒
You can change the Page Numbering settings with the User Tools. See
P.326
“Page Numbering”
❒
The font and size of Page Numbering can be changed with the User Tools. See
“Font” and “Size” in ⇒ P.326
❒
You can select whether the Page Numbering is printed negative if it overlaps
black parts of image. See “Superimpose” in ⇒ P.326
❒
You can choose the default settings for the stamp position with the User
Tools. See “Position Priority” in ⇒ P.326
❒
You can choose the default settings for the stamp format with the User Tools.
See “Format Priority” in ⇒ P.326
❒
The font, size and superimpose settings are linked with the Date Stamp function.
❒
You cannot combine the Page Numbering function with the Image Repeat or
Double Copies function.
.
“Page Numbering”
“Page Numbering”
“Page Numbering”
.
“Page Numbering”
.
.
⇒
.
198
Page 100

❒
The relationship between the direction in which you set the original and the
Page Numbering orientation/position is as follows:
GCSTMP8E
Stamp
2
❒
You can change the stamp position to top, bottom, left and right each way in
1mm, 0.1" steps. See “Position Priority” in ⇒ P.326
❒
If you combine this function with the Duplex (Top to Top) function and select
“Page Numbering”
.
the “P1, P2” or “1/n, 2/n” style, the page numbers on the back of the copy
paper are printed as follows.
1
2
GCSTMPBE
1. Front
2. Back
❒
If you combine this function with the Duplex (Top to Top) function, you can
change the setting to stamp on the back side in the same position as the front
side. See “Duplex Back Page Number Position” in ⇒ P.326
❒
If you use this function with the Combine, Magazine, or Booklet function, the
page is stamped as follows.
“Page Numbering”
.
199
 Loading...