

Savin 2555
Operating Instructions
COPY REFERENCE
Read this manual carefully before you use this product and keep it handy for future
reference.
For safety, please follow the instructions in this manual.

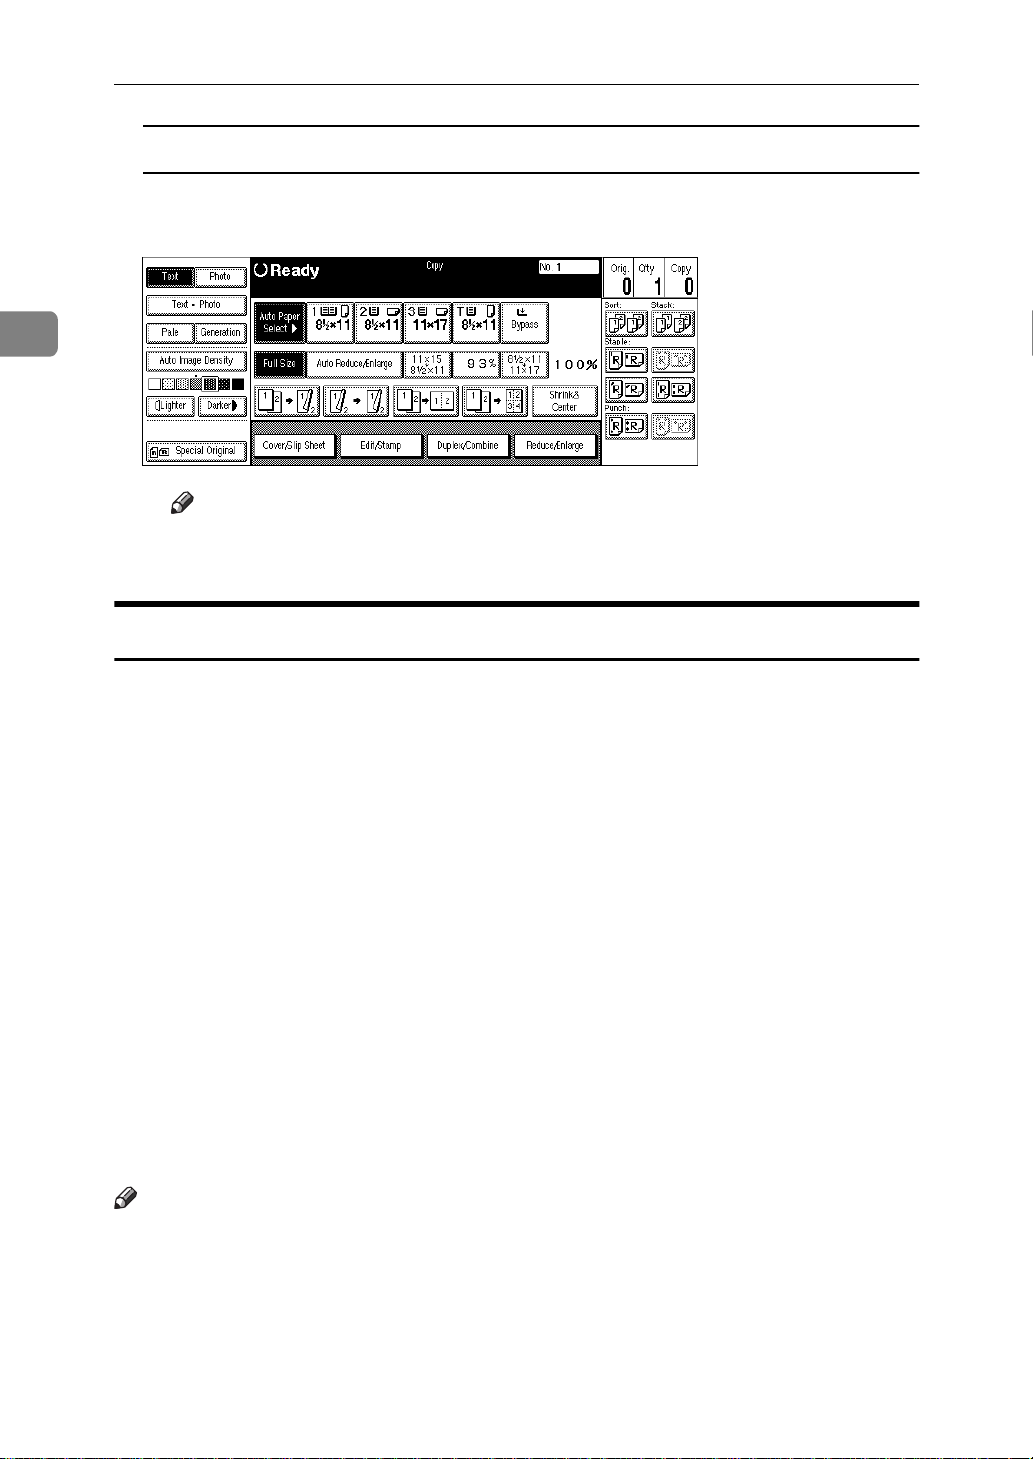
Basic Procedure
A Make sure that the machine is in Copy mode.
2. Copying
If the machine is not in Copy mode, press the
{
Copy/New Job
key.
}
B When the machine is set for the user code, enter the user code with the
number keys and then press the
Reference
⇒
P.90
“User Codes”
.
key.
}
{
#
C Make sure that there are no previous settings remaining.
Note
❒
To clear settings, press the
{
Clear Modes/Energy Saver
key.
}
D Set your originals.
Reference
⇒
P.31
“Setting Originals”
.
E Set your desired settings.
F Enter the number of copies required with the number keys.
Sample Copy
Start
Enter
Clear/Stop
TSPS020N
29
Copying
Note
❒
The maximum copy quantity can be set between 1 and 999 (default:
See “Maximum Copy Quantity” in ⇒ P.313
❒
To change the number entered, press the
new number.
“General Features
{
Clear/Stop
key and enter the
}
2
/3”
).
999
.
2
G Press the
The machine starts copying.
Note
❒
When you set originals on the exposure glass, press the
originals are scanned.
❒
Usually, when you set a single original on the exposure glass or in the document feeder, the copied paper is delivered face up. However, with some
functions, copies will be delivered face down.
❒
You can choose to have copies delivered either face up or face down (except for copying through the bypass tray). See “Face-Up/Down Selection
in Platen Mode” in ⇒ P.329
❒
To stop the machine during the multi-copy run, press the
❒
To return the machine to the initial condition after copying, press the
Modes/Energy Saver
Auto Reset
-
The machine returns to its initial condition automatically when your job is finished, after a certain period of time. This function is called “Auto Reset”.
{
Start
key.
}
key.
}
“Input/Output”
key after all
}
{
#
.
{
Clear/Stop
key.
}
{
Clear
Note
❒
You can change the Auto Reset time. See “Auto Reset Timer” in ⇒ P.310
“General Features 1/3”
Auto Off
-
The machine turns itself off automatically after your job is finished, after a certain period of time. This function is called “Auto Off”.
Note
❒
You can change the Auto Off time. See “Auto Off Timer” in the System Settings manual.
.
30

Setting Originals
Setting Originals
Limitation
❒
Set originals after correction fluid and ink has completely dried. Not taking
this precaution could mark the exposure glass and cause marks to be copied.
Note
❒
Basically originals should be aligned to the rear left corner. However, some
copy functions may produce different results depending on the direction of
the originals. For details, see the explanations of each function.
Reference
⇒
P.19
“Originals”
.
Setting Originals on the Expo sure Glass
2
A Lift the document feeder.
Important
❒
Do not open the document feeder with a force. Otherwise, the cover of the
document feeder might open or be damaged.
Note
❒
Be sure to open the document feeder by more than 30°. Otherwise the original size might not be detected correctly.
31

2
Copying
B Set the original face down on the exposure glass. The original should be
aligned to the rear left corner.
1
2
ND1C01EE
1: Reference mark
2: Scale
Note
❒
Start with the first page to be copied.
C Lower the document feeder.
Setting Originals in the Document Feeder
Note
❒
The last page should be on the bottom.
❒
Do not stack originals beyond the limit mark on the side fence of the document feeder.
❒
When copying thin originals (40 – 52g/m
in the document feeder at a time or place it on the exposure glass to avoid
damage due to a multi-sheet feed (several pages fed together at the same
time).
❒
The original might become dirty if it is written with a pencil or similar tools.
❒
Usually, one-sided originals are delivered to the ADF external tray, and twosided originals to the ADF tray.
Reference
Regarding originals that the document feeder can handle, see ⇒ P.19
.
nals”
2
, 11 – 14 lb. Bond), set one original
“Origi-
32
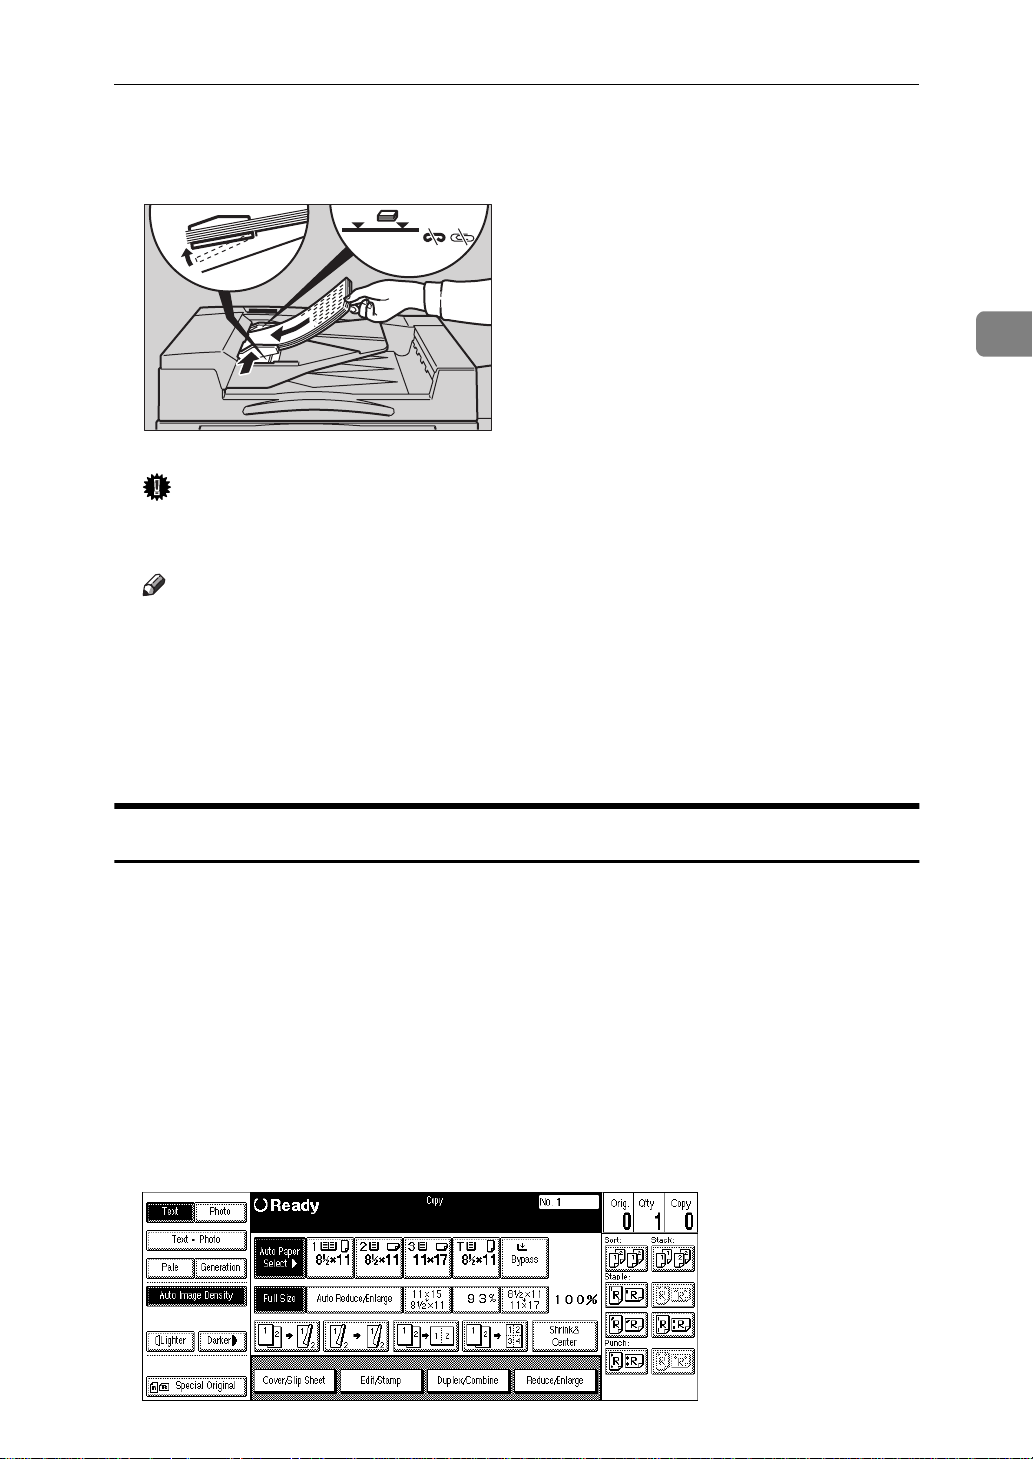
A Set the aligned originals face up into the document feeder.
Setting a stack of originals is completed when the bottom plate rises.
TSPH040E
Important
❒
After the bottom plate of the document feeder rises, do not add or force in
originals.
Note
❒
Straighten curls in the originals before setting them in the document feeder.
❒
To avoid a multi-sheet feed, shuffle the originals before setting them in the
document feeder.
❒
You can set the timing for the bottom plate of the document feeder to rise.
See “ARDF Original Table Rise Time” in ⇒ P.329
“Input/Output”
Setting Originals
2
.
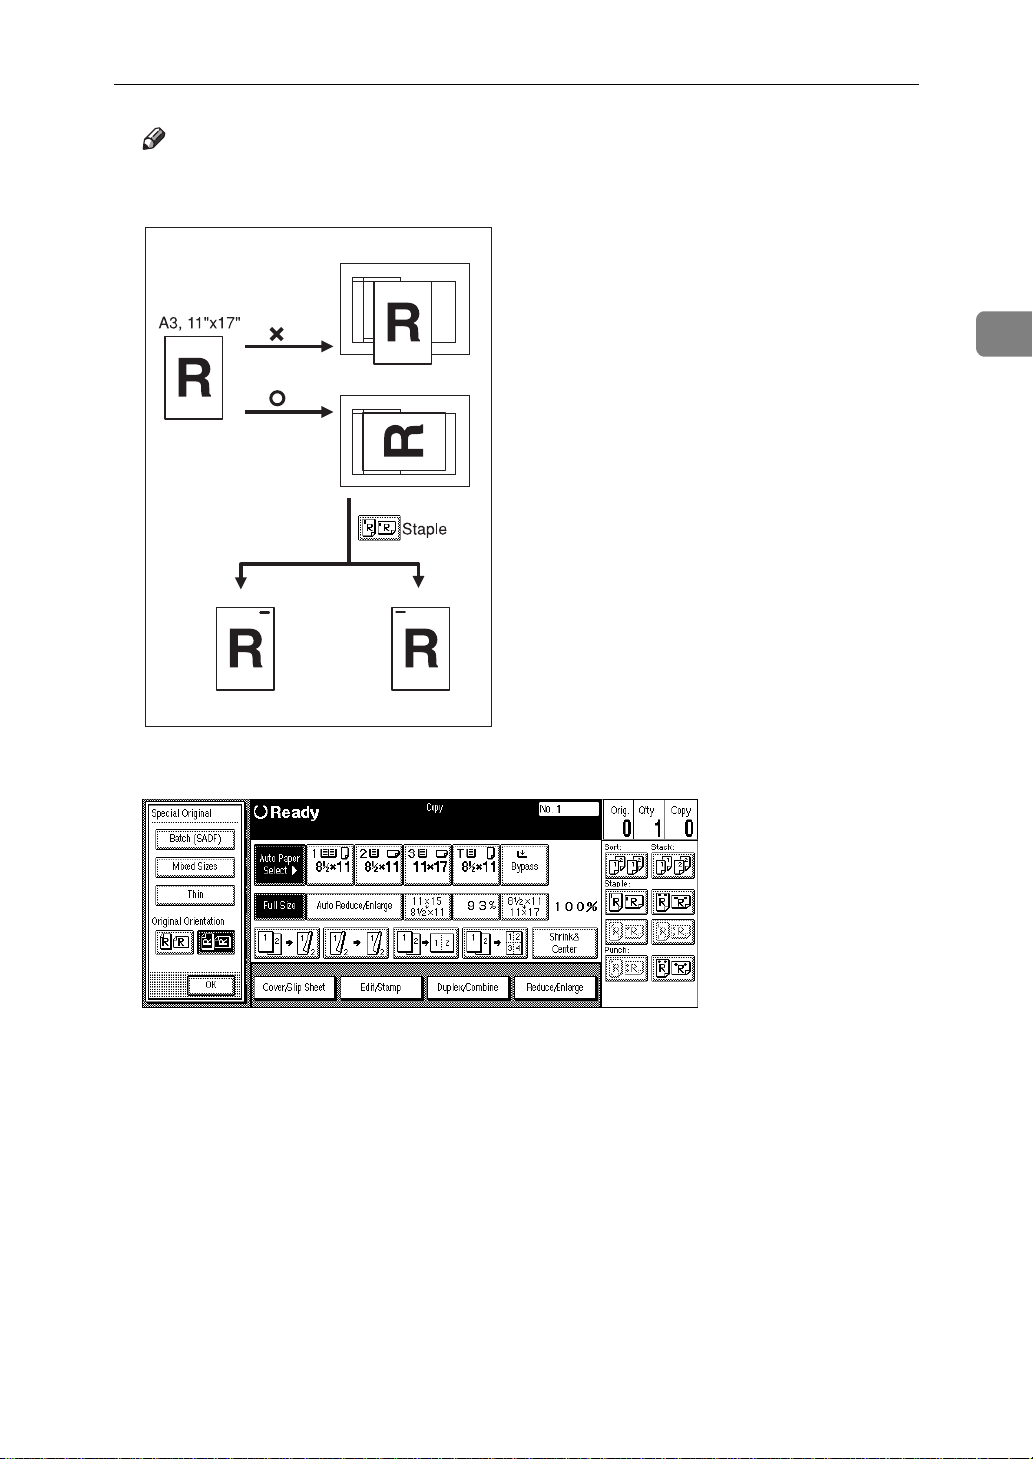
Original Orientation
You can set the original orientation separately in the following ways.
This function is useful for copying torn originals or large originals.
❖
Standard Orientation
Select this function when the original direction is the same as the copy paper
direction.
❖
90° Turn
This function rotates the copy image by 90°.
Use this function when you want to copy onto A3, B4, 11" × 17" paper.
A Press the
[
Special Original
key.
]
33
Copying
B Select the original orientation.
Standard Orientation
2
A Make sure that the
90° Turn
When you want to copy A3K, B4K or 11" × 17"K size originals, set your
original in the landscape orientation and then press the
machine rotates the original image and you can make copies as you wish. This
is useful for copying large originals with the Staple, Punch, Duplex, Combine
or Stamp functions.
For example, if you want to copy A3K or 11" × 17"K originals with for the
Staple function configured as shown below:
[
Standard Orientation
key is selected.
]
[
90° Turn
key. The
]
34
Setting Originals
Note
❒
It is recommended to use this function together with the Auto Paper Select
or Preset Reduce/Enlarge function.
2
A Press the
C Press the
[
90° Turn
]
[
OK
key.
key.
]
GCGSET2E
35
Copying
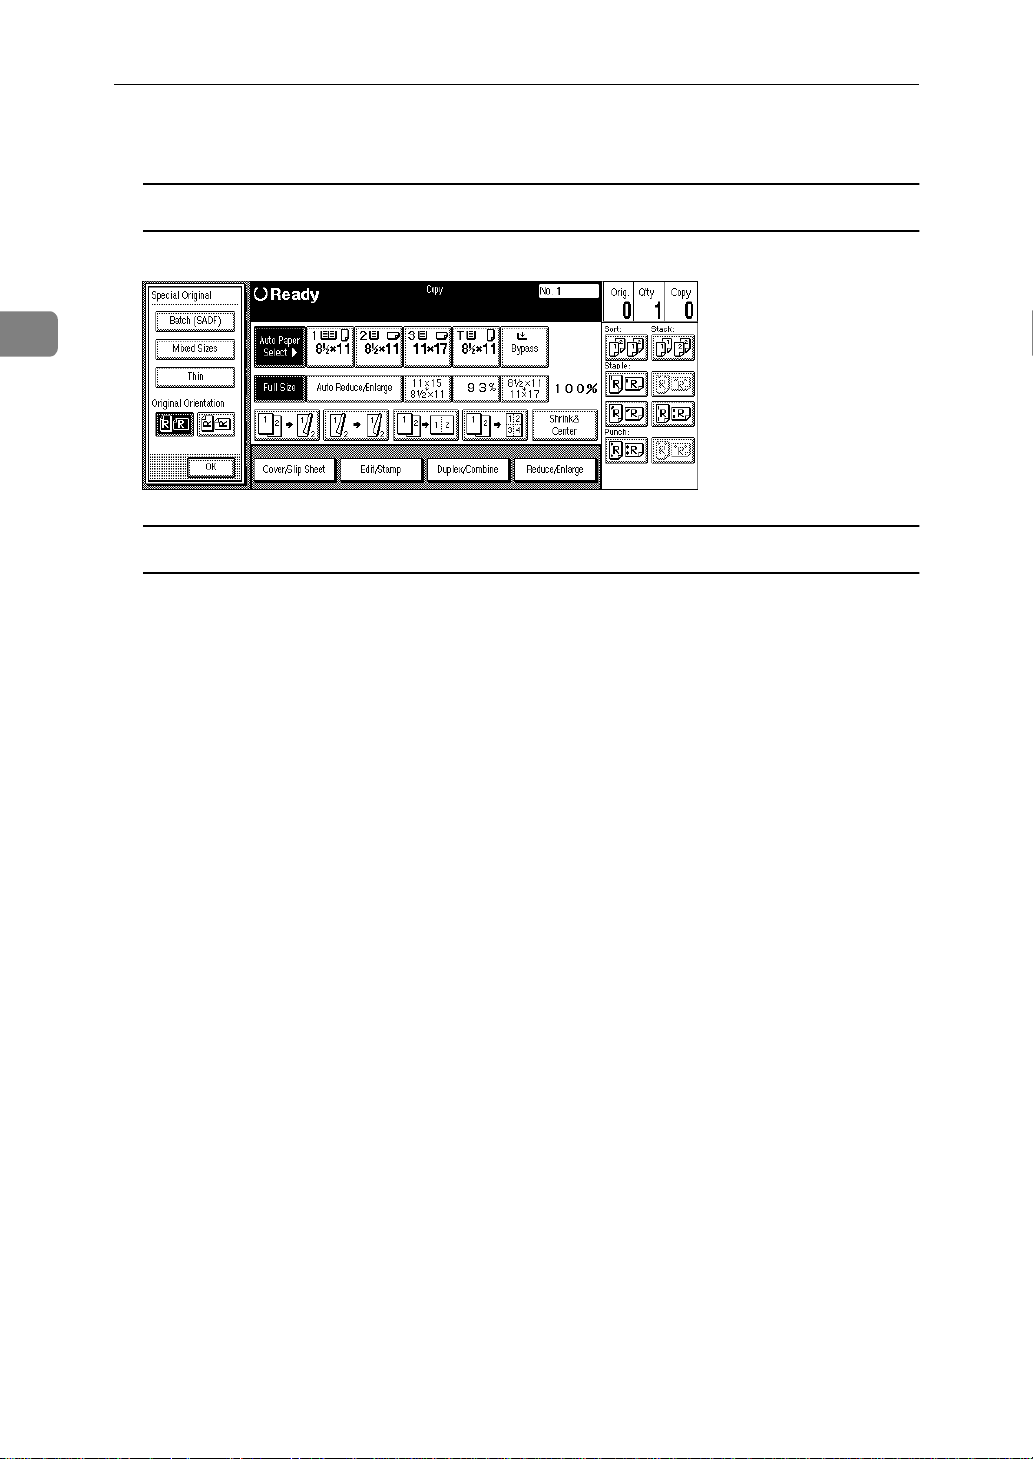
Setting Special Originals
Use this function when you want to use Batch (SADF), Mixed Sizes, Thin mode,
or when you select the original orientation.
Batch (SADF) mode
2
Up to 100 standard originals can be set in the document feeder at a time. If there
are more than 100 originals, set Batch (SADF) mode so that originals can be fed
automatically without pressing the
ument feeder.
Important
❒
When setting special originals such as translucent paper, set them one by one.
Note
❒
In Batch (SADF) mode, even when one original is set in the document feeder,
the original is automatically fed each time it is set.
A Press the
[
Special Original
key.
]
{
key each time they are set in the doc-
}
Start
B Press the
C Press the
[
Batch (SADF)
key.
]
[
OK
D Set your originals, then press the
The Auto Feed indicator of the document feeder goes on.
36
key.
]
{
Start
key.
}

Setting Originals
E After all the previously set originals are fed, set the next originals while the
Auto Feed indicator is on.
The second and subsequent originals can be fed automatically without pressing the
❒
{
Note
When the Sort, Combine or Duplex function has been set, press the
after all originals are scanned.
❒
You can change the lighting-up time of the Auto Feed indicator. See “Batch
(SADF) Auto Reset Time” in ⇒ P.329
Start
key.
}
DF02E
“Input/Output”
key
}
{
#
.
2
Mixed Sizes mode
When originals of different sizes are set on the document feeder at a time, the
machine automatically checks the size of the originals and makes copies.
Limitation
❒
When setting originals of different sizes on the document feeder and making
copies without using Mixed Sizes mode, parts of the original image might not
be copied.
❒
The weight of originals that can be set with this function is 52 – 81g/m
2
, 14 –
20 lb. Bond.
❒
The original sizes that can be set with this function are as follows:
Metric version A3L, B4L, A4KL, B5KL
Inch version
❒
For smaller originals, the copy image might be slanted since the originals
11" × 17"L, 8
1
/2" × 14"L, 81/2" × 11"KL, 51/2" × 81/2"KL
might not be correctly aligned with the original guide.
37

Copying
2
A Press the
B Press the
C Press the
[
Special Original
key.
[
Mixed Sizes
key.
]
[
OK
]
key.
]
D Align the rear and left edges of the originals as shown in the illustration.
1
1: Set into the document feeder.
2: Vertical size
Important
❒
If the originals are of different vertical sizes, put the longer original on the
bottom, otherwise the sizes might not be detected correctly.
X14
11X17
2
CP19AN
E Adjust the guide to the widest original size.
F Set the aligned originals face up into the document feeder.
38
Thin mode
Setting Originals
Use Thin mode if the scanned image is distorted at the edges when copying thin
(52g/m
❒
A Press the
B Press the
2
, 14 lb. Bond or lighter) originals.
Important
Set to Thin mode when you place thin paper into the document feeder, otherwise your originals might be damaged.
key.
[
Special Original
key.
]
[
Thin
]
2
C Press the
[
OK
key.
]
39
2
Copying
Basic Functions
The following basic functions are explained in this section.
❖
Adjusting Copy Image Density
Auto and Manual Image Density
❖
Selecting Original Type Setting
Text, Text·Photo, Photo, Pale, Generation Copy
❖
Selecting Copy Paper
Auto Paper Select and Manual Paper Select
❖
Auto Reduce/Enlarge
The machine can choose an appropriate reproduction ratio based on the paper and original sizes you select.
Note
❒
You can select functions to be activated when Auto Reset is turned on, when
Energy Saver is turned off, or after the machine is powered on. See ⇒ P.310
“General Features
❒
You can change default settings for basic functions. See ⇒ P.310
Can Change with the User Tools”
1
/3”
.
“Settings You
.
Adjusting Copy Image Densit y
You can adjust the copy image density to match your originals.
There are three types in this function:
❖
Auto Image Density
The machine automatically adjusts the image density.
❖
Manual Image Density
If you require darker or lighter copies, adjust the image density yourself.
❖
Combined Auto and Manual Image Density
Use when copying originals with a dirty background (such as newspapers).
You can adjust the foreground density while leaving the background unchanged.
40

Basic Functions
Note
❒
In Connect Copy mode, make adjustments to copy image density on the master unit.
• The image density level set on the master unit will be used by both units,
However, in order to produce similar images on both units, make sure that
the “Original Mode Quality Level” settings are the same on each unit. If
they are not the same, the finish of images may differ. See “Original Mode
Quality Level” in ⇒ P.310
“General Features
1
/3”
.
A Select one of Image Density modes.
Auto Imag e Density
2
A Make sure that the
Note
❒
If the
[
Auto Image Density
key.
]
ty
❒
If you do not wish to set any other functions, press the
start copying.
[
Auto Image Density
key is not selected, press the
]
key is selected.
]
Manual Image Density
A Press the
B Press the
[
Auto Image Density
[
Lighter
or
]
[
Darker
key to cancel it.
]
key to adjust the image density.
]
[
Auto Image Densi-
Start
key to
}
{
Note
❒
If you do not wish to set any other functions, press the
start copying.
{
Start
key to
}
41
Copying
Combined Auto and Manual Image Density
2
A Make sure that the
B Press the
Note
❒
If you do not wish to set any other functions, press the
start copying.
[
Lighter
[
Auto Image Density
or
]
[
Darker
key to adjust the density.
]
key is selected.
]
{
Selecting Origin al Type Setting
Select one of the following types to match your originals:
❖
Text
Select this mode when your originals contain only letters (no pictures).
Start
key to
}
42
❖
Text·Photo
Select Text·Photo when your originals contain photographs or pictures with
letters.
❖
Photo
Delicate tones of photographs and pictures can be reproduced with this
mode.
❖
Pale
Select this mode for originals that have lighter lines written in pencil, or for
faint copied slips. The faint lines will be clearly copied.
❖
Generation Copy
If your originals are copies (generation copies), the copy image can be reproduced sharply and clearly.
Note
❒
You can directly display the
See “Original Mode Display” in ⇒ P.310
❒
You can adjust the quality level for each original type. See “Original Mode
Quality Level” in ⇒ P.310
❒
In Connect Copy mode, make adjustments to the original type on the master
unit.
[
Original Mode
“General Features
key on the copy original display.
]
“General Features
1
.
/3”
1
/3”
.

A Press the appropriate key to select the original type.
Note
❒
If “Yes” has been selected in “Original Mode Display” of the User Tools,
press the
key. See “Original Mode Display” in ⇒ P.310
[
Original Mode
key to select the original type, then press the
]
“General Features
Basic Functions
/3”
[OK]
.
1
2
❒
If you do not wish to set any other functions, press the
copying.
{
Start
}
key to start
Selecting Copy Paper
There are two ways to select copy paper:
❖
Auto Paper Select
The machine selects a suitable size of copy paper automatically based on the
original size and the reproduction ratio. ⇒ P.46
❖
Manual Paper Select
Choose the tray containing the paper you wish to copy onto: Paper Tray, Bypass Tray or large capacity tray (LCT).
Reference
P.73
⇒
Limitation
❒
Auto Paper Select mode is intended for normal and recycled paper.
❒
If you set all the paper trays other than “No Display” or “Recycled Paper”,
you cannot use Auto Paper Select.
“Copying from the Bypass Tray”
.
“Rotated copy”
.
43

2
Copying
Note
❒
See the following table for possible copy paper sizes and directions with Auto
Paper Select (when copying at a ratio of 100%):
❖
Metric version
Where Original Is Set Paper Size and Direction
Exposure glass
Document feeder A3L, B4L, A4KL, B5KL, A5KL,
*1
You can select from 81/2" × 13", 81/4" × 13" and 8" × 13" with the User Tools (System Settings). See “<F/F4>Size Setting” in the System Settings manual.
❖
Inch version
Where Original Is Set Paper Size and Direction
Exposure glass
Document feeder
A3L, B4L, A4KL, B5KL, 8
*1
13"L
B6KL, 11" × 17"L, 8
" × 13"L
2
11" × 17"L, 8
11"KL
A4KL, 11" × 17"L, 11" × 15"L, 8
14"L, 8
14"L, 5
*1
, 8KL, 16KKL
1
/2" × 14"L, 81/2" ×
1
/2" × 11"KL, 8" × 10"L, 10" ×
1
/2" × 81/2"KL, 81/2" × 13"L
1
/2" × 11"KL, 81/
1
/2" ×
1
/2" ×
*1
44
*1
You can select from 81/2" × 13", 81/4" × 13" and 8" × 13" with the User Tools (System Settings). See “<F/F4>Size Setting” in the System Settings manual.
❒
For some originals, the original size might not be detected correctly. See
P.21
“Sizes difficult to detect”
❒
When you set special paper, such as recycled paper, in the paper tray, you can
.
have the kind of paper shown on the display. See “Special Paper Indication”
in the System Settings manual.
❒
In Connect Copy mode, select the copy paper in the master unit.
• We recommend that both units have the same paper settings. Only paper
trays loaded with the paper of the same size, direction and type installed
in both the master unit and sub-unit are available.
• When you press the
[
Connect
key, only the paper trays that have the same
]
settings in both units are displayed. Other trays are shown grayed out and
cannot be selected.
• If the multiple trays are available in Connect Copy mode, each unit selects
the paper tray detected in each “Paper Tray Priority” setting. See “Paper
Tray Priority” in the System Settings manual.
• If the paper tray in use runs out of paper in the sub-unit, the paper tray that
has the paper identical in size and different in direction is selected, and the
original image is rotated (if “On (Rotate)” is selected in “Auto Tray Switching”). See “Auto Tray Switching” in the System Settings manual.
⇒

A Select the copy paper.
Auto Paper Select
Basic Functions
A Make sure that the
Note
❒
If the
key.
❒
If you do not wish to set any other functions, press the
start copying.
[
Auto Paper Select
[
Auto Paper Select
key is not selected, press the
]
key is selected.
]
[
Auto Paper Select
{
Start
Manual Paper Select
A Select the paper tray, bypass tray or large capacity tray (LCT).
key to
}
2
]
Note
❒
If you do not wish to set any other functions, press the
start copying.
{
Start
key to
}
45

2
GCROTA2E
R
Copying
Rotated copy
-
If the direction in which your original is set (landscape or portrait) is different
from that of the paper you are copying onto, this function rotates the original image by 90° and fits it on the copy paper. This function works when Auto Paper
Select or Auto Reduce/Enlarge is selected. See “Auto Paper Select” in ⇒ P.43
“Selecting Copy Paper”
Original
Orientation
Paper Orientation
and ⇒ P.47
Copy Orientation
“Auto Reduce/Enlarge”
.
R
R
GCROTA0E
Limitation
❒
You cannot use the Rotated Copy function with Auto Paper Select if the “Auto Tray Switching” setting of the User Tools (System Settings) is set to “On
(No Rotate)” or “No”. See “Auto Tray Switching” in the System Settings manual.
❒
You cannot use the Rotated Copy function when enlarging onto B4 or A3 size
paper. In this case, set your original in the landscape direction.
46
Original Size and Direction
You cannot
rotate:
However,
you can rotate:
❒
You cannot use the Rotated Copy function when “Top Slant”, “Left 2” or
“Saddle Stitch” is selected for stapling or if the Punch function is selected. See
P.60
⇒
“Staple”
A4,
B5, or
A5
portrait
A4,
B5, or
A5
landscape
and ⇒ P.69
R
GCROTA1E
R
GCROTA3E
“Punch”
When enlarging to
When enlarging to
.
Copy Paper Size and Direction
B4,
A3
→
B4,
A3
→
R
GCROTA4E
Basic Functions
Auto Reduce/Enlarge
The machine can choose an appropriate reproduction ratio based on the paper
and original sizes you select.
Limitation
❒
You cannot use the bypass tray with this function.
Note
❒
When you use Auto Reduce/Enlarge, see the following table for possible
original sizes and directions:
2
❖
Metric version
Where Original Is Set Original Size and Direction
Exposure glass
A3L, B4L, A4KL, B5KL, 8
*1
13"L
, 8KL, 16KKL
Document feeder A3L, B4L, A4KL, B5KL, A5KL,
B6KL, 11" × 17"L,11" × 15"L, 8
11"KL, 8
*1
You can select from 81/2" × 13", 81/4" × 13" and 8" × 13" with the User Tools (Sys-
1
/2" × 13"L
*1
, 8KL, 16KKL
tem Settings). See “<F/F4>Size Setting” in the System Settings manual.
❖
Inch version
Where Original Is Set Original Size and Direction
Exposure glass
11" × 17"L, 8
1
/2" × 14"L, 81/2" ×
11"KL
Document feeder
*1
You can select from 81/2" × 13", 81/4" × 13" and 8" × 13" with the User Tools (Sys-
A4KL, 11" × 17"L, 11" × 15"L, 8
14"L, 8
"KL, 81/2" × 13"L
2
1
/2" × 11"KL, 51/2" × 81/
*1
tem Settings). See “<F/F4>Size Setting” in the System Settings manual.
❒
The reproduction ratios the machine will select are 25 – 400%.
1
/2" ×
1
1
/2" ×
/2" ×
47
Copying
❒
For some originals, the original size might not be detected correctly. See
P.21
“Sizes difficult to detect”
❒
You can set originals of different sizes in the document feeder at a time. See
P.37
⇒
“Mixed Sizes mode”
.
.
⇒
2
A Press the
[
Auto Reduc e/Enlarge
key.
]
B Select the paper tray.
Note
❒
If you do not wish to set any other functions, press the
copying.
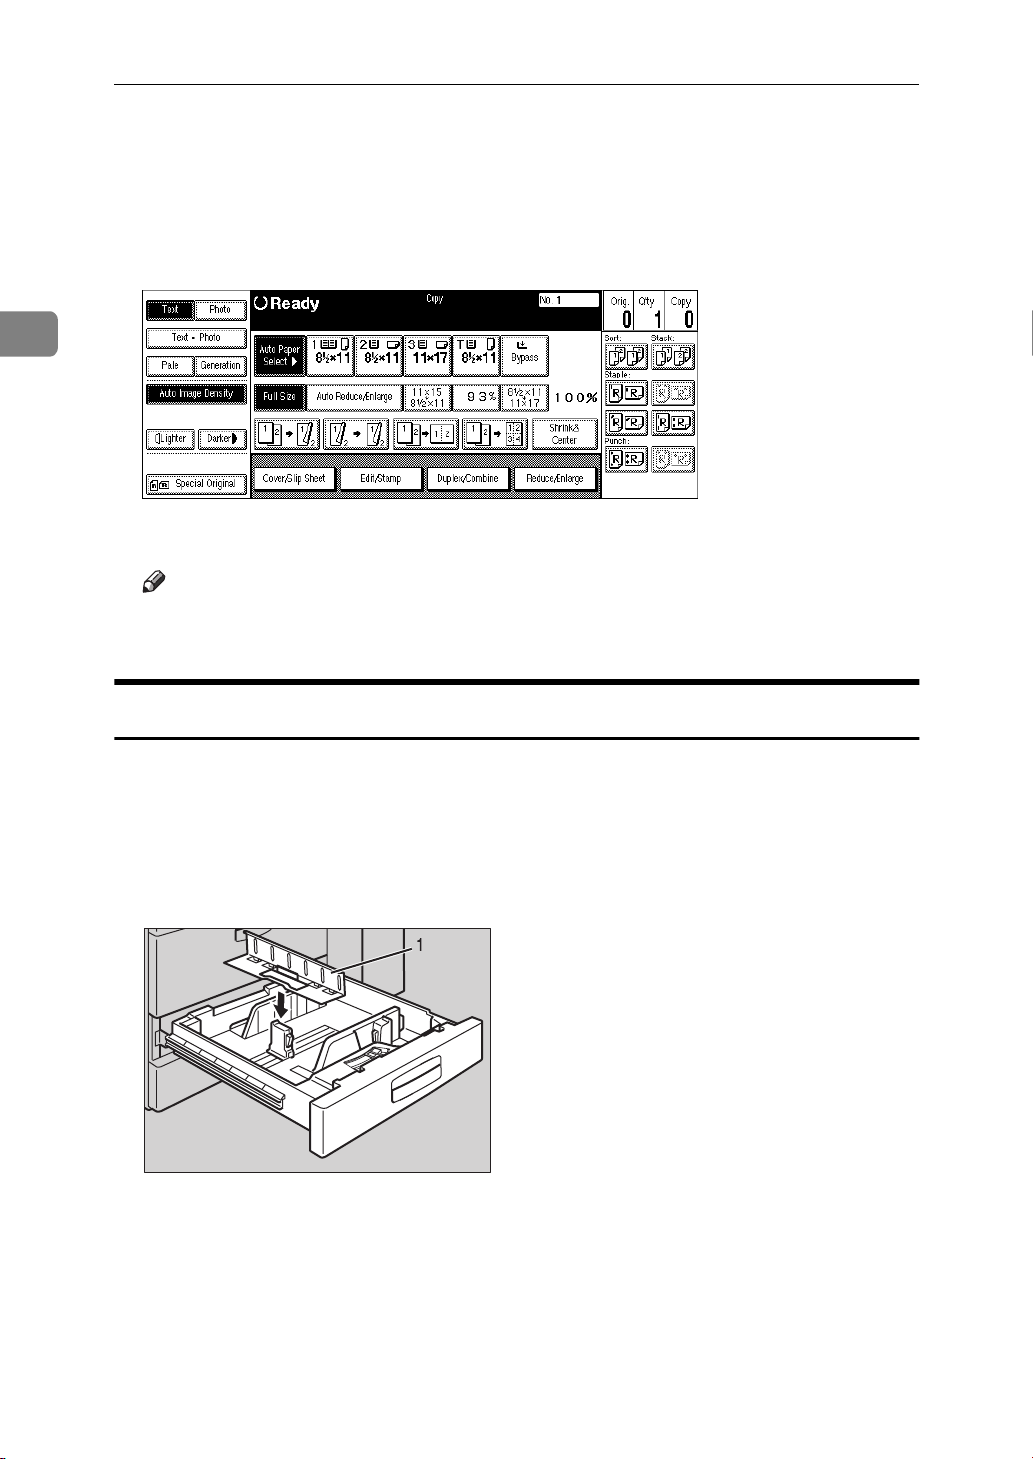
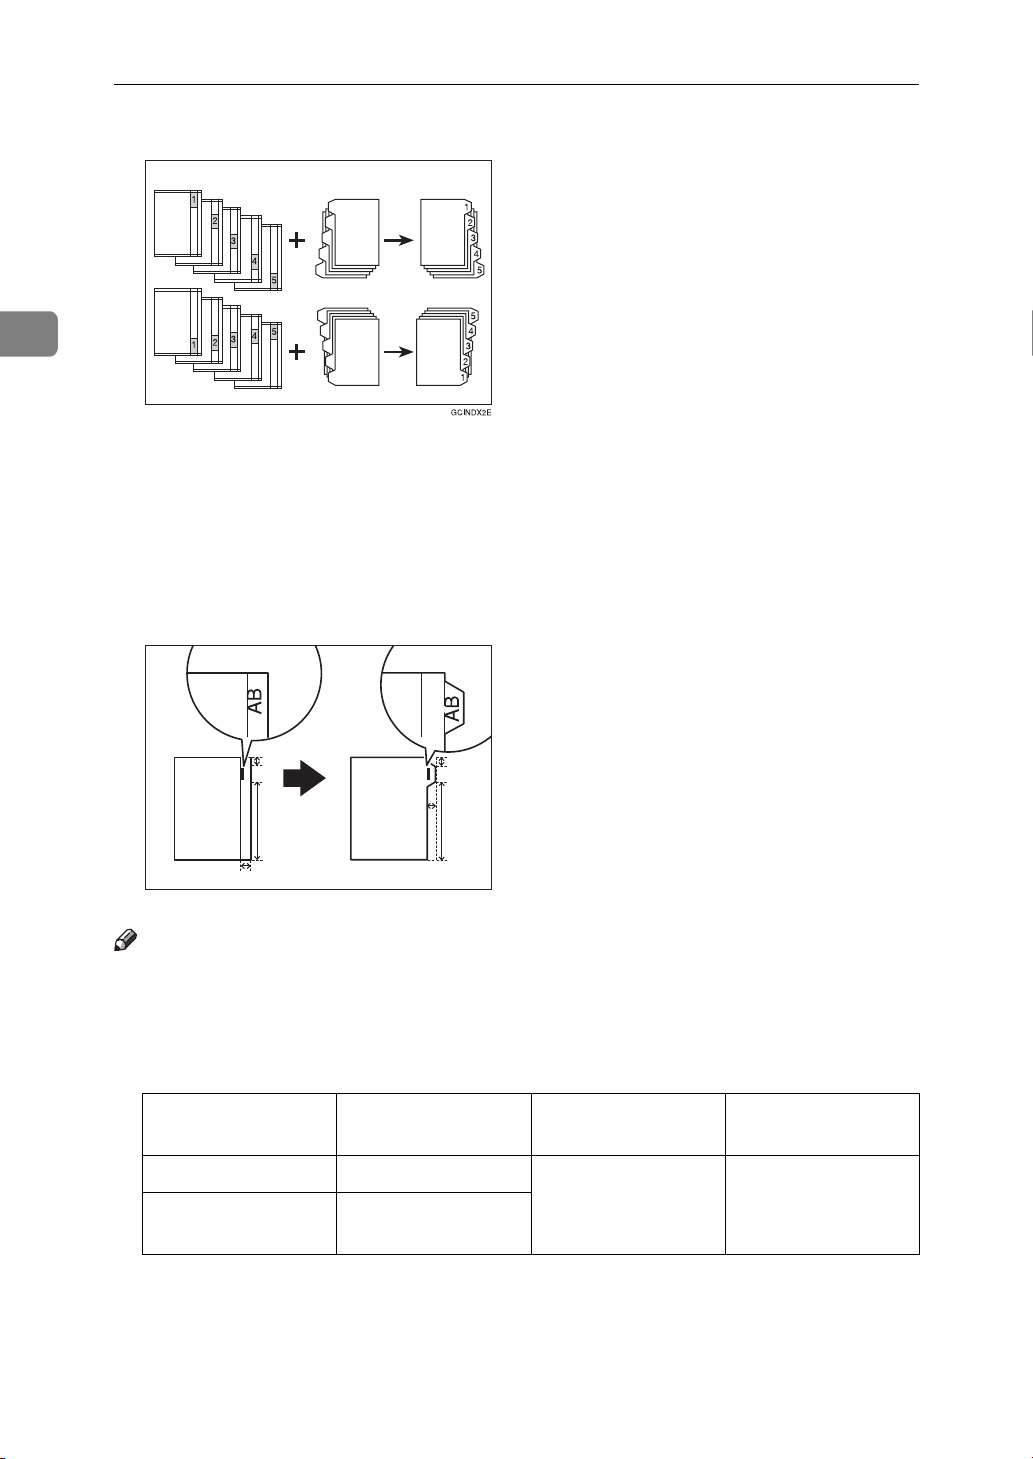
Copying onto Tab Stock
The options which are required to use this function are as follows:
•
Output tray or 100-sheet finisher
{
Start
key to start
}
•
Tab sheet tray
ZBQY260E
1. Tab sheet tray
To make copies onto tab stock, you need to specify the paper type. For details,
see “Tray 2: Special Paper Indication” in the System Settings manual.
48
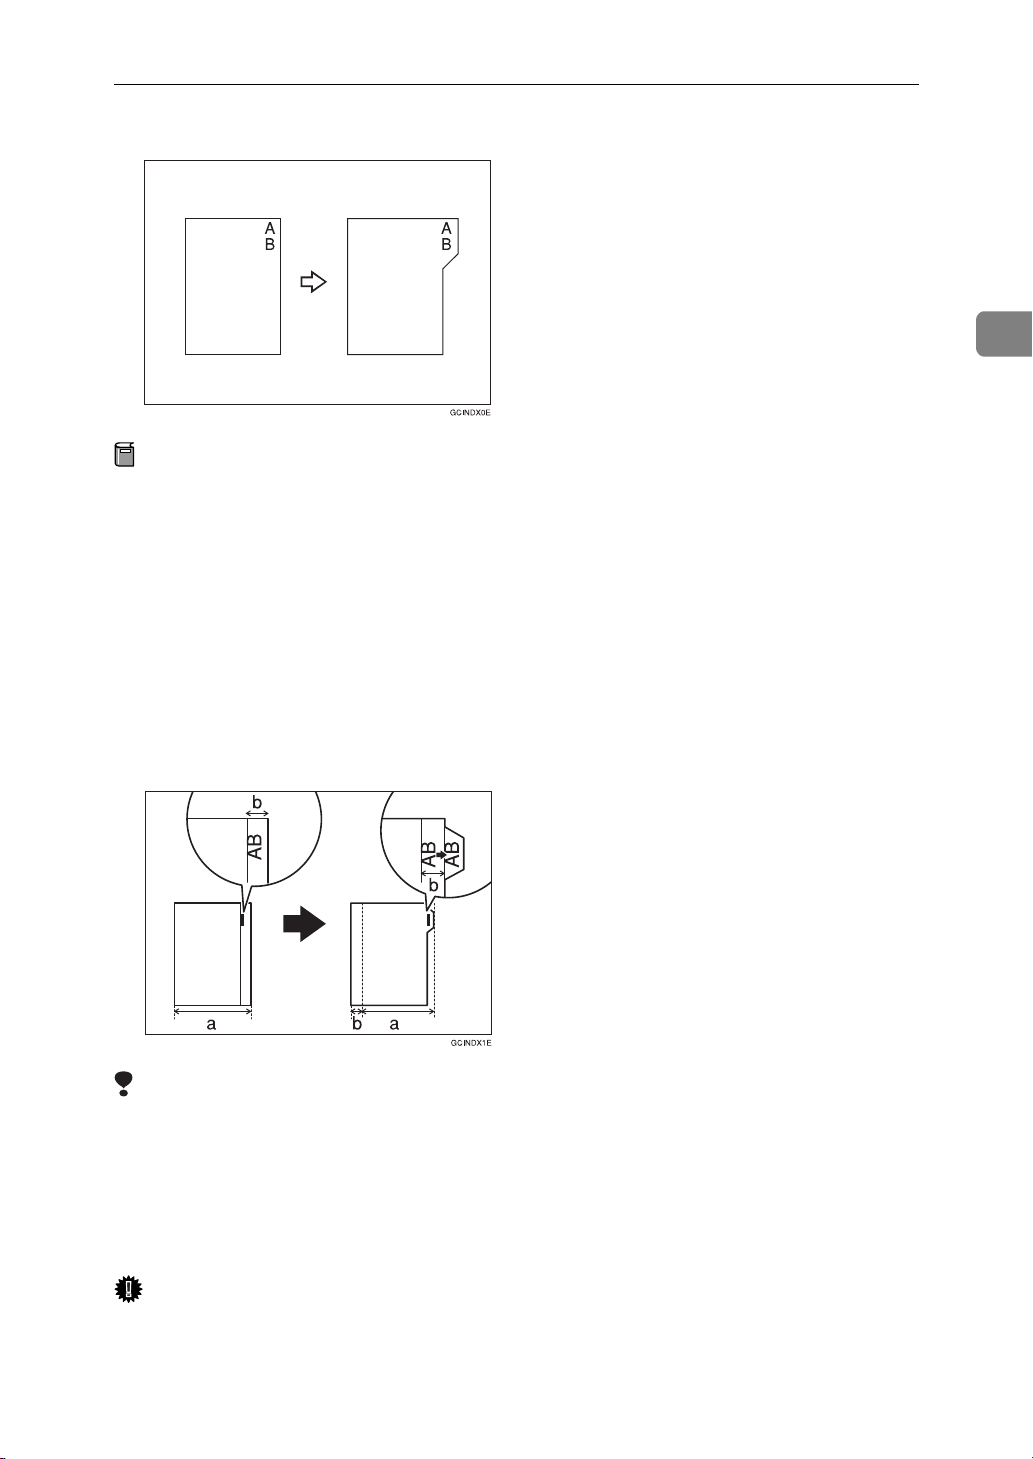
Basic Functions
Preparation
Select “Tab Stock” in “Tray 2: Special Paper Indication” of the User Tools
(System Settings). See “Tray 2: Special Paper Indication” in the System Settings manual.
Specify the paper size in “Tray 2:Paper Size Setting” of the User Tools (System
Settings) as follows:
• Metric version: A4
• Inch version: 8
K
1
/2" × 11"
K
2
Set the tab stock in tray 2.
Check the position of the index tab to avoid cropping the image. See “Tray 2:
Special Paper Indication” in the System Settings manual.
Limitation
❒
Use originals which contain only text.
❒
The image area of one original should be 6% or less of the whole area of the
original.
❒
The font size of the letters on the originals should be 16 points or less.
❒
When using the tab stock, the temperature should be 20ºC, 68ºF or more.
Important
❒
Tab stock is always fed starting with the top tab.
49
Copying
2
1
2
3
1. Set originals
2. Place the tab stocks in tray 2
3. Make copies
❒
Use the originals which do not have any images on the top or bottom part of
the index tab. If the images are on the top or bottom part of the index, the images are not copied on the paper, and the machine will be damaged.
Note
❒
When copying onto the tab stock, copying speed will be reduced.
❒
Copies are delivered face down.
❒
The number of tabs, weights and types of the tab stock that can be placed in
tray 2 are as follows:
Metric version Tab 5
Inch version Tab 1 – 5, Tab 8,
❒
You can store the optional tab sheet tray using the hook which is packed with
the tab sheet tray.
A Pull out tray 2 until it stops.
50
GCINDX6E
Number of Tabs Weight of Tab
Stock
160g/m
Index or lighter
Tab 12
2
, 110 lb.
Type of Tab Stock
Small tab only
(large tab is not
available)
 Loading...