

Page 1
e
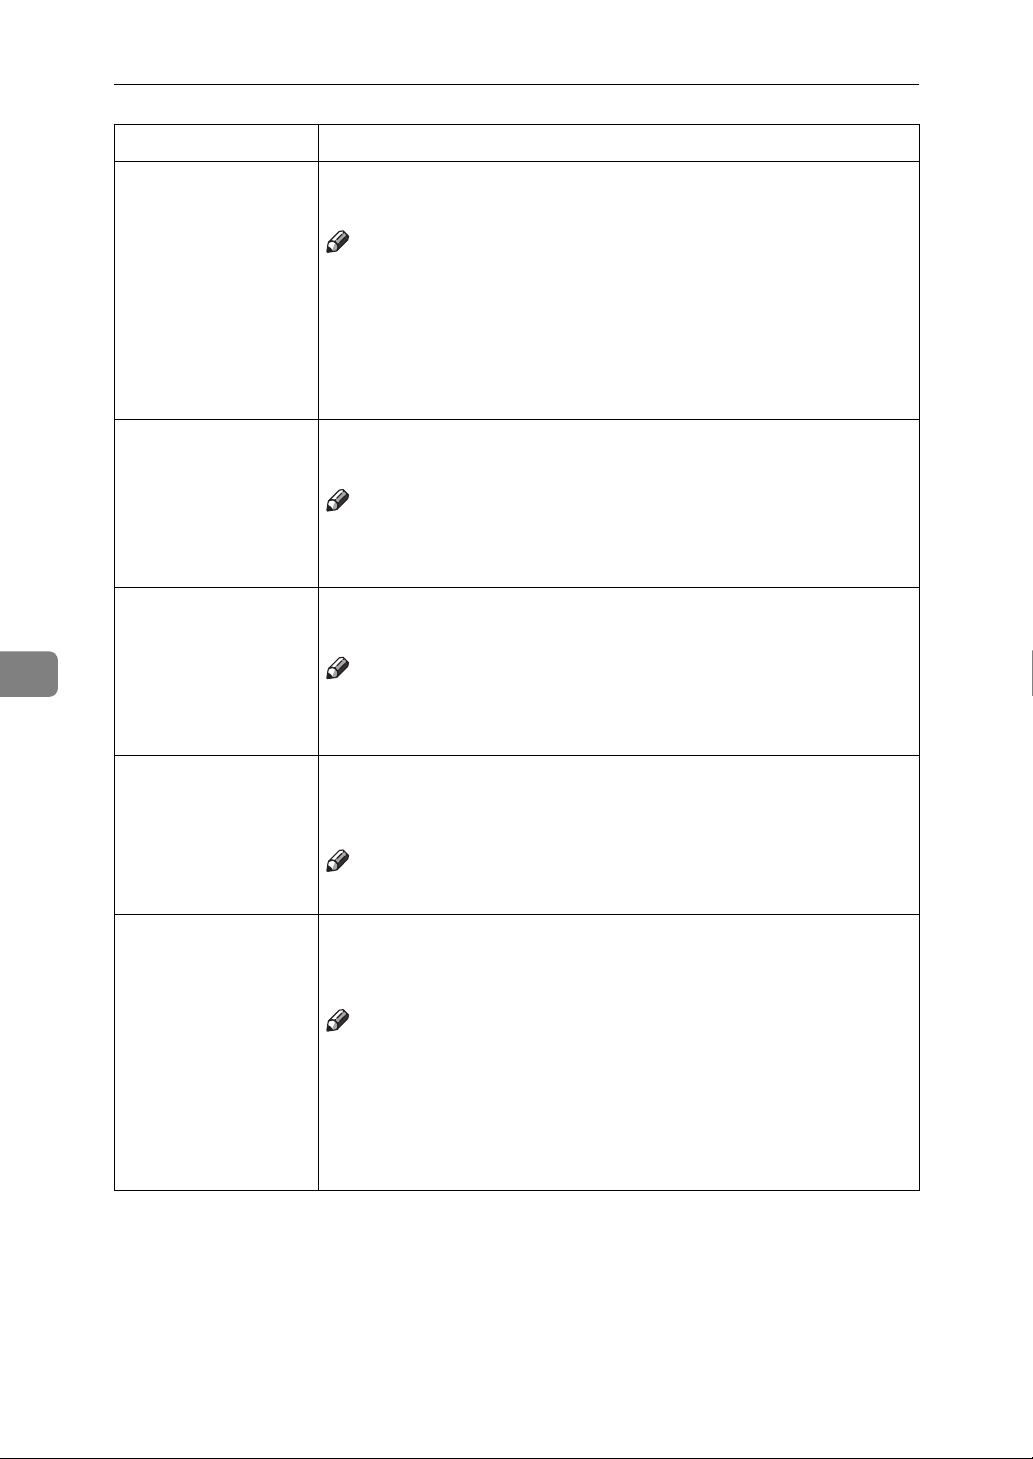
Removing Jammed Staples
e
Removing Jammed Staples
Note
❒
Staples might be jammed because of curled copies. In this case, try turning the
copy paper over in the tray. If there is no improvement, change the copy paper with less curls.
❒
After removing jammed staples, staples might not be ejected the first few
times you try to use the stapler.
❒
If the optional booklet finisher is installed, initialize the staple unit for the
Saddle Stitch function with the User Tools (System Settings) after adding staples or removing jammed staples. If you do not, misfeeds might occur. See
“Staple initialization” in the System Settings manual.
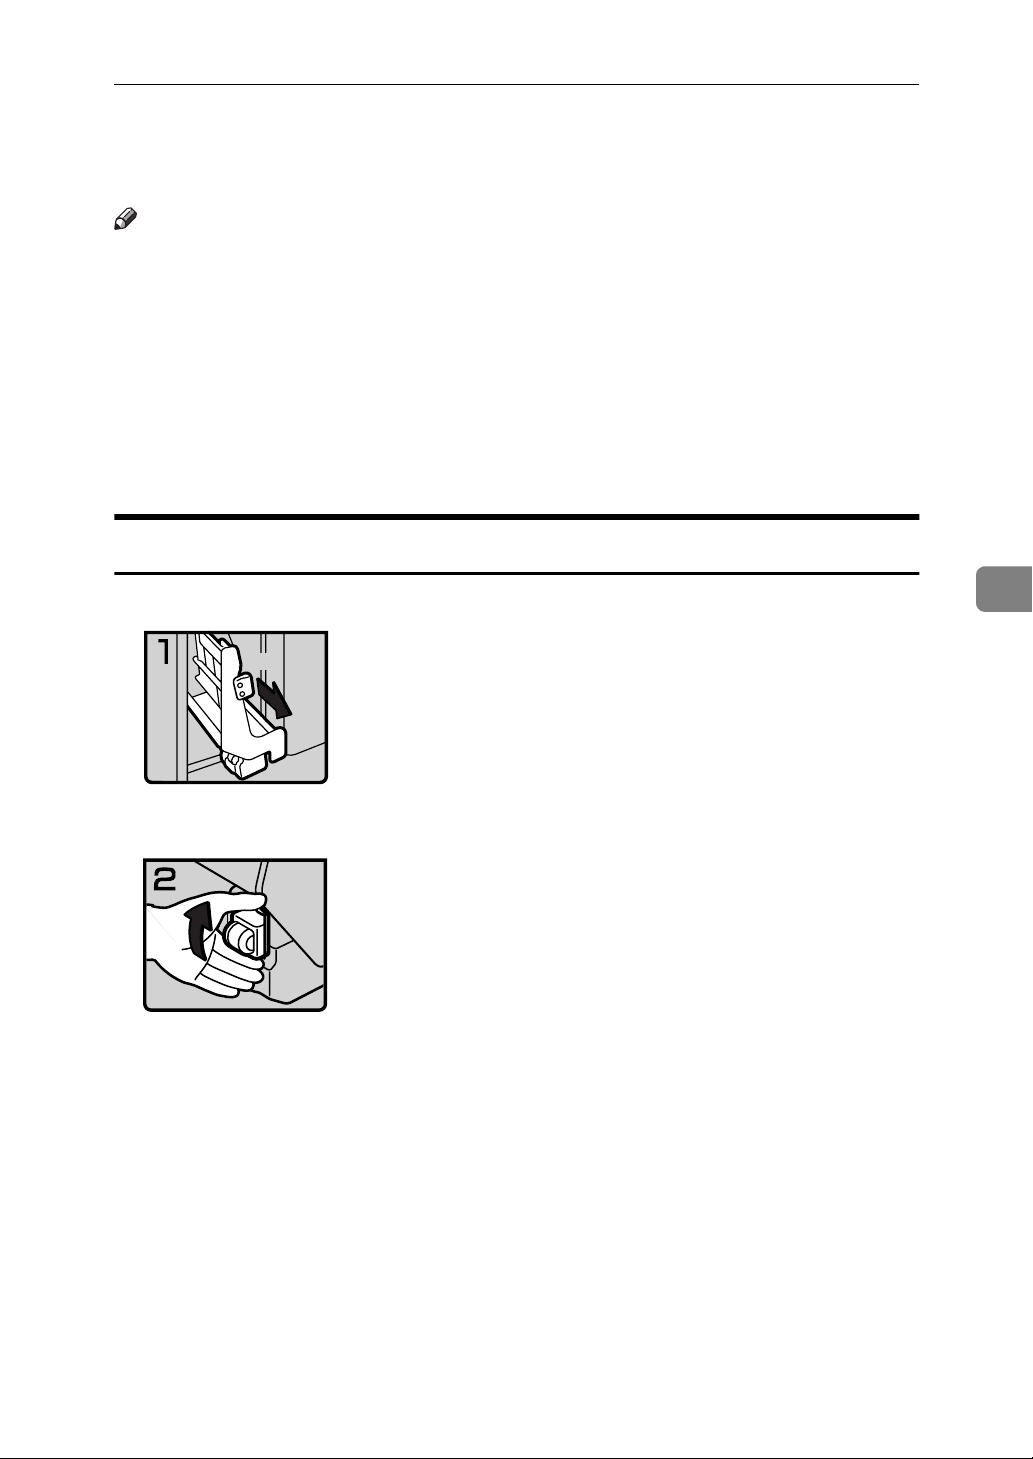
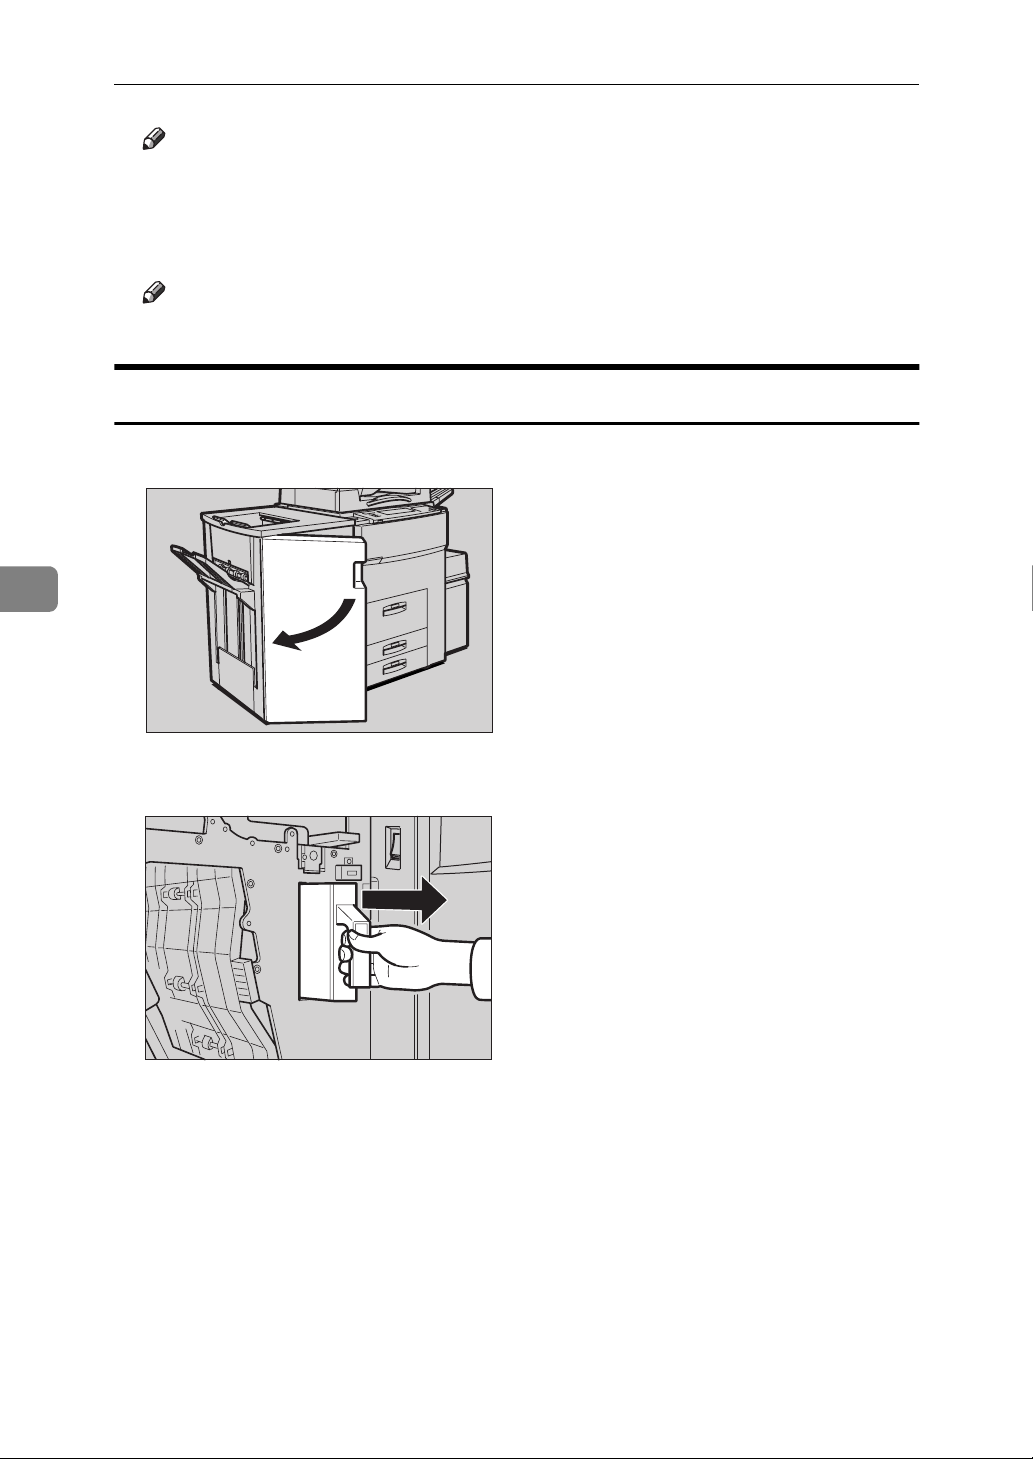
50-Sheet Finisher
R7
ZBQP610E
ZBQP620E
• 1: Open the front cover of the finisher.
• 2: Pull out the staple unit.
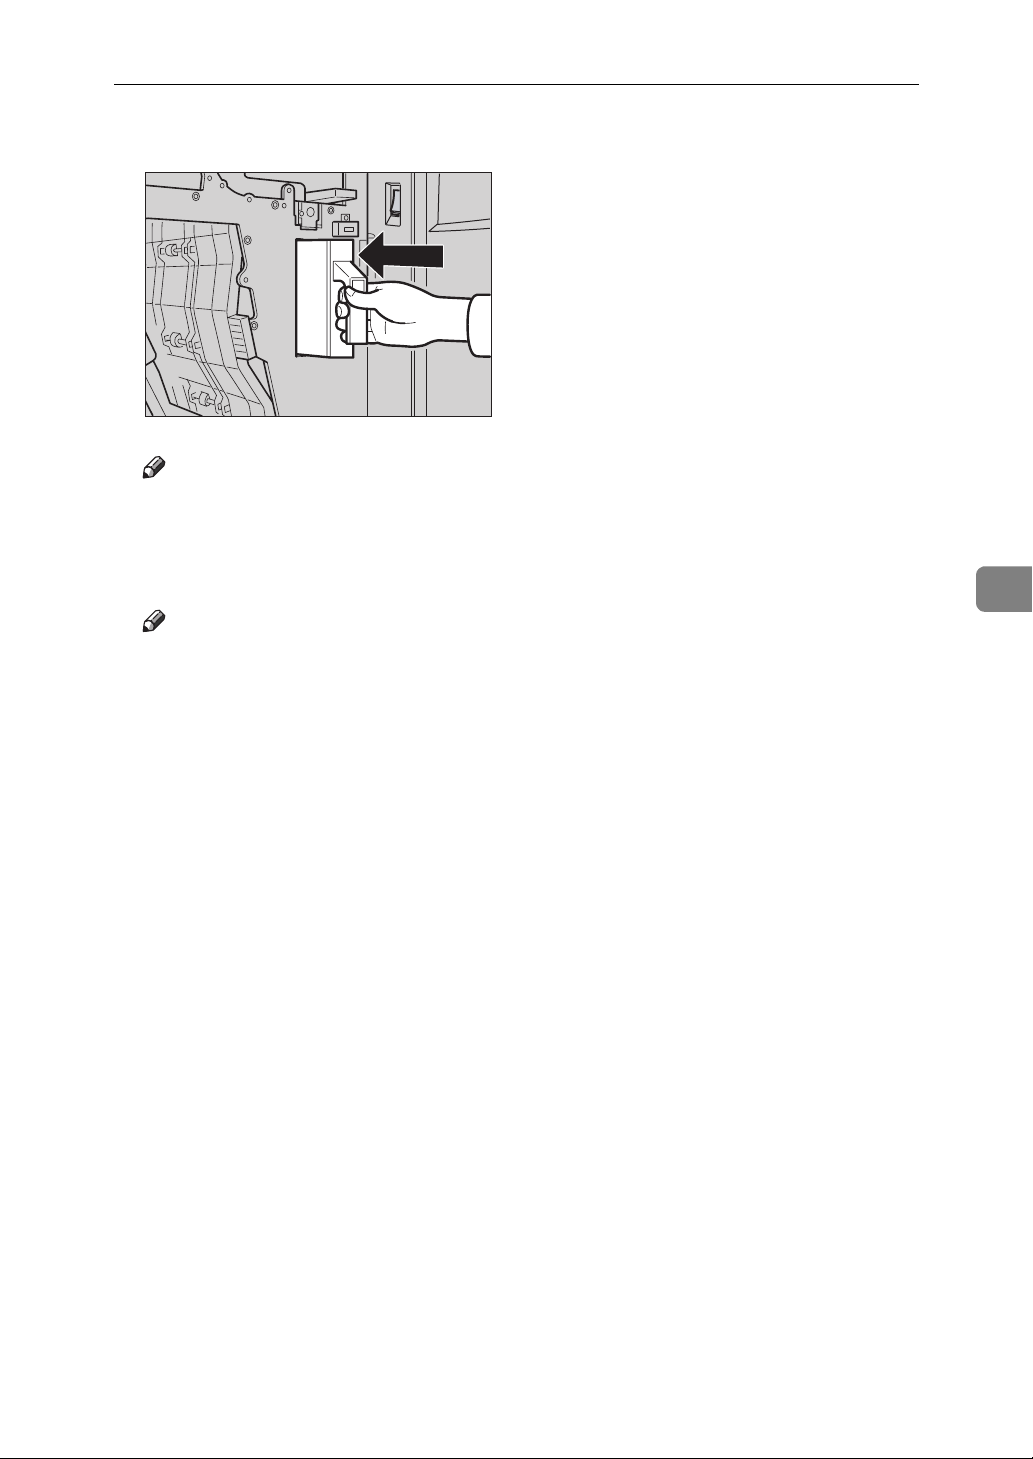
• 3: Lift the cartridge until it clicks.
5
293
Page 2
What to Do If Something Goes Wrong
ZBQP630E
ZBQP640E
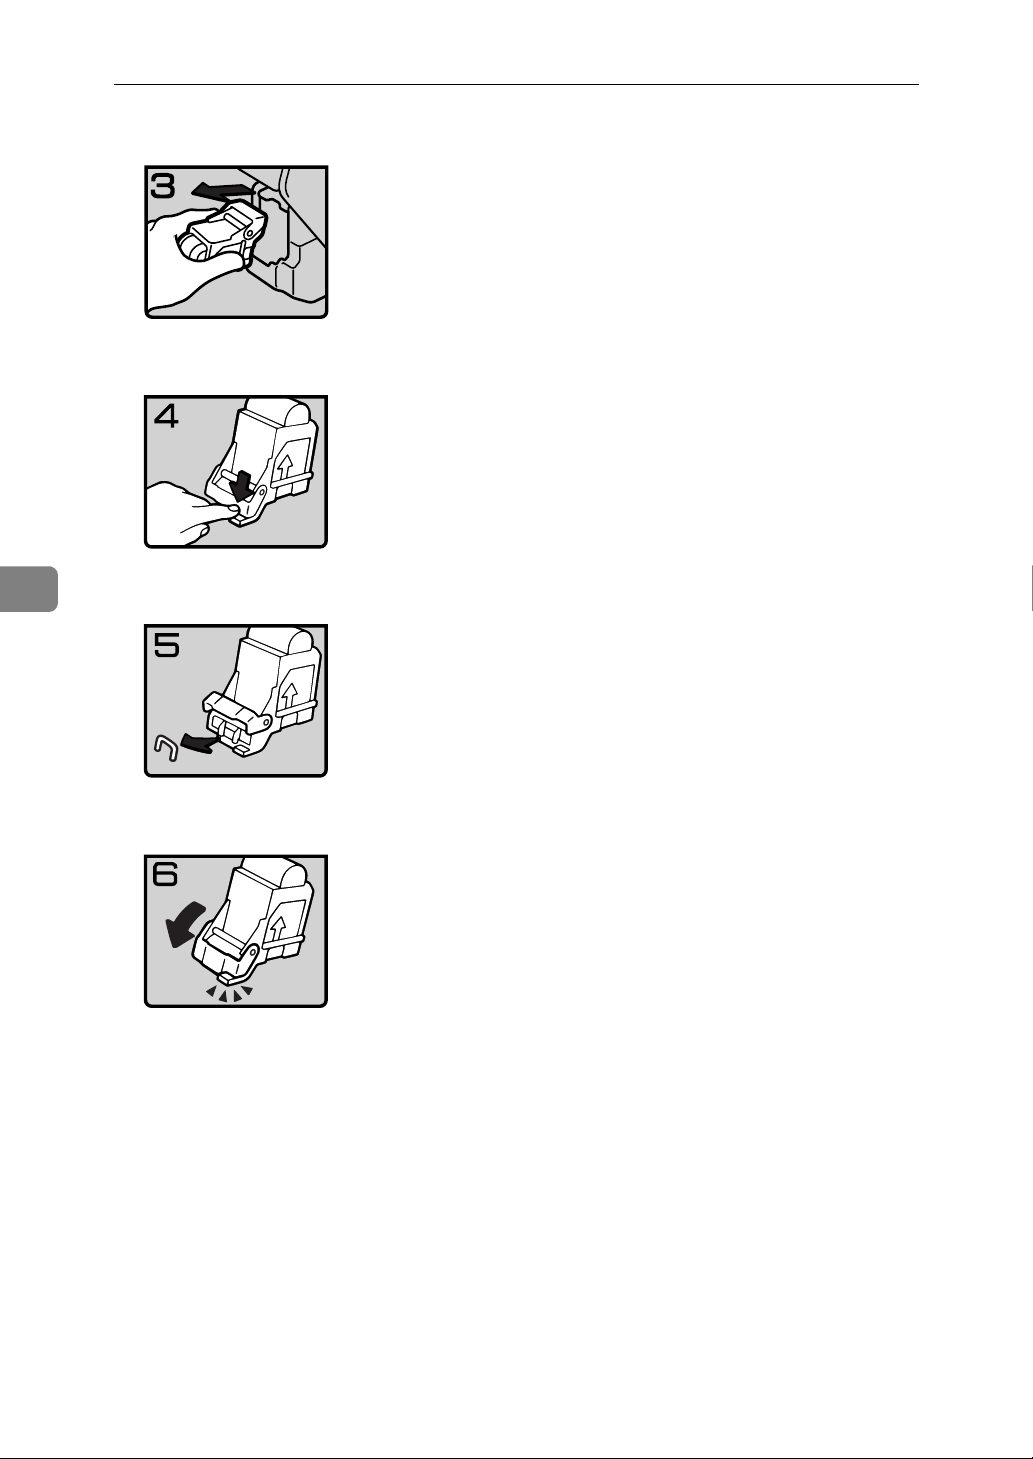
• 4: Pull out the cartridge gently.
• 5: Open the face plate by pressing the
lock on the right.
5
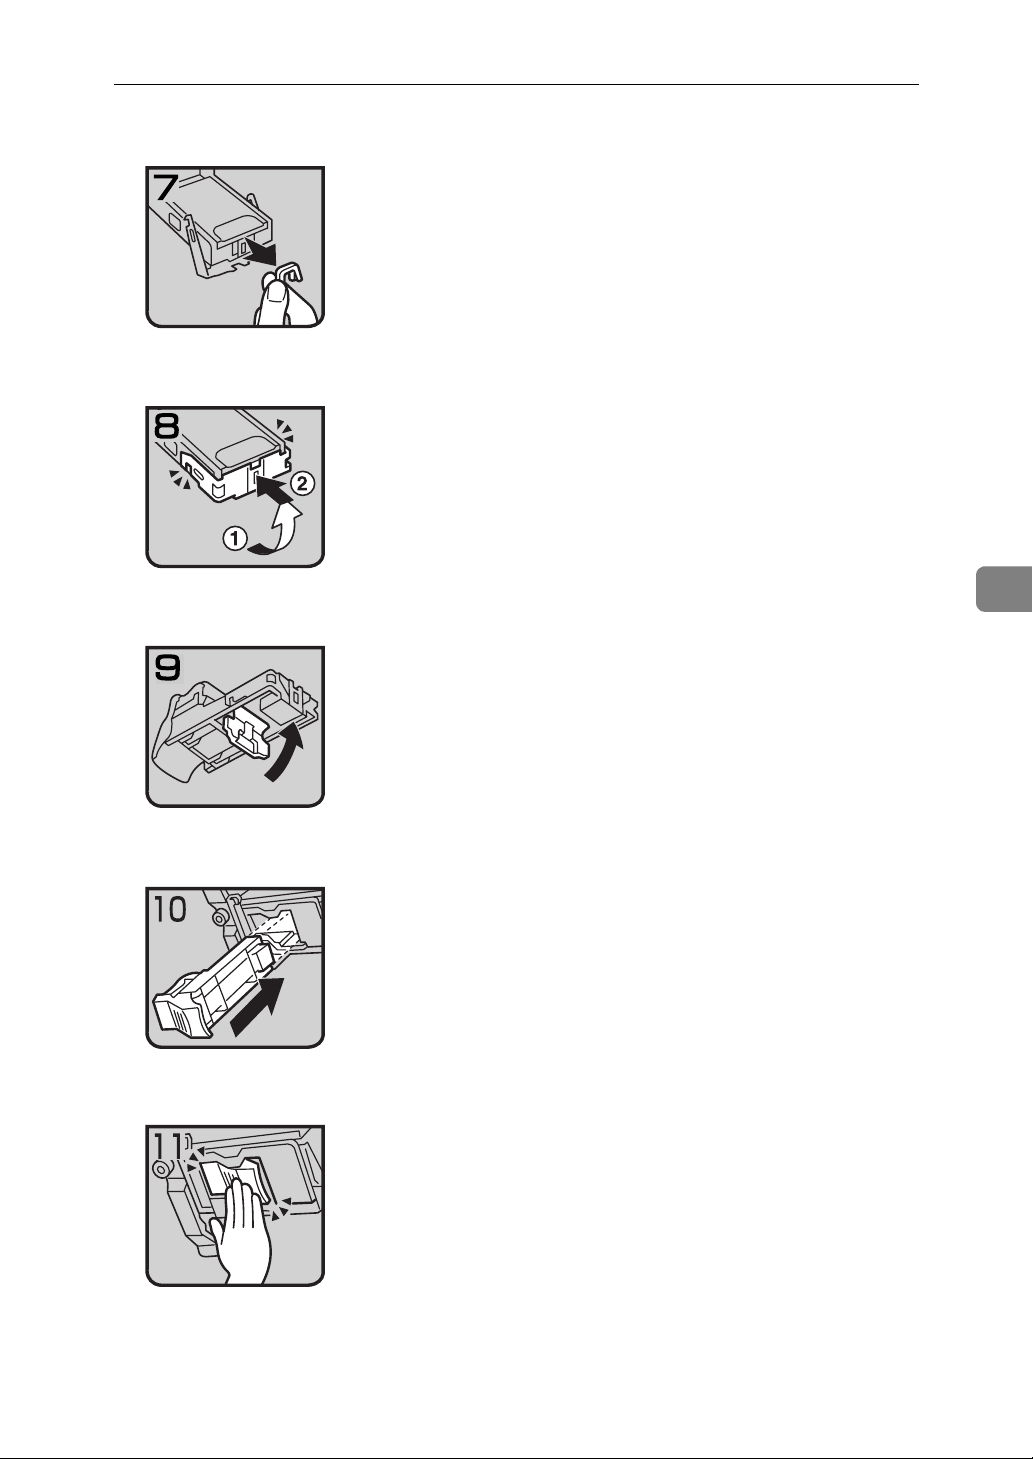
• 6: Remove the jammed staples.
ZBQP650E
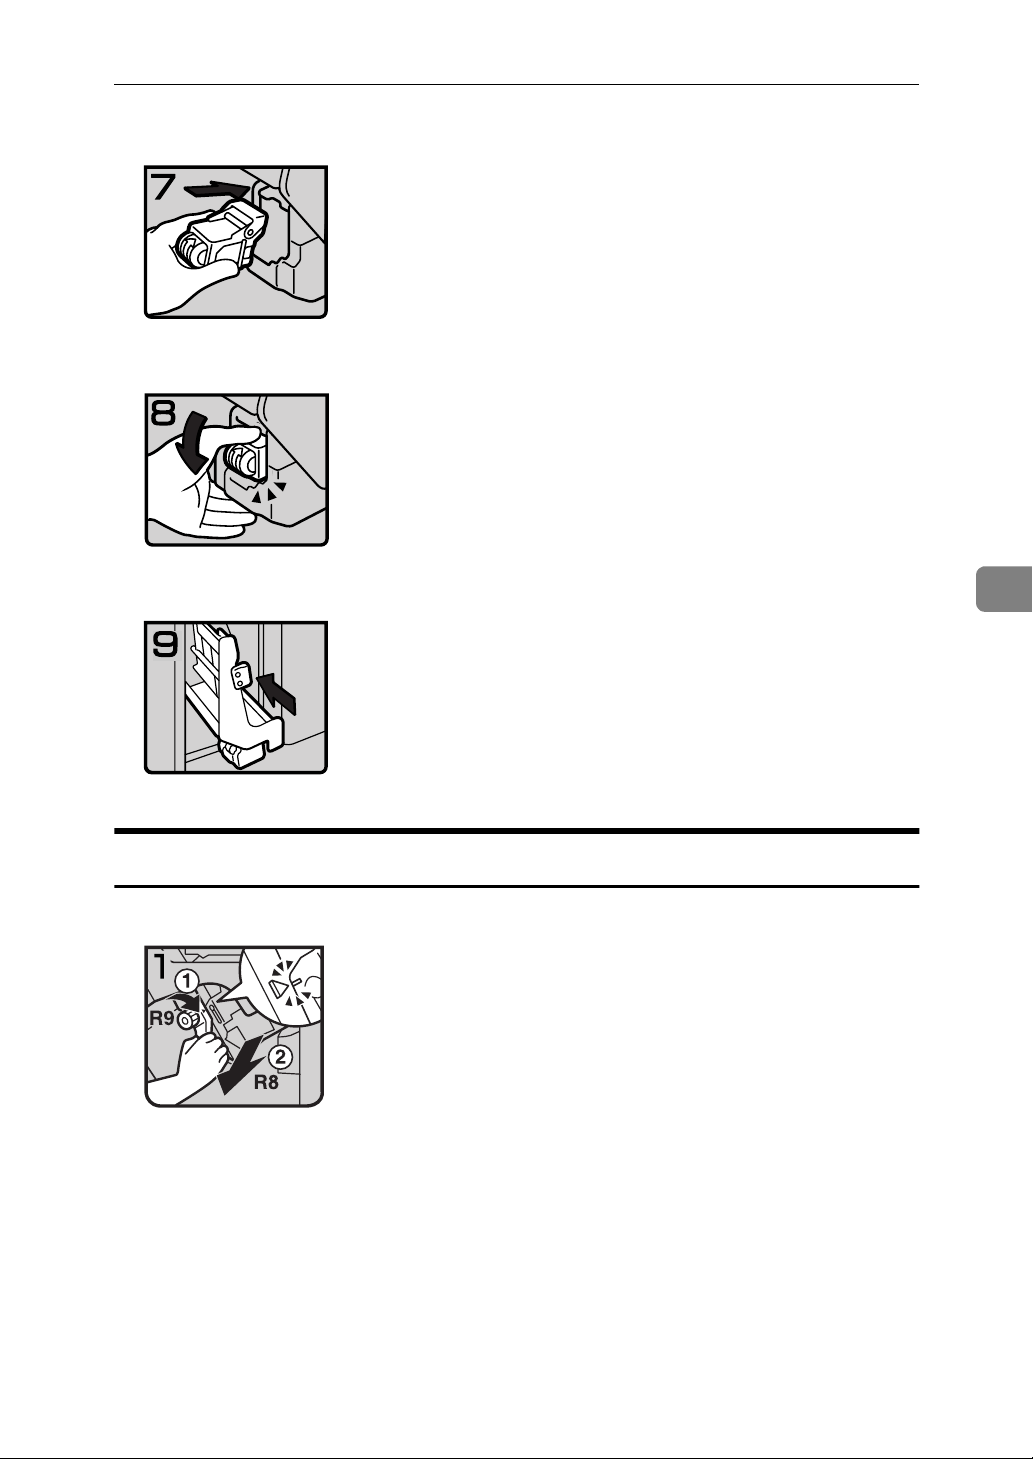
• 7: Close the face plate by pressing it
until it clicks.
ZBQP660E
294
Page 3
ZBQP670E
ZBQP680E
e
Removing Jammed Staples
• 8: Reinstall the cartridge.
• 9: Press down the cartridge until it
clicks.
ZBQP690E
100-Sheet Finisher
ZBQP320E
• 10: Bring the staple unit back into
place.
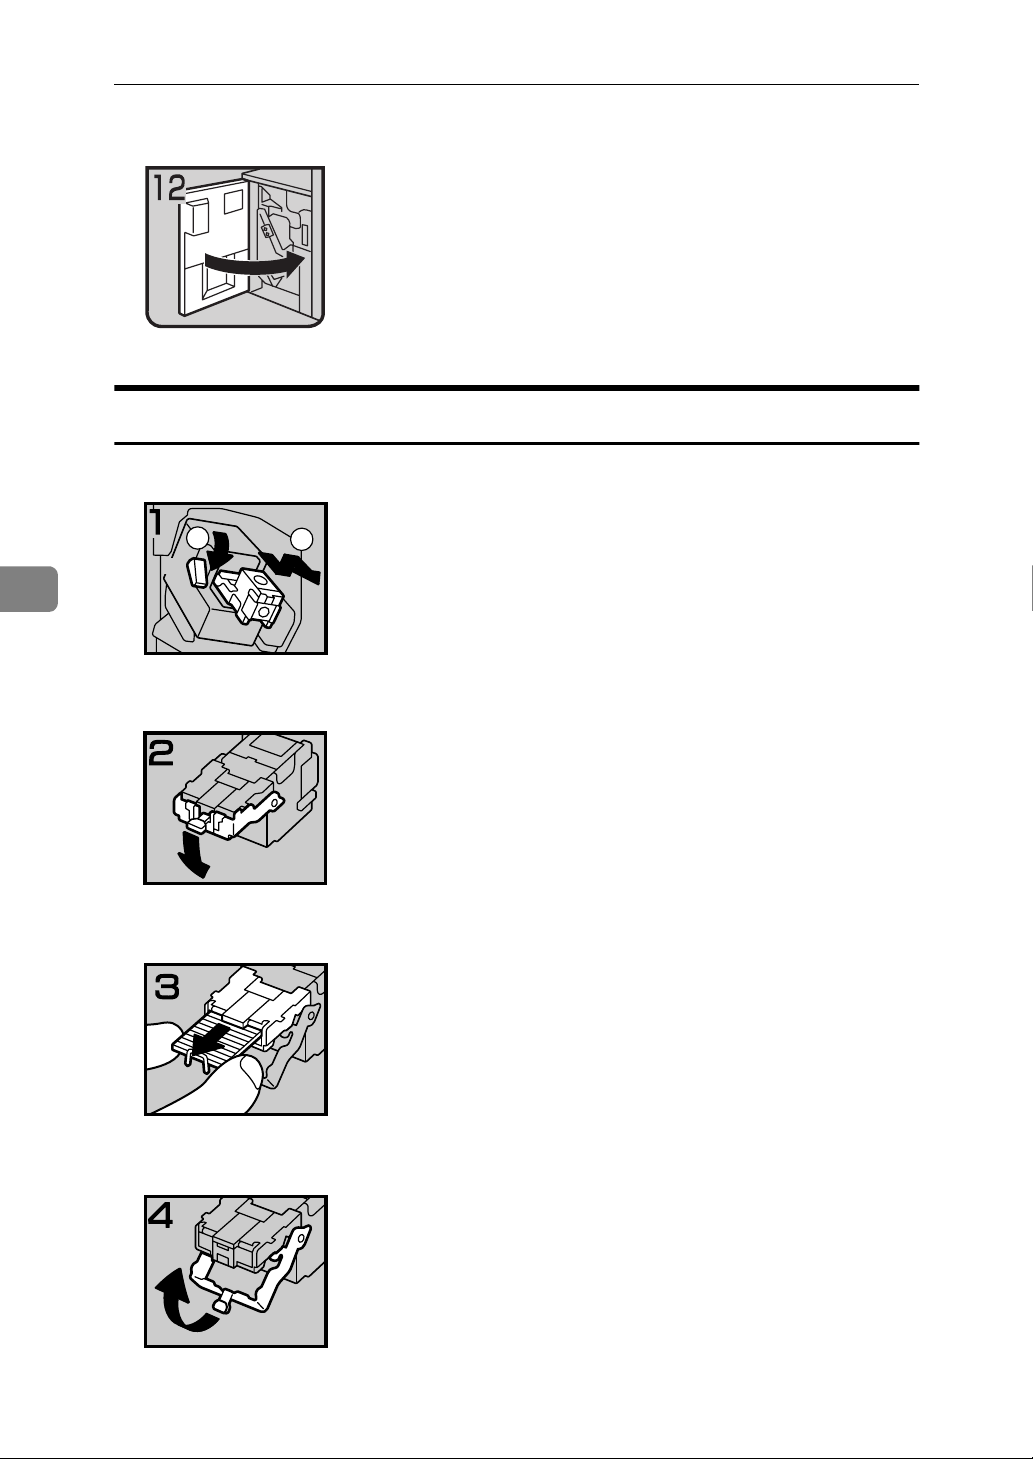
• 11: Close the front cover of the finisher.
• 1: Open the front cover of the finisher
and pull lever R9 down.
• 2: Pull lever R8 and fully pull out the
staple unit.
5
295
Page 4
5
What to Do If Something Goes Wrong
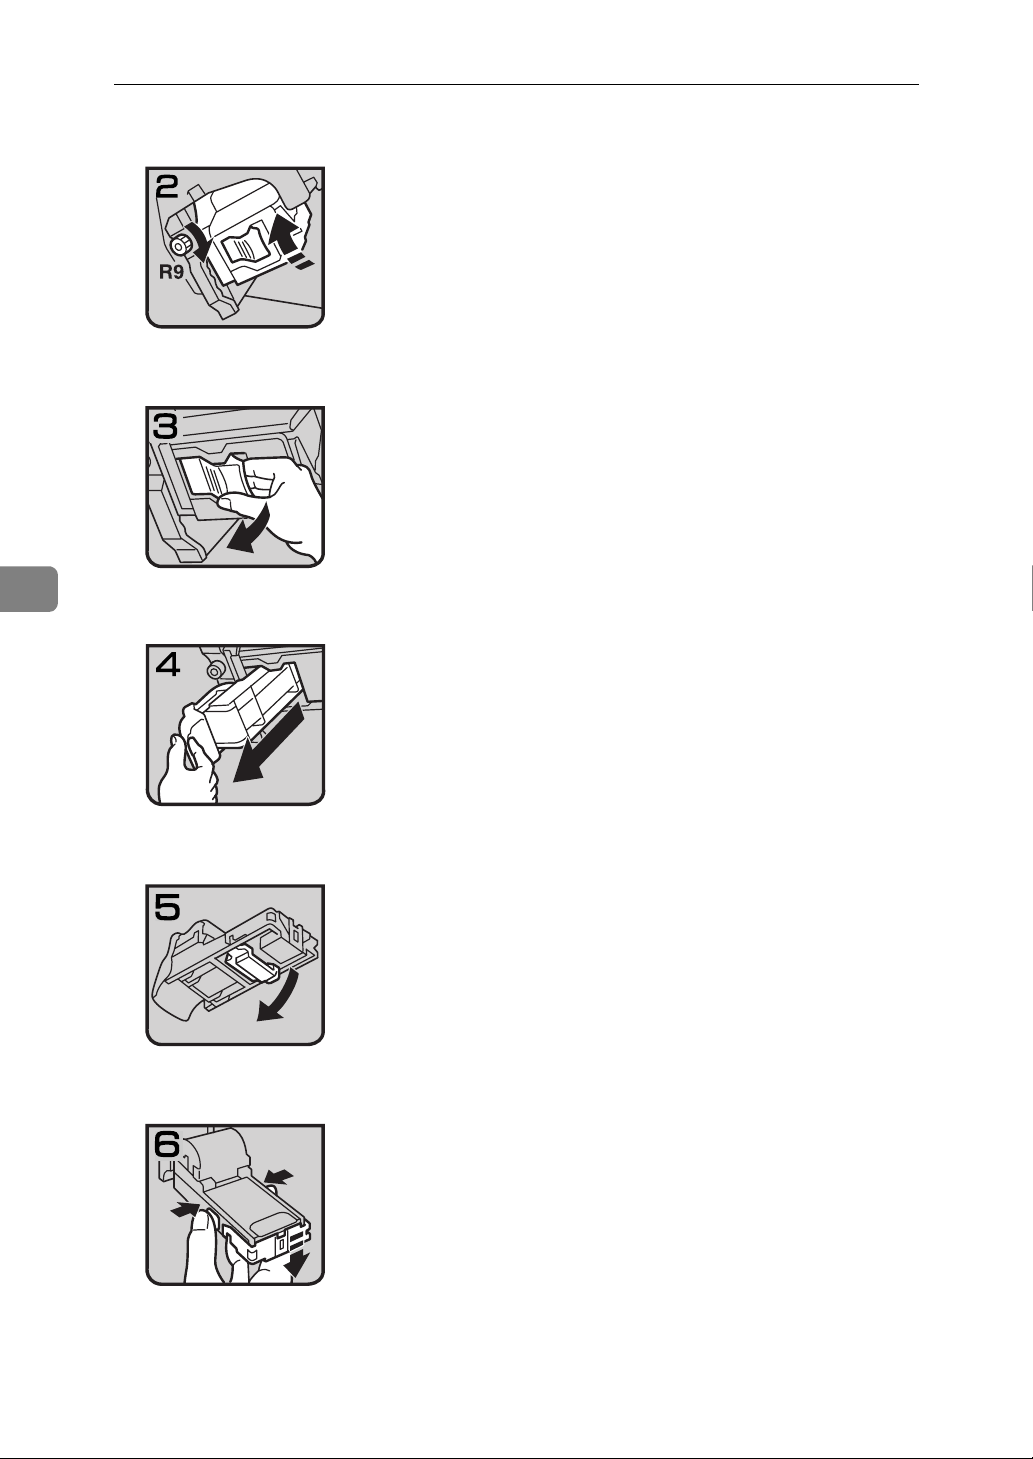
• 3: Turn knob R9 until the marks are
aligned.
ZBQP330E
• 4: Pull out the staple unit lever.
ZBQP340E
• 5: Pull out the staple unit gently.
ZBQP350E
ZBQP360E
ZBQP370E
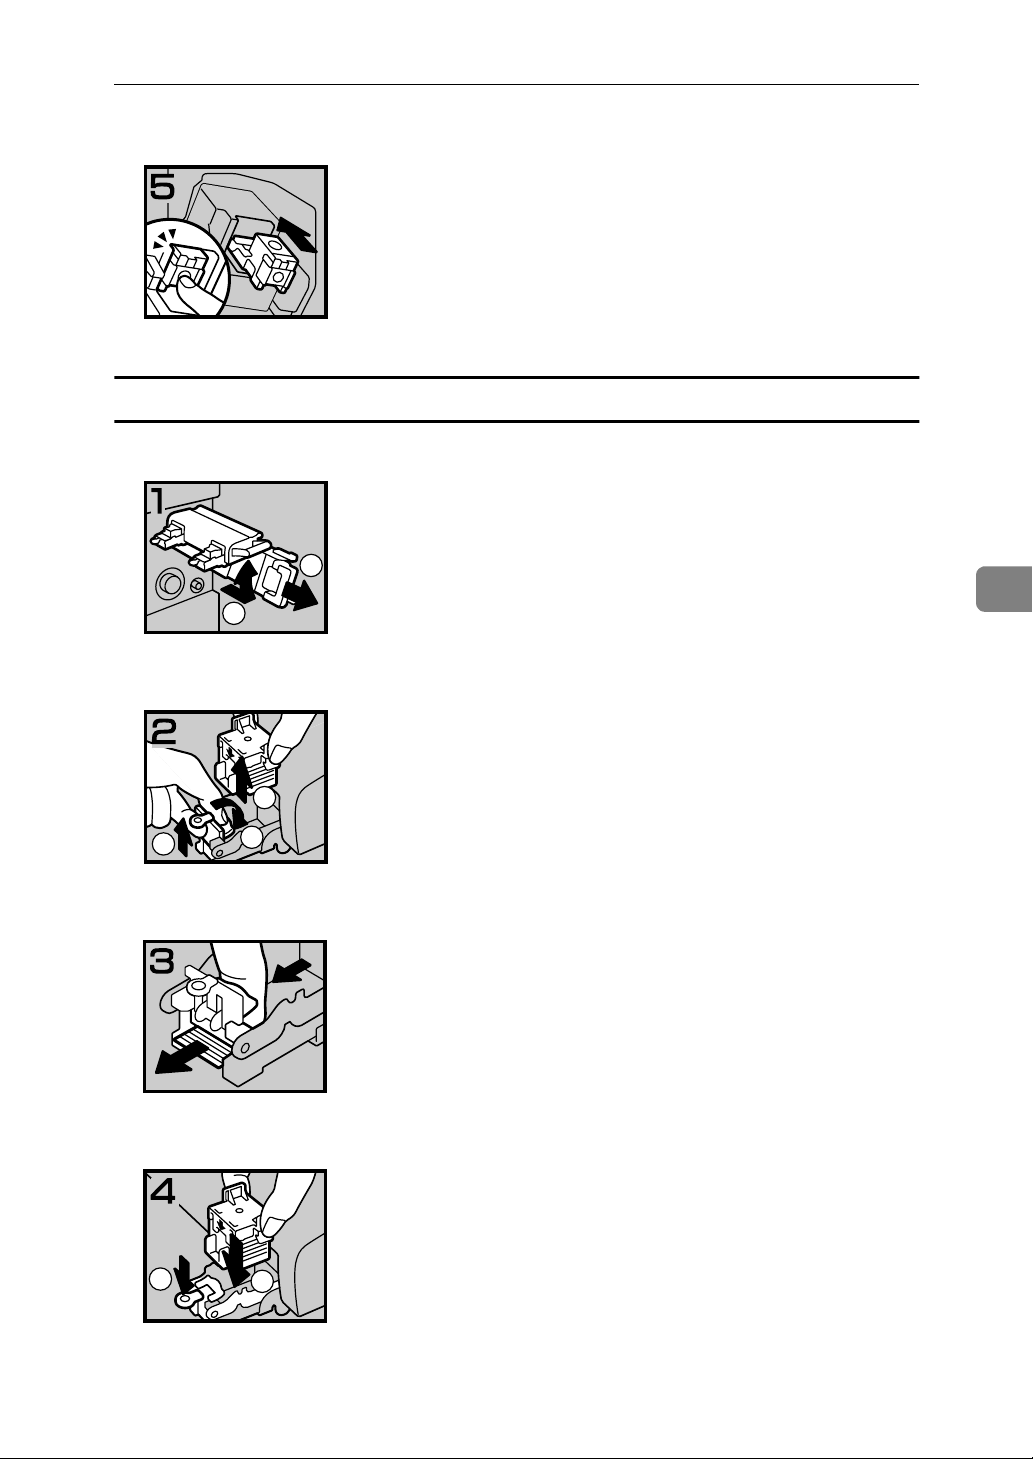
• 6: Raise the blue lever.
• 7: Push the buttons on the both sides of
the staple unit and open the face plate.
296
Page 5
ZBQP380E
ZBQP390E
e
Removing Jammed Staples
• 8: Pull out the jammed staples.
• 9: Lower the face plate until it clicks.
• 10: Lower the blue lever.
5
ZBQP400E
ZBQP410E
ZBQP420E
• 11: Reinstall the staple unit.
• 12: Push the staple unit until it clicks.
297
Page 6
5
1
2
What to Do If Something Goes Wrong
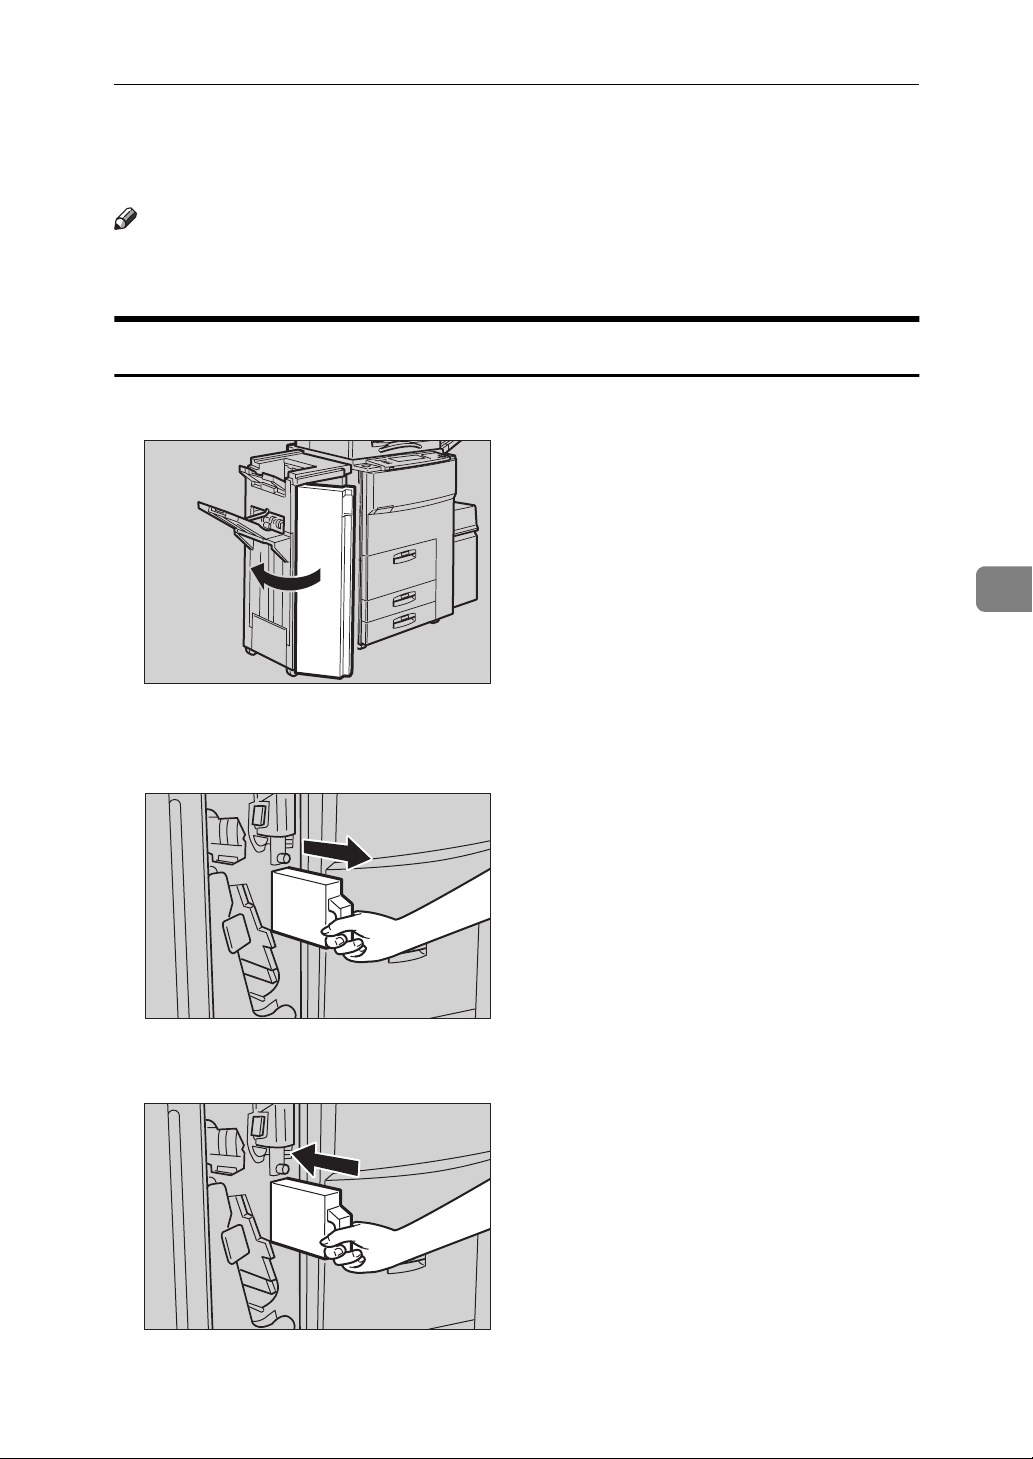
• 13: Replace the staple unit.
• 14: Close the front cover of the finisher.
ZBQP430E
Booklet Finisher
• 1: Open the front cover of the finisher.
• 2: Pull lever R6 down, then pull out the
cartridge while lifting the cartridge.
R6
ZBQP100E
ZBQP110E
ZBQP120E
• 3: Pull down the knob of the cartridge.
• 4: Take out all staples slid from the cartridge.
• 5: Set the knob of the cartridge back
into place.
298
ZBQP130E
Page 7
ZBQP140E
Staple unit for Saddle Stitch function
1
2
R7
ZBQP150E
e
Removing Jammed Staples
• 6: Push the cartridge until it clicks.
• 7: Close the front cover of the finisher.
• 1: Open the front bottom cover of the
finisher.
• 2: Pull lever R7 and fully pull out the
staple unit.
• 3: While pulling the lever of the staple
unit, lift the lever of the staple unit.
5
• 4: Take out the cartridge.
• 5: Pull the blue knob down, then lift
the knob of the face plate.
1
3
2
ZBQP160E
• 6: Remove all jammed staples.
ZBQP170E
• 7: Bring the face plate back into place
by pushing it.
• 8: Push the cartridge.
• 9: Bring the staple unit back into place,
then close the front bottom cover of the
1
2
finisher.
ZBQP180E
299
Page 8

What to Do If Something Goes Wrong
To initialize the staple unit with the User Tools (System Settings)
5
A Press the
B Press the
C Press the
D Press the
The machine staples a few times without ejecting staples.
E Press the
F Press the
{
User Tools/Counter
[
System Settings
[
Staple initialization
key.
[
]
OK
key and return to the User Tools Main Menu.
[
]
Exit
key and return to Copy mode.
[
]
Exit
key.
}
key.
]
key on the “Basic Page 2” menu.
]
300
Page 9
y
Removing Punch Waste
y
Removing Punch Waste
Note
❒
While “Hole Punch Receptacle Full.” is displayed, you cannot use the Punch
function.
50-Sheet Finisher
A Open the front cover of the finisher.
5
ZBQP440E
B Pull out the punch waste box and remove punch waste.
ZBQP450E
C Reinstall the punch waste box.
ZBQP460E
301
Page 10
5
What to Do If Something Goes Wrong
Note
❒
If you do not, “Hole Punch Receptacle Full.” is still displayed.
D Close the front cover of the finisher.
“Hole Punch Receptacle Full.” disappears.
Note
❒
If the message is still displayed, reinstall the punch waste box.
100-Sheet Finisher
A Open the front cover of the finisher.
ZBQP470E
B Pull out the punch waste box and remove punch waste.
ZBQP480E
302
Page 11
C Reinstall the punch waste box.
ZBQP490E
Note
❒
If you do not, “Hole Punch Receptacle Full.” is still displayed.
D Close the front cover of the finisher.
“Hole Punch Receptacle Full.” disappears.
Note
❒
If the message is still displayed, reinstall the punch waste box.
y
Removing Punch Waste
5
303
Page 12

5
What to Do If Something Goes Wrong
304
Page 13
6. User Tools (Copy/
Document Server Features)
Accessing the User Tools (Copy/
Document Server Features)
This section is for the key operators in charge of this machine. You can change
or set the machine's default settings.
Preparation
After using the User Tools, be sure to exit from the User Tools.
The selected key is highlighted.
Any changes you make with the User Tools remain in effect even if the main
power switch or operation switch is turned off, or the
key is pressed.
}
er
Reference
For details, see “Accessing the User Tools (System Settings)” in the System
Settings manual.
{
Clear Modes/Ener gy Sav-
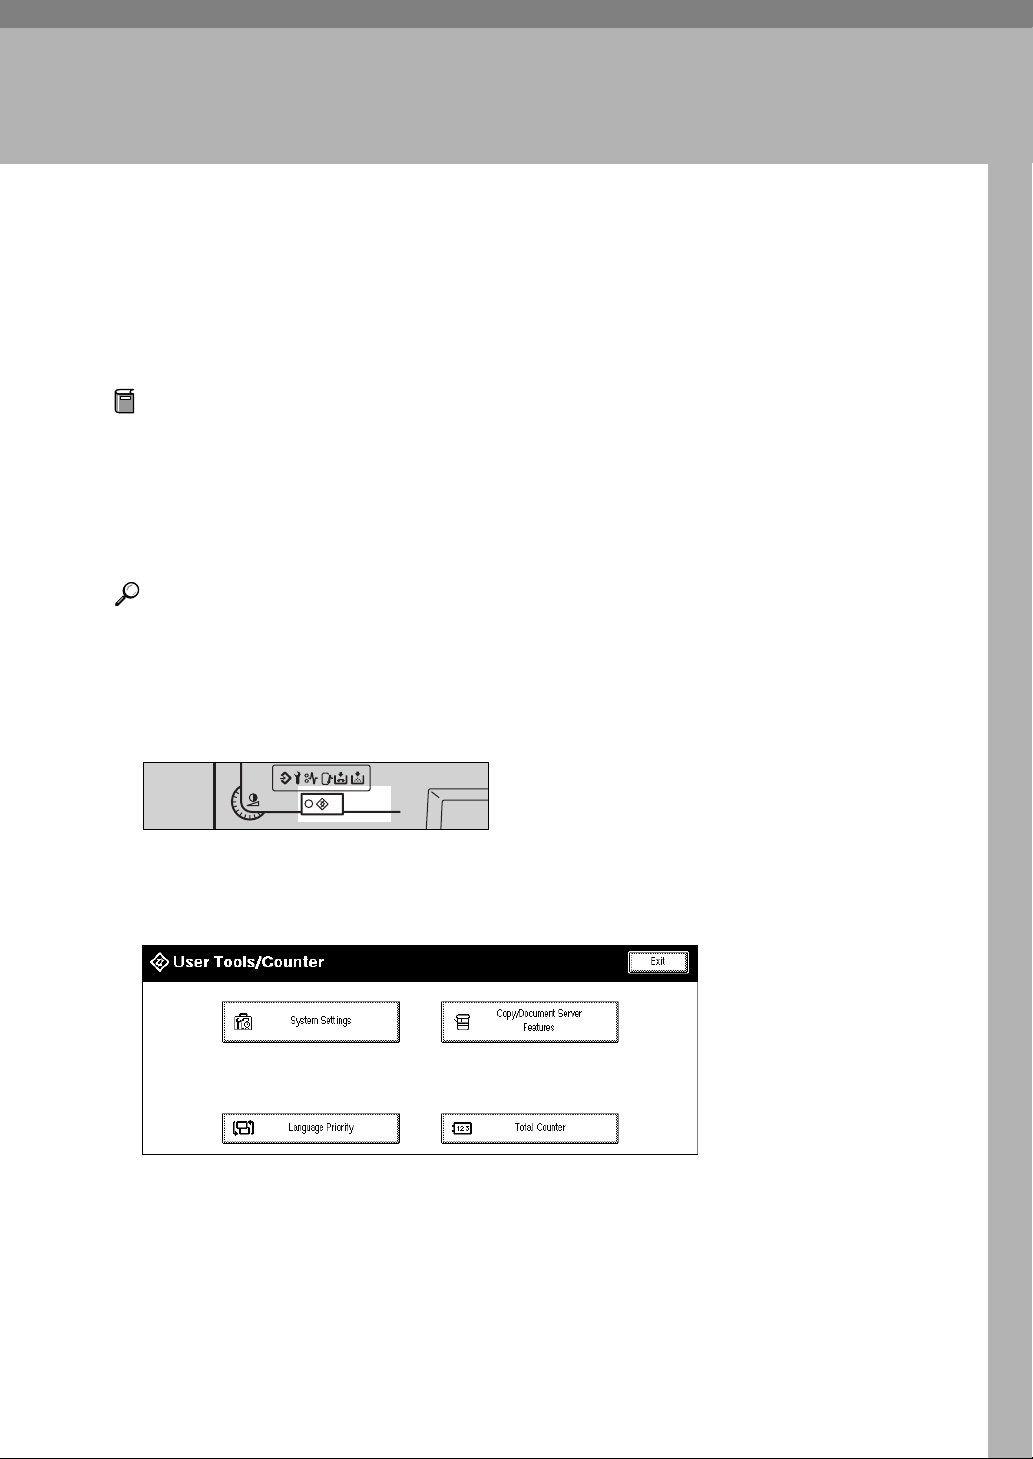
A Press the
The User Tools Main Menu appears.
B Press the
The Copy/Document Server Features menu appears.
{
User Tools/Counter
Screen
Contrast
[
Copy/Document Server Features
User Tools/
Counter
key.
}
TSPS040N
key.
]
305
Page 14
User Tools (Copy/Document Server Features)
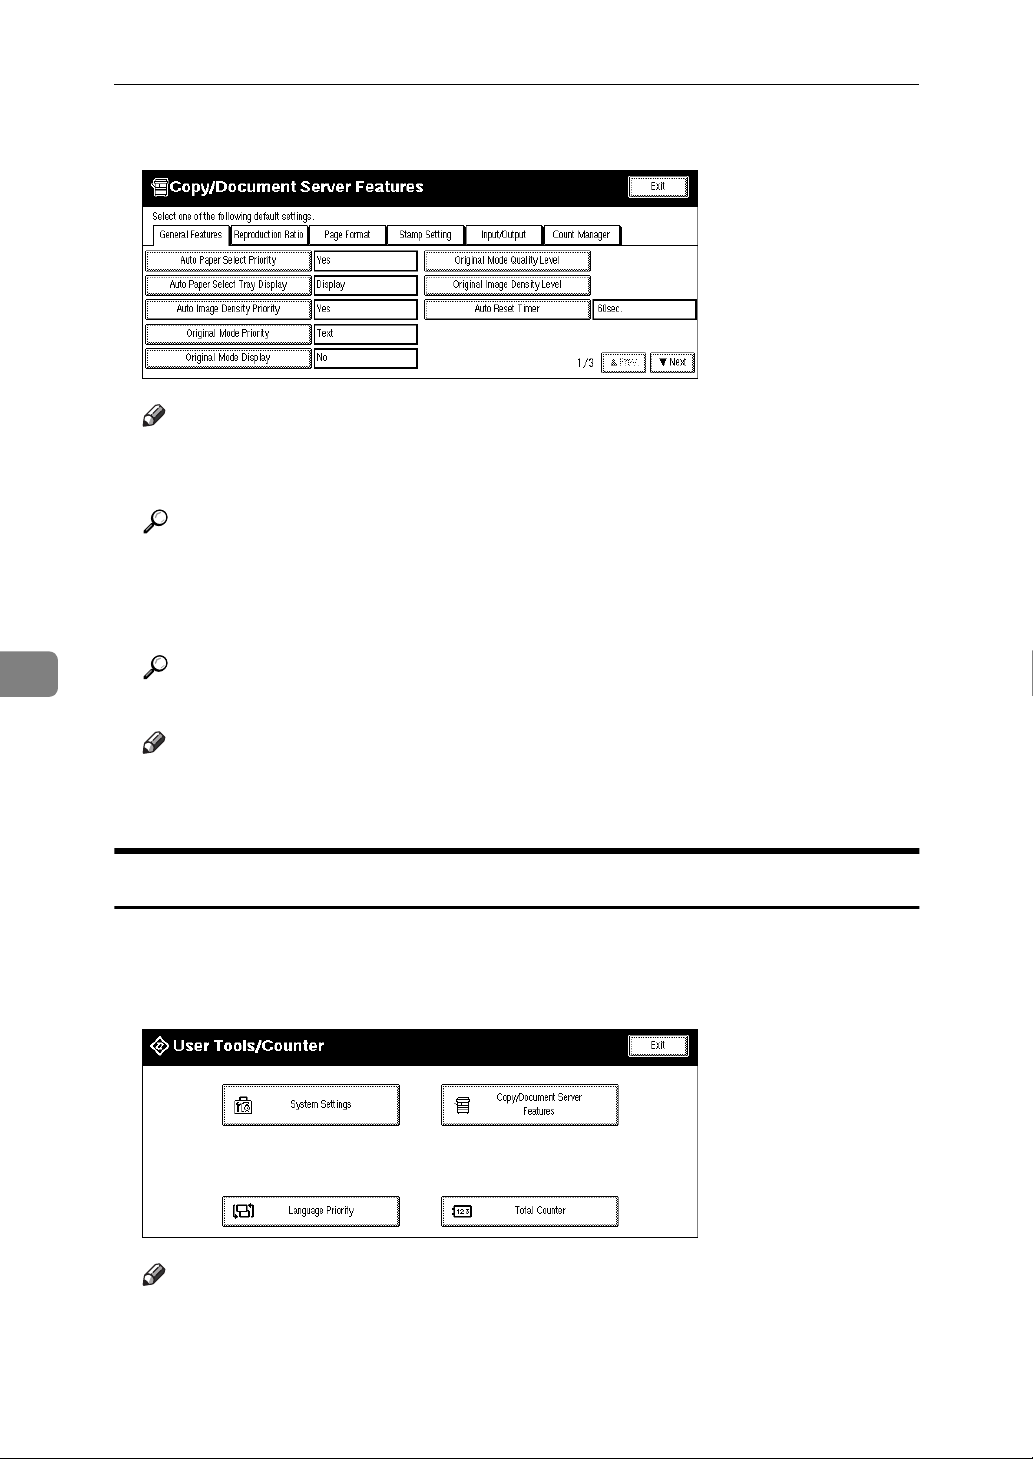
C Select the desired menu and press the key.
Note
❒
T
[
❒
U
[
Reference
⇒
: Press to go to the next page.
]
Next
: Press to go back to the previous page.
]
Prev.
P.308
“User Tools Menu (Copy/Document Server Features)”
.
D Change the settings by following the instructions on the display panel.
Then press the
[
OK
key.
]
6
Reference
❒
❒
P.310
⇒
Note
[
OK
[
Cancel
“Settings You Can Change with the User Tools”
: Press to set the new settings and return to the previous menu.
]
: Press to return to the previous menu without changing any data.
]
.
Exiting From the User Tools
A After changing the User Tools settings, press the
Tools Main Menu.
Changing the User Tools is completed, and the machine is ready for copying.
key on the User
]
[
Exit
306
Note
❒
To exit from the change of the machine's default settings and return to
Copy mode, press the
❒
You can also exit from the User Tools by pressing the
key.
{
User Tools/Counter
key.
}
{
User Tools/Counter
}
Page 15

Accessing the User Tools (Copy/Document Server Features)
This page is intentionally blank.
6
307
Page 16
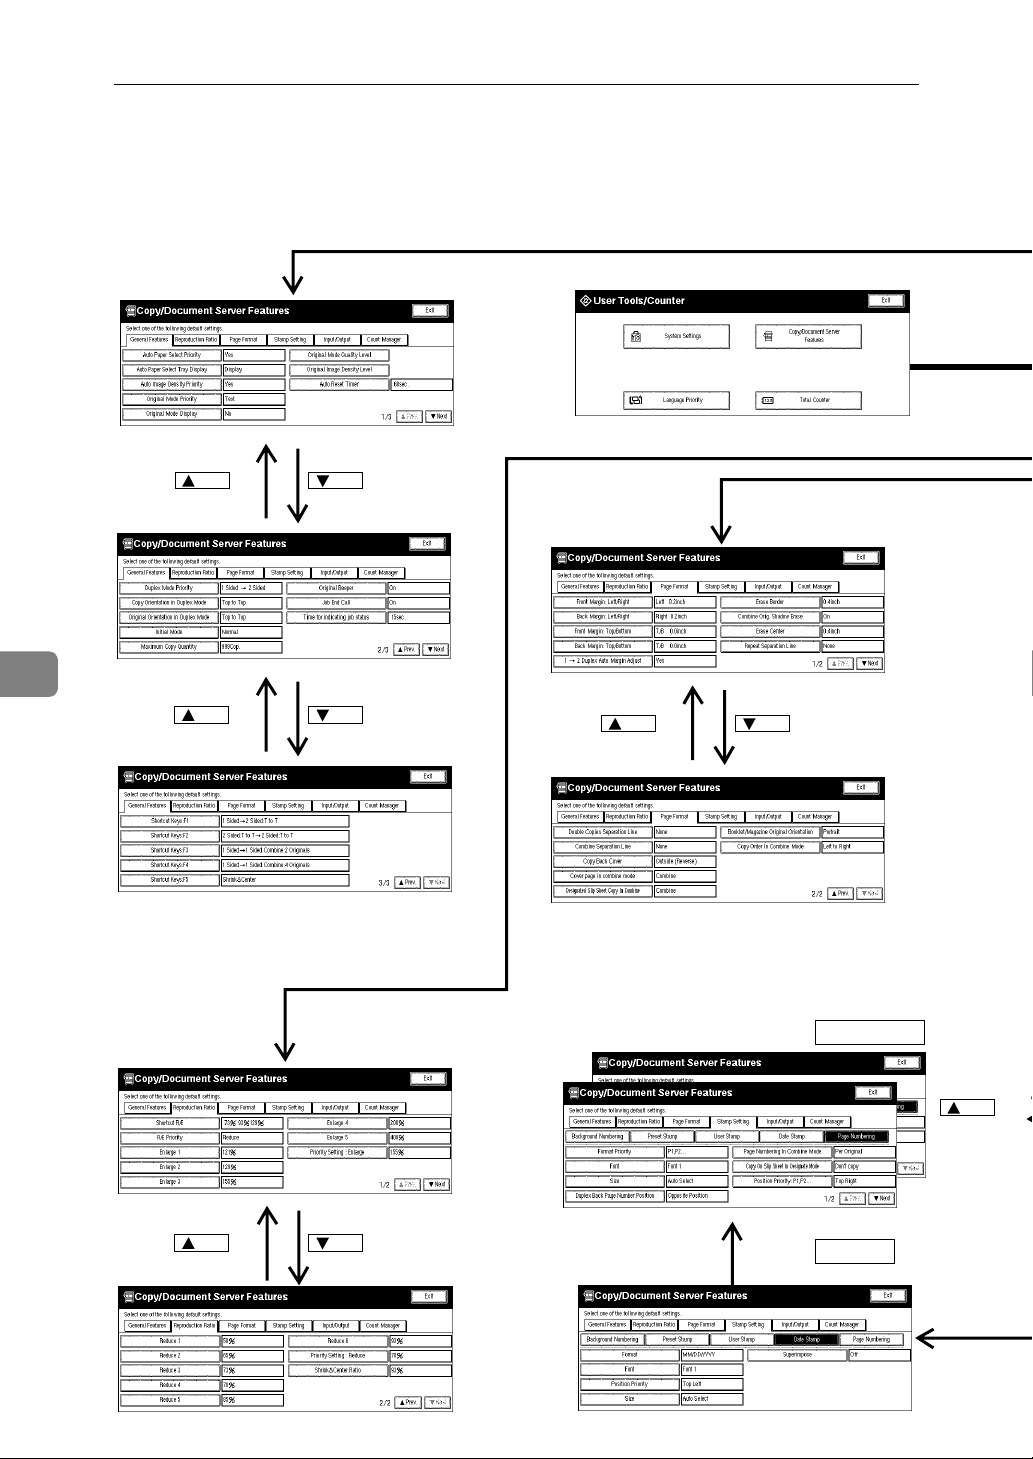
User Tools (Copy/Document Server Features)
User Tools Menu (Copy/Document Server Features)
General Features
Prev. Key Next Key
Page Format
6
Prev. Key Next Key
Reproduction Ratio
Prev. Key
Next Key
Prev. Key
Next Key
Page Numbering
Prev. Key
Date Dtamp
308
Page 17
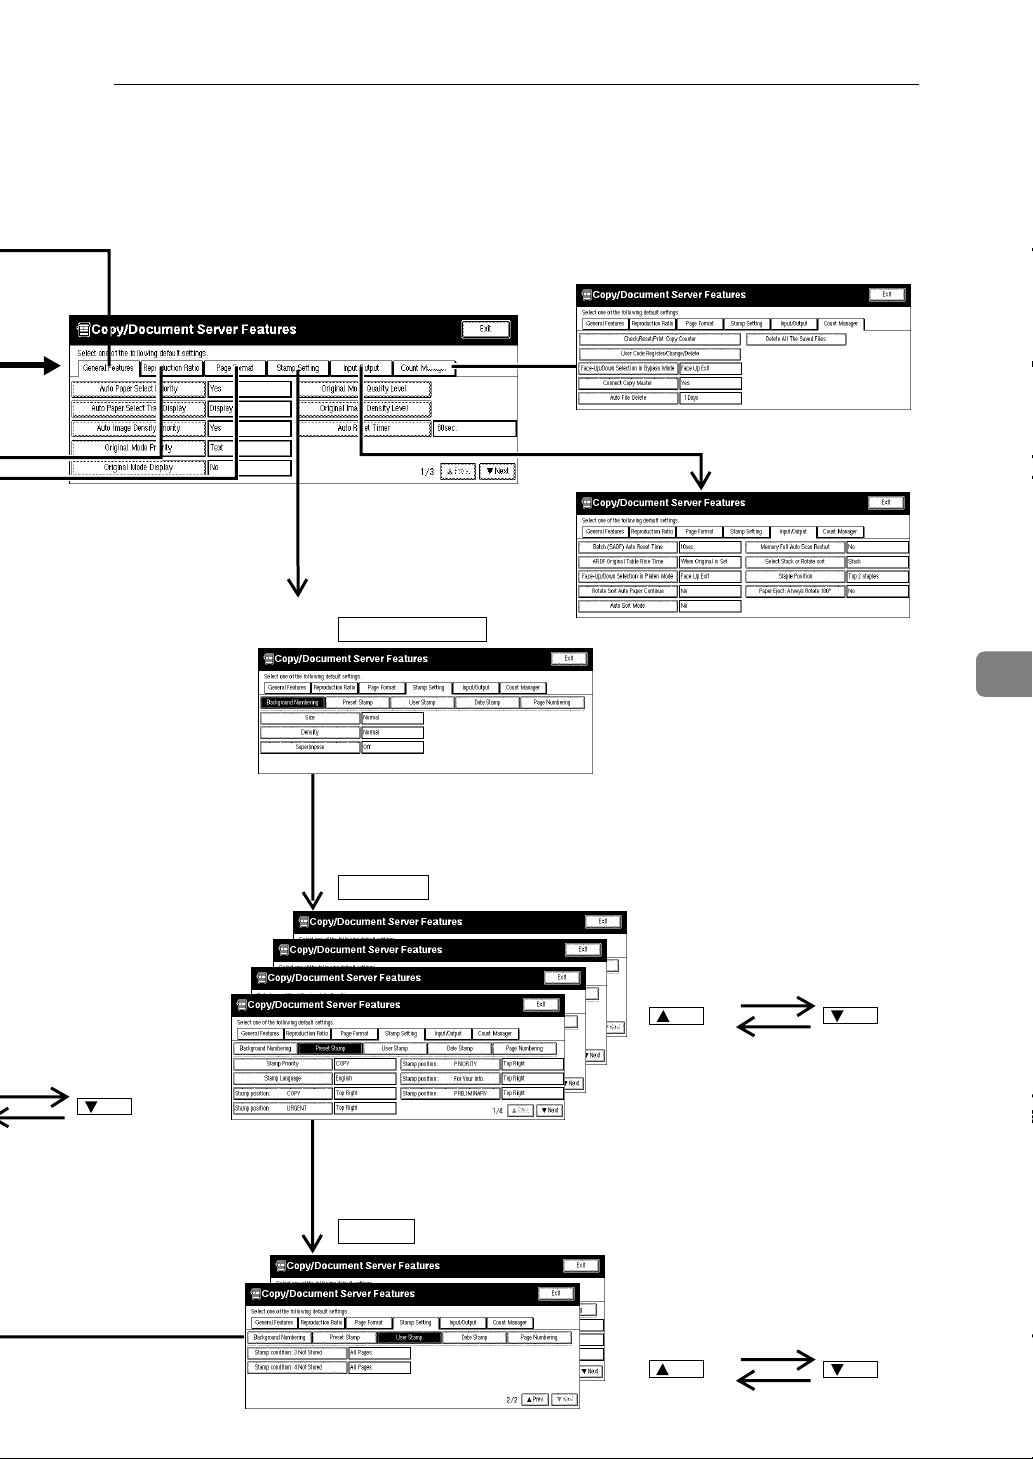
Stamp Setting
Background Numbering
User Tools Menu (Copy/Document Server Features)
Count Manager
Input / Output
Next Key
Preset Stamp
User Stamp
Prev. Key
6
Next Key
Prev. Key
Next Key
309
ZBQS130E
Page 18
User Tools (Copy/Document Server Features)
Settings You Can Change with the User
Tools
Reference
For how to access the User Tools, see ⇒ P.305
Document Server Features)”
.
“Accessing the User Tools (Copy/
6
General Features 1/
Menu Description
Auto Paper Select
Priority
Auto Paper Select
Tray Display
3
As a default setting, Auto Paper Select is selected. You can cancel this setting.
Note
Default:
❒
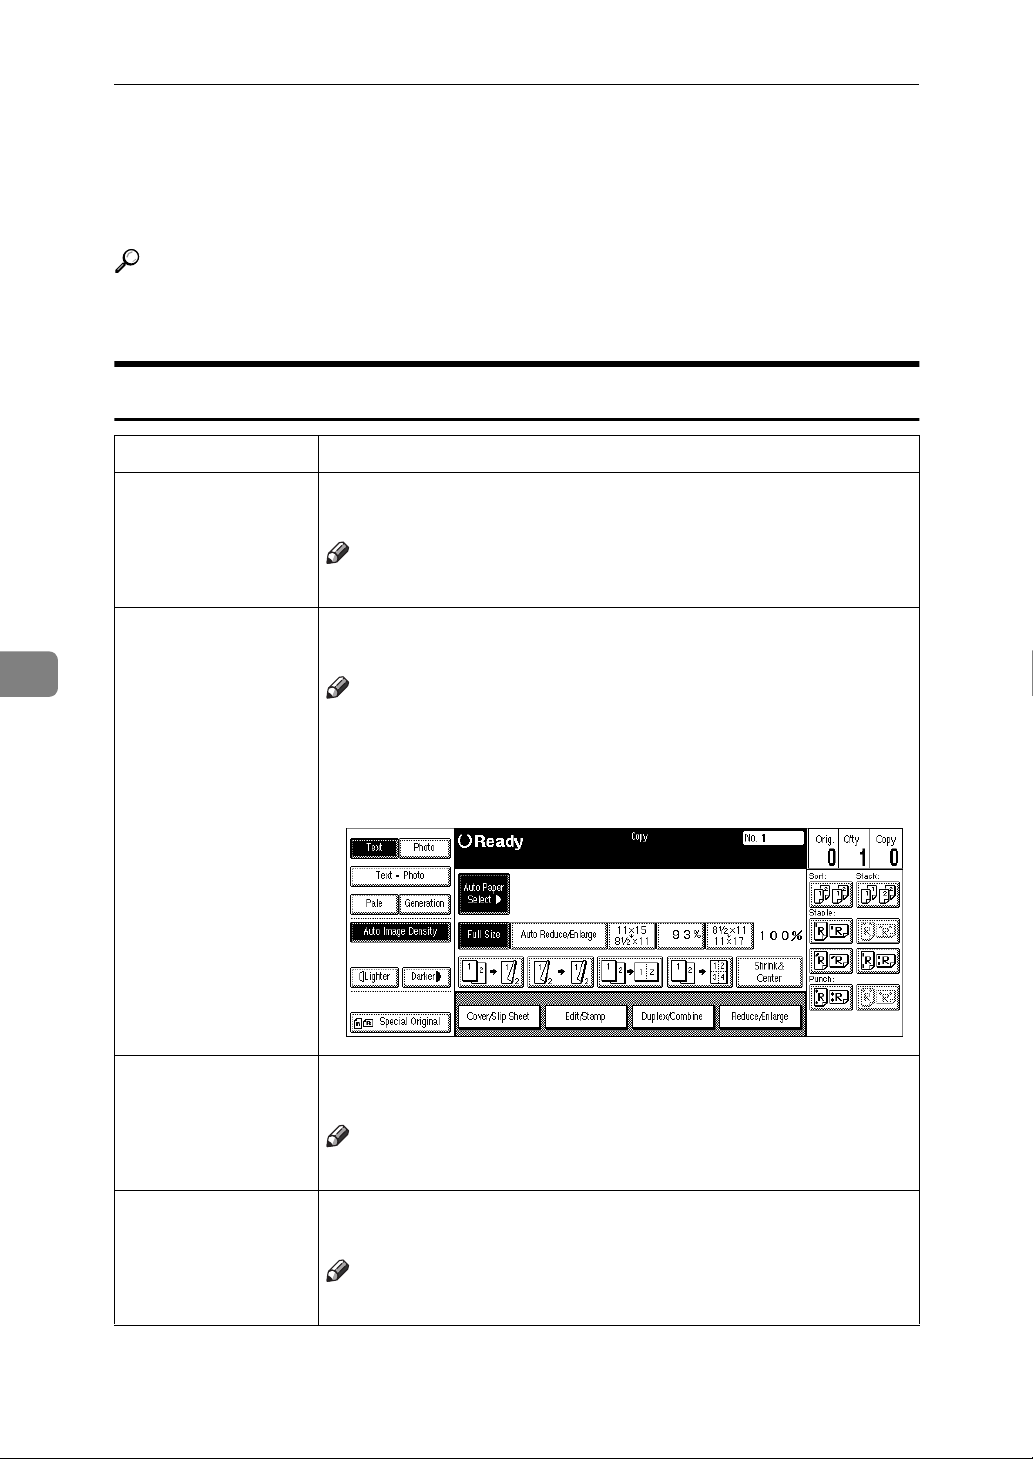
You can choose whether the available paper trays/sizes are
shown on the initial display.
Note
Default:
❒
If you choose “Hide”, the display is shown as below. When
❒
the [
Auto Paper Select
the display.
Yes
Display
] key is pressed, paper sizes appear on
310
Auto Image Density
Priority
Original Mode Priority
As a default setting, Auto Image Density is selected. You can
change this setting.
Note
Default:
❒
As a default setting, Text is selected as the Originals Type. You
can change it to Text·Photo, Photo, Pale, or Generation.
Note
Default:
❒
Yes
Text
Page 19
Menu Description
Settings You Can Change with the User Tools
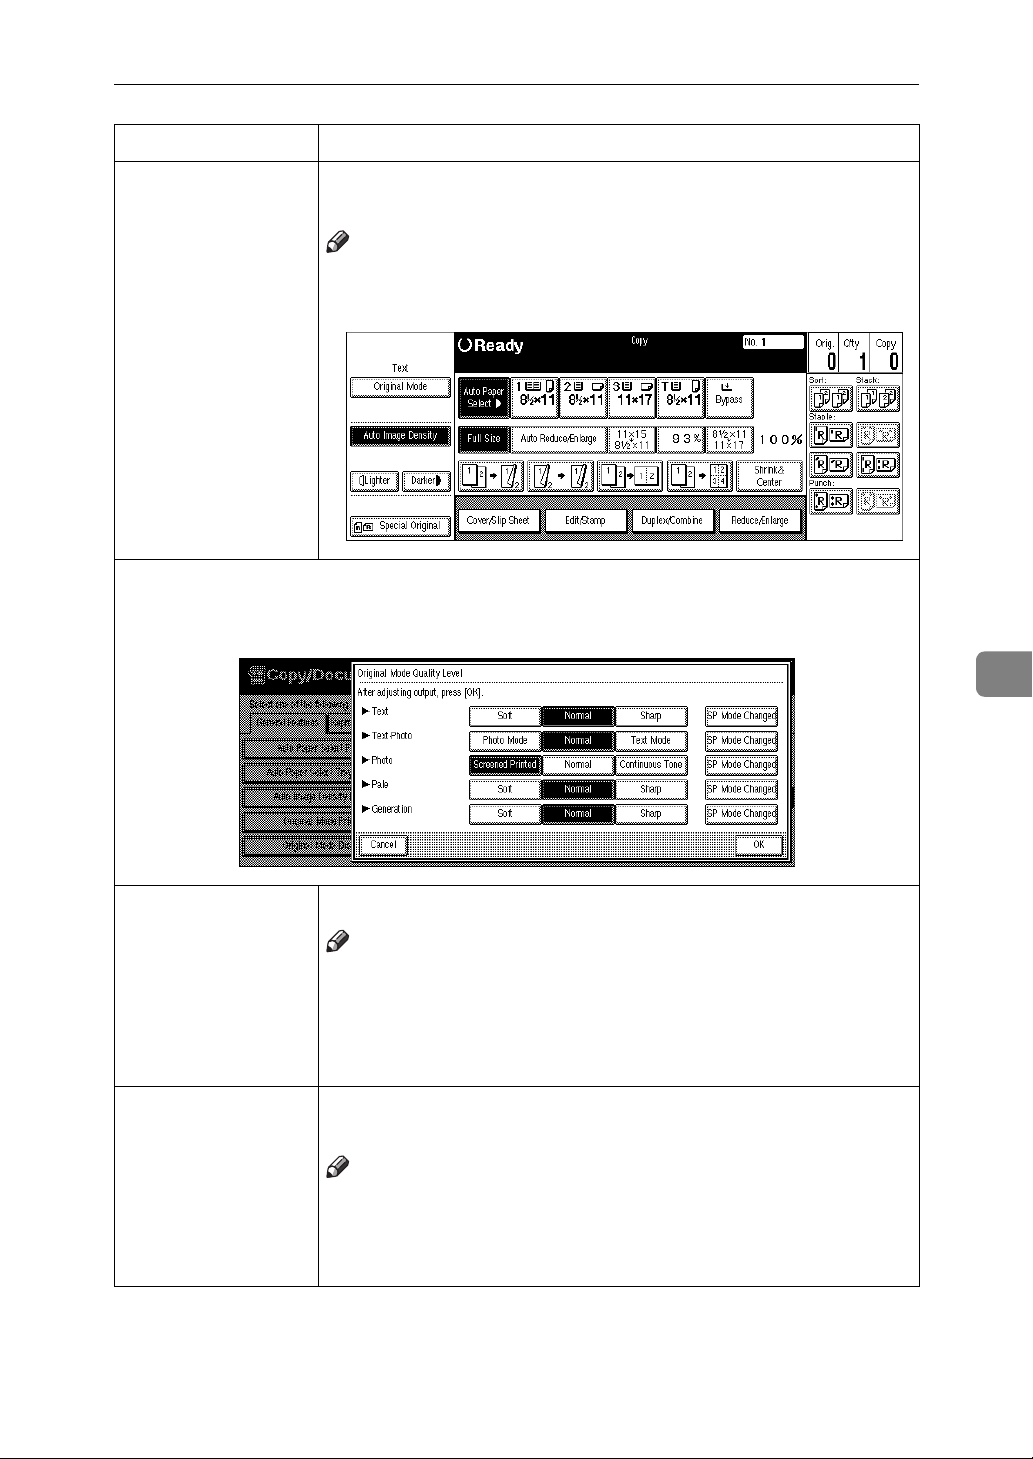
Original Mode Display
You can choose whether the original modes are shown on the
initial display.
Note
Default:
❒
If you choose “Yes”, the display is shown as below.
❒
Original Mode Quality Level
You can adjust the quality level of copies for each of the original types (Text, Text·Pho-
to, Photo, Pale, Generation).
No
6
Text Adjust the sharpness of text.
Note
Default:
❒
[
SP Mode Changed
❒
Choosing [
❒
text.
Text·Photo When there are photo(s) and text on the original, determine
whether the photo or text takes priority.
Normal
Sharp
] is the value set during service setup.
] or [
] affects the outline sharpness of
Soft
Note
Default:
❒
[
SP Mode Changed
❒
[
Normal
❒
Normal
] is the value set during service setup.
] achieves a good balance between text and photos.
311
Page 20
User Tools (Copy/Document Server Features)
Menu Description
Photo For a photo original, adjust the finish quality level to match the
type of photo original.
Note
Default:
❒
[
SP Mode Changed
❒
Select [
❒
tinuous Tone
Select [
❒
Pale Adjust the quality level for the finish of a pale original with nor-
mal density.
Screened Printed
] is the value set during service setup.
Screened Printed
] for printed photo originals with fine dots.
] for printed photo and text originals.
Normal
] for printed photo originals, and [
Con-
Note
Default:
❒
[
SP Mode Changed
❒
Generation Adjust the quality level so as not to thicken the lines of the finish
image.
Normal
] is the value set during service setup.
6
Note
Default:
Original Image
Density Level
❒
[
SP Mode Changed
❒
You can select one of seven original image density levels for
each of the original types (Text, Text·Photo, Photo, Pale, Generation).
Normal
] is the value set during service setup.
Note
Default:
❒
Auto Reset Timer The machine returns to its initial condition automatically after
your job is finished. The time can be set from 10 to 999 seconds,
or 0.
Normal
Note
Default:
❒
To turn “Auto Reset Timer” off, input “0”.
❒
Note that when “Auto Reset Timer” is turned off, the ma-
❒
chine will not return to the user code input window automatically.
60sec.
312
Page 21

Settings You Can Change with the User Tools
General Features 2/
Menu Description
Duplex Mode Priority
3
You can select the type of the Duplex function effective when
the machine is turned on, Energy Saver mode is off, or Auto Reset is on.
Note
Default:
❒
• Metric version:
• Inch version:
Copy Orientation in
Duplex Mode
You can set the copy orientation when making two-sided copies.
Note
Default:
❒
Original Orientation in Duplex
Mode
You can set the original orientation when making two-sided
copies.
Note
Default:
❒
1 Sided
Top to Top
Top to Top
1 Sided
→
1 Sided
→
2 Sided
6
Initial Mode You can select the initial mode or Program No. 10 as the mode
effective when the machine is turned on, or modes are cleared.
Note
Default:
Maximum Copy
Quantity
❒
The maximum copy quantity can be set between 1 and 999.
Normal
Note
Default:
❒
Original Beeper The beeper (key tone) sounds when you forgot to remove orig-
inals after copying.
999Cop.
Note
Default:
❒
If the “Operation Panel Beeper” of the User Tools (System
❒
Settings) setting is “Off”, the beeper does not sound irrespective of the “Original Beeper” setting. See “Operation Panel
Beeper” in the System Settings manual.
On
313
Page 22

User Tools (Copy/Document Server Features)
Menu Description
Job End Call You can choose whether or not the beeper sounds when copy-
ing is complete, when copying is interrupted, when the paper
tray runs out of paper, or when there is a paper jam.
Note
Default:
❒
When the “Auto Response (Human) Sensor” of the User
❒
Tools (System Settings) setting is set to “Yes” and the machine senses that there is a person present, it judges that
copying operations are not complete and the beeper does not
sound. See “Auto Response (Human) Sensor” in the System
Settings manual.
If the “Operation Panel Beeper” of the User Tools (System
❒
Settings) setting is “Off”, the beeper does not sound irrespective of the “Job End Call” setting. See “Operation Panel
Beeper” in the System Settings manual.
On
6
Time for indicating
job status
The machine returns to its initial condition automatically from
the Job List display. The time can be set from 10 to 999 seconds,
or 0.
Note
Default:
❒
To turn “Time for indicating job status” off, input “0”.
❒
General Features 3/
Menu Description
Shortcut Keys:F1
Shortcut Keys:F2
Shortcut Keys:F3
Shortcut Keys:F4
Shortcut Keys:F5
3
You can register frequently used functions in Shortcut Keys F1
to F5. You can also change the registered functions. See ⇒ P.10
“Display Panel”
Note
Default:
❒
• Shortcut Keys:F1:
• Shortcut Keys:F2:
• Shortcut Keys:F3:
• Shortcut Keys:F4:
• Shortcut Keys:F5:
By using the Copy Face Up function, you can have copies de-
❒
livered in reverse order specified by “Face-Up/Down Selection in Platen Mode” of the User Tools. However, you cannot
combine the Copy Face Up function with the Staple/Punch
function. If you select the bypass tray in which tab stocks are
loaded, the “Copy Face Up” setting is ignored.
15sec.
.
1 Sided
2 Sided:T to T
1 Sided
1 Sided
Shrink&Center
2 Sided:T to T
→
2 Sided:T to T
→
1 Sided Combine:2 Originals
→
1 Sided Combine:4 Originals
→
314
Page 23

Settings You Can Change with the User Tools
Reproduction Ratio 1/
Menu Description
Shortcut R/E You can register up to three frequently used Reduce/Enlarge
R/E Priority Specify which Reduce, Enlarge or Input Ratio is shown on the
2
ratios other than the fixed Reduce/Enlarge ratio and have them
shown on the initial display. You can also change the registered
Reduce/Enlarge ratios.
If no Reduce/Enlarge ratio has been set when selecting [
], [
tio 1
User Ratio 2
Enlarge ratio using the number keys.
display panel with priority when the [
pressed.
], or [
User Ratio 3
], enter the desired Reduce/
Reduce/Enlarge
User Ra-
] key is
Note
Default:
Enlarge 1
Enlarge 2
Enlarge 3
Enlarge 4
Enlarge 5
❒
You can customize the enlargement ratios available when you
press the [
Note
Default:
❒
• Metric version:
• Inch version:
When selecting [
❒
ber keys (in the range of 101 to 400%).
Reduce
Reduce/Enlarge
• Enlarge 1:
• Enlarge 2:
• Enlarge 3:
• Enlarge 4:
• Enlarge 5:
• Enlarge 1:
• Enlarge 2:
• Enlarge 3:
• Enlarge 4:
• Enlarge 5:
] key followed by the [
115%
122%
141%
200%
400%
121%
129%
155%
200%
400%
User Set. Ratio
], enter a ratio using the num-
Enlarge
] key.
6
315
Page 24

User Tools (Copy/Document Server Features)
Menu Description
6
Priority Setting : Enlarge
You can set the ratio with priority when the [
is pressed, followed by the [
Note
Default:
❒
• Metric version:
• Inch version:
Reproduction Ratio 2/
Menu Description
Reduce 1
Reduce 2
Reduce 3
Reduce 4
Reduce 5
Reduce 6
2
You can customize the reduction ratios available when you
press the [
Note
Default:
❒
• Metric version:
• Reduce 1:
• Reduce 2:
• Reduce 3:
• Reduce 4:
• Reduce 5:
• Reduce 6:
• Inch version:
• Reduce 1:
• Reduce 2:
• Reduce 3:
• Reduce 4:
• Reduce 5:
• Reduce 6:
When selecting [
❒
number keys (in the range of 25 to 99%).
141%
155%
Reduce/Enlarge
50%
65%
71%
75%
82%
93%
50%
65%
73%
78%
85%
93%
User Reduc.Ratio
Reduce/Enlarge
Enlarge
] key followed by the [
] key.
], enter a ratio using the
Reduce
] key
] key.
316
Priority Setting : Reduce
You can set the ratio with priority when the [
is pressed, followed by the [
Reduce
] key.
Note
Default:
❒
• Metric version:
• Inch version:
75%
78%
Reduce/Enlarge
] key
Page 25

Menu Description
Settings You Can Change with the User Tools
Shrink&Center Ratio
You can set a Reduce/Enlarge ratio when registering
“Shrink&Center” in a Shortcut Key.
Note
Default:
❒
Page Format 1/
Menu Description
Front Margin: Left/
Right
2
You can specify left and right margins on the front side of copies
in Margin Adjust mode.
Note
Default:
❒
• Metric version:
• Inch version:
Back Margin: Left/
Right
You can specify left and right margins on the back side of copies
in Margin Adjust mode.
Note
Default:
❒
• Metric version:
• Inch version:
93%
Left 5mm
Left 0.2"
6
Right 5mm
Right 0.2"
Front Margin: Top/
Bottom
Back Margin: Top/
Bottom
You can specify front top and bottom margins on the front side
of copies in Margin Adjust mode.
Note
Default:
❒
• Metric version:
• Inch version:
You can specify back top and bottom margins on the front side
of copies in Margin Adjust mode.
Bottom 0mm
Bottom 0.0"
Note
Default:
❒
• Metric version:
• Inch version:
Bottom 0mm
Bottom 0.0"
317
Page 26

User Tools (Copy/Document Server Features)
Menu Description
6
1 → 2 Duplex Auto
Margin Adjust
In 1 sided →2 sided Duplex mode, you can specify whether to
automatically set the margins on the back side.
The margin is set to the same value of “Back Margin: Left/
Right”.
Note
Default:
❒
Erase Border The default setting of the width of the erased margins in Erase
Border mode can be changed as follows:
• Metric version: 3 – 50mm in 1mm steps
• Inch version: 0.1" – 2.0" in 0.1" steps
Yes
Note
Default:
❒
Combine Orig.
Shadow Erase
• Metric version:
• Inch version:
In Combine Copy or Booklet/Magazine Copy mode, you can
specify whether to erase a 3mm, 0.1" bounding margin around
all four edges of each original.
10mm
0.4"
Note
Default:
❒
On
Erase Center The default setting of the width of the erased margins in Erase
Center mode can be changed as follows:
• Metric version: 3 – 50mm in 1mm steps
• Inch version: 0.1" – 2.0" in 0.1" steps
Note
Default:
❒
• Metric version:
• Inch version:
10mm
0.4"
318
Page 27

Menu Description
Settings You Can Change with the User Tools
Repeat Separation
Line
You can select a separation line in Image Repeat mode from no
line, Solid line, Broken line 1, Broken line 2, or Crop.
•None
•Solid
•Broken 1
•Broken 2
•Crop
6
Note
Default:
❒
None
319
Page 28

User Tools (Copy/Document Server Features)
6
Page Format 2/
Menu Description
Double Copies Separation Line
2
You can select a separation line in Double Copy mode from no
line, Solid line, Broken line, or Crop.
•None
•Solid
•Broken
• Crop Marks
Note
Default:
❒
None
320
Page 29

Menu Description
Settings You Can Change with the User Tools
Combine Separation Line
You can select a separation line in Combine mode from no line,
Solid line, Broken line 1, Broken line 2, or Crop.
•None
•Solid
•Broken 1
•Broken 2
•Crop
6
Note
Default:
❒
Copy Back Cover When copying the back cover, you can specify whether to issue
the back cover outside (outside page) or inside (inside page).
None
Note
Default:
Cover page in combine mode
❒
You can specify whether to make a combined copy on the front
cover sheet when you select [
Outside (Reverse)
] in Front Cover mode.
Copy
Note
Default:
Designated Slip
Sheet Copy In Combine
❒
You can specify whether to make a combined copy on the inserted slip sheets in Designate: Copy mode.
Combine
Note
Default:
❒
Combine
321
Page 30

User Tools (Copy/Document Server Features)
Menu Description
6
Booklet/Magazine
Original Orientation
Copy Order In
Combine Mode
You can select the type of originals for Booklet or Magazine
mode.
Note
Default:
❒
You can set the copy order in Combine mode to “Left to Right”
or “Top to Bottom”.
Portrait
322
Note
Default:
❒
Left to Right
Page 31

Settings You Can Change with the User Tools
Stamp Setting
Background Numbering
Menu Description
Size You can set the size of the numbers.
Note
Default:
❒
• Small: About 8 × 4mm, 0.32" × 0.16"
• Normal: About 32 × 16mm, 1.28" × 0.64"
• Large: About 64 × 32mm, 2.56" × 1.28"
Density You can set the density of the numbers.
Note
Default:
❒
Superimpose You can select whether the numbering is printed negative
when it overlaps black parts of the image.
Normal
Normal
6
Note
Default:
❒
Off
Preset Stamp
Menu Description
Stamp Priority You can select the stamp type priority detected in Stamp
mode.
Note
Default:
❒
Stamp Language You can select the language of the message that is printed
in Stamp mode.
Note
Default:
❒
COPY
English
323
Page 32

User Tools (Copy/Document Server Features)
Menu Description
Stamp position You can set the position at which the stamp is printed.
Press the arrow keys to adjust the position.
Note
Default:
❒
• Metric Version:
• Position:
• Top/Bottom Margin:
• Left/Right Margin:
• Inch Version:
• Position:
• Top/Bottom Margin:
• Left/Right Margin:
Stamp condition
You can adjust the size, density and print page for the stamp.
Top Right
Top Right
24mm
0.9"
24mm
0.9"
6
Size You can set the size of the stamp.
Note
Default:
❒
Density You can set the pattern used to print the stamp.
1X
Note
Default:
❒
Normal: The stamp is printed on the image. You cannot
❒
confirm which parts overlap the image.
Lighter: The image can be seen through the stamp.
❒
Light: You can see the image even clearer than in the
❒
“Lighter” setting.
Print Page You can select whether the stamp is printed on the first
page or all pages.
Normal
Note
Default:
❒
Superimpose You can select whether the Preset Stamp is printed negative
when it overlaps black parts of the image.
All Pages
Note
Default:
❒
Off
324
Page 33

Settings You Can Change with the User Tools
User Stamp
Menu Description
Program/Delete Stamp
You can register up to 4 custom stamps with your favorite design. You can register/
change/delete your favorite design as a user stamp.
How to Program/Delete Stamp, see ⇒ P.189
Stamp position You can set the position at which the stamp is printed.
Press the arrow keys to adjust the position.
“Program/Delete User Stamp”
Note
Default:
❒
• Metric version:
• Position:
• Top/Bottom Margin:
• Left/Right Margin:
• Inch version:
• Position:
• Top/Bottom Margin:
• Left/Right Margin:
Top Right
Top Right
24mm
0.9"
24mm
0.9"
.
6
Stamp condition
You can adjust the print page for User Stamp 1 to 4 you registered.
Print Page You can select whether the stamp is printed on the first
page or all pages.
Note
Default:
❒
All Pages
Date Stamp
Menu Description
Format You can select the date format for Date Stamp mode.
Note
Default:
❒
• Metric version:
• Inch version:
DD/MM/YYYY
MM/DD/YYYY
325
Page 34

6
User Tools (Copy/Document Server Features)
Menu Description
Font You can select the Date Stamp font.
Note
Default:
❒
This setting is linked with Page Numbering.
❒
Position Priority You can set the position at which the stamp is printed.
Press the arrow keys to adjust the position.
Font 1
Note
Default:
❒
• Metric version:
• Position:
• Top/Bottom Margin:
• Left/Right Margin:
• Inch version:
• Position:
• Top/Bottom Margin:
• Left/Right Margin:
Top Left
Top Left
8mm
32mm
0.3"
0.8"
Size You can set the Date Stamp size.
Note
Default:
❒
This setting is linked with Page Numbering.
❒
Superimpose You can select whether the Date Stamp is printed negative
when it overlaps black parts of the image.
Auto Select
Note
Default:
❒
This setting is linked with Page Numbering.
❒
Off
Page Numbering
Menu Description
Format Priority You can select the page number format priority detected in
Page Numbering mode.
Note
Default:
❒
P1, P2
326
Page 35

Settings You Can Change with the User Tools
Menu Description
Font You can select the font of the page number that is printed in
Page Numbering mode.
Note
Default:
❒
This setting is linked with Date Stamp.
❒
Size You can set the size of the stamp that is printed in Page
Numbering mode.
Font 1
Note
Default:
❒
This setting is linked with Date Stamp.
❒
Auto Select
Duplex Back Page
Number Position
Page Numbering In
Combine Mode
Copy On Slip Sheet In
Designate Mode
Position Priority: P1,
P2...
Position Priority: 1/5,
2/5...
Position Priority: -1-, -2...
Position Priority: P.1,
P.2...
Position Priority: 1, 2...
Position Priority: 1-1, 1-
2...
You can set the position of the duplex back page number
that is printed in Duplex mode.
Note
Default:
❒
You can set how the pages are numbered when you use the
Combine function and Page Numbering function together.
Opposite Position
Note
Default:
❒
You can select whether to print the page number onto slip
sheets when you use the Designate function set to “Copy”
and Page Numbering function together.
Per Original
Note
Default:
❒
You can set the position at which the stamp is printed.
Press the arrow keys to adjust the position.
Don't copy
Note
Default:
❒
• Metric version:
• Position: P1, 1/5, P.1, 1:
Center
• Top/Bottom Margin: P1, 1/5, P.1, 1:
8mm
• Left/Right Margin: P1, 1/5, P.1, 1:
0mm
• Inch version:
• Position: P1, 1/5, P.1, 1:
Center
• Top/Bottom Margin: P1, 1/5, P.1, 1:
• Left/Right Margin: P1, 1/5, P.1, 1:
Top Right
Top Right
, -1-, 1-1:
12mm
, -1-, 1-1:
12mm
, -1-, 1-1:
, -1-, 1-1:
0.5"
, -1-, 1-1:
0.5"
Bottom
, -1-, 1-1:
Bottom
0.3"
0.0"
6
327
Page 36

User Tools (Copy/Document Server Features)
Menu Description
Superimpose You can select whether page numbers are printed negative
when they overlap black parts of the image.
Note
Default:
❒
This setting is linked with Date Stamp.
❒
Off
6
328
Page 37

Input/Output
Menu Description
Settings You Can Change with the User Tools
Batch (SADF) Auto Reset Time
ARDF Original Table
Rise Time
Face-Up/Down Selection in Platen Mode
Rotate Sort Auto Paper
Continue
When you set one original at a time in the document feeder,
the
Auto Feed
original is fed to show that the document feeder is ready for
another original. You can adjust this time from 3 seconds to
99.
indicator lights for a selected time after an
Note
Default:
❒
You can set the document feeder original table rise time.
10sec.
Note
Default:
❒
When copying an original placed on the exposure glass or
loaded in the document feeder, you can specify which way
it is ejected.
When Original is Set
Note
Default:
❒
You can specify whether to continue copying when the paper of the required orientation has run out during rotatesorting. See “Rotate Sort” in ⇒ P.55
• If you select [
When paper of the required orientation runs out, the
machine stops copying and prompts you to supply copy
paper. When you load paper, the machine will continue
copying.
• If you select [
Copying continues using copy paper of a different direction. The copy job will finish even if you have left the
machine.
Face Up Exit
]:
No
]:
Yes
“Sort”
.
6
Note
Default:
❒
No
329
Page 38

User Tools (Copy/Document Server Features)
Menu Description
Auto Sort Mode You can specify whether Sort mode is selected when the
machine is turned on or the mode is cleared.
Note
Default:
❒
No
6
Memory Full Auto Scan
Restart
Select Stack or Rotate
sort
When the memory becomes full while scanning originals,
the machine can make copies of the scanned originals first,
then automatically proceed scanning the remaining originals.
You can enable or disable this function.
• If you select [
When the memory becomes full, the machine stops operation allowing you to remove the copy pages delivered on the output tray.
• If you select [
You can leave the machine unattended to make all the
copies, but the resulting sorted pages will not be sequential.
Yes
No
]:
]:
Note
Default:
❒
Specify which Stack or Rotate Sort is shown on the initial
display with priority.
No
Note
Default:
❒
The optional finisher or booklet finisher is required to
❒
use this function.
Stack
330
Staple Position Specify which Top 2 staples or Bottom is shown on the ini-
tial display with priority.
Note
Default:
Paper Eject: Always Rotate 180
°
❒
The optional finisher or booklet finisher is required to
❒
use this function.
If you want to copy on the paper with letterhead, the machine rotates the image correctly. To use this function, select
“Yes”.
Top 2 staples
Note
Default:
❒
No
Page 39

Settings You Can Change with the User Tools
Count Manager
When a key operator code has already been entered, you cannot begin manager
settings unless you enter the key operator code (up to 8 digits).
Menu Description
Check/Reset/Print Copy Counter
You can check or print the number of copies made under each user code. You can also
reset each user code's counter to 0.
If more than 10 user codes are registered, you can view all the counters using the [
] or [
rev.
Print You can print the copied quantity of the counter for each
Reset Counter You can reset each user code's counter to 0.
Reset All You can reset all counters to 0.
T
Next
] key.
user code.
To start the printing, press the
To stop the printing, press the [
Start
{
Cancel
key.
}
] key.
U
P-
User Code Register/Change/Delete
You can register, change, or delete the user codes (8 digits or less).
Note
Up to 500 user codes can be registered.
❒
Even if you have changed the user code, the counter value will not be cleared.
❒
When the user code is deleted, the counter value will be automatically deleted.
❒
Register You can register the user codes.
Change You can change the user codes.
Note
The number of copies made under the old code is added
❒
to that made under the new user code.
Delete User Code You can delete the user codes.
Delete All User Codes You can delete all the user codes.
6
331
Page 40

User Tools (Copy/Document Server Features)
Menu Description
6
Face-Up/Down Selection in Bypass Mode
You can set whether copies are delivered face up or face
down when making copies from the bypass tray.
Limitation
Only use “Face Down Exit” when copying onto stan-
❒
dard high quality paper with a weight of 52 – 105g/m
(14 – 28 lb. Bond).
When you select “OHP” or “Thick Paper”, copy paper is
❒
delivered face up even if you have set the “Face-Up/
Down Selection in Bypass Mode” setting to “Face Down
Exit”.
2
Note
Default:
❒
Connect Copy Master You can select whether the [
If you choose “No”, the [
and this unit cannot become the master unit. As a default
setting, “Yes” is selected. You can cancel this setting.
Face Up Exit
Connect
Connect
] key is displayed or not.
] key will not be displayed
Note
Default :
❒
Auto File Delete Old files stored on the Document Server can be deleted au-
tomatically. The time can be set from 1 to 180 days, or 0.
Yes
Delete All The Saved
Files
Note
Default:
❒
To turn “Auto File Delete” off, input “0”.
❒
You can delete all the saved documents by pressing the [
lete All The Saved Files
tion dialog box.
1 Days
] key, and the [
] key in the confirma-
Yes
Note
All the documents including those with a password are
❒
deleted.
De-
332
Page 41

7. REMARKS
R
Do's And Don'ts
CAUTION:
•
Unplug the power cord from the wall outlet before you move the equipment.
While moving the equipment, you should take care that the power cord will
not be damaged under the equipment.
• When you use this equipment for a long time in a confined space without
good ventilation, you may detect an odd smell. To keep the workplace comfortable, we recommend you keep it well ventilated.
• Do not press areas on or around the fusing unit. These areas get hot.
• After making copies continuously, the exposure glass may feel warm—this is
not a malfunction.
• You might feel warm around the ventilation hole. This is caused by exhaust
air, and is not a malfunction.
• Do not turn off the operation switch while copying or printing. Make sure
that all copying or printing has finished.
• The machine might fail to produce good copy images if condensation forms
inside the machine due to rapid temperature change. To prevent this problem, the machine has an anti-condensation function. Even after the main
power switch is in the stand-by position, the anti-condensation heater is active, thus keeping the machine body slightly warm.
• Do not open the covers of machine while copying or printing. If you do, misfeeds might occur.
• Do not move the machine while copying or printing.
• If you operate the machine improperly or a failure occurs on the machine,
your machine settings might be lost. Be sure to take a note of your machine
settings.
• Supplier shall not be liable for any loss or damages resulting from a failure on
the machine, loss of machine settings, and use of the machine.
• Depending on the operating conditions (e.g., low temperature, input voltage), the copying speed might be reduced to produce a good copy image.
333
Page 42

REMARKS
R
R
Where to Put Your Machine
Machine Environment
Your machine's location should be carefully chosen because environmental conditions greatly affect its performance.
Optimum environmental conditions
CAUTION:
•
Keep the equipment away from humidity and dust. Otherwise a fire or an
electric shock might occur.
•
Do not place the equipment on an unstable or tilted surface. If it topples
over, it could cause injury.
CAUTION:
•
If you use the equipment in a confined space, make sure there is a continuous air turnover.
7
• Temperature: 10 – 32°C (50 – 89.6°F)(humidity to be 54% at 32°C, 89.6°F)
• Humidity: 15 – 80% (temperature to be 27°C, 80.6°F at 80%)
• A strong and level base.
• The machine must be level within 5mm, 0.2" both front to rear and left to
right.
• To avoid possible buildup of ozone, be sure to locate this machine in a large
well ventilated room that has an air turnover of more than 30 m
3
/hr/person.
Environments to avoid
• Locations exposed to direct sunlight or strong light (more than 1,500 lux).
• Locations directly exposed to cool air from an air conditioner or heated air
from a heater. (Sudden temperature changes might cause condensation within the machine.)
• Locations close to such machines generating ammonia as diazo copy machine.
• Places where the machine might be subjected to frequent strong vibration.
• Dusty areas.
• Areas with corrosive gases.
334
Page 43

Where to Put Your Machine
R
R
R
Power Connection
WARNING:
Only connect the machine to the power source described on the inside
•
front cover of this manual. Connect the power cord directly into a wall
outlet and do not use an extention cord.
Do not damage, break or make any modifications to the power cord.
•
Do not place heavy objects on it. Do not pull it hard nor bend it more
than necessary. These actions could cause an electric shock or fire.
CAUTION:
•
Unplug the power cord from the wall outlet before you move the equipment.
While moving the equipment, you should take care that the power cord will
not be damaged under the equipment.
CAUTION:
•
When you disconnect the power plug from the wall outlet, always pull the
plug (not the cable).
• When the main switch is in the Stand-by positions, the optional anti-condensation heaters are on. In case of emergency, unplug the machine's power cord.
• When you unplug the power cord, the anti-condensation heaters turn off.
• Make sure that the plug is firmly inserted in the outlet.
• Voltage must not fluctuate more than 10%.
• The socket-outlet shall be installed near the equipment and shall be easily accessible.
7
335
Page 44

REMARKS
Access to the Machine
Place the machine near the power source, providing clearance as shown.
1
4
2
3
TSPS060E
1. Rear: more than 3 cm (1.2")
2. Right: more than 4 cm (1.6")
3. Front: more than 70 cm (27.6")
7
4. Left: more than 10 cm (4.0")
Note
❒
For the required space when options are installed, contact your service representative.
336
Page 45

Maintaining Your Machine
Maintaining Your Machine
If the exposure glass or document feeder belt is dirty, you might not be able to
make copies as you want. Clean them if you find them dirty.
❖
Cleaning the machine
Wipe the machine with a soft, damp cloth. Then, wipe it with a dry cloth to
remove the water.
Important
❒
Do not use chemical cleaner or organic solvent, such as thinner or benzene. If
they get into the machine or melt plastic parts, a failure might occur.
❒
Do not clean parts other than those specified in this manual. Such parts
should be cleaned by your service representative.
Cleaning the Exposure Glass
ND1C0200
Cleaning the Document Feeder
A1P0100E
7
337
Page 46

REMARKS
7
338
Page 47

8. Specification
Mainframe
❖
Configuration:
Console
❖
Photosensitivity type:
OPC drum (Φ100)
❖
Original scanning:
One-dimensional solid scanning system through CCD
❖
Copy process:
Dry electrostatic transfer system
❖
Development:
Dry two-component magnetic brush development system
❖
Fusing:
Heating roll pressure system
❖
Resolution:
600 dpi
❖
Exposure glass:
Stationary original exposure type
❖
Original reference position:
Rear left corner
❖
Warm-up time:
Less than 330 seconds (23°C)
❖
Originals:
Sheet/book/objects
❖
Maximum original size:
A3L, 11" × 17"
❖
Copy paper size:
• Trays: A3L – A5L, 11" × 17"L – 51/2" × 81/2"
•Bypass: A3L – A6L, 11" × 17"L – 5
L
1
/2" × 81/2"
L
L
• Bypass (non-standard size):
Vertical: 100 – 300mm, 4.0" – 11.7"
Horizontal: 140 – 432mm, 5.6" – 17.0"
339
Page 48

Specification
•Duplex: A3L – A5L, 11" × 17"L – 51/2" × 81/2"L (impossible on A5K,
1
5
/2" × 81/2" K)
•LCT: A4K, B5K, 8
*1
The optional 81/2" × 14" paper size tray is required to set this size of paper.
❖
Copy paper weight:
1
/2" × 14"K
*1
, 81/2" × 11"
K
• Paper tray: 52 – 128g/m2, 14 – 34 lb. Bond
• Bypass tray: 52 – 157g/m
52 – 200g/m
2
, 14 lb. Bond – 90 lb. Index
2
, 14 lb. Bond – 110 lb. Index
(When the optional 100 sheet finisher is installed.)
❖
Non-reproduction area:
• Leading edge: Less than 3 ± 2mm
• Trailing edge: More than 1mm
• Left edge: More than 2 ± 1.5mm
• Right edge: More than 0.5mm
❖
First copy time:
8
• 3.5 seconds or less
(face up feed, A4K, 8
1
/2" × 11"K, 100%, feeding from tray 1, on the expo-
sure glass, Text·Photo mode, Auto Image Density)
• 5.3 seconds or less
(face down feed, A4K, 8
1
/2" × 11"K, 100%, feeding from tray 1, on the ex-
posure glass, Text·Photo mode, Auto Image Density)
❖
Copying speed: (Type 1)
• 28 copies/minute (A3L, 11" × 17"L)
• 55 copies/minute (A4K, 8
❖
Copying speed: (Type 2)
1
/2" × 11"K)
• 36 copies/minute (A3L, 11" × 17"L)
• 70 copies/minute (A4K, 8
❖
Reproduction ratio:
1
/2" × 11"K)
Preset reproduction ratios:
Metric version Inch version
Enlargement 400% 400%
200% 200%
340
141% 155%
122% 129%
115% 121%
Full Size 100% 100%
Page 49

Mainframe
Reduction 93% 93%
82% 85%
75% 78%
71% 73%
65% 65%
50% 50%
Zoom: From 25 to 400% in 1% steps.
❖
Maximum continuous copy run:
999 sets
❖
Copy paper capacity:
• Tray 1 (Tandem tray) : 3,100 sheets (1,550 sheets × 2) (80g/m2, 20 lb. Bond)
• Tray 2 (550-sheet tray) : 550 sheets (80g/m
• Tray 3 (550-sheet tray) : 550 sheets (80g/m
• Bypass tray: 50 sheets (80g/m
2
, 20 lb. Bond)
2
, 20 lb. Bond)
2
, 20 lb. Bond)
❖
Power consumption:
• Mainframe only
Type 1 Type 2
Warm-up about 1.29 kw about 1.29 kw
Stand-by about 0.25 kw about 0.25 kw
During printing about 1.6 kw about 1.6 kw
Maximum less than 1.75 kw less than 1.75 kw
• Complete system
Warm-up about 1.29 kw about 1.29 kw
Stand-by about 0.26 kw about 0.26 kw
During printing about 1.6 kw about 1.6 kw
Maximum less than 1.75 kw less than 1.75 kw
*1
The Complete System consists of the mainframe, finisher and large capacity
tray (LCT).
❖
Dimensions (W × D × H up to exposure glass):
*1
Type 1 Type 2
690 × 750 × 1,138mm, 27.2" × 29.6" × 44.9"
8
341
Page 50

Specification
❖
Space for mainframe (W × D):
• 1,265 × 750mm, 49.9" × 29.6" (ADF external extender is not used. Optional
Output tray is installed.)
• 1,380 × 750mm, 54" × 30" (ADF external extender is used for larger size
originals. Optional Output tray is installed.)
8
❖
Noise Emission
*1
Sound Power Level:
• Mainframe only
Stand-by Less than 49 dB (A) Less than 49 dB (A)
During printing (ADF 1 to 1) Less than 74 dB (A) Less than 75 dB (A)
Copying (From Memory) Less than 71 dB (A) Less than 71 dB (A)
• Complete system
Stand-by Less than 49 dB (A) Less than 49 dB (A)
During printing (ADF 1 to 1) Less than 73 dB (A) Less than 75 dB (A)
During printing(From Memory) Less than 70 dB (A) Less than 71 dB (A)
Sound Pressure Level
• Mainframe only
Stand-by Less than 35 dB (A) Less than 35 dB (A)
During printing (ADF 1 to 1) Less than 62 dB (A) Less than 65 dB (A)
:
Type 1 Type 2
*3
Type 1 Type 2
*2
:
Type 1 Type 2
342
During printing (From Memory) Less than 57 dB (A) Less than 58 dB (A)
• Complete system
Stand-by Less than 35 dB (A) Less than 35 dB (A)
During printing (ADF 1 to 1) Less than 62 dB (A) Less than 65 dB (A)
During printing (From Memory) Less than 56 dB (A) Less than 58 dB (A)
*1
The above measurements made in accordance with ISO 7779 are actual value.
*2
It is measured at the position of the bystander.
*3
The Complete System consists of the mainframe, finisher and large capacity
tray (LCT).
❖
Weight:
*3
Type 1 Type 2
Type 1, 2: Approx. 188 kg, 414.5 lb (Mainframe with document feeder)
Page 51

Document Feeder
❖
Mode:
ADF mode, Batch (SADF) mode, Mixed Sizes mode, Thin mode
❖
Original size:
Document Feeder
•A3L – B6
• 11" × 17"L – 5
❖
Original weight:
• 1-sided originals: 52 – 157g/m2 (14 – 42 lb. Bond)
• 2-sided originals: 52 – 128g/m
• Thin original: 41 – 157g/m
❖
Number of originals to be set:
100 sheets (80g/m2, 20 lb. Bond) or less than 12mm, 0.4"
Note
❒
Specifications are subject to change without notice.
KL
1
/2" × 81/2"
KL
2
(14 – 34 lb. Bond) (Duplex)
2
(11 – 42 lb. Bond)
8
343
Page 52

Specification
50-Sheet Finisher
❖
Paper size:
Proof Tray: A3L – B6L, A6L, 11" × 17"L – 51/2" × 81/2"
Shift Tray: A3L – A5
Staple Mode: A3L – B5
KL
, 11" × 17"L – 5
KL
, 11" × 17"L – 8
Punch Mode:
•2 holes: A3L – A5
KL
, 11" × 17"L, 8
•3 holes: A3L, B4L, A4K, B5K, 11" × 17"L, 8
•4 holes:
• Metric version: A3L, A4K, 11" × 17"L, 8
• Scandinavian version: A3L – A5K, 11" × 17"L, 8
1
K
8
/2"
❖
Paper weight:
Stack: 52 – 157g/m2, 14 – 42 lb. Bond
2
Staple: 64 – 80g/m
, 17 – 20 lb. Bond
Punch:
• 4 holes: 52 – 128g/m
• 2 or 3 holes: 52 – 157g/m
2
, 14 – 34 lb. Bond
2
, 14 lb. Bond – 90 lb. Index
1
/2" × 81/2"
1
/2" × 11"
1
/2" × 14"L – 51/2" × 81/2"
1
/2" × 11"
1
/2" × 11"
KL
KL
KL
K
K
1
/2" × 14"L – 51/2"
KL
×
8
❖
Stack capacity:
Proof Tray (without Punch):
• 250 sheets (A4, 8
• 50 sheets (B4, 8
1
/2" × 11" or smaller) (80g/m2, 20 lb. Bond)
1
/2" × 14" or larger) (80g/m2, 20 lb. Bond)
Proof Tray (with Punch):
• 200 sheets (A4, 8
• 50 sheets (B4, 8
1
/2" × 11" or smaller) (80g/m2, 20 lb. Bond)
1
/2" × 14" or larger) (80g/m2, 20 lb. Bond)
Shift Tray (without Punch):
• 3,000 sheets (A4K, 8
1
/2" × 11"K) (80g/m2, 20 lb. Bond)
• 1,500 sheets (except A4K, A5L) (80g/m
• 100 sheets (A5L) (80g/m
2
, 20 lb. Bond)
Shift Tray (with Punch):
• 2,500 sheets (A4K, 8
1
/2" × 11"K) (80g/m2, 20 lb. Bond)
• 1,500 sheets (except A4K, A5L) (80g/m
2
• 100 sheets (A5L) (80g/m
❖
Staple capacity:
, 20 lb. Bond)
Without Punch:
• 2 – 50 sheets (A4, 8
• 2 – 30 sheets (B4, 8
1
/2" × 11" or smaller) (80g/m2, 20 lb. Bond)
1
/2" × 14" or larger) (80g/m2, 20 lb. Bond)
With Punch:
• 2 – 40 sheets (A4, 8
• 2 – 25 sheets (B4, 8
1
/2" × 11" or smaller) (80g/m2, 20 lb. Bond)
1
/2" × 14" or larger) (80g/m2, 20 lb. Bond)
2
, 20 lb. Bond)
2
, 20 lb. Bond)
344
❖
Staple position:
Four positions (Top, Top Slant, Bottom, 2 Staples)
Page 53

❖
Power consumption:
48W (power is supplied from the mainframe.)
❖
Dimensions (W × D × H):
625 × 545 × 960mm, 24.7" × 21.5 " × 37.8"
❖
Weight:
Approx. 45kg, 99.3 lb
Note
❒
Specifications are subject to change without notice.
50-Sheet Finisher
345
8
Page 54

Specification
100-Sheet Finisher
❖
Paper size:
Proof Tray: A3L – A5
Shift Tray: A3L – A5
Staple Mode: A3L – B5
KL
KL
KL
, 11" × 17"
, 11" × 17"
, 11" × 17"L – 8
Punch Mode:
•2 holes: A3L – A5
KL
, 11" × 17"L, 8
•3 holes: A3L, B4L, A4K, B5K, 11" × 17"L, 8
•4 holes:
• Metric version: A3L, A4K, 11" × 17"L, 8
• Scandinavian version: A3L – A5K, 11" × 17"L, 8
1
K
8
/2"
❖
Paper weight:
Stack: 52 – 216g/m2, 14 lb. Bond – 80 lb. Covers
2
Staple: 64 – 80g/m
, 17 – 20 lb. Bond
Punch:
• 4 holes: 52 – 128g/m
• 2 or 3 holes: 52 – 157g/m
2
, 14 – 34 lb. Bond
2
, 14 lb. Bond – 90 lb. Index
KL
– 51/2" × 81/2"
KL
– 5
1
/2" × 14"L – 51/2" × 81/2"
1
/2" × 81/2"
1
/2" × 11"
1
/2" × 11"
1
/2" × 11"
KL
KL
KL
KL
K
K
1
/2" × 14"L – 51/2"
×
8
❖
Stack capacity:
Proof Tray:
• 500 sheets (A4, 8
• 250 sheets (B4, 8
1
/2" × 11" or smaller) (80g/m2, 20 lb. Bond)
1
/2" × 14" or larger) (80g/m2, 20 lb. Bond)
Shift Tray (without Punch):
• 3,000 sheets (A4K, 8
• 1,500 sheets (except A4K, A5L) (80g/m
• 100 sheets (A5L) (80g/m
1
/2" × 11"K) (80g/m2, 20 lb. Bond)
2
, 20 lb. Bond)
2
, 20 lb. Bond)
Shift Tray (with Punch):
• 2,500 sheets (A4K, 8
• 1,500 sheets (Others) (80g/m
1
/2" × 11"K) (80g/m2, 20 lb. Bond)
2
, 20 lb. Bond)
Shift Tray (with Staple):
• 10 – 100 originals = 200 – 30 sets (A4, 8
• 1,500 sheets (B4, 8
❖
Staple capacity:
1
/2" × 14" or larger) (80g/m2, 20 lb. Bond)
1
/2" × 51/2" ) (80g/m2, 20 lb. Bond)
• 2 – 100 sheets (A4K, B5K, 81/2" × 11"K) (80g/m2, 20 lb. Bond)
• 2 – 50 sheets (Others) (80g/m
❖
Staple position:
2
, 20 lb. Bond)
Five positions (Top, Top Slant, Bottom, Left 2, Top 2)
❖
Power consumption:
140W (power is supplied from the mainframe.)
346
Page 55

❖
Dimensions (W × D × H):
800 × 728 × 980mm, 31.5" × 28.7 " × 38.6"
❖
Weight:
Approx. 50kg, 130.1 lb
Note
❒
Specifications are subject to change without notice.
100-Sheet Finisher
347
8
Page 56

8
Specification
Booklet Finisher
❖
Paper size:
Proof Tray: A3L – A5
Shift Tray: A3L – A5
Staple Mode:
• Bottom or Top: A3L – B5K, 11" × 17"L, 8
•2 Staples: A3L, B4L, A4K, B5K, 11" × 17"L, 8
Saddle Stitch Mode: A3L – A4L, 11" × 17"L, 8
❖
Paper weight:
Stack: 52 – 163g/m2, 14 – 42 lb. Bond
Staple: 64 – 80g/m
Saddle Stitch:
• 64 – 80g/m
• 64 – 128g/m
❖
Stack capacity:
2
, 17 – 20 lb. Bond
2
, 14 – 34 lb. Cover (up to 1 cover sheet can be stapled.)
Proof Tray:
• 150 sheets (A4K, 8
• 75 sheets (A4L, 8
Shift Tray (without Staple):
• 1,000 sheets (A4K, 8
• 500 sheets (A4L, 8
Shift Tray (with Staple):
• 750 sheets (A4K, 8
• 500 sheets (A4L, 8
Booklet Tray:
• 25 sets (1 – 5 sheets, 80g/m
• 15 sets (6 – 10 sheets, 80g/m
• 10 sets (11 – 15 sheets, 80g/m
KL
, 11" × 17"L – 51/2" × 81/2"
KL
, 11" × 17"L – 5
2
, 17 – 20 lb. Bond
1
/2" × 11"K or smaller) (80g/m2, 20 lb. Bond)
1
/2" × 11"L or larger) (80g/m2, 20 lb. Bond)
1
/2" × 11"K) (80g/m2, 20 lb. Bond)
1
/2" × 11"L or larger) (80g/m2, 20 lb. Bond)
1
/2" × 11"K) (80g/m2, 20 lb. Bond)
1
/2" × 11"L or larger) (80g/m2, 20 lb. Bond)
2
, 20 lb. Bond)
2
, 20 lb. Bond)
2
, 20 lb. Bond)
1
/2" × 81/2"
1
/2" × 11"
1
1
/2" × 11"
KL
KL
KL
/2" × 11"
L
L
348
❖
Staple capacity:
Staple Mode:
1
• 2 – 50 sheets (A4K, 8
• 2 – 30 sheets (A4L, 8
Saddle Stitch Mode: 2 – 15 sheets (80g/m
❖
Staple position:
/2" × 11"K or smaller) (80g/m2, 20 lb. Bond)
1
/2" × 11"L or larger) (80g/m2, 20 lb. Bond)
2
, 20 lb. Bond)
Staple Mode: Five positions (Top, Top Slant, Bottom, Left 2, Top 2)
Saddle Stitch Mode: One position
❖
Folding:
Center folding
❖
Power consumption:
60W (power is supplied from the mainframe.)
Page 57

❖
Dimensions (W × D × H):
689 × 603 × 1,055mm, 27.2" × 23.8 " × 41.6"
❖
Weight:
Approx. 50kg, 130.1 lb
Note
❒
Specifications are subject to change without notice.
Booklet Finisher
349
8
Page 58

Specification
Punch Kit (Option)
❖
Paper size
8
•2 holes: A3L – A5
•3 holes: A3L, B4L, A4K, B5K, 11" × 17"L, 8
•4 holes:
• Metric version: A3L, A4K, 11" × 17"L, 8
• Scandinavian version: A3L – A5K, 11" × 17"L, 8
1
K
8
/2"
❖
Paper weight:
• 4 holes: 52 – 128g/m2, 14 – 34 lb. Bond
• 2 or 3 holes: 52 – 157g/m
❖
Power consumption:
33.6 W (power is supplied from the mainframe.)
❖
Dimensions (W × D × H):
92 × 463 × 100mm, 3.7" × 18.3" × 4.0"
❖
Weight:
Approx. 2.4 kg, 5.3 lb
Note
❒
Specifications are subject to change without notice.
KL
, 11" × 17"L, 81/2" × 14"L – 51/2" × 81/2"
2
, 14 lb. Bond – 90 lb. Index
1
/2" × 11"
1
/2" × 11"
KL
K
K
1
/2" × 14"L – 51/2"
×
350
Page 59

Output Tray (Option)
❖
Paper capacity:
• A3, 11" × 17" : 250 sheets
•B4, 8
•A4, 8
•B5, 5
❖
Dimensions (W × D × H):
390 × 330 × 130mm, 15.4" × 13.0" × 5.2"
❖
Weight:
Approx. 650 g, 1.5 lb
Note
❒
Specifications are subject to change without notice.
1
/2" × 14" : 500 sheets
1
/2" × 11" : 500 sheets
1
/2" × 81/2" : 250 sheets
Output Tray (Option)
351
8
Page 60

Specification
Large Capacity Tray (LCT) (Option)
❖
Paper size:
A4K, B5K, 81/2" × 14"K
*1
The optional 81/2" × 14" paper size tray is required to set this size of paper.
❖
Paper weight:
64 – 105g/m2, 16 – 24 lb. Bond
❖
Paper capacity:
3,500 sheets (80g/m2, 20 lb. Bond)
❖
Power consumption
Maximum. 48 W (power is supplied from the mainframe.)
❖
Dimensions (W × D × H, option unit):
403 × 529 × 608mm, 15.9" × 20.9" × 24.0"
❖
Weight:
Approx. 22 kg, 48.6 lb
*1
, 81/2" × 11"
K
8
Note
❒
Specifications are subject to change without notice.
352
Page 61

Copy Connector Cable (Option)
Copy Connector Cable (Option)
❖
Continuous copying speed:
With two 55 copies/minute models:
• 110 copies/minute (A4L, 8
• 58 copies/minute (A3L, 11" × 17"L)
With two 70 copies/minute models:
• 140 copies/minute (A4K, 8
• 72 copies/minute (A3L, 11" × 17"L)
With one 55 copies/minute model and one 70 copies/minute model:
• 125 copies/minute (A4K, 8
• 64 copies/minute (A3L, 11" × 17"L)
❖
Dimensions (W × D × H):
310 × 310 × 65mm, 12.2" × 12.2" × 2.5"
❖
Weight:
Approx. 500g, 1.1 lb
❖
Length:
10m
1
/2" × 11"L)
1
/2" × 11"K)
1
/2" × 11"K)
353
8
Page 62

INDEX
100-Sheet Finisher
50-Sheet Finisher
A
, 7,
, 7,
346
344
Copying
Connect Copy
Copy Paper
Cover
Back Cover
Front Cover
, 23,
,
,
223
43
151, 154
,
151, 154
285
, 4,
234
,
,
336
5
47
Access to the Machine
,
5
, 30,
, 30,
,
90
,
235
Adding Staples
ADF external tray
ADF tray
Auto Off
Auto Reduce/Enlarge
Auto Reset
Auto Start
B
Back Cover
Background Numbering
Basic functions
Batch (SADF) mode
Booklet Finisher
Book originals, copying
Border Erase
Bypass tray
,
151, 154
,
,
, 5,
40
,
, 7,
225, 348
172, 173
73
36
,
,
181
137, 140
C
Center/Border Erase
Center Erase
Centering
Changing Paper
Tray 2
Changing the Paper Size
Changing the Toner Bottle
Chapters
Clearing Misfeeds
Clear Modes/Energy Saver key
Clear/Stop key
Combination Chart
Combine
Connect Copy
Document Server
Exiting
Interrupt
Relationship
Connect Copy port
Control Panel
Control panel
,
,
179
,
,
158
,
107, 115
,
282
,
,
,
,
172, 177
172, 175
,
,
,
270
,
9
,
206
,
223, 225, 230, 353
,
226
235
226
,
239
,
5
8
4
282
268
,
D
Date Stamp
Designate
Directional Magnification (%)
Directional Size Magnification (inch)
Display
Display Panel
Display panel
Document Feeder
Document feeder
Document Server
Do's And Don'ts
Double Copies
,
194
,
156
,
10
,
227
, 8,
10
,
343
, 4, 32,
,
,
,
337
220
216
,
,
,
165
209
333
Cleaning
Deleting
Features and Benefits
Printing
Scanning Originals
,
,
232
210
212
,
101
,
104
E
,
334
172, 173
172, 175
,
, 4, 19,
,
337
,
88
172, 177
31
Energy Saver mode
,
,
94
,
,
74
Enlarging
Environment
Erase
Border
Center
Center/Border
Exposure glass
8
Cleaning
Extender
F
File Merge Printing
Finisher
Front Cover
Front cover
Function indicators
Function Status indicator
,
225
100-Sheet Finisher
50-Sheet Finisher
Booklet Finisher
,
,
,
151, 154
4
,
,
211
,
,
7
9
7
7
,
9
354
Page 63

I
P
,
,
8
,
, 40,
167
,
88
8
41
Image Density
Image Repeat
Indicators
Interrupt Copy
Interrupt key
J
Job Preset
,
83
L
Large Capacity Tray (LCT)
,
,
,
,
263
265
265
263
Loading Paper
Large Capacity Tray (LCT)
Tray 1
Tray 2
Tray 3
M
, 4,
,
,
37
,
,
170
8
17
Machine Environment
,
,
,
,
247
270
339
,
337
225
Mainframe
Main power indicator
Main power switch
Maintenance
Margin Adjustment
Master unit
Messages
Misfeeds
Mixed Sizes mode
N
Numbering
Background Numbering
,
Page Numbering
Number keys
,
9
198
O
8
, 4, 8,
,
231
,
351
7
91
31
, 4,
,
210
17
,
6
On Demand Printing
,
7
, 19,
, 4,
,
, 4,
On indicator
Operation switch
Options
Original Beeper
Original Mode Quality Level
Originals
Originals, setting
Original Type, selecting
Output Tray
Output tray
Output tray guide
334
42
, 7,
,
181
,
,
352
266
226
,
,
4
,
,
,
,
78
350
,
,
263
,
78
282
183
80
80
81
8
,
,
,
69
198
335
Page Numbering
Paper
Changing
Loading
Paper tray
Power Connection
Preset Stamp
Program
Changing
Deleting
Recalling
Storing
Program key
Programs
Punching copies
Punch kit
,
,
R
,
94
333
,
,
94
167
Reduce/Enlarge
Reducing
Remarks
Removing Jammed Staples
Removing Punch Waste
Repeat
,
Image Repeat
S
Safety information
Sample Copy
Sample Copy key
Screen Contrast knob
Series Copies
Slip Sheets
Sort
Sorting copies into sets
Specification
Stack
,
,
52
100-Sheet Finisher
50-Sheet Finisher
Booklet Finisher
Connect Copy
Document Feeder
Large Capacity Tray (LCT)
Mainframe
Output Tray
Punch kit
, 52,
58
,
,
91
,
,
137, 138
151, 162
,
339
,
,
339
,
,
350
8
,
353
351
i
,
,
,
348
,
,
8
,
344
343
55
346
,
301
293
,
352
355
Page 64

,
Stamp
Staple
Staples
Stapling copies
Start key
Sub-unit
181
Background Numbering
Date Stamp
Page Numbering
Preset Stamp
User Stamp
,
52
,
285
Removing Jammed Staples
,
9
,
225
T
,
,
,
,
60
194
183
186
,
198
,
181
,
293
Thin mode
Toner
Toner Bottle
Two-sided Copies
,
,
27
Changing
Storage
,
39
,
27
268
,
U
User Codes
User Stamp
User Tools
User Tools/Counter key
,
90
,
186
Copy/Document Server Features
,
Settings
310
V
Ventilation hole
,
6
Z
,
Zoom
97
107, 111
,
,
305
8
356UEUSA
 Loading...