


5. Troubleshooting
If Your Machine Does Not Operate As You
Want
The following chart gives explanations of common problems and messages. If
other messages appear, follow the instructions displayed.
Note
r If you cannot make copies as you want because of paper type, paper size or
paper capacity problems, use recommended paper. See p.167 “Copy Paper”.
General
Problem Causes Solutions
Please wait.” ap-
“
pears
The display is off. The screen contrast knob is
Nothing happens when the
operation switch is turned
on.
Memory is full. There are too many
The function status indicator is red.
This message appears
when you turn on the operation switch or change the
toner bottle.
turned to the dark position.
The machine is in Energy
Saver mode.
The operation switch is
turned off.
The main power switch is
turned off.
scanned pages or stored
files: hard disk capacity is
exceeded.
The function associated
with the red indicator was
interrupted.
Wait for the machine to get ready.
Set the screen contrast knob to the
light position to see the display panel properly.
Press the {Energy Saver} key to cancel Energy Saver mode.
Turn on the operation switch.
Turn on the main power switch.
Press [Delete File] to delete unnecessary documents.
Press the function key corresponding to the indicator. Follow the instructions that appeared on the
control panel.
The user code entry display appears.
Users are restricted by user
management.
Enter the user code (up to eight digits), and then press [#].
107

Troubleshooting
Problem Causes Solutions
5
The main power indicator
continues blinking and
does not turn off when
pressed.
Original images are printed on the reverse side of
the paper.
Misfeeds occur frequently. The tray's side guides may
This occurs in the following cases:
• The exposure glass cover or the ADF is open.
• The machine is communicating with external
equipment.
• The hard dis k is active.
You may have loaded the
paper incorrectly.
not be locked.
The tray's end guide may
not be set properly.
You may have loaded paper of a size not shown on
the paper size selector.
Close the exposure glass cover or
ADF, and check if the machine is
communicating with a computer.
Load paper correctly. Load paper
into Tray 1-4 with the print side up,
and into the LCT or bypass tray
with the print side down. See p.112
“Orientation-Fixed Paper or TwoSided Paper”.
Check the side guides are locked.
p.126 “Changing the Paper Size”.
Check the end guide is set properly.
See p.126 “Changing the Paper
Size”.
When using paper of a size that cannot be detected automatically, use
Tray Paper Settings to set the paper
size. See p.55 “Tray Paper Size: Tray
1–4” and p.167 “Copy Paper”.
An error message remains,
even if misfed paper is removed.
Cannot print in duplex
mode.
You forgot your key operator code
When a misfeed message
appears, it remains until
you open and close the cover, as required.
You cannot use paper in
the bypass tray for duplex
printing.
[1 Sided Copy] is selected for
Paper Type: Tray 1-4.
— Contact your service representative.
Clear misfed paper, and then open
and close the front cover. See p.116
“x Clearing Misfeeds”.
For duplex printing, select Tray 1-4
in copier mode or with the printer
driver.
Select [2 Sided Copy] for Paper Type:
Tray 1-4. See p.56 “Paper Type: Tray
1–4”
108

If Your Machine Does Not Operate As You Want
Document Server
Problem Solutions
"
Scanned pages exceeded max.
number. Do you want to store the
scanned pages as a file?
You forgot your password. You can temporarily access password-protect-
" appears.
The number of scanned pages exceeds the capacity per file of the Document Server.
To store scanned pages as a file, press [Store
File]. Scanned data is stored as a file in the Doc-
ument Server. If you do not want to store
scanned pages, press [No]. Scanned data is deleted.
ed files temporarily.
Press [Unlock] in Password Management for
Stored Files in User Tools. See p.151 “Temporarily Disabling Document Security” .
You can delete all stored documents at once
with User Tools. See p.65 “Delete All Files” .
Make sure no important documents are stored
in the Document Server before deleting all
stored documents.
5
You cannot find out what is stored in a file. Check the date or time column in the Docu-
ment Server: Select Files to Print display.
Check the document content by printing its
first page. Press the line of the desired document in the Document Server: Select Files to
Print display, and then press [Print 1st Page]
followed by the {Start} key.
Memory frequently becomes full. • Press [Delete File] to delete selected docu-
ments, to increase available memory.
• Delete documents stored using the scanner
function. See Scanner Reference.
You want to check print quality before making
a large print run.
Original is being scanned by
"
another function.
" appears.
Check print quality by printing out only the
first set using the {Sample Copy} key.
The copier or scanner function is in use. To
cancel a job in progress, first press [Exit], and
then press the {Copy} key or {Scanner} key.
Next, press the {Clear/Stop} key. When the
message "
pressed.Stop printing?
press [Stop].
[Stop] key was
" appears,
109
Troubleshooting
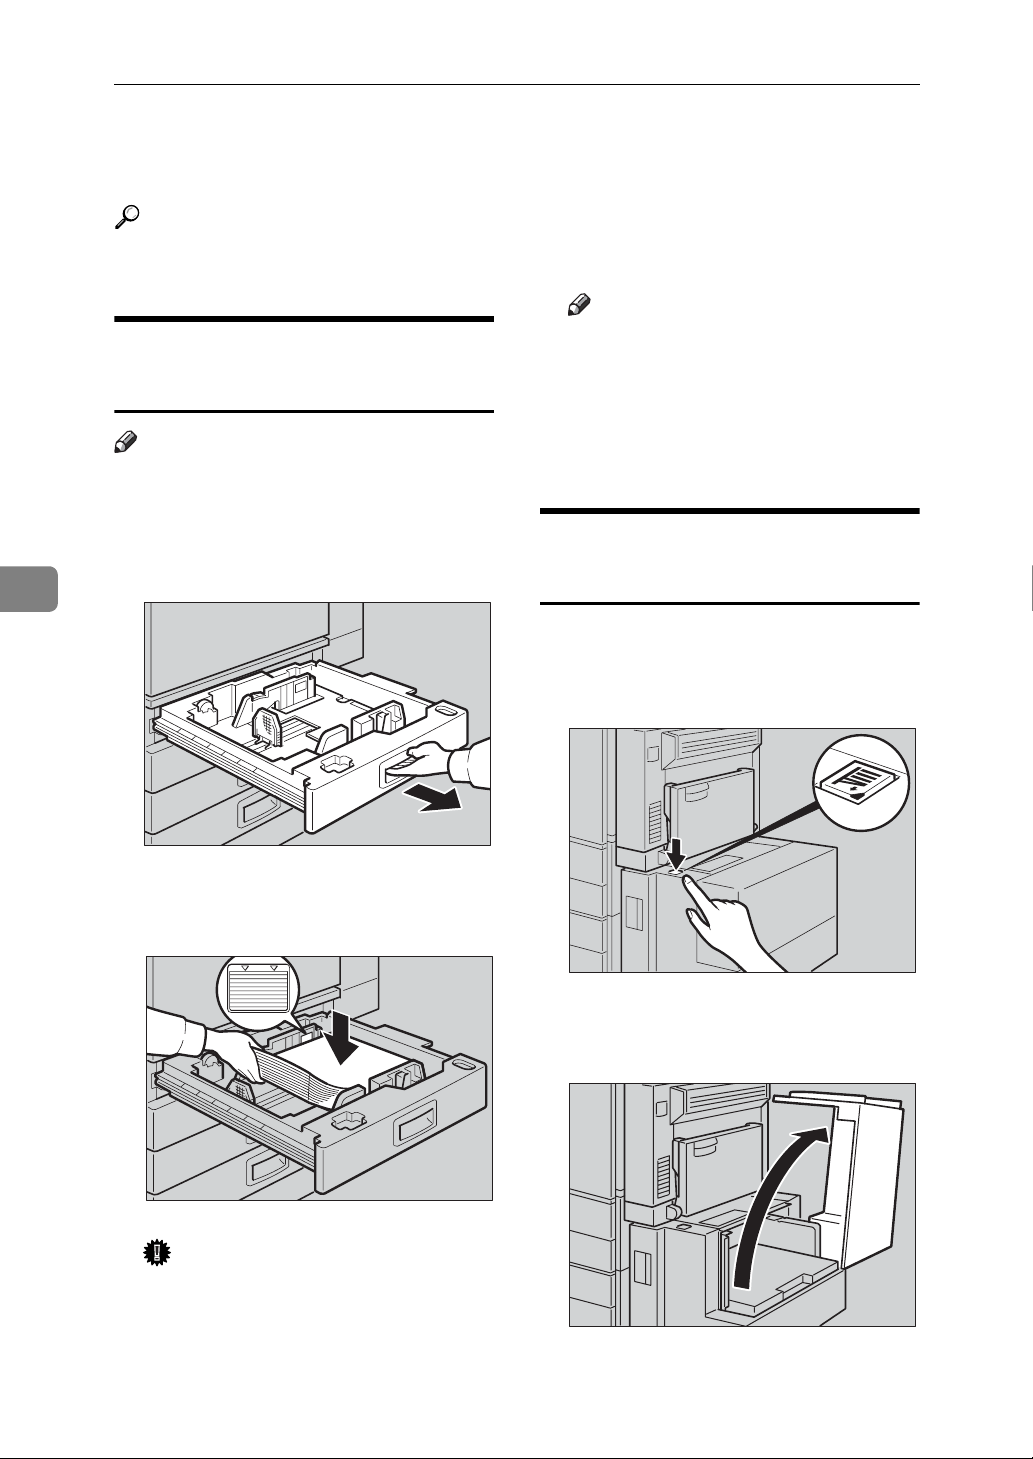
B Loading Paper
5
Reference
For paper types and sizes, see
p.167 “Copy Paper”.
Loading Paper into Paper
Trays
Note
r You can change the paper size, see
p.126 “Changing the Paper Size”.
A Pull the paper tray out slowly un-
til it stops.
r Make sure the paper stack is
flush against the right side
fence.
Note
r Fan the paper before loading.
r Straighten curled or warped pa-
per before loading.
C Push the paper tray in until it
stops.
Loading Paper into Large
Capacity Tray (optional)
A Press the key if it is not lit.
The key blinks while the bottom
plate is moving down.
B Square the paper, and then load it
into the tray.
Important
r Check that the top of the stack is
not higher than the limit mark
inside the tray.
110
B When the key stops blinking and
lights up, open the top cover.
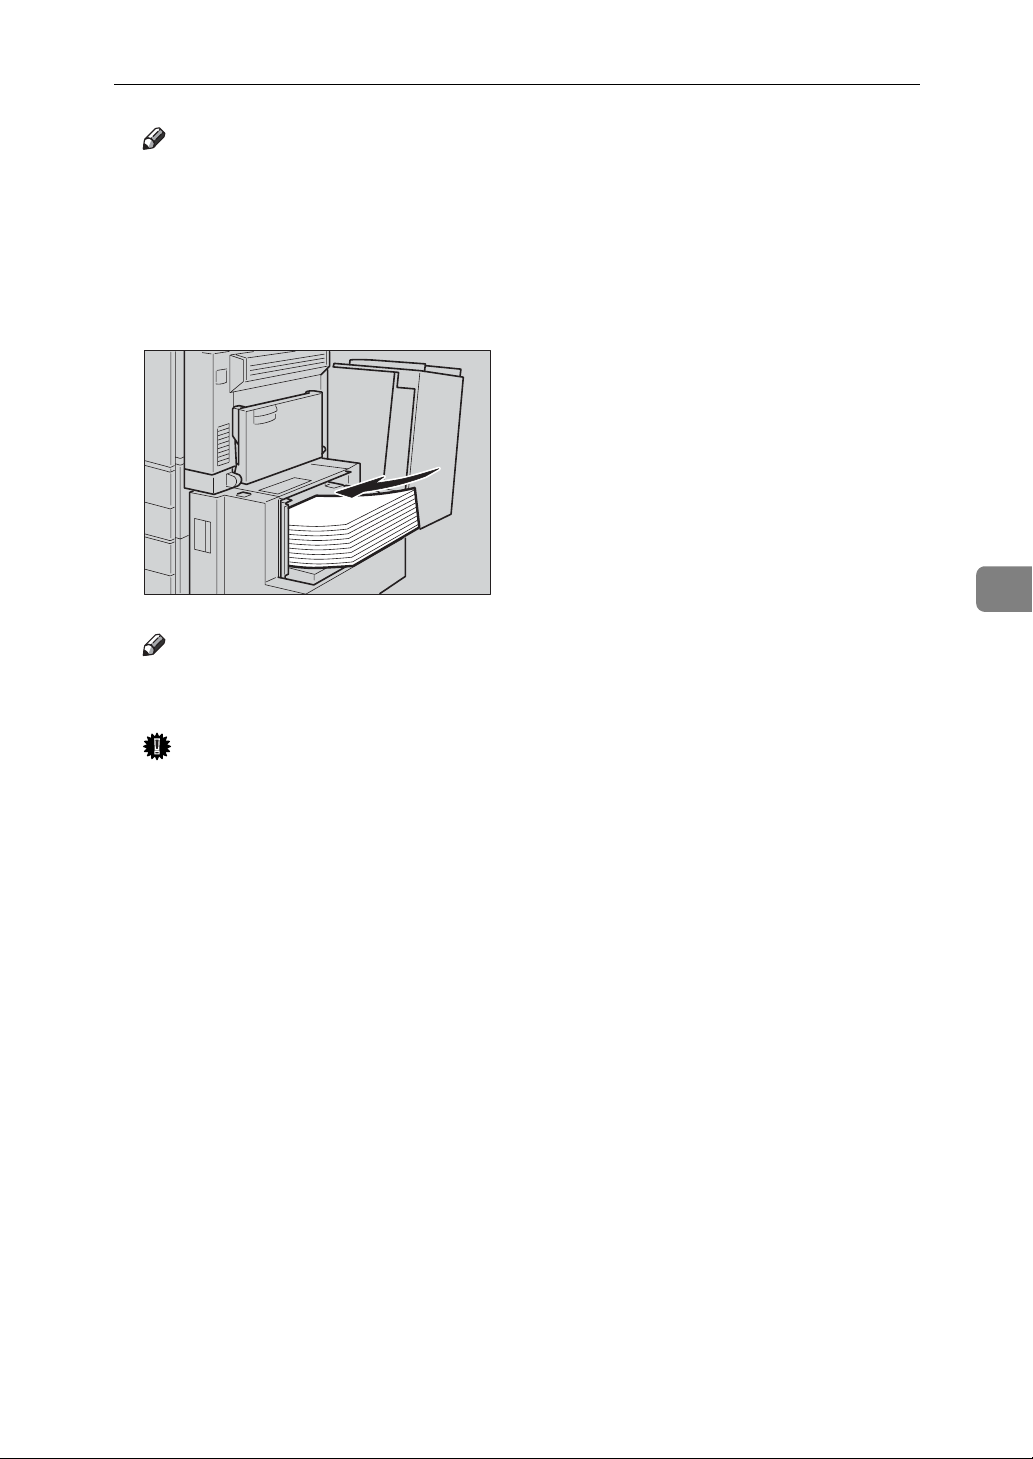
Note
r Make sure no paper sheet is in-
volved in the paper feeding side
of the LCT. Remove the sheet, if
any.
C Load paper into the tray along the
edge on the left.
Note
r The tray contains up to 1,500
sheets.
B Loading Paper
5
Important
r Make sure the paper stack is
flush against the left side fence.
r Check the top of the stack is not
higher than the limit mark inside the tray.
D Close the top cover.
111
5
Troubleshooting
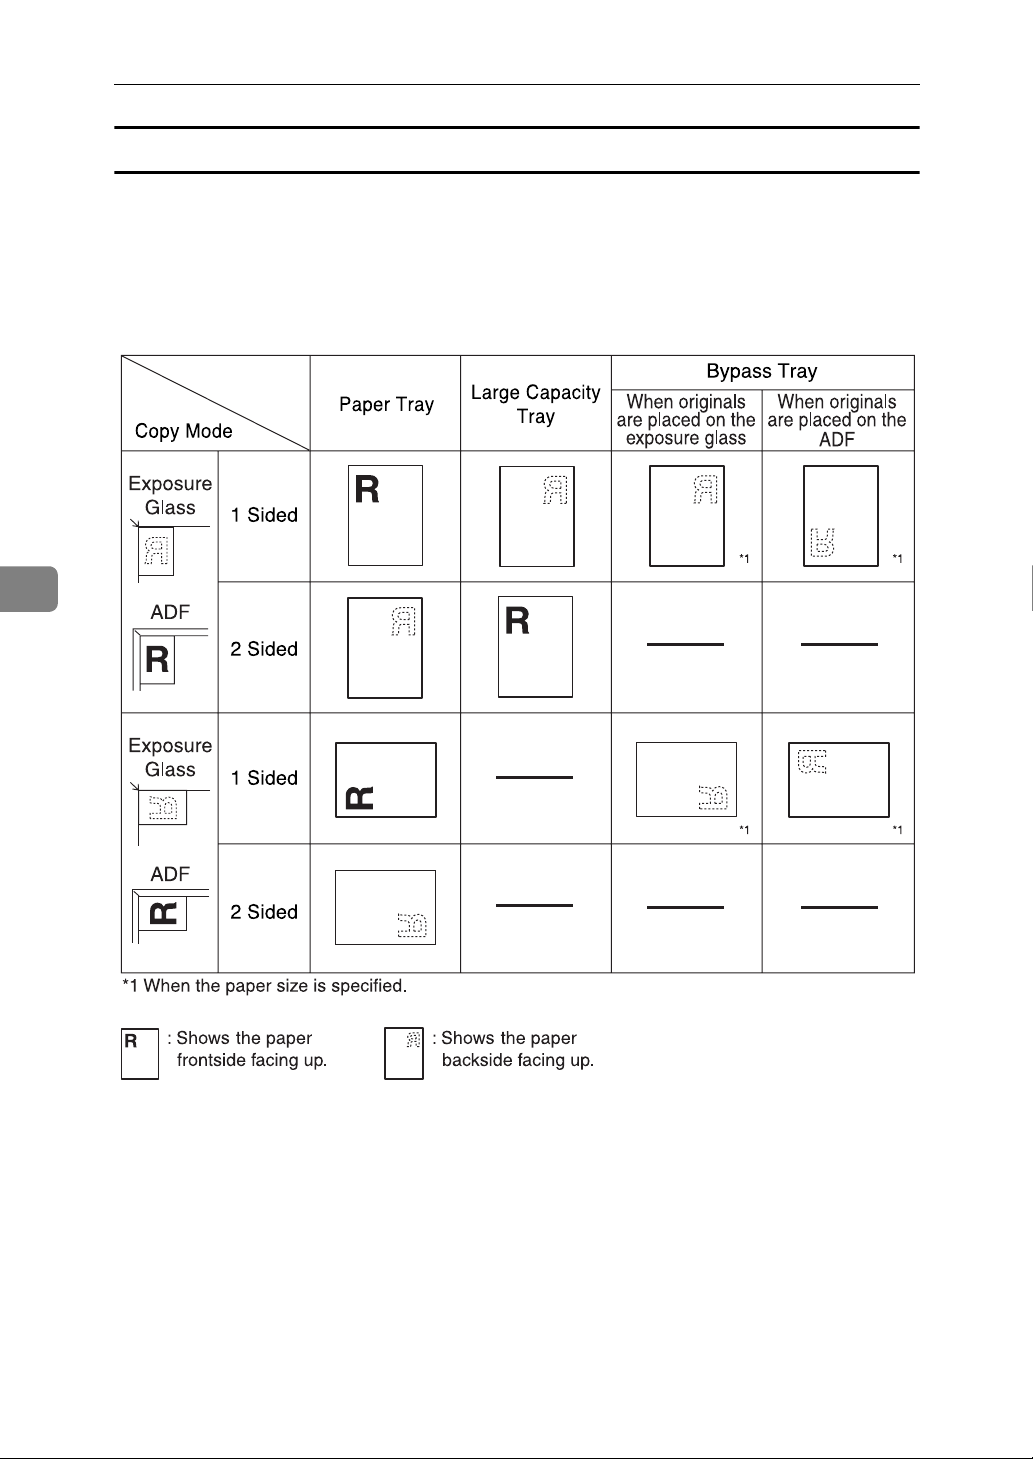
Orientation-Fixed Paper or Two-Sided Paper
Orientation-fixed (top to bottom) or two-sided paper (for example, letterhead
paper, prepunched paper, or copied paper) might not print correctly, depending
on how the originals and paper are placed. Select [Yes] in Letterhead Setting under Copier/Document Server Features, and then place the original and paper as
shown below (see Copy Reference). When printing with the printer function, placing orientation is the same.
112
D Adding Toner
R
R
D Adding Toner
When D appears, it is time to add toner.
WARNING:
• Do not incinerate used toner or toner containers. Toner dust might ignite when exposed to an open flame. Dispose of used toner containers
in accordance with local regulations.
CAUTION:
• Keep toner (used or unused) and toner containers out of reach of children.
Important
r Faults may occur if you use toner other than the recommended type.
r When adding toner, do not turn off the operation switch. If you do, settings
will be lost.
r Always add toner when the machine instructs you.
r Do not repeatedly install and remove toner bottles. This will result in toner
leakage.
r Do not shake the removed toner bottle. Remaining toner might scatter.
5
Note
r You can make about 90 copies even after the “DToner is almost emp-
ty.”and “Replace Toner Bottle.” messages appear, but replace toner ear-
ly to prevent poor copy quality.
Reference
For details about toner storage, see p.140 “Toner Storage”.
113
5
Troubleshooting
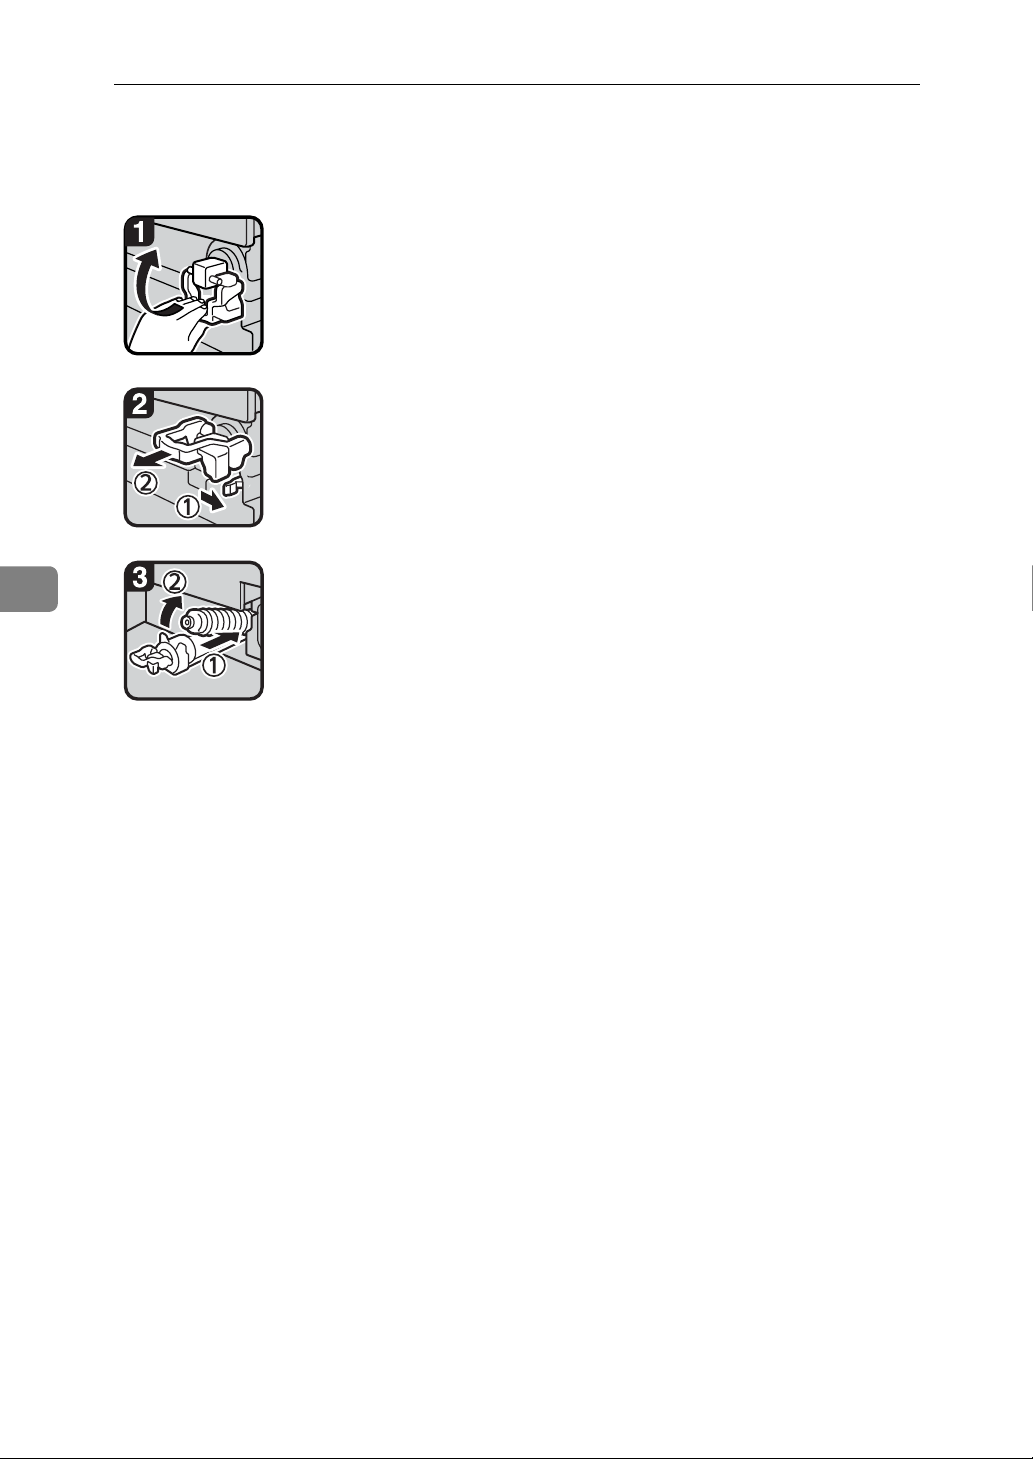
Removing Toner
• 1: Open the front cover of the machine.
• 2: Lift the green lever.
• 3: Push the green lever, and then gently
pull out the holder.
• 4: Press the toner bottle back to raise its top,
and then gently pull it out.
114
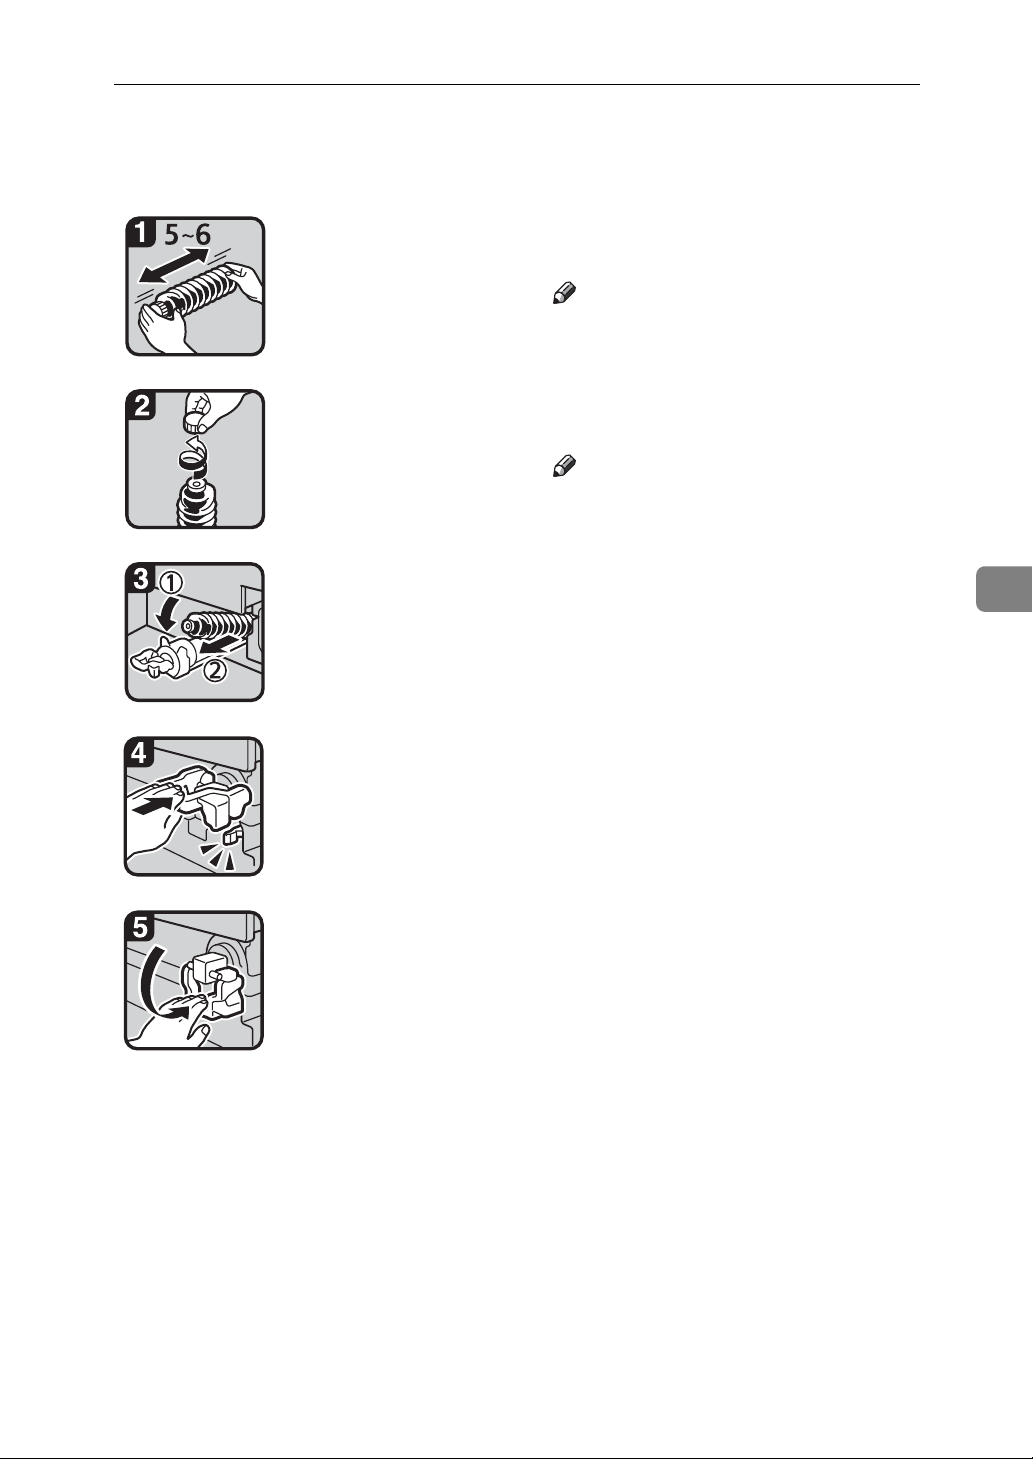
Inserting Toner
Inserting Toner
• 1: Hold the new bottle horizontally and
shake it from side to side five or six times.
Note
r Do not remove the black cap before
shaking.
•2: Remove the black cap.
Note
r Do not remove the inner cap.
5
• 3: Put the toner bottle on the holder, and
then pull its top forward.
• 4: Push in the green lever until it clicks.
• 5: Press down the green lever.
• 6: Close the machine's front cover.
115

5
R
Troubleshooting
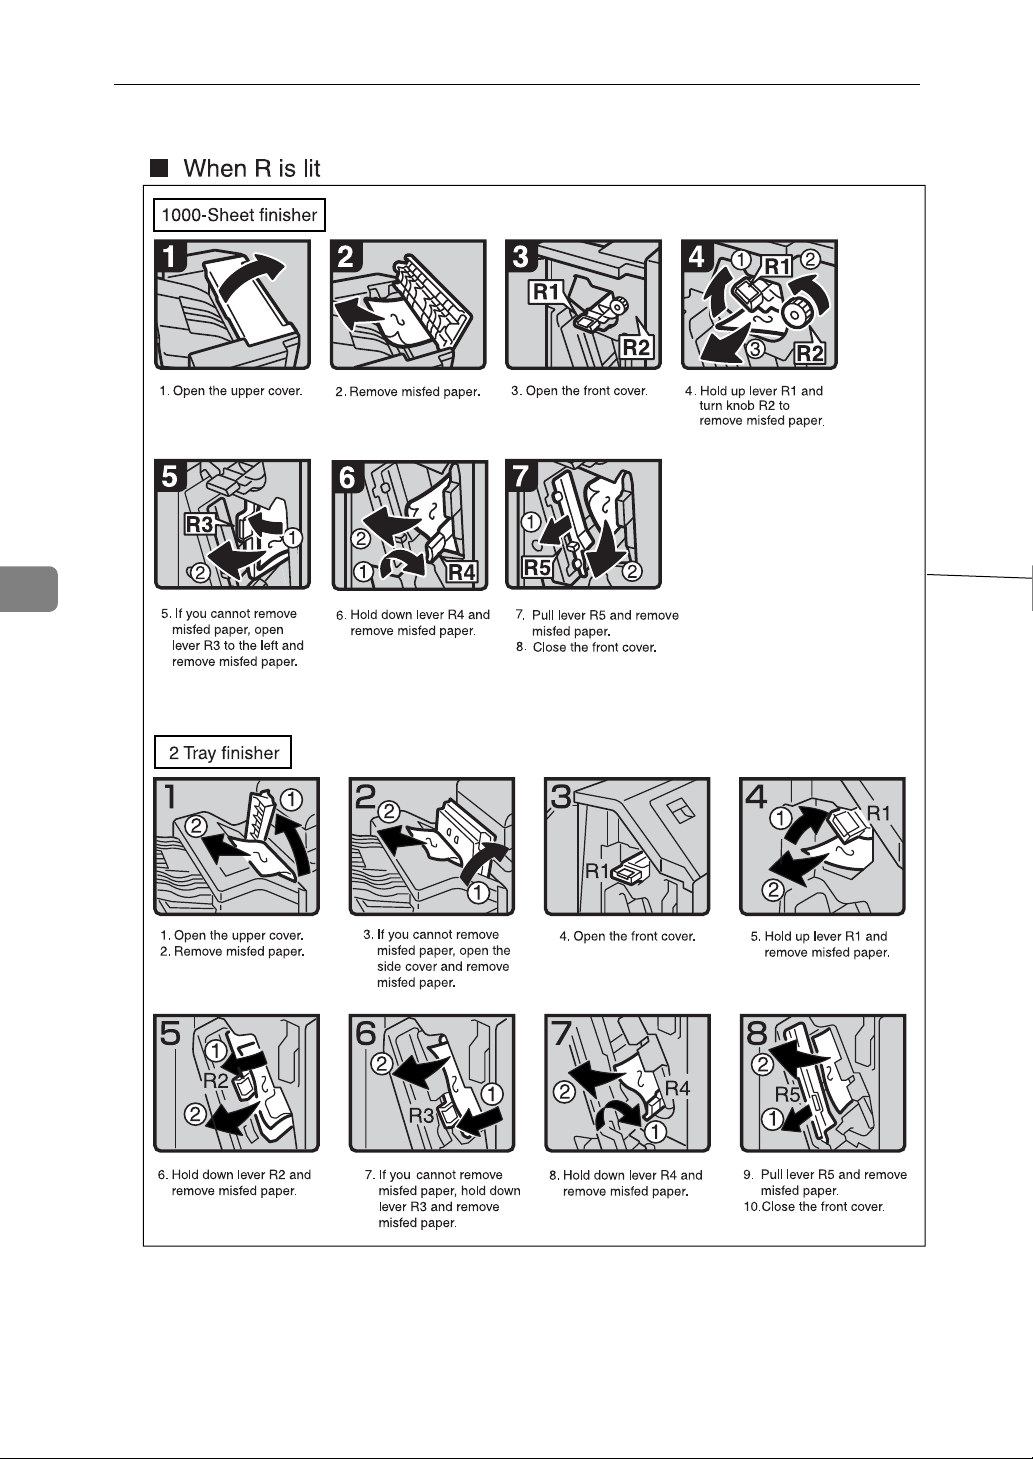
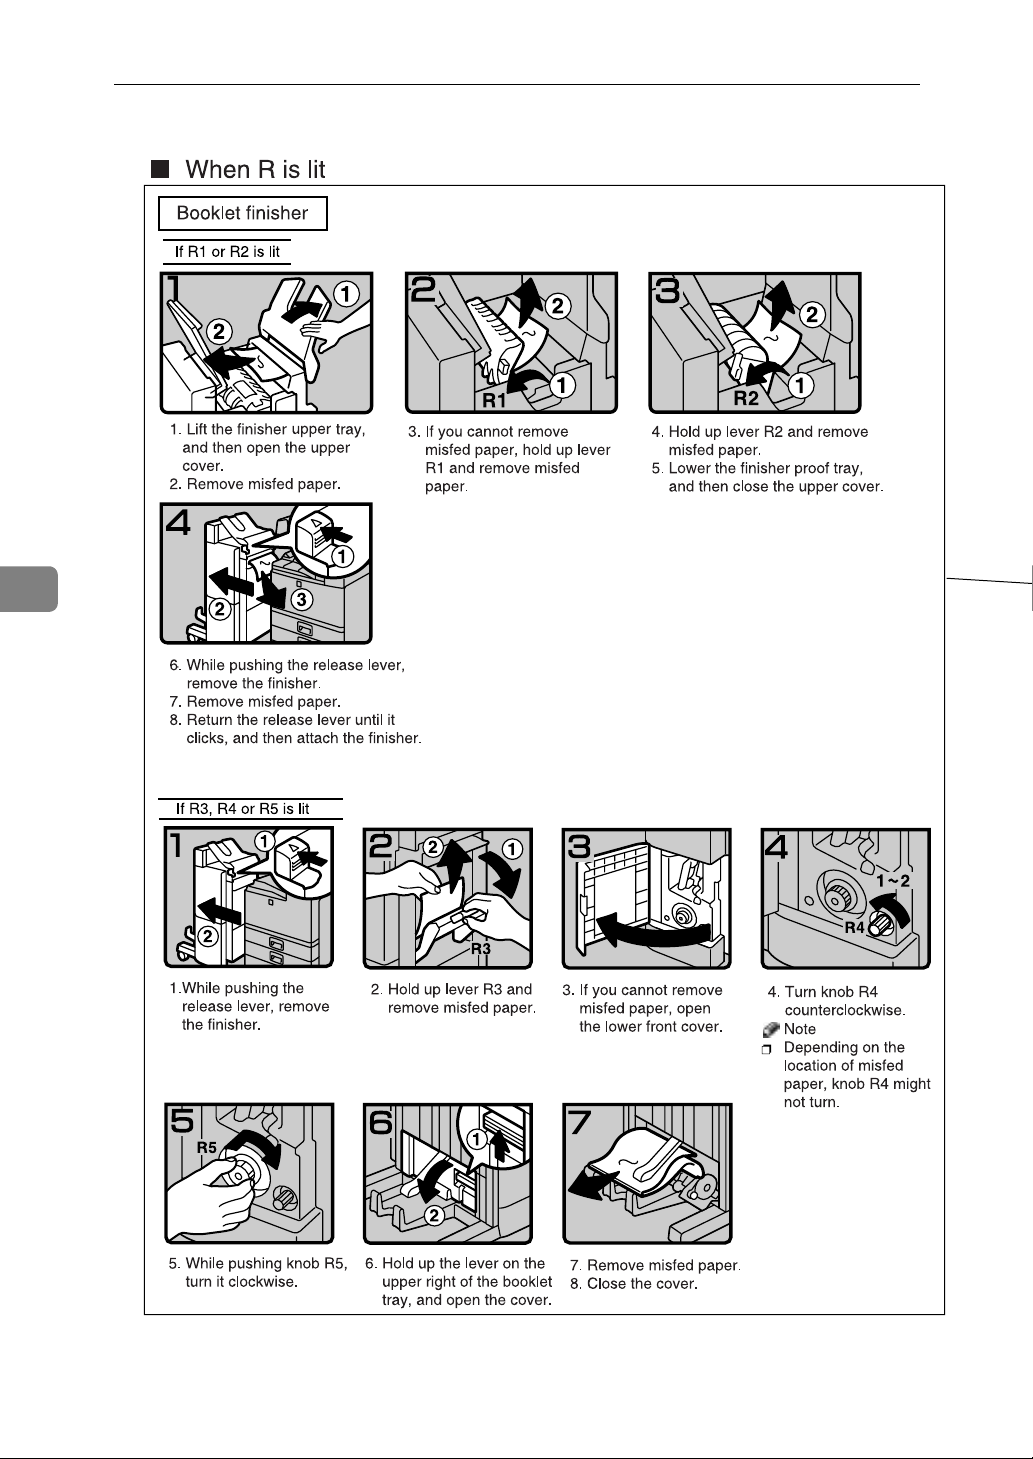
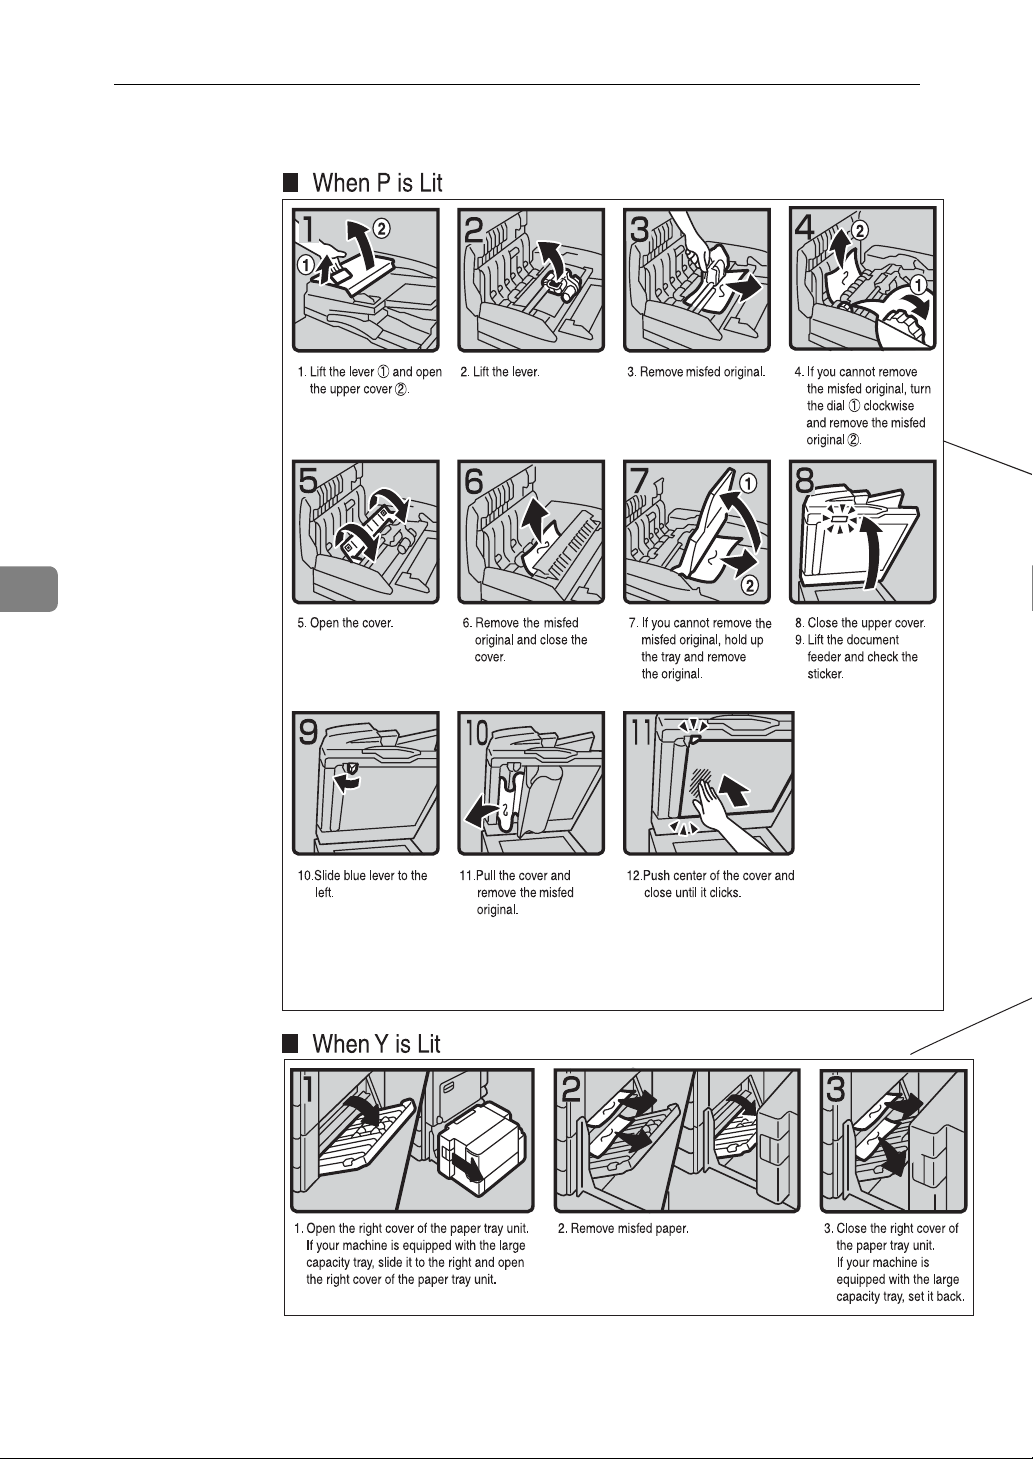
x Clearing Misfeeds
CAUTION:
• The fusing section of this machine might be very hot. Caution should be taken when removing misfed paper.
Important
r When clearing misfeeds, do not turn off the operation switch. If you do, your
copy settings will be lost.
r To prevent misfeeds, do not leave any torn scraps of paper inside the ma-
chine.
r If paper misfeeds occur frequently, contact your service representative.
Note
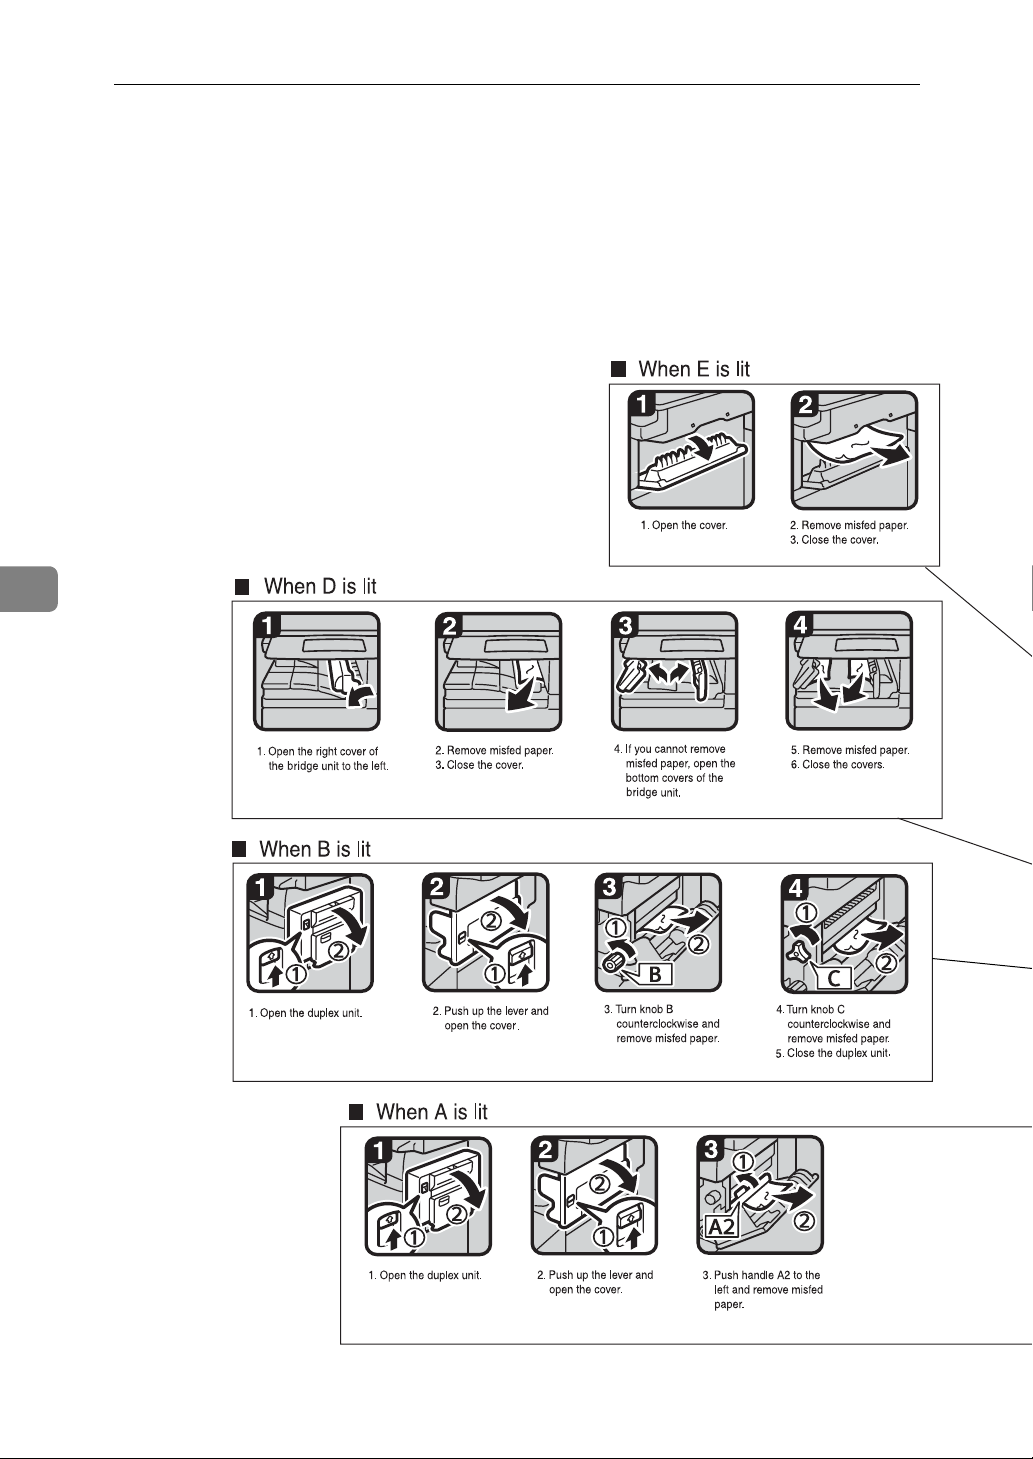
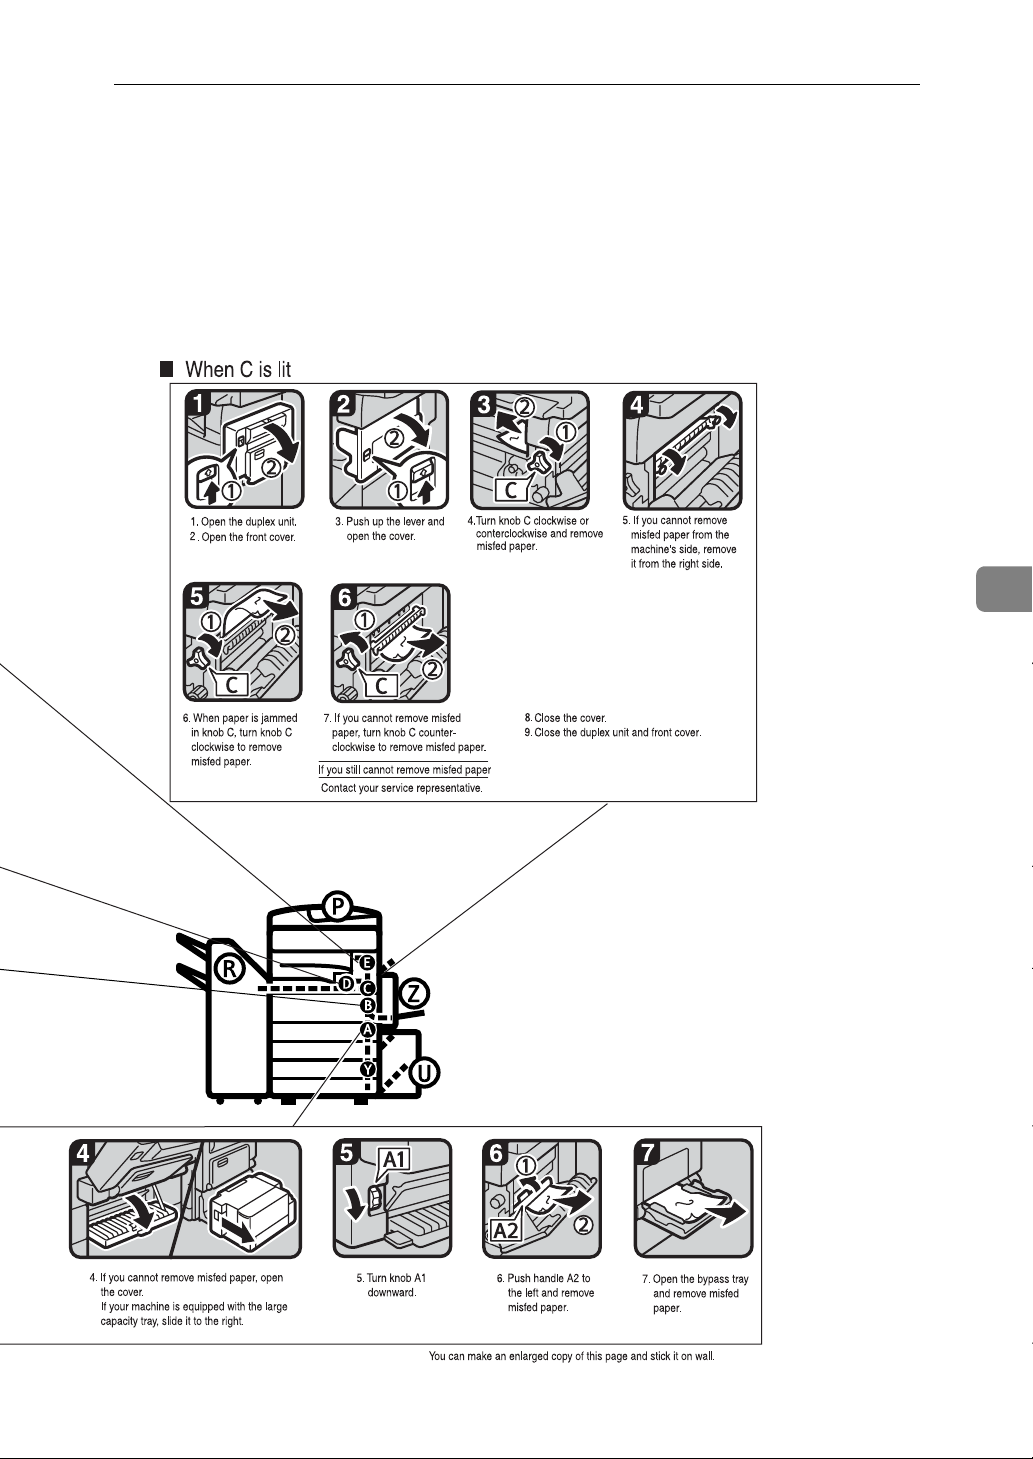
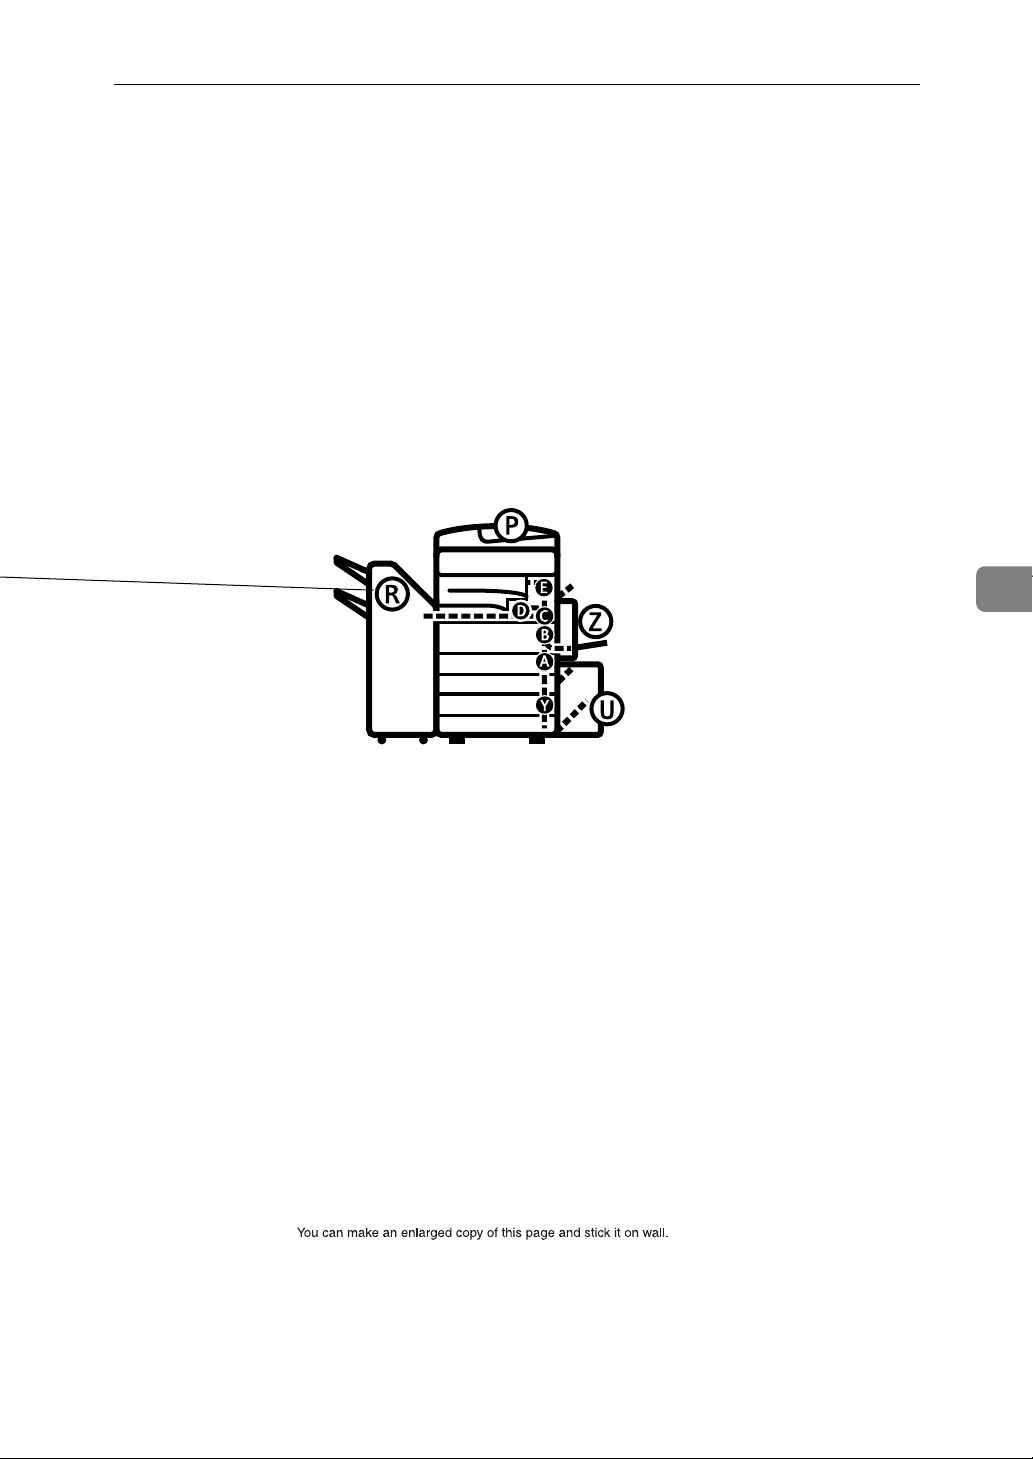
r More than one misfeed may be indicated. When this happens, check all the
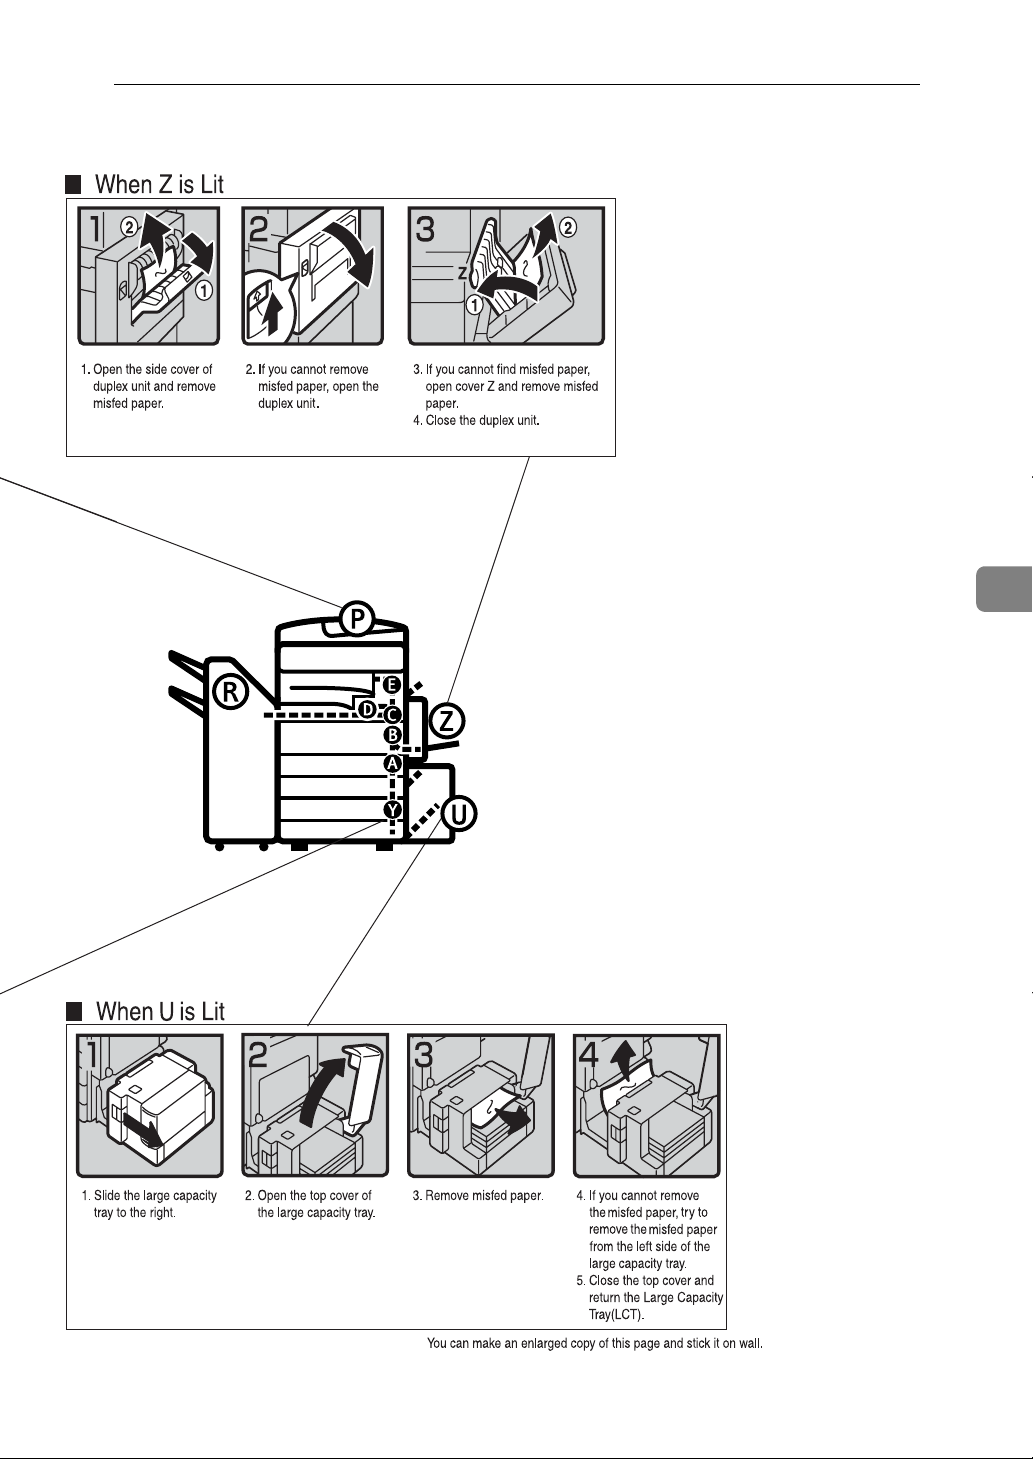
areas indicated. See the following charts: A, B, C, D, E, P, U, R, Y, Z
r Inside the finisher, or inside the front cover, there is a sticker explaining how
to remove misfed paper.
116

x Clearing Misfeeds
5
117
5
Troubleshooting
118
x Clearing Misfeeds
5
119
5
Troubleshooting
120
x Clearing Misfeeds
5
121
5
Troubleshooting
122

x Clearing Misfeeds
5
ZHVX030J
123
5
Troubleshooting
124
x Clearing Misfeeds
5
125
Troubleshooting
Changing the Paper Size
5
Preparation
Be sure to select the paper size
with User Tools and the paper size
selector. If you do not, misfeeds
might occur. See p.55 “Tray Paper
Size: Tray 1–4”.
Important
r If you want to change the paper
size set in the LCT, contact your
service representative.
Reference
For details about paper sizes and
types, see p.167 “Copy Paper”.
Changing the Paper Size of the
Paper Tray
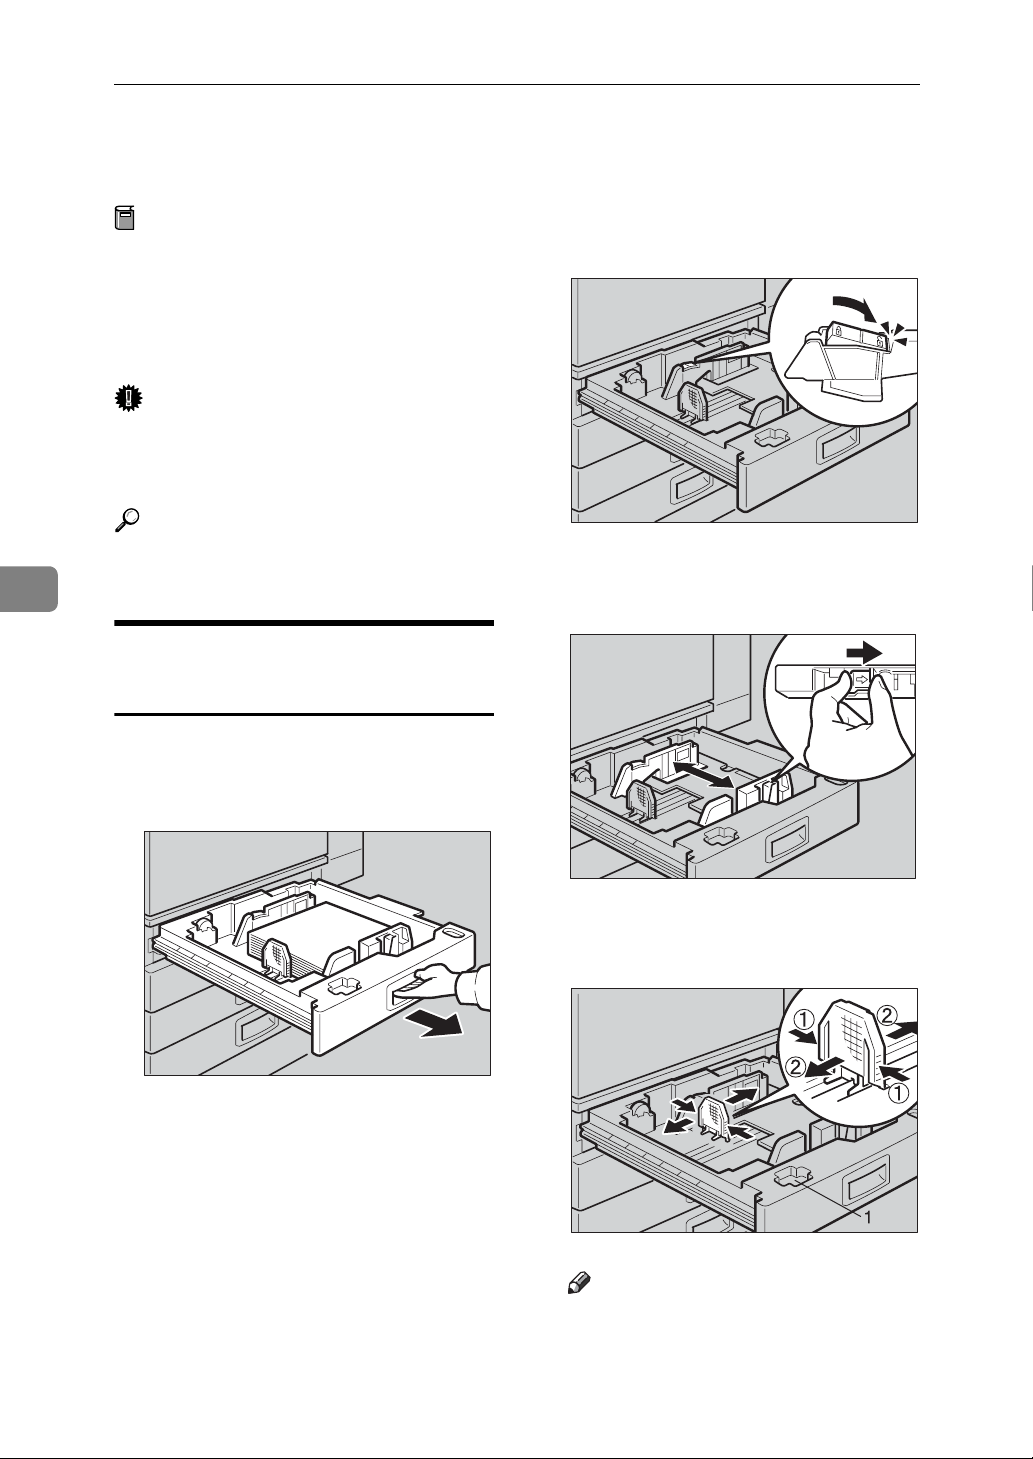
A Make sure the paper tray is not in
use. Then, pull the paper tray out
slowly.
C Release the side lever to the "un-
locked" position.
D While pressing the release lever,
adjust the side fences.
B If paper is loaded in the tray, re-
move it.
126
E Adjust the back guide to the new
paper size.
Note
r For 11” × 17” paper, put the
back guide inside 1.
Changing the Paper Size
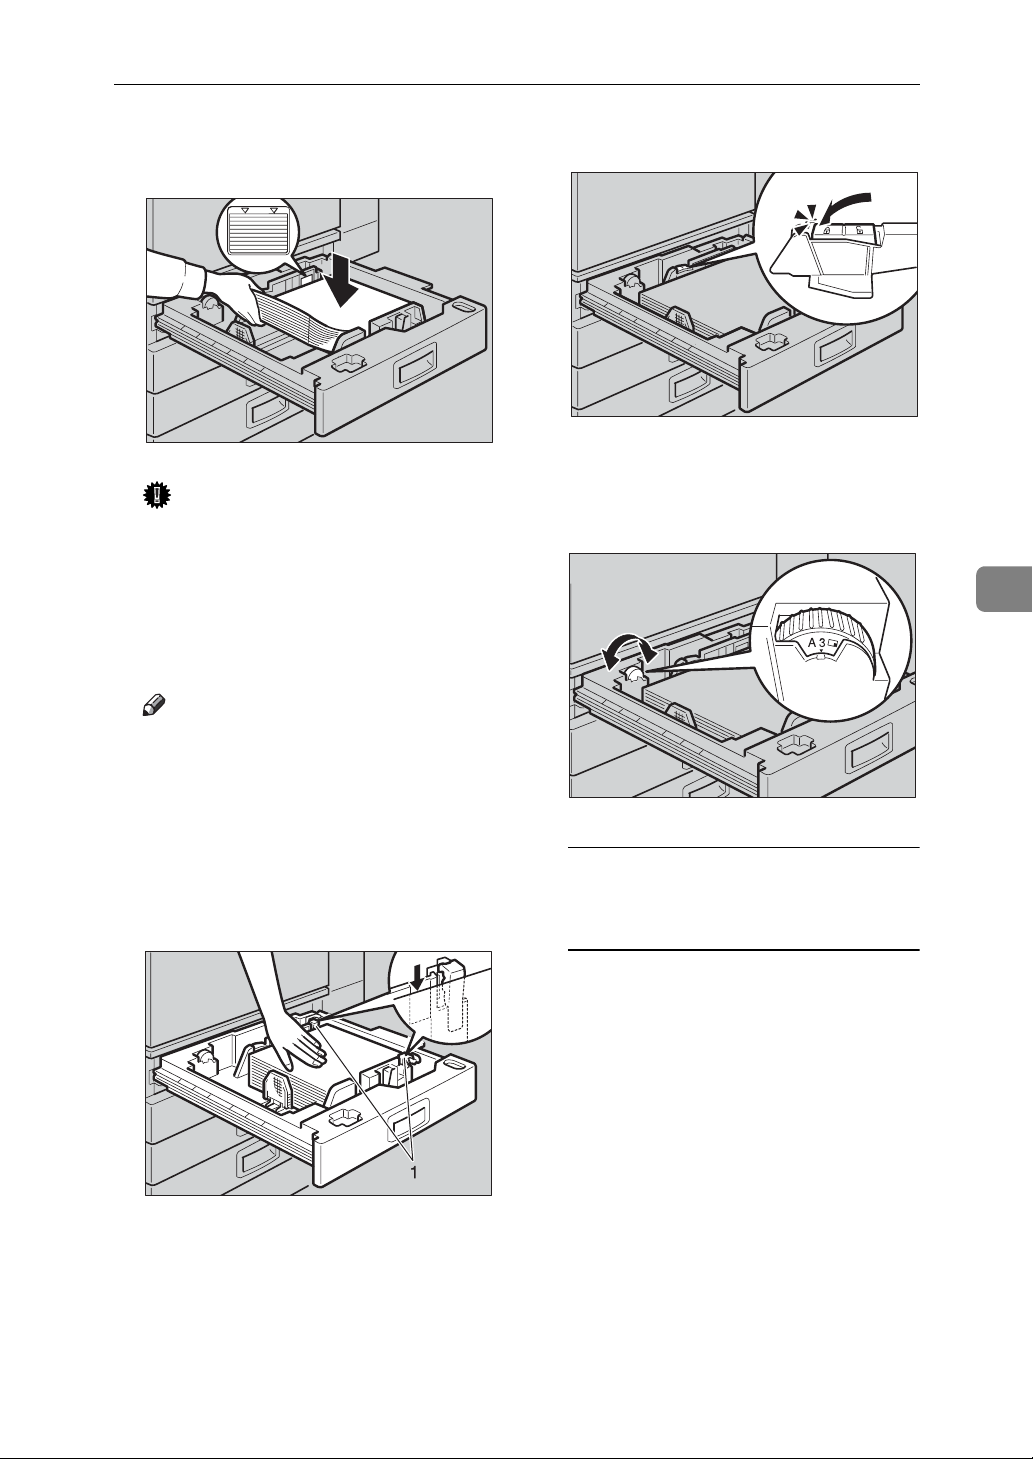
F Square the paper and load it into
the tray.
Important
r Check that the top of the stack is
not higher than the limit mark
inside the tray.
r Make sure the paper stack is
flush against the right side
fence.
Note
r Fan the paper before loading.
H Lock the side lever.
I Adjust the tray size with the pa-
per size selector to the new paper
size.
5
r Straighten curled or warped pa-
per before loading.
G After loading, make sure that on
either side, the paper does not
catch (on 1). Push down the paper
stack.
To adjust the paper size to a size
not indicated on the paper size
selector
A Set the paper size selector to
the p mark.
B Press the {User Tools/Counter}
key.
C Press [System Settings].
D Press [Tray Paper Settings].
E Press [Tray Paper Size: Tray 1],
[Tray Paper Size: Tray 2], [Tray Pa-
per Size: Tray 3] or [Tray Paper
Size: Tray 4].
F Select the required size, and
then press [OK].
127

5
Troubleshooting
G Press [Exit] or the {User
Tools/Counter} key to quit User
Tools.
Reference
p.55 “Tray Paper Size: Tray
1–4”
J Gently push the paper tray in un-
til it stops.
K Check the paper size shown on
the display panel.
128

d Adding Staples
d Adding Staples
Important
r Stapling failure or jams may occur if you use a staple cartridge other than that
recommended.
Reference
For details about the type of finisher, see p.18 “External Options”.
1000-Sheet Finisher
• 1: Open the front cover of the finisher, and
then pull out the staple unit.
• 2: Hold the green lever while gently pulling out the cartridge.
• 3: Hold both sides of the cartridge.
• 4: Pull up the upper unit of the cartridge.
5
• 5: Take out the empty refill in the arrow direction.
129

5
Troubleshooting
• 6: Align the arrows on the new refill with
those on the cartridge, and then push in the
refill until it clicks.
• 7: Gently push down the upper unit into
the cartridge.
• 8: Pull out the ribbon.
2 Tray Finisher
• 9: Hold the green lever while pushing in
the cartridge until it clicks.
• 10: Push back the staple unit, and then
close the front cover of the finisher.
• 1: Open the front cover of the finisher.
• 2: Hold the green lever while gently pulling out the cartridge.
130

d Adding Staples
• 3: Hold both sides of the cartridge.
• 4: Pull up the upper unit of the cartridge.
• 5: Take out the empty refill in the arrow direction.
• 6: Align the arrows on the new refill and
the cartridge, and then push in the refill
until it clicks.
5
• 7: Gently push down the upper unit into
the cartridge.
• 8: Pull out the ribbon.
• 9: Hold the green lever while pushing in
the cartridge until it clicks.
• 10: Close the front cover of the finisher.
131

5
Troubleshooting
Booklet Finisher
• 1: Open the front cover of the finisher.
• 2: Pull lever R6 down, and then pull out the
cartridge while lifting the cartridge.
• 3: Take out the empty refill in the arrow direction.
• 4: Set the new refill.
• 5: Pull out the ribbon.
• 6: Push in the cartridge until it clicks.
• 7: Close the front cover of the finisher.
132

Staple unit for saddle stitch function
d Adding Staples
• 1: Open the front bottom cover of the finisher.
• 2: Pull lever R7 and fully pull out the staple
unit.
• 3: Lift the lever of the staple unit while
pulling it.
• 4: Take out the empty cartridge.
• 5: Set the new cartridge.
• 6: Bring the staple unit back into place.
• 7: Close the front bottom cover of the finisher.
v Using “Prepare Stapling ”in User Tools to initialize the staple unit
When the booklet finisher is in stalled, make sure to initialize the staple unit
for the saddle stitch function with User Tools after adding staples or removed
jammed staples. If you do not do this, copies may not be stapled and misfeeds
may occur.
Reference
p.54 “Prepare Stapling”
A Press the {User Tools/Counter} key.
B Press [System Settings].
C Press [Prepare Stapling ] on the menu of General Features 2/2.
D Press [OK].
The machine staples five to seven times without ejecting staples.
E Press [Exit].
5
F Press [Exit].
133

5
Troubleshooting
Removing Jammed Staples
Note
r Curled paper may cause staples to jam. To avoid this, turn copy paper over
in the tray. If there is no improvement, change to stiffer copy paper.
r When the booklet finisher is installed, after removing jammed staples, staples
will not be ejected the first few times you try to use the stapler.
Reference
For types of finisher, see p.18 “External Options”.
1000-Sheet Finisher
• 1: Open the front cover of the finisher, and
then pull out the staple unit.
134
• 2: Hold the green lever while gently pulling out the cartridge .
• 3: Op en the cartridge's face plate.
• 4: Remove any jammed staples.

2 Tray Finisher
Removing Jammed Staples
• 5: Pull down the cartridge's face plate until
it clicks.
• 6: Hold the green lever while pushing in
the cartridge until it clicks.
• 7: Push back the staple unit, and then close
the front cover of the finisher.
5
• 1: Open the front cover of the finisher.
• 2: Hold the green lever while gently pulling out the cartridge .
• 3: Pull up the cartridge's knob.
• 4: Take out all staples slid from the cartridge.
135

5
Troubleshooting
• 5: Pull down the cartridge's knob until it
clicks.
• 6: Hold the green lever while pushing in
the cartridge until it clicks.
• 7: Close the front cover of the finisher.
Booklet Finisher
• 1: Open the front cover of the finisher.
• 2: Pull lever R6 down, and then pull out the
cartridge while lifting the cartridge.
• 3: Pull down the cartridge's knob.
• 4: Take out all staples slid from the cartridge.
136
• 5: Set the cartridge's knob back into place.

Staple unit for saddle stitch function
Removing Jammed Staples
• 6: Push in the cartridge until it clicks.
• 7: Close the front cover of the finisher.
• 1: Open the front bottom cover of the finisher.
• 2: Pull lever R7 and fully pull out the staple
unit.
• 3: Lift the lever of the staple unit while
pulling it.
5
• 4: Take out the cartridge.
• 5: Pull the blue knob down, and then lift
the knob of the face plate.
• 6: Remove all jammed staples.
• 7: Bring the face plate back into place by
pushing it.
• 8: Push the cartridge.
• 9: Bring the staple unit back into place, and
then close the front bottom cover of the finisher.
Reference
Initialize the staple unit for the saddle stitch function after removing jammed
staples. See p.133 “Using “Prepare Stapling ”in User Tools to initialize the staple unit”.
137

Troubleshooting
y Removing Punch Waste
5
Note
r While “Punch Receptacle Full”
is displayed, you cannot use the
Punch function.
A Open the front cover of the 2 Tray
finisher.
B Pull out the punch waste box, and
then remove punch waste.
Note
r If you do not, “Punch Recepta-
cle Full” is still displayed.
D Close the front cover of the 2 Tray
finisher.
“
Punch Receptacle Full” disap-
pears.
Note
r If the message is still displayed,
reinstall the punch waste box.
r The message “
cle Full
when the punch waste box is
not yet full. If this happens, the
position of the punch waste box
(indicated by the arrow as
shown) may be blocked by
punch waste. Remove the
punch waste.
Punch Recepta-
” may appear even
C Reinstall the punch waste box.
138

Dos and Don'ts
R
6. Remarks
CAUTION:
• Unplug the power cord from the
wall outlet before you move the
machine. While moving the machine, you should take care that
the power cord will not be damaged under the machine.
Important
r Do not turn the power off while
the On indicator is lit or blinking.
Doing so may damage the hard
disk.
r Before unplugging the power cord
or turning off the main power
switch, make sure remaining
memory space is at 100%, as
shown on the display. See p.24
“Turning Off the Power” and
“Turning Off the Main Power”.
• When you use this machine for a
long time in a confined space without good ventilation, you may detect an odd smell. To keep the
workplace comfortable, we recommend that you keep it well ventilated.
• Do not touch areas on or around
the fusing unit. These areas get hot.
• After making copies continuously,
the exposure glass may become
warm—this is not a malfunction.
• The area around the ventilation
hole might feel warm. This is
caused by exhaust air and is not a
malfunction.
• When the machine is not in use
and in stand-by mode, you may
hear a small noise inside. This is
caused by the image stabilization
process and is not a malfunction.
• Do not turn off the operation
switch while copying or printing.
Make sure all copying or printing
has finished first.
• The machine might not produce
good copy images if condensation
forms inside as a result of rapid
temperature change.
• Do not open the covers of the machine while copying or printing. If
you do, misfeeds might occur.
• Do not move the machine during
copying or printing.
• If you operate the machine improperly or a machine failure occurs, settings might be lost. Be sure
to make a note of your machine
settings.
• The manufacturer shall not be liable for any loss or damage resulting from mechanical failure, loss of
settings, or use of the machine.
139

Remarks
R
R
Toner
Handling Toner
WARNING:
• Do not incinerate used toner or toner containers. Toner dust might ignite when exposed to an open flame. Dispose of used toner containers
in accordance with local regulations.
CAUTION:
• Keep toner (used or unused) and toner containers out of reach of children.
Important
r Faults may occur if you use toner other than the recommended type.
Reference
To add toner, see p.113 “D Adding Toner”.
6
Toner Storage
When storing toner, the following precautions should always be followed:
• Store toner containers in a cool, dry place free from direct sunlight.
• Store on a flat surface.
Used Toner
Note
r Toner cannot be re-used.
140

Where to Put Your Machine
R
R
R
• Locations directly exposed to cool
Machine Environment
Choose your machine's location carefully. Environmental conditions
greatly affect its performance.
Optimum environmental conditions
CAUTION:
• Keep the machine away from humidity and dust. Otherwise a fire
or an electric shock might occur.
• Do not place the machine on an
unstable or tilted surface. If it topples over, an injury might occur.
air from an air conditioner or heated air from a heater. (Sudden temperature changes can cause
condensation to form inside the
machine.)
• Locations close to machines generating ammonia, such as a diazo
copy machine.
• Places where the machine will be
subject to frequent strong vibration.
•Dusty areas.
• Areas with corrosive gases.
Moving
Where to Put Your Machine
CAUTION:
• If you use the machine in a confined space, make sure there is a
continuous air turnover.
• Temperature: 10-32 °C (50-89.6 °F)
(humidity to be 54% at 32 °C, 89.6
°F)
• Humidity: 15-80% (temperatur e to
be 27 °C, 80.6 °F at 80%)
• A strong and level base.
• The machine must be level within
5 mm, 0.2 inches: both front to rear
and left to right.
• To avoid possible buildup of
ozone, make sure to locate this machine in a large well ventilated
room that has an air turnover of
more than 30 m
3
/hr/person.
Environments to avoid
• Locations exposed to direct sunlight or other sources of strong
light (more than 1,500 lux).
CAUTION:
• Unplug the power cord from the
wall outlet before you move the
machine. While moving the machine, you should take care that
the power cord will not be damaged under the machine.
Important
r Be careful when moving the ma-
chine. Take the following precautions:
• Turn off the main power. See
p.24 “Turning Off the Main
Power”.
• Unplug the power cord from
the wall outlet. When you pull
out the plug from the socket,
grip the plug to avoid damaging the cord, thereby reducing
the risk of fire or electric shock.
• Close all covers and trays, including the front cover and bypass tray.
r Move the machine carefully. If you
do not, it could be damaged and
stored files might be lost.
6
141

Remarks
R
R
R
6
r Do not take off the holding stand.
r Protect the machine from strong
shocks. Impact can damage the
hard disk and cause stored files to
be lost. As a precautionary measure, files should be copied to another computer.
Power Connection
WARNING:
• Connect the machine only to
the power source described on
the inside front cover of this
manual. Connect the power
cord directly into a wall outlet
and do not use an extension
cord.
• Do not damage, break or make
any modifications to the power
cord. Do not place heavy objects on it. Do not pull it hard
nor bend it more than necessary. These actions could
cause an electric shock or fire.
• When you unplug the power cord,
the anti-condensation heaters turn
off.
• Make sure the plug is inserted
firmly in the wall outlet.
• Voltage must not fluctuate by
more than 10%.
• The wall outlet shall be installed
near the machine and shall be easily accessible.
Access to the Machine
Place the machine near the power
source, providing the clearance areas
shown.
CAUTION:
• Unplug the power cord from the
wall outlet before you move the
machine. While moving the machine, you should take care that
the power cord will not be damaged under the machine.
CAUTION:
• When you disconnect the power
plug from the wall outlet, always
pull the plug (not the cable).
• When the main power switch is in
the stand-by position, the optional
anti-condensation heaters are on.
In an emergency, unplug the machine's power cord.
142
1. Rear: 10 cm (4") or more
2. Right: 10 cm (4") or more
3. Front: 75 cm (29.6") or more
4. Left: 10 cm (4") or more
Note
r For the required space when op-
tions are installed, contact your
service representative.

Maintaining Your Machine
h050j
h130j
If the exposure glass, exposure glass
cover, or ADF belt is dirty, copy clarity may be reduced. Clean these parts
if they are dirty.
v Cleaning the machine
Wipe the machine with a soft,
damp cloth, and then wipe it with
a dry cloth to remove the water.
Important
r Do not use chemical cleaners or or-
ganic solvents, such as thinner or
benzene. If such substances get inside the machine or melt plastic
parts, a failure might occur.
r Do not clean parts other than those
explicitly specified in this manual.
Other parts should only be cleaned
by your service representative.
Cleaning the Exposure Glass
Cover
Cleaning the Auto Document
Feeder
Maintaining Your Machine
6
Cleaning the Exposure Glass
Gds
Clean 1 and 2.
.eps
Gds
Clean 1 and 2.
.eps
143

6
Remarks
Changing the Photoconductor
Unit (PCU)
Only use the photoconductor unit
made specifically for this machine.
Follow the procedure below to
change the unit.
Important
r Be sure to unplug the power code
from the outlet before changing
the photoconductor unit.
A Open the front door, duplex unit,
and then transfer unit right cover.
B Push the development unit to the
left, and then pull out the photoconductor unit.
C Remove the harness clamps on the
charge unit and cleaning unit of the
new photoconductor unit.
D Push the development unit to the
left, and then install the new photoconductor unit.
Note
r If the copy quality is still not satis-
factory after replacing the photoconductor unit, contact your
service representative.
144

Other Functions
Other Functions
Inquiry
The inquiry function lets you check
the telephone numbers to conta ct for
repairs, or ordering consumables
such as toner. Be sure to contact your
service engineer to verify the following:
v Consumables
• Telephone No. to order
•Toner
•Staple
• Staple (Centre)
•TX Stamp Name
v Machine Maintenance/Repair
• Telephone No.
• Serial No. of Machine
v Sales Representative
Printing inquiry information
A Press [Print Inquiry List].
B Press the {Start} key.
Inquiry information prints out.
C Press [Exit].
D Press [Exit].
Changing the Language
You can change the language used on
the display. English is set as default.
A Press the {User Tools/Counter} key.
6
• Telephone No.
A Press the {User Tools/Counter} key.
B Press [Inquiry].
Inquiry information appears.
ZCAS100E
B Press [Français].
The language is changed to
French.
C Press [Exit].
The menu appears in French.
145

Remarks
Counter
Displaying the Total Counter
You can display the total counter value used for all functions.
A Press the {User Tools/Counter} key.
ZCAS100E
B Press [Counter].
6
C To print a counter list, press [Print
Counter List].
D Press the {Start} key.
A counter list prints out.
146

7. Entering Text
Entering Text
This section describes how to enter characters. When you enter a character, it appears at the position of the cursor. If there is a character already at the cursor position, the entered character appears before that.
Available Characters
• Alphabetic characters
ABCDEFGHIJKLMNOPQRSTUVWXYZabcdefghijklmnopqrstuvwxyz
•Symbols
•Numerals
0123456789
Keys
Note
r When entering uppercase or lowercase letters continuously, use [Shift Lock] to
lock the case.
147

Entering Text
How to Enter Text
Entering letters
A Press [Shift] to switch between uppercase and lowercase.
B Press the letters you want to enter.
Deleting characters
A Press [Backspace] or [Delete All] to delete characters.
7
148

8. Security
Security
Confidential information is always at risk of being copied without permission or
subject to unauthorized access through the network. To protect docume nts from
such intrusion, not only can passwords be set, but also the Extended Security
function can be used to strengthen security.
For those who require increased document protection, we recommend the Extended Security function.
Primary Security Functions
v Protecting Stored Documents
Protects documents with a password when using Document Ser ver or Locked
Print. Furthermore, the Extended Security function can protect against password-generating cracking. See p.149 “Extended Security Function”.
v Protecting Image Data Remaining in Memory
Protects image data remaining in memory. When a copy or print job is completed, or a job is canceled, the data is secure.
v Protecting against Unauthorized Access via Phone Line
Accepts only facsimile calls.
v Authenticating Administrator
Protects essential functions for administrating document security using an access code. See p.60 “Key Operator Code”.
Extended Security Function
By setting a password, document operations such as printing, deleting, or delivering can be restricted to authorized users and denied to others. However, passwords can be cracked. When the Extended Security function is used, entering the
wrong password 10 times will lock that document, protecting it from unauthorized access.
To unlock documents, see p.151 “Unlocking a locked document”.
Documents that can be protected by the Extended Security function are as fol-
lows (all documents must be set with a password to be protected using this function):
149

Security
v Documents stored in the Document Server by the following functions
• Document Server function
•Copier function
•Fax transmission
•Scanner function
• Printer driver
v Documents stored from the printer driver using the Locked Print function
Reference
For information about Document Server, see p.33 “Document Server”.
For information about Locked Prin t, see “Locked Print”, Printer Reference
2, or the printer driver Help.
Note
r Once a document is locked, it will reject the correct password until it is un-
locked.
r When the Extended Security function is on, delivery server settings cannot
be changed. Turn the function off to change the settings.
8
Setting Extended Security
Preparation
The Extended Security setting is not available unless the access code set in the
Key Operator Code settings of the System Settings has six or more digits. See
p.60 “Key Operator Code”.
Note
r To ensure increased document protection under the Extended Security set-
ting, we recommend you select [All Initial Settings] when programming a key
operator code.
A Press the {User Tools/Counter} key.
B On the display panel, press [System Settings], and then press [Key Operator
Tools].
C Press [Extended Security]. Press [ON], and then [OK].
The Extended Security function is enabled and the security mark appears
in the upper right of the display panel.
D Press the {User Tools/Counter} key to finish.
150

Security
Unlocking a locked document
Unlock a document that was locked because a wrong passw ord was entered
multiple times, making it available for authorized users to access again.
A Press the {User Tools/Counter} key.
B On the display panel, press [System Settings], and then press [Password Man-
agement for Stored Files].
C Press [OK] under Unlock Files.
The document is unlocked.
D Press the {User Tools/Counter} key to finish.
Temporarily Disabling Document Security
If you forget a password, document protection can be temporarily disabled,
making documents available for operations such as setting new passwords or
deleting.
Important
r When operations are complete, be sure to press [Do not Unlock] under Tempo-
rarily Unlock Files, protecting the document by password again.
Note
r For a document stored using Locked Print, only document deletion is availa-
ble when protection is disabled.
A Press the {User Tools/Counter} key.
B On the display panel, press [System Settings], and then press [Password Man-
agement for Stored Files].
C Press [Unlock] under Temporarily Unlock Files.
Note
r Protection can be disabled for only three minutes. Access the document,
set a new password, and perform any other necessary operations to the
document within that time. Documents will automatically return to the
password-protected condition after three minutes.
D Press the {User Tools/Counter} key to finish.
8
151

Security
Operating Environment and Notes
Security for this machine is assured on the premises that the machine is used under the following conditions:
Operating Environment
• The condition of the machine is normal. (For example, it is not damaged,
modified, or lacking components.)
• When the machine is connected to a network, the machine is protected from
illegitimate access including unauthorized packet sniffing.
• The machine is managed by an administrator with thorough knowledge of
the machine and capable of providing the proper conditions under which users can use the machine safely.
For Administrator
8
• This machine does not protect against illegitimate actions on the network. To
avoid any risks on the network, further security is required.
• Security of this machine cannot be assured if any hardware component is detached or replaced with an inappropriate component. If these things have the
possibility of occurring, other security measures are necessary.
• Regularly check that the Extended Security function is on. While the machine
is in this mode, the security mark is displayed at the upper right of the display panel. Be sure to check it particularly after the machine is moved or a
power failure occurs. See p.150 “Setting Extended Security”.
• Avoid using a single number or consecutive numbers for an access code such
as “00000000” or “12345678”. Since the numbers like this are easy to guess, using them will not provide the appropriate level of security.
• Remote document management using SmartNetMonitor for Admin is not
available when the Extended Security function is on.
• User code is a function to help manage the use of the machine. It is not to protect confidential documents from others. See p.70 “User Code”.
• As for using the delivery function, the security of this machine can assure
only the protection of documents having a password set and stored in the
Document Server. Be sure to select the destination correctly when deliveri ng
documents.
152

Operating Environment and Notes
For User
• Be careful not to let anyone know your password, especially when entering a
password or recording it. Keep any record of your password in a safe place.
• Avoid using a single number or consecutive numbers for a password such as
“0000” or “1234”, since the numbers like this are easy to guess, so using them
will not provide a worthwhile level of security.
• A document accessed with a correct password remains selected even after operations are complete, and it can be accessed by other users. To stop this, be
sure to press the {Clear Modes} key to cancel the document selection.
• The user name used when adding a document to the Document Server is to
identify the document creator and type. It is not to protect confidential documents from others.
• Before scanning documents using the scanner function, make sure all other
operations are complete.
153
8

Security
8
154

9. Specifications
Main unit
v Configuration:
Desktop
v Photosensitivity type:
OPC drum
v Original scanning:
One-dimensional solid scanning system through CCD
v Copy process:
Dry electrostatic transfer system
v Development:
Dry two-component magnetic brush development system
v Fusing:
Heating roll pressure system
v Resolution:
600 dpi
v Exposure glass:
Stationary original exposure type
v Original reference position:
Rear left corner
v Warm-up time:
From the main power switch
• Type 1: 15 seconds or less (20 °C) (When Facsim ile or Printer is inst alled:
18 seconds or less (20 °C))
• Type 2: Less than 20 seconds (20 °C)
From the operation switch
• Type 1: Less than 10 seconds (20 °C)
• Type 2: Less than 15 seconds (20 °C)
v Originals:
Sheet/book/objects
v Maximum original size:
A3L, 11" × 17"L
155

Specifications
v Copy paper size:
•Trays: A3L – A5L, 11" × 17"L – 51/2" × 81/2"L
1
•Bypass: A3L – A6L, 11" × 17"L – 5
/2" × 81/2"L
• Bypass (custom size):
Vertical: 100 – 297 mm, 4 – 11.7 in
Horizontal: 148 – 600 mm, 5.9 – 23.6 in
•Duplex: A3L – A5L, 11" × 17"L – 5
1
8
/2" K)
1
•LCT: A4K, 8
/2" × 11"K
1
/2" × 81/2"L (except A5K, 51/2" ×
v Paper weight:
• Paper tray 1, 2: 64 – 105 g/m2, 17 – 28 lb.
• Bypass tray: 52 – 163 g/m
• Duplex: 64 – 105 g/m
2
, 14 – 43.6 lb.
2
, 17 – 28 lb.
v Non-reproduction area:
• Leading edge: 3 ± 2 mm or less
• Trailing edge: 2 ± 2 mm or less
• Left edge: 2 ± 1.5 mm or less
• Right edge: 2 + 2.5/-1.5 mm or less
9
v First copy time:
• Type 1: 4.5 seconds or less
(face up feed, A4K, 100%, feeding from the tray 1, on the exposure glass,
Text·Photo mode, Auto Image Density)
• Type 2: 3.6 seconds or less
(face down feed, A4K, 100%, feeding from the tray 1, on the exposure
glass, Text·Photo mode, Auto Image Density)
v Copying speed: (Type 1)
• 19 copies/minute (A3L, 11" × 17"L)
• 35 copies/minute (A4K, 8
1
/2" × 11"K)
v Copying speed: (Type 2)
• 22 copies/minute (A3L, 11" × 17"L)
1
• 45 copies/minute (A4K, 8
/2" × 11"K)
156

v Reproduction ratio:
Preset reproduction ratios:
Metric version Inch version
Enlargement 400% 400%
200% 200%
141% 155%
122% 129%
115% 121%
Full size 100% 100%
Reduction 93% 93%
82% 85%
75% 78%
71% 73%
65% 65%
50% 50%
25% 25%
Main unit
Zoom: From 25 to 400% in increments of 1%.
v Maximum continuous copy run:
999 sheets
v Paper capacity:
• Tray 1, 2: 550 sheets (72 g/m2, 19 lb.)
2
• Bypass tray: 50 sheets (72 g/m
, 19 lb.)
v Power consumption:
• Main unit only
Type 1 Type 2
Warm-up about 1.25 kw about 1.25 kw
Stand-by about 0.139 kw about 0.17 kw
During printing about 1.2 kw about 1.2 kw
Maximum less than 1.5 kw less than 1.5 kw
• Complete system
Warm-up about 1.3 kw about 1.3 kw
Stand-by about 0.17 kw about 0.195 kw
During printing about 1.4 kw about 1.4 kw
*1
Type 1 Type 2
9
Maximum less than 1.5 kw less than 1.5 kw
*1
The complete system consists of the main unit, ADF, internal tray 2, paper tray
unit, bridge unit, 2 tray finisher, LCT, fax unit and printer/scanner unit.
157

Specifications
v Dimensions (W × D × H up to exposure glass):
Type 1, 2: 670 × 650 × 720 mm, 26.4 × 25.6 × 28.3 in
v Space for main unit (W × D):
Type 1, 2: 980 × 650 mm, 38.6 × 25.6 in (Bypass tray extender is used for large
size paper)
v Noise emission
Sound power level:
• Main unit only
Stand-by Less than 42 dB (A) Less than 42 dB (A)
Copying Less than 69 dB (A) Less than 69 dB (A)
• Complete system
Stand-by Less than 42 dB (A) Less than 42 dB (A)
Copying Less than 73 dB (A) Less than 74 dB (A)
Sound pressure level
• Main unit only
Stand-by Less than 37 dB (A) Less than 37 dB (A)
Copying Less than 54 dB (A) Less than 55 dB (A)
• Complete system
*1
:
Type 1 Type 2
*3
Type 1 Type 2
*2
Type 1 Type 2
*3
Type 1 Type 2
9
158
Stand-by Less than 37 dB (A) Less than 37 dB (A)
Copying Less than 59 dB (A) Less than 60 dB (A)
*1
The above measurements, made in accordance with ISO 7779 are actual va lues.
*2
Measured at the position of the bystander.
*3
The complete system consists of the main unit, ADF, internal tray 2, paper tray
unit, bridge unit, 2 tray finisher and LCT.
v Weight:
Type 1, 2: Approx. 79 kg, 174.2 lb.
v HDD:
20 GB or more
• Capacity for Document Server
7.6 GB
• Capacity for memory sorting
5.3 GB
• Capacity for others
7.1 GB or more

Options
Exposure Glass Cover
Lower this over originals for copying.
Auto Document Feeder
v Mode:
ADF mode, Batch mode, SADF mode, Mixed Size mode, Custom Size Originals mode
v Original size:
•A3L – B6 JISKL(except two-sided originals of B6 JISKL)
• 11" × 17"L – 5
v Original weight:
1
/2" × 81/2"KL
Options
• One-sided originals: 40–128 g/m2 (11–34 lb.)
2
• Two-sided originals: 52–105 g/m
v Maximum number of originals:
80 sheets (80 g/m2, 20 lb.) or less than 11 mm, 0.43 in
v Maximum power consumption:
Less than 60 W (power is supplied from the main unit)
v Dimensions (W×D×H):
570 × 518 × 150 mm, 22.4 × 20.4 × 5.9 in
v Weight:
Approx. 12 kg, 26.5 lb.
Note
r Specifications are subject to change without notice.
(14–28 lb.)
9
159

Specifications
1000-Sheet Finisher
Finisher Upper Tray:
v Paper size:
A3L, B4 JISL, A4KL, B5 JISKL, A5KL, B6 JISL, A6L, 12" × 18"L, 11"
× 17"L, 8
13"L, 8
v Paper weight:
52–163 g/m2, 14–43 lb.
v Stack capacity:
• 250 sheets (A4KL, 81/2" × 11"KL or smaller) (80 g/m2, 20 lb.)
• 50 sheets (B4 JISL, 8" × 13"L or larger) (80 g/m
Finisher Shift Tray:
v Paper size:
A3L, B4 JISL, A4KL, B5 JISKL, A5KL, 12" × 18"KL, 11" × 17"L, 81/2"
× 14"L, 10
1
/2" × 14"L, 101/2" × 71/4"KL, 81/2" × 13"L, 81/2" × 11"KL, 8" ×
1
/4" × 13"L, 51/2" × 81/2"KL
2
, 20 lb.)
1
/2" × 71/4"L, 8" × 13L, 81/4" × 13"L, 51/2" × 81/2" KL
9
v Paper weight:
52 – 163 g/m2, 14 – 43 lb.
v Stack capacity:
• 1,000 sheets (A4KL, 81/2" × 11"KL or smaller) (80 g/m2, 20 lb.)
• 500 sheets (B4 JISL, 8" × 13"L or larger) (80 g/m
2
, 20 lb.)
v Staple capacity:
• 50 sheets (A4KL, 81/2" × 11"KL or smaller) (80 g/m2, 20 lb.)
2
• 30 sheets (B4 JISL, 8" × 13"L or larger) (80 g/m
, 20 lb.)
v Staple paper size:
A3L, B4 JISL, A4KL, B5 JISKL, 12" × 18"L, 11" × 17"L, 81/2" × 14"L,
1
8
/2" × 11"KL, 101/2" × 71/4"KL, 8" × 13"L, 81/2" × 13"L, 81/4" × 13"L
v Staple paper weight:
64–90 g/m2, 17–24 lb.
v Staple position:
• 1 staple – 2 positions
• 2 staples – 2 positions
v Power consumption:
Less than 50 W (power is supplied from the main unit)
160

v Dimensions (W × D × H):
520 × 520 × 790 mm, 20.5 × 20.5 × 31.1 in (including trays)
v Weight:
Approx. 25 kg, 55.2 lb.
2 Tray Finisher
Finisher Shift Tray 1:
v Paper size:
A3L, B4 JISL, A4KL, B5 JISKL, A5KL, B6 JISL, A6L, 11" × 17"L,
1
/2" × 14"L, 81/2" × 11"KL, 51/2" × 81/2"KL
8
v Paper weight:
52 – 163 g/m2, 14 – 43 lb.
v Stack capacity:
• 500 sheets (A4KL, B5 JISKL, A5K, 81/2" × 11"KL) (80 g/m2, 20 lb.)
• 250 sheets (A3L, B4 JISL, 8
1
• 100 sheets (A5L, 5
/2" × 81/2"KL) (80 g/m2, 20 lb.)
1
/2" × 14"L, 11" × 17"L) (80 g/m2, 20 lb.)
Options
Finisher Shift Tray 2:
v Paper size:
A3L, B4 JISL, A4KL, B5 JISKL, A5KL, B6 JISL, A6L, 11" × 17"L,
1
8
/2" × 14"L, 81/2" × 11"KL, 51/2" × 81/2" KL
v Paper weight:
52 – 163 g/m2, 14 – 43 lb.
v Stack capacity:
No Staple:
1
• 2,000 sheets (A4K, 8
• 750 sheets (A3L, B4 JISL, A4L, B5 JISKL, 11" × 17"L, 8
1
8
/2" × 11"L) (80 g/m2, 20 lb.)
• 500 sheets (A5K) (80 g/m
• 100 sheets (A5L, 5
/2" × 11"K) (80 g/m2, 20 lb.)
2
1
/2" × 81/2" KL) (80 g/m2, 20 lb.)
, 20 lb.)
1
/2" × 14"L,
Staple:
• 1,500 sheets (A4K, 8
• 750 sheets (A3L, B4 JISL, A4L, B5 JISKL, 11" × 17"L, 8
1
8
/2" × 11"L) (80 g/m2, 20 lb.)
• 500 sheets (A5K) (80 g/m
• 100 sheets (A5L, 5
1
/2" × 11"K) (80 g/m2, 20 lb.)
2
1
/2" × 81/2" KL) (80 g/m2, 20 lb.)
, 20 lb.)
1
/2" × 14"L,
9
v Staple capacity:
• 50 sheets (A4KL, B5 JISKL, 81/2" × 11"KL) (80 g/m2, 20 lb.)
• 30 sheets (A3L, B4 JISL, 11" × 17"L, 8
1
/2" × 14"L) (80 g/m2, 20 lb.)
161

Specifications
v Staple paper size:
A3L, B4 JISL, A4KL, B5 JISKL, 11" × 17"L, 81/2" × 14"L, 81/2" × 11"KL
v Staple paper weight:
64 – 90 g/m2, 17 – 24 lb.
v Staple position:
• 1 staple – 3 positions
• 2 staples – 1 position
v Power consumption:
Less than 50 W (power is supplied from the main unit)
v Dimensions (W × D × H):
520 × 520 × 790 mm, 20.5 × 20.5 × 31.1 in (including trays)
v Weight:
Approx. 25 kg, 55.2 lb.
Punch Kit
9
v Paper size
•2 holes: A3L – A5KL, 11" × 17"L, 81/2" × 14"L – 51/2" × 81/2"KL
1
•3 holes: A3L, B4 JISL, A4K, B5 JISK, 11" × 17"L, 8
•4 holes:
•Metric version: A3L, B4 JISL, A4K, B5 JISK, 11" × 17"L, 8
• Narrow 2 × 2 version: A3L – A5K, 11" × 17"L, 8
1
/2"K
8
/2" × 11"K
1
/2" × 14"L – 51/2" ×
v Paper weight:
• 4 holes: 52 – 163 g/m2, 14 lb. – 43 lb.
2
• 2 or 3 holes: 52 – 163 g/m
, 14 lb. – 43 lb.
v Power consumption:
26.4 W (power is supplied from the main unit.)
v Dimensions (W × D × H):
142 × 456 × 92 mm, 55.9 × 179.5 × 36.2 in
v Weight:
Approx. 2.9 kg, 6.4 lb
Note
r Specifications are subject to change without notice.
1
/2" × 11" K
162

Booklet Finisher
Finisher Upper Tray:
v Paper size:
A3L, B4 JISL, A4KL, B5 JISKL, A5KL, B6 JISL, A6L, 11" × 17"L, 11"
× 15"L, 8
v Paper weight:
52 – 163 g/m2, 14 – 43 lb.
v Stack capacity:
• 150 sheets
Finisher Shift Tray:
v Paper size:
A3L, B4 JISL, A4KL, B5 JISKL, A5K, 11" × 17"L, 81/2" × 11"KL
v Paper weight:
52 – 163 g/m2, 14 – 43 lb.
1
/2" × 14"L, 81/2" × 11"KL, 51/2" × 81/2"L
Options
v Stack capacity:
No Staple:
• 1,000 sheets (A4K, B5 JISKL, A5K, 8
• 500 sheets (A3L, B4 JISL, A4L, 11" × 17"L, 8
1
/2" × 11"K) (80 g/m2, 20 lb.)
1
/2" × 11"L) (80 g/m2, 20
lb.)
Staple:
• 750 sheets (A4K, B5 JISKL, A5K, 8
• 500 sheets (A3L, B4 JISL, A4L, 11" × 17"L, 8
1
/2" × 11"K) (80 g/m2, 20 lb.)
1
/2" × 11"L) (80 g/m2, 20
lb.)
v Staple capacity:
• 50 sheets (A4K, B5 JISK, 81/2" × 11"K, 71/4" × 101/2"K) (80 g/m2, 20 lb.)
1
• 30 sheets (A3L, B4 JISL, A4L, 11" × 17"L, 8
1
8
/2" × 11"L) (80 g/m2, 20 lb.)
/2" × 14"L, 81/2" × 13"L,
v Staple paper size:
A3L, B4 JISL, A4KL, B5 JISKL, 11" × 17"L, 81/2" × 14"L, 81/2" × 11"KL
v Staple paper weight:
64 – 80 g/m2, 17 – 20 lb.
v Staple position:
9
• 1 staple – 2 positions
• 2 staples – 2 positions
163

Specifications
v Saddle stitch
• Paper size:
A3L, B4 JISL, A4L, 11" × 17"L, 8
lb.)
• Saddle stitching capacity: 15 sheets
• Stack capacity:
2–5 sheets: 25 sets
6–10 sheets: 15 sets
11–15 sheets: 10 sets
• Folding: Centre folding
•Paper weight:
Plain paper: 64 – 80 g/m
Cover sheet (one sheet): 64 – 128 g/m
• Position: 1 position
2
, 17 – 20 lb.
1
/2" × 11"L, 81/2" × 14"L(80 g/m2, 20
2
, 17 – 34 lb.
v Power consumption:
Less than 55 W (power is supplied from the main unit)
v Dimensions (W × D × H):
689 × 603 × 1,055 mm, 27.1 × 23.7 × 41.5 in
v Weight:
Approx. 50 kg, 110.2 lb. (main unit only)
9
Bridge Unit
v Dimensions:
413 × 435 × 126 mm, 16.3 × 17.1 × 5.0 in
v Weight:
3.6 kg, 7.9 lb.
164

Internal Tray 2 (1 bin tray)
v Number of bins:
1
v Paper size:
A3L, B4 JISL, B5 JISKL, A5L, 11" × 17"L, 81/2" × 14"L, 81/2" × 11"KL,
1
5
/2" × 81/2" L
v Paper capacity:
125 sheets (80 g/m2, 20 lb.)
v Paper weight:
60 – 105 g/m2 (16 – 28 lb.)
v Maximum power consumption:
Less than 15 W (power is supplied from the main unit)
v Dimensions (W × D × H):
470 × 565 × 140 mm, 18.5 × 22.2 × 5.5 in
Options
v Weight:
Approx. 4 kg, 8.8 lb.
Note
r Specifications are subject to change without notice.
Large Capacity Tray
v Paper size:
A4K, 81/2" × 11"K
v Paper weight:
60 – 105 g/m2, 16 – 28 lb.
v Paper capacity:
1,500 sheets (80 g/m2, 20 lb.)
v Power consumption:
Maximum 40 W (power is supplied from the main unit)
v Dimensions (W × D × H, option unit):
390 × 500 × 390 mm, 15.4 × 19.7 × 15.4 in
9
v Weight:
Approx. 17 kg, 37.5 lb.
Note
r Specifications are subject to change without notice.
165

Specifications
Paper Tray Unit
v Paper weight:
60–105 g/m2 (16–28 lb.)
v Paper size:
A3L, B4 JISL, A4KL, B5 JISKL, A5L, 11" × 17"L, 81/2" × 14"L, 81/2" ×
13"L, 8
14"L, 11" × 14"L, 8" × 10
v Maximum power consumption:
Less than 50 W (power is supplied from the main unit)
v Paper capacity:
550 sheets (72 g/m2, 19 lb.) × 2 trays
v Dimensions (W × D × H):
540 × 650 × 270 mm, 21.3 × 25.6 × 10.6 in
v Weight:
Approx. 25 kg, 55.2 lb.
1
/2" × 11"KL, 81/4" × 13"L, 8" × 13"L, 71/4" × 101/2"L, 81/4" ×
1
/2"KL, 51/2" × 81/2" L
9
Note
r Specifications are subject to change without notice.
166
Copy Paper
Recommended Paper Sizes and Types
The following limitations apply to each tray:
Copy Paper
Tray type Paper type and
weight
2
Tray 1, 2
Paper tray
64-105 g/m
(17-28 lb.)
unit (optional)
Bypass
*1 *2
tray
Standard paper
2
60-90.2 g/m
(16-24 lb.)
Metric version Inch version Paper
capacity
A3L, A4KL, 11" × 17"L, 81/2" × 14"L, 81/2" ×
11"KL
*1
550 sheets
*5
A3L, B4 JISL, A4KL, B5 JISKL, A5L, 11" ×
17"L, 8
L, 7
× 13"L, 8
A3L, A4KL, A5KL,
8" × 13"L
*1
B4 JISL, B5 JISKL, B6
JISL, A6L, PostcardL,
11" × 17"L, 8
L, 8
× 8
KL, 8
× 13"L, 8
11" × 14"L, 11" × 15"L,
10" × 14"L, 10" × 15"L,
8" × 10"KL, 8" × 10
1
/2" × 14"L, 81/2" × 11"KL, 51/2" × 81/2"
1
/4" × 101/2"L, 8" × 13"L, 81/2" × 13"L, 81/4"
1
/4" × 14"L, 11" × 14"L, 8" × 10"1/2KL
A3L, 11" × 17"L, 8
1
11"KL, 5
*1
/2" × 81/2"L
B4 JISL, A4KL, B5 JIS
KL, A5KL, B6 JISL,
1
1
/2" × 14"
/2" × 11"KL, 51/2"
1
/2"L, 71/4" × 101/2"
1
/2" × 13"L, 81/4"
1
/4" × 14"L,
A6L, PostcardL, 8
1
× 14"L, 7
L, 8
/4" × 101/2"K
1
/2" × 13"L, 81/4" ×
13"L, 11" × 14"L, 11" ×
15"L, 10" × 14"L, 10" ×
15"L, 8" × 10"KL, 8" ×
1
/2"KL
10
1
/2"
1
/2" ×
1
/2"
50 sheets
KL
Custom size
*8
Vertical: 100-297 mm
Horizontal: 148-600 mm
*9
Custom size
Vertical: 3.9-11.6 in
Horizontal: 5.8-23.4 in
*8
*9
9
Thin paper
52-59 g/m
2
(14-16 lb.)
Thick paper
*7
91-163 g/m2
(24-43.5 lb.)
*5
A3L, A4KL, A5KL,
8" × 13"L
Custom size
Vertical: 100-297 mm
Horizontal: 148-600 mm
*9
*3 *5
A3L, A4KL, A5KL,
8" × 13"L
*8
Custom size
Vertical: 100-297 mm
Horizontal: 148-600 mm
*9
A3L, 11" × 17"L, 8
1
11"KL, 5
*8
Custom size
/2" × 81/2"L
1
*8
/2" ×
50 sheets
Vertical: 3.9-11.6 in
1
/2" ×
*9
25 sheets
Horizontal: 5.8-23.4 in
A3L, 11" × 17"L, 8
1
11"KL, 5
*8
Custom size
/2" × 81/2"L
Vertical: 3.9-11.6 in
Horizontal: 5.8-23.4 in
*9
167

Specifications
Tray type Paper type and
weight
Bypass
*1 *2
tray
LCT (optional)
*1
See p.127 “To adjust the paper size to a size not indicated on the paper size selec tor”
*2
When copying onto custom size paper, you need to specify vertical and horizontal
dimensions. See “Copying from the Bypass Tray”, Copy Reference.
*3
Select [OHP Sheet] or [Thick Paper] in the display panel. See “Copying from the Bypass
Tray”, Copy Reference.
*4
Placing one sheet at a time is recommended. See “Copying from the Bypass Tray”,
Copy Reference.
*5
When loading paper, make sure the top of the stack is not higher than the limit mark
of the paper tray.
*6
The paper guide is immovable. If you want to change the size of paper placed in this
tray, contact your service representative.
*7
If you want to use thick (128–163 g/m2, 34 lb.–43.5 lb.) paper, select [Thick Paper] on
the display panel. See “Copying from the Bypass Tray”, Copy Reference.
*8
With paper longer than 433 mm, misfeeds, jams and creasing may occur. Make sure
that paper is placed correctly so that it feeds in straight.
*9
The horizontal size is 148–432 mm (5.8"–17") when the booklet finisher is installed.
Translucent
paper
OHP transparencies
Label paper
(adhesive labels)
60-105 g/m2
*5 *6
(16-28 lb.)
*4 *5
*3 *4
Metric version Inch version Paper
capacity
/2" ×
40 sheets
1 sheet
sheets
A3L, A4KL, A5KL,
8" × 13"L
A4L 81/2" × 11"L 20 sheets
A3L, A4KL, A5KL,
8" × 13"L
A4K, 81/2" × 11"K 1500
A3L, 11" × 17"L, 81/2" ×
11"KL, 5
A3L, 11" × 17"L, 8
11"KL, 5
1
/2" × 81/2"L
1
1
/2" × 81/2"L
9
Important
r If you use damp or curled paper, a misfeed may occur.
Note
r Load paper into the Tray 1-4 with the print side up.
r Place paper in the LCT and bypass tray with the print side down.
r When using the bypass tray, it is recommended to set the paper orientation to
L.
r When loading OHP transparencies, check the fro nt and back of the sheets,
and place them correctly, or a misfeed might occur. Set the paper orientation
to L and select A4L, 8
1
/2"×11"K as paper size.
r When using OHP transparencies, fan them for each use. If you store the sheets
in the tray, they may adhere and may cause feeding problems.
r When copying onto OHP transparencies, remove copied sheets one by one.
r If multiple-sheet jams occur, load the paper sheet by sheet.
r Postcards should be fed using the bypass tray. Select [Thick Paper] on the dis-
play panel. See “Copying from the Bypass Tray”, Copy Reference.
r When copying onto letterhead paper, the paper placing orientation is differ-
ent depends on which function you are using. See p.112 “Orientation-Fixed
Paper or Two-Sided Paper”.
168

Copy Paper
R
r If you load paper of the same size in the same orientation in two or more
trays, the machine automatically shifts to the other tray when the first tray in
use runs out of paper. This function is called “Auto Tray Switching”. (However, if one tray has recycled or special paper, the settings of the other trays
must be the same for Auto Tray Switching to work.) This saves int errupting
a copy run to replenish paper when making a large number of copies. See
“General Features 1/4 Auto Tray Switching”, Copy Reference and p.55 “Tray
Paper Size: Tray 1–4”.
r The paper types you can select in System Settings are only general classifica-
tions. Copy quality for every kind o f paper in a classification is not g uaranteed. See p.169 “Unusable Paper” for details.
Unusable Paper
CAUTION:
• Do not use aluminum foil, carbon paper, or similar conductive paper to avoid
a fire or machine failure.
Important
r To prevent faults, do not use any of the following kinds of paper:
• Paper for inkjet printers
• Thermal fax paper
• Art paper
• Aluminum foil
• Carbon paper
•Conductive paper
• Colored OHP transparencies
• Paper with perforated lines
• Hemmed-edge paper
r Do not use paper designed for inkjet printers, as these may stick to the fusing
unit and cause a misfeed.
r Do not use copy paper that has been already copied onto, faults could occur
if you do.
9
169

Specifications
Note
r To prevent misfeeds, do not use the following kinds of paper:
• Bent, folded, or creased paper
• Torn paper
• Slippery paper
• Perforated paper
• Rough paper
• Thin paper with little stiffness
• Paper with a dusty surface
r If you copy onto rough grain paper, the image might be blurred.
Paper Storage
Note
r When storing paper, the following precautions should always be followed:
• Do not store paper where it will be exposed to direct sunlight.
• Avoid storing paper in humid areas (humidity: 70% or less).
• Store on a flat surface.
9
r Do not store paper vertically.
r Under high temperature and humidity conditions, or low temperature and
humidity conditions, store paper in vinyl bags.
170

INDEX
1000-sheet finisher, 18, 160
1 bin tray
2 Tray finisher
, 18
, 18, 161
A
Adding staples, 129
Adding toner
Address Book
change order
edit title
program/change/delete group
program/change/delete transfer request
select title
Address Book Management
Auto Delete File
Auto Document Feeder
cleaning
Auto Off
Auto off timer
Auto reset timer
copier/Document Server
facsimile
scanner
system
, 113
, 67
, 63
, 64
, 63
, 65
, 62
, 65
, 18, 159
, 143
, 25
, 58
, 58
, 59
, 59
, 58
B
Booklet finisher, 163
Bridge unit
Browse network
Bypass tray
, 18, 164
, 87
, 16
C
Changing a group name, 97
Changing an LDAP server
Changing a registered e-mail destination
Changing a registered fax destination
Changing a registered FTP folder
Changing a registered SMB folder
Changing a registered Transfer Station/
Receiving Station
Changing a user code
Changing default settings
Changing paper
Changing the language
Changing the paper size
, 100
, 126
, 104
, 91
, 88
, 72
, 50
, 145
, 126
, 63
, 84
, 79
Check Modes key
Clear
counter per user code
Clearing misfeeds
Clearing the number of prints
Clear Modes key
Clear/Stop key
Combined function operations
Common key operations
Control panel
Copy Count Display
Copy paper
Cover sheet tray
, 20
, 61
, 116
, 75
, 20
, 21
, 27
, 22
, 20
, 51
, 167
, 57
D
Delete
, 65
all files
Deleting a group
Deleting a registered e-mail destination
Deleting a registered fax destination
Deleting a registered FTP folder
Deleting a registered SMB folder
Deleting a registered Transfer Station/
Receiving Station
Deleting a user code
Display
counter
counter per user code
Displaying destinations registered in groups
Displaying the number of prints for each
user code
Displaying the total counter
Display panel
Document Server
Deleting
Printing
Using the Document Serv er
Dos and Don'ts
, 97
, 81
, 92
, 89
, 101
, 73
, 61
, 61
, 73
, 146
, 20, 22
, 33
, 43
, 40
, 35
, 139
, 84
, 96
171

E
M
172
E-mail destination, 82
Energy Saver key
Entering text
Environment
Exposure glass
cleaning
Exposure glass cover
cleaning
Extended security
Extended Security function
External charge unit management
External options
, 20
, 147
, 141
, 15
, 143
, 18
, 143
, 60
, 149
, 18
F
Fax destination, 76
Finisher
1000-sheet finisher
2 Tray finisher
Booklet finisher
Folders
Front cover
FTP
Function keys
Function Priority
Function reset timer
Function status indicators
, 85
, 16
, 89
, 21
, 18
, 18
, 18
, 51
, 52
, 21
I
Indicators, 20
Inquiry
Internal options
Internal tray
Internal tray 2
Interrupt key
, 145
, 19
, 15
, 16, 18
, 21
K
Key counter management, 60
Key Operator Code
, 60
L
Large Capacity Tray, 18, 165
LCT
, 18, 165
LDAP server
Loading paper
Large Capacity Tray
paper trays
, 102
, 110
, 110
, 110
, 60
Machine environment, 141
Main power indicator
Main power switch
Maintaining your machine
Main unit
Misfeeds
Moving
Multi-Access
, 155
, 116
, 141
, 29
, 15, 21
, 15, 23
, 143
N
Number keys, 21
O
On indicator, 21
Operation switch
Options
, 159
, 21, 23
P
Panel off timer, 58
Panel Tone
Paper
Paper tray
Paper tray priority
Paper tray unit
Paper type
Password management for stored files
Power connection
Prepare stapling
Print
Printing the number of prints for each
user code
Print Priority
Program/change LDAP server
Program key
Programming an LDAP server
Protection
Punch kit
, 51
changing
loading
, 126
, 110
, 16
, 55
copier
facsimile
printer
, 55
, 55
, 18
bypass tray
LCT
tray 1–4
, 56
, 57
, 56
, 142
, 54
Address Book
counter
counter per user code
, 62
, 61
, 74
, 51
, 20
, 93, 94
code
destination
, 93
, 162
, 61
, 66
, 102
, 65

R
T
Receiving Station, 98
Registering a fax destination
Registering an e-mail destination
Registering a new user code
Registering a protection code
Registering a protection code to a group user
Registering a protection code to a single user
Registering a Transfer Station/
Receiving Station
Registering destination information
Registering destinations to a group
Registering Folders
Registering sender information
Registering the Transfer Request
Remarks
Removing a destination from a group
Removing jammed staples
Removing punch waste
, 139
, 98
, 85
, 77
, 82
, 70
, 93
, 69
, 98
, 134
, 138
S
Safety information, 9
Sample Copy key
Saving energy
Screen contrast knob
Security
Set date
Set time
# (sharp) key
size setting
Slip sheet tray
SMB
Specifications
Staples
Start key
System Reset
, 149
, 59
, 59
, 85
1000-sheet finisher
2 Tray finisher
Auto Document Feeder
booklet finisher
bridge unit
internal tray 2 (1 bin tray)
Large Capacity Tray (LCT)
main unit
paper tray unit
punch kit
adding
removing jammed staples
, 21
, 21
, 25
, 20
, 21
, 54
, 57
, 155
, 160
, 161
, 159
, 163
, 164
, 165
, 165
, 155
, 166
, 162
, 129
, 134
, 28
, 94
, 93
, 68
, 95
, 96
Toner, 140
adding
, 113
storage
, 140
To register an FTP folder
To register an SMB folder
Transfer Station
Tray paper size
, 98
, 55
, 89
, 85
U
Use LDAP server, 66
User code
User Tools
User Tools/Counter key
User Tools (System Settings)
Using FTP to Connect
Using SMB to Connect
, 70
management
, 50
, 59
, 20
, 47
, 89
, 85
V
Ventilation holes, 17
W
Warm Up Notice (copier/Document Server)
, 51
173

MEMO
174 GB GB B138-6500
 Loading...