

Page 1
Printer/Scanner Unit
***C1-Cli
350.tif*
Type 1515
Operating Instructions
Printer Reference 1
ent-
Getting Started
Preparing to Print
Read this manual carefully before you use this product and keep it handy for future reference.
For safe and correct use, please be sure to read the Safety Information in the "Copy Refer-
ence" before using the machine.
Page 2

Printer/Scanner Unit Type 1515 Operating Instructions Printer Reference 1
Printed in China
EN USA B683-8592
Page 3

Introduction
This manual describes detailed instructions on the operation and notes about the use of this machine.
To get maximum versatility from this machine all operators are requested to read this manual carefully
and follow the instructions. Please keep this manual in a handy place near the machine.
Important
Contents of this manual are subject to change without prior notice. In no event will the company be li able for direct, indirect, special, incidental, or consequential damages as a result of handling or operating the machine.
Caution:
Use of controls or adjustments or performance of procedures other than those specified in this manual
might result in hazardous radiation exposure.
Two kinds of size notation are employed in this manual. With this machine refer to the inch version.
Trademarks
Microsoft
®
, Windows® and Windows NT® are registered trademarks of Microsoft Corporation in the
United States and/or other countries.
Adobe®, PostScript®, Acrobat®, PageMaker® and Adobe Type Manager are registered trademarks of
Adobe Systems Incorporated.
PCL® is a registered trademark of Hewlett-Packard Company.
AppleTalk, Apple, Macintosh and Mac are registered trademarks of Apple Computer, Incorporated.
IPS-PRINT™ Printer Language Emulation Copyright
©
2000, Oak Technology, Inc., All Rights Reserved.
UNIX is a registered trademark in the United States and other countries, licensed exclusively th rough
X/Open Company Limited.
Bluetooth is a Trademark of the Bluetooth SIG, Inc. (Special Interest Group) and lice nsed to RICOH
company limited.
Copyright © 2001 Bluetooth SIG, Inc.
The Bluetooth Trademarks are owned by Bluetooth SIG, Inc. USA
Other product names used herein are for identification purposes only and might be trademarks of their
respective companies. We disclaim any and all rights to those marks.
The proper names of the Windows operating systems are as follows:
• The product name of Windows
®
95 is Microsoft® Windows® 95
• The product name of Windows® 98 is Microsoft® Windows® 98
• The product name of Windows
• The product name of Windows
®
Microsoft
Microsoft
Windows® 2000 Advanced Server
®
Windows® 2000 Server
®
Me is Microsoft® Windows® Millennium Edition (Windows Me)
®
2000 are as follows:
Microsoft® Windows® 2000 Professional
®
• The product name of Windows
Microsoft
®
Windows® XP Professional
XP are as follows:
Microsoft® Windows® XP Home Edition
TM
• The product names of Windows Server
Microsoft
®
Windows ServerTM 2003 Standard Edition
2003 are as follows:
Microsoft® Windows ServerTM 2003 Enterprise Edition
®
Microsoft
• The product name of Windows
Windows ServerTM 2003 Web Edition
®
NT are as follows:
Microsoft® Windows NT® Server 4.0
®
Microsoft
Windows NT® Workstation 4.0
Notes:
Some illustrations in this manual might be slightly different from the machine.
Certain options might not be available in some countries. For details, please contact your local dealer.
Page 4

Note to users in the United States of America
Notice:
This equipment has been tested and found to comply with the limits for a Class B digital device, pursuant to Part 15 of the FCC Rules. These limits are designed to provid e reasonable protection against
harmful interference in a residential installation. This equipment generates, uses and can radiate radio
frequency energy and, if not installed and used in accordance with the instructions, may cause harmful
interference to radio communications.
However, there is no guarantee that interference will not occur in a particular installation. If this equipment does cause harmful interference to radio or television reception, which can be determined by turning the equipment off and on, the user is encouraged to try to correct the interference by one more of
the following measures:
Reorient or relocate the receiving antenna.
Increase the separation between the equipment and receiver.
Connect the equipment into an o utlet on a circ uit different from that to which the receiver is
connected.
Consult the dealer or an experienced radio/TV technician for help.
Caution
Changes or modifications not expressly approved by the party responsible for compliance could void
the user's authority to operate the equipment.
Caution (in case of IEEE1284 environment) :
Properly shielded and grounded cables and connectors must be used for connections to host computer
(and/or peripheral) in order to meet FCC emission limits.
Use a commercially available shielded cable.
Caution (in case of 100BaseTX environment):
Network interface cable with ferrite core must be used for RF interference suppression.
Use a commercially available cable after attaching the ferrite core provided.
Caution (in case of IEEE1394 environment):
Use the cable provided with the machine.
Caution (in case of USB2.0 environment):
Use a commercially available shielded USB cable.
Declaration of Conformity
Product Name: Printer Controller
Model Number: Printer/Scanner Unit Type 1515
Responsible party: Ricoh Corporation
Address: 5 Dedrick Place, West Caldwell, NJ 07006
Telephone number: 973-882-2000
This device complies with part 15 of FCC Rules.
Operation is subject to the following two conditions:
This device may not cause harmful interference, and
this device must accept any interference received,
including interference that may cause undesired operation.
Note to users in Canada
Note:
This Class B digital apparatus complies with Canadian ICES-003.
Remarque concernant les utilisateurs au Canada
Avertissement:
Cet appareil numérique de la classe B est conforme à la norme NMB-003 du Canada.
Copyright © 2004
Page 5

Manuals for This Machine
The following manuals describe the operational procedures of this machine. For
particular functions, see the relevant parts of the manual.
Note
Manuals provided are specific to machine type.
Adobe Acrobat Reader is necessary to view the manuals as a PDF file.
Two CD-ROMs are provided:
• CD-ROM 1“Operating Instructions for Printer/Scanner”
• CD-ROM 2“Scanner Driver & Document Management Utilities”
General Settings Guide
Provides an overview of the machine and describes System Settings (paper
trays, Key Operator Tools, etc.), and troubleshooting.
Refer to this manual for Address Book procedures such as registering fax
numbers, e-mail addresses, and user codes.
Network Guide (PDF file - CD-ROM1)
Describes procedures for configuring the machine and computers in a network environment.
Copy Reference
Describes operations, functions, and troubleshooting for the machine’s copier
function.
Facsimile Reference <Basic Features>
Describes operations, functions, and troubleshooting for the machine’s facsimile function.
Facsimile Reference <Advanced Features>
Describes advanced functions and settings for key operators.
Printer Reference 1 (this manual)
Describes system settings and operations for the machine’s printer function.
Printer Reference 2 (PDF file - CD-ROM1)
Describes operations, functions, and troubleshooting for the machine’s printer function.
Scanner Reference (PDF file - CD-ROM1)
Describes operations, functions, and troubleshooting for the machine’s scanner function.
i
Page 6

Manuals for DeskTopBinder V2 Lite
DeskTopBinder V2 Lite is a utility included on the CD-ROM labeled “Scanner
Driver & Document Management Utilities”.
• DeskTopBinder V2 Lite Setup Guide (PDF file - CD-ROM2)
Describes installation of, and the operating environment for DeskTop-
Binder V2 Lite in detail. This guide can be displayed from the [Setup] dia-
log box when DeskTopBinder V2 Lite is installed.
• DeskTopBinder V2 Introduction Guide (PDF file - CD-ROM2)
Describes operations of DeskTopBinder V2 Lite and provides an overview
of its functions. This guide is added to the [Start] menu when DeskTop-
Binder V2 Lite is installed.
•Auto Document Link Guide (PDF file - CD-ROM2)
Describes operations and functions of Auto Document Link installed with
DeskTopBinder V2 Lite. This guide is added to the [Start] menu when
DeskTopBinder V2 Lite is installed.
Manuals for ScanRouter V2 Lite
ScanRouter V2 Lite is a utility included on the CD-ROM labeled “Scanner
Driver & Document Management Utilities”.
• ScanRouter V2 Lite Setup Guide (PDF file - CD-ROM2)
Describes installation of, settings, and the operating environment for Scan-
Router V2 Lite in detail. This guide can be displayed from the [Setup] dia-
log box when ScanRouter V2 Lite is installed.
• ScanRouter V2 Lite Management Guide (PDF file - CD-ROM2)
Describes delivery server management and operations, and provides an
overview of ScanRouter V2 Lite functions. This guide is added to the [Start]
menu when ScanRouter V2 Lite is installed.
Other manuals
• PostScript 3 Supplement (PDF file - CD-ROM1)
• UNIX Supplement (available from an authorized dealer, or as a PDF file on
our Web site)
ii
Page 7

TABLE OF CONTENTS
Manuals for This Machine......................................................................................i
How to Read This Manual .....................................................................................1
1. Getting Started
Control Panel..........................................................................................................3
Reading the Display and Using Keys.........................................................................4
2. Preparing to Print
Preparing the Machine ..........................................................................................6
Connecting the Machine ............................... .. ...........................................................6
Setting Paper on the Bypass Tray .............................................................................8
Installing the Software.........................................................................................13
Auto Run....................................................... .. ............................... ... .......................13
Quick Install..............................................................................................................14
Installing the PCL 6/5e and RPCS™ Printer Driver.................................................16
Setting Up Options - PCL 6/5e and RPCS...............................................................20
Installing the PostScript 3 Printer Driver ..................................................................21
Mac OS - Installing the PostScript 3 Printe r Driver and Utilities...............................27
Mac OS X - Installing the PostScript 3 Printer Driver...............................................29
Installing the Printer Driver Using USB....................................................................30
Installing the Printer Driver Using IEEE 1394 ..........................................................32
Installing SmartDeviceMonitor for Client/Admin.......................................................35
Installing Font Manager 2000...................................................................................35
Using Adobe PageMaker Version 6.0, 6.5, or 7.0....................................................36
Software and Utilities Included on the CD-ROM...............................................37
Printer Drivers..........................................................................................................37
Software and Utilities .. .............................................................................................38
INDEX.........................................................................................................40
iii
Page 8

iv
Page 9

How to Read This Manual
R
R
Symbols
In this manual, the following symbols are used:
WARNING:
This symbol indicates a potentially hazardous situation which, if instructions
are not followed, could result in death or serious injury.
CAUTION:
This symbol indicates a potentially hazardous situation which, if instructions
are not followed, may result in minor or moderate injury, or damage to property.
* The statements above are notes for your safety.
Important
If this instruction is not followed, paper might misfeed, originals might be damaged, or data might be lost. Be sure to read this.
Preparation
This symbol indicates prior knowledge or preparation is required before operation.
Note
This symbol indicates precautions for operation, or actions to take after mal-operation.
Limitation
This symbol indicates numerical limits, functions that cannot be used together,
or conditions in which a particular function cannot be used.
Reference
This symbol indicates a reference.
[]
Keys and buttons that appear on the computer's display.
[]
Keys that appear on the machine's display.
{}
Keys built into the machine's control panel.
{}
Keys on the computer's keyboard.
1
Page 10

Names of Major Components and Software
The following software products are referred to using a general name:
• DeskTopBinder V2 Lite and DeskTopBinder V2 professional→ DeskTop-
Binder V2 Lite/professional
• ScanRouter V2 Lite and ScanRouter V2 professional (optional)→ ScanRouter
V2 Lite/professional
2
Page 11
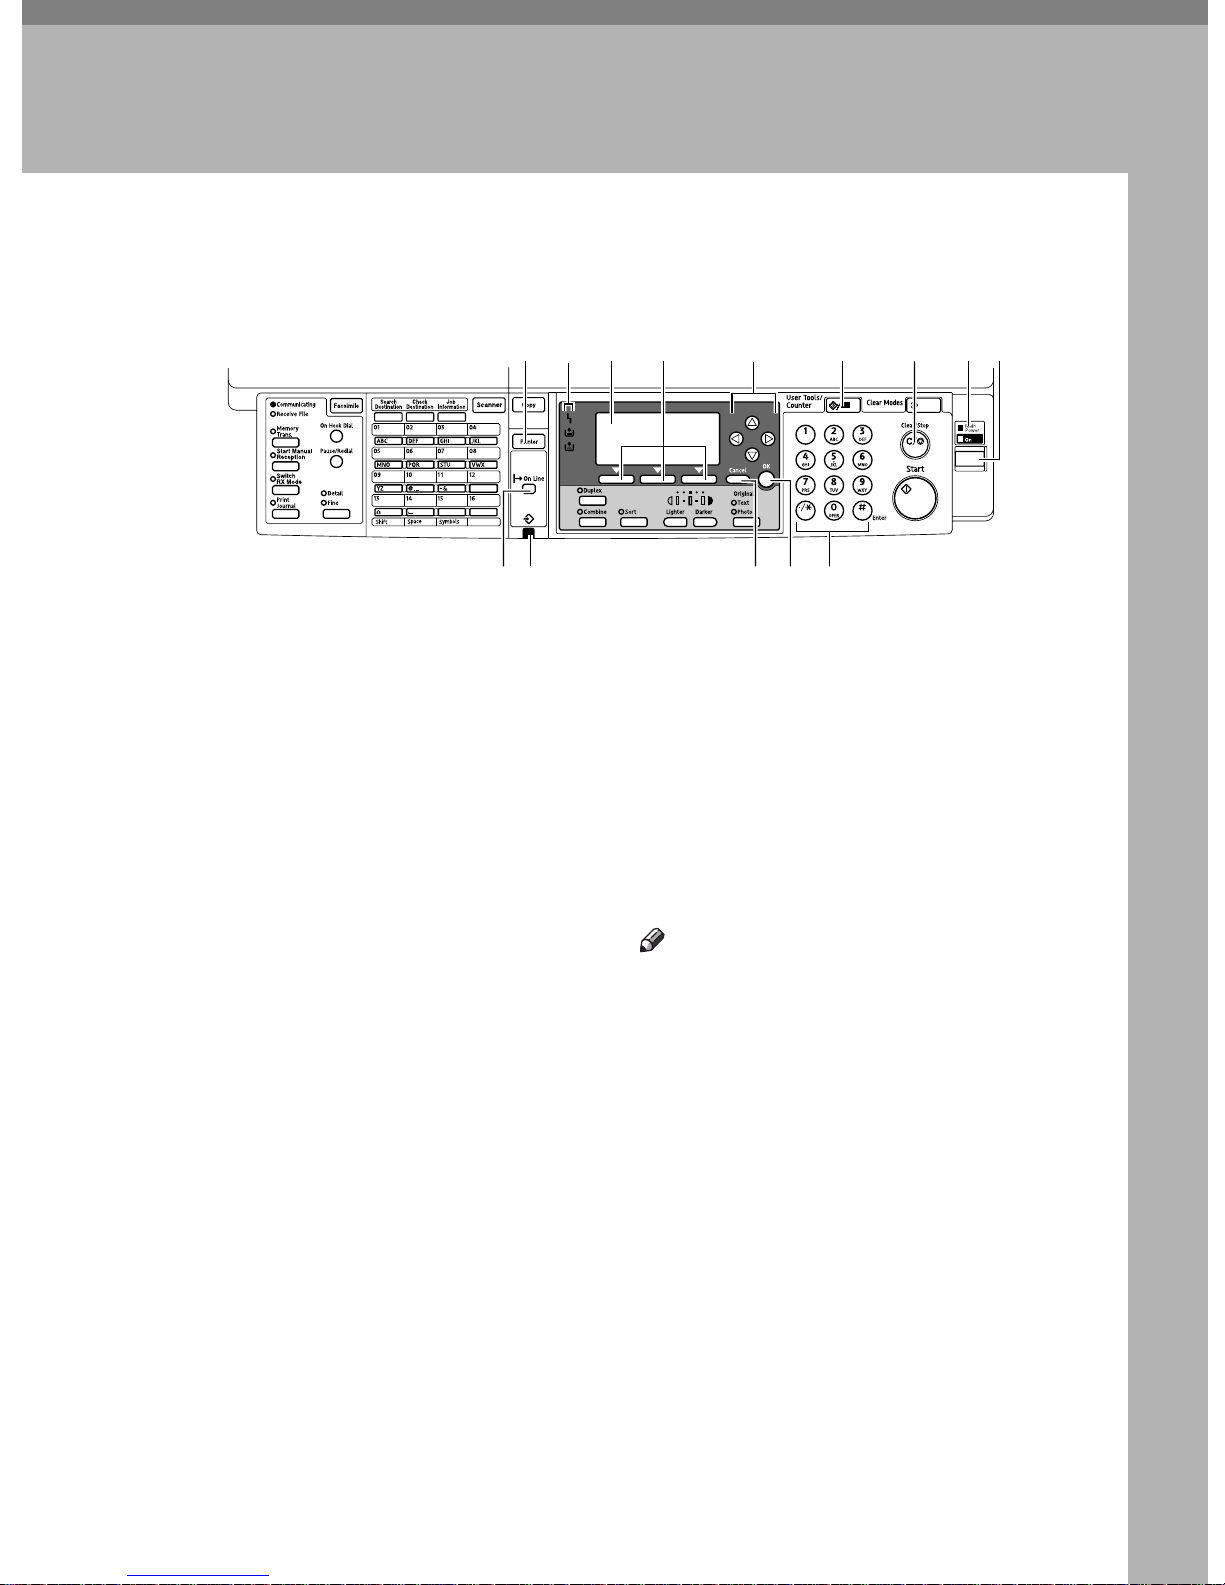
Control Panel
9
024
ABW
S.eps
1. Getting Started
21345678
1. {Printer} key
Press to activate the printer function.
2. Indicators
Displays errors and machine status.
h: Error indicator. See Network Guide
and General Settings Guide.
B: Load Paper indicator. See Copy Reference.
D: Add Toner indicator. See Copy Refer-
ence.
3. Display
Displays operation status and messages.
4. Selection keys
Correspond to items on the display. Press
to select the corresponding item.
5. Scroll keys
Press to select an item.
{U}: scroll upward
{T}: scroll downward
{V}: scroll right
{W}: scroll left
6. {User Tools/Counter} key
Press to change default or operation parameters according to requirement.
7. {Clear/Stop} key
Clear: clears an entered numeric value.
13 14121110
ABW024S
8. Main power indicator and On in-
dicator
The main power indicator lights when
the main power switch is turned on. The
On indicator lights when the operation
switch is turned on.
9. Operation switch
Press to turn the power on. The On indicator lights. To turn the power off, press
again.
Note
This key is inactivate during printing
or while setting printer defaults.
10. {Online} key
Press to switch the printer between online and offline.
11. Data In indicator
Blinks while the printer is receiving data
from a computer. Lights when there is
data remaining to be printed.
12. {Cancel} key
Press to cancel an operation or return to
the previous display.
13. {OK} key
Press to set a selected item or entered numeric value.
14. Number keys
Press to enter numeric values.
3
Page 12
1
4
021S1
Getting Started
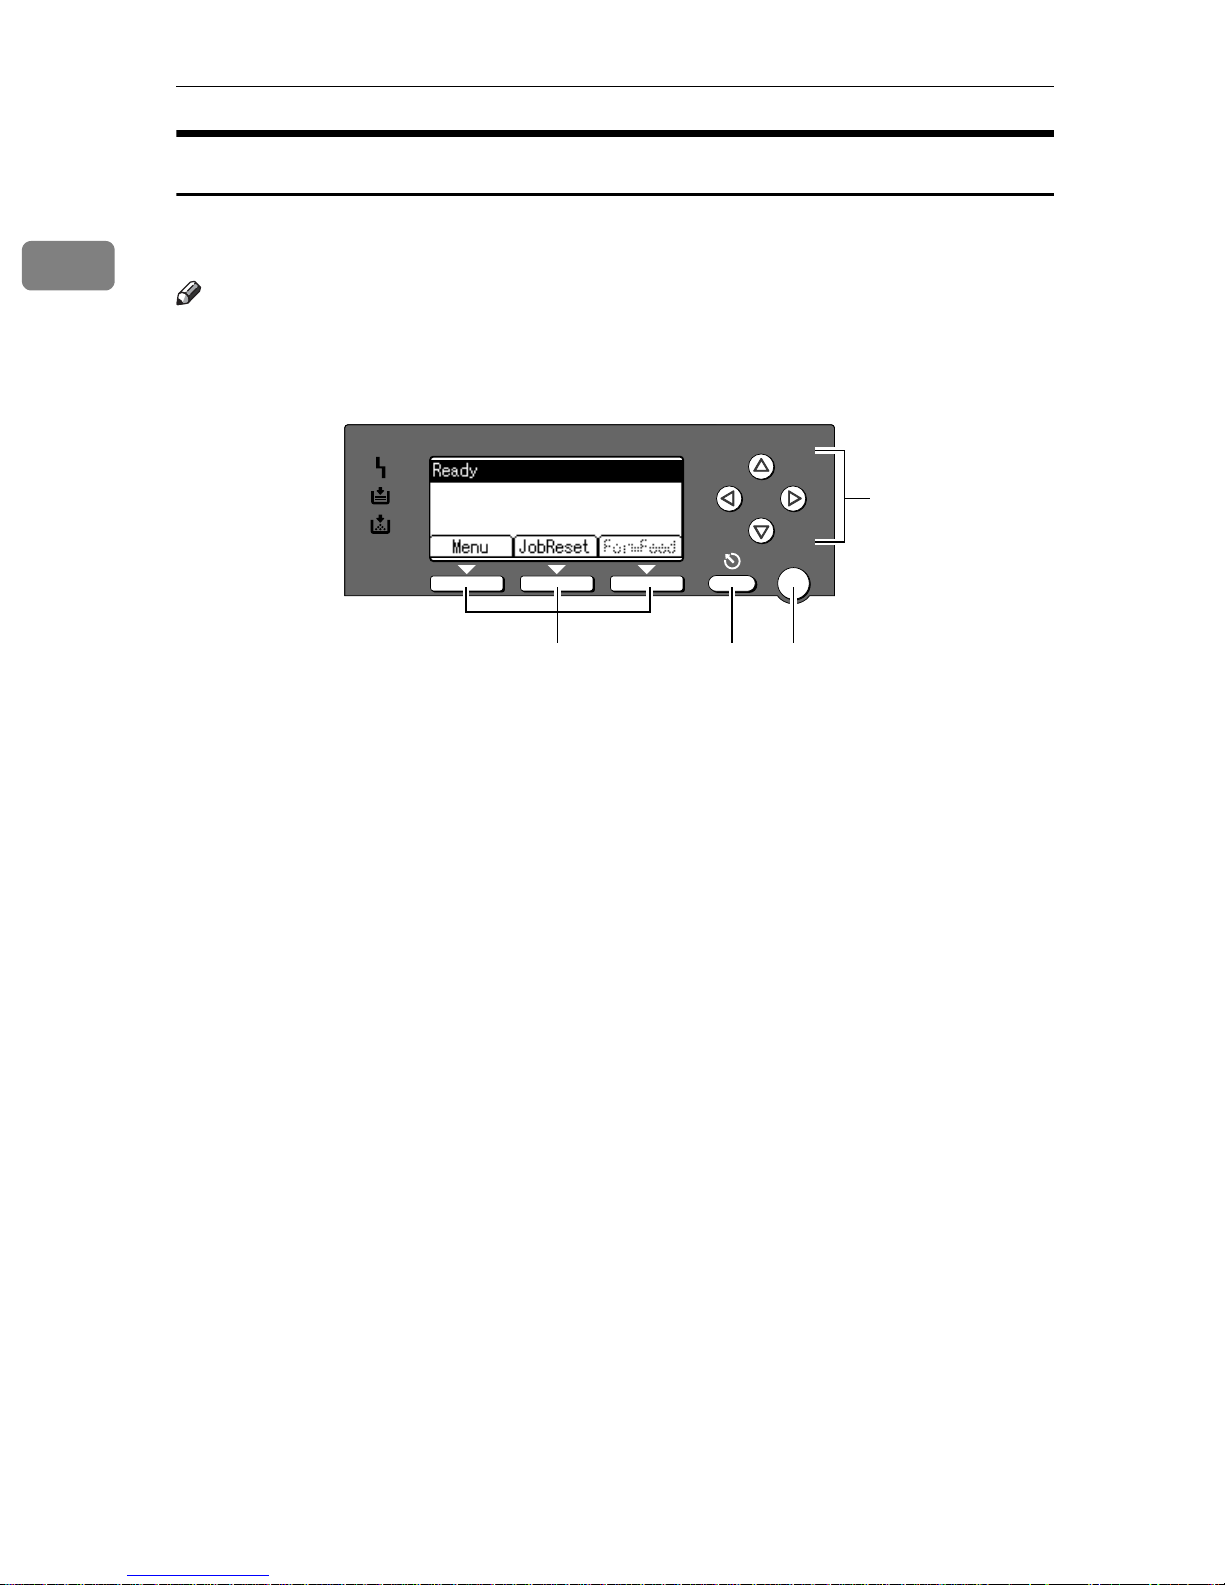
Reading the Display and Using Keys
This section explains how to read the display and using the selection key for the
initial display.
Note
The copy display is set as the default screen when the machine is turned on.
You can change the settings in [System Settings]. See General Settings Guide.
ABW
.eps
123
1. Selection keys
Correspond to the function items at the
bottom line on the display.
Example: Basic screen
When the instruction "press [JobReset]"
appears in this manual, press the center
selection key.
2. {Cancel} key
Press to cancel an operation or return to
the previous display.
OK
ABW021S1
3. {OK} key
Press to set a selected item or entered numeric value.
4. Scroll keys
Press to move the cursor in each direction, step by step.
When the {U}, {T}, {V}, or {W} key appears in this manual, press the scroll key
of the same direction.
4
Page 13

2. Preparing to Print
This section gives instructions for connecting the machine and computer, configuring the machine, and installing software.
When operating the machine with a USB connection, parallel connection, or IEEE
1394 (SCSI print) connection
• Connect the machine and computer using a USB cable, a parallel cable, or
an IEEE 1394 (SCSI print) cable.
Reference
For more information, see p.6 “Connecting the Machine”.
• Install a printer driver from the CD-ROM.
Reference
For more information, see p.13 “Installing the Software”.
When operating the machine under a network environment
• Configure the network using the machine's control panel.
Reference
For more information, see "Network Configuration", Network Guide.
• Install a printer driver and other utilities from the CD-ROM.
Reference
For more information, see p.13 “Installing the Software”.
Note
"Network environment" describes a situation where the machine is connected
to a computer via Ethernet, wireless LAN, or IEEE 1394 (IP over 1394).
5
Page 14
Preparing to Print
016S1
Preparing the Machine
2
Connecting the Machine
Reference
For information about connection
using Ethernet and wireless LAN,
see "Confirming the Connection",
Network Guide.
For information about connection
using Bluetooth
that comes with the optional Bluetooth interface unit.
Requirements
Before using this machine, make sure
all environmental and electrical requirements are met. Connect the machine to the host computer using the
USB port, network interface unit, or
both.
Make sure all cables, connectors, and
electrical outlets necessary to attach
the machine to the host computer or
network are at hand.
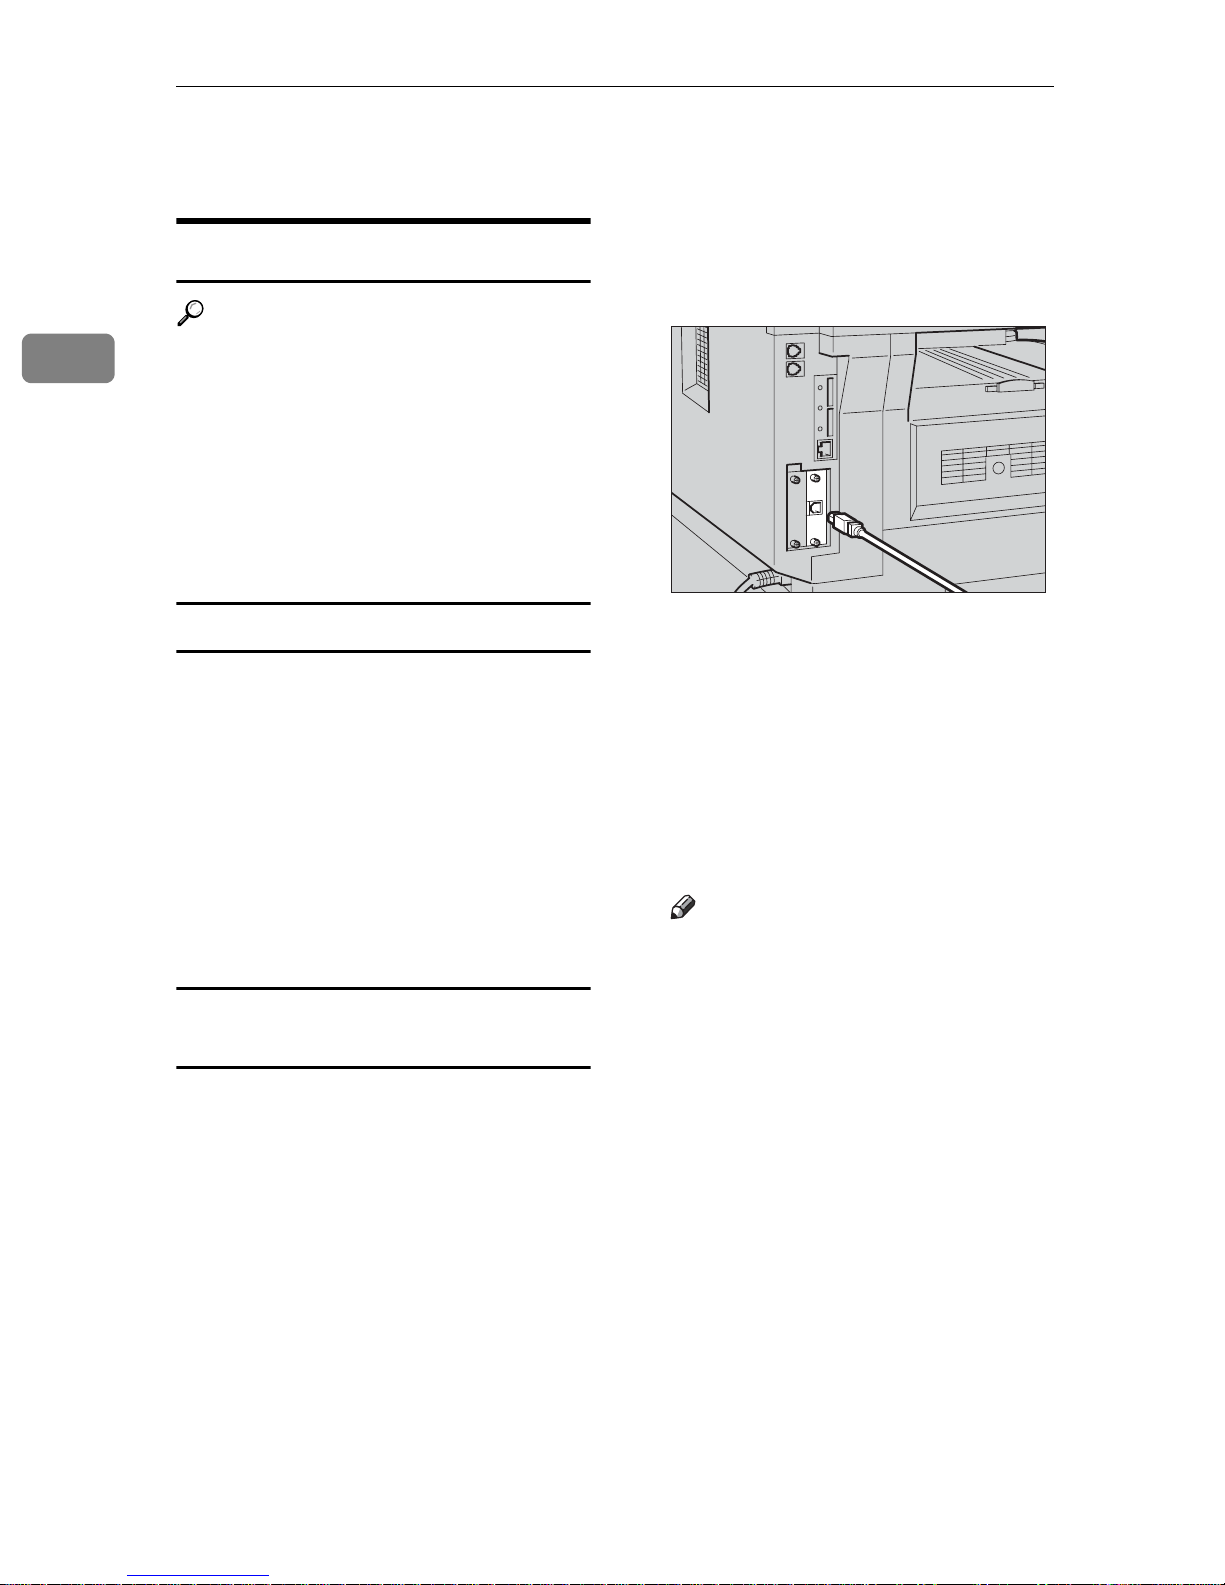
Connecting the Machine to the host
using a USB cable
You can connect the machine to the
host computer using a USB interface
cable.
This machine does not come with a
USB interface cable. Make sure you
purchase the appropriate cable for the
machine and your computer.
Follow the procedure below to connect the machine to the host computer
using a USB interface cable.
TM
, see the manual
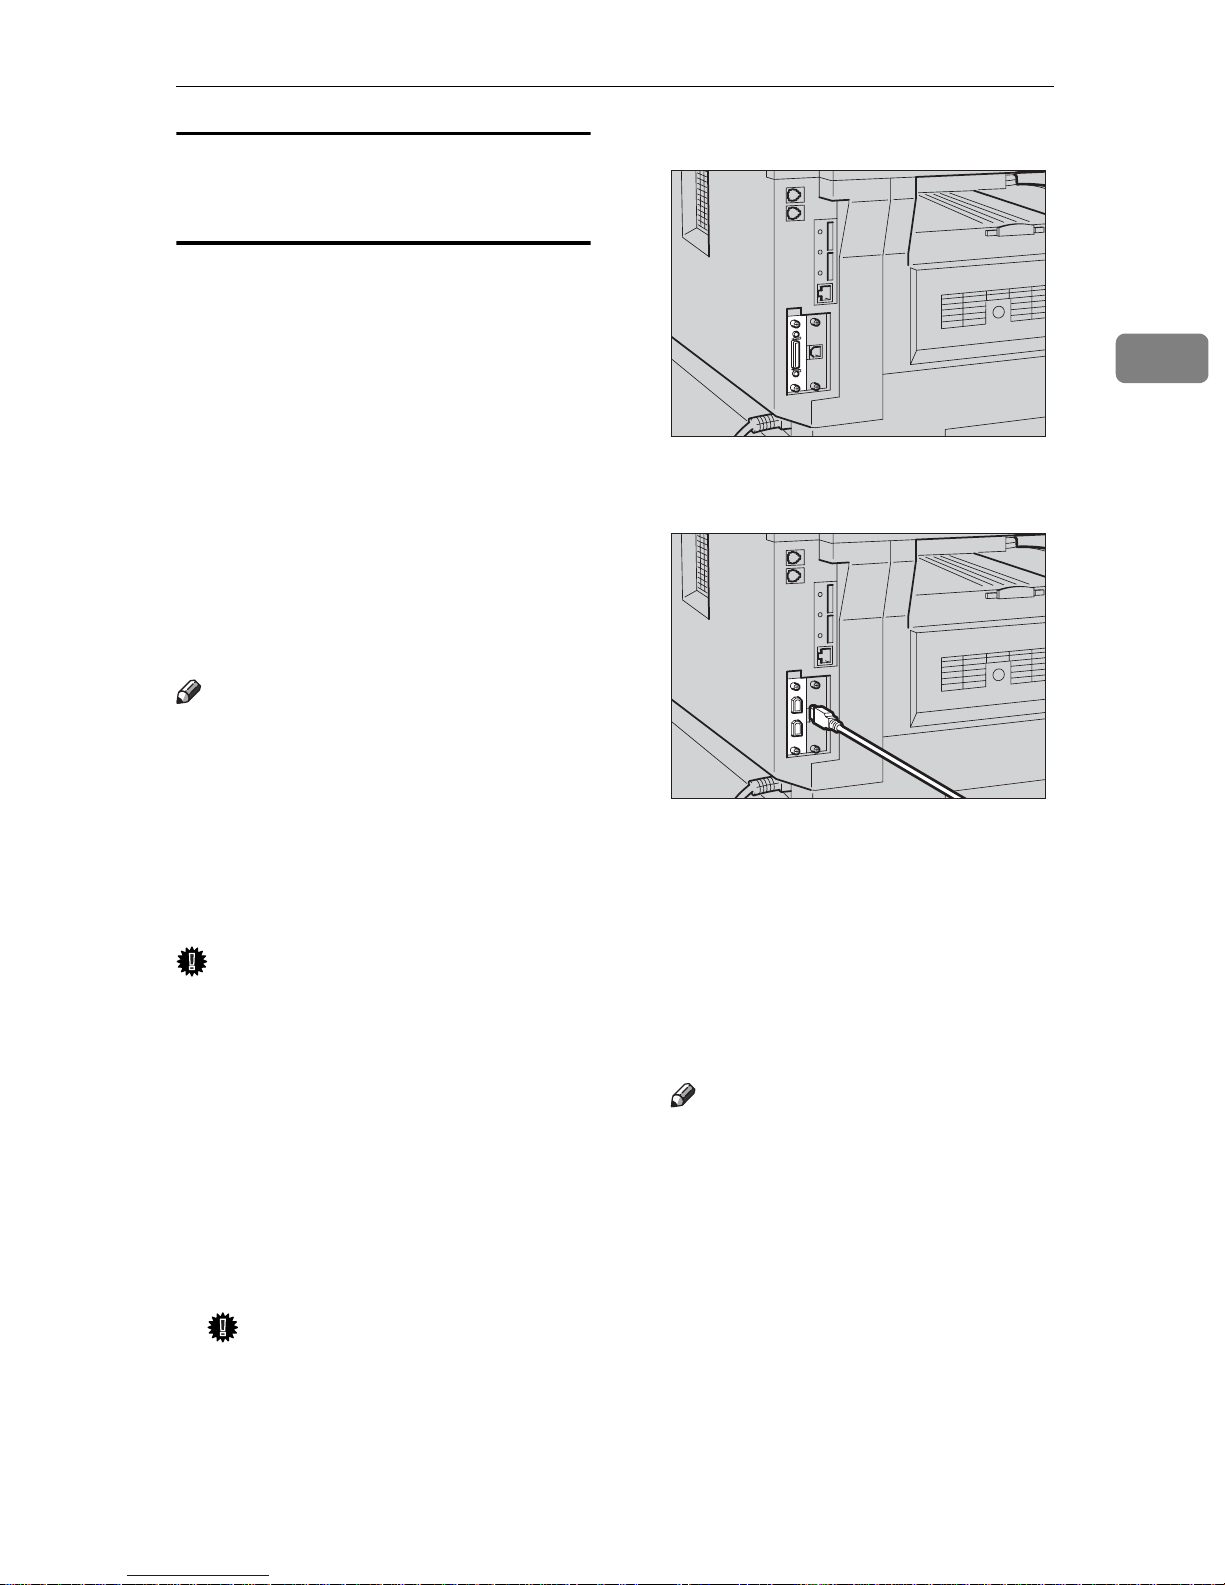
A Connect the USB 2.0 interface ca-
ble to the USB port on the right
side of the machine's back cover.
ABW
.eps
ABW016S1
B Connect the other end to the USB
port on the host computer.
The machine and computer are
now connected. The printer driver
must be installed next. For details
about how to install the printer
driver, see p.13 “Installing the Software”.
Note
The USB 2.0 interface is sup-
ported by Windows 98 SE/Me,
Windows 2000/XP, Mac OS 9.x,
and Mac OS X.
• For Windows 98 SE/Me:
Make sure to install “USB
Printing Support”. If USB 2.0
is used with Windows 98
SE/Me, only a speed equal to
that of USB 1.1 is possible.
•For Macintosh:
Macintosh supports only
USB 1.1. If USB 2.0 is used
with a Macintosh, only a
speed equal to that of USB 1.1
is possible.
6
Page 15
Connecting the Machine to the host
017S1
018S1
using the parallel cable/IEEE 1394 (SCSI
print) cable
Connect the machine to the host computer using the optional IEEE 1284 interface board or optional IEEE 1394
interface board. This machine does
not come with a parallel cable to connect the machine to the host computer.
The machine's parallel interface is a
standard bidirectional interface. It requires an IEEE 1284 compliant Micro
Centronics 36 Pin Cable and a parallel
port on the host computer. Make sure
you purchase the appropriate cable
for the machine and your computer.
Preparing the Machine
Parallel Connection
ABW
.eps
ABW017S1
IEEE 1394 (SCSI print) Connection
ABW
.eps
2
Note
Do not use a parallel cable that is
longer than 3 meters (10 feet).
Rating voltage of the interface con-
nector: Max. DC 5V
Follow the procedure below to connect the machine to the host computer.
Important
Before connecting the machine to a
computer using a parallel interface
cable, make sure the machine is
idle, and then turn off both machine and computer.
Be sure to use a specified interface
cable. Other cables may cause radio interference.
A Turn off the main power switches
of the machine and computer.
Important
Before turning off the main
power switch, see “Turning Off
the Power”, Copy Reference.
B Plug the cable into the connector
on the machine’s interface.
ABW018S1
C Plug the other end of the cable
into the connector on the computer’s interface.
D Turn on the machine's main pow-
er switch.
E Turn on the computer.
Note
When using Windows 95/98
SE/Me/2000/XP or Windows
Server 2003, a printer driver installation screen might appear
when the computer is turned
on. If this happens, click [Cancel]
on the screen. For more information, see p.13 “Auto Run”.
The machine and computer are
now connected. The printer driver
must be installed next. For information about how to install the
printer driver, see p.13 “Installing
the Software”.
7
Page 16
Preparing to Print
019S1
2
Setting Paper on the Bypass
Tray
This section gives instructions for setting paper on the bypass tray. Use the
bypass tray to print onto OHP transparencies, labels, thick paper, and envelopes that cannot be loaded in the
paper tray.
Reference
For details about setting paper in
the paper tray, see General Settings
Guide.
Note
When loading letterhead paper,
pay attention to its orientation. See
“Orientation-Fixed Paper or TwoSided Paper”, Copy Reference.
Paper within the following dimen-
sions can be set in the bypass tray:
Important
When printing using the printer
function, original images are always rotated by 180 degrees (the
orientation of images to be printed
is opposite to that of the copier
function). When printing onto paper with specific orientation requirements, such as envelopes and
letterheads, make sure to rotate the
paper feed orientation to 180 degrees.
Be sure to set the paper size using
the printer driver when printing
data from the computer. The paper
size set using the printer driver has
priority over the one set using the
control panel.
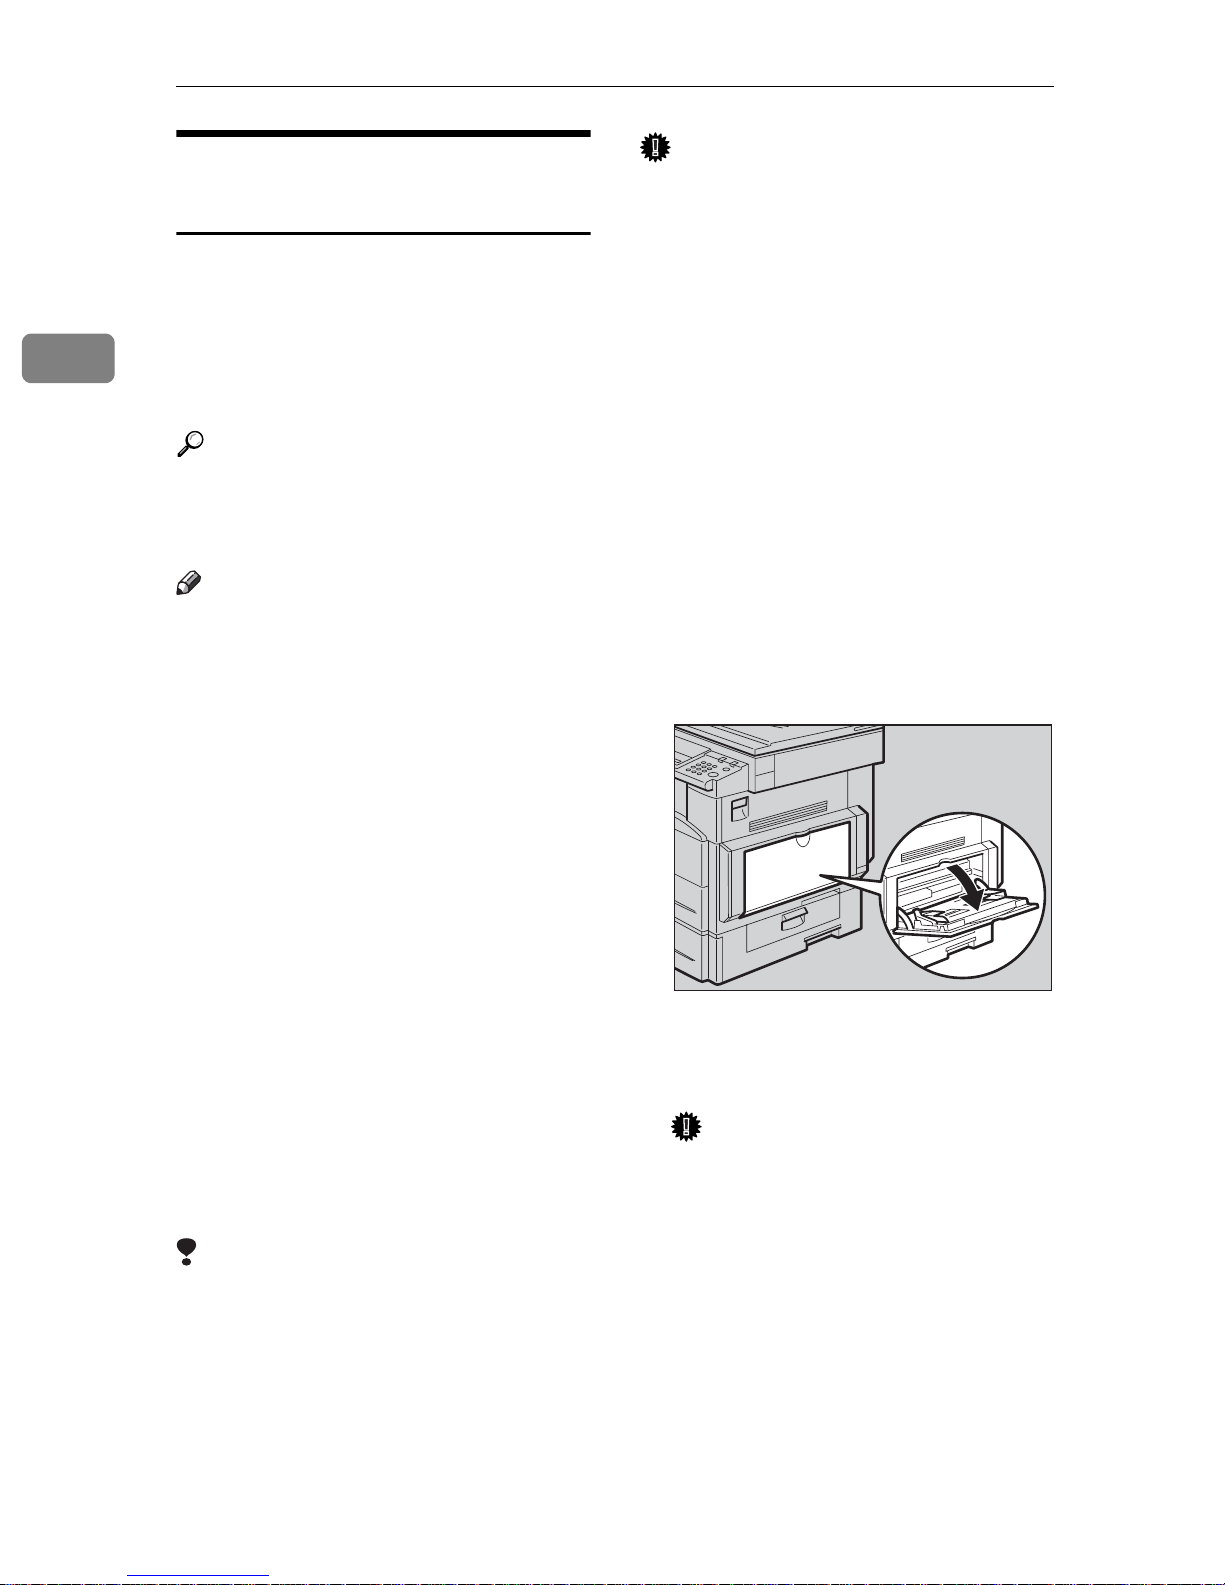
A Open the bypass tray.
ABW
.eps
• Vertical: 90.0-216.0 mm (3.54 in.-
8.50 in.)
• Horizontal: 139.0-600.0 mm (5.47
in.-23.62 in.)
Be sure to set the paper with the
side you want to print facing down
in the bypass tray.
When loading OHP transparencies
or thick paper in the bypass tray,
make the paper setting using the
control panel or printer driver.
The number of sheets that can be
loaded in the bypass tray depends
on the paper type.
Limitation
The following functions are dis-
abled when printing from the bypass tray:
• Duplex Printing
ABW019S1
B Adjust the paper guides to the pa-
per size.
Important
If the paper guides are not flush
against the paper, skewed images or paper misfeeds might
occur.
•Auto Tray Select
•Auto Tray Switching
8
Page 17

Preparing the Machine
020S1
***
001.tif***
***
002.tif***
C Gently insert paper face down
into the bypass tray.
ABW
1. Extender
2. Paper guides
Do not stack paper over the lim-
Open out the extender to sup-
Fan the paper to get air between
.eps
ABW020S1
Note
it mark, otherwise a skewed image or misfeeds might occur.
port paper sizes larger than A4
1
L, 8
/
"×11" L.
2
the sheets to avoid a multi-sheet
feed.
D Select the paper size.
Note
You can set paper size using the
printer driver. The following
procedures are not necessary
when setting paper size using
the printer driver.
2
The paper size set using the
printer driver has priority over
that set using the control panel.
When the printer driver is not
used, make settings using the
control panel.
Reference
For printer driver settings, see
the printer driver Help.
For details about setting custom
sizes, see p.10 “Setting custom
size paper”.
A Press the {User Tools/Counter}
key.
B Select [Printer Features] using
{U} or {T}, and then press the
{OK} key.
PRN
When setting an OHP transpar-
ency, make sure that its front
and back sides are properly positioned.
Select paper type when printing
onto OHP transparencies or
thick paper (over 105g/m
2
). For
details, see p.11 “Setting thick
paper or OHP transparencies”.
Select paper type when printing
onto envelopes. For details, see
p.12 “Setting envelopes”.
C Select [Paper Input] using {U} or
{T}, and then press the {OK}
key.
PRN
9
Page 18

Preparing to Print
***
003.tif***
***
004.tif***
001.tif
002.tif
003.tif
004.tif
***
005.tif***
2
D Select [Bypass Paper Size], and
then press the {OK} key.
PRN
E Select the paper size using {U}
or {T}, and then press the {OK}
key.
PRN
Note
When printing onto thick pa-
per or OHP transparencies,
select the paper type. For details, see p.11 “Setting thick
paper or OHP transparencies”.
A Press the {User Tools/Counter} key.
B Select [Printer Features] using {U}
or {T }, and then press the {OK}
key.
PRN
C Select [Paper Input] using {U} or
{T}, and then press the {OK} key.
PRN
D Select [Bypass Paper Size], and then
press the {OK} key.
PRN
F Press the {User Tools/Counter}
key.
Setting custom size paper
Note
Custom sizes can also be set using
the printer driver. The following
procedures are not necessary
when setting custom sizes using
the printer driver.
Custom size settings set using the
printer driver have priority over
those set using the machine's control panel.
When the printer driver is not
used, make settings using the control panel.
Reference
For printer driver settings, see the
printer driver Help.
E Select [Custom Size] using {U} or
{T}, and then press the {OK} key.
PRN
F Enter the vertical size of the paper
using the number keys, and then
press the {OK} key.
PRN
10
Page 19

Preparing the Machine
***
006.tif***
001.tif
***
007.tif***
***
008.tif***
***
009.tif***
G Enter the horizontal size of the
paper using the number keys, and
then press the {OK} key.
PRN
H Press the {User Tools/Counter} key.
Setting thick paper or OHP
transparencies
Note
Paper settings can also be set using
the printer driver. The following
procedures are not necessary
when setting paper sizes using the
printer driver.
Paper size settings set using the
printer driver have priority over
those set using the machine's control panel.
C Select [Tray Paper Settings] using
{U} or {T}, and then press the
{OK} key.
PRN
2
D Select [Paper Type:Bypass Tray] us-
ing {U} or {T}, and then press the
{OK} key.
PRN
E Select [OHP (Transparency)] or [Thick
Paper] using {U} or {T}, and then
press the {OK} key.
PRN
When the printer driver is not
used, make settings using the control panel.
Reference
For printer driver settings, see the
printer driver Help.
A Press the {User Tools/Counter} key.
B Select [System Settings] using {U}
or {T}, and then press the {OK}
key.
PRN
F Press the {User Tools/Counter} key.
Note
Settings made remain valid un-
til they are reset again. After
printing on OHP transparencies
or thick paper, make sure you
clear settings for the next user.
11
Page 20

Preparing to Print
***
010.tif***
***
011.tif***
***
012.tif***
***
013.tif***
***
014.tif***
***
015.tif***
***
016.tif***
004.tif
2
Setting envelopes
A Press the {User Tools/Counter} key.
B Select [System Settings] using {U}
or {T}, and then press the {OK}
key.
PRN
C Select [Tray Paper Settings] using
{U} or {T}, and then press the
{OK} key.
PRN
G Select [Printer Features] using {U}
or {T }, and then press the {OK}
key.
PRN
H Select [Paper Input] using {U} or
{T}, and then press the {OK} key.
PRN
I Select [Bypass Paper Size], and then
press the {OK} key.
PRN
D Select [Paper Type:Bypass Tray] us-
ing {U} or {T}, and then press the
{OK} key.
PRN
E Select [Thick Paper] using {U} or
{T}, and then press the {OK} key.
PRN
F Press the {Cancel} key twice to re-
turn to the User Tools main menu.
J Select the paper envelope size
from [C6 EnvL][C5 EnvL][DL En-
vL], and then press the {OK} key.
PRN
K Press the {User Tools/Counter} key.
12
Page 21

Installing the Software
This manual assumes you are familiar
with general Windows procedures
and practices. If you are not, see the
operating instructions that come with
Windows for details.
The procedure for installing the printer driver depends on the connection
with the computer. With a parallel or
Ethernet connection, Quick Install is
also available. With a wireless LAN
connection, check the machine and
computer are communicating properly and then install the printer driver
by following the procedure used for
an Ethernet connection.
• For details about the parallel/network connection, see p.14 “Quick
Install” or p.16 “Installing the PCL
6/5e and RPCS™ Printer Driver”.
• For details about the USB connection, see p.30 “Installing the Printer Driver Using USB”.
• For details about the IEEE 1394
connection (SCSI print), see p.32
“Installing the Printer Driver Using IEEE 1394”.
Installing the Software
Auto Run
Inserting the CD-ROM into the CDROM drive starts the installer automatically. The installer helps you install the following printer drivers and
software easily.
Note
If “plug and play” starts, click
[Cancel] in [New Hardware Found],
[Device Driver Wizard] or [Found New
Hardware Wizard] dialog box, and
then insert the CD-ROM. The [New
Hardware Found], [Device Driver Wizard] or [Found New Hardware Wizard]
dialog box appears depending on
the system version of the Windows
95/98/Me/2000/XP, Windows
Server 2003, or Windows NT 4.0.
Auto Run might not work auto-
matically with certain operating
system settings. If this happens,
launch "Setup.exe", located on the
CD-ROM root directory.
If you want to cancel Auto Run,
hold down the {SHIFT} key (if your
operating system is Windows
2000/XP or Windows Server 2003,
hold down the left {SHIFT} key)
while inserting the CD-ROM. Keep
the {SHIFT} key held down until
the computer has finished accessing the CD-ROM.
2
Limitation
If your operating system is Win-
dows 2000/XP, Windows Server
2003, or Windows NT 4.0, installing software using Auto Run requires Administrator permission.
When you install software using
Auto Run, log on using an account
that has Administrators permission.
13
Page 22

2
Preparing to Print
The following table shows the printer
drivers and software that can be installed using Auto Run:
*1
Printer
and Util-
ity Wiz-
ard
PCL 6
printer
driver
PCL 5e
printer
driver
Auto Run
Quick Install Add
Network
connection with
TCP/IP
Parallel
connection
Quick Install
Auto Run will start the installer automatically when you insert the CDROM into the CD-ROM drive. By selecting Quick Install, you can easily
install the PCL 6 printer driver and
the RPCS™ printer driver. SmartDeviceMonitor for Client can also be installed provided the machine and
computer are connected via the network.
Preparation
Before starting installation, close
all documents and applications.
RPCS™
printer
driver
PostScript 3
printer
driver
LAN-Fax
Driver
Font
Manager
2000
SmartDeviceMonitor for
Admin
SmartDeviceMonitor for
Client
*1
Available operating systems are: Win-
dows 95/98/Me, Windows 2000/XP,
Windows Server 2003, and Windows
NT 4.0. Auto Run is unavailable with
Macintosh.
Limitation
The following conditions are re-
quired:
• Windows 95/98/Me/2000/XP,
Windows Server 2003, or Windows NT 4.0
For network connections:
• The machine must be connected to
the network using an Ethernet cable.
• TCP/IP protocol must be configured.
• The IP address must be assigned to
both machine and computer.
• The IEEE 802.11b interface unit is
installed and the connection is
properly made.
• The IEEE 1394 interface board (IP
over 1394) is installed and the connection is properly made.
For parallel connections:
• The machine must be connected to
the computer using a parallel cable.
14
• Bidirectional transmission must be
enabled.
Page 23

Installing the Software
Important
If your system is Windows NT 4.0,
we recommend that you upgrade
the Windows NT 4.0 operating
system to Service Pack 4 or later
before installing the PCL 6/5e or
RPCS™ printer drivers. Contact
your Windows retailer for more information about latest versions.
Note
When the machine is connected to
the computer using the USB 2.0 interface or the IEEE 1394 interface,
Quick Install cannot be used. See
p.30 “Installing the Printer Driver
Using USB”, p.32 “Installing the
Printer Driver Using IEEE 1394”.
A Quit all applications running.
B Insert the CD-ROM into the CD-
ROM drive.
Auto Run will start the installer.
C Select a language for the interface
language, and then click [OK].
The following languages are available: Cestina (Czech), Dansk (Danish), Deutsch (German), English
(English), Espanol (Spanish),
Francais (French), Italiano (Italian),
Magyar (Hungarian), Nederlands
(Dutch), Norsk (Norwegian), Polski
(Polish), Portugues (Portuguese),
Russian (Russian), Suomi (Finnish),
Svenska (Swedish)
The default interface language is
English.
D Click [Quick Install].
The software license agreement
appears in the [License Agreement]
dialog box.
E After reading through the agree-
ment, click [I accept the agreement]
to agree, and then click [Next].
F Click the machine model you are
using when the [Select Printer] dia-
log box appears.
Note
For TCP/IP network connec-
tion, select the machine whose
IP address is displayed in the
[Connect To] column.
For parallel connection, select
the machine whose printer port
is displayed in the[Connect To]
column.
G Click [Install].
H Follow the instructions on the
screen.
A message prompting you to restart your computer may appear.
To complete installation, restart
your computer.
Important
If the machine has options in-
stalled, you should make settings for them using the printer
driver. See p.20 “Setting Up Options - PCL 6/5e and RPCS”.
Note
If you want to change the print-
er name, follow the procedure
below:
Windows 95/98/Me, Windows
•
2000, and Windows NT 4.0
On the [Start] menu, point to
[Settings], and then click
[Printers]. The [Printers] win-
dow appears. Right-click the
machine icon, and then click
[Rename].
2
15
Page 24

2
Preparing to Print
•
Windows XP Professional and
Windows Server 2003
On the [Start] menu, click
[Printers and Faxes]. The [Print-
ers and Faxes] window ap-
pears. Right-click the
machine icon, and then click
[Rename].
• Windows XP Home Edition
On the [Start] menu,
click[Control Panel]. Click
[Printers and Other Hardware],
and then click [Printers and
Faxes]. The [Printers and Faxes] window appears. Right-
click the machine icon, and
then click [Rename].
Installing the PCL 6/5e and
RPCS™ Printer Driver
This section gives basic instructions
for installing the PCL 6/5e printer
driver and RPCS™ printer driver
without using Quick Install. Follow
the procedures below, as appropriate.
Reference
See p.14 “Quick Install” to install
the PCL 6 printer driver or RPCS™
printer driver using Quick Install.
Limitation
If your operating system is Win-
dows 2000/XP, Windows Server
2003, or Windows NT 4.0, installing a printer driver using Auto
Run requires Administrator permission. When you install a printer
driver using Auto Run, log on using an account that has Administrator permission.
Important
If your operating system is Win-
dows NT 4.0, we recommend that
you upgrade the Windows NT 4.0
operating system to Service Pack 4
or later before installing the printer
drivers. Contact your Windows retailer for more information about
latest versions.
Note
If you want to share the machine
on a Windows 2000/XP, Windows
Server 2003, or Windows NT 4.0
platform, use the [Sharing] tab in
the printer properties dialog box to
specify the additional driver (alternate driver). For details, see the operating instructions that come with
Windows 2000/XP, Windows
Server 2003, or Windows NT 4.0.
When prompted for the additional
driver (alternate driver) location,
select the following folders on the
CD-ROM:
• Windows 95/98/Me
PCL 6: \DRIVERS\PCL6\
WIN9X_ME\(Language)\
DISK1\
PCL 5e: \DRIVERS\PCL5E\
WIN9X_ME\(Language)\
DISK1\
RPCS™: \DRIVERS\RPCS\
WIN9X_ME\(Language)\
DISK1\
•
Windows 2000/XP and Windows
Server 2003
PCL 6: \DRIVERS\PCL6\
WIN2K_XP\(Language)\
DISK1\
PCL 5e: \DRIVERS\PCL5E\
WIN2K_XP\(Language)\
DISK1\
RPCS™: \DRIVERS\RPCS\
WIN2K_XP\(Language)\
DISK1\
16
Page 25

Installing the Software
• Windows NT 4.0
PCL 6: \DRIVERS\PCL6\
NT4\(Language)\DISK1\
PCL 5e: \DRIVERS\PCL5E\
NT4\(Language)\DISK1\
RPCS™: \DRIVERS\RPCS\
NT4\(Language)\DISK1\
A Quit all applications running.
B Insert the CD-ROM into the CD-
ROM drive.
Auto Run will start the installer.
C Select a language for the interface
language, and then click [OK].
The following languages are available: Cestina (Czech), Dansk (Danish), Deutsch (German), English
(English), Espanol (Spanish),
Francais (French), Italiano (Italian),
Magyar (Hungarian), Nederlands
(Dutch), Norsk (Norwegian), Polski
(Polish), Portugues (Portuguese),
Russian (Russian), Suomi (Finnish),
Svenska (Swedish)
The default interface language is
English.
D Click [PCL/RPCS Printer Drivers].
The software license agreement
appears in the [License Agreement]
dialog box.
H Double-click the machine name
to display the printer settings.
I Select SmartDeviceMonitor.
SmartDeviceMonitor
A Click [Port:], and then click
[Add].
B Click [SmartDeviceMonitor], and
then click [OK].
C Select the machine you want to
use.
TCP/IP
A Click [TCP/IP], and then
click [Search].
Available machines will
be listed.
B Select the machine you
want to use, and then click
[OK].
Note
Machines that respond to
an IP broadcast from the
computer will be displayed. To print to a machine not listed here, click
[Specify Address], and then
enter the IP address or
host name.
2
E After reading through the agree-
ment, click [I accept the agreement]
to agree, and then click [Next].
F Select the printer drivers you
want to install when the [Select
Program] dialog box appears, and
then click [Next].
G Select the model of the machine
you are using.
To change the printer name,
change it in the [Change settings for
'Printer Name'] box.
Part of the printer's IP ad-
dress is used for the port
name. Under Windows
95/98/Me, avoid using an
address that is partially
similar to one already in
use. For example , if
“192.168.0.2” is already
used, “192.168.0.2xx” cannot be used. Similarly, if
“192.168.0.20” is already
used, “192.168.0.2” cannot
be used.
17
Page 26

Preparing to Print
2
NetBEUI
A Click [NetBEUI], and then
click [Search].
A list of machines that can
be used with NetBEUI appears.
B Select the machine you
want to use, and then click
[OK].
Note
NetBEUI cannot be used
under Windows XP or
Windows Server 2003.
Machines that respond to
a broadcast from the computer will be displayed.
To print to a machine not
listed here, click [Specify
Address], and then enter
the NetBEUI address.
Confirm the NetBEUI address on the network is on
the configuration page.
For more information
about printing the configuration page, see "Printer
Features Parameters",
Printer Reference 2. The
NetBEUI address appears
as “\\RNPxxxx\xxx” on
the configuration page.
Enter the machine's network path name in the
form of "%%Computer
name\Share name". Do
not enter "\\" but "%%" as
head characters.
You cannot print to ma-
chines beyond routers.
IPP
A Click [IPP].
The IPP setting dialog box
appears.
B
To specify the IP address of the
machine, enter "http://machine's-ip-address/printer" or
"ipp://machine's-ip-address/printer" in the
URL
]
box.
(Example: IP address is
192.168.15.16)
http://192.168.15.16/
printer
ipp://192.168.15.16
/printer
C If necessary, enter the
names to distinguish the
machine in the [IPP Port
Name] box. Enter a differ-
ent name to those of any
existing port name.
If you do not do this, the
address entered in the
[Printer URL] box will be set
as the IPP port name.
D If a proxy server and IPP
user name are used, click
[Detailed Settings], and then
configure the necessary
settings.
Note
For more information
about these settings,
see SmartDeviceMonitor for Client Help.
E Click [OK].
[
Printer
18
J Make sure the location for the se-
lected machine appears after
[Port:].
K Configure the user code and de-
fault printer as necessary.
Page 27

Installing the Software
User Code
User codes are eight digit codes
that allow you to keep track of
printing done under each code.
To use this feature, the network
administrator should assign
user codes and inform users of
them before they install the
printer driver.
Use the following methods to
enter a user code for registration:
• For the PCL 6/5e or Post-
Script 3 printer drivers, enter
the user code on the [Statis-
tics] tab in the printer proper-
ties dialog box.
• For the RPCS™ printer driv-
er, click the [Printer Configura-
tion] button on the [Print
Settings] tab in the printer
properties dialog box. Click
the [User Code] button. A dia-
log box appears. Enter the
user code in the dialog box.
Note
When using the RPCS™
printer driver on Windows
95/98/Me, the user code
cannot be changed once it is
entered. To change an entered user code, uninstall the
printer driver, reinstall it,
and then enter a new user
code.
Reference
For more information about
user codes, see “User Code
(MFP)”, General Settings
Guide.
L Click [Continue] to start printer
driver installation.
M Follow the instructions on the
screen.
Changing port settings
Follow these steps to change SmartDeviceMonitor for Client settings,
such as the proxy server settings or
IPP URL.
Note
There are no settings for NetBEUI.
A In the [Printers] window, click the
icon of the machine you want to
use. On the [File] menu, click
[Properties].
Note
Under Windows XP and Win-
dows Server 2003, click the icon
of the machine you want to use
in the [Printers and Faxes] win-
dow.
B Click the [Details] tab, and then
click [Port Settings].
The [Port Settings] dialog box ap-
pears.
Note
Under Windows 2000/XP, Win-
dows Server 2003, and Win-
dows NT 4.0, click the [Ports]
tab, and then click [Configure
Port]. The [Port Configuration] dia-
log box appears.
• For TCP/IP, you can configure
Timeout Settings.
2
Default Printer
Select the [Default Printer] check
box to set the printer as the default printer.
19
Page 28

Preparing to Print
2
Note
If you cannot set the items on
the [Recovery/Parallel Printing]
tab, follow the procedure below.
A Click [Cancel] to close the
[Port Settings] dialog box.
B Start SmartDeviceMonitor
for Client, and then rightclick the SmartDeviceMonitor for Client icon on
the taskbar.
C Click [Extended Features
Settings], and then select
the [Set Recovery/Parallel
Printing for each port] check
box.
D Click [OK] to close the [Ex-
tended Features Settings] di-
alog box.
• For IPP, you can configure IPP
User Settings, Proxy Settings
and Timeout Settings.
Note
For more information about
these settings, see SmartDeviceMonitor for Client Help.
Setting Up Options - PCL 6/5e
and RPCS
If the machine has options installed,
you should set the options using the
printer driver.
Under Windows NT 4.0, changing
printer settings requires Full Control permission. Members of the
Administrators, Server Operators,
Print Operators, and Power Users
groups have Full Control permission by default. When you set up
options, log on using an account
that has Full Control permission.
When setting up options, you should
access the printer properties dialog
box from Windows. You cannot set
up options by accessing the printer
properties dialog box from an application.
PCL 6/5e printer driver
A On the [Start] menu, point to [Set-
tings], and then click [Printers].
The [Printers] window appears.
Note
If using Windows XP Profes-
sional or Windows Server 2003,
click the [Printers and Faxes] window on the [Start] menu.
If using Windows XP Home
Edition, access the [Printers and
Faxes] window by clicking the
[Start] button on the taskbar,
click [Control Panel], click [Print-
ers and Other Hardware], and then
click [Printers and Faxes].
B Click the icon of the machine you
want to use.
Limitation
Under Windows 2000/XP and
Windows Server 2003, changing
printer settings requires Manage
Printers permission. Members of
the Administrators and Power Users groups have Manage Printers
permission by default. When you
set up options, log on using an account that has Manage Printers
20
permission.
C On the [File] menu, click [Proper-
ties].
The printer properties dialog box
appears.
D Click the [Accessories] tab.
E Select the options installed in the
[Options] area.
F Click [OK].
Page 29

Installing the Software
RPCS™ printer driver
A On the [Start] menu, point to [Set-
tings], and then click [Printers].
The [Printers] window appears.
Note
If using Windows XP Profes-
sional or Windows Server 2003,
click the [Printers and Faxes] window on the [Start] menu.
If using Windows XP Home
Edition, access the [Printers and
Faxes] window by clicking
the[Start] button on the taskbar,
click [Control Panel], click [Print-
ers and Other Hardware], and then
click [Printers and Faxes].
B Click the icon of the machine you
want to use.
C On the [File] menu, click [Proper-
ties].
The printer properties dialog box
appears.
Note
If the following message ap-
pears “Configure installed ac-
cessories in the [Accessories] tab
of [Printer Configuration], which
will open next.”, click [OK], and
then proceed to step
E
.
D Click the [Change Accessories] tab.
Note
In Windows 95/98/Me, click
[Printer Configuration] on the
[Print Settings] tab, and then click
[Change Accessories].
F Click [OK].
G Click [OK], and then close the
printer properties dialog box.
Installing the PostScript 3
Printer Driver
This section gives basic instructions
for installing the PostScript 3 printer
driver. Actual procedures may differ
depending on the operating system.
Follow the procedures below, as appropriate.
Reference
To use the PostScript 3 printer
driver, see PostScript 3 Operating
Instructions Supplement for details.
Windows 95/98/Me - Installing the
PostScript 3 printer driver
A Quit all applications running.
B Insert the CD-ROM into the CD-
ROM drive.
Auto Run will start the installer.
C Select a language for the interface
language, and then click [OK].
The following languages are available: Cestina (Czech), Dansk (Danish), Deutsch (German), English
(English), Espanol (Spanish),
Francais (French), Italiano (Italian),
Magyar (Hungarian), Nederlands
(Dutch), Norsk (Norwegian), Polski
(Polish), Portugues (Portuguese),
Russian (Russian), Suomi (Finnish),
Svenska (Swedish)
2
E Select the options installed in the
[Select printer options:] list.
The default interface language is
English.
21
Page 30

Preparing to Print
2
Note
The printer driver with the se-
lected language will be installed.
The printer driver will be in-
stalled in English if you select
the following languages: Cestina, Magyar, Polski, Portugues,
Suomi, and Russian.
D Click [PostScript 3 Printer Driver].
Add Printer Wizard starts.
E Click [Next].
F Click [Local Printer], and then click
[Next].
A dialog box for selecting the
printer appears.
G Select the model of the machine
you are using, and then click
[Next].
C On the [File] menu, click [Proper-
ties].
The printer properties dialog box
appears.
D Click the [Accessories] tab.
E Select the options you have in-
stalled in the [Options] area.
F Click [OK].
Windows 2000/XP and Windows Server
2003 - Installing the PostScript 3 printer
driver
Limitation
Installing a printer driver requires
Administrator permission. When
you install a printer driver, log on
using an account that has Administrator permission.
H In the [Available ports:] box, click
[Printer Port], and then click [Next].
I Change the name of the machine
if you want to, and then click
[Next].
Note
Click [Yes] if you want to set the
machine as the default printer.
J Follow the instructions on the
screen.
Windows 95/98/Me - Setting up options
If the machine has options installed,
you should make settings for them
using the printer driver.
A On the [Start] menu, point to [Set-
tings], and then click [Printers].
Note
If you want to share the machine
on a Windows 2000/XP or Windows Server 2003 platform, use the
[Sharing] tab in the printer proper-
ties dialog box to specify the additional driver (alternate driver). For
details, see the operating instructions that come with Windows
2000/XP and Windows Server
2003.
When prompted for the additional
driver (alternate driver) location,
select the following folders on the
CD-ROM:
• Windows 95/98/Me:
\DRIVERS\PS\WIN9X_ME\
(Language)\DISK1\
• Windows NT 4.0:
\DRIVERS\PS\NT4\
(Language)\DISK1\
The [Printers] window appears.
B Click the icon of the machine you
22
want to use.
Page 31

Installing the Software
A Quit all applications that are run-
ning.
B Insert the CD-ROM into the CD-
ROM drive.
Auto Run will start the installer.
C Select a language for the interface
language, and then click [OK].
The following languages are available: Cestina (Czech), Dansk (Danish), Deutsch (German), English
(English), Espanol (Spanish),
Francais (French), Italiano (Italian),
Magyar (Hungarian), Nederlands
(Dutch), Norsk (Norwegian), Polski
(Polish), Portugues (Portuguese),
Russian (Russian), Suomi (Finnish),
Svenska (Swedish)
The default interface language is
English.
Note
The printer driver with the se-
lected language will be installed.
G Select the check box of the port
you want to use, and then click
[Next].
A dialog box for selecting the
printer appears.
H Select the model of the machine
you are using, and then click
[Next].
I Change the name of the machine
if you want to, and then click
[Next].
Note
Click [Yes] if you want to set the
machine as the default printer.
J Select whether or not you want to
share the machine, and then click
[Next].
Reference
See Network Guide for information about setting up and using
the machine in a network environment.
2
The printer driver will be in-
stalled in English if you select
the following languages: Cestina, Magyar, Polski, Portugues,
Suomi, and Russian.
D Click [PostScript 3 Printer Driver].
Add Printer Wizard starts.
E Click [Next].
F Click [Local Printer], and then click
[Next].
Note
If using Windows XP or Win-
dows Server 2003, click [Local
printer attached to this computer],
and then click [Next].
A dialog box for selecting the
printer port appears.
K Follow the instructions on the
screen.
Windows 2000/XP and Windows Server
2003 - Setting up options
If the machine has options installed,
you should make settings for them
using the printer driver.
Limitation
Changing the printer settings re-
quires Manage Printers permission.
Members of the Administrators
and Power Users groups have Manage Printers permission by default.
When you set up options, log on using an account that has Manage
Printers permission.
23
Page 32

Preparing to Print
2
A On the [Start] menu, point to [Set-
tings], and then click [Printers].
The [Printers] window appears.
Note
In Windows XP Professional or
Windows Server 2003, click the
[Printers and Faxes] window on
the [Start] menu.
In Windows XP Home Edition,
access the [Printers and Faxes]
window by clicking the [Start]
button on the taskbar, click
[Control Panel], [Printers and Other
Hardware], and then click [Printers and Faxes].
B Click the icon of the machine you
want to use.
C On the [File] menu, click [Proper-
ties].
The printer properties dialog box
appears.
We recommend that you upgrade
Windows NT 4.0 operating system
to Service Pack 6 or later before installing the printer driver. Contact
your Windows retailer for more information about latest versions.
Note
If you want to share the machine
on a Windows NT 4.0 platform,
use the [Sharing] tab in the printer
properties dialog box to specify the
additional driver (alternate driver). For details, see the operating
instructions that come with Windows NT 4.0.
When prompted for the additional
driver (alternate driver) location,
select the following folders on the
CD-ROM:
• Windows 95/98/Me:
\DRIVERS\PS\WIN9X_ME\
(Language)\DISK1\
A Quit all applications running.
D Click the [Device Settings] tab.
E Select the options you have in-
stalled under [Installable Options].
F Click [OK].
Windows NT 4.0 - Installing the
PostScript 3 printer driver
Limitation
Installing a printer driver requires
Administrator permission. When
you install a printer driver, log on
using an account that has Administrator permission.
Important
The CD-ROM containing Windows
NT Server operating system version 4.0, or the Windows NT Workstation operating system is required
to install the printer driver.
B Insert the CD-ROM into the CD-
ROM drive.
Auto Run will start the installer.
C Select a language for the interface
language, and then click [OK].
The following languages are available: Cestina (Czech), Dansk (Danish), Deutsch (German), English
(English), Espanol (Spanish),
Francais (French), Italiano (Italian),
Magyar (Hungarian), Nederlands
(Dutch), Norsk (Norwegian), Polski
(Polish), Portugues (Portuguese),
Russian (Russian), Suomi (Finnish),
Svenska (Swedish)
The default interface language is
English.
24
Page 33

Installing the Software
Note
The printer driver with the se-
lected language will be installed.
The printer driver will be in-
stalled in English if you select
the following languages: Cestina, Magyar, Polski, Portugues,
Suomi, and Russian.
D Click [PostScript 3 Printer Driver].
Add Printer Wizard starts.
E Confirm that the [My Computer] op-
tion is selected, and then click
[Next].
A dialog box for selecting the
printer port appears.
F Select the check box of the port
you want to use, and then click
[Next].
Windows NT 4.0 - Setting up options
If the machine has options installed,
you should make settings for them
using the printer driver.
Limitation
Changing printer settings requires
Manage Printers permission.
Members of the Administrators
and Power Users groups have
Manage Printers permission by default. When you set up options, log
on using an account that has Manage Printers permission.
A On the [Start] menu, point to [Set-
tings], and then click [Printers].
The [Printers] window appears.
B Click the icon of the machine you
want to use.
2
A dialog box for selecting the
printer appears.
G Select the model of the machine
you are using, and then click
[Next].
H Change the name of the machine
if you want to, and then click
[Next].
Note
Click [Yes] if you want to set the
machine as the default printer.
I Select whether or not you want to
share the machine, and then click
[Next].
Reference
See Network Guide for information about setting up and using
the machine in a network environment.
J Follow the instructions on the
screen.
C On the [File] menu, click [Proper-
ties].
The printer properties dialog box
appears.
D Click the [Device Settings] tab.
E Select the options you have in-
stalled under [Installable Options].
F Click [OK].
-Bidirectional transmission
When bidirectional transmission is
enabled, information such as paper
size and feed orientation is automatically sent to the computer. You can
also check machine status from your
computer.
• Bidirectional transmission is supported under Windows 95/98/Me/
2000/XP, Windows Server 2003,
and Windows NT 4.0.
25
Page 34

Preparing to Print
2
• When bidirectional transmission is
running, machine status and information can be viewed by opening
the printer driver screen.
To support bidirectional transmission, the following conditions are required:
When connecting with USB 2.0
• The port on the USB 2.0 inter-
face and the USB port on the
computer are connected using a
USB interface cable (Windows
98 SE/Me/2000/XP, Windows
Server 2003).
Note
In Windows 98 SE/Me, [Enable
bi-directional support for this print-
er] must be selected in [Spool Settings] on the [Details] tab in
RPCS™ printer driver.
• The IP address specified in the
Microsoft TCP/IP Print is used
(Windows NT 4.0).
• The IP address is included in
port name, if using IPP protocol.
Note
In Windows 95/98/Me, [Enable
bi-directional support for this print-
er] must be selected in [Spool Settings] on the [Details] tab in
RPCS™ printer driver.
In Windows 2000/XP, Windows
Server 2003, or Windows NT 4.0,
[Enable bidirectional support] must
be selected, and [Enable printer
pooling] must not be selected on
the [Ports] tab in RPCS™ printer
driver.
When connecting with IEEE 1394
In Windows 2000/XP or Win-
dows Server 2003, [Enable bidi-
rectional support] must be
selected, and [Enable printer pool-
ing] must not be selected on the
[Ports] tab in RPCS™ printer
driver.
When connecting with the network
• The machine must be set to bidirectional transmission.
• SmartDeviceMonitor for Client
included on the CD-ROM must
be installed.
One of the following conditions
must also be satisfied as well as the
two requirements mentioned
above:
• The port for SmartDeviceMonitor and TCP/IP must be used.
• The standard TCP/IP port is
used without changing the port
name (Windows 2000/XP, Windows Server 2003).
• The port on the optional IEEE
1394 interface board and the
IEEE 1394 port on the computer
are connected using an interface
cable (Windows Me/2000/XP,
Windows Server 2003).
Note
[SCSI print (SBP-2)] must be set to
Active and [Bidirectional SCSI
print] must be set to ON in [IEEE
1394] on the [Interface Settings]
tab in the machine's System Settings.
In Windows Me, [Enable bi-direc-
tional support for this printer] must
be selected in [Spool Settings] on
the [Details] tab in RPCS™ print-
er driver.
In Windows 2000/XP, Windows
Server 2003, [Enable bidirectional
support] must be selected, and
[Enable printer pooling] must not
be selected on the [Ports] tab in
RPCS™ printer driver.
26
Page 35

Installing the Software
When connecting with a parallel cable
• The computer must support bidirectional transmission.
• The machine must be set to bidirectional transmission.
• The machine parallel port and
computer parallel port are connected using a parallel interface
cable that supports bidirectional transmission.
Note
In Windows 95/98/Me, [Enable
bi-directional support for this print-
er] must be selected in [Spool Settings] on the [Details] tab in
RPCS™ printer driver.
In Windows 2000/XP, Windows
Server 2003, or Windows NT 4.0,
[Enable bidirectional support] must
be selected, and [Enable printer
pooling] must not be selected on
the [Ports] tab in RPCS™ printer
driver.
B Double-click the CD-ROM icon.
C Double-click the [Mac OS 8 and 9]
folder.
D Double-click the [PS Driver] folder.
E Double-click the folder of the lan-
guage you use.
F Open [Disk 1], and then double-
click the installer icon.
The PostScript 3 printer driver installer window appears.
G Follow the instructions on the
screen.
H Double-click [Extensions] in [Sys-
tem Folder].
I Double-click [Printer Descriptions].
J Double-click the CD-ROM icon
on the desktop.
K Double-click the [Printer Descrip-
tions] folder in the [Mac OS 8 and 9]
folder.
2
Mac OS - Installing the
PostScript 3 Printer Driver and
Utilities
It is necessary to install a printer driver and a PPD file to print from a Macintosh.
Follow this procedure to install a
printer driver and a PPD file on Macintosh running OS 8.6 or later versions up to 9.2, and Mac OS X Classic
mode.
Note
For installation under Mac OS X
(v10.1.x), see p.29 “Mac OS X - Installing the PostScript 3 Printer
Driver”.
A Insert the CD-ROM into the CD-
ROM drive.
L Double-click [Disk 1] in the folder
of the language you use.
M Drag the PPD file into [Printer De-
scriptions] in [Extensions] in [System
Folder].
N Restart the Macintosh.
Setting up the PPD file
Preparation
Make sure that the machine is connected to an AppleTalk network
before performing the following
procedure:
A On the Apple menu, click [Choos-
er].
B Click the [Adobe PS] icon.
27
Page 36

Preparing to Print
2
C In the [Select a PostScript Printer:]
list, click the name of the machine
you want to use.
D Click [Setup].
E Click [Select PPD...].
F Click the printer description file
you want to use, and then click
[Select].
G Click [OK].
The PPD file is set up, and the [Ado-
be PS] icon appears at the left of the
machine name in the list. Next, follow the procedure on p.28 “Setting
up options” to make the option set-
tings, or close the [Chooser] dialog
box.
F Click [OK].
The list of options closes.
G Click [OK].
H Close the [Chooser] dialog box.
Installing Adobe Type Manager (ATM)
Note
Quit all applications running be-
fore installation. Install after restarting.
A Start the Macintosh.
B Insert the CD-ROM into the CD-
ROM drive.
C Double-click the CD-ROM icon.
Setting up options
A On the Apple menu, click [Choos-
er].
B Click the [Adobe PS] icon.
C In the [Select a PostScript Printer:]
list, click the name of the machine
you want to use, and then click
[Setup].
D Click [Configure].
A list of options appears.
E Select the option you want to set
up, and then select the appropriate setting for it.
Note
If the option you want to set up
is not displayed, the PPD file
might not be set up correctly.
Check the name of the PPD file
shown in the dialog box.
D Double-click the [Mac OS 8 and 9]
folder.
E Double-click the [ATM] folder.
F Double-click the [ATM 4.6.2 install-
er] icon.
G Follow the instructions on screen.
H Restart the Macintosh.
Note
Make sure to restart the com-
puter. [ATM] will be completely
installed only after restarting.
I Select [Control Panel] from the Ap-
ple menu, and then click [ATM].
J Open the ATM control panel.
Note
For more information about in-
stallation, see the User's Guide
in the ATM folder.
28
Page 37

Installing the Software
Installing screen fonts
A Start the Macintosh.
B Insert the CD-ROM into the CD-
ROM drive.
C Double-click the CD-ROM icon.
D Double-click the [Mac OS 8 and 9]
folder.
E Double-click the [Fonts] folder.
F Copy the fonts you want to install
into the [System] folder.
A confirmation dialog box appears.
G Click [OK].
The fonts are installed.
H Restart the Macintosh.
A Insert the CD-ROM into the CD-
ROM drive.
B Double-click the CD-ROM icon.
C Double-click the [Mac OS X] fold-
er.
D Double-click the [Mac OSX PPD In-
staller] folder, and then double-
click the installer icon.
E Follow the instructions on screen.
Setting up the PPD file
A Run [Print Center].
B Click [Add Printer].
Note
Select [AppleTalk] in the first
pop-up menu.
2
Reference
For information about installing
Printer Utility for Mac, see Post-
Script 3 Operating Instructions
Supplement.
Mac OS X - Installing the
PostScript 3 Printer Driver
It is necessary to install a PPD file to
print from a Macintosh. Follow the
procedures to install a PPD file on
Macintosh running Mac OS X.
Printer driver is included in Mac OS.
When printing under Mac OS X
v10.1.x, use the printer driver included in Mac OS.
Preparation
You need an administrator name
and a password (phrase). For more
information, consult your administrator.
If the zone has been set, select
the zone in the second pop-up
menu.
C Select the PPD file for the model
you are using from the [Printer
Model:] pop-up menu.
D Click [Add].
Setting up options
Limitation
You can make settings for all print-
er features, even if the necessary
option is not installed, due to Mac
OS X Native mode limitations.
Check which options are installed
in the machine before you print.
29
Page 38

2
Preparing to Print
Installing the Printer Driver
Using USB
This section gives basic instructions
for installing printer drivers using
USB. The printer drivers can be installed from the CD-ROM that comes
with this machine.
Preparation
Make sure that all other applications are closed and the computer
is not printing before installation.
Windows 98 SE/Me - Installing the printer
driver using USB
The procedure below uses Windows
98 SE as an example. The procedure
for Windows Me may be slightly different.
When the USB interface cable is used
for the first time, the “plug and play”
function starts and [New Hardware
Found] dialog box appears.
If printer drivers are already installed, “plug and play” appears, and
the printer with its port directed to
the USB interface cable is added to the
[Printers] folder.
A Click [Next].
B Click [Search for the best driver for
your device. {Recommended}.], and
then click [Next].
C Select the [Specify a location:] check
box, and then click [Browse...].
The [Browse for Folder] dialog box
appears.
If you want to disable Auto
Run, press {Shift} when insert-
ing the CD-ROM into the drive
and keep it pressed until the
computer completes transmission to the drive.
E Select the drive where the printer
driver is located according to your
operating system, and then click
[Next].
If the CD-ROM drive is D, the folder will be “D:\DRIVERS\USBPRINT\WIN98ME”.
F Confirm the printer driver loca-
tion, and then click [Next].
USB Printing Support will be installed.
G Click [Finish].
H Follow the “plug and play” on the
screen to install the printer drivers.
Note
Each printer driver is stored in
the following folders on the CDROM:
• PCL 6: \DRIVERS\PCL6\
WIN9X_ME\(Language)\
DISK1
• PCL 5e: \DRIVERS\PCL5E\
WIN9X_ME\(Language)\
DISK1
• RPCS™: \DRIVERS\RPCS\
WIN9X_ME\(Language)\
DISK1
• PostScript 3: \DRIVERS\
PS\WIN9X_ME\
(Language)\DISK1
D Insert the CD-ROM provided
into the CD-ROM drive.
Note
When Auto Run starts, click [Ex-
it].
30
When installation is complete, the
printer with its port directed to
“USB00n” appears in the [Printers]
folder. (“n” is the number of printers connected.)
Page 39

Installing the Software
Windows 2000/XP and Windows Server
2003 - Installing the printer driver using
USB
Limitation
Installing a printer driver requires
the Administrators permission.
When you install a printer driver,
log on using an account that has
Administrator permission.
When the USB interface cable is used
for the first time, the [Found New Hard-
ware Wizard] dialog box appears, and
Windows 2000/XP's USB Printing
Support will be installed automatically.
If the printer driver is already installed, the “plug and play” is displayed, and the printer with its port
directed to the USB interface cable is
added to the [Printers]
Note
Under Windows XP, even if the
printer driver has already been in-
stalled, [Found New Hardware Wizard]
may start when connecting the
printer and the computer with the
USB interface cable for the first
time. If this happens, install the
printer driver by following the
procedure below:
*1
folder.
A Install the printer driver by refer-
ring to the instructions for installation.
Note
Each printer driver is stored in
the following folders on the CDROM:
• RPCS™: \DRIVERS\RPCS\
WIN2K_XP\(Language)\
DISK1
• PostScript 3: \DRIVERS\
PS\WIN2K_XP\
(Language)\DISK1
When installation is complete, the
printer with its port directed to
“USB00n” appears in the [Printers]
*1
folder. (“n” is the number of
printers connected.)
*1
In Windows XP, the folder is [Print-
ers and Faxes].
Macintosh - Creating a desktop printer
icon
When you connect the machine and
your computer using USB 2.0, create a
Desktop Printer icon.
Limitation
In Mac OS X Native mode, print-
ing is disabled when connected to
the machine using USB.
A Double-click [Desktop Printer Utility]
in the [AdobePS Components] fold-
er.
B Select [AdobePS] in [With:] and
[Printer (USB)] in [Create Desktop],
and then click [OK].
C Click [Change] in [USB Printer Selec-
tion].
D Select the model of the machine
you are using in [Select a USB Print-
er:], and then click [OK].
E Click [Auto Setup] in [PostScript
Printer Description (PPD) File].
TM
2
• PCL 6: \DRIVERS\PCL6\
WIN2K_XP\(Language)\
DISK1
• PCL 5e: \DRIVERS\PCL5E\
WIN2K_XP\(Language)\
DISK1
F Click [Create].
G Enter the machine name, and then
click [Save].
The printer icon appears on the
desktop.
31
Page 40

Preparing to Print
2
H Close the Desktop Printer Utility.
Installing the Printer Driver
Using IEEE 1394
Printing using a SCSI print device
with the optional IEEE 1394 interface
board is possible under Windows
2000/XP or Windows Server 2003.
Preparation
Make sure that all other applications are closed and the computer
is not printing before installation.
Important
When the printer driver is being
installed, do not turn on the power
of other printers connected to the
same bus, or connect another IEEE
1394 device.
Before uninstalling the printer driv-
er, be sure to disconnect the IEEE
1394 interface cable from the computer.
If you send data from your com-
puter when data is being received
from another client computer,
your data will be printed after
completing the print job for the
other client computer.
When the machine is connected to
the computer properly via the 1394
interface, the appearance of the
icon in the printer window changes.
Windows 2000
Important
In Windows 2000, the optional
IEEE 1394 interface board can only
be used with Service Pack 1 or later. If the Service Pack is not installed, the connectable number of
devices in an IEEE 1394 bus is only
one, and the client cannot access
the IEEE 1394 interface board without using an account that has Administrator permission.
32
SCSI print must be enabled using
the control panel. See "Interface
Settings/IEEE 1394", Network
Guide.
SCSI print using the optional IEEE
1394 interface board is not supported by Windows 95/98/Me, or
Windows NT 4.0. If the “plug and
play” function starts, click [Cancel]
in the [New Hardware Found] or [De-
vice Driver Wizard] dialog box.
Note
If [Found New Hardware Wizard] ap-
pears every time the computer is
started or the cable is connected
with Windows 2000/XP or Windows Server 2003, when the printer function that uses SCSI print is
not installed, disable the device.
See p.33 “Disabling the Device” for
more information.
A Connect the machine and com-
puter using the IEEE 1394 interface cable.
The [Found New Hardware Wizard] di-
alog box appears.
B Click [Next].
“This wizard will complete the installation for this Device: Unknown” appears.
C Select [Optional search locations:],
and then click [Next].
D When “Locate Driver Files” ap-
pears, select the [Optional search lo-
cations.] check box and the [Specify
a location] check box, and then
click [Next].
Page 41

Installing the Software
E Hold down the left {SHIFT} key
and insert the CD-ROM into the
CD-ROM drive.
Keep the left {SHIFT} key held
down until the computer has finished accessing the CD-ROM.
If the Auto Run program starts,
click [Cancel], and then click [Exit].
F Click [Browse].
G Select the printer driver you want
to install. Each printer driver is
stored in the following folders:
• PCL 6: \DRIVERS\PCL6\
WIN2K_XP\(Language)\
DISK1
• PCL 5e: \DRIVERS\PCL5E\
WIN2K_XP\(Language)\
DISK1
• RPCS™: \DRIVERS\RPCS\
WIN2K_XP\(Language)\
DISK1
• PostScript 3: \DRIVERS\PS\
WIN2K_XP\(Language)\
DISK1
H Click [Open].
I Click [OK].
A printer model selection dialog
box appears.
Windows XP and Windows Server
2003
A Connect the machine and the
computer using the IEEE 1394 interface cable.
The [Found New Hardware Wizard] di-
alog box appears.
B Confirm that “This wizard helps
you install software for: (printer
name)” is displayed, and click [In-
stall from a list or specific location (Ad-
vanced)], and then click [Next].
“Please choose your search and installation option.” appears.
C Select the [Search for the best driver
in these locations.] check box, and
[Include this location in the search:]
check box.
D Install the printer driver follow-
ing the same procedure as in steps
to J for Windows 2000.
E
Note
When installation is complete, a
printer with its port directed to
“1394_00n” appears in the
[Printers and Faxes] folder. (“n” is
the number of printers connected.)
2
J Follow the instructions on the
screen.
Note
When installation is complete,
the printer with its port directed
to “1394_00n” appears in the
[Printers] folder. (“n” is the num-
ber of printers connected.)
-Disabling the Device
If [Add New Hardware Wizard] ap-
pears every time you restart the computer using an operating system that
does not support SCSI print, or plug
in/take out the cable, disable the device with the following procedure:
33
Page 42

Preparing to Print
2
• Windows Me
A In the [Add New Hardware Wiz-
ard] dialog box, confirm that
[Windows has found the follow-
ing new Hardware: IEEE SBP-2
Device] is displayed, and click
[Recommended search for a better driver [Recommended]], and
then click [Next].
B When “Windows was unable
to locate the software for this
device.” appears, click [Fin-
ish].
If you do not want to install the printer
when [Found New Hardware Wizard]
starts when using an operating system that supports SCSI print, disable
the device with the following procedure:
• Windows XP and Windows Server 2003
A In the [Found New Hardware
Wizard] dialog box, confirm
“This wizard helps you install software for: Unknown”
is displayed, and click [Install
from a list or specific location
(Advanced)], and then click
[Next].
B When “Please choose your
search and installation option.” appears, remove all se-
lections from [Search for the
best driver in these locations.],
and then click [Next].
C When “The wizard could not
find the software on your
computer for..” appears,
click [OK].
• Windows 2000
A In the [Found New Hardware
Wizard] dialog box, click
[Next].
B When “This wizard will com-
plete the installation for this
Device: Unknown” appears,
click [Search for a suitable driver
for my device [recommended]],
and then click [Next].
C When “Locate Driver Files”
appears, remove all selec-
tions from [Optional search lo-
cations.], and then click [Next].
D When “Driver Files Search
Results” appears, click [Dis-
able the device. The Add/Remove
Hardware Wizard in the control
panel can be used to complete
the driver installations.], and
then click [Finish].
D When “Cannot Install this
Hardware” appears, select
the [Don't prompt again to install
the software] check box, and
then click [Finish].
If [Found New Hardware Wizard] ap-
pears every time you restart the computer when using an operating
system that does not support IP over
1394, or plug in/take out the cable,
disable the device with the following
procedure:
• Windows 2000
A In [Found New Hardware Wiz-
ard] dialog box, click [Next].
B When “This wizard will com-
plete the installation for this
Device:” and “IP over 1394”
appear, click [Search for a suit-
able driver for my device [recom-
mended]], and then click [Next].
34
C When “Locate Driver Files”
appears, remove all selec-
tions from [Optional search lo-
cations.], and then click [Next].
Page 43

Installing the Software
D When “Driver Files Search
Results” appears, click [Dis-
able the device. The Add/Remove
Hardware Wizard in the Control
Panel can be used to complete
the driver installations.], and
then click [Finish].
Installing SmartDeviceMonitor
for Client/Admin
Limitation
If your operating system is Win-
dows 2000/XP, Windows Server
2003, or Windows NT 4.0, installing software using Auto Run requires Administrator permission.
When you install a printer driver
using Auto Run, log on using an
account that has Administrator
permission.
A Quit all applications running.
B Insert the CD-ROM into the CD-
ROM drive.
Auto Run will start the installer.
C Select a language for the interface
language, and then click [OK].
The following languages are available: Cestina (Czech), Dansk (Danish), Deutsch (German), English
(English), Espanol (Spanish),
Francais (French), Italiano (Italian),
Magyar (Hungarian), Nederlands
(Dutch), Norsk (Norwegian), Polski
(Polish), Portugues (Portuguese),
Suomi (Finnish), Svenska (Swedish)
D Click [SmartDeviceMonitor for Cli-
ent/Admin].
The software license agreement
appears in the [License Agreement]
dialog box.
E After reading through the agree-
ment, click [I accept the agreement]
to agree, and then click [Next].
F Select the program you want to
install when the [Select Program]
dialog box appears.
G Follow the instructions on the
screen.
Installing Font Manager 2000
Limitation
If your operating system is Win-
dows 2000/XP, Windows Server
2003, or Windows NT 4.0, installing software using Auto Run requires Administrator permission.
When you install a printer driver
using Auto Run, log on using an
account that has Administrator
permission.
Note
Font Manager 2000 English ver-
sion is provided.
A Quit all applications running.
B Insert the CD-ROM into the CD-
ROM drive.
Auto Run will start the installer.
2
The default interface language is
English.
35
Page 44

Preparing to Print
2
C Select a language for the interface
language, and then click [OK].
The following languages are available: Cestina (Czech), Dansk (Danish), Deutsch (German), English
(English), Espanol (Spanish),
Francais (French), Italiano (Italian),
Magyar (Hungarian), Nederlands
(Dutch), Norsk (Norwegian), Polski
(Polish), Portugues (Portuguese),
Russian (Russian), Suomi (Finnish),
Svenska (Swedish)
The default interface language is
English.
D Click [Font Manager 2000].
E Follow the instructions on the
screen.
Using Adobe PageMaker
Version 6.0, 6.5, or 7.0
• For PageMaker 6.0 default instal-
lation
The directory is “C:\PM6\RSRC\
PPD4”.
• For PageMaker 6.5 default instal-
lation
The directory is “C:\PM65\RSRC\
USENGLISH\PPD4”.
“USENGLISH” may vary depending on your language selection.
• For PageMaker 7.0 default instal-
lation
The directory is “C:\PM7\RSRC\
USENGLISH\PPD4”.
“USENGLISH” may vary depending on your language selection.
Note
When using PageMaker, optional
features that can be selected by the
printer driver will not be active.
The following procedure describes
how to activate the optional printer features.
If you use the machine under Windows 95/98/Me, Windows 2000/XP,
Windows Server 2003, or Windows
NT 4.0 with Adobe PageMaker, you
need to copy the PPD file to the PageMaker folder.
The PPD file is the file with the extension “.ppd” in the folder “DRIVERS\PS\WIN9X_ME\(Language)\
DISK1\” on the CD-ROM.
The [WIN9X_ME] folder, inside the [PS]
folder is for Windows 95/98/Me. Use
the folder at a level appropriate for
the operating system you are currently using.
The third folder, “(Language)” may
be renamed with an appropriate language name.
Copy the file with extension “.ppd” to
the PageMaker folder.
A On the [File] menu, click [Print].
The [Print Document] dialog box
appears.
B Make the necessary settings in
the [Features] box.
36
Page 45

Software and Utilities Included on the CD-ROM
Software and Utilities Included on the CDROM
*1
There are two CD-ROMs that come
with this machine.
• Printer Drivers and Utilities
• Operating Instructions for Printer/Scanner
The CD-ROM labeled “Printer Drivers and Utilities” is mainly used for
machine printer functions. In this
manual, “CD-ROM” refers to the
“Printer Drivers and Utilities” CDROM, unless specified otherwise.
Printer Drivers
Printing requires installation of a
printer driver for your operating system. The following drivers are included on the CD-ROM labeled “Printer
Drivers and Utilities” that comes with
the printer option of this machine.
Printer
Language
Windows 95
*1
Windows 98
*2
Windows
*3
Me
Windows
*4
2000
Windows
*5
XP
PCL 6 PCL 5eRPCS™Post-
Script
3
√√√
√√√
√√√
√√√
√√√
*12
√
*12
√
*12
√
*13
√
*13
√
Microsoft Windows 95 operating system
*2
Microsoft Windows 98 operating system
*3
Microsoft Windows Millennium Edition
*4
Microsoft Windows 2000 Advanced
Server
Microsoft Windows 2000 Server
Microsoft Windows 2000 Professional
*5
Microsoft Windows XP Professional
Microsoft Windows XP Home Edition
*6
Microsoft Windows Server 2003 Standard Edition
Microsoft Windows Server 2003 Enterprise Edition
Microsoft Windows Server 2003 Web
Edition
*7
Microsoft Windows NT Server operating system version 4.0, Microsoft
Windows NT Workstation operating
system version 4.0 in a computer using x86 processors.
*8
Versions 8.6 to 9.2 of the Mac OS (Mac
OS X Classic mode is supported.)
*9
Mac OS X 10.1 or later (Native mode)
*10
Requires Service Pack 4 or later.
*11
Requires Service Pack 6 or later.
*12
The Adobe PostScript 3 printer drivers and PostScript Printer Description
(PPD) files are included on the CDROM labeled “Printer Drivers and
Utilities”.
*13
The PostScript Printer Description
(PPD) files are included on the CDROM labeled “Printer Drivers and
Utilities”.
*14
The Adobe PostScript Printer Description (PPD) installer is included on the
CD-ROM labeled “Printer Drivers
and Utilities”.
2
Windows
Server 2003
*6
Windows
NT 4.0
Mac OS
Mac OS X
*7
*8
√√√
*9
*10
√
*10
√
√
*10
√
√
√
√
*12
*13
*11
*12
*14
37
Page 46

Preparing to Print
2
PCL printer drivers
Two kinds of PCL printer drivers:
PCL 6 and PCL 5e, are included on
the CD-ROM that comes with this
machine. These drivers allow the
computer to communicate with
the machine via a printer language. We recommend PCL 6 as
your first choice.
Note
Some applications may require
installation of the PCL 5e printer driver. In this case, you can
install PCL 5e without having to
install PCL 6.
See p.16 “Installing the PCL 6/5e
and RPCS™ Printer Driver”
RPCS™ printer driver
The RPCS™ printer drivers are included on the CD-ROM that comes
with this machine. This printer
driver allows the computer to
communicate with the machine via
a printer language. The preset type
user interface is provided in addition to the usual one.
See p.16 “Installing the PCL 6/5e
and RPCS™ Printer Driver” .
Adobe PostScript 3 printer drivers
and PPD files
The Adobe PostScript 3 printer
drivers and the PPD files are included on the CD-ROM that comes
with this machine. This printer
driver allows the computer to
communicate with the printer via a
printer language. The PPD files allow the printer driver to enable
printer specific functions.
See p.21 “Installing the PostScript
3 Printer Driver” .
LAN-Fax driver
The LAN-Fax driver is included on
the CD-ROM that comes with this
machine. This driver allows you to
use LAN-Fax functions. The LANFax driver, Address Book, and
LAN-Fax Cover Sheet Editor can
be installed using this driver.
Software and Utilities
SmartDeviceMonitor for Admin
This utility is for the system administrator to manage network
printers.
Reference
See SmartDeviceMonitor for
Admin online Help for more information about using SmartDeviceMonitor for Admin.
SmartDeviceMonitor for Client
This utility is for users to manage
their own print status on the network.
Reference
See SmartDeviceMonitor for
Client online Help for more information about using SmartDeviceMonitor for Client.
Font Manager 2000
This utility helps you install new
screen fonts, or organize and manage fonts already installed on the
system.
1394 Utility
This utility is for the IEEE 1394 interface board. For more information, see the Readme file or the
manual that comes with the optional IEEE 1394 interface board.
38
Page 47

USB Printing Support
This utility is for the USB 2.0 interface. Install this to use USB on
computers running Windows 98
SE/Me. For information about installation, see p.30 “Installing the
Printer Driver Using USB”.
Software and Utilities Included on the CD-ROM
Acrobat Reader
This utility allows you to read PDF
files (Portable Document Format).
Note
Documentation about using the
machine is included on the CD-
ROM in PDF format. See Acro-
bat Reader online Help for more
information about using Acro-
bat Reader.
Printer Utility for Mac
This utility allows users to download and manage a variety of fonts
as well as manage printers. For
more information about this utility, see PostScript 3 Operating In-
structions Supplement which is
provided as a PDF file on the CDROM labeled “Operating Instructions for Printer/Scanner”.
2
Important
Software and utilities must be un-
installed before installing newer
versions of Windows. Reinstall
software and utilities after upgrading Windows.
39
Page 48

INDEX
O
1394 Utility, 38
A
Acrobat Reader, 39
ATM
Macintosh, installing
, 28
B
Bidirectional transmission, 25
Bypass tray
, 8
C
CD-ROM, 37
Connection
Ethernet board connection
IEEE 1394 interface board connection
Parallel interface connection
USB connection
Control Panel
Control panel
Custom size paper
printing, bypass tray
, 3
, 4
, 6
, 10
, 8
D
Display, 4
F
Font Manager 2000, 38
installing
, 35
I
, 6
, 6
, 6
OHP Transparencies
printing, bypass tray
P
PageMaker, 36
PCL
, 38
PCL 5e
Windows 2000/XP and
Windows Server 2003, installing
Windows 95/98/Me, installing
Windows NT 4.0, installing
PCL 6
Windows 2000/XP and
Windows Server 2003, installing
Windows 95/98/Me, installing
Windows NT 4.0, installing
PostScript 3
Mac OS, installing
Mac OS X, installing
Windows 2000/XP and
Windows 95/98/Me, installing
Windows NT 4.0, installing
Printer driver
Auto Run
installing, IEEE 1394 connection
installing, USB connection
PCL 5e
PCL 6
PostScript 3
Quick Install
RPCS
Printer Utility for Mac
, 38
Windows Server 2003, installing
, 13
, 37
, 37
, 37
, 14
, 37
, 11
, 16
, 16
, 16
, 16
, 16
, 16
, 27
, 29
, 22
, 21
, 24
, 32
, 30
, 39
IEEE 1394 connection
installing, printer driver
IP over 1394
, 32
M
Macintosh
ATM, installing
Screen fonts, installing
Mac OS
PostScript 3, installing
Mac OS X
PostScript 3, installing
, 28
40
, 32
, 29
, 27
, 29
Q
Quick Install, 14
R
RPCS, 38
Windows 2000/XP and
Windows Server 2003, installing
Windows 95/98/Me, installing
Windows NT 4.0, installing
, 16
, 16
, 16
Page 49

S
Screen fonts
Macintosh, installing
SCSI print
SmartDeviceMonitor for Admin
SmartDeviceMonitor for Client
Software
, 32
Quick Install
, 14
, 29
T
Thick Paper
printing, bypass tray
, 11
U
USB connection
printer driver, installing
USB Printing Support
, 30
, 39
W
, 35, 38
, 35, 38
Windows 2000/XP and Windows Server 2003
PCL 5e, installing, 16
PCL 6, installing
PostScript 3, installing
RPCS, installing
Windows 95/98/Me
PCL 5e, installing
PCL 6, installing
PostScript 3, installing
RPCS, installing
Windows NT 4.0
PCL 5e, installing
PCL 6, installing
PostScript 3, installing
RPCS, installing
, 16
, 22
, 16
, 16
, 16
, 21
, 16
, 16
, 16
, 24
, 16
41
Page 50

MEMO
42
Page 51

MEMO
43
Page 52

MEMO
44 EN USA B683-8592
 Loading...