

Page 1
Page 2

Trademarks
• Windows, Windows 95, Windows 98, Windows Me, Windows NT, Windows 2000
and Windows XP are trademarks of Microsoft corporation.
• Other names and trademarks mentioned in this manual are trademarks of their
respective holders.
Page 3
I
Introduction
Welcome! ––––––––––––––––––––––––––––––––––––––––– 1.1
Contents –––––––––––––––––––––––––––––––––––––––––– 1.3
Identifying Parts ––––––––––––––––––––––––––––––––––– 1.4
Setting Up Your Machine
Choosing a Location –––––––––––––––––––––––––––––––– 1.9
Preparing Your Machine for Use ––––––––––––––––––––– 1.9
Attaching the Supports –––––––––––––––––––––––––––– 1.10
Connecting to the Phone Line –––––––––––––––––––––– 1.11
Connecting to the Computer (MFP model only) –––––– 1.12
Plugging In the Power ––––––––––––––––––––––––––––– 1.13
Loading Paper –––––––––––––––––––––––––––––––––––– 1.13
Installing the Toner Cartridge –––––––––––––––––––––– 1.16
Setting the Date and Time ––––––––––––––––––––––––– 1.18
Setting Your Fax Number and Name –––––––––––––––– 1.19
Contents
Getting Started
Setting Up Stand-alone Fax System
Setting Volume –––––––––––––––––––––––––––––––––– 2.1
Setting Alert Tones ––––––––––––––––––––––––––––––– 2.2
Setting User-Selectable System Options –––––––––––––– 2.2
Sending a Fax
Preparing Documents for Faxing or Copying ––––––––––– 2.7
Setting Document Resolution and Contrast –––––––––––– 2.8
Loading Documents ––––––––––––––––––––––––––––––– 2.9
Sending a Fax Automatically ––––––––––––––––––––––– 2.10
Sending a Fax After Talking ––––––––––––––––––––––– 2.11
1
2
Stand-alone Fax
Page 4

II
Receiving a Fax
About
Reception Modes –––––––––––––––––––––––––– 2.12
Loading Paper for Receiving Faxes
–––––––––––––––– 2.13
Receiving Automatically in FAX Mode –––––––––––––––– 2.13
Receiving in AUTO Mode –––––––––––––––––––––––––– 2.14
Receiving Automatically in ANS/FAX Mode –––––––––––– 2.14
Receiving Manually in TEL Mode –––––––––––––––––––– 2.15
Receiving Manually Using Remote Receive Start Code ––– 2.15
Making a Copy
Copying Overview ––––––––––––––––––––––––––––––– 2.16
Making a Single Copy –––––––––––––––––––––––––––– 2.16
Using Advanced Copy Features ––––––––––––––––––––– 2.17
Automatic Dialling
How To Enter a Name Using the Number Keys ––––––––– 2.18
One-Touch Dialling –––––––––––––––––––––––––––––– 2.20
Speed Dialling –––––––––––––––––––––––––––––––––– 2.22
Searching for a Number in the Memory –––––––––––––– 2.24
Transmission Options
Broadcasting ––––––––––––––––––––––––––––––––––– 2.25
Delayed Fax –––––––––––––––––––––––––––––––––––– 2.26
Priority Fax –––––––––––––––––––––––––––––––––––– 2.28
Polling –––––––––––––––––––––––––––––––––––––––– 2.29
Adding Documents To a Scheduled Operation ––––––––– 2.31
Cancelling a Scheduled Operation ––––––––––––––––––– 2.31
Additional Functions
Monitoring a Dual Job Status ––––––––––––––––––––––– 2.32
Forwarding Received Faxes –––––––––––––––––––––––– 2.32
Printing Reports ––––––––––––––––––––––––––––––––– 2.33
Group Dialling
(for Multi-Address Transmission) ––––––––––– 2.35
Stand-alone Fax (continued)
2
Page 5

III
Contents (continued)
Installing Software
System Requirements –––––––––––––––––––––––––––––– 3.1
Installing the Software ––––––––––––––––––––––––––––– 3.1
Uninstalling the Software ––––––––––––––––––––––– 3.3
Print Media
Selecting Print Media ––––––––––––––––––––––––––––––– 3.5
Using the Automatic Paper Input Tray –––––––––––––––– 3.7
Using the Manual Paper Input Tray –––––––––––––––––– 3.9
Specialty Paper Guidelines ––––––––––––––––––––––––– 3.12
Printing
Printing a Document –––––––––––––––––––––––––––––– 3.13
Cancelling a Print Job ––––––––––––––––––––––––––––– 3.16
Printing Help ––––––––––––––––––––––––––––––––––––– 3.17
Printing Several Pages Per Sheet ––––––––––––––––––– 3.18
Scaling Your Document –––––––––––––––––––––––––––– 3.19
Fitting Your Document to a Selected Paper Size –––––– 3.20
Printing Posters ––––––––––––––––––––––––––––––––––– 3.21
Printing Watermarks –––––––––––––––––––––––––––––– 3.22
Using Page Overlays –––––––––––––––––––––––––––––– 3.24
Printing in a Network Environment ––––––––––––––––– 3.28
Scanning
Scanning from a Windows Application –––––––––––––– 3.30
Type1100 TWAIN for Scan Window ––––––––––––––––– 3.31
Printing and Scanning (MFP model only)
3
Page 6

IV
Guidelines for Maintenance ––––––––––––––––––––––––– 4.1
Clearing Memory ––––––––––––––––––––––––––––––––––– 4.1
Cleaning the OPC Drum –––––––––––––––––––––––––––– 4.2
Adjusting Shading ––––––––––––––––––––––––––––––––– 4.2
Setting the Machine to be Checked by Phone ––––––––– 4.3
Sending Toner Low Information
to the Service Company ––––––––––––––––––––––––––––– 4.3
Cleaning the Machine –––––––––––––––––––––––––––––– 4.4
Managing the Toner Cartridge ––––––––––––––––––––––– 4.7
Automatic Document Feeder Rubber Pad Replacement 4.10
4
Maintenance
Clearing Paper Jams
––––––––––––––––––––––––––––––––––
5.1
LCD Error Messages
––––––––––––––––––––––––––––––––––
5.5
Fax Problems
––––––––––––––––––––––––––––––––––––––––
5.7
General Printing Problems (MFP model only)
––––––––––
5.9
Print Quality Problems
––––––––––––––––––––––––––––––
5.11
Troubleshooting
5
Connecting Other Devices to the Phone line
–––––––––––
A.1
Specifications
––––––––––––––––––––––––––––––––––––––––
A.4
Safety Information
–––––––––––––––––––––––––––––––––––
A.6
Index
––––––––––––––––––––––––––––––––––––––––––––––
A.13
Appendix
Page 7
Environmental and Safety Consideration
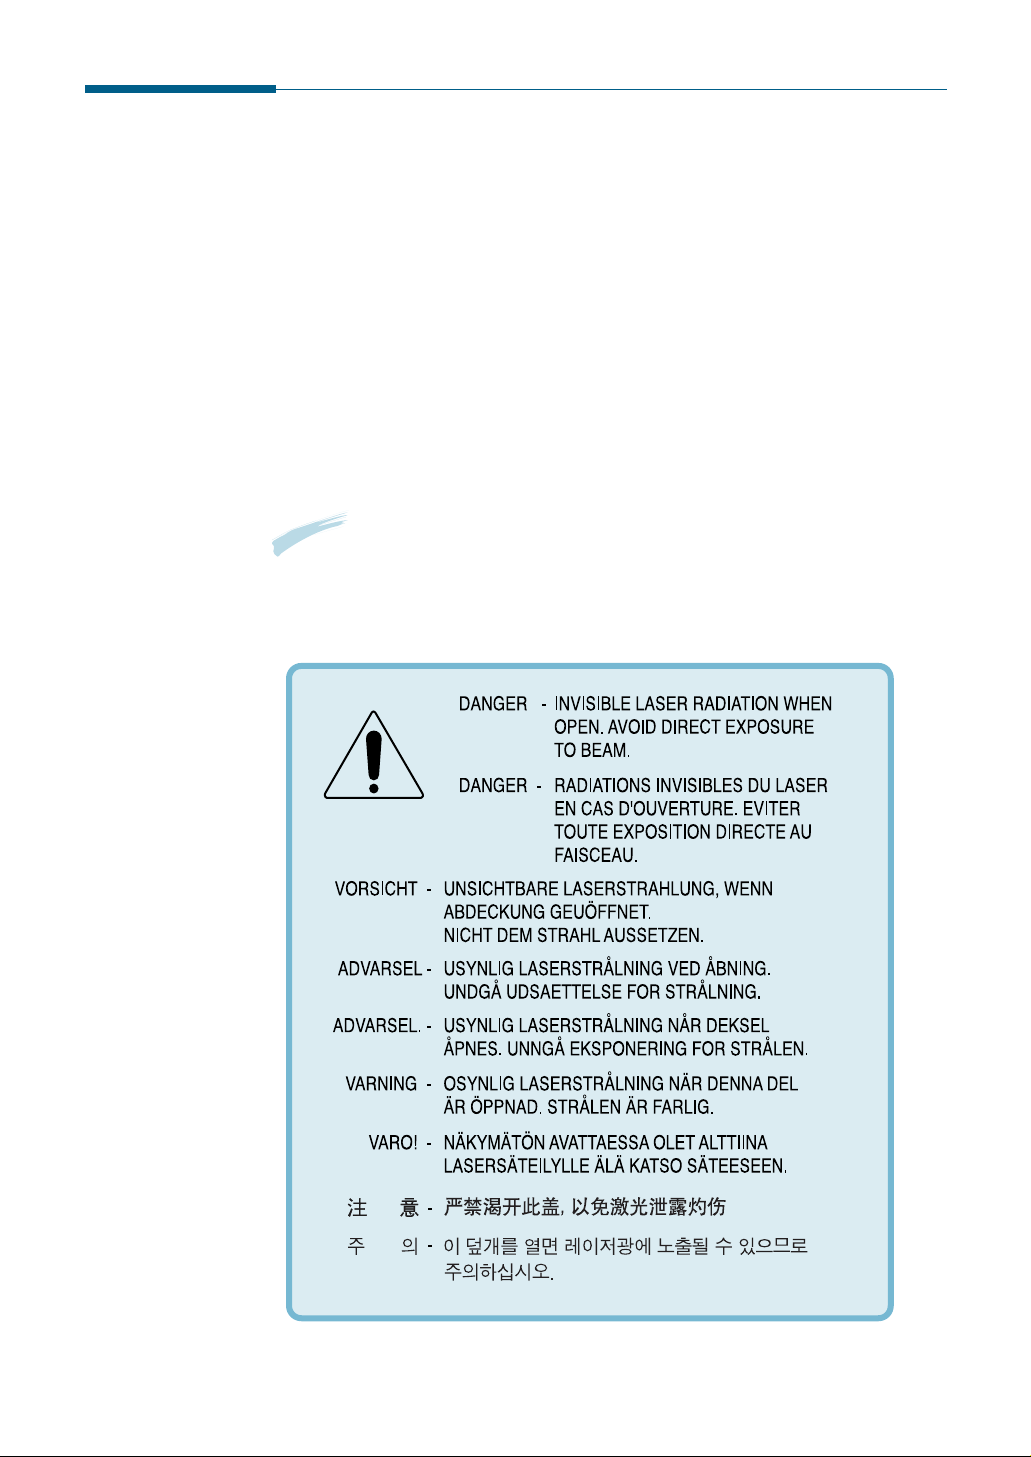
Laser Safety Statement
The printer is certified in the U.S. to conform to the
requirements of DHHS 21 CFR, chapter 1 Subchapter J for Class
I(1) laser products, and elsewhere is certified as a Class I laser
product conforming to the requirements of IEC 825.
Class I laser products are not considered to be hazardous. The
laser system and printer are designed so there is never any
human access to laser radiation above a Class I level during
normal operation, user maintenance, or prescribed service
condition.
CAUTION: Use of controls or adjustment or performance of
procedures other than those specified in this manual
might result in hazardous radiation exposure.
WARNING
Never operate or service the printer with the protective cover removed
from Laser/Scanner assembly. The reflected beam, although invisible, can
damage your eyes.
V
Page 8

Ozone Safety
During normal operation, this machine produces ozone. the ozone
produced does not present a hazard to the operator. However, it is
advisable that the machine be operated in a well ventilated area.
If you need additional information about ozone, please request
your nearest dealer.
Power Saver
This printer contains advanced energy conservation technology
that reduces power consumption when it is not in active use.
When the printer does not receive data for an extended period of
time, power consumption is automatically lowered.
The energy star emblem does not represent EPA endorsement of
any product or service.
Radio Frequency Emissions
FCC Regulations
This equipment has been tested and found to comply with the
limits for a Class B digital device, pursuant to Part 15 of the FCC
Rules. These limits are designed to provide reasonable protection
against harmful interference in a residential installation. This
equipment generates, uses and can radiate radio frequency energy
and, if not installed and used in accordance with the instructions,
may cause harmful interference to radio communications.
However, there is no guarantee that interference will not occur in a
particular installation.
If this equipment does cause harmful interference to radio or
television reception, which can be determined by turning the
equipment off and on, the user is encouraged to try to correct the
interference by one or more of the following measures:
• Reorient or relocate the receiving antenna.
• Increase the separation between the equipment and receiver.
• Connect the equipment into an outlet on a circuit different from
that to which the receiver is connected.
• Consult the dealer or an experienced radio/TV technician for
help.
Do not make any changes or modifications to the equipment
unless otherwise specified in the manual. If such changes or
modifications should be made, you must first stop operation of the
equipment.
Use of shielded cable is required to comply with Class B limits in
Subpart B of Part 15 of FCC Rules.
CAUTION: Changes or modifications not expressly approved by the
manufacture responsible for compliance could void the
user’s authority to operate the equipment.
VI
Page 9

Canadian Radio Interference Regulations
This digital apparatus does not exceed the Class B limits for
radio noise emissions from digital apparatus as set out in the
interference-causing equipment standard entitled “Digital
Apparatus”, ICES-003 of the Industry and Science Canada.
Cet appareil numérique respecte les limites de bruits
radioélectriques applicables aux appareils numériques de Classe
B prescrites dans la norme sur le matériel brouilleur: “Appareils
Numériques”, ICES-003 édictée par l’Industrie et Sciences
Canada.
DDeeccllaarraattiioonn ooff CCoonnffoorrmmiittyy
Notice to Users in EEA Countries
This product complies with the essential requirements and
provisions of Directive 1999/5/EC of the European Parliament
and of the Council of 9 March 1999 on radio equipment and
telecommunications terminal equipment and the mutual
recognition of their conformity.
Notice to Users Accessing Analog PSTN
in EEA Countries
This product is designed to be able to access analog PSTN in all
EEA countries. Local PSTN compatibility is dependent on
software switch settings. Please contact your service
representative if relocating this product to another country. In
the event of problems, please contact your service
representative in the first instance.
Ricoh/NRG/LANIER: The CE Decalration of Conformity is available on the Internet at URL:
http://www.ricoh.co.jp/fax/ce_doc/
VII
Page 10

VIII
Memo
Page 11
chapter
1
1
This chapter provides information on the following topics:
Introduction
◆ Welcome!
◆ Contents
◆ Identifying Parts
Setting Up Your Machine
◆ Choosing a Location
◆ Preparing Your Machine for Use
◆ Attaching the Supports
◆ Connecting to the Phone Line
◆ Connecting to the Computer (MFP model only)
◆ Plugging In the Power
◆ Loading Paper
◆ Installing Toner Cartridge
◆ Setting the Date and Time
◆ Setting Your Fax Number and Name
Page 12
1.1
Getting Started
Welcome!
Thank you for purchasing this product, a powerful business tool with the
capabilities of a full range of office equipment. With this machine, you
can:
Introduction
You can get 600 x 600 dpi high-quality laserjet printing
from this machine. You can create professional documents
using the creative printing features on the various kinds of
print media, such as plain papers, envelopes,
transparencies, label, and so on.
Print (MFP model only)
Use this product as a full-featured stand-alone fax
machine to send and receive faxes. Perform advanced
tasks such as delayed transmission, broadcasting, and
unattended memory sending.
Fax
Page 13
1.2
Getting Started
Make up to 99 copies of a 20-pages document without
having to connect to a PC. You can adjust the contrast,
enlarge or reduce the copies and collate.
Copy
Scan important documents to create electronic files. Use
the scanner to add photo or graphic images to other
software applications or to jazz up your projects.
Scan (MFP model only)
A
A
Page 14
1.3
Getting Started
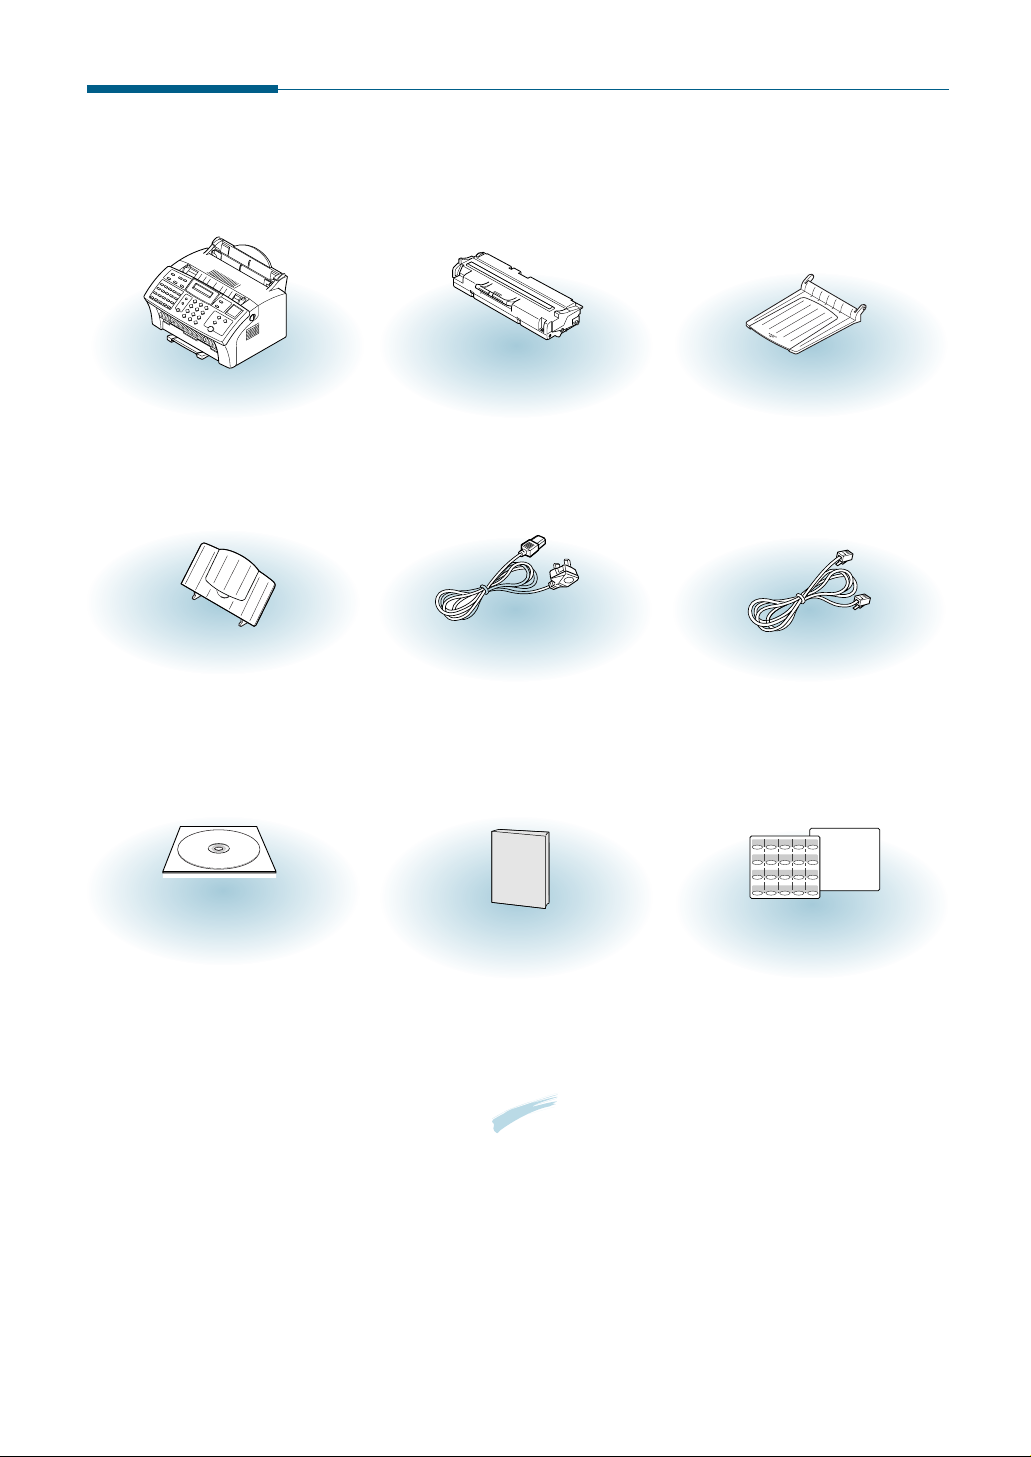
Document output support
Document input support
Power cord *
Telephone line cord *
software CD-ROM
(for MFP model only)
User’s Guide
One-touch label for the front panel
and a panel sheet (for Europe only)
Contents
Here’s what comes with this machine.
Toner cartridge
Fax machine
*
: These may look different depending on the country.
Notes:
•
You should use the Telephone line cord which is supplied with the
machine. If you are replacing it with the other vendor’s part, it
should be AWG #26 or lower gage.
•
Power cord must be plugged in grounded power socket.
Page 15
1.4
Getting Started
Identifying Parts
Before setting up your machine, make sure you identify the following
parts related to the scanner and paper print paths.
Document input support
Supports original documents.
Aligns documents.
Loads up to 20 pages at a time.
Supports the original document
when faxing, copying, or
scanning is complete.
Document guides
Automatic document feeder
Document output support
Identifying Scanner Path Parts
Items to be faxed, copied, or scanned use the scanner path
which consists of the following parts:
Page 16

1.5
Getting Started
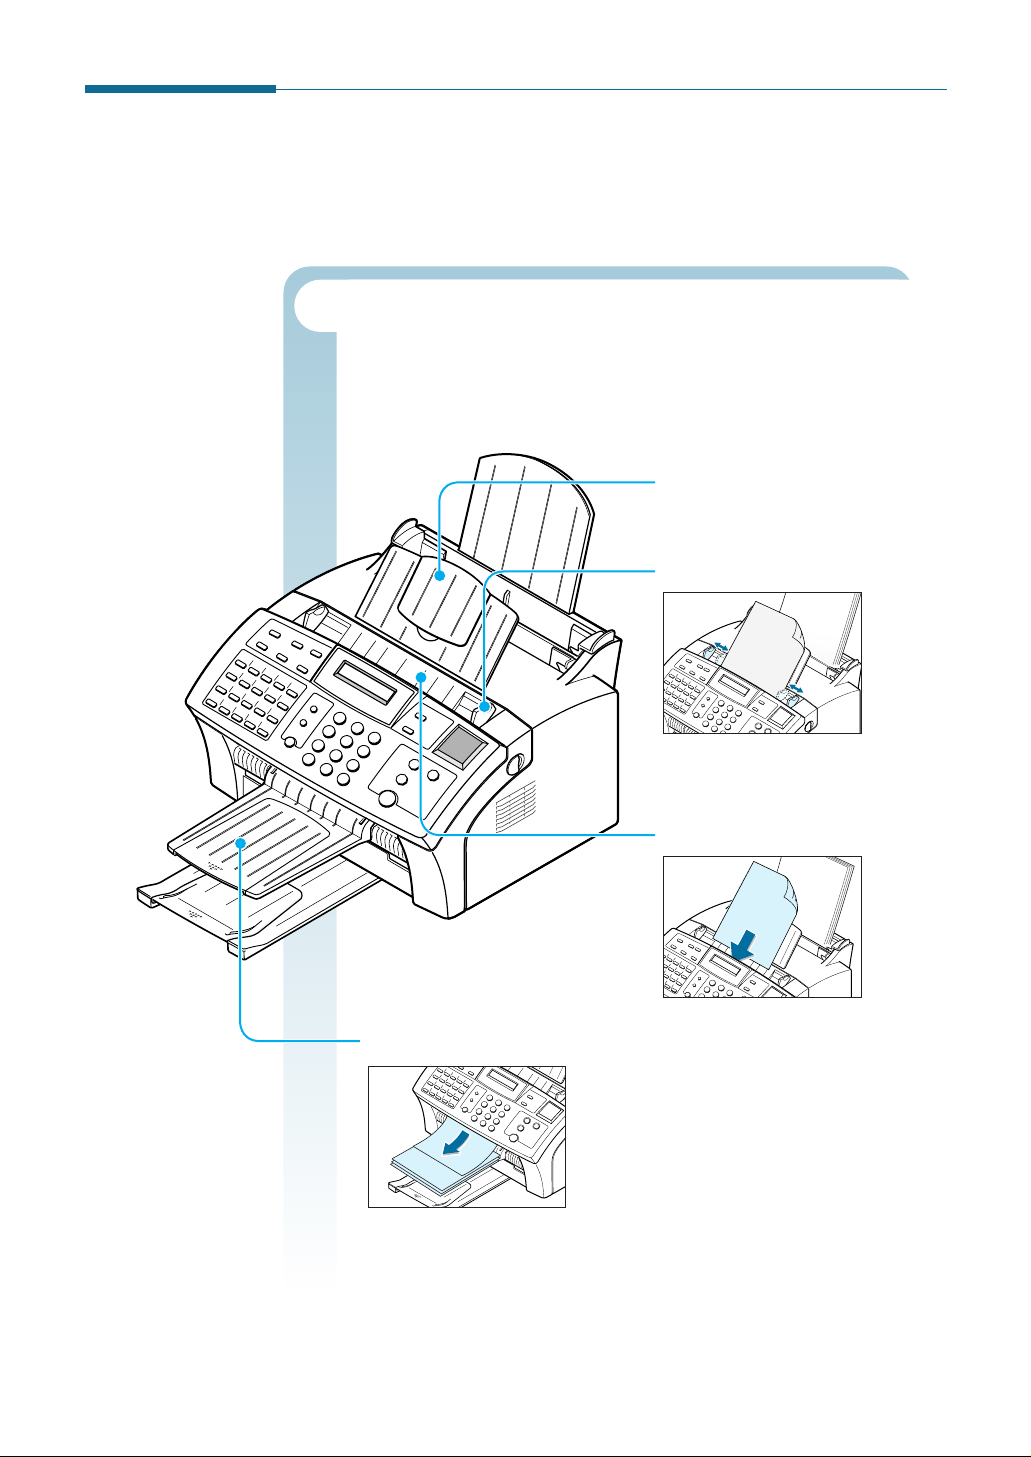
Identifying Printer Path Parts
Paper for printing, receiving faxes and copying follow the printer
path. This path consists of the following parts:
Use to feed paper one
sheet at a time.
Supports the printed pages.
Holds paper.
Aligns paper.
Manual paper input tray
(For MFP model only)
Support the print media
Paper input support
Paper output tray
Automatic paper input tray
Paper guides
Page 17
1.6
Getting Started
01 02 03 04 05
16 17 18 19
11 12 13 14 15
20
06 07 08 09 10
GHI
TPQRS
Sy
Demo
01 02 03 04 05
16 17 18 19
11 12 13 14 15
20
06 07 08 09 10
1
4
7
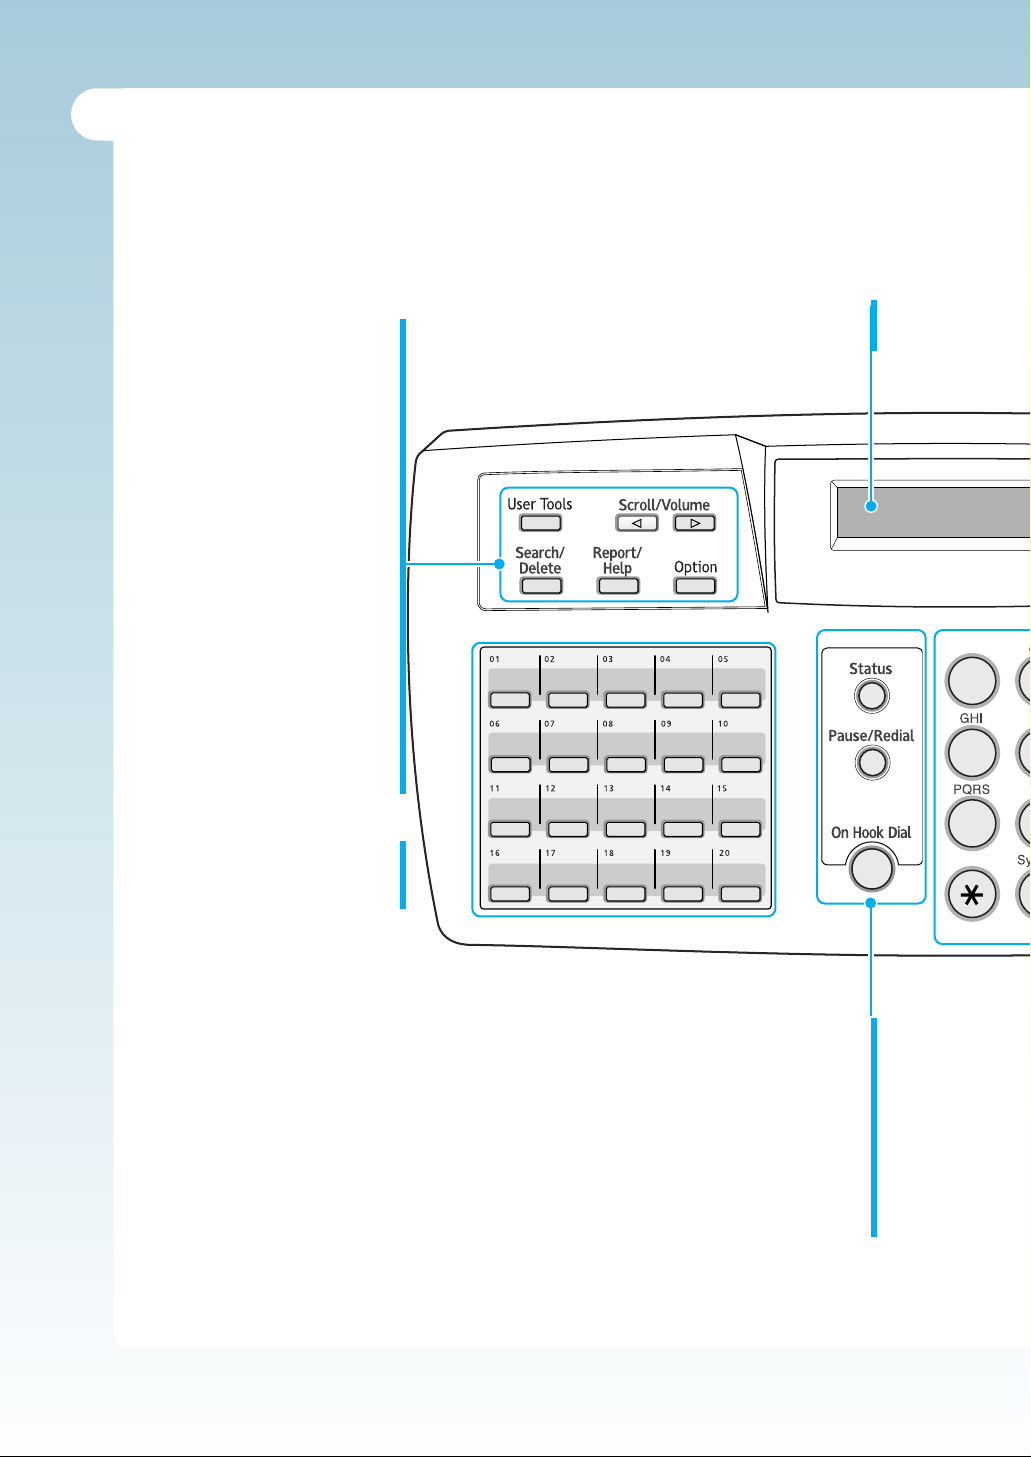
Identifying Front Panel Features
Look for the following keys and features on the front panel. These features are used to
fax documents, make copies, and adjust settings.
User Tools
Use to set up various system
options.
Scroll/Volume
Use to scroll the menu items or us
to move the cursor left or right
through the display. Also, use to
adjust the ringer volume.
Search/Delete
Use to search for a number in
memory or to delete the last digit
when typing text.
Report/Help
Use to print various reports and
the help list.
Trans. Option
Use to access advanced fax
operations.
Twenty One-Touch Buttons
Store frequently dialled fax
numbers.
LCD Display
Displays messages and menu settings.
Status
Use to switch the display status while
performing dual jobs.
Pause/Redial
Use to redial the last fax number or to
insert a pause into a fax number.
On Hook Dial
Use to dial numbers without picking up
the handset. Also, use to make a voice
call after sending or receiving a fax.
Page 18
1.7
Getting Started
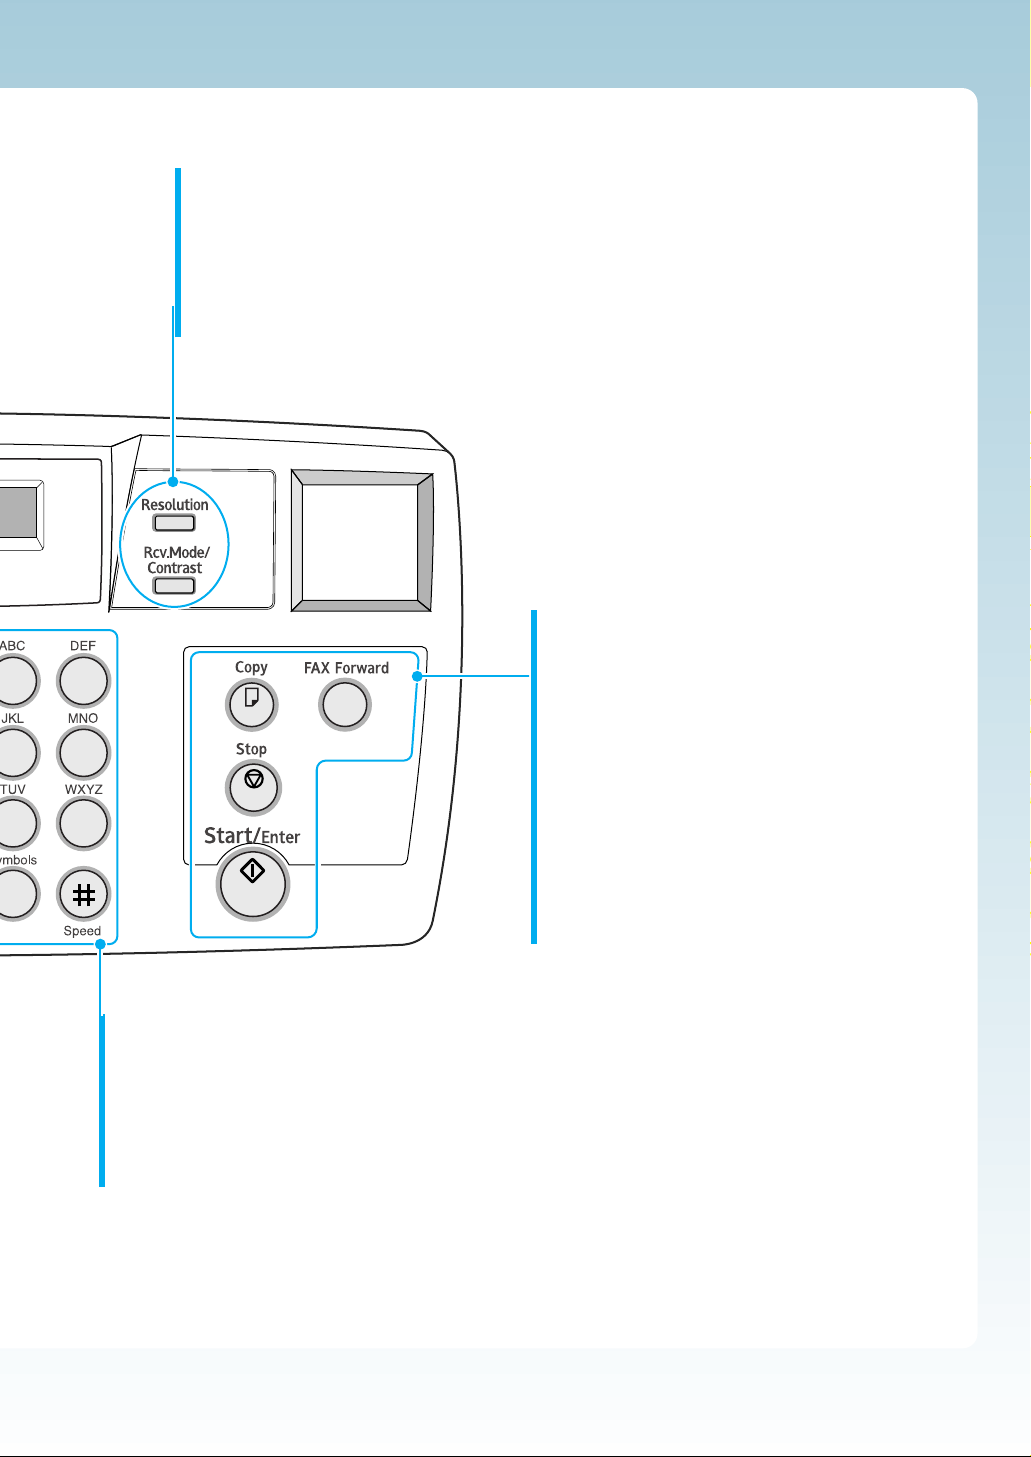
Rcv. Mode/Contrast
When a document is loaded, choose the contrast characteristic of copied
or transmitted documents.
When a document is not loaded, choose the receive mode to use.
The selected mode is displayed in Standby mode.
Resolution
Choose the resolution of documents.
Number Keypad
Use to enter fax numbers manually or to
enter letters.
Speed(#)
Use to send documents by entering a
registered 2-digit number.
Fax Forward
Allows you to forward the received faxes to
the defined remote fax machine at a specified
duration.
Copy
Makes a copy of a document.
Start/Enter
Starts a job. Also use to activate the selection
shown on the display.
Stop
Stops an operation at any time.
JKL MNO
TUV WXYZ
Speed
Rcv. Mode/
Contrast
Resolution
23
56
0
89
Page 19
1.8
Getting Started
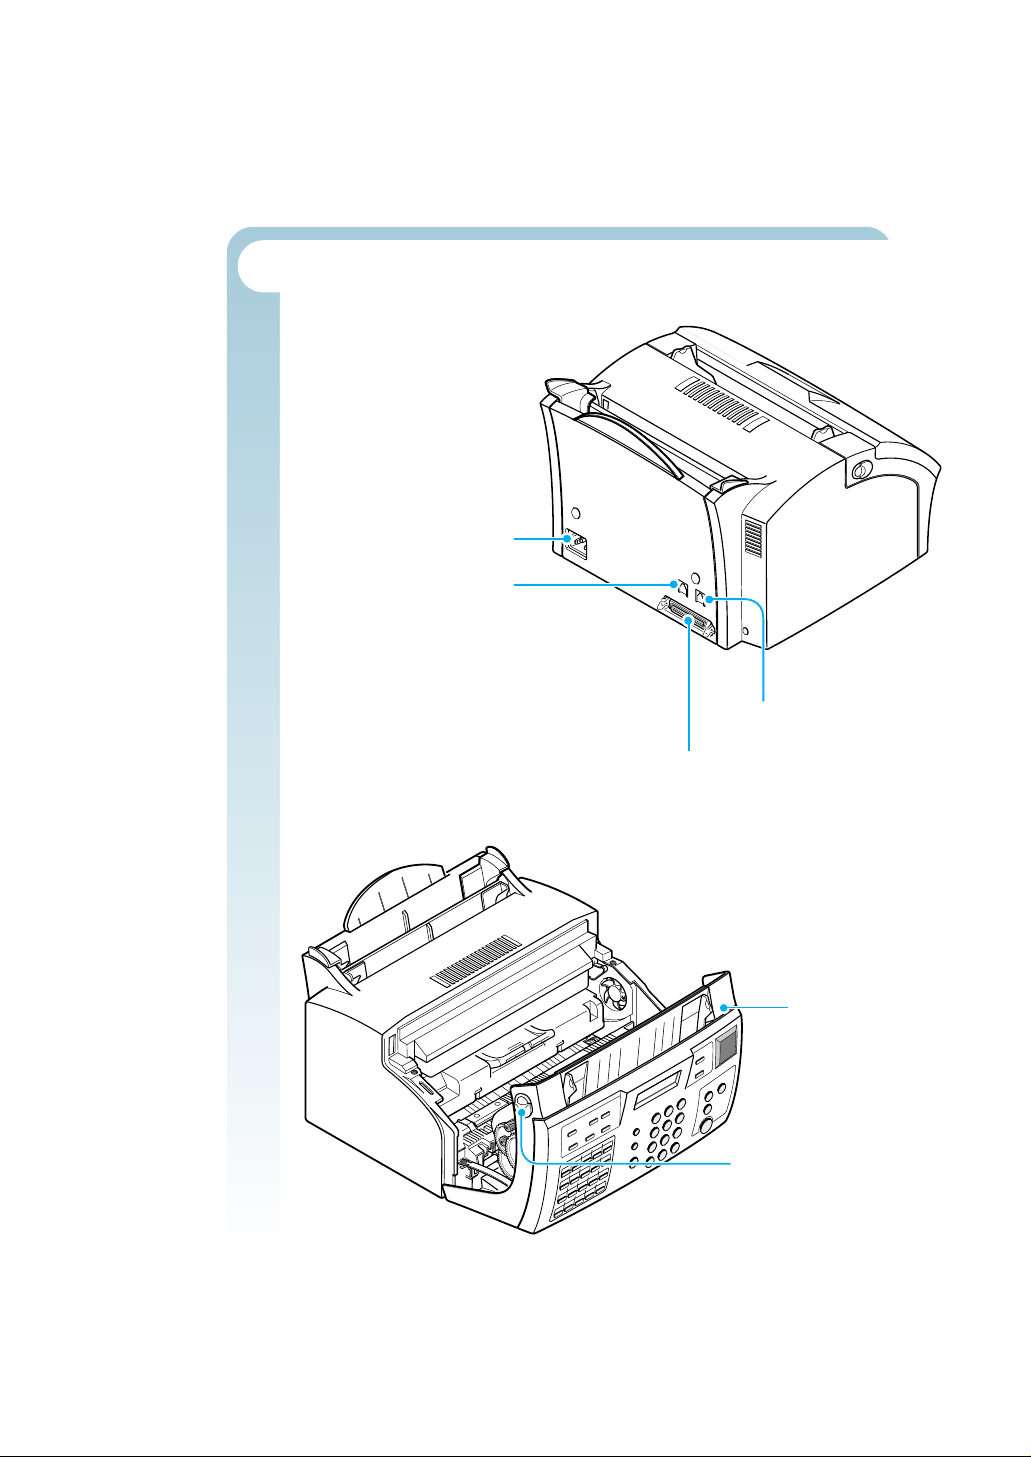
Identifying Connecting Parts and Others
Power cord connector
Telephone line jack
Extension telephone jack
Cover
Cover release
buttons (right and left)
Parallel cable connector
(MFP model only)
Page 20
1.9
Getting Started
Choosing a Location
For the trouble-free operation of your machine, place it on a flat, stable
surface near your workstation. Leave enough space to allow for easy
paper loading and exiting, as well as opening the front cover.
Do not place your machine:
• In direct sunlight.
• Near heat sources or air conditioners.
• In a dusty or dirty environment.
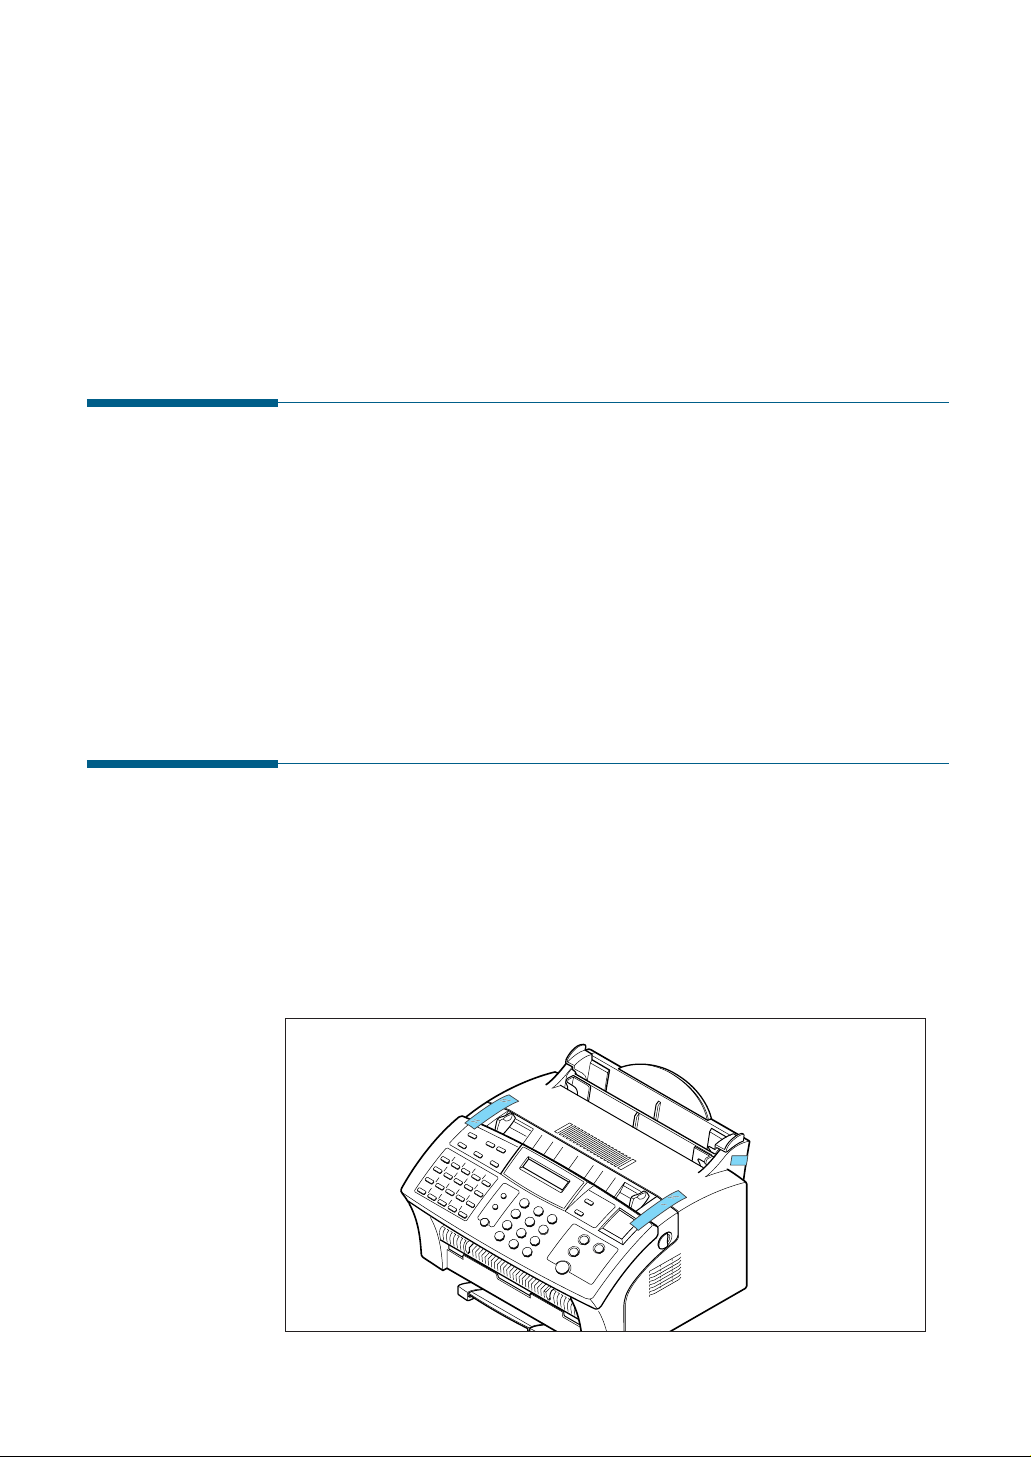
Preparing Your Machine for Use
When you take this machine out the box, note that it has been packaged
to protect it during shipping. Before you use the machine, make certain
that you check for the following items:
• Remove all tapes.
• Remove all packing materials.
Setting Up
Your Machine
Page 21
1.10
Getting Started
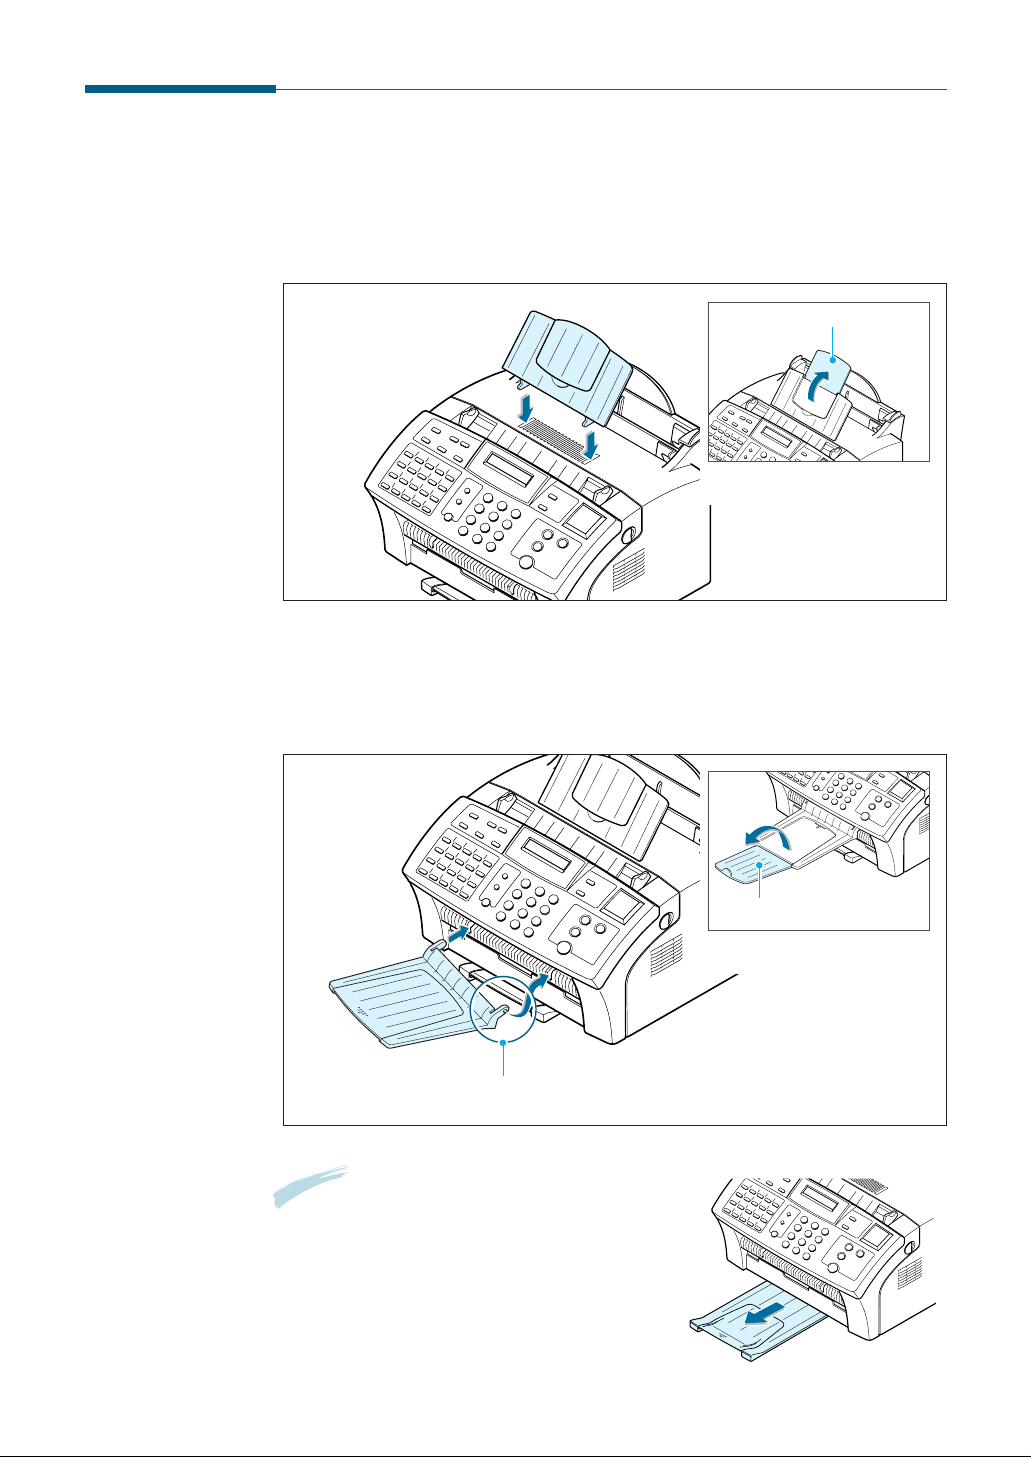
Attaching the Supports
Document Input Support
Insert the document input support with the groove pointing to the rear
top of the machine.
Document Output Support
Insert the two tabs on the document output support into the slots on the
front of your machine.
Note: This machine is shipped with the paper
output tray already installed. Extend
the tray to use.
Fold out the extender if necessary.
Extender
Fold out the extender if
necessary.
Insert one end first, then the other end by squeezing this
leg inward to make the tray easy to insert.
Extender
Fold out the extender if
necessary.
Page 22
1.11
Getting Started
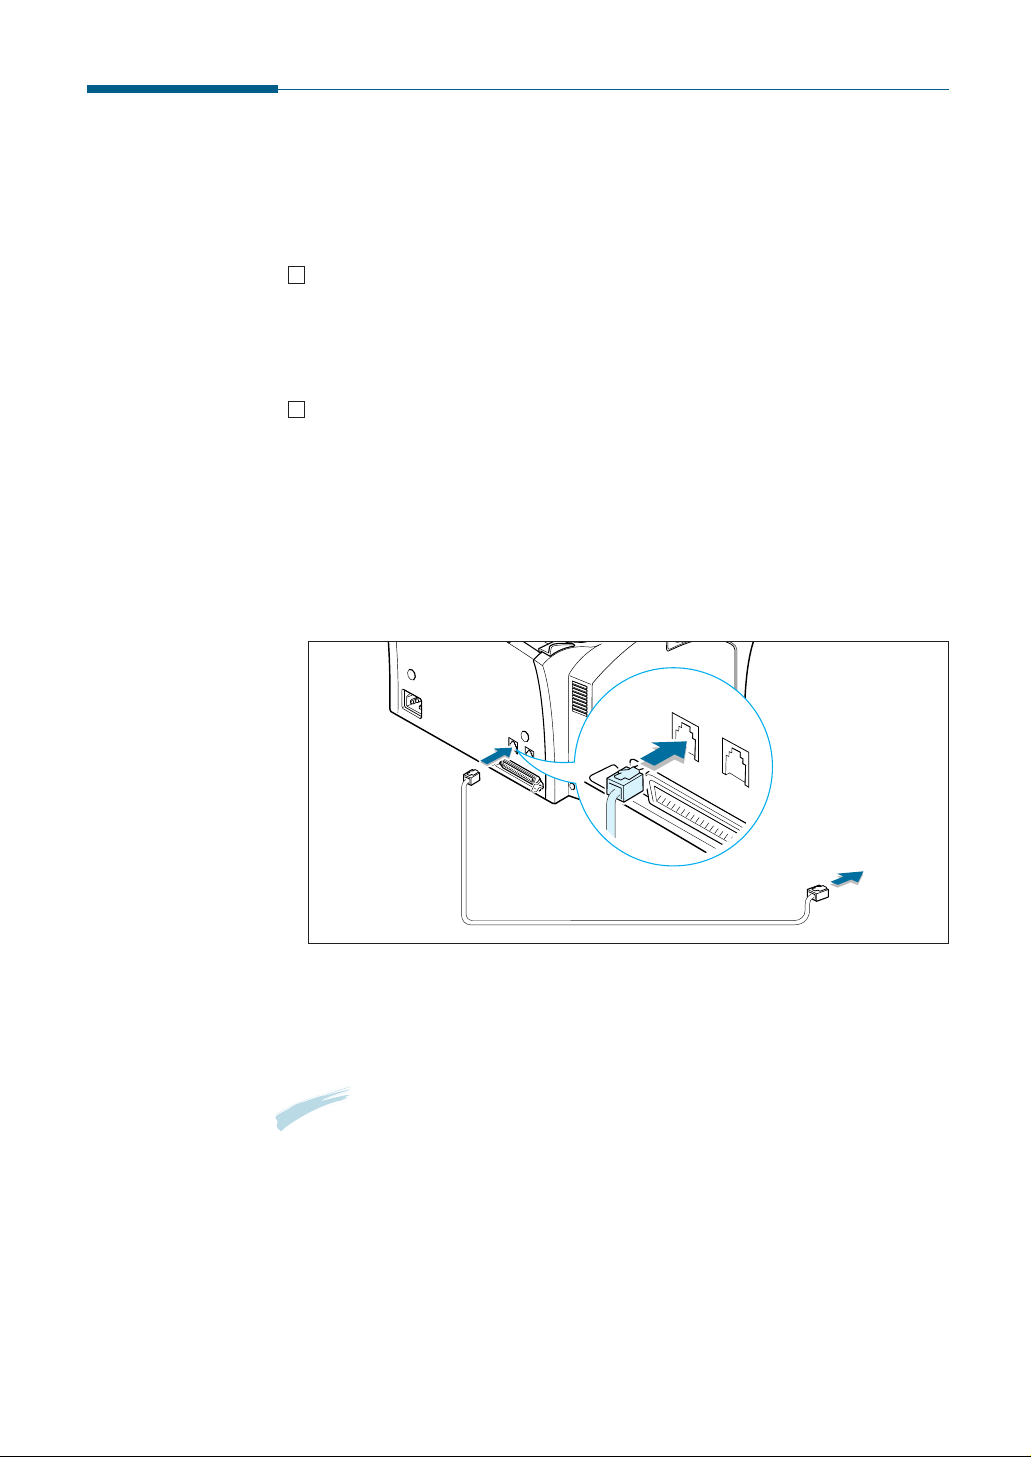
Connecting to the Phone Line
For proper operation, this machine must be connected to the wall jack.
Once you have decided which wall jack you will be using, check a box
below and follow the instructions.
I only have one phone line coming to this wall jack. (This
includes two phone numbers on one line with distinctive ring service.)
Go to “To Connect to a Wall Jack that Has Only One Phone Line” on
this page.
I have two phone lines coming to this wall jack. Go to “To
Connect to a Wall Jack that Has Two Phone Lines” on page 1.12.
LINE
EXT.
To a standard
phone wall jack
To Connect to a Wall Jack that has Only One Phone Line
1. Plug the included telephone cord into the jack on the back of the unit
marked the word LINE.
2. If a telephone cord is plugged into the wall jack, unplug the cord and
set it aside.
3. Plug the other end of the phone cord into the wall jack.
Notes:
• If you are connecting other devices such as a telephone to the phone
line, go to Appendix “Connecting Other Devices To the Phone Line” on
page A.1.
• If you are not connecting other devices, go to “Plugging In the Power”
on page 1.13.
Page 23
1.12
Getting Started
To Connect to a Wall Jack that Has Two Phone Lines
1. Plug the included telephone cord into the jack on the back of the unit
marked the word LINE.
2. If a telephone cord is plugged into the wall jack, unplug it and set it
aside.
3. If you do not have a wall jack that has a built-in splitter, plug a phone
unit splitter (not included) into the wall jack.
4. Plug the cord into the side of the phone unit splitter for the fax
number.
Notes:
• If you are connecting other devices such as a telephone to the same
phone line, go to Appendix “Connecting Other Devices To the Phone
Line” on page A.1.
• If you are not connecting other devices, go to “Plugging In the Power”
on page 1.13.
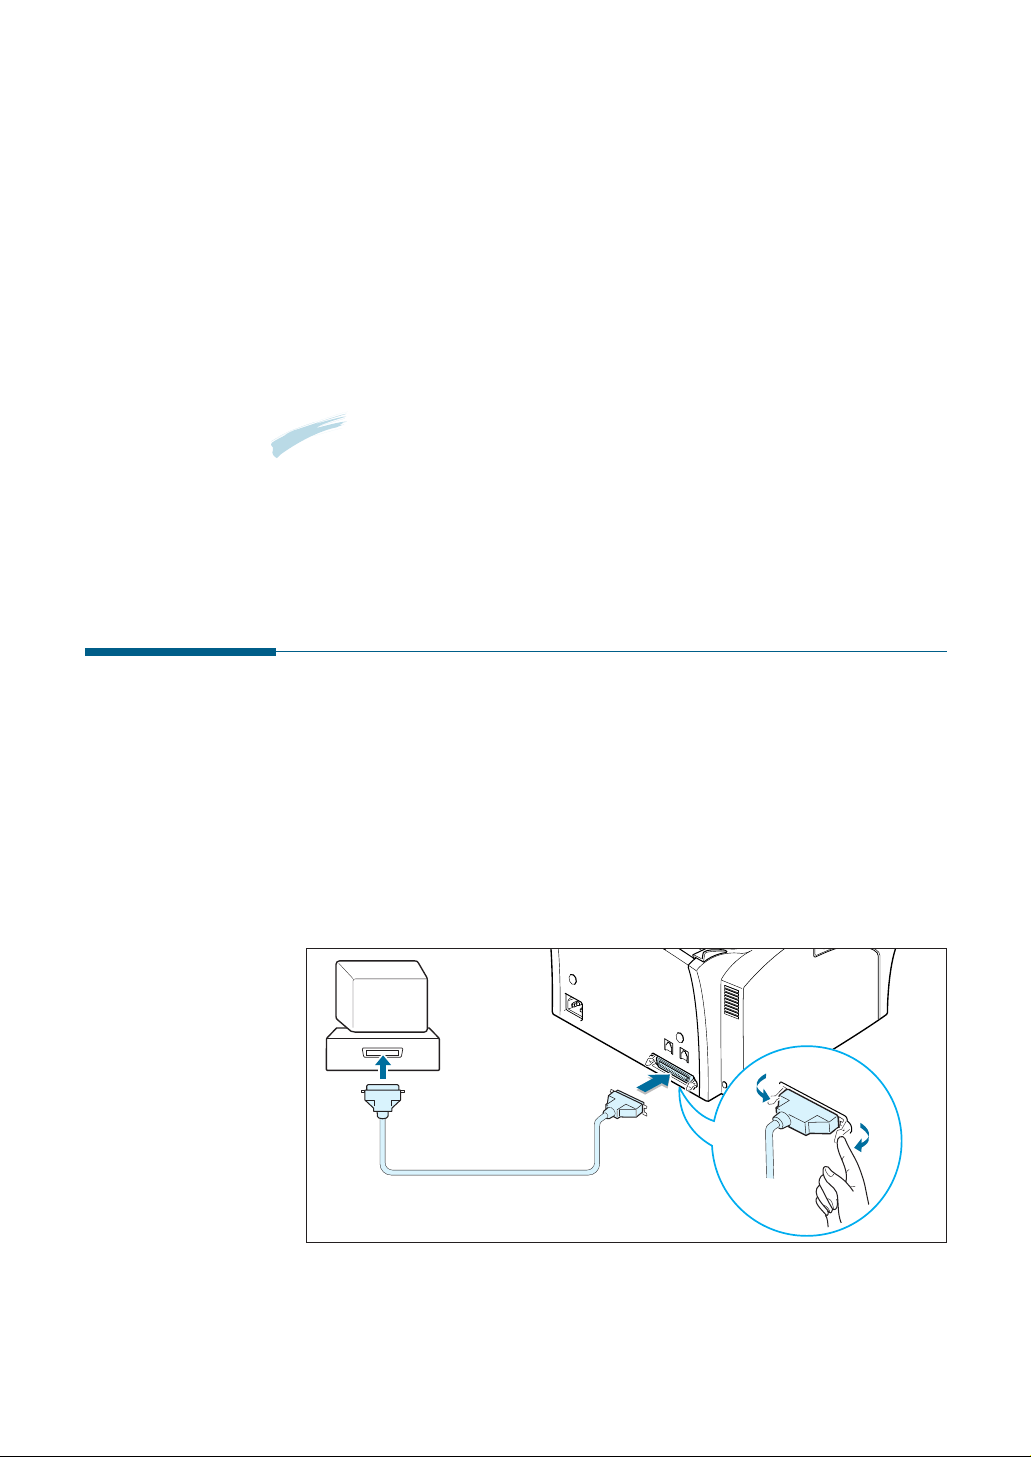
Connecting to the Computer (MFP model only)
Your machine has a parallel port which allows use with a Windows PC.
Connecting to the Computer Using the Parallel interface
1. Plug the supplied parallel printer cable into the connector on the back
of your machine. Push the metal clips down to fit inside the notches
on the cable plug.
2. Connect the other end of the cable to the parallel interface port on
your computer. See your computer documentation for more
information.
Page 24
1.13
Getting Started
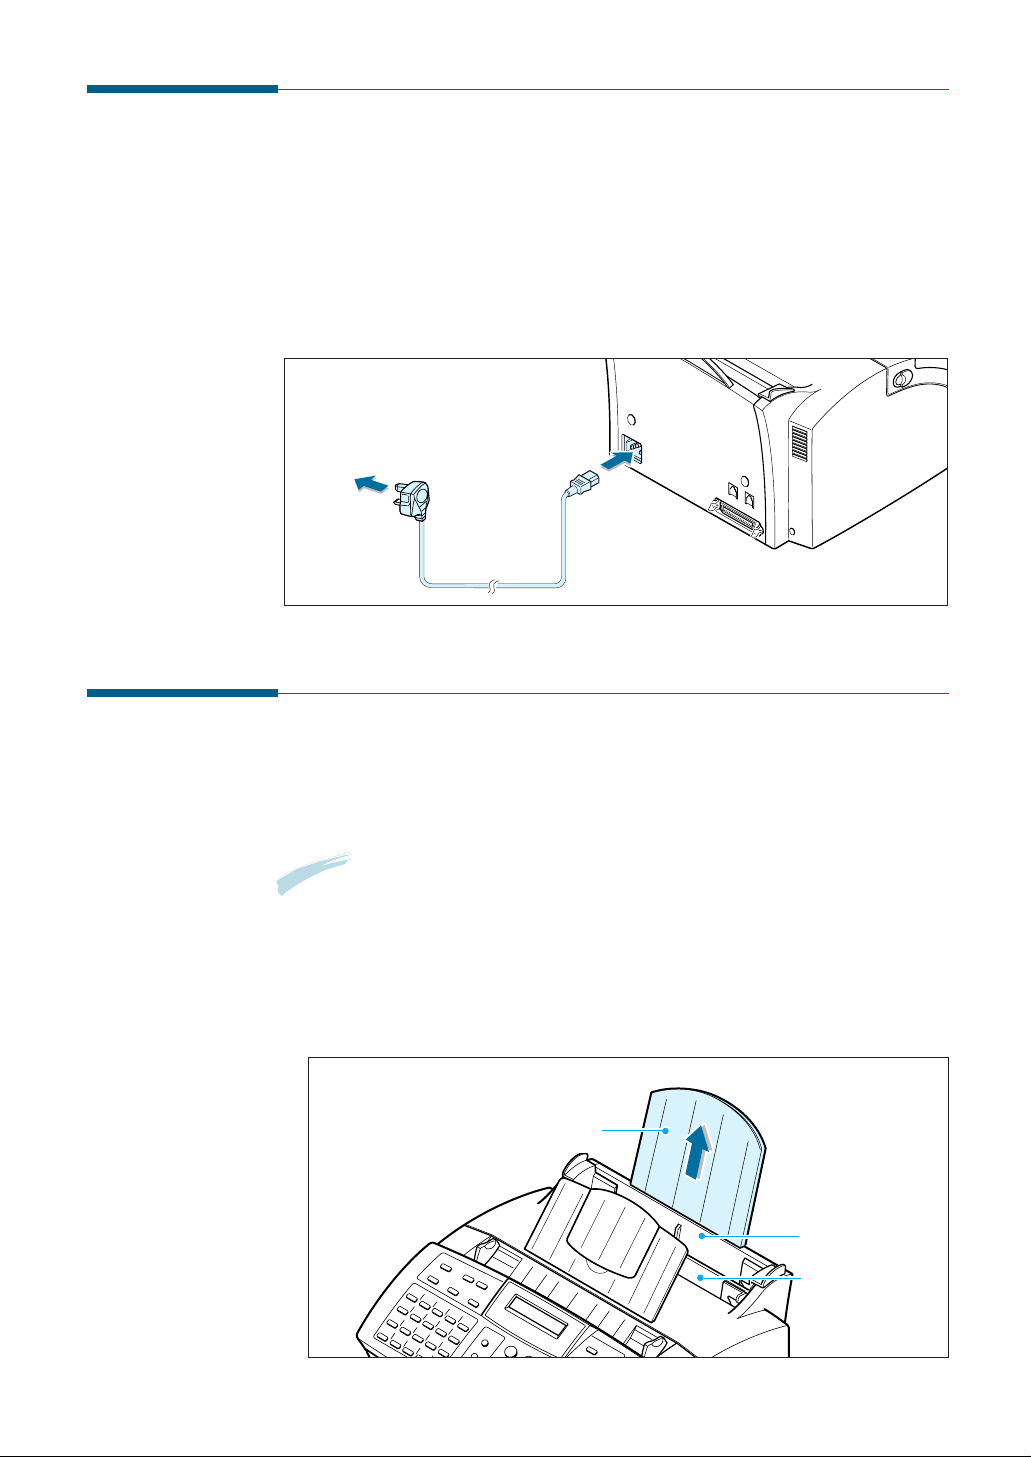
Loading Paper
For best results, use high quality xerographic paper. The automatic paper
input tray can hold a maximum of 150 sheets of plain paper. The
maximum capacity may be less, depending on the paper thickness.
Note: For stand-alone copy and fax operations, this machine supports A4,
letter, and legal paper. After loading paper, make sure that you
select the correct paper size. For more information on setting the
paper size, see ‘Setting User-Selectable System Options’ on page
2.2.
1. Pull the paper input support completely out of the unit.
Paper input support
Automatic paper
input tray
Manual paper
input tray only
for MFP model.
Plugging In the Power
Plug one end of the cord into the back of the machine and the other end
into a standard AC power outlet.
This machine will turn on and the display will show ‘SYSTEM INITIAL’. If
there is no paper loaded, the displays will shows ‘NO PAPER.’ then if
there is no cartridge installed, the display will show ‘JAM/NO
CARTRIDGE’.
To AC outlet
To turn off, unplug the power cord.
Page 25
1.14
Getting Started
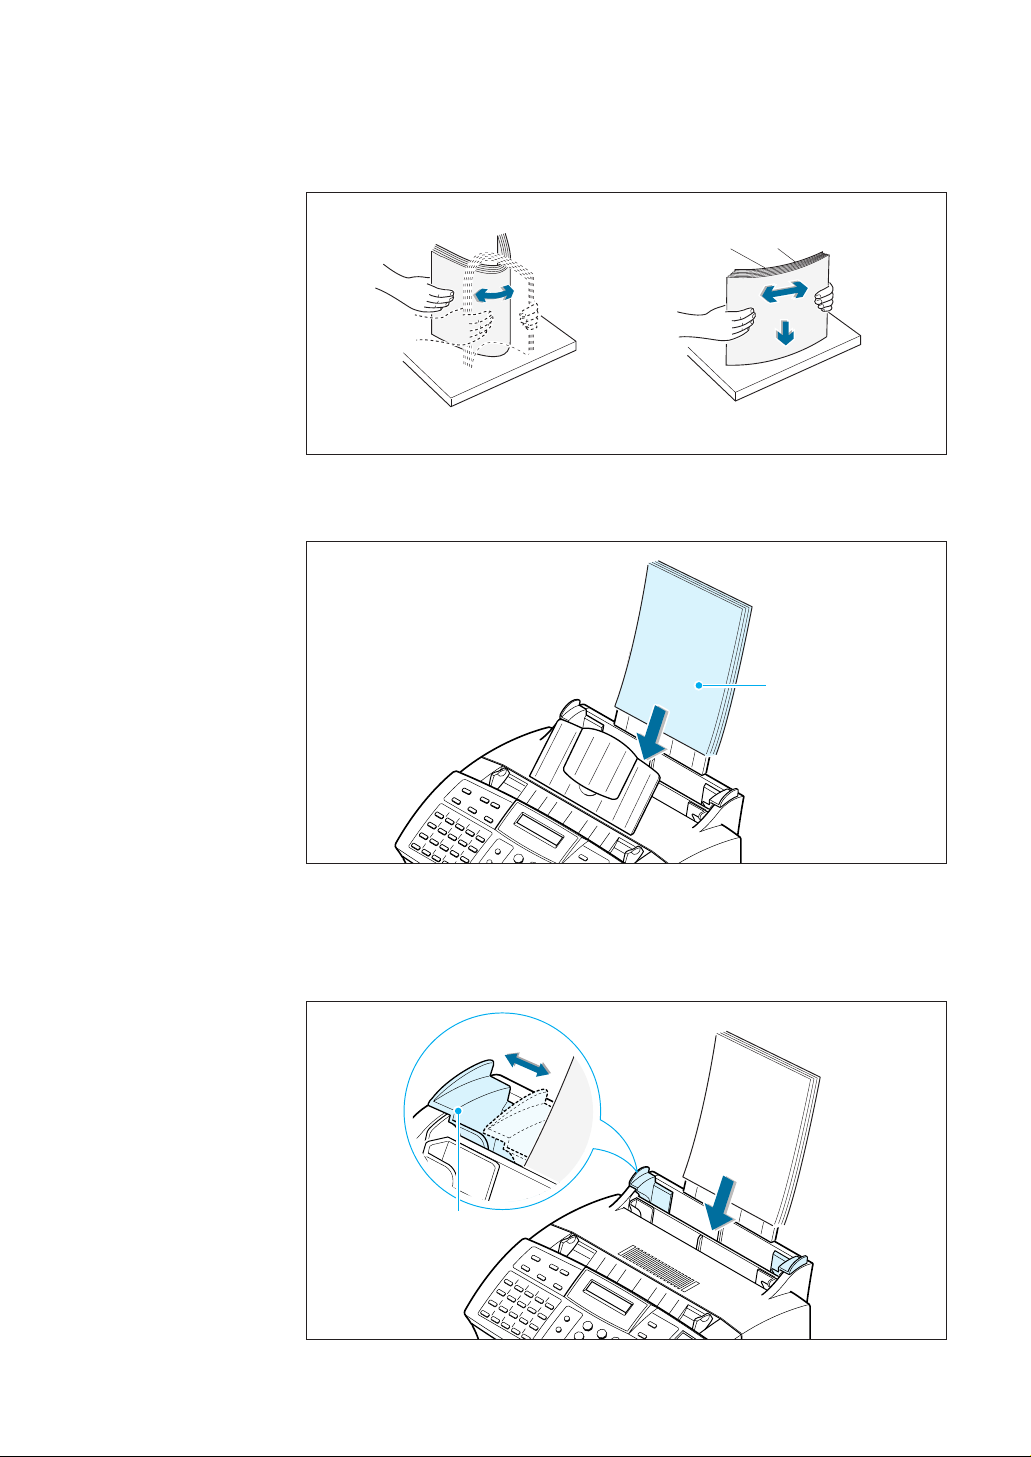
2. Remove a stack of paper from its packaging. Tap the stack on a flat
surface to even it up.
4. Adjust the paper guides to the width of the print media. Slide the
guides until they lightly touch the stack of print media. Do not bend
the print material.
Paper guide
3. Insert the paper with the print side facing you.
Place the print side
facing you.
Page 26

1.15
Getting Started
Paper Type and Size
Satisfactory print and receive quality can be obtained with many types of
plain paper. Since the quality of plain paper varies widely, test the print
quality before buying large quantities of paper. Your machine uses a
variety of papers including:
• Xerographic paper
• Bond paper
• Dual-purpose paper
Because all papers vary in physical characteristics, you can receive
mixed results from different packages of paper even through the
packages contain the same paper. If you encounter undesirable results,
try the other side of the paper, a different type, or another package of
the same kind of paper.
DO NOT use the following types of paper with your machine:
• Continuous form feed paper
• Synthetic paper
• Thermal paper
• Multi-sheet forms and documents
• Chemically treated paper
• Papers with raised, embossed lettering
To load paper with a preferred print side:
• If you are using xerographic paper, load the paper with the preferred
print side facing down.
• If you are using letterhead or bond paper, load the paper with the
preferred side facing up.
The following papers can be used in your machine for fax:
• Letter : 216 x 279 mm (8.5 x 11.0 in.) - 60 g/m
2
~ 90 g/m2(16 ~ 24 lb)
• A4 : 210 x 297 mm (8.3 x 11.7 in.) - 60 g/m
2
~ 90 g/m2(16 ~ 24 lb)
• Legal : 216 x 356 mm (8.5 x 14.0 in.) - 60 g/m
2
~ 90 g/m2(16 ~ 24 lb)
Page 27
1.16
Getting Started
Installing the Toner Cartridge
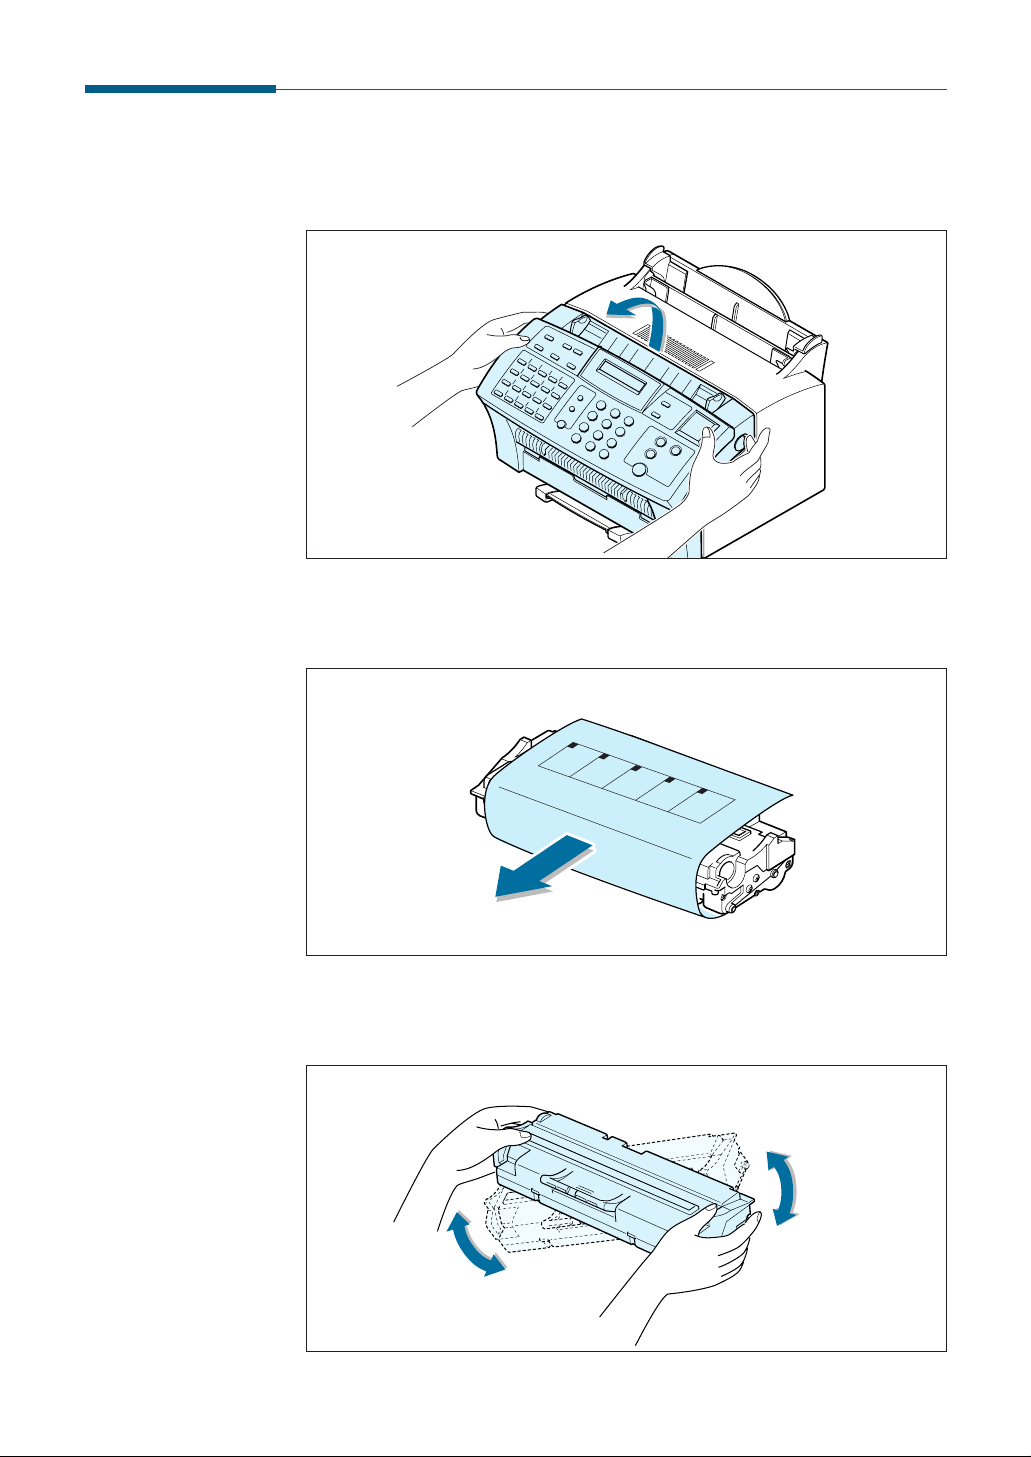
1. Pulling the cover release buttons found on both sides of the machine
toward you, open the cover.
2. Unpack the cartridge from its plastic bag, and then remove the paper
rolled the cartridge.
3. Shake the cartridge from side to side 5 or 6 times to redistribute the
toner evenly inside the cartridge.
Page 28
1.17
Getting Started
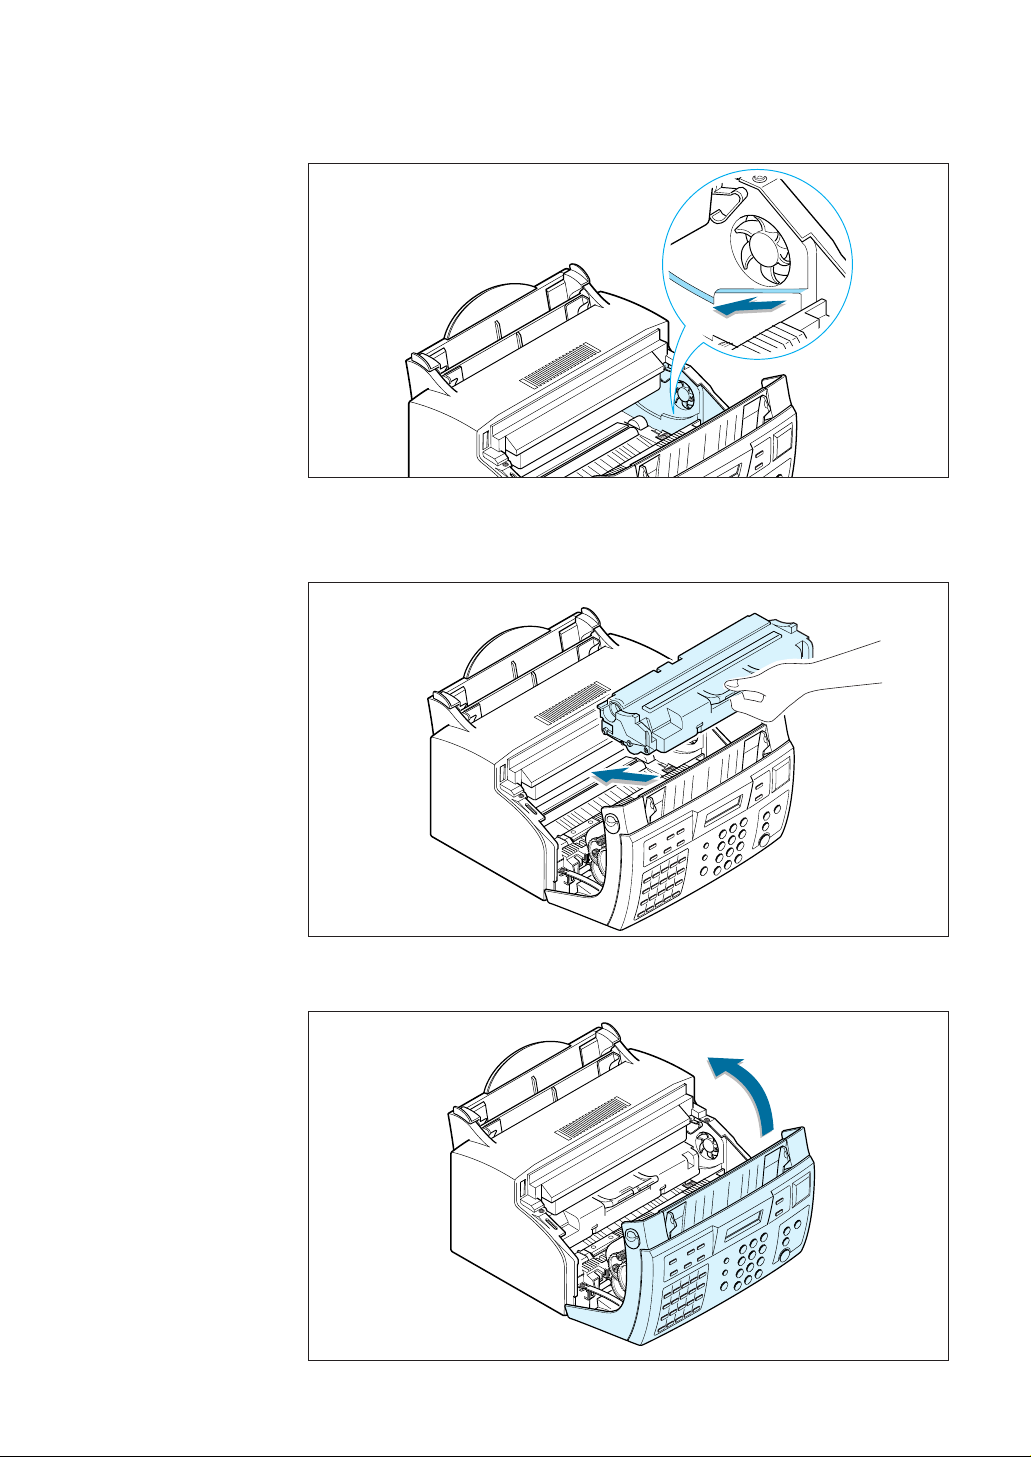
4. Find the cartridge slots inside the machine, one on each side.
6. Close the cover. Make sure that the cover is securely closed.
5. Grasp the handle at the front of the cartridge and slide it down
between the cartridge slots, and push it firmly.
Page 29

1.18
Getting Started
Setting the Date and Time
The current date and time are shown on the display when the machine is
on and ready for use (Standby mode). The date and time are printed on
all transmitted faxes.
When you install this series for the first time, or when the product is
without power for about 15 seconds, the display prompts you to reset the
date and time.
1. Press User Tools on the front panel. the display shows the first setup
menu; FAX NUMBER/NAME.
2. Press ➛ or ❿ until ‘TIME/DATE SETUP’ appears, then press
Start/Enter to access the Time/Date Setup menu.
3. The display asks you to choose a date format. Press Start/Enter.
4. Press ➛ or ❿ until you find the desired date format, then press
Start/Enter.
If you select USA, the date appears in format of Month-Day-Year. The
EUROPE format will be displayed in format of Day-Month-Year.
The display shows the currently set date and time using the selected
date format and asks you to set the month.
5. Enter the correct date and time for each item using the number keypad.
Each time you enter the appropriate number, the display asks you to
enter the next item in the following order: MONTH, DATE, YEAR, HOUR,
and MINUTE.
Enter the time in 24-hour format. For example, enter 2230 for 10:30
P.M.
If you enter an invalid number, the display does not proceed to the next
step. If this happens, re-enter the correct number.
6. When you are finished, press Start/Enter to save the setting. The
display returns to Standby mode and shows the date and time you have
set.
SET DATE & TIME
04-01-2001 10:30
19-MAR 12:30 FAX
(USA Format)
(EUROPE Format)
Page 30
1.19
Getting Started
Setting Your Fax Number and Name
Your fax number and name can be printed at the top of each page
transmitted.
1. Press User Tools on the front panel. The display shows the first setup
menu; FAX NUMBER/NAME.
2. Press Start/Enter to access the Fax Number/Name menu.
The display shows ‘FAX NUMBER.’
3. Press Start/Enter.
If there is a number already set, the number appears.
4. Enter the telephone number your machine is connected to. You can
enter up to 20 digits.
Press for plus sign (+) and # for a hyphen. If you entered a wrong
number, press Search/Delete to delete it.
5. Press Start/Enter when the number on the display is correct.
If there is a name already set, the name appears.
6. Enter your name using number keypad. You can enter up to 40
characters.
For details on how to use the number keypad to enter alphanumeric
characters, see page 2.19.
7. Press Start/Enter when the name on the display is correct.
TEL:
NAME:
Page 31

chapter
2
2
This chapter explains how to send and receive faxes from
the front panel of this machine. This chapter also
demonstrates how to use the Transmission Option features
and change the settings on the fax system.
This chapter provides information on the following topics:
◆ Setting Up Stand-alone Fax System
◆ Sending a Fax
◆ Receiving a Fax
◆ Making a Copy
◆ Automatic Dialling
◆ Transmission Options
◆ Additional Functions
Page 32

2.1
Stand-alone Fax
Setting Volume
Ringer Volume
You can adjust the volume of the ringer to your desired volume.
1. Press ➛ or ❿ in Standby mode.
The display shows the current ringer volume setting.
2. Press ➛ or ❿ until you find the desired loudness. Four levels are
available; 0~3.
You will hear the selected volume and the display will show the level.
Setting ‘0’ turns the ringer off. The machine will work normally even if
the ringer is set to off.
3. Press Start/Enter to save the setting.
Speaker Volume
1. Press On Hook Dial to adjust the speaker volume. If you cannot hear
dial tone, check the phone line connection.
2. Press ➛ or ❿ repeatedly until you find the desired loudness.
The display shows the current volume level.
3. After choosing the desired volume level, press On Hook Dial.
Setting up Standalone Fax System
RINGER VOL.[3]
SPEAKER VOL.[2]
Page 33

2.2
Stand-alone Fax
Setting Alert Tones
You can choose an alarm tone to sound when an error occurs (ALARM
VOLUME) or when any key is pressed (KEY VOLUME).
1. Press User Tools on front panel. The display shows the first setup
menu; FAX NUMBER/NAME.
2. Press ➛ or ❿ until ‘VOLUME SETUP’ appears, then press Start/Enter.
The display shows ‘ALARM VOLUME’.
3. Press Start/Enter to access the Alarm Volume menu. To access the
Key Volume menu, press ➛ or ❿ until ‘KEY VOLUME’ appears, then
press Start/Enter.
4. Press ➛ or ❿ to turn the sound ON or OFF, then press Start/Enter
to save the setting.
5. To return to Standby mode, press Stop.
Setting User-Selectable System Options
Your machine has various user-selectable system options. These options
are preset at the factory but you may need to change them. To find out
how the options are currently set, print the System Data list. For more
information on printing the list, see above.
Setting an Option
1. Press User Tools on the front panel. The display shows the first
menu; FAX NUMBER/NAME.
2. Press ➛ or ❿ until ‘SYSTEM SETUP’ appears. The display shows the
first option menu; LANGUAGE.
3. Scroll through the options by pressing ➛ or ❿ repeatedly.
4. When the option you want appears on the display, press
Start/Enter.
5. Choose the desired status by pressing ➛ or ❿ repeatedly, or enter
the desired value using the number keypad.
Page 34

2.3
Stand-alone Fax
6. When setting is done, press Start/Enter to save the setting.
You can exit from setup mode at any time by pressing Stop. The
machine returns to Standby mode without saving the setting you
have already changed.
Selectable Options
These instructions assume you have followed the steps on page 2.2
under ‘Setting an Option’ and the machine is prompting you to change
one of the options listed here.
• LANGUAGE — You can select the display language. The available
languages are ENGLISH, GERMAN, FRENCH, ITALIAN, SPANISH,
PORTUGUESE and DUTCH.
• SEND FROM MEMORY—Enables all transmission documents to be
automatically scanned into the memory before transmission.
Select ON to enable.
Select OFF to disable.
• SENDING CONFIRM — A confirmation report shows whether the last
transmission was successful or not, how many pages were sent, etc.
Select ERROR to print only when an error occurs and the transmission
was not successful.
Select ON to print a confirmation report automatically each time you
send a fax.
Select OFF to turn off.
• FAX PAPER SIZE — Select the paper size you will use for recording.
LETTER, A4 and LEGAL sizes are available.
Note: If you set the Auto Reduction menu option, or turned Paper
Save mode on, your machine will determine the reduction rate
according to this setting.
Page 35

2.4
Stand-alone Fax
• AUTO REDUCTION — When receiving a document as long or longer
than the paper loaded in your machine, the machine can reduce the
data in the document to fit into your recording paper size.
Turn this feature on to reduce an incoming page that may need to be
divided into two pages with only a few lines on the second page. If the
fax machine cannot reduce the data to fit onto one page with this
feature enabled, the data will be divided and printed in actual size on
two or more sheets if necessary.
Select ON to enable. Note that this feature does not apply to the copy
mode.
Select OFF to turn this feature off. The overflow data will be printed
out on a second page.
• DISCARD SIZE — When receiving or copying a document as long as
or longer than the paper installed in your machine, you can set the
machine to discard any excess image at the bottom of the page to fit
onto the recording paper size.
Enter the desired discard size from 0 through 30 mm using the
number keypad.
If the received page is outside the margin set, it will be printed on two
sheets of paper at the actual size.
If the data is within the margin, and the Auto Reduction feature is on,
it will be reduced to fit onto the appropriate size paper (Discard does
not take place). If the Auto Reduction feature is turned OFF or fails,
the data within the margin will be discarded.
• RINGS TO ANSWER —You can select the number of times your
machine rings before answering an incoming call. If you are using your
machine as both a telephone and a fax machine, we suggest you set
the ring count to at least 4 to give you time to answer.
Original Received data
Page 36

2.5
Stand-alone Fax
• STAMP RCV. NAME—Allows the machine to automatically print the
page number, and the date and time of the reception at the bottom of
each page of a received document.
Select ON to enable.
Select OFF to disable.
• RCV. START CODE — The remote receive start code allows you to
initiate fax reception from an extension phone plugged into the EXT.
jack on the back of your machine. If you pick up the extension phone
and hear fax tones, enter the remote code and the machine will start
receiving. The password is preset to ‘ 9 ’ at the factory.
Enter the desired code 0 to 9 on the number keypad.
• ECM MODE (Error Correction Mode) — This mode compensates for
poor line quality and ensures accurate, error-free transmission with
another ECM-equipped facsimile machine. If the line quality is poor,
transmission time may be increased when the ECM is enabled.
Select ON to enable.
Select OFF to disable.
• JUNK FAX BARRIER — With this feature set to ON, the system will
only accept a fax sent from the remote station of which the fax
number is stored in memory as a one-touch or two-digit speed dial
number. This feature is useful for blocking any unwanted fax.
Select ON to turn this feature on. You can receive only from the
registered stations.
Select OFF to turn this feature off. Anybody can send you a fax.
Notes:
• This feature needs the number reported by the remote fax to be an exact
match to a one-touch or speed dial number in this machine.
If you have a problem receiving faxes, turn this feature off.
Page 37

2.6
Stand-alone Fax
• DRPD MODE — “Distinctive Ring” is a telephone company service
which enables a user to use a single telephone line to answer several
different telephone numbers. The particular number someone uses to
call you on is identified by different ringing patterns, which consist of
various combinations of long and short ringing sounds. This feature is
often used by answering services who answer telephones for many
different clients and need to know which number someone is calling in
on to properly answer the phone.
Using the Distinctive Ring Pattern Detection feature, your fax machine
can “learn” the ring pattern you designate to be answered by the FAX
machine. Unless you change it, this ringing pattern will continue to be
recognised and answered as a FAX call, and all other ringing patterns
will be forwarded to the extension telephone or answering machine
plugged into the EXT. jack.
You can easily suspend or change Distinctive Ring Pattern Detection at
any time.
Before using the Distinctive Ring Pattern Detection option, Distinctive
Ring service must be installed on your telephone line by the telephone
company. To setup Distinctive Ring Pattern Detection, you will need
another telephone line at your location, or someone available to dial
your FAX number from outside.
Select ON to turn this feature on.
Select OFF to turn this feature off.
Select SET to setup or change the Distinctive Ring Pattern Detection.
The LCD displays ‘WAITING RING’. Call your fax number from another
telephone. It is not necessary to place the call from a fax machine.
When your machine begins to ring, do not answer the call. The
machine requires several rings to learn the pattern.
When the machine completes learning, the LCD displays ‘END DRPD
SETUP’.
With the DRPD feature active, ‘DRPD’ appears in the display and the
previously set reception mode is ignored. If you turn off DRPD, the
machine returns to any previously set reception mode.
Notes:
• DRPD must be set up again if you re-assign your fax number, or
connect the machine to another telephone line.
• After DRPD has been set up, call your fax number again to verify that
the machine answers with a fax tone. Then have a call placed to a
different number assigned to that same line to be sure the call is
forwarded to the extension telephone or answering machine plugged
into the EXT. jack.
Page 38

2.7
Stand-alone Fax
Preparing Documents for Faxing or Copying
To fax or copy documents that are printed on standard letter or A4 size
paper, follow these guidelines.
• Do not attempt to feed the following types of documents into the
machine: - wrinkled, curled, or folded paper
- chemically processed paper (pressure-sensitive paper,
carbon-coated paper, etc.)
- coated paper (glossy, etc.)
- thin paper (onion skin, airmail paper, etc.)
- thick paper
- small or short paper (such as a label, voucher, etc.)
- paper made of cloth or metal
To feed any of these documents, make copies using a standard copy
machine and insert the copies into the document tray.
• Remove all staples and paper clips before feeding the document.
• Ensure any glue, ink, or correction fluid on the paper is completely dry
before feeding the document.
• Do not feed documents with pages that are different sizes or different
thicknesses.
ACCEPTABLE DOCUMENTS (for ADF
1
)
Sending a Fax
Effective Scanning Width
Number of sheets which can
be loaded at a time
Thickness of document
Print Quality
Document Size
Max.
Min.
8.5 in. (W) x 11.7 in. (L)
(216 mm x 297 mm)
8.5 in. (W) x 14 in. (L)
(216 mm x 356 mm)
5.8 in. (W) x 5.0 in. (L)
(148 mm x 128 mm)
8.26 in. (210 mm)
Uncoated on both sides
Up to 20
0.05 mm ~ 0.07 mm
0.15 mm ~ 0.2 mm
0.075 mm ~ 0. 12 mm
Single Sheet
2 or More Sheets
1
ADF stands for Automatic Document Feeder. It allows you to stack original documents, which will
be faxed or copied one by one.
Page 39

2.8
Stand-alone Fax
Setting Document Resolution and Contrast
We recommend sending documents printed using a typewriter, felt tip pen,
black ink, or laserwriter. The paper should be white or very light, and of
normal weight – not cardboard. Blue lines on a ruled pad do not fax well.
To send normal documents, there is no need to adjust the resolution and
the contrast.
To send documents with unusual contrast characteristics, including
photographs, adjust the resolution and contrast.
Resolution
To increase sharpness and clarity, press the Resolution button repeatedly
after loading a document until you find the desired mode. You can choose
between STANDARD, FINE, or SUPER FINE mode.
STANDARD (200X 100 dpi) works well for documents with normal sized
characters.
FINE (200 X 200 dpi) is good for documents containing small characters,
thin lines, or print from a dot-matrix printer.
SUPER FINE (300 X 300 dpi) works well for documents containing
extremely fine details. SUPER FINE works only if the remote machine also
has the SUPER FINE features.
Contrast
To compensate for the brightness or darkness of your document, press the
Rcv. Mode/Contrast button repeatedly after loading a document until
you find the desired mode. You can choose between NORMAL, DARKEN,
LIGHTEN, or PHOTO.
NORMAL works well for normal documents.
DARKEN works well for light print or faint pencil markings. The light
image and text on the document will be darker on the printed page.
LIGHTEN works well for dark print. The dark image and text on the
document will be lighter on the printed page.
PHOTO is used when faxing photographs or other documents containing
color or shades of gray. When you choose this mode, you should set the
resolution to FINE.
Page 40

2.9
Stand-alone Fax
Loading Documents
1. Load your document face down with the top edge first going into the
document feeder.
2. Adjust the document guides for the width of the document.
3. Slide the sheet down into the document feeder until it is in the feed
area.
You can insert up to 20 sheets at a time. If you insert more than
one sheet, ensure the bottom sheet enters first. Stagger the leading
edge of the document slightly, and insert the document with a slight
push to ensure they feed smoothly.
To add pages while the fax is being sent, place them on top of the
already loaded sheets.
4. If necessary, use the Resolution and Rcv. Mode/Contrast buttons
to change the resolution and the contrast (see page 2.8).
Document guide
Page 41

2.10
Stand-alone Fax
Sending a Fax Automatically
1. After loading a document, enter the number of the remote fax using
the keypad.
One-touch or speed dialling is also available if you have already
stored the number into a one-touch or speed dial number. For
information on storing and using numbers in the memory, see page
2.18.
If you make a mistake while entering a number, press
Search/Delete to delete the number.
2. Press Start/Enter when the number appears correctly on the display.
The machine dials the number and begins to transmit.
Cancelling a Transmission
Press Stop any time during transmission. The machine continues to send
the fax and the display shows a message warning that the machine is in
use. Press Stop again.
Confirming a Transmission
When the last document has been sent successfully, the machine beeps
and returns to the Standby mode.
If something went wrong during your fax transmission, an error message
appears on the display. For a listing of error messages and their
meanings, see page 5.5. When you receive an error message, press
Stop to clear the message and resend the document.
You can print out a confirmation report automatically each time sending
is completed. For more information, see `Setting User-Selectable System
Options’ on page 2.2.
Automatic Redialling
If the number you have dialled is busy or there is no answer, the
machine will automatically redial the number every three minutes up to
a maximum of two times.
The display shows ‘RETRY REDIAL?.’ To redial the number without
waiting, press Start/Enter. To cancel the automatic redialling, press
Stop.
Page 42

2.11
Stand-alone Fax
Sending a Fax After Talking
You can send a fax after talking with the remote location.
1. After loading a document, pick up the handset of the extension
telephone and call the remote machine.
2. If the remote party answers, talk with her/him.
3. Press Start/Enter after you finish talking. The machine begins to
transmit.
4. Replace the handset.
Last Number Redialling
Press Pause/Redial with a document loaded in the feeder, the machine
begins to send.
The redial memory in your machine retains the last 10 numbers called.
To search through the redial memory, do as follows:
1. Press and hold Pause/Redial for about 2 seconds.
2. Press ➛ or ❿ to search through the memory until you find the desired
number.
3. When the desired number appears on the display, press Start/Enter
to dial.
Answering a Voice Request
When the phone rings after receiving a fax, pick up the external handset
and press Stop.
If the person at remote end is waiting with the handset lift up, you can
talk to the person.
If you do not answer the Voice Request, the machine prints out the
number that made the Voice Request, as well as the time and date that
the request was made.
Page 43

2.12
Stand-alone Fax
About Reception Modes
Your machine has four reception modes:
• In FAX mode, the machine answers an incoming call and immediately
goes into receive mode.
• In AUTO mode, the machine answers an incoming call expecting to
receive a fax. If the machine does not sense a fax signal, it will
continue to sound the ringing tone to tell you it is a phone call. If you
do not lift the handset of the extension telephone during the ringing,
the machine will switch to automatic fax reception mode.
• In ANS/FAX mode, the answering machine answers an incoming call,
and the caller can leave a message on the answering machine. If the
fax machine senses a fax tone on the line, the call automatically
switches to the fax machine.
Note: To use the ANS/FAX mode, attach an answering machine to the
EXT. jack on the back of your machine (see page A.1).
• In TEL mode, the automatic fax reception is turned off. If you pick up
the extension telephone and hear fax tones, you can receive a fax by
pressing Start/Enter on the front panel of your machine.
• In DRPD mode, you can receive a call using the Distinctive Ring
Pattern Detection (DRPD) feature. “Distinctive Ring” is a telephone
company service which enables a user to use a single telephone line to
answer several different telephone numbers. This mode is displayed
when you have set up the distinctive ring pattern. For details on this
feature, see page 2.6.
Receiving a Fax
Page 44

2.13
Stand-alone Fax
The current reception mode is displayed when the machine is in Standby
mode.
If you seldom use the fax line for voice conversations, set your
machine to receive a fax automatically by selecting FAX mode.
08-DEC 15:30 FAX
Current reception mode
Loading Paper for Receiving Faxes
The instructions for loading paper in the paper input tray are the same
whether you are printing, faxing, or copying, except that faxes can only
be printed on letter-, A4-, or legal-sized paper. See “Loading Paper” on
page 1.13 for instructions.
After loading paper for receiving faxes, set the paper size to the size of
paper you normally load in the paper input tray. This product uses this
setting when printing reports and determining autoreduction for incoming
faxes. See page 2.3 to set the paper size.
Note: As for MFP model, the printing function does not use this setting. If
you are loading special-sized media only for your current print job, do not
change this setting. After you have finished printing, reload the original
paper.
Receiving Automatically in FAX Mode
This machine is preset to FAX mode at the factory. If you have changed
the fax mode, take the following steps to receive faxes automatically:
1. Press and hold down Rcv. Mode/Contrast on the front panel
repeatedly until the display shows ‘FAX’.
2. When you receive a call, the machine answers the call on a specified
number of rings and receives a fax automatically. To change the
number of rings. See ‘Setting User-Selectable System Options’ on
page 2.2.
To adjust the ringer volume, see ‘Setting Volume’ on page 2.1.
Page 45

2.14
Stand-alone Fax
Receiving Automatically in ANS/FAX Mode
For this mode, you MUST attach an answering machine to the EXT. jack
on the back of your machine (see page A.1).
1. Press and hold down Rcv. Mode/Contrast on the front panel
repeatedly until the display shows ‘ANS/FAX.’
2. When you receive a call, the answering machine will answer.
If the caller leaves a message, the answering machine stores the
message as it would normally. If your machine hears a fax tone on
the line, it automatically starts to receive fax.
Notes:
• If you have set your machine to ANS/FAX mode and your answering
machine is switched off, or no answering machine is connected to your
machine, your machine will automatically go into FAX mode after 6 rings.
• If your answering machine has a ‘user-selectable ring counter’, set the
machine to answer incoming calls within 1 ring.
• If you are in TEL mode (manual reception) when the answering machine
is connected to your machine, you must switch off the answering
machine, or the outgoing message from the answering machine will
interrupt your phone conversation.
Receiving in AUTO Mode
1. Press and hold down Rcv.Mode/Contrast on the front panel
repeatedly until the display shows ‘AUTO’.
2. When you get a call, the machine answers it.
If a fax is being sent, the machine goes into reception mode.
If the machine does not detect a fax signal, it will continue ringing to
tell you it is a phone call. You should pick up the handset of the
extension telephone and press Stop to answer the call, or it will
switch to automatic reception mode.
Page 46

2.15
Stand-alone Fax
Receiving Manually in TEL Mode
You can answer calls using the handset of the extension telephone, and
start the machine to receive a fax.
1. Press and hold down Rcv.Mode/Contrast repeatedly until the display
shows ‘TEL.’
2. When the telephone rings, pick up the handset of the extension
telephone and answer it.
3. If you hear a fax tone, or if the person on the other end asks you to
receive a document, press Start/Enter.
4. Replace the handset of the extension telephone. The machine begins
receiving and returns to Standby mode when the reception is
complete.
Receiving Manually Using Remote Receive
Start Code
You can receive a fax from someone you are talking to on the extension
telephone without having to go to the fax machine.
1. When you receive a call on the extension phone and hear fax tones,
press the keys “ 9 ” (star nine star) on the extension telephone.
The machine receives the document.
Press the buttons slowly in sequence. If you still hear the fax tone
from the remote machine, try pressing “ 9 ” once again.
“ 9 ” is the remote receive start code preset at the factory. The
first and the last asterisks are fixed, but you can change the middle
number to whatever you choose. For more information, see page 2.5.
2. When you have finished speaking and receiving documents, replace
the handset of the extension telephone.
Page 47

2.16
Stand-alone Fax
Copying Overview
The resolution is automatically set to S.FINE while the copy feature is in
use. However, the contrast can be changed to produce optimal copy
quality for a particular document containing faint markings, dark image,
photographs, or other halftone images.
• Copy quantity : 1 to 99 copies of the document can be made.
• Custom sizing: You can reduce or expand the image size by 1%
increments from 50% to 130%. For MFP model, you can reduce or
expand the image size by 1% increments from 50% to 200%.
• Print order and sorting : When the Collate Copy menu is set to YES,
the machine sorts the print jobs. All pages of the document are printed
in reverse order before the next copy is printed. For example, if you
copy a three-page job to print 2 copies, the machine prints page 3,
page 2, page 1, page 3, page 2, page 1.
Making a Copy
Making a Single Copy
To make a single copy without setting options, take the following steps:
1. Load a document with the print side facing down.
2. Press Copy twice. Your machine starts copying.
Page 48

2.17
Stand-alone Fax
Using Advanced Copy Features
You can adjust the quantity, size, and print order for copying. Take the
following steps:
1. Load your document face down with the top edge first going into the
document feeder. If necessary, press Rcv. Mode/Contrast to change
the contrast. For details on the Contrast, see page 2.8.
2. Press Copy . The display asks you to enter the copy quantity
(1 to 99).
3. If you need two or more copies, enter the desired number and press
Start/Enter.
4. If you want to reduce or expand the image size, enter the number of
the desired zoom rate, then press Start/Enter.
5. The display asks you to set the Collate Copy menu. Press ➛or ❿ to
choose YES or NO. Setting YES will reverse the print order and sort
the print job.
Example: 2 copies of a 3-page document
6. When the desired setting is selected, press Start/Enter or Copy to
begin the copying.
Note: Pressing Copy at any time begins the copy operation immediately
without displaying the remaining options.
3
1
1
2
2
3
3
2
1
3
2
1
NO
YES
Page 49

2.18
Stand-alone Fax
How To Enter a Name Using the Number Keys
As you perform various tasks, you will need to enter names and
numbers. For example, when you set up your machine, you have to
enter your name (or your company’s name) and telephone number.
When you store a one-touch dial or speed dial, you also enter the
telephone numbers and names.
When the display asks you to enter a name, the LCD display reads:
Use the procedures described below to enter alphanumeric characters,
special symbols, or spaces.
Entering Alphanumeric Characters
You can also include special symbols in the name by using the 0 key.
See `Keypad Character Assignments’ on the next page.
1. Locate the button labelled with the letter you want – then press the
button repeatedly until the correct letter appears in the display.
Automatic Dialling
NAME:
ABC DEF
123
JKLGHI MNO
456
TUVPQRS WXYZ
789
Symbols
0
p
Page 50

2.19
Stand-alone Fax
For example, to enter an ‘R’, press 7 (labelled PQRS). Each time you
press 7, the display shows a different letter–first ‘P’, then ‘Q’, ‘ R’, ‘ S’,
and finally ‘7.’
The letter appears on the display as shown below.
2. When the letter you want appears on the display, press another
number key labelled with the next letter you want.
If the next letter is printed on the same number button, move the
cursor right by pressing ❿, then press the button.
The blinking cursor moves right and the next letter appears on the
display.
3. Select additional letters in the same way. When you have finished
entering the letters, press Start/Enter.
KEYPAD CHARACTER ASSIGNMENTS
Key
1
2
3
4
5
6
7
8
9
0
Space
➝
1
A ➝B ➝C ➝2
D ➝E ➝F ➝3
G ➝H ➝I ➝4
J ➝K ➝L ➝5
M ➝N ➝O ➝6
P ➝Q ➝R ➝S ➝7
T ➝U ➝V ➝8
W ➝X ➝Y ➝Z ➝9
+ ➝- ➝, ➝. ➝‘ ➝/
➝➝
# ➝& ➝0
Assigned numbers, letters, or characters
NAME:R
NAME:RP
Page 51

2.20
Stand-alone Fax
One-Touch Dialling
One-Touch dialling lets you use any of the 20 one-touch buttons to
automatically dial a number.
Storing a Number for One-Touch Dialling
1. Press and hold one of 20 one-touch buttons for about 2 seconds. The
display shows `Txx:’, where `xx’ represents the selected one-touch
button number.
If a number has already been stored in the location you chose, the
display shows the number. To edit the number, see the next page.
If you press and hold the button used for group dial number, the
display shows ‘GROUP ASSIGNED’, then asks you to press another
one-touch button.
2. Enter the number you want to store by using the number keypad,
then press Start/Enter.
To insert a pause between numbers, press Pause/Redial; a ‘P’
appears on the display.
If you make a mistake while entering a number, press
Search/Delete and re-enter the correct number.
Editing Name
If you make a mistake while entering a number or name, move the
cursor under the incorrect digit by ➛or ❿. Then, press the correct
number to change, or press Search/Delete to delete the number.
Inserting a Pause While Entering a Number
Some telephone systems require an access code (9, for example) and
listen for a second dial tone before dialling an outside number. In such
cases, you must insert a pause in the number when setting up a onetouch or a speed dial number.
To insert a pause, press Pause/Redial while entering the number.
When you dial a number, the dialling process pauses for a specified time
at the point where you pressed Pause/Redial.
For a longer pause, press Pause/Redial twice.
Txx:_
Page 52

2.21
Stand-alone Fax
3. The display asks you to enter a name. For information on how to
enter names, see page 2.19.
Or, if you do not want to assign a name, skip this step.
4. Press Start/Enter when the name appears correctly or without
entering a name. The display asks you to press another one-touch
number.
5. To set another one-touch number, press the desired one-touch button
and repeat steps 2 through 4.
Or, to return to Standby mode, press Stop.
Editing a Number for One-Touch Dialling
1. Press and hold the one-touch button where the phone number has
been stored.
2. Press ➛or ❿ to move the cursor to the desired number and edit the
number.
Note: When you press the One-Touch dial number stored for group dial,
the display briefly shows ‘G-REGISTERED’ to indicate that the
number is used for group dial, then you can edit the number.
3. When you have finished editing, press Start/Enter.
Sending a Fax Using a One-Touch Number
1. Load the document face down with the top edge first going into the
document feeder.
2. Press the one-touch button where you stored a number. The number
will be automatically dialled and the document transmitted when the
remote fax machine answers.
T01:0
25413000
Page 53

2.22
Stand-alone Fax
Speed Dialling
You can store up to 80 numbers in 2-digit Speed Dial locations (01-80).
Storing a Number for Speed Dialling
1. Press and hold Speed(#) for about 2 seconds.
2. Enter a 2-digit location number (01 through 80) where you want to
store a number, then press Start/Enter.
If a number has already been stored in a location, the display shows
the number. To edit the number, see the next page.
3. Enter the number you want to store, then press Start/Enter.
4. To assign a name to the number, enter the desired name. For
information on how to enter names, see page 2.19.
If you do not want to assign a name, skip this step.
where xx represents the
speed location you have
selected at step 2.
LOC. [01-80]❿##
Sxx:05512637522
Using Address Label
A One-touch label sheet is included with your machine. As you store
numbers in one-touch dial buttons, make a note of the numbers on the
label to remind you which number is stored in each position.
1. Remove the clear cover and
label.
2. Write information on the
label and replace the label
and cover.
You may want to use pencil
in case you wish to change
these numbers later.
Page 54

2.23
Stand-alone Fax
5. Press Start/Enter when the name appears correctly or simply
without entering a name. The display asks you to select another
location.
6. To store more speed dial numbers, repeat steps 2 through 5.
Or,
To return to Standby mode, press Stop.
Editing a Number for Speed Dialling
1. Press and hold Speed(#) for 2 seconds.
2. Enter the 2-digit location number where the phone number you want
to edit has been stored, then press Start/Enter. The display shows
the number.
3. Press ➛ or ❿ to move the cursor to the desired number and edit the
number.
Note: When you press the speed dial number stored for group dial, the
display briefly shows ‘G-REGISTERED’ to indicate that the number is
used for group dial, then you can edit the number.
4. When you have finished editing, press Start/Enter.
Sending a Fax Using a Speed Number
1. Load the document face down with the top edge first going into the
document feeder.
2. Press Speed(#), then enter a 2-digit speed dial location number.
3. Press Start/Enter to dial the number. The number will be
automatically dialled and the document transmitted when the remote
fax machine answers.
Sxx:05512637522
Page 55

2.24
Stand-alone Fax
Searching for a Number in the Memory
There are two ways to search for a number in the memory. You can
either scan from A to Z sequentially, or you can search using the first
letter of the name associated with the number.
Searching Sequentially through the Memory
1. Press Search/Delete on the front panel.
2. Press ➛ or ❿ to scroll through the memory until you find the name
and number you want.
Pressing ➛ or ❿ allows you to search downward through the entire
memory in alphabetical order (from A to Z).
While searching through the machine’s memory, you will see that each
entry is preceded by one of three letters: ‘T’ for one-touch dial, ‘S’ for
speed, or ‘G’ for group dial number. These letters tell you how the
number is stored.
3. When the name and number you want appears on the display, press
Start/Enter to dial.
If a document is loaded, the document begins to be transmitted when
the remote fax machine answers the phone.
Searching with a Particular First Letter
1. Press Search/Delete, then press the button labelled with the letter
you want to search for. A name beginning with the letter appears on
the display.
For example, if you want to find the name ‘MOBILE,’ press the ‘6’
button, which is labelled with ‘MNO.’
2. Press ➛ or ❿ to display the next name in the list.
3. When the name and number you want appear, press Start/Enter to
dial.
PRESS ➛, ❿, A-Z
Page 56

2.25
Stand-alone Fax
Transmission
Options
Broadcasting
This feature will allow documents to be sent to multiple locations. After
sending, the documents are erased from the memory.
1. Load your document face down with the top edge first going into the
document feeder. And adjust the resolution and contrast, if necessary.
For details, see page 2.8.
2. Press Trans. Option on the front panel. The display shows the first
menu; BROADCASTING.
3. Press Start/Enter to access the Broadcasting menu.
4. Enter the number of the remote machine using the number keypad.
You can also press a one-touch button including group dial buttons. If
not, press Speed(#), enter a 2-digit speed dial number, then press
Start/Enter. The stored number appears on the display.
5. Press Start/Enter to confirm the number. The display asks you to
enter another fax number.
6. If you want to send to more than one location, repeat steps 4 and 5.
Note: You cannot use Group dial numbers for another fax number.
Or,
To send to one location or when you complete the last fax number
setting, press Start/Enter.
Page 57

2.26
Stand-alone Fax
Delayed Fax
This machine can be set to send a fax at a future time.
1. Load your document face down with the top edge first going into the
document feeder. And adjust Resolution and Contrast, if necessary.
For details, see page 2.8.
2. Press Trans. Option on the front panel. The display shows the first
menu; BROADCASTING.
3. Press ➛ or ❿ until ‘DELAYED FAX’ appears, and press Start/Enter to
access the Delayed FAX menu.
4. Enter the number of the remote machine using the ten number
keypad.
You can also press a one-touch button including group dial buttons. If
not, press Speed(#), enter a 2-digit speed dial number, then press
Start/Enter. The stored number appears on the display.
5. Press Start/Enter to confirm the number. The display asks if you
want to enter another fax number.
7. The document will be scanned into memory. The display shows the
memory capacity and the number of pages being stored. The machine
begins sending the documents in order of the numbers you entered.
Notes:
• If ‘MEMORY FULL’ occurs while scanning into the memory, the display
will show:
Press ➛or ❿ to select the option you want. If you select Cancel,
broadcasting is cancelled. If you select Done, your machine performs
broadcasting only with the pages already scanned.
• If an error occurs while sending to a specific number, the machine
transmits the document to all the other numbers, then retries the number
that previously recorded an error. After completing transmission, your
machine prints the multi-communication report.
ENTER ANOTHER NO
JOB❿CANCEL❿DONE
Page 58

2.27
Stand-alone Fax
6. If you want to send to more than one location, repeat steps 4 and
5.
Note: You cannot use Group dial numbers for another fax number.
Or,
To send to one location or when you complete the last fax number
setting, press Start/Enter.
7. The display asks you to enter a name. If you want to assign a
name to the transmission, enter the name. If not, skip this step.
For details on how to enter the name using the number keypad, see
page 2.19.
8. Press Start/Enter. The display shows the current time and asks
you to enter the time when the fax is to be sent.
9. Enter the time by using the number keypad, then press
Start/Enter.
Enter the time in 24-hour format. For example, enter 2230 for
10:30 P.M. If you set a time earlier than the current time, the
document will be sent at that time on the following day.
10. The document will be scanned into memory. The display shows the
memory capacity and the number of pages being stored.
11. The machine returns to Standby mode and the display alternates
between messages to remind that you are in Standby mode and
that a Delayed Transmission is set.
Note: To cancel the operation reserved in memory, see ‘Cancelling a
Scheduled Operation’ on page 2.31.
TIME(10:30)10:30
The current time
Page 59

2.28
Stand-alone Fax
Priority Fax
When the priority fax is enabled, a high priority document can be
transmitted ahead of reserved operations. The document is scanned into
the memory, then transmitted when the current operation is concluded.
In addition, a priority transmission will interrupt a broadcast operation
between stations (i.e., when transmission to station A ends, before
transmission to station B begins) or between redial attempts.
1. Load the document face down. If necessary, adjust Resolution, or
Contrast. For details, see page 2.8.
2. Press Trans. Option on the control panel. The display shows the first
menu; BROADCASTING.
3. Press ➛ or ❿ until ‘PRIORITY FAX’ appears, then press Start/Enter
to access the Priority Fax menu.
4. Enter the number of the remote machine using the ten number
keypad.
You can also press a one-touch button. If not, press Speed(#), enter
a 2-digit speed dial number, then press Start/Enter. The stored
number appears on the display.
5. Press Start/Enter to confirm the number. The display asks you to
enter a name.
6. If you want to assign a name to the transmission, enter the name.
If not, skip over this step.
For details on how to enter a name using the number keypad,
see page 2.19.
7. Press Start/Enter. The document will be scanned into memory. The
display shows the memory capacity and the number of pages being
stored.
8. The machine shows the number being dialled, then begins sending the
document.
Page 60

2.29
Stand-alone Fax
POLLCODE [0000]
BULLETIN❿YES❿NO
5. To use a poll code, enter the 4-digit code (except for 0000), then
press Start/Enter. Or,
If you do not want to secure the transmission with a poll code, press
Start/Enter when the display shows 0000 for the poll code, or press
0000.
6. The display asks you to store the document in the machine’s bulletin
memory.
Polling
What is Polling?
Polling is used when one fax machine requests another to send a
document. This is useful when the person with the original document is
not in the office. The person to receive the document calls the machine
holding the original and requests that the document be sent. In other
words, it “polls” the machine holding the original.
Polling Transmission
You can program the fax machine to send documents in your absence
when polled by a remote fax machine. A polling code is used to prevent
unauthorized polling of your machine. When you secure your machine in
this manner, only those who know the poll code can poll your machine.
Note: Polling Transmission only works with machines of the same model
that have the Polling Reception feature.
1. Load your document face down with the top edge first going into the
document feeder, and adjust the resolution and contrast. For details,
see page 3.8.
2. Press Trans. Option on the front panel. The display shows the first
menu; BROADCASTING.
3. Press ➛ or ❿ until ‘SEND POLLING’ appears, and press Start/Enter
to access the Send Polling menu.
4. The display asks you to enter a 4-digit poll code. The poll code is
preset to 0000 at the factory which represents no poll code.
Page 61

2.30
Stand-alone Fax
7. Press ➛ or ❿ to highlight YES or NO, then press Start/Enter.
If you want to store the document in the bulletin board memory,
select YES. More than one remote station can poll that document from
your machine.
If not, the document will be automatically erased after being polled by
a remote machine.
8. The machine stores the document in memory. The display counts the
number of pages being stored in memory and the memory capacity
remaining.
The machine returns to Standby mode and the display shows a
reminder that a Polling Transmission is set. The machine automatically
switches to FAX mode (automatic receiving) when set to be polled.
Polling Reception
You can set your machine to automatically receive documents from
an unattended remote fax machine. This feature permits unattended
polling in the evening hours when telephone rates are lower.
Note: The remote machine must be ready for polling.
1. Press On Hook Dial and when you hear a dial tone, call the remote
fax machine.
2. When you hear the fax tone, press Trans. Option. Then, ‘RECEIVE
POLLING?’ appears.
3. Press Start/Enter. The display asks you for a 4-digit code. Poll code
‘0000’ represents no code.
4. If the remote machine is secured with a poll code, you must enter
the correct code, and press Start/Enter. Or,
If the remote machine is not secured with a poll code, press
Start/Enter to accept [0000] which represents no code.
5. The machine begins to receive polling.
Notes:
• To cancel the operation, press Stop at any time.
• Not all fax machines have polling capability, and polling incompatibility
can occur between different manufacturers.
Page 62

2.31
Stand-alone Fax
Adding Documents To a Scheduled Operation
You can add documents to the delayed transmission previously reserved
in memory.
1. Load the document face down, and adjust Resolution, or Contrast, if
necessary. For details, see page 2.8.
2. Press Trans. Option on the front panel. The display shows the first
menu; BROADCASTING.
3. Press ➛ or ❿ until ‘ADD SCHEDULE’ appears, and press Start/Enter.
The display shows the operation, time and name currently reserved in
memory.
4. Press ➛ or ❿ repeatedly until you find the operation to which you
want to add documents, then press Start/Enter.
The machine automatically and stores the documents in memory, and
the display shows the memory capacity and the number of pages.
5. After storing, the machine displays the total number of pages, then
returns to Standby mode.
Cancelling a Scheduled Operation
1. Press Trans. Option on the front panel. The display shows the first
menu; BROADCASTING.
2. Press ➛ or ❿ until ‘CANCEL SCHEDULE’ appears, and press
Start/Enter. The display shows the operation, time and number
currently reserved in the memory.
3. Press ➛ or ❿ repeatedly until you find the operation you want to
cancel, then press Start/Enter. The display asks you to confirm your
selection.
4. Press Start/Enter to cancel the selected operation. The operation is
deleted from memory.
Page 63

2.32
Stand-alone Fax
Additional Functions
Monitoring a Dual Job Status
Your machine can perform more than one of many functions
simultaneously. For example, you can;
• Receive a fax into the memory while making a copy.
• Store a fax document for later transmission while printing an incoming
fax.
When the machine performs dual tasks, press Status to see the current
status on the display of the other operation. Each time you press
Status, the current status of the two operations displays alternatively.
Forwarding Received Faxes
You can forward all faxes which you receive during the specified period to
a specified remote station. This can be useful when you are out of your
work station and want to receive your faxes through another station.
Setting Time and Destination for Forwarding Faxes
To forward the received fax, you must define the remote fax machine
where the fax is to be sent and the start time and end time of a period
when the Fax Forward feature operates.
1. Press and hold down Fax Forward for about 2 seconds on front panel.
2. Enter the number of a designated fax machine to where the faxes are
delivered using the ten number keypad.
You can also use one of one-touch dial button or a speed dial number.
Note: You cannot use the Group dial number for forwarding a fax.
Page 64

2.33
Stand-alone Fax
3. When the correct number displays, press Start/Enter.
The displays prompts you to enter the start time.
4. Enter the date and time when the Fax Forwarding feature starts to
operate and press Start/Enter.
The displays prompts you to enter the end time.
5. Enter the date and time when the Fax Forwarding feature ends and
press Start/Enter.
Turning the Fax Forwarding Feature On or Off
Press Fax Forward on front panel to turn this feature on or off.
• If the LED is on, Fax Forwarding activates. All faxes delivered to your
machine during the specified period will be automatically forwarded to a
registered station.
• If the LED is off, Fax Forwarding deactivates.
Notes:
• If an error occurs during forwarding a fax, your machine will
automatically redial the number every three minutes up to a maximum of
two times, just like normal fax operation.
• The Sending Confirmation report showing time when faxes are
forwarded, the designated fax number, the transmission result, the
contents of the fax and so on will automatically print right before the end
time.
Printing Reports
You can print help and reports containing useful information.
Notes: The list you have set to print out automatically will not print out
when there is no paper loaded or a paper jam has occurred.
Help
Shows the machine’s basic functions and commands and can be used as
a quick reference guide.
Sent Journal
Shows information concerning fax transmission activities recently made.
Received Journal
Shows information concerning fax reception activities recently made.
Page 65

2.34
Stand-alone Fax
Phonebook
Lists all numbers currently stored in memory as One-touch dial numbers,
Speed dial numbers, and Group dial numbers.
Sending Confirmation
Shows the fax number, the number of pages, elapsed time of the
operation, the communication mode, and the communication results.
You can print the confirmation report in one of the following ways
according to your setting in System Setup(see page 3.2):
• Automatically after each transmission (ON)
• Automatically only if an error occurs during transmission (ERROR)
• No report printed at all (OFF). You can print this report manually.
Schedule Information
Shows the document currently stored for Delayed transmission, Priority
transmission, Broadcasting and Send polling. The list shows the starting
time, type of operation, etc.
System Data List
Shows the status of the user-selectable options. After you change any
setting, print this list to confirm your changes.
Multi-Communication Report
Is printed automatically after sending documents to or receiving
documents from more than one location.
Callback Message
Is printed out automatically when you do not respond to a remote
operator’s Voice Request.
Power Failure Report
Is printed out automatically when power is restored after a power failure.
This report shows data erased by the power failure.
TO PRINT LISTS
1. Press Report/Help on the front panel. The display shows the first
menu.
2. Press ➛ or ❿ until you find the list you want to print, then press
Start/Enter. The selected list will be printed.
HELP
Page 66

2.35
Stand-alone Fax
Group Dialling (for Multi-Address Transmission)
Multiple one-touch and speed dial numbers can be registered as a group.
By using the group number, you can send a document to multiple parties
in a single operation. The machine will dial the remote numbers in stored
sequence. If the number is busy, the machine will dial the next stored
number. After dialing all of the stored numbers, the unit will
automatically redial any number that was busy. Before you can use this
feature, you must program the group numbers desired.
Storing One-Touch or Speed Dial Numbers for Group
Dialing
1. Press User Tools on the front panel.
The display shows the first menu; FAX NUMBER/NAME.
2. Press ➛ or ❿ until ‘GROUP DIAL SETUP’ appears, and press
Start/Enter.
3. Press one of the 20 one-touch buttons that you want to use for group
dial.
4. The display asks you to confirm that you use this button for group
dialing.
Press Start/Enter to confirm.
If you do not want to use the one-touch number, press Stop.
Then,press another one-touch button.
Note: If the button you chose has already been used for one-touch
dialing , the display warns the one-touch number is used.
Then you are allowed to select ‘OTHER’ or ‘RENEW’ by pressing
➛ or ❿. To replace that number and continue, select RENEW
and to start over with a different location, select OTHER. When the
desired option is displayed, press Start/Enter.
GROUP NO.: T15
T15 USED !
Page 67

2.36
Stand-alone Fax
5. The display asks you to press a one-touch button or to enter a 2-digit
speed dial number that you wish to include in the group.
6. Press a one-touch button where the fax number you wish to include in
the group is stored.
Or,
Enter a 2-digit speed dial location where the fax number you wish to
include in the group is stored.
7. Press Start/Enter. The display shows the fax number which was
stored in the selected location.
8. Repeat step 6 to 7 to enter additional numbers into the selected
group.
9. Press Start/Enter when you have entered all the desired
destinations. The display asks you to enter a name.
10. To assign a name to the group, enter the desired name. See page
2.19 for entering letters.
Or,
If you do not want to assign a name, skip this procedure.
11. Press Start/Enter. The display asks you to select a one-touch
number for another group dial.
12. To continue storing, press the wanted one-touch button and repeat
steps 4 through 11.
13. To stop storing, press Stop. The display returns to Standby mode.
Note: You cannot include one group dial number in another group dial
number.
Page 68

2.37
Stand-alone Fax
Editing Group Dial Numbers
You can edit one-touch or speed dial numbers stored for group dialling.
1. Press User Tools on the control panel.
The display shows the first menu; FAX NAME/NUMBER.
2. Press ➛or ❿ until you find ‘GROUP DIAL SETUP’, then press
Start/Enter.
3. Press the one-touch group dial button used for the group dial
number you want to edit.
4. Press ➛or ❿ to select the option you want, then press Start/Enter.
Select MEMBER ADD to add a number, and enter as many numbers
as needed. To stop entering numbers, press Start/Enter. Note that
you cannot include one group number in another group dial number.
Select MEMBER DELETE to delete a number. When the number that
you want to delete is displayed, press Start/Enter.
5. When you are finished editing, press Stop.
Sending a Fax Using Group Dialing
(Multi-Address Transmission)
You can use Group Dialling for the Delayed Transmission or Memory
Transmission.
Follow the procedure of the desired operation (Broadcasting transmission
- p.2.25, Delayed transmission - p.2.26). When the display requests you
to enter the remote fax number, press the one-touch button where you
stored the group number. You can use only one group number for each
operation. Continue the procedure to complete the desired operation.
The machine automatically scans the document into memory and dials
each of the numbers included in the group.
Page 69

chapter
3
3
You MUST install the Printer Driver Type 1100 and the Twain
Scanner Driver Type 1100 to use your machine as a printer and
scanner.
Read this chapter to learn how to select and load print media
and how to use the print settings.
The topics included in this chapter are:
Print Media
◆ Selecting Print Media
◆ Using the Automatic Paper Input Tray
◆ Using the Manual Paper Input Tray
◆ Specialty Paper Guidelines
Scanning
◆ Scanning from a Windows Application
◆ Type1100 TWAIN for scan Window
Installing Software
◆ System Requirements
◆ Installing the Software
◆ Uninstalling the Software
Printing
◆ Printing a Document
◆ Cancelling a Print Job
◆ Printing Help
◆ Printing Several Pages Per Sheet
◆ Scaling Your Document
◆ Fitting Your Document to a Selected Paper Size
◆ Printing Posters
◆ Printing Watermarks
◆ Using Page Overlays
◆ Printing in a Network Environment
Page 70

3.1
Printing and Scanning
System Requirements
Before you begin, ensure you have the following computer setup:
Minimal requirements:
• Operating systems: Windows 95 OSR2/Windows 98/Windows 98
SE/Windows Me/Windows NT 4 Workstation or
Server with Service Pack 3/Windows 2000
• Disk space: 120 MB for installation
• Memory: 32 MB
• CPU: Pentium 133
Installing Software
Installing the Software
Note: For Windows 95/98 users, close “New Hardware Found” screen
when the computer boots up.
1. Insert the supplied CD-ROM into your CD-ROM drive.
The CD-ROM is automatically running and the opening window
appears.
If the opening window does not appear, click Start, and then Run.
Type X:Setup.exe, replacing “X” with the letter of your drive, and
click OK.
Page 71

3.2
Printing and Scanning
2. When the opening screen appears, click the language you want to
use.
3. Click Install the Software on your PC.
Uninstalls the Software.
Installs the Software on
your PC.
4. When the installation is completed, The message box recommends
you restart your computer. Click Finish, then Windows restarts.
If your computer does not shut down and restart automatically, you
must shut it down manually and restart for the changes to saved.
Page 72

3.3
Printing and Scanning
Uninstalling the Software
Un-installing is required if you are upgrading the software or if your
installation fails.
Note: Before beginning un-installation, ensure all applications are closed
on your PC. A system reboot is required after the software is uninstalled.
Un-installing the MFP Driver
1. Start Windows if not already started.
2. From the Start menu, select Programs, then select the software you
want to uninstall, then select Printer Driver Uninstall.
3. When your computer confirms your selection, click Yes. The printer
driver and all its components are removed from your computer.
4. When un-installation is done, click OK.
5. The message box recommends you restart your computer.
Click OK, then restart Windows.
Page 73

3.4
Printing and Scanning
Using the CD-ROM
You can un-install both the MFP driver and the software with the CDROM you have used to install the software.
1. Insert the CD-ROM into your CD-ROM drive.
The CD-ROM is automatically running and the opening window
appears. (If the opening window does not appear, select Run from the
Start menu, then type X:SETUP, replacing “X” with the letter of your
drive and click OK.
2. When the opening window appears, click the language you want to
use.
3. Click Uninstall the software on your PC.
4. Follow the on-screen instructions to complete un-installation.
You must shut down and restart your computer before changes you
have made will be in effect.
Page 74

3.5
Printing and Scanning
Selecting Print Media
The type of media you select affects the performance and print quality.
Selecting Media Types
Most photocopy paper, postcards, index cards, transparencies, envelopes,
and labels will work your printer, particularly paper that is marked for
use in laser printers. For the best results, use one of the papers
developed especially for an laser printer.
What to Consider
• Desired outcome. The paper you choose should be appropriate for
the project. For example, use greeting card paper when making party
invitations.
• Size. Choose any size paper that fits easily within the paper adjusters
of the printer.
• Weight. Use 20~24-pound or 75~90 g/m
2
plain paper for
multipurpose, everyday use.
• Brightness. Some papers are whiter than others and produce sharper,
more vibrant colors. Use premium photo paper for documents with
photographs. Use white paper for documents with any other pictures.
• Surface smoothness. The smoothness of the paper affects how crisp
the printing looks on the paper. Glossy, coated paper works well for
pictures and charts where you want crisp lines.
Get the Right Paper
Your machine is designed to work well on most common office paper
types and with quality 25% cotton bond paper. Because your printer
uses toner to produce an image, paper that accepts toner produces the
best results. Be sure to test a variety of paper types before buying large
quantities.
Print Media
Page 75

3.6
Printing and Scanning
Paper that Might Not Work
• Highly textured stock, such as linen, may not print evenly because the
toner can bleed.
• Extremely smooth, shiny, or coated papers not specifically designed for
laser printers can jam the printer and repel toner.
• Multi-part forms, such as duplicate or triplicate forms can wrinkle and
jam; the toner is also more likely to smear.
• Paper in poor condition — with tears, dust, wrinkles, curled or bent
edges, or that doesn’t lie flat can jam the printer.
• Envelopes with thick or crooked edges; envelopes that are damaged,
curled, wrinkled, or irregularly shaped; envelopes that are shiny or
embossed; or envelopes with clasps or windows.
Selecting Media Sizes
The paper input tray can hold up to 150 sheets of 20 Ib (75 g/m2)
paper. The single-sheet manual input tray is designed to hold one sheet.
Both can be adjusted to hold media measuring from 3.87 by 6.38
inches (98.5 by 162 mm) to 8.5 by 14 inches (216 by 356 mm). This
includes, but is not limited to, the following paper and envelope sizes:
•A4: 8.25 by 11.75 in; 210 by 297 mm
•A5: 5.82 by 8.25 in; 148 by 210 mm
•B5: 7.16 by 10.12 in.; 182 by 257 mm
•Letter: 8.5 by 11 in; 216 by 279 mm
•Folio: 8.5 by 13 in; 216 by 330 mm
•Legal: 8.5 by 14 in; 216 by 356 mm
•Executive: 7.25 by 10.5 in; 184 by 267 mm
•No.10 Envelopes: 4.12 by 9.5 in; 105 by 241 mm
•DL. Envelopes: 4.33 by 8.66 in.; 110 by 220 mm
•C5 Envelopes: 6.38 by 9.01 in.; 162 by 229 mm
•C6 Envelopes: 4.49 by 6.38 in.; 114 by 162 mm
•B5 Envelopes: 6.93 by 9.84 in.; 176 by 250 mm
•Monarch Envelopes: 3.87 by 7.5 in; 98.5 by 190.5 mm
Note: Insert all media vertically (portrait orientation) into the paper input
tray or single-sheet manual input tray. To print horizontally (landscape
orientation), make this selection through software. Do not print on
paper smaller than 3.87 by 6.38 inches (98.5 by 162 mm).
Page 76

3.7
Printing and Scanning
Using the Automatic Paper Input Tray
You can stack paper or transparencies in the automatic paper tray to
feed automatically. The automatic tray can hold a maximum of 150
sheets of plain paper. The maximum capacity may be reduced depending
on the thickness.
For best results, adjust the paper settings each time you change paper
(see page 3.13).
Note: If you experience feeding problems, try printing one at a time from
the manual input tray. See page 3.9.
1. Pull the paper input support completely out of the unit.
2. Prepare the print material for loading.
• For paper:
- Flex or fan the paper back and forth. Do not fold or crease the
paper. Straighten the edges on a level surface.
Page 77

3.8
Printing and Scanning
• For transparencies:
- Hold the transparencies by the edges and avoid touching the print
side.
- Fan the stack of transparencies to prevent feeding failures.
Be careful not to scratch or leave fingerprints on the print sides.
3. Load the print material into the paper tray. Load only as much paper
as will fit beneath the lip protruding from the paper-length adjuster.
Neatly stacking the paper before loading will help prevent print
problems. Do not mix types. See the following directions to load each
type of print material.
• Load paper with the print side facing up.
LETTERHEAD
• Load letterhead paper face up with the top of the page going
into the tray first.
Page 78

3.9
Printing and Scanning
4. Slide both paper adjusters to fit against the paper’s edges. Ensure
the paper line flat in the tray.
Print Side Up
Most papers prints better on one side than on the other. This is
especially true for coated or specially treated paper. The print side is
usually indicated on the paper package. Be sure to insert the paper into
the paper tray of the printer with the print side up.
Using the Manual Paper Input Tray
To load a single envelope, card stock, or specialty paper, use the manual
paper input tray. When you use the manual input tray, you must feed
one piece of media at a time. Manual feeding is helpful when printing on
heavy paper or when experiencing paper jam with the automatic paper
input tray.
Manual paper
input tray
Page 79

3.10
Printing and Scanning
Notes:
• Make sure that you select the Manual for Paper Source and the correct
paper size and type from your software application before starting your
print job. See page 3.14.
• When you use the manual paper tray, the paper must loaded in the
automatic paper tray. By doing so, you can prevent the paper jam which
might occur in the manual tray.
1. Place the print media in the manual input tray with print side facing
up and adjust the paper guides to the width of the print media.
• Load a sheet of the envelope with the flap side facing away from
you. Make sure that the stamp area is at the top left and the end of
the envelope with stamp area enters the tray.
• Load transparencies face up with the adhesive strip on top
going into the tray first.
Page 80

3.11
Printing and Scanning
Start/Enter
2. In your computer, start printing of the document. the display on the
front panel displays ‘PC PRINTING...’ and ‘PRESS START.’
3. Press Start/Enter to start manual feeding. If you have more than
one page to print, press Start/Enter for each page.
• Load a sheet of the label with the adhesive backing facing away
from you.
• Load a sheet of the card stock with print side up, short edge
first.
Page 81

3.12
Printing and Scanning
Specialty Paper Guidelines
• Read all instructions that come with special paper for important
information regarding how to achieve the highest print quality.
• It is recommended to feed one sheet at a time for special paper types.
• For transparency film, follow these guidelines:
- Let printed sheets of film dry completely before storing.
- When a sheet of film has dried completely, cover its printed side with
a sheet of plain (not coated) paper before storing; This is
recommended even if placed in a clear file or plastic holder.
- Do not leave the film in the paper tray for long periods of time as
dust and dirt may accumulate, resulting in poor copy quality.
- To avoid fading, do not expose the printed film to prolonged direct
sunlight.
- Store unused papers and films flat. Do not remove papers from their
protective packaging until ready for use.
- Store unused film at temperatures between 59
o
F to 86oF (15oC to 30
o
C). The relative humidity should be between 10% and 70%.
• For labels, follow these guidelines:
- Verify that the labels’ adhesive material can tolerate fusing
temperature of 200°C (392°F) for 0.1 second.
- Make sure that there is no exposed adhesive material between the
labels. Exposed areas can cause labels to peel off during printing,
which can cause paper jams. Exposed adhesive can also cause
damage to printer components.
- Do not feed a sheet of labels through the printer more than once.
The adhesive backing is designed for one pass through the printer.
- Do not use labels that are separating from the backing sheet or are
wrinkled, bubbled, or otherwise damaged.
• If the print density of your page is very high, light paper stock may
curl slightly due to the large amount of toner. To print dense graphics,
try printing on heavier stock.
• Do not use paper that is thicker than the specifications as it may
damage the toner cartridge.
Page 82

3.13
Printing and Scanning
3. To take advantage of the printer features provided by this machine,
click Properties in the application’s Print dialogue box and go to step
4.
If you see Setup, Printer, or Options, click that button instead.
Then click Properties in the next screen.
Printing a Document
The following procedure describes the steps required for printing from
various Windows applications. The exact steps for printing a document
may vary depending on the application program. Refer to your software
application’s documentation for the exact printing procedure.
1. Start the program to create the document, and open the document
you want to print.
2. Select Print from the File menu. You see the Print dialogue box for
your application (the Print dialogue box for your application may look
slightly different).
The basic print settings you required are usually selected within the
Print dialogue box. These settings include the number of copies, paper
size, and page orientation.
Printing
Make sure that your
printer is selected.
If you see Properties
button, click it. If you see
Setup, Printer, or Options,
click that button instead;
then click Properties in the
next screen.
Page 83

3.14
Printing and Scanning
4. The dialogue box allows you to access all information necessary for
using your printer.
If necessary, click the Paper tab to display the settings shown below.
The Paper tab contains the options for setting the basic paper
handling.
• Paper Source: Make sure the Paper Source is set to Auto Select. If you use
the manual input slot on the back of the printer (see page 4.5),
select Manual.
• Paper Size: Select the paper size you have loaded in your printer.
• Paper Type: The Paper Type option allows you to select the paper type you
want to use.
Select the number of copies
to be printed.
The Paper Orientation option
allows you to select the direction in
which information is printed on a
page. Portrait prints across the
width of the page, letter style.
Landscape prints across the length
of the page, spreadsheet style.
Page 84

3.15
Printing and Scanning
5. If you want to change the setting for print quality, click the Graphic
tab.
The Resolution option allows
you to select the print
resolution. The higher the
setting, the sharper the clarity
of printed characters. Higher
settings may increase the time
it takes to print a document.
• Altitude Correction: To optimize print quality, the Altitude
Correction should be checked for high
place.
• Dark Text: When the Dark Text is checked, all text in your
document is allowed to print darker than normal
document.
• All Text to Black: When the All Text to Black is checked, all
text in your document is allowed to print
solid black, regardless of the color it
appears on the screen.
When it is not checked, colored text is
allowed to print in shades of gray.
6. When you complete changing print settings, click OK until you see the
Print dialogue box again.
7. Click OK to start printing.
The Toner Save Mode option
allows the printer to use less
toner on each page.
• Printer Setting: this feature
is determined by the setting
you’ve made on the control
panel of the printer.
• Standard: does not save
toner to print a document.
• Save: allows the printer to
use less toner on each page.
Page 85

3.16
Printing and Scanning
Notes:
• Most Windows applications will override settings you specify in the
printer driver. Change all print settings available in the software
application first, and any remaining settings with the printer driver.
• The settings you change here remain in effect while you are using
the current program. To make your changes permanent, make them
in the Printers folder as follows:
1. Click the Windows Start button.
2. Select Settings, then Printers to open the Printers window.
3. Select the Printer Drivers Type1100.
4. Click the right mouse button and select Properties to open
the properties window.
Cancelling a Print Job
There are two ways to cancel a print job:
• If your print job has not started to print, cancel from the print spooler
in Windows 95, 98, Me, 2000, XP or NT 4.0.
• If your print job is currently printing, press Stop twice on the front
panel of your printer.
CAUTION: If a fax job is currently being transmitted or received, this
procedure will also clear it.
Page 86

3.17
Printing and Scanning
Printing Help
This machine’s printer has the help screen that can be activated from the
Help button in the printer properties dialogue box. These help screens
give detailed information about the printer features provided by this
printer driver.
From the upper right hand corner, click ? then click on a setting for
more information.
To restore default printer properties setting when you change the print
settings, click Defaults in the properties dialogue box.
Page 87

3.18
Printing and Scanning
Printing Several Pages Per Sheet
Your printer is equipped with an option that prints several pages on one
sheet of paper by reducing the size of each page and organizing them in
rows and columns.
1. Load letter or A4 paper into the paper input tray.
2. To change the print settings from your software application, access
the printer properties. See page 3.13 to access the printer properties.
From the Paper tab, select the paper orientation, source and size.
3. Click the Output tab, and choose Multiple Pages Per Sheet in the
Type drop down list under the Output Mode section.
4. Select the number of pages to print per sheet (2, 4, 9, or 16) in the
Pages per sheet drop-down list. When you make a selection, the
graphic above the option changes to show how the printed page will
look.
5. Click Print Page Borders when you want each page image in your
document to print with a border.
1 2
3 4
6. Click OK, then start printing.
Select the number of the
pages per one sheet.
Put a check mark to print
borders of each pages.
Page 88

3.19
Printing and Scanning
4. Click OK, then start printing.
Scaling Your Document
This printer feature allows you to scale your print job on a page.
1. When you change the print settings from your software application,
access the printer properties. See page 3.13 to access the printer
properties.
2. Click the Output tab, and select Scale Printing in the Type drop
down list under the Output Mode section.
3. Enter the desired scaling rate in the Scale input field.
You can also click the or ❷ buttons.
Select the scaling rate
Page 89

3.20
Printing and Scanning
4. Click OK, then start printing.
Fitting Your Document To a Selected Paper
Size
This printer feature allows you to scale your print job to any selected
paper size regardless of the digital document size. This can be useful
when you want to check fine details on a small document.
1. When you change the print settings from your software application,
access the printer properties. See page 3.13 to access the printer
properties.
2. Click the Output tab, and select Fit to Page in the Type drop down
list under the Output Mode section.
3. You’ll see the Application page size and be prompted to select the Fit
to Paper Size. Select the correct size from the drop-down list.
A
Select the paper size
Page 90

3.21
Printing and Scanning
Printing Posters
This feature allows you to print a single-page document onto up to 16
sheets of paper which can be pasted together to form one poster-size
document.
1. To change the print settings from your software application, access
the printer properties. See page 3.13 to access the printer properties.
From the Paper tab, select the paper orientation, source and size.
2. Click the Output tab, and Poster Printing in the Type drop down
list under the Output Mode section.
Select the poster style.
Specify the area to
be overlapped.
Switch between
mm or inch.
➛➛
➛➛
2 x 2
➛➛
➛➛
3 x 3
3. To determine the scaling factor, select the Style; 2x2, 3x3 or 4x4.
For example, if you select 2x2, the output will be automatically
stretched to cover 4 physical pages.
Page 91

3.22
Printing and Scanning
Overlap=0
Overlap=5mm
5 mm
5 mm
5. Click OK, then start printing.
4. You may specify an overlap in millimeter or inch to make it easier to
reconstruct the resulting poster.
Printing Watermarks
The Watermark option allows you to print text over an existing
document. For example, you may want to have large gray letters reading
“Draft” or “Confidential” printed across the first page or all pages of a
document.
There are several predefined watermarks, and they can be modified or
you can add new ones to the list.
To use an existing watermark
1. When you change the print settings from your software application,
access the printer properties. See page 3.13 to access the printer
properties.
2. Click the Watermark tab, and select the desired watermark in the
Message drop-down list. You will see the selected watermark in the
preview window.
3 Click OK, then start printing.
preview window
Page 92

3.23
Printing and Scanning
To create or edit a watermark
1. When you change the print settings from your software application,
access the printer properties. See page 3.13 to access the printer
properties.
2. Click the Watermark tab, and enter the desired text message in the
Text field. This will be displayed in the preview window. The preview
window is provided so that you can see how the watermark will
appear on the printed page.
3. Select the desired watermark options. You can select the font type
and size, color and angle. There are three checkboxes at the bottom
of the dialog box:
• Transparent Text – Allows the document to show through the
watermark.
• As Outline Only – Prints the text outline of the watermark. This
setting globally effects all watermarks in the list.
• On First Page Only – Prints the watermark only on the
first page.
Use these scroll
bars to adjust the
position.
Use this button to move
the watermark to the
center of the page.
Use these options
to edit or create a
watermark.
Page 93

3.24
Printing and Scanning
4. If you have created a new or edited an existing watermark, the Add
and Update button is enabled.
To add a new watermark to the list, click Add.
5. If you want to edit, select the desired watermark from the list, edit,
then click Update.
6. When you complete the edit, click OK, then start printing.
To stop printing the watermark, select None in the Message drop-down
list.
To delete a watermark
1. When you change the print settings from your software application,
access the printer properties. See page 3.13 to access the printer
properties.
2. From the Watermark tab, select the watermark you want to delete in
the Messages drop-down list.
3. Click Delete.
4. Click OK.
WORLD BEST
Dear ABC
Regards
Using Page Overlays
What is an Overlay?
An overlay is text and/or images stored in the computer HDD as a
special file format that can be printed on any document you choose.
Overlays are often used to take the place of preprinted forms and
letterhead paper. Rather than using preprinted letterhead, for example,
you can create an overlay containing the exact same information as is
currently on your letterhead. Then when you want to print a letter with
your company’s letterhead, you do not need to load preprinted
letterhead paper in the printer. You need only to tell the printer to print
the letterhead overlay on your document.
Page 94

3.25
Printing and Scanning
Creating a New Page Overlay
To use a page overlay, you must create a new page overlay containing
your logo or image.
1. Create or open a document containing a text or image you want to
use for page overlay. Position the items exactly as you wish them to
appear when printed as an overlay. If needed, save the file for later
use.
2. Select Print from the File menu. Then click Properties in the
application’s Print dialog box to access the printer properties. For
details, see page 3.13.
3. Click the Overlays tab, and click Create Overlay.
4. In the Create Overlay dialog box, type a name of up to eight
characters in the File name box. Select the destination path if
necessary.
Page 95

3.26
Printing and Scanning
5. Click OK. You will see the name in the Overlay List box.
6. Click OK or Yes until you complete the creation.
The file is not printed out. Instead it will be stored on your computer
HDD disk.
Note: The overlay document size must be the same as documents you will
print with the overlay.
Using Page Overlay
After an overlay has been created, it is ready to be printed with your
document. To print an overlay with a document:
1. Create or open the document you want to print.
2. When you change the print settings from your software application,
access the printer properties. See page 3.13 to access the printer
properties.
3. Click the Overlays tab, and select the desired overlay from the
Overlay List box.
4. If the desired overlay file does not appear in the Overlay List box,
click Load Overlay, and select the overlay file.
If you have stored the overlay file you want to use into an external
source, you can also load the file when you access this Load Overlay
window.
Page 96

3.27
Printing and Scanning
After you select the file, click OK. The file is now shown in the
Overlay List box and is available for printing. Select the overlay from
the Overlay List box.
5. If necessary, click the Query Page Overlay check box. If this box is
checked, a message box will appear each time you submit a document
for printing, asking you to confirm your wish to print an overlay on your
document.
Answering Yes to the message box means that the selected overlay will
be printed with your document.
Answering No to the message box cancels overlay printing.
If this box is empty, and an overlay has been selected, the overlay will
be automatically printed with your document.
6. Click OK or Yes until the printing starts.
The selected overlay will be downloaded with your print job and printed
on your document.
Deleting a Page Overlay
You can delete page overlays that are no longer used.
1. In the printer properties dialog box, click the Overlays tab.
2. Select the overlay you want to delete from the Overlay List box.
3. Click Delete Overlay.
4. Click OK until you exit the Print dialog box.
Page 97

3.28
Printing and Scanning
Printing in a Network Environment
If you work in a network environment, you can connect your machine
printer directly to a selected computer (called the “host computer”) on
the network. The printer can then be shared by other users on the
network through a Windows 9x, Me, NT 4.0, 2000 or XP network printer
connection.
Note: You need to install the Printer Drivers Type1100 printer driver on
each computer that will print documents to the printer.
Setting Up Host Computer
1. Start Windows.
2. From the Start menu, select Control Panel, and double-click on the
Network icon.
3. Check the File and Print Sharing box, then click OK. Close the
window.
4. Click Start and select Printers from Settings, then double-click your
printer name.
5. Select Properties in the Printers menu.
6. Click the Sharing tab, then check the Shared As box. Fill in the
Shared Name field, then click OK.
Setting Up Client PC
1. Right-click the Start menu, and select Explorer.
2. Open your network folder in the left column.
3. Right-click the shared name, and select Capture Printer Port.
4. Select the port you want, check the Reconnect at log on box, then
click OK.
5. From the Start menu, select Settings, then Printers.
Page 98

3.29
Printing and Scanning
6. Double-click your printer icon.
7. From the Printers menu, select Properties.
8. Press the Details tab, select the printer port, then click OK.
Printing a Document
Print your document following the procedures described in page 3.13.
Page 99

3.30
Printing and Scanning
Scanning from a Windows Application
Scanning is available through any Windows application that supports a
TWAIN interface.
This section provides simple explanations about scanning from a
Windows application. The actual procedure you need to perform differs
somewhat depending on the application you are using. For full details on
scanning, refer to the manual for the application.
1. Set the document to be scanned. For details, refer to “Sending a FAX”
on page 2.7.
2. Access the Type1100 TWAIN Options from your Scanner Software.
3. Adjust the settings for this type of scan. Refer to the next page for
the settings that can be used.
The settings that can be used are Scan mode, Resolution and
Brightness. Depending on the application being used, you may not
have access to all these settings.
4. Click OK to scan the ducument.
Scanning
Page 100

3.31
Printing and Scanning
Type1100 TWAIN for Scan Window
Brief desciptions for the controls of Type1100 TWAIN for Scan window
are provided below.
Setting Tabs: Each tab (Basic, Image
quality, Filters, and the About tab)
contains settings to adjust the scan image.
Use help for further details.
 Loading...