

Page 1

AdonisC2_EN_b-f_FM.book Page 1 Tuesday, January 23, 2001 4:45 PM
FAX Option Type 1045
Operating Instructions
Facsimile Reference (option)
<Basic Features>
ZDPH130e.eps
Read this manual carefully before you use this product and keep it handy for future
reference.
For safety, please follow the instructions in this manual.
Page 2
AdonisC2_EN_b-f_FM.book Page 1 Tuesday, January 23, 2001 4:45 PM
FAX Option Type 1045 Operating Instructions
Printed in Japan
UE USA B360-8607
Page 3

AdonisC2_EN_b-f_FM.book Page 1 Tuesday, January 23, 2001 4:45 PM
Available Options
• Fax Function Upgrade Unit (Fax Function Upgrade Type 185)
• ISDN Unit (ISDN Option Type 1045)
• Extra G3 Interface Unit (G3 Interface Unit Type 1045)
• Expansion Memory (32MB: DIMM)
• Handset (Handset Type 450)
Supplies
• Marker Ink (Marker Type 30 is recommended for the best performance)
Page 4

AdonisC2_EN_b-f_FM.book Page 1 Tuesday, January 23, 2001 4:45 PM
Copyright © 2001
Page 5
R
R
AdonisC2_E N_b-f_FM.bo ok Page i Tues day, January 23, 2001 4:4 5 PM
How to Read this Manual
Symbols
In this manual, the following symbols are used:
WARNING:
This symbol indicates a potentially hazardous situation that might result in
death or serious injury when you misuse the machine without following the instructions under this symbol. Be sure to read the instructions, all of which are included in the Safety Information section in the Copy Reference manual.
CAUTION:
This symbol indicates a potentially hazardous situation that might result in minor or moderate injury or property damage that does not involve personal injury
when you misuse the machine without following the instructions under this
symbol. Be sure to read the instructions, all of which are included in the Safety
Information section in the Copy Reference manual.
* The statements above are notes for your safety.
Important
If this instruction is not followed, paper might be misfeed, originals might be
damaged, or data might be lost. Be sure to read this.
Preparation
This symbol indicates the prior knowledge or preparations required before operating.
Note
This symbol indicates precautions for operation or actions to take after misoperation.
Limitation
This symbol indicates numerical limits, functions that cannot be used together,
or conditions in which a particular function cannot be used.
Reference
This symbol indicates a reference.
[]
Keys that appear on the machine's display panel.
{}
Keys built into the machine's control panel.
i
Page 6

AdonisC2_E N_b-f_FM.bo ok Page ii Tues day, January 23, 2001 4:45 PM
ii
Page 7
AdonisC2_EN_b-f_FM.book Page iii Tuesday, January 23, 2001 4:45 PM
TABLE OF CONTENTS
Manuals for This Machine......................................................................... 1
Basic Features (this manual) ........................................................................ 1
Advanced Features....................................................................................... 1
1.Getting Started
Guide to Components ............................................................................... 3
Front View..................................................................................................... 3
Rear View...................................................................................................... 4
Control Panel ............................................................................................. 6
Starting the Machine ................................................................................. 8
Turning On the Power ................................................................................... 8
Turning Off the Power ................................................................................... 9
Switching Between Copy Mode, Facsimile Mode and Printer/Scanner Mode
Reading the Display ................................................................................ 11
Reading the Display Panel and Using Keys................................................ 11
Standby Display .......................................................................................... 12
Communication Display .............................................................................. 13
Display Prompts.......................................................................................... 14
... 10
2.Faxing
Overview................................................................................................... 15
Changing Memory Transmission and Immediate Transmission ................. 15
Setting Originals...................................................................................... 16
Setting a Single Original on the Exposure Glass ........................................ 17
Setting Originals in the Document Feeder (ADF)........................................ 18
Setting a Scan Area .................................................................................... 20
If the Machine Cannot Detect the Size of Your Original.............................. 22
Original Sizes Difficult to Detect.................................................................. 23
Memory Transmission ............................................................................ 24
Broadcasting ............................................................................................... 27
Canceling a Memory Transmission ....................................................... 29
Canceling the Transmission Before the Original is Scanned ...................... 29
Canceling a Transmission While the Original is Being Scanned ................ 29
Canceling a Transmission While the Message is Being Sent ..................... 29
Immediate Transmission ........................................................................ 32
Canceling an Immediate Transmission................................................. 35
Canceling a Transmission Before You Have Pressed the Start Key .......... 35
Canceling a Transmission After You Have Pressed the Start Key ............. 35
iii
Page 8
AdonisC2_EN_b-f_FM.book Page iv Tuesday, January 23, 2001 4:45 PM
Scan Settings........................................................................................... 36
Resolution ................................................................................................... 36
Original Type............................................................................................... 37
Image Density (Contrast) ............................................................................ 38
Mixing Scan Settings for a Multiple Page Original ...................................... 40
Dialing....................................................................................................... 41
Number Keys .............................................................................................. 41
Quick Dials.................................................................................................. 43
Groups ........................................................................................................ 45
Reception ................................................................................................. 46
Selecting the Reception Mode .................................................................... 46
3.Setup
Initial Settings and Adjustments............................................................ 47
Programing.................................................................................................. 48
Editing ......................................................................................................... 51
Deleting....................................................................................................... 52
Quick Dial ................................................................................................. 54
Programing Quick Dials .............................................................................. 54
Editing Quick Dials ...................................................................................... 57
Deleting Quick Dials.................................................................................... 60
Groups...................................................................................................... 62
Programing Groups ..................................................................................... 62
Editing Groups ............................................................................................ 64
Deleting Groups .......................................................................................... 67
Entering Text............................................................................................ 70
Available Characters................................................................................... 70
Keys ............................................................................................................ 70
How to Enter Text ....................................................................................... 71
4.Troubleshooting
Adjusting Volume .................................................................................... 73
Error Messages and Their Meanings..................................................... 75
When the {Facsimile} key is Lit in Red.................................................... 76
Solving Problems .................................................................................... 77
INDEX........................................................................................................ 78
iv
Page 9

AdonisC2_EN_b-f_FM.book Page 1 Tuesday, January 23, 2001 4:45 PM
Manuals for This Machine
Two Facsimile Reference manuals are provided, the Basic Features manual and
the Advanced Features manual. Please refer to the manual that suits your needs.
Basic Features (this manual)
The Basic Features manual explains the most frequently used fax functions and
operations.
Advanced Features
The Advanced Features manual describes more advanced functions, and also
explains settings for key operators.
❖❖❖❖ Chapter 1 Transmission Mode
Explains how to send at a specific time without having to be by the machine,
and also take advantage of off-peak telephone line charges.
❖❖❖❖ Chapter 2 Checking and Canceling Transmission Files
Explains how to cancel a transmission, and resend a message when it fails to
transmit.
❖❖❖❖ Chapter 3 Communication Information
Explains how to erase a fax message programed in memory and check the
contents of any file in memory.
❖❖❖❖ Chapter 4 Transmission Features
Explains about useful transmission features, also learn how to dial numbers
easily.
❖❖❖❖ Chapter 5 Reception Features
Explains about reception features. Learn how to receive messages in telephone mode, and print two pages of received messages on one page.
❖❖❖❖ Chapter 6 Simplifying the Operation
Explains how to specify a Program and use the Document Server.
❖❖❖❖ Chapter 7 Facsimile User Tools
Explains how to program frequently used functions as a Quick Dial Key and
User Function Key.
❖❖❖❖ Chapter 8 Key Operator Setting
Explains about functions the key operator handles. Learn how to setup the
phone line type, and how to store the Memory Locked ID and the Confidential ID.
1
Page 10
AdonisC2_EN_b-f_FM.book Page 2 Tuesday, January 23, 2001 4:45 PM
❖❖❖❖ Chapter 9 PC FAX Feature
Explains how to fax directly from a computer and make necessary settings.
❖❖❖❖ Chapter 10 Troubleshooting
Explains what to do when toner runs out and when power is turned off or
fails.
❖❖❖❖ Chapter 11 Appendix
You can check consumables and options for facsimile functions.
2
Page 11

AdonisC2_EN_b-f_FM.book Page 3 Tuesday, January 23, 2001 4:45 PM
1. Getting Started
Guide to Components
Front View
1.
Document Feeder (ADF)/Platen
Cover (Option)
Holds a document stack of up to 50
sheets which are fed automatically one at
a time. Place documents face up here.
2.
Exposure Glass
Place the original face down on the upper
left corner of the exposure glass, aligning
the upper left corner with the reference
mark. Close the platen cover when you set
a document on the exposure glass.
3.
Internal Tray
Fax messages are delivered here.
4.
ISDN Line Connector (Option)
5.
Parallel Interface Port
Plug the parallel cable into this port.
6.
Network Interface Unit
Plug the network cable into this port.
3
Page 12
AdonisC2_EN_b-f_FM.book Page 4 Tuesday, January 23, 2001 4:45 PM
Getting Started
7.
Main Power Switch
Do not touch this switch. This switch
should be only used by a service representative.
1
Note
❒ If the operation switch is on and there
is still no power, turn on the Main
Power switch.
❒ If you leave the Main Power switch
off for more than an hour, all files in
memory are lost. ⇒ Chapter 10,
"When Power is Turned off or Fails" in
the Advanced Features manual
❒ The On indicator blinks when:
• The platen cover or document
feeder (ADF) is open.
• Communicating with other destination machines.
• The hard disk is running.
8.
Handset/External Telephone (Op-
tion)
9.
Operation Switch
Press this switch to turn the power on
(the On indicator lights up). To turn the
power off, press this switch again (the On
indicator goes off). ⇒ P.8 “Turning On the
Power”
10.
Internal Tray 2
Fax messages are delivered here when received. The Internal tray 2 allows you to
distinguish fax messages from copied or
printed paper that are delivered to other
trays. The indicator beside the Internal
tray 2 is lit when the Internal tray 2 contains fax messages or printouts. ⇒Chap-
ter 1, "Printing a Received Fax" in the
System Settings
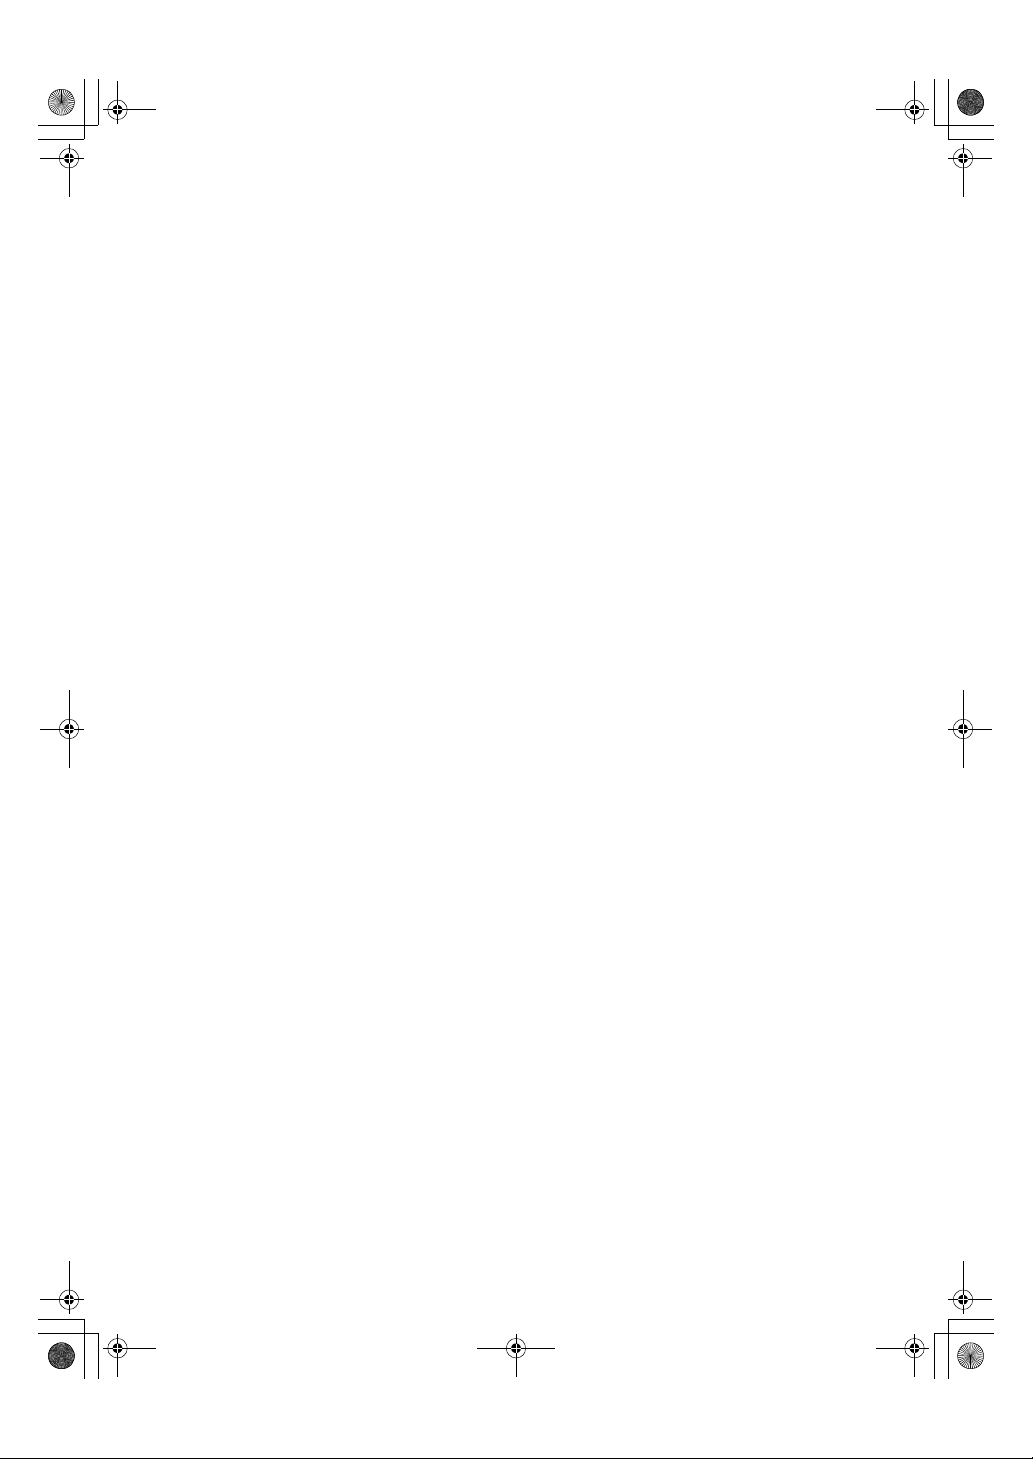
Rear View
1.
Bypass Tray
Select this tray for non-standard size paper.
⇒ "Copying from the Bypass Tray" in the
Copy Reference
⇒ Chapter 5, "Having Incoming Messages Printed on Paper From the Bypass
Tray" in the Advanced Features manual
4
2.
Analog Line Connector
⇒ Appendix, "Connecting the Machine
to a Telephone Line and Telephone" in
the Advanced Features manual
Page 13

AdonisC2_EN_b-f_FM.book Page 5 Tuesday, January 23, 2001 4:45 PM
3.
Handset (Option)/External Tele-
phone Connector
⇒ Appendix, "Connecting the Machine
to a Telephone Line and Telephone" in
the Advanced Features manual
4.
Extra G3 Interface Unit Connector
(Option)
⇒ Appendix, "Connecting the Machine
to a Telephone Line and Telephone" in
the Advanced Features manual
Guide to Components
1
5
Page 14
AdonisC2_EN_b-f_FM.book Page 6 Tuesday, January 23, 2001 4:45 PM
Getting Started
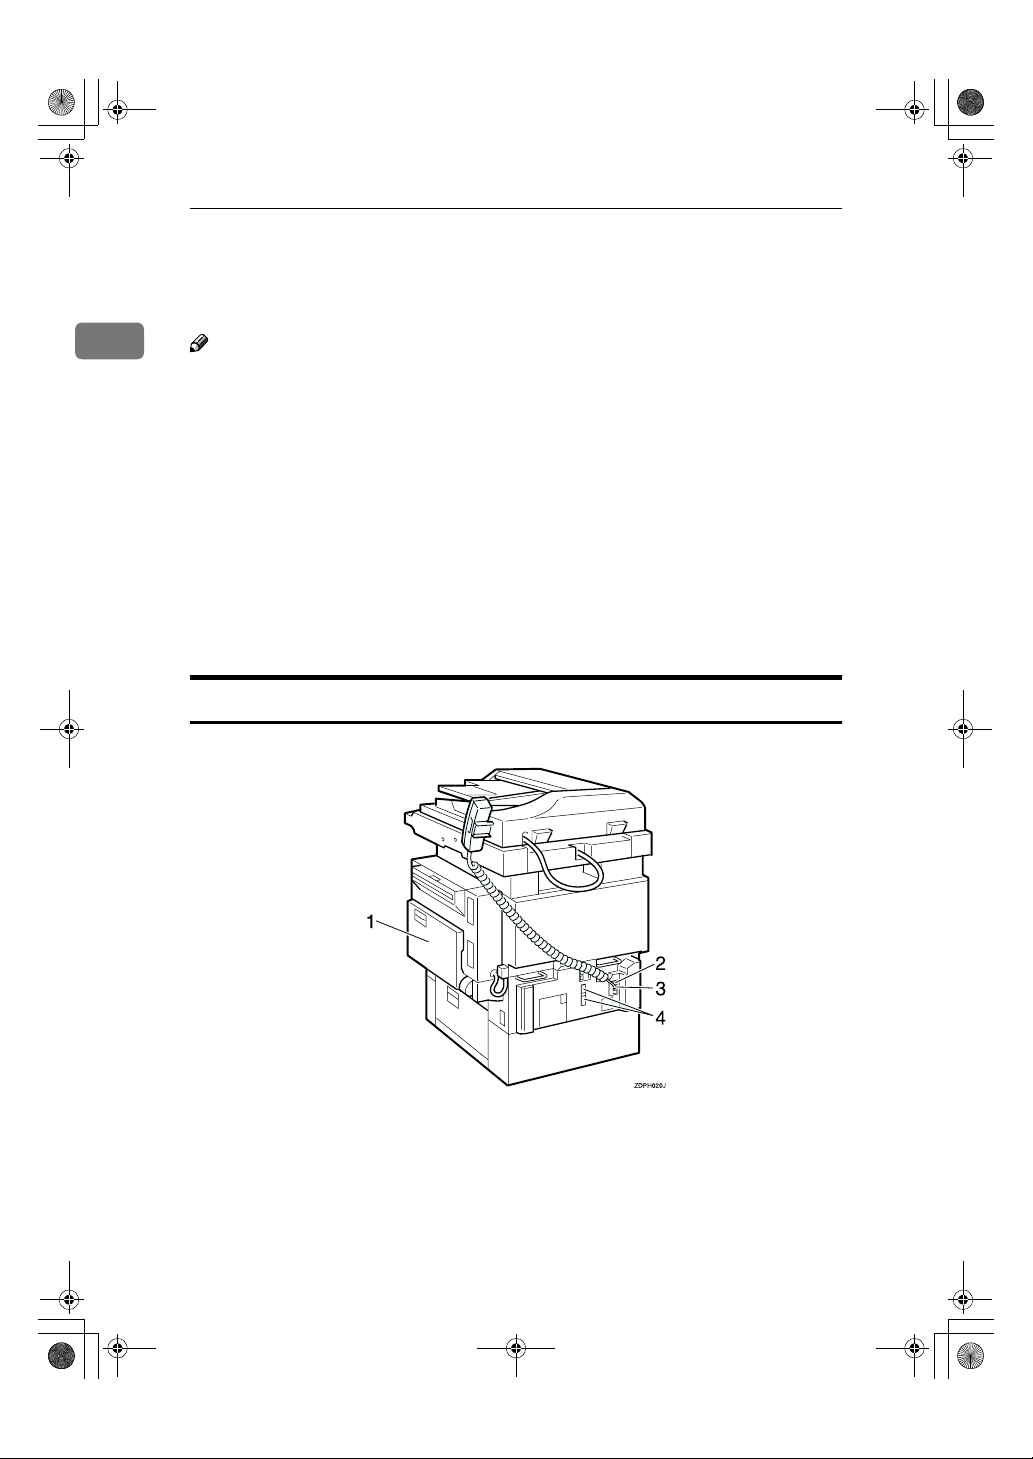
Control Panel
1
1.
Confidential File Indicator
Lights when a message has been received
into memory with Confidential Reception. Blinks when a Memory Lock file has
been programed in memory. ⇒ Chapter
3, "Printing a Confidential Message" and
Chapter 3, "Printing a File Received with
Memory Lock" in the Advanced Features
manual
2.
Communicating Indicator
Lights during transmission or reception.
3.
{{{{User Tools/Counter}}}} key
User Tools:
Press to enter User Tools mode. These
tools allow you to customize the default
settings. ⇒ Chapter 7, "General Setting/
Adjustment" in the Advanced Features
manual
Counter:
Display and print the total number of
pages transmitted and received.
4.
LCD display
This guides you through tasks and informs you of the machine status. A messages appears here. ⇒ P.11 “Reading the
Display”
5.
{{{{Start Manual RX}}}} key
Press to start manual reception.
6.
{{{{Check Modes}}}} key
Press this key before pressing the {Start}
key to check the settings selected for the
fax about to be sent.
7.
{{{{Program}}}} key
Press to use the program function. ⇒
Chapter 6, "Simplifying the Operation" in
the Advanced Features manual
8. {
{Clear Modes}}}} key
{{
Press to cancel the current settings and
returns.
9. {
{Energy Saver}}}} key
{{
Hold down for more than a second to enter Energy Saver mode.
10.
{{{{Interrupt}}}} key
Press to interrupt the current fax operation in order to start copying.
11.
Receive File Indicator
Lights when a message other than a Confidential Reception or Memory Lock file
has been received. ⇒ Chapter 5, "When
the Confidential File Indicator is Lit or
Blinking" in the Advanced Features manual
6
Page 15

AdonisC2_EN_b-f_FM.book Page 7 Tuesday, January 23, 2001 4:45 PM
12.
{{{{Facsimile}}}} key
Press to switch to Facsimile mode. ⇒ P.12
“Standby Display”
• Lights in yellow
Facsimile mode has been selected.
• Lights in green
Facsimile mode has been printing.
• Lights in red
Lights up whenever any facsimile error occurs. Press {Facsimile} to display
the error message and take the appropriate action. ⇒ P.76 “When the
}
key is Lit in Red”
simile
13.
{{{{On Hook Dial}}}} key
Use to dial a number from the numeric
keypad without having to lift the handset. ⇒ Chapter 4, "Handy Dialing Functions" in the Advanced Features manual
14.
{{{{Tone}}}} key
Press to send tonal signals down a pulse
dialing line. ⇒ P.43 “Tone”
15. {
{Pause/Redial}}}} key
{{
Pause:
Insert a pause when you are dialing or
storing a fax number. A pause cannot be
inserted as the first digit. ⇒ P.42 “Pause”
Redial:
Press to redial one of the last ten num-
bers. ⇒ Chapter 4, "Redial" in the Advanced Features manual
16.
Number keys
Use to dial fax numbers or enter the number of copies.
17.
{{{{Clear/Stop}}}} key
Clear:
Deletes one character or digit.
Stop:
Interrupts the current operation (trans-
mission, scanning, copying or printing).
18. {
{Start}}}} key
{{
Press to start all tasks.
{
Control Panel
1
Fac-
7
Page 16

AdonisC2_EN_b-f_FM.book Page 8 Tuesday, January 23, 2001 4:45 PM
Getting Started
Starting the Machine
To start the machine, turn on the op-
1
eration switch.
Note
❒ This machine automatically enters
Energy Saver mode or turns itself
off if you do not use the machine
for a while. ⇒ "Energy Saver Timer", "Auto Off Timer" in the Copy
Reference
----Power switches
This machine has two power switches: ⇒ P.3 “Guide to Components”
❖❖❖❖ Operation switch
Turn on this switch to activate the
machine. When the machine has
warmed up, you can make copies
or send faxes.
❖❖❖❖ Main power switch
Do not touch the Main Power
switch. It should be used only by a
service representative when the
optional fax unit is installed.
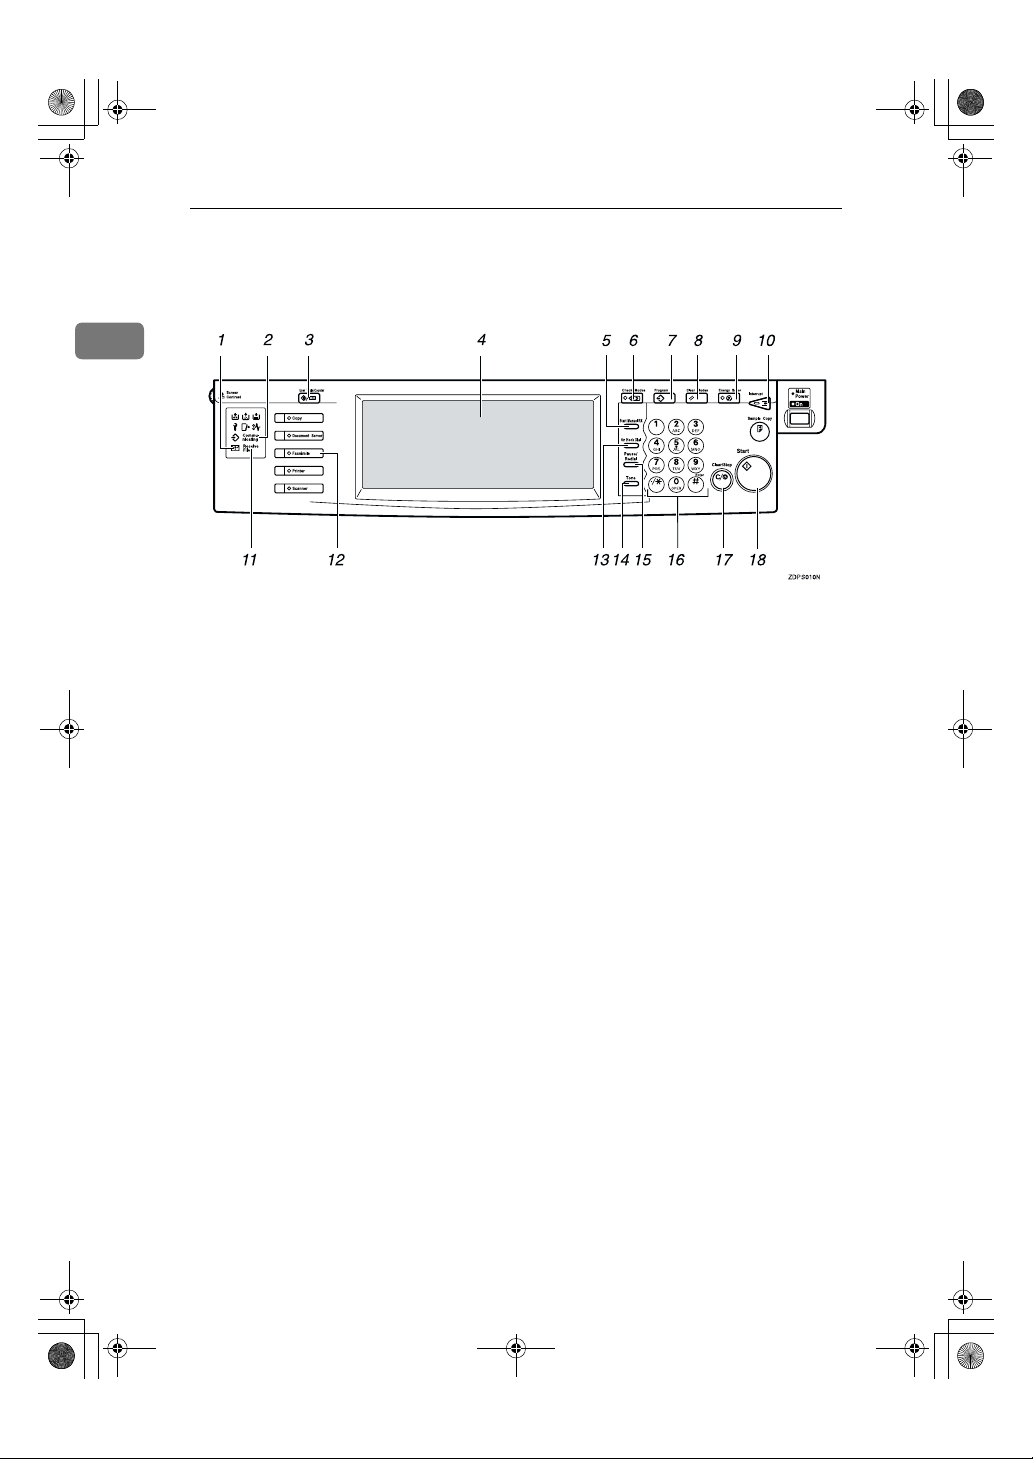
Turning On the Power
Confirm that the power cord is
A
plugged into the wall outlet firmly and the Main Power switch is
on.
Confirm that the Main power
B
switch is on.
Turn on the operation switch. The
C
On indicator should light.
Important
❒ If you leave the Main Power
switch off for more than one hour,
all fax files in memory are deleted.
See "Turning Off The Power" below.
8
The panel display will turn on.
Page 17
AdonisC2_EN_b-f_FM.book Page 9 Tuesday, January 23, 2001 4:45 PM
Starting the Machine
Note
❒ If nothing happens when you
turn on the operation switch,
make sure the Main Power
switch is turned on.
Turning Off the Power
Turn off the operation switch.
A
The On indicator will go out.
Important
❒ Fax files programed in memory
will be deleted an hour after
you turn the Main Power
switch off or you unplug the
power cord. ⇒ Chapter 10,
"When Power is Turned off or
Fails" in the Advanced Features
manual
Important
❒ Do not turn off the Main Power
switch while the indicator is lit or
blinking. This may cause problems
in the hard disk or memory.
❒ Be sure to turn off the Main Power
switch before unplugging the
power cord. This may cause problems in the hard disk or memory.
❒ Make sure that 100% is shown on
the display before you turn the
Main Power switch off or you unplug the power cord. Fax files programed in memory will be deleted
an hour after you turn the Main
Power switch off or you unplug
the power cord.
Make sure the On indicator is off.
A
Turn off the Main Power switch.
B
The Main Power indicator turns
off.
1
Turning Off the Main Power Switch
When the Main Power switch is
turned off while using the fax function, waiting fax jobs and print jobs
may be canceled, and incoming fax
documents cannot be received. Normally, only the service representative
operates this switch. When you have
to turn off this switch for some reason, follow the procedure below.
9
Page 18
AdonisC2_E N_b-f_FM.bo ok Page 10 Tue sday, Janua ry 23, 2001 4:4 5 PM
Getting Started
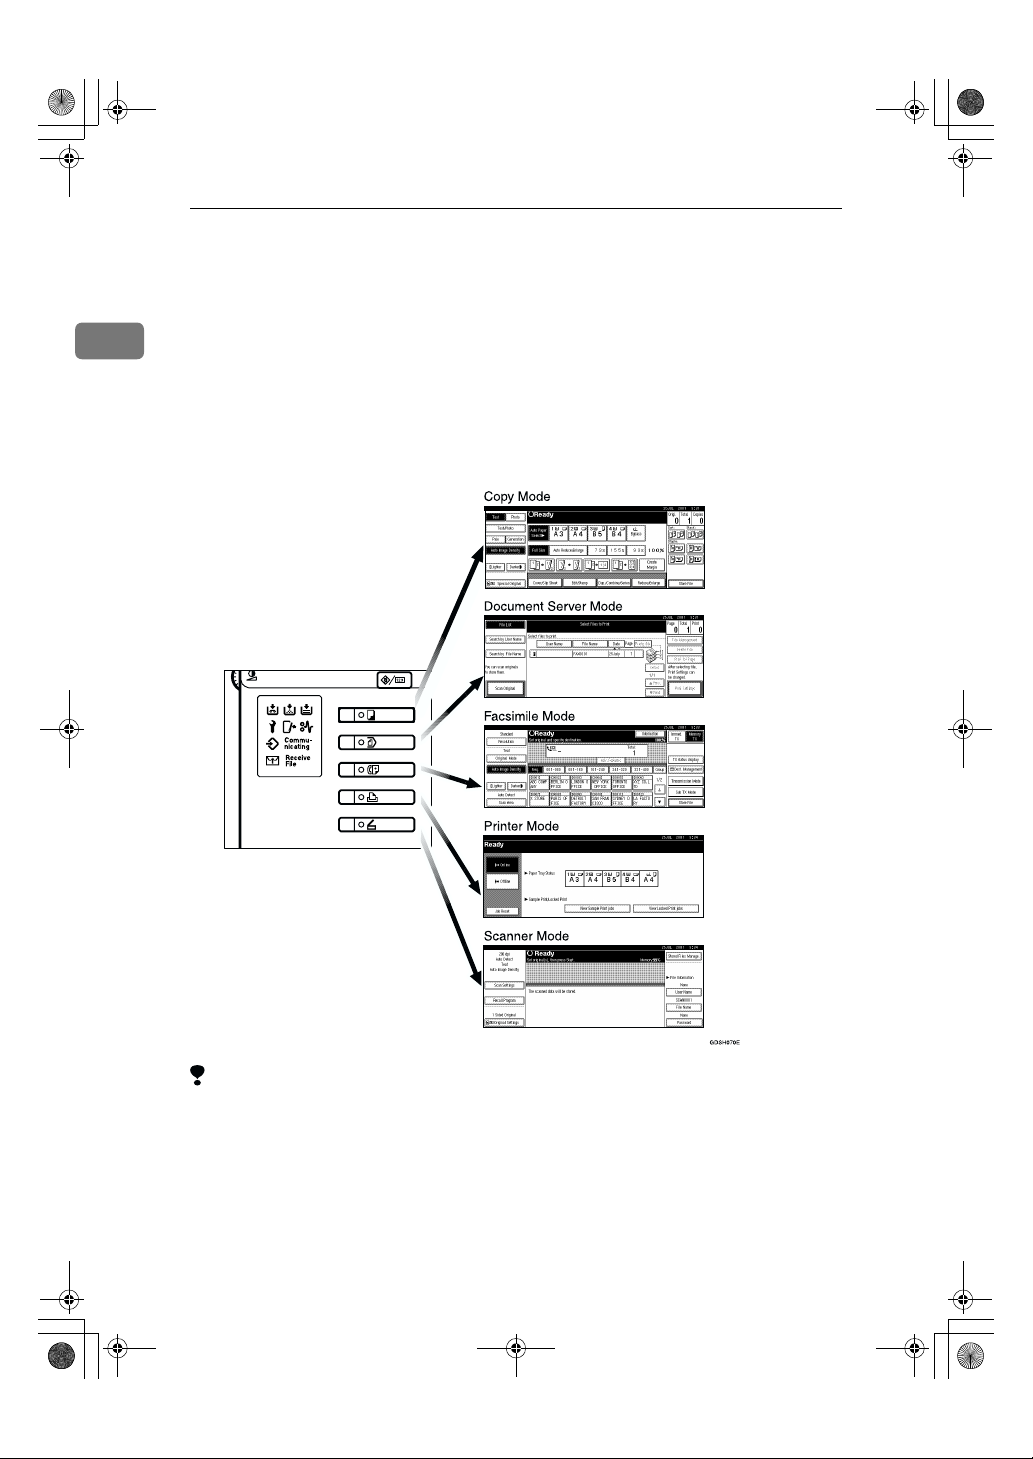
Switching Between Copy Mode, Facsimile
Mode and Printer/Scanner Mode
1
This machine is both a fax and a copier. When you turn on the power switch, the
copier screen is shown and the machine is ready to make copies. When you wish
to use fax functions, press the {Facsimile} key on the left of the operation panel.
You can set the machine to start in the Facsimile mode. ⇒ "Changing the Machine Settings" in the Copy Reference
Limitation
❒ You cannot switch modes under the following circumstances:
• While scanning in a fax
• During Immediate Transmission
• While editing the System Settings
• During Interrupt Copying
• While using On-hook Dial
10
• During Energy Saver mode
Page 19

AdonisC2_E N_b-f_FM.bo ok Page 11 Tue sday, Janua ry 23, 2001 4:4 5 PM
Reading the Display
The display tells you the machine status and guides you through operations.
Reading the Display
Note
❒ Functions that have been selected are highlighted (for example ).
Keys that you cannot select are shown with a dashed outline (for example
).
❒ All procedures in this manual assume you are in Facsimile mode. By default,
when you turn the machine on it is in Copy mode. Press the {Facsimile} key
to change to Facsimile mode. You can have the machine start in Facsimile
mode. ⇒ "Changing the Machine's Settings" in the Copy Reference
Reading the Display Panel and Using Keys
1
1.
Displays the scanning conditions
and sizes you can choose.
Displays the possible selections for various functions.
2.
Displays the name and facsimile
number of a destination when transmitting. Also displays the size of the
original.
3.
Displays the entered number of a
destination. When adding destinations with the number keys, press
[Add].
4.
Displays messages and the ma-
chine status.
5.
Press to display various informa-
tion about transmission.
6.
Appears when a destination is en-
tered. Press [Clear] to erase character
or numbers one by one.
7.
Switches the transmission mode
between memory transmission and
immediate transmission.
11
Page 20
AdonisC2_E N_b-f_FM.bo ok Page 12 Tue sday, Janua ry 23, 2001 4:4 5 PM
Getting Started
8.
Displays Quick Operation Keys
set for often used functions.
[
TX File Status
preset.
9.
1
Displays various functions for
transmitting.
Additional transmitting functions.
] and [
Dest. Management
] are
10.
Displays the programed desti-
nations.
Displays the Quick Dial table of programed destinations.
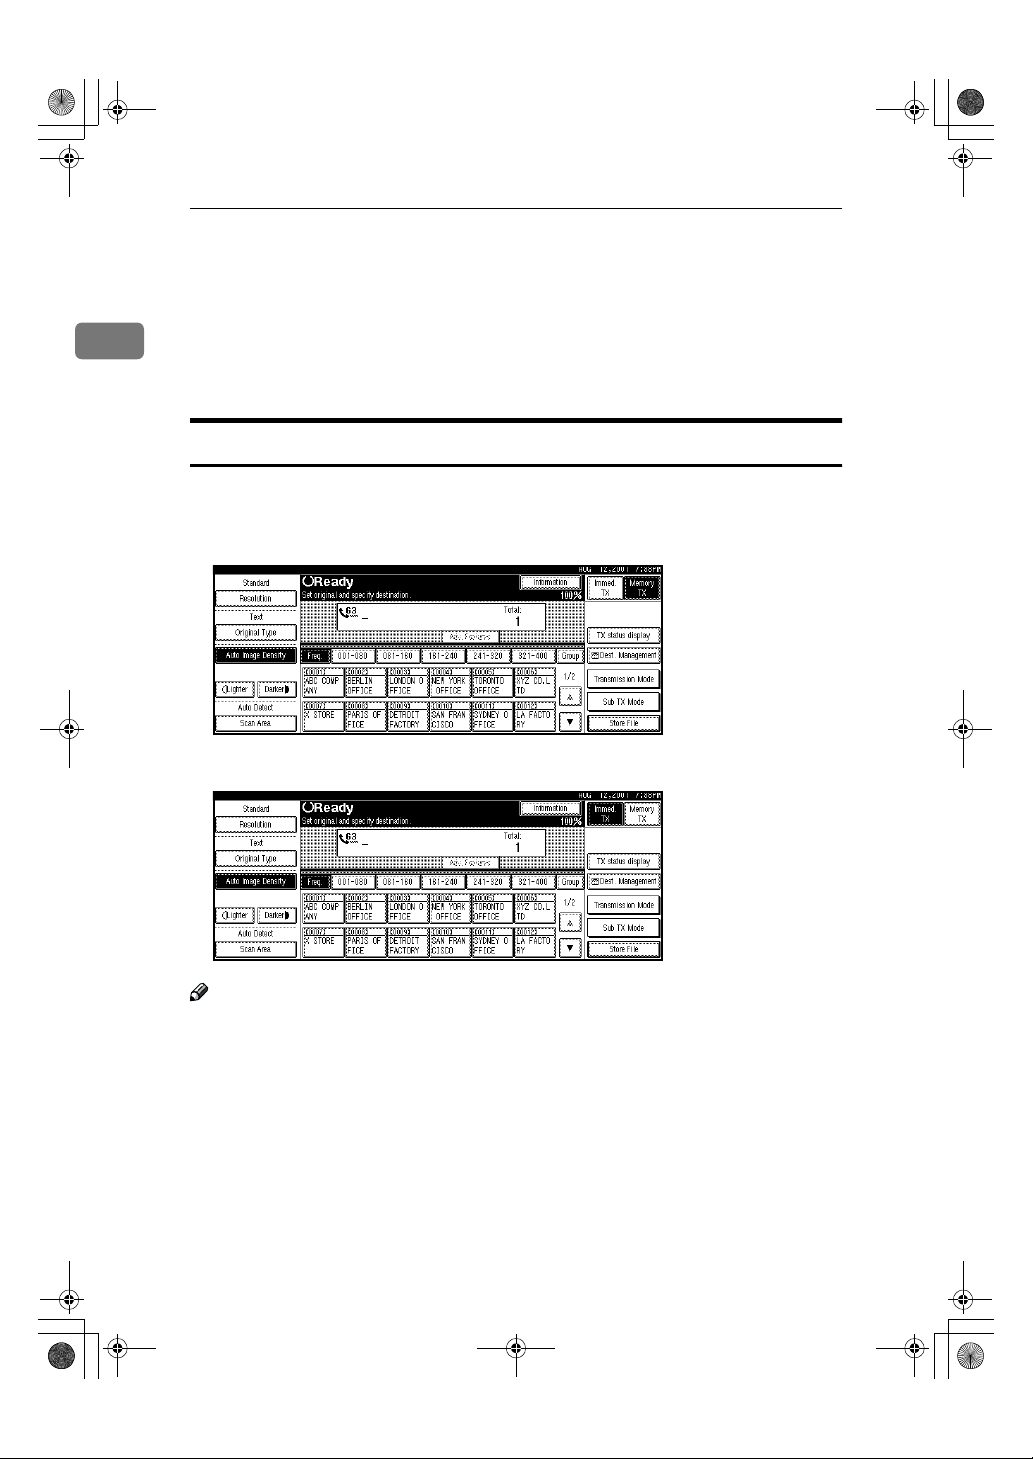
Standby Display
While the machine is in standby mode (immediately after the {Facsimile} key is
pressed or after the {Clear Modes} key is pressed), the following display is shown.
❖❖❖❖ Memory Transmission
❖❖❖❖ Immediate Transmission
Note
❒ To return the machine to standby mode, do one of the following:
• If you have set the original and have not pressed the {Start} key, remove
the original.
• If you have not set an original, press the {Clear Modes} key.
• If you are in User Tools mode, press the {User Tools/Counter} key.
12
Page 21

AdonisC2_E N_b-f_FM.bo ok Page 13 Tue sday, Janua ry 23, 2001 4:4 5 PM
Communication Display
While the machine is communicating, the status is displayed.
Reading the Display
❖❖❖❖ Memory Transmission
Note
❒ Even when the machine is using memory to fax a message or receive a mes-
sage, you can still scan the next original into memory. ⇒ Chapter 4, "More
Transmission Functions" in the Advanced Features manual
❖❖❖❖ Reception
Note
❒ Even when the machine is being used a copier or printer, the sender's name
or number will be displayed for received faxes.
1
❖❖❖❖ Immediate Transmission
13
Page 22

AdonisC2_E N_b-f_FM.bo ok Page 14 Tue sday, Janua ry 23, 2001 4:4 5 PM
Getting Started
Display Prompts
Depending on the situation, the machine will show various prompts on the display.
1
❖❖❖❖ Instructions and Requests
❖❖❖❖ Questions
14
❖❖❖❖ Selections
❖❖❖❖ Status
Page 23
AdonisC2_E N_b-f_FM.bo ok Page 15 Tue sday, Janua ry 23, 2001 4:4 5 PM
Overview
Changing Memory
Transmission and Immediate
Transmission
The basic procedure to send a fax
message is:
A Make sure the Facsimile indicator
is lit
B Set your original
C Dial the number
D Press the {Start} key
The rest of this section describes these
steps and the various features that are
available in more detail.
There are two ways to send a fax message:
• Memory Transmission
• Immediate Transmission
Check the display to see which mode
is correctly active. You can change the
transmission mode by pressing
[Immed. TX] or [Memory TX].
2. Faxing
15
Page 24

AdonisC2_E N_b-f_FM.bo ok Page 16 Tue sday, Janua ry 23, 2001 4:4 5 PM
Faxing
Setting Originals
In this manual an original can mean a
single or multiple page document.
You can set your originals either in
the Document Feeder (ADF) or on the
2
exposure glass. Some types of originals are unsuitable for the Document
Feeder (ADF) so they must be set on
the exposure glass.
Which way you place your original
depends on its size and whether you
are using the Document Feeder
(ADF) or the exposure glass.
Limitation
❒ If you place A5 size documents on
the exposure glass, they will not be
detected. A5 size documents loaded in the ADF are sent as A4 size.
Note
❒ When sending a fax, the image
output at the other end depends on
the size and direction of paper
used in the receiver's terminal. If
the receiver does not use paper of
the same size and direction as that
of the original, the fax image may
be output reduced, trimmed at
both edges, or divided into two or
more sheets. When sending an important original, we recommend
that you ask the receiver about the
size and direction of the paper
used in their terminal.
❒ When sending an original of an ir-
regular (i.e. non-standard) size or
part of a large original, you can
specify the scan area precisely. ⇒
P.20 “Setting a Scan Area”
❒ You can scan non-standard sized
documents as standard sized doc-
uments with the Irregular Scan
Area feature. When you turn on
this feature, the area scanned will
be in the specified range regardless
of the actual document size. A
blank margin will appear or the
image will be cut at the receiving
end.
❒ Make sure that all ink, correcting
fluid etc., has completely dried be-
fore setting your original. If it is
still wet, the exposure glass will be
marked and those marks will ap-
pear on the received image.
❒ If you set an A4 size original in the
portrait direction, the machine ro-
tates the image by 90 degrees be-
fore sending it. ⇒ Chapter 4,
"Transmission with Image Rota-
tion" in the Advanced Features
manual
Reference
For how to set 2-sided documents,
see Chapter 4, "2-sided Transmis-
sion" in the Advanced Features
manual.
16
Page 25
AdonisC2_E N_b-f_FM.bo ok Page 17 Tue sday, Janua ry 23, 2001 4:4 5 PM
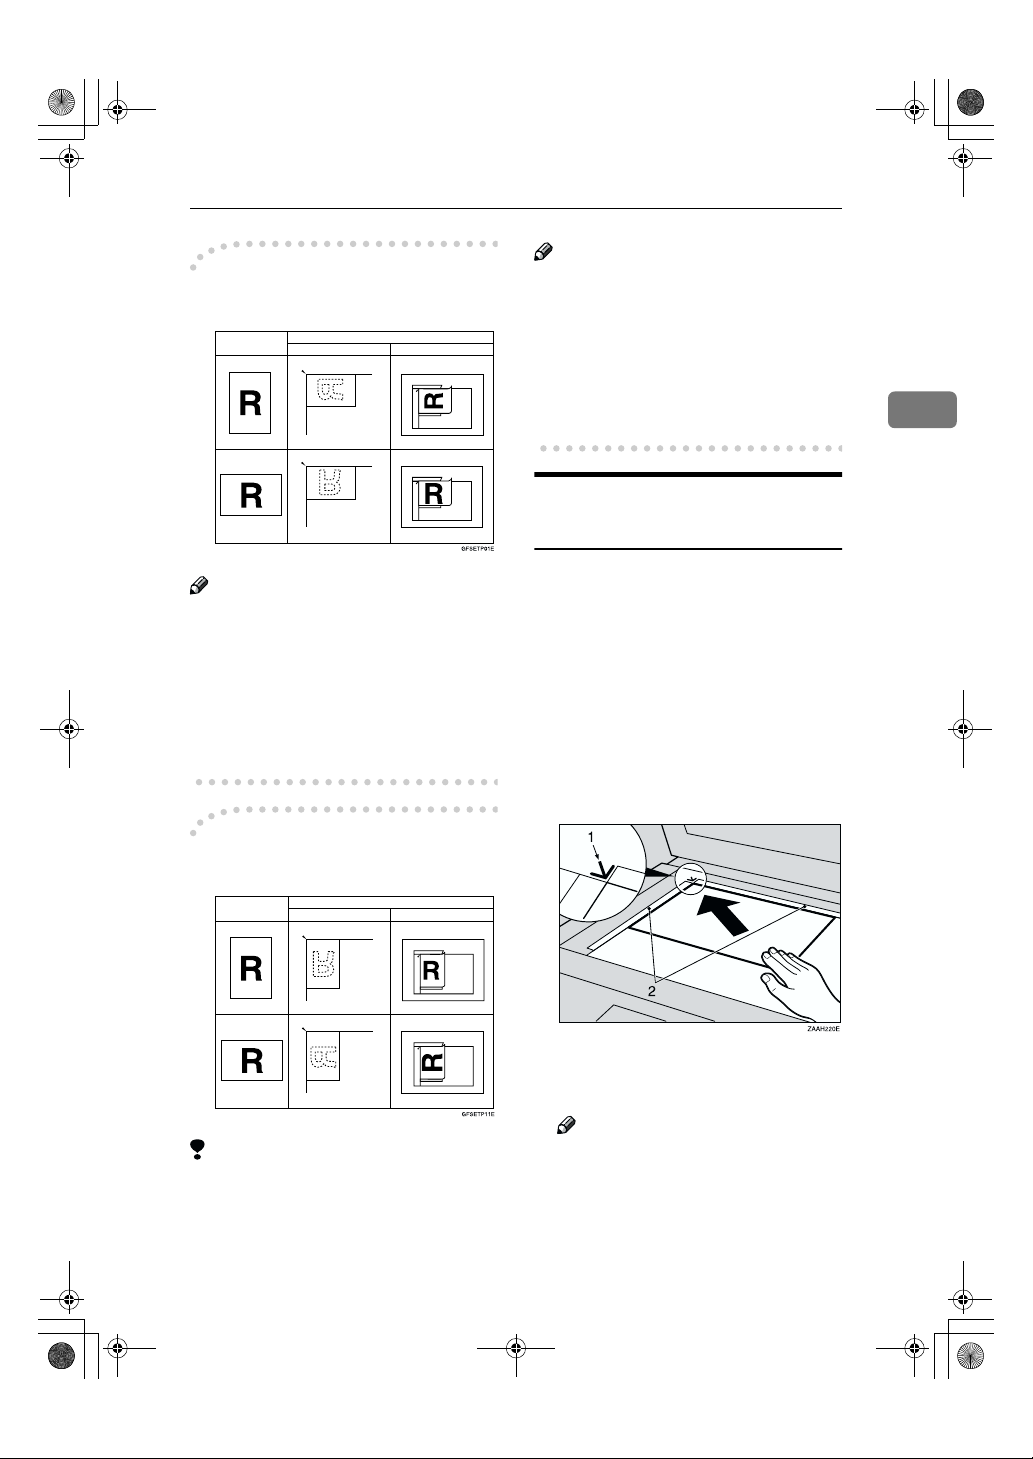
----How to set A4, B4, A3, Lt, LG
and DLT size originals
Original
*1
*2
Where original is set
Exposure glass Document Feeder(ADF)
Setting Originals
Note
❒ When you set originals on the ADF
as shown in the above illustration,
the Fax Header will be printed on
the received faxes at the destina-
tion as follows:
• *1 On the upper end of printings
• *2 On the left end of printings
Setting a Single Original on
the Exposure Glass
2
Note
❒ When you set originals in the ADF
as shown in the above illustration,
the Fax Header will be printed on
the received faxes at the destination as follows:
• *1 On the upper end of printings
• *2 On the left end of printings
----How to set A4, A5 and B5 size
originals
Original
*2
*1
Limitation
Where original is set
Exposure glass Document Feeder(ADF)
❒ A5 size documents are not detect-
ed the exposure glass. Load A5
size documents in the ADF.
Set originals that cannot be placed in
the Document Feeder (ADF), such as
a book, on the exposure glass one
page at a time.
Lift the Document Feeder (ADF)
A
by at least 30 degrees. Place the
original face down and align its
upper left corner with the refer-
ence mark at the upper left corner
of the exposure glass.
1.
Reference mark
2.
Scale
Note
❒ If you do not raise the Docu-
ment Feeder (ADF) by at least
30 degrees, the original size will
not be detected.
17
Page 26
AdonisC2_E N_b-f_FM.bo ok Page 18 Tue sday, Janua ry 23, 2001 4:4 5 PM
Faxing
Close the Document Feeder (ADF).
B
Note
❒ When sending a bound original,
the received image may contain
some black areas. To reduce this
effect, hold down the original to
2
prevent its bound part from rising.
Setting Originals in the
Document Feeder (ADF)
Use the Document Feeder (ADF) to
scan in a stack of originals in one operation. The Document Feeder (ADF)
can handle both single-sided and
double-sided originals.
----Bound Original Page Order
When sending bound originals
(books, magazines, etc.), you can
choose to have either the left page or
right page sent first. ⇒ Chapter 4,
"Book Fax" in the Advanced Features
manual
Note
❒ The default setting is Send Right
Page first. ⇒ Chapter 8, "Changing
the User Parameters" in the Advanced Features manual
Limitation
❒ The maximum document length is
1200mm (47").
❒ Place all the originals to be sent in
a single stack.
❒ You cannot set originals in the
Document Feeder (ADF) one page
at a time or in sheaves.
❒ Do not open the Document Feeder
(ADF) while it is scanning the orig-
inals or a document could become
jammed.
Note
❒ If you send documents longer than
420mm (17"), select Long Docu-
ment mode with the User Parame-
ters. If a jam occurs, the document
might be damaged because scan-
ning will not stop. ⇒ P.20 “Setting
a Scan Area” ⇒ Chapter 8, " Chang-
ing the User Parameter " in the Ad-
vanced Features manual
❒ Documents longer than 420mm
(17") must be sent by memory
transmission (immediate transmis-
son is not possible).
❒ If an original jams, press the {Clear/
Stop} key then remove the original
carefully.
❒ If your original is bent or folded,
flatten it before you set it.
❒ Set thin originals on the exposure
glass.
18
Page 27
AdonisC2_E N_b-f_FM.bo ok Page 19 Tue sday, Janua ry 23, 2001 4:4 5 PM
Setting Originals
Reference
For information about the sizes
and number of originals that can
be placed in the Document Feeder
(ADF), ⇒ Appendix, "Acceptable
types of Originals" in the Advanced Features manual
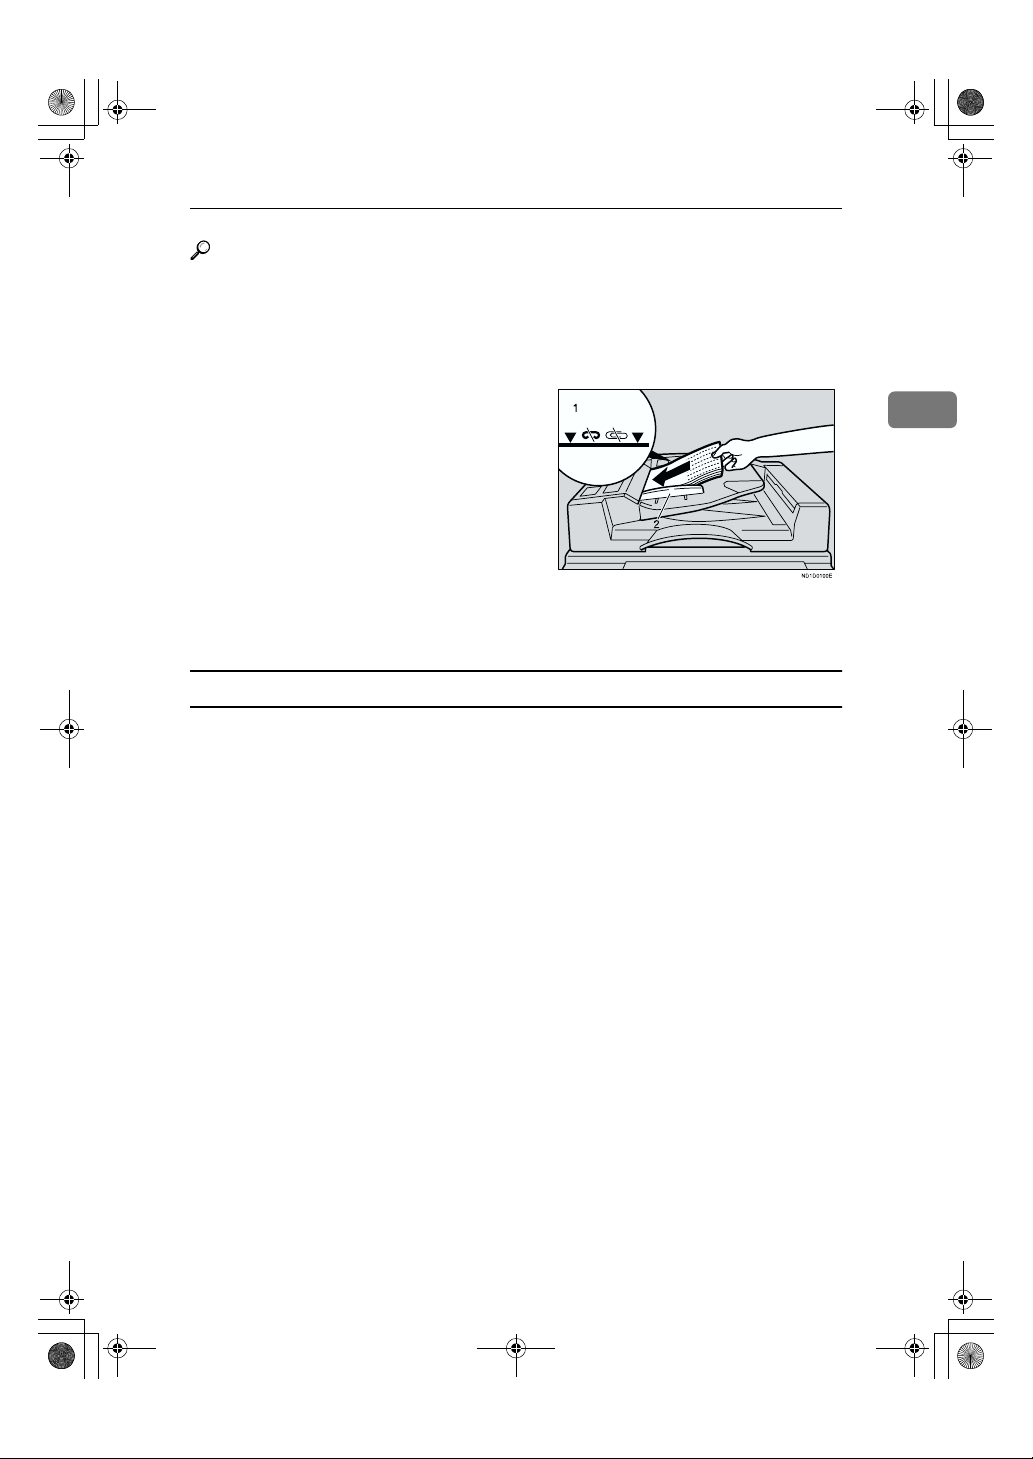
Adjust the document guide to
A
match the size of your originals.
Align the edges of your originals
and stack them in the Document
Feeder (ADF) face up.
1.
Limit mark
2.
Document guide
Originals unsuitable for the Document Feeder (ADF)
Do not set the following types of originals in the Document Feeder (ADF) because they may be damaged. Place them on the exposure glass instead.
• Originals containing staples or clips
• Perforated or torn originals
• Curled, folded, or creased originals
• Pasted originals
• Originals with any kind of coating, such as thermosensitive paper, art paper,
aluminum foil, carbon paper, or conductive paper
• Originals with index tabs, tags, or other projecting parts
• Sticky originals, such as translucent paper
• Thin and soft originals
• Originals of inappropriate weight
• Originals in bound form, such as books
• Transparent originals, such as OHP transparencies or translucent paper
2
19
Page 28

AdonisC2_E N_b-f_FM.bo ok Page 20 Tue sday, Janua ry 23, 2001 4:4 5 PM
Faxing
Setting a Scan Area
Normally, the area of a set document
is scanned automatically. If a scan
area is specified, the document is
scanned accordingly. Thus, documents can be sent without extra space
2
or blank margins. Normally, all documents loaded in the Document Feeder (ADF) are scanned as the same
sizes. To scan originals of different
sizes as different sizes, use Mixed
Original Sizes.
❖❖❖❖ Auto Detect
The area of a set document is
scanned automatically.
❖❖❖❖ Regular
The set document is scanned according to the specified size regardless of its actual size.
The sizes that can be specified are
A4, B4, A3, LT, LG, and DLT.
Note
❒ When using the Mixed Original
Sizes, the machine sends the
originals by memory transmission. ⇒ Chapter 4, "Transmission with Image Rotation" in the
Advanced Features manual
❒ When using the Mixed Original
Sizes feature, rotation transmission is disabled.
Set the originals, and select any
A
scan settings you require.
Note
❒ When setting different size orig-
inals into the ADF, adjust the
document guide to the largest
original.
❒ Small originals may be sent at a
slight slant since they do not
match the document guide.
Press the [Scan Area] key.
B
❖❖❖❖ Area
Enter the area to be scanned. The
set document is scanned according
to the entered size regardless of its
actual size. ⇒ Chapter 7, "Programing and Changing a Scan
Size" in the Advanced Features
manual
❖❖❖❖ Mixed Original Sizes
Select this to scan one by one the
size of originals loaded in the ADF.
For example, when A4 and B4 size
originals are sent together, usually
all are sent as B4 size. By selecting
Mixed Original Sizes, the machine
scans and sends each document according to its size.
The Scan Area menu is shown.
Select the scan area.
C
Specifying Standard Sizes
A Press the [Regular] key.
20
Page 29

AdonisC2_E N_b-f_FM.bo ok Page 21 Tue sday, Janua ry 23, 2001 4:4 5 PM
Setting Originals
B Press the size of the originals
to be sent.
Note
❒ To cancel the specified stan-
dard size, press [Cancel]. The
display appears as in step B.
❒ 8 1/2 x 11 is LT, 8 1/2 x 14 is
LG, and 11 x 17 is DLT.
C Press [OK].
The specified size is shown.
D Press [OK].
Note
❒ To cancel the set programed
size, press [Cancel]. The menu
returns to that of step B.
B Press [OK].
2
[Area 1] or [Area 2] is highlighted
on the display the scan area is
shown above this.
Specifying Mixed Original Sizes
A Press the [Mixed Original Sizes]
key.
[Regular] is highlighted on the
display and the size is shown
above this.
Specifying Programed Sizes
A Press the [Area 1] or [Area 2] key.
The length and width of the
programed size is shown.
B Press [OK].
[Mixed Original Sizes] is highlight-
ed on the display the scan area
is shown above this.
Specify the receiver and press the
D
{{{{Start}}}} key.
21
Page 30

AdonisC2_E N_b-f_FM.bo ok Page 22 Tue sday, Janua ry 23, 2001 4:4 5 PM
Faxing
If the Machine Cannot Detect the Size of Your Original
If the machine cannot detect the original size, the following display is shown:
2
If this happens, carry out the following steps.
Press [Exit].
A
Remove the original and replace it on the exposure glass.
B
Press the {{{{Start}}}} key to scan the original again.
C
If the above display appears again, repeat steps A to C.
Note
❒ If the machine still cannot detect the original size, the following display is
shown:
❒ If this happens, carry out the following steps.
• Press the key to switch the scan size.
• Press the {Start} key again.
22
Page 31

AdonisC2_E N_b-f_FM.bo ok Page 23 Tue sday, Janua ry 23, 2001 4:4 5 PM
Original Sizes Difficult to Detect
The machine finds it difficult to detect the size of the following kinds of originals. If this happens, the receiving machine may not select print paper of the correct size. ⇒ P.22 “If the Machine Cannot Detect the Size of Your Original”
• Documents set on the exposure glass of sizes other than those listed in the table below
• Originals with index tabs, tags, or projecting parts
• Transparent originals, such as OHP transparencies or translucent paper
• Dark originals with many characters or drawings
• Originals which partially contain solid printing
• Originals which have solid printing at their edges
The following paper sizes are automatically detected in Facsimile mode.
❖❖❖❖ Inch Version
Paper Size
Where Original
is Set
Exposure Glass
Document Feeder (ADF)
11"××××17"KKKK
ΟΟΟ× Ο ΟΟ
ΟΟΟΟ Ο ΟΟ
1
8
14"KKKK
/2"××××
1
/2"××××
8
11"KKKK
LLLL
1
/2"××××
5
1
/2"
8
KKKKLLLL
10"××××14"LLLL
1
/2"××××
8
13"LLLL
Setting Originals
2
8"××××10"KKKK
Ο - Auto detect
× - Unable to auto detect
23
Page 32

AdonisC2_E N_b-f_FM.bo ok Page 24 Tue sday, Janua ry 23, 2001 4:4 5 PM
Faxing
Memory Transmission
In Memory Transmission mode, after
you press the {Start} key, the machine
does not dial the destination until all
pages of your fax message have been
2
scanned into memory (in contrast
with Immediate Transmission, where
the number is dialed first and pages
are scanned and sent one by one).
Memory Transmission is useful because:
• You can take your original away
from the machine without having
to wait too long
• While your message is being sent,
other people can operate the machine
• You can send the same message to
more than one place in a single operation (Broadcasting)
Important
❒ If there is a power failure (Main
Power switch is off) or the plug is
pulled out for more than 1 hour, all
the files programed in memory are
deleted. As soon as power is restored, the Power Failure Report is
printed to help you identify deleted files. If you turn just the operation switch off, files are not
deleted. ⇒ Chapter 10, "When
Power is Turned off or Fails" in the
Advanced Features manual
Limitation
❒ If memory is full (0% appears on
the display), Memory Transmission is disabled. Use Immediate
Transmission instead.
Note
❒ Maximum number of Memory
Transmission files: 400 (up to 800
files with optional Expansion
Memory installed)
❒ Maximum number of destinations
per Memory Transmission: 200
❒ Combined total number of desti-
nations that can be programed:
500. (2,000, with Fax Function Upgrade Unit.)
❒ The theoretical maximum number
of destinations you can enter with
the number keys is 100, but this
will depend on the amount of
memory currently available.
❒ The number of pages that you can
store in memory depends on the
original images and the scan settings. You can store up to 160 standard pages (ITU-T #1 chart,
Resolution: Standard, Original
Mode: Text).
❒ The machine will return to the de-
fault transmission mode (Memory
Transmission) after every transmission. You can change this so
that the desired setting is maintained. ⇒ Chapter 7, "General Setting/Adjustment" in the
Advanced Features manual
❒ The maximum total number of
documents that can be programed
in memory is as follows:
• About 1000 pages with only the
optional Expansion Memory installed
• About 2,080 pages with both the
optional Expansion Memory
and the optional Fax Function
Upgrade Unit installed
24
Page 33

AdonisC2_E N_b-f_FM.bo ok Page 25 Tue sday, Janua ry 23, 2001 4:4 5 PM
Memory Transmission
Make sure that the Memory
A
Transmission is selected.
If it is not, press the [Memory TX]
key.
Set the original.
B
Limitation
❒ You can send the first pages
from the exposure glass then
the remaining pages from the
Document Feeder (ADF). After
you remove the last page from
the exposure glass, you have 60
seconds to insert the remaining
pages in the Document Feeder
(ADF).
❒ Note that you cannot set pages
on the exposure glass after you
have started using the Document Feeder (ADF).
Note
❒ To store multiple page originals
from the exposure glass, set
them page by page.
❒ The original can be placed at ei-
ther Document Feeder (ADF) or
Exposure Glass, until you press
the {Start} key.
Make the necessary settings you
C
require.
Reference
⇒ P.36 “Scan Settings”
Dial.
D
If you make a mistake, press the
{Clear/Stop} key and enter the correct number again.
Reference
⇒ P.41 “Dialing”
⇒ Chapter 4, "Chain Dial" and
"Redial" in the Advanced Features manual
Press the {{{{Start}}}} key.
E
2
Reference
P.16 “Setting Originals”
The machine starts scanning the
original.
25
Page 34

AdonisC2_E N_b-f_FM.bo ok Page 26 Tue sday, Janua ry 23, 2001 4:4 5 PM
Faxing
Note
❒ Do not open the Document
Feeder (ADF) while it is scanning originals.
After scanning, the machine will
F Set the last original then press
[####].
G Press the {{{{Start}}}} key.
The machine calls the destination.
return to standby mode.
2
----Checking the Transmission
Settings
You can check the transmission settings (e.g. destination and transmission mode) on the display.
A Press the {Check Modes} key.
Sending Originals from the
Exposure Glass
The following display appears.
A Set the first page of your origi-
nal on the exposure glass face
down.
B Dial.
C Select any scan settings you re-
quire.
D Press the {{{{Start}}}} key.
The machine starts scanning the
original.
E Set the next original on the ex-
posure glass within 60 seconds
after the machine has finished
scanning the first original.
B After checking the settings on the
display, press the {Check Modes}
key.
This returns the display to the display shown before pressing the
{Check Modes} key the first time.
26
Note
❒ Repeat steps C to E for all
pages.
Page 35

AdonisC2_E N_b-f_FM.bo ok Page 27 Tue sday, Janua ry 23, 2001 4:4 5 PM
Broadcasting
Send the same messages to several
destinations.
Note
❒ Maximum number of destinations
per Broadcasting: 500
❒ Combined total number of desti-
nations that can be set: 500
❒ The number of destinations that
can be set using the number keys
varies according to the machine's
memory usage. The maximum
number is 100 or 1000 when the
operational Expansion Memory is
installed. ⇒ P.42 “Restrictions
When Dialing with the Number Keys”
Make sure that Memory Trans-
A
mission is selected.
Memory Transmission
❒ Note that you cannot set pages
on the exposure glass after you
have started using the Document Feeder (ADF).
Note
❒ To scan multiple page originals
from the exposure glass, place
them page by page.
❒ The original can be placed at ei-
ther place until you press the
{Start} key. ⇒ P.16 “Setting
Originals”
Select any settings you require.
C
2
If it is not, press the [Memory TX]
key.
Set the original.
B
Limitation
❒ You can send the first pages
from the exposure glass then
the remaining pages from the
Document feeder (ADF). After
you remove the last page from
the exposure glass, you have 60
seconds to insert the remaining
pages in the Document Feeder
(ADF).
Reference
⇒ P.20 “Setting a Scan Area”
Dial a destination.
D
If you make a mistake, press the
{Clear/Stop} key and enter the correct number again.
Reference
⇒ P.20 “Setting a Scan Area”
⇒ Chapter 4, "Chain Dial" and
"Redial" in the Advanced Features manual
27
Page 36

AdonisC2_E N_b-f_FM.bo ok Page 28 Tue sday, Janua ry 23, 2001 4:4 5 PM
Faxing
Press [Add].
E
The machine starts calling the destinations. After scanning, the machine will return to standby mode.
2
Note
❒ When specifying a destination
using Quick Dial or Group Dial,
the destination is added even
without pressing [Add].
Dial a destination.
F
Note
❒ Repeat steps E and F for more
destinations.
28
Press the {{{{Start}}}} key.
G
The machine starts scanning the
original.
Page 37

AdonisC2_E N_b-f_FM.bo ok Page 29 Tue sday, Janua ry 23, 2001 4:4 5 PM
Canceling a Memory Transmission
Canceling a Memory Transmission
Canceling the Transmission
Before the Original is Scanned
Press the {{{{Clear Modes}}}} key.
A
Note
❒ When documents are loaded in
the Document Feeder (ADF),
you can cancel the transmission
by just removing them.
Canceling a Transmission
While the Original is Being
Scanned
Canceling a transmission after pressing the {Start} key.
Press the {{{{Clear/Stop}}}} key.
A
Canceling a Transmission
While the Message is Being
Sent
Use this procedure to cancel a transmission after the original has been
scanned.
Limitation
❒ If transmission finishes while you
are carrying out this procedure, it
will not be canceled.
Note
❒ If you cancel a message while it is
being sent, transmission is halted
as soon as you finish this procedure. However, some pages of
your message may have already
been sent and will be received at
the other end.
Canceling a transmission using the
[Change/Stop TX File] key
Press [Change/Stop TX File].
A
2
The machine will stop storing the
original and the data will not be
sent.
The list of programed files being
transmitted or a waiting transmission is displayed.
29
Page 38

AdonisC2_E N_b-f_FM.bo ok Page 30 Tue sday, Janua ry 23, 2001 4:4 5 PM
Faxing
Select the file you want to cancel.
B
2
Note
❒ If the desired file is not shown,
press [UUUU Prev.] or [TTTT Next].
Press [Stop Transmission].
C
Canceling a transmission using the
{{{{Clear/Stop}}}} key
Press the {{{{Clear/Stop}}}} key.
A
Select the file you want to cancel.
B
30
Note
❒ To cancel another file, repeat
steps B and C.
Press [Exit].
D
The machine will return to standby
mode.
Note
❒ If the desired file is not shown,
press [UUUU Prev.] or [TTTT Next].
Press [Stop Transmission].
C
Note
❒ To cancel another file, repeat
steps B and C.
Page 39

AdonisC2_E N_b-f_FM.bo ok Page 31 Tue sday, Janua ry 23, 2001 4:4 5 PM
Press [Exit].
D
The machine will return to standby
mode.
Canceling a Memory Transmission
2
31
Page 40

AdonisC2_E N_b-f_FM.bo ok Page 32 Tue sday, Janua ry 23, 2001 4:4 5 PM
Faxing
Immediate Transmission
With Immediate Transmission, when
you press the {Start} key, the fax
number is dialed immediately. The
message is scanned and transmitted
2
page by page without being programed in memory. This contrasts
with Memory Transmission which
scans all pages into memory before
dialing the destination.
Immediate Transmission is useful if
you want immediate confirmation
that the message is being sent to the
correct destination (just check for the
other terminal's Own name or Own
Fax Number on the operation panel
during transmission).
Note
❒ You cannot send the same message
to multiple destinations (Broadcasting). Use Memory Transmission for this purpose.
❒ Place the original on the exposure
glass or in the Document Feeder
(ADF). To send two or more pages
from the exposure glass, set them
one page at a time.
❒ You can scan some pages of your
original from the exposure glass
and the remainder from the Document Feeder (ADF). When you
have finished scanning from the
exposure glass, place the remainder of the pages in the Document
Feeder (ADF) and press the {Start}
key within ten seconds.
❒ By default, the transmission mode
selected when the machine is
turned on or when modes are
cleared (transmission mode home
setting) is Memory Transmission.
You can change this with the [Gen.
Settings/Adjust] key. ⇒ Chapter 7,
"General Setting/Adjustment" in
the Advanced Features manual
Make sure that Immediate Trans-
A
mission is selected.
If it is not selected, press the
[Immed. TX] key.
Set the original.
B
Limitation
❒ Do not open the Document
Feeder (ADF) while it is scanning the originals. This can
cause originals to jam.
Note
❒ The original can be placed at ei-
ther Document Feeder (ADF) or
Exposure Glass, until you press
the {Start} key.
Reference
P.16 “Setting Originals”
32
Page 41

AdonisC2_E N_b-f_FM.bo ok Page 33 Tue sday, Janua ry 23, 2001 4:4 5 PM
Immediate Transmission
Select any scan settings you re-
C
quire.
Reference
⇒ P.36 “Scan Settings”
Dial.
D
If you make a mistake, press the
{Clear/Stop} key and enter the correct number again.
Reference
⇒ P.41 “Dialing”
⇒ Chapter 4, "Chain Dial" in the
Advanced Features manual
Press the {{{{Start}}}} key.
E
The Sender Name/Number isn't
displayed until the machine connects to the other one.
2
Reference
P.47 “Initial Settings and Adjust-
ments”
After transmission the machine
will return to standby mode.
Sending Originals from the
Exposure Glass
A Set the first page face down on
the exposure glass.
B Dial.
C Select any scan settings you re-
quire.
D Press the {{{{Start}}}} key.
The machine starts scanning the
original.
33
Page 42

AdonisC2_E N_b-f_FM.bo ok Page 34 Tue sday, Janua ry 23, 2001 4:4 5 PM
Faxing
E Set the next original on the ex-
posure glass within 10 seconds
after the machine has finished
scanning the first original.
2
Note
❒ Repeat steps C to E for all
originals.
F Set the last original then press
[####].
G Press the {{{{Start}}}} key.
The machine starts to call the
destination.
----If the Connection Could Not Be
Made
The following display appears if the
fax could not be sent:
Do one of the following:
• Press [Cancel Transmission] and try
again.
• Press [Memory Transmission] to have
the machine scan in the document
and then automatically redial the
number.
34
Page 43

AdonisC2_E N_b-f_FM.bo ok Page 35 Tue sday, Janua ry 23, 2001 4:4 5 PM
Canceling an Immediate Transmission
Canceling an Immediate Transmission
Canceling a Transmission
Before You Have Pressed the
Start Key
Press the {{{{Clear Modes}}}} key.
A
Note
❒ When the original is being set,
you can also cancel an Immediate Transmission by removing
the original from the machine.
2
Canceling a Transmission
After You Have Pressed the
Start Key
Press the {{{{Clear/Stop}}}} key, and
A
then remove the original.
Note
❒ If the transmission finishes
while you are carrying out this
procedure, it will not be canceled.
35
Page 44

AdonisC2_E N_b-f_FM.bo ok Page 36 Tue sday, Janua ry 23, 2001 4:4 5 PM
Faxing
Scan Settings
You may wish to send many different
types of fax messages. Some of these
may be difficult to reproduce at the
other end. However, your machine
2
has three settings that you can adjust
to help you transmit your document
with the best possible image quality.
❖❖❖❖ Resolution:
Standard, Detail, Super Fine (option)
❖❖❖❖ Image density:
Auto Image Density, Manual Image Density (7 levels)
❖❖❖❖ Original Type:
Text, Text/Photo, Photo
Resolution
Images and text are scanned into the
machine by converting them to sequences of dots. The frequency of dots
determines the quality of the image
and how long it takes to transmit.
Therefore, images scanned at high resolution (Super Fine) have high quality
but transmission takes longer. Conversely, low resolution (Standard)
scanning results in lower quality but
your original is sent more quickly.
Choose the setting that matches your
needs based upon this trade off between speed and image clarity.
Standard (8××××3.85lines/mm, 200××××100dpi)
❖❖❖❖
Select for originals containing normal sized characters.
❖❖❖❖ Detail (8××××7.7lines/mm, 200××××200dpi)
Select for originals containing
small characters or when you require greater clarity. This resolution is twice as fine as Standard.
❖❖❖❖ Super Fine (optional Expansion Mem-
ory required: 16××××15.4lines/mm,
400××××400dpi)
Select for originals with very fine
details or when you require the
best possible image clarity. This
resolution is eight times as fine as
Standard.
Limitation
❒ If the other party's machine does
not support the resolution at
which you are sending, this machine automatically switches to a
resolution which is supported.
❒ Sending with Super Fine resolu-
tion requires that your machine
has the optional Expansion Memory and the other party's machine
has the capability to receive fax
messages at Super Fine resolution.
❒ Note that even if the option is in-
stalled on your machine, transmission and reception may take place
using Detail resolution if the other
party's machine does not support
this feature. ⇒ Chapter 4, "Printed
Report" in the Advanced Features
manual
Note
❒ When the machine is turned on or
modes are cleared, the resolution is
set to Standard by default. You can
change this with the [Gen. Settings/
Adjust] key. ⇒ Chapter 7, "General
Setting/Adjustment" in the Advanced Features manual
❒ By default, the resolution returns
to the home setting after every
transmission. You can change this
with the [Gen. Settings/Adjust] key.
⇒
Chapter 7, "General Setting/
Adjustment" in the Advanced Features manual
36
Page 45

AdonisC2_E N_b-f_FM.bo ok Page 37 Tue sday, Janua ry 23, 2001 4:4 5 PM
Press [Resolution].
A
Select the resolution you require.
B
Press [OK].
C
Scan Settings
Original Type
If your original contains photographs, illustrations or diagrams with
complex shading patterns or grays,
select the appropriate Original Type
to optimize image clarity.
❖❖❖❖ Text
Select Text to send an original containing a high-contrast black-andwhite image. Use this setting even
if your original contains text and
photographs or if you only want to
send clearer text.
❖❖❖❖ Text / Photo
Select Text / Photo to send an orig-
inal containing both a high-contrast black-and-white image, such
as text, and a halftone image such
as a photograph.
2
❖❖❖❖ Photo
Select Photo to send an original
containing a halftone image such
as a photograph or a color original.
Note
❒ If you select Text / Photo or Photo,
the transmission will take longer
than when Text is selected.
❒ If you send a fax message with
Text / Photo or Photo and the
background of the received image
is dirty, reduce the density setting
and re-send the fax.
❒ When the machine is turned on or
modes are cleared, the Original
Type is set to Text. You can change
this with the [
key. ⇒ Chapter 7, "General Setting/Adjustment" in the Advanced Features manual
Gen. Settings/Adjust
]
37
Page 46

AdonisC2_E N_b-f_FM.bo ok Page 38 Tue sday, Janua ry 23, 2001 4:4 5 PM
Faxing
❒ By default, the machine returns to
the Original Type home setting after every transmission. You can
change this with the [Gen. Settings/
Adjust] key. ⇒ Chapter 7, "General
Setting/Adjustment" in the Advanced Features manual
Press [
2
A
B
Original Type
Select the original type you require.
].
Image Density (Contrast)
The text and diagrams in your original should stand out clearly from the
paper they are written on. If your
original has a darker background
than normal (for example, a newspaper clipping), or if the writing is faint,
adjust the image density.
❖❖❖❖ Auto Image Density
The appropriate density setting for
the original is automatically selected.
❖❖❖❖ Manual Image Density
Use manual image density, to set
image density yourself.
❖❖❖❖ Combined Auto and Manual Image
Density
You can adjust image density for
only photographs, illustrations or
diagrams when the original has a
dark background.
38
Press [OK].
C
Note
❒ When the machine is turned on or
modes are cleared, the image density is set to Auto Image Density.
You can change this with the [Gen.
Settings/Adjust] key. ⇒ Chapter 7,
"General Setting/Adjustment" in
the Advanced Features manual
❒ By default, the machine returns to
the Auto Image Density home setting after every transmission. You
can change this with the [
tings/Adjust] key. ⇒ Chapter 7,
"General Setting/Adjustment" in
the Advanced Features manual
Gen. Set-
Page 47

AdonisC2_E N_b-f_FM.bo ok Page 39 Tue sday, Janua ry 23, 2001 4:4 5 PM
Scan Settings
Selecting the type of image densi-
A
ty.
Auto Image Density
A Make sure that [
sity] is selected.
Note
❒ If [Auto Image Density] is not
selected, press [Auto Image
Density].
Auto Image Den-
Manual Image Density
A Make sure that [Auto Image Den-
sity] is not selected. If it is se-
lected, press [Auto Image Density]
to turn it off.
B Press [iiiiLighter] or [Darkerjjjj] to
change the density.
2
Note
❒ You can select one of seven
density levels.
Combined Auto and Manual
Image Density
A Make sure that [Auto Image Den-
sity] is selected. If it is not se-
lected, press [Auto Image Density]
to turn it on.
B Press [iiiiLighter] or [Darkerjjjj] to
change the density.
Note
❒ You can select one of seven
density levels.
39
Page 48

AdonisC2_E N_b-f_FM.bo ok Page 40 Tue sday, Janua ry 23, 2001 4:4 5 PM
Faxing
Mixing Scan Settings for a
Multiple Page Original
When sending an original consisting
of several pages, you can select different Image Density, Resolution and
2
Original Mode settings for each page.
Set your original, select the scan settings for the first page, dial and press
the {Start} key as you would normally. Then follow one of the following
two procedures.
When setting originals on the exposure
glass
While the machine is beeping, you
have about 60 seconds (10 for Immediate Transmission) to select density,
resolution and original mode. The remaining time is shown on the display.
Check which pages you wish to
A
scan with different settings.
Remove the previous page and set
B
the next page.
When setting originals in the document
feeder (ADF)
Check which pages you wish to
A
scan with different settings.
Select the Image Density, Resolu-
B
tion and Original Mode before
the next page is scanned.
40
Select the Image Density, Resolu-
C
tion and Original Mode.
Note
❒ Adjust settings for each page
before you press the {Start} key.
Page 49

AdonisC2_E N_b-f_FM.bo ok Page 41 Tue sday, Janua ry 23, 2001 4:4 5 PM
Dialing
Dialing
There are two main ways to dial a
number:
❖❖❖❖ Number keys:
Enter numbers directly using the
key pad on the right side of the operation panel.
❖❖❖❖ Quick Dials:
When you have programed a destination's number in a Quick Dial
key, you can dial the number by
just pressing that key. Additionally, you can store a name that will
appear on the display whenever
you press that Quick Dial.
This section covers these features and
others in more detail.
Number Keys
Enter numbers directly using the key
pad on the right side of the operation
panel.
Note
❒ Maximum length of a fax number:
254 digits.
❒ You can insert pauses and tones in
a fax number. ⇒ P.42 “Pause”, P.43
“Tone”
❒ If the optional ISDN Unit is in-
stalled, you may need to enter a
sub-address. ⇒ Chapter 4, "Subaddress" in the Advanced Features
manual
Enter the fax number with the
A
number keys.
The digits appear on the display as
you enter them.
Note
❒ If you make a mistake, press the
{Clear/Stop} key to erase the incorrect digits and try again.
❒ If the optional ISDN Unit is in-
stalled, select G3 or G4 before
you go to the next step. ⇒
Chapter 4, "Changing the Line
Type" in the Advanced Features
manual
2
41
Page 50

AdonisC2_E N_b-f_FM.bo ok Page 42 Tue sday, Janua ry 23, 2001 4:4 5 PM
Faxing
----Restrictions When Dialing with
the Number Keys
Fax numbers entered with the number keys are programed in internal
memory (separate from memory for
2
storing original data). Therefore, you
cannot program more than 100 numbers , total, with the number keys for
the following:
• Destinations specified in a Memory Transmission (including Confidential Transmission and Polling
Reception)
• Transfer Stations and End Receivers specified in a Transfer Request
• Destinations and Transfer Stations
specified in a Group
• Destinations specified in program
registration
For example, when 90 destinations
are programed in a Group with the
number keys, only 10 destinations
can be dialed for Memory Transmission from the number keys.
❒
If a memory file is awaiting transmission and the
and you cannot enter with number keys"
when dialing with the number keys,
you cannot dial any more numbers.
This is because fax numbers have
been dialed with the number keys
for some of the files awaiting transmission. When these files have been
sent and their fax numbers are deleted from memory, additional fax
numbers can be dialed.
❒ The display shows the percentage
of free memory space for storing
originals. Since fax numbers are
programed in separate memory,
dialing fax numbers with the number keys does not change the percentage on the display.
"Memory is full
message is displayed
Pause
Press the {Pause/Redial} key when dialing or storing a number to insert a
pause of about two seconds.
Note
❒ When this machine is requested to
transfer a call (i.e. become a Transfer Station), 2 fax numbers are automatically programed. Therefore,
the number of destinations that
can be dialed from the number
keys decreases by two whenever
this machine is requested to transfer a call.
❒ When a total of 100 fax numbers is
programed, only Immediate
Transmission is allowed.
42
Limitation
❒ You cannot insert a pause before
the first digit of a fax number.
Note
❒ A pause is shown as a "-" on the
display.
❒ You can insert pauses in numbers
programed in Quick Dials.
Page 51

AdonisC2_E N_b-f_FM.bo ok Page 43 Tue sday, Janua ry 23, 2001 4:4 5 PM
Tone
This feature allows a machine connected to a pulse dialing line to send
tonal signals (for example if you want
to use a special service on a tone dialing line). When you press the {Tone}
key, the machine dials the number using tonal signals.
Limitation
❒ You cannot place a tone before the
first digit of a fax number.
❒ Some services may not be available
when using the {Tone} key.
Note
❒ A tone is shown as a "•" on the dis-
play.
----Using the {Tone} key with On
Hook Dial
A Press the {On Hook Dial} key.
B Enter the fax number with the
number keys.
C Press the {Tone} key.
Dialing
----Sending Tonal Signals by ISDN
(Optional ISDN Unit Required)
You can still send tone signals to a G3
user even if the machine is only connected to an ISDN line.
Note
❒ This feature can only be used for
Memory or Immediate Transmission. You cannot dial through
ISDN using On-hook Dial or Manual Dial.
Quick Dials
When you have programed a destination's number in a Quick Dial table,
you can dial the number by just selecting the destination from Quick
Dial table.
Additionally, you can store a name
that will appear on the display whenever you press that Quick Dial.
Preparation
You must program the fax number
of destination for the Quick Dial
table prior to using Quick Dial.⇒
P.54 “Programing Quick Dials”
Note
❒ To check the contents of Quick Di-
al, print the destination list. ⇒
Chapter 7, "Reports/Lists" in the
Advanced Features manual
Reference
⇒ P.41 “Dialing”
2
43
Page 52

AdonisC2_E N_b-f_FM.bo ok Page 44 Tue sday, Janua ry 23, 2001 4:4 5 PM
Faxing
Set your original and select any
A
scan settings you require. ⇒⇒⇒⇒ P.36
“Scan Settings”
Press the title key for the table
B
with the desired destination key.
2
Press the destination key If the
C
desired destination key is not
shown, press [UUUU] and [TTTT] to look
through the table.
----Changing Display Method
A Press [
B
C Select [Display Quick Dial Tbl] or [Dis-
D Press [OK].
E Press [Exit].
Dest. Management
Press [Switch Display].
play Number Keys].
Note
❒ To cancel the change, press
[Cancel]. The display appears as
in step B.
].
❖❖❖❖ Quick Dial Table
44
Note
❒ To cancel a selected destination,
press that destination again.
❒ If you wish to dial another des-
tination, press [
steps B and C.
Press the {{{{Start}}}} key.
D
] and repeat
Add
❖❖❖❖ Display Number Key
Page 53

AdonisC2_E N_b-f_FM.bo ok Page 45 Tue sday, Janua ry 23, 2001 4:4 5 PM
Groups
If you frequently send the same message to more than one place, program
these numbers into a Group. Then
you can send the messages to all the
destinations in that Group with just a
few keystrokes. You can also program a name for the Group (for example, "Branch Offices") which will be
displayed before you press the {Start}
key.
Preparation
You need to program the Groups.
⇒ P.62 “Programing Groups”
Limitation
❒ Group Dial can be used only for
Memory Transmission; it cannot
be used for Immediate Transmission. The machine automatically
changes to Memory Transmission
when you use Group Dial.
Press the group key for the de-
C
sired group.
A programmed destination and
the total number of destinations is
displayed. Press [UUUU Prev.] or [TTTT
Next] to see the other destination.
Dialing
2
Note
❒ To check the contents of the
Groups, print the list. ⇒ Chapter 7,
"Group Dial List" in the Advanced
Features manual
❒ A total of 500 destinations pro-
gramed for Group Dial.
Set your original and select any
A
scan settings you require.
Press [Group].
B
Note
❒ If you make a mistake, press the
{Clear/Stop} key and start again.
45
Page 54

AdonisC2_E N_b-f_FM.bo ok Page 46 Tue sday, Janua ry 23, 2001 4:4 5 PM
Faxing
Reception
Selecting the Reception Mode
There are two ways you can set up
your machine to handle incoming
2
calls:
• Manual Reception (external telephone required)
• Auto Reception (external telephone required)
Manual Reception
When a telephone call comes in, the
machine rings. If the call is a fax message, you must manually change to
facsimile mode.
Auto Reception
When a telephone call comes in, the
machine automatically receives it as a
fax message. If the call is a fax message, you must manually change to
telephone mode.
Limitation
❒ You cannot select the reception
mode when the Extra G3 Interface
Unit (option) is installed.
❒ The optional external telephone is
required to use this machine as a
telephone.
❒ You cannot select the reception
mode when you use an ISDN line.
46
Page 55

AdonisC2_E N_b-f_FM.bo ok Page 47 Tue sday, Janua ry 23, 2001 4:4 5 PM
Initial Settings and Adjustments
3. Setup
You can send information to the other
party when transmitting or receiving
a fax message. This information is
shown on the display of the other machine and printed as a report. The following information can be sent.
❖❖❖❖ Own name
The Own name is sent to the other
party when you send or receive a
fax. This name should include
your name. The Own name is
shown on the display of the other
machine and printed in a report.
• You can program letters, sym-
bols, number, and spaces.
Limitation
❒ Own name works only when
the other machine is the same
make and has the Own name
feature.
Note
❒ You can program up to 20 char-
acters in Own name.
❖❖❖❖ Fax Header
The Fax Header is printed on the
header of every fax you send. You
should include your name in Fax
Header.
You can program letters, symbols,
number, and spaces.
Note
❒ You can program up to 32 char-
acters in Fax Header. ⇒ Chapter 7, "General Setting/
Adjustment" in the Advanced
Features manual
❖❖❖❖ Own Fax Number (Facsimile number
of sender)
The Own Fax Number of the sender is sent to the other party when
sending a fax using a G3 line. The
received Own Fax Number is
shown on the display of the other
machine and printed in a report.
This function is available regardless of the make of the other party's
machine.
Note
❒ You can program up to 20 char-
acters in Own Fax No.
❖❖❖❖ G4 Terminal ID
The optional G4 Unit is required to
use this function.
G4 Terminal ID is available when
the machine is connected to an
ISDN line. This information is
printed by the other party's machine when a fax is transmitted.
You can program letters, symbols,
number, and spaces.
Note
❒ You can program up to 22 char-
acters in G4 Terminal ID.
Important
❒ You can confirm the programed
settings from Parameter Setting.
We recommend that you print
the Parameter List and keep it
when you program or change
settings. ⇒ Chapter 8, "Printing
the User Parameter List" in the
Advanced Features manual
47
Page 56

AdonisC2_E N_b-f_FM.bo ok Page 48 Tue sday, Janua ry 23, 2001 4:4 5 PM
Setup
Programing
Press the {{{{User Tools/Counter}}}} key.
A
Program the name and Own Fax
E
Number.
Programing a Fax Header
Press [Facsimile Features].
B
A Press [
Name].
First Name
] or [
Second
3
B Enter a Fax Header.
Press [Gen. Settings/Adjust].
C
Reference
⇒ P.70 “Entering Text”
D
Press [
Program Fax Information
].
C Press [OK].
48
Note
❒ If "Program Fax Information" is
not shown, press [UUUU Prev.] or [TTTT
].
Next
Page 57

AdonisC2_E N_b-f_FM.bo ok Page 49 Tue sday, Janua ry 23, 2001 4:4 5 PM
Initial Settings and Adjustments
Programing a Own name
A Press [Own Name].
B Press [
C Enter a Own name.
Own Name
].
Programing a Own Fax Number
A Press [Own Fax Number].
3
B Select line type to Program.
Note
❒ The display differs according
to the number of G3 Interface
Unit (option) installed.
❒ When an Extra G3 Interface
Unit (option) is installed
Reference
⇒ P.70 “Entering Text”
D Press [OK].
❒ When two Extra G3 Interface
Units (option) are installed
49
Page 58

AdonisC2_E N_b-f_FM.bo ok Page 50 Tue sday, Janua ry 23, 2001 4:4 5 PM
Setup
C Enter a facsimile number.
3
Reference
⇒ P.70 “Entering Text”
D Press [OK].
E Press [Facsimile No.].
F Enter a facsimile number using
the number keys.
Programing G4 Terminal ID
A Press [G4 Terminal ID].
G Press [OK].
H Press [Terminal Name].
B Press [Country Code].
50
C Enter a country code using the
number keys.
D Press [OK].
I Enter a terminal name.
Reference
⇒ P.70 “Entering Text”
J Press [OK].
Press [Exit].
F
Page 59

AdonisC2_E N_b-f_FM.bo ok Page 51 Tue sday, Janua ry 23, 2001 4:4 5 PM
Initial Settings and Adjustments
Press the {{{{User Tools/Counter}}}} key.
G
The machine will return to standby
mode.
Editing
Note
❒
The following procedure explains
how to edit Own name as an example.
Press the {{{{User Tools/Counter}}}} key.
A
Press [Facsimile Features].
B
Press [Gen. Settings/Adjust].
C
Note
❒ If "Program Fax Information" is
not shown, press [UUUU Prev.] or [TTTT
Next].
Press [Fax Header], [Own Name] or
E
[Own Fax Number] for editing.
Press the item you want to edit.
F
Press [Backspace] or [Delete All] and
G
reenter the name or number.
3
Press [Program Fax Information].
D
Note
❒ Press [Clear], if you want to edit
Own Fax No., Country Code
and Own Fax No. of G4 Terminal ID.
51
Page 60

AdonisC2_E N_b-f_FM.bo ok Page 52 Tue sday, Janua ry 23, 2001 4:4 5 PM
Setup
Press [OK].
H
Press [Exit].
3
I
Deleting
Note
❒
The following procedure explains
how to edit Own name as an example.
Press the {{{{User Tools/Counter}}}} key.
A
Press [Facsimile Features].
B
52
Press the {{{{User Tools/Counter}}}} key.
J
The machine will return to standby
mode.
Press [Gen. Settings/Adjust].
C
Press [Program Fax Information].
D
Note
❒ If "Program Fax Information" is
not shown, press [UUUU Prev.] or [TTTT
Next].
Page 61

AdonisC2_E N_b-f_FM.bo ok Page 53 Tue sday, Janua ry 23, 2001 4:4 5 PM
Initial Settings and Adjustments
Press [Fax Header], [Own Name] or
E
[
Own Fax Number
Press the item you want to delete.
F
Press [Backspace] or [Delete All] and
G
reenter the name or number.
] for editing.
Press [OK].
H
Press [Exit].
I
Press the {{{{User Tools/Counter}}}} key.
J
The machine will return to standby
mode.
3
Note
❒ Press [Clear], if you want to edit
Own Fax No., Country Code
and Own Fax No. of G4 Terminal ID.
53
Page 62

AdonisC2_E N_b-f_FM.bo ok Page 54 Tue sday, Janua ry 23, 2001 4:4 5 PM
Setup
Quick Dial
To save time, you can program a fax
number that you use often into a
Quick Dial key. Then, whenever you
are sending a message to that location, just press that Quick Dial key to
dial.
Use the following steps to program a
3
new Quick Dial or to edit or overwrite
existing Quick Dials.
You can program the following items
in each key:
• Destination fax number (up to 254
digits)
You can select a line type for each
destination, when the ISDN Unit
(option) or Extra G3 Interface Unit
(option) is installed.
Setting can also be made for SEP,
SUB, PWD, PID (up to 20 digits),
sub-address (optional ISDN Unit is
required), UUI, and tonal signals.
⇒ P.43 “Tone”, ⇒ Chapter 4,
"Transmission Features" in the Advanced Features manual
• Destination name (up to 20 digits)
• Label Insertion (whether to print
the destination name on faxes sent
to this number)
• Fax Header (which Fax Header is
printed on faxes sent to this number) ⇒ Chapter 4, "Sub Transmission Mode" in the Advanced
Features manual
• Key Display
You can program the Key Display
shown on the display (up to 16
characters). The Group name (up
to 16 characters of group name)
will be programed as the Key Display automatically if you do not
program a Key Display.
• Select Title
You can select a title to display
programed destinations. If no specific title is selected, only "Quick
Dial List" will be shown.
Important
❒ We recommend that you print the
Quick Dial list and keep it when
you program or change fax numbers. ⇒ Chapter 7, "Reports/Lists"
in the Advanced Features manual
Programing Quick Dials
If a receiver is programed in the
Quick Dial table, you can just press
that Quick Dial key to dial.
Limitation
❒ When a programed Quick Dial key
is being used for a standby Memory Transmission, the message
Specified destination is
"
used by transmission standby
file. It cannot be changed or
deleted. Specify it again
after transmission is completed.
change the destination for this key.
Note
❒ Up to 400 destinations can be pro-
gramed. You can program up to
1200 destinations when Fax Function Upgrade Unit is installed.
❒ The maximum number of digits
for a fax number may be less than
254 due to the setting for the F
Code, Space and Sub-address.
" is shown. You cannot
54
Page 63

AdonisC2_E N_b-f_FM.bo ok Page 55 Tue sday, Janua ry 23, 2001 4:4 5 PM
Quick Dial
❒ You can program a destination
into the Quick Dial table using
[Prog./Change/Delete] in facsimile
User Tools. ⇒ Chapter 7, "General
Setting/Adjustment" in the Advanced Features manual
Press [Dest. Management].
A
Press [Program/Change/Delete Quick
B
Dial].
❒ If an unprogramed key is not
shown, press [UUUU Prev.] or [TTTT
Next].
❒ Press [Change Title] to display
another title.
Enter the name of the receiver.
D
Note
❒ If the key has been programed,
already the contents are shown.
Press [OK].
E
The name has been programed.
Enter the facsimile number you
F
want to program with the number
keys or [1], [2], [3], [4], [5], [6],
[7],[8], [9], [0], [pppp], and [qqqq].
3
Select the destination key you
C
want to program.
Note
❒ If the destination key has not
been programed,[p Not pro-
] is shown.
gramed
Note
❒ You should program a facsimile
number.
❒ If you make a mistake, press
[Clear] and start again.
❒ Press [Adv. Features] to edit F
code, sub-address or UUI.
55
Page 64

AdonisC2_E N_b-f_FM.bo ok Page 56 Tue sday, Janua ry 23, 2001 4:4 5 PM
Setup
❒ You can select a line type for
each destination when the ISDN
Unit (option) or Extra G3 Interface Unit (option) is installed.
Press [Select Line] to select a line
type.
Selecting a Fax Header
A Press [Select Fax Header].
B Select [1st Name] or [2nd Name]
for registration.
Programing/Changing Key
Display
3
A Press [Key Display].
B Enter a Key Display.
C Press [OK].
Programing Label Insertion
A Press [Label Insertion].
B Select [ON] or [OFF].
Note
❒ The name which you pro-
gramed is shown. ⇒ P.70
“Entering Text”
C Press [OK].
The Key Display which you
programed is shown.
56
Selecting a Title
A Press [Select Title].
B Select the title you want to pro-
gram.
C Press [OK].
Note
❒ If you select [OFF] or if you
want to insert only the receiver name, go to step F.
C Press [Change] at the right side
of the second or third line.
Page 65

AdonisC2_E N_b-f_FM.bo ok Page 57 Tue sday, Janua ry 23, 2001 4:4 5 PM
D Select the standard message to
be stamped at the second or
third line.
E Press [OK].
F Press [OK].
Press [OK].
G
Quick Dial
Editing Quick Dials
Change the receiver information already programed.
Limitation
❒ When a programed Quick Dial key
is being used for a standby Memory Transmission, the message
"Specified destination is
used by transmission standby
file. It cannot be changed or
deleted. Specify it again
after transmission is completed."
change the destination for this key.
Press [Dest. Management].
A
is shown. You cannot
3
Note
❒ If you press [Cancel], group is
not programed. The display appears as in step C.
Press [
H
The machine will return to standby
mode.
Exit
] twice.
Select [Program/Change/Delete Quick
B
Dial].
57
Page 66

AdonisC2_E N_b-f_FM.bo ok Page 58 Tue sday, Janua ry 23, 2001 4:4 5 PM
Setup
Select the destination key you
C
want to change.
Editing a Destination
A Press [Destination].
B Reenter the destination.
3
Note
❒ If the destination key you re-
quire is not shown, press [UUUU
Prev.] or [TTTT Next].
❒ Press [Change Title] to display
another title.
Press the {{{{Clear/Stop}}}} key or [Clear]
D
and reenter the facsimile number.
Edit the items only you want to
change. If you do not edit, go to
step E.
Note
❒ Press [Adv. Features] to edit F
code, sub-address or UUI.
❒ You can select a line type for
each destination when the ISDN
Unit (option) or Extra G3 Interface Unit (option) is installed.
Press [Select Line] to select a line
type.
Reference
⇒ P.70 “Entering Text”
C Press [OK].
The new destination entered is
shown.
Editing a Key Display
A Press [Key Display].
B Reenter the key display.
Reference
⇒ P.70 “Entering Text”
C Press [OK].
The new key display entered is
shown.
58
Page 67

AdonisC2_E N_b-f_FM.bo ok Page 59 Tue sday, Janua ry 23, 2001 4:4 5 PM
Quick Dial
Editing a Title
A Press [Select Title].
B Select the title you want to edit.
Note
❒ You can programed the same
destinations for [
2], [Title 3].
❒ When [Freq.] is selected for
one title, [Freq.] is selected for
all titles.
C Press [OK].
Title 1
], [
Title
Editing a Fax Header
A Press [Select Fax Header].
B Select [1st Name] or [2nd Name]
and edit them.
Editing Label Insertion
A Press [Label Insertion].
B Select [ON] or [OFF].
Note
❒ If you select [
want to insert only the receiver name, go to step F.
C Press [Change] at the right side
of the second or third line.
D Select the standard message to
be stamped at the second or
third line.
] or if you
OFF
3
C Press [OK].
E Press [OK].
F Press [OK].
59
Page 68

AdonisC2_E N_b-f_FM.bo ok Page 60 Tue sday, Janua ry 23, 2001 4:4 5 PM
Setup
Press [OK].
E
3
Note
❒ If you press [
not programed. The display appears as in step C.
Press [Exit] twice.
F
Cancel
], group is
Deleting Quick Dials
This procedure describes how to find
a programmed Quick Dial and delete
it.
Limitation
❒ When a deleted Quick Dial key is
being used for a standby Memory
Transmission, the message
ified destination is used by
transmission standby file. It
cannot be changed or deleted.
Specify it again after transmission is completed."
shown. You cannot delete the destination for this key.
Press [Dest. Management].
A
"Spec-
is
60
The machine will return to standby
mode.
Select [Program/Change/Delete Quick
B
Dial].
Page 69

AdonisC2_E N_b-f_FM.bo ok Page 61 Tue sday, Janua ry 23, 2001 4:4 5 PM
Quick Dial
Press [Delete].
C
Select the destination key to be
D
deleted.
The information for the destination key is shown.
Note
❒ If the destination key you re-
quire is not shown, press [UUUU
Prev.] or [TTTT Next].
❒ Press [Change Title] to display
another title.
Press [Delete].
E
The destination has been deleted.
Note
❒ If you press [Do not Delete], the
destination is not deleted. The
display appears as in step D.
Press [Exit] twice.
F
The machine will return to standby
mode.
3
61
Page 70

AdonisC2_E N_b-f_FM.bo ok Page 62 Tue sday, Janua ry 23, 2001 4:4 5 PM
Setup
Groups
Programing Groups
If you send the same message to several destina tions at the same t ime on a
regular basis, program these destination numbers as a Group. This allows
you to dial these destinations with a
3
single key press.
You can program the following items
in a Group:
• Destination fax numbers (up to 500
numbers for each group, up to 254
digits for each number)
• Group name (up to 20 characters)
• Key Display
You can program the Key Display
shown on the display (up to 16
characters). The Group name (up
to 16 characters of group name)
will be programed as the Key Display automatically if you do not
program a Key Display.
Limitation
❒ When a programed group is being
used for a standby Memory Transmission, the message "
destination is used by transmission standby file. It cannot be changed or deleted.
Specify it again after transmission is completed.
Specified
" is
shown. You cannot change the destinations for this Group.
Note
❒ The maximum number of Groups
you can program is 64.
❒ The theoretical maximum number
of destinations you can store in a
*1
Group
*1
If the same number is programed in
several Groups, it will only be counted as a single item.
*2
There a Maximum of 100 numbers
with the Group key and 100 numbers
entered directly with the number
keys.
is 500
*2
.
You can edit destinations which are
Press [Dest. Management].
programed in a group.
A
Programing Groups
Important
❒ It is recommended that you print
and keep the Group Dial list when
you program or change destinations. ⇒ Chapter 7, "Reports/
Lists" in the Advanced Features
manual
62
Page 71

AdonisC2_E N_b-f_FM.bo ok Page 63 Tue sday, Janua ry 23, 2001 4:4 5 PM
[Program/Change/Delete Group]
Press
B
Select the group key you want to
C
program.
Note
❒ If the group key has not been
programed, [p Not programed]
is shown.
❒ If the destination key you re-
quire is not shown, press [UUUU
Prev.] or [TTTT Next].
Enter the name of the group.
D
Groups
.
Press [OK].
E
The name has been programed.
Specify the destinations to be
F
programed in the Group.
3
Note
❒ You should program facsimile
numbers using the number keys
or Quick Dial table.
❒ If you make a mistake, press the
{Clear/Stop} key or [Clear] and
enter again.
❒ When you specify multiple des-
tinations using the number
keys, press [Add].
❒ Press [Dest. List], you can con-
firm the destinations programed in the group.
Press [OK].
G
Note
❒ You should program the group
name.
Reference
⇒ P.70 “Entering Text”
Note
❒ If you press [Cancel], the group
is not programed. The display
appears as in step C.
63
Page 72

AdonisC2_E N_b-f_FM.bo ok Page 64 Tue sday, Janua ry 23, 2001 4:4 5 PM
Setup
Press [Exit] twice.
H
Reference
⇒ Chapter 5, “Reception Func-
tions” in the Advanced Features
manual
Editing Groups
Change the Groups already programed.
3
The machine will return to standby
mode.
----Programing the Group as a
Transfer Station of a Multi-step
Transfer
A Group can be programed as a
Transfer Station of a Multi-step
Transfer. You should program the receiving stations when you program
the group as a Transfer Station.
For more information, contact your
service representative.
A Follow step A to F in "Programing
Groups".
B Press [Adv. Features].
Press [Transfer Req.].
C
D Press [
E Specify the receiving station.
F After specifying all of the receiving
G Press [Exit].
Receiving Station
Note
❒ When you specify the receiving sta-
tion with Quick Dial, press [
] and enter the Group Dial
Dial
number using the number keys.
❒ When you specify the receiving sta-
tion with Group Dial, press [
] and enter the Group Dial
Dial
number using the number keys.
stations, press [OK].
].
Quick
Group
Limitation
❒ When a programed Group is being
used for a standby Memory Transmission, the message
destination is used by transmission standby file. It cannot be changed or deleted.
Specify it again after transmission is completed."
shown. You cannot change the destination for this key.
Press [Dest. Management].
A
[
Select
B
Program/Change/Delete Group
"Specified
is
]
.
64
Page 73

AdonisC2_E N_b-f_FM.bo ok Page 65 Tue sday, Janua ry 23, 2001 4:4 5 PM
Groups
Select the key for the group key
C
want to change.
Note
❒ If the group key you require is
not shown, press [UUUU Prev.] or [TTTT
Next].
Change the contents of the group.
D
B Press [Backspace] and [Delete All]
to reenter the group name.
Reference
⇒ P.70 “Entering Text”
C Press [OK].
Editing Key Display
A Press [Key Display].
3
Editing a Group Name
A Press [Group Name].
B Press [Backspace] and [Delete All]
to reenter the key display.
C Press [OK].
65
Page 74

AdonisC2_E N_b-f_FM.bo ok Page 66 Tue sday, Janua ry 23, 2001 4:4 5 PM
Setup
Editing a destination programed
in a Group
A Press [Change] for the destina-
tion you want to edit.
Destinations programed with the
Quick Dial table
A Press the {{{{Clear/Stop}}}} key or
[Clear] to cancel the destination.
3
Note
❒ If the destination you require
is not shown, press [UUUU Prev.
or [TTTT Next
B Edit the destination.
].
Destinations programed with the
number keys
A Press the {{{{Clear/Stop}}}} key or
[Clear] and reenter the facsimile
number.
]
B Select the desired destination
key from the Quick Dial table.
Adding destinations
66
A Press [Add].
Page 75

AdonisC2_E N_b-f_FM.bo ok Page 67 Tue sday, Janua ry 23, 2001 4:4 5 PM
B Add the destination using the
number keys or destination
key.
Press [OK].
E
Groups
Deleting Groups
Limitation
❒ When a programed Group is being
used for a Memory Transmission
on standby, the message "
fied destination is used by
transmission standby file.
It cannot be changed or deleted. Specify it again after
transmission is completed.
shown. You cannot delete destinations for this Group.
Deleting a destination programed in
a Group
Press [Dest. Management].
A
Speci-
" is
3
Press [
F
The machine will return to standby
mode.
Exit
] twice.
B
[Program/Change/Delete Group]
Select
.
67
Page 76

AdonisC2_E N_b-f_FM.bo ok Page 68 Tue sday, Janua ry 23, 2001 4:4 5 PM
Setup
Select the group key which con-
C
tains the destination you want to
delete.
Note
❒ If you want to delete another
destination, press [UUUU Prev.] or [TTTT
Next] to display it.
The programed Group is shown
on the display.
Press [OK].
F
3
Note
❒ If the group key you require is
not shown, press [UUUU Prev.] or [TTTT
Next].
Press [Change] for the destination
D
you want to delete.
Note
❒ If you press [Cancel], the display
appears as in step C.
Press [Exit] twice.
G
68
Press the {{{{Clear/Stop}}}} key or [Clear]
E
to delete the facsimile number.
If you programed the destination
with the number keys, the number
will clear one digit at a time. If you
programed it with the Quick Dial
table, the number will clear all at
once.
The machine will return to standby
mode.
Deleting Groups
Press [Dest. Management].
A
Page 77

AdonisC2_E N_b-f_FM.bo ok Page 69 Tue sday, Janua ry 23, 2001 4:4 5 PM
[Program/Change/Delete Group]
Select
B
Groups
.
Press [Delete].
E
Press [Delete].
C
Select the key for the group you
D
want to delete.
Note
❒ If the group key has not been
programed, [p Not programed]
is shown.
❒ If the group key has been pro-
gramed, the group name or key
display is shown.
The group has been deleted.
Note
❒ If you press [Do not Delete]. The
display appears as in step C.
Press [Exit] twice.
F
3
69
Page 78

AdonisC2_E N_b-f_FM.bo ok Page 70 Tue sday, Janua ry 23, 2001 4:4 5 PM
Setup
Entering Text
This section describes how to enter characters. When you enter a character, it is
shown at the position of the cursor. If there is a character at the cursor position,
the entered character is shown before the character.
Available Characters
• Alphabetic characters
3
ABCDEFGHIJKLMNOPQRSTUVWXYZabcdefghijklmnopqrstuvwxyz
• Symbols
• Numerals
0123456789
Keys
Note
❒ When entering uppercase or lowercase continuously, use the [Shift Lock] to
lock the case.
70
Page 79

AdonisC2_E N_b-f_FM.bo ok Page 71 Tue sday, Janua ry 23, 2001 4:4 5 PM
How to Enter Text
Entering letters
Press [Shift] to switch between uppercase and lowercase.
A
Press the letter you want to enter.
B
Entering Text
Deleting characters
Press [Backspace] or [Delete All] to delete characters.
A
3
71
Page 80

AdonisC2_E N_b-f_FM.bo ok Page 72 Tue sday, Janua ry 23, 2001 4:4 5 PM
Setup
3
72
Page 81

AdonisC2_E N_b-f_FM.bo ok Page 73 Tue sday, Janua ry 23, 2001 4:4 5 PM
4. Troubleshooting
Adjusting Volume
You can change the volume of the following sounds the machine makes.
❖❖❖❖ On Hook
Sounds when the {On Hook Dial}
key is pressed.
❖❖❖❖ Transmission
Sounds when the machine sends a
message.
❖❖❖❖ Reception
Sounds when the machine receives
a message.
❖❖❖❖ Dialing
Sounds after pressing the {Start}
key until the line connect to the
destination.
❖❖❖❖ Printing
Sounds when a received message
has been printed. ⇒ Chapter 5,
"Print Completion Beep" in the Advanced Features manual
Limitation
❒ Adjusting Volume is not available
with G4 on the optional Extra G3
Interface Unit.
Press the {{{{User Tools/Counter}}}} key.
A
Press [Facsimile Features].
B
Select [Gen. Settings/Adjust].
C
Select [Adjust Sound Volume].
D
Note
❒ You can adjust the On Hook vol-
ume when you press the {On Hook
Dial} key. ⇒ Chapter 4, "On-Hook
Dial" in the Advanced Features
manual
❒ You can adjust the optional hand-
set bell volume. ⇒ Appendix,
"Connecting the Machine to a Telephone Line and Telephone" in the
Advanced Features manual
73
Page 82

AdonisC2_E N_b-f_FM.bo ok Page 74 Tue sday, Janua ry 23, 2001 4:4 5 PM
Troubleshooting
Press [Lower] or [Louder] for each
E
item.
Note
❒ You can hear the actual volume
4
by pressing [
Press [OK].
F
Note
❒ If you press [Cancel], the volume
setting is canceled. The display
appears as in step C.
Check
].
74
Press [Exit].
G
Press {{{{User Tools/Counter}}}}.
H
The machine will return to standby
mode.
Page 83

AdonisC2_E N_b-f_FM.bo ok Page 75 Tue sday, Janua ry 23, 2001 4:4 5 PM
Error Messages and Their Meanings
Error Messages and Their Meanings
If there is an error, one of the following messages may appear on the display. It
might just flash briefly, so if you are watching for errors, stay by the machine and
check the display.
Message Problem and Solution
Put original back, check it and press [Start]. Original jammed during Memory Transmis-
Error occurred, and transmission was canceled.
Cannot detect original size. Place original
again, then press [Start].
L
Call Service
Functional problems with facsimile. Please call
service.
Memory is full. Cannot scan more. Transmitting only scanned pages.
sion. Reset originals that have not been
scanned.
A document jam occurred during Immediate
Transmission. Press
which has been not sent.
An error occurred during Immediate Transmission. Press
[OK]
and re-send the page
[OK]
and re-send the original.
Note
❒
There may be a problem with the machine
or the telephone line (for example noise or
cross talk). If the erro r re-occurs frequently,
contact your service representative.
The machine failed to detect the size of the
original. Reset originals and press the
key.
There is a problem with the fax function.
Record the code number shown in the display
and contact your service representative. The
copier function will still work normally.
If you press
standby mode and starts transmitting pages
which has been scanned.
[OK]
, the machine returns to the
{Start}
4
75
Page 84

AdonisC2_E N_b-f_FM.bo ok Page 76 Tue sday, Janua ry 23, 2001 4:4 5 PM
Troubleshooting
When the {Facsimile} key is Lit in Red
If this key is lit, refer to the table below and take the appropriate action.
Problem Solution
Paper has run out. Add paper.
The paper output tray is full. Remove the paper from the tray.
The machine is in RDS (Remote Diagnostic
System) mode.
A facsimile error has occurred. The facsimile has a problem. Contact a service
4
Toner is empty. Replace the toner cartridge.
⇒
"Loading Paper" in the Copy Reference
Wait with the
will go to the standby mode after it exits from
the RDS mode.
representative. The copier will still function
normally.
⇒
"Adding Toner" in the Copy Reference
Main Power
switch on. Machine
76
Page 85

AdonisC2_E N_b-f_FM.bo ok Page 77 Tue sday, Janua ry 23, 2001 4:4 5 PM
Solving Problems
This table lists some common problems and their solutions.
Problem Solution Refer to
Image background appears
dirty when received at the
other end.
Printed or sent image contains
spots.
Received image is too light. Request the sender to increase
Message appears blank at the
other end.
You want to cancel a Memory
Transmission.
You want to cancel an Immediate Transmission.
You cannot add any destinations in a Group at though the
number of destinations has
not reached the maximum.
Adjust the scan density.
The Document Feeder (ADF)
or exposure glass is dirty.
Clean them. ⇒ the Copy Reference manual
Make sure that ink or correction fluid is dry before setting
the original.
the image density.
When using moist, rough or
processed paper, the printed
image may be partly invisible.
Only use recommended paper.
When D appears on the display, toner is beginning to run
out. Replace the toner cartridge soon. ⇒ the Copy Reference manual
The original was set upside
down. Set it properly.
If the original is being programed, press the
key.
If the original is being sent,
use "Change/ Stop TX File".
Press the
100 destinations have been
programmed with the number keys (1000 with the optional Expansion Memory).
Program more numbers with
Quick Dials or Speed Dials.
{Clear/Stop}
{Clear/Stop}
key.
Solving Problems
⇒
“Image Density (Con-
P.38
trast)”
---
---
⇒
Appendix, "Acceptable
Types of Originals" in the Advanced Features manual
---
⇒
“Setting Originals”
P.16
⇒
“Canceling a Memory
P.29
Transmission”
⇒
Chapter 2, "Checking and
Canceling Transmission Files"
in the Advanced Features
manual
⇒
“Canceling a Memory
P.29
Transmission”
⇒
“Dialing”
P.41
4
77
Page 86

AdonisC2_E N_b-f_FM.bo ok Page 78 Tue sday, Janua ry 23, 2001 4:4 5 PM
INDEX
A
Adjusting Volume, 73
Analog Line Connector
Auto Reception
, 46
,
4
B
Broadcasting
Bypass Tray
,
,
24
4
C
Canceling a Memory Transmission, 29
Canceling an Immediate Transmission
Changing Memory Transmission and
Immediate Transmission
Check Modes key
Clear Modes key
Clear/Stop key
Communicating Indicator
Components
Confidential File Indicator
Control Panel
CSI→Own Fax Number
, 6
, 6
, 7
, 3
, 6
, 15
, 6
, 6
, 47
D
Detail, 36
, 41
Dialing
Display
Document Feeder (ADF)
,
11
, 3
E
Energy Saver key
Entering letters
Entering Text
Error Messages
Exposure Glass
Extra G3 Interface Unit Connector
,
,
, 71
70
, 75
, 3
6
, 5
F
Facsimile key, 7
Faxing
, 15
G
Groups, 45, 62
, 35
H
Handset/External Telephone, 4
Handset/External Telephone Connector
I
Image density, 36
Image Density (Contrast)
Immediate Transmission
Interrupt key
, 6
38
,
, 13, 15,
L
LCD display, 6
letters
, 71
M
Main Power Switch, 4
Manual Reception
Memory Transmission
, 46
, 13, 15, 24
N
Number keys, 7, 41
O
On Hook Dial key, 7
Operation Switch
Original Type
, 4
, 36,
37
P
Pause
42
,
Pause/Redial key
, 37
Photo
Platen
, 3
,
7
Q
Quick Dial, 41, 43, 54
R
Receive File Indicator, 6
Reception
Resolution
RTI→Own name
, 46
, 36
, 47
32
,
5
78
Page 87

AdonisC2_E N_b-f_FM.bo ok Page 79 Tue sday, Janua ry 23, 2001 4:4 5 PM
S
Scan Settings
Selecting the Reception Mode
Setting Originals
Setup
, 47
Solving Problems
Standard
Start Manual RX key
Super Fine
, 36
, 36
,
36
, 16
, 77
, 6
T
Text, 37
, 43
,
, 37
7
,
43
, 73
, 47
Text·Photo
Tonal Signals
Tone
Tone key
Troubleshooting
TTI→Fax Header
U
User Tools/Counter key, 6
, 46
79
Page 88

AdonisC2_E N_b-f_FM.bo ok Page 80 Tue sday, Janua ry 23, 2001 4:4 5 PM
MEMO
80 UE USA B360
 Loading...