

Page 1
PRINTER Controller
Type 1013
Operating Instructions
Printer Reference 1 (option)
Printer Reference 2 (option)
Part #G1620
Read this manual carefully before you use this product and keep it handy for future
reference.
For safety, please follow the instructions in this manual.
Page 2

Introduction
This manual contains detailed instructions on the operation and maintenance of this machine. To get
maximum versatility from this machine all operators should carefully read and follow the instructions in
this manual.
Please keep this manual in a handy place near the machine.
Please read the Safety Information in the “Copy Reference” before using this machine. It contains important information related to USER SAFETY and PREVENTING EQUIPMENT PROBLEMS.
Notes:
"PS2" stands for PostScript level2 Compatible in this manual.
Important
Parts of this manual are subject to change without prior notice. In no event will the company be liable
for direct, indirect, special, incidental, or consequential damages as a result of handling or operating
the machine.
Trademarks
Microsoft and Windows are registered trademarks of Microsoft Corporation in the United States and/or
other countries.
Ethernet is a registered trademark of Xerox Corporation.
Adobe, PostScript, Acrobat and PageMaker are registered trademarks of Adobe System Incorporated.
PCL is a registered trademark of Hewlett-Packard Company.
Other product names used herein are for identification purposes only and might be trademarks of their
respective companies. We disclaim any and all rights in those marks.
Warning:
Use of controls or adjustment or performance of procedures other than those specified in this manual
might result in hazardous radiation exposure.
Notes:
Some illustrations might be slightly different from your machine.
Certain options might not be available in some countries. For details, please contact your local dealer.
Page 3

Manuals for This Machine
Manuals for This Machine
There are ten manuals that separately describe the operational procedures for
the operation and maintenance of the machine.
To enhance safe and efficient operation of the machine, all users should read and
follow the instructions contained in the following manuals.
❖❖❖❖ Copy Reference
Describes the procedures and functions for using this machine as a copier.
❖❖❖❖ System Settings
Describes the system settings of this machine.
❖❖❖❖ Facsimile Reference <Basic Features>
Describes the procedures and most frequently used functions for using this
machine as a facsimile.
❖❖❖❖ Facsimile Reference <Advanced Features>
Describes the procedures and more advanced functions for using this machine as a facsimile. And also explains settings for key operators.
❖❖❖❖ Printer Reference 1
Describes the system settings, procedures and functions for using this machine as a printer. (this manual)
❖❖❖❖ Printer Reference 2
Describes the procedures and provides necessary information about using
this machine as a printer. This manual is provided as a PDF file on the CDROM labeled “Operating Instructions for Printer”.
❖❖❖❖ Network Interface Board Quick Configuration Guide
Describes the procedures and provides necessary information about setting up
and using the printer under the network environment. This manual is provided
as a PDF file on the CD-ROM labeled “Operating Instructions for Printer”.
❖❖❖❖ Type 1018 PostScript level2 Compatible Kit Operating Instructions Supplement
Describes the functions of Printer Utility for Mac. This manual is provided as
a PDF file on the CD-ROM labeled “Operating Instructions for Printer”.
❖❖❖❖ UNIX Supplement
Provides information about setting up and using the printer in a UNIX environment. This manual is provided as a PDF file on the CD-ROM labeled “Operating Instructions for Printer”.
❖❖❖❖ Network Interface Board Type 1018 Owner's Manual
Describes the procedures and provides necessary information about setting
up and using the printer under the network environment. This manual is provided as a PDF file on the CD-ROM labeled “Print Server Software and Documentation” which comes with optional Network Interface Board Type 1018.
i
Page 4

ENERGY STAR Program
As an ENERGY STAR Partner, we have determined
that this machine model meets the ENERGY STAR
Guidelines for energy efficiency.
The ENERGY STAR Guidelines intend to establish an international energy-saving system for
developing and introducing energy-efficient office equipment to deal with environmental issues, such as global warming.
When a product meets the ENERGY STAR Guidelines for energy efficiency, the Partner shall
place the ENERGY STAR logo onto the machine model.
This product was designed to reduce the environmental impact associated with office equipment by means of energy-saving features, such as Low-power mode.
• Low Power mode
This product automatically lowers its power consumption 15 minutes after
the last copy or print job has finished. Fax reception and printing is still possible in Low Power mode, but if you wish to make copies press the operation
switch first.
For details about how to change the default interval that the machine waits
before entering Low Power mode, see “4.Energy Saver Timer” in the System
Settings.
• Sleep mode (Fax or printer installed)
If the fax or printer features are installed, this product automatically lowers
its power consumption even further 30 minutes after the last copy or print job
has finished. Fax reception and printing is still possible in Sleep mode, but if
you wish to make copies press the operation switch first.
For details about how to change the default interval that the machine waits
before entering Sleep mode, see “6.Auto Off Timer” in the System Settings.
• Auto Off mode (Copier only)
To conserve energy, this product automatically turns off 30 minutes after the
last copying or printing job has completed. If you wish to make copies when
the machine is in Auto Off mode, press the operation switch first.
For details about how to change the default interval that the machine waits
before entering Auto Off mode, see “6.Auto Off Timer” in the System Settings.
ii
Page 5
❖❖❖❖ Specification
Copier only Fax or printer installed
Low Power
mode
Sleep mode Power
Auto Off
mode
Power
consumption
Default
interval
Recovery
time
consumption
Default
interval
Recovery
time
Power
consumption
Default
interval
Recovery
time
50 Wh 60 Wh
15 minutes 15 minutes
Less than 10 seconds Less than 10 seconds
- 20 Wh
- 30 minutes
- 20 seconds
less than 2 Wh -
30 minutes -
20 seconds -
Recycled Paper
In accordance with the ENERGY STAR Program, we recommend use of recycled
paper which is environment friendly. Please contact your sales representative
for recommended paper.
iii
Page 6

How to Read This Manual
R
R
Symbols
In this manual, the following symbols are used:
WARNING:
This symbol indicates a potentially hazardous situation which, if instructions
are not followed, could result in death or serious injury.
CAUTION:
This symbol indicates a potentially hazardous situation which, if instructions
are not followed, may result in minor or moderate injury or damage to property.
* The statements above are notes for your safety.
Important
If this instruction is not followed, paper might be misfed, originals might be
damaged, or data might be lost. Be sure to read this.
Preparation
This symbol indicates the prior knowledge or preparations required before operating.
Note
This symbol indicates precautions for operation, or actions to take after misoperation.
Limitation
This symbol indicates numerical limits, functions that cannot be used together,
or conditions in which a particular function cannot be used.
Reference
This symbol indicates a reference.
[]
Keys that appear on the machine's panel display.
Keys and buttons that appear on the computer's display.
{}
Keys built into the machine's control panel.
Keys on the computer's keyboard.
iv
Page 7

TABLE OF CONTENTS
1.Getting Started
Features of This Machine .......................................................................... 1
Printer Drivers for This Machine..................................................................... 2
Software and Utilities provided on the CD-ROM............................................ 3
Guide to This Machine ............................................................................... 5
Control Panel ................................................................................................. 5
Panel Display ................................................................................................. 6
Connecting the Machine ............................................................................ 8
Requirements................................................................................................. 8
Connecting the Network Interface Cable to the Network ............................. 10
Connecting the Machine to the Host Using the Parallel Interface Cable ..... 12
2.Configuring the Printer for the Network
Configuring the Printer for the Network with the Control Panel.......... 13
3.Installing the Printer Driver and Software
Installation Method................................................................................... 15
Quick Install .............................................................................................. 16
Installing the PCL 6/5e Printer Driver ..................................................... 18
Installing the PCL 6/5e Printer Driver........................................................... 18
Installing the PostScript Printer Driver .................................................. 20
Windows 95/98/Me - Installing the PostScript Printer Driver........................ 20
Windows 2000 - Installing the PostScript Printer Driver............................... 21
Windows NT 4.0 - Installing the PostScript Printer Driver............................ 23
Using Adobe PageMaker Version 6.0 or 6.5 ................................................ 24
Installing the SmartNetMonitor for Client/Admin .................................. 25
Installing the AGFA Monotype Font Manager 2000............................... 26
Macintosh.................................................................................................. 27
Macintosh - Installing the PPD File .............................................................. 27
INDEX......................................................................................................... 29
PRINTER REFERENCE 2 procedures start in second section
v
Page 8

vi
Page 9

1. Getting Started
Features of This Machine
This machine is designed especially for office workgroups, both for shared usage within a network environment, and for one-to-one usage by being connected
directly to the computer.
❖❖❖❖ Time Saving
Superior features save time on print tasks.
Note
❒ Printing speed depends on the machine. Confirm which type of machine
you have. See the Copy Reference.
❖❖❖❖ Compact Body
Its compact body requires minimum space to place it on your desk side.
❖❖❖❖ Network Connectivity
This printer is network ready with optional Network Interface Board Type
1018.
❖❖❖❖ Major Specifications
Printing Speed Printing speed depends on the machine.
Maximum Print Quality True 600 × 600 dpi resolutions (PCL 6, 5e, PS2
Printer Language PCL 6, PCL 5e, PS2 (option)
Maximum Input Paper Size Maximum input paper size depends on the
Standard Memory Size 16MB
Maximum Memory Size with Optional
Memory
Confirm which type of machine you have.
See the Copy Reference.
(option))
machine. Confirm which type of machine
you have. See the Copy Reference.
144MB
1
Page 10
Getting Started
Printer Drivers for This Machine
Printing requires installation of a printer driver for your operating system. The
1
following drivers are provided on the CD-ROM that comes with this machine.
Printer Language PCL 6 PCL 5e PS2
Operating system
Windows 95
Windows 98
Windows Me
Windows 2000
Windows NT 4.0
Mac OS
*1
Microsoft Windows 95 operating system
*2
Microsoft Windows 98 operating system
*3
Microsoft Windows Millennium Edition
*4
Microsoft Windows 2000 Professional
Microsoft Windows 2000 Server
*5
Microsoft Windows NT Server operating system version 4.0, Microsoft Windows NT
Workstation operating system version 4.0 in a computer using x86 processors.
*6
Required version is 8 or 9 operating system. With Mac OS X, the machine operates in
only Classic mode.
*7
Requires Service Pack 4 or later.
*8
PPD (PostScript Printer Description) files are provided on the CD-ROM.
*9
You can use the LaserWriter printer driver that comes with a Macintosh. Use the ap-
*1
*2
*3
*4
*5
*6
√√ √
√√ √
√√ √
√√ √
√
*8 *9
*7
√√√
propriate printer driver that comes with the Macintosh operating system you are using. See the documentation that comes with the Macintosh for more information
about the LaserWriter functions.
❖❖❖❖ PCL printer drivers
Printer drivers allow the computer to communicate with the printer via a
printer language. Two kinds of PCL printer drivers, PCL 6 and PCL 5e, are
provided with this printer. We recommend PCL 6 as your first choice.
Note
❒ Some of your applications might require the installation of the PCL 5e
printer driver. In this case, you can install PCL 5e in addition to PCL 6.
⇒ p.18 “Installing the PCL 6/5e Printer Driver”
❖❖❖❖ PostScript Printer Description (PPD) files for Windows
The printer specific functions can be used by installing the PPD file specific
for the printer.
⇒ p.20 “Windows 95/98/Me - Installing the PostScript Printer Driver”
⇒ p.21 “Windows 2000 - Installing the PostScript Printer Driver”
⇒ p.23 “Windows NT 4.0 - Installing the PostScript Printer Driver”
2
Page 11

Features of This Machine
❖❖❖❖ PostScript Printer Description (PPD) files for a Macintosh
PPD files, in combination with the LaserWriter driver, allow the computer to
communicate with the printer. The printer specific functions can be used by
installing a PPD file. You can use the LaserWriter printer driver that comes
with the Macintosh. Use the appropriate printer driver that comes with the
Macintosh operating system you are using. See the documentation that comes
with the Macintosh for more information about the LaserWriter functions.
⇒ p.27 “Macintosh”
Software and Utilities provided on the CD-ROM
❖❖❖❖ AGFA Monotype Font Manager 2000
Helps you to install new screen fonts, or organize and manage fonts already
installed on the system.
❖❖❖❖ SmartNetMonitor for Admin
SmartNetMonitor for Admin is software that uses the TCP/IP and IPX/SPX
protocols to monitor the printers in a network. It can monitor multiple network printers having IP addresses. We recommend network administrators
to use this software.
Reference
For more information about SmartNetMonitor for Admin, see the SmartNetMonitor for Admin online Help file.
❖❖❖❖ SmartNetMonitor for Client
SmartNetMonitor for Client is software equipped with the following functions. We recommend all users of this printer to install this software.
• Provides the function to print in a Peer-to-Peer network.
• Uses the TCP/IP and IPX/SPX protocols to monitor the status of devices
in a network constantly.
Reference
For more information about SmartNetMonitor for Client, see the SmartNetMonitor for Client online Help file.
1
❖❖❖❖ Acrobat Reader
A utility that allows you to read PDF (Portable Document Format). This software is provided as a PDF file on the CD-ROM labeled “Operating Instructions for Printer”.
Note
❒ Documentation about using the printer is provided as a PDF format on the
CD-ROM. See Acrobat Reader online Help for more information about using Acrobat Reader.
3
Page 12

Getting Started
❖❖❖❖ Printer Utility for Mac
This utility allo ws users to dow nload and manage a variety of fonts as well as
to manage their printers. For more information about this utility, see the Type
1018 PostScript level2 Compatible Kit Operating Instructions Supplement
1
which is provided as a PDF file on the CD-ROM labeled “Operating Instructions for Printer”.
❖❖❖❖ UNIX Install Shell
The installation shell script helps with the setup process. The installation shell
script automates some of the tasks in configuring /etc/hosts, /etc/printcap,
and in creating the spool directory for BSD UNIX, and in running lpadmin
command for System V UNIX.
Reference
For more information about UNIX Install Shell, see the “UNIX Supplement”.
Important
❒ If you upgrade to Windows 2000 from Windows 95/98/Me or Windows NT
4.0, the software and utilities must be uninstalled prior to installing Windows
2000. Then reinstall them in a Windows 2000 environment.
4
Page 13
Guide to This Machine
Guide to This Machine
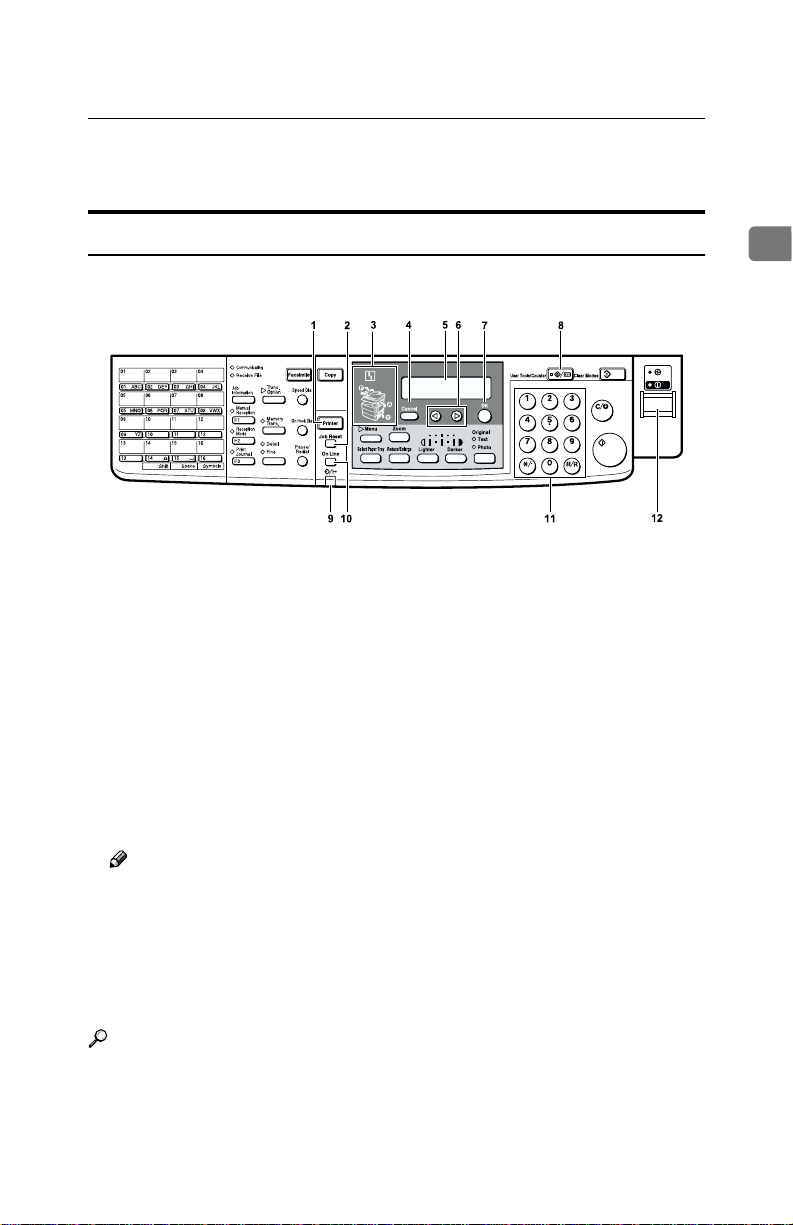
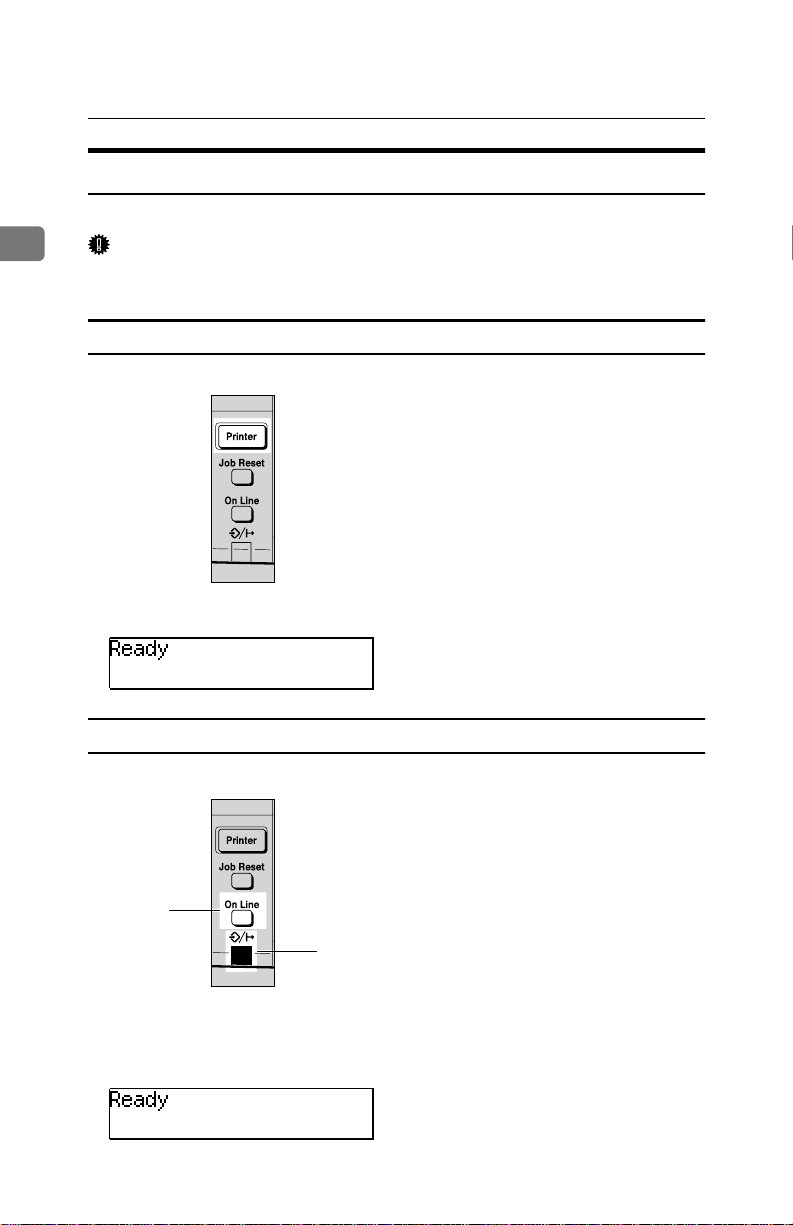
Control Panel
This panel display is for the installed Printer and Facsimile feature.
ABC DEF
GHI
MNO
JKL
TUV WXY
PRS
OPER
1.
Printer Mode key
Press to use printer functions.
2.
{Job Reset} key
When the printer is online, press this key
to cancel any ongoing print job.
3.
Indicators
These indicators show errors or the status
of the machine.
The h symbol is displayed following
conditions and the message is displayed
on the panel display.
❖❖❖❖ Loading Paper
There is no paper in the paper tray.
Note
❒ Appears only when you use the
machine as a Copier or Facsimile.
❖❖❖❖ Changing the Toner Cartridge
It is time to supply toner.
❖❖❖❖ Clearing Misfeeds
Paper misfeeds have occurred.
Reference
For more information about solving above error, see "Troubleshoot-
ing" in the Copy Reference.
4.
{Cancel} key
Press to cancel an operation or return to
the previous display.
5.
Display panel
Shows operation status, error messages,
and function menus.
6.
01 keys
Press to select an item on the panel display.
7.
{OK} key
8. {User Tools/Counter} key
Press to change the default settings and
conditions to meet your requirements.
9.
Data In/Online indicator
Blinks while the printer is receiving data
from a computer or printing and is on
while the printer is online.
10.
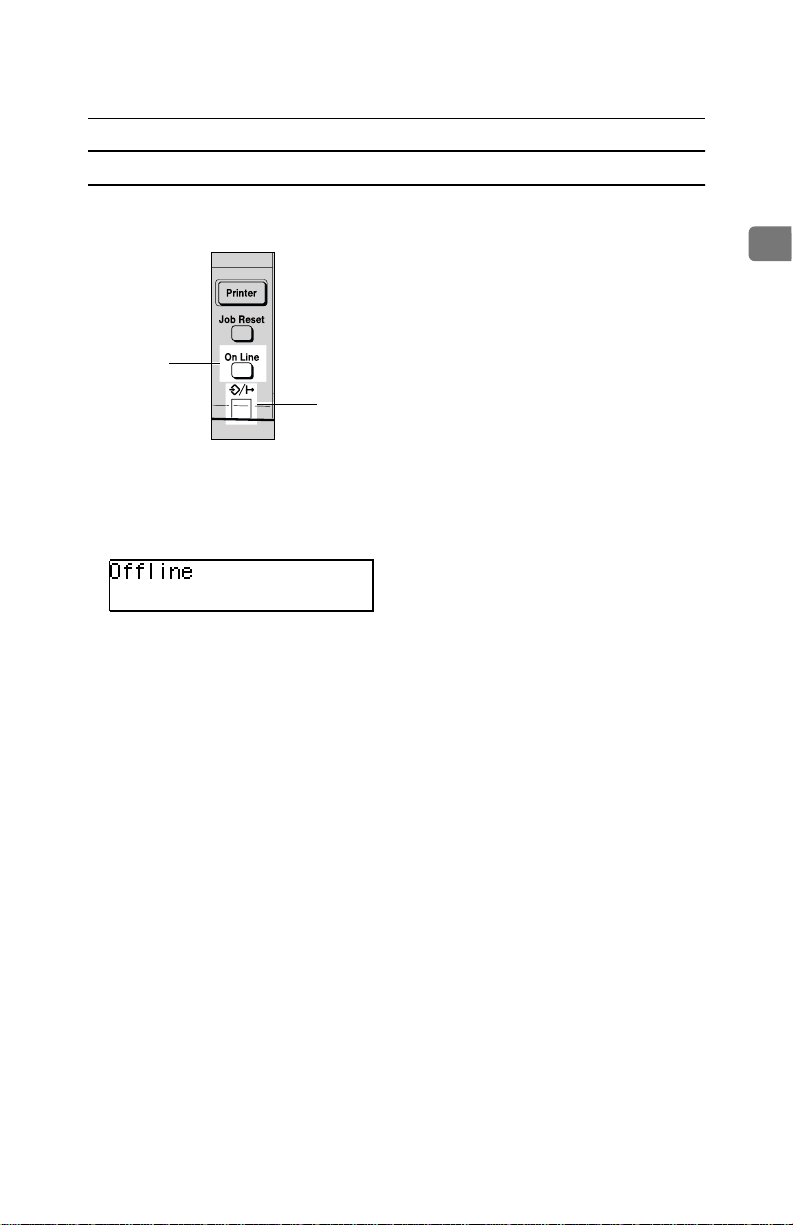
{Online/Offline} key
Press this key to switch the printer between online and offline.
11.
Number keys
Use to enter the desired number of copies
and data for selected modes.
12.
Operation switch
Press this switch to turn the power on (the On
indicator goes on). To turn the power off, press
this switch again (the On indicator goes off).
1
5
Page 14
Getting Started
Panel Display
The panel display shows operational status, error messages, and function menus.
1
Important
❒ Do not apply a strong shock or force of more than about 30N (about 3kgf) to
the panel display or it may be damaged.
Online and Offline
Press {Printer Mode} on the control panel.
"Ready" appears on the panel display.
Online
When the machine is online, it can receive data from the computer.
1
2
1.
{Online/Offline} key
Press this key to switch the printer online.
"Ready" appears on the panel display.
2.
Data In/Online indicator
Is on while the printer is online.
6
Page 15
Guide to This Machine
Offline
When the machine is offline, it cannot receive data from the computer.
1
2
1
1.
{Online/Offline} key
Press this key to switch the printer offline.
"Offline" appears on the panel display.
2.
Data In/Online indicator
Is off while the printer is offline.
7
Page 16

Getting Started
Connecting the Machine
Confirm that the shape and the position of the connector are as shown in the il-
1
lustration.
1.
10BASE-T/100BASE-TX (option)
2.
Parallel Port
Requirements
Requirements
Before using this machine, confirm that all the environmental and electrical requirements have been met. Connect the machine to the computer using the parallel port, optional Network Interface Board Type 1018, or both.
Confirm that all the cables, connectors, and electrical outlets necessary to attach
the machine to the computer or network.
Important
❒ The interface cable is not supplied in the box. It is your responsibility to pro-
vide the interface cable appropriate for the computer that you are using.
Reference
For more information about using the parallel port, see p.9 “Parallel cable requirements”.
For more information about using a network, see p.9 “Network cable requirements”.
8
Page 17
Connecting the Machine
Network cable requirements
Optional Network Interface Board Type 1018 can be installed to allow direct
connection to a network.
The optional Network Interface Board supports 10BASE-T or 100BASE-TX connections.
You can use the machine in the following network environments:
• Using the appropriate network management software and printer driver.
• Attaching the machine to a network (computer) set up as a server.
Client
Driver
File Server
Protocol
*1
Under Windows NT 4.0, only × 86 CPU is supported.
Windows 95, 98, Me, Windows 2000, Windows NT 4.0,
or 9 (Type 1018 PostScript level2 Compatible Kit is required)
PCL 6/5e, PS2
NetWare 3.x, NetWare 4.x, NetWare 5.x
TCP/IP, IPX/SPX, AppleTalk
*1
, Mac OS 8
In a mixed network environment, the protocol switches automatically.
Reference
For more information about resolving network connection problems, see p.13
“Configuring the Printer for the Network”.
Note
❒ Consult your network administrator before connecting the machine to a net-
work.
❒ Be sure to use the interface cable with ferrite core for the connection to the
computer (and/or HUB) in order to meet FCC and EMC Directive 89/336/
EEC emission guidelines.
1
Parallel cable requirements
The machine's parallel interface is a standard bidirectional interface. It requires
a standard 36-pin parallel cable compliant with IEEE 1284 and a parallel port
available on the host computer.
This machine does not provide the parallel cable to connect the machine to the
computer.
Note
❒ Do not use a parallel cable that is longer than 3 meters (10 feet).
9
Page 18

Getting Started
Connecting the Network Interface Cable to the Network
Connect the machine to the network using optional Network Interface Board
1
Type 1018.
Follow these steps to connect the machine.
Confirm that you have the correct cable.
A
Confirm that the machine is turned off.
B
Loop the network cable. The loop should be about 15cm (6”) from the end
C
of the cable on the end closest to the printer.
Attach the ferrite core to the loop.
D
Attach the network cable to the 10BASE-T/100BASE-TX port on the ma-
E
chine.
Reference
See p.8 “Connecting the Machine” to confirm the position of the 10BASET/100BASE-TX port.
10
Note
❒ Confirm that the cable is connected to the 10BASE-T/100BASE-TX port.
Connect the other end of the cable to the network.
F
Page 19

Indicators on the optional Network Interface Board
Connecting the Machine
1
1.
Indicator (green)
Is on when the power of the machine is
on and on while the machine is in a network environment.
2.
Indicator (orange)
Is blinking while the machine is receiving
print jobs over the network environment
and off when the print jobs have been
sent to the controller.
----Status page
The status page of Network Interface Board will be automatically printed in the
following cases:
• when the printer is turned on.
• when Network Interface Board is reset.
This feature can be disabled with NIB Setup Tool which is included in the SmartNetMonitor for Admin program folder.
To disable this feature, check [
Click [Detailed...] in the [General] tab and remove the check from the box for "Print
configuration page on start up".
Property Sheet
] in the "NIB Setup Tool" screen.
11
Page 20

Getting Started
Connecting the Machine to the Host Using the Parallel Interface
Cable
1
Connect the machine to the host computer using a parallel interface cable compliant with IEEE 1284 (supplied by you).
Follow these steps to connect the machine to the host computer.
Confirm that you have the correct cable.
A
Confirm that both the machine and a computer are turned off.
B
Plug the 36-pin end of the parallel cable into the parallel port at the right
C
side of the back cover of the machine.
Reference
See p.8 “Connecting the Machine” to confirm the position of the parallel
port.
Squeeze the wire clips on each side of the connector together until they
D
snap into place. The clips hold the cable securely in place.
Plug the other end of the parallel cable into the computer's parallel port.
E
12
Page 21

2. Configuring the Printer for
the Network
Configuring the Printer for the Network
with the Control Panel
After installing the optional Network
Interface Board, configure it for the
network using the printer's control
panel.
If you use TCP/IP, you should assign
the IP Address and Subnet Mask. You
can also set the Gateway Address using the printer's control panel.
Note
❒ When you turn the machine's pow-
er switch on, it may take a few
minutes to initialize the optional
Network Interface Board. If the “2.
Network Setup” in the following
step 4. is shaded, wait for a few
minutes.
Reference
For more information about using
this machine as a network printer,
see the “Quick Configuration
Guide” which is provided as a PDF
file on the CD-ROM labeled “Operating Instructions for Printer”.
Press {User Tools/Counter}.
A
Press the 0 or 1key until the fol-
B
lowing message appears on the
panel display.
Press {OK}.
C
The following screen appears on
the panel display.
Press the 0 or 1key until the fol-
D
lowing message appears on the
panel display.
Press {OK}.
E
The following screen appears on
the panel display.
GHI
ABC DEF
JKL
MNO
Press {OK}.
F
The following screen appears on
the panel display.
13
Page 22

Configuring the Printer for the Network
Set the IP Address with the 0 or
G
1key and the number keys.
B Press {OK}.
The following screen appears
on the panel d isplay for tw o seconds.
ABC DEF
JKL
GHI
2
PRS
MNO
TUV WXY
The setting of the IP Address is
completed. Then return to the
previous screen.
OPER
Press the 0 or 1key to display
H
“Subnet Mask”and "Gateway Ad-
Note
❒ To get the IP Address for the
printer, contact your network
administrator.
A Type the first three digits of the
dress", then set "Subnet Mask"
and "Gateway Address" following the same procedure for setting
the IP Address, if necessary.
IP Address, and the pointer
moves to the next entry field automatically.
Note
❒ 1 key : Press to go to the
next entry field.
❒ 0 key : Press to go back to
the previous entry field.
The following screen appears
on the panel display.
----Address
❖❖❖❖ Subnet Mask
A number used to mathematically
"mask" or hide an IP Address on
the network by eliminating those
parts of the address that are alike
for all the machines on the network.
❖❖❖❖ Gateway Address
A gateway is a connection or interchange point that connects two
networks. A gateway address is for
Repeat these procedures to
complete the IP Address setting.
Note
❒ {OK}: Press to set the new
the router or host computer used
as a gateway.
Note
❒ To get the addresses, contact
your network administrator.
settings and return to the
previous menu.
❒ {Cancel}: Press to return to
the previous menu without
changing any data.
14
Page 23
3. Installing the Printer Driver
and Software
This manual assumes that you are familiar with general Windows procedures
and practices. If you are not, see the documentation that comes with Windows
for details.
Installation Method
The following table shows how to install the printer drivers and software.
Parallel
*1
installation
❍
❍
❍
❍
*2
Auto Run
Quick Install Custom
Network connection
with TCP/IP
PCL 6 printer driver
PCL 5e printer driver
PostScript printer driver
AGFA Monotype Font Manager
2000
SmartNetMonitor for Admin
SmartNetMonitor for Client
*1
Available operating systems are as follows: Windows 95/98/Me, Windows 2000,
Windows NT 4.0
*2
Using custom installation, you can install various software separately.
Reference
❍❍❍
❍❍
connection
For more information about the printer drivers, see p.2 “Printer Drivers for
This Machine”. For installing the printer drivers, see p.18 “Installing the PCL
6/5e Printer Driver” or p.20 “Installing the PostScript Printer Driver”.
For more information about the software and utilities, see p.3 “Software and
Utilities provided on the CD-ROM”.
Important
❒ Before starting this installation, close all documents and applications. In a net-
work environment, confirm that users who are logged on are disconnected.
Be sure to do this when it will create the least interference with other users.
❒ After installing a printer driver, you must restart the computer.
Note
❒ If the "plug and play" function is started, click [Cancel] in the [New Hardware
Found], [Device Driver Wizard] or [Found New Hardware Wizard] dialog box, and
then insert the CD-ROM. The [New Hardware Found], [Device Driver Wizard] or
[Found New Hardware Wizard] dialog box appears depending on the system ver-
sion of the Windows 95/98/Me, Windows 2000.
15
Page 24

Installing the Printer Driver and Software
Quick Install
Auto Run starts the installer automatically when you load the CD-ROM in the
CD-ROM drive. By selecting Quick Install, you can install the necessary software
easily.
TCP/IP requires the following:
• This machine must be connected to the network through the network interface cable.
• This machine must be turned on.
3
• The TCP/IP protocol must be configured.
• An IP address must be allocated to this machine and to the computer.
Limitation
❒ If your system is Windows 2000 or Windows NT 4.0, installing a printer driv-
er by Auto Run requires Administrators permission. When you install a printer driver by Auto Run, log on using an account that has Administrators
permission.
Note
❒ Auto Run might not automatically work with certain OS settings. In this case,
launch "Setup.exe" located on the CD-ROM root directory.
If you want to cancel Auto Run, hold down the {SHIFT} key (when your system
is Windows 2000, hold down the left {SHIFT} key) while inserting the CD-ROM.
Keep the {SHIFT} key held down until the computer has finished accessing the
CD-ROM.
16
Close all applications that are running.
A
Insert the CD-ROM into the CD-ROM drive.
B
Auto Run will start the installer.
Select a language to change the interface language, and then click [OK].
C
The following languages are available: Cestina (Czech), Dansk (Danish),
Deutsh (German), English (English), Espanol (Spanish), Francais (French),
Italiano (Italian), Magyer (Hungarian), Nederlands (Dutch), Norsk (Norwegian), Polski (Polish), Portugues (Portuguese), Suomi (Finnish), Svenska
(Swedish)
Default interface language is English.
Select [Quick Install].
D
The software license agreement appears in the [License Agreement] dialog
E
box.
After reading through all of the contents, click [I accept the agreement] to agree
with the License Agreement, and then click [Next].
Page 25

Quick Install
Click to select a model name you want to use when the "Select Printer" di-
F
alog box appears.
Note
❒ For a network connection with TCP/IP, select the printer whose IP address
is displayed in [Connect To].
❒ For parallel connection, select the printer whose printer port is displayed
in [Connect To].
Click [Install].
G
Follow the instructions on the screen.
H
Note
❒ During installation in Windows 2000, the [Digital Signature Not Found] dialog
box may appear. In this case, click [Yes] to continue the installation.
A message prompting you to restart your computer may appear. To complete
the installation, restart your computer.
3
17
Page 26

Installing the Printer Driver and Software
Installing the PCL 6/5e Printer Driver
Installing the PCL 6/5e Printer Driver
Two kinds of PCL printer drivers, PCL 6 and PCL 5e, are provided with this
printer. We recommend PCL 6 as your first choice.
Limitation
❒ If your system is Windows 2000 or Windows NT 4.0, installing a printer driv-
3
er by Auto Run requires Administrators permission. When you install a printer driver by Auto Run, log on using an account that has Administrators
permission.
Important
❒ When updating the printer driver by installing the latest version, you should
uninstall that of former version if any. See “Uninstalling the Printer Driver
and Software” in Printer Reference 2.
Close all applications that are running.
A
Insert the CD-ROM into the CD-ROM drive.
B
Auto Run will starts the installer.
Select a language to change the interface language, and then click [OK].
C
The following languages are available: Cestina (Czech), Dansk (Danish),
Deutsh (German), English (English), Espanol (Spanish), Francais (French),
Italiano (Italian), Magyer (Hungarian), Nederlands (Dutch), Norsk (Norwegian), Polski (Polish), Portugues (Portuguese), Suomi (Finnish), Svenska
(Swedish)
Default interface language is English.
18
Select [PCL Printer Drivers].
D
The software license agreement appears in the [License Agreement] dialog
E
box.
After reading through all of the contents, click [I accept the agreement] to agree
with the License Agreement, and then click [Next].
Select the printer driver you want to install when the "Select Program" di-
F
alog box appears.
Follow the instructions on the screen.
G
Note
❒ During installation in Windows 2000, the [Digital Signature Not Found] dialog
box may appear. In this case, click [Yes] to continue the installation.
Page 27

Installing the PCL 6/5e Printer Driver
Setting up options
Important
❒ If the printer is equipped with certain options (e.g. the Paper Feed Unit or the
Memory Unit), you should set up the options with the printer driver.
Limitation
❒ In Windows 2000, changing the printer settings requires Manage Printers per-
mission. Members of the Administrators and Power Users groups have Manage Printers permission by default. When you set up options, log on using an
account that has Manage Printers permission.
❒ In Windows NT4.0, changing the setting of the printer requires Full Control
access permission. Members of the Administrators, Server Operators, Print
Operators, and Power Users groups have Full Control permission by default.
When you set up options, log on using an account that has Full Control permission.
Note
❒ When setting up options, you should access the Printer Properties dialog box
from Windows. You cannot set up options by accessing the Printer Properties
dialog box from an application.
Click [Start] on the taskbar, point to [Settings], and then click [Printers].
A
The [Printers] window appears.
Click to select the icon of the printer you want to use.
B
3
On the [File] menu, click [Properties].
C
The Printer Properties appear.
Click the [Accessories] tab.
D
Select options you have installed from the [Options] group.
E
Click [OK] .
F
19
Page 28

Installing the Printer Driver and Software
Installing the PostScript Printer Driver
This section describes basic instructions for installing the PostScript printer driver. The actual procedure may differ depending on the operating system. Follow
the appropriate procedures below.
Important
❒ When updating the printer driver by installing the latest version, you should
uninstall that of former version if any. See “Uninstalling the Printer Driver and
Software” in Printer Reference 2.
3
Windows 95/98/Me - Installing the PostScript Printer Driver
Installing the printer driver
Close all applications that are running.
A
Insert the CD-ROM into the CD-ROM drive.
B
Auto Run will start the installer.
Select a language to change the interface language, and then click [OK].
C
The following languages are available: Cestina (Czech), Dansk (Danish),
Deutsh (German), English (English), Espanol (Spanish), Francais (French),
Italiano (Italian), Magyer (Hungarian), Nederlands (Dutch), Norsk (Norwegian), Polski (Polish), Portugues (Portuguese), Suomi (Finnish), Svenska
(Swedish)
Default interface language is English.
20
Select [PostScript level2 Compatible Printer Driver].
D
[Add Printer Wizard] starts.
Click [Next].
E
Check [Local Printer] and then click [Next].
F
A dialog box for selecting the printer appears.
Select the printer you want to use and then click [Next].
G
Follow the instructions on the screen.
H
Page 29

Installing the PostScript Printer Driver
Setting up options
Important
❒ If the printer is equipped with certain options (e.g. the Paper Feed Unit or the
Memory Unit), you should set up the options with the printer driver.
Click [Start] on the taskbar, point to [Settings], and then click [Printers].
A
The [Printers] window appears.
Click to select the icon of the printer you want to use.
B
On the [File] menu, click [Properties].
C
The Printer Properties appear.
Click the [Accessories] tab.
D
Select options you have installed from the [Options] group.
E
Click [OK].
F
Windows 2000 - Installing the PostScript Printer Driver
Installing the printer driver
Limitation
❒ Installing a printer driver requires Administrators permission. When you in-
stall a printer driver, log on using an account that has Administrators permission.
3
Close all applications that are running.
A
Insert the CD-ROM into the CD-ROM drive.
B
Auto Run will start the installer.
Select a language to change the interface language, and then click [OK].
C
The following languages are available: Cestina (Czech), Dansk (Danish),
Deutsh (German), English (English), Espanol (Spanish), Francais (French),
Italiano (Italian), Magyer (Hungarian), Nederlands (Dutch), Norsk (Norwegian), Polski (Polish), Portugues (Portuguese), Suomi (Finnish), Svenska
(Swedish)
Default interface language is English.
Select [PostScript level2 Compatible Printer Driver].
D
[Add Printer Wizard] starts.
21
Page 30

Installing the Printer Driver and Software
Click [Next].
E
Check [Local Printer] and then click [Next].
F
A dialog box for selecting the printer port appears.
Select the check box of the port you want to use, and then click [Next].
G
A dialog box for selecting the printer appears.
Select the printer you want to use and then click [Next].
H
Follow the instructions on the screen.
I
3
Note
❒ During installation, the [Digital Signature Not Found] dialog box may appear.
In this case, click [Yes] to continue the installation.
Setting up options
Important
❒ If the printer is equipped with certain options (e.g. the Paper Feed Unit or the
Memory Unit), you should set up the options with the printer driver.
Limitation
❒ Changing the printer settings requires Manage Printers permission. Members
of the Administrators and Power Users groups have Manage Printers permission by default. When you set up options, log on using an account that has
Manage Printers permission.
22
Click [Start] on the taskbar, point to [Settings], and then click [Printers].
A
The [Printers] window appears.
Click to select the icon of the printer you want to use.
B
On the [
C
The Printer Properties appear.
Click the [Accessories] tab.
D
Click [OK].
E
] menu, click [
File
Properties
].
Page 31

Installing the PostScript Printer Driver
Windows NT 4.0 - Installing the PostScript Printer Driver
Installing the printer driver
Limitation
❒ Installing a printer driver requires Administrators permission. When you in-
stall a printer driver, log on using an account that has Administrators permission.
Important
❒ The CD-ROM containing the Windows NT Server operating system version
4.0, or the Windows NT Workstation operating system is required for installing the printer driver.
❒ We recommend that you upgrade the Windows NT 4.0 operating system to
Service Pack 4 or later before installing the printer driver. Contact your Windows retailer for more information about the latest version available.
Close all applications that are running.
A
Insert the CD-ROM into the CD-ROM drive.
B
Auto Run will start the installer.
Select a language to change the interface language, and then click [OK].
C
The following languages are available: Cestina (Czech), Dansk (Danish),
Deutsh (German), English (English), Espanol (Spanish), Francais (French),
Italiano (Italian), Magyer (Hungarian), Nederlands (Dutch), Norsk (Norwegian), Polski (Polish), Portugues (Portuguese), Suomi (Finnish), Svenska
(Swedish)
Default interface language is English.
Select [PostScript level2 Compatible Printer Driver].
D
[Add Printer Wizard] starts.
Click [Next].
E
After confirming that the [My Computer] option is selected, click [Next].
F
A dialog box for selecting the printer port appears.
3
Select the check box of the port you want to use, and then click [Next].
G
A dialog box for selecting the printer appears.
Select the printer you want to use and then click [Next].
H
Follow the instructions on the screen.
I
23
Page 32

Installing the Printer Driver and Software
Setting up options
Limitation
❒ Changing the printer settings requires Manage Printers permission. Members
of the Administrators and Power Users groups have Manage Printers permission by default. When you set up options, log on using an account that has
Manage Printers permission.
Important
❒ If the printer is equipped with certain options (e.g. the Paper Feed Unit or the
3
Memory Unit), you should set up the options with the printer driver.
Click [Start] on the taskbar, point to [Settings], and then click [Printers].
A
The [Printers] window appears.
Click to select the icon of the printer you want to use.
B
On the [File] menu, click [Properties].
C
The Printer Properties appear.
Click the [Accessories] tab.
D
Select options you have installed from the [Options] group.
E
Click [OK].
F
Using Adobe PageMaker Version 6.0 or 6.5
If you use the printer under Windows 95/98/Me, Windows 2000, Windows NT
4.0 with Adobe PageMaker, you need to copy the PPD file to the PageMaker
folder.
The PPD file is the file with extension ".ppd". It is in the folder "DRIVERS\PS\WIN9X_ME\(Language)\DISK1\" on the CD-ROM.
The [WIN9X_ME] folder, inside the [PS] folder is for the Windows 95/98/Me operating system. Use the folder at this level that is appropriate for the operating
system you are using.
The third folder, "(Language)" may be substituted by an appropriate language
name.
Copy this file to the PageMaker folder.
For PageMaker 6.0 default installation, the folder is "C:\PM6\RSRC\PPD4",
and for PageMaker 6.5 default installation, the directory is
"C:\PM65\RSRC\USENGLISH\PPD4". "USENGLISH" may differ depending
on your language selection.
Reference
For more information about the language name, see p.16 “Quick Install”.
24
Page 33

Installing the SmartNetMonitor for Client/Admin
Installing the SmartNetMonitor for Client/
Admin
Limitation
❒ If your system is Windows 2000 or Windows NT 4.0, installing software by
Auto Run requires Administrators permission. When you install a printer
driver by Auto Run, log on using an account that has Administrators permission.
Close all applications that are running.
A
Insert the CD-ROM into the CD-ROM drive.
B
Auto Run will start the installer.
Select a language to change the interface language, and then click [OK].
C
The following languages are available: Cestina (Czech), Dansk (Danish),
Deutsh (German), English (English), Espanol (Spanish), Francais (French),
Italiano (Italian), Magyer (Hungarian), Nederlands (Dutch), Norsk (Norwegian), Polski (Polish), Portugues (Portuguese), Suomi (Finnish), Svenska
(Swedish)
Default interface language is English.
Select [SmartNetMonitor for Client/Admin].
D
The software license agreement appears in the [License Agreement] dialog
E
box.
After reading through all of the contents, click [I accept the agreement] to agree
with the License Agreement, and then click [Next].
3
Select the program you want to install when the "Select Program" dialog
F
box appears.
Follow the instructions on the screen.
G
25
Page 34

Installing the Printer Driver and Software
Installing the AGFA Monotype Font
Manager 2000
Limitation
❒ If your system is Windows 2000 or Windows NT 4.0, installing software by
Auto Run requires Administrators permission. When you install a printer
driver by Auto Run, log on using an account that has Administrators permission.
Close all applications that are running.
3
A
Insert the CD-ROM into the CD-ROM drive.
B
Auto Run will start the installer.
Select a language to change the interface language, and then click [OK].
C
The following languages are available: Cestina (Czech), Dansk (Danish),
Deutsh (German), English (English), Espanol (Spanish), Francais (French),
Italiano (Italian), Magyer (Hungarian), Nederlands (Dutch), Norsk (Norwegian), Polski (Polish), Portugues (Portuguese), Suomi (Finnish), Svenska
(Swedish)
Default interface language is English.
Select [AGFA Monotype Font Manager 2000].
D
Follow the instructions on the screen.
E
26
Page 35

Macintosh
Macintosh
Macintosh - Installing the PPD File
You can use the LaserWriter printer driver that comes with a Macintosh when
printing from a Macintosh. However, if you use the LaserWriter printer driver
alone, you cannot use the printer specific functions. The printer specific functions can be used by installing the PPD file.
Note
❒ The LaserWriter printer driver for a Macintosh does not come with this print-
er. Use the appropriate printer driver that comes with the Macintosh you are
using.
❒ See the documentation that comes with the operating system for more infor-
mation about the functions of the LaserWriter 8 printer driver.
Installing the PPD File
Start the Macintosh.
A
Double-click the icon of the hard disk to open it.
B
Open the [Extensions] folder inside the [System Folder] by double-clicking it.
C
Insert the CD-ROM into the CD-ROM drive.
D
The icon of the CD-ROM appears.
Double-click the CD-ROM icon.
E
The contents of the CD-ROM are displayed.
Double-click the [Printer Descriptions] folder of the CD-ROM, and then dou-
F
ble-click the folder having the appropriate language name to open it.
Drag the PPD file for the printer and drop it into the [Printer Descriptions]
G
folder inside the [Extensions] folder on the Macintosh hard disk.
The PPD file is installed.
3
Drag the CD-ROM icon and drop it into [Trash] to eject the CD-ROM.
H
This completes PPD file installation.
27
Page 36

Installing the Printer Driver and Software
Setting up the PPD file
Preparation
Confirm that the printer is connected to an AppleTalk network before performing the following procedure.
On the Apple menu, select [Chooser].
A
Click the [LaserWriter 8] icon.
B
In the [Select a PostScript Printer] list, click to select the name of the printer
3
C
you want to use.
Click [Create].
D
Click to select the printer you want to use, and then click [Select].
E
The PPD file is set up, and the LaserWriter 8 icon appears at the left of the
printer name on the list. Next, follow the procedure on p.28 “Setting up options” to make the option settings, or close the [Chooser] dialog box.
Setting up options
On the Apple menu, select [Chooser].
A
Click the [LaserWriter 8] icon.
B
In the [Select the PostScript Printer] list, click to select the name of the printer
C
you want to use, and then click [Setup].
28
Click [Configure].
D
A list of options appears.
Select the option you want to set up and select the appropriate setting for it.
E
Note
❒ If the option you want to set up does not appear, the PPD file has not been
set up correctly. Check the name of the PPD file shown in the dialog box.
Click [OK].
F
The list of options closes.
Click [OK].
G
The [Chooser] dialog box appears.
Close the [Chooser] dialog box.
H
Page 37

INDEX
10BASE-T/100BASE-TX
A
AGFA Monotype Font Manager 2000, 3
C
Cancel key, 5
Control Panel
, 5
D
Display panel, 5
G
Gateway Address, 14
I
Indicators, 5
J
Job Reset key, 5
M
Macintosh
PostScript, installing
setting up options
N
Network Connections
Network Interface Cable
Number keys
, 5
O
Online and Offline, 6
Online/Offline key
Operation switch
options, setting up
Macintosh, 28
Windows 2000
Windows 95/98/Me
Windows NT 4.0
, 5
, 5
, 22
,
, 28
,
,
24
,
,
9
, 10
21
8
27
P
PageMaker 6.0 or 6.5, 24
Panel Display
Parallel Cable
Parallel Port
PCL 5e
, 2
,
PCL 6
PostScript
Macintosh, installing
Windows 2000, installing
Windows 95/98/Me, installing
Windows NT 4.0, installing
PostScript printer driver, installing
PPD
, 27, 28
printer driver
Printer Mode key
2
, 8
, 2, 3
,
6
,
, 9, 12
2
, 5
, 27
, 21
Q
Quick Install, 16
S
SmartNetMonitor for Admin, 3
SmartNetMonitor for Client
Subnet Mask
, 14
, 3
U
User Tools/Counter key, 5
W
Windows 2000
PostScript, installing
setting up options
Windows 95/98/Me
PostScript, installing
setting up options
Windows NT 4.0
PostScript, installing
setting up options
, 22
, 21
, 24
21
,
, 20
, 23
, 20
, 23
, 20
29
Page 38

MEMO
30 UE USA B441
Page 39

Manuals for This Machine
Manuals for This Machine
There are ten manuals that separately describe the operational procedures for
the operation and maintenance of the machine.
To enhance safe and efficient operation of the machine, all users should read and
follow the instructions contained in the following manuals.
❖❖❖❖ Copy Reference
Describes the procedures and functions for using this machine as a copier.
❖❖❖❖ System Settings
Describes the system settings of this machine.
❖❖❖❖ Facsimile Reference <Basic Features>
Describes the procedures and most frequently used functions for using this
machine as a facsimile.
❖❖❖❖ Facsimile Reference <Advanced Features>
Describes the procedures and more advanced functions for using this machine as a facsimile. And also explains settings for key operators.
❖❖❖❖ Printer Reference 1
Describes the system settings, procedures and functions for using this machine as a printer.
❖❖❖❖ Printer Reference 2
Describes the procedures and provides necessary information about using
this machine as a printer. This manual is provided as a PDF file on the CDROM labeled “Operating Instructions for Printer”. (this manual)
❖❖❖❖ Network Interface Board Quick Configuration Guide
Describes the procedures and provides necessary information about setting up
and using the printer under the network environment. This manual is provided
as a PDF file on the CD-ROM labeled “Operating Instructions for Printer”.
❖❖❖❖ Type 1018 PostScript level2 Compatible Kit Operating Instructions Supplement
Describes the functions of Printer Utility for Mac. This manual is provided as
a PDF file on the CD-ROM labeled “Operating Instructions for Printer”.
❖❖❖❖ UNIX Supplement
Provides information about setting up and using the printer in a UNIX environment. This manual is provided as a PDF file on the CD-ROM labeled “Operating Instructions for Printer”.
❖❖❖❖ Network Interface Board Type 1018 Owner's Manual
Describes the procedures and provides necessary information about setting
up and using the printer under the network environment. This manual is provided as a PDF file on the CD-ROM labeled “Print Server Software and Documentation” which comes with optional Network Interface Board Type 1018.
i
Page 40

How to Read This Manual
R
R
Symbols
In this manual, the following symbols are used:
WARNING:
This symbol indicates a potentially hazardous situation which, if instructions
are not followed, could result in death or serious injury.
CAUTION:
This symbol indicates a potentially hazardous situation which, if instructions
are not followed, may result in minor or moderate injury or damage to property.
* The statements above are notes for your safety.
Important
If this instruction is not followed, paper might be misfed, originals might be
damaged, or data might be lost. Be sure to read this.
Preparation
This symbol indicates the prior knowledge or preparations required before operating.
Note
This symbol indicates precautions for operation, or actions to take after misoperation.
Limitation
This symbol indicates numerical limits, functions that cannot be used together,
or conditions in which a particular function cannot be used.
Reference
This symbol indicates a reference.
[]
Keys that appear on the machine's panel display.
Keys and buttons that appear on the computer's display.
{}
Keys built into the machine's control panel.
Keys on the computer's keyboard.
ii
Page 41

TABLE OF CONTENTS
1.Setting Up the Printer Driver and Canceling a Print Job
PCL 6/5e - Accessing the Printer Properties ........................................... 1
Windows 95/98/Me - Accessing the Printer Properties .................................. 1
Windows 2000 - Accessing the Printer Properties ......................................... 2
Windows NT 4.0 - Accessing the Printer Properties ...................................... 4
PostScript - Setting Up for Printing.......................................................... 6
Windows 95/98/Me - Accessing the Printer Properties .................................. 6
Windows 2000 - Accessing the Printer Properties ......................................... 7
Windows NT 4.0 - Accessing the Printer Properties ...................................... 9
Macintosh - Setting Up for Printing .............................................................. 10
Canceling a Print Job............................................................................... 12
Windows 95/98/Me, Windows 2000, Windows NT 4.0 - Canceling a Print Job ...12
Macintosh - Canceling a Print Job ............................................................... 13
2.Uninstalling the Printer Driver and Software
Uninstalling the PCL 6/5e Printer Driver ................................................ 15
Windows 95/98/Me - Uninstalling the PCL 6/5e Printer Driver..................... 15
Windows 2000 - Uninstalling the PCL 6/5e Printer Driver............................ 15
Windows NT 4.0 - Uninstalling the PCL 6/5e Printer Driver......................... 16
Uninstalling the PostScript Printer Driver.............................................. 17
Windows 95/98/Me - Uninstalling the PostScript Printer Driver ................... 17
Windows 2000 - Uninstalling the PostScript Printer Driver .......................... 17
Windows NT 4.0 - Uninstalling the PostScript Printer Driver ....................... 18
Macintosh - Uninstalling the PostScript Printer Driver ................................. 18
3.Troubleshooting
Error & Status Messages on the Control Panel..................................... 19
Machine Does Not Print ........................................................................... 21
Other Printing Problems.......................................................................... 22
iii
Page 42

4.Using the Control Panel
Adjusting Printer Features ...................................................................... 24
Printer Features Menu ................................................................................. 24
Printer Features Parameters ................................................................... 27
Job Control Menu......................................................................................... 27
Network Setup Menu.................................................................................... 34
Maintenance Menu....................................................................................... 35
List Print Menu ............................................................................................. 37
Adjusting System Settings...................................................................... 40
Accessing the System Settings.................................................................... 40
System Settings Parameters........................................................................ 41
5.Appendix
Specifications ........................................................................................... 43
Options......................................................................................................... 44
INDEX......................................................................................................... 45
iv
Page 43

1. Setting Up the Printer Driver
and Canceling a Print Job
PCL 6/5e - Accessing the Printer Properties
Windows 95/98/Me - Accessing the Printer Properties
Changing the default printer settings
Click [Start] on the taskbar, point to [Settings], and then click [Printers].
A
The [Printers] window appears.
Click to select the icon of the printer whose default settings you want to
B
change.
On the [File] menu, click [Properties].
C
The Printer Properties appear.
Make any settings you require and click [Apply].
D
Note
❒ With some applications, the printer driver's settings are not used, and the
application's own default settings are applied.
Click [OK].
E
Making printer settings from an application
To make the printer settings for a specific application, open the Printer Properties dialog box from that application. The following example describes how to
make settings for the WordPad application that comes with Windows 95/98/
Me.
Note
❒ The actual procedure you should follow to open the Printer Properties dialog
box may differ depending on the application. For more information, see the
documentation that comes with the application you are using.
❒ Any settings you make in the following procedure are valid for the current
application only.
On the [File] menu, click [Print].
A
The [Print] dialog box appears.
1
Page 44

Setting Up the Printer Driver and Canceling a Print Job
Select the printer you want to use in the [Name] list box, and then click [Prop-
B
erties].
The Printer Properties appear.
Make any settings you require and click [Apply].
1
C
Click [OK] to start printing.
D
Windows 2000 - Accessing the Printer Properties
Changing the default printer settings - Printer Properties
Limitation
❒ Changing the setting of the printer requires Manage Printers permission.
Members of the Administrators and Power Users groups have Manage Printers permission by default. When you set up options, log on using an account
that has Manage Printers permission.
Click [Start] on the taskbar, point to [Settings], and then click [Printers].
A
The [Printers] window appears.
Click to select the icon of the printer whose default settings you want to
B
change.
On the [File] menu, click [Properties].
C
The Printer Properties appear.
Make any settings you require and click [Apply].
D
Note
❒ Settings you make here are used as the default settings for all applications.
Click [OK].
E
Changing the default printer settings - Printing Preferences Properties
Limitation
❒ Changing the setting of the printer requires Manage Printers permission.
Members of the Administrators and Power Users groups have Manage Printers permission by default. When you set up options, log on using an account
that has Manage Printers permission.
Click [Start] on the taskbar, point to [Settings], and then click [Printers].
A
The [Printers] window appears.
2
Page 45

PCL 6/5e - Accessing the Printer Properties
Click to select the icon of the printer whose default settings you want to
B
change.
On the [File] menu, click [Printing Preferences...].
C
The Printing Preferences Properties appear.
Make any settings you require and click [Apply].
D
Note
❒ Settings you make here are used as the default settings for all applications.
Click [OK].
E
Making printer settings from an application
To make the printer settings for a specific application, open the [Print] dialog box
from that application. The following example describes how to make settings for
the WordPad application that comes with Windows 2000.
Note
❒ The actual procedures you should follow to open the [Print] dialog box may
differ depending on the application. For more information, see the documentation that comes with the application you are using.
❒ Any settings you make in the following procedure are valid for the current
application only.
On the [File] menu, click [Print...].
A
The [Print] dialog box appears.
1
Select the printer you want to use in the [Select Printer] box.
B
Make any settings you require and click [Apply].
C
Click [Print] to start printing.
D
3
Page 46

Setting Up the Printer Driver and Canceling a Print Job
Windows NT 4.0 - Accessing the Printer Properties
1
Changing the default printer settings - Printer Properties
Limitation
❒ Changing the setting of the printer requires Full Control access permission.
Members of Administrators, Server Operators, Print Operators, and Power
Users groups have Full Control permission by default. When you set up options, log on using an account that has Full Control permission.
Click [Start] on the taskbar, point to [Settings], and then click [Printers].
A
The [Printers] window appears.
Click to select the icon of the printer whose default settings you want to
B
change.
On the [File] menu, click [Properties].
C
The Printer Properties appear.
Make any settings you require and click [OK].
D
Note
❒ Settings you make here are used as the default settings for all applications.
Changing the default printer settings - Default Document Properties
Limitation
❒ Changing the setting of the printer requires Full Control access permission.
Members of the Administrators, Server Operators, Print Operators, and Power Users groups have Full Control permission by default. When you set up
options, log on using an account that has Full Control permission.
Click [Start] on the taskbar, point to [Settings], and then click [Printers].
A
The [Printers] window appears.
Click to select the icon of the printer whose default settings you want to
B
change.
On the [File] menu, click [Document Defaults...].
C
The Default Document Properties appear.
Make any settings you require and click [OK].
D
Note
❒ Settings you make here are used as the default settings for all applications.
4
Page 47

PCL 6/5e - Accessing the Printer Properties
Making printer settings from an application
To make the printer settings for a specific application, open the Printer Properties dialog box from that application. The following example describes how to
make settings for the WordPad application that comes with Windows NT 4.0.
Note
❒ The actual procedure you should follow to open the Printer Properties dialog
box may differ depending on the application. For more information, see the
documentation that comes with the application you are using.
❒ Any settings you make in the following procedure are valid for the current
application only.
On the [File] menu, click [Print...].
A
The [Print] dialog box appears.
Select the printer you want to use in the [Name] list box, and then click [Prop-
B
erties].
The Printer Properties appear.
Make any settings you require and click [OK].
C
Click [OK] to start printing.
D
1
5
Page 48

Setting Up the Printer Driver and Canceling a Print Job
PostScript - Setting Up for Printing
1
Windows 95/98/Me - Accessing the Printer Properties
Changing the default printer settings
To make the Printer default settings, first open the Printer Properties dialog box
from the [Printers]window.
Note
❒ With some applications, the printer driver's settings are not used, and the ap-
plication's own default settings are applied.
Click [Start] on the taskbar, point to [Settings], and then click [Printers].
A
The [Printers] window appears.
Click to select the icon of the printer whose default settings you want to
B
change.
On the [File] menu, click [Properties].
C
The Printer Properties appear.
Make any settings you require and click [Apply].
D
Click [OK].
E
Making printer settings from an application
To make the printer settings for a specific application, open the Printer Properties dialog box from that application. The following example describes how to
make settings for the WordPad application that comes with Windows 95/98/
Me.
Note
❒ The actual procedure you should follow to open the Printer Properties dialog
box may differ depending on the application. For more information, see the
documentation that comes with the application you are using.
❒ With some applications, the printer driver's settings are not used, and the ap-
plication's own default settings are applied.
❒ Any settings you make in the following procedure are valid for the current
application only.
On the [File] menu, click [Print].
A
The [Print] dialog box appears.
6
Page 49

PostScript - Setting Up for Printing
Select the printer you want to use in the [Name] list box, and then click [Prop-
B
erties].
The Printer Properties appear.
Make any settings you require and click [Apply].
C
Click [OK] to start printing.
D
Windows 2000 - Accessing the Printer Properties
Changing the default printer settings - Printer Properties
Limitation
❒ Changing the setting of the printer requires Manage Printers permission.
Members of the Administrators and Power Users groups have Manage Printers permission by default. When you set up options, log on using an account
that has Manage Printers permission.
Click [Start] on the taskbar, point to [Settings], and then click [Printers].
A
The [Printers] window appears.
Click to select the icon of the printer whose default settings you want to
B
change.
On the [File] menu, click [Properties].
C
The Printer Properties appear.
1
Make any settings you require and click [Apply].
D
Note
❒ Settings you make here are used as the default settings for all applications.
Click [OK].
E
Changing the default printer settings - Printing Preferences Properties
Limitation
❒ Changing the setting of the printer requires Manage Printers permission.
Members of the Administrators and Power Users groups have Manage Printers permission by default. When you set up options, log on using an account
that has Manage Printers permission.
Click [Start] on the taskbar, point to [Settings], and then click [Printers].
A
The [Printers] window appears.
7
Page 50

Setting Up the Printer Driver and Canceling a Print Job
Click to select the icon of the printer whose default settings you want to
B
change.
On the [File] menu, click [Printing Preferences...].
C
1
The Printing Preferences Properties appear.
Make any settings you require and click [Apply].
D
Note
❒ Settings you make here are used as the default settings for all applications.
Click [OK].
E
Making printer settings from an application
To make the printer settings for a specific application, open the [Print] dialog box
from that application. The following example describes how to make settings for
the WordPad application that comes with Windows 2000.
Note
❒ The actual procedures you should follow to open the [Print] dialog box may
differ depending on the application. For more information, see the documentation that comes with the application you are using.
❒ Any settings you make in the following procedure are valid for the current
application only.
On the [File] menu, click [Print...].
A
The [Print] dialog box appears.
Select the printer you want to use in the [Select Printer] box.
B
Make any settings you require and click [Apply].
C
Click [OK] to start printing.
D
8
Page 51

PostScript - Setting Up for Printing
Windows NT 4.0 - Accessing the Printer Properties
Changing the default printer settings - Printer Properties
Limitation
❒ Changing the setting of the printer requires Full Control access permission.
Members of Administrators, Server Operators, Print Operators, and Power
Users groups have Full Control permission by default. When you set up options, log on using an account that has Full Control permission.
Click [Start] on the taskbar, point to [Settings], and then click [Printers].
A
The [Printers] window appears .
Click to select the icon of the printer whose default settings you want to
B
change.
On the [File] menu, click [Properties].
C
The Printer Properties appear.
Make any settings you require and click [OK].
D
Note
❒ Settings you make here are used as the default settings for all applications.
Changing the default printer settings - Default Document Properties
Limitation
❒ Changing the setting of the printer requires Full Control access permission.
Members of the Administrators, Server Operators, Print Operators, and Power Users groups have Full Control permission by default. When you set up
options, log on using an account that has Full Control permission.
1
Click [Start] on the taskbar, point to [Settings], and then click [Printers].
A
The [Printers] window appears.
Click to select the icon of the printer you want to use.
B
On the [File] menu, click [Document Defaults...].
C
The Default Document Properties appear.
Make any settings you require and click [OK].
D
Note
❒ Settings you make here are used as the default settings for all applications.
9
Page 52

Setting Up the Printer Driver and Canceling a Print Job
Making printer settings from an application
To make the printer settings for a specific application, open the Printer Properties dialog box from that application. The following example describes how to
1
make settings for the WordPad application that comes with Windows NT 4.0.
Note
❒ The actual procedure you should follow to open the Printer Properties dialog
box may differ depending on the application. For more information, see the
documentation that comes with the application you are using.
❒ Any settings you make in the following procedure are valid for the current
application only.
On the [File] menu, click [Print].
A
The [Print] dialog box appears.
Select the printer you want to use in the [Name] list box, and then click [Prop-
B
erties].
The Printer Properties appear.
Make any settings you require and click [OK].
C
Click [OK] to start printing.
D
Macintosh - Setting Up for Printing
Making paper settings from an application
Open the file you want to print.
A
On the [File] menu, click [Page Setup].
B
The [LaserWriter 8 Page Setup] dialog box appears.
Confirm that the printer you want to use is shown in [Format for:] box.
C
Then, use [Paper] to select the paper size you want to use.
Note
❒ If the printer is not shown in the [Format for:] box, use the pop-up menu to
display a list of available printers.
Reference
The actual appearance of the [Page Setup] dialog box depends on the appli-
cation you are using. See the documentation that comes with the Macintosh for more information.
After configuring the settings, click [OK].
D
10
Page 53

Setting up for printing from an application
Open the file you want to print.
A
PostScript - Setting Up for Printing
On the [File] menu, click [Print].
B
The [Printer] dialog box appears.
Confirm that the printer is selected in the [Printer :] box, and make the print-
C
er settings.
After configuring the settings, click [Print] .
D
1
11
Page 54

Setting Up the Printer Driver and Canceling a Print Job
Canceling a Print Job
1
Windows 95/98/Me, Windows 2000, Windows NT 4.0 - Canceling a
Print Job
Double-click the printer icon on the Windows taskbar.
A
A window appears, showing all the print jobs that are currently queuing to
be printed. Check the current status of the job you want to cancel.
Select the name of the job you want to cancel.
B
On the [Document] menu, click [Cancel].
C
Note
❒ You can also open the print job queue window by double-clicking the
printer icon in the [Printers] window.
Press {Job Reset} on the control panel.
D
The message appears on the panel display indicating that the print job is being canceled.
12
Important
❒ This procedure cancels the print job that is being processed by the printer.
In some cases, the printer may already be processing data for the next print
job following the one currently being output. In this case, the next print job
is also canceled when you press {Job Reset}.
❒ When the printer is being shared by multiple computers, be careful not to
accidentally cancel someone else's print job.
Note
❒ You cannot stop printing data that has already been processed internally
by the printer. Because of this, printing may continue for a few pages after
you press {Job Reset}.
❒ A print job that contains a large volume of data may take considerable time
to stop.
Page 55

Canceling a Print Job
Macintosh - Canceling a Print Job
Double-click the printer's icon on the desktop.
A
A window appears, showing all the print jobs that are currently queuing to
be printed. Check the current status of the job you want to cancel.
Select the name of the job you want to cancel.
B
Click the pause icon, and then click the trash icon.
C
Press {Job Reset} on the control panel.
D
The message appears on the panel display indicating that the print job is being canceled.
Important
❒ This procedure cancels the print job that is being processed by the printer.
In some case, the printer may already be processing data for the next print
job following the one currently being output. In this case, the next print job
is also canceled when you press {Job Reset}.
❒ When the printer is being shared by multiple computers, be careful not to
accidentally cancel someone else's print job.
1
Note
❒ You cannot stop printing data that has already been processed internally
by the printer. Because of this, printing may continue for a few pages after
you press {Job Reset}.
❒ A print job that contains a large volume of data may take considerable time
to stop.
13
Page 56

Setting Up the Printer Driver and Canceling a Print Job
1
14
Page 57

2. Uninstalling the Printer
Driver and Software
Uninstalling the PCL 6/5e Printer Driver
This section describes how to uninstall the printer driver. The actual procedure
may differ depending on the operating system.
Follow one of the appropriate procedures below.
Windows 95/98/Me - Uninstalling the PCL 6/5e Printer Driver
Close all applications that are currently running.
A
Click [Start] on the taskbar, point to [Settings], and then click [Printers].
B
The [Printers] window appears.
Click to select the icon of the printer you want to remove.
C
On the [File] menu, click [Delete].
D
A confirmation dialog box appears.
Click [Yes] to uninstall the printer driver.
E
Windows 2000 - Uninstalling the PCL 6/5e Printer Driver
Limitation
❒ Uninstalling a printer driver requires Manage Printers permission. Members
of the Administrators and Power Users groups have Manage Printers permission by default. When you uninstall a printer driver, log on using an account
that has Manage Printers permission.
Close all applications that are currently running.
A
Click [Start] on the taskbar, point to [Settings], and then click [Printers].
B
The [Printers] window appears.
Click to select the icon of the printer you want to remove.
C
On the [File] menu, click [Delete].
D
A confirmation dialog box appears.
Click [Yes] to uninstall the printer driver.
E
15
Page 58

Uninstalling the Printer Driver and Software
Windows NT 4.0 - Uninstalling the PCL 6/5e Printer Driver
Limitation
❒ Uninstalling a printer driver requires Full Control access permission. Mem-
bers of the Administrators, Server Operators, Print Operators, and Power Users groups have Full Control Permission by default. When you install a
2
printer driver, log on using an account that has Full Control permission.
Close all applications that are currently running.
A
Click [Start] on the taskbar, point to [Settings], and then click [Printers].
B
The [Printers] window appears.
Click to select the icon of the printer you want to remove.
C
On the [File] menu, click [Delete].
D
A confirmation dialog box appears.
Click [Yes] to uninstall the printer driver.
E
16
Page 59

Uninstalling the PostScript Printer Driver
Uninstalling the PostScript Printer Driver
This section describes how to uninstall the PostScript printer driver.
The actual procedure may differ depending on the operating system.
Follow one of the appropriate procedures below.
Windows 95/98/Me - Uninstalling the PostScript Printer Driver
A Close all applications that are currently running.
Click [Start] on the taskbar, point to [Settings], and then click [Printers].
B
The [Printers] window appears.
Click to select the icon of the printer you want to remove.
C
On the [File] menu, click [Delete].
D
A confirmation dialog box appears.
Click [Yes] to uninstall the printer driver.
E
Windows 2000 - Uninstalling the PostScript Printer Driver
Limitation
❒ Uninstalling a printer driver requires Manage Printers permission. Members
of the Administrators and Power Users groups have Manage Printers permission by default. When you uninstall a printer driver, log on using an account
that has Manage Printers permission.
Close all applications that are currently running.
A
Click [Start] on the taskbar, point to [Settings], and then click [Printers].
B
The [Printers] window appears.
Click to select the icon of the printer you want to remove.
C
2
On the [File] menu, click [Delete].
D
A confirmation dialog box appears.
Click [Yes] to uninstall the printer driver.
E
17
Page 60

Uninstalling the Printer Driver and Software
Windows NT 4.0 - Uninstalling the PostScript Printer Driver
Limitation
❒ Uninstalling a printer driver requires Full Control access permission. Mem-
bers of the Administrators, Server Operators, Print Operators, and Power Users groups have Full Control Permission by default. When you uninstall a
2
printer driver, log on using an account that has Full Control permission.
Close all applications that are currently running.
A
Click [Start] on the taskbar, point to [Settings], and then click [Printers].
B
The [Printers] window appears.
Click to select the icon of the printer you want to remove.
C
On the [File] menu, click [Delete].
D
A confirmation dialog box appears.
Click [Yes] to uninstall the printer driver.
E
Macintosh - Uninstalling the PostScript Printer Driver
Delete the “PPD” file inside the [Printer Description] folder in the [Extensions]
A
folder in [System Folder].
18
Page 61

3. Troubleshooting
Error & Status Messages on the Control
Panel
Messages/Second messages Description Solution
Add Toner
Open Front Cover and
/Follow Instructions to
Replace it
Clear Misfeed(s)
/Follow instructions in
Front Cover
Close Front/Right Cover The front or right cover is open. Close the front or right cover.
Load Bypass Tray
[Paper Size]
Load Paper
[Paper Size]
Load Tray #
[Paper Size]
Memory Overflow
Job Incomplete
Memory Full
Job Incomplete
Printing... The printer is printing. Wait for a while.
Print Overrun
Job Incomplete
Toner is running out. It is time to supply toner.
There is misfeed at the front
cover.
There is no paper left in the
Bypass Tray.
The paper size setting on the
tray differs from that of printer driver.
There is no paper left in this
tray.
A memory overflow has occurred.
A memory full has occurred. Add memory to the printer.
A print overrun occurred on a
file being printed. Only a part
of the data on the page will be
printed, and the print job is
suspended, or the current
print job has been canceled.
Remove the misfed paper following the instructions inside
the front cover.
Load paper into the Bypass
Tray.
Load paper that matches the
paper size settings. Printing
will not automatically resume
if the paper size and orientation settings are incorrect.
Load paper into the tray indicated.
Add memory to the printer.
To print the image correctly,
add memory to the printer or
simplify the actual data size.
Set "Page Protect" to "On" on
the printer driver. Be sure to
return "Page Protect" to "Auto" after the print job. With
"Page Protect" "On", the printer performance might be decreased. While using the
PostScript printer driver, lower the resolution setting.
19
Page 62

Troubleshooting
Messages/Second messages Description Solution
Processing... The printer is processing in-
Ready The printer is online and
Resetting Job... The print job is being reset. Wait for a while.
Toner is Almost Empty Toner is almost running out. Replace the toner early to pre-
Waiting... The printer is waiting for the
3
Warming Up... The printer is warming up or
ternally.
ready to print.
next print job.
toner is being supplied.
Wait for a while.
If you want to set the printer
offline, press {Online}.
vent poor print quality.
Wait for a while.
Wait until the panel display
changes to "Ready".
20
Page 63

Machine Does Not Print
Machine Does Not Print
Possible Cause Solutions
Is the power on? Turn on the machine.
Is the interface cable properly connected? Connect the interface cable properly.
If there are any connectors or screws, make
sure that they are fastened securely.
Are you using the correct interface cable? Be sure to use the correct one. If the cable is
Did you connect the interface cable after turning on the main switch?
Is the machine Online? Make it Online by touching the [Online] key.
Is the specified paper set? Set the specified paper in any of the input
Are there any error messages on the panel display?
Does the indicator above the Printer Mode key
stay red?
Is the Data-in Indicator blinking or lit? If not, the data does not reach the machine.
Can you print a configuration page? If you cannot, check the printer cable connec-
Can you make a "Print Test Page" from the
printer driver?
damaged or worn, replace it with a new one.
Be sure to connect the interface cable before
turning on the main switch.
trays.
Check the error message, and take the required
action.
Check the error message, and take the required
action.
Check the printer cable connection.
Also confirm that the printer port settings are
correct.
tion.
Also confirm that the printer port settings are
correct.
If you cannot, the machine might be out of order.
Contact your sales or service representative.
3
21
Page 64

Troubleshooting
Other Printing Problems
Problem Action
An image is printed on the reverse side of the
paper.
Multiple pages are fed through the printer at
once.
Paper misfeeds occur frequently. Check the paper size settings. Use the recom-
3
An control panel error message stays on after
removing the misfed paper.
It takes a long time for the printer to start
printing.
It takes too much time to complete the print job. The data is so large or complex that it takes
Windows 95/98/Me, 2000, NT 4.0 :
The computer does not recognize the installed
printer options.
No image is printed when loading paper on
the bypass tray.
Set the paper upside down.
Remove all the paper from the tray and fan
them gently.
mended paper. Avoid using curled, folded or
wrinkled paper, perforated paper, or glossy
paper.
A paper misfeed message will remain until the
front cover is opened and then closed. Open
the front cover and close it.
The machine might be in Energy Saver mode
or Low Power mode, which requires more
time for warming up and resuming the print
job.
time to process it.
If the Data In indicator is blinking, the data
processing is being done.
Just wait until it is finished.
If the printer is not connected to a network,
specify which options you have installed using the printer driver.
See the HELP file of the printer driver.
The machine operates the function that forces
to feed the paper in three minutes after you
load the paper on the bypass tray. Load the paper on the bypass tray again.
22
Page 65

4. Using the Control Panel
Though the factory default settings of the printer are suitable for most printing
jobs, the "Printer Features" gives you access to a number of settings that control
basic printer operations. "Printer Features" settings you make are retained even
when you turn off the printer.
Reference
For more information about the copy features and their system settings, see
the "Copy Reference" and the "System Settings" manuals.
Note
❒ Some of the settings accessed by the printer driver can be accessed by the
“Printer Features”. Settings made by the printer driver take priority over settings by the“Printer Features”.
23
Page 66

Using the Control Panel
Adjusting Printer Features
Printer Features Menu
There are four menu items in the "Printer Features" menu.
• Job Control
• Network Setup
• Maintenance
• List Print
You can select functions in the following table.
4
Category Function menu
Job Control
⇒ p.27
Paper Input Tray Priority
Print Quality Edge Smoothing
System Print PS Errors
PCL Menu Orientation
Tray Locking
Bypass Paper
Size
Resolution PCL
Toner Saving
I/O Timeout
I/O Buffer
Page Protect
Auto Continue
Sub Paper Size
Form Lines
Font Source
Font Number
Point Size
Font Pitch
Symbol Set
Standard Size
Custom Size
PS
24
Page 67

Category Function menu
Network Setup
*1
⇒ p.34
Maintenance
⇒ p.35
List Print
⇒ p.37
*1
Optional Network Interface Board is required.
*2
Optional PostScript level2 Compatible Kit is required.
IP Address
Subnet Mask
Gateway Address
Restart Printer
Menu Reset
Hex Dump
Configuration Page
Menu List
PCL Font List
PS Font List
*2
Accessing the Printer Features Menu
Press {User Tools/Counter}.
Adjusting Printer Features
4
ABC DEF
JKL
MNO
GHI
Press the 0 or 1key to display “5.Printer Features”, then press {OK}.
The following screen appears on the panel display.
Press the 0 or 1key to display the following four items one by one.
• Job Control
• Network Setup
• Maintenance
•List Print
25
Page 68

Using the Control Panel
Note
❒ 1 key : Press to go to the next menu.
❒ 0 key : Press to go back to the previous menu
❒ After making the printer settings, be sure to return to the previous menu by
pressing {Cancel}.
4
❒ After making the printer settings, press {User Tools/Counter} to return to the
initial display.
ABC DEF
JKL
MNO
GHI
❒ The revised settings are not canceled even if the power switch is turned off.
26
Page 69

Printer Features Parameters
Job Control Menu
There are four menu items in the “Job Control” menu.
• Paper Input
• Print Quality
•System
• PCL Menu
Printer Features Parameters
Job Control Parameters
❖❖❖❖ Paper Input
Menu Description
Tray Priority When no tray or paper size is selected for a print job, the tray se-
Tray Locking If you use different kinds of paper, you can lock a tray to prevent
lected here is used.
Tray 1, Tray 2
Note
❒ Default: Tray 1
❒ Only the installed trays appear on the panel display.
❒ It is recommended that you load paper having the size and di-
rection you frequently use in the tray selected with “Tray Priority”.
printing on wrong paper such as letterhead or colored paper.
When “Auto Select” is selected in the Paper Source selections
from the printer driver, the locked tray will not be used.
Tray 1, Tray 2, None
Note
❒ Default:
❒ This menu is invalid if the optional tray is not installed.
❒ If you want to use the locked tray, you must select the tray
❒ When a locked tray is selected from the printer driver, the
None
from the printer driver.
printer does not search for any other tray.
4
27
Page 70

Using the Control Panel
Menu Description
Bypa ss P ap er S ize You can speci fy th e paper siz e, stan dar d or cust om, for the bypa ss
tray.
When the bypass paper size is not specified, the paper size you set
on the control panel is used.
If you use PCL 6 or PS2 printer driver to print custom paper size,
the paper size you set in the printer driver is used.
If you use PCL 5e printer driver to print custom paper size, paper
size you set on the control panel is used.
If the Bypass Tray can hold paper of either the short edge feed size
or the long edge feed size, use the short edge feed size.
Note
❒ Specifications of bypass tray depends on the machine. Con-
4
firm which type of machine you have. See the Copy Reference.
❖❖❖❖ Print Quality
Menu Description
Edge Smoothing You can set whether to enable Edge Smoothing.
•On
•Off
Note
❒ Default: On
❒ If “Toner Saving” is “On”, “EdgeSmoothing” is ignored even
if it is “On”.
❒ The setting in the printer driver takes priority of the setting on
control panel.
Resolution You can set the print resolution in dots per inch.
28
❖❖❖❖ PCL
300 dpi, 600 dpi
❖❖❖❖ PS
300 dpi, 600 dpi
Note
❒ Default: 600 dpi
❒ The setting in the printer driver takes priority of the setting on
control panel.
Page 71

Printer Features Parameters
Menu Description
Toner Saving You can select whether to enable Toner Saving.
•Off
•On
Note
❒ Default: Off
❒ If “Toner Saving” is “On”, “EdgeSmoothing” is ignored even
if it is “On”.
❒ The setting in the printer driver takes priority of the setting on
control panel.
❖❖❖❖ System
Menu Description
I/O Timeout You can set how many seconds the printer should wait before
ending a print job. If data from other port often appears in the
middle of the print job, you should increase the timeout value.
15 seconds, 30 seconds, 60 seconds, 180 seconds, 300 seconds
Note
❒ Default: 30 seconds
I/O Buffer You can set the size of the I/O Buffer. Normally it is not necessary
to change this setting.
16 KB, 32 KB, 64 KB, 128 KB, 256 KB, 512 KB
Note
❒ Default: 32 KB
Print PS Errors You can set whether the PS error sheet should be printed out.
•Off
•On
Note
❒ Default: Off
Page Protect When the "Print Overrun. Job Incomplete.” message appears on
the panel display, set this function to "On”.
•Auto
•On
Note
❒ Be sure to return “Page Protect”to “Auto” after the print job.
With “Page Protect” “On”, the printer performance might be
decreased.
❒ Default: Auto
❒ The setting in the printer driver takes priority of the setting on
control panel.
4
29
Page 72

Using the Control Panel
Menu Description
Auto Continue You can set whether to enable Auto Continue. When it is set to
“On”, the printing continues even if the following error messages
appear on the display.
“Print Overrun. Job Incomplete.”, “Memory Overflow. Job Incomplete.”, “Memory Full. Job Incomplete.”
•Off
•On
Note
❒ When it is “On”, and a certain type of error occurs, the current
job might be canceled, and the printer automatically resumes
the next job.
❒ Default: Off
4
Sub Paper Size You can enable the Auto Substitute Paper Size feature between A4
and letter size. When you select "On", the printer substitutes A4
↔ letter size if the paper currently specified is not loaded.
•Off
•On
Note
❒ Default: Off
❖❖❖❖ PCL Menu
Menu Description
Orientation You can set the page orientation.
• Portrait
• Landscape
Note
❒ Default: Portrait
Form Lines You can set the number of lines per page.
5-128
Note
❒ Default: 64 (Metric version), 60 (Inch version)
Font Source You can set the location of the default font.
• Internal
• Download
Note
❒ Default: Internal
❒ When you select "Download", you can select only fonts down-
loaded to printer RAM.
30
Page 73

Printer Features Parameters
Menu Description
Font Number You can set the ID of the default font you want to use.
• 0 to 54 (for Internal)
• 1 to 50 (for Download source)
Note
❒ Default: Internal
❒ Default: 0
Point Size You can set the point size you want to use for the default font.
4 to 999.75 by 0.25
Note
❒ Default: 12.00
❒ This setting is effective only for a variable-space font.
Font Pitch You can set the number of characters per inch you want to use for
the default font.
0.44 to 99.99 by 0.01
Note
❒ Default: 10.00
❒ This setting is effective only for a fixed-space font.
Symbol Set You can specify the set of print characters for the default font. The
available options are as follows.
Roman-8, ISO L1, ISO L2, ISO L5, PC-8, PC-8 D/N, PC-850, PC852, PC8-TK, Win L1, Win L2, Win L5, Desktop, VN Intl, VN US,
MS Publ, Math-8, VN Math, Pifont, Legal, ISO 4, ISO 6, ISO 11,
ISO 15, ISO 17, ISO 21, ISO 60, ISO 69, Win 3.0
Note
❒ Default: Roman-8
4
31
Page 74

Using the Control Panel
Changing the Paper Input Menu
The following procedure describes changing the “Tray Priority” as an example
in the “Paper Input”menu.
Press {User Tools/Counter}.
A
ABC DEF
4
JKL
MNO
GHI
Press the 0 or 1key until the following message appears on the panel dis-
B
play.
Press {OK}.
C
The following screen appears on the panel display.
Press {OK}.
D
The following screen appears on the panel display.
Press {OK}.
E
The following screen appears on the panel display.
32
Page 75

Press {OK}.
F
The following screen appears on the panel display.
Press the 0 or 1key to select the tray type you want to use.
G
Press {OK}.
H
“Programmed” is displayed for two seconds.
The following screen appears on the panel display.
I
Press {User Tools/Counter} to return to the initial display.
J
ABC DEF
Printer Features Parameters
4
GHI
JKL
MNO
33
Page 76

Using the Control Panel
Network Setup Menu
There are three menu items in the “Network Setup” menu.
•IP Address
• Subnet Mask
• Gateway Address
Note
❒ This “Network Setup” menu appears only when installing the optional Net-
work Interface Board.
Network Setup Parameters
4
Menu Description
IP Address You can set the IP Address.
Note
❒ Default: All zero
Reference
See “Configuring the Printer for the Network with the Control Panel” in "Printer Reference 1".
Subnet Mask You can set the Subnet Mask.
Note
❒ Default: 255.000.000.000
Reference
See “Configuring the Printer for the Network with the Control Pan-
in "Printer Reference 1".
el”
Gateway Address You can set the Gateway Address.
Note
❒ Default: All zero
Reference
See “Configuring the Printer for the Network with the Control Pan-
in "Printer Reference 1".
el”
34
Page 77

Printer Features Parameters
Maintenance Menu
There are three menu items in the “Maintenance” menu.
• Restart Printer
•Menu Reset
• Hex Dump
Maintenance Parameters
Menu Description
Restart Printer You can restart the printer.
⇒ p.35 “Restarting a Printer”
Menu Reset You can reset the menu settings to the factory defaults except the
optional Network Interface Board settings.
Hex Dump You can set to isolate the source of a print job problem. With this
function “On”, all data sent to the printer is printed in hexadecimal character representation.
•On
•Off
Note
❒ Default: Off
4
Restarting a Printer
The following procedure describes selecting the “Restart Printer” as an example
in the “Maintenance” menu.
Press {User Tools/Counter}.
A
ABC DEF
JKL
MNO
GHI
35
Page 78

Using the Control Panel
Press the 0 or 1key until the following message appears on the panel dis-
B
play.
Press {OK}.
C
The following screen appears on the panel display.
Press the 0 or 1key until the following message appears on the panel dis-
D
4
play.
Press {OK}.
E
The following screen appears on the panel display.
Press {OK}.
F
The following screen appears on the panel display.
36
Press {OK}.
G
"Ready" appeares on the panel display.
Page 79

Printer Features Parameters
List Print Menu
There are four menu items in the “List Print” menu.
• Configuration Page
•Menu List
• PCL Font List
•PS Font List
List Print Parameters
Menu Description
Configuration Page You can print a Configuration Page. ⇒ p.37 “Printing a Configu-
ration Page”
Menu List You can print the Menu List which shows the function menus of
this machine.
PCL Font List You can print a PCL Font List.
PS Font List You can print a PS Font List.
Printing a Configuration Page
The following procedure describes printing the “Configuration Page” as an example in the “List Print”menu.
4
Reference
For more information, see p.39 “Interpreting the Configuration Page”.
Press {User Tools/Counter}.
A
ABC DEF
JKL
MNO
GHI
Press the 0 or 1key until the following message appears on the panel dis-
B
play.
37
Page 80

Using the Control Panel
Press {OK}.
C
The following screen appears on the panel display.
Press the 0 or 1key until the following message appears on the panel dis-
D
play.
Press {OK}.
E
4
The following screen appears on the panel display.
Press {OK}.
F
The following screen appears on the panel display.
38
Press {OK}.
G
The following screen appears on the panel display.
In a short time, the printing of the configuration page will start.
Important
❒ If you cannot complete printing a configuration page correctly, make sure
an error message appears on the panel display. For more information
about error messages, see p.19 “Error & Status Messages on the Control
Panel”.
Page 81

Printer Features Parameters
Interpreting the Configuration Page
Reference
❖❖❖❖ Printer ID
Shows the serial number assigned to the board by its manufacturer.
❖❖❖❖ Firmware Version
Shows the version number of the printer firmware.
❖❖❖❖ Pages Printed
Shows the total number of pages printed by the printer to date.
❖❖❖❖ Total Memory
Shows the total amount of memory (SDRAM) installed on the printer.
❖❖❖❖ Options
Show the options that you installed.
Job Control
Shows the settings made under the “Job Control” menu.
Reference
For more information, see p.27 “Job Control Menu”.
Network Setup
Shows the settings you made under the “Network Setup” menu.
When DHCP is active on the network, the actual IP Address, Subnet Mask and
Gateway Address appear in parentheses on the configuration page.
Reference
For more information, see p.34 “Network Setup Menu”.
Maintenance
Shows the settings you made under the “Maintenance”.
Reference
For more information, see p.35 “Maintenance Menu”.
4
Error Log
Shows the log of printer errors.
39
Page 82

Using the Control Panel
Adjusting System Settings
Accessing the System Settings
Press {User Tools/Counter}.
A
GHI
ABC DEF
MNO
JKL
4
Press the 0 or 1key to display “2.System Settings”.
B
Press {OK}.
C
The following screen appears on the panel display.
Select the desired menu you want to change.
Change the settings by following the instructions on the panel display,
D
then press {OK}.
⇒ p.41 “System Settings Parameters”
Note
❒ Press the {Language} key to switch the display language.
Exiting from the User Tools/Counter
Press {User Tools/Counter}.
A
40
Page 83

Adjusting System Settings
System Settings Parameters
This section contains the information about the parameters used for the printer.
Reference
For more information about the other parameters in the System Settings
menu, see the “System Settings” manual.
Menu Description
1.Function Priority You can specify the mode (Copier or Facsimile) to be displayed im-
3.System Reset The machine returns to its prioritized mode automatically after
6.Auto Off Timer The machine turns itself off automatically to conserve energy after
13Measurement Unit You can select the measurement unit.
mediately after the operation switch is turned on or System Reset
mode is turned on.
Note
❒ Default:
your job is finished, when you selected the time. This function is
called “System Reset”. The time can be set from 10 to 999 seconds,
or no system reset.
Copier
Note
❒ Default: On (60 seconds)
❒ You can specify the prioritized mode with the user tools. See
“1.Function Priority”.
your job is finished, after the selected time. This function is called
“Auto Off ”. The time can be set from 1 to 240 minutes.
Note
❒ Default: 60 minutes
❒ Auto Off might not be effective when an error message is dis-
played.
❒ To return to the ready condition from Auto Off, the machine re-
quires the same warm-up time as the time for becoming ready
after power is turned on.
❒ When the machine receives a fax or printer data in Auto Off
mode, it automatically prints the fax or the printer data.
•mm
• inch
Note
❒ Default: mm
4
41
Page 84

Using the Control Panel
4
42
Page 85

5. Appendix
Specifications
This section contains the electrical and hardware specifications for the printer,
including the information about the options.
Component Specification
*1
*2
/98
*6
*4
*7
, PS2
*1
, PCL6, PS2
*5
/Me
Resolution 300 × 300 dpi; PCL5e
600 × 600 dpi; PCL5e
Printing Speed Printing Speed depends on the machine. Confirm which type of
Parallel Interface Standard 36-pin printer cable and a parallel port on the host com-
machine you have.
puter.
IEEE1284
Note
❒ Do not use a parallel cable that is longer than 3 meters (10 feet).
Printer Language PCL5e , PCL6
PS2 (option)
Fonts PCL5e, PCL6
35 Intellifonts, 10 True Type fonts
PS2 (option)
80 PS Resident fonts
Memory Standard : 16MB
Optional SDRAM : 32MB, 64MB, 128MB
Operation Systems supported by this printer
Network Topology : Ethernet 10BASE-T/100BASE-TX
Network Cable 10BASE-T/100BASE-TX interface cable with ferrite core.
*1
For PCL5e, only 600dpi is selectable from the printer driver.
*2
PostScript level2 Compatible
*3
Microsoft Windows 95 operating system
*4
Microsoft Windows 98 operating system
*5
Microsoft Windows Millennium Edition
*6
Microsoft Windows 2000 Professional
Microsoft Windows 2000 Server
*7
Microsoft Windows NT Server operating system version 4.0, Microsoft Windows NT
Workstation operating system version 4.0 in a computer using x86 processors.
*8
Required version is 8 or 9 operating system. With Mac OS X, the machine operates in
Windows 95
Windows 2000
Windows NT 4.0
Mac OS
Protocol : TCP/IP, IPX/SPX, AppleTalk
*3
*8
only Classic mode.
43
Page 86

Appendix
Options
Network Interface Board Type 1018
❖❖❖❖ Topology:
Ethernet (10BaseT/100BaseTX)
❖❖❖❖ Protocols:
TCP/IP, IPX/SPX, AppleTalk
❖❖❖❖ Interface Connector:
RJ45
❖❖❖❖ Required Cable:
Interface cable with ferrite core
Interface cable is not provided with this option.
5
Memory Unit
❖❖❖❖ Module Type:
SO-DIMM (Small Outline Dual-in-line Memory Module)
❖❖❖❖ Memory Type:
SDRAM (Synchronous Dynamic RAM)
❖❖❖❖ Number of Pins
144 pins
❖❖❖❖ Compatible:
PC100 compatible
Type 1018 PostScript level2 Compatible Kit
PostScript level2 compatible.
44
Page 87

INDEX
A
Auto Off Timer
C
Cancel key
Config. Page
Configuration Page
,
26
,
E
,
error
19
F
Function Priority
H
Hex Dump
,
35
J
Job Control
, 25,
L
List Print
, 25,
M
,
,
,
18
, 25,
37
,
35
19
Macintosh
Maintenance
Measurement Unit
menu, accessing
Menu List
Menu Reset
messages
N
Network Setup
,
41
37
,
27
37
,
, 25,
35
,
25
,
41
P
panel display, messages
Paper Input
Parameters
PCL 5e
37
PCL 6
PCL Font List
PCL Menu
PostScript
PostScript Printer Driver
Printer Features
Print Quality
PS Font List
,
27
,
27
,
1
Windows 2000, uninstalling
Windows 95/98/Me, uninstalling
Windows NT 4.0, uninstalling
,
1
Windows 2000, uninstalling
Windows 95/98/Me, uninstalling
Windows NT 4.0, uninstalling
,
,
27
Windows 2000, uninstalling
Windows 95/98/Me, uninstalling
Windows NT 4.0, uninstalling
Macintosh, uninstalling
,
,
37
,
19
,
15
,
15
,
16
,
15
,
15
,
,
16
,
17
,
17
,
18
18
37
,
24
27
R
Restart Printer
,
35
S
,
System
41
System Reset
System Settings
27
,
41
,
40
T
Troubleshooting
,
19
U
34
User Tools/Counter key
,
26
45
Page 88

W
Windows 2000
PCL 5e, uninstalling
PCL 6, uninstalling
PostScript, uninstalling
printer properties, PCL
printer properties, PostScript
Windows 95/98/Me
PCL 5e, uninstalling
PCL 6, uninstalling
PostScript, uninstalling
printer properties, PCL
printer properties, PostScript
Windows 95/98/Me, Windows 2000,
Windows NT
canceling a job
Windows NT 4.0
document defaults, PCL
document defaults, PostScript
PCL 5e, uninstalling
PCL 6, uninstalling
PostScript, uninstalling
printer properties, PCL
printer properties, PostScript
,
,
15
,
15
,
17
,
2
,
,
15
,
15
,
17
,
1
,
12
,
4
,
,
16
,
16
,
18
,
4
,
7
6
9
9
46
UE USA B441
Page 89

Note to users in the United States of America
Notice:
This equipment has been tested and found to comply with the limits for a Class B digital device, pursuant to Part 15 of the FCC Rules. These limits are designed to provide reasonable protection against
harmful interference in a residential installation. This equipment generates, uses and can radiate radio
frequency energy and, if not installed and used in accordance with the instructions, may cause harmful
interference to radio communications.
However, there is no guarantee that interference will not occur in a particular installation. If this equipment does
cause harmful interference to radio or television reception, which can be determined by turning the equipment
off and on, the user is encouraged to try to correct the interference by one more of the following measures:
Reorient or relocate the receiving antenna.
Increase the separation between the equipment and receiver.
Connect the equipment into an outlet on a circuit different from that to which the receiver is
connected.
Consult the dealer or an experienced radio/TV technician for help.
Warning
Changes or modifications not expressly approved by the party responsible for compliance could void
the user's authority to operate the equipment.
Caution(in case of IEEE1284 environment) :
Properly shielded and grounded cables and connectors must be used for connections to host computer
(and/or peripheral) in order to meet FCC emission limits.
Caution (in case of 100BaseTX environment):
Interface cable with ferrite core must be used for RF interference suppression.
Declaration of Conformity
Product Name: Printer Controller
Model Number: Type 1013
Responsible party: Ricoh Corporation
Address: 5 Dedrick Place, West Caldwell, NJ 07006
Telephone number: 973-882-2000
This device complies with part 15 of FCC Rules.
Operation is subject to the following two conditions:a
1. This device may not cause harmful interference, and
2. this device must accept any interference received,
including interference that may cause undesired operation.
Note to users in Canada
Note:
This Class B digital apparatus complies with Canadian ICES-003.
Remarque concernant les utilisateurs au Canada
Page 90

PRINTER Controller Type 1013 Operating Instructions Printer Reference 1 (option)
Printed in China
UE USA B441-8607
 Loading...