

Page 1

1
www.saveometer.com
What’s in the box?
Connecting your new gas transmitter
After you have your electricity transmitter up and running and your Saveometer is measuring and showing your electricity use, you
can link a gas transmitter. The gas transmitter will then automatically be linked with your Saveometer displays providing they are all
within range of the transmitter. Your new gas transmitter has a special lithium battery which will normally last between 12 - 14
years.
1 Take the gas transmitter so that you and it are close to your (already connected) electricity transmitter. Remove the tag as
shown on the label on the rear side.
2 Press the central transmit button on gas transmitter for a few seconds until the blue LED starts to flash slowly & then release.
The blue LED will continue to flash then immediatley.....
3 Press the green transmit button on your electricity transmitter until the red LED starts to flash slowly.
4 The gas transmitter blue LED will soon stop flashing, and when it extinguishes the link has been completed. The red LED on
the electricity transmitter will also extinguish about 5 to10 seconds later.
All that has to be done now is to connect the gas transmitter & sensor to your gas meter
A A gas sensor and plastic screw is included with your new Saveometer gas transmitter. This can be easily insw.
Type A - sensor attachment peg. Use a
blunt point to fully press home the peg to
firmly secure the sensor to your meter.
The sensor must fit to the gas meter
without any wobble or movement
RJ plug (same shape as on a telephone)
from the gas transmitter is inserted in to
the sensor socket – either of the 2
sockets provided may be used
Connecting wire between gas sensor &
the gas transmitter. (The Elster meters
use a different sensor & the transmitter
plug is connected via a socket from the
sensor. See 5c below)
Unused wire can be neatly coiled after
transmitter position is decided
Saveometer gas transmitter
This shows the blue LED and the
transmit button used when linking
with your electricity transmitter for the
first (and only) time. When you have
decided the precise gas transmitter
location it may be attached using the
velcro pad provided
The “m3” indicates metering in
cubic meters of gas. There are 5
black numbers/digits indicating
how many cubic meters have
been used. The red digits are one
hundredths of a Cu Mtr
1 Gas transmitter
2 Gas pulse sensors
(2 different types)
3 Velcro pad
4 Cable tie
5 Guarantee card
6 This user guide
This is a typical installation
(installations may vary so please
read below)
Type A meter pulse sensor already
fitted to the meter provided.
GAS TRANSMITTER INSTALLATION GUIDE
Gas pulse sensor- type A
(Shown already attached
to an Actaris meter)
Gas transmitter
+ connecting wire & plug
Gas pulse sensor- type B
(Shown before attaching to
a gas meter)
Page 2

2
5a Schlumberger or Actaris G4 or U6 gas meters are similar to the previous illustration. A gas
sensor and plastic attachment peg is included with your new Saveometer gas transmitter. This is used when the
transmitter is to be attached to a Schlumberger or Actaris G4 or U6 gas meter. The meter pulse sensor can be easily
installed by attaching it at the gas meter by firmly pressing the peg into the hole provided on the meter using a blunt
instrument. Once the gas sensor is attached, insert the RJ plug from the transmitter into either of the sensor sockets
as shown in the preceding photo.
5b Schlumberger & Actaris & UGI Limited R5 or Wilson G4 meters
5c Elster BK series gas meters – use Type B sensors
6 Once the sensor is attached, position the gas transmitter at a convenient permanent location. In most houses
and small businesses the transmitter will perform well when mounted in or in close proximity to the meter cupboard.
But to achieve the optimum range between the gas transmitter and your display(s), such as in larger or tall houses or
businesses, you may wish to locate the gas transmitter away from the meter itself, in an area where there are least
brick, concrete, stone or steel walls through which the transmitter signals must penetrate. The gas transmitter is
supplied with a 2.5 meter cable for this purpose.
7 When the transmitter location is finalised it may be mounted using the Velcro pad, and any excess wire may be
neatly gathered using the cable tie provided.
8 It is important now to select if your gas meter measures gas in cubic feet or cubic meters and also if your gas
meter has 4, 5 or 6 meaningful digits or numbers. Meaningful digits or numbers are those that are not either in red
or surrounded by red. To do this select mode 18 on your Saveometer display.You may find the illustrations on the
following page useful when making your selection. Please inspect your meter, then using your Saveometer display
select mode 18. Now use the < or > keys to select either cubic meters or cu feet, and also whether your meter has 4,
5 or 6 meaningful numbers - always ignore the red numbers on the right. (If your meter has only 4 meaningful digits
it is fairly elderly ; in this case when using mode 18 please select 5 digits).
Elster “BK” series meter
The Elster BK series of meters can be recognised by the letters
BK found on the meter face. BK is usually followed by G 4 and
occasionally by G1.6, or G 2.5. This type of meter requires its
own special type B sensor and one is supplied with each
transmitter. The Elster meters come in several colours – mainly
light brown or grey. Fitting a sensor to the meter takes seconds.
Offer the sensor up to the right
hand underside of the meter
face and fix by placing the
plastic nut & bolt through the
holes provided. Once fixed, the
RJ plug from the transmitter (it
looks like a telephone plug)
should be plugged into the
socket leading from the sensor.
Sensor fits here
under the meter
display
When your new gas transmitter is attached to any of these
meters the seperate meter pulse sensors provided are not
required. You simply plug in the RJ connector from the
transmitter directly into the meter as shown . We
recommend that you keep the spare gas pulse sensors in
a safe place just in case you move premises and need one
in the future. The illustration shows a Schlumberger meter
– other makes do vary slightly. These meters measure in
“Imperial Units” (no longer used) and require you to set the
Saveometer as follows: Mode 20 – precede the 4 main
meter digits with a zero when inputting your meter reading.
Mode 19: set a factor of 32.0 NOT 0.32 Mode 18: set to
Cu Ft and 5 digits (we discontinued 4). These settings take
place only at initial installation.
Connect transmitter here
Use plastic nut & bolt to attach sensor
Type B sensor
Page 3
3
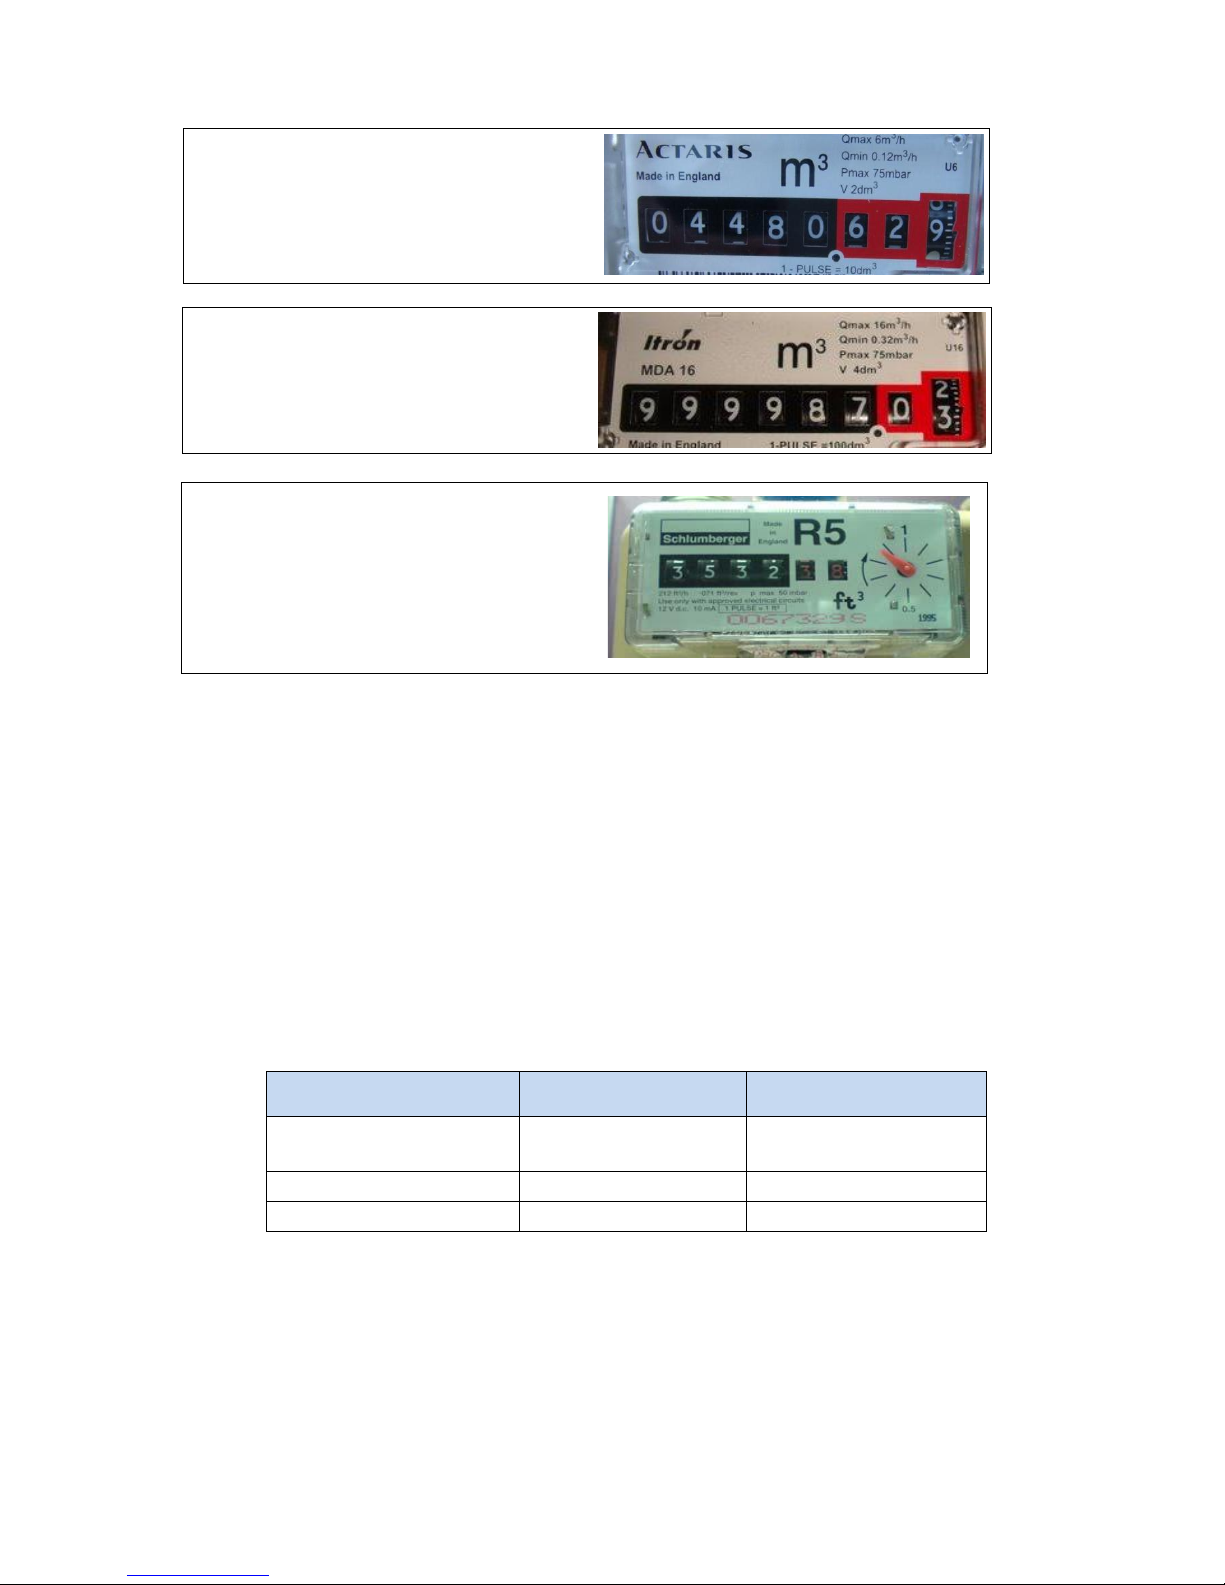
Here are some examples:
9 To make sure your gas transmitter is in range This step is not normally required in homes and small businesses and
only necessary if your transmitter is distant from your Saveometer display. Once installed, select mode 21 („Gas Test) at your
Saveometer, and press S to select. You will see „Gas RX‟. Now press the blue transmit button on the gas transmitter for 1 – 2
seconds and if the transmitter is working correctly and within range you will see some numbers above „Gas RX‟. Press the top
button and the display reverts to your hourly cost of electricity. If your boiler is currently using gas (to heat water or for central
heating) your gas readings will start in 1 hour – the gas transmitter sends data once an hour to the display.
10 To make sure your Saveometer reads the same as your gas meter Please now read mode 20 in the Saveometer
User Guide. Your Saveometer records cubic feet or cubic meters. If you wish your Saveometer to read the same as your actual gas
meter this is simple to achieve. Select mode 20 and use the < and > keys to change the displayed numbers so that they match the
current reading of your gas meter. Remember to set only the „meaningful, digits - that is usually the first 5 or 6 numbers from the left
which are normally (but not always) coloured black on white or white on black. The numbers on the right (these are usually
surrounded by red & moving when gas is being used) are not significant. (Some gas meters, such as the Schlumbeger R5 only
have 4 meaningful digits – in such cases precede your meter reading in mode 20 with a zero; for example if the actual gas meter
reads 4567.89 then using mode 20 set the Saveometer to 04567
11 To make sure your gas costs are as accurate as possible And finally it is necessary to select the correct “conversion
factor” for your particular meter. Select mode 19 at your Saveometer and set the correct conversion factor from the chart below:
Your gas meter
displays
Number of meaningful
digits
Set mode 19
Conversion factor to
Cubic feet (Imperial units)
4
31.53
Cubic meters
5
11.13
Cubic meters 6 111.35
Your set up is now completed and settings will not require alteration until you change location or gas meter. The price
you are paying for gas will unfortunately increase - this setting is changed in mode 16.
In this example the actaris gas meter has 5
“meaningful digits” /numbers and measures
gas in Cubic Meters indicated by M3
Meaningful digits or numbers are those that are
not either in red or surrounded by red
In this example the Itron gas meter has
6 meaningful numbers and measures
gas in Cubic Meters indicated by M3
Meaningful digits or numbers are those that
are not either in red or surrounded by red
For this example the Schlumberger gas
meter has only 4 meaningful numbers which
measure gas in 100‟s of cubic feet – often
called “Imperial Units” on a gas bill.
These
are fairly old meters - in mode 18 select 5 digits
please – we phased out the 4 digit option.
Meaningful digits or numbers are those that are
not either in red or surrounded by red.
Page 4
4
OUR GUARANTEE
In addition to the comprehensive 18 month warranty as set out below, and your statutory rights, Eco1 Limited guarantee that you will save
at least the Eco1 recommended selling price of your Saveometer transmitter (any model or part) within 6 months of installation and
permanent connection in the UK during winter months, or you may return it to us (in appropriate protective packaging, fully insured &
prepaid postage please). If you return any unit in good condition, together with your original dated receipt or evidence of purchase and the
relevant utility bills for the year in question, Eco1 will refund your purchase price in full providing your Saveometer has remained
permanently connected. You can register on line using www.saveometer.com/register or by completing and posting the enclosed
guarantee card. To enjoy the Eco1 Limited unique guarantee your Saveometer must be registered within 14 days of purchase.
18 MONTH WARRANTY
The Saveometer gas transmitter is guaranteed against manufacturing defects for a period of 18 months. This guarantee does not
cover faults caused by misuse of any sort including contravention of the user guide, or when any part of the product has been
dropped or modified in any way. Please take care of your Saveometer gas transmitter. The full term and conditions of your warranty
are set out in the main user guide that accompanied your new Saveometer display.
Technical Specification
Operational Temperature: 5 deg C – 45 deg C (41 deg F – 113 deg F) at 85% relative humidity
Dimensions: Transmitter 70 mm W x 115H x 35 D, weight 110g ,
Servicing: Do not attempt to service any part yourself. The transmitter is a sealed unit. Opening or removing
covers may expose you to risks and voids all warranties. Refer all servicing only to qualified
engineers at Eco1 Limited.
Batteries: The supplied lithium battery will last between 10 to 12 years in normal use.For replacement contact Eco1 Limited or at
www.saveometer.com. Do not attempt to replace the battery yourself.
Dimensions: Transmitter 70 mm W x 115H x 35 D, weight 150g ,
Cleaning: Only clean the transmitter using a dry cloth. Do not use aerosol or liquid cleaners.
UK roll out of Gas & Electricity Supplier installed Smart Meters (SSM’s)
A gradual roll out of supplier‟s smart meters may soon commence throughout the UK. New meters
will be provided by your gas and electricity supplier, and the Government hopes that they will be
installed in all homes by the end of 2020, or perhaps a little later. Technical standards for these
new smart meters are being formulated and when roll out commences the new meters will enable
all gas and electricity companies to accurately monitor both your gas and electricity consumption in
real time, as well as introducing very sophisticated new charging rates and discounts. When the
new open standard has been agreed and published by Ofgem it is the intention of Eco1 Limited
that the Saveometer will be adapted to interface and function with every newly installed smart
meter. All Saveometer users who have registered their warranty will be offered either an upgrade
at a substantially discounted price, or alternatively offered a trade-in value when investing in the
latest Saveometer.
Gas transmitter installation guide R27
The gas transmitter is a sealed
unit. No serviceable parts within.
Opening the transmitter voids
your warranty.
No part or parts of the Saveometer should be disposed in household waste. This equipment should be taken to
your local recycling centre for safe treatment. Details of your local recycling centre can be found at www.recycle-
more.co.uk or by telephoning your local council.
Safety: EN60 950-01 2002 & EN 503712002
ETSI EN 300 220-2 V2.1.2 (2007-06)
ETSI EN 300 330-2 V1.3.1 (2006-04)
ETSI EN 301-489-3 V1.4.1
R & TTE Directive (1999/5/EC)
Conforms to the
adjacent technical &
safety standards –
see also Saveometer
display compliance
 Loading...