

Savant Systems SSR2000 Users Manual
Savant Select Remote (SSR-2000)
Quick Reference Guide
009-xxxx-00
SSR-2000-00
Copyright © 2011 Savant Systems LLC, SAVANT® and RacePoint Blueprint™ are trademarks of Savant Systems LLC.
All brand names, product names and trademarks are the property of their respective owners.
Savant Systems LLC reserves the right to change product specifications without notice.
75 Perseverance Way, Hyannis, MA 02601 Phone 508.683.2500 Fax 508.683.2600 SavantSystems.com
Savant Confidential and Proprietary
The Savant Select Remote (SSR-2000) Quick Reference Guide provides the information
necessary to setup and operate the Savant Select Remote.
Box Contents
(1) Savant Select Remote (SSR-2000-xx)
(1) Lithium-Ion Battery Pack (070-0016-xx)
(1) USB Type A to Mini Custom B for remote (24”) (064-0235-xx)
(1) 5V DC 2.5 AMP Universal Wall Unit (025-0098-xx)
(1) SSR Remote Base (068-0179-xx)
(1) Quick Reference Guide (this document)
Specifications
Savant Select (SSR-2000)
Environmental
Operating Temperature
32º to 95º F (0º to 35º C)
Non-operating Temperature
32º to 113º F (0º to 45º C)
Operating Humidity
5% to 95% Non-condensing
Physical
Dimensions (L x. W x D)
9 x 2.6 x 0.65 inches (228.6 x 66 x 16.5 mm)
Weight
6 oz (170 g) with Battery Pack
Enclosure
High-impact molded ABS plastic
Power
Power
3.7V/1150mAh, 4.25 Watt-hours
Integrated Motion Detector for power management
Battery
Lithium-Ion battery pack
Battery Charge Time
3-4 hours (nominal)
Communication
Wireless
-WiFi 802.11 b/g/n (802.11 n 2.4 GHz only) or
-RF Transceiver, Frequency (Spectrum) - ISM Band
(2.4 GHz to 2.483 GHz)*
Display and Backlights
Touch Screen Display
Multi-Touch® high resolution Retina display: 960 x 640
pixels
3.5-inch (diagonal) multi-touch display
Backlights
White LED for all navigation buttons
Battery Charging Status
Orange/Green/Red LED
USB Connector and Cable
Connector
Mini-USB
Cable
Mini-USB Sync Cable
Regulatory
Safety and Emissions
CSA NRTL/C and FCC Part 15 Class B/C-Tick**
RoHS
Compliant
Charging Base (SSB-2000)
Power
Input Power
5V DC, 2.5 A Adaptor with one meter cord
Physical
Dimensions (L x. W x D)
9 x 2.6 x 0.55 inches (228.6 x 66 x 14 mm)
Weight
3 oz (85 g)
*RF communications requires an RFG-2000, sold separately
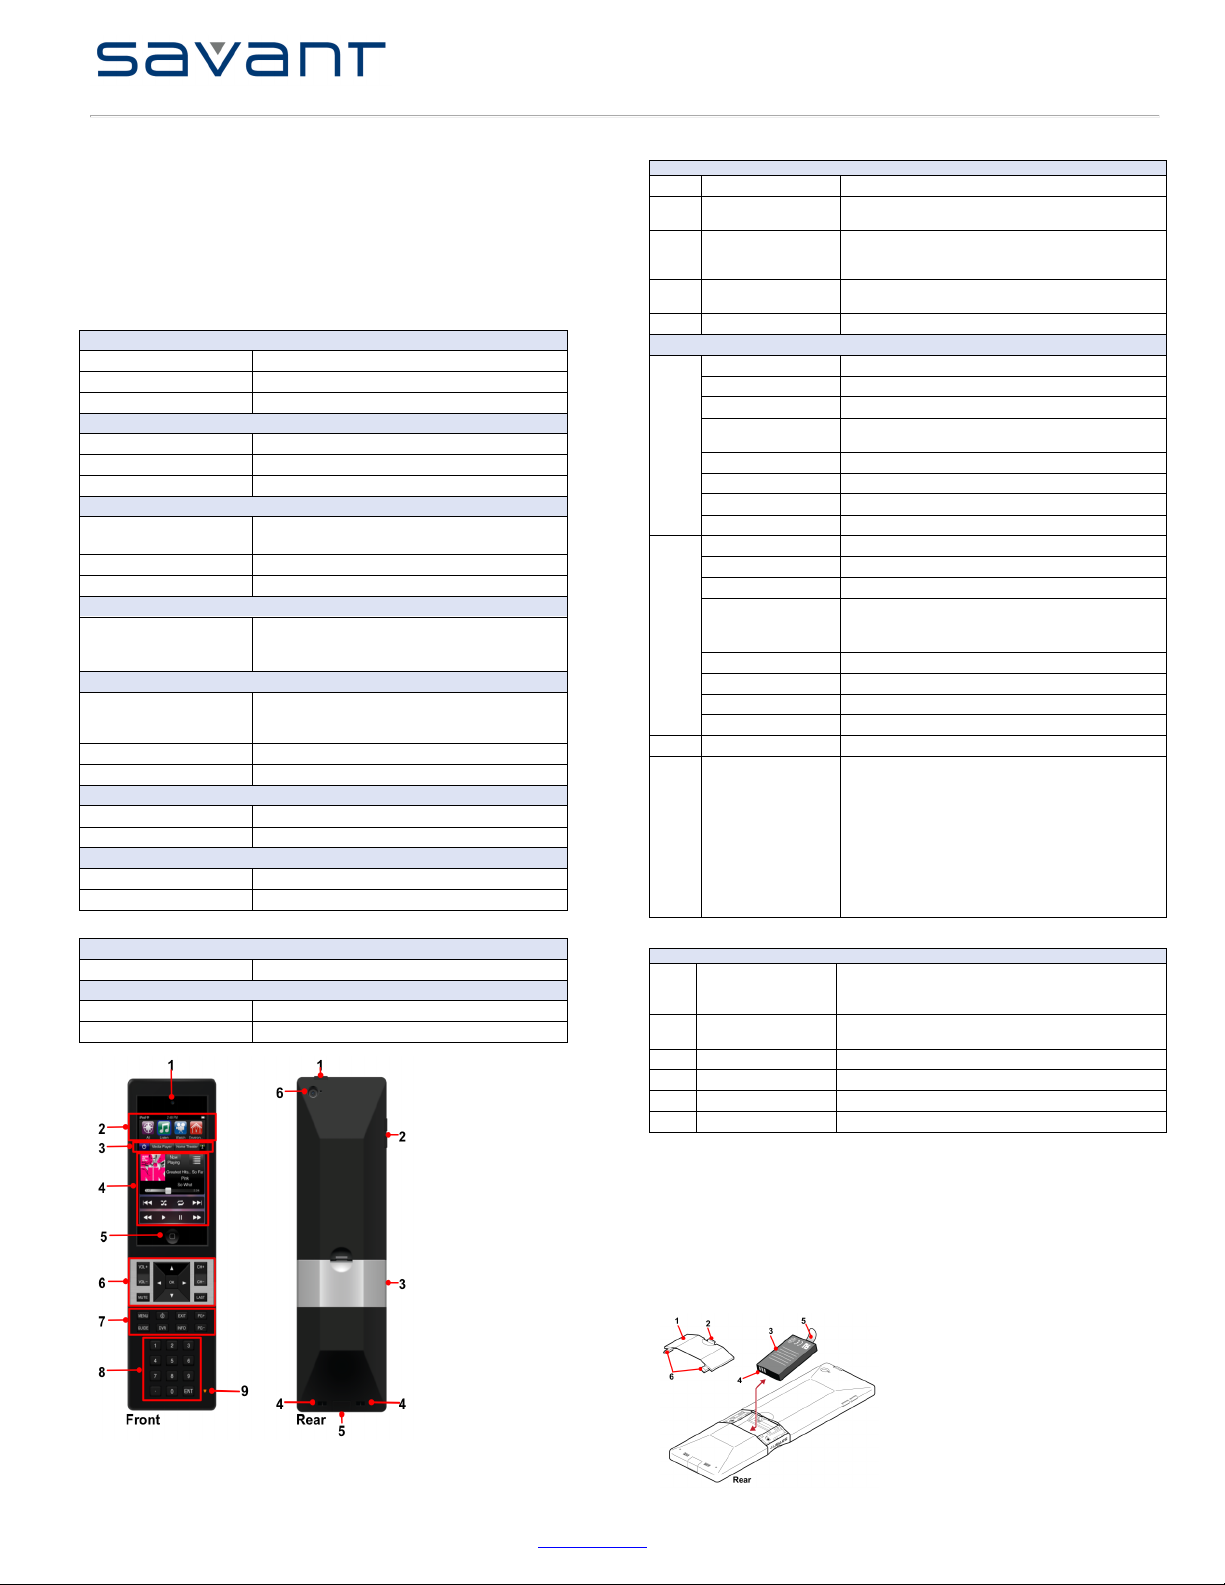
iPod touch Area
Front
1
Camera
Front facing camera
2
Category Dock
Provides quick access to subsets of system functions,
such as watch, listen, environment and settings.
3
Navigation Bar
Allows quick navigation between rooms, services and
subsystems. Also provides simple navigation back to the
active service.
4
Touch Screen Display
Indicates the controls and content for the active service,
or the service being currently controlled
5
Home button
Press to return to home screen
Remote Area
VOL +
Press for volume up
VOL -
Press for volume down
MUTE
Press to mute sound
Up, Down, Left, Right
Navigation
Press up, down, left, and right to navigate selected
service screen
OK button
Press to select
CH +
Press to channel up
CH -
Press to channel down
6
LAST
Press to return to last channel
MENU
Press to view menu
GUIDE
Press to view guide
Backlights
White LED for all navigation buttons
TrueCom mand launch
Power Off
Press to launch True Command II App on display.
Press and hold to power off remote
DVR
Press to enable the DVR
EXIT
Press to exit page
INFO
Press to view information
7
PG +/PG-
Press to page up/page down
8
Numerical Keypad
Use to directly tune channels
9
Status LED
Status LED indicates the following:
Green indicates the remote is fully charged and docked.
Orange indicates remote is charging.
Red indicates the remote is not docked and battery is
low and needs charging.
Off indicates the remote is not docked and charged.
Flashing Red indicates that one of the remote buttons
was pressed, but ignored because the iPod touch® was
in the sleep mode or not in the TrueControl II app mode.
(See ** below for details.)
Rear
1
Power On/Off button
Press and release to power on iPod touch when powered
off
Press and hold to power off iPod touch
2
Volume Up/Down
buttons
Press buttons for volume up/down for the iPod touch®
3
Battery
Rechargeable Battery
4
Charging ports
Plug into Charging Base (SSB-1000)
5
Connector
Mini-USB
6
Camera/mic
Rear Facing camera and microphone
Setup
Battery Installation
To install the battery, refer to the figure below.
1. Locate the battery cover (1) on the rear of the remote.
2. Push the latch (2) down and pull the cover out to remove.
3. Install the battery (3). Ensure the battery contacts (4) are positioned as shown. Ensure
the battery pull-tab (5) is accessible in the event you must remove the battery.
4. Position the two tabs (6) on the cover into the lower section and press cover in until
latch clicks to secure the cover.
Savant Select Remote (SSR-2000)
Quick Reference Guide
009-xxxx-00
SSR-2000-00
Copyright © 2011 Savant Systems LLC, SAVANT® and RacePoint Blueprint™ are trademarks of Savant Systems LLC.
All brand names, product names and trademarks are the property of their respective owners.
Savant Systems LLC reserves the right to change product specifications without notice.
75 Perseverance Way, Hyannis, MA 02601 Phone 508.683.2500 Fax 508.683.2600 SavantSystems.com
Savant Confidential and Proprietary
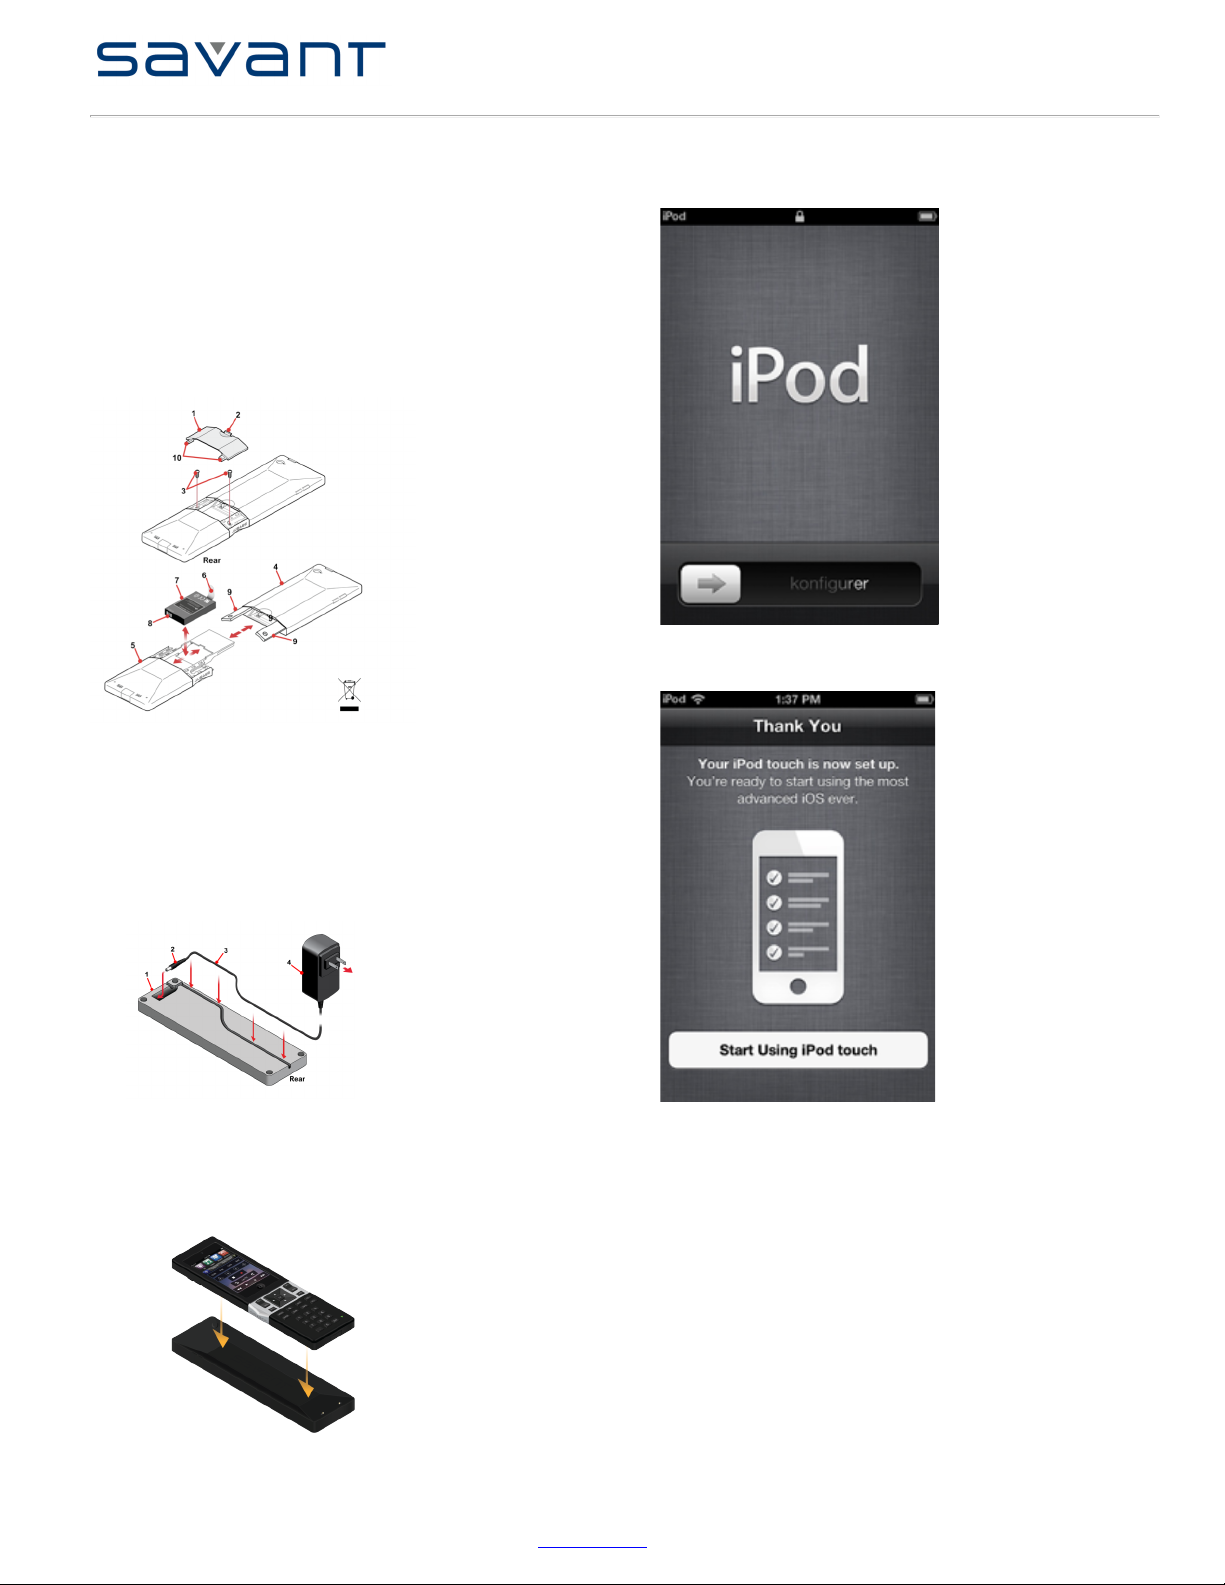
Battery Removal and Replacement
To remove and replace the battery, refer to the figure below.
1. Locate the battery cover (1) on the rear of the remote.
2. Push the latch (2) down and pull the cover out to remove.
3. Using a small Phillips screwdriver, remove the two screws (3) on each side of the
battery that secure both sections.
4. Place your thumb on the iPod touch while holding the top section (4) so that they
remain together; pull the bottom section (5) to separate the two sections.
5. Install the battery (7). Ensure the following:
• Battery contacts (8) are positioned as shown.
• Battery pull-tab (6) is accessible in the event you must remove the battery.
6. Push the top section (4) together with the bottom section (5). Ensure the antenna is not
pinched and that the iPod connector seats properly.
7. Replace the two (3) screws on each side of the battery to secure the sections.
8. Position the two tabs (10) on the cover into the lower section and press cover in until
latch clicks to secure cover.
Charging Base Power Adaptor Installation
To install 5V DC, 2.5 AMP adaptor with 1 meter power cord (2, 3 and 4), do the following:
1. At the rear of the Charging Base (1), select the path you want to use to install the
power cord.
2. Note: Savant recommends installing the 5V DC jack (2) first and then routing the
power cord (3).
3. If you choose to route the power cord (3) in the channel as shown below, press the
power cord between the retainers in the channel.
4. After routing the power cord, select and snap in the “power clip” for the specific region
into the power adaptor and plug the adaptor (4) into a 100-240 50/60 Hz surge
protected outlet.
Charging the Battery
To charge the lithium-ion battery, do the following:
1. Plug the Charging Base (SSB-1000) into a 100-240 50/60 Hz surge protected outlet
using the supplied 100-240V AC, 50/60 Hz V DC to 5V DC, 2.5 A Adaptor with one 1
meter power cord.
2. Place the Savant Select onto the charging base as shown.
3. Refer to the Front table; item 9 Status LED for battery status and charging
information.
Registration, Sync and Charge
1. Connect the SSR-1000 to the USB port in your Mac using the included cable.
2. Follow the on screen instructions in iTunes® to set up the iPod touch®. There are many
screens.
3. When the following image appears on the iPod, the registration is complete.
4. Select Start Using iPod touch.
For the entire sequence of screens, see Reset All Settings on the iPod
Purchase and Download Savant TrueControl II
To purchase and download the TrueControl II App, using the Savant Select (iPod touch®) tap
the Apple® App StoreSM icon. Follow the on screen directions to purchase and download the
App.
Important: Connecting the Mobile Device Server and the Savant Select to the same LAN
ensures that Bonjour® discovery allows all components to communicate.
Wi-Fi Network Connection
You must connect the Savant Select to the Wi-Fi network on your system and load a mobile
instance in order for the remote buttons to function.
Optional Wireless RF Gateway (RFG-2000)
The RFG-2000 wireless gateway is an option for two-way wireless communication in addition
to WiFi.
 Loading...